VC500 - Vacuum Cleaner Diamond - Free user manual and instructions
Find the device manual for free VC500 Diamond in PDF.


User questions about VC500 Diamond
0 question about this device. Answer the ones you know or ask your own.
Ask a new question about this device
Download the instructions for your Vacuum Cleaner in PDF format for free! Find your manual VC500 - Diamond and take your electronic device back in hand. On this page are published all the documents necessary for the use of your device. VC500 by Diamond.
USER MANUAL VC500 Diamond
natural_image
Woman smiling beside a filmstrip-style computer with multiple video content thumbnails against a red background (no text or symbols visible)PowerDirector 12
Manual is located on the CD-ROM.
VC500 Quick Start Guide
© 2017 Diamond Multimedia
VC500
Quick Installation Guide

California Proposition 65 Warning:

Warning: Cables, Cable Assemblies and Printed Circuit board can expose you to chemicals including lead/lead based compounds and DEHP which are known to the state of California to cause cancer and birth defects or other reproductive harm. For more information, go to: www.P65warnings.ca.gov
System requirement
● Inter Pentium4 1.4G CPU, recommended Pentium4 2.0G or higher
● Windows 7, 8, 8.1 and 10
● Memory 128M min, recommend 256M or higher
● A high speed USB2.0 interface
● VGA card supports DirectX9.0
- CD/DVD-ROM (for installation) Note: The full installation disk can be downloaded at: http://www.dmmdownload.com/downloads/CURRENT/PVR/VC500W10PD_Complete_install.zip
● 300MB HD space (install driver and applications, like EZ Grabber), 600MB to 3GB per hour for recording
Contents
-
VC500
● AV cable (Composite RCA cable)
● Software Installation Disk (Includes the following) -
Windows Driver
• Power Director 12 for Video capture, Video editing and creating/burning videos to DVD - Ez Grabber for Video or Audio Capture (This is an optional video capture utility as Power Director 12 has the same features plus much more)
VC500 Connection Diagram
Note:
make sure you connect the V500 inputs to your video source (VHS or Camcorder) outputs. The device source example; your VCR will be labeled Video out. Connect the Yellow cable to the Yellow video out of the source. Connect the Red and White cable to the audio out of the source. You also have the option to use the S-Video input but note you still need to connect the red and white audio cables. In some cases, your VHS or Camcorder only has one output (Mono) in this case you can connect the one audio output to either the red or white audio inputs on the VC500.
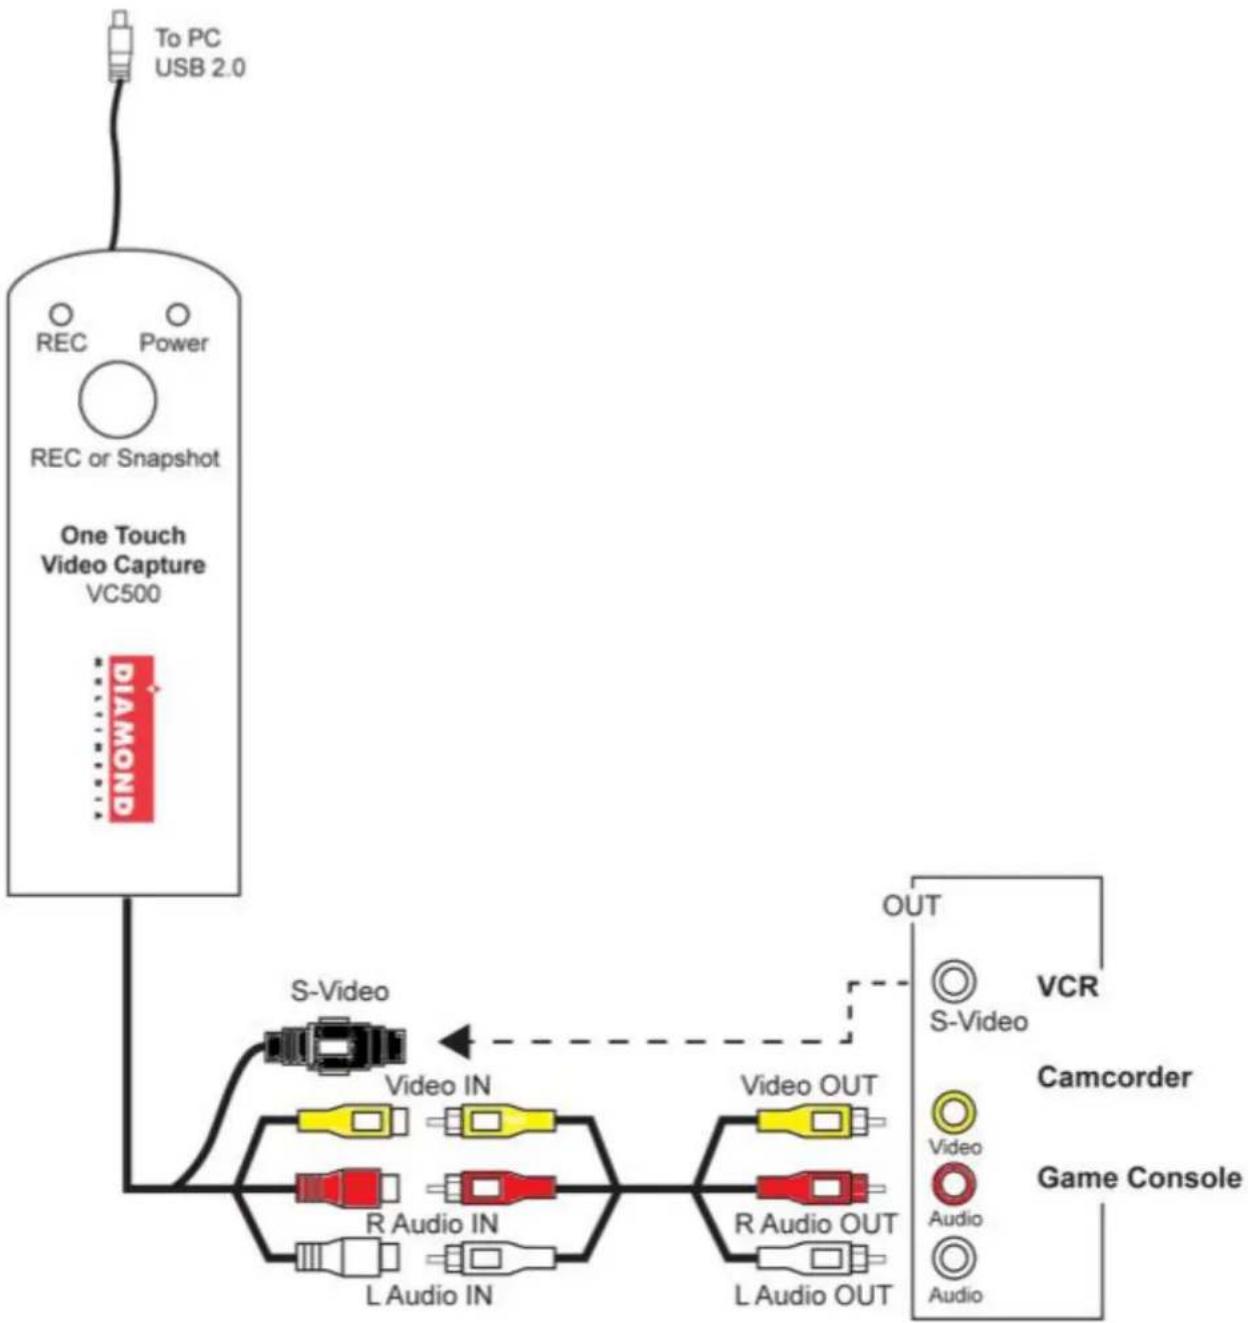
flowchart
graph TD
    A["One Touch Video Capture VC500"] -->|To PC USB 2.0| B["S-Video"]
    B --> C["Video IN"]
    B --> D["R Audio IN"]
    B --> E["L Audio IN"]
    B --> F["Video OUT"]
    F --> G["VCR"]
    G --> H["Camcorder"]
    G --> I["Game Console"]
    B --> J["OUT"]
    J --> K["S-Video"]
    J --> L["Video"]
    J --> M["Audio"]
    J --> N["Audio"]
Driver and Application Installation
Step1:
Insert the VC500 USB capture device into your USB Port. Note: the blue light should come on. If it does not or if
the light is red there is a hardware problem and you should try another USB port. Once plugged in Windows may display “New Hardware Device” found. Please choose “Cancel” and continue to the next step.
Step2:
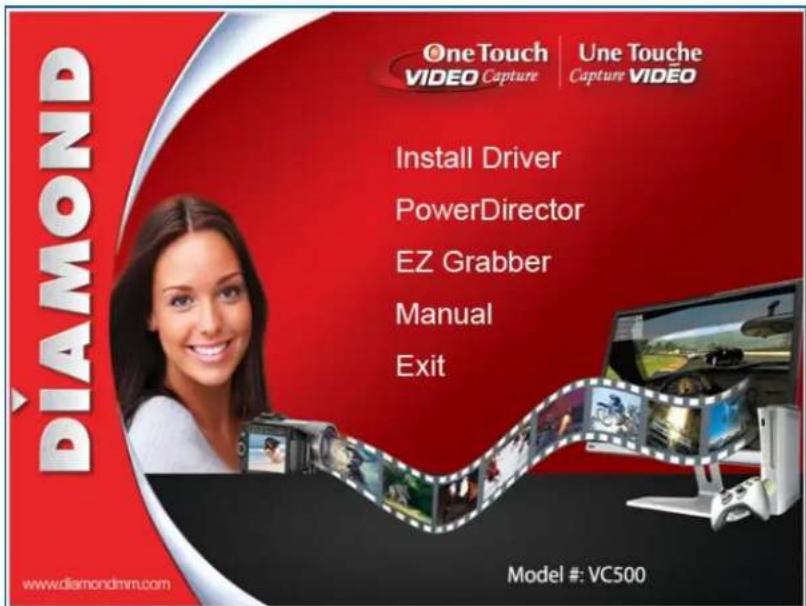
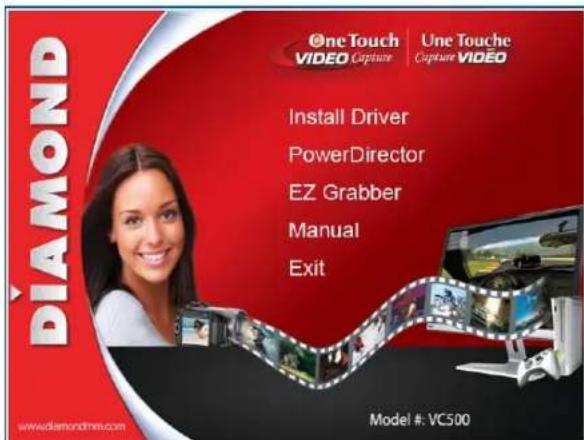
Insert the installation CD and open up the CD contents. Note: you may have to double click on your CD/DVD drive while the disk is in the drive to see the contents of the disk. Select and run VC500.EXE. If you get a windows User Account Control message, click Yes to allow the app to run. You will see the menu below:
If you do not have a CD/DVD drive you can download the complete installation CD from the link below: http://www.dmmdownload.com/downloads/CURRENT/PVR/VC500W10PD_Complete_install.zip
Note: Do not throw away your installation CD sleeve, the serial number to activate the Cyberlink Power Director 12 application is printed on the back.
text_image
One Touch VIDEO Capture | Une Touche Capture VIDEO Install Driver PowerDirector EZ Grabber Manual Exit www.diamondmm.com Model #: VC500Step 3:
Click on "Install Driver" as shown on the above menu
Step 4:
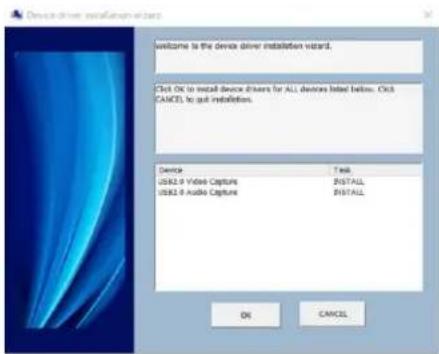
You will get the message shown below. Click on "OK" If you get a "Windows Security" Alert message and just click on "Continue Anyway"
text_image
Device driver installation wizard welcome is the device driver installation wizard. Click OK to install device drivers for ALL devices listed below. Click CANCEL to exit installation. Device USB2.0 Audio Capture USB2.0 Audio Capture Test INSTALL INSTALL OK CANCELStep 5:
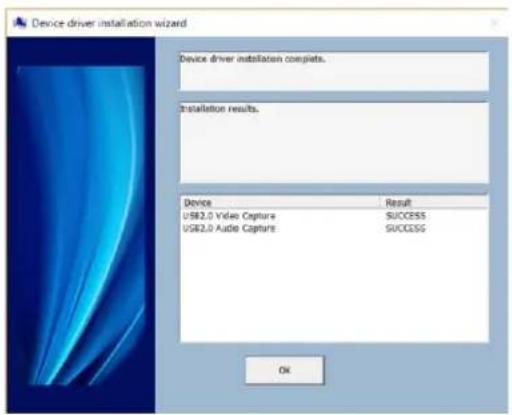
After the installation is complete you should see the screen below. Click on "OK" to finish.
text_image
Device driver installation wizard Device driver installation completes. Installation results. Device Result USB2.0 Video Capture SUCCESS USB2.0 Audio Capture SUCCESS OKStep 6: (Optional)
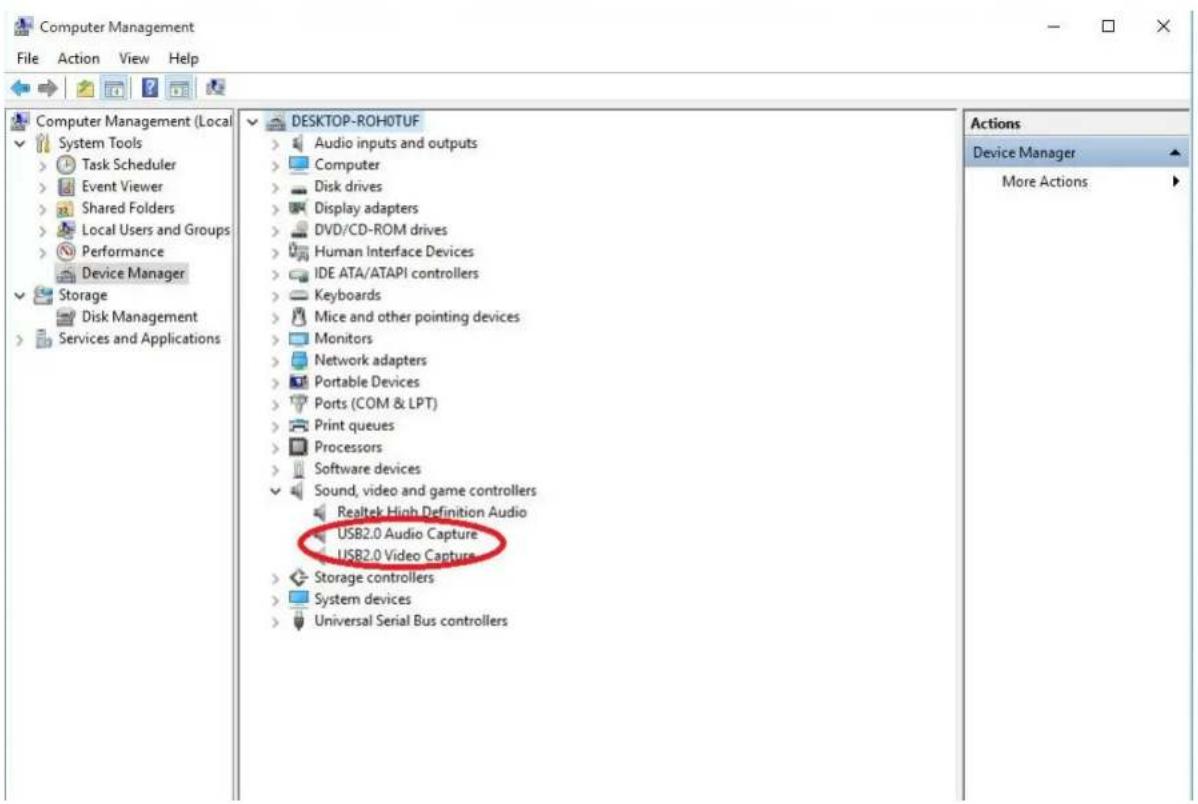
If you need to verify the driver installation open the windows device manager. Under "Sound, video and game controllers". You should see two new devices "USB2.0 Audio Capture" and "USB2.0 Video Capture" as shown below:
text_image
Computer Management File Action View Help Computer Management (Local System Tools > Task Scheduler > Event Viewer > Shared Folders > Local Users and Groups > Performance Device Manager Storage Disk Management Services and Applications DESKTOP-ROH0TUF Audio inputs and outputs Computer Disk drives Display adapters DVD/CD-ROM drives Human Interface Devices IDE ATA/ATAPI controllers Keyboards Mice and other pointing devices Monitors Network adapters Portable Devices Ports (COM & LPT) Print queues Processors Software devices Sound, video and game controllers Realtek High Definition Audio USB2.0 Audio Capture USB2.0 Video Capture Storage controllers System devices Universal Serial Bus controllers Actions Device Manager More ActionsInstalling Power Director Capture and Editing Software.
Step 1:
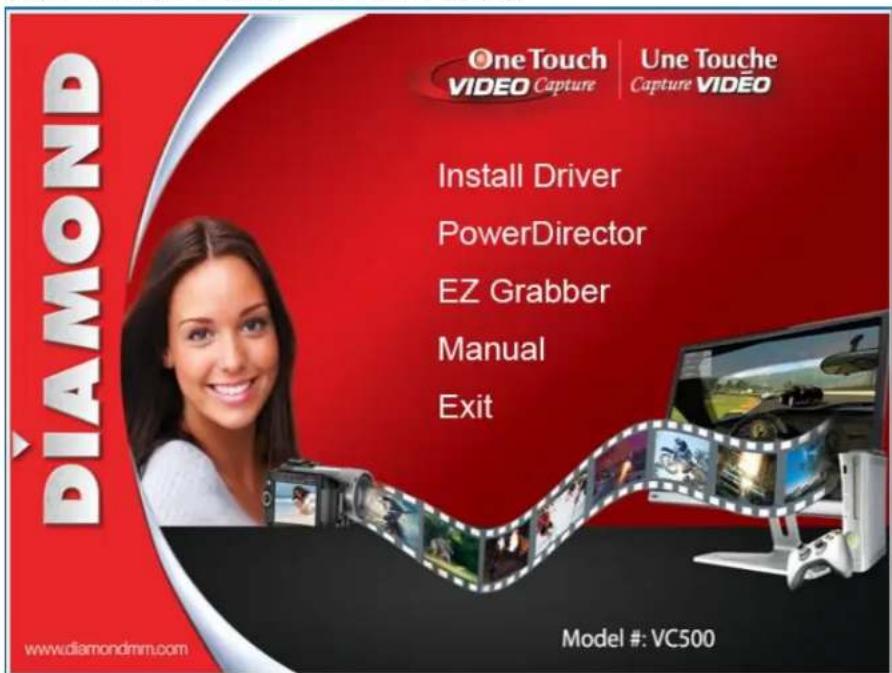
Click "Power Director" as shown below:
text_image
One Touch VIDEO Capture Une Touche Capture VIDEO Install Driver PowerDirector EZ Grabber Manual Exit www.diamondmm.com Model #: VC500Step 2:
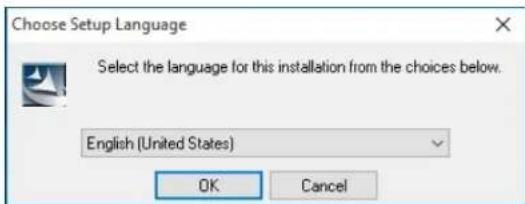
Select your preferred language and click "OK"
text_image
Choose Setup Language Select the language for this installation from the choices below. English (United States) OK CancelStep 3:
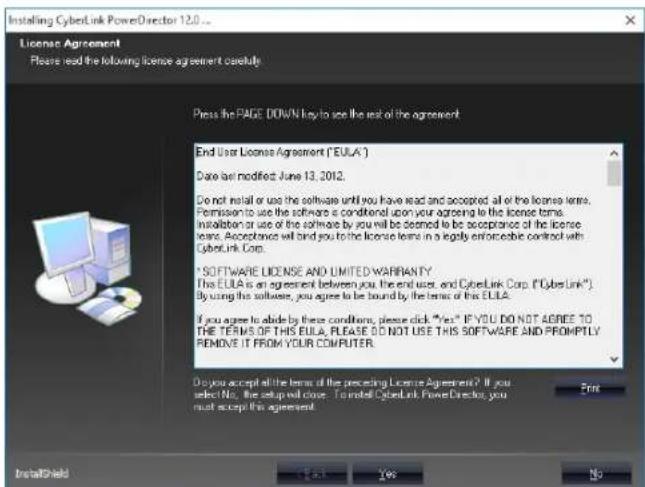
Click "Yes" to accept the license agreement to continue the "PowerDirector" installation.
text_image
Installing CyberLink PowerDirector 12.0... License Agreement Please read the following license agreement carefully Press the PAGE DOWN key to see the rest of the agreement End User License Agreement ("EULA") Date for modified June 13, 2012. Do not install or use the software until you have read and accepted all of the license terms. Promissent to use the software is conditioned upon your agreeing to the license terms. Installation or use of the software by you will be deemed to be acceptance of the license terms. Acceptance will bind you to the license terms in a legally enforceable contract with CyberLink Corp. * SOFTWARE LICENSE AND LIMITED WARRANTY. The EULA is an agreement between you, the end user, and CyberLink Corp. ("CyberLink"). By using this software, you agree to be bound by the terms of this EULA. If you agree to abide by these conditions, please click "Yes" IF YOU DO NOT AGREE TO THE TERMS OF THIS EULA, PLEASE DO NOT USE THIS SOFTWARE AND PROMPTLY REMOVE IT FROM YOUR COMPUTER. Do you accept all the terms of the preceding License Agreement? If you select No, the setup will close. To install CyberLink PowerDirector, you must accept this agreement. InstallShield Edit Yes NoStep 4:
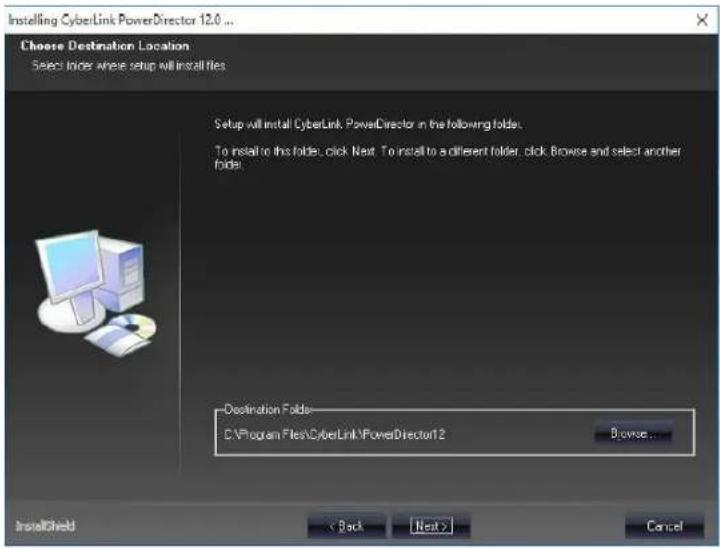
Click "Next" As shown below:
text_image
Installing CyberLink PowerDirector 12.0 ... Choose Destination Location Select folder where setup will install files Setup will install CyberLink PowerDirector in the following folds: To install to this folder, click Next. To install to a different folder, click Browse and select another folder. Destination Folds: C:\Program Files\CyberLink\PowerDirector12 Browse... InstallShield < Back Next > CancelStep 5:
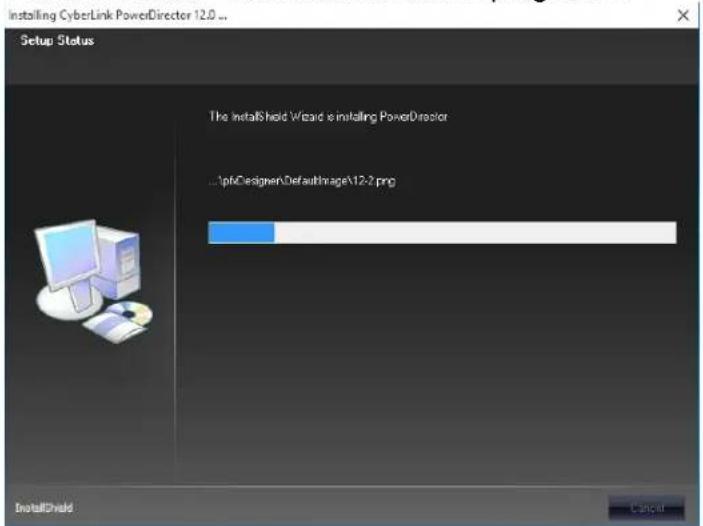
PowerDirector" installation is now in progress ...
text_image
Installing CyberLink PowerDirector 12.0 .. Setup Status The InstallShield Wizard is installing PowerDirector ...1.p6Designer\DefaultImage\12.2.png InstallShield CancelStep 6:
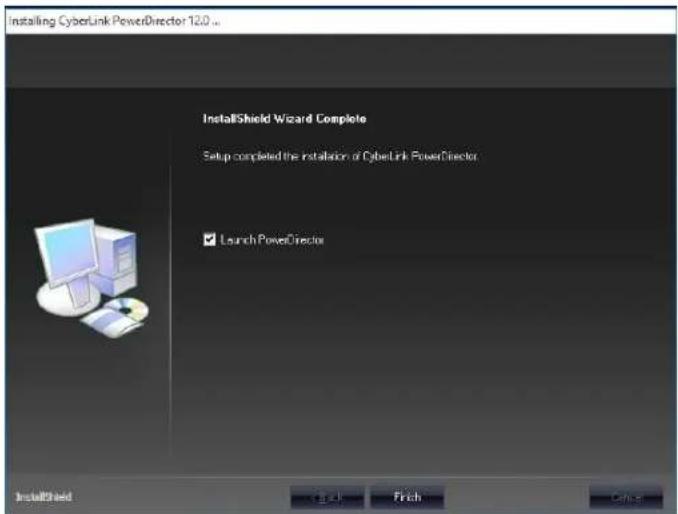
Click "Finish" "PowerDirector" installation is complete
text_image
Installing CyberLink PowerDirector 12.0 .. InstallShield Wizard Complete Setup completed the installation of CyberLink PowerDirector ✓ Launch PowerDirector InstallShield S-41 Fitch CohortStep 7:
If you choose not to launch the Power Director you can do so later by Double-clicking on the desktop icon "to launch the "PowerDirector" program.
Step 8:
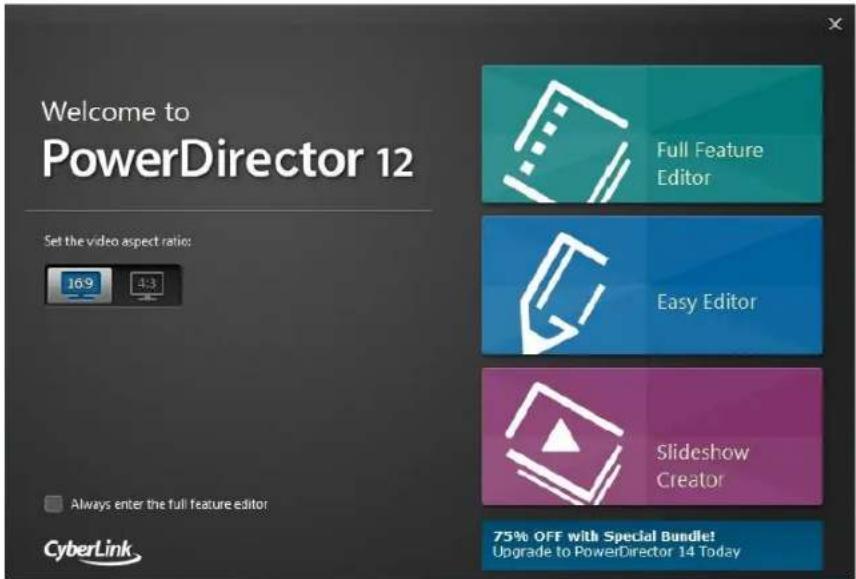
Select the video aspect ratio and then click on full feature editor
text_image
Welcome to PowerDirector 12 Set the video aspect ratio: 16.9 3:3 Always enter the full feature editor CyberLink Full Feature Editor Easy Editor Slideshow Creator 75% OFF with Special Bundle! Upgrade to PowerDirector 14 TodayStep 9:
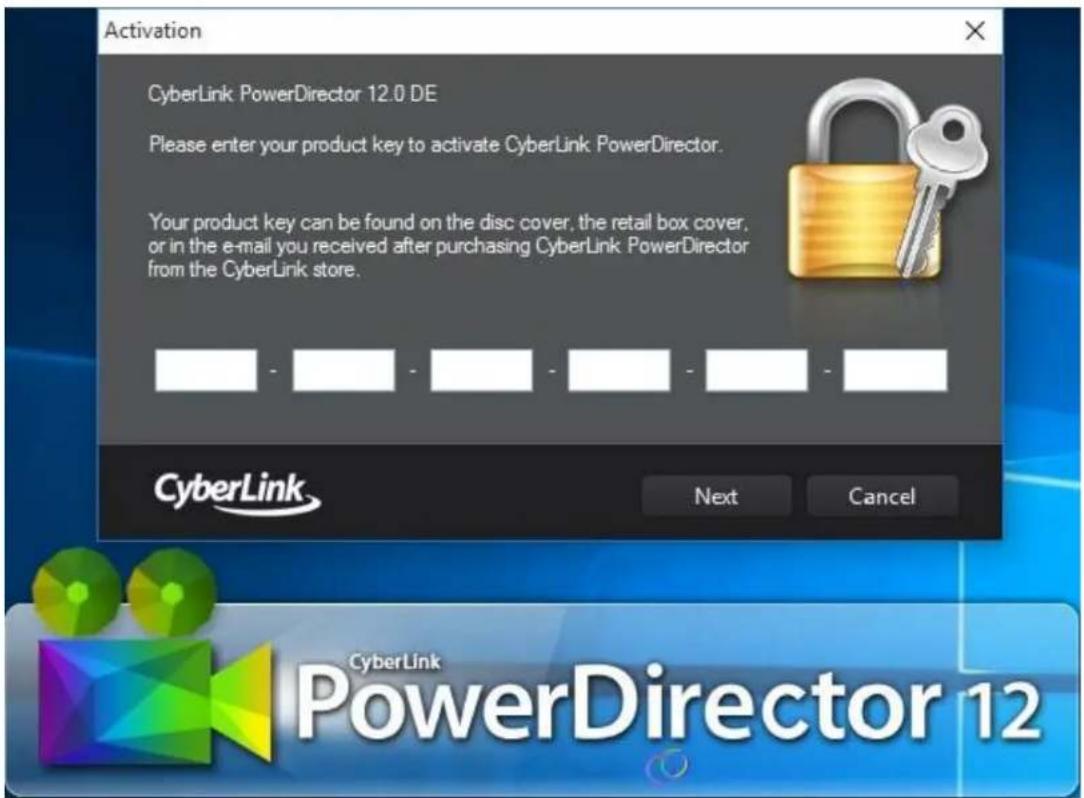
Please enter the license key to activate the program. Key is located on the CD Jacket and click "Next".
text_image
Activation CyberLink PowerDirector 12.0 DE Please enter your product key to activate CyberLink PowerDirector. Your product key can be found on the disc cover, the retail box cover, or in the e-mail you received after purchasing CyberLink PowerDirector from the CyberLink store. CyberLink Next Cancel CyberLink PowerDirector 12Step 10:
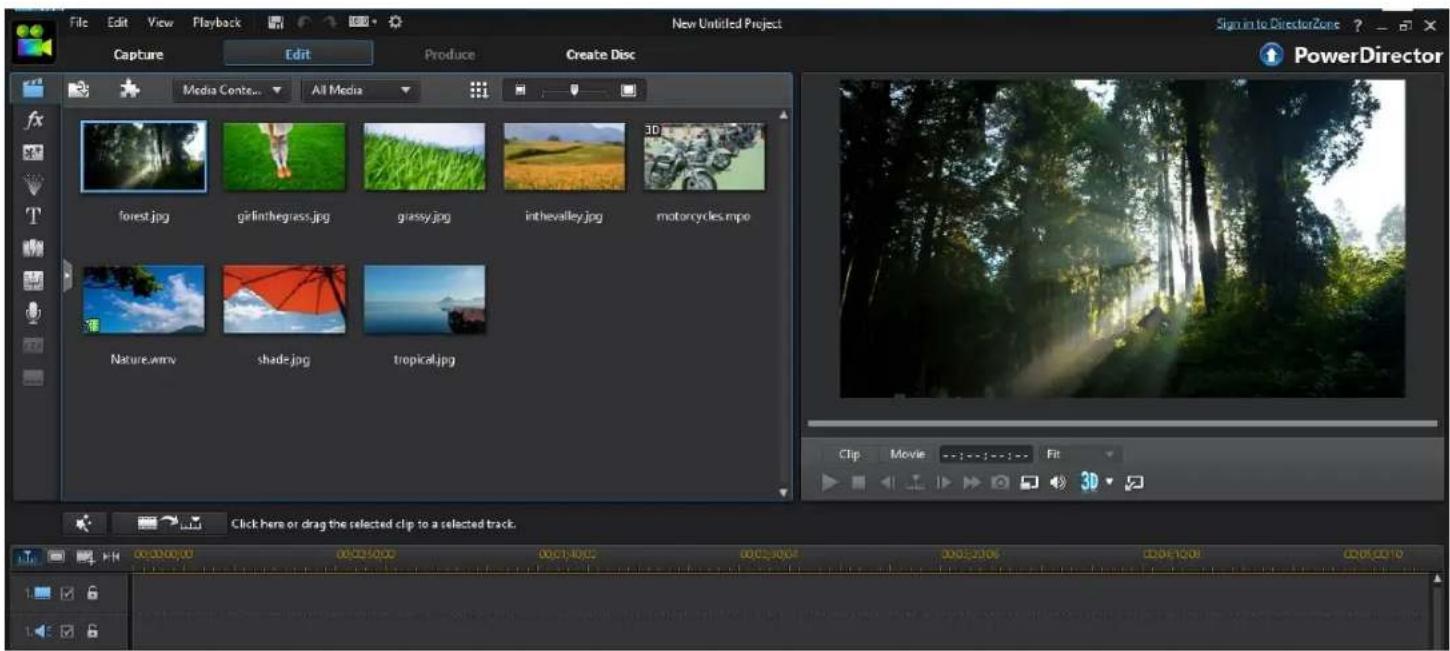
Select "Full Feature Editor" modules to enter video capture interface. If you get the User Account Control warning just lick Yes to continue to the screen below:
text_image
File Edit View Playback New Untitled Project Capture Edit Produce Create Disc Media Contos... All Media PowerDirector forest.jpg girlinthegrass.jpg grassy.jpg inthevalley.jpg motorcycles.mpo Nature.wmv shade.jpg tropical.jpg Click here or drag the selected clip to a selected track. Clip Movie --:---:---:--- Fit 00:00:00 00:00:00 00:01:00 00:02:00 00:03:00 00:04:00 00:05:00Step 11:
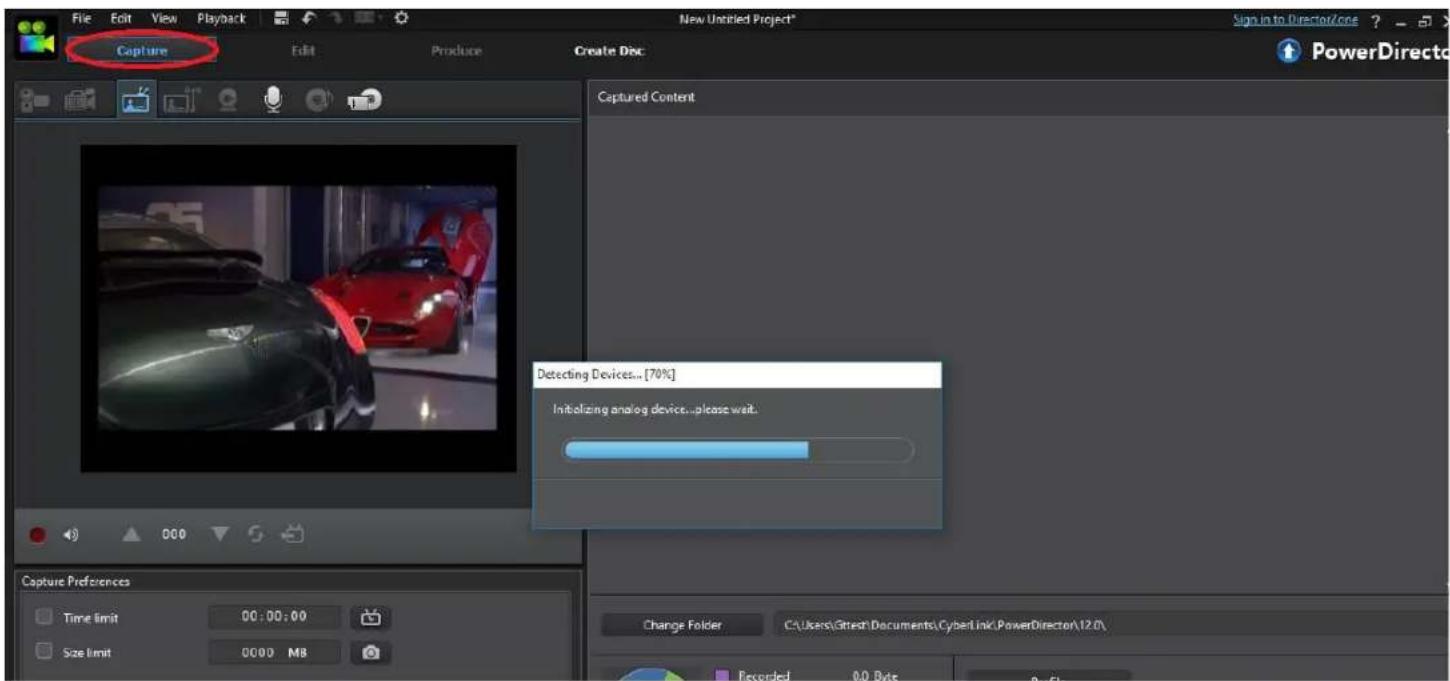
Click the "Capture" button
text_image
File Edit View Playback New Untitled Project® Capture Edit Produce Create Disc Sign In to DirectorZone PowerDirecto Captured Content Detecting Devices... [70%] Initializing analog devices...please wait. Capture Preferences Time limit 00:00:00 Size limit 0000 MB Change Folder C:\Users\Gitter\Documents\CyberLink\PowerDirector\12.0\ Recorded 0.0 BitsHow to use PowerDirector basic settings. Note: the full users guide is located on the installation disk, in the folder named Manual.
Capture module.
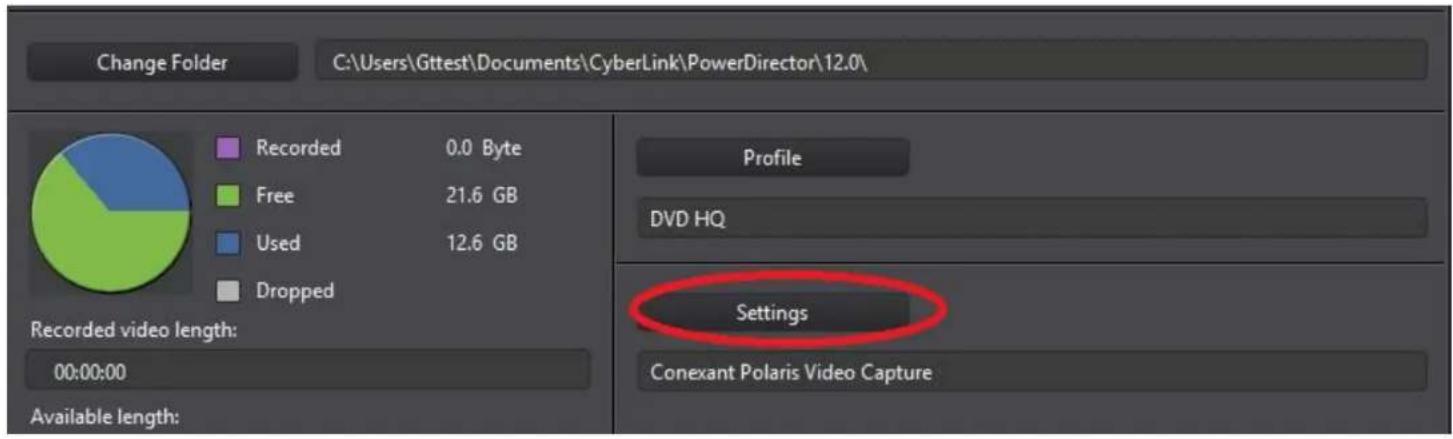
It will detect video format automatically, or click "Settings" to change it. (Default settings are recommended for North America. Outside of North America you may have to change the video standard settings
text_image
Change Folder C:\Users\Gttest\Documents\CyberLink\PowerDirector\12.0\ Recorded 0.0 Byte Free 21.6 GB Used 12.6 GB Dropped Recorded video length: 00:00:00 Available length: Profile DVD HQ Settings Conexant Polaris Video Capture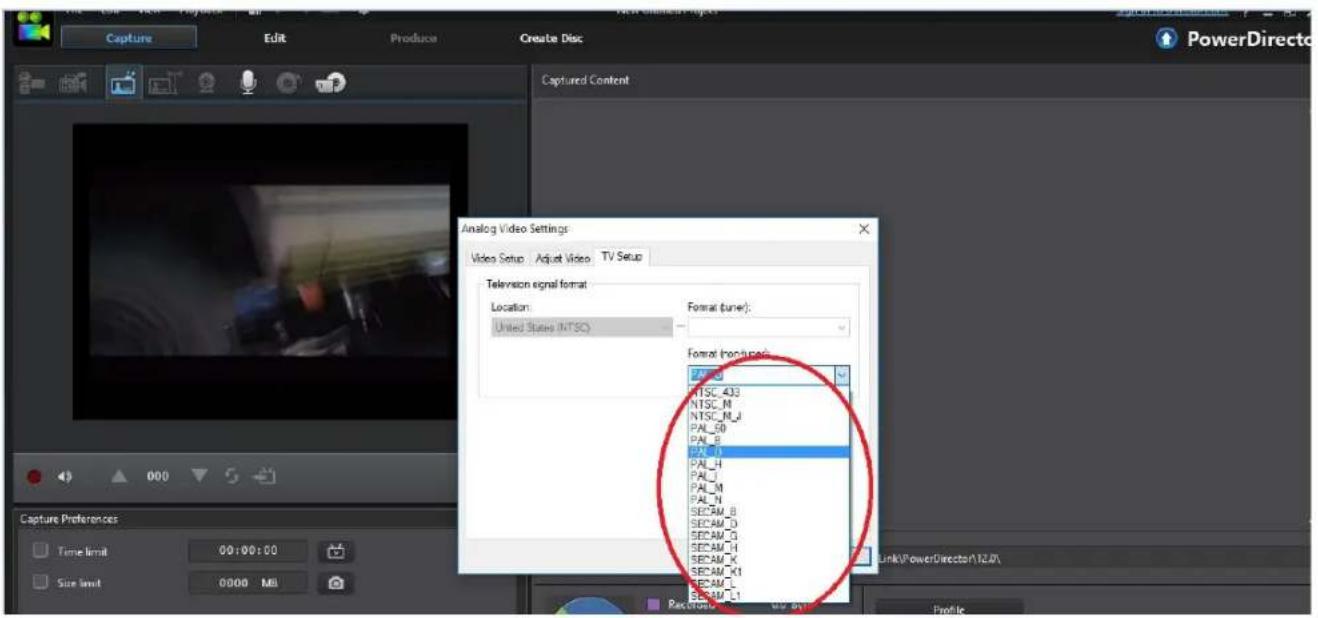
text_image
Capture Edit Produce Create Disc Captured Content Analog Video Settings Video Setup . Adjust Video . TV Setup Television signal format Location: United States (NTSC) Format (Tuner): Format (Inocursals) PTSC_403 NTSC_M NTSC_N_J PAL_60 PAL_B PTC_1 PAL_H PAL_I PAL_M PAL_N SECAM_B SECAM_D SECAM_G SECAM_H SECAM_K SECAM_K1 SECAM_L SECAM_L1 Link\PowerDirector\NLD\ Capture Preferences Time limit 00:00:00 Size limit 0000 MB Receivers 00:00:00If you are using the red, white and yellow composite video connectors there is no need to change the video source settings. If you use the S-Video connector. Choose Video SVideo as shown below:
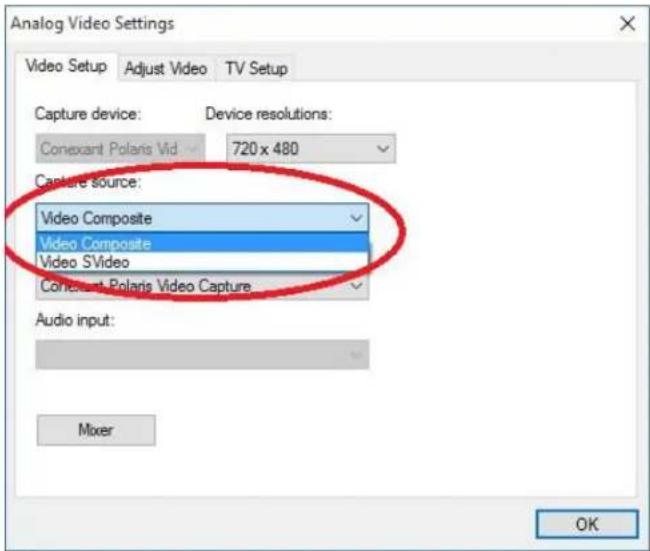
text_image
Analog Video Settings Video Setup Adjust Video TV Setup Capture device: Device resolutions: Conexant Polaris Vid 720 x 480 Capture source: Video Composite Video Composite Video SVideo Conexant Polaris Video Capture Audio input: Mixer OKChoose video format and location of recorded files.
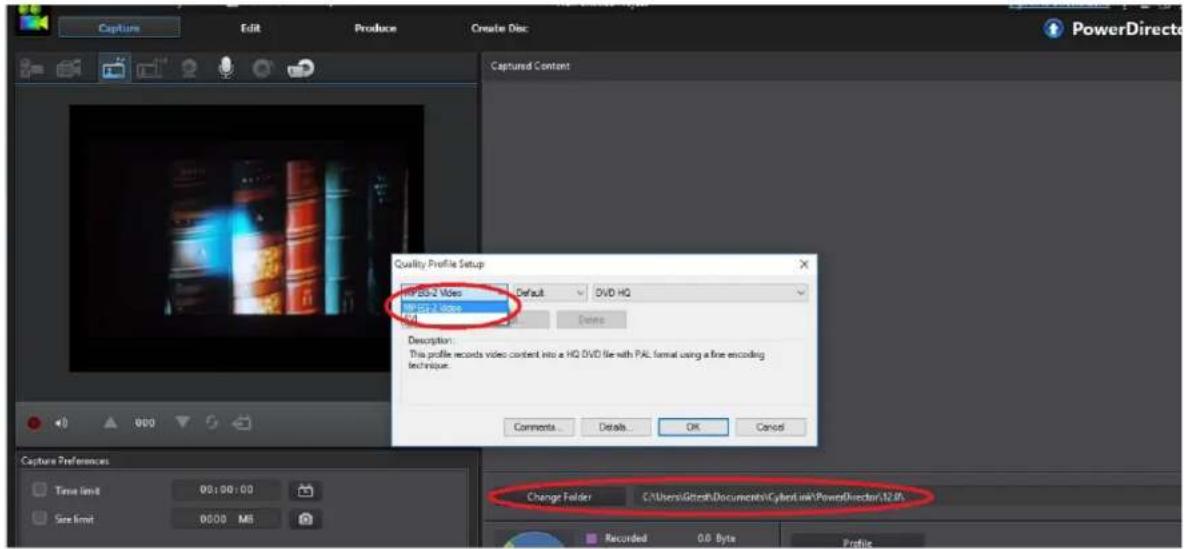
text_image
Capture Edit Produce Create Disc Captured Content Quality Profile Setup MP-ES-2 Video Default DVD HQ MP-ES-2 video Description: This profile records video content into a HQ DVD file with PAL format using a fine encoding technique. Comments... Details... OK Cancel Capture Preferences Time limit 00:00:00 Size limit 0500 MB Change Folder C:\Users\Gitcsh\Documents\CyberWith\PowerDirector\12.8% Recorded 0.0 Byte ProfilePlease click"?" button to get online help.
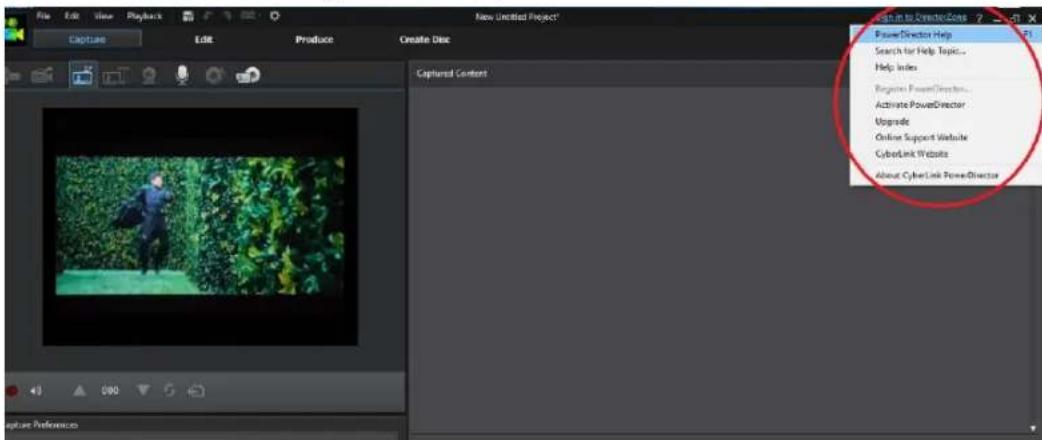
text_image
File Edit View Playback New Untitled Project Capture Edit Produce Create Disc Capture Content PowerDirector Help Search for Help Topic... Help Index Regime PowerDirector... Activate PowerDirector Upgrade Online Support Website CyberLink Website About CyberLink PowerDirector Capture PreferencesEz Grabber Installation:
Ez Grabber is a simple capture tool. If you want to capture, edit and burn to DVD we recommend using the Power Director application and only use Ez Grabber if you just want to do a simple video or audio capture to store locally or external storage drives.
Step 1:
Insert the installation CD and run the VC500.EXE file located in the root of the installation CD
Note: if you get a user account warning just click Yes to continue and you should get the menu as shown below:
text_image
One Touch VIDEO Capture | Une Touche Capture VIDEO Install Driver PowerDirector EZ Grabber Manual Exit Model #: VC500 www.diamondtimes.comStep 2:
Click on Ez Grabbeer to begin the installation
Step 3:
Select your language and click OK. (English is the default)
Note: You may get a message from “Microsoft Visual C++ 2010 x 86 Redistributable Maintenance” if so just click on the option for “Repair Microsoft Visual C++ 2010 x 86 Redistributable to its original state” and click Next to continue. You may get this message twice, if so do the same and click repair. After repair is complete click Finish
Step 4:
You should get the "Welcome to the EzGrabber Setup Wizard" Screen. Click Next to continue
Step 5:
You will be prompted to select a destination folder to where you want to install the program folder to. We recommend you leave the default and click Next
Step 6:
Under the "Select Additional Tasks" screen we suggest you leave the default option "Create Desktop Icon" checked. This will create a shortcut "Ezgrabber" icon on your desktop for easy access to the program
Step 7:
Click Install from the "Ready to Install" menu
Note: again you may receive the “Microsoft Visual C++ 2010 x 86 Redistributable Maintenance”, click repair and then finish after the repair is complete
Step 8:
Click Finish after the Ez Grabber installation is complete. We recommend you reboot your PC after.
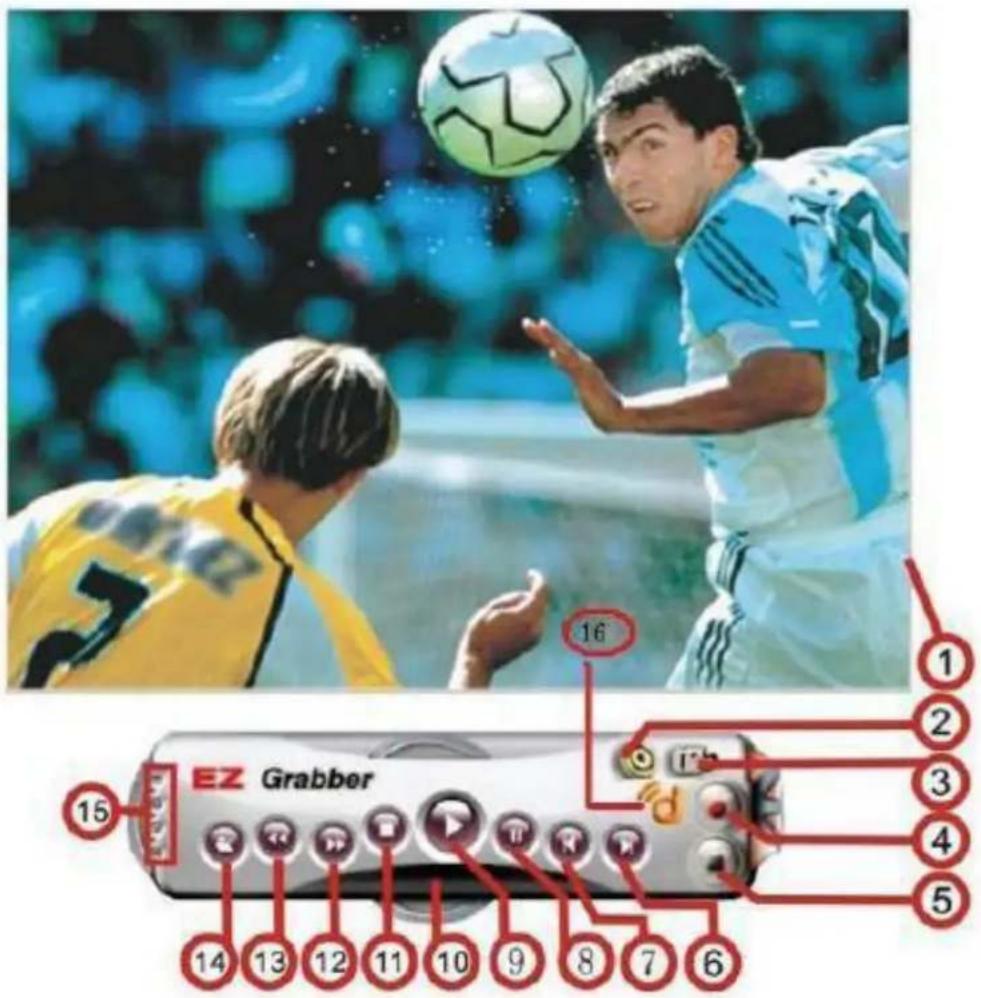
Using Ez grabber:
text_image
EZ Grabber 15 16 1 2 3 4 5 14 13 12 11 10 9 8 7 6Control Features:
- Video Preview screen
- Setup Menu. Here you can change your video format, video source, picture adjustments, One Touch Capture button actions, Snapshot format, video record formats and recorded video destination folder.
- Snapshot icon. Click here to create a snapshot still photo of your video
- Record start button. Click to start recording video
- Record stop button. Click to stop recording video
Note: The following buttons are for video playback only, they do not control any function on your VCR or Camcorder
- Skip to End button. (skips to the end of your recorded video file)
- Skip Home (skips to the beginning of the recorded video file)
- Pause (pause video playback)
- Play (play recorded video)
- Display Status
- Stop button (stop video playback)
- Skip Forward
- Skip Backward
- Open File. (Click here to open the video folder you want to playback)
- Full Screen, About, Minimize and Exit buttons
Technical Support
Diamond Technical Support staff is here to help resolve any issues that you may be experiencing. Prior to contacting technical support please make sure you have the following information available.
- Model #: (Printed on the bar code, located on the box)
- Installation CD Version: (printed on the CD label)
- The version of Windows that your system is running.
- The manufacturer and model # of your computer.
- CPU type and speed (example: Intel Pentium4 2.4GHz)
- A complete description of the problem that you are experiencing including any steps that you have taken to try to resolve the issue.
Technical Support Options
On-Line Chat
User Guide and Frequently asked Questions Download Full installation Disk
https://www.diamondmm.com/product/diamond-vc500-one-touch-video-capture-edit-stream/#tab-support-downloads
On-line Support and warranty information
http://www.diamondmm.com/support.html