
A10 - Flash PROFOTO - Free user manual and instructions
Find the device manual for free A10 PROFOTO in PDF.


User questions about A10 PROFOTO
0 question about this device. Answer the ones you know or ask your own.
Ask a new question about this device
Download the instructions for your Flash in PDF format for free! Find your manual A10 - PROFOTO and take your electronic device back in hand. On this page are published all the documents necessary for the use of your device. A10 by PROFOTO.
USER MANUAL A10 PROFOTO
User guide Profoto A10
For other languages visit:
www.profoto.com
Profoto®

bar
| Category | Value | | -------- | ----- | | Category1 | 0.000 | | Category2 | 0.000 | | Category3 | 0.000 | | Category4 | 0.000 | | Category5 | 0.000 | | Category6 | 0.000 | | Category7 | 0.000 | | Category8 | 0.000 | | Category9 | 0.000 | | Category10 | 0.000 | | Category11 | 0.000 | | Category12 | 0.000 | | Category13 | 0.000 | | Category14 | 0.000 | | Category15 | 0.000 | | Category16 | 0.000 | | Category17 | 0.000 | | Category18 | 0.000 | | Category19 | 0.000 | | Category20 | 0.000 | | Category21 | 0.000 | | Category22 | 0.000 | | Category23 | 0.000 | | Category24 | 0.000 | | Category25 | 0.000 | | Category26 | 0.000 | | Category27 | 0.000 | | Category28 | 0.000 | | Category29 | 0.000 | | Category30 | 0.000 | | Category31 | 0.000 | | Category32 | 0.000 | | Category33 | 0.000 | | Category34 | 0.000 | | Category35 | 0.000 | | Category36 | 0.000 | | Category37 | 0.000 | | Category38 | 0.000 | | Category39 | 0.000 | | Category40 | 0.000 | | Category41 | 0.000 | | Category42 | 0.000 | | Category43 | 0.000 | | Category44 | 0.000 | | Category45 | 0.000 | | Category46 | 0.000 | | Category47 | 0.000 | | Category48 | 0.000 | | Category49 | 0.000 | | Category50 | 0.001 | | Category51 | 1.599 | | Category52 | 1.599 | | Category53 | 1.599 | | Category54 | 1.599 | | Category55 | 1.599 | | Category56 | 1.599 | | Category57 | 1.599 | | Category58 | 1.599 | | Category59 | 1.599 | | Category60 | 1.599 | | Category61 | 1.599 | | Category62 | 1.599 | | Category63 | 1.599 | | Category64 | 1.599 | | Category65 | 1.599 | | Category66 | 1.599 | | Category67 | 1.599 | | Category68 | 1.599 | | Category69 | 1.599 | | Category70 | 1.599 | | Category71 | 1.599 | | Category72 | 1.599 | | Category73 | 1.599 | | Category74 | 1.599 | | Category75 | 1.599 | | Category76 | 1.599 | | Category77 | 1.599 | | Category78 | 1.599 | | Category79 | 1.599 | | Category80 | 1.599 | | Category81 | 1.599 | | Category82 | 1.599 | | Category83 | 1.599 | | Category84 | 1.599 | | Category85 | 1.599 | | Category86 | 1.599 | | Category87 | 1.599 | | Category88 | 1.599 | | Category89 | 1.599 | | Category90 | 1.599 | | Category91 | 1.599 | | Category92 | 1.599 | | Category93 | 1.599 | | Category94 | 1.599 | | Category95 | 1.599 | | Category96 | 1.599 | | Category97 | 1.599 | | Category98 | 1.599 | | Category99 | 1.599 | | Category100 | 1.599 |Congratulations on your new Profoto product!
Regardless if you chose a new flash or a new light shaping tool, know that half a century's worth of experience was put into its making.
If the years have taught us one thing, it is to never neglect a single detail. We only put our name on a product in which we have the fullest confidence. Before shipping, every one of our products passes an extensive and strict testing program. Unless it complies with the specified performance, quality and safety, it is a no-go.
As a result, we are confident that your new Profoto product will stay with you for years and help you grow as a photographer. But getting the product is only the beginning of that journey. Using it for light shaping is the real adventure. That is why we take pride in providing you with such a wide assortment of light shaping tools, allowing you to shape the light in any way you can imagine.
The almost infinite possibilities might seem bewildering at first, but we're certain you will soon get the hang of it.
I encourage you to sign up for our newsletter or visit Profoto stories, www.profoto.com/profoto-stories, to learn more about shaping light from photographers who are sharing their stories about how Profoto Light Shaping Tools help them to create outstanding images.
Enjoy your Profoto product!
Conny Dufgran, founder
General safety instructions

Safety Precautions!
Do not operate the equipment before studying the instruction manual and these safety instructions. Make sure that Profoto Safety Instructions is always accompanied the equipment! Profoto products are intended for indoor conditions use. Do not place or use the equipment where it can be exposed to moisture, extreme electromagnetic fields, or in areas with flammable gases or dust! Do not expose the equipment to dripping or splashing. Do not place any objects filled with liquids, such as vases, on or near the equipment. Do not expose the equipment to hasty temperature changes in humid conditions as this could lead to condensation water in the unit. Do not connect this equipment to flash equipment from other brands. Front lens shall be changed if it has become visibly damaged to such an extent that their effectiveness is impaired, for example by cracks or deep scratches. Equipment must only be serviced, modified or repaired by authorized and competent service personnel

WARNING – Electrical Shock Hazard – High Voltage!
Do not open or disassemble flashes, generators or lamp heads! Equipment operates with high voltage. Generator capacitors are electrically charged for a considerable length of time after being turned off, even with the battery removed. Batteries (battery pack or batteries installed) shall not be exposed to excessive heat such as direct sunlight, fire, or the like.
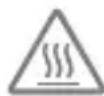
Caution – Burn Hazard – Hot Parts!
If front lens cracks, it must be replaced before re-use of the equipment. Do not touch front lens during operation it may reach high temperature.
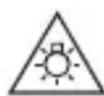
Caution!
Possibly hazardous optical radiation emitted from this product. Do not stare at operating lamp. May be harmful to the eye.
Note about RF!
This equipment makes use of the radio spectrum and emits radio frequency energy. Make sure the device is operated according to local regulations. The frequency spectrum this device is using is shared with other users. Interference cannot be ruled out. Due to varying regulations and limits on radio transmissions Profoto's A10 has a power output setting. Some countries does not allow use of the full power mode P0, please refer to your country specific section in the user guide to see the maximum allowed power setting allowed by national regulations. Please note that reducing the power output will affect the range of the device. Regulations change from time to time, so please make sure you are using the latest firmware and instructions to ensure compliance with rules and regulations. These can be downloaded free from profoto.com.
Laser radiation
CLASS 1 LASER PRODUCT
IEC 60825-1, Edition 2.0 (2007-03). Wavelength at room temperature: 660 nm. Power through 7 mm aperture at 100 mm distance in front of the exit window of the autofocus assist unit at room temperature: < 300 W. Complies with 21 CFR 1040.10 and 1040.11 except for deviations pursuant to Laser Notice No. 50, dated June 24, 2007.
Caution: Do not remove, disassemble or manipulate the laser auto focus assist light. Failure to comply with this caution might lead to possible exposure to hazardous laser radiation.
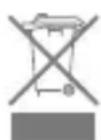
Final Disposal
When the product reach end of service, do not dispose of it with your other household waste. Equipment contains battery, electrical and electronic components that could be harmful to the environment. Equipment may be returned to Profoto distributors free of charge for recycling. Follow local legislation for disposal of batteries, electrical and electronic components, respectively.
一般安全须知

安全注意事项!
CLASS 1 LASER PRODUCT
CLASS 1 LASER PRODUCT
CLASS 1 LASER PRODUCT
CLASS 1 LASER PRODUCT
CLASS 1 LASER PRODUCT
CLASS 1 LASER PRODUCT
General safety instructions....4
Introduction 14
About the product....14
Getting started....18
Battery charging....18
Attach battery to flash....19
Attach light shaping tools....19
On-camera use in TTL mode (AUTO) 20
On-camera use in manual mode 20
Off-camera use....21
Off-camera mobile mode....22
Operation....23
Power on/off 23
Mode selection (TTL or Manual) 24
Flash power scale 24
Operation in TTL mode (Automatic mode) 24
Operation in MAN mode (Manual mode) 26
Continuous light 27
Activate/deactivate flash head 27
Lock user interface....27
Manual zoom....28
Test sync....28
Using the flash off-camera 29
Change settings....29
General notes on Profoto Air operation.... 34
Light shaping....36
Clic Dome 37
Bounce Card....38
Additional functions....40
Firmware upgrade....40
Factory reset....40
Profoto Air compatibility ....41
Technical data....42
Warranty 45
Regulatory information 46
Introduction About the product
We have designed the A10 to be the world's smallest studio light.
It is designed to provide a beautiful light with great light shaping capabilities and also being incredible easy to use.
We have made the head round to create a circular and natural light pattern. We have a soft and even light fall off that makes it easy to control and set the light creatively. In addition to that we have a range of dedicated Light Shaping Tools that are easily clicked on with a magnetic mount.
The A10 has also AirTTL Remote and receiver built-in, which means it will automatically communicate with other freestanding Profoto lights wirelessly and it can also be used off-camera. This makes it easy to grow in a system and grow with light shaping.
A10 even has a Profoto BLE receiver built-in allowing full control from the Profoto Camera app (available for iOS and selected Android phones). The A10 can be used as an off-camera mobile phone light.
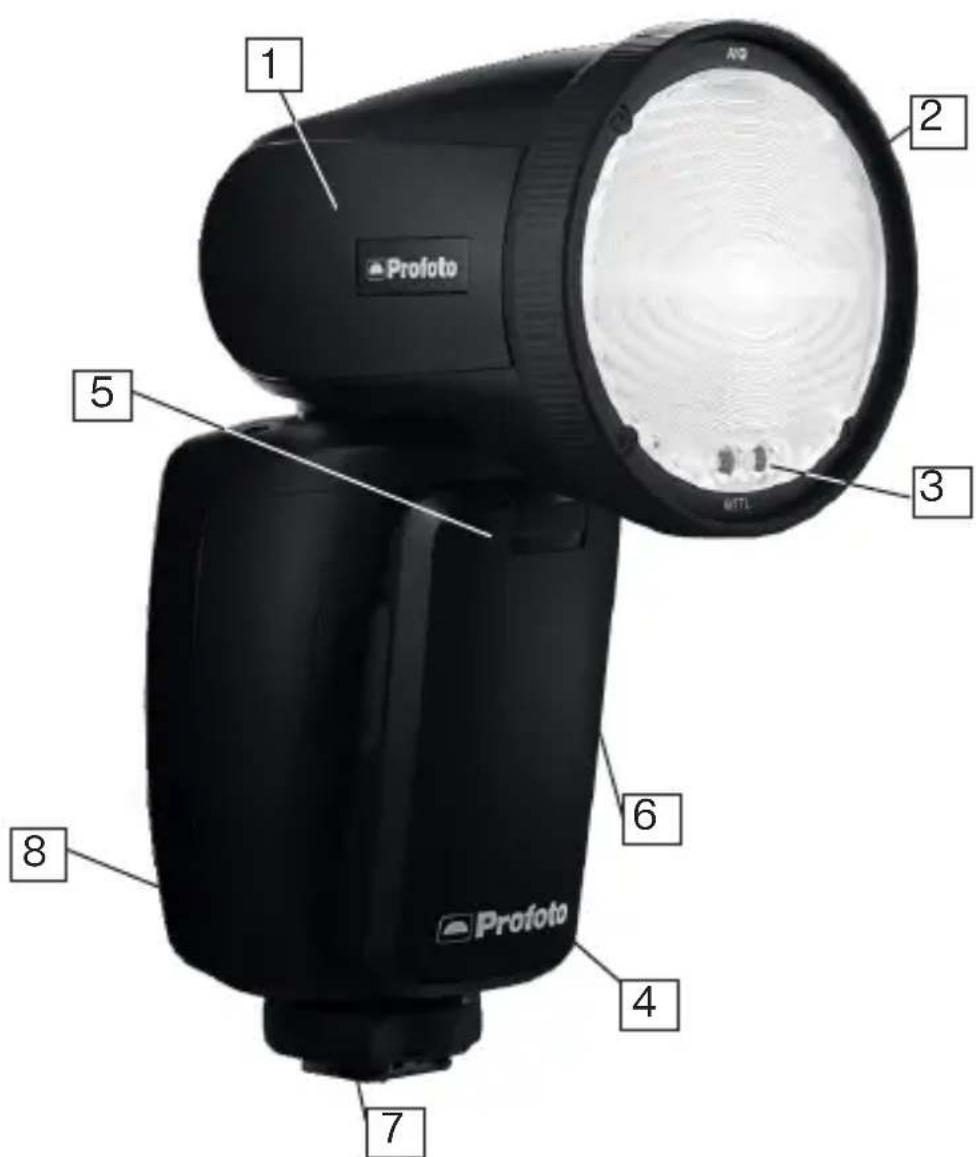
text_image
1 2 5 3 MTTL 6 4 7 8 Profoto- Flash head
- Zoom ring
- LED continuous lights
-
Battery
-
Battery release button
- AF (auto focus) assist structured laser light
- Hot shoe connector
- USB port
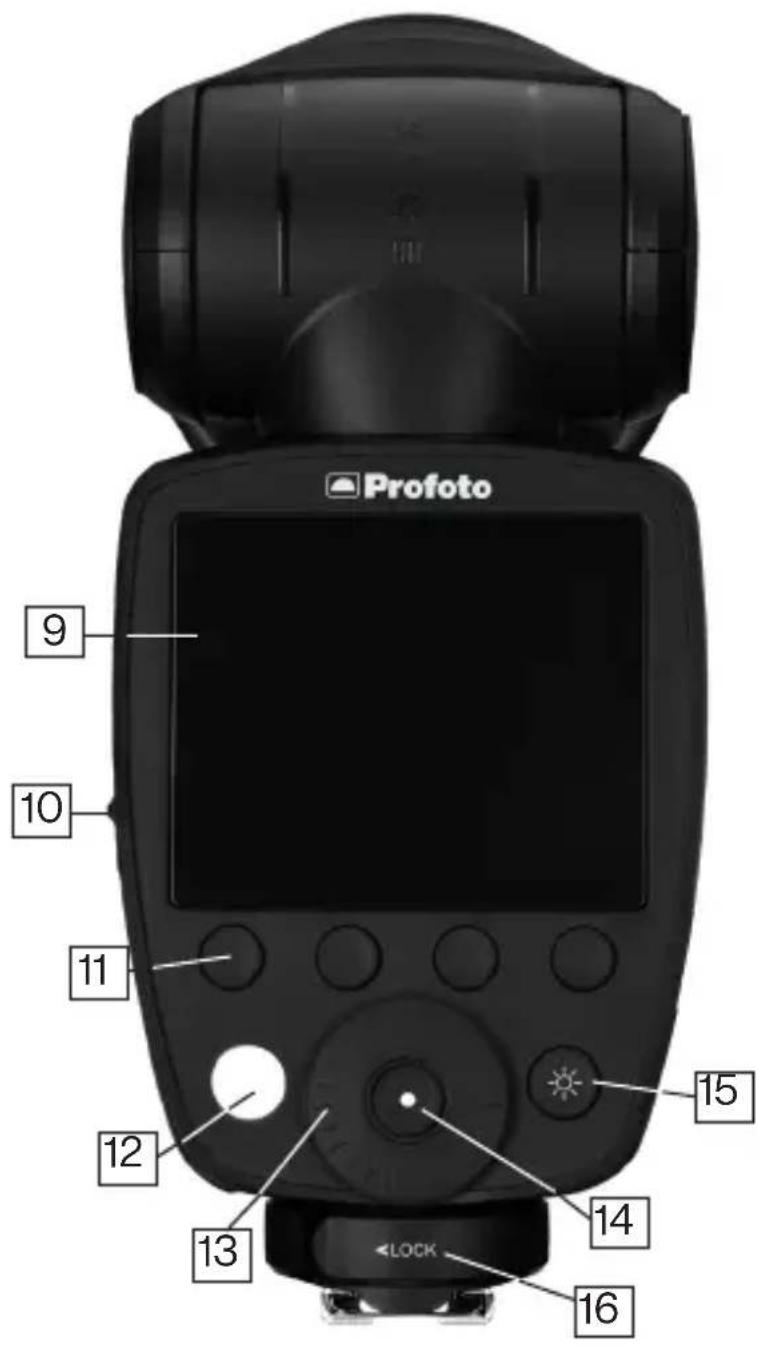
text_image
9 10 11 12 13 14 15 16 LOCK- Display
- Mode switch (TTL or MAN). Only active when A10 is on-camera.
- Group buttons (A, B, C, D)
-
TEST button & ON/OFF button
-
Dial
- Settings button
- Continuous light button
- Lock ring
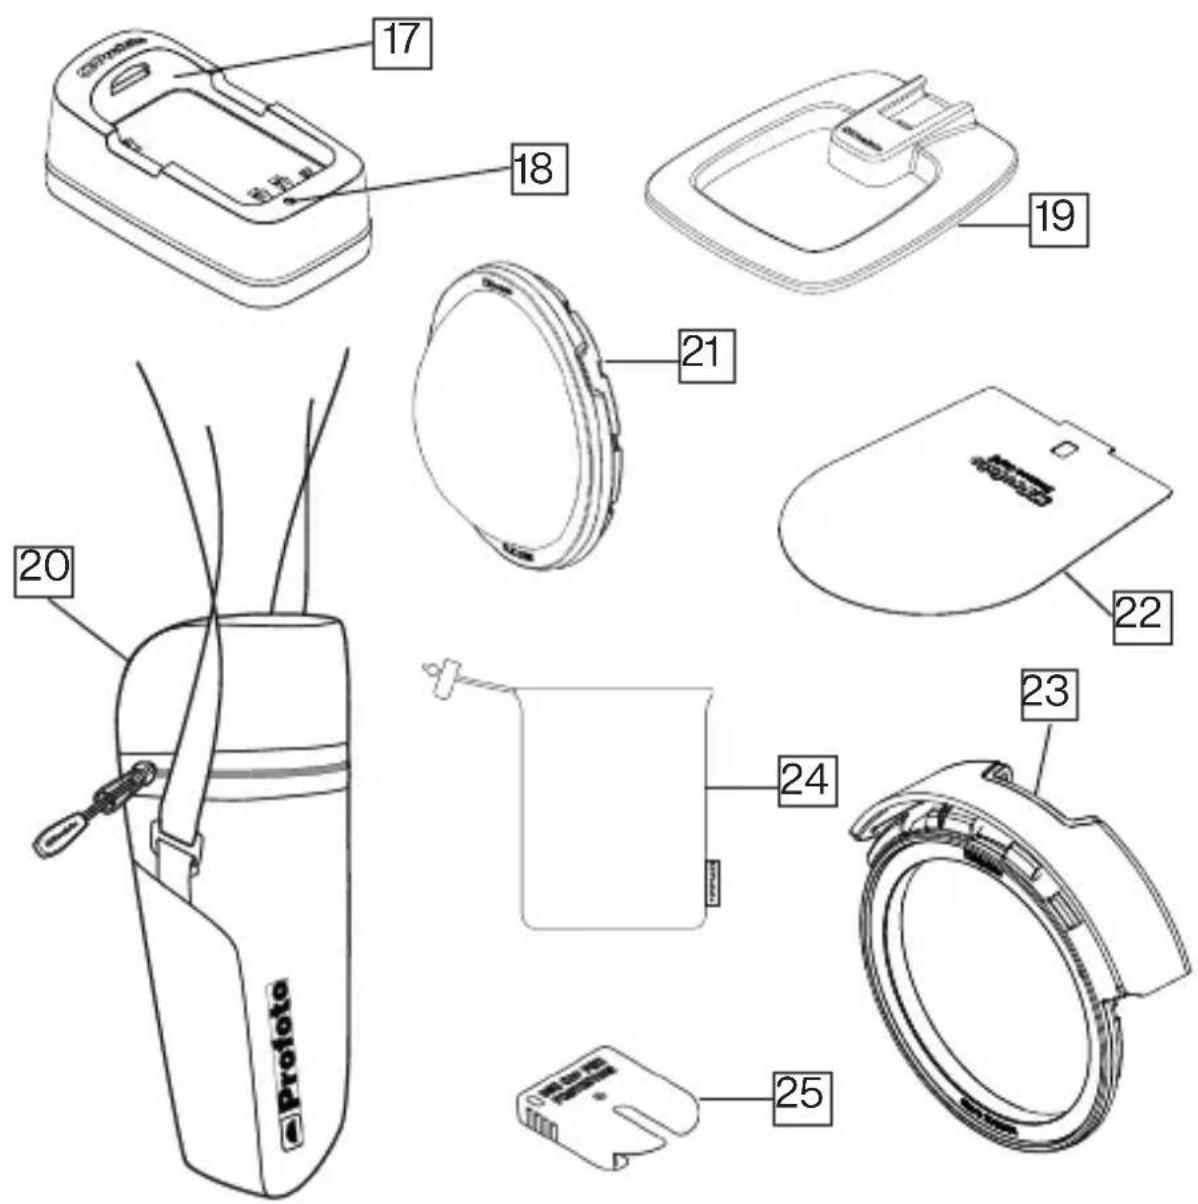
text_image
17 18 19 20 21 22 23 24 25 26 Profoto- Battery charger
- Battery charger indicator
- Flash stand
- Bag
-
Clic Dome
-
Bounce card
- Bounce card holder
- Bounce card pouch
- Protective cap (for Sony only)
Getting started Battery charging
For optimal performance, the battery should be fully charged prior to usage. The battery can be charged from any charge level. For increased life-time, do not leave the battery uncharged for a long time.
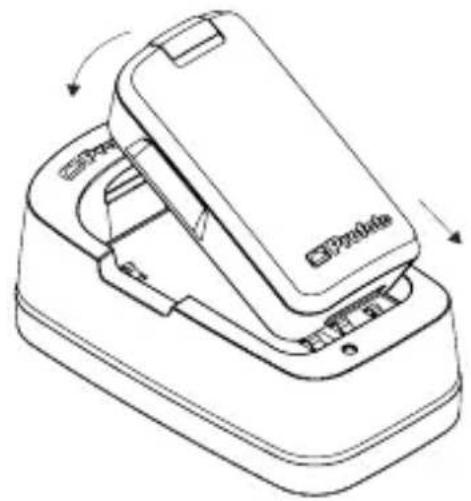
Charge the battery:
-
Push the battery release button [5] and remove the battery from the flash. This can be done while the A10 is mounted on the camera.
-
Connect the battery to battery charger [17]
natural_image
Line drawing of a device with a closed lid and buttons, showing rotational arrows (no text or symbols)- Connect the battery charger to mains power.
-
Check that the charge indicator [18] is continuously orange, indicating that charging is in progress.
-
When the charging is completed, the charge indicator [18] is green.
Note:
If the battery is deeply discharged, the charging time can be longer than specified in section Technical data.
Battery blinking orange indicates battery error. Contact your local Profoto dealer for support.
The charger mains cable and plug serve as the disconnect device from mains power. When charging is done, always disconnect the charger from the mains outlet by pulling the plug, not the cable.
The socket outlet should be in close proximity to the equipment and should be easily accessible.
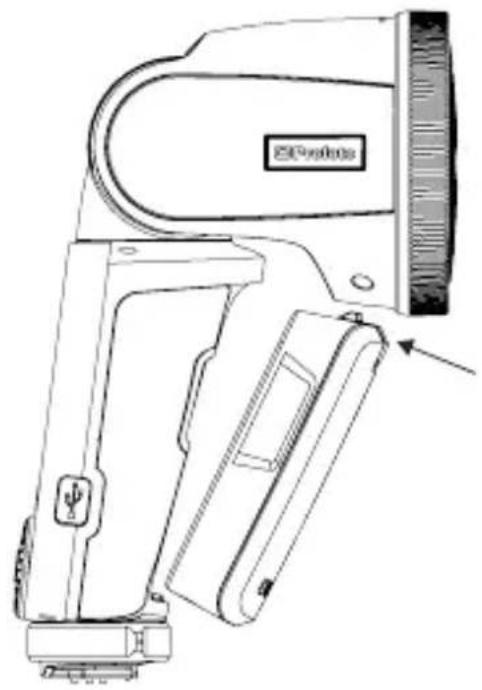
Attach battery to flash
Connect the bottom part of the battery to the flash and then press it in place until you hear a "click".
natural_image
Technical line drawing of a portable flash unit with no visible text or symbolsAttach light shaping tools
The dedicated light shaping tools are easy and quick to attach. Just snap them in place in front of the flash lens until you hear a "click". To remove them, just pull them off.

natural_image
Technical line drawing of a handheld device with a side panel and internal components (no text or symbols)On-camera use in TTL mode (AUTO)
- Slide the hot shoe connector [7] on the A10 into the hot shoe of the camera. Turn the locking mechanism to secure.
- Switch on the A10.
- Turn the dial [13] clockwise to unlock.
- Use the mode switch [10] to select TTL mode (AUTO).
- Take an image with the camera and the flash will adjust its power to get a correct exposure.
- Use the dial [13] to adjust the flash exposure compensation. This can also be done in camera by changing the flash exposure compensation.
TIP: You can at all time switch to manual mode and keep the setting from the last TTL flash. This is extra helpful when you need to lock the flash power and keep it constant.
Note:
TTL is only available in group A-C and group D-F are always manual mode, even if switch [10] is set to TTL mode (AUTO).
For Profoto A10 Air TTL-S, always use the Protective cap [25] when flash is not mounted on the camera or Flash stand [19]. Secure with the locking ring [16].
On-camera use in manual mode
- Follow step 1-3 above
- Use the mode switch [10] to select MAN (Manual) mode.
- Take an image to check the exposure or use the test button [12] and light meter to measure the exposure.
- Use the dial [13] to adjust the light output to your preferences.
TIP: To improve efficiency, use TTL for first shot and then switch to manual to lock the flash power. By doing this you get correct exposure quickly and then you can fine tune flash power in manual mode.
Off-camera use
This describes how to operate an A10 unit off-camera and with an A10 unit on camera as transmitting unit. When A10 is used off-camera together with an Air Remote on camera, please see instruction manual for Air Remote how to adjust the flash from on-camera position.
- Switch on the A10.
- Turn the dial [13] clockwise to unlock.
- Turn on Air and select the same radio channel on the A10 unit as on the transmitting unit on the camera.
- Select a group on the A10 flash. The unit is now set up for off-camera use.
- Take an image to check the exposure or use the test button [12] and light meter to measure the exposure in manual mode.
- Adjust overall flash exposure compensation with dial [13] or in camera menu.
- To adjust an individual light, select the group on the group buttons [11] you like to adjust on the transmitting unit and adjust flash power by rotating the dial [13]. This can both be done in TTL- and manual mode.
- In manual mode, the energy setting can also be done on each unit individually.
Note:
When A10 is used as off-camera unit, the TTL/MAN switch [10] will be overridden. The switch is only valid for triggering an A10 mounted on the camera.
Off-camera mobile mode
It's easy to connect the A10 with the Profoto apps and once you are connected it is even easier and more fun to use the A10. The Profoto apps gives you access to:
- Easy updates and smart remote control using the Profoto Control App. This will always give you the latest A10 updates available at your fingertips and an ability to view and control all A10 settings from your smartphone screen.
- Creative capture using the Profoto Camera app. You can play with light and shadows to create amazing smartphone images lit with your A10.
To connect the Profoto apps to the A10 you need to select BLUETOOTH ON in the settings menu on the A10. Then start the Profoto app and follow the in-app instructions.
Note
When using the Profoto control or Profoto Camera app, the mode switch [10] is disabled and the app will dictate if TTL (AUTO) or manual mode is used regardless if the A10 is mounted on a camera hot shoe or not.
Operation
Mounted in the camera hot shoe, the A10 unit acts both as an on-camera flash and as a wireless extension of your camera to your Profoto off-camera flashes, combining TTL (Through-The-Lens) exposure control with the option to manually adjust and sync your Profoto flashes.
The A10 can also be used as a flash for your mobile camera using the Profoto Camera App. See chapter Profoto Camera and Control apps.
Power on/off
- Push the ON/OFF button [12] to switch on the A10.
- Push and hold the ON/OFF button [12] to switch off the A10.
When the A10 is switched off, the current settings are stored and will apply when the unit is switched on again.
To save battery, the A10 automatically enters standby mode after a period of inactivity (selectable via the standby setting) and switches off completely after 90 minutes. These functions can be deactivated via the standby setting.
In this automatically entered standby mode, the display [9] and test button [12] are switched off. To return to operational mode, push any of the A10 buttons or use the camera.
Note:
When the standby and auto power off functions are deactivated, the battery will drain in approx. 8 hours of inactive use.
Mode selection (TTL or Manual)
Use the mode switch [10] to select TTL or or MAN mode. The mode switch is only active for the on-camera unit. When the A10 is used off-camera, the function of the switch is disabled and the on-camera unit will dictate to all off-camera units if TTL or manual mode is used. When using the Profoto control or Profoto Camera app the mode switch will also be disabled.
- TTL mode (AUTO): The camera dictates the light output of the flashes. The relation between the energy levels for group A-C and flash exposure compensation can be set up from the A10.
- MAN mode: The light output for group A, B, C and D can be controlled manually from the A10.
Note:
By pressing a group twice all groups will be selected and highlighted. All settings done will now apply to all groups A, B, C, D, E and F.
Flash power scale
The A10 unit has a relative f-stop scale to indicate the flash power level. Full flash power, 100% is always shown as 10. Decreasing 1-fstop means reducing the flash power to half, hence energy 9.0 is 50% of total flash power.
Energy can be adjusted in 0.1f-stop increments.
Operation in TTL mode (Automatic mode)
Adjustment of flash power relations
In TTL mode the camera dictates the light output of the flashes. If more than one light is used the relationship between the flash power levels of group A, B and C can be adjusted. This can, for example, be used to achieve more light on one side of the object.
- Press the A, B or C group button [11] to select the corresponding group.
- When a group is selected, do one or more of the following:
- Use the dial [13] to set the relative light output for the selected group, in relation to the other groups. The relations can be set to +/- 2 f-stops for each group A, B or C.
- Press button [15] to turn on/off the continuous light in the selected group.
- Press and hold the group button [11] to turn on/off the lamp heads in the selected group.
- The display automatically returns to the main menu after a few seconds.
Note:
In TTL mode the numbers displayed for each group only show the relation between the groups. The absolute flash exposure is always set by the flash exposure compensation, either in the flash or in the camera.
Note:
If flashes without Profoto AirTTL support are used in combination with Profoto AirTTL flashes in TTL mode, the flash outputs of the non-TTL flashes are added to the total flash exposure. Such flashes can for instance be used to manually set the exposure on the background.
If a Profoto AirTTL compatible flash is set to group D, E or F, it will be synchronized but not part of the TTL calculation. The flash outputs of these flashes are added to the total flash exposure and can for instance be used to manually set the exposure on the background.
Flash exposure compensation
As an alternative to the flash exposure compensation function in the camera, the A10 can be used to compensate the total flash exposure when in TTL mode.
The A10 must be connected to the camera hot shoe to enable adjusting flash exposure compensation. Ensure that no group is selected and use the dial [13] to adjust the flash exposure compensation +-3.0 f-stops. The selected flash exposure compensation will be applied to lights in all TTL groups (A, B and C).
Operation in MAN mode (Manual mode)
With the A10 set to MAN mode, the light output for the groups A, B, C, and D can be adjusted manually.
- Select group(s) by doing one of the following:
- Press the A, B, C, or D group button [11] to select the corresponding group.
- To select all groups, press one of the group buttons [11] twice. When all groups are selected, the A10 will also control the lights in group E and F (selected on the flash).
- When a group is selected, do one or more of the following:
- Use the dial [13] to adjust the light output for the flash power setting. The adjustment always starts from the current light output setting (displayed as 0.0 above the group indicator) and the adjustment value (e.g. +1.2) is momentarily shown above the group indicator.
- Press button [15] to turn on/off the continuous light in the selected group.
- Press and hold the group button [11] to turn on/off the flashes in the selected group.
- The display automatically returns to the main menu after a few seconds.
Note:
If a light output cannot be set by the flash because it is outside its flash power range, the A10 beeps to signal that the command was not executed. The flash power of all flashes in the selected group then remains unchanged.
Continuous light
To turn on the continuous light on A10, press button [15].
To turn on continuous light on a specific group, first select a group and then press button [15].
When the A10 continuous light is on, a white dot is displayed to the right on the display and/or on the different groups.
Activate/deactivate flash head
The flash head can be deactivated without turning off the power of the A10 unit. This is used when the A10 should work as a remote control for off-camera flashes but no flash itself.
Press and hold the Continuous light button [15] to turn on/off the A10 lamp head.
Note:
The A10 flash head can also be activated/deactivated in the settings menu.
Lock user interface
A long push on the settings button [14] will lock the user interface. This is indicated with a lock symbol. The flash operates normally, although the user interface will not respond to button pushes until unlocked by the user by another long push on the same button.
Manual zoom
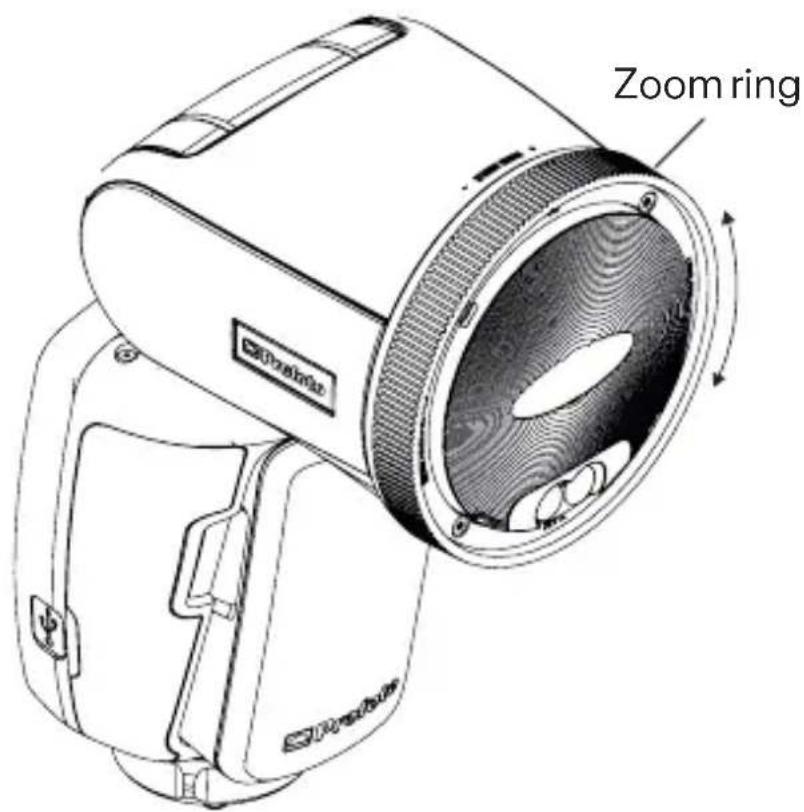
The beam angle from the flash can be adjusted at any time to match your preferences. You can for example narrow the light to highlight part of the image.
Rotate the Zoom ring [2] on the flash head clockwise or counter clockwise to change the beam angle.
text_image
Zoom ring DraiklabTest sync
To test the flash or take meter readings with a light meter the test button will fire a flash on the A10 unit. If Air is activated it will also fire test flashes on all flashes on the selected channel.
Press the test button [12] to manually transmit a sync signal and fire the flash.
Using the flash off-camera
The A10 unit is easy to use also as an off-camera flash unit as it has a built in radio transceiver (AirTTL). The transmitting unit in the camera hot shoe can be either an A10 unit or an Air Remote.
- On the transmitting unit in the camera hot shoe, enable Air and set channel.
- On the off-camera unit, enable Air and set channel to the same as on the transmitting unit.
Change settings
All settings are easily accessed in the settings menu.
For detailed information about the different settings, see the subsequent sections.
- Push the settings button [14] to display the settings menu.
- Turn the dial [13] to select (highlight) a setting.
- Press the settings button [14] to display the options menu for the selected setting.
- Turn the dial [13] to change the setting option.
- Press the settings button [14] to choose option and return to the settings menu.
- Select the left arrow at the top of the settings menu to return to the main menu, or press any other button.
Air Group
The group setting (A-F) applies to the A10 flash.
The selected group is shown in the top of the display [9].
Air Channel
The air channel setting applies to the A10 control unit and the A10 flash.
The selected channel is shown in the top of the display [9].
Air
The Air setting is used to activate/deactivate the built-in Profoto Air transceiver.
- ON: The A10 can be used to trigger and/or control Profoto Air flash units and generators, including the A10 flash. In this setting the unit can also be controlled from another AIR transmitter
- OFF: The A10 can only be used to control the A10 flash, and can't be controlled from other remotes or flashes.
- ON (TRANSMIT ONLY): Used to deactivate the receiver functionality. The A10 can be used to trigger and/or control Profoto Air flash units and generators, including the A10 flash, but can't be controlled from other remotes or flashes. This can be useful on-camera to avoid the flash to be triggered from an AIR transmitter on another camera using the same radio channel.
Bluetooth
Enable or disable the A10's Bluetooth Low Energy Technology, which enables the A10 to work with the Profoto app.
The Disconnect button will send a request to the connected smartphone to end the connection with the A10.
Head
The head setting is used to activate/deactivate the A10 flash head. By doing this the flash will not fire when it receives a sync signal. This function works both on and off camera.
Sync
Depending on Camera, the Sync menu displays different options:
Canon
• 1ST
2ND
X-SYNC
Nikon
• 1ST
2ND
X-SYNC
Menu displays current camera settings, unless X-sync is selected on flash unit.
Fujifilm
1ST
2ND
- Auto FP (HSS)
Auto FP (HSS) enables automatic Hi-S depending on cameras shutterspeed.
Sony
No Sync menu displayed, all sync settings are controlled from camera.
Canon and Nikon X-sync option can be used to maximize exposures per second in continuous shooting. Except for the sync signal, all communication between the flash and camera is disabled. This option will disable all controllable camera settings in the A10 including TTL and Hi-S.
Enabling X-sync on Canon and Nikon version, allows you to use the A10 in manual mode on any camera with a standard hotshoe. The same is valid for the A10 for Fujifilm without any special setting.
Zoom
The zoom (beam angle) setting applies to the A10 flash.
The following zoom options are available:
- MANUAL: The beam angle is adjusted manually, by turning the zoom ring [2].
- AUTO: The beam angle of the A10 flash light will automatically follow the zooming on the camera.
- The beam angle of the A10 flash can be set to different beam angles, from wide to narrow.
Note:
If a light shaping tool is attached to A10, the beam angle will be different
Continuous light
The continuous light is a constant light source positioned in the flash head. The angle of the light (light spread) will follow the zoom setting on the flash. Use the continuous light to analyze shadows or as a help to position your subject in relation to the flash.
The setting is used to select how the A10 continuous light intensity should correspond with the flash light output.
There are four setting options:
- MIN: The lamp gets the half intensity, regardless of the selected energy level (light output).
- MAX: The lamp gets the maximum intensity, regardless of the selected energy level (light output).
- PROP: The light intensity is automatically adjusted to be proportional to the selected light output (energy level).
- FLICKER FREE: The lamp gets the maximum intensity regardless of zoom setting.
Ready Signal
Ready signaling is used to indicate when the A10 flash is fully recycled.
There are four ready signaling options:
- BEEP: The unit beeps when it is ready to flash again after recharging. This option will also enable key sound.
- DIM: The continuous light turns off after flashing and turns on when the unit is ready to flash again.
- BEEP DIM: The continuous light turns off after flashing. The light turns on and the unit beeps when it is ready to flash again.
• OFF: No ready signal.
The test button light [12] always comes off after flashing and comes on again when the A10 flash is fully recycled.
Control Sounds
The setting can be ON or OFF to enable/disable tactile sounds for Dial and buttons.
Warning Sounds
The WARNING SOUNDS setting can be set to ON or OFF to enable/disable a warning sound for wrong exposure if a flash is fired before the Profoto A10 AirTTL has recycled. A warning is also issued if the
requested flash energy is out-of-range while using TTL. Factory default setting is OFF.
Display Brightness
The backlight of the display [9] has an impact on the battery time.
There are three backlight options:
• MIN
- MEDIUM
• MAX
Standby
There are three standby options:
• 2 MIN: Standby mode is entered after 2 minutes of inactivity.
• 30 MIN: Standby mode is entered after 30 minutes of inactivity.
- OFF: Standby mode is disabled. This setting also disables the auto power off function.
If the Standby timer is active, there is a corresponding Auto Power Off timer set to 90 minutes.
Regulatory info
Displays important regulatory information for various markets. See also markings on the A10 unit and chapter Regulatory information.
About
Displays hardware variant and current firmware installed on A10. Reset button will set A10 to factory default settings.
AF assist
The AF (autofocus) assist setting activates or deactivates the AF assist. The AF assist light works with a structured laser light ‘which is generally harmless for the eye, although the hazard increases if viewed with optical aids, including magnifiers, binoculars, or telescopes.
• OFF: Deactivates the AF assist
- AUTO: The camera activates the AF assist automatically when needed if the A10 is connected to a compatible camera
• ON: Activates the AF assist so that it is always on.
General notes on Profoto Air operation
The Profoto Air channels use specific frequencies in the 2.4 GHz band and have an operating range of up to 300 meters (1000ft). The frequencies are evenly distributed over the entire frequency band. Since each channel uses a different radio frequency, it is possible to select a channel without interference from other photographers using Profoto Air, WLAN/Bluetooth devices, or other radio equipment operating on the 2.4 GHz frequency band.
- Maintain line of sight between Profoto Air units whenever possible.
- When hiding the flash from view, try to not hide it behind or against metal or water-filled objects as this will affect the operating range.

bar
| Category | Value | | -------- | ----- | | Category1 | 0.000 | | Category2 | 0.000 | | Category3 | 0.000 | | Category4 | 0.000 | | Category5 | 0.000 | | Category6 | 0.000 | | Category7 | 0.000 | | Category8 | 0.000 | | Category9 | 0.000 | | Category10 | 0.000 | | Category11 | 0.000 | | Category12 | 0.000 | | Category13 | 0.000 | | Category14 | 0.000 | | Category15 | 0.000 | | Category16 | 0.000 | | Category17 | 0.000 | | Category18 | 0.000 | | Category19 | 0.000 | | Category20 | 0.000 | | Category21 | 0.000 | | Category22 | 0.000 | | Category23 | 0.000 | | Category24 | 0.000 | | Category25 | 0.000 | | Category26 | 0.000 | | Category27 | 0.000 | | Category28 | 0.000 | | Category29 | 0.000 | | Category30 | 0.000 | | Category31 | 0.000 | | Category32 | 0.000 | | Category33 | 0.000 | | Category34 | 0.000 | | Category35 | 0.000 | | Category36 | 0.000 | | Category37 | 0.000 | | Category38 | 0.000 | | Category39 | 0.000 | | Category40 | 0.000 | | Category41 | 0.000 | | Category42 | 0.000 | | Category43 | 0.000 | | Category44 | 0.000 | | Category45 | 0.000 | | Category46 | 0.000 | | Category47 | 0.000 | | Category48 | 0.000 | | Category49 | 0.000 | | Category50 | 0.001 | | Category51 | 1.599 | | Category52 | 1.599 | | Category53 | 1.599 | | Category54 | 1.599 | | Category55 | 1.599 | | Category56 | 1.599 | | Category57 | 1.599 | | Category58 | 1.599 | | Category59 | 1.599 | | Category60 | 1.599 | | Category61 | 1.599 | | Category62 | 1.599 | | Category63 | 1.599 | | Category64 | 1.599 | | Category65 | 1.599 | | Category66 | 1.599 | | Category67 | 1.599 | | Category68 | 1.599 | | Category69 | 1.599 | | Category70 | 1.599 | | Category71 | 1.599 | | Category72 | 1.599 | | Category73 | 1.599 | | Category74 | 1.599 | | Category75 | 1.599 | | Category76 | 1.599 | | Category77 | 1.599 | | Category78 | 1.599 | | Category79 | 1.599 | | Category80 | 1.599 | | Category81 | 1.599 | | Category82 | 1.599 | | Category83 | 1.599 | | Category84 | 1.599 | | Category85 | 1.599 | | Category86 | 1.599 | | Category87 | 1.599 | | Category88 | 1.599 | | Category89 | 1.599 | | Category90 | 1.599 | | Category91 | 1.599 | | Category92 | 1.599 | | Category93 | 1.599 | | Category94 | 1.599 | | Category95 | 1.599 | | Category96 | 1.599 | | Category97 | 1.599 | | Category98 | 1.599 | | Category99 | 1.599 | | Category100 | 1.599 |Light shaping
The A10 flash creates a round and even light spread in all zoom positions. In addition, there are specially designed light shaping tools for the A10 that can modify the light quality in various ways.
When A10 is used on camera it can automatically follow the zoom setting on the lens. For creative freedom the beam angle can also be set manually, either in the menu or by rotating the zoom ring [2]. When the zoom ring [2] is used the beam angle setting will automatically go to manual mode. The current beam angle setting is shown in the top of the display [9].
The zoom setting on the flash corresponds approximately to the following focal length coverage for a 35mm camera.
Beam angle setting Focal length coverage
| A10 without accessories | |
| 105 mm | |
| 80 mm | |
| 60 mm | |
| 45 mm | |
| 32 mm |
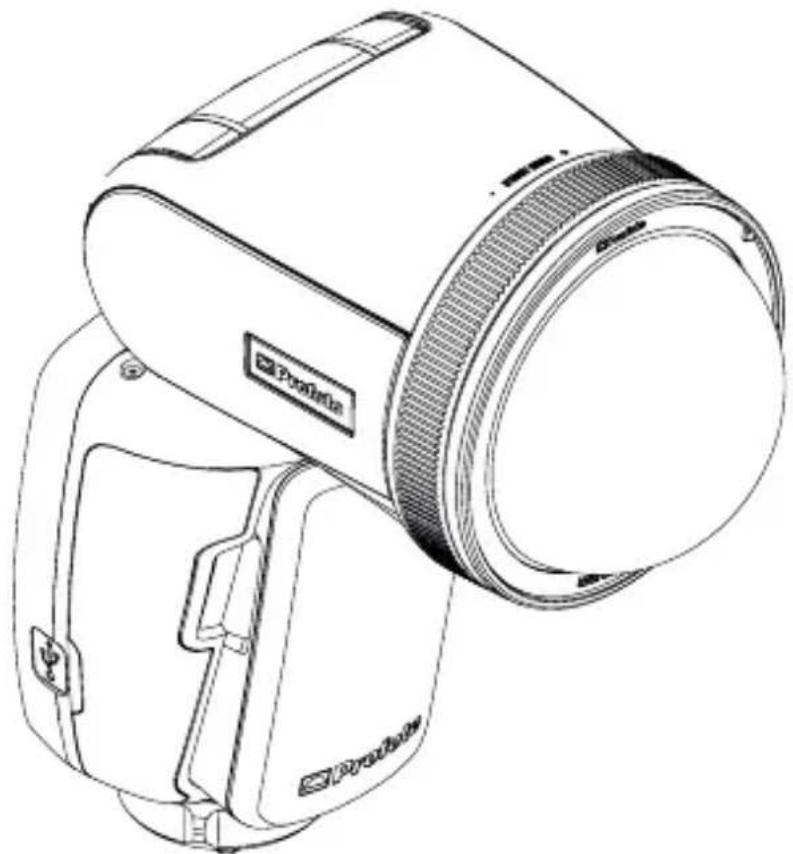
Clic Dome
The Clic Dome attaches to the A10 unit with the built in magnetic mount. The light quality will be diffused and spread omni directional.
natural_image
Line drawing of a portable camera with visible lens and side panels (no text or symbols)Note:
The Clic Dome can also be stacked together with other light shaping tools. For example the optional Gel can be used in combination with the Clic Dome.
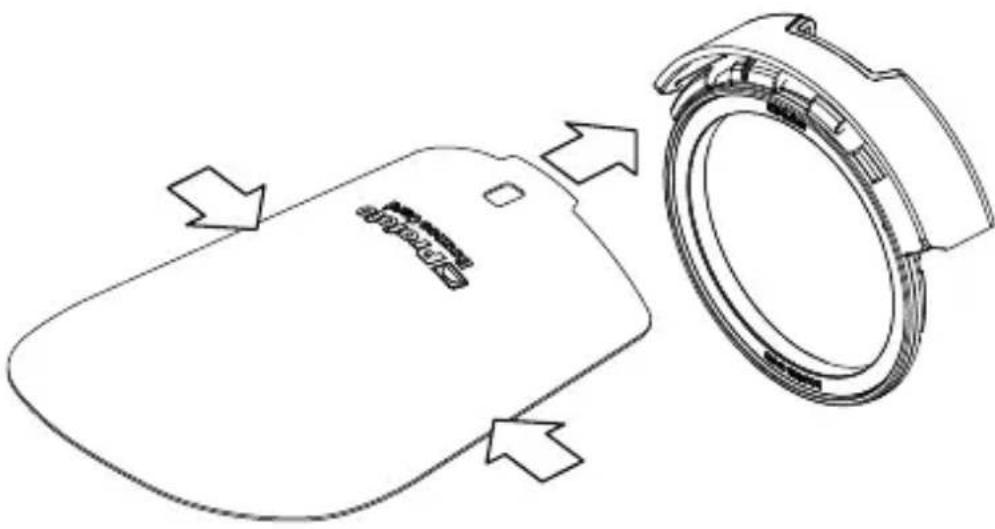
Bounce Card
The Bounce Card attaches in the same way as the Clic Dome with a magnetic mount. The application is similar to the Clic Dome but will provide a more directional light quality.
To attach the Bounce Card to its holder, squeeze the sides of the Bounce card slightly and then push it firmly into the holder until the card locks in place.
In most cases the flash is directed against a bouncing surface and the bounce card is directed against the subject.
natural_image
Diagram of a device with directional arrows indicating flow or movement, no text or symbols presentNote:
The Bounce Card can also be stacked together with other light shaping tools. For example the optional gel can be used in combination with the Bounce Card.

bar
| Category | Value | | -------- | ----- | | Category1 | 0.000 | | Category2 | 0.000 | | Category3 | 0.000 | | Category4 | 0.000 | | Category5 | 0.000 | | Category6 | 0.000 | | Category7 | 0.000 | | Category8 | 0.000 | | Category9 | 0.000 | | Category10 | 0.000 | | Category11 | 0.000 | | Category12 | 0.000 | | Category13 | 0.000 | | Category14 | 0.000 | | Category15 | 0.000 | | Category16 | 0.000 | | Category17 | 0.000 | | Category18 | 0.000 | | Category19 | 0.000 | | Category20 | 0.000 | | Category21 | 0.000 | | Category22 | 0.000 | | Category23 | 0.000 | | Category24 | 0.000 | | Category25 | 0.000 | | Category26 | 0.000 | | Category27 | 0.000 | | Category28 | 0.000 | | Category29 | 0.000 | | Category30 | 0.000 | | Category31 | 0.000 | | Category32 | 0.000 | | Category33 | 0.000 | | Category34 | 0.000 | | Category35 | 0.000 | | Category36 | 0.000 | | Category37 | 0.000 | | Category38 | 0.000 | | Category39 | 0.000 | | Category40 | 0.000 | | Category41 | 0.000 | | Category42 | 0.000 | | Category43 | 0.000 | | Category44 | 0.000 | | Category45 | 0.000 | | Category46 | 0.000 | | Category47 | 0.000 | | Category48 | 0.000 | | Category49 | 0.000 | | Category50 | 0.001 | | Category51 | 1.599 | | Category52 | 1.599 | | Category53 | 1.599 | | Category54 | 1.599 | | Category55 | 1.599 | | Category56 | 1.599 | | Category57 | 1.599 | | Category58 | 1.599 | | Category59 | 1.599 | | Category60 | 1.599 | | Category61 | 1.599 | | Category62 | 1.599 | | Category63 | 1.599 | | Category64 | 1.599 | | Category65 | 1.599 | | Category66 | 1.599 | | Category67 | 1.599 | | Category68 | 1.599 | | Category69 | 1.599 | | Category70 | 1.599 | | Category71 | 1.599 | | Category72 | 1.599 | | Category73 | 1.599 | | Category74 | 1.599 | | Category75 | 1.599 | | Category76 | 1.599 | | Category77 | 1.599 | | Category78 | 1.599 | | Category79 | 1.599 | | Category80 | 1.599 | | Category81 | 1.599 | | Category82 | 1.599 | | Category83 | 1.599 | | Category84 | 1.599 | | Category85 | 1.599 | | Category86 | 1.599 | | Category87 | 1.599 | | Category88 | 1.599 | | Category89 | 1.599 | | Category90 | 1.599 | | Category91 | 1.599 | | Category92 | 1.599 | | Category93 | 1.599 | | Category94 | 1.599 | | Category95 | 1.599 | | Category96 | 1.599 | | Category97 | 1.599 | | Category98 | 1.599 | | Category99 | 1.599 | | Category100 | 1.599 |Additional functions Firmware upgrade
We recommend that you look for firmware upgrades before you start using your new A10.
To access the latest free upgrades; create your personal account on profoto.com/myprofoto. Once you have an account you can also choose to register your products and be sure you get noticed when new upgrades are released.
Upgrade of firmware is made via the USB port [8] on the A10 or through the Profoto app, following the instructions provided in the upgrade application downloaded from profoto.com/myprofoto. You can always contact your local dealer or distributor for professional service.
Check current firmware version:
- Switch on the A10.
- Push settings button [14] and scroll down.
- Select ABOUT [14]
If updating the firmware on your A10 using the Profoto app, do not switch off the device or pull the battery before the update is completed. If your A10 has an incomplete firmware update, it will not start. If this has happened, perform a firmware update using the USB firmware uploader found on the Profoto website.
Factory reset
In the About menu, select RESET to restore all settings to the factory default options.
Profoto Air compatibility
- The Profoto A10 AirTTL-C is specifically designed for Canon cameras that use Canon's E-TTL II metering system.
- The Profoto A10 AirTTL-N is specifically designed for Nikon cameras that use Nikon's i-TTL metering system.
- The Profoto A10 AirTTL-S is specifically designed for Sony cameras that use Sony's TTL metering system.
- The Profoto A10 AirTTL-F is specifically designed for Fujifilm cameras that use Fujifilm's TTL measurement system.
- Some camera models may not be supported or have limited functionality. Check profoto.com for the latest information on camera support.
- The Profoto A10 AirTTL operates with Profoto flash units and generators, with built-in Profoto Air functionality according to the table below.
- The Profoto A10 AirTTL can also be used to trigger the Air Remote and Air Sync Profoto Air transceivers.
- The Profoto A10 AirTTL flash can also be triggered and controlled by other Profoto Air transceivers.
- The Profoto A10 AirTTL-C is not compatible with Canon Speedlites or other non-Profoto flashes.
- The Profoto A10 AirTTL-N is not compatible with Nikon Speedlights or other non-Profoto flashes.
- The Profoto A10 AirTTL-S is not compatible with Sony flashes or other non-Profoto flashes.
- The Profoto A10 AirTTL-F is not compatible with Fujifilm flashes or other non-Profoto external flash products.
- The Profoto A10 AirTTL is not compatible with any 3rd party radio triggering systems.
| Air labeling on Profoto flash | Enabled features on Profoto A10 AirTTL Manual sync Remote control TTL HSS |
| AirTTL X X X X | |
| Air X X | |
| AirS X |
Technical data
Specifications
Profoto Air
Frequency band 2.4GHz (2404 to 2479.3 MHz)
No of frequency channels 20 (1-20)
Radio Power Output Maximum 19.9 dBm
No of groups per channel TTL operation: 3 (A-C)
Manual operation: 6 (A-F)
Bluetooth Low Energy Technology
Frequency Band 2.4 GHz (2404 to 2479.3)
No. of frequency channels 40
Radio Output Power Maximum 8 dBm
Operation modes TTL, Manual
Camera TTL compatibility A10 AirTTL-C - Canon E-TTL II
A10 AirTTL-N - Nikon i-TTL
A10 AirTTL-S - Sony TTL
A10 AirTTL-F - Fujifilm TTL
Sync modes 1st curtain, 2nd curtain, Hi-S (HSS/
Auto FP), X-Sync
Camera mount/Connectors Hot shoe mount for Canon/
Nikon/Sony/Fujifilm
USB micro-B connector for firm-
ware upgrades
- Output power varies with setting in the A10.
- Actual range will vary due to site layout, surrounding materials and other radio transmissions.
Specifications
Range Up to 300 m (1000 ft.) for normal
triggering (free line of sight in open space) ^2
Up to 100 m (330 ft.) for remote control and TTL
Flash energy 76Ws
Flash power range 9 f-stops (2-10)
Flash recycling time 0.05 - 1.0 seconds
Flash duration 1/20,000 - 1/800
Flash power 0.2f-stop
Color temp stability ±150°K
Continuous lamps LED
Battery type Li-ion
Battery charging time 115 minutes
Battery capacity: Up to 450 full power flashes
LCD display Yes
Standby Enters standby mode after a
period of inactivity (2 min, 30 min, OFF).
Specifications
Auto power off Turns off after 90 minutes of inactivity (can be deactivated).
Supported Profoto Air functionality
Flash Sync/Trigger Yes, A10 triggers Air Remote and Air Sync transceivers plus all Profoto labeled AirTTL, Air and AirS.
Remote control Yes, A10 works as a manual remote control for all Profoto flashes labeled AirTTL and Air.
TTL control TTL with group control for all Profoto flashes labelled AirTTL.
Measurements (LxWxH)
Dimensions 108x75x165 mm
Weight (including battery) 560g
All data are to be considered as nominal and Profoto reserves the right make changes without further notice.
Warranty
The Warranty can be downloaded from the product page at www.profoto.com
Regulatory information Compliance marking
Regulatory information, certification and compliance marks specific to Profoto A10 AirTTL are available on the A10 AirTTL. It can be found both on the A10 AirTLL unit label and in the settings menu. Go to Settings > Regulatory information.
World-wide Usage of Radio Spectrum
The Profoto Air system operates on the license-free 2.4GHz ISM band for SRD (Short Range Devices). This band may be used in most parts of the world. Regional restrictions may apply.
Note:
Refer to national regulations for the region where the Profoto A10 AirTTL shall be operated and make sure that they are followed.
EU Declaration of Conformity
Hereby, Profoto AB declares that the radio equipment type Profoto A10 AirTTL is in compliance with Directive 2014/53/EU.
The full text of the EU declaration of conformity is available at the following internet address:
https://profoto.com/int/support/declaration-of-conformity
RF Power
In order to remain compliant with national regulations and restrictions, please use the following RF POWER settings while operating your A10 in these countries. Please note that these are subject to change and you may find updated information available for download at Profoto.com
COUNTRY CHANNEL RF POWER
USA/Canada CH1-7,9-20 P1
USA/Canada CH 8 P4
EU (and EES) CH1-20 P1
South Korea CH1-20
China, Taiwan CH1-20
P5
P3
To enter the RF SETTING menu, go to SETTINGS, hold down the B button, and tap the C button.
www.profoto.com
United States and Canada
FCC Suppliers Declaration of Conformity (SDoC)
Profoto AB
Transmitter / Receiver
MODEL: Profoto A10 AirTTL
PRODUCT NO: PCA1534-0020, PCA1534-0010, PCA1534-0030,
PCA1534-0050
Contains FCC ID: W4G-RMIX, QOQ13
and IC: 8167A-RMIX, 5123A-13
Designed in Sweden and manufactured in Thailand
Responsible Party
U.S. Contact Information
Profoto US
Profoto US
220 Park Ave
Suite120
Florham Park NJ 07932
+1973-822-1300
us-info@profoto.com
F.C.C. and Industry Canada
Compliance Statement (Part 15.19) This device complies with Part 15 of FCC rules and RSS-210 of Industry Canada.
Operation is subject to the following two conditions:
-
this device may not cause harmful interference and,
-
this device must accept any interference received, including interference that may cause undesired operation.
The term ‘IC’ before the certification/registration number only signifies that the Industry Canada technical specifications were met.
Changes or modifications not expressly approved by the party responsible for compliance could void the user's authority to operate the equipment.
FCC Radio Frequency Exposure
WARNING: The Profoto A10 device radiates radio frequency energy at a level below the United States FCC radio frequency exposure limits. Nevertheless, this device should be used in such a manner that the potential for human contact during normal operation is minimized. For handheld operation, this device has been tested and meets FCC RF exposure guidelines when the device is positioned a minimum of 1.0 cm from the body.
IC RF Exposure limits
The Profoto A10 device complies with the IC RSS-102 radiation exposure limits set forth for an uncontrolled environment. For handheld operation, this device has been tested and meets IC RF exposure limits when the device is positioned a minimum of 1.0 cm from the body.
The module has been granted modular approval for sale and operation in Japan.
特定無線設備の種類
Classification of specified radio equipment:
Article 2, Clause 1, Item 19
2.4 GHz Wide Band Low Power Data Communication
This is to certify that the above-mentioned certification by type has been granted in accordance with the provisions of Article 38-24, Paragraph 1 of the Radio Law.
202-SMH030
209-J00306
South Korea
Apple iPhone is a trademark of Apple Inc., registered in the U.S. and other countries.
The Bluetooth word mark and logos are registered trademarks owned by the Bluetooth SIG, Inc. and any use of such marks by Profoto is under license.
Other trademarks and trade names are those of their respective owners.
Third party copyright & License Terms
LibOpenCM3 is free software licensed under the terms of the GNU Lesser General Public License as published by the Free Software Foundation, either version 3 of the License, or (at your option) any later version. LibOpenCM3 is distributed in the hope that it will be useful, but WITHOUT ANY WARRANTY; without even the implied warranty of MERCHANTABILITY or FITNESS FOR A PARTICULAR PURPOSE. See the GNU General Public License and the GNU Lesser General Public License for more details, http://www.gnu.org/licenses/. You may obtain a copy of the source code for the LibOpenCM3 under the terms of the LGPL upon written request to Profoto.

bar
| Category | Value | | -------- | ----- | | Category1 | 0.000 | | Category2 | 0.000 | | Category3 | 0.000 | | Category4 | 0.000 | | Category5 | 0.000 | | Category6 | 0.000 | | Category7 | 0.000 | | Category8 | 0.000 | | Category9 | 0.000 | | Category10 | 0.000 | | Category11 | 0.000 | | Category12 | 0.000 | | Category13 | 0.000 | | Category14 | 0.000 | | Category15 | 0.000 | | Category16 | 0.000 | | Category17 | 0.000 | | Category18 | 0.000 | | Category19 | 0.000 | | Category20 | 0.000 | | Category21 | 0.000 | | Category22 | 0.000 | | Category23 | 0.000 | | Category24 | 0.000 | | Category25 | 0.000 | | Category26 | 0.000 | | Category27 | 0.000 | | Category28 | 0.000 | | Category29 | 0.000 | | Category30 | 0.000 | | Category31 | 0.000 | | Category32 | 0.000 | | Category33 | 0.000 | | Category34 | 0.000 | | Category35 | 0.000 | | Category36 | 0.000 | | Category37 | 0.000 | | Category38 | 0.000 | | Category39 | 0.000 | | Category40 | 0.000 | | Category41 | 0.000 | | Category42 | 0.000 | | Category43 | 0.000 | | Category44 | 0.000 | | Category45 | 0.000 | | Category46 | 0.000 | | Category47 | 0.000 | | Category48 | 0.000 | | Category49 | 0.000 | | Category50 | 0.001 | | Category51 | 1.599 | | Category52 | 1.599 | | Category53 | 1.599 | | Category54 | 1.599 | | Category55 | 1.599 | | Category56 | 1.599 | | Category57 | 1.599 | | Category58 | 1.599 | | Category59 | 1.599 | | Category60 | 1.599 | | Category61 | 1.599 | | Category62 | 1.599 | | Category63 | 1.599 | | Category64 | 1.599 | | Category65 | 1.599 | | Category66 | 1.599 | | Category67 | 1.599 | | Category68 | 1.599 | | Category69 | 1.599 | | Category70 | 1.599 | | Category71 | 1.599 | | Category72 | 1.599 | | Category73 | 1.599 | | Category74 | 1.599 | | Category75 | 1.599 | | Category76 | 1.599 | | Category77 | 1.599 | | Category78 | 1.599 | | Category79 | 1.599 | | Category80 | 1.599 | | Category81 | 1.599 | | Category82 | 1.599 | | Category83 | 1.599 | | Category84 | 1.599 | | Category85 | 1.599 | | Category86 | 1.599 | | Category87 | 1.599 | | Category88 | 1.599 | | Category89 | 1.599 | | Category90 | 1.599 | | Category91 | 1.599 | | Category92 | 1.599 | | Category93 | 1.599 | | Category94 | 1.599 | | Category95 | 1.599 | | Category96 | 1.599 | | Category97 | 1.599 | | Category98 | 1.599 | | Category99 | 1.599 | | Category100 | 1.599 |Technical data and product information are subject to change without notice.
September 2020.
Profoto AB
Box 1264,
172 25 Sundbyberg
Sweden
+46 (0) 8 447 53 00
info@profoto.com
www.profoto.com
Profoto®