
Toughbook CF-33 - Tablet PANASONIC - Free user manual and instructions
Find the device manual for free Toughbook CF-33 PANASONIC in PDF.

| Product Type | Rugged Tablet PC |
| Brand | Panasonic |
| Model | Toughbook CF-33 |
| Operating System | Windows 10 Pro 64-bit |
| Processor | Intel Core (7th gen, model varies by configuration) |
| RAM | Up to 16 GB DDR4 |
| Storage | Flash memory drive (SSD, 128 GB/256 GB/512 GB options) |
| Display | 10.1" IPS, 1920 x 1080 pixels, capacitive touch + digitizer |
| Input Methods | Touch screen, digitizer pen (included), keyboard base, tablet buttons |
| Battery | Dual hot-swappable battery packs (CF-VZSU1A or CF-VZSU1B series) |
| Ports (Tablet) | USB 3.0 (x2, one with charging), HDMI, LAN, Serial, Headset jack, microSD slot, nanoSIM slot |
| Ports (Keyboard Base) | USB 2.0, HDMI, VGA, LAN, SD slot, DC-IN |
| Wireless | WiFi 802.11 a/b/g/n/ac, Bluetooth 4.2, optional WWAN (4G LTE), GPS |
| Security | Kensington lock slots, Smart Card reader, Fingerprint reader, TPM |
| Dimensions (Tablet only) | Approx. 273 x 209 x 21.5 mm |
| Weight (Tablet only) | Approx. 1.18 kg |
| Ruggedness | MIL-STD-810G compliant, IP65 (dust/water resistant) |
| Power Supply | AC adaptor (input: 100-240V, output: 15.6V) |
| Consumables | Battery packs, digitizer pen, carrying handle |
| Repairability | Battery packs user-replaceable; other repairs by authorized service |
| Certifications | FCC, CE, etc. |
| Warranty | 3 years (varies by region) |
Frequently Asked Questions - Toughbook CF-33 PANASONIC
User questions about Toughbook CF-33 PANASONIC
0 question about this device. Answer the ones you know or ask your own.
Ask a new question about this device
Download the instructions for your Tablet in PDF format for free! Find your manual Toughbook CF-33 - PANASONIC and take your electronic device back in hand. On this page are published all the documents necessary for the use of your device. Toughbook CF-33 by PANASONIC.
USER MANUAL Toughbook CF-33 PANASONIC
Model No. CF-33 Series
Operating Instructions - Reference Manual
natural_image
Line drawing of a laptop with visible keyboard, front panel, and side buttons (no text or symbols)We recommend that thisReference Manual be printed.
Disclaimer
Computer specifications and manuals are subject to change without notice. Panasonic Corporation assumes no liability for damage incurred directly or indirectly from errors, omissions or discrepancies between the computer and the manuals. Refer for the latest information about optional products to the catalogs, etc.
Trademarks
- Microsoft, Windows, and the Windows logo are registered trademarks or trademarks of Microsoft Corporation of the United States and/or other countries.
Intel, Core, and PROSet are either registered trademarks or trademarks of Intel Corporation.
SDXC and microSDXC Logos are trademarkof SD-3C, LLC.

- MobileMark® is a U.S. Registered Trademark of the Business Applications Performance Corporation.
The terms HDMI and HDMI High-Definition Multimedia Interface, and the HDMI Logo are trademarks or registered trademarks of HDMI Licensing Administrator, Inc. in the United States and other countries.
Bluetooth® is a registered trademark owned by Bluetooth SIG, Inc., U.S.A. and licensed to Panasonic Corporation. - Names of products, brands, etc., appearing in this manual are trademarks or registered trademarks of their respective own companies.
Panasonic Corporation
Osaka, Japan
Web Site : https://panasonic.net/cns/pc/
Illustrations and Terminology in this manual
- This manuale explains using the default setting.
In principle, thismanual explains based on the following conditions: - When the tablet and keyboard base have been installed
- When the keyboard and touchpad are used for operation
Some illustrations are simplified to help your understanding and may look different from the actual unit.
Some types of software are automaticallyupdated, and differences may occur from descriptions in thismanual.
- If you do not sign in as an administrator, you cannot use some functions or cannot display some screens.
This manual explains operation procedures using the touchpad or mouse as typical examples. In addition, you can touch the display screen to operate the computer.
When using the touch operation, please replace the terms as described below, and read the instructions.
Operation terms to be replaced:
Click → Touch
• Double-click → Double-touch
Right-click→ Touch and hold (Long touch)
Terms and illustrations in these instructions.
- CAUTION: Conditions that may result in minor or moderate injury.
NOTE: Useful and helpful information. - « Enter» : Thismeans to pressthe Enter key.
- « Fn» + « F7» :
This illustration means to press and hold « Fn » key, and then press « F7 » key.
The display of the key may be different from this manual according to the keyboard used. (e.g. "Delete" instead of "Del")

In these instructions, the names are referred as follows.
- "Windows10 Pro 64-bit" as "Windows" or "Windows 10"
- Circular media including DVD-ROM and CD-ROM as "discs".
- "Multilanguage User Interface" as "MUI".
The Digitizer + Touch Screen (Capacitive) as the "digitizer", and the Touch Screen as the "touchscreen". - The digitizer pen and the stylus as the "pen (included)".
- The computer screen supporting touching methods (using stylus / your fingers) is referred to as the "screen".
In this manual, the tablet mode refers to the status where only the tablet is used, or the status where the LCD part is folded toward back.
Regarding Windows 10
Desktop mode and Tablet mode
Windows 10 offers the desktop mode in which operation is performed using the keyboard or touchpad, and also the tablet mode optimized for the touch panel operation.
The mode can be switched by clicking (Notification), and then clicking (Tablet mode) tile.
In thismanual, the tablet mode may refer to the status when the tablet detached from the keyboard base is used.
In the tablet mode, operations from the Start screen are explained.
NOTE
If some icons do not appear on the taskbar, perform the following operations.
- Touch and hold the task bar.
- Select the item to display.
Screen Messages
Screen messages are explained in [English (United States)].
(Depending on the language preference, some screen messages in these instructions are different from the actual screen messages. For example, [Flight mode] may be displayed instead of [Airplane mode] in some language preference)
Opening the Control Panel
- Right-click

at the bottom left corner, and then click [Control Panel].
Opening the Settings
- Click

- (Settin

Alternatively, click (settings) in the tablet mode.
Latest Information on Windows 10
When Microsoft Windows ^® 10 is updated, the screen displayor operation procedures may be changed.
For the latest information on Windows 10, see the following web page.
http://pc-dl.panasonic.co.jp/itn/addendum/
Sound and Video
Sound (e.g. MP3, WMA) and video (e.g. MPG, WMV) recorded in SD Memory Cards may be interrupted during playback. If this happens, copy them to the flash memory drive and play back.
- Depending on the processing status on Windows, sound may be interrupted at Windows startup. You can mute the sound at startup.
The startup sound ismuted as the factory default.

(Start) at the bottom left corner, and then click [Control Panel] - [Hardware and Sound] - [Sound] - [Sounds].
- Remove the checkmark from [Play Windows Startup sound], and click [OK].
When high-frequency sound occurs
If high-frequency sound occurs while using the computer, checkthe settings for the USB power saving function.
- Set [USB selective suspend setting] to [Enabled].

t) - (Settings) - [System] - [Power & sleep] - [Additional power settings].
- Click [Change plan settings] of the current power plan.
- Click [Change advanced power settings].
- In [Advanced settings], double-click [USB settings].
- Double-click the displayed [USB selective suspend setting].
- Change settings of [On battery] and [Plugged in] to [Enabled].
- Click [OK] and exit the "Advanced settings" screen.
About the Ambient Light Sensor
The ambient light sensor is used to adjust the display screen brightness automatically.
To configure the automatic adjustment function, proceed as follows.
- Click (Start) - (Settings) - [System] - [Display].
Alternatively, click (Settings) - [System] - [Display] in the tablet mode. - Click [Change brightness automatically when lighting changes] and select [On].
Windows Update
You can update to the latest patches and service packs for Windows with the following menus.
-
Click (Start) - (Settings) - [Update & security] - [Windows Update].
Alternatively, click (Settings) - [Update & security] - [Windows Update] in the tablet mode. -
Click [Check for updates].
Do not apply "Driver Updates" even if a message to update a driver appears. If a driver update is required, contact your technical support office.
Create a Recovery Disc
You can make a recovery disc for preinstalled software.
The recovery disc returns the flash memory to the factory default. To create a backup of the recent state of the flash memory, refer to Flash Memory Backup/Restore Function.
Preparation
- Blank discs(About usable types of discs and required numbers of discs, refer to the screen.)
USB memory device can also be used as a recovery disc.
• Prepare the commercially available optical drive. - Connect the AC adaptor and do not remove it until the operation is complete.
- Close all applications except for this utility.
- Remove allperipherals (except for the commerciallyavailable optical drive).
- Turn off the wireless function.
NOTE
■ If the recovery partition is deleted, you cannot create recovery disc(s).
CAUTION
■ USB memory device can also be used as a recovery disc.
■ Do not perform the following operations until creating the recovery disc is complete.
- Shut down or restart Windows.
- Enter sleep or hibernation.
- Remove the commercially available optical drive.
If you interrupted creating a recovery disc, a message of failure may appear in step 9 screen below. In this case, restart the computer, and create a new recovery disc again.
- Sign in to Windows as an administrator.
- Connect the commercially available optical drive to the USB Port.
- Set a disc into the commercially available optical drive.
- Click (Start) - [Panasonic] - [Panasonic PC Settings Utility], and click (Support) - (Recovery Disc Creation) - [Launch Recovery Disc Creation Utility].
Alternatively, click (All apps) - [Panasonic] - [Panasonic PC Settings Utility] in the tablet mode, and click (Support) - (Recovery Disc Creation) - [Launch Recovery Disc Creation Utility].
If [User Account Control] is displayed, click [Yes].
CAUTION
■ Do not remove the tablet during operation.
- Click [Next].
Read the notice before creating the recovery disc(s). - Confirm on-screen information ([Select OS Image] and [Number of discs required]).
Click [Next]. - Select the disc type.
-
Click [Next].
Select [Write Speed], and then click [OK]. -
When [Recovery disc #1 complete.] is displayed, remove the disc. And write contents of the written disc on the label.
Do not use sharp objects that may leave a mark.
- Click [OK].
Following on-screen instructions, create all recovery discs.
- Click [OK] on [All recovery discs complete.] screen.
NOTE
■ The disc created with this utility is only for this computer. You cannot use for others.
■ Additional applications cannot be recovered even if you use a recovery disc created with this utility.
■ Once the recovery disc(s) have been created, you cannot create other recovery discs using this utility. If, however, the flash memory recovery is executed or OS is reinstalled from the created recovery disc, you can create a recovery disc again.
■ If you fail to create a recovery disc or an error message appears, try either of the following procedures.
- Insert the disc correctly.
- Checkthe disc condition.
- Restart the computer and try to create a recovery disc again.
Contact Panasonic Technical Support.
About the Partition Structure
You can shrink a part of an existing partition to create unallocated disk space, from which you can create a new partition.
In the default setting, you can use a single partition.
CAUTION
- Do not add or delete partitions in Windows 10, as the Windows area and recovery partition must be adjacent to each other in Windows 10.
Panasonic Corporation will bear no responsibility for any damage suffered (including loss of data) as a result of the use of this function.
Creating a Backup of the Flash Memory Data
You can create a backup of the flash memory data, which can be used to recover from hardware failure.
This function creates a backup of the recent state of the flash memory. To return the factory default, use a recovery disc. ( Create a Recovery Disc )
To create a backup of the flash memory on another storage media (e.g., external hard disk):
Connect the storage media, and follow the steps below.
- Open the Control Panel, and then click [System and Security] - [File History].
To open the ControlPanel, proceed as follows.
- Perform either of the following procedures.
![Right-click at the bottom left corner of the screen. Click (All apps) - [Windows System].](/content/2026/05/760340/images/714e1b2a5da009a03fb9140f12c013253eb118ae1b92e16030a1780f3161f9af.jpg)
-
Click [Control Panel].
-
Click [System Image Backup].
Follow the on-screen instructions.
NOTE
■ Connect the AC adaptor and do not remove it until backup is complete.
Restoring the Flash Memory Data
Connect the storage media that created the backup.
-
Click (Start) at the bottom left corner, and then click (Settings) - [Update & security] - [Recovery]. Alternatively, click (Settings) - [Update & security] - [Recovery] in the tablet mode.
-
Click [Restart now] under "Advanced startup".
- Click [Troubleshoot] - [Advanced options].
- Click [System Image Recovery].
Follow the on-screen instructions.
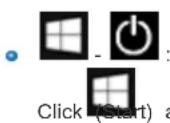
A. Wireless WAN Antenna / GPS Antenna
B. Microphone
C. Camera Lens
D. Ambient Light Sensor
E. Camera Indicator
F. IR camera lights (RED)
G. LCD
H. Wireless LAN Antenna / Bluetooth Antenna
I. Wireless LAN Antenna
J. Tablet Buttons
K. LED Indicator
01: Battery 1 Status
2: Battery 2 Status
: Drive Status
L: Power Status
Off: Power off/Hibernation
Green: Power on
Blinking green: Sleep
Blinking green rapidly:
Cannot power on or resume due to low temperature.
L. Power Switch
M. Function (Fn) Keys
N. Keyboard
O. Touchpad (Touchpad)

Caps Lock indicator

Num Lock (numeric lock) indicator

ScrollLock indicator
P. Display Latch
Q. Speaker
R. Detach Indicator
S. Security Slot (Clamshell)
When the tablet is attached, both the tablet and keyboard base can be secured at the same time.
A Kensington cable can be connected. For further information, read the manual that comes with the cable.
T. Release Lever
U. Detach Lock
V. Security Slot (Keyboard base)
A Kensington cable can be connected. For further information, read the manual that comes with the cable.
W. USB 3.0 Port
X. LAN Port
Y. Serial Port
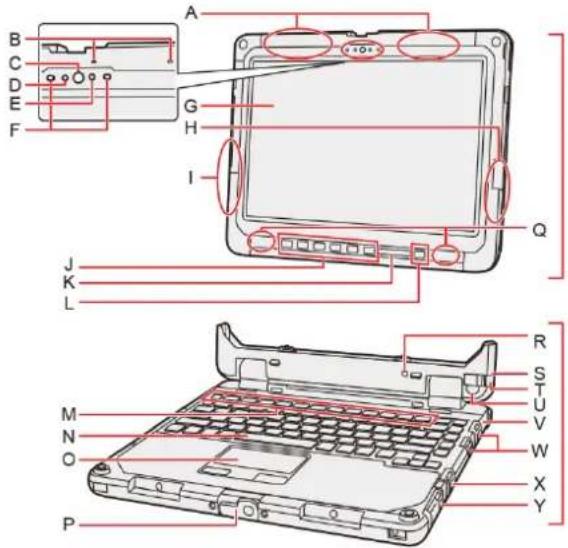
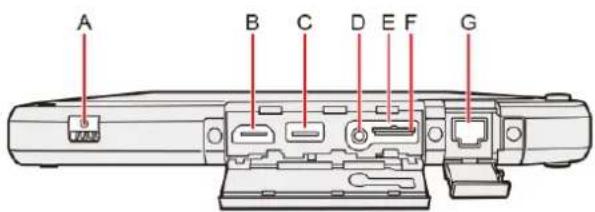
Tablet (Right Side)
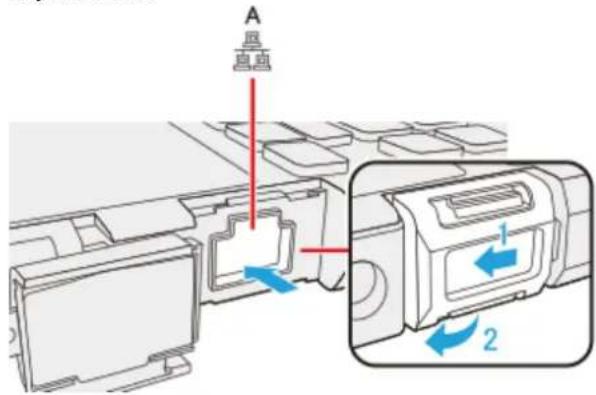
A. DC-IN Jack
When the tablet has been attached to the keyboard base, connect the AC adaptor to the DC-IN jack of the keyboard base.
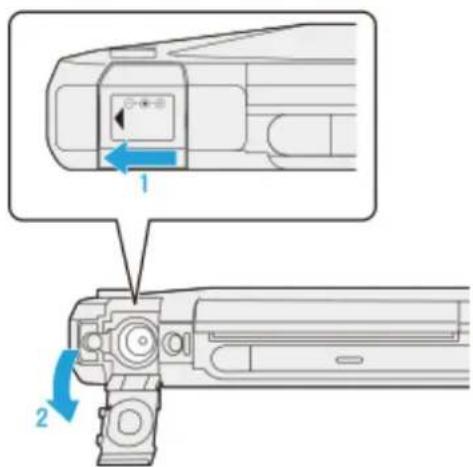
To open the cover
- Slide the cover to the arrow direction.
- Open the cover.
To close the cover
-
Close the cover.
-
Slide the cover to the arrow direction.
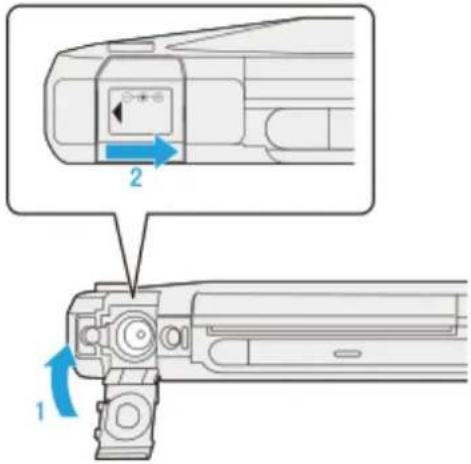
NOTE
■ While pressing the cover, slide and close it securely as described in the illustration above. After that, make sure that the cover has been closed properly.
B. Tether Hole
C. Pen
D. Pen Holder
E. Strap Hole
F. Security Slot (Tablet)
A Kensington cable can be connected. For further information, read the manual that comes with the cable.
Tablet (Left Side)
A. Strap Hole
B. HDMI Port
C. USB 3.0 Port (CHG)
Do not insert any foreign object in the USB port.
D. Headset Jack
A headset or headphone can be connected.
E. SD Memory Card Indicator
(Blinking: During accessor a password isrequested)
F. microSD Memory Card Slot
Keep microSD Memory Cards away from infants and small children.
G. LAN Port
Keyboard Base (Left Side)
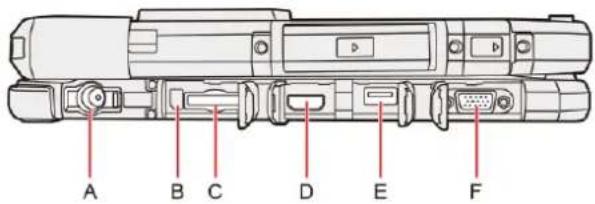
A. DC-IN Jack
B. SD Memory Card Indicator
(Blinking: During access or a password is requested)
C. SD Memory Card Slot
Keep SD Memory Cards away from infants and smallchildren.
D. HDMI Port
E. USB 2.0 Port
F. VGA Port
Keyboard Base (Bottom Side)
A. Carrying Handle
B. External Antenna Connector (EXT_ANT1)
C. External Antenna Connector (EXT_ANT2)
D. Expansion Bus Connector
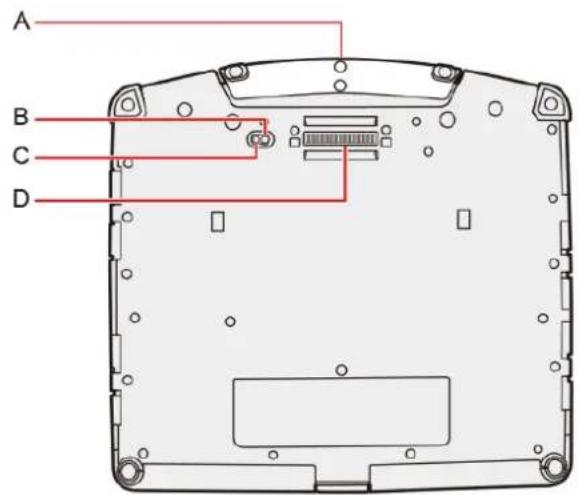
Tablet (Rear Side)

Rear Camera
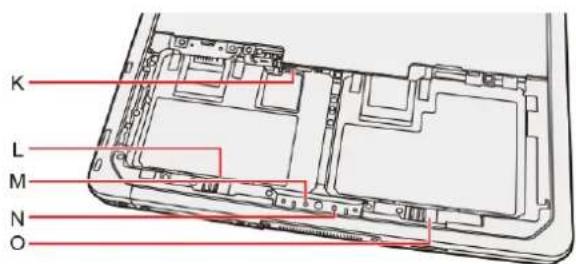
A. Camera Light
B. Camera Lens
C. Camera Indicator
D. LED Indicator
Blinking green rapidly: Cannot power on or resume due to low temperature.
E. Smart Card Reader
Contactless Smart Card Reader/RFID Reader
Fingerprint Reader
F. Battery Cover
The shape of this may vary depending on the model.
G. Release Latch
H. External Antenna Connector (EXT_ANT1)
I. External Antenna Connector (EXT_ANT2)
J. Ventilation Hole (Intake)
K. nanoSIM Card Slot
L. Battery Pack 2 Latch
M. Battery 2 Indicator (replace)
N. Battery 1 Indicator (replace)
O. Battery Pack 1 Latch
Tablet (Top Side)
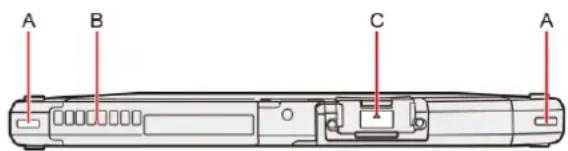
A. Strap Hole
B. Ventilation Hole (Exhaust)
C. Serial Port
2nd USB Port
Rugged USB Port
Barcode Reader
Turning On
Press and hold the power switch ⏻ until the power indicator ⏱ lights. (→ Description of Parts)
NOTE
■ Do not pressthe power switch repeatedly.
■ The computer will forcibly be turned off if you press and hold the power switch for four seconds or longer.
■ Once you turn off the computer, wait for ten seconds or more before you turn on the computer again.
Turning Off
- Click (Start) at the bottom left corner.
- Click (Power) - [Shut down].
NOTE
To turn off the computer completely, proceed as follows.
-
Click (Start) at the bottom left corner, and then click (Settings) - [Update & security] - [Recovery].
Alternatively, click (Settings) - [Update & security] - [Recovery] in the tablet mode. -
Click [Restart now] under "Advanced startup".
-
Click [Turn off your PC].
Precautions against Starting Up/Shutting Down
Do not do the following
- Connecting or disconnecting the AC adaptor
- Pressing the power switch
- Touching the keyboard, touchpad, screen or externalmouse
NOTE
■ To conserve power, the following power saving methods are set at the time of purchase.
The screen automatically turnsoff after :
10 minutes (when AC adaptor is connected) of inactivity
5 minutes (when operating on battery power) of inactivity
The computer automatically enters sleep after :
20 minutes (when AC adaptor is connected) of inactivity 15 minutes (when operating on battery power) of inactivity
Ignition Mode
You can turn on/off the computer without using power switch.
- Click (Start) - [Panasonic] - [Panasonic PC Settings Utility], and click (Settings) - (Power Management).
Alternatively, click (all-apps) - [Panasonic] - [Panasonic PC Settings Utility], and click (Settings) - (Power Management) in the tablet mode.
To power on the computer, add the checkmark [Enable "Power on AC"].
To power off the computer, add the checkmark [Enable "Power off AC"].
Touchpad
Use the touchpad to move the cursor on the screen and perform computer operations.
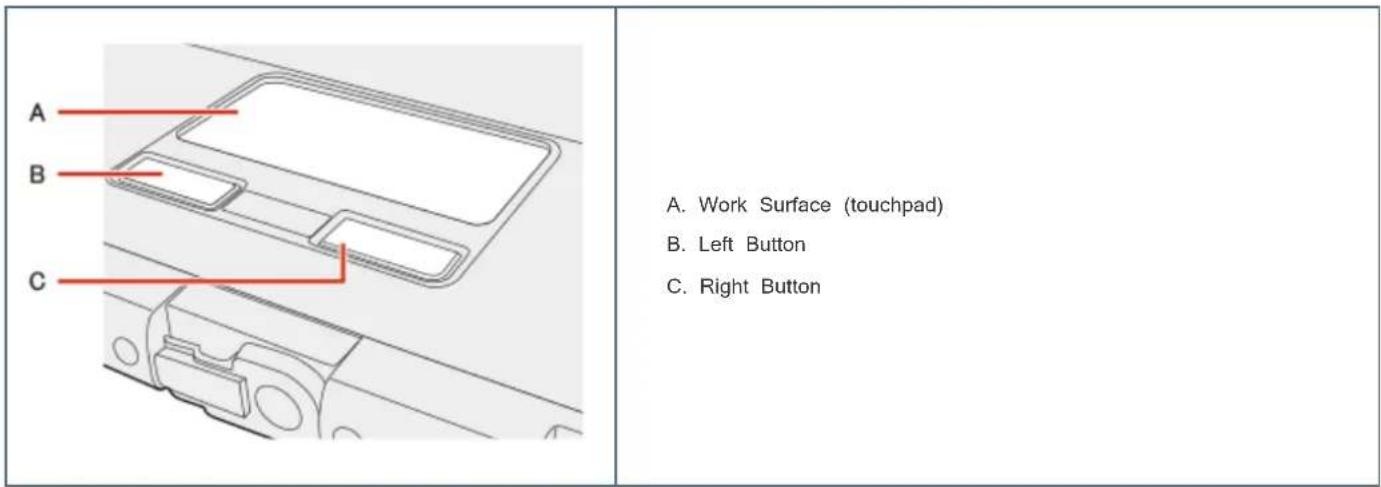
| Function Operation | |
| Move cursor Move the tip of your finger lightly over the work surface. | |
| Click(Tap) Tap a touchpad or press a left button. Right-click: press a right button. | |
| Double click(Double tap) Tap quicklytwo times. | |
| Verticalscroll Trace the touchpad vertically with a finger. | |
Handling the touchpad
- By design, the touchpad is to be used with a fingertip only. Do not place any object on the work surface or press down forcefully with sharp-pointed objects (e.g., nails) or hard objects that can leave marks (e.g., pencils and ball point pens).
- Try to avoid having any harmful substances, such as oil, come in contact with the touchpad. The cursor may not work properly in such cases.
- When the touchpad becomes dirty: Wipe to remove dirt by using a dry soft cloth such as gauze or a soft cloth first applied with detergent diluted with water and then thoroughly wrung. Do not use benzene or thinner, or rubbing alcohol. Doing so may adversely affect the surface, e.g., discoloration. In addition, do not use commercially available household cleaners and cosmetics, as they may contain components harmful to the surface.
NOTE
■ Do not repeatedly press the keysin quick succession.
■ Do not use the key combinations together with touchpad (external mouse), screen, tablet buttons, or other key operations.
- Do not use the key combinations before you sign in to Windows. On the Setup Utility screen, you can use the key combinations of « Fn » + « F1 » and « Fn » + « F2 ». By using the key combinations of « Fn » + « F3 », the display is switched between the internal LCD, simultaneous display and the external display.
■ The key combinations may not work with some applications.
■ The pop-up display shown in the table below appears after signing on to Windows. It may not appear in some application conditions.
| Key Function | Pop-up display | *4 |
| << Fn>> + << ESC>> | Undock/dock the tablet from keyboard baseIf a [Undock complete] appears, you can detach the tablet from board base without turning off the computer. If you want to use shell style, press << Fn>> + << ESC>> again. | key- Undock Completethe cl Windows has finished undocking the computer. You can now remove the computer from the Docking Device. (Press "Fn" + "Esc" to dock again) |
<< Fn>> + << *F1>>LCD brightness<< Fn>> + << *F2>(<< Fn>> + << F1>> = down / << Fn>> + << F2>> = up)[AWWZ] | A slide bar appears. | |
<< Fn>> + << F3>> | Display mode switching(→Switching the display mode)When an external display (a projector etc.) isconnected, you can change the display mode.1. Press << Fn>> + << F3».2. Click the display mode.CAUTIONDo not press any keys until the display has finished switching.Do not use this function:When playing motion video such as DVD or MPEG.When an external display is not connected.When showing a game screen such as pinball. | "Project" appears. |
<< Fn>> + << *F4>>Speaker on/off*2 | You can checkthe status of speaker by seeing an icon on the ta | A slide bar appears. :OFF(MUTE) :OFF(MUTE) |
<<Fn>>+<<*F5>>Volume<<Fn>>+<<*F6>(<<Fn>>+<<F5>>=down/<<Fn>>+<<F6>>=up) | NOTEWhen fine-tuning the sound volume, press and hold<<Fn> ,and press<<F5>>or<<F6>> intermittently.This does not work on speakers connected to the USB port. | A slide bar appears. |
<<Fn>>+<<F7» | Activate sleep(→Entering/Resuming from Sleep or Hibernation) | |
<<Fn>>+<<*F8>>Concealed Mode on/off | You can select on/off of indication status the following devices.LCD backlightLEDSoundWirelessRadioCamera lightBacklit keyboard( Concealed Mode) | |
| NOTEConcealed Mode is enabled as the factory default.You can set the devicesturned off in [Concealed Mode Configuration] with Setup Utility.Alternatively you can change the settings using Panasonic PC Settings Utility.If you press<<Fn>>+<<F8>>in succession,the Concealed Mode may not be switched. More than 4 seconds intervalis necessary to switch on/off. | ||
<<Fn>>+<<F9» | Remaining battery power(When the battery pack is inserted in the computer) | Checking the Remaining Battery Power |
<<Fn>>+<<F10» | Activate hibernation(→Entering/Resuming from Sleep or Hibernation) | |
<<Fn>>+<<F12» | Backlit keyboard ON/OFF<Only for model with backlit keyboard> When you pressthe keys, the luminance of backlit keyboard is changed (four luminance/off). | |
| <<Fn>>+<<1> | Application 1 | |
| <<Fn>>+<<2> | Application 2 |
*1 : These key combinations are disabled when [Concealed Mode] is enabled.
*2: Even if [Sound] is set to [OFF] on the [Concealed Mode Configuration] menu, the sound volume setting of Windows does not show mute state. However, audio from the speaker is not heard.
*3: You can also turn on/off the Concealed Mode by pressing « F8 », right « Alt », or the Enter button (one of the Tablet Buttons). Change the [Trigger Key] setting in the submenu of [Concealed Mode Configuration] in the [Main] menu of the Setup Utility.
*4 : You can display operations when « Fn» is pressed. Make the settings according to the following procedures.


- Click (Start) - [Panasonic] - [Panasonic PC Settings Utility], and click (Settings) - (Button / Key).
Alternatively, click (All apps) - [Panasonic] - [Panasonic PC Settings Utility], and click (Settings) - (Button / Key) in the tablet mode.
-
Add the checkmark to [Display status bar while Fn Key isheld down].
-
Select [Display Location].
Hotkey Settings
You can make the following settings:
Fn key lock
When you press « Fn », the key is locked (pressed-down) until you press another key. Use this when pressing difficult key combinations.
- Start up the Hotkey Settings.


Click (Start) - [Panasonic] - [Panasonic PC SettingsUtility], and click (Settings) - (Button / Key).
Alternatively, click (All apps) - [Panasonic] - [Panasonic PC Settings Utility], and click (Settings) - (Button / Key) in the tablet mode.
- Make the settings.
[Use Fn key lock]
- When using an « Fn» key combination
-
Press « Fn» once. (Locked)
-
Press another key. (Lock released)
- When using successive « Fn» key combinations
-
Press « Fn» twice. (Locked)
-
Press another key.
Fn key remains locked until you press « Fn » again.
[Make sounds when Fn key ispressed]

[Display icon in notification area]: Displays the Fn key status when on the task tray is clicked.


[Display status bar while Fn Key is held down]
[Display Location]: If you select [Top], the status bar will be displayed near upside of the computer.
If you select [Bottom], the status bar will be displayed near downside of the computer.
NOTE
■ You can have different settings for each user.
*5 : If the speaker ismuted or [Sound] is turned off in [Concealed Mode Configuration], beeps do not sound.
Screen Input Operation
The screen of your computer allows you to perform the same operations as a mouse by touching its surface.
You can use the digitizer function to perform the same operation as the touchpad and mouse by touching the screen surface with the digitizer pen (included). And you can use the touchscreen function to perform the same operation as the touchpad and mouse by touching the screen with your finger etc.
You can select the screen input mode.


- Click (Start) - [Panasonic] - [Panasonic PC Settings Utility], and click (Settings) - (Touch Screen).
Alternatively, click (All apps) - [Panasonic] - [Panasonic PC Settings Utility], and click (Settings) - (Touch Screen) in the tablet mode.
- Select the input mode under "Touch Input".
[Use touch screen/Use digitizer pen]
You can operate the screen with the digitizer pen (included) and other input methods such as your fingers.
[Use touch screen]
You can operate the screen with your fingers.
[Use digitizer pen]
You can operate the screen with the digitizer pen (included).
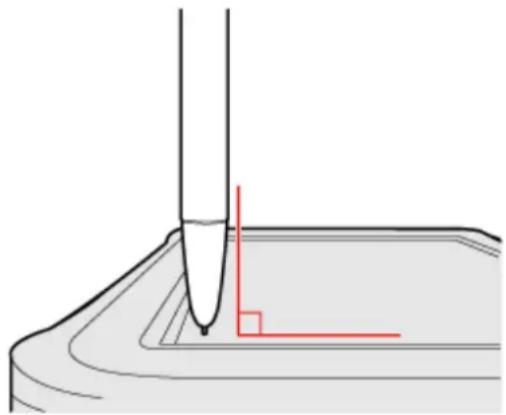
Using the digitizer pen
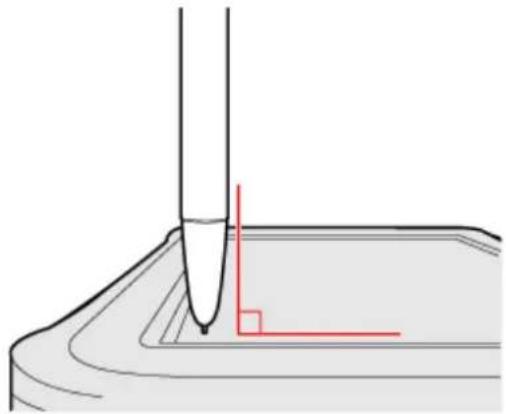
We recommend placing the digitizer pen (included) perpendicular to the screen surface when using it.
natural_image
Diagram showing a tool interacting with a surface, with a red line indicating a step or measurement (no text or symbols present)- Press the digitizer pen's tip on the screen surface, and use the pen.
If you cannot input properly even if you press the tip on the screen surface, the digitizer pen may malfunction. Contact your support office.
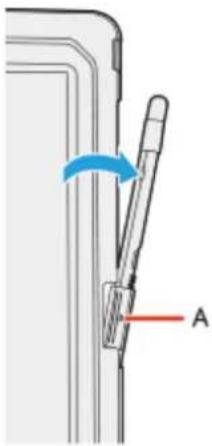
Detaching the pen from the computer
- Pull out the pen holder (A), and take out the pen.
Attaching the pen to the computer
- Pull out the pen holder (A).
- Hold the pen, and attach it to the holder firmly.
natural_image
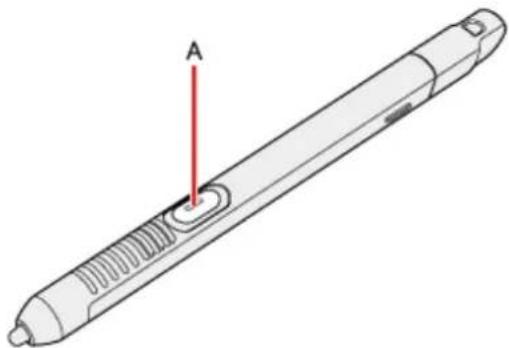
Diagram of a device with a pen and arrow indicating rotation, labeled 'A' (no text or symbols beyond label)To operate right-click
- Touch and hold with the digitizer pen or finger, and release it when a frame surrounding the object appears.
- You can use right-click by changing button function of digitizer pen (included).
In the default settings, the button of digitizer pen (included) has the erasing function.
To change the button function, perform as follows.
- Click (Start) - [Panasonic] - [Panasonic PC Settings Utility], and click (Settings) - [Digitizer Button Mode]. Alternatively, click (All apps) - [Panasonic] - [Panasonic PC Settings Utility], and click (Settings) - [Digitizer Button Mode] in the tablet mode.
- Click[Right click] or [Eraser].
Press and hold the button (A) of the digitizer pen (included), and then touch the object.
natural_image
Technical line drawing of a pen-like tool with a red arrow labeled 'A' pointing to the tip (no text or symbols beyond label)Operation by touching the screen
Instead of operating the screen with the pointer, you can use your fingers.
 | Touch (Tap) | Touch the screen once with one finger. |
  | Spread / pinch | Touch an image or document with two fingers, and spread your fingers apart to zoom in or pinch them together to zoom out. |
 | Drag Touch | an object (file, icon, etc.) and drag your finger to the desired location before removing it to move the object. |
 | Swipe Touch | with a sweeping motion. |
| Flick Touch | with a quick sweeping motion. |
Change Touch Screen Mode
You can select the suitable operation mode in Touch Screen Mode.


- Click (Start) - [Panasonic] - [Panasonic PC Settings Utility], and click (Settings) - (Touch Screen).
Alternatively, click (fill apps) - [Panasonic] - [Panasonic PC Settings Utility], and click (Settings) - (Touch Screen) in the tablet mode.
- Select the operation mode under "Touch Screen Mode".
[Touch] mode
- Suitable for finger operation.
- Use this mode when not operating with the pen (included).
[Touch (Glove)] mode
- Use this mode when operating with a glove on.
- Depending on the type of glove, operation may be ignored.
With finger operation, the screen may not respond properly.
[Touch (Water)] mode
- Use this mode when the screen or finger is wet with water drops in operation.
-
Depending on the water drop condition, operation may be ignored.
Operation may not be performed correctly around the edges of the screen. -
If a confirmation message appears, click [OK].
Calibrating the Screen
When you cannot point correctly with the pen (included) or your fingers, calibrate the screen by following the steps below.
Perform the calibration as an administrator. A standard user needs to perform the calibration as an administrator before performing the calibration for each user.
NOTE
■ At first, sign in to Windows as an administrator, and perform thiscalibration.
■ Return the rotated display to landscape before performing the screen calibration.
- Open the Control Panel, and then click [Hardware and Sound] - [Tablet PC Settings].
- Click [Calibrate...].
-
Click [Pen input].
-
If [User Account Control] isdisplayed, click [Yes].
It is not necessary to perform [Touch input] for thisproduct. -
Using the digitizer pen (included), touch each of the “+” target marks one by one, and then click [Yes].
NOTE
■ Make sure pen (included) is perpendicular to the screen to get the most accurate calibration.
natural_image
Diagram of a pipette tip interacting with a surface, showing red measurement lines (no text or symbols)The following message, "Right-click anywhere on the screen to return to the last calibration point. Press the Esc button to close the tool." will appear on the center of the screen during calibration. However, the operation to close the tool by pressing the [Esc] key can be performed.
■ If you cannot touch the desired position, perform Digitizer Calibration again and restart the computer.
CAUTION
If you perform calibration as a standard user, the calibration data is valid until you sign out. (The data becomes invalid after you have signed out.) When using the computer continuously, perform calibration as an administrator.
If you cannot operate the computer correctly after calibration, delete the calibration data by clicking [Control Panel] - [Tablet PC Settings] - [Reset...], and perform calibration again. (Be sure to delete the calibration data as an administrator.)
■ We recommend using [Touch input] at the factory default.
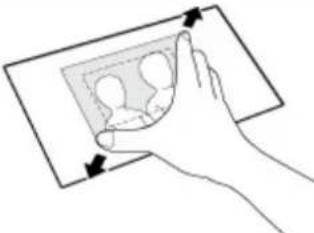
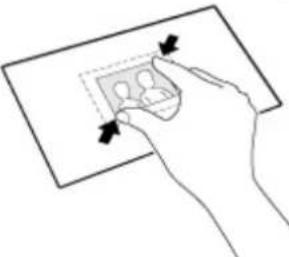
About Touch Operation Support
Touch Operation Support is an application that allows you to perform screen operations more easily. When you use a two-finger tap gesture to specify the area in which you want to perform touch operations, the area is displayed in a zoom window, allowing you to perform touch operations in an expanded display.
Important usage notes
- Thisapplication willonlyoperate on internal screen displays.
- Using the two-finger tap gesture may not display the zoom window in certain applications that handle touch operations independently (e.g., Microsoft Office Word, Internet Explorer and Paint).
- This application may take some time to start after sign in.
- You cannot use the two-finger tap gesture to display the zoom window unless this application is running.
- Using the two-finger tap gesture will not display the zoom window in some applications (Magnifier (Windows), Touch Keyboard (Windows), On-Screen Keyboard (Windows), etc.).
Expanding a portion of the display
When you use a two-finger tap gesture to specify the area in which you want to perform touch operations, the area is displayed in a zoom window, allowing you to perform touch operations in an expanded display.
Opening the zoom window
- Perform a two-finger tap on the area of the screen you want to expand.
A rectangular zoom window with a diagonal length equal to the distance between the two tapped points appears.
(1) Perform two-finger tap. (2) Display expands.
You can quickly expand the corner of the screen, for example, by performing a two-finger tap with both fingers joined.
(1) Tap with two fingers joined. (2) Display expands.
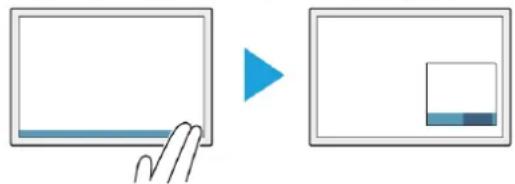
- Perform touch operations in the zoom window.
NOTE
You can perform the following touch operations in the zoom window.
■ Tap (Left Click)
■ Double Tap (Left Double Click)
■ Press and Hold (Right Click)
■ Tap on the popup menu to be displayed after right click
■ Drag (Drag by Left Button)
■ Drag after Pressand Hold (Drag by Right Button)
■ Drag from inside to inside of the zoom window
■ Drag from inside to outside of the zoom window
■ Drag from outside to inside of the zoom window
■ Drag from outside to outside of the zoom window
Operation guides may appear when using the zoom window for the first time. These guides will not appear again if you select the [Do not show this again] checkbox and tap [OK].
NOTE
If two points that will result in a zoom window size that is larger than the resolution of the screen are tapped, the zoom window will be adjusted to fit the screen.
■ Even if you use a two-finger tap gesture on a small rectangular area, the zoom window cannot be displayed in a size smaller than the predetermined minimum size.
The zoom window may not appear if you perform a two-finger tap on a window's title bar or edges or on an unfixed taskbar.
■ The zoom window may also appear when you tap using three fingers.
If a button for another application, for example, exists within the area of the two-finger tap, the button may be activated in addition to the zoom window opening in some cases.
- You can also use mouse and perform operation inside the zoom window. In that case, the displayed area in the zoom window follows mouse cursor movement.
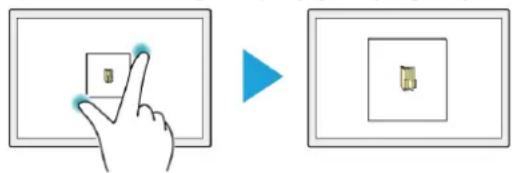
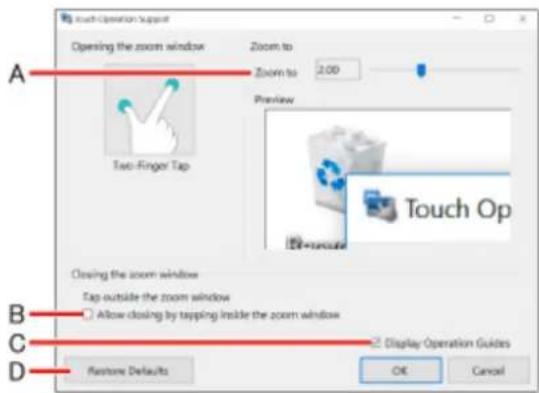
Closing the zoom window
- Tap outside the zoom window. The zoom window closes.
natural_image
Hand pointing at a square button with a small icon, no text or symbols presentNOTE
If you are displaying the edge of the screen in the zoom window and you tap the edge of the screen outside the zoom window, an operation identical to that inside the zoom window may be performed and the zoom window may not close in some cases.
■ The zoom window automatically closes when:
- You disable the utility in the tasktray menu
- You rotate the screen
- You change the resolution
- Computer enters into the hibernation mode
The screen islocked
A user is switched
- The desktop size (taskbar width, etc.) ischanged
- An additional zoom window is opened
- Any of the applications that cannot be used together is launched
Changing the position of the zoom window
The zoom window cannot be moved.
To change the area displayed in the zoom window, close the zoom window and perform the steps in "Opening the zoom window" to expand the display again.
Additional functions
Touch operation support settings include the following helpful functions for when you press and hold or drag and drop a folder or file.
Context menu displays
When you perform a press and hold gesture in a zoom window to display a context menu, for example, the zoom window will be automatically adjusted to display the whole context menu.
NOTE
■ Thisfunction cannot be used in some applications.
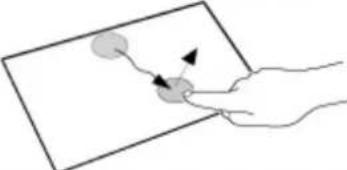
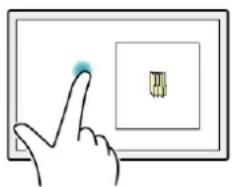
Drag and drop operations
When you drag a folder or file from inside a zoom window to the outside, the zoom window will disappear temporarily and a dotted line will appear around the object being dragged.
As you drag the object to its target location, the area of the target location will be displayed in expanded view automatically, allowing for easier drop operations.
(1) Drag outside.
flowchart
graph TD
    A["Left Image"] --> B["Arrow pointing to the next image"]
    B --> C["Arrow pointing to the next image"]
    C --> D["Right Image"]
(2) Dotted line appears.
(3) Expanded view appears when you slow your drag speed.
Changing settings
- Click (Start) - [Panasonic] - [Panasonic PC Settings Utility], and click (Settings).
Alternatively, click (All apps) - [Panasonic] - [Panasonic PC Settings Utility], and click (Settings) in the tablet mode.
-
Click [Advanced Settings] under "Touch Operation Support".
-
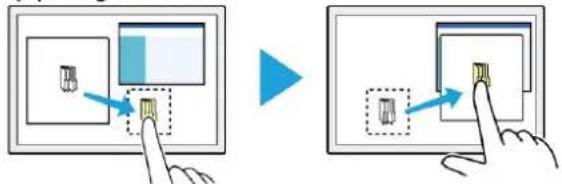
Adjust each setting.
A. Use the slider to change the zoom ratio of the window (4 levels in 0.5x increments).
B. If you clear the checkbox, the zoom window will continue to be displayed when you tap inside the zoom window. If you select the checkbox, the zoom window will close when you tap inside the zoom window.
C. If you select the [Display Operation Guides] checkbox and click [OK] to close the window, operation guides will appear the next time you perform a two-finger tap after signing in.
D. Clickthisto restore changed values to default settings.
- Click [OK].
Thiscompletes settings adjustment.
NOTE
■ Specifying a zoom ratio other than 2.0x or 3.0x may cause text in the zoom window to appear unclear.
■ When the setting window is displayed, the zoom window will not be displayed.
Disabling Touch Operation Support
- Click (Start) - [Panasonic] - [Panasonic PC Settings Utility], and click (Settings).
Alternatively, click (All apps) - [Panasonic] - [Panasonic PC Settings Utility], and click (Settings) in the tablet mode.
- To disable "Touch Operation Support", remove a checkmark to "Support touch operation".
Tablet Buttons
| Button | Function |
| A1 | While operating OSLaunch Panasonic PC Settings UtilityYou can change the button assign using Panasonic PC Settings Utility (To change the button functions)When launching the Setup UtilitySame as F12 keyWhile operating the Setup UtilityYou can change the button assign to Concealed Mode Trigger/Alt+Ctrl+Del. (A1 Button) |
| A2 | While operating OSSingle for model with barcode reader>Read barcodeLaunch input panelYou can change the button assign using Panasonic PC Settings Utility (To change the button functions)When launching the Setup UtilitySame as F2 keyWhile operating the Setup UtilityYou can change the button assign to Wireless Switch/Barcode Reader trigger(Only for model with barcode reader)/Alt+Ctrl+Del. (A2 Button)Sleep/hibernation/power offCheck the batterystatus.(Checking the Remaining Battery Power) |
| - | While operating OSVolume downWhile operating the Setup UtilitySame as down keyYou can change the button assign to brightness down/disable. (Setup Utility) |
| + | While operating OSVolume upWhile operating the Setup UtilitySame as right keyYou can change the button assign to brightness up/disable. (Setup Utility) |
| ■ | While operating OSWindows keyWhile operating the Setup UtilitySame as Enter keyYou can change the button assign to disable. (Setup Utility) |
| § | While operating OSRotation LockWhile operating the Setup UtilityESC KeyYou can change the button assign. (Rotation LockButton) |
NOTE
■ The Tablet buttons may not work immediately after Windows is started up or the Windows sign in screen (or the Welcome screen) is displayed.
NOTE
■ You can have different settings for each user.
■ On the Windows sign in screen and Welcome screen, the tablet buttons are enabled and work in default irrespective of the settings you made.
To change the button functions
You can change the functions of A1, A2 and Rotation Lockbuttons.
-
Click (Start) - [Panasonic] - [Panasonic PC Settings Utility], and click (Settings) - (Button / Key). Alternatively, click (All apps) - [Panasonic] - [Panasonic PC Settings Utility], and click (Settings) - (Button / Key) in the tablet mode.
-
Select the key and click [Change].
- Select the function in [Press] and [Press and hold].
- Click[Browse] to select the application if you select [Start a program].
- Click [OK].
- Click [OK].
NOTE
■ If you click [Reset], the setting will be the factory default.
■ You can also open the setting screen by the following steps.

Right-click (Start) at the bottom left corner, and then click [Control Panel] - [Hardware and Sound] - [Set tablet buttons to perform certain tasks].
Important Battery Tips
How to use the battery with minimal deterioration
The battery is a consumable and, as such, its performance will gradually deteriorate. This deterioration is accelerated under the following conditions.
- When the battery is repeatedly charged
- When the battery is used, charged or stored in a place with high temperature
To minimize deterioration of the battery and ensure a longer battery life, you must reduce the number of charges and ensure that the temperature inside the battery does not become too high. Bear in mind the following points.
NOTE
■ The battery pack gradually deteriorates over time even if cared following the above points. If it deteriorates, be sure to replace with a new and specified battery pack.
■ This computer reduces the full charge capacity in stages to ensure a longer life of the battery pack.
Charge the battery in a temperature range of 10^ C to 30^ C { 50^ F to 86^ F}
In places where the outside air temperature is high, the temperature inside the battery will also become high. Do not charge the battery inside a vehicle with all its windows closed and exposed to the hot sun or in other places where the temperature is high.
This computer's battery will not be charged if its temperature is outside the allowable range. (At such a time, the battery indicator blinks orange.)
We recommend charging the battery no more than once per day
Recharging the battery after every small use raises the total number of battery charges and speeds battery deterioration.
To lower the total number of battery charges, we recommend recharging the battery no more than once per day or when the remaining charge drops to 10% or less.
With this computer, in order to reduce the number of charges, the battery will not be recharged immediately after it has been fully charged unless the remaining charge has fallen to less than 95 %.
Charging the battery while the computer is powered off is recommended
If the computer's power is on, the temperature inside the battery rises due to the effects of heat from the CPU and other components. We recommend that you only charge the battery when the computer is powered off.
How to use the computer to maximize the battery operation time
Leave the computer off when it is not in use
Decrease the internal LCD brightness by pressing «Fn» + «F1» or Panasonic PC Settings Utility
The power consumption is reduced by decreasing the brightness.
Before stepping away from your computer, press «Fn» + «F7» or «Fn» + «F10» to put your computer in the sleep or hibernation mode
Pressing these key combinations will put your computer in the sleep or hibernation mode, thereby lowering the power consumption.
Click

th

sk tray, and select a power plan that uses the power-saving function.
If no power plan that uses the power-saving function is shown, click [Power & sleep settings] - [Additional power settings] and then click [Change plan settings] for the power plan you want to modify.
Then change the power-saving settings.
We recommend against using applications or screen saver that place a significant load on the CPU
Some screen savers place a large load on the CPU. When using these screen savers, a significant load is placed on the CPU even when the computer is not being used. We recommend that you do not use screen saver that will drain the CPU.
Remove peripheral devices (USB devices, external mouse, etc.) when not in use
When the network communication is not working, turn off the wireless LAN
When the computer is not going to be used for an extended period (a month or more)
In order to maintain the battery performance, remove the battery with a remaining charge of 30% to 40% from the computer, and store it in a cool, dark place
If the battery pack is kept installed in the computer, it will discharge gradually even when the computer's power is off. If this condition continues for a long period (several months or more), the battery may overdischarge, causing its performance to deteriorate. In addition, this deterioration will accelerate if the battery pack is stored inside a vehicle with all its windows closed and exposed to the hot sun or in other places where the temperature is high. Store the battery packwhere the temperature is within the range of 10°C to 30°C {50°F to 86°F}.
Things to keep in mind when using the battery pack
Bear in mind the following points when installing and removing the battery pack
- Do not install or remove the battery pack while the computer is in the sleep mode.
Removal of the battery pack in this mode cause the data to be erased and cause the computer to malfunction. - Do not touch the terminals on the battery pack.
If the terminals are dirty or damaged, the battery may not function properly or the computer may not operate properly.
Charging time and discharging time differs depending on the computer's power status and temperature
It takes longer to fully charge the battery when the computer's power is on. To charge the battery more quickly, power the computer off, or put it in the sleep or the hibernation mode.
It takes longer to fully charge the battery in low temperature environments. The battery discharges more quickly in low temperature environments.
Battery Indicator
Battery indicator (situation in use): (Description of Parts)
| Battery indicator Battery status | |
| Not lit | The battery pack is not inserted or not being charged.Concealed modeis set to ON. |
| Orange Charging is in progress. | |
| Green The battery is fully-charged. | |
| Blinking green | In order to stop the battery from deteriorating when the battery temperature is high (60 °C or more), power supply from AC adaptor has been shut off, and the battery power is being consumed. Be careful of high temperature. |
| Red | The remaining battery is approximately9%or less. |
| Blinking red | The battery pack or the charging circuit is not operating properly. |
| Blinking orange | The battery cannot be charged temporarily due to the following reasons:Its internal temperature is out of the acceptable range.The power supply isnot enough because software applications or peripheral devices are consuming a large amount of power. |
| Blinking green and orange alternately | The temperature islow and the computer is warming up to prevent the flash memory drive from malfunctioning. The computer will start automatically after warming-up. |
| Blinking orange slowly | When you set [Battery Charging Indicator] to [Flashing] on the Main menu of Setup Utility. |
Battery indicator (replacing status): ☐1 ☐2 Description of Parts)
| Battery indicator Battery status | |
| Green | The battery pack can be replaced without turning off the computer. (When the battery cover is opened, or the battery pack has remaining battery charge.) |
| Not lit | The battery packs cannot be replaced.The battery packs not inserted or not being charged or other than those above.Concealed modeis set to ON. |
NOTE
■ Once the battery is fully charged, the computer performs recharging only when the battery level becomes less than approximately 95%, so over-charging is avoided.
■ When [LED] is set to [OFF] on the [Concealed Mode Configuration] menu, LED does not light.
Charging
- The battery pack is not charged when you first purchase it. Be sure to charge it before using for the first time. If both the battery packs are attached to the computer, the battery 1 starts discharging first.
Checking the Remaining Battery Power
You can check the remaining battery power on [System] page of Panasonic PC Settings Utility.


- Click (Start) - [Panasonic] - [Panasonic PC Settings Utility], and click (Status).
Alternatively, click (All-apps) - [Panasonic] - [Panasonic PC Settings Utility], and click (Status) in the tablet mode.
- Check an icon under "Battery".
Alternatively, you can check the remaining battery charge by « Fn » + « F9 » key combination. (After signing in to Windows)
- When the battery is fully charged (example)

- When the battery is empty

- When the battery is discharging

NOTE
- The battery display may not correspond to the actual remaining battery charge in the cases as below. To correct the display, perform the Battery Recalibration ( Correcting the Battery Display (Battery Recalibration)).
- The battery indicator remains red.
- The indicator lights orange and the display shows 99% for a long time.
- Low battery warning appears soon after a short time of use.
This can occur when the computer is in sleep for a long time without power supply from the AC adaptor.
■ The battery display may not be the same as that of task tray. This is not a malfunction.
Computer behavior with low battery
The default settings are as follows.
When the battery level becomes 10 % [Low battery level]
- Displaysa message that the battery levelislow.
↓
When the battery level becomes 5 % [Critical battery level]
- The computer enters hibernation.
↓
Charge the battery. Connect the AC adaptor or replace the battery to start up the computer.
| When the battery level becomes 10 %[Low battery level] | When the battery level becomes 5 %[Critical battery level] |
| Connect the AC adaptor immediately. If you do not have the AC adaptor, exit the running programs and Windows, then confirm that the power indicator is off.If you have a fullycharged spare battery, turn off the computer, replace the battery and turn the computer on again. | Connect the AC adaptor and charge the battery.If you have a fullycharged spare battery, turn off the computer, replace the battery, the computer on again.When the computer enters hibernation with the batterydown and you resume the op without charging the battery, the Windows Resume Loader starts up. Follow the on instructions. After that, however, Windows may not start up normally, or the [Low b level]/[Criticalbattery level] function may not worknormally. |
NOTE
■ Battery goes to sleep if the battery level is about 5%, may be displayed such as "Not exist" or "Not use" is not a malfunction. Please wait for a while to connect the AC adaptor.
Changing the Battery Charging Speed
The battery may become hot while being charged. You can make the battery charging speed slower to keep the battery cooler during charge.
-
Click (Start) - [Panasonic] - [Panasonic PC Settings Utility], and click (Support) - (Troubleshooting). Alternatively, click (All apps) - [Panasonic] - [Panasonic PC Settings Utility], and click (Support) - (Troubleshooting) in the tablet mode.
-
At [Battery Charge Speed], select [Slow] to make the battery charging speed slower.
To return to the normalcharging speed, select [Standard].
Correcting the Battery Display (Battery Recalibration)
The "Battery Recalibration" function measures and memorizes the battery capacity. To correct the battery display, use this function to fill the battery and then discharge it completely. Perform the procedure at least once immediately after purchasing the computer. Normally the interval of battery recalibration is 3 months. The battery display may not be correct when the battery pack deteriorates after a long time use. In this case, perform the procedure again.
- Connect the AC adaptor.
- Perform "Battery Recalibration".
You can operate your computer while the battery recalibration is in progress.
-
Click (Start) - [Panasonic] - [Panasonic PC Settings Utility], and click (Support) - (Battery) - [Perform Battery Recalibration]. Alternatively, click (All apps) - [Panasonic] - [Panasonic PC Settings Utility] in the tablet mode, and click (Support) - (Battery) - [Perform Battery Recalibration].
-
Select the battery pack on which to perform BatteryRecalibration.
When using multiple battery packs, confirm below.
1: Battery Pack 1
2: Battery Pack 2
The required time is displayed.
- Select [Perform Battery Recalibration while Windows operations are running] or [Perform Battery Recalibration after shutting down Windows].
- Click [Start].
If you select [Perform Battery Recalibration after shutting down Windows.], the confirmation message for Windows termination
appears. Click [Yes].
After the battery recalibration is finished, normal charging starts.
NOTE
■ Alternatively, you can start "Battery Recalibration" using the following steps.


Right-click or to select [Battery Recalibration].
■ The temperature range should be 10^ C to 30^ C {50°F to 86°F}.
- When performing the battery recalibration without shutting down Windows, the battery recalibration ends and will not be completed if the AC adaptor is removed, or if the computer enters sleep or hibernation mode during recalibration.
- Frequent recalibration of the battery can degrade the battery. A caution message appears when the battery recalibration is performed at the shorter interval than approximately a month. In this case, cancel the battery recalibration.
If the computer is turned off during the battery recalibration (e.g., due to power failure, or accidental removal of the AC adaptor and battery pack), the battery recalibration will not be completed.
- You can also perform the battery recalibration with the following procedure. (You can perform the battery recalibration after shutting down Windows.)
- Connect an external keyboard to the computer.
- Restart the computer.
- Press and hold « F9 » while the [Panasonic] boot screen is displayed just after the computer starts the startup procedure.
- When the remaining battery capacity is displayed, press « Enter» .
-
Follow the on-screen instructions.
-
The battery recalibration may take a long time due to the large battery capacity. This is not a malfunction. (An expected approximate recalibration time is displayed. When performing the battery recalibration without shutting down Windows, the recalibration time will be longer than shown.)
CF-VZSU1A series
| Status Full charge Complete discharge | ||
| 1 battery pack | 2.5 hours | 1.5 hours |
| 2 battery packs 3.0 hours | ||
CF-VZSU1B series
| Status Full charge Complete discharge | ||
| 1 battery pack | 2.5 hours | 3.0 hours |
| 2 battery packs 6.0 hours | ||
An expected approximate recalibration time is displayed. When performing the battery recalibration without shutting down Windows, the recalibration time will be longer than shown.
Battery duration
The computer consumes electricity even when the computer power is off. If the battery pack is fully charged, the battery will fully discharge in the following period of time:
CF-VZSU1A series x 2
| Status Wake Up from wired LAN | Discharge period | |
| Only for model with keyboard base | For tablet | |
| In sleep | Disabled 7 days 10 days | |
| Enabled 5 days 7 days | ||
| When power is off/In hibernation | Disabled 4.5 weeks 7 weeks | |
| Enabled 9 days 10 days | ||
CF-VZSU1B seriesx 2
| Status Wake Up from wired LAN | Discharge period | |
| Only for model with keyboard base | For tablet | |
| In sleep | Disabled 14 days 20 days | |
| Enabled 10 days 14 days | ||
| When power is off/In hibernation | Disabled 9 weeks 14 weeks | |
| Enabled 18 days 20 days | ||
Replacing the Battery Pack
CAUTION
■ The battery pack is not charged when you first purchase it. Be sure to charge it before using for the first time. Charging starts automatically when the AC adaptor is connected to the computer.
■ Use only the specified battery pack with your computer. The CF-VZSU1B series battery pack cannot be used in models with CF-VZSU1A series, or the CF-VZSU1A series battery pack cannot be used in models with CF-VZSU1B series, either.
■ Make sure no foreign objects are under the computer.
In sleep, do not remove/replace the battery pack. Otherwise your data will be lost and the computer may be damaged.
■ Do not use without inserting battery pack/dummy battery.
■ If the computer is wet, wipe them off and open the cover. Make sure to dry off the computer, replace/remove the battery pack.
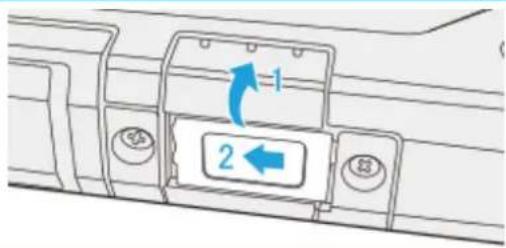
1. Open the battery cover.
Make sure no foreign objects are under the computer.
Depending on the models, the shape of cover may differ.
- Slide the release latch (A) to the arrow direction.
- Slide the cover to the arrow direction.
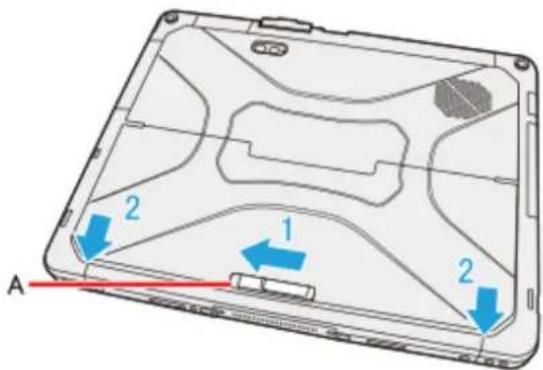
When the replacing the battery pack without turning off the computer, check the battery indicator (C). (→ Replacing the battery pack without turning off the computer)
- Remove/Insert the battery pack.
To remove
- Slide the latch (B).
- Remove the battery pack.
To insert
-
Insert the battery pack until it securely fits the connector.
-
Slide the battery cover back.
-
Slide the battery cover in the arrow direction until the release latch clicks into place securely.
natural_image
Illustration of hands holding pens and writing on a car hood (no text or symbols)Replacing the battery pack without turning off the computer
If one of the batteries has enough remaining power, you can replace the battery pack without turning off and during sleeping the computer.
Open the battery cover, and check the Battery indicator.
If a battery indicator lights green, you can replace the battery pack without turning off the computer.
If a battery indicator does not light, you cannot replace the battery pack without turning off the computer. Turn off the computer before replace the battery pack.
CAUTION
■ Concealed Mode is set to OFF before replacing the battery pack.
NOTE
■ During battery replacement, the LCD backlight is turned off.
Starting Up Your Computer Quickly
The sleep or hibernation functions allow you to shut off the computer without closing programs and documents. You can quickly return to the programs and documents that you were working on before sleep or hibernation.
| Function Data is saved to Recovery time Power supply | |||
| Sleep Memory Short Required. (If power is not supplied, all data will be lost.) | |||
| Hibernation | Flash memory drive | Rather long | Not required. (However power is slightly consumed to keep the hibernation.) |
Setting Sleep or Hibernation
Sleep
- Click or on the task tray, and click [Power & sleep settings] - [Additional power settings].
- Click [Change plan settings] of the power plan you want to change.
- Select the setting for [Put the computer to sleep], and then click [Save changes].
The setting for hibernation may change unexpectedly when you change the setting for sleep. Confirm that the time to enter hibernation is 180 minutes (default setting) or longer (below).
Hibernation
- After the step 2 of "Sleep" setting (above), click [Change advanced power settings].
- Double-click [Sleep], and double-click [Hibernate after].
- Click the item and select the setting.
- Click [OK].
Precautions
- Connect the AC adaptor if the computer will be in sleep for a long period of time. If you cannot use the AC adaptor, use hibernation instead.
- Using sleep or hibernation repeatedly may cause malfunction of the computer. To stabilize computer operation, restart Windows regularly (about once a week) without using sleep or hibernation.
- Save the necessary data.
- Close files you have opened from removable disks and network drives.
- Do not enter sleep or hibernation in the conditions below, otherwise the data or file may be corrupted, sleep or hibernation may not work, or malfunction may occur in the computer or the peripheral devices.
- When the extended desktop function is activated.

- When any of the SD Memory Card indicator and the drive indicator are on.
- When playing/recording audio files or displaying motion video such as MPEG files.
- When playing a DVD-Video.
- When writing to a disc.
- When using communication software or network functions. (except for using wake up from wired LAN function)
- When using peripheraldevices.
If the computer fails to work normally, restart the computer.
The password you set in the Setup Utility will be requested upon resuming from hibernation (but not from sleep), if [Password On Resume] is set to [Enabled] in the [Security] menu of the Setup Utility. To disable it, set [Password On Resume] to [Disabled].
The [Password On Resume] setting is valid when you shut down the computer by clicking (Start) - [Power] - [Shut down].
It may take 1 or 2 minutes to enter hibernation. Do not touch any key though the screen becomes dark.
CAUTION
The following problems will occur when you fail the password input (failing three times or leaving the computer unattended for one minute or more) while resuming from sleep or hibernation.
■ Failing the password input while resuming from hibernation:
- Cannot resume from hibernation by the Wake Up from wired LAN function, the Task Scheduler or the operation to open the display.
Entering/Resuming from Sleep or Hibernation
To enter sleep or hibernation
In order to enter sleep or hibernation by following procedure, change the power option settings first so that the [Power buttons and lid] operation is set to sleep or hibernation. (Setting Sleep or Hibernation)
Using hardware functions
- Close the display, or press the power switch. (Description of Parts)
Sleep: The power indicator blinks green.
Hibernation: The power indicator goes off.
The computer automatically enters sleep after:
20 minutes (when AC adaptor is connected) of inactivity
15 minutes (when operating on battery power) of inactivity
Using «Fn»
You can also enter sleep or hibernation using « Fn » .
(KeyCombinations)
Using Windows function
You can alternatively enter sleep using Windows function.
- Click

) - (Pow

Alternatively, click (Power) in the tablet mode.
- Click [Sleep].
NOTE
■ Hibernation from the Windows system menu is not available as the factory default. To enter hibernation from the Windows system menu, the following setting is necessary.


- On the desktop screen, click or on the task tray, and click [Power & sleep settings] - [Additional power settings].
- Click [Choose what the power button does] - [Change settings that are currently unavailable].
- Add check mark for [Hibernate] and click [Save changes].
CAUTION
While the computer is entering sleep or hibernation
■ Do not:
- Touch the keyboard, touchpad, screen, tablet buttons, or power switch.
- Use an external mouse or other peripheral devices.
- Connect or disconnect the AC adaptor.
- Close or open the display
- Insert and remove the SD Memory Card.
Wait until the power indicator blinksgreen (sleep) or goes off (hibernation).
■ It may take 1 or 2 minutes to enter sleep or hibernation. Do not touch any key though the screen becomes dark.
■ After releasing the power switch, do not operate it until the power indicator blinks or goes off.
If you press and hold the power switch for longer than 4 seconds, the computer will forcibly shut down and unsaved data will be lost even if you have set [When I press the power button] to any item in [Choose what the power button does] of [Power Options] in [Control Panel].
In sleep or hibernation
■ Do not attach or remove peripheral devices. Doing so may cause malfunction.
■ Power is consumed in sleep.
When power is exhausted, the data retained in memory will be lost. Connect the AC adaptor when the computer is in the sleep function for a prolonged time.
To resume from sleep or hibernation
- Open the display, or press the power switch. (Description of Parts)
CAUTION
- Do not perform the following operations until resuming is complete. After the display is resumed, wait approximately 15 seconds (normally) or 60 seconds (when the computer is on a network).
- Touch the keyboard, touchpad, screen, tablet buttons, or power switch.
- Use an external mouse or other peripheral devices.
- Connect or disconnect the AC adaptor.
- Close or open the display.
- Shut down or restart Windows.
- Enter sleep or hibernation.
- Insert and remove the SD Memory Card.
■ If you touch the USB keyboard keys or mouse connected to the computer, the computer may resume from sleep.
Panasonic PC Settings Utility
You can perform the following operations easily by using the Panasonic PC Settings Utility.
When starting up this application for the first time, connect to the Internet for initial setup. If it is first started up without Internet connection, the initial setup may take time, and several minutes may be required for startup.
Starting Panasonic PC Settings Utility
- Click (Start) - [Panasonic] - [Panasonic PC Settings Utility].
Alternatively, click (full-apps) - [Panasonic] - [Panasonic PC Settings Utility] in the tablet mode.
You can also press [A1] button to start Panasonic PC Settings Utility.
The screen to the below appears.
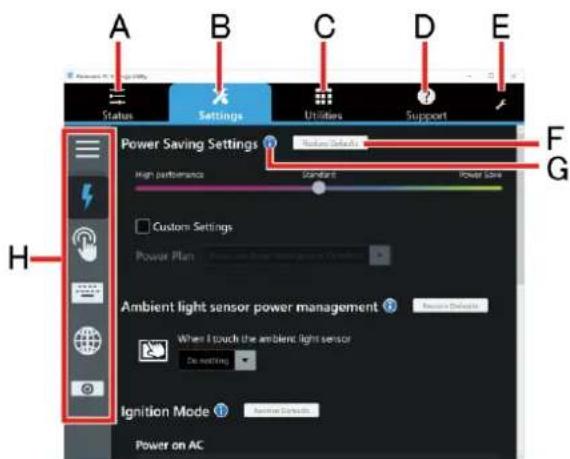
A. Status
B. Settings
C. Utilities
D. Support
E. ThisApplication Settings
F. Restore Defaults
Restore the settings to the default values.
G. Information
Display help.
H. Menu
Select the items.

- Make the operation.

Status
Battery:
Display battery status.

Checking the Remaining Battery Power)
Brightness:
Adjust the LCD brightness. Slide slider to the right or left to increase or decrease the brightness respectively. To adjust the brightness automatically according to the surrounding brightness, add a checkmark to [Adaptive Brightness].
Volume: Adjust the sound volume. Slide slider to the right or left to increase or decrease volume respectively. To mute the sound, add a checkmark to [Mute].
- Microphone Input: Adjust the level of microphone input. Slide slider to the right or left to increase or decrease level respectively. To disable the microphone input, add a checkmark to [Mute].

Settings
Power Management
Power Saving Settings:
(Saving Power)
Ambient light sensor power management:
(Saving Power)
Ignition Mode: Change settings of the ignition mode.
Touch Screen
Touch Screen:
Touch Input:
When using digitizer pen (included): Select [Use digitizer pen].
When using finger: Select [Use touch screen].
All: Select [Use touch screen/Use digitizer pen].
Digitizer Button Mode:
Change the button setting of digitizer pen.
You can select [Right click] or [Eraser].
Touch Screen Mode:
( Change Touch Screen Mode)
Disable:
You can disable the touch screen.
Pen and Touch:
Change the pen (included)/fingers operation mode.
Touch Operation Support:
When you use a two-finger tap gesture to specify the area in which you want to perform touch operations, the area is displayed in a zoom window. To use this function, add a checkmark to [Support touch operation].
( About Touch Operation Support)

Button / Key
Tablet Buttons:
You can change the functions of , , buttons.
( Setting the Tablet Buttons)
Concealed Key:
( Concealed Mode)
Fn Key:
( HotkeySettings)

USB
USB Charge Settings:
(USB Charge Setting)

Network
Network and Sharing Center:
Network Connection:
Wireless LAN:


Camera Device:
Enable or Disable the built-in camera.
If the camera is disabled by the Setup Utility, you cannot enable the camera by clicking [Enable].


Utilities
You can use Panasonicapplications that displayicons. To use these applications, click an icon.

Support

Manual
[Launch Manual Selector]
For further information about the computer, you can refer to the on-screen manual.
- Operating Instructions - Reference Manual (This Manual)
This manual contains the practical information to help you fully enjoy the computer's performance. Update it to the latest version using network connection. - Important Battery Tips
The Important Battery Tips will provide you with the battery information so that you can use the battery in the optimum condition to obtain longer operation time.
Update the on-screen manuals
This describes the procedures to update the on-screen manual. - Connect to a network
This describes the connection procedures using the network devices mounted on this unit.

System
[Launch PC Information Viewer]

ecking the Computer's Usage Status)

Battery
[Perform battery recalibration]

recting the Battery Display(Battery Recalibration))

Troubleshooting
Battery Charge Speed:

anging the Battery Charging Speed)

Recovery Disc Creation
[Launch Recovery DiscCreation Utility]

ate a Recovery Disc)

ThisApplication Settings
- Themes Settings:
Change the skin of this utility.
• Show/Hide each item:
Click [Administrator settings] to allow you to make the show/hide settings for each item. If [User Account Control] is displayed, click [Yes].
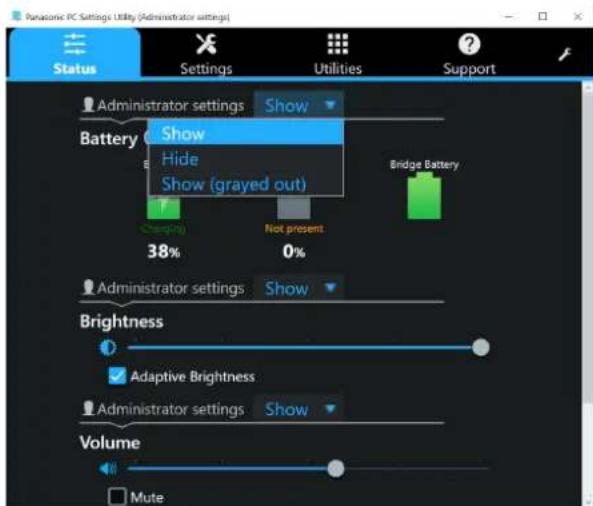
The new settings will be activated after restarting this application.
You can export or import the display items that can be used by XML files on thisutility.
About Panasonic PC Settings Utility:
Displaythe version information.
To add or delete functions
To add or delete functions, follow the procedure below.

- Right-click (Start) at the bottom left corner, and then click [Programs and Features].
- Select [Panasonic PC Settings Utility], click [Change].
- Click [Add or Remove Features], and then click [Next].
- Add or delete checkmarks, and then click [Next].
NOTE
■ If [This program might not have uninstalled correctly] is displayed, follow the on-screen instructions.
Detaching the tablet from the keyboard base
When detaching the tablet from the keyboard base while it is turned on, note the following points.
CAUTION
■ Before detaching the tablet, confirm the following things.
- Save the necessary data.
- Close files you have opened from removable disks and network drives.
- Remove peripheral devices connecting to the tablet.
■ Do not detach the tablet in the conditions below.
- When the SD Memory Card indicator is on.
- When playing/recording audio files or displaying motion video such as MPEG files.
- When playing a DVD-Video.
- When writing to a disc.
- When using communication software or network functions.
To detach the tablet while it is turned on, perform the following.


- Click in the taskbar of the desktop screen, and then click - [ ] Docking Device].
Alternatively, press the «Fn» and «ESC» keyboard keys at the same time.
NOTE
■ To cancel detachment, press the «Fn» and «ESC» keyboard keys at the same time after the above operation.
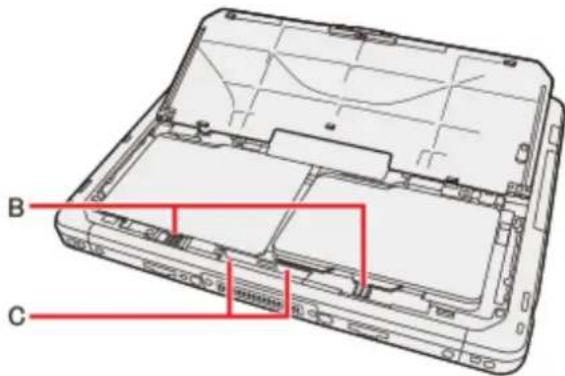
- Release the detach lock (A).
- Slide the release lever (B) in the direction of the arrow.
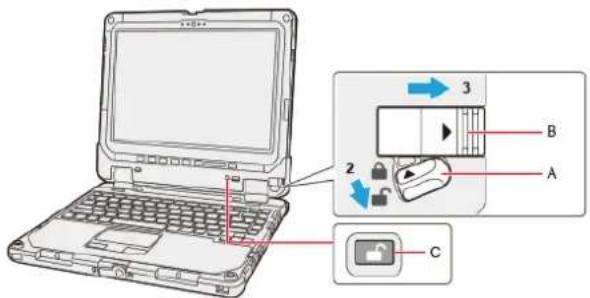
The detach indicator (C) will turn from black ( ) to orange ( ).
CAUTION
■ After step 3, you cannot stop detaching the tablet. Detach the tablet once.
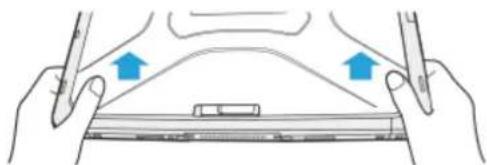
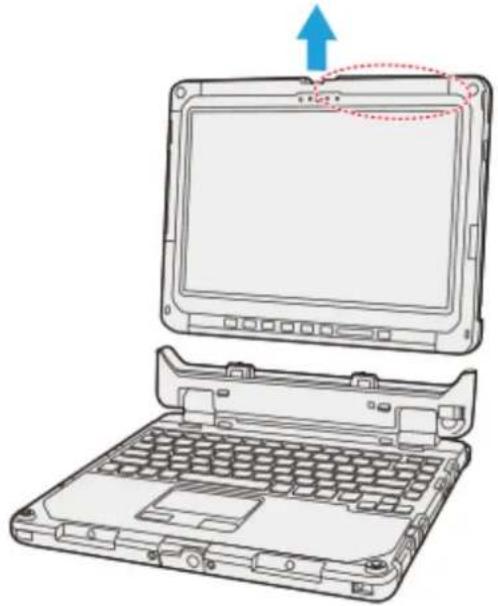
- Detach the tablet from the keyboard base.
CAUTION
■ When detaching the tablet from the keyboard base, hold the area enclosed by the dashed circle in the illustration.
natural_image
Line drawing of a laptop with open lid and keyboard, showing front panel and side panel (no text or symbols)■ Attach/detach the tablet on a flat surface.
■ When attaching/detaching the tablet, securely hold the keyboard.
NOTE
■ Do not attach/detach the tablet in the rain.
Attaching the tablet to the keyboard base
- Hold the area enclosed by the dashed circle in the illustration, and push the tablet downward.
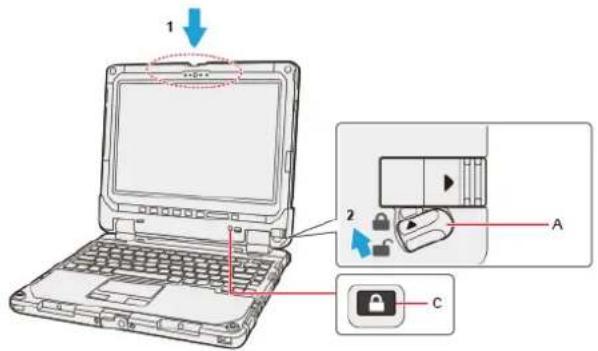
The detach indicator (C) will turn from orange ( ) to black( ).
- Lock the detach lock (A).
CAUTION
■ Confirm that the detach indicator (C) has turned black (—). If the detach indicator is still orange-colored or partially orange-colored, the tablet has not been properly locked to the keyboard base. Attach the tablet properly.
- Do not lift up the computer set when even a little orange color is seen in the detach indicator. Doing so may result in the tablet falling down.
LAN
Connecting LAN
CAUTION
■ Do not connect the telephone cable to the LAN port.
- Turn off the computer.
Do not use sleep or hibernation.
-
Slide the cover and open it.
-
Connect the LAN cable.
- Connect the LAN port (A) and the network system (server, HUB, etc.) using a LAN cable.
Keyboard base
- Do not remove the tablet from keyboard base while using the LAN function.
Tablet

- Turn on the computer.
NOTE
■ While pressing the cover, slide and close it securely as described in the illustration below. After that, make sure that the cover has been closed properly.
Wake Up from wired LAN function
When the Wake Up from wired LAN function is enabled, the computer automatically resumes from sleep or hibernation when the computer is accessed from the network server via the internal LAN port.
Setup
- Right-click (Start) at the bottom left corner, and then click [Device Manager].
- Double-click the Ethernet device under "Network adapters", and then click [Power Management].
- Add a checkmark to [Allow this device to wake the computer].
- Click [OK].
NOTE
■ The setting made is enabled after restarting the computer.
■ The LAN port of keyboard base does not support the Wake Up from wired LAN function.
Disabling/Enabling Wireless Communication
There are several ways of disabling and enabling wireless communication.
- Using airplane mode
Setting [Wireless Configuration] in the [Advanced] menu of the Setup Utility
Network and Sharing Center (Using the Wireless LAN Function)
NOTE
■ For further information about Wireless LAN.
■ For further information about Bluetooth.
■ For further information about Wireless WAN.
■ For further information about GPS.
Using airplane mode
(For wireless LAN, wireless WAN, Bluetooth, and dedicated GPS / GPS on wireless WAN)


- Click (Start) - (Settings) - [Network & Internet] - [Airplane mode].

Alternatively click (Settings) - [Network & Internet] - [Airplane mode] in the tablet mode.
- To disable wireless communications, set [Airplane mode] to [On].
To enable wireless communications, set [Airplane mode] to [Off], and then;
- set [Wi-Fi] to [On] (for wirelessLAN).
- set [Cellular] to [On] (for wireless WAN).
- set [GPS] to [On] (for GPS on wireless WAN).
- set [Bluetooth] to [On] (for Bluetooth).
- set [GPS/GNSS] to [On] (for dedicated GPS).
Wireless LAN
CAUTION
- Do not use wireless LAN on airplanes, in hospitals, or in other locations where wireless LAN signals may affect devices. Follow the instructions of airline companies and hospitals. If you use the computer in these locations, turn off the wireless LAN.
■ To avoid unauthorized access to the computer through wireless LAN We recommend you to make security settings such as encryption before using wireless LAN. Otherwise the disk data such as the shared filescan be exposed to the risk of unauthorized access.
NOTE
■ Communication is established through the wireless LAN antenna. Do not block the antenna area with your hand or body.
■ The transmission rate will be lower when a microwave oven is used nearby.
■ To use wireless LAN, set [Wireless LAN] of [Wireless Configuration] to [Enabled] (default) in the [Advanced] menu of the Setup Utility.
Using the Wireless LAN Function
Before using a wireless LAN, turn the wirelessLAN communication on.
Turning on/off the wireless LAN communication
- To enable the wireless communication (Disabling/Enabling Wireless Communication).
Setting the wireless LAN access point
Preparation
Follow the instruction manual of the wireless LAN access point to make settings for the access point to recognize the computer.
- Turn the wireless LAN on.
- Click on the task tray.
- Select an access point, and click [Connect].
- Input the key you set for the access point to recognize the computer, and click [Next].
Wait for the computer to connect to the wireless LAN accesspoint.
When the icon on the task tray is changed to, the wireless LAN setting is complete.
NOTE
■ The settings depend on the network environment. For further information, ask the system administrator or the person in charge of the network.
■ If you use the stealth type wireless LAN access point which restricts automatic detection of the wireless LAN access point, take the following procedure.
If you do not perform the procedure below, you may not be able to access the wireless LAN access point automatically or the wireless LAN access point may not be displayed.

- Click on the task tray, and then click [Hidden network].
- Click[Connect], enter the necessary information such as the network name (SSID), and click [Next].
For further information, ask the system administrator or the person in charge of the network.

- Click (Start) - [Panasonic] - [Panasonic PC Settings Utility], and click (Settings)
Alternatively click 📄 (All apps) - [Panasonic] - [Panasonic PC Settings Utility], and click


- Click [Enabled] or [Disabled] for the wireless LAN IEEE802.11a.
NOTE
In some countries, communication using IEEE802.11a (5 GHz wireless LAN) standard is restricted by law.
If IEEE802.11a is enabled or disabled while the computer is connected to an IEEE802.11b/g access point, the connection will be temporarily interrupted.
Bluetooth
You can access internet and other Bluetooth devices without connecting cables.
NOTE
■ Communication is established through the Bluetooth antenna. Do not block the antenna area with your hand or body. ( Description of Parts)
■ To use Bluetooth, set [Bluetooth] of [Wireless Configuration] to [Enabled] (default) in the [Advanced] menu of the Setup Utility.
■ The transmission rate will be lower when a microwave oven is used nearby.
■ When you uninstall the Bluetooth Driver, turn Bluetooth off.
Using the Bluetooth Function
Before using a Bluetooth, turn the Bluetooth communication on.
Turning on/off the Bluetooth communication
- Click (Start) - (Settings) - [Network & Internet] - [Airplane mode], and set [Airplane mode] to [Off].
Alternatively, click (Settings) - [Network & Internet] - [Airplane mode] in the tablet mode, and set [Airplane mode] to [Off].
To turn off the Bluetooth communication, set [Bluetooth] to [Off].
To turn on the Bluetooth communication, set [Bluetooth] to [On].
To check the Bluetooth communication status
- Click (Start) - (Settings) - [Devices] - [Bluetooth].
Alternatively, click on the task tray, and click (Bluetooth) - [Show Bluetooth Devices].
Wireless WAN
This computer is equipped with the Wireless WAN enabling you to communicate using radio frequencies.
NOTE
■ Communication is established through the Wireless WAN antenna. Do not block the antenna area with your hand or body. (→ Description of Parts)
■ To use wireless WAN, set [Wireless WAN] of [Wireless Configuration] to [Enabled] (default) in the [Advanced] menu of the Setup Utility.
■ Before the computer enters sleep or hibernation, cut the Wireless WAN communication. Entering sleep or hibernation without cutting the connection may disable communication after resuming. In this case, restart the computer.
If "Device driver software was not installed correctly." (or a similar message) appears when starting the computer or resuming from sleep or hibernation.
- When communication works normally, WirelessWAN isoperating correctly.
- If communication fails, the device may not be recognized correctly. In this case, restart the computer.
■ Do not use the nanoSIM card adapter.
Inserting/Removing a nanoSIM Card
Before using the Wireless WAN, set a nanoSIM card to the nanoSIM card slot.
CAUTION
■ Be sure to turn off the computer before inserting or removing the nanoSIM card.
To insert a nanoSIM card
- Turn off the computer.
Disconnect the AC adaptor. - Detach the tablet from the keyboard base.
- Remove the battery pack.(Replacing the BatteryPack)
- Slide the lock cover (A).
- Open the SIM card cover.
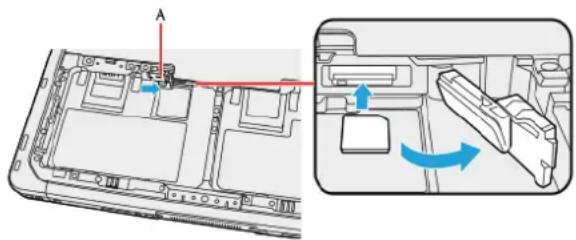
natural_image
Diagram of a laptop interior showing the front panel and rear compartment with directional arrows indicating movement (no text or symbols present)- Insert the nanoSIM card into the nanoSIM card slot.
CAUTION
■ Do not insert the nanoSIM card upside down.
- Close the SIM card cover, and then close the lock cover.
- Insert the battery pack.(Replacing the Battery Pack)
To remove a nanoSIM card
-
Turn off the computer.
-
Turn over the computer, and then open the cover.
Make sure no foreign objects are under the computer.
-
Remove the battery pack. (Replacing the Battery Pack)
-
Open the SIM card cover.
-
Push the nanoSIM card.
It will come out of the slot a little bit.
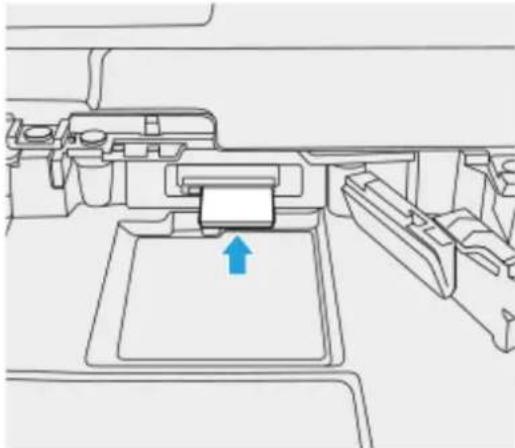
natural_image
Technical line drawing of a mechanical assembly with a blue arrow indicating a component (no text or symbols present)- Pull the card all the way out as illustrated below.
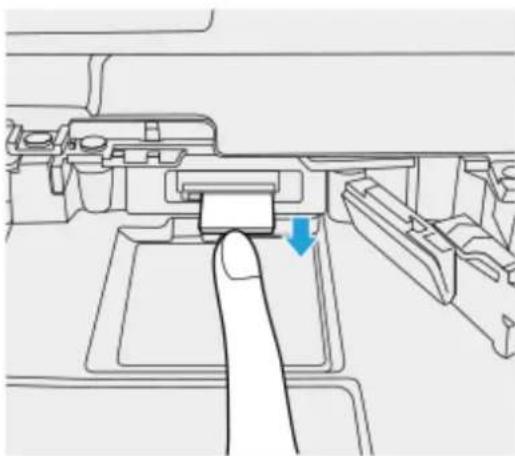
natural_image
Line drawing of a finger pressing a button on a mechanical component (no text or symbols)-
Close the SIM card cover.
-
Insert the battery pack. (Replacing the Battery Pack)
Connecting to a network
- Click

- (Setti

- [Network & Internet] - [Cellular].
Alternatively, click (e.g. 1985) - [Network & Internet] - [Cellular] in the tablet mode.
- Click ISP under "Cellular".
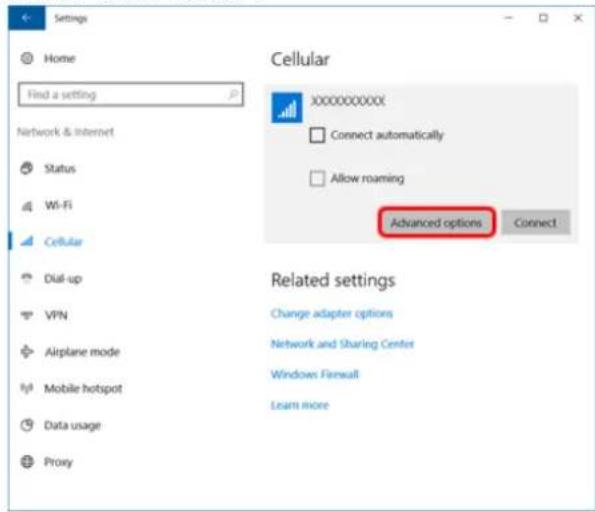
- Click [Advanced options], add an APN.
If an APN is not displayed under "Internet APN":
- Click [Add an Internet APN].
- Input detailed information such as APN, and then click [Save].
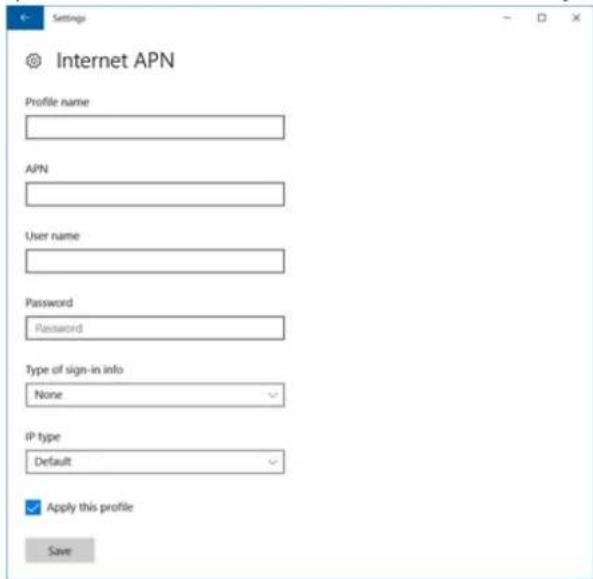
- Click arrow upper left (return to previous page).
- Select created APN profile, and then click [Apply].
Disconnecting to a network
- Click and then click ISP.
- Click (Start) - (Setting) - [Network & Internet] - [Cellular], and then click ISP.


Alternatively, click (Sings) - [Network & Internet] - [Cellular] in the tablet mode, and then click ISP.
3. Click [Disconnect].
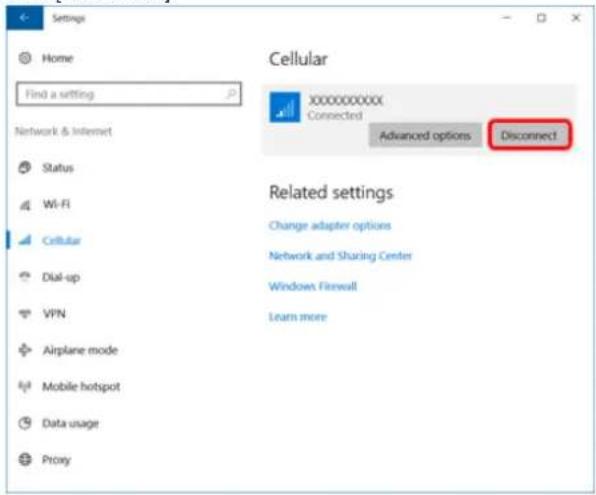
GPS
Thiscomputer has the GPS function with the wireless WAN module, and the dedicated GPS function.
For the differences, refer to the table below.
| Devices Device | name Support system | |
| GPS on wireless WAN | EM7430/EM7455 | GPS / GLONASS / BeiD |
| EM7305/EM7355 | GPS / GLONASS | |
| Dedicated GPS Ublox | 8(M8N) GPS / GLONASS / SBAS | |
GPS information can be checked using the GPS Viewer.
To use the "GPS viewer", proceed the following operation.
- Click (Start) - [Panasonic] - [GPS viewer].
Alternatively, click (All apps) - [Panasonic] - [GPS viewer] in the tablet mode.

You can start up GPS viewer from Panasonic PC Settings Utility. Launch Panasonic PC Settings Utility, and then click (Utilities) - (GPS viewer).
NOTE
■ Communication is established through the GPS antenna. Do not block the antenna area with your hand or body. ( Description of Parts)
■ When the u-blox Virtual COM Port is included in Ports (COM & LPT) under Device Manager, the following ports cannot be used.
For EM7430/EM7455:
Sierra Wireless SnapdragonTM X7 LTE-A NMEA Port
For EM7305/EM7355:
Sierra Wireless NMEA Port
You can extend battery life and save power also during AC adaptor usage.
Reducing Power Consumption
Use the methods below to reduce power consumption.
- Use Panasonic PC Settings Utility to set the power plan to [Power saver]. When the power plan is changed, the display brightness, cooling fan rotation, and other items will be automatically switched to the recommended mode in the plan. Furthermore, each configuration can be customized. ( Configuring Power Saving Settings)
- Use Panasonic PC Settings Utility to reduce LCD brightness. Reducing internal LCD brightness will reduce power consumption.
Furthermore power saving options:
- Turn off the computer when it is not in use
You can also turn off only the wirelessLAN or wireless WAN power. - Disconnect external devices (USB devices, external mouse, etc.) that are not being used
Use Sleep/Hibernation
Press « Fn » + « F7 » to set the computer to sleep or « Fn » + « F10 » to set it to hibernation when you have to leave the computer. Thisshuts down computer operation to reduce power consumption.
- Disable Wake Up from wired LAN function when it is not needed. This reduces power consumption in Sleep/Hibernation. To confirm current settings:

- Right-click (Start) at the bottom left corner, and then click [Device Manager].
- Double-click the Ethernet device under "Network adapters", and then click [Power Management].
- Checkthe setting of [Allow this device to wake the computer].
- When using the battery, do not use applications that place a significant load on the CPU.
Some application software may place a large burden on the CPU only with start-up and may consume power.
- When you are using the screen saver with 3D graphics, change to another screen saver
To change the screen saver, right-click the desktop, click [Personalize] - [Lock screen] - [Screen saver settings] and click the title of the screen saver.
- Power management using the ambient light sensor
You can set the operation, such as turning off the display when you click the ambient light sensor.

-
Click (Start) - [Panasonic] - [PanasonicPC Settings Utility], and click (Settings) - (Power Management). Alternatively, click (Maps) - [Panasonic] - [PanasonicPC Settings Utility], and click (Settings) - (Power Management) in the tablet mode.
-
Select an item under "Ambient light sensor power management options".
-
Turn off the display.
To resume, touch the screen.
Turn off the display and lock the computer.
To resume, touch the screen, and release the lockscreen. - Launch the screen saver.
To resume, touch the screen.
NOTE
■ This function works when the tablet has been detached from the keyboard base.
■ This function does not work when you touch the ambient light sensor too short, or too long (approximately 2 seconds or more).
■ This function works in a lighted environment.
This function may malfunction under the environment subject to sudden changes of brightness. If a malfunction occurs, set the option to Do nothing.
Configuring Power Saving Settings
You can adjust the power plan to change power saving features as required.
Switching the power plan
-
Click (Start) - [Panasonic] - [Panasonic PC Settings Utility], and click (Settings) - (Power Management). Alternatively, click (Kill apps) - [Panasonic] - [Panasonic PC Settings Utility], and click (Settings) - (Power Management) in the tablet mode.
-
Add a checkmark to [Custom settings]. The custom settings menu will be displayed.
- Set each item.
Customizing the Power Setting
You can choose the optimum power setting for your operating condition by selecting a power plan. You can also create your own power plan.
Changing the Power Plan Setting
- Click or on the task tray and click [Power & sleep settings] - [Additional power settings].
- Click [Change plan settings] of the power plan you want to change.
- Change the settings.
- [Change advanced power settings]: You can make more detailed settings.
- Click [Save changes].
Creating Your Own Power Setting
- Click or on the task tray and click [Power & sleep settings] - [Additional power settings].
- Click [Create a power plan], click the basic plan and input the name of power plan.
- Click [Next].
- Change the settings and click [Create].
To change the settings or to make more detailed settings. ( Changing the Power Plan Setting)
Deleting the Power Plan
- Click or on the task tray and click [Power & sleep settings] - [Additional power settings].
- Click [Change plan settings] of the power plan you wish to delete.
If the power plan you wish to delete is already selected, select another plan first. - Click [Delete this plan], and then click [OK] on the confirmation screen.
Use these features to protect your data.
Setting the Supervisor Password/User Password
Set the Supervisor Password before setting the User Password.
- Start up the Setup Utility. (Starting the Setup Utility)
- Select [Security].
- Select [Set Supervisor Password] or [Set User Password], and press « Enter ».
-
Enter your password in [Create New Password] and press « Enter ».
-
When the password has been set, you need to enter your password in [Enter Current Password] and press « Enter ».
-
To disable the password, leave the input field empty and press « Enter ».
-
Enter your password again in [Confirm New Password] and press « Enter ».
-
Press « F10», and press « Enter ».
If you use on-screen keyboard, touch [SYM] - [F10] instead of pressing « F 10 ».
CAUTION
■ Do not forget your password. If you forget your Supervisor Password, you will not be able to use your computer. Contact Panasonic Technical Support.
- When running the Setup Utility, do not leave and go away from your computer even for a short time, since other people may set or change the password.
- When running the Setup Utility, inputting from the keyboard and on-screen keyboard is based on the English keyboard layout. Pay attention of inputting if you use other keyboard layouts than English.
NOTE
■ The password will not be displayed on the screen.
■ If the [Caution] screen appears when entering the password, check the status of NumLock and CapsLock.
■ You can use up to 32 alphanumeric characters (including spaces).
The case (upper/lower) is distinguished.
- Use only the upper horizontal row of numerickeys to input your password.
- You cannot use « Ctrl » to input a password.
■ Disabling the Supervisor Password also disables the User Password.
Preventing Your Computer from Unauthorized Use
You can set a start-up password to protect your computer from unauthorized use.
- Set the password (→ Setting the Supervisor Password/User Password), and select [Enabled] in [Password On Boot] and/or [Password On Resume] in the [Security] menu of the Setup Utility.
NOTE
■ The [Password On Resume] of Setup Utility is effective when the computer was once shut down, and not effective when the computer resume from sleep.
If the Supervisor Password or User Password has been set, the password input screen will be displayed on starting-up of the Setup Utility even though [Password On Boot] and/or [Password On Resume] is set to [Disabled]. If you set [Password On Boot] to [Enabled] and set [Password On Reboot] to [Same as Boot], password input will also be required at Windows restart. ([Same as Boot] is the default setting.)
Preventing Your Flash Memory Data from Being Read or Written
The flash memory lock function protects the flash memory data from being read or written by removing the flash memory from the computer. (Note that the flash memory lock does not guarantee complete protection of the data.)
- Select [Enabled] in [Hard Disk Lock] in the [Security] menu of the Setup Utility.
CAUTION
- You cannot use the flash memory lock function without setting the Supervisor Password. Set the Supervisor Password beforehand (Setting the Supervisor Password/User Password).
■ When you have your flash memory drive repaired - Contact Panasonic TechnicalSupport.
Before sending back the flash memory drive, be sure to set the [Hard Disk Lock] to [Disabled].
NOTE
■ The flash memory lock function works with the built-in flash memory. It does not work with the external hard disk.
■ We recommend you to set [Password On Boot] to [Enabled] to ensure security though it is not required to enable the flash memory lock.
■ Note that the flash memory lock does not guarantee complete protection of the data.
Using Intel ^® Identity Protection Technology (Intel ^® IPT)
With Intel® IPT, a six-digit One-Time Password is generated every 30 seconds. Using this One-Time Password can perform two-factor authentication to prevent unauthorized access. Thus, stronger authentication is enabled. To use Intel dedicated solution or application software provided by a service provider is required.
For information about the using method, contact the service provider.
Other security measure
About Secure Boot
"Secure Boot" is a function that protects your computer by prohibiting Operating System other than those permitted under factory default conditions from being executed during startup. (This function is enabled as the factory default.)
About TPM
TPM (Trusted Platform Module) is a security chip aimed at high level cryptographic processing and secure storage of encryption keys.
In the file encryption using the TPM, encryption keys can be stored on a TPM chip separated from the internal disk. This will allow you to increase the security level.
To use the TPM function, perform the following steps.
For more information about the usage, follow the instructions by a system administrator.

- Right-click (Start), and click [Control Panel] - [System and Security] - [BitLocker Drive Encryption].
- Click [TPM Administration].
Windows Hello
This function is used to sign in to Windows quickly, or perform individual authentication.
The face recognition for Windows Hellos is supported.
To use Windows Hellos, perform the following steps for setup.
1.


Alternatively, click (Settings) in the tablet mode.
- Click [Accounts] - [Sign-in Options].
- Click [Set up] under the "Windows Hello".
- Follow the on-screen instructions.
NOTE
■ To use Windows Hellos, you need to set the password and PIN for sign-in options.
■ During face recognition, the IR sensor camera light turns on, and becomes hot. Do not touch the IR sensor section when the light is on, and shortly after the light turns off.
The screen display rotates automatically when this unit is the tablet or convertible mode.
Rotation Lock
The Rotation Lock button allows you to lock the screen display when this unit is the tablet mode.
- Press the Rotation button (A).
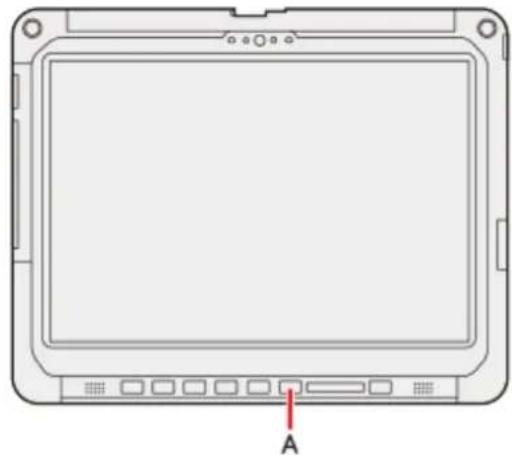
natural_image
Front view of a rectangular electronic device with labeled point A (no text or symbols beyond label)You can switch automatic rotation ON/OFF by pressing the Rotation Lockbutton (A).
Alternativelyyou can switch automaticrotation ON/OFF by the following procedure:
- Click (Decimation) on the task tray, and then click (Rotation lock) or (Rotation lock).
NOTE
-
When an external display is connected to the computer and the computer is rotated while in the "Duplicate" mode or "Extend" mode: The screen display on the external display does not rotate. The screen display on the internal LCD remains landscape, and does not rotate.
■ To change the angle of the screen rotation manually, perform the following steps. Right-click the desktop screen, and click [Display Settings].
■ While the display is rotated: -
Do not use the Extended Desktop. The touchpad or screen may not work properly.
- Do not set the resolution larger than that of the internal LCD.
The computer's performance is slightly lowered. - The touchpad scroll functions do not work.
■ When the display is rotated, the motion video may not be displayed correctly or the sound may be distorted. Return the display angle to landscape.
- When you start up Windows and rotate the display right after signing in, the display may return to the previous state. Then, the display returns to the rotated state. The similar situation will occur when you switch the user, computer resumes from Sleep-/Hibernation and Windows is unlocked.
Concealed Mode
You can make your computer inconspicuously using the concealed mode.
You can select on/off of LCD backlight, LED, Sound, Wireless Radio and Backlit Keyboard.
CAUTION
■ Concealed Mode is enabled as the factory default.
■ The camera indicator cannot be turned off.
Switching the concealed mode
If you press keys in succession, the Concealed Mode may not be switched. More than 4 seconds interval is necessary to switch on/off.
Disabling/Enabling the concealed mode
This function is effective when the computer is restarted.
Using Panasonic PC Settings Utility
-
Click (Start) - [Panasonic] - [Panasonic PC Settings Utility], and click (Settings) - (Button / Key). Alternatively, click (All apps) - [Panasonic] - [Panasonic PC Settings Utility], and click (Settings) - (Button / Key) in the tablet mode.
-
Set to [Enabled]/[Disabled] under "Concealed Key", and then click [Apply].
- If a confirmation message appears, click [Yes]. Restart the computer.
Using Setup Utility
- Set [Concealed Mode] of [Concealed Mode Configuration] to [Enabled] or [Disabled] in the [Main] menu of the Setup Utility.
Change the settings
This function is effective when the computer is restarted.
Using Panasonic PC Settings Utility
-
Click (Start) - [Panasonic] - [Panasonic PC Settings Utility], and click (Settings) - (Button / Key). Alternatively, click (All apps) - [Panasonic] - [Panasonic PC Settings Utility], and click (Settings) - (Button / Key) in the tablet mode.
-
Set to [Enabled] under "Concealed Key".
- Add a checkmark to "Advanced Settings"
- Change the settings.
- Click [Apply]. Restart the computer. The settings will be activated after restarting the computer.
Using Setup Utility
- You can change the devices turned on/off in [Concealed Mode Configuration] with Setup Utility. You can change the trigger key in [Trigger key].
NOTE
■ When set [LCD Backlight] to [Minimum] and [LED] to [ON], the LED may become dark.
■ When [LCD Backlight] is set to [OFF] (Panasonic PC Settings Utility / Setup Utility), touch operation is disabled.
You can make the settings of the computer's operating environment (password settings, startup drive selection, etc.)
Starting the Setup Utility


- Click (Start) - (Settings) - [Update & security] - [Recovery].
Alternatively, click (Settings) - [Update & security] - [Recovery] in the tablet mode.
-
Click [Restart now] under "Advanced startup".
-
Click [Troubleshoot] - [Advanced options] - [UEFI Firmware Settings] - [Restart]. The computer restarts, and the Setup Utility screen appears.
NOTE
■ When the fast startup is enabled, Setup Utility cannot be started by pressing « F2 » or « Del » during the startup procedure.
When [Enter Password] is displayed, enter your password.
When you start the Setup Utility with Supervisor Password
- You can make the settings of allitems of the Setup Utility.
When you start the Setup Utility with User Password
Note the following:
- In the [Advanced] and [Boot] menus, you cannot make the settings of all items.
In the [Security] menu, you can change only the User Password when [User Password Protection] is set to [No Protection]. You cannot delete the User Password.
- In the [Exit] menu, you cannot make the setting of [Load Default Values] and [Boot Override].
- « F9» (Setup Defaults) does not function.
To set Setup Utility, alternatively you can use pen input and touch input.
Using touch screen:
Double-touch the setting value to be changed, select the new value, and touch it again.
Using on-screen keyboard:
To input characters and symbols, touch at the upper right corner of the Setup Utility screen to display the on-screen keyboard.
| ESC | 1 | 2 | 3 | 4 | 5 | 6 | 7 | 8 | 9 | 0 | BKS |
| q | w | e | r | t | y | u | i | o | p | ENTER | |
| a | s | d | f | g | h | j | k | l | ↑ | SPACE | |
| z | x | c | v | b | n | m | CAP | ← | ↓ | → | SYM |

To operate special keys such as a function key, touch [SYM] on the on-screen keyboard so that the key is highlighted as illustrated below.
| F1 | F2 | F3 | F4 | F5 | F6 | F7 | F8 | F9 | F10 | F11 | F12 |
| ` | - | = | ~ | ! | @ | # | $ | % | ^ | ENTER | |
| & | * | ( | ) | _ | + | [ | ] | \ | { | } | SPC |
| | | ; | ` | : | " | . | . | / | < | > | ? | SYM |
NOTE
■ Setup Utility screen is displayed on the internal LCD even when an external display is connected to the computer as the factory default. However, if the LID (display) is closed, it will come to be displayed on an external display.
The [Panasonic] boot screen may not appear when only the external display is being used. In this case, as soon as the computer starts up, press « F2 » or « Del » several times and start the Setup Utility.
■ "Tablet" on the menu means the tablet.
Information Menu
Underlined items are the factory presets.
| Language English | ___FrenchJapanese |
Product Information
| Model NoSerial No | Computer information (cannot be changed.) |
System Information
| Processor TypeProcessor SpeedMemory SizeAvailable MemoryHard Disk | Computer information (cannot be changed.) |
BIOS Information
| BIOSBIOS ConfigurationEmbedded ControllerIntel(R) ME FirmwareAccumulative Operating TimeAccess Level | Computer information (cannot be changed.) |
Main Menu
Underlined items are the factory presets.
| System DateDay of the Week/Month/Day/Year.You can use « Tab» to move the cursor. | [xxx xx/xx/xxxx] |
| System Time24-hr. style.You can use « Tab» to move the cursor. | [xx:xx:xx] |
| 10-Key ModeSelect the behavior of the 10-key area of the keyboard.When [NumLock] isselected, the 10-key area works as a number pad when NumLock LED is on.When [Fn Key] isselected, the 10-key area works as a number pad when the « Fn» key is held, and NumLock LED is on. | NumLockFn Key |
| Ejection HotKeyEnable or disable hotkey ejection ( « Fn » + « Esc » key). | DisabledEnabled |
| Application HotKey Disabled | Enabled |
| ► Tablet Button ConfigurationThe submenu appears when this item isselected. | Enter the sub-menu. |
Sub-menu (Tablet Button Configuration)
| A1 Button Disabled | Application1Ctrl+Alt+DelConcealed Mode Trigger |
| Preboot Key BindingKey assignment during startup | Not AssignedF1F2F3F4F5F6F7F8F9F10F11F12 |
| A2 Button Disabled | Application2(Only for model without Barcode Reader)Ctrl+Alt+DelWirelessSwitchBarcode Reader Trigger(Only for model with Barcode Reader) |
| Preboot Key BindingKey assignment during startup | Not AssignedF1F2F3F4F5F6F7F8F9F10F11F12 |
| Up/Down Buttons Disabled | Volume Up/DownBrightness Up/Down |
| Windows Button Disabled | Enabled |
| Rotation LockButton Disabled | Application3Ctrl+Alt+DelBarcode Reader TriggerRotation Lock |
| Preboot Key BindingKey assignment during startup | Not AssignedF1F2F3F4F5F6F7F8F9F10F11F12Esc |
Table of Preboot Key Bindings
- The settings for [A1 Button], [A2 Button], and [Rotation LockButton] can be changed on [Tablet Button Configuration]. The settings for [Down Button], [UP Button] and [Windows Button] cannot be changed.
| A1 Button | You can change the button assign( Tablet Button Configuration) |
| A2 Button | You can change the button assign( Tablet Button Configuration) |
| Down Button | |
| Up Button | |
| Windows Button | |
| Rotation LockButton | You can change the button assign( Tablet Button Configuration) |
| LCD Brightness ModeThe lowest brightness is 2 ed/m | Normal BrightnessLow Brightness |
| Battery Charging Indicator On Continuous | Flashing |
| Power On AC Disabled | Enabled |
| WirelessAntenna Switching PC (built-in) | Auto |
| ▶ Concealed Mode Configuration○ The submenu appears when thisitem isselected. | Enter the sub-menu. |
| Concealed Mode Disabled | Enabled |
| LCD BacklightCan be changed only when [Concealed Mode] is set to [Enabled].When [LCD Backlight] isset to [OFF], touch operation is disabled. | OFFMinimumON |
| LEDCan be changed only when [Concealed Mode] is set to [Enabled].Except for the camera indicator and the LED of external devices. | OFFON |
| SoundCan be changed only when [Concealed Mode] is set to [Enabled]. | OFFON |
| Wireless RadioCan be changed only when [Concealed Mode] is set to [Enabled]. | OFFON |
| Camera Light OFF | ON |
| Backlit KeyboardOnly for modelwith Backlit KeyboardCan be changed only when [Concealed Mode] isset to [Enabled]. | OFFON |
| Fan OFF | ON |
| TouchScreen OFF | ON |
| Barcode Reader OFF | ON |
| Trigger KeyCan be changed only when [Concealed Mode] isset to [Enabled].Select the key combination to turn on/off the Concealed Mode.When [F8] isselected, pressing « F8» turns on/off the Concealed Mode.When [Right Alt] is selected, pressing right « Alt» turns on/off the Concealed Mode.When [A1 Button] is selected, pressing the A1 ( ) button turns on/off the Concealed Mode. | Fn+F8F8Right AltA1 Button |
| ▶ FAN Diagnostics | Press « Enter» to start fan test.To use this option, set [Concealed Mode] to [Disabled]. |
| ▶USB Charge Settings | Enter the sub-menu. |
Sub-menu (USB Charge Settings)
| Alwayson Charging Disabled | Enabled |
| QuickCharging Disabled | Enabled |
| ▶ Optional Kit Configuration○ Normally do not change this setting. | Enter the sub-menu.A separately provided password is required to enter the sub-menu. |
Advanced Menu
Underlined items are the factory presets.
| ▶CPU Configuration• The submenu appears when thisitem is selected. | Enter the sub-menu. |
Sub-menu (CPU Configuration)
| Intel(R) Hyper-Threading Technology Disabled | Enabled |
| Intel(R) Virtualization Technology Disabled | Enabled |
| Intel(R) VT-d Disabled | Enabled |
| Intel(R) Trusted Execution TechnologyCan be changed only when [Intel(R) VT-d] isset to [Enabled]. | DisabledEnabled |
| Intel(R) Turbo Boost Technology 2.0 Disabled | Enabled |
| Intel(R) Software Guard Extensions Software Controlled | EnabledDisabled |
Peripheral Configuration
| ▶ Serial Port SettingsThe submenu appears when thisitem is selected.Used to configure the serialport.Displayed only for model with serial port of tablet. | Enter the sub-menu. |
Sub-menu (Serial Port Settings)
| Serial Port Disabled | EnabledAuto |
| Tablet LANOnly for tablet | DisabledEnabled |
| Power On by LANCan be changed only when [Tablet LAN] is set to [Enabled]. | DenyAllow |
| ▶ Wireless Configuration• The submenu appears when thisitem isselected. | Enter the sub-menu. |
| Wireless LANOnly for model with wireless LAN | DisabledEnabled |
| Wireless WANOnly for model with wireless WAN | DisabledEnabled |
| BluetoothOnly for model with Bluetooth | DisabledEnabled |
| GPSOnly for model with dedicated GPS | DisabledEnabled |
| Ext Antenna SelectOnly for model with External AntennaThe number of antennas used in devices to which the external antenna nected can be specified. The settings of the selected items are displayedNOTEThis computer always has two channels for the external antenna. The settings of the antenna that is not displayed on the screen also enabled.Single setting works only for the vehicle dock with one external antenna. | SingleDualis con-are |
| Ext Antenna 1GPS on wireless WAN)>WWAN mainWWAN GPSNONE | GPS on wireless WAN)>WWAN mainWWAN GPSNONE |
| GPSWWAN mainNONE | |
| WWAN mainNONE | |
| Ext Antenna 2GPS on wireless WAN)>WWAN GPSWWAN subNONE | GPS on wireless WAN)>WWAN GPSWWAN subNONE |
| microSD Card SlotOnly for tablet | DisabledEnabled |
| Extension Port Disabled | Enabled |
Sub-menu (Wireless Configuration)
| Tablet USB Port Disabled | Enabled |
| Keyboard Base USB Port Disabled | Enabled |
SuperSpeed USB Configuration
| Left Port of Tablet Disabled | Enabled |
| Keyboard Base and Port Replicator Disabled | Enabled |
| Legacy USB Support Disabled | Enabled |
Camera Configuration
| Camera (Front)Only for model with front camera | DisabledEnabled |
| Camera (Rear)Only for model with rear camera | DisabledEnabled |
Boot Menu
Underlined items are the factory presets.
| Boot ModeIf the startup from USB devices is not possible, set [Compatible] and retryHowever, setting [Compatible] will require longer time to display the Windows compatible boot screen than setting [Normal]. | Normal |
| ▶UEFI Priorities• The sub-menu appears when thisitem is selected. | Enter the sub-menu. |
UEFI Priorities
| Boot Option #1 - #5 Windows Boot Manager | Recovery PartitionUEFI: IP4 Intel Ethernet Connection ...Windows Recovery EnvironmentUEFI: IP6 Intel Ethernet Connection ...Disabled |
UEFI Boot Device Control
Set whether to enable or disable the startup of each device.
| UEFI Boot from Hard Disk Disabled | Enabled |
| UEFI Boot from LAN Disabled | Enabled |
| UEFI Boot from USB Disabled | Enabled |
To change the boot order
- [Boot Option] for [UEFI Boot Device Control] shows the boot device recognized by Firmware (BIOS).
- Boot from a device or not can be selected at [UEFI Priorities], device by device.
- You can select the boot device during start-up of the computer, too. Press « Esc » soon after [Panasonic] boot screen is displayed. [Boot Menu] appears and you can select the device. To use this function, set [Boot Popup Menu] to [Enabled].
Security Menu
Underlined items are the factory presets.
Boot Prompt Configuration
| Boot Popup Menu Disabled | Enabled |
| Password On BootThe shutdown when the fast startup is enabled, this function is ineffective. | DisabledEnabled |
| Password On Reboot Disabled | Same as Boot |
| Password On ResumeCan be changed only when [Password On Boot] isset to [Enabled].Thisfunction iseffective when the computer is restarted after a shutdown (when fast startup isenabled) and when the computer resumes from hibernation, not when it resumes from sleep. | DisabledEnabled |
| Set Supervisor Password | Enter the sub-menu. |
| Hard DiskLockCan be changed only when [Set Supervisor Password] isset. | DisabledEnabled |
| User Password Protection | No ProtectionProtected |
| Set User PasswordCan be changed only when [Set Supervisor Password] isset. | Enter the sub-menu. |
| SW KB Support for Encryption | DisabledEnabled |
| Profile SelectionCan be changed only when [SW KB Support for Encryption] is set to [Enabled]. | 1 field2 fields |
| SW KB Support for BitLocker | DisabledEnabled |
| ▶ Embedded Security(TPM)Onlyfor model that supports TPM.Can be changed only when [Set Supervisor Password] isset.Sub menu items:Sub-Menu ProtectionTPM State (Depending on the models, this item is not displayed.)Pending TPM operationWhen [Clear TPM Owner] is selected, clear owner information in the TPM chip.Use for discarding and transferring this product.If you select [Clear TPM Owner] when the BitLocker iseffective, you may need to reinstall OS.Current TPM Status Information (Depending on the models, this item is not displayed.) | Enter the sub-menu. |
| ▶AMT Configuration○Onlyfor model that supports Intel(R) AMT.○Can be changed only when [Set Supervisor Password] isset. | Enter the sub-menu. |
| ▶Fingerprint Security○Sub menu items:○Sub-Menu Protection○Power-on Security | Enter the sub-menu. |
| ▶Secure Boot○The submenu appears when this item is selected.○If you change factory default setting, preinstalled-OS may not operate correctly. | Enter the sub-menu. |
Exit Menu
| Save Values and Reboot To reboot the system after | saving the changes. |
| Reboot Without Saving Changes To reboot the system | without saving the changes. |
Save Options
| Save Current Values To save the changes for all Setup options. | |
| Load Previous Values To load previous values for all Setup options. | |
| Load Default Values To return the settingsto the default values. |
Boot Override
| Recovery Partition Erase your flash memory or restore the computer to its original factory default image. | |
| Windows Recovery Environment Boot from Windows | Recovery Environment |
| UEFI: IP4 Intel Ethernet Connection ... Boot from LAN device (IP4) | |
| UEFI: IP6 Intel Ethernet Connection ... Boot from LAN device (IP6) | |
| Windows Boot Manager | Boot from preinstalled OS |
Depending on the hardware constructions, some device names are different.
| ▶ Diagnostic Utility | Execute Diagnostic Utility. |
Operation environment
- Place the computer on a flat stable surface not subject to shock, vibration, and danger of dropping. Do not place the computer upright or turn it over. If the computer is exposed to an extremely strong impact, it may become damaged.
- Operating environment
Temperature:
Operation : -10 °C to 50 °C {14 °F to 122 °F} (IEC60068-2-1, 2)
Storage : -20 °C to 60 °C { - 4 °F to 140 °F }
Humidity:
Operation : 30% to 80% RH (No condensation)
Storage : 30% to 90% RH (No condensation)
Even within the above temperature/humidity ranges, operation for a long time in extreme environments, smoking nearby, or operation in places where oil is used or where there is a lot of dust will result in the product deterioration and will shorten the product life.
If the computer is wet in temperatures of 0 ^ 32 ^ or below, freeze damage may occur. Make sure to dry off the computer in such temperatures.
*1 : Do not expose the skin to this product when using the product in a hot or cold environment.
- Do not place the computer in the following areas, otherwise the computer may be damaged.
- Near electronic equipment. Image distortion or noise may occur.
- In extremely high or low temperature.
- As the computer can become hot during operation, keep it away from items that are sensitive to heat.
Handling cautions
This computer is designed to minimize shock to parts such as the LCD and the flash memory drive and equipped with a drip-proof keyboard, but no warranty is provided against any trouble caused by shock. Be extremely careful when handling the computer.
- When carrying the computer:
- Turn off the computer.
- Remove all externaldevices, cables and other protruding objects.
- Do not drop or hit the computer against solid objects.
-
Do not leave the display open.
Do not grip the display part. -
Do not put anything (e.g., a piece of paper) between the display and keyboard.
- When you board an airplane, take the computer with you and never put it in your checked luggage.
- When using the computer on airplane, follow the airline's instructions.
- When carrying a spare battery, put it in a plastic bag to protect its terminals.
- Be careful not to get injured by dropping or getting hit when carrying the computer.
- The touchpad is designed to be used by fingertip. Do not place any object on its surface and do not press down strongly with sharp-pointed or hard objects that may leave marks (e.g., nails, pencils and ballpoint pens).
- Avoid any harmful substances such as oil from getting into the touchpad. The pointer may not work correctly.
- Touch the screen with the pen (included) or your fingers.
When touching the screen, use only the pen (included) or your fingers on the surface.
Touching the screen with an object other than the pen (included) or your fingertip (a fingernail or metal object, or other hard or sharp objects that may leave a mark) may scar or stain the surface, causing the malfunction.
- Do not apply too much pressure when operating the screen.
Only a light touch is required to operate the screen. Applying too much pressure may damage the surface.
Do not use the screen when dust or dirt (e.g., oil) is on the screen.
Otherwise foreign particles on the screen/pen (included) can scratch the screen surface or obstruct the pen (included) operation.
Handling the screen
- Do not apply strong pressure to the screen outside of the LCD display.
Applying strong pressure to the screen outside of the display area may result in malfunctions or damage to the LCD screen.
- Do not apply excessive force to the screen.
Do not lift the computer while holding the LCD screen, or allow the screen to be twisted. Do not place any objects on the LCD screen. Any of the above may cause the screen glass to break, or may damage the LCD screen.
Operation response may be slower in low temperature environments.
The screen may respond to operations more slowly when using the computer in temperatures less than 5 °C, but this is not a malfunction. Response time will return to normal when the computer is returned to room temperature.
- If the pointer jumps to a location other than where the screen was touched, or if the LCD resolution changes, recalibrate the screen.
Perform the procedure of "Calibrating the Screen".
Handling the pen (included)
- Clean the pen (included) tip and screen prior to operation.
Foreign particlescan scratch the screen and impede the operation of the pen (included).
- Use the pen (included) only for touching the screen.
Using it for any other purpose may damage the pen (included) and result in scratches on the screen.
The pointer cannot follow the pen (included) movement if you move the pen (included) too quickly.
- Do not apply excessive force to the tip of digitizer pen.
The tip of the digitizer pen (A) is equipped with a sensor. Continued applied pressure to the tip may result in its malfunction or degradation. Make sure excessive pressure is not applied to the tip when storing the digitizer pen.
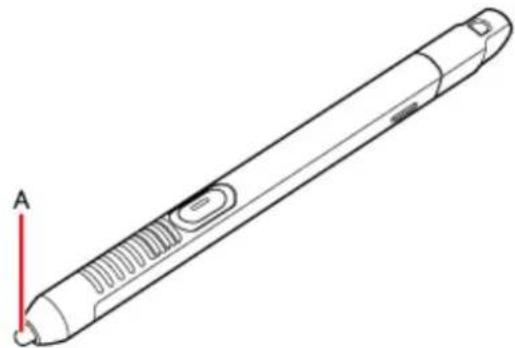
natural_image
Line drawing of a pen-like device with a red vertical axis labeled 'A' (no text or symbols on the object itself)The digitizer uses electromagnetic induction and may not work properly near strong electrical field or magnetic field.
such as:
- Near AM radio base station or relay station antennas
- Near CRT displays that generate strong electromagneticfield noise
Move the digitizer away from such locations so it will work properly.
When using peripheral devices
Follow these instructions and this Manual to avoid any damage to the devices. Carefully read the instruction manuals of the peripheral devices.
- Use the peripheral devices conforming to the computer's specifications.
- Connect to the connectors in the correct direction.
- If it ishard to insert, do not try forcibly but checkthe connector'sshape, direction, alignment of pins, etc.
- If screws are included, fasten them securely.
- Remove the cables when you carry the computer. Do not pullthe cables forcibly.
Preventing your computer from unauthorized use via wireless LAN/Bluetooth/wireless WAN
Before using wireless LAN/Bluetooth/wireless WAN, make the appropriate security settings such as data encryption.
When the battery indicator does not light on
The battery indicator may not light on even if the AC adaptor and the battery pack are correctly connected to the computer, due to the following reasons.
The AC adaptor's protection function may be working. In this case, pull out the AC cord and wait for more than 1 minute before reconnecting the AC cord.
Sensors
This computer is equipped with four sensors (acceleration sensor, gyro sensor, magnetic sensor, ambient light sensor), and you can use these sensors with any software that is compatible.
As the accuracy of each sensor output is dependent on the operating environment and other conditions, the results should only be used as a reference.
The acceleration sensor, gyro sensor, and magnetic sensor are located at the bottom left of the LCD. The detection results of each sensor may vary depending on how you are holding the computer, the application software you are using, and other factors.
Automatic brightness adjustment
The computer is equipped with an automatic brightness adjustment function that adjusts the display screen based on the ambient light sensor. You can configure the automatic adjustment function as follows.


- Click (Start) at the bottom left corner, and then click (Settings) - [System] - [Display].

Alternatively, click (settings) - [System] - [Display] in the tablet mode.
- Set [Change brightness automatically when lighting changes] to [On].
CAUTION
■ The [Change brightness automatically when lighting changes] item may not be available in some cases. In such cases, click the arrow to the left of [Settings] at the top left of the screen, and perform the operation from [System] - [Display] again.
The ambient light sensor is located at the top of LCD.
The ambient light cannot be detected properly if this area is obstructed or dirty.
Magnetic sensor
The magnetic sensor on the computer operates by detecting geomagnetism. Therefore, the magnetic sensor may not function properly and it readings may be inaccurate, especially in the following environments.
- Inside or near steel structures such as buildings or bridges
- Inside or near automobiles, or near train power lines
- Near metallic furniture or appliances
- When the AC adaptor or other peripheral devices are brought closer to the computer
- Near magnets, speakers, or other objects with strong magnetic fields
The magnetic directions indicated by the magnetic sensor may not be accurate immediately after purchase or in environments with poor magnetic fields.
In such cases, turn on the computer and move it as follows.
- Hold the computer so that its screen side is facing upward and level.
- While keeping the computer level, rotate it 90 degrees or more clockwise.
- Return the computer to position 1, and rotate it 90 degrees or more counterclockwise.
- Return the computer to position 1.
- Tilt the computer 90 degrees or more to the left so that the left side of the computer tilts down.
- Return the computer to position 1, and tilt it 90 degrees or more to the right so that the right side of the computer tilts down.
Maintenance
Cleaning the LCD panel
The screen is specially treated to prevent dirt from adhering to the surface. Also, to improve the outdoor visibility of the display, a low reflection coating has been added.
When removing the dirt on the screen surface, use only an approved soft cloth (included) in order to avoid scratches and peeling of the coating.
Before using the computer, be sure to read the instructions provided below.
- Be sure to wipe the LCD displayto remove fingerprints, etc., with the soft cloth.
- The included soft cloth is designed for cleaning the LCD surface. Do not wipe areas other than the LCD display with it.
• How to use the soft cloth
- Use the soft cloth when it is dry. Do not apply water or solvents to the soft cloth.
- First, lightly wipe foreign particles and dust adhering to the LCD display on one side of the soft cloth. Do not use force, since the LCD surface may be damaged with the foreign particles or dust.
Next, wipe off fingerprint, etc., with the other side of the soft cloth.
After wiping off foreign particles and dust, wash the soft cloth (refer to the following) to remove the foreign particles and dust from the soft cloth.
- When the soft cloth becomes dirty, wash it with neutral detergent. Do not use bleach or a fabric conditioner (softener), or carry out sterilization by boiling.
- If the LCD gets wet, wipe the surface lightly with the soft cloth.
- While wiping the LCD display, the computer must be turned off.
- Clean the screen while the computer is powered off.
Cleaning the screen while the power is on may cause the computer to malfunction. Also, dirt on the screen is easier to see when the computer is powered off, and so is easier to clean.
- Wash the soft cloth when it becomes dirty.
When the soft cloth becomes dirty, wash it with mild detergent. Do not use bleach or fabric conditioner (softener), or try to sterilize the cloth by boiling.
If the soft cloth is dirty, it may be ineffective in cleaning the screen, and in fact may cause dirt to adhere to the screen.
- Checkthe following to prevent the surface of the screen from being scratched.
Are you using your fingers or the pen (included) to operate the screen?
Is the surface clean?
Is the soft cloth clean?
Are you using the pen (included) with the tip extended?
Is the tip of the pen (included) clean?
Are your fingers clean?
Cleaning areas other than the LCD panel
Wipe with a soft dry cloth such as gauze. When using detergent, dip a soft cloth in water-diluted detergent and wring it thoroughly.
CAUTION
■ Do not use benzene, thinner, or rubbing alcohol since it may adversely affect the surface causing discoloration, etc. Do not use commercially available household cleaners and cosmetics, as they may contain components harmful to the surface.
■ Do not apply water or detergent directly to the computer, since liquid may enter inside of the computer and cause malfunction or damage.
■ Use a soft, dry cloth to wipe droplets of water from the surface of the unit. Do not use a microwave to dry the unit. Doing so will result in
malfunction or damage.
SD Memory Card Information
- The SD MemoryCard slot on thiscomputer accepts SD/SDHC/SDXC and microSD/SDHC/SDXC Memory Cards. Tablet has a microSD memory card slot. Keyboard base has a SD memory card slot.
To use the SD Memory Card on other devices, format the card on the devices. For more details on how to format the card on Windows, refer to our website below.
http://panasonic.jp/support/global/cs/sd/download/sd_formatter.html
Inserting/Removing the SD Memory Card
CAUTION
■ Do not remove or insert the SD Memory Card until Windows has completed loading.
■ Do not remove the card or turn off the computer in the following cases, otherwise the data may be corrupted.
- While the computer is in sleep or hibernation.
- While the SD Memory Card indicator ison.
- While data is being read from or written to the card.
- Immediately after the writing operation. The computer may still continue the access to the card just after writing operation. If you remove the card before the operation is completed, the data may be damaged or the card access may no longer be performed normally.
■ Note that Panasonic assumes absolutely no liability for any loss of data recorded by the user, or any other damages, direct or indirect.
■ Cards Away from Infants and Small Children.
To insert the card
- Slide the cover to the arrow direction. The cover is unlocked.
- Open the cover.
Tablet
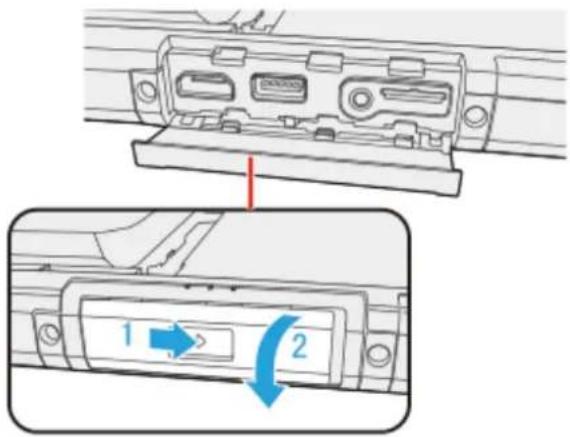
Keyboard Base
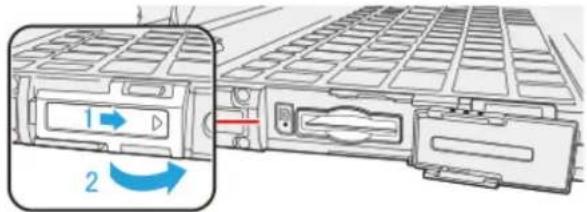
- Insert the SD Memory Card.
Tablet
Confirm that the label side is facing down.
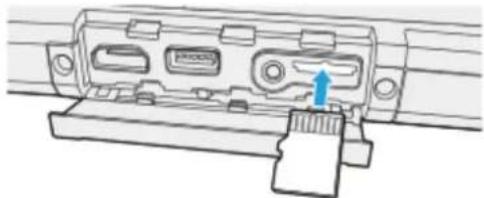
natural_image
Technical line drawing of a mechanical component with a blue arrow indicating a specific part (no text or symbols present)Keyboard Base
Confirm that the label side is facing up.
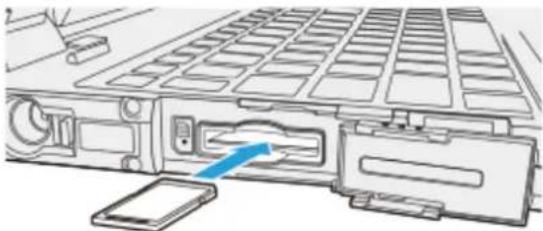
natural_image
Diagram of a computer interface showing an open drive and a smartphone, with no visible text or symbols.NOTE
■ While pressing the cover, slide and close it securely as described in the illustration below. After that, make sure that the cover has been closed properly.
(The illustration shows the cover on the tablet, for example.)

To remove the card
Preparation
- Save the data and close all applications.
-
Open the cover and confirm the SD Memory Card indicator (A) is off.
-
Disable the card function.


-
Click on the task tray and click
-
Select the card.
These steps are not necessary when:
- Remove the card after turning off the computer.
is not displayed. - The card does not appear in the list.

-
Remove the card.
-
Push the card so it comes out of the slot.
- Draw it straight out.
Tablet
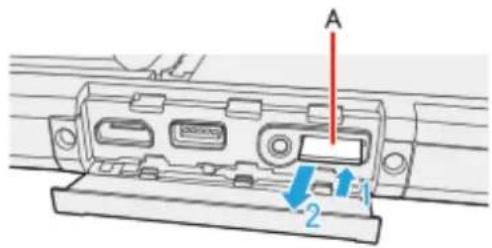
Keyboard Base
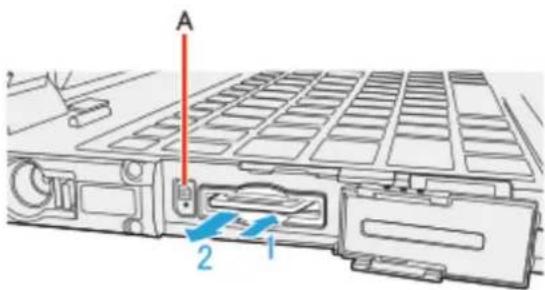
CAUTION
■ After pressing the SD memory card, do not release your finger suddenly. The SD memory card may jump out.
NOTE
■ Close the cover as described in the illustration below, and make sure that it has been closed properly.
(The illustration shows the cover on the tablet, for example.)

natural_image
Technical line drawing of a mechanical component with labeled parts and directional arrows (no text or symbols)Smart Card
CAUTION
Do not:
- Hit, bend, or drop the card.
- Touch the contact part with fingers or metalobject.
- Place the card in very hot location for a long time.
- Remove the card immediately after inserting it.
Inserting/Removing the Smart Card
To insert the card
- Slide the latch (A), and then open the cover (B).
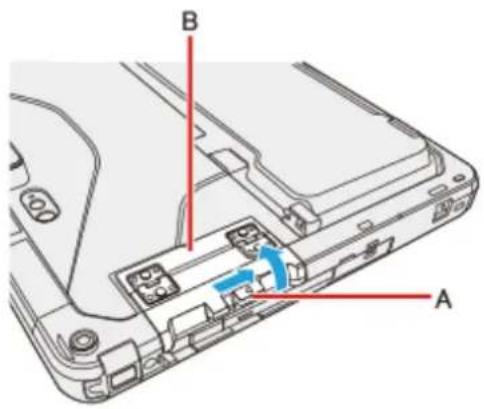
- Insert the Smart Card to the lower slot (C) with the contact part (D) in front.
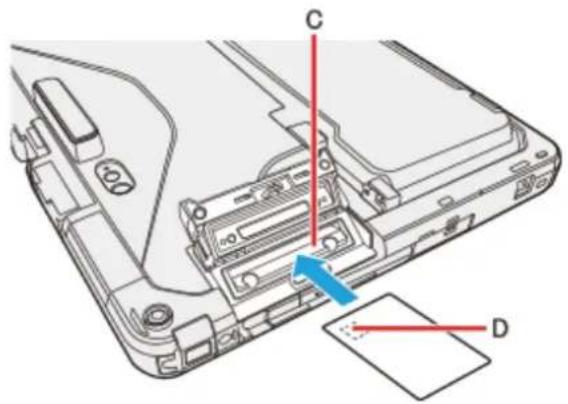
- Close the cover.
- Insert the card untilit securelyfitsinto the slot.
- Slide the latch (A), and then open the cover (B).
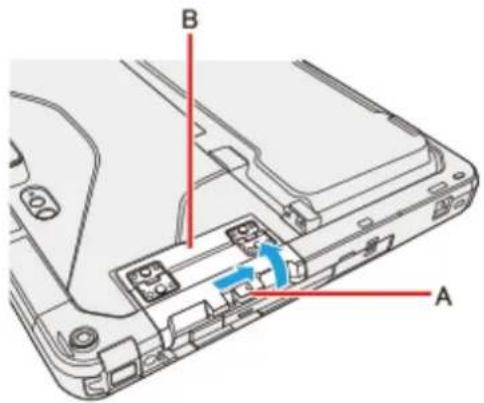
- Draw the card straight out using your fingers.
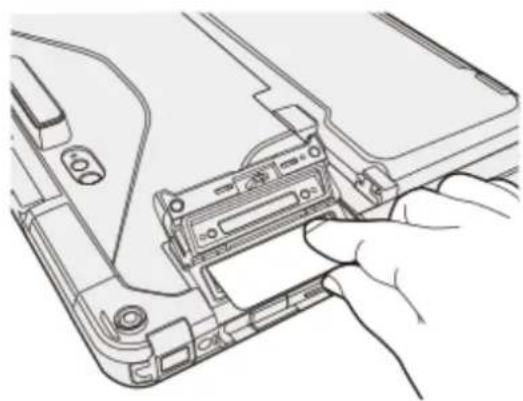
natural_image
Line drawing of a hand inserting a device into a computer chassis (no text or symbols visible)- Close the cover.
External Display
The external monitor (HDMI/VGA) connected to the keyboard base cannot display until Windowsstarts up.
HDMI Port
You can switch the output destination to an externalHDMI display.
Tablet
- Turn off the computer.
Do not use sleep or hibernation.
- Slide the cover to the arrow direction.
The cover is unlocked.
-
Open the cover.
-
Connect the cable.
Connect the HDMI output port (A) and the HDMI display using a HDMI cable.
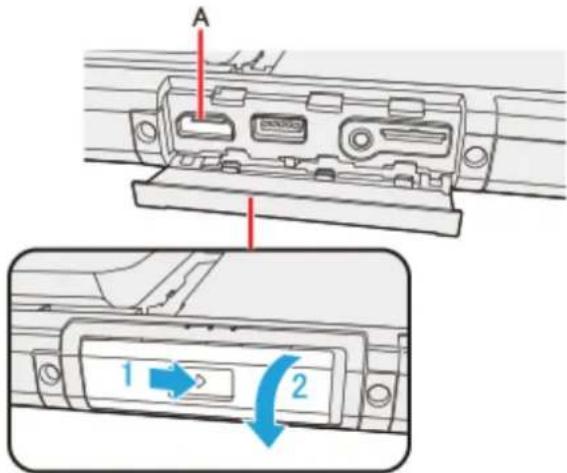
- Turn on the computer.
You can switch the output destination to an externalHDMI display.
Before switching the computer on, connect the HDMI display to the HDMI port and the AC adaptor to the DC-IN jack on the port replicator.
For further information of the connection with terminals, refer to "Port Replicator".
Keyboard Base
- Turn off the computer.
Do not use sleep or hibernation.
- Slide the cover to the arrow direction.
The cover is unlocked.
-
Open the cover.
-
Connect the cable.
Connect the HDMI output port (B) and the HDMI display using a HDMI cable.
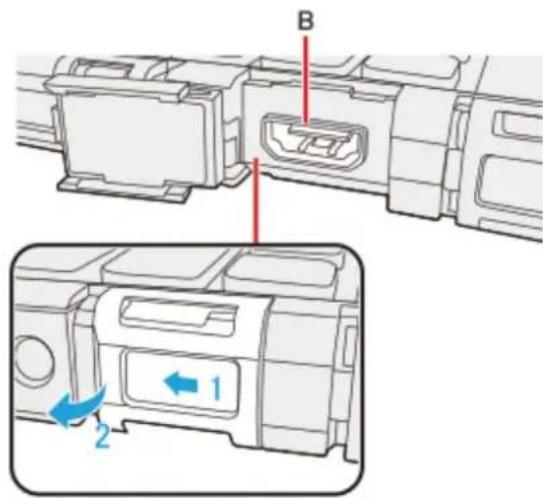
- Turn on the computer.
NOTE
■ When you connect the HDMI cable for the first time, it may take time until the image is displayed.
■ While pressing the cover, slide and close it securely as described in the illustration below. After that, make sure that the cover has been closed properly.
(The illustration shows the cover on the tablet, for example.)

natural_image
Technical line drawing of a mechanical component with blue arrows indicating motion or rotation (no text or symbols)VGA Port
You can switch the output destination to an external analog display.
Keyboard Base
- Turn off the computer.
Do not use sleep or hibernation. - Slide the cover to the arrow direction.
The cover is unlocked. - Open the cover.
- Connect the cable.
Connect the VGA port (C) and the external display using a VGA cable.
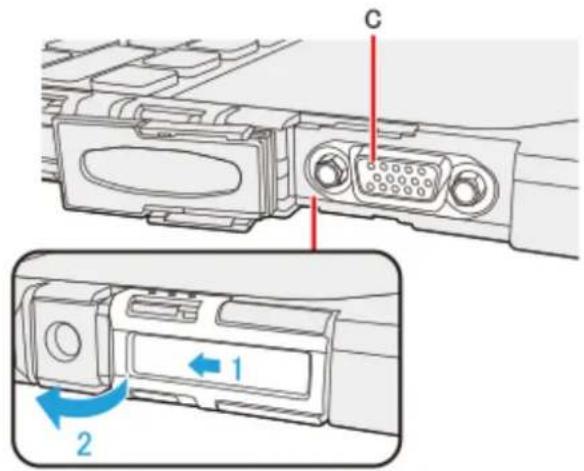
- Turn on the computer.
NOTE
■ When you connect the VGA cable for the first time, it may take time until the video is displayed.
If you connect VGA monitors after connecting high resolution HDMI monitors, such as 4K monitors, images could not be displayed. In such cases, connect VGA monitors first, and then connect high resolution HDMI monitors.
Switching the display mode
Using key function
- Click [Advanced display settings].
- Select the resolution.
Alternatively, you can open above screen by the following procedure: Right-click the desktop, and then click [Display settings]. Follow the on-screen instructions.
NOTE
■ After switching the display mode, the display resolution may change.
■ After resuming from sleep or hibernation, or restarting the computer, the output destination may not be the same as selected in the previous status.
■ When using the HDMI or VGA of the keyboard base for extended display, the extended display may appear on the tablet side after resuming from sleep or hibernation. Switch the setting.
■ When you change the display after Windows starts up, do not press any key until switching is complete.
■ Until Windows startup is completed (during Setup Utility, etc.), the simultaneous display cannot be used and pressing « Fn » + « F3 » switches the display between the internal LCD and the external display.
■ Do not connect or remove the external display during sleep or hibernation.
■ It may take some time to switch between displays depending on the displays used.
- When you use the external display only, set the suitable number of colors, resolution, or refresh rate separately from when you use the internal LCD only or when you use the simultaneous display. 32 bit is fixed for the color setting. This cannot be changed.
Depending on the settings, some external displays may be distorted or may not display the mouse pointer correctly. In this case, set the settings to lower value.
■ When you use the simultaneous display, MPEG files and other motion image files may not be played back smoothly.
■ Carefully read the instruction manual of the external display. -
When connecting an external display that does not conform to the Plug & Play standards, select the display driver accordingly in the following menu, or use the driver disc supplied with the monitor.
-
Click (Start) - (Settings) - [System] - [Display] - [Advanced display settings] - [Display adapter properties] - [Monitor] - [Properties].
- Click [Driver] - [Update Driver].
CAUTION
■ Before disconnecting the external display, switch to the internal LCD by pressing « » key + « P» or « Fn» + « F3». Other-
wise the displayed image quality may become different after disconnection (e.g., wrong resolution). In this case, press « » key + « P » or « Fn » + « F3 » to reset the image quality.
■ The screen may become distorted due to the following operations. In this case, restart the computer.
- Disconnecting an external display for which you have set high resolution or high refresh rate.
- Connecting/disconnecting an external display during computer operations.
Extended Desktop
NOTE
■ It may not be possible to use the extended desktop with some software applications.
- When you click the maximize button, the window is displayed on one of the displays. You cannot move the maximized window to the other display.
■ Do not use the display rotation in the extended desktop.
■ The pop-up displayed by « Fn » key combination appears only on the primary display.
■ Set the internal LCD to the primary display when using the screen. The cursor will move on the primary display when you touch the internal LCD.
To Change the Sound Output Destination
When an HDMI display is connected, you can specify sound to be output via the speakers of the personal computer or via the speakers of the HDMI display.
Make sure your HDMI display is equipped with speakers.
- Right-click (Start) at the bottom left corner, and then click [Control Panel] - [Hardware and Sound] - [Sound].
- Select the sound output destination.
- If you have changed the sound output destination, click [Set Default], and then click [OK].
Connecting/Removing USB Devices
To connect the USB device
Tablet
-
Slide the cover to the arrow direction. The cover is unlocked.
-
Open the cover.
-
Connect the USB device to one of the USB port (A) on the computer.
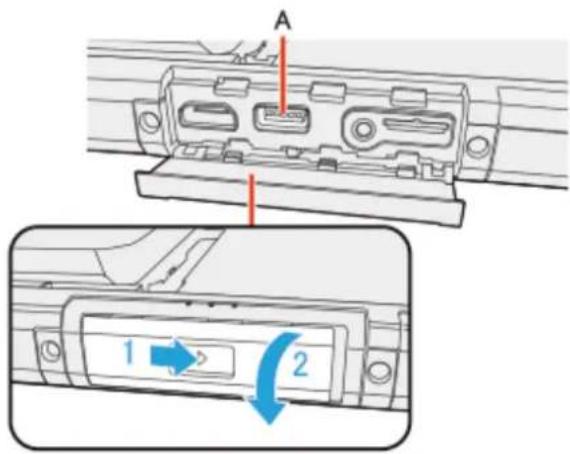
NOTE
■ While pressing the cover, slide and close it securely as described in the illustration below. After that, make sure that the cover has been closed properly.
(The illustration shows the cover on the tablet, for example.)
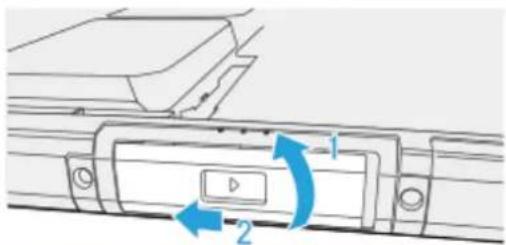
natural_image
Technical line drawing of a mechanical component with two blue arrows indicating rotation or movement (no text or symbols)Keyboard Base
- Slide the cover to the arrow direction. The cover is unlocked.
- Open the cover.
- Connect the USB device to one of the USB ports (B), (C) or (D) on the computer.
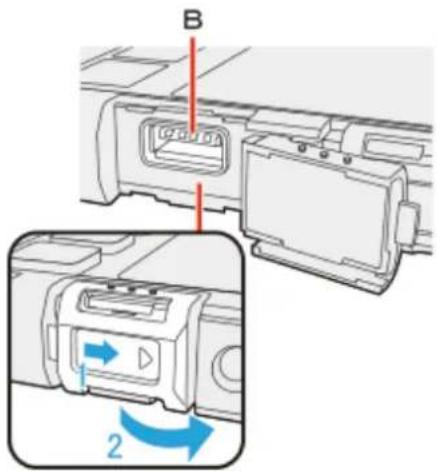

To remove the USB device
- Disable the USB device.


-
Click on the task tray and click
-
Select the USB device.
These steps are not necessary when;
- Remove the device after turning off the computer.

is not displayed.
- The device does not appear in the list in step 2.
- Remove the USB device.
NOTE
■ Close the cover as described in the illustration below, and make sure that it has been closed properly.
(The illustration shows the cover on the tablet, for example.)
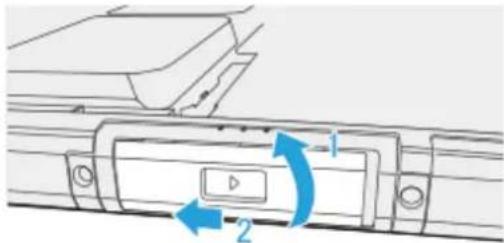
natural_image
Technical line drawing of a mechanical component with labeled parts and directional arrows (no text or symbols)■ You may need to install the driver for the USB device. Follow the on-screen instructions or refer to the instruction manual of the USB device.
■ You may need to install the driver again when connecting the device to another port.
- When a USB device is connected, sleep or hibernation may not function normally. If the computer does not start up normally, remove the USB device and restart the computer.
- When the USB device is removed and then inserted while the computer is on, or may appear in the Device Manager and the device may not be correctly recognized. In this case, remove and connect the device again, or restart the computer.
■ When a USB device is connected, power consumption increases. Remove the USB device when it is not in use, especially when operating by battery power.
■ If you touch the USB keyboard keys or mouse connected to the computer, the computer may resume from sleep.
USB Charge Setting
- Click (Start) - [Panasonic] - [Panasonic PC Settings Utility], and click (Settings) - (USB). Alternatively, click (All apps) - [Panasonic] - [Panasonic PC Settings Utility], and click (Settings) - (USB) in the tablet mode.
Enabling or Disabling USB Quick Charging
- Add or remove a check mark to [Enable Quick Charging].
NOTE
■ If USB quick charging is set to be always enabled, the following problems may occur.
- USB device cannot be detected as a USB device.
- Charging is not possible.
For some USB devices in USB quick charging, even though the computer is connected to the AC adaptor, it may temporarily switch to battery operation. If this happens, disable USB quick charging.
■ Depending on the USB device, its charging may not be possible.
■ Charging time varies depending on the USB device.
■ Connect the USB device directly to the USB port. If connection is via a USB hub, charging may not be possible.
■ For USB devices which do not require charging, connect them to other ports.
■ If the computer is not connected to the AC adaptor, its battery power will be consumed quickly.
■ Do not insert any foreign object in the USB port.
- When the computer resumes from sleep or hibernation, it may not be able to detect the USB device. If this happens, removing and then reconnecting the USB device may enable the computer to detect the device.
Enabling or Disabling Power-Off Charging
- Add or remove a check mark to [Enable Always on Charging].
NOTE
■ USB charging is not performed if you press the power switch for more than 4 seconds to turn off the power, or if you reconnect the AC adaptor and battery after removing them in power-off state.
■ With USB charging during power-off enabled, if a USB keyboard or USB mouse is connected to the port allowing USB quick charging, then they cannot be used to resume the computer from sleep.
If charging is done when the computer is powered by battery, charging automatically stops when the battery level drops below 10%.
Connecting Serial device
Keyboard Base
- Slide the cover to the arrow direction. The cover is unlocked.
- Open the cover.
- Connect the serial device to the serial port (A).
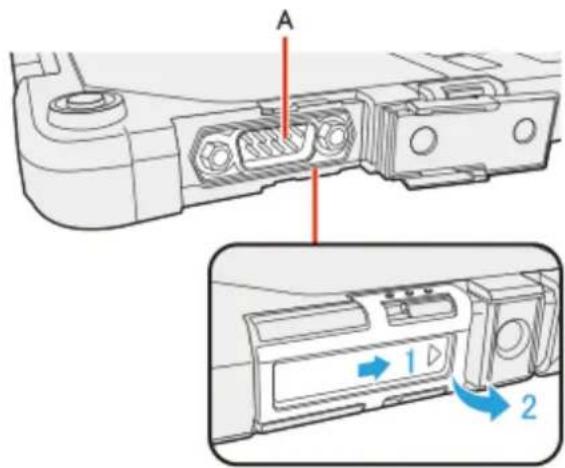
- Connect the serial device to the connector of the serial cable.
Tablet
- Slide the cover to the arrow direction. The cover is unlocked.
- Open the cover.
- Connect the serial device to the serial port (A).
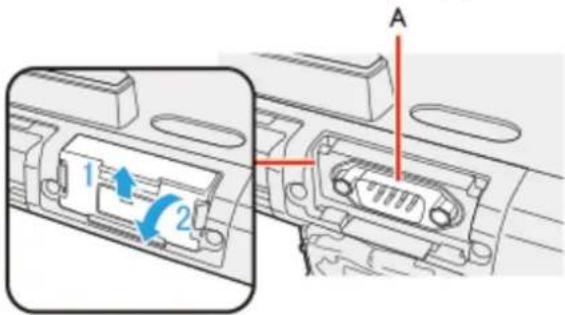
- Connect the serial device to the connector of the serial cable.
NOTE
■ When connecting a cable, be sure to secure it with screws.
■ It does not support serial mouse.
Using the Camera
For the camera position and functions, refer to "Description of Parts". (→ Description of Parts)
NOTE
■ When the camera is in use, the Camera Indicator lights up. (Even if [Concealed Mode] is set to [Enabled] and [LED] to [OFF], the camera indicator cannot be turned off.)
- When the computer is moved from hot and humid environment to low temperature environment, dew condensation may form on the lens. This is not a malfunction. Wait until the lens dries out.
■ Depending on your environment, the sound volume could not be stabilized during recording. If the sound volume is not stabilized, perform the following procedure before use.


- Click on the task tray, and right-click
- Click [Sound Manager], and then click [Microphone Array] tab.
- Add the check on [Alloff] in [Microphone Effects].
- Click [OK].
Panasonic PC Camera Utility
The Panasonic PC Camera Utility can be used to shoot photos and videos.
When you use pictures and videos recorded using this utility at Web conferences, or other services, use specialized applications accordingly.
Starting up
1. Click


(Panasonic PC Camera Utility).
The Panasonic PC Camera Utilitystartsup, and the following screen isdisplayed.
- When the utility is running, do not remove or insert audio devices (such as microphones and speakers). Also, do not enable or disable such devices.
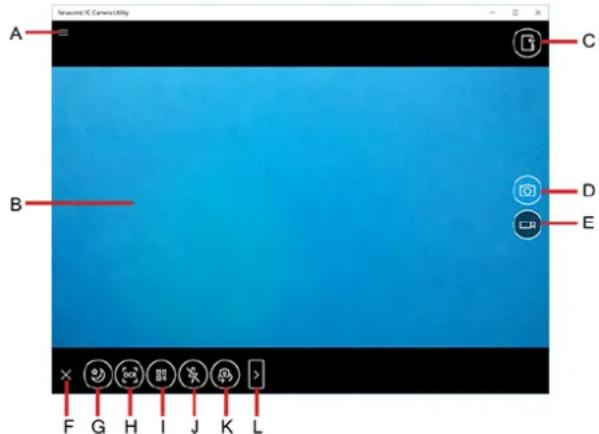
A. Open the camera settings
B. Preview screen
C. Display the folder where recorded data is saved
D. Shoot photos
E. Start/Stop shooting videos
F. Hide the mode menu
G. Night Mode switching
H. OCR
I. Barcode reader
J. Camera light
K. Camera device
L. Change the menu
Shooting Photos and Videos
| Shoot photos |  1. Click .You cannot shoot photos when the save destination storage space is less than 10 MB. 1. Click .You cannot shoot photos when the save destination storage space is less than 10 MB. |
| Start/Stop shooting videos |  1. Click.The camera switches to the video shooting mode. 1. Click.The camera switches to the video shooting mode. 2. Click ..During shooting, the icon is show 2. Click ..During shooting, the icon is show  3. To stop shooting, click .If the save destination storage space becomes lessthan 100 MB during video shooting, shooting willautomatically stop. 3. To stop shooting, click .If the save destination storage space becomes lessthan 100 MB during video shooting, shooting willautomatically stop. |
| NOTE■ Shooting will stop when you minimize the application window, or put the computer into the hibernation mode during video shooting. | |
| Turn the Night Mode ONTo make the dark viewing image brighter |  1. Click .When using the Night Mode, the icon is shown as . 1. Click .When using the Night Mode, the icon is shown as . |
| NOTE■ Updating the preview screen may be delayed when using the Night Mode.■ CPU utilization increases when using the Night Mode. If you leave the computer for long hours, the area around the exhaust vent may be heated. | |
| Display the recorded image or video files |  1. Click .The recorded data will be saved in the displayed folder named the recording date. 1. Click .The recorded data will be saved in the displayed folder named the recording date. |
Other Functions
OCR Scanning


- Click . The icon is shown as .

- Point the window at the target text you want to scan, and click on the right side of the screen.
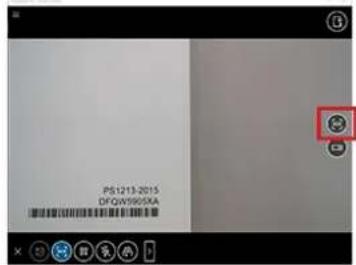
When the target text has been scanned, the scanned OCR text is displayed above the preview window.
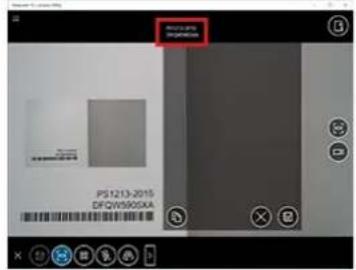

Copy the OCR text to the clipboard.

Retry OCR scanning.

Save the OCR text.
To stop scanning, cl

| Barcode Reader<Only for model with rear camera> |   1. Click is shown as .2. Point the on-screen guide at the barcode.You can turn on the light. Click . 1. Click is shown as .2. Point the on-screen guide at the barcode.You can turn on the light. Click .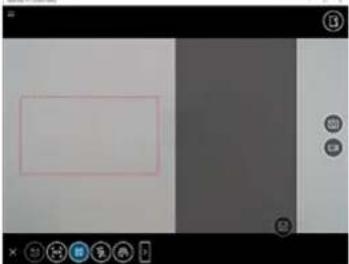 When the barcode has been scanned, the scanned barcode text isdisplayed on the right the preview window. When the barcode has been scanned, the scanned barcode text isdisplayed on the right the preview window.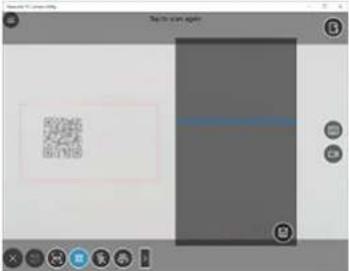  Save the barcode text. Save the barcode text. | |
| Turn the light ON/OFF<Only for model with rear camera> | You can turn on/off the light. Turn off the light. Turn off the light. Turn off the light (Flash available). Turn off the light (Flash available). Turn on the light. Turn on the light. | |
| Switch camera<Only for model with multiple cameras> | Switch between the front and rear cameras. 1. Click 1. Click | |
Zoom
To enlarge or reduce the camera image.
- Use the Zoom slider for adjustment.

If the slider is not displayed,

Changing the Settings
1. Click


The "Settings" menu is displayed.
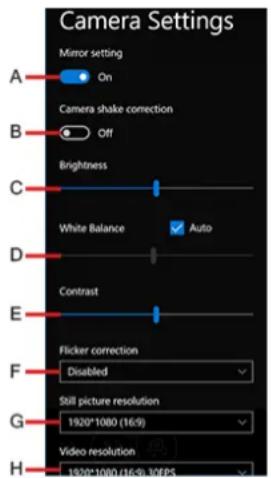
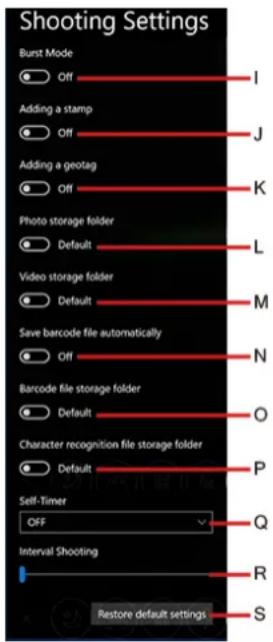
A. Mirror setting
Make the preview screen mirror-reversed (flip horizontal). (Recorded images will not be reversed)
B. Camera shake correction
Enable the image stabilizer when shooting photos.
C. Brightness
Change the brightness of camera images.
D. White Balance
Change the white balance of camera images. To set manually, uncheckthe [Automatic] option.
E. Contrast
Change the contrast of camera images.
F. Flicker correction
Set the flickering correction of camera images.
G. Still picture resolution
Change the still picture resolution. Perform touch operation or mouse click to select the resolution. The resolution may not be correctly specified if you use the keyboard cursor keys.
H. Video resolution
Change the video resolution. Perform touch operation or mouse click to select the resolution. The resolution may not be correctly specified if you use the keyboard cursor keys.
Note that the described FPS values are theoretical. They may be decreased depending on the actualuse conditions.
I. Burst Mode
Press and hold the photo shooting button to shoot continuously while the button is pressed. The maximum number of continuous shooting is 20.
- You cannot shoot continuously when using the Night Mode.
J. Adding a stamp
Add geolocation and time stamps to still images.
K. Adding a geotag
Add geotagging to the Exif data of stillimages.
L. Photo storage folder
Specify the destination of recorded photo data to save. The default value is the "Picture" folder.
M. Video storage folder
Specify the destination of recorded video data to save. The default value is the "Video" folder.
- If you specify the FAT32 formatted storage as destination to save, video files cannot be correctly created when the storage data capacity exceeds 4 GB.
N. Save barcode file automatically
O. Barcode file folder
Specify the destination of saved barcode text. The default value is the "Pictures/Barcode" folder.
P. Character recognition file storage folder
Specify the destination of saved OCR text. The default value is the "Pictures/OCR" folder.
Q. Self-Timer
Specify the time period untilshooting starts after the button is pressed. (OFF/5 sec./10 sec.)
R. Interval Shooting
When you move the slider to the right, and specify the value except [0], the camera automatically repeats shooting at intervals of specified seconds. The maximum 10 photos can be shot continuously.
S. Restore default settings
Return all the settings to the default values.
To close the "Setting" menu, click on the upper left of the screen, or click the preview screen.
NOTE
■ To specify the save destination folder, select the folder you have the access right to. If a writing error occurs, change the specified folder.
■ The settings of "New photos and videos will save to:" under "Save locations" (Start) - (Settings) - [System] - [Storage]) are applied to the "Picture" folder.
■ The settings of "New photos and videos will save to:" under "Save locations" (Start) - (Settings) - [System] - [Storage]) are applied to the "Video" folder.
Barcode Reader
Preparation
Setting the Language
To enter correct character strings, set the language of the barcode reader according to the Default Input Local using the Barcode HID Language Setting Utility. This setting is necessary only for the first time use.
![1. Click (Start) - [Panasonic] - [Barcode HID Language Auto Setting]. Alternatively, click (All apps) - [Panasonic] - [Barcode HID Language Auto Setting] in the tablet mode.](/content/2026/05/760340/images/f5dec33ded408a5b0ad5f826edfcb1ea9733222f6d5da6b47f27fa25b7ea7a99.jpg)
- Set the language of the barcode reader according to the Default Input Local.
NOTE
If the barcode cannot be read following the above steps, change the language of the barcode reader according to the Input Locale of the application to be used. If none of them is applicable, set "English (United States)" both for the barcode reader and the application.
Following are the languages that can be set for the barcode reader.
- English (United States)
French (France)
German (Germany)
French (Canadian Legacy)
French (Canadian) - Spanish (Spain)
Italian (Italy)
Swedish (Sweden) - English (United Kingdom)
Japanese - Portuguese (Portugal)
- Portuguese (Brazil)
Czech (QWERTY)
Czech (QWERTZ)
Slovakian (QWERTY)
Hungarian (101-key)
German (Switzerland)
French (Switzerland)
French (Belgium)
Danish
Norwegian
Hungarian
Dutch (Netherlands)
Setting the USB Mode
Use in the [USB HID Keyboard] mode normally. If the barcode cannot be read with this mode, the application may be compatible with [USB HID POS]. In this case, change the mode according to the following steps.

- Click (Start) - [Panasonic] - [Barcode HID Mode Setting Utility].

Alternatively, click (All apps) - [Panasonic] - [Barcode HID Mode Setting Utility] in the tablet mode.
- When using POS API: Click and add a check mark for [USB HID POS], and then click [OK].
When not using POS API: Click and add a check mark for [USB HID Keyboard], and then click [OK].
Reading Barcodes
CAUTION
■ Do not look directly into the reading window.
DO NOT LOOK DIRECTLY AT THE BARCODE READER LIGHT.
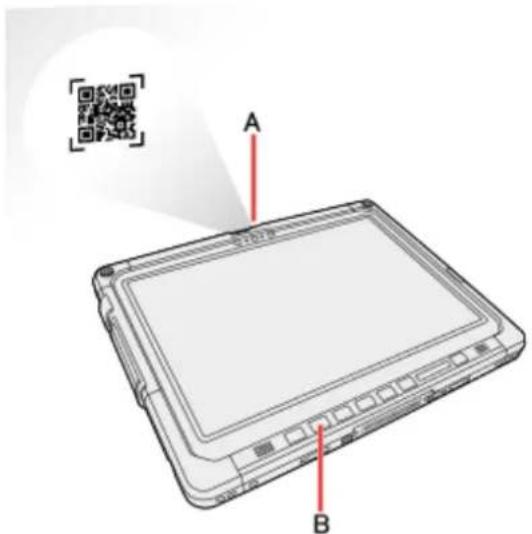
- Open the software for reading a barcode, and put the cursor on it.
- Aim the Barcode Reader (A) at the barcode.
- Press button (B).
The Barcode Reader lights red to indicate the reading position.
NOTE
■ When the barcode read operation is finished, please wait about three seconds to start the next reading. You may press the button immediately, even if you set to release, it takes several seconds to light to light actually.
■ If an error message appears and nothing is displayed, restart this utility.
■ You can change the button assign to Rotation lock button.
To Correctly Read a Barcode with This Computer, Observe the Following
- The reading angle is important factor.
Perform reading at the angle indicated in the figure. We recommend you to set at approximately 2^ to 3^ angle from the perpendicular position.

natural_image
Line drawing of a tablet device with a small inset showing a pointer (no text or symbols)- Hold the reader farther away when reading a larger barcode, and closer in when reading a smaller barcode.
- Perform reading so that the entire symbol falls within the center of the red Barcode Reader light.
- The reader can still read a barcode even if the barcode is not in the center of the red Barcode Reader light.
However, if a part of the barcode lies outside the Barcode Reader light, the barcode cannot be read. Make sure the entire barcode is inside the Barcode Reader light.
Cleaning the Reading Window
If the reading window is dirty, gentlywipe the reading window with a cloth or a cotton swab moistened with water.
Do not allow materials that can easily scratch the reading window to touch the window, such as sandpaper or metal object.
For parts other than the reading window, please read "Handling and Maintenance" in the OPERATING INSTRUCTIONS that comes with the computer.
Decode Capabilities
Following symbologies are supported as the factory default.
Codabar, Code 128, EAN 128, Code 39, DataMatrix, Interleaved 2 of 5, PDF417, QR Code, RSS-14, RSS Limited, RSS Expanded, UPC-A, UPC-E, EAN-8, EAN-13
Following symbologies also can be used by specifying them with Barcode Configuration Utility.
Codablock A, Codablock F, Code 11, Code 128 French CIP, EAN 128 Irregular, ISBT, Code 93, EAN.UCC Composite CC-A/B, EAN.UCC Composite CC-C, EAN.UCC Composite Linear, ISBN, ISMN, ISSN, Matrix, Maxicode, MicroPDF417, MSI, Plessey, Standard 2 of 5, Telepen, UPC-E1, TLC 39, Australian Post, BPO, Dutch Post, Japan Post, Planet, Postnet, Canada Post, Infomail, Sweden Post
Barcode Setting Utility
Barcode Setting Utility applies the barcode configuration file (*.INI file) to the Barcode Key Emulator or Barcode Reader module.
Barcode Configuration Utility
Using the Barcode Configuration Utility, you can create and perform the configuration files to set up the settings.
-
Sign in to Windows as an administrator.
-
Click (Start) - [Panasonic] - [Barcode Configuration Utility].
Alternatively, click (all apps) - [Panasonic] - [Barcode Configuration Utility] in the tablet mode.
If you want to reflect/create a barcode configuration file, right-click [Barcode Configuration Utility], and then click [Run as administrator].
- Click target model, and then click [OK].
Usually choose [2D Barcode Reader Type B Series].
- Make necessary setting.
- If you want to set the type of barcode
- Click [Barcode standard configuration] tab.
- To deploy the barcode standard you want to set.
- Select [Disabled] or [Enabled] in [ACTIVATE].
- If you can set up a data editing function of barcode reader
- Click [Data configuration] tab.
- Make necessary settings.
You can specify the setting contents using the edit boxes and pull-down lists for each setting item.
- Revert to the factory default state of the machine settings
- Click [Preferences] button on each tab.
- At the confirmation message, select [Yes].
NOTE
In each setting tab, only items that need to be set, please put a check in the checkbox. If you do not want to change any settings, please do not put it in check.
- Create and reflect the barcode configuration file.
- When creating a barcode configuration file
- Click [File] - [Save as].
- Save the barcode configuration file.
- Barcode Configuration file (that created by the Barcode Configuration Utility) can be reflected in the barcode reader module by dragging and dropping to the Barcode Setting Utility (→ Direct application of the barcode configuration file)
- When creating and reflecting the barcode configuration file
- Click [Tool] - [Apply Configuration].
- Save the barcode configuration file.
The setting of the barcode configuration file will be reflected.
- If you want to reflect the barcode configuration file you created
- Click [File] - [Open], open the barcode configuration file.
-
Click [Tool] - [Apply Configuration].
-
Click [File] - [Exit].
At the confirmation message, select [Yes].
Direct application of the barcode configuration file
-
Create the barcode configuration file (*.INI file) using Barcode Configuration Utility.
-
Drag and drop the *.INI file to the following application file.
<For 32-bit OS>
C:\Program Files\Panasonic\BCR2D_B_Set\BCR2D_B_Set.exe
<For 64-bit OS>
C:\Program Files (x86)\Panasonic\BCR2D_B_Set\BCR2D_B_Set.exe
- If the [User Account Control] screen appears, click [Yes].
Contactless Smart Card Reader/RFID Reader
You can read the data from RFID (Radio Frequency Identification) tags / Contactless Smart Card.
NOTE
This sensor is typically used with specialized applications. For further information, ask the system administrator.
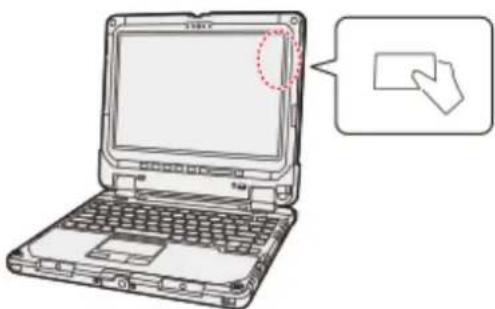
natural_image
Line drawing of a laptop with a speech bubble showing a hand pointing to the screen (no text or symbols on the device itself)- Aim the center of RFID tag / Smart Card at the Contactless Smart Card Reader.
- Continue operation by using the specialized applications.
NOTE
■ Wave cards one at a time. If multiple cards are waved simultaneously, proper reading will not be possible.
If the chip device is held outside of the NFC sensor area or at an angle, or waved incorrectly, proper reading may not be possible.
■ Operation distance depends on RFID tag / Smart Card.
Fingerprint Reader
Precautions
For Security When Using Fingerprint Authentication
- Fingerprint authentication does not guarantee complete user authentication and identification. Please note that we cannot accept liability for any lossor damage incurred from your use or inability to use fingerprint authentication. Please be forewarned.
We cannot accept liability for any loss of data due to malfunction of the fingerprint reader.
Registration may be impossible if there is insufficient fingerprint or other information to identify an individual. - Interoperation with third-party software cannot be guaranteed.
- Fingerprint authentication can be performed using either fingerprint or password data. If you lose this data you may be unable to use this device, so store the data in a safe place.
Fingerprint Reader Handling
- Avoid the following. Failure to do so may result in malfunction or damage to the fingerprint reader.
- Do not rub or scratch the reader with hard materials or poke it with smallpointed objects that could cause scratches.
- Do not touch the surface with dirty fingers.
Do not soil or cover the reader with a sticker.
In the following cases, fingerprint reader sensitivity may be degraded, impeding or preventing authentication and registration.
- If the surface of the fingerprint reader is soiled with dirt, skin oil, or sweat
- If the surface of the fingerprint reader is wet by moisture or condensation
- If your finger istoo wet or too dry
- If your finger is wounded or inflamed
- If your fingerprint grooves have become too shallow due to wear
- If sliding too quickly or too slowly
If your finger isswollen, such as from bathing - If your fingerprint has changed due to weight lossor gain
- Fingerprint reader sensitivity may be restored by the following.
- Wipe the fingerprint reader with a soft cloth.
- Wash and wipe your hands.
- Use another finger for registration and authentication.
- If your finger isextremely dry, moisten it using hand cream.
- Static electricity can cause the fingerprint reader to malfunction. To discharge static electricity, touch a metal surface before touching the fingerprint reader. Be especially careful about static electricity in the winter and in other dry conditions.
- When a faulty fingerprint reader is repaired, previously saved passwords may be reset in the process. Please be forewarned.
Setting a Password
If you forget your sign in password you will be unable to use the device or Windows, so be absolutely certain that you will not forget it.
If you are using Windows Hello:
- When you have installed the Fingerprint Authentication Utility (DDS EVE FA Standalone for Panasonic), Windows Hello will become deactivated.
Fingerprint Authentication Function
Use fingerprint authentication to improve security and convenience by replacing the conventional password entry required to sign in to windows or provide authentication on websites.
- The OS provides the fingerprint registration/authentication function.
If you use fingerprint authentication only to sign in to Windows, you do not need to install the Fingerprint Authentication Utility (DDS EVE FA Standalone for Panasonic). In that case, however, automatic sign in to websites using fingerprint authentication for verification is not available.
The fingerprint authentication function of the OS can be used as follows.

- Click (Notification) on the task tray, and click [Allsettings] - [Accounts]- [Sign-in options] - [Fingerprint].
- When fingerprints are registered with both the OS fingerprint authentication function and the Fingerprint Authentication Utility, authentication is performed by the Utility during Windows sign-in. (The OS's fingerprint information cannot be used.)
Fingerprint Authentication Utility Features
Power On Security
Perform fingerprint authentication before the computer starts up. Set the Supervisor Password for the Setup Utility beforehand.
• Sign in fingerprint authentication
Use fingerprint authentication to unlock your computer and sign in to Windows.
- Fingerprint enrollment tool
Use to register, update, and delete fingerprints.
- Fingerprint authentication ID manager
Use fingerprint authentication to automatically sign in to websites that require a user ID and password, such as are displayed in Internet Explorer.
For Windows 10
If the Fingerprint Authentication Utility (DDS EVE FA Standalone for Panasonic) is installed, the Windows-standard fingerprint registration/authentication function and the function to set the personal identification number (PIN) cannot be used.
Fingerprint Authentication Initial Configuration
Preparations for Using Fingerprint Authentication
Use the following procedure for fingerprint authentication utility with this device.
Set up a Windows user account and password.

Sign in to Windows with administrator rights, and set up the Fingerprint Authentication Utility (DDS EVE FA Standalone for Panasonic).

Sign in with a user account that uses this device to register fingerprints.

Perform Power On Security as necessary.
If the [User Account Control] screen appears, click [Yes].
Fingerprint Reader Location
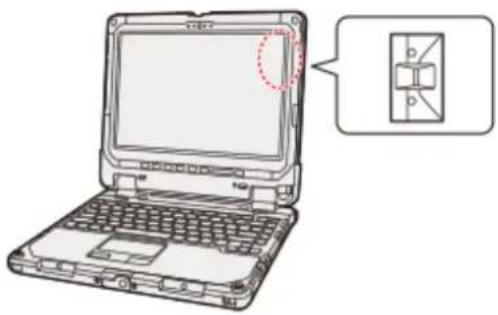
Step 1. Set up a user account and password.
If a user account for fingerprint authentication and a Windows sign in password have already been set, skip to Step 2. If a user account for fingerprint authentication has not yet been set, set up a new user account and password.
NOTE
■ There are two types of user account.
Administrator
- Standard user
Some operations and settings are partially prohibited by standard user (restricted user) accounts.
Step 2. Set up the Fingerprint Authentication Utility (DDS EVE FA Standalone for Panasonic).
- Sign in to Windows with an account having Administrator rights.
If you have signed in as a standard user, click the user name on the upper left of the start menu to display the menu. Then, sign in using administrator privileges.
- Close all other programs.
- Click (Start) - [Windows System] - [This PC] - [Windows(C:)].

Alternatively, click (Settings) - [Windows System] - [This PC] - [Windows(C:)] in the tablet mode.
- Double-click [util], and double-click [fgrprint].
- When FSAInstaller_XXXXXXXXXXXXXXX appears, double-click.
If the "User Account Control" screen appears, click[Yes].
- Follow the on-screen instructions.
- Sign in after restarting.
If there are multiple users, select the one to sign in.
- Click "Sign-in options," click the key icon, enter your Windows password, and then click [→].
Step 3. Register a Fingerprint
Step 3-1. Start registering fingerprints
If "Fingerprint not Enrolled" screen is displayed, click "Enroll".
When you click "Skip Enrollment", the Fingerprint Enrollment Tool can be started by the following procedure.
-
Have the user whose fingerprint is to be registered sign in to Windows with their account.
-
Click

task tray, and click and

click [Fingerprint Enrollment Tool].
Step 3-2. Enter the Windows sign in password.
When the "Fingerprint Enrollment Tool - User Enrollment" screen appears, enter the Windows sign in password and click [Next].
- Click the button for a finger to be registered, and click [Next].
NOTE
- Register at least two fingers. That way, if by any chance one finger is injured, another can be used.
- Enter fingerprints on the fingerprint reader.
Enter each fingerprint at least three times. When the fingerprints are being registered, the "Progress" indicator lights green. When all three parts of the "Progress" indicator light green, the "Fingerprint authenticated normally" message appears.
CAUTION
■ To prevent scanning errors, pay attention to the following.
- Set the first joint of the finger you want to register on the fingerprint reader so that the center of the fingerprint can pass over the center of the reader.
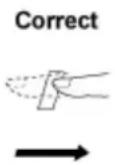
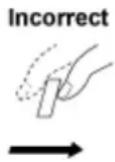
- Slide the finger toward you while maintaining contact with reader.
- Slide your finger until you can see the reader.
■ In the following cases, the fingerprint reader may fail to register or authenticate.
- Sliding too quickly or too slowly.
- The finger is dirty or scarred.
The finger is too wet or too dry.
See "Fingerprint Reader Handling" for details.
■ In rare cases, features necessary for fingerprint authentication may not be detected.
In such cases, try registering another finger.
If pop-up or other messages appear on the desktop screen, fingerprint entry may be inhibited temporarily. In such cases, click outside of the Fingerprint Authentication window, then click again back inside it.
-
Click [Next], and register another finger using the same procedure as the first.
-
After registering the second finger, click "Finish".
To register more fingers, check "Add/change/delete a fingerprint", then click [Next] and repeat the same procedure.
- Click [OK].
Perform Power On Security as necessary.


-
Click on the lower right of the desktop screen, click on the task tray, and click [Power On Security tool].
-
When the [Log On] screen is displayed, input the fingerprint that has been registered.
-
Set [Power On Security] to [On] on the [Power On Security Configuration] screen.
When signing in to Windows with only the authentication before startup, enable [Single sign on].
- Click the finger button to use for Power On Security.
You can select the registered finger.
-
Click [Done], and then click [Yes] on the confirmation screen.
-
Click [OK].
NOTE
■ If the backup file is recovered, the Power On Security setting is deleted. Make the setting again after the recovery.
■ Enabling the Power On Security will register the fingerprint data on BIOS. To erase the fingerprint data that has been registered on BIOS, uninstall the fingerprint authentication utility (DDS EVE FA Standalone for Panasonic). (The fingerprint data is not erased even if the OS is recovered or the data on the built-in disk is erased) ( Uninstalling the fingerprint authentication utility)
How to use the fingerprint authentication utility
See the online Help (EVE FA Standalone Help) installed with the device for more details on using the fingerprint authentication utility, troubleshooting, restrictions, and other info.
Use the following procedure to display the online Help (EVE FA Standalone Help).

- Click (Start) at the bottom left corner, and then click [DDS] - [EVE FA Standalone Help].
Alternatively, click (All apps) - [DDS] - [EVE FA Standalone Help] in the tablet mode.
Uninstalling the fingerprint authentication utility
Perform the following procedure to uninstall the device's fingerprint authentication utility.


- Click (Start) - (Settings) - [System] - [Apps & features].
- Select "EVE FA Standalone for Panasonic (xxx) x.x.x.xxxxx", and click [Uninstall].
(x.x.x.xxxxxindicates the version number)
Follow the on-screen instructions.
- If you want to be able to use the user authentication data in the future, select [No] when the "Do you delete all the data such as registered fingerprint information?" message appears. Otherwise, select [Yes] to completely delete the authentication data.
- Follow the on-screen instructions.
Port Replicator
You can use an optional port replicator (CF-VEB331 series). This device frees you from being bothered by a lot of cable connections when you carry the computer. It also allows you to connect various peripherals.
Connect the port replicator to the expansion bus connector on the bottom of the computer. (Description of Parts) Read the instruction manual of the port replicator before using.
CAUTION
■ Connect the AC adaptor always when using the port replicator.
■ The driver of the port replicator is preinstalled in the computer.
■ Connect or disconnect the port replicator while the computer power is turned off.
■ To boot the computer from a commercially available optical drive, be sure to connect the USB drive to the USB port on the computer, not to the USB port on the port replicator.
NOTE
■ Use only the specified port replicator (CF-VEB331 series).
Description of Parts
Read carefully this manual that described for each device when connecting each device to the port replicator.
CAUTION
■ Do not touch the expansion bus connector or pins of the port replicator.
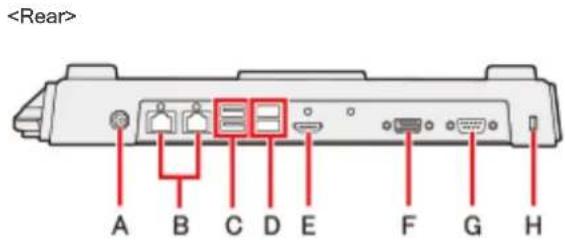
A. DC-IN Jack
B. LAN Port (2 ports)
C. USB 3.0 Port (2 ports)
D. USB 2.0 Port (2 ports)
E. HDMI Port
Connect the HDMI compatible digital display.
It is not compatible with the analog display.
The display specifications of the maximum resolution, etc. that can be output differ according to the specifications of the device connected. For details, refer to the specifications of the device connected.
F. VGA Port
G. Serial Port
It does not support serialmouse.
H. Security Slot
A Kensington cable can be connected.
- For more information, read the manual that comes with the cable.
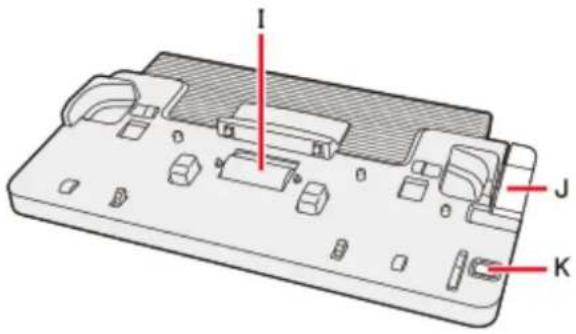
I. Expansion Bus Connector
This connects to the expansion bus connector on the bottom of the computer.
J. Lever
Slide the lever allthe way back to release the computer.
K. Power Switch
This operates identically to the power switch on the computer.
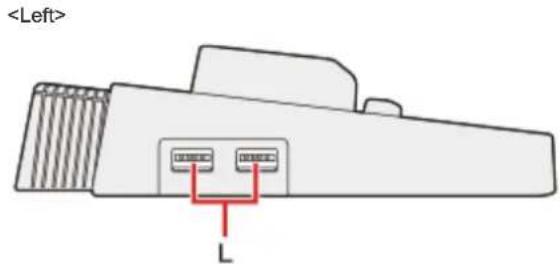
L. USB 2.0 Port (2 ports)
NOTE
■ As for external displays you can use at the same time, refer to the table below.
| Without Port replicator With Port replicator | ||
| Tablet HDMI × 1 HDMI × 1 | ||
| Keyboard Base HDMI × 1, VGA × 1 No Support | ||
| Port replicator | No Support | HDMI × 1, VGA × 1 |
Connecting/Disconnecting the Computer
CAUTION
■ Make sure to turn the computer off for connection/disconnection.
- Do not connect or disconnect the port replicator while the computer is powered on or in the sleep or hibernation mode.
Connecting
- Turn off the computer.
Disconnect all the devices and cables and close the terminal cover and close the display.
- Connect the AC adaptor to DC-IN jack of the port replicator.
Connect the AC cord to the AC adaptor, and connect to an AC outlet.
CAUTION
■ Refer to the OPERATING INSTRUCTIONS accompanying computer for information on proper handling of the AC adaptor and AC cord.
- Place the corners of the computer in the latches of the port replicator (as shown by the arrows below).
Make sure to close all connector covers of the computer. Do not attempt to make connections if there is any object between the computer and the port replicator. Doing so could damage the computer and the port replicator.
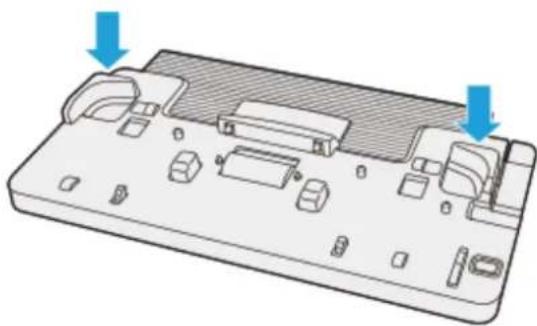
natural_image
3D diagram of a computer monitor base with two blue arrows pointing to the top panel (no text or symbols present)- Pull out the handle of the computer.
- If you do not pullout the handle before opening the display, the computer may fallover due to the weight of the display.
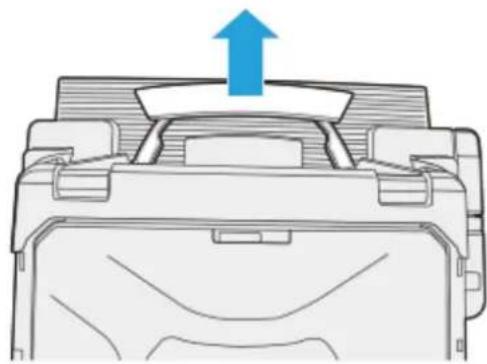
natural_image
Diagram of a mechanical component with an upward arrow indicating motion or force (no text or symbols present)- Press the computer in the direction of the arrow and set firmly against the port replicator.
CAUTION
■ Do not allow your hand to get caught between the computer and the port replicator when setting the computer.
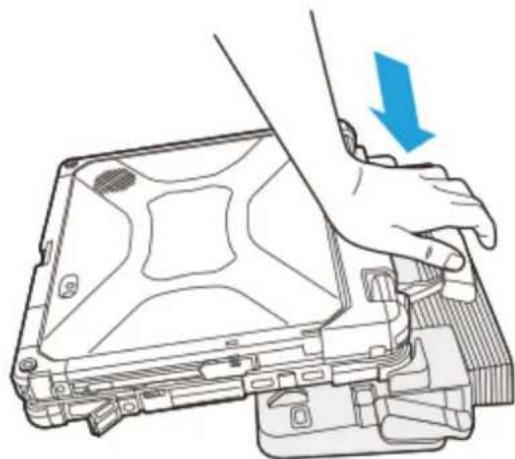
natural_image
Illustration of a hand pressing down on a laptop case with a blue arrow indicating the action (no text or symbols present)CAUTION
■ Do not attempt to move the port replicator while connecting the computer to the port replicator.
If the computer malfunctions while the port replicator is attached, disconnect the port replicator and check to see if the computer operates normally. If the computer operates normally, the port replicator may be malfunctioning. Contact Panasonic Technical Support.
NOTE
■ See other chapters in this manual for connecting and setting USB devices, external displays and LAN.
Disconnecting
- Turn off the computer and close the display.
- If the cable has been connected to the security slot on the side, remove the cable.
- Push the lever.
The computer's connector is disengaged from the expansion bus connector of the port replicator.

natural_image
Technical line drawing of a mechanical component with a blue arrow indicating a downward motion (no text or symbols present)CAUTION
■ After sliding the lever, do not suddenly release it. The lever may relock. Do not slide the lever while pressing against the computer from above. Doing so could damage the computer.
If the computer malfunctions while the port replicator is attached, disconnect the port replicator and check to see if the computer operates normally. If the computer operates normally, the port replicator may be malfunctioning. Contact Panasonic Technical Support.
- Lift up the computer to remove it from the port replicator.
NOTE
If it is difficult to disconnect the computer, push the lever while holding the computer from top for easy disconnection.
Vehicle Dock Adaptor
You can use an optional vehicle dock adaptor (CF-VVK33 series). The Vehicle Dock Adaptor is the device to connect the CF-33 series (tablet) to the legacy Vehicle Dock. For models with the Slim Keyboard, the keyboard can be detached.
Read the instruction manual of the vehicle dock adaptor before using.
For attaching the vehicle dockadaptor to the vehicle dock, read the instruction manual of the vehicle dock.
CAUTION
■ Connect or disconnect the vehicle dock adaptor while the computer power is turned off.
Description of Parts
When connecting each device to the vehicle dock adaptor, carefully read the appropriate chapters for the device in this manual.
Descriptions in this chapter are based on the models with the Slim Keyboard.
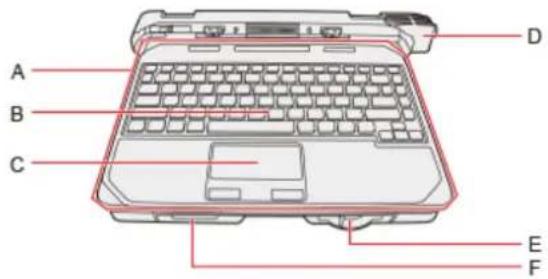
A. Slim Keyboard
B. Keyboard
C. Touchpad
D. Security Lock
- For more information, read the manual that comes with the cable.
E. Release Lever
Used to detach the Slim Keyboard.
F. USB Port
Attaching/Detaching the Computer
CAUTION
■ Do not connect or disconnect the vehicle dock adaptor while the computer is powered on, or in the sleep or hibernation mode.
■ Make sure that there are no foreign objects between the vehicle dock adaptor and the computer.
Attaching the tablet to the vehicle dock adaptor
- Turn off the computer.
Disconnect all the devices and cables and close the terminal cover.
- Hold the area enclosed by the dashed circle in the illustration, and push the tablet downward.
The detach indicator (A) will turn black.
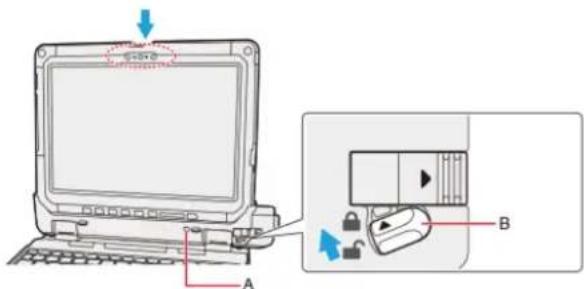
- Lock the detach lock (B).
CAUTION
■ Confirm that the detach indicator (A) has turned black.
■ Be careful not to get your hands caught between the computer and the vehicle dock adaptor when attaching the computer.
If the computer malfunctions when the vehicle dock adaptor is attached, disconnect the vehicle dock adaptor and check to see if the computer operates normally. If the computer operates normally, the vehicle dock adaptor may malfunction. Contact Panasonic Technical Support.
NOTE
■ For connecting and setting USB devices, see the other chapter in this manual.
Detaching the tablet from the vehicle dock adaptor
CAUTION
■ Before detaching the tablet, confirm the following things.
- Save the necessary data.
- Close files you have opened from removable disks and network drives.
- Remove peripheral devices connecting to the tablet.
■ Do not detach the tablet in the conditions below.
- When the SD Memory Card indicator is on.
- When playing/recording audio files or displaying motion video such as MPEG files.
- When playing a DVD-Video.
- When writing to a disc.
- When using communication software or network functions.
To detach the tablet while it is turned on, perform the following.
- Click

task tray, and then click

Reyear the car
Alternatively, pressthe «Fn» and «Esc» keyboard keysat the same time.
NOTE
■ To cancel detachment, press the «Fn» and «Esc» keyboard keys at the same time after the above operation.
- Release the detach lock (A).
- Slide the release lever (B) in the direction of the arrow.
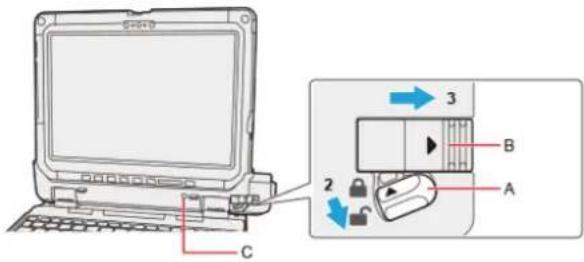
The detach indicator (C) will turn orange.
- Detach the tablet from the vehicle dock adaptor.
CAUTION
■ When detaching the tablet from the vehicle dock adaptor, hold the area enclosed by the dashed circle in the illustration.
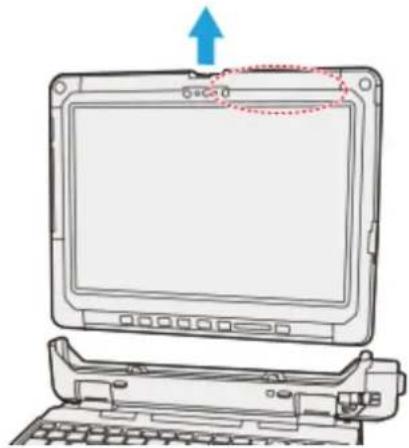
natural_image
Line drawing of a laptop computer with an upward arrow and dotted outline highlighting the screen area (no text or symbols present)■ Attach/detach the tablet on a flat surface.
■ When attaching/detaching the tablet, securelyhold the vehicle dock adaptor.
Attaching/Detaching the Slim Keyboard
CAUTION
■ Make sure that there are no foreign objects between the vehicle dock adaptor and the slim keyboard.
Attaching the slim keyboard to the vehicle dock adaptor
- Attach the Slim Keyboard by fitting its stand parts into the slits of the vehicle dock adaptor.
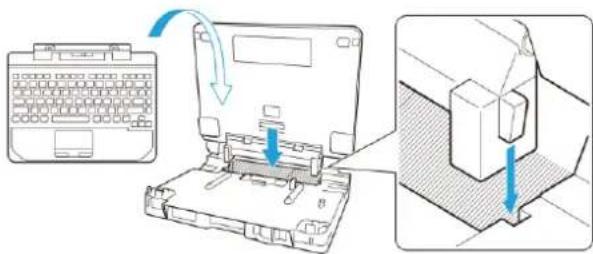
- Press the Slim Keyboard from above.
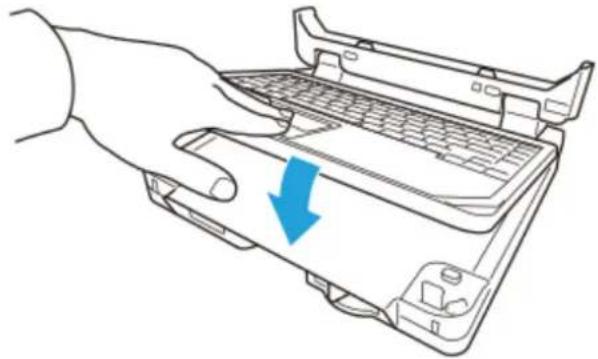
natural_image
Line drawing of a hand pressing down on a computer keyboard with a blue arrow indicating the press direction (no text or symbols present)Detaching the slim keyboard from the vehicle dock adaptor
- Slide the release lever (A).
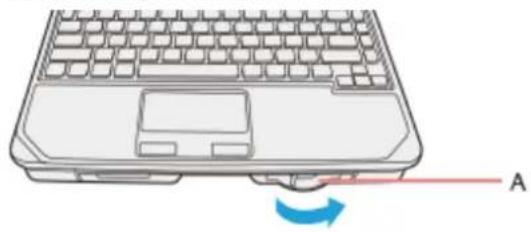
natural_image
Illustration of a laptop keyboard with a blue scroll arrow indicating rotation (no text or symbols)- Detach the slim keyboard.
Slim Keyboard
You can use an optional slim keyboard (CF-VKB33 series). The slim keyboard can be attached not only to the Vehicle Dock Adaptor, but also to the CF-33 series (tablet) directly.
Read the instruction manual of the slim keyboard before using.
Connecting/Disconnecting the Tablet
Connecting
Connect the slim keyboard to the tablet according to the following steps.
Preparation
- Place the slim keyboard as shown below.
Make sure that there are no foreign objectsunder the slim keyboard.
- Align the connect guide holes (A) of the tablet with the connect guides (C) of the slim keyboard.
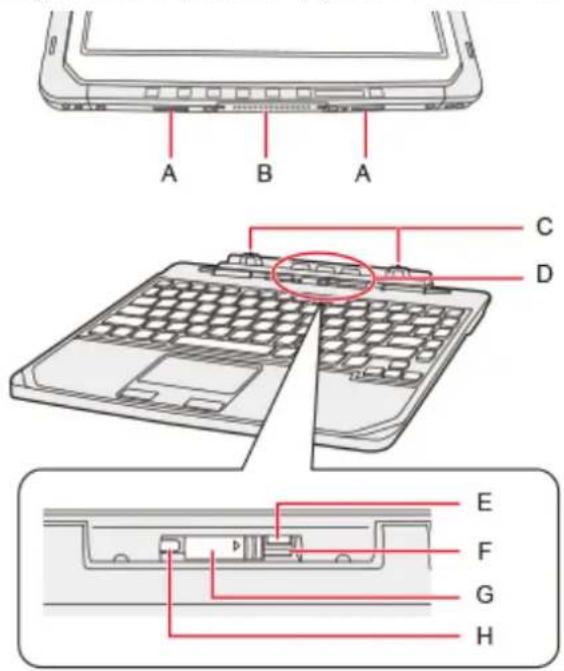
CAUTION
■ Do not touch either the expansion bus connector of the tablet (B), or the expansion connector of the slim keyboard (D).
- Hold the area enclosed by the dashed circle in the illustration, and push the tablet downward.
The orange-colored sign (H) will be hidden.
- Raise the detach lock (F) upward.
The orange-colored sign (E) will be hidden.
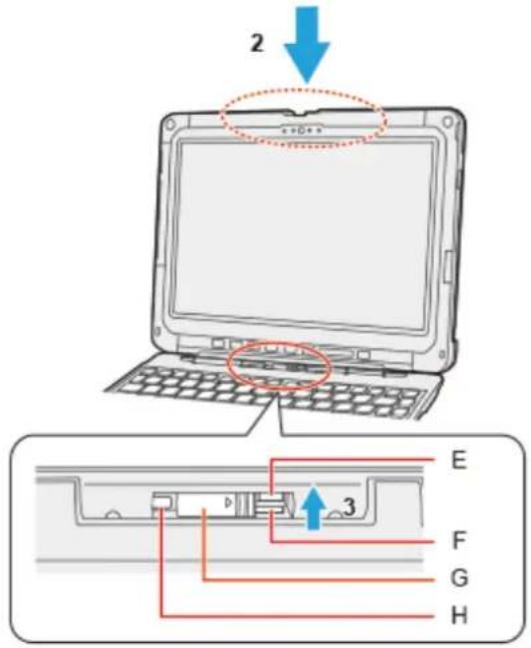
CAUTION
■ Do not incline the display more outwardly than necessary. Doing so may result in the tablet falling over due to the display weight.
■ Confirm that the orange-colored sign (E) has been invisible.
Disconnecting
- Release the detach lock (F).
The orange-colored sign (E) will be shown.
- Slide the release lever (G) in the direction of the arrow.
- Detach the tablet from the slim keyboard.
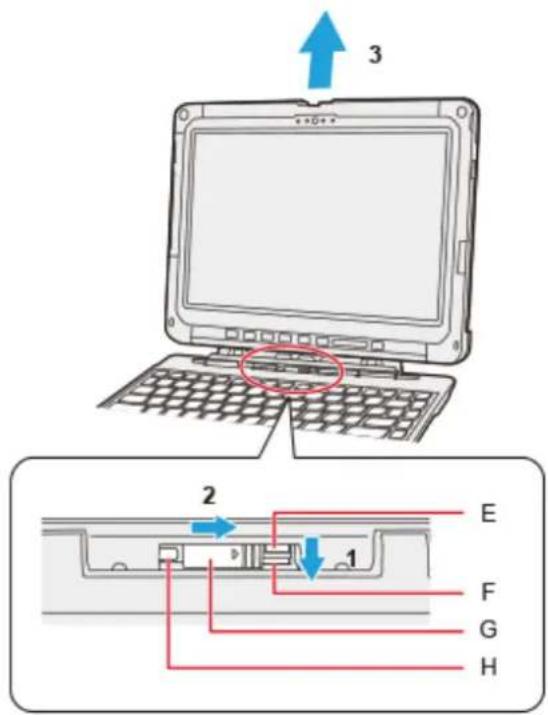
Hand Strap
Attaching the straps (hand strap/shoulder strap/rotate hand strap) helps you stably hold the computer.
Attaching the Hand Strap and the Shoulder Strap
CAUTION
■ Make sure that there are no foreign objects under the tablet before attaching the straps.
- Put the belt through the strap holes (A) of the tablet.
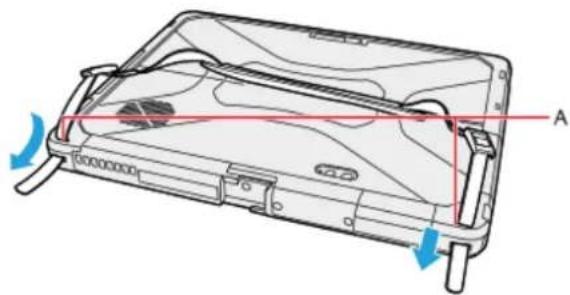
natural_image
Diagram of a device casing with internal components and directional arrows indicating movement (no text or symbols)- Put the belt through the adjuster and securely tighten it so as not to loosen.
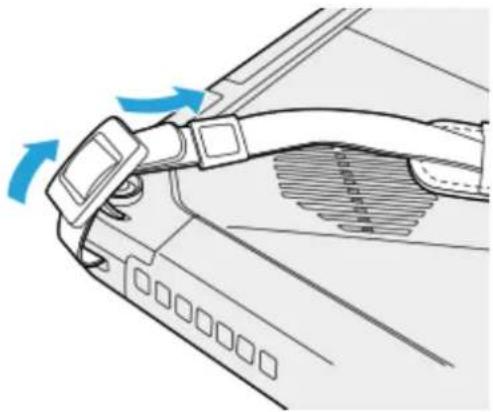
natural_image
Diagram of a car interior showing a belt switch and directional arrows indicating motion (no text or symbols)CAUTION
■ Do not use the strap to carry items heavier than the tablet. Doing so may cause the strap to become loose.
■ Do not use the strap if it becomes worn or damaged.
Installing the Rotate Hand Strap
NOTE
■ When you mount the tablet on the vehicle dock to use it, carefully read the Operating Instructions of the vehicle dock.
Preparation
- Detach the tablet from the keyboard base. And then turn over the tablet.
CAUTION
■ Place the tablet on a soft cloth with the panel side down. In addition, make sure that there are no objects under the tablet.
- Remove the release buckle and fixed tether from the rotate hand strap.
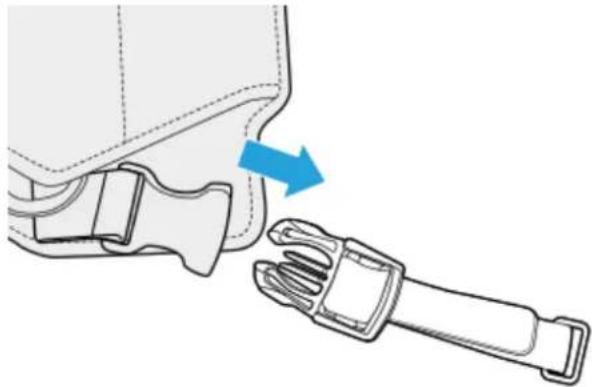
natural_image
Diagram showing a belt buckle being adjusted to a seatbelt, with a blue arrow indicating the motion (no text or symbols present)- Remove the release buckle (A) from the fixed tether (B).
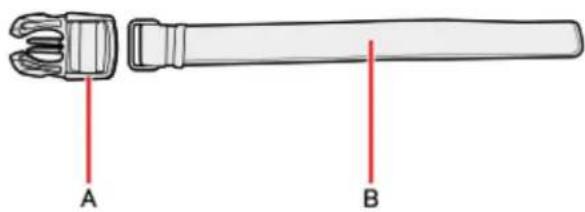
natural_image
Diagram of a mechanical tool with labeled parts A and B, showing two views (no text or symbols beyond labels)- Put the fixed tether through the strap hole of the tablet.
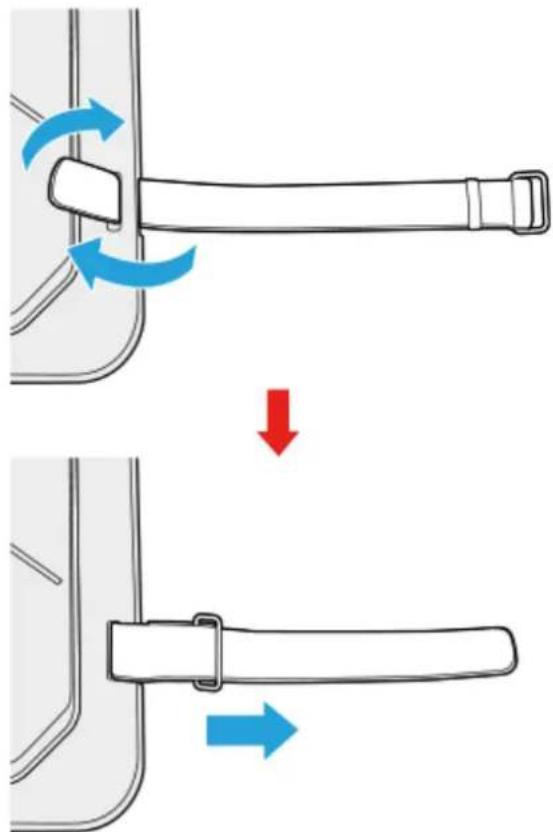
- Attach the release buckle to the fixed tether, and secure it.
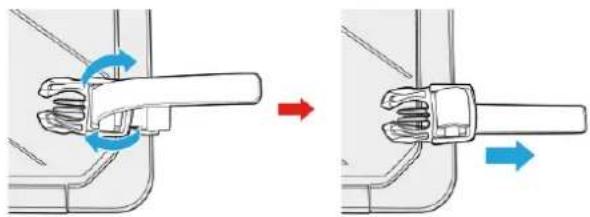
natural_image
Diagram showing two mechanical assembly steps with blue arrows indicating rotation or movement (no text or symbols)In the same way as above, attach the release buckle and fixed tether on the opposite side of the tablet.
Attaching the Rotate Hand Strap
- Put the belts with the adjusters (C) attached through the strap holes (D) located on the upper side of the back of the tablet.
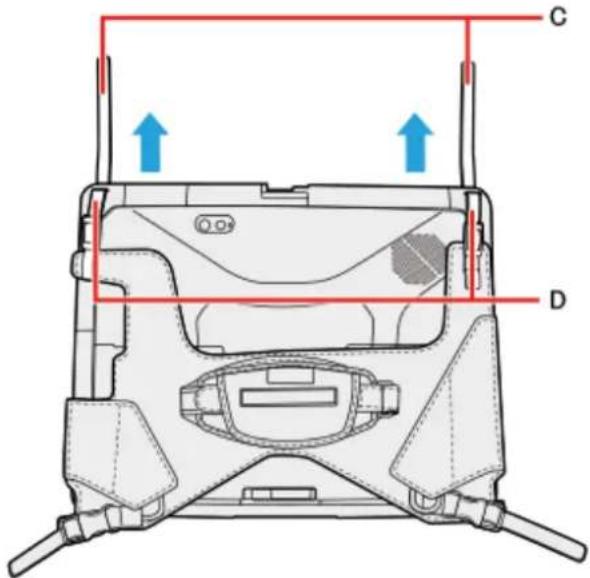
- Put the belt through the adjuster, and securely tighten it so as not to loosen.
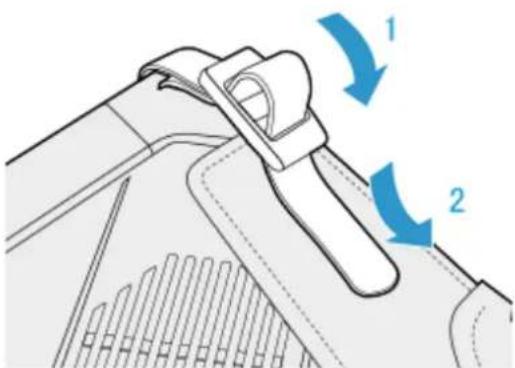
natural_image
Technical diagram of a mechanical component with two blue arrows indicating motion direction (no text or symbols)If the belt is too long, you can also put the belt through the adjuster again as illustrated below.
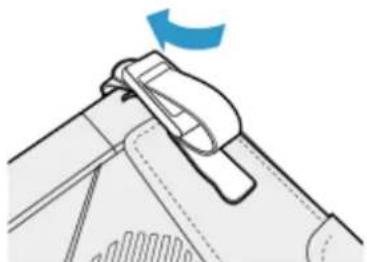
natural_image
Diagram of a hand holding a zipper, with no visible text or symbols- Connect the release buckle to the belt.
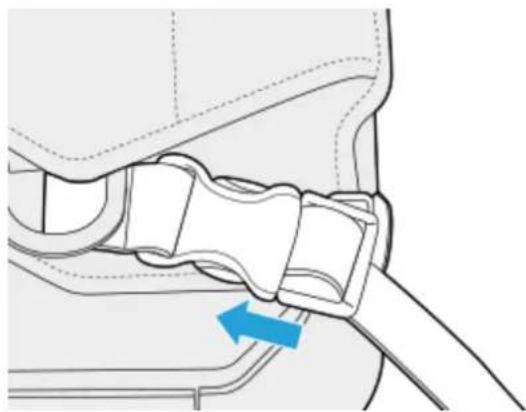
natural_image
Mechanical assembly diagram showing a blue arrow pointing to a component within a housing (no text or symbols present)- Make sure that the strap has been installed without looseness.

natural_image
Technical line drawing of a laptop case with front panel and rear seats (no text or symbols)Using the Rotate Hand Strap
- When holding the tablet in one hand and using it, insert your hand to the rotate hand strap.
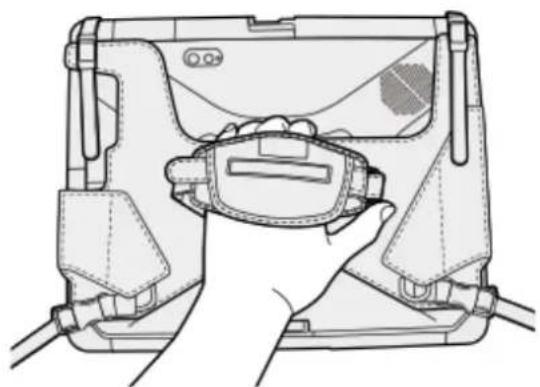
natural_image
Line drawing of a hand inserting a device into a device casing (no text or symbols)-
Fix the rotate hand strap firmly enough to support the tablet, and turn it over.
-
Adjust the angle of the rotate hand strap, if necessary.

natural_image
Diagram of a device interior with blue circular arrows indicating rotation or movement (no text or symbols)■ If the hand is not securely fixed to the rotate hand strap, the tablet may drop.
When the rotate hand strap istoo loose or too tight, adjust the rotate hand strap according to the instructions below.
- Remove (E) from the strap joint, and then remove (F).
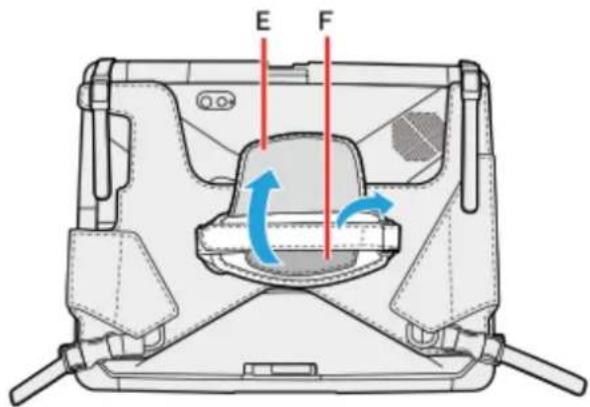
- Move (F), and then adjust the position (G).

natural_image
Technical line drawing of a mechanical device with labeled component G (no text or symbols beyond label)- Attach (F), and then attach (E) to the joint.
- Firmly attach the hand strap so as not to loosen.
When inserting/removing the battery pack
CAUTION
■ Place the tablet on a soft cloth with the panel side down. In addition, make sure that there are no objects under the tablet.
- Remove the release buckle.
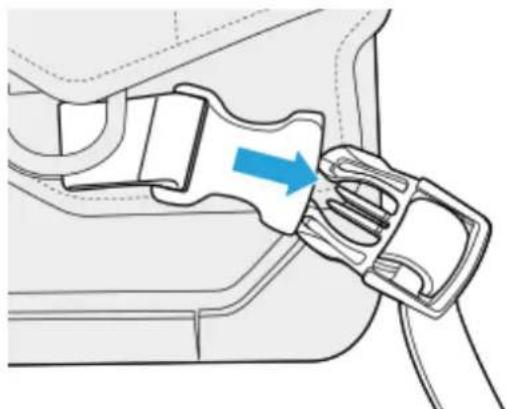
natural_image
Mechanical diagram showing a blue arrow pointing to a highlighted component inside a car seatbelt (no text or symbols present)- Raise the upper side of the rotate hand strap.
With the upper side of the rotate hand strap lifted up, remove the backcover.
Refer to "Replacing the Battery Pack".
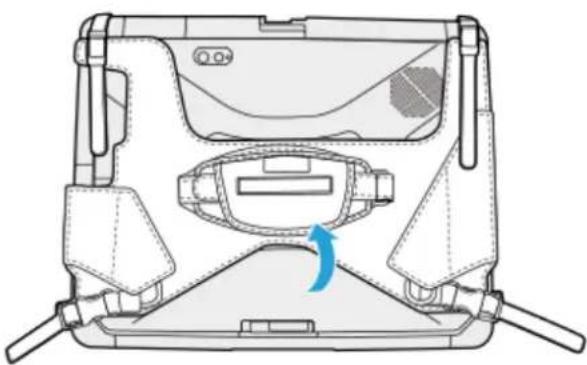
natural_image
Technical line drawing of a mechanical device with no visible text or symbolsAttaching the pen to the Rotate Hand Strap
The pen can be attached to the rotate hand strap.
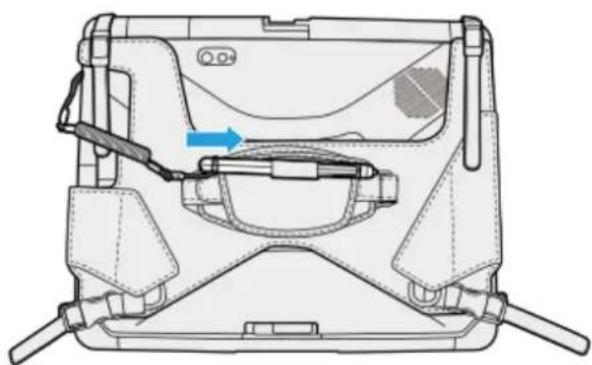
natural_image
Technical line drawing of a mechanical device with no visible text or symbolsAttaching the shoulder strap to the Rotate Hand Strap
The shoulder strap can be attached to the rings (H) of the rotate hand strap.
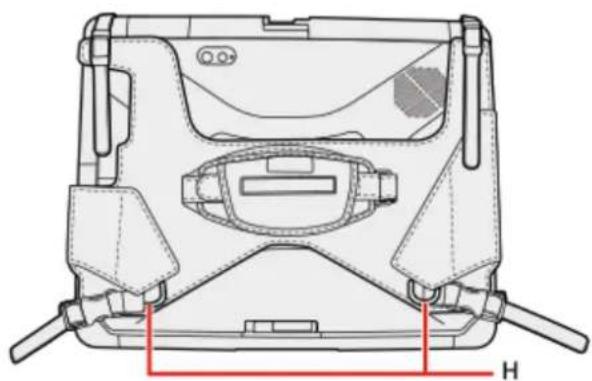
natural_image
Technical line drawing of a laptop case with labeled components (no text or symbols)- Unfold the stands on the both sides.
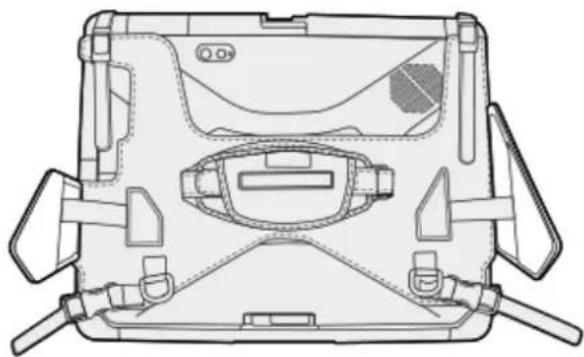
natural_image
Technical line drawing of a laptop case with front panel and side connectors (no text or symbols)- Stand the tablet as illustrated below.
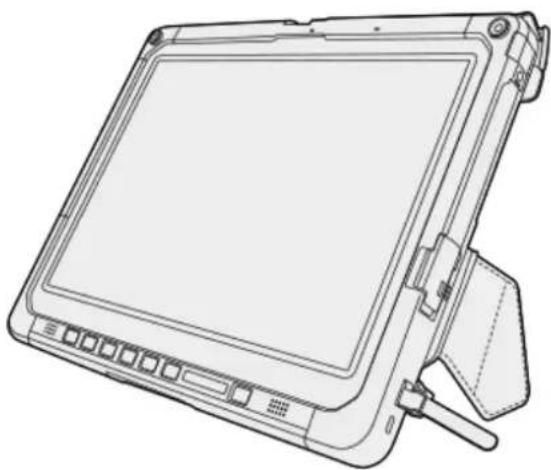
natural_image
Line drawing of a tablet device with front panel and side arm (no text or symbols)Battery Charger
The battery charger is designed for charging the battery pack for the Panasonic computer series. To recharge a battery pack, you will need the AC adaptor and AC cord included with this product.
Read both this Operating Instructions and the computer's Operating Instructions before using.
Description of Parts
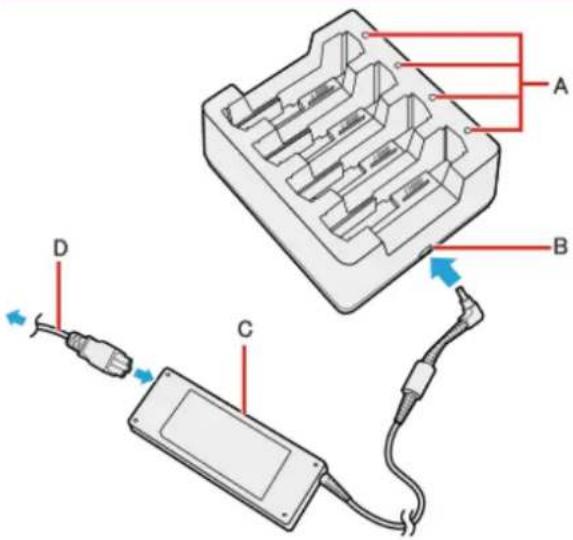
A. Battery Indicator (1 to 4)
B. DC-IN Jack
C. AC adaptor
Clean the dust and other debris of the connector regularly.
D. AC cord
CAUTION
■ The AC cord may vary depending on the country.
■ Use only the specified AC adaptor with this product.
Indicators
The power indicator on the battery charger lights green when the power is being supplied (when the adaptor is connected).
| Battery Indicator Battery status | |
| Not lit The battery pack is not inserted | or not being charged. |
| Orange Charging is in progress. | |
| Green | The battery is fully-charged. |
| Blinking red | The battery pack or the charging circuit is not operating properly. |
| Blinking orange | The battery cannot be charged temporarily due to the following reasons:Its internal temperature isout of the acceptable range. |
Charging the battery pack
- Connect the AC Adaptor.
- Insert the battery pack(s).
Insert the battery packfirmlywith its battery connector (B) facing the indicator (A) of the charger.
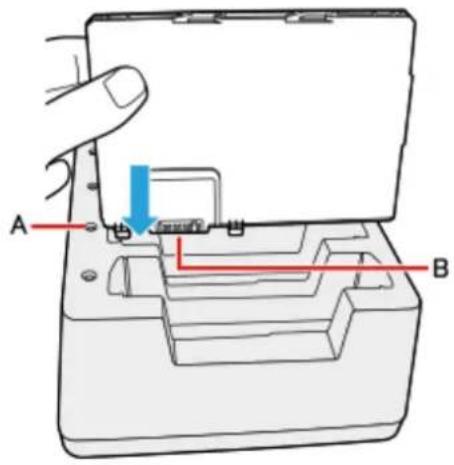
CAUTION
■ Do not insert the battery pack vertically or at an angle. The terminal of the battery charger may be damaged.
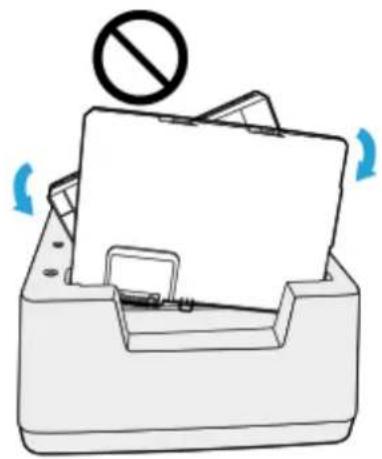
natural_image
Illustration of a printer with a paper slot and a prohibition symbol above it, showing no text or symbols on the main object.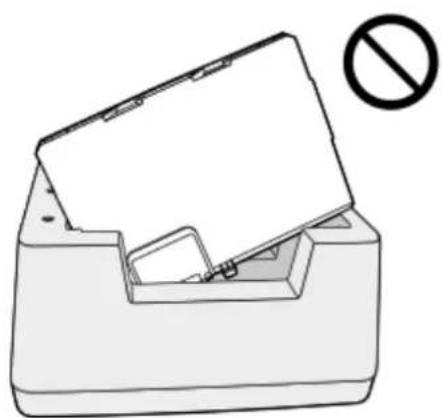
natural_image
Simple line drawing of a printer with a paper roll and a prohibition symbol (no text or labels)■ If the battery pack got lodged in the slots, push the middle of the battery pack.
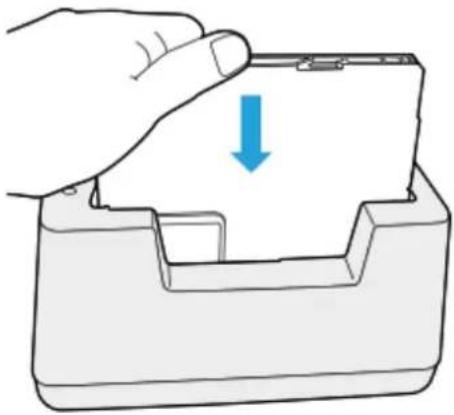
natural_image
Hand pressing down on a device component with a blue arrow indicating downward motion (no text or symbols)NOTE
■ The battery indicator lights when the battery pack is properly inserted with the AC adaptor connected.
■ Four battery packs can be inserted simultaneously. Each of them can be inserted in any slot.
■ When removing the battery pack, pull it out in the opposite direction of attaching the battery pack.
■ Charging begins automatically.
■ The battery pack or battery charger will become somewhat warm during normal use. This is not a malfunction.
Troubleshooting
Refer to the following instructions when a problem occurs. If the remedies indicated in the chart do not solve the problem, contact Panasonic Technical Support.
For a software problem, refer to the instruction manual of the software.
- Refer to Checking the Computer's Usage Status.
Starting Up
| Cannot start up.The power indicator or batteryindicator is not lit. | Connect the AC adaptor.Insert a fully charged battery.Remove the batterypack and the AC adaptor, and then connect them again.Even if the AC adaptor and batterypack are correctly connected, if the battery indicator is not lit, the AC adaptor protection function may be operating. Disconnect the AC cord, wait three minutes or more, and reconnect the AC cord.If a device isconnected to the USB port, disconnect the device, or set [Tablet USB Port] or [LegacyUSB Support] to [Disabled] in the [Advanced] menu of the Setup Utility.Press «Fn» + «F8» to turn off the concealed mode. |
| Cannot turn on the computer.The computer does not resume from sleep.(The power indicator blinksrapidly in green.) | Leave it in an environment of 5 °C {41 °F} or higher temperature for about an hour, then turn on the power again. |
| It takes time for the power indicator to light up. | If the power switch is pressed immediately after the batterypack has been mounted on the computer, and while the AC adaptor is not connected, it may take about five seconds before the power indicator lights up and the computer turns on. This is because the computer is checking the remaining battery charge; it is not a malfunction. |
| The date and time are incorrect. | Make the correct settings.1. Click (Start) - (Settings) - [Time & language] - [Date & time], and check[Off] in "Set time automatically".2. Click[Change], and then set the day and time.If the problem persists, the internalclock battery may need to be replaced. Contact PanasonicTechnical Support.When the computer is connected to LAN, check the date and time of the server.The 2100 A.D. or later year will not be correctly recognized on this computer. |
| [Executing Battery Recalibration] screen appears. | The Battery Recalibration was cancelled before Windows was shut down last time. To start up Windows, turn off the computer by the power switch, and then turn on. |
| Other startup problems. | Start in the Setup Utility ( Setup Utility) to return the Setup Utility settings (excluding the passwords) to the default values. Start the Setup Utility and make the settings again.Remove allperipheral devices.Check to see if there was a disk error.Remove allperipheral devices including an external display.Right-click (Start) at the bottom left corner, and then click [File Explorer].Click[This PC].Right-click[Windows (C:)], and click [Properties].Click[Tools] - [Check].A standard user needs to enter an administrator pass-word.Follow the on-screen instructions. |
Entering Password
| Forgot the password. | Supervisor Password or User Password: Contact Panasonic Technical Support.Administrator password:If you have a password reset disk, you can reset the administrator password. Set the disk and enter any wrong password, then follow the on-screen instructions and set a new password.If you do not have a password reset disk, reinstall (Installing Software) and set up Windows, and then set a new password. |
| Even after entering the password, password input screen isdisplayed again. | The computer may be in ten-keymode.If the Num Lockindicator lights, press «Num Lock» to disable the ten-keymode, and then input.The computer may be in Caps Lockmode.If the Caps Lockindicator lights, press «Caps Lock» to disable the Caps Lock mode, and then input. |
Shut Down/Sleep/Hibernation/Resume
| Cannot turn off the computer. | Remove allperipherals.It maytake 1 or 2 minutes to turn off the computer. |
Sleep / Hibernation
| Cannot enter sleep or hibernation. | Remove USB devices temporarily. If the problem persists, restart the computer.It maytake 1 or 2 minutes to enter sleep or hibernation.The computer does not enter sleep or hibernation immediately after resuming. Wait approximately 1 minute. |
| Cannot enter sleep or hibernation automatically. | Disconnect peripheral devices.If you connect to a networkusing wireless LAN function, select the profile and connect to the access point (Disabling/Enabling Wireless Communication).If you do not use wireless LAN function, turn off wireless LAN function (Disabling/Enabling Wireless Communication).Make sure that you are not using any software that regularly accesses the flash memory. |
| The computer does not enter sleep mode while the screensaver is running. (The screen staysblack.) | Press and hold the power switch for 4 seconds or longer to shut down the computer forcibly. (Data not saved willbe lost.) Then disable the screensaver. |
| The computer does not resume. | If you pressand hold the power switch for 4 seconds or longer, the power willbe turned off for cibly and the computer willnot resume. In this case, allunsaved data will be lost.You disconnected the AC adaptor and the battery pack while the computer was in sleep. If the computer's power supplyisdisconnected in sleep, unsaved data will be lost and the computer will not resume.The battery is exhausted. Sleep and hibernation consumes some power.An error may occur when the computer automatically enters the sleep or hibernation mode while the screensaver is active. In this case, turn off the screensaver or change the pattern of the screensaver. |
| [Enter Password] does not appear when resuming from sleep/hibernation. | Select [Enabled] in [Password On Resume] in the [Security] menu of the Setup Utility (Setup Utility).The Windows password can be used instead of the password set in the Setup Utility.1. Add a password.Click (Start) - (Settings) - [Accounts].Alternatively, click (Settings) - [Accounts] in the tablet mode.Click [Sign-in options], and click [Add] under "Password".2. Set up the following.Click (Start) - (Settings) - [System] - [Accounts] - [Sign-in options].2. Select [When PC wakes up from sleep] under "Require sign-in". |
| Cannot sign in to Windows using the face recognition for Windows Hello outdoors. | If you have registered the face recognition indoors, you may not sign in to Windows using the face recognition outdoors. In such cases, perform the following procedure.Click (Start) - (Settings) - [Accounts].Alternatively, click (Settings) - [Accounts] in the tablet mode.Click [Sign-in options].Click [Improve recognition] under "Windows Hello" and then click [Get Started]."Making sure it'syou" is displayed, click [More choices], and then click [PIN].Input PIN numberIf you cannot register the face recognition outdoors properly, try to take the following measuresIn the shade, register your face with your back against the wall that does not reflect light.Place the tablet vertically to block the sunlight, and register your face. |
Display
| The screen does not become bright. | The brightnessisset low to avoid malfunction where surrounding temperature is high. For proper operating temperature (Specifications) |
| There are red, green, or blue dots on the screen, or there is unevenness in colors and brightness on the screen. | The following are not malfunctions.Although advanced high-precision technologies are used in the production of color LCD screens, 0.002% or less of the picture elements may be dark or remain constantlylit (i.e., more than 99.998% of elements function properly).Due to the natural characteristics of LCD screens, you may notice unevenness in colors and brightnessdepending on your angle of view. Hues may also vary by product. |
| No display. | The external display isselected. Press «Fn» + «F3» or + «P» to switch the display.Then clickthe display mode.When using an external display,Check the cable connection.Turn on the display.Check the settings of external display.The display isturned off by the power saving function. The screen returns to the original state when you operate keyboard, touchpad, or screen. When operating the keyboard, press a key that does not affect the computer operation, such as «Ctrl».The computer entered sleep or hibernation by the power saving function. To resume, press the power switch. |
| The screen is disordered. | Changing the number of display colors and resolution may affect the screen. Restart the computer.Connecting/disconnecting an external display may affect the screen. Restart the computer.Resuming from sleep or hibernation may affect the screen of the external display. Restart the computer. |
| During Simultaneous display, one of the screens becomes disordered. | When using the Extended Desktop, use the same display colors for the external display as the used by the LCD. If you continue to experience problems, try changing the display.Simultaneous displaycannot be used untilWindows startup iscomplete (during Setup Utility, etc.). |
| The external display does not work nor-mally. | If the external display does not support the power saving function, it may not work normally when the computer enters the power saving mode. Turn off the external display. |
Sound
| No sound. | Press « Fn» key or tablet buttons to cancelmute.Turn off theconcealed mode.Restart the computer.Beeping sounds are not emitted by this device. |
| Distorted sound. | Performing « Fn» key combinations sometimes causes sound distortion. Stop and restart playback. |
| Cannot change the volume by pressing « Fn» key or tablet buttons. | Activate the Windows sound function. When it isnot active, the volume does not change even slide bar isdisplayed. |
| The microphone volume is small. | Increase the volume of the microphone according to the following steps.:1. Right-click (Start) at the bottom left corner, and then click [Control Panel] - [Hardware and Sound] - [Sound] - [Recording] - [Microphone Array] - [Properties], and then increase the volume of [Microphone] and/or [Microphone Boost] in [Levels]. |
| When signing in (e.g., resuming the computer), audio isdistorted. | Perform the following steps to change the audio settings to prevent audio output.1. Right-click (Speaker) on the tasktray, and click [Sounds].2. Remove the checkmark from [Play Windows Startup sound]. |
Keyboard
| Only numbers can be input. | When the indicator is on, the keyboard is in ten-key mode. Press « NumLock» to cancel. |
| Only capital letters can be input. | When the indicator is on, the keyboard is in Caps Lock mode. Press « Caps Lock» to cancel. |
| Cannot enter specialcharacters (β, à, ç, etc.) and symbols. | Use the character map.1. Click (Start) at the bottom left corner, and then click[Windows Accessories] - [Character Map].Alternatively, click (4-maps) - [Windows Accessories] - [Character Map] in the tablet mode. |
Network
| Cannot connect to a network. | Set the device ([Tablet LAN] / [Wireless LAN]) to [Enabled] in the [Advanced] menu of the Setup Utility. | |
| Cannot checkthe computer's MAC address. | Follow the steps below.1. Right-click (Start) at the bottom left corner, and then click[Command Prompt].2. Input "getmac /fo list /v", and press « Enter» .Insert a space between "fo" and "list", and between "list" and "/v".The MAC addressof each device appears.The MAC addresses are the 12 alphanumericcharacters that appear in the "Ph Address" rows of each of the items.The names of each of the devices are as follows. | |
| Device Connection Name | ||
| Wireless LAN Wi-Fi | ||
| LAN Ethernet | ||
| LAN (Keyboard Base) Ethernet 2 | ||
| Bluetooth Bluetooth Network Connection | ||
| Wireless WAN | Cellular | |
| * The content displayed will vary depending on the device and model.3. Input "exit", and press« Enter» . | ||
Wireless Communication (only for model with wireless LAN/Bluetooth/wireless WAN))
*1: In the case of wireless communications, the frequency band being used can be divided into segments, so that different communications can be conducted on each band segment. A "Channel" refers to the individual frequencybandwidth divisions.
| Cannot connect to a network. | Confirm the airplane mode is Off.To turn off the airplane mode, follow the steps below.[IMAGE]1. Click (Start) - (Settings) - [Network & Internet] - [Airplane mode].Alternativelyclick (Settings) - [Network & Internet] - [Airplane mode] in the table mode.2. Click[Airplane mode] to [Off], and then;set [Wi-Fi] to [On] (for wireless LAN).set [Cellular] to [On] (for wireless WAN).set [GPS] to [On] (for GPS on wireless WAN).set [Bluetooth] to [On] (for Bluetooth).set [GPS/GNSS] to [On] (for dedicated GPS).If this computer cannot be connected to an IEEE802.11a network, confirm the setting [802.11a] by Panasonic PC Settings Utility.Restart the computer. |
| Access point is not detected. | Shorten the distance between the computer and the access point, and try the detection again.Confirm the following settings:[WirelessLAN] in the [Advanced] menu of the Setup UtilityConfirm that [Wireless LAN] of [Wireless Configuration] is set to [Enabled].Airplane modeConfirm that WirelessLAN (Wi-Fi) is ON.This computer uses channels 1 through when using IEEE802.11b/g/n. Check the channel being used by the access point. |
| Confirm that [Wireless WAN] of [Wireless Configuration] is set to [Enabled] in the [Advanced] menu of the Setup Utility.Use the Airplane mode and confirm that the wirelessWAN (Cellular) is on.Confirm that the nanoSIM card isinserted correctly.If communication is not established after proceeding with the above remedies, the wireless WAN device may not be correctly recognized. Restart the computer. |
Display Rotation
| Cannot rotate the display. | The application program currently running may not support the image rotation. Quit the program, and then try to rotate the image. Thiscan ameliorate the status.When the automatic rotation isoff, screen display does not rotate automatically. |
| The operations of screen do not match rotation angle. | The application program currently running may not support the image rotation. Quit the program, and then try to rotate the image. Thiscan ameliorate the status.Change a screen setup to landscape. |
Connecting Peripherals
| An error occurs while installing the driver. | When you install a driver of card or peripheral device, make sure that the driver is compatible with the operating system. If it is not compatible, malfunction may occur. For information about the driver, contact the manufacturer of the peripheral device. |
| A peripheral device does not work. | Installthe driver.Contact the manufacturer of the device.When or is displayed in the Device Manager, remove and insert the device. If the problem persists, restart the computer.When you set [Tablet USB Port] / [Keyboard Base USB Port] to [Disabled] in the [Advanced] menu of the Setup Utility, USB ports of port replicator are also disabled.The computer may not recognize the connection/removal of some devices, or may not operate normally with some devices.1. Right-click  t) at the bottom left corner, and then click [Device Manager].2. Select the device, and remove the check mark for [Allow the computer to turn off this device to save power] in [Power Management]. (This item may be unavailable for some types of devices.)In the case that a USB device does not work, remove the USB device and connect it again c connect the USB device to another port. t) at the bottom left corner, and then click [Device Manager].2. Select the device, and remove the check mark for [Allow the computer to turn off this device to save power] in [Power Management]. (This item may be unavailable for some types of devices.)In the case that a USB device does not work, remove the USB device and connect it again c connect the USB device to another port. |
| You do not know the address map for I/O port address, etc. | IRQ, You can check with the following procedure.1. Right-click  t) at the bottom left corner, and then click [Device Manager].2. Click [View] - [Resourcesby type]. t) at the bottom left corner, and then click [Device Manager].2. Click [View] - [Resourcesby type]. |
| The device connected to the serialport does not work. | Check the connection.The device driver may not work. Refer to the instruction manual of the device.Do not connect 2 mouse devices simultaneously.Set [Serial Port] to [Auto] in the sub-menu of [Serial Port Settings] in the [Advanced] menu of the Setup Utility.The I/O and IRQ you can use vary depending on the device. If the setting does not work, try other settings in the Setup Utility. |
| You can checkthe GPS status.(GPS)Set airplane mode to OFF.Check the airplane mode setting.If a USB 3.0 compatible device is used, GPS information may not be correctly received. In this case, do any of the following.Set [Left Port of Tablet] or [Keyboard Base and Port Replicator] to [Disabled] at the Setup Utility. |
Touchpad / Screen
| The pointer does not work. | Connect the external mouse correctly.Restart the computer using the keyboard.If the computer does not respond to keyboard commands, read "No response". |
| Cannot input using the touchpad. | The touchpad may be disabled by some mouse drivers. Check your mouse'soperating tions. |
| Cannot point the correct position using included pen. | Perform the Calibrating the Screen. |
SD Memory Card
| Cannot use an SD Memory Card. | Set [microSD Slot] to [Enabled] in the [Advanced] menu of the Setup Utility.This computer does not support the maximum speed some types of SD/SDHC/SDXC Cards guarantee. |
Smart Card (only for model with Smart Card slot)
| Cannot use a Smart Card. | Insert the Smart Card correctly.To use a Smart Card, you need a specified software and driver. |
| The reader does not enroll or authenticate my fingerprint. | If pop-up or other messages appear on the desktop screen, fingerprint entry may be temporarily. In such cases, click outside of the Fingerprint Authentication window, and again back inside it.Slide your finger correctly. For further information about enrollment and authentication, refer toFingerprint Readerand [Help].1. Click (Start) - [DDS] - [EVE FA Standalone Help].Alternatively, click (mapps) - [DDS] - [EVE FA Standalone Help] in the tablet mode.2. Click [View] - [Resources bytype].The reader enrolls or authenticatesno fingerprint, or performs authentication poorly, despite the correct way of finger sliding when your finger is in any of the conditions stated below:Rough skins, or injured finger (with a cut or a skin inflammation)Extremely drySoiled with mud or oilFingerprint has been worn and has fadedWet with water or sweatWash your hands or wipe them dry.Use a different finger for registration or authentication.Treat your finger with a hand cream when it is rough skin or dry.Clean the fingerprint reader. For further information, refer toFingerprint Reader Handling.The fingerprint reader maybe malfunctioning when it continues to perform poorly after the stepsdescribed above have been performed. Contact PanasonicTechnical Support. |
| User cannot use enrolled finger. (e.g. injury) | If none of your enrolled fingers can be used, follow thisprocedure:Sign in to Windows.You can always accessthe computer by using your Windows sign in password.2. Update the enrolled fingerprints.Click in the task tray at the lower right of the desktop screen, andclick and then click[Fingerprint Enrollment Tool].Click [Password], and you can start enrollment using the windowspassword. |
| Removing data. | If you need to remove allregistered data, uninstall EVE FA Standalone for Panasonic.When the message "Do you delete all the data such as registered fingerprint information?" is played, select [Yes]. (Allfingerprint data and ID manager data are deleted.)After uninstallation, reinstallEVE FA Standalone for Panasonic. |
User Switching
| Some applications do not work properly. | When switching to a different user without signing out, some applications do not work properly. In this case, sign out the other users. |
Others
| Although the computer isturned on, the lowing problems occur.- The indicators do not light.- No sound.- Screen isdark. | fol- • The concealed mode is enabled (Key Combinations). |
| No response. | Open TaskManager and close the software application.1. Right-click (Start) at the bottom left corner, and then click [TaskManager].An input screen (e.g., password input screen at startup) may be hidden behind another window. Use « Alt» + « Tab » to check.Shut down by pressing and holding the power switch for 4 seconds or longer, and turn on the computer and open the application again.If Windows runs correctly, but the application software does not start, uninstall the failing application software, then reinstall it.To uninstall, perform the procedure below.1. Click (Start) - (Setting) - [System] - [Apps & features].2. Select the program you want to uninstall, and click [Uninstall]. |
| A motion image file cannot be played using Windows® Media Player and the message [Codec required] appears. | Some motion image files require a Codec that isnot installed as standard. In this case, connect to the internet and try playback of the file again. The Codec may automatically be downloaded so you may able to playit. |
| "Battery not exist" is displayed. | Battery goes to sleep if the battery is about 5%, may be displayed such as "Not exist" or "Not use" is not a malfunction. Connect the AC adaptor for a while. |
Checking the Computer's Usage Status
You can check the computer's usage status in the PC Information Viewer. You may need this information when calling Panasonic Technical Support for advice.
NOTE
This computer periodically records the management information of the flash memory, etc. The maximum data volume for each record is 1024 bytes. The information is only used for estimating the cause when the flash memory goes down by any possibility. They are never sent to outside via network nor used for any other purpose except for the purpose described the above. To disable the function, add the check mark for [Disable the automatic save function for management information history] in [Hard Disk Status] of PC Information Viewer, and click [OK].
- A standard user needs to enter an administrator password.
■ If you have not signed in with the administrator authority, some of Information will be displayed as [Not Found].
■ Depending on your network environment, it may take 1 minute to start up the PC Information Viewer.
To perform the PC Information Viewer
- Click Viewer. (Start) - [Panasonic] - [Panasonic PC Settings Utility], and click (Support) - (System) - [Launch PC Information
Alternatively, click (All apps) - [Panasonic] - [Panasonic PC Settings Utility] in the tablet mode, and click (Support) - (System) - [Launch PC Information Viewer].
- Select the item to display the detailed information.
NOTE
■ You can start up the PC Information Viewer using the following steps.
- Click (Start) at the bottom left corner, and then click [Panasonic] - [PC Information Viewer].
Alternatively, click (altapps) - [Panasonic] - [PC Information Viewer] in the tablet mode.
To save the information as a text file
- Display the information you wish to save.
- Click [Save].
- Select the file save range option and click [OK].
- Select the folder to save the information, input the file name, and then click [Save].
If you do not add the check mark for [Disable the automatic save function for management information history], the records already recorded are also saved.
To save a copy of the screen as an image file
The screen image is saved in "Screenshots" folder under "Pictures" folder.
Hardware Diagnostics
If it appears that the hardware installed in this computer is not operating properly, you can use the PC-Diagnostic Utility to determine whether or not there is a problem.
If the utility discovers a problem in the hardware, contact Panasonic Technical Support.
Software cannot be checked using this utility.
Preparation
- Connect an external keyboard to the computer (only for tablet).
Hardware that can be checked using the PC-Diagnostic Utility
CPU/System
RAM XXX MB
Storage XXX GB
Sound ^*1
USB
SD
- Keyboard (Only when the keyboard base is attached)
- Touch Screen
- WirelessLAN (Only for model with wireless LAN)
Video
Wired LAN
- Serial Port (Only for model with serial port on tablet)
- WirelessWAN (Only for model with wireless WAN)
- Bluetooth (Only for model with Bluetooth)
- GPS (Only for model with dedicated GPS)
*1: When the PC-Diagnostics Utility is running a loud beep will sound, so do not use headphones as this time. (The beep will not sound if mute is using in Windows or [Sound] is turned off in [Concealed Mode Configuration].)
NOTE
■ When the video diagnostic check is running, the display may be distorted. This is not malfunction.
Regarding the PC-Diagnostic Utility
We recommend that you use the touchpad for operations. When not using the touchpad, you can operate using the internal keyboard instead. Do not use the screen.
| Operations Touchpad/mouse | operations | Keyboard operations |
| Select icon Place the cursor above the | icon | Press « Space», and then press « → » « ← » « ↑ » « ↓ » ( (close) cannot be selected) |
| Click the icon Touch or click (right click | cannot be used) | Press« Space» above the icon |
| Complete the PC-DiagnosticsUtility and then restart the computer | Click (close) | Press « Ctrl» + « Alt» + « Del» |
- If the touchpad does not operate properly, press « Ctrl » + « Alt » + « Del » to restart the computer, or press the power switch to turn the power off, and then restart the PC-DiagnosticUtility.
Running the Diagnostic Check
Run thisutility using the default settings in the Setup Utility.
If the Setup Utility or other settings will not allow hardware to be executed, the hardware icon will be displayed in gray.
- Connect the AC adaptor, and then connect external keyboard or mouse (only for tablet).
During the diagnostic check, do not remove the AC adaptor, or attach any peripheral devices.
- Follow the steps below.


- Click (Start) - (Settings) - [Update & security] - [Recovery].

Alternatively, click (settings) - [Update & security] - [Recovery] in the tablet mode.
- Click [Restart now] under "Advanced startup".
-
Click [Troubleshoot] - [Advanced options] - [UEFI Firmware Settings] - [Restart]. The computer restarts, and the Setup Utility screen appears.
-
If the password isrequested, enter the Supervisor Password.
-
If you are using the computer after changing the settings from the status at the time of purchase, we recommend that you make a note of the settings that are changed.
-
Press « F9» .
At the confirmation message, select [Yes] and press« Enter».
- Press « F10» .
At the confirmation message, select [Yes] and press« Enter».
The computer will restart.
- Press « F2» to display Setup Utility.
- Select the [Exit] menu, and then select [Diagnostic Utility].
When the PC-Diagnostic Utilitystarts up, it will automatically begin the diagnosticcheck for allhardware components.
- If the password isrequested, enter the password.
The touchpad and the internal keyboard may not be used when each hardware checking is running. While checking, vertical green progress bar is displayed on the right side of the hardware icon (A).
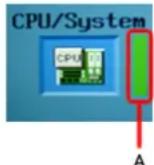
- By selecting the icon, you can execute the following operations:
: Start the diagnosticcheckfrom the beginning
: Stop the diagnosticcheck(You cannot restart the check partwaythrough by selecting )
: Display help (click the screen or press « Space » to return to the original diagnostic check screen)
- You can check the status of the diagnostic checkbythe display on the right side of the hardware icon (A).
- None: Not running diagnostic check
- Vertical green progressbar: Currentlyrunning diagnostic check.
During memory diagnostic check, the display may stop for a long period of time. Wait until the process is complete.
- Green: No problems discovered
Red: Problems discovered
NOTE
■ Using the following procedure, you can run a diagnostic check on a specified hardware component, or run an extended
diagnostic check on the memory or the flash memory (The extended diagnostic check is only for the memory and the flash memory). The extended diagnostic check is more detailed, and so requires a longer period of time to run.

-
Select to stop the diagnosticcheck.
-
Select the icon for the hardware that is not to be checked, so that the icon is displayed in puffy (B).
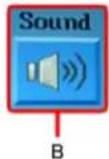
When running a check on the memory or the flash memory, selecting the icon once will turn on the extended diagnostic check ("Full" (C) will be displayed below the icon); select again, and the icon will be displayed in puffy (D).
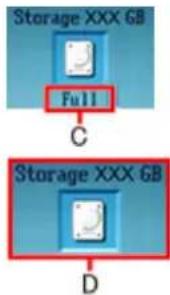
flowchart
graph TD
    A["Storage XXX GB"] --> B["Full"]
    B --> C["C"]
    D["Storage XXX GB"] --> E["D"]
    E --> F["D"]
- Select to start the diagnosticcheck.
■ Only for the storage, touchpad and screen you can select standard diagnostic check or extended diagnostic check. When the PC-Diagnostic Utility starts up, it will run the standard diagnostic check.
- When all the hardware has been checked, confirm the diagnostic check results.
If the display is red and the message "TEST FAILED" is displayed, you can assume that there is a problem with the computer's hardware. Confirm which hardware component is displayed as red, and contact Panasonic TechnicalSupport. If the display is green and the message "TEST PASSED" is displayed, the computer's hardware is operating normally. Continue using the computer as it is. If the computer still does not operate properly, reinstall the software (Installing Software).
- After the diagnostic check is complete, select (close), or press «Ctrl» + «Alt» + «Del» to restart the computer.
When the Icon Becomes Gray and the Corresponding Device Cannot Be Checked
- The device is disabled in the Setup Utility:
Set the device to [Enabled] in the Setup Utility.
Reset your computer
If operations on the unit become unstable, we recommend refreshing Windows. This involves reinstalling the operating system while retaining personal files and settings (Personalization).
Preparation
- Remove allperipherals and SD memory card, etc.
- Connect the AC adaptor and do not remove it until installation is complete.


- Click (Start) at the bottom left corner, and then click (Settings) - [Update & security] - [Recovery].
Alternatively, click (Settings) - [Update & security] - [Recovery] in the tablet mode.
- Click [Get Started] under "Reset this PC".
-
Select the option.
-
[Keep my files]
Windows reinstallation can be completed in a short time (Approximately 30 minutes).
Applications and other items that do not come with this computer will be removed.
- [Remove everything]
Select [Yes] or [No] under the "Keep thisPC set up for your work space".
- [Just remove my files] (Approximately 30 minutes)
- [Remove files and clean the drive]
By fully cleaning, the deleted files cannot be recovered easily and the security level will be increased. The processing time will be longer (Approximately 50 minutes).
- Follow the on-screen instructions.
After the reinstallation, the computer will restart.
Do not interrupt installation, for example by turning off the computer or performing other operation. Otherwise installation may become unavailable as Windows may not start up or the data may be corrupted.
- Perform Setup Windows (OPERATING INSTRUCTIONS - Read Me First
NOTE
■ The date and time, and the time zone may not be correct. Be sure to set them correctly.
- Perform Windows Update.
Clear TPM.

- Right-click (Start) at the bottom left corner.
- Click [Run], then input [tpm.msc] and click [OK].
- Click [Clear TPM...] under "Actions" on the right of the "TPM Manager on Local Computer" screen.
- Click [Restart] of the "Manage the TPM security hardware" screen.
The computer will restart.
- When "TPM configuration change was requested to ..." is displayed, press « F12 ».
Installing Software
Installing software will return the computer to the default condition. When you install the software, the internal SSD data will be erased.
Back up important data to other media or an externalflash memory before installation.
CAUTION
■ Do not delete the recovery partition on the SSD. If it has been deleted, the recovery disc could not be created.
To check the recovery partition, perform the following methods.

- Right-click (Start) at the bottom left corner, and click [DiskManagement].
- A standard user needs to enter an administrator password.
Disk recovery
You can reinstall the OS that was pre-installed at the time of purchase (Windows 10).
CAUTION
■ If the recovery partition is deleted, you cannot perform flash memory recovery.
If reinstallation using the method described in "Reset this PC" is not successful, follow the steps below.
Preparation
- Remove all peripherals and SD memorycard etc.
-
Connect the AC adaptor and do not remove it until installation is complete.
-
Start the Setup Utility.


- Click (Start) - (Settings) - [Update & security] - [Recovery].

Alternatively, click (settings) - [Update & security] - [Recovery] in the tablet mode.
- Click[Restart now] under "Advanced startup".
-
Click[Troubleshoot] - [Advanced options] - [UEFI Firmware Settings] - [Restart].
-
Write down all of the contents of the Setup Utility and press «F9».
At the confirmation message, select [Yes] and press «Enter».
- Press «F10».
At the confirmation message, select [Yes] and press «Enter». Computer will restart.
- Press «F2» or «Del» while [Panasonic] boot screen is displayed.
The Setup Utility starts up.
- If the password is requested, enter the Supervisor Password.
-
Select the [Exit] menu, then select [Recovery Partition] and press «Enter».
-
Click [Recovery]
Click [CANCEL] to abort the operation.
-
Click [Disk 0].
-
Click [Recovery ALL Partitions].
Installation starts according to the instructions on the screen. (It will take approximately severaltensof minutes.)
Do not interrupt installation, for example by turning off the computer or performing other operation. Otherwise installation may become unavailable as Windows may not start up or the data maybe corrupted.
-
When the Ending process screen is displayed, click [Shutdown.] to turn off the computer.
-
Turn on the computer.
- If the password is requested, enter the Supervisor Password.
-
Perform Setup Windows (OPERATING INSTRUCTIONS - Read Me First
-
Start the Setup Utility and change the settings as necessary.
-
Clear TPM.

-
Right-click (Start) at the bottom left corner.
-
Click[Run], then input [tpm.msc] and click [OK].
-
Click[Clear TPM...] under "Actions" on the right of the "TPM Manager on LocalComputer" screen.
-
Click[Restart] of the "Manage the TPM security hardware" screen.
The computer will restart.
- When "TPM configuration change was requested to ..." is displayed, press « F12 ».
Using Recovery Disc
Use the Recovery Disc in the following conditions.
- You have forgotten the administrator password.
- Installation is not complete. The recovery partition in the flash memory maybe broken.
Preparation
• Prepare the following items:
- Recovery Disc (USB memory device can also be used as a recovery disc.) ( Create a Recovery Disc)
• Commercially available optical drive
- Remove allperipherals and SD memory card etc. (except for the commercially available optical drive).
- Connect the AC adaptor and do not remove it until installation iscomplete.
-
Connect the commercially available optical drive to the USB port.
-
Start the Setup Utility.


- Click (Start) - (Settings) - [Update & security] - [Recovery].

Alternatively, click (settings) - [Update & security] - [Recovery] in the tablet mode.
-
Click[Restart now] under "Advanced startup".
-
Click[Troubleshoot] - [Advanced options] - [UEFI Firmware Settings] - [Restart].
-
Write down all of the contents of the Setup Utility and press «F9».
At the confirmation message, select [Yes] and press «Enter».
-
Set the Recovery Disc into the DVD drive or commercially available optical drive.
-
Press «F10».
At the confirmation message, select [Yes] and press «Enter». Computer will restart.
- Press «F2» or «Del» while [Panasonic] boot screen is displayed.
The Setup Utility starts up.
- If the password is requested, enter the Supervisor Password.
-
Select the [Exit] menu, then select DVD drive or commercially available optical drive in [Boot Override] and press «Enter».
-
Click [Recovery].
- At the confirmation message, click [Accept].
- Click [Disk 0].
- Click [Recovery ALL Partitions].
- Click [Remain Recovery Partition].
Follow the on-screen instructions.
- When the Ending process screen is displayed, remove the Recovery Disc and DVD drive or commercially available optical drive and then click [Reboot].
Follow the on-screen instructions.
- On the "Finish Recovery Process." screen, click [Shutdown].
- Turn on the computer.
- Perform Setup Windows (OPERATING INSTRUCTIONS - Read Me First
- Start the Setup Utility and change the settings as necessary.
Clear TPM.

- Right-click (Start) at the bottom left corner.
- Click[Run], then input [tpm.msc] and click [OK].
- Click[Clear TPM...] under "Actions" on the right of the "TPM Manager on Local Computer" screen.
- Click[Restart] of the "Manage the TPM security hardware" screen.
The computer will restart.
- When "TPM configuration change was requested to ..." is displayed, press « F12 ».
Error Message
Follow the instructions below when an error message appears. If the problem persists or if the error message is not shown here, contact Panasonic Technical Support.
| Error Message Solution | |
| Bad System CMOS | An error has occurred in the memory of system settings. This occurs when the memory content is changed by an unexpected program operation, etc.Start the Setup Utility and return the settings to the default values, and then change the settings as necessary.If the problem persists, the internal clock battery may need to be replaced. Contact Panasonic Technical Support. |
| System CMOS Checksum Error | |
| Invalid Year. System date restored to 01/01/20XX | The date and time settings are not correct.Start the Setup Utility and set the correct date and time.If the problem persists, the internal clock battery may need to be replaced. Contact Panasonic Technical Support. |
| Press F2 for Setup / F12 for LAN | Write down the error details and press « F2» or « Del» to start the Setup Utility.Change the settings if necessary. |
| Reboot and Select proper Boot device or Insert Boot Media in selected Boot device and press a key | The operating system is not properly installed in the flash memory that you are going to boot from.If you cannot start up the OS from the internal disk, checkif the internal disk is properly recognized on the [Information] menu of the Setup Utility.If it is recognized ("xxx GB" isdisplayed.), perform the reinstallation.If not ("Empty" isdisplayed.), contact Panasonic Technical Support.If a device isconnected to the USB port, remove the device, or set [LegacyUSB] to [Disabled] on the "Advanced" menu of the Setup Utility. |
| Disk error Press any key to restart | |
| Warming up the system (up 30 minutes) | the computer is warming up before start up. Wait for the computer to start up (takes up to 30 minutes). If, “Ca warm up the system” is displayed, the computer failed to warm up and does not start. In this case, turn off the puter, leave it in an environment of 5 °C {41 °F} or higher temperature for about an hour, and then turn on the once more. |
| Remove disksor other media. Press any key to restart | If a device isconnected to the USB port, disconnect the device, or set [Tablet USB Port] or [Legacy USB Support] to [Disabled] in the [Advanced] menu of the Setup Utility.If the problem persists after removing the disk, it may be a flash memory failure. Contact Panasonic Technical Support. |
| Problem Undoing From Keyboard Base | Perform the following procedure.Close the dialog box.Remove peripheral devices connecting to the keyboard base, and then retry detaching the tablet from the keyboard base (Detaching the tablet from the keyboard base). |
Network Connections and Communications Software
Close the communications software before using the power saving function.
- If the power saving function (sleep or hibernation) is activated while communications software is used, the network connection may be interrupted, or the performance may be adversely affected. In this case, restart the computer.
In a network environment, set [Never] for [Sleep after] and [Hibernate after] (Setting Sleep or Hibernation).
About Fast startup
The fast startup is enabled as the factory default.
If the computer shut down by the following steps, the fast startup will be disabled at next boot-up.
-
Click (Start) at the bottom left corner, and then click (Settings) - [Update & security] - [Recovery]. Alternatively, click (Settings) - [Update & security] - [Recovery] in the tablet mode.
-
Click [Restart now] under "Advanced startup".
-
Click [Turn off your PC].
If you perform the following steps, the fast startup function becomes alwaysdisabled.
- Click (Start) - (Settings) - [System] - [Power & sleep] - [Additional power settings] - [Choose what the power button does].
- Click [Change settings that are currently unavailable].
- Remove checkmark from [Turn on fast startup (recommended)] in "Shutdown settings".
About FCC ID Number
SAR information on this product is on file with the FCC and can be found by searching for the product's FCC ID Number at http://www.fc-c.gov/oet/ea/fccid. To find the FCC ID number for your product, first remove the battery pack from the tablet.
The FCC ID number (A) is printed on the nameplate underneath.
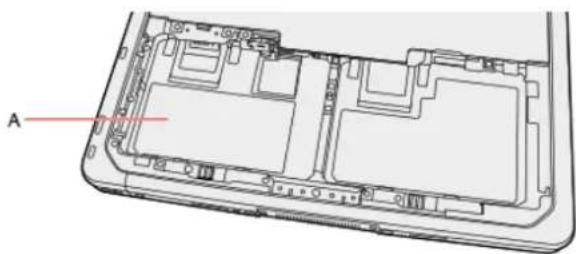
natural_image
Technical diagram of a device rear panel with labeled component A (no text or symbols beyond label)LIMITED USE LICENSE AGREEMENT
THE SOFTWARE PROGRAM(S) ("PROGRAMS") FURNISHED WITH THIS PANASONIC PRODUCT ("PRODUCT") ARE LICENSED ONLY TO THE END-USER ("YOU"), AND MAY BE USED BY YOU ONLY IN ACCORDANCE WITH THE LICENSE TERMS DESCRIBED BELOW. YOUR U OF THE PROGRAMS SHALL BE CONCLUSIVELY DEEMED TO CONSTITUTE YOUR ACCEPTANCE OF THE TERMS OF THIS LICENSE.
Panasonic Corporation has developed or otherwise obtained the Programs and hereby licenses their use to you. You assume sole responsibility for the selection of the Product (including the associated Programs) to achieve your intended results, and for the installation, use and results obtained therefrom.
LICENSE
A. Panasonic Corporation hereby grants you a personal, non-transferable and non-exclusive right and license to use the Programs in accordance with the terms and conditions stated in this Agreement. You acknowledge that you are receiving only a LIMITED LICENSE TO USE the Programs and related documentation and that you shall obtain no title, ownership nor any other rights in or to the Programs and related documentation nor in or to the algorithms, concepts, designs and ideas represented by or incorporated in the Programs and related documentation, all of which title, ownership and rights shall remain with PanasonicCorporation or its suppliers.
B. You may use the Programs only on the single Product which was accompanied by the Programs.
C. You and your employees and agents are required to protect the confidentiality of the Programs. You may not distribute or otherwise make the Programs or related documentation available to any third party, by time-sharing or otherwise, without the prior written consent of Panasonic Corporation.
D. You may not copy or reproduce, or permit to be copied or reproduced, the Programs or related documentation for any purpose, except that you may make one (1) copy of the Programs for backup purposes only in support of your use of the Programs on the single Product which was accompanied by the Programs. You shall not modify, or attempt to modify, the Programs.
E. You may transfer the Programs and license them to another party only in connection with your transfer of the single Product which was accompanied by the Programs to such other party. At the time of such a transfer, you must also transfer all copies, whether in printed or machine readable form, of every Program, and the related documentation, to the same party or destroy any such copies not so transferred.
F. You may not remove any copyright, trademark or other notice or product identification from the Programs and you must reproduce and include any such notice or product identification on any copy of any Program.
G. Your Product may periodically access servers of Panasonic Corporation, including servers that Panasonic Corporation rents or otherwise controls (“Panasonic’s servers”), and download certain information regarding PC support services (“Service Information”). In order to provide you with relevant emergency notifications regarding customer support services for Your Product and Programs, if Panasonic Corporation has a reasonable basis to conclude that Your Product may harm You or Your property, Panasonic Corporation may prepare the Service Information and transfer it to Your Product through Panasonic’s servers. The Service Information may cause Your Product to develop a full screen sized warning message from Panasonic Corporation. Panasonic Corporation may periodically update the Programs as needed to be able to properly relay such warning messages. Panasonic will never transfer any information regarding Your Products or Programs to Panasonic’s servers.
No personally identifiable information shall be transferred between this Program and Panasonic. In the event of an alert being generated by this Program, you will be sent a link to a secure Panasonic website where you can provide the information that is necessary for Panasonic to provide you with the level of support required via an online form. Personally identifiable information may be required as part of completing this online form. At the point of completing this online form you will be informed what information is required and what information is optional and you will be provided with details of Panasonic's applicable Privacy Policy that will outline how your information will be processed by Panasonic.
YOU AGREE THAT PANASONIC CORPORATION MAY CAUSE YOUR PRODUCT TO PERIODICALLY DOWNLOAD THE SERVICE INFORMATION AND MAY UPDATE THE PROGRAMS AS SET FORTH IN THIS AGREEMENT WITHOUT NOTIFYING YOU IN ADVANCE.
YOU MAY NOT REVERSE ASSEMBLE, REVERSE COMPILE, OR MECHANICALLY OR ELECTRONICALLY TRACE THE PROGRAMS, OR ANY COPY THEREOF, IN WHOLE OR IN PART.
YOU MAY NOT USE, COPY, MODIFY, ALTER, OR TRANSFER THE PROGRAMS OR ANY COPY THEREOF, IN WHOLE OR IN PART, EXCE EXPRESSLY PROVIDED IN THE LICENSE.
IF YOU TRANSFER POSSESSION OF ANY COPY OF ANY PROGRAM TO ANOTHER PARTY, EXCEPT AS PERMITTED IN PARAGRAPH E ABOVE, YOUR LICENSE IS AUTOMATICALLY TERMINATED.
TERM
This license is effective only for so long as you own or lease the Product, unless earlier terminated. You may terminate this license at any time by destroying, at your expense, the Programs and related documentation together with all copies thereof in any form. This license will also terminate effective immediately upon occurrence of the conditions thereof set forth elsewhere in this Agreement, or if you fail to comply with any term or condition contained herein. Upon any such termination, you agree to destroy, at your expense, the Programs and related documentation together with all copies thereof in any form.
YOU ACKNOWLEDGE THAT YOU HAVE READ THIS AGREEMENT, UNDERSTAND IT AND AGREE TO BE BOUND BY ITS TERMS AND CONDITIONS. YOU FURTHER AGREE THAT IT IS THE COMPLETE AND EXCLUSIVE STATEMENT OF THE AGREEMENT BETWEEN US, WHICH SUPERSEDES ANY PROPOSAL OR PRIOR AGREEMENT, ORAL OR WRITTEN, AND ANY OTHER COMMUNICATIONS BETWEEN US RELATING TO THE SUBJECT MATTER OF THIS AGREEMENT.
This product incorporates the following software:
(1) the software developed independently by or for Panasonic Corporation,
(2) the software owned by third party and licensed to Panasonic Corporation,
(3) the software licensed under the GNU General Public License Version 2.0 (GPL V2.0),
(4) the software licensed under the GNU LESSER General PublicLicense, Version 2.1 (LGPL V2.1), and/or
(5) open source software other than the software licensed under the GPL V2.0 and/or LGPL V2.1.
The software categorized as (3) - (5) are distributed in the hope that it will be useful, but WITHOUT ANY WARRANTY, without even the implied warranty of MERCHANTABILITY or FITNESS FOR A PARTICULAR PURPOSE. Please refer to the detailed terms and conditions thereof shown in the "About the Software License".
At least three (3) years from delivery of this product, Panasonic will give to any third party who contacts us at the contact information provided below, for a charge no more than our cost of physically performing source code distribution, a complete machine-readable copy of the corresponding source code covered under GPL V2.0, LGPL V2.1 or the other licenses with the obligation to do so, as well as the respective copyright notice thereof.
Contact Information: oss-cd-request@gg.jp.panasonic.com
The source code and the copyright notice are also available for free in our website below.
http://panasonic.net/avc/oss/index.html
GOVERNMENT RESTRICTED RIGHTS.
The Software is provided with "RESTRICTED RIGHTS." Use duplication or disclosure by the government is subject to restrictions as set forth in FAR52.227-14 and DFAR252. 227-7013 et seq. or their successors.
Use of the Software by the government constitutes acknowledgement of Intel's proprietary rights therein.
Contractor or Manufacturer is Intel Corporation, 2200 Mission College Blvd., Santa Clara, CA 95052.
About the Software License
This product incorporates the following software:
(1) the software developed independently by or for PanasonicCorporation,
(2) the software owned by third party and licensed to Panasonic Corporation, and/or
(3) open source software
The software categorized as (3) is distributed in the hope that it will be useful, but WITHOUT ANY WARRANTY, without even the implied warranty of MERCHANTABILITY or FITNESS FOR A PARTICULAR PURPOSE. Please refer to the detailed terms and conditions thereof shown below.
About zlib
/* zlib.h -- interface of the 'zlib' general purpose compression library version 1.2.8, April28th, 2013
Copyright (C) 1995-2013 Jean-loup Gailly and Mark Adler
This software is provided 'as-is', without any express or implied warranty. In no event will the authors be held liable for any damages arising from the use of thissoftware.
Permission is granted to anyone to use this software for any purpose, including commercial applications, and to alter it and redistribute it freely, subject to the following restrictions:
- The origin of this software must not be misrepresented; you must not claim that you wrote the original software. If you use this software in a product, an acknowledgment in the product documentation would be appreciated but is not required.
- Altered source versions must be plainlymarked as such, and must not be misrepresented as being the original software.
- This notice may not be removed or altered from any source distribution.
Jean-loup Gailly Mark Adler
jloup@gzip.org madler@alumni.caltech.edu
*/
About Lib PNG
This copy of the libpng notices is provided for your convenience. In case of any discrepancy between this copy and the notices in the file png.h that is included in the libpng distribution, the latter shall prevail.
COPYRIGHT NOTICE, DISCLAIMER, and LICENSE:
If you modify libpng you may insert additional notices immediately following this sentence.
This code is released under the libpng license.
libpng versions 1.2.6, August 15, 2004, through 1.6.3, July 18, 2013, are Copyright (c) 2004, 2006-2013 Glenn Randers-Pehrson, and are distributed according to the same disclaimer and license as libpng-1.2.5 with the following individual added to the list of Contributing Authors
Cosmin Truta
libpng versions 1.0.7, July 1, 2000, through 1.2.5 - October 3, 2002, are Copyright (c) 2000-2002 Glenn Randers-Pehrson, and are distributed according to the same disclaimer and license as libpng-1.0.6 with the following individuals added to the list of Contributing Authors
Simon-Pierre Cadieux
Eric S. Raymond
Gilles Vollant
and with the following additions to the disclaimer:
There is no warranty against interference with your enjoyment of the library or against infringement. There is no warranty that our efforts or the library will fulfill any of your particular purposes or needs. This library is provided with all faults, and the entire risk of satisfactory quality, performance, accuracy, and effort is with the user.
libpng versions 0.97, January 1998, through 1.0.6, March 20, 2000, are Copyright (c) 1998, 1999 Glenn Randers-Pehrson, and are distributed according to the same disclaimer and license as libpng-0.96, with the following individuals added to the list of Contributing Authors:
Tom Lane
Glenn Randers-Pehrson
Willem van Schaik
libpng versions 0.89, June 1996, through 0.96, May 1997, are Copyright (c) 1996, 1997 Andreas Dilger Distributed according to the same disclaimer and license as libpng-0.88, with the following individuals added to the list of Contributing Authors:
John Bowler
Kevin Bracey
Sam Bushell
Magnus Holmgren
Greg Roelofs
Tom Tanner
libpng versions 0.5, May 1995, through 0.88, January 1996, are Copyright (c) 1995, 1996 Guy Eric Schalnat, Group 42, Inc.
For the purposes of this copyright and license, "Contributing Authors" is defined as the following set of individuals:
Andreas Dilger
Dave Martindale
GuyEric Schalnat
Paul Schmidt
Tim Wegner
The PNG Reference Library is supplied "AS IS". The Contributing Authors and Group 42, Inc. disclaim all warranties, expressed or implied, including, without limitation, the warranties of merchantability and of fitness for any purpose. The Contributing Authors and Group 42, Inc. assume no liability for direct, indirect, incidental, special, exemplary, or consequential damages, which may result from the use of the PNG Reference Library, even if advised of the possibility of such damage.
Permission is hereby granted to use, copy, modify, and distribute this source code, or portions hereof, for any purpose, without fee, subject to the following restrictions:
- The origin of this source code must not be misrepresented.
- Altered versions must be plainlymarked as such and must not be misrepresented as being the original source.
- This Copyright notice may not be removed or altered from any source or altered source distribution.
The Contributing Authors and Group 42, Inc. specifically permit, without fee, and encourage the use of this source code as a component to supporting the PNG file format in commercial products. If you use this source code in a product, acknowledgment is not required but would be appreciated.
A "png_get_copyright" function is available, for convenient use in "about" boxes and the like:
printf("%s", png_get_copyright(NULL));
Also, the PNG logo (in PNG format, of course) is supplied in the files "pngbar.png" and "pngbar.jpg (88x31) and "pngnow.png" (98x31).
Libpng is OSI Certified Open Source Software. OSI Certified Open Source is a certification mark of the Open Source Initiative.
Glenn Randers-Pehrson
glennrp at users.sourceforge.net
July 18, 2013
Erasing Flash Memory Data
When disposing the computer or transferring the ownership, erase all flash memory drive data in order to avoid data leakage. Even if you erase the data or initialize the flash memory drive using normal Windows commands, the data can be read with some special software. Use the flash memory drive data erase function to erase the data completely.
Note that transferring of the ownership without uninstalling the commercial software will be a violation of the software's license agreement.
Erasing Flash Memory Data
The flash memory drive data erase utility erases data using an overwriting method, but there is a possibility that due to malfunctions or other operational errors, data may not be completely erased. There are also specialized devices that may be able to read data that has been erased using this method. If you need to erase highly confidential data, we recommend that you contact a company that specializes in this process. Panasonic Corporation will bear no responsibility for losses or damages suffered as a result of the use of this utility.
NOTE
This utility cannot be used to erase the data on the specified partition. However, the entire flash memory drive data including the data of the partition with recovery tools will be erased.
Using Recovery Disc
Preparation
Prepare the following items:
- Commercially available optical drive
- Recovery Disc ( Create a Recovery Disc)
- Remove allperipherals. (except for the commerciallyavailable optical drive)
-
Connect the AC adaptor and do not remove it until flash memory drive data erase is complete.
-
Connect the commercially available optical drive to the USB port.
- Turn on the computer.
- Start the Setup Utility. (Starting the Setup Utility)
- Write down all of the contents of the Setup Utility and press « F9 ».
At the confirmation message, select [Yes] and press« Enter» .
- Set the Recovery Disc into the commercially available optical drive.
- Press « F10» .
At the confirmation message, select [Yes] and press« Enter» . The computer will restart.
The Setup Utility starts up.
If the password is requested, enter the Supervisor Password.
- Select the [Exit] menu, then select the commercially available optical drive (indicated as [xxxx DVD], for example) in "Boot Override".
- Press « Enter» .
- Click [Erase].
- Click [Erase the all data on the whole Disk].
- Click [Start Erase Process].
Erasing the flash memory drive data starts.
- After the erasing is completed, remove the Recovery Disc and click [Shutdown].
Dispose of Computer
Preparation
- Remove all peripherals and SD memory card, etc.
- Erase the stored data. ( Erasing Flash Memory Data)
When disposing of thisproduct, accord with your national legislation.
Specifications
Thispage provides the specifications for the basic model.
The model number is different according to the unit configuration.
To check the model number:
Check the bottom of the computer or the box the computer came in at the time of purchase.
To check CPU speed, memory size and the flash memory drive (SSD) size:
Run the Setup Utility( Setup Utility) and select [Information] menu.
[Processor Speed]: CPU speed, [Memory Size]: Memory size, [Hard Disk]: SSD size
Main Specifications
| CPU Intel | ®CoreTM i5-7300U vProTM Processor (3 *MBache, 2.6 GHz up to 3.5 GHz) with Intel® Turbo Boost Technology / InteloreTM i7-7600U vProTM Processor (4 *MB cache, 2.8 GHz up to 3.9 GHz) with Turbo Boost Technology | |
| Chip Set Built-in CPU | ||
| Video controller Intel | ®HD Graphics 620 (Built-in CPU) | |
| Main Memory ^2 | 4 GB ^*1 / 8 GB ^ /16 GB ^ , LPDDR3 SDRAM | |
| Storage 128 GB | *3 / 256 GB/ 512 GB (SSD)Approx. 10 GB is used as a partition with disk recovery tools. (Users cannot use this partition.)Approx. 1 GB is used as a partition with system tools. (Users cannot use this partition.) | |
| Display Method | 12.0" QHD (2160 × 1440 dots) | |
| Internal LCD ^4 Max. 16,777,216 colors (2160 × 1440 dots) | ||
| External Display (HDMI)Tablet : 65,536 / 16,777,216 colors (2160 × 1440 dots Max.)Keyboard Base : 65,536 / 16,777,216 colors (1920 × 1080 dots Max.) | ||
| WirelessLAN ^*6 | Intel® Dual Band Wireless-AC 8265 ( WirelessLAN ) | |
| Bluetooth ^*7 | ( Bluetooth) | |
| LAN | Tablet / Keyboard Base: IEEE 802.3 10Base-T / IEEE 802.3u 100BASE-TX / IEEE 802.3ab 1000BASE-T | |
| Sound | Intel® High Definition Audio subsystem support, Speaker × 2 (Stereo) | |
| SecurityChip ^*8 | TPM (TCG V2.0 compliant) | |
| SD Memory Card Slot | Tablet: microSD Memory Card Slot x1Keyboard Base: SD Memory Card Slot x1 | |
| Interface | USB Port (USB 3.0 port *10 1) LAN Port (RJ-45) × 1 / HDMI Port (Type Headset(Miniature jack, 3.5 DIA, CTIA standard / Headphone: Impedance 32 Ω, Output mW × 2, Stereo)<Keyboard Base>USB Port (USB 3.0 port × 2 / 2.10/×LAN Port (RJ-45) × 1 / HDMI Port (Type VGA Port × 1 / SerialPort × 1 / Expansion Bus Connector | |
| Camera (Front) 2 MP w/ stereo microphone/ALS/IR | ||
| Sensor Ambient light sensor Equipped | ||
| Keyboard / Pointing Device 87 Keys/ Touchpad / Touchscreen / Digitizer | ||
| Power Supply AC adaptor or Battery pack | ||
| AC Adaptor*12 | Input: 100 V - 240 V AC, 50 Hz/60 Hz, Output: 15.6 V DC, 7.05 A | |
| Battery Pack | Li-ion 11.1 V, Minimum 1990 mAh (with CF-VZSU1A series) | |
| <Only for model with keyboard base>Approx. 10 hours (with CF-VZSU1A series × 2)<For tablet>Approx. 11 hours (with CF-VZSU1A series × 2) | ||
| <Power Off>Approx. 2.5 hours<Power On>Approx. 3 hours | ||
| Power Consumption*15 | Approx. 45 W6/ Approx. 90 W (maximum when recharging in the ON state) | |
| Physical Dimensions (W × D × H) (excluding projecting parts) | <Only for model with keyboard base>313.0 mm × 288.4 mm × 46.1 mm {12.32" × 11.35" × 1.82"}<For tablet>308.0 mm × 243.6 mm × 21.6 mm {12.13" × 9.59" × 8.50"} | |
| Weight | <Only for model with keyboard base>Approx. 2.76 kg {6.09 lb.} (with CF-VZSU1A seriesx 2)<For tablet>Approx. 1.53 kg {3.37 lb.} (with CF-VZSU1A seriesx 2) | |
| Environment | Operating Temperature | -10 °C to 50 °C {14 °F to 122 °F} (IEC60068-2-1, 2)*17 |
| Operating Humidity | 30 % to 80 % RH (No condensation) | |
| Storage Temperature | -20 °C to 60 °C {-4 °F to 140 °F} | |
| Storage Humidity | 30 % to 90 % RH (No condensation) | |
Software
| Base OS | Windows 10 Pro 64-bit |
| Installed OS ^18 | Windows 10 Pro 64-bit |
| Pre-installed Software PC Information Viewer, Intel | ^ PROSet/WirelessSoftware ^*19 , Inter ^ WirelessBluetooth ^*19 , Panasonic PC Camera Utility GPS Viewer ^*19 , Manual Selector,Microsoft Office Trial ^*20 , Wireless Manager Mobile Edition ^*21 , Recovery Disc CreationUtility, DDS EVE FA Standalone for PanasonicPanasonic PC Settings Utility Wireless Toolbox |
| Aptio Setup Utility, PC-Diagnostic Utility, Hard Disk Data Erase ^*24 Utility |
Wireless LAN ^4
| Data Transfer Rates | IEEE802.11a : 54 Mbps *25IEEE802.11b : 11 Mbps *25IEEE802.11g : 54 Mbps *25IEEE802.11n *26: HT20 = 144.4 MbpsHT40 = 300 MbpsIEEE802.11ac : VHT80 : 866.7 MbpsVHT40 : 400 MbpsVHT20 : 173.3 Mbps |
| Standard Supported IEEE802.11a / IEEE802.11b / IEEE802.11g / IEEE802.11n / IEEE802.11ac | |
| Transmission Method OFDM system, DS-SS system |
Bluetooth ^*7
| Bluetooth Bluetooth Ver.4.1 | |
| Classic mode / Low Energy mode | |
| Transmission Method FHSS system | |
| Wireless Channels Used Channels 0 to 78 / Channels 0 to 39 | |
| RF Frequency Band 2.402 GHz - 2.480 GHz | |
Optional Devices
| Wireless WAN ^27 | LTE compatible |
| Dedicated GPS | Chip: u-blox NEO-M8NGPS/GLONASS/SBAS Support |
| Smart Card Slot | × 1 |
| nanoSIM Card Slot | × 1 |
| USB 2.0 port ^10 | × 1 |
| Serial Port | × 1, Serial (true) |
| Fingerprint Reader | Array Size : -, Image Size : 200×400 pixels, Image Resolution : 508 DPI |
| Contactless Smart Card Reader | RF frequency: 13.56 MHz, compatible with ISO14443 Type-A, ISO14443 Type-B |
| Rear Camera ^28 | 2048 × 1536 dots, 15fps (Video) / 3264 × 2448 dots (Still), with Camera light |
| Battery Pack | Li-ion 10.8 V, Minimum 4120 mAh (CF-VZSU1B series) |
| Operating Time ^13 | Approx. 20 hours (with CF-VZSU1B series× 2)Approx. 22 hours (with CF-VZSU1B series× 2) | |
| Charging Time ^14 | Approx. 2.5 hoursApprox. 3 hours |
*1: 1 MB = 1,048,576 bytes / 1 GB = 1,073,741,824 bytes
*2: Memory size of the factory default depends on the model. You can physically expand the memory up to 8 GB, but the total amount of usable memory available will be less depending on the actualsystem configuration.
*3: 1 MB = 1,000,000 bytes / 1 GB = 1,000,000,000 bytes. Your operating system or some application software will report as fewer GB.
*4: Depending on the OS settings.
*5: Selectable resolution depends on the specifications of the external display. Display may be impossible using some connected external displays.
*6: Only for model with wirelessLAN.
*7: Only for model with Bluetooth. Does not guarantee operation of all Bluetooth peripherals.
*8: Only for model with TPM.
*9: Operation has been tested and confirmed using Panasonic SD/SDHC/SDXC Memory Cards with a capacity of up to 64 GB. Operation on other SD equipment is not guaranteed.
*10: Does not guarantee operation of all USB-compatible peripherals.
*11: Does not guarantee operation of all HDMI-compatible peripherals.
*12:
The AC adaptor is compatible with power sources up to 240 V AC adaptor. This computer is supplied with a 125 V AC compatible AC cord.
*13: Measured by MobileMark2014.
Varies depending on the usage conditions, or when an optional device is attached.
*14: Varies depending on the usage conditions, CPU speed, etc.
*15: Approx. 0.5 W when the battery pack is fully charged (or not being charged) and the computer is off.
Even when the AC adaptor is not connected to the computer, power is consumed (Max. 0.15 W) simply by having the AC adaptor plugged into an AC outlet.
*16: Rated power consumption.
*17: Do not expose the skin to this product when using the product in a hot or cold environment. OPERATING INSTRUCTIONS - Read Me First When using in hot or cold environment, some peripherals and battery pack may fail to work properly. Check the operation environment of the peripherals.
Using this product continuously in a hot environment will shorten the product life. Avoid use in these types of environments. When using in low temperature environment, startup may become slow or battery operation time may become short.
The computer consumes power when the flash memory is warming up during startup. Therefore, if you are using battery power and the remaining power is low, the computer may not start up.
*18: Operations of this computer are not guaranteed except for the pre-installed OS and the OS which is installed by using the flash memory recovery and the recovery disc.
*19: Depending on the models, this application software is not installed.
*20: To continue using this software after the end of the trial, purchase a license by following the on-screen instructions.
*21: Must be installed before use.
*22: For localized OS model. For information on Wireless Manager, refer to the “Supplementary Instructions for Wireless Manager mobile edition” by the following procedure.

- Right-click (Start) at the bottom left corner.
- Click [Run], input "c:\util\wlprjct\Supplementary Instructions.pdf" then click [OK].
*23: Panasonic PC Settings Utility includes the following functions: Battery Charge Speed / Battery Recalibration / Touch Operation Support / USB Charge Settings / Power Saving Settings / etc.
*24: Perform on the recovery disc.
*25: These are speeds specified in IEEE802.11a+b+g+n+ac standards. Actual speeds may differ.
*26: Available when set to "WPA-PSK", "WPA2-PSK" or "none".
Only available when HT40 enabled by the computer and access point which associated supports HT40.
*27: The specifications may differ depending on the model.
A nanoSIM card (12.3 mm {0.48"} × 8.8 {0.35"} mm) must be inserted in the nanoSIM card slot.
*28: The specifications may differ depending on the model. Depending on the specification of application software, the following cases may occur. In these cases, select a smaller resolution.
- Cannot select a large resolution.
- When selecting a large resolution, an error occurs.
Main Specifications
| CPU Intel |  | |
| Chip Set Built-in CPU | ||
| Video controller Intel |  | |
| Main Memory ^2 | 4 GB ^*1 / 8 GB ^14 /16 GB ^1 , LPDDR3 SDRAM | |
| Storage 128 GB |    | |
| Display Method 12.0" QHD (2160 × 1440 dots) | ||
| Internal LCD ^4 |  | |
| External Display (HDM ^F ) |   | |
| WirelessLAN ^6 |  | |
| Bluetooth ^7 |  | |
| LAN Tablet / Keyboard Base: IEEE 802.3 10Base-T |  | |
| Sound Intel |  | |
| SecurityChip ^8 | TPM (TCG V2.0 compliant) | |
| SD Memory Card Slot | Tablet: microSD Memory Card Slot x1Keyboard Base: SD Memory Card Slot x1 | |
| Interface | USB Port (USB 3.0 port ^10 1)LAN Port (RJ-45) × 1 / HDMI Port (Type Headset(Miniature jack, 3.5 DIA, CTIA standard / Headphone: Impedance 32 Ω, Output mW × 2, Stereo)<Keyboard Base>USB Port (USB 3.0 port × 2 / ^2.19 /×LAN Port (RJ-45) × 1 / HDMI Port (Type VGA Port × 1 / Serial Port × 1 / Expansion Bus Connector | |
| Camera (Front) 2 MP w/ stereo microphone/ALS/IR | ||
| Sensor Ambient light sensor Equipped | ||
| Keyboard / Pointing Device 87 Keys / Touchpad / Touchscreen / Digitizer | ||
| Power Supply AC adaptor or Battery pack | ||
| AC Adaptor ^12 | Input: 100 V - 240 V AC, 50 Hz/60 Hz, Output: 15.6 V DC, 7.05 A | |
| Battery Pack Li-ion 11.1 V, Minimum 1990 mAh (with CF-VZSU1A series) | ||
| Operating Time ^13 Approx. 10 hours(with CF-VZSU1A series× 2)<For tablet>Approx. 11 hours(with CF-VZSU1A series× 2) | ||
| Charging Time ^14 Approx. 2.5 hours<Power On>Approx. 3 hours | ||
| Power Consumption ^15 | Approx. 45 W ^6 / Approx. 90 W (maximum when recharging in the ON state) | |
| Physical Dimensions (W × D × H) (excluding projecting parts) | ||
| 313.0 mm × 288.4 mm × 46.1 mm {12.32" × 11.35" × 1.82"}<For tablet>308.0 mm × 243.6 mm × 21.6 mm {12.13" × 9.59" × 8.50"} | ||
| Weight | ||
| Approx. 2.76 kg{6.09 lb.} (with CF-VZSU1A series × 2)<For tablet>Approx. 1.53 kg{3.37 lb.} (with CF-VZSU1A series × 2) | ||
| Environment | Operating Temperature | -10 °C to 50 °C {14 °F to 122 °F} (IEC60068-2-1, 2) ^17 |
| Operating Humidity | 30 % to 80 % RH (No condensation) | |
| Storage Temperature | - 20 °C to 60 °C {-4 °F to 140 °F} | |
| Storage Humidity | 30 % to 90 % RH (No condensation) | |
Software
| Base OS Windows 10 Pro 64-bit | |
| Installed OS^18 | Windows 10 Pro 64-bit |
| Pre-installed Software PC Information Viewer, Intel | ^® PROSet/Wireless Software^19 , Intel ^® WirelessBluetooth ^®*19 , Panasonic PC Camera Utility GPS Viewer ^19 , ManualSelector,Microsoft Office Trial ^20 , Wireless Manager Mobile Edition ^21*22 , Recovery Disc CreationUtility, DDS EVE FA Standalone for Panasonic ^18*21 Panasonic PC Settings Utility Wireless Toolbox |
| Aptio Setup Utility, PC-DiagnosticUtility, Hard Disk Data Erase ^24 Utility |
Wireless LAN ^4
| Data Transfer Rates | IEEE802.11a : 54 Mbps *25IEEE802.11b : 11 Mbps *25IEEE802.11g : 54 Mbps *25IEEE802.11n *26: HT20 = 144.4 MbpsHT40 = 300 MbpsIEEE802.11ac : VHT80 : 866.7 MbpsVHT40 : 400 MbpsVHT20 : 173.3 Mbps |
| Standard Supported IEEE802.11a / IEEE802.11b / IEEE802.11g / IEEE802.11n / IEEE802.11ac | |
| Transmission Method OFDM system, DS-SS system |
Bluetooth ^*7
| Bluetooth Bluetooth Ver.4.1 | |
| Classic mode / Low Energy mode | |
| Transmission Method FHSS system | |
| Wireless ChannelsUsed | Channels0 to 78 / Channels0 to 39 |
| RF FrequencyBand | 2.402 GHz - 2.480 GHz |
Optional Devices
| Wireless WAN ^27 | LTE compatible |
| Dedicated GPS | Chip: u-blox NEO-M8NGPS/GLONASS/SBAS Support |
| Smart Card Slot | × 1 |
| nanoSIM Card Slot | × 1 |
| USB 2.0 port ^10 | × 1 |
| Serial Port | × 1, Serial(true) |
| Fingerprint Reader | Array Size : -, Image Size : 200×400 pixels, Image Resolution : 508 DPI |
| ContactlessSmart Card Reader RF frequency: 13.56 MHz, compatible with ISO14443 Type-A, ISO14443 Type-B | |
| Rear Camera*28 | 1920 × 1080 dots, 30fps (Video) / 3200 × 2400 dots (Still) |
| Battery Pack Li-ion 10.8 V, Minimum 4120 mAh (CF-VZSU1B series) | |
| Operating Time*13 | <Only for model with keyboard base>Approx. 20 hours (with CF-VZSU1B series × 2)<For tablet>Approx. 22 hours (with CF-VZSU1B series × 2) |
| Charging Time*14 | <Power Off>Approx. 2.5 hours<Power On>Approx. 3 hours |
*1: 1 MB = 1,048,576 bytes/ 1 GB = 1,073,741,824 bytes
*2: Memory size of the factory default depends on the model. You can physically expand the memory up to 8 GB, but the total amount of usable memory available will be less depending on the actual system configuration.
*3: 1 MB = 1,000,000 bytes / 1 GB = 1,000,000,000 bytes. Your operating system or some application software will report as fewer GB.
*4: Depending on the OS settings.
*5: Selectable resolution depends on the specifications of the external display. Display may be impossible using some connected external displays.
*6: Only for model with wireless LAN.
*7: Only for model with Bluetooth. Does not guarantee operation of allBluetooth peripherals.
*8: Only for model with TPM.
*9: Operation has been tested and confirmed using Panasonic SD/SDHC/SDXC Memory Cards with a capacity of up to 64 GB. Operation on other SD equipment is not guaranteed.
*10: Does not guarantee operation of all USB-compatible peripherals.
*11: Does not guarantee operation of all HDMI-compatible peripherals.
*12:
The AC adaptor is compatible with power sources up to 240 V AC adaptor. This computer is supplied with a 125 V AC compatible AC cord.
*13: Measured by MobileMark2014.
Varies depending on the usage conditions, or when an optional device is attached.
*14: Varies depending on the usage conditions, CPU speed, etc.
*15: Approx. 0.5 W when the battery pack isfully charged (or not being charged) and the computer is off.
Even when the AC adaptor is not connected to the computer, power is consumed (Max. 0.15 W) simply by having the AC adaptor plugged into an AC outlet.
*16: Rated power consumption.
*17: Do not expose the skin to this product when using the product in a hot or cold environment. Operating instructions - Read Me First When using in hot or cold environment, some peripherals and battery pack may fail to work properly. Check the operation environment of the peripherals.
Using this product continuously in a hot environment will shorten the product life. Avoid use in these types of environments. When using in low temperature environment, startup may become slow or battery operation time may become short.
The computer consumes power when the flash memory is warming up during startup. Therefore, if you are using battery power and the remaining power is low, the computer may not start up.
*18: Operations of this computer are not guaranteed except for the pre-installed OS and the OS which is installed by using the flash memory recovery and the recovery disc.
*19: Depending on the models, this application software is not installed.
*20: To continue using this software after the end of the trial, purchase a license by following the on-screen instructions.
*21: Must be installed before use.
*22: For localized OS model. For information on Wireless Manager, refer to the "Supplementary Instructions for Wireless Manager mobile edition" by the following procedure.

-
Right-click (Start) at the bottom left corner.
-
Click [Run], input "c:\util\wlprjct\Supplementary Instructions.pdf" then click[OK].
*23: Panasonic PC Settings Utility includes the following functions: Battery Charge Speed / Battery Recalibration / Touch Operation Support / USB Charge Settings / Power Saving Settings / etc.
*24: Perform on the recovery disc.
*25: These are speeds specified in IEEE802.11a+b+g+n+ac standards. Actualspeeds may differ.
*26: Available when set to "WPA-PSK", "WPA2-PSK" or "none".
Only available when HT40 enabled by the computer and access point which associated supports HT40.
*27: The specifications may differ depending on the model.
A nanoSIM card (12.3 mm {0.48"} × 8.8 {0.35"} mm) must be inserted in the nanoSIM card slot.

*28: The specifications may differ depending on the model. Depending on the specification of application software, the following cases may occur. In these cases, select a smaller resolution.
- Cannot select a large resolution.
- When selecting a large resolution, an error occurs.
For U.S.A.
Panasonic System CommunicationsCompany of North America (PSCNA)
Computer Products - Worldwide Warranties
Section 1: Limited Warranty - Hardware
PSCNA, referred hereafter as “Panasonic” will repair the products listed below with new or rebuilt parts, free of charge in a Global Panasonic designated service location for the period specified below from the date of original purchase in the event of a defect in materials or workmanship. These warranties are extended solely to the original purchaser. A purchase receipt or other proof of date of original purchase will be required before warranty performance is rendered.
- Laptop PC (CF-##) - 3 Years
- Tablet PC (FZ-##) - 3 Years
Ultra-Mobile (CF-U#/CF-H# Series) - 3 Years - PDRC - LCD & Keyboard Assembly - 3 Years
Battery Warranty
Batteries supplied with the product are covered under the warranty for one (1) year from date of purchase, except as excluded in Section 3. Batteries purchased separately are covered under the warranty for one (1) year from the date of purchase. A replacement battery furnished under the product warranty is covered for the remaining period of the one year warranty on the original or purchased battery.
Optional: Panasonic "Protection Plus" Warranty
Any unit for which the Panasonic “Protection Plus” warranty has been purchased will receive additional coverage for any failure that occurs due to accidental damage. All other terms and conditions of the standard warranty apply and this additional coverage will exist for the duration of the standard warranty period of the unit. If an extended Protection Plus warranty program is purchased, coverage is extended to the end of the last year of extended coverage purchased.
This warranty does not cover failures or defects that are caused by fire, intentional acts, loss, theft, improper maintenance, modification or service by anyone other than the Panasonic National Service Center or a Panasonic Authorized Service Provider, or damage that is attributable to acts of God. Cosmetic damage that does not affect functionality is not covered. Cosmetic damage on units with hardware failures will be repaired in accordance with the warranty terms. This warranty is extended solely to the original purchaser on the unit serial number for which it was purchased. Complete unit replacement fulfills the full obligation and is at the discretion of Panasonic and is limited to once during the coverage term. Maximum benefit is limited to one replacement per coverage year of the Motherboard, LCD, Storage Drive, and Keyboard.
Wireless Module Warranty
Panasonic approved wireless modems installed in Panasonic brand computers and integrated by Panasonic or an Authorized Panasonic Wireless Integrator are covered under the warranty for the remaining warranty period of the device in which the modem is installed. For devices with less than three (3) months remaining on the unit warranty, the wireless modem will be covered for a period of three (3) months from the date of installation of the modem, covering only modem replacement or modem installation related issues.
All modems must be approved by the wireless carrier prior to use. Any use or attempted use of a wireless modem not approved and activated by the carrier for use on their network is strictly prohibited and is not sanctioned or warranted by Panasonic and may result in legal action. In addition, all modems must be approved by Panasonic as compatible with the device hardware before installation or use.
Panasonic's sole responsibility for the warranty or technical support of the software required to install or operate the modem is defined in Section 2 (Limited Software Warranty). Any attempted software installation by anyone other than a Panasonic Authorized Wireless Integrator is not covered under warranty and may result in service charges to re-image or replace the hard drive.
Installation or attempted installation by any party other than Panasonic or an Authorized Panasonic Wireless Integrator is strictly not covered under the warranty and may void the computer warranty if damage results.
Options and Accessories Warranties
The below listed Panasonic brand or supplied options and accessories are covered under this limited warranty for the period specified from the date of purchase or as specifically stated:
AC Adaptor / Power Cord - 3 Years
• Memory Expansion Card (Panasonic Brand) - 3 Years
- Car Mount - Docking Station PCB or Vehicle Docking Station - 3 Years
- Desktop Port Replicator, I-O Box, Docking Cradle (like CF-U1) - 3 Years
- Antenna Pass-through Cable - 3 Years
- Backlit or Full-sized keyboard - 3 Years or assumes warranty of the unit in which it is installed
- Integrated Panasonic supplied options and kits including, but not limited to Wireless Modems, Media Bay Drives (Floppy, CD, DVD, Combo), Camera, GPS, Bluetooth, Smartcard Reader, Magnetic Card Reader, Barcode Scanner, and Fingerprint Reader - 3 Years or assumes warranty period of the unit in which it is installed provided the integration was performed by Panasonic or an Authorized Integrator.
- Hard Drive / Solid State Drive (Internal) - 3 Years
• Separately purchased 2nd Hard Drive - 1 Year
External USB Drives (CD / DVD / Floppy / Hard Drive) - 1 Year
- Optional Battery - 1 Year
Battery Charger / Multi-Bay Battery Charger - 1 Year
• Stylus Pens, Digitizer & Standard - 90 Days(physical damage excluded)
Section 2 - Limited Warranty - Software
Panasonic warrants to you only that the disk(s) or other media on which the Programs are furnished will be free from defects in material and workmanship under normal use for a period of sixty (60) days from the date of delivery thereof to you, as evidenced by your purchase receipt.
This is the only warranty Panasonic makes to you. Panasonic does not warrant that the functions contained in the Programs will meet your requirements or that the operation of the Programs will be uninterrupted or error free. Panasonic shall have no obligation for any defects in the disk(s) or other media on which the Programs are furnished resulting from your storage thereof, or for defects that have been caused by operation of the disk(s) or other media
Panasonic's entire liability and your exclusive remedy under this warranty shall be limited to the replacement, in the United States or other Panasonic designated location, of any defective disk or other media which is returned to Panasonic's Authorized Service Center, together with a copy of the purchase receipt, within the aforesaid warranty period.
Section 3 - Limited Warranty Exclusions - Specifically excluded from the warranty are:
- All consumable items; such as screen protection films, logo badges, labels, cleaning cloths, carry cases, manuals, cables, straps, belts, holsters, tethers, and harnesses and any other options and accessories not listed above or covered under a separate warranty.
- Failures related to the product operating system, hard drive or solid state drive image, software setup, software program, virus, other program (s) or file(s) on any drive or in any computer memory location.
- Failures due to BIOS settings or changes, as well as any cosmetic or physical damage to the unit.
- Any unit or device with a missing or altered model number or serial number label
Cosmetic damage or any damage which occurs in shipment - Failures which are caused by products not supplied by Panasonic
- Failures which result from alteration, accident, misuse, introduction of liquid or other foreign matter into the unit, abuse, neglect, installation, maladjustment of consumer controls, improper maintenance or modification, use not in accordance with product use instructions
- Failures due to service by anyone other than a Panasonic Authorized Service Provider
- Failures caused by improper installation of options or accessories or due to integration by any company other than Panasonic or a Panasonic Authorized Integrator
- Damage, failure, or loss due to the unit being stolen, lost, misplaced, or used by anyone other than the original purchaser
- Damage that isattributable to actsof God
This limited warranty only covers failures due to defects in materials or workmanship which occur during normal use. If a unit is sent to a Panasonic Authorized Service Center and no hardware failure is found, the customer will be billed for labor to correct a software issue or reimage the hard drive plus shipping and applicable administrative fees at the current rates set by the service provider.
THIS PRODUCT IS NOT INTENDED FOR USE AS OR PART OF NUCLEAR EQUIPMENT/SYSTEMS, AIR TRAFFIC CONTROL EQUIPMENT/SYSTEMS, OR AIRCRAFT COCKPIT EQUIPMENT/SYSTEMS
PANASONIC WILL NOT BE RESPONSIBLE FOR ANY LIABILITY RESULTING FROM THE USE OF THIS PRODUCT ARISING OUT OF THE FOREGOING USES.
*1: AIRCRAFT COCKPIT EQUIPMENT/SYSTEMS include class 2 Electrical Flight Bag (EFB) Systems and Class 1 EFB Systems when used during critical phases of flight (e.g., during take-off and landing) and/or mounted onto the aircraft. Class 1 EFB Systems and 2 EFB Systems are defined by FAA: AC (Advisory Circular) 120-76A or JAA: JAA TGL (Temporary Guidance Leaflets) No. 36.
Other Limits and Exclusions: There are no other express warranties except as listed above.
PANASONIC SHALL NOT BE LIABLE FOR LOSS OF DATA OR OTHER INCIDENTAL OR CONSEQUENTIAL DAMAGES RESULTING FROM THE USE OF THIS PRODUCT, OR ARISING OUT OF ANY BREACH OF THIS WARRANTY. ALL EXPRESS AND IMPLIED WARRANTIES, INCLUDING THE WARRANTIES OF MERCHANTABILITY AND FITNESS FOR A PARTICULAR PURPOSE ARE LIMITED TO THE APPLICABLE WARRANTY PERIOD SET FORTH ABOVE. Some states do not allow the exclusion or limitation of incidental or consequential damages, or limitations on how long an implied warranty lasts, so the above limitations or exclusions may not apply to you.
This limited warranty gives you specific legal rights, and you may also have other rights which vary from state to state.
For technical support or to arrange for service on your Panasonic computer product, call our toll-free hotline at 1-855-PSC-TECH (855-772-8324).
DIAL TOLL FREE: 1-855-PSC-TECH (855-772-8324)
Web Site : www.panasonic.com/toughbook
For Canada
PANASONIC COMPUTER AND PERIPHERALS LIMITED WARRANTY
Coverage - Panasonic Canada Inc. ("PCI") warrants to you, the first end user customer, this computer product (excluding software media), when purchased from PCI or from a PCI authorized reseller, to be free from defects in materials and workmanship under normal use, subject to the terms set forth below, during the period of warranty coverage specified.
| Scope of Coverage Period of Coverage Type | of Failure Coverage | |
| Laptop Computers (except Battery) and AC AdaptorFactory/PCI installed options including WirelessWAN, GPS, Bluetooth, Finger print reader, Backlit keyboard, Memory Card and Media Bay Drives (Floppy CD/DVD)Ultra-Mobile PCTablet PCMobile Wireless DisplayPDRC ~ LCD and Keyboard AssembliesPort Replicator | Three (3) Years from Date of Original End Customer Purchase Defective Materials or Workmanship | Defective Materials or Workmanship |
| Hand-held ComputersBatteryBattery chargerAuto AdaptorExternal USB Drives | One (1) Year from Date of Original End User Customer Purchase | Defective Materials Workmanship |
| Standard or Digitizer Stylus Pen | Ninety (90) Daysfrom Date of Original End User Customer Purchase | Defective Materials or Workmanship |
| All consumable items including protection film, cleaning cloth, carry case, tether and harness No Coverage | No Coverage |
Remedy - In the event of a warranty claim, contact PCI's representatives within the applicable warranty period, identifying the nature of the defect claimed, at 1-800-668-8386 between 9:00 A.M. and 5:00 P.M., Eastern Time Zone, Mon. \~ Fri. (excluding holidays) for instructions on how to obtain service. A purchase receipt or other proof of date of original purchase is required before warranty service is performed. Defective parts covered by this Limited Warranty will be repaired or replaced with new or comparable rebuilt parts on an exchange basis. Warranty replacement or repair is subject to the terms of this Limited Warranty for the balance of the original period of warranty coverage.
No Coverage - This Limited Warranty does not cover products purchased outside Canada. Neither does it cover damage to, failure of, or defects in a product or accessory through mishandling, improper installation, abnormal use, misuse, neglect, accident, introduction of liquid or other foreign matter into the product, alteration or servicing by anyone not authorized by PCI, or act of God.
THIS PRODUCT IS NOT INTENDED FOR USE AS, OR AS PART OF, NUCLEAR EQUIPMENT/SYSTEMS,
AIR TRAFFIC CONTROL EQUIPMENT/SYSTEMS, OR AIRCRAFT COCKPIT EQUIPMENT/SYSTEMS
PANASONIC WILL NOT BE RESPONSIBLE FOR ANY LIABILITY RESULTING FROM THE USE OF THIS PRODUCT ARISING OUT OF THE FOREGOING USES.
*2: AIRCRAFT COCKPIT EQUIPMENT/SYSTEMS include Class2 Electrical Flight Bag (EFB) Systems and Class1 EFB Systems when used during critical phases of flight (e.g., during take-off and landing) and/or mounted on to the aircraft. Class1 EFB Systems and 2 EFB Systems are defined by FAA: AC (Advisory Circular) 120-76A or JAA: JAA TGL (Temporary Guidance Leaflets) No.36
IF YOU SHIP THE PRODUCT FOR WARRANTY SERVICE
Carefully pack the product, preferably in the original carton. Include details of defect claimed and proof of date of original purchase. No liability is assumed for lossor damage to the product while in transit, if you chose your own transportation carrier.
SOFTWARE MEDIA LIMITED WARRANTY
Coverage - PCI warrants to you, the first end user customer, that the disk(s) or other media on which software program(s) is/are supplied will be free from defects in materials and workmanship under normal use in Canada for a period of sixty (60) days from date of receipt as evidenced by your purchase receipt for your PanasonicComputer product.
THIS IS THE ONLY WARRANTY THAT PCI MAKES RESPECTING THE SOFTWARE MEDIA. PCI does not warrant the software. Please refer to the software licensor's written warranty (accompanying the copy of the software) for any software warranty claim.
Claim Procedure - In the event of a defect in material or workmanship in the media during the sixty (60) days warranty period, and you return it, transportation costs prepaid, to Panasonic Canada Inc., Computer Products Marketing, 5770 Ambler Drive, Mississauga, Ontario L4W 2T3, within the warranty period, together with a copy of your purchase receipt, and an explanation of the suspected defect, PCI will replace in Canada the defective disk(s) or other media.
Remedy - PCI's entire liability, and your only remedy for any breach of this software media warranty is limited to replacement of the media only. It does not cover any other damages, including, but not limited to, loss of use or profit loss, or special, indirect or consequential damages, or other claims, whether or not of similar character.
No Coverage - This limited warranty does not apply if the disk(s) or other media has been used in other than a Panasonic product, or in environmental conditions other than those specified by PCI or the manufacturer, or if subjected to misuse, neglect, mishandling, modification or attempted modification of the program, or if damaged by accident or act of God. PCI is not responsible for damage to or loss of any program, data or removable storage media.
GENERAL
NO OTHER WARRANTIES - PCI DISCLAIMS ALL OTHER WARRANTIES, EITHER EXPRESS OR IMPLIED, INCLUDING, BUT NOT LIMITED TO IMPLIED WARRANTIES OF MERCHANTABILITY AND FITNESS FOR A PARTICULAR PURPOSE, WITH RESPECT TO THE SOFTWARE, SOFTWARE MEDIA, COMPUTER PRODUCT, OPTIONS AND ACCESSORIES.
NO LIABILITY FOR CONSEQUENTIAL DAMAGES - IN NO EVENT SHALL PCI BE LIABLE FOR ANY SPECIAL, INDIRECT OR CONSEQUENTIAL DAMAGES ARISING FROM ANY BREACH OF THE LIMITED WARRANTIES SET OUT IN THIS DOCUMENT, OR FROM THE USE OF THE COMPUTER PRODUCT, INCLUDING, WITHOUT LIMITATION, LOSS OF DATA, BUSINESS, PROFIT OR GOODWILL. IN ANY EVENT, PCI'S MAXIMUM LIABILITY FOR ANY BREACH SHALL NOT EXCEED THE AMOUNT ACTUALLY PAID BY YOU FOR THE COMPUTER PRODUCT. ACTION, REGARDLESS OF ITS BASIS, MAY BE BEGUN AGAINST PCI MORE THAN TWO (2) YEARS AFTER THE CAUSE OF ACTION ARG
Statutory Warranties - Some jurisdictions do not allow these limitations or exclusions, so they may not apply to you.
Pour le Canada
GARANTIE LIMITÉE - ORDINATEURS ET PÉRIPHÉRIQUES PANASONIC
EXPÉDITION DU PRODUIT POUR SERVICE SOUS GARANTIE
Panasonic System Communications Company Europe
Panasonic System Communications Company Europe (referred to as "Panasonic") will repair this product (other than software, which is treated in a different section of this warranty) with new or refurbished parts, from the date of original purchase in the event of a defect in materials or workmanship. This warranty only applies to new Panasonic Toughbookspurchased in the EEA and Switzerland and Turkey.
Panasonic (or its authorised Service Provider) target to repair your equipment within 48 hours from its receipt in our service centre.
Additional charges may apply for shipment to countries outside of the European Union. Panasonic will use all reasonable endeavours to ensure this service.
This warranty only covers failures due to defects in materials or workmanship which occur during normal use for the applicable Service Agreement Period listed below. In the event that any product (or part thereof) is replaced, Panasonic shall transfer ownership of the replacement product (or part) to the customer and the customer shall transfer ownership of the replaced product (or part) to Panasonic.
Service Agreement Period - from original date of purchase
- Toughbooks (and every accessory included in the original packaging except the battery) - 3 years
- Toughpads (and every accessory included in the original packaging except the battery) - 3 years
- Accessories included in the original package - 3 years
Additional peripherals manufactured by Panasonic (including media bay devices such as CD-Rom drives) - 1 year - Batteries - 6 months. Panasonic Warranty covers the battery for six months. A battery is considered good if it maintains 50% of its charge capacity during the warranty period. If a battery is returned under this contract and testing determines that it has charge capacity greater than 50% , the battery will be returned with an invoice for the retail purchase price of a new battery.
This warranty is extended solely to the original purchaser. A purchase receipt or other proof of date of original purchase will be required before warranty performance is rendered.
Limits and Exclusions:
This warranty does not cover and shall be void for:
- Broken or cracked LCD screen.
- Defective pixel in notebook displays and LCD screens within 0.002%
- Damage that is attributable to fire, theft or acts of God.
- Damage caused by environmental influences (electrical storms, magneticfields etc.).
- Damage which has not been caused during normal operation
Repair of damage that is cosmetic only or does not affect product functionality such as wear and tear, scratches and dents.
- Failures caused by productsnot supplied by Panasonic.
Failures resulting from alteration, accidental damage, casualty, misuse, abuse or neglect. - Introduction of liquid or other foreign matter into the unit.
- Improper installation, operation or maintenance.
- Improper connections with peripherals.
- Maladjustment of consumer controls such as function settings.
- Modification or service by anyone other than Panasonic or its approved Service Providers.
- Productsused as short term rental or leased equipment.
- Products whose serial number has been removed making the unit warranty condition impossible to clearly determine.
THIS PRODUCT IS NOT INTENDED FOR USE AS, OR AS PART OF, NUCLEAR EQUIPMENT/SYSTEMS, AIR TRAFFIC CONTROL EQUIPMENT/SYSTEMS, OR AIRCRAFT COCKPIT EQUIPMENT/SYSTEMS. PANASONIC WILL NOT BE RESPONSIBLE FOR ANY LIABILITY RESULTING FROM THE USE OF THIS PRODUCT ARISING OUT OF THE FOREGOING USES.
There are no other expresswarranties except as listed above.
We strongly recommend that customers backup their data before sending back their unit to an Authorised Service Provider.
Panasonic shall not be liable for loss of data or other incidental or consequential damages resulting from the use of this product, or arising out of any breach of this warranty. All express and implied warranties, including the warranties of satisfactory quality and fitness for a particular purpose are limited to the applicable warranty period set forth above. Panasonic shall not be liable for any indirect, special or consequential loss or damage (including without limitation any loss of profits) arising from the use of this product or for any breach of this warranty.
This limited warranty gives you specific legal rights, and you may have other rights that vary from country to country. You must consult the applicable country laws for a full determination of your rights. This limited warranty is in addition to, and does not affect any rights arising out of any contract of sale or by statute.
Data Storage Media
Data Storage Media is the media on which the Operating System, drivers and programs originally installed by Panasonic on the tablet are stored. This media is originally provided with the unit.
Panasonic warrants to you only that the disc(s) or other media on which the Programs are furnished will be free from defects in material and workmanship under normal use for a period of sixty (60) days from the date of delivery thereof to you, as evidenced by your purchase receipt.
This is the only warranty Panasonic makes to you. Panasonic does not warrant that the functions contained in the Programs will meet your requirements or that the operation of the Programs will be uninterrupted or error free.
Panasonic's entire liability and your exclusive remedy under this warranty shall be limited to the replacement of any defective disk or other media which is returned to Panasonic's authorized Service Centre, together with a copy of the purchase receipt, within the aforesaid warranty period.
Panasonic shall have no obligation for any defects in the disk(s) or other media on which the Programs are furnished resulting from your storage thereof, or for defects that have been caused by operation of the disk(s) or other media otherwise than on the Product or in the environment conditions other than those specified by Panasonic by alteration, accident, misuse, abuse, neglect, mishandling, misapplication, installation, maladjustment of consumer controls, improper maintenance, modification or damage that is attributable to acts of God. In addition, Panasonic shall have no obligation for any defects in the disk(s) or other media if you have modified, or attempted to modify any Program.
Duration of implied warranties, if any is limited to sixty (60) days.
Pre-installed software
Pre-installed software means the software shipped pre-loaded by Panasonic, not that loaded by any third party or selling agent.
Panasonic and its suppliers makes no warranty, either express, implied or statutory, with respect to software provided with the Product and licensed to Purchaser, its quality, performance, merchantability, or fitness for a particular purpose. Panasonic does not warrant that the functions contained in the software will be uninterrupted or error free. Panasonic assumes no risk of and shall not in any case be liable for any damages, including, without limitation, any special, incidental, consequential, or punitive damages arising from breach of warranty or contract, negligence or any other legal theory, including, without limitation loss of goodwill, profits or revenue, loss of use of the Programs or Products or any associated equipment, cost of capital, cost of any substitute equipment, facilities, or services, downtime costs, or claims of any party dealing with such damages.
Some countries do not allow the exclusion or limitation of incidental or consequential damages, or limitations on how long an implied warranty lasts, so the above limitations or exclusions may not apply to you.
This limited warranty gives you specific legal rights and you may also have other rights that vary from country to country. You must consult applicable country laws for a fulldetermination of your rights.
Contacts
Address Panasonic System Communications Company Europe
Panasonic Manufacturing U.K. Ltd.
Service Centre Building B4,
Wharfedale Road, Pentwyn Industrial
Estate, Cardiff,
United Kingdom
CF23 7XB
Web page http://business.panasonic.co.uk/computer-product/
Help desk
English speaking service +44 (0) 800 0884324
French speaking service +33 (0) 80 5636449
German speaking service +49 (0) 800 7235211
Italian speaking service +39 800 986915
Spanish speaking service +34 (0) 901 101 157
Austria +43 (0) 800 006493
Switzerland (German) +41 (0) 800 002429
Switzerland (French) +41 (0) 800 588017
E-mail address toughbooksupport@eu.panasonic.com
Czech speaking service +420 (0) 800 143234
Hungarian speaking service +36 (0) 6800 163 67
Polish speaking service +48 (0) 800 4911558
Romanian speaking service +40 (0) 800 894 743
Slovakian speaking service +421 (0) 800 42672627
E-mail address toughbooksupport@csg.de
Payments
toughbookservicepayments.cardiff@eu.panasonic.com

- Disclaimer
- Trademarks
- Illustrations and Terminology in this manual
- Regarding Windows 10
- Desktop mode and Tablet mode
- NOTE
- Screen Messages
- Opening the Control Panel
- Opening the Settings
- Latest Information on Windows 10
- Sound and Video
- When high-frequency sound occurs
- About the Ambient Light Sensor
- Windows Update
- Create a Recovery Disc
- Preparation
- CAUTION
- About the Partition Structure
- Creating a Backup of the Flash Memory Data
- Restoring the Flash Memory Data
- Tablet (Right Side)
- Tablet (Left Side)
- Keyboard Base (Left Side)
- Keyboard Base (Bottom Side)
- Tablet (Rear Side)
- Tablet (Top Side)
- Turning On
- Turning Off
- Precautions against Starting Up/Shutting Down
- Ignition Mode
- Touchpad
- Handling the touchpad
- Hotkey Settings
- Screen Input Operation
- Using the digitizer pen
- Detaching the pen from the computer
- Attaching the pen to the computer
- To operate right-click
- Operation by touching the screen
- Change Touch Screen Mode
- Calibrating the Screen
- About Touch Operation Support
- Important usage notes
- Opening the zoom window
- Closing the zoom window
- Changing the position of the zoom window
- Additional functions
- Context menu displays
- Drag and drop operations
- Changing settings
- Disabling Touch Operation Support
- To change the button functions
- Important Battery Tips
- How to use the battery with minimal deterioration
- How to use the computer to maximize the battery operation time
- When the computer is not going to be used for an extended period (a month or more)
- Things to keep in mind when using the battery pack
- Battery Indicator
- Charging
- Checking the Remaining Battery Power
- Computer behavior with low battery
- Changing the Battery Charging Speed
- Correcting the Battery Display (Battery Recalibration)
- 1: Battery Pack 1
- 2: Battery Pack 2
- Battery duration
- Replacing the Battery Pack
- Open the battery cover.
- Replacing the battery pack without turning off the computer
- Starting Up Your Computer Quickly
- Setting Sleep or Hibernation
- Sleep
- Hibernation
- Precautions
- Entering/Resuming from Sleep or Hibernation
- To enter sleep or hibernation
- Using hardware functions
- Using Windows function
- To resume from sleep or hibernation
- Panasonic PC Settings Utility
- Starting Panasonic PC Settings Utility
- Status
- Settings
- Button / Key
- USB
- Network
- To add or delete functions
- Detaching the tablet from the keyboard base
- Attaching the tablet to the keyboard base
- LAN
- Connecting LAN
- Wake Up from wired LAN function
- Setup
- Disabling/Enabling Wireless Communication
- Using airplane mode
- Wireless LAN
- Using the Wireless LAN Function
- Turning on/off the wireless LAN communication
- Setting the wireless LAN access point
- Bluetooth
- Using the Bluetooth Function
- Turning on/off the Bluetooth communication
- To check the Bluetooth communication status
- Wireless WAN
- Inserting/Removing a nanoSIM Card
- To insert a nanoSIM card
- To remove a nanoSIM card
- Connecting to a network
- Click [Disconnect].
- GPS
- Reducing Power Consumption
- Configuring Power Saving Settings
- Switching the power plan
- Customizing the Power Setting
- Changing the Power Plan Setting
- Creating Your Own Power Setting
- Deleting the Power Plan
- Setting the Supervisor Password/User Password
- Preventing Your Computer from Unauthorized Use
- Preventing Your Flash Memory Data from Being Read or Written
- Using Intel ® Identity Protection Technology (Intel ® IPT)
- Other security measure
- Rotation Lock
- Concealed Mode
- Switching the concealed mode
- Disabling/Enabling the concealed mode
- Change the settings
- Using Setup Utility
- Starting the Setup Utility
- Information Menu
- Main Menu
- Peripheral Configuration
- Boot Menu
- To change the boot order
- Security Menu
- Exit Menu
- Save Options
- Boot Override
- Operation environment
- Handling cautions
- Handling the screen
- Handling the pen (included)
- When using peripheral devices
- Preventing your computer from unauthorized use via wireless LAN/Bluetooth/wireless WAN
- When the battery indicator does not light on
- Sensors
- Automatic brightness adjustment
- Magnetic sensor
- Maintenance
- Cleaning the LCD panel
- Cleaning areas other than the LCD panel
- SD Memory Card Information
- Inserting/Removing the SD Memory Card
- To insert the card
- To remove the card
- Smart Card
- Do not:
- Inserting/Removing the Smart Card
- External Display
- HDMI Port
- Tablet
- Keyboard Base
- VGA Port
- Switching the display mode
- Using key function
- Extended Desktop
- To Change the Sound Output Destination
- Connecting/Removing USB Devices
- To connect the USB device
- To remove the USB device
- USB Charge Setting
- Enabling or Disabling USB Quick Charging
- Enabling or Disabling Power-Off Charging
- Connecting Serial device
- Using the Camera
- Panasonic PC Camera Utility
- Starting up
- Click
- Other Functions
- OCR Scanning
- Changing the Settings
- Barcode Reader
- Setting the Language
- Setting the USB Mode
- Reading Barcodes
- To Correctly Read a Barcode with This Computer, Observe the Following
- Cleaning the Reading Window
- Decode Capabilities
- Barcode Setting Utility
- Barcode Configuration Utility
- Direct application of the barcode configuration file
- Contactless Smart Card Reader/RFID Reader
- Fingerprint Reader
- For Security When Using Fingerprint Authentication
- Fingerprint Reader Handling
- Setting a Password
- Fingerprint Authentication Function
- Fingerprint Authentication Utility Features
- Fingerprint Authentication Initial Configuration
- Preparations for Using Fingerprint Authentication
- Fingerprint Reader Location
- Step 3. Register a Fingerprint
- Perform Power On Security as necessary.
- How to use the fingerprint authentication utility
- Uninstalling the fingerprint authentication utility
- Port Replicator
- Description of Parts
- Connecting/Disconnecting the Computer
- Connecting
- Disconnecting
- Vehicle Dock Adaptor
- Attaching/Detaching the Computer
- Attaching the tablet to the vehicle dock adaptor
- Detaching the tablet from the vehicle dock adaptor
- Attaching/Detaching the Slim Keyboard
- Attaching the slim keyboard to the vehicle dock adaptor
- Detaching the slim keyboard from the vehicle dock adaptor
- Slim Keyboard
- Connecting/Disconnecting the Tablet
- Hand Strap
- Attaching the Hand Strap and the Shoulder Strap
- Installing the Rotate Hand Strap
- Attaching the Rotate Hand Strap
- Using the Rotate Hand Strap
- When inserting/removing the battery pack
- Attaching the pen to the Rotate Hand Strap
- Attaching the shoulder strap to the Rotate Hand Strap
- Battery Charger
- Indicators
- Charging the battery pack
- Troubleshooting
- Wireless Communication (only for model with wireless LAN/Bluetooth/wireless WAN))
- User Switching
- Others
- Checking the Computer's Usage Status
- To perform the PC Information Viewer
- To save the information as a text file
- To save a copy of the screen as an image file
- Hardware Diagnostics
- Hardware that can be checked using the PC-Diagnostic Utility
- Regarding the PC-Diagnostic Utility
- Running the Diagnostic Check
- When the Icon Becomes Gray and the Corresponding Device Cannot Be Checked
- Reset your computer
- Installing Software
- Disk recovery
- Using Recovery Disc
- Error Message
- Network Connections and Communications Software
- About Fast startup
- About FCC ID Number
- LIMITED USE LICENSE AGREEMENT
- LICENSE
- TERM
- GOVERNMENT RESTRICTED RIGHTS.
- About the Software License
- About zlib
- About Lib PNG
- Erasing Flash Memory Data
- Dispose of Computer
- Specifications
- For U.S.A.
- Section 1: Limited Warranty - Hardware
- Battery Warranty
- Optional: Panasonic "Protection Plus" Warranty
- Wireless Module Warranty
- Options and Accessories Warranties
- Section 2 - Limited Warranty - Software
- Section 3 - Limited Warranty Exclusions - Specifically excluded from the warranty are:
- For Canada
- PANASONIC COMPUTER AND PERIPHERALS LIMITED WARRANTY
- IF YOU SHIP THE PRODUCT FOR WARRANTY SERVICE
- SOFTWARE MEDIA LIMITED WARRANTY
- GENERAL
- Pour le Canada
- GARANTIE LIMITÉE - ORDINATEURS ET PÉRIPHÉRIQUES PANASONIC
- EXPÉDITION DU PRODUIT POUR SERVICE SOUS GARANTIE
- Panasonic System Communications Company Europe
- Data Storage Media
- Pre-installed software
- Contacts
Brand : PANASONIC
Model : Toughbook CF-33
Category : Tablet