
AT-VM95SP - DJ Mixer Audio-Technica - Free user manual and instructions
Find the device manual for free AT-VM95SP Audio-Technica in PDF.


| Product Type | DJ Mixer |
| Brand | Audio-Technica |
| Model | AT-VM95SP |
| Dimensions (W x D x H) | 200 x 150 x 50 mm |
| Weight | 0.8 kg |
| Power Supply | USB 5V or DC 9V (adapter not included) |
| Number of Channels | 2 |
| Inputs | 2x RCA (Line/Phono), 1x Mic (6.35mm) |
| Outputs | 1x RCA (Master), 1x 6.35mm (Headphone) |
| Crossfader | Replaceable, 50mm travel |
| Equalizer | 3-band per channel (High, Mid, Low) |
| Cue System | PFL (Pre-Fader Listen) with split cue |
| Phono Preamp | Built-in, selectable |
| Maintenance | Clean with dry cloth; avoid liquids |
| Safety | Use only specified power; keep away from water |
| Spare Parts Availability | Crossfader, knobs, fader caps |
| Repairability | Modular design; replaceable components |
| General Information | Compact 2-channel mixer for DJs; suitable for home and professional use |
Frequently Asked Questions - AT-VM95SP Audio-Technica
User questions about AT-VM95SP Audio-Technica
0 question about this device. Answer the ones you know or ask your own.
Ask a new question about this device
Download the instructions for your DJ Mixer in PDF format for free! Find your manual AT-VM95SP - Audio-Technica and take your electronic device back in hand. On this page are published all the documents necessary for the use of your device. AT-VM95SP by Audio-Technica.
USER MANUAL AT-VM95SP Audio-Technica
Audio-Technica Corporati
2-46-1 Nishi-naruse, Machida, Tokyo 194-8606, Japan
www.audio-technica.com ©2018 Audio-Technica
Global Support Contact: www.at-globalsupport.com
112301445-01-01 var.1 2018.07.01
■ 外形寸法図/Dimensions
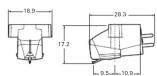
(单位 mm)

日本語
Thank you for purchasing this Audio-Technica product. Before using the product, read through this year manual to ensure that you will use
the product, held through this user manual to ensure that you will use the product correctly. Please keep this manual for future reference.
■ Safety precautions
- Keep the plastic bag provided with the product out of the
reach of small children and away from open flames to avoid
- Keep the product out of the reach of small children to avoid accidents or fire.
accidents or malfunction. • Do not put the product in a location where it is exposed to
- do not put the product in a location where it is eligible to direct sunlight, near heating devices, or in places with high
temperatures, high humidity, or high concentrations of dust to avoid malfunction.
- Do not touch the product's cantilever, stylus tip, and magnet to avoid moll-motion.
• Do not attempt to disassemble or modify the product to avoid
malfunction. + Do not subject the product to strong impact to avoid
and not disagree with a problem to bring impact to overall malfunction.

■ Name of each part
Become familiar with each part before using the product.
1 Protector 5 Cartilever 2 Cartridge body 6 Stylus tip
3 Output terminals 7 Magnets
4 Stylus (Replacement stylus)
How to use
Remove the (replacement) stylus before mounting the produ
- Mount the product onto the headshell or headshell-
integrated tonearm.
- Connect the lead tips, hizing output polarity.
Connect headache load tips to the product output terminals (as shown in the figure).
· Never apply heat (from solder, etc.) to the output terminals.
- Determine the correct position for installing the product (adjust overhang). b
- Adjust overhang following the instructions in the tonearm's, turntable's, or headshell's user manual.
If you are unsure, align the stylus tip to the cartridge originally attached to the top arm (as shown in the flexural
- Adjust tracking force
- Confirm the tracking force for the product in "Specifications."
· Do not apply stylus pressure unnecessarily. It may not only damage the record and stylus but impair audio quality.
- Adjust tonearm height.
· Adjust the height so that the bottom surface of the head/shell the record surface are parallel, as seen from the side. An
improper tonearm height may cause the body of the product to make contact with the record and could impair audio quality o
make contact with the record and could impair audio quality of damage the record.
- Connect directly to the PHONO (MM) terminal of the preamplifier/amplifier
- If your preamplifier/amplifier does not have a PHONO termina
use a phono equalizer (sold separately).
■ Care-
- Use a brush to remove dirt and dust from the stylus tip.
· Always move the brush in the direction in which the record rotates
- A stylus cleaner (sold separately) is recommended to remove

■ Replacing the stylus
- Remove the replacement stylus by pulling in the direction
of the arrow without touching the cantilever, stylus tip, a magnets.
- Install a new replacement stylus onto the cartridge body
- Lifetime of the replacement stylus is approx. 300 to 500 hours.
■ Specifications
■ Speculations Type: VM
Frequency response: 20 to 20,000 Hz
Output voltage: 2.7 mV (1 kHz, 0 cm/sec) Output balance: 1.5 dB (1 kHz)
Tracking force: 4.5 to 5.5 g (5.0 g standard) Coil impedance: 3.7 k ohms (1 kHz).
DC resistance: 485 ohms
Recommended load impedance: 47 k ohms Recommended load capacitance: 100 to 200 pF
Coil inductance: 550 mH (1 kHz) Static compliance: 12 = 10/temperature
Dymeric compliance: 2.0 × 10^6 cm/dyna (100 Hz)
Stylus: Conical bonded Stylus curvature radius: 3.0 mil
Cantilever: Aluminum pipe
Vertical tracking angle: 23 Dimensions: 17.2 mm (0.68") × 18.9 mm (0.74") × 28.3 mm (1.20")
(H × W × U) Weight: 6.1 g (0.22 oz)
Replacement stylus (solid separately) ^a : AT-VMN9558
Accessories: Cartilage Installation Stooled Screws 11.0 mm (0.43") × 2 at 8.0 mm (0.31") × 2, Washer × 2
* The replacement stylus of this product is used for AT-VM95 series products. In series, we offer replacement styli with different stylus tip structures and point
shapes. For more details, please visit our Audio-Technica website.
For product improvement, the product is subject to modification without notice.
Français
■ Certifications techniques
