
Duo22 Live - Hi-Fi System icon - Free user manual and instructions
Find the device manual for free Duo22 Live icon in PDF.


| Product Type | Hi-Fi System |
| Brand | Icon |
| Model | Duo22 Live |
| Dimensions (W x H x D) | 430 mm x 140 mm x 320 mm |
| Weight | 5.5 kg |
| Power Supply | AC 230V, 50Hz |
| Power Consumption | 60W (operating), <1W (standby) |
| Speaker Impedance | 4 - 8 ohms |
| Output Power (RMS) | 2 x 20W (per channel) |
| Frequency Response | 40 Hz - 20 kHz |
| Supported Media | CD, CD-R/RW, MP3 via USB |
| Tuner Bands | FM, AM |
| Bluetooth Version | 5.0 |
| Inputs | AUX (3.5mm), USB, FM/AM antenna |
| Outputs | Speaker terminals (screw type), Headphone jack (3.5mm) |
| Remote Control | Included (battery: CR2025) |
| Display | LCD with backlight |
| Cleaning Instructions | Wipe with soft dry cloth; do not use liquids or sprays |
| Safety Precautions | Keep away from water, heat sources; unplug during storms |
| Spare Parts Availability | Contact Icon support or authorized service centers |
| Repairability Index | 7/10 (user-serviceable fuses, speaker terminals) |
Frequently Asked Questions - Duo22 Live icon
User questions about Duo22 Live icon
0 question about this device. Answer the ones you know or ask your own.
Ask a new question about this device
Download the instructions for your Hi-Fi System in PDF format for free! Find your manual Duo22 Live - icon and take your electronic device back in hand. On this page are published all the documents necessary for the use of your device. Duo22 Live by icon.
USER MANUAL Duo22 Live icon
1 Mic-In / 1 Instrument-In, 2 Out professional recording USB interface with smart phone connectivity for live streaming application
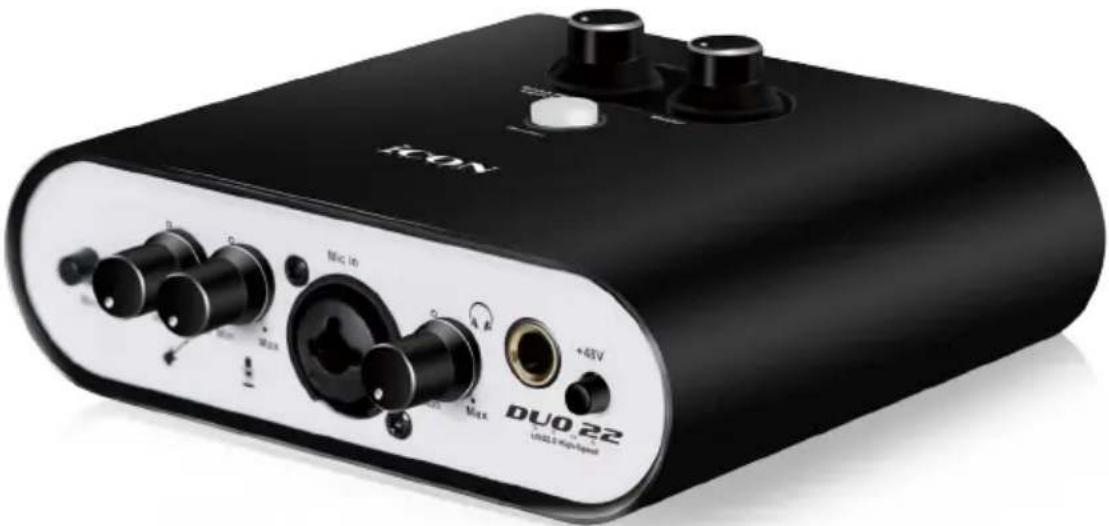
natural_image
Black and white photo of an IECOY audio amplifier device (no visible text or symbols on body)

The lightning flash with arrowhead symbol within an equilateral triangle, is intended to alert the user to the presence of uninsulated dangerous voltage within the product's enclosure, that may be of sufficient magnitude to electric shock to persons. Le symbol clair avec point de flche l'int rieur d'un triangle quilat ral est utilis pour alerter l'utilisateur de la pr sence l'int rieur du coffret de voltage dangereux non isol d ampleur suff
Important Safety Instructions
-
Read this manual thoroughly before using this unit.
-
Keep this manual for future reference.
-
Take notice of and comply with all warnings included in the user's manual or indicated on the appliance.
-
Follow all instructions included in this manual.
-
Do not expose this unit to rain or moisture. Avoid having water or other liquids spilled on this unit.
-
When cleaning the cabinet or other parts of this appliance, use only a dry or slightly damp soft cloth.
-
Do not block any ventilation openings or interfere with the proper ventilation of this unit. Install in accordance with the manufacturer's instructions.
-
Do not use or store near any heat sources such as radiators, heat registers, stoves, or other heat-producing appliances.
-
Do not interfere with the safety purpose of the polarized or grounding-type plug. A polarized plug has two blades with one wider than the other. A grounding-type plug has two blades and a third grounding prong. These are designated for your safety. If the provided plug does not fit into your outlet, consult an electrician.
-
Protect the power cord from being walked on or otherwise damaged by items placed on or against them. Particular attention should be given to the plugs, receptacles, and the point where the cord exits the appliance.
-
To avoid the risk of electrical shock, do not touch any exposed wiring while the unit is in operation.
-
Only use attachments/accessories specified by the manufacturer.
-
Unplug this unit and all connected electrical equipment during lightning storms or when left unused a long period of time.
-
Refer all servicing to qualified service personnel. Servicing is required when the appliance has been damaged in any way or fails to operate normally.
WARNING: To reduce the risk of fire or electric shock, do not expose this unit to rain or moisture
Contents
Introduction......4
What's in the package? 4
Register your ICON ProAudio product to your personal account ....5
Features 6
Front Panel 8
Rear Panel....9
Top Panel....10
Mac driver installation....11
Install ProDriver 4 with LoopBack function....11
Mixer control panel(Mac)....15
Windows driver installation....17
ProDriver4 20
Mixer control panel(Windows)....21
Settings (Sample rate and latency settings)....24
ProDriver hosting rack (Mac/Windows) 28
Hardware Connections....36
Different types of microphone connection method diagram ....37
Specifications ....38
Services....39
Introduction
Thank you for purchasing the ICON ProAudio Duo22 Dyna digital audio Interface. We sincerely trust this product will provide years of satisfactory service, but if anything is not to your complete satisfaction, we will endeavor to make things right.
In these pages, you'll find a detailed description of the features of the Duo22 Dyna digital audio interface, as well as a guided tour through its front and rear panels, step-by-step instructions for their setup and use, and full specifications.
Please register the product on our website at the below link www.iconproaudio.com/registration:
Please follow the step by step procedures. Start by inputting the device's serial number as well as your personal information, etc. By registering your product online, you will be entitled to service and after-sales support at our Help Center by visiting our website at www.iconproaudio.com. Also, all the registered products under your account will be listed on your personal product page where you will find updated information such as firmware/driver upgrades, software bundles, user manual downloads, etc. for your device.
As with most electronic devices, we strongly recommend you retain the original packaging. In the unlikely event the product must be returned for servicing, the original packaging (or reasonable equivalent) is required.
With proper care and adequate air circulation, your Duo22 Dyna digital audio interface will operate without any trouble for many years.
What's in the package?
• Duo22 Dyna USB Recording Interface
- Quick Start Guide x 1
• USB 2.0 cable (Type C) x 1
• 3.5mm TRS audio cable x 1
Register your ICON ProAudio product to your personal account
1. Check serial number of your device
Please go to http://iconproaudio.com/registration or scan the QR code below.
Input your device's serial number and the other information on the screen. Click "Submit".
A message will pop up showing your device information such as model name and its serial number - Click "Register this device to my account" or if you see any other message, please contact our after-sales service team
2. Log in to your personal account page for existing user or sign up for new user
Existing user: Please log into your personal user page by inputing your user name and password.
New user: Please click "Sign Up" and fill in all the information.
3. Download all useful materials
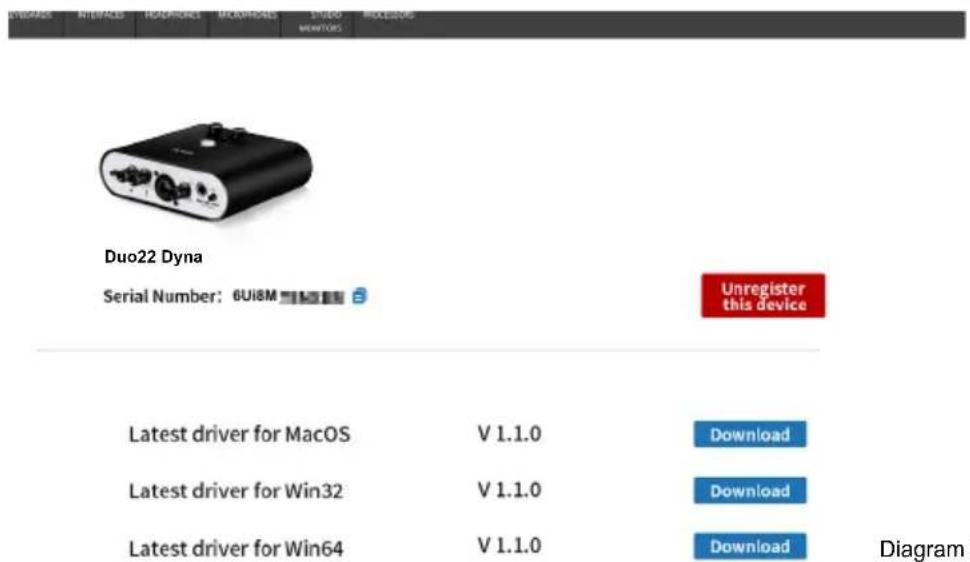
All your registered devices under your account will show on the page. Each product will be listed along with all its available files such as drivers, firmware, user manual in different languages and bundled software etc. for download. Please make sure you have download the necessary files such as driver before you begin device installation.
Features
natural_image
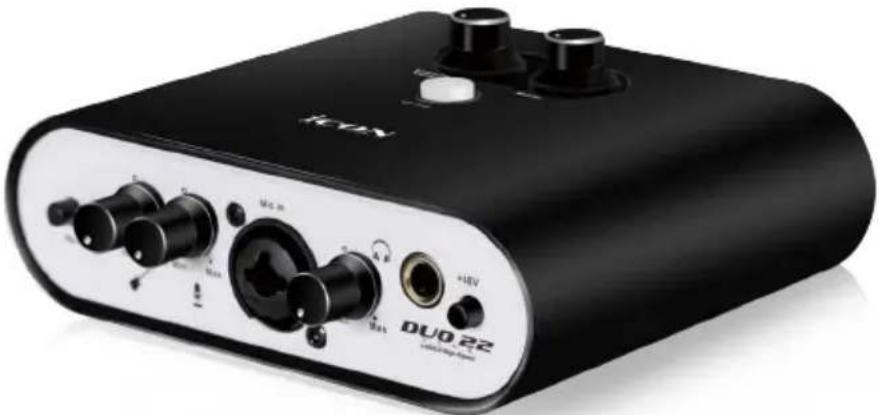
Black KYZ audio amplifier device with external knobs and buttons (no visible text or symbols on body)The ICON ProAudio Duo22 Dyna USB recording interface provides an audio input and output module as well as analog & digital connectivity with any smart mobile devices for live streaming applications. Main features include:
• 24-Bit 192KHz 1 mic-In/1 inst-In, 2-Out USB Recording Interface
• Hi-end studio grade DAC/ADC provides super high dynamic range
Dynamic Range: 127dB
• Supporting Mac/PC connectivity operating simultaneously with SmartDevice
• Live session possible with audio signal processing via ProDriver4 virtual plug-in rack
• 2x2 analog I/O full duplex recording and playback
- Compatible with iOS and Android Digital I/O jack (Type C) & Analog I/O jack (3.5mm stereo TRRS)
• For direct connection with smartphone, tablet or other device
- Mic/Instrument preamps with individual gain control and phantom power switch
- 2 analog outputs on 1/4" TRS jacks or stereo output on 3.5mm phone connector
• Smart phone input level control on the top panel
• Direct monitor button control on the top panel
• 1 headphone output with assignable source and individual volume control
- Flexible channel routing via the ProDriver4 software control panel
- ICON ProAudio developed ultra low latency ProDriver4™ driver is provided
- ICON ProAudio innovative and user friendly plug-in hosting rack software is built-in with ProDriver4™ (Windows and Mac)
• USB2.0 High Speed equipped and USB bus-powered
- ARM-M7/500MHz processing power and technology for super fast and stable signal processing
• Supports DirectSound, WDM and ASIO2.0
- LoopBack function is equipped with ProDriver 4 ^TM for both Mac and Windows platforms
- Compatible with mac OS (M1/ Intel Mac) 10.11 and later, iOS 9 or above, Andriod and Windows 7, 8 & 10 (32-bit/64-bit)
• Full duplex, simultaneous record/playback
- +5VDC power supply connector is equipped for external power supply when using with iOS
• Rugged aluminum construction
- Bitwig 8Track included
• Dotec audio plugins included
Front Panel
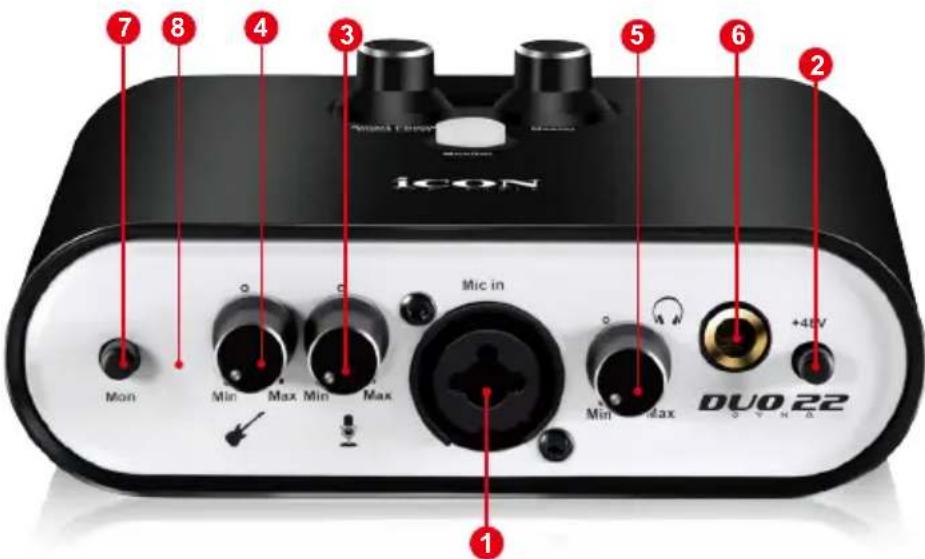
- 3-pin XLR (Balanced) – For condenser microphone with +48V phantom power or dynamic microphone.
Please refer to P.36 for the connection method of different types of microphones and instruments.
1/4" TS (Unbalanced) – For dynamic microphone
Please refer to P.36 for the connection method of different types of microphones.
- 48V phantom power switch
Press to supply +48V phantom power to the associated XLR input. This phantom power circuit is suitable for most condenser microphones.
- Input gain level control (Microphone)
This potentiometer controls the input level of the analog microphone input.
- Input gain level control (Guitar)
This potentiometer controls the input level of the instrument input.
- Headphone level control
This potentiometer controls the output level of the headphone output.
- Headphone output
This output jack accepts a standard 1/4" stereo TRS headphone connector.
- Mon (Monitor – Control smart phone & PC monitoring signal)
Switch between monitoring smart device with PC signal or only PC's signal
Rear Panel
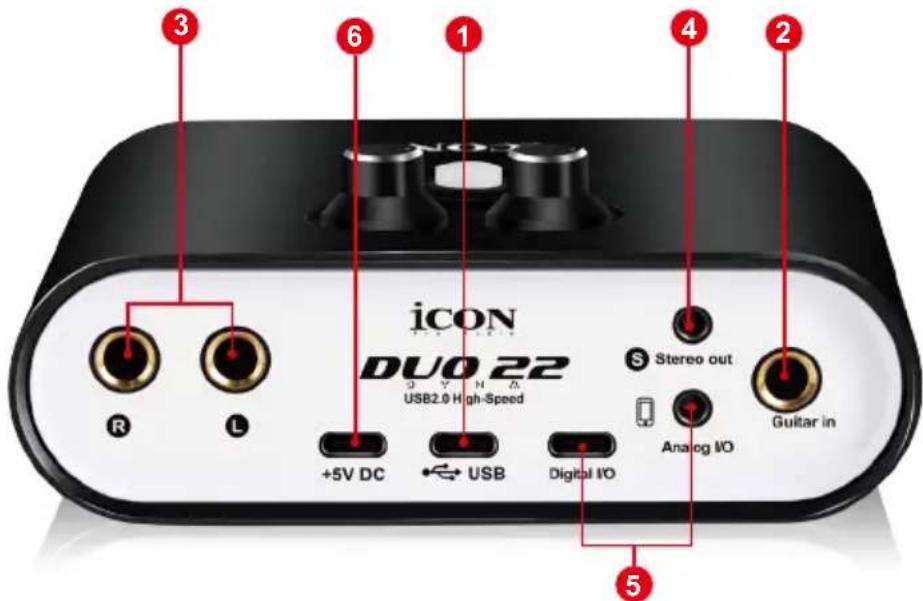
1. USB 2.0 connector (Type C)
Connect it with the provided USB cable to your Mac/PC or your iOS device camera kit's USB connector. Your Mac/PC must have a USB2.0 connector in order to run the full speed of Duo22 Dyna .
2. HI-Z input
This is a high impedance input for guitar/bass.
3. Line outputs L/R
These are unbalanced analog outputs on standard 1/4" TS connectors at +6dBU line level.
4. Stereo output L/R
This is an unbalanced analog output on a standard 3.5mm stereo connector.
(Note: Master level control will only adjust the output level of both the Line output 1/2 and the 3.5mm stereo output.)
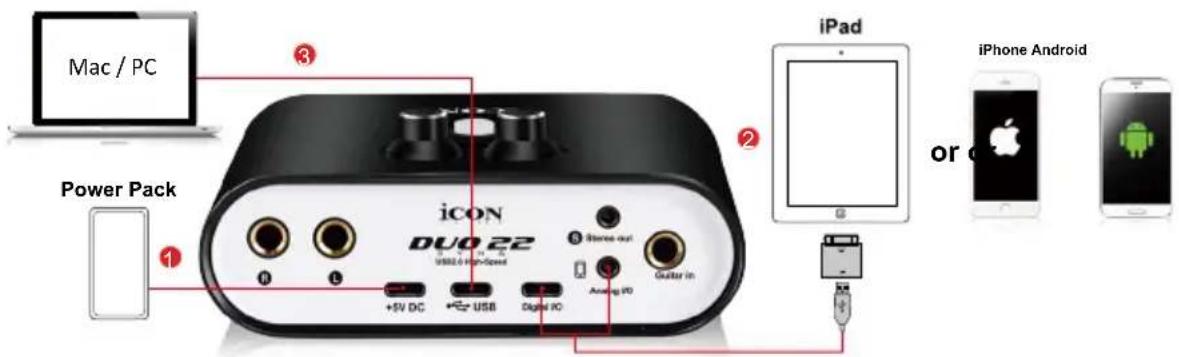
5. Smart Device I/O (Digital - Type C & Analog - 3.5mm TRRS)
These ports allow you to connect your smart device and your Mac/PC simultaneously so you may process the audio signal with your Mac/PC before delivering signal to the smart device for live streaming application.
Digital - Type C jack for connecting directly to the digital jack of the smart devicec (OTG adapter required)
Analog - TRRS stereo jack for connecting directly to smart device's audio I/O
6. Power supply connector (USB Type C)
Duo22 Dyna is USB-bus powered. If your computer does not supply sufficient power, connect an ICON 5VDC power supply adapter to this jack. Or you may try to use your smart phone power adapter with the correct cable type (USB Type C). Normally it should work and provide enough power to the device.
(Note: You can get the power adapter from ICON distributors/dealers near you)
(Note: External power adapter is needed if the Duo22 Dyna is us as a standalone unit without a Mac or PC)
Top Panel

1. Direct Monitor button
Press to monitor the input signal (i.e. microphone or instrument) through your headphones. Pressing In will allow for Direct monitoring of signal which mean signal without computer processing.
2. Smart Phone Input Level Control
Adjust to control the audio input level to the smart phone.
3. Master Level Control
Master level control will only adjust the output level of both the Line output 1/2 and the 3.5mm stereo output.
Mac driver installation
Duo22 Dyna is a class compliant device. Thus there is no driver installation needed for Mac. Also, it fully supports iOS devices by connecting the unit to a camera kit.
Install ProDriver 4 with LoopBack function
- Download ProDriver 4 (Mac) from your "Personal User Portal" page for your audio interface.
(Please refer to P.5 "register your ICON ProAudio product to your personal account" for creating your persoanl user portal)
- Double click the file "ProDriver-OSX-xxx.dmg" that you just downloaded from your Persoanl User Portal
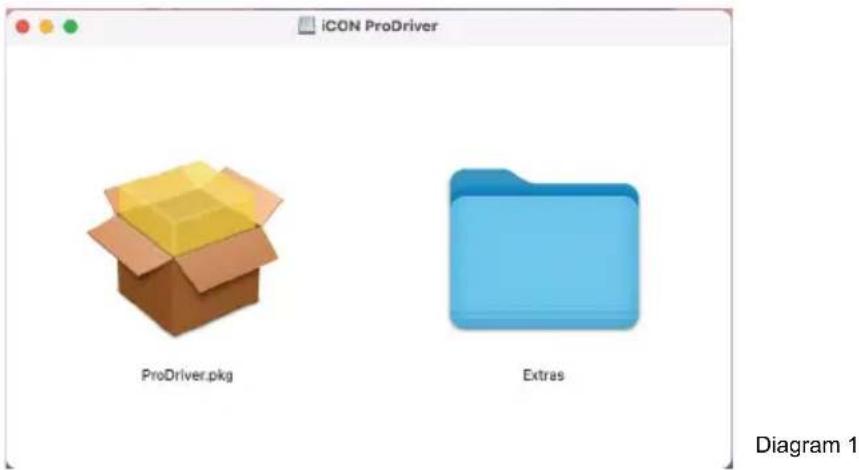
- Double click "ProDriver.pkg" to start the ProDriver installation
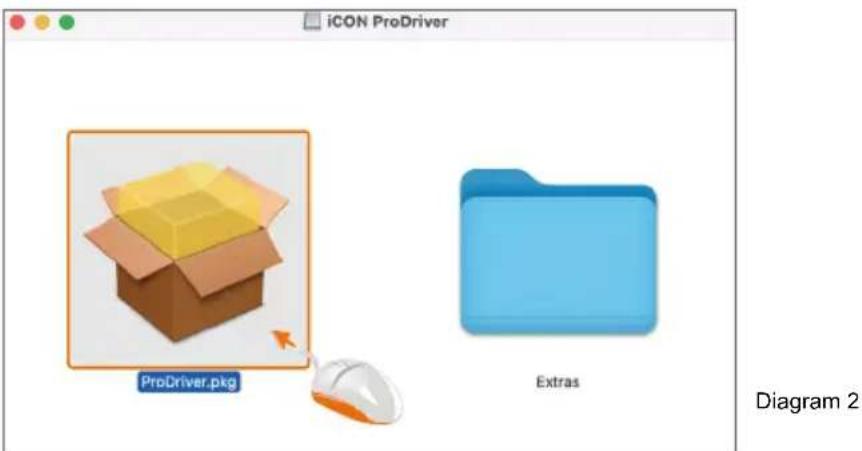
4. Click "Continue"
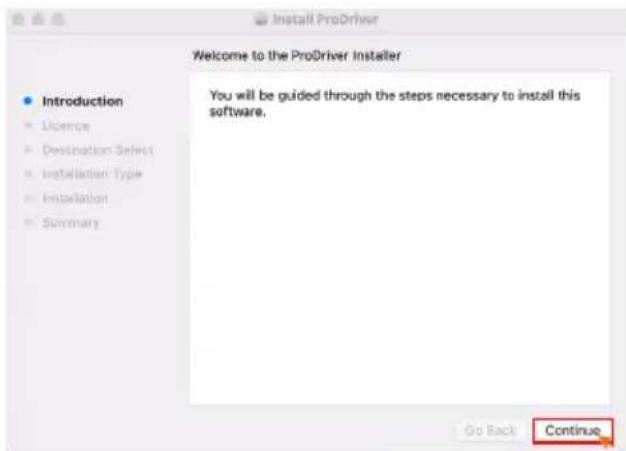
Diagram 3
5. Click "Continue"
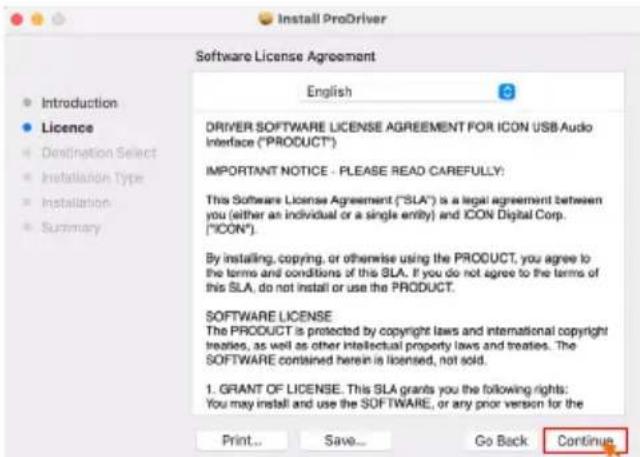
Diagram 4
6. Click "Read License" to read the lincense terms or click "Agree" to start the installation
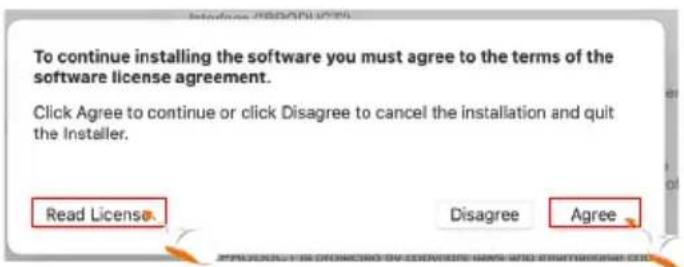
Diagram 5
7. Select the disk where you would like ProDriver to be installed and then click "Continue"
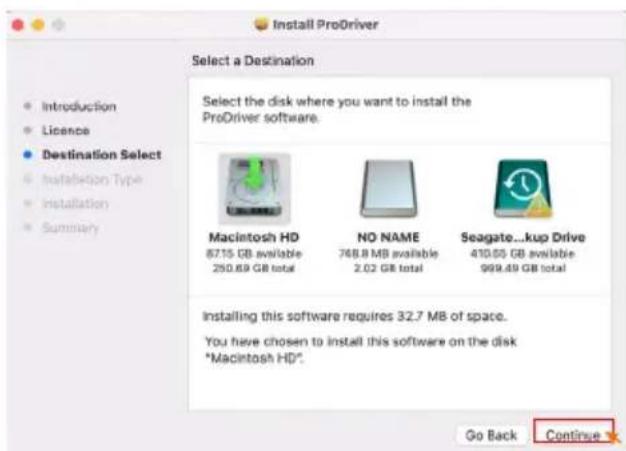
Diagram 6
8. Click "Install"
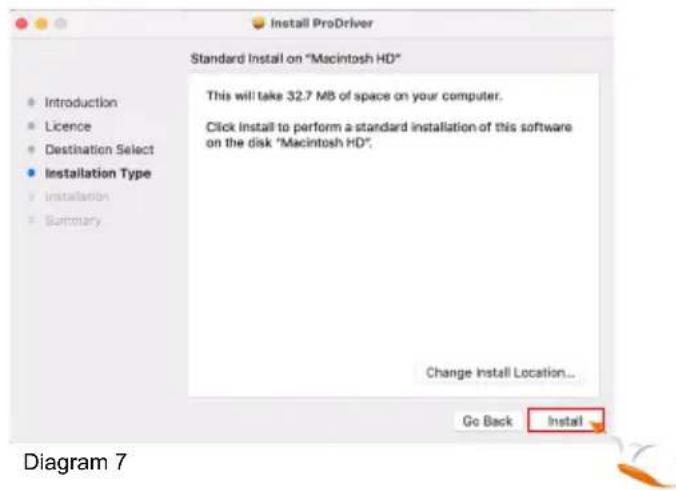
9. Input your password or tap your finger print to start the installation.
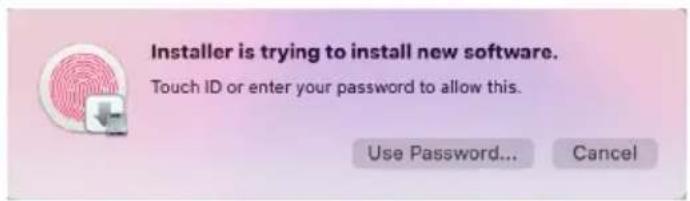
Diagram 8
10. Installation started and click "Close" after it has completed.

11. Please connect your audio interface at this state to you Mac and then click the ICON logo as shown.
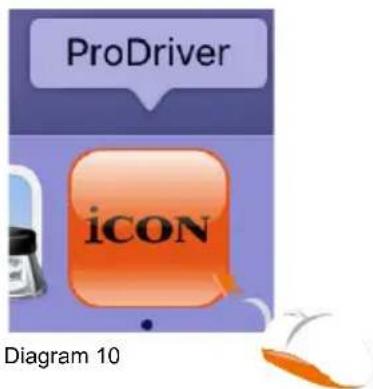
- Select your audio interface model from the list and click "Select"
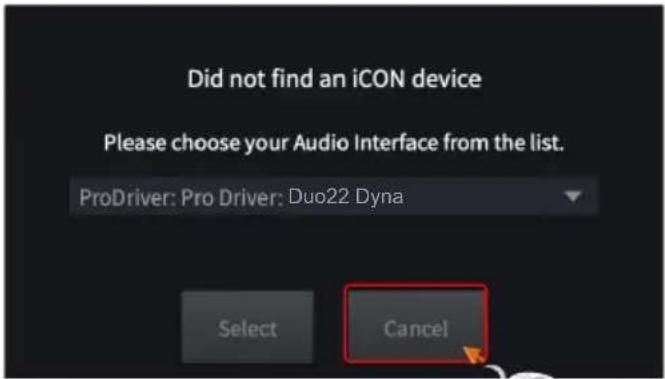
Diagram 11
- Click "OK" to allow ProDriver to access the microphones.
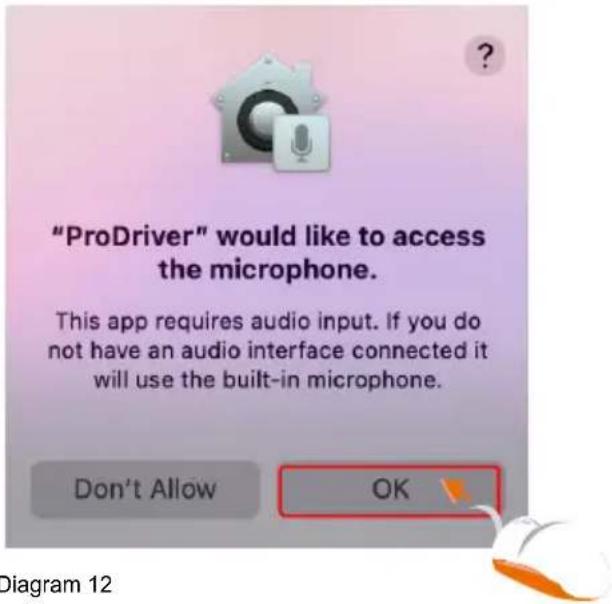
- ProDriver activate logo will appear on your desktop and click it to launch the ProDriver control panel.
Diagram 13
- Audio MIDI setup
Open the "Audio MIDI setup" window and confirm that the Duo22 Dyna device has been setup properly as shown in diagram 14.
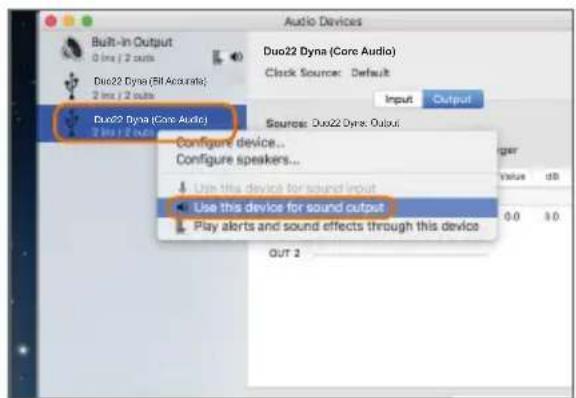
Diagram 14
Mixer control panel(Mac)
The mixers work like a matrix mixer. Activate and adjust the corresponding input or output channel level. They are very useful and make your inputs and outputs very flexible. You may route any of your input(s) to any output(s).
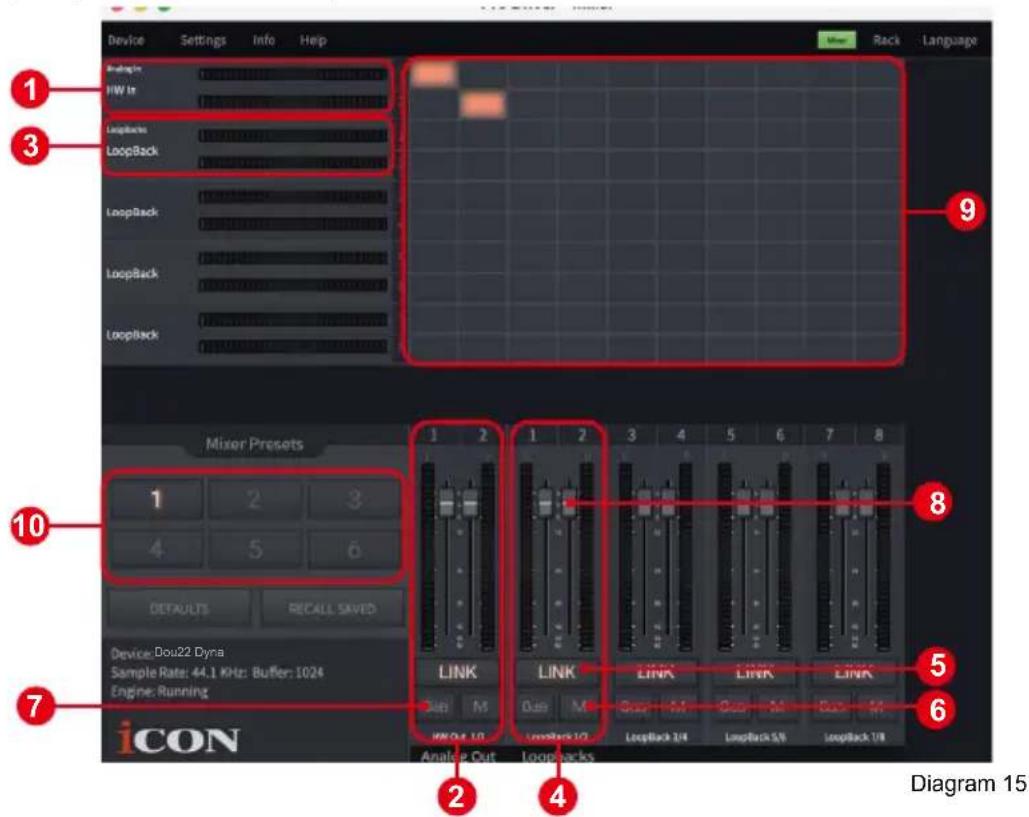
1. HW In 1/2 level metering
Shows the hardware 1/2 input level. (HW In 1/2).
2. HW Out 1/2 level metering
Shows the hardware 1/2 output level.(HW Out 1/2).
3. LoopBack In 1-8 level metering
Show the LoopBack 1/2, 3/4, 5/6 & 7/8 input level
4. LoopBack Out 1-8 level metering
Show the LoopBack 1/2, 3/4, 5/6 & 7/8 output level
5. Link switch
Switch to adjust both channels' levels simultaneously.
6. Mute switch
Switch to mute the corresponding channel.
7. "0dB" switch
Switch to instantly adjust the corresponding channel to "0dB" level.
8. Gain control fader
Slide to adjust the gain level for the corresponding channel.
9. Inputs & Outputs Matrix switches
Switch to turn On/Off the corresponding input channel route to the corresponding output channel. Remember you may route any input(s) to any output(s).
10. Mixer Presets
6 Mixer-Presets button slots are available for saving or loading your routing channel settings.
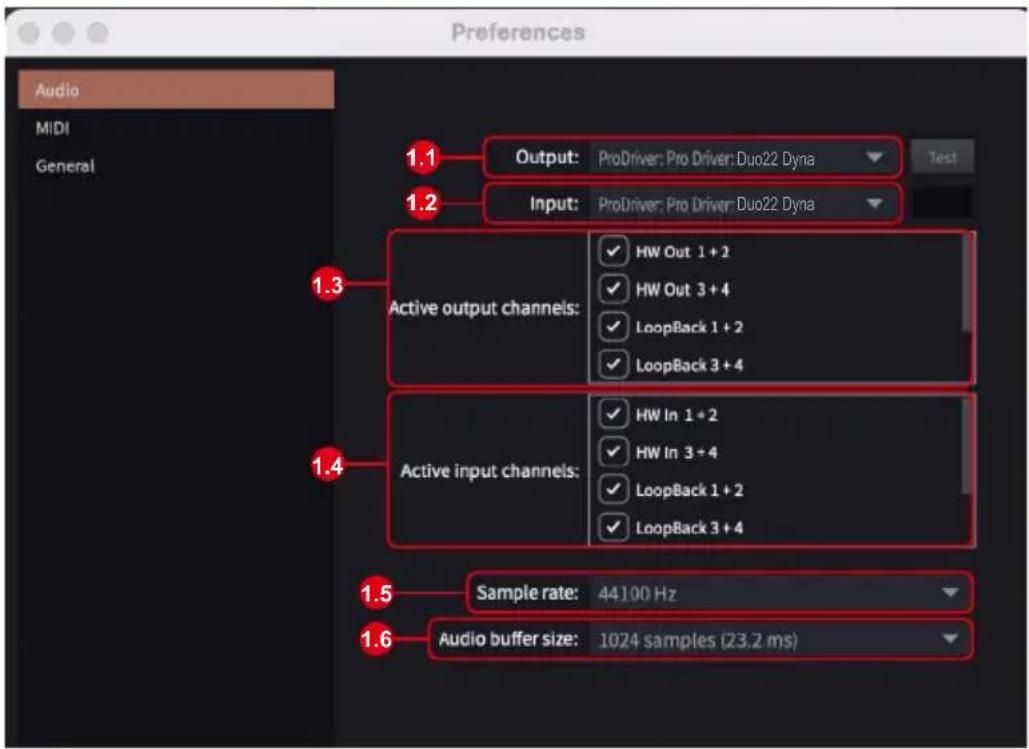
Diagram 16
11. Device Preferences
Click "Device" at the top menu bar to launch the "Preferences" window.
11.1 Output
Select your audio interface as your output device
11.2 Input
Select your audio interface as your input device
11.3 Active output channels
Showing you all the avaliable and active output channels for your audio interface
11.4 Active output channels
Showing you all the avaliable and active input channels for your audio interface
11.5 Sample rate
Select your desire sample rate from the list
11.6 Audio buffer size
Select your desire audio buffer size from the list
(Note: If a clicking sound occurs, you should change to a larger buffer size for the settings. If the largest buffer size has been selected and there is still a clicking sound. It means your computer performance is not able to handle the task. (It is not caused by Duo22 Dyna digital audio interface.)
Windows driver installation
Please follow the step-by-step procedures below to install your Duo22 Dyna USB recording interface and its driver.
1. Turn on your computer
Note: Do not connect the Duo22 Dyna digital audio interface to your computer yet.
2. Download the Windows driver from your "Personal User Page at www.iconproaudio.com" (Please refer to P.5 "register your ICON ProAudio product to your personal account" for creating your persoanl user portal)
After you downloaded the driver file, please click it to start the installation process.
3. Installation Wizard appears
Choose "Next" when you see the Welcome Screen shown in Diagram 18.
4. License Agreement
Click "I Agree" to proceed.
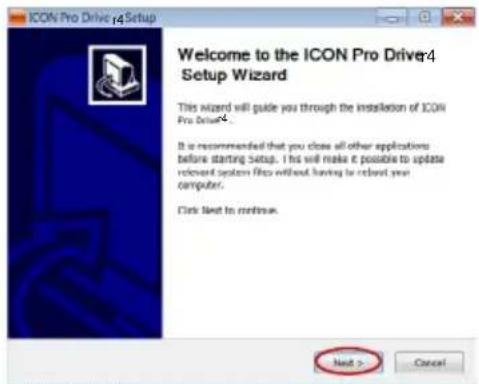
Diagram 18
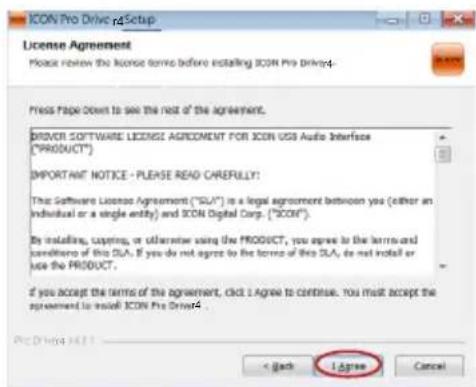
Diagram 19
5. Select components for installation
Check mark the components that you would like to install. We strongly recommend that you select all components.
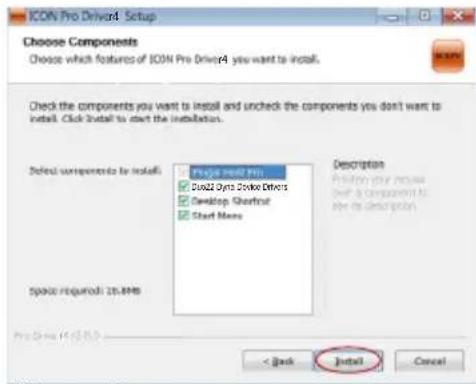
Diagram 20
6. Preparing installation files
Once the installation process has started, the process may take some time depending on your computer performance. Please be patient and wait for the process to finish.
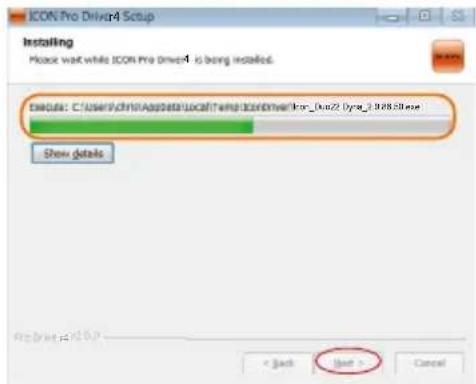
Diagram 21
7. Click "Install" to proceed.
Note: The same message will appear three times as there are three different driver installations.
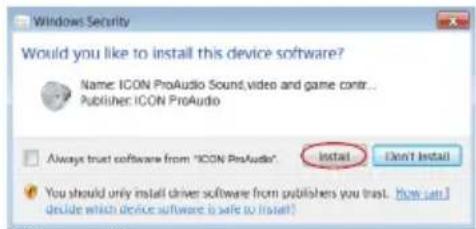
Diagram 22
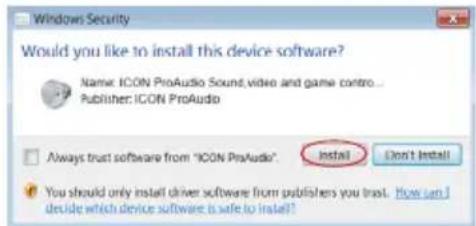
Diagram 23
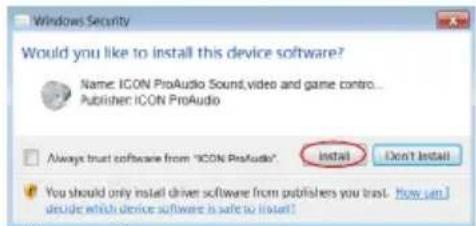
Diagram 24
8. Setup completed
A window as shown in Diagram 25 should appear. Choose "Finish".
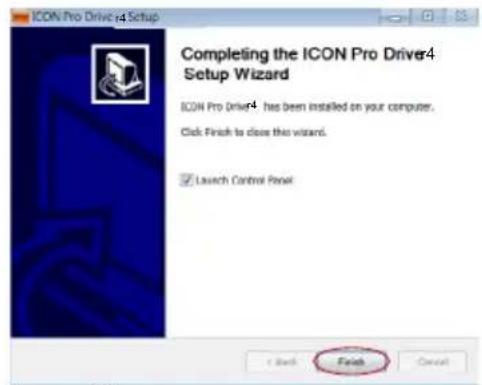
Diagram 25
9. Launch the software control panel
You may click the ICON ProAudio logo on the system tray to launch the software control panel (Page 20).
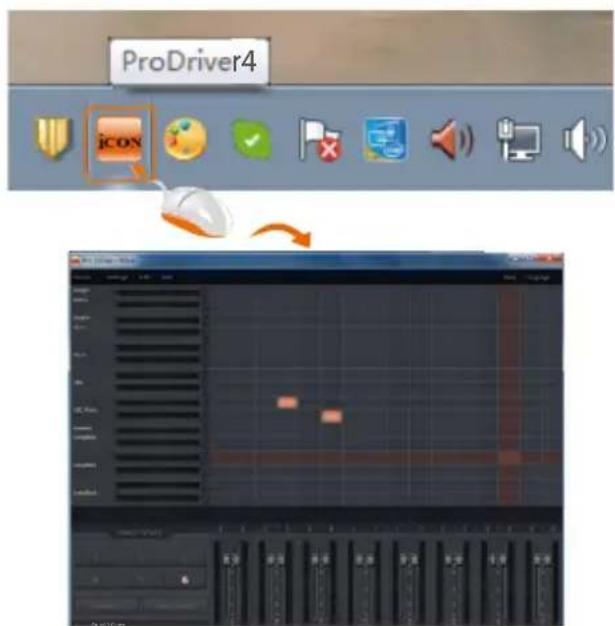
Diagram 26
10. Connect your Duo22 Dyna digital audio interface
Now connect the Duo22 Dyna digital audio interface to your computer's USB port.
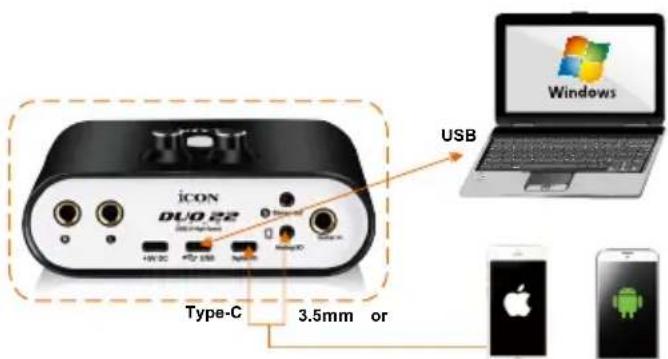
Diagram 27
ProDriver4
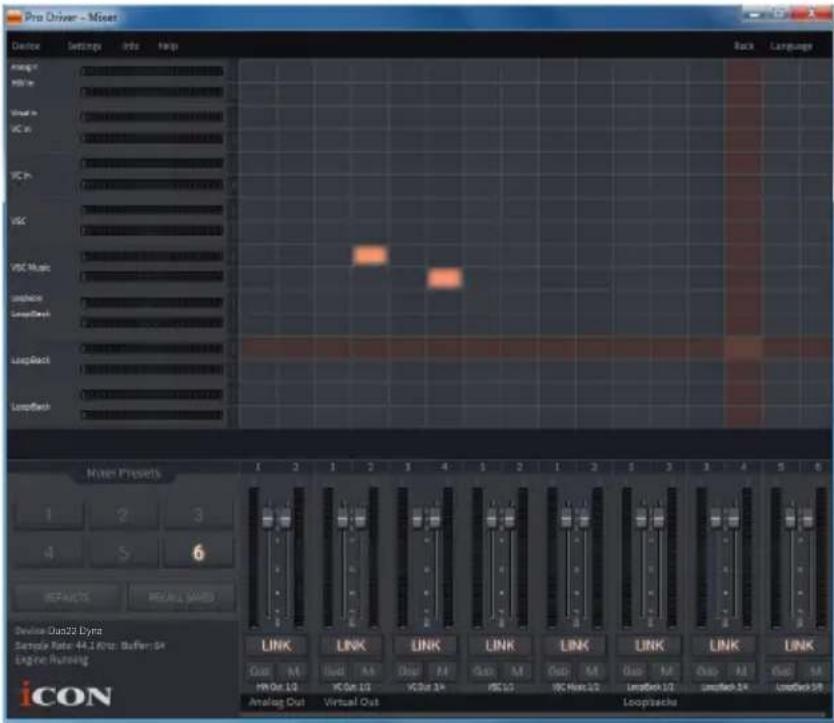
Diagram 28
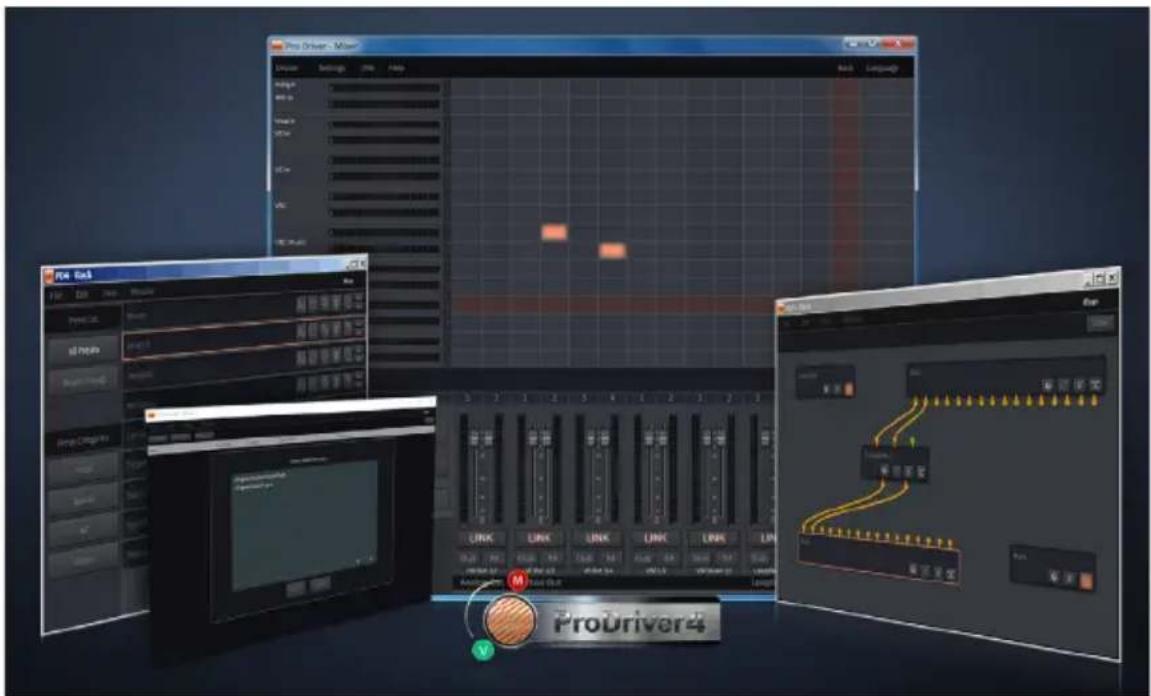
Diagram 29
Introducing ProDriver4, the leading edge in audio innovation for stage, studio and streaming from ICON ProAudio. The ProDriver audio system supplies you with the most reliable tools for almost any audio application, in the moment, right when you need it. The heart of the system, is our driver, employing breakthrough technology and zero latency monitoring. The user interface makes it easy to grab, route and redirect audio from any source in your computer with our virtual signal router. Use the ProDriver Plugin Host to connect your favorite VST, Audio Units and Direct X plugins. Run ProDriver4 in standalone mode or with your favorite DAW. Save your favorite plugin chains as presets and recall them during your session or live on stage in real time.
Mixer control panel(Windows)
There are two different audio drivers including “WDM” (Windows Driver Model) and “ASIO” (Audio Stream Input and Output) within the ICON ProAudio audio interface driver. WDM are widely used for daily software such as media player and ASIO is mainly being used for most of the recording software such as LogicPro. The advantage of ASIO is that it has much lower latency than WDM and this is very important when you are doing recording with load of plugins. Actually, most of the daily software does not support ASIO driver and using WDM only, in that case you just simply need to use the HW channel (Hardware channels). Below please find some explanations on the different terminology for each channel type.
1. HW IN (Hardware Channel IN)
This mean the hardware input channels including the microphones or internment input channels
2. HW Out (Hardware Channel OUT)
This mean the hardware output channels including the headphone or line out output channels
3. VC Out (Virtual Channel OUT)
This only exists on ASIO driver and it is a virtual channel that its output signal go to ASIO VC IN
4. VC Out (Virtual Channel IN)
This only exists on ASIO driver and it is a virtual channel that its input signal is coming from ASIO VC Out
5. LoopBack (LoopBack Channel)
ASIO internal loopback channel (e.g. ASIO VC Out signal go to ASIO VC IN)
On the mixer control panel, there are four different types of ASIO channels that you can manipulate.
1. Duo22 Dyna Hardware channels (HW In 1/2 & HW Out 1/2)
These are the hardware input and output channels on Duo22 Dyna.
2. Duo22 Dyna Virtual channels (VC In 1/2, 3/4 and 5/6), (VC Out 1/2, 3/4 and 5/6)
These are the input and output virtual channels that related to the WDM.
For example: WDM Out 1/2 linked to VC In1/2
VC Out1/2 linked to WDM In1/2
3. Duo22 Dyna Loopback channels (LB 1/2, 3/4 and 5/6)
These are the ASIO loop-back channels.
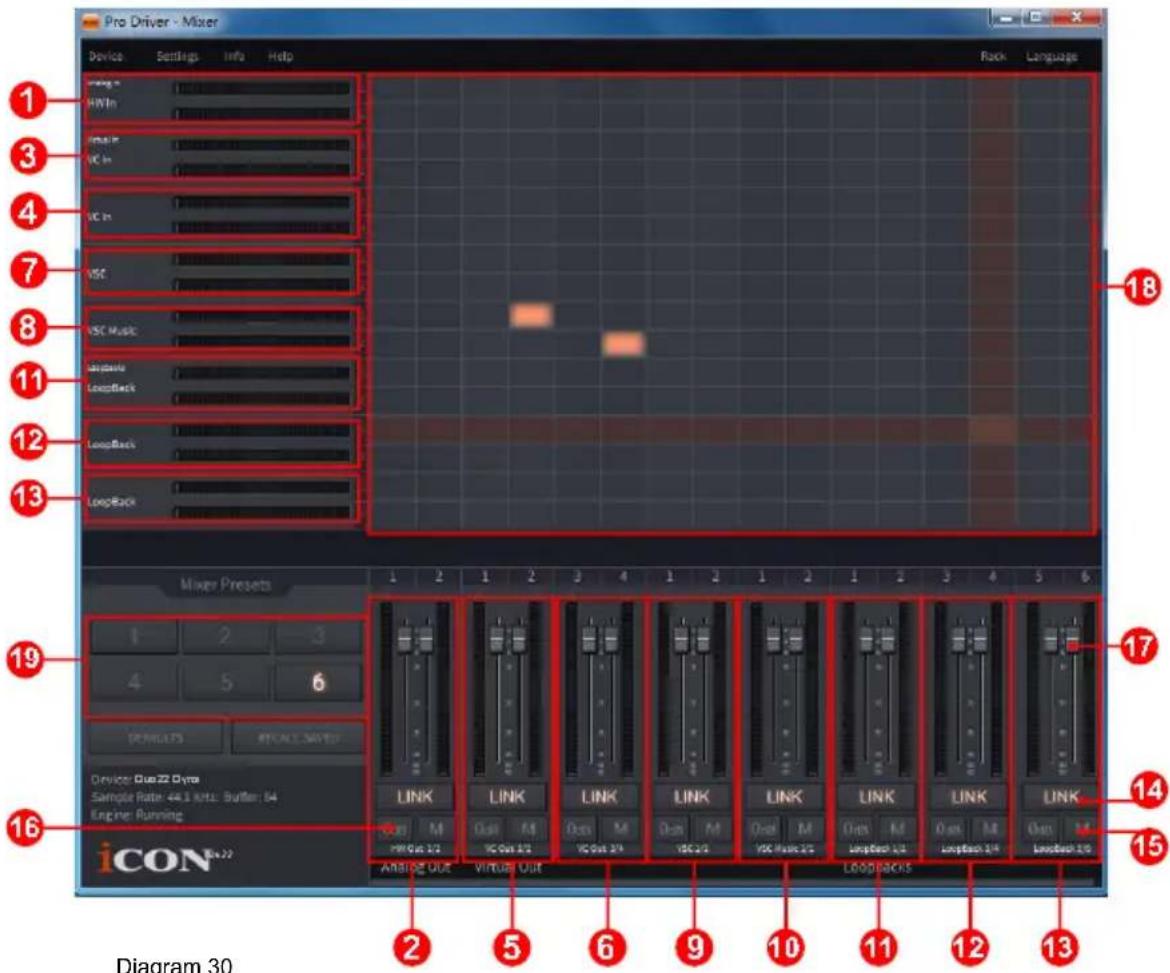
By activating different cross points, you may route the corresponding signal to your desired channels.
- HW Input 1/2 level metering
Showing the hardware 1/2 input level (HW In 1/2).
- HW Output 1/2 level metering
Showing the hardware 1/2 output level (HW Out 1/2).
- VC In 1/2 (Virtual) input level metering
Showing the WDM 1/2 output level (VC In 1/2).
- VC In 3/4 (Virtual) input level metering
Showing the WDM 3/4 output level (VC In 3/4).
- VC Out 1/2 (Virtual) output level metering
Showing the ASIO 1/2 VC output level (VC Out 1/2).
- VC Out 3/4 (Virtual) output level metering
Showing the ASIO 3/4 VC output level (VC Out 3/4).
- VSC In 1/2 (Virtual) input level metering
Showing the WDM 1/2 output level (VSC In 1/2).
8. VSC Music In 1/2 (Virtual) input level metering
Showing the WDM 1/2 output level (VSC music In 1/2).
9. VSC Out 1/2 (Virtual) output level metering
Showing the ASIO 1/2 VC output level (VSC Out 1/2).
10. VSC Music Out 1/2 (Virtual) output level metering
Showing the ASIO 1/2 VC output level (VSC music Out 1/2).
11. Loopback 1/2
Showing the ASIO loop-back 1/2 channel's level metering.
12. Loopback 3/4
Showing the ASIO loop-back 3/4 channel's level metering.
13. Loopback 5/6
Showing the ASIO loop-back 5/6 channel's level metering.
14. Link switch
Switch to adjust both channels level simultaneously.
15. Mute switch
Switch to mute the corresponding channel.
16. "0dB" switch
Switch to instantly adjust the corresponding channel to "0dB" level.
17. Gain control fader
Slide to adjust the gain level for the corresponding channel.
18. Inputs & Outputs Matrix switches
Switch to turn On/Off the corresponding input channel route to the corresponding output channel. The matrix is very useful and makes your inputs and outputs very flexible. You may route any of your input(s) to any output(s).
19. Mixer Presets
6 Mixer-Presets button slots are available for saving or loading your routing channel settings.
Settings (Sample rate and latency settings)
Click the "Setting" button to launch the settings window.
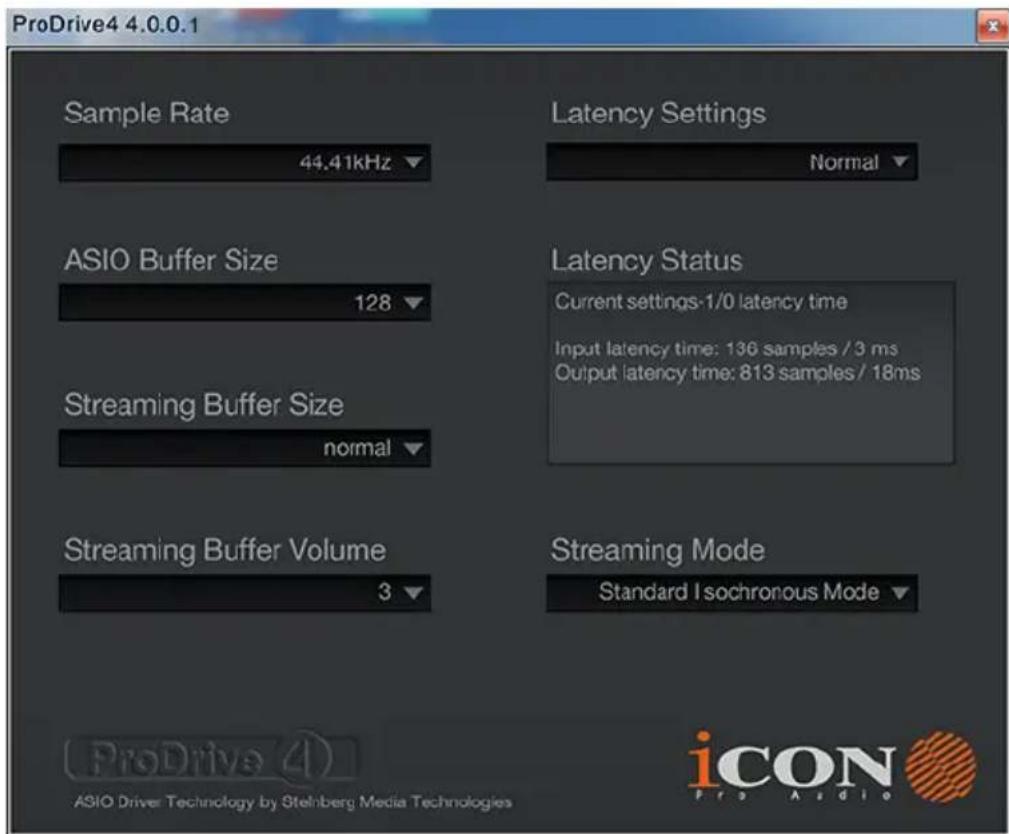
Diagram 31
Sample rate setting
Select your desired sampling rate from 44.1KHz to 192KHz on the pull down window shown in Diagram 32.
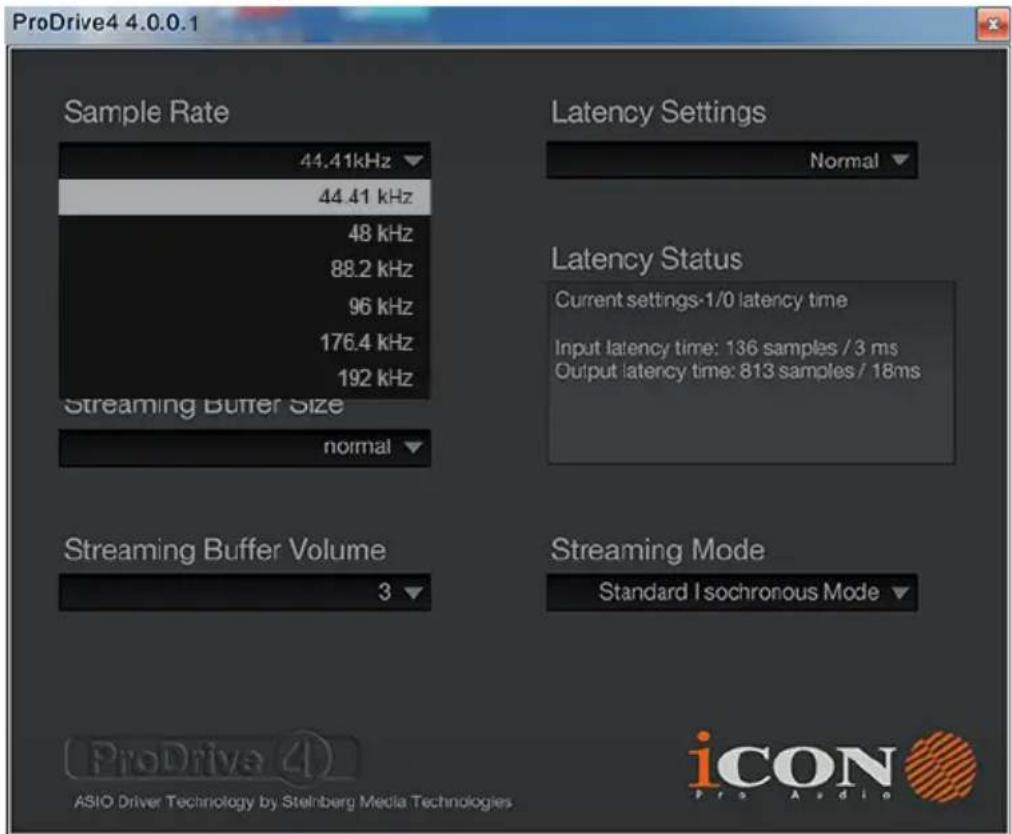
Diagram 32
Latency settings
There are six standard latency settings to select. If you would like to customize your own latency value, select custom.
• Safe (maximum latency)
- Extra Large
Normal
Small
- Very Small
• Minimum (minimum latency)
- Custom
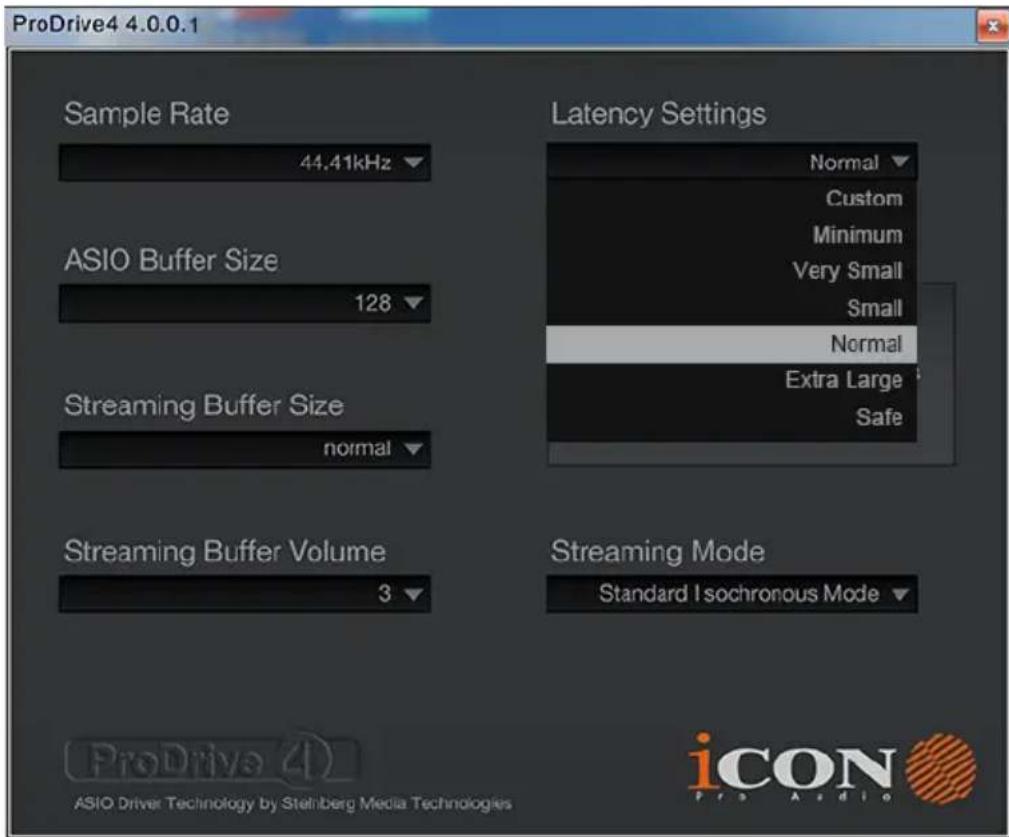
Diagram 33
There are three different settings you can adjust to customize your own latency settings: These values include:
1. ASIO buffer Size
You may adjust the value ranging from 32/64/128/256/512/1024/2048 and 4096.
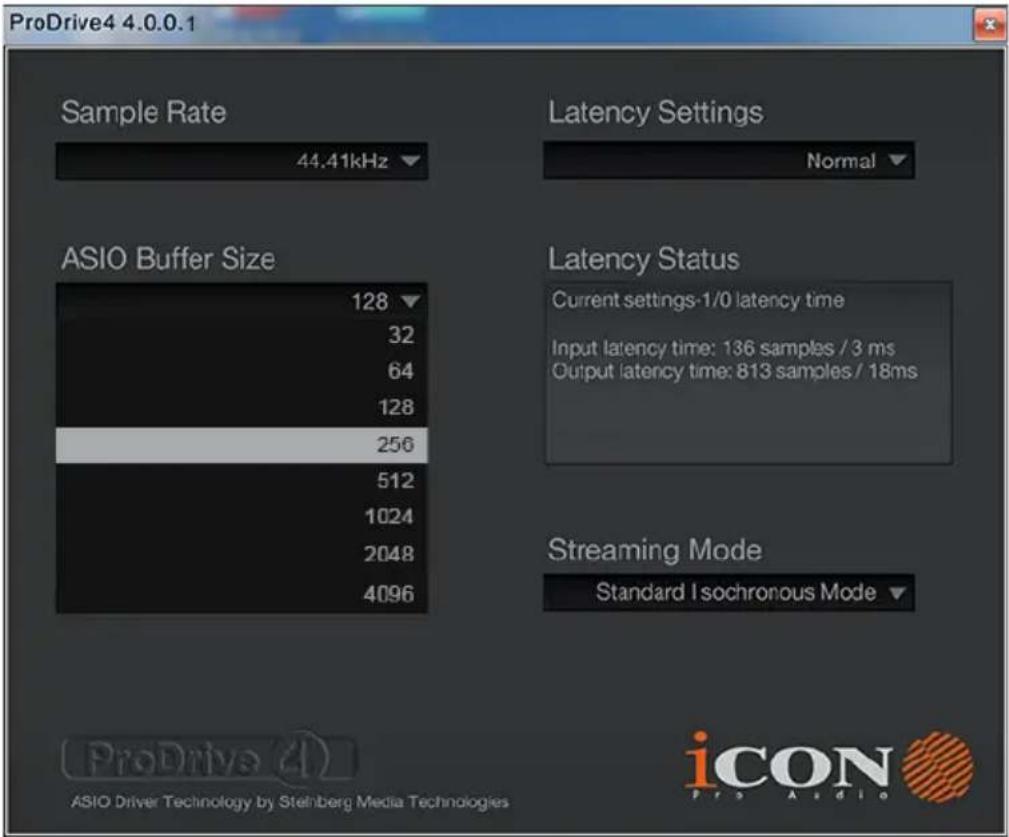
Diagram 34
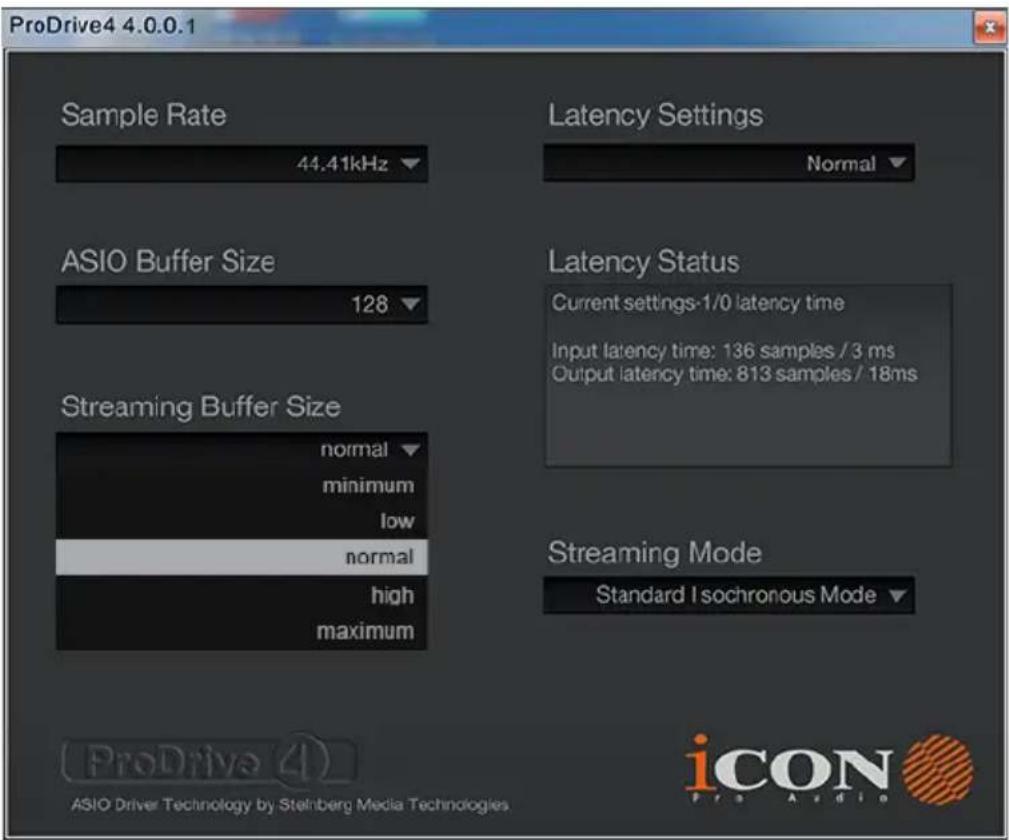
2. Streaming buffer Size
Adjustable settings: Minimum/Low/Normal/High and Maximum.
3. Streaming buffer volume
Adjustable values: 2/3 and 4.
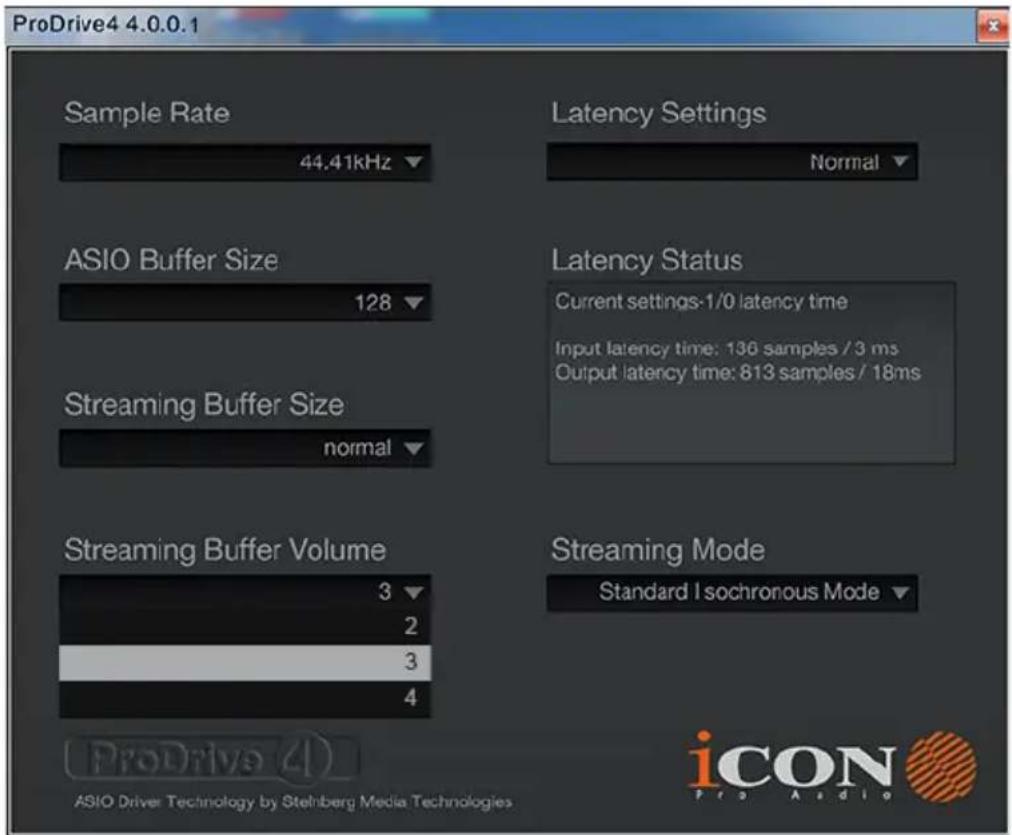
Diagram 36
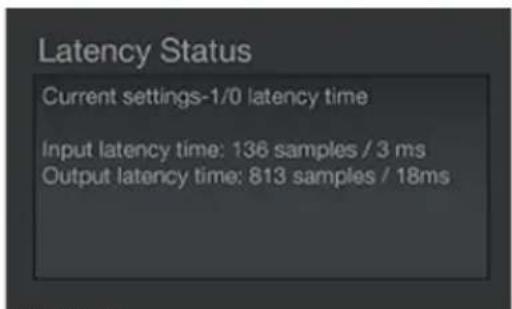
Diagram 37
(Note: If a warning message appears on the "Latency Status" windows, please select a larger latency setting.)
(Note: If a clicking sound occurs, you should change to a larger buffer size for the settings. If the largest buffer size has been selected and there is still a clicking sound. It means your computer performance is not able to handle the task. (It is not caused by Duo22 Dyna digital audio interface.)
ProDriver hosting rack (Mac/Windows)
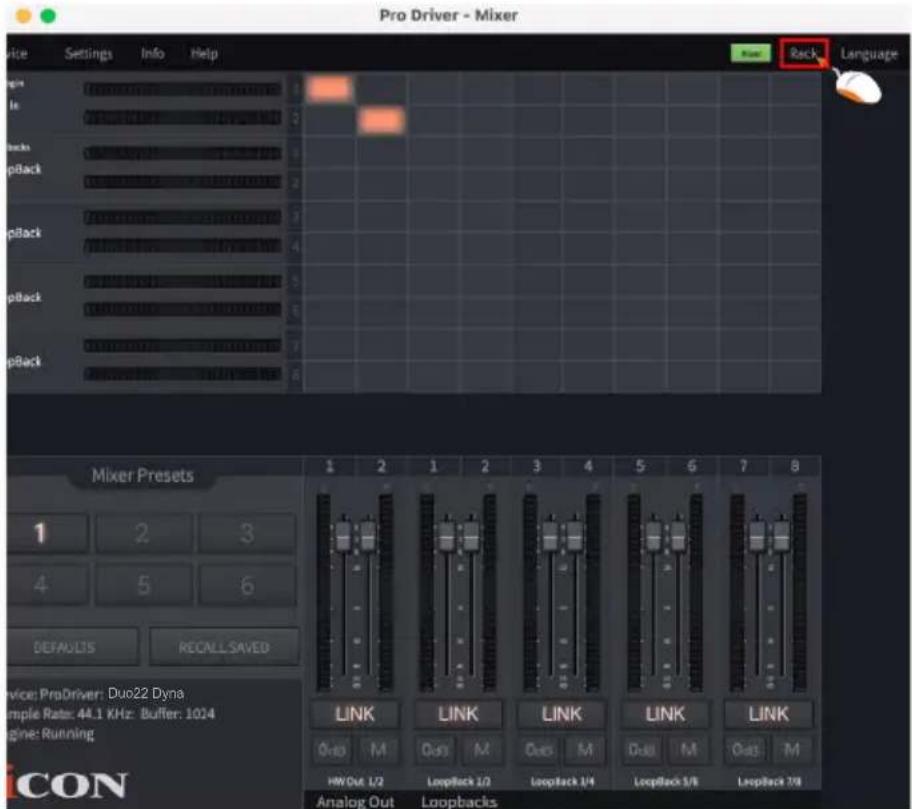
Diagram 38
With the ProDriver Rack, you can use any of your plug-ins with your DAW. Or you may use your device as a standalone plug-ins effectors without the need to run a DAW.
Click the "Rack" button on your ProDriver's mixer panel to launch the Virtual Rack window
Session & Preset
A session could contain unlimited presets. Each preset allows you to insert different plug-ins to create your desire sound effect or application need.
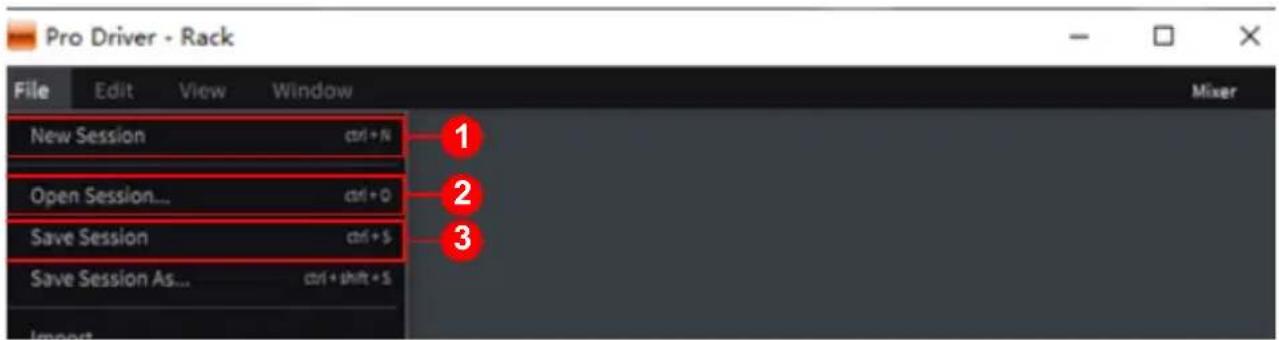
Diagram 39
1、Create a New Session
Click "New Session" under the "file" tab on the top menu bar. Then click "Save Session" and input file name.
2、Open a saved Session
Click "Open Session" under the "File" tab on the top menu bar and select the saved session file to open the session.
3、Save a Session
When you make any changes to your session, you may save it by clicking the "Save Session" function under the "File" tab on the top menu bar. Or if you would like to save as a new session, click "Save Session As" function and input a new session name.
Create a New Preset
Click "New Preset" function under the "Edit" tab on the top menu bar. A new preset slot will create.
Tip: To rename the preset, click the "Aa" button on the selected preset slot.
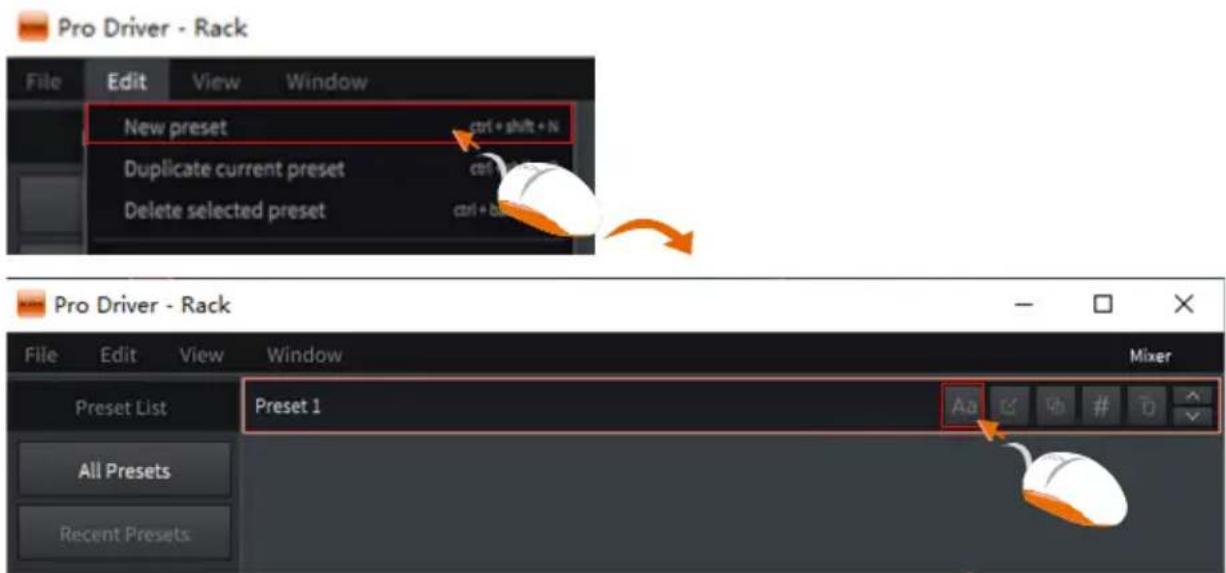
Diagram 40
Duplicate Current Preset
Sometime you may like to make small changes to a current preset and compare the two. The function of "Duplicate Current Preset" will allow you to copy the current preset instantly. Then you may make changes as wish with one of the preset and make comparison between the two. Click "Duplicate Current Preset" function on the "Edit" tab on the top menu bar.
Tip: You may duplicate a selected preset by clicking the third button on the right on the selected preset slot.

Diagram 41
Delete a Preset
You may delete any preset. Select a preset and click "Delete selected preset" under the "Edit" tab on the top menu bar.
Tip: You may also delete a selected preset by clicking the "Trash" button on the selected preset slot.
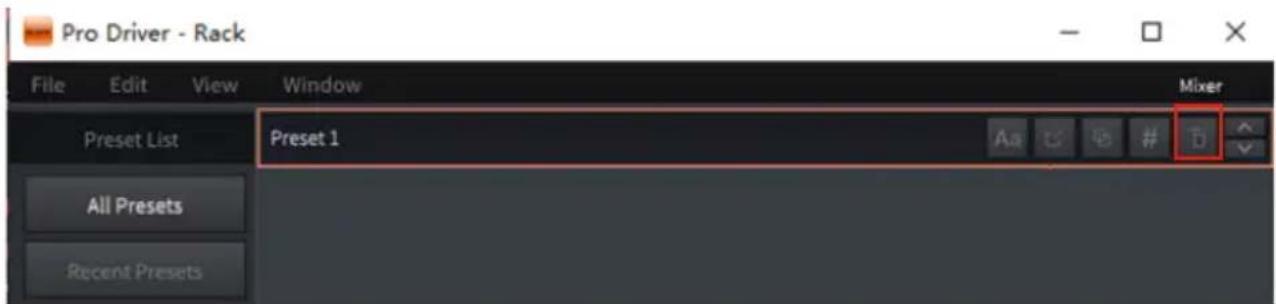
Diagram 42
Grouping a Preset
There are four "Preset Categories" including "Vocal", "Special", "MC" and "Others" that allow you grouping all your current presets. This is very useful to manage your different presets according to different application such as singing (Vocal), broadcasting (MC) or Guitar (Special) etc. To set a selected preset to a particular category - Click the "#" button in the selected preset slot and click the category from the pull down menu.
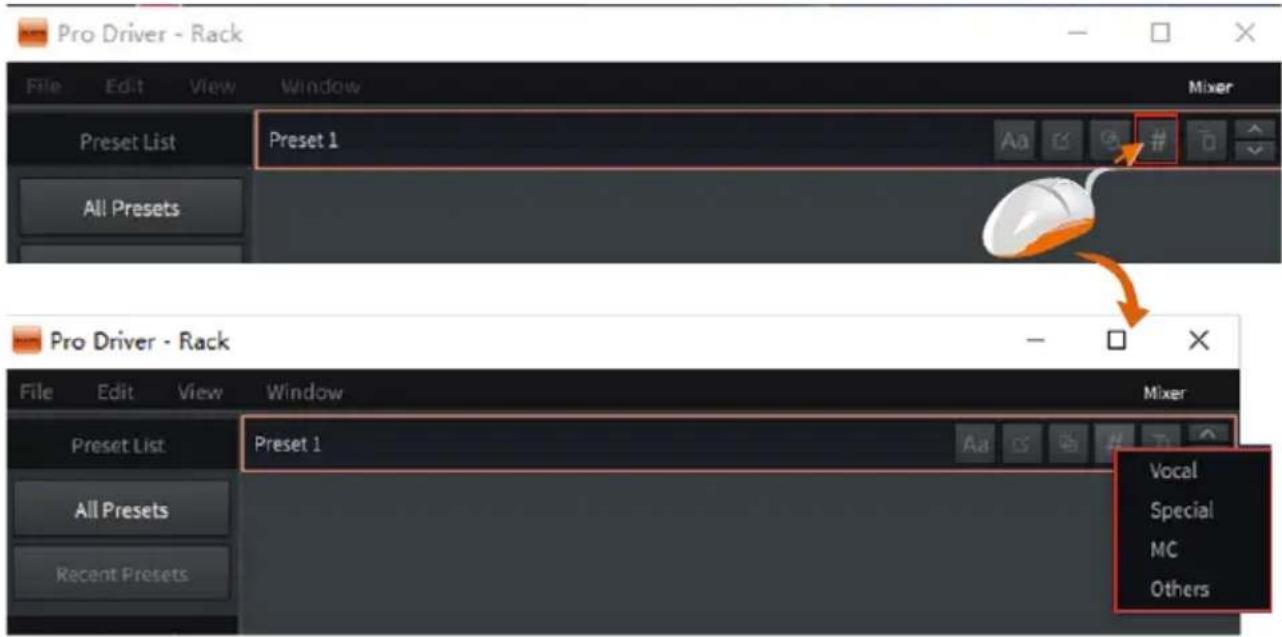
Diagram 43
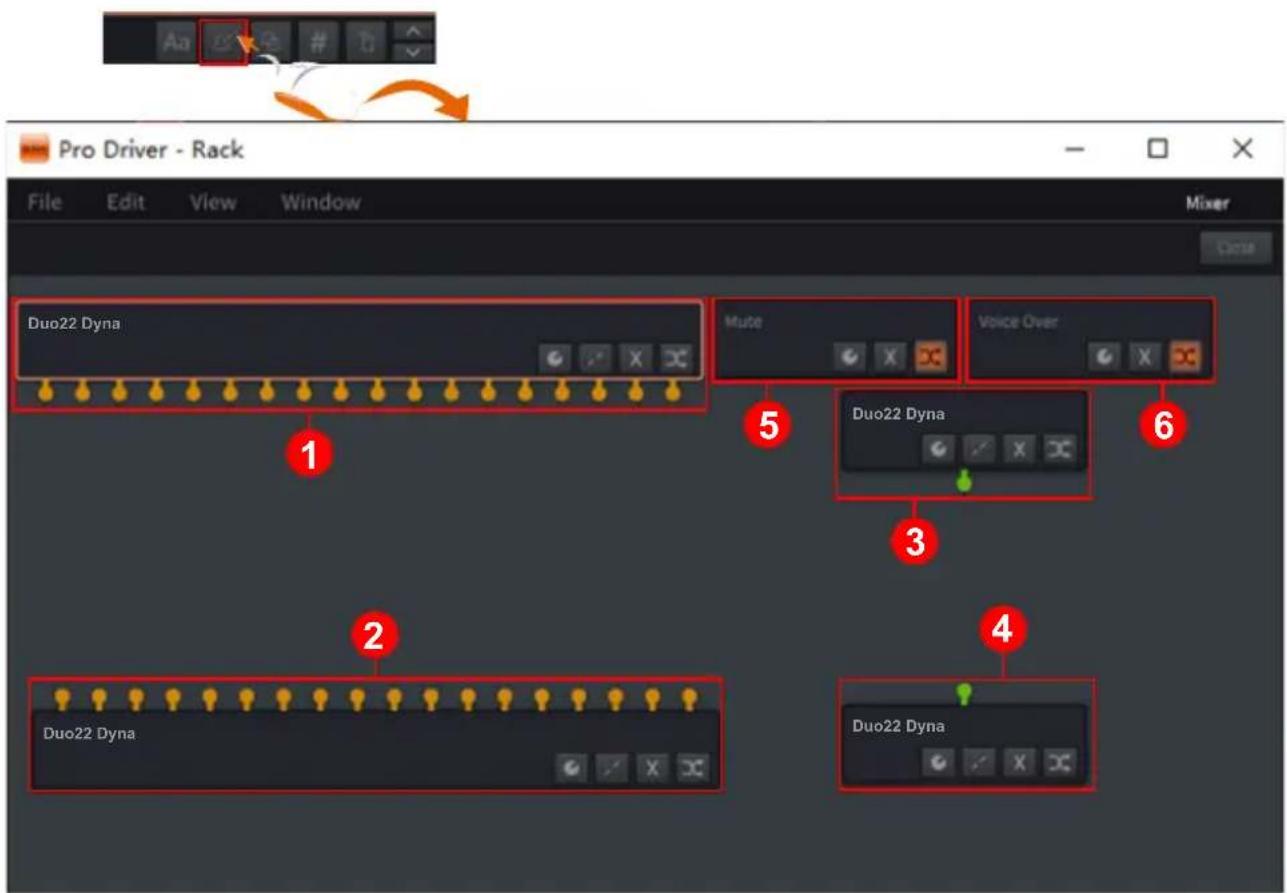
Diagram 44
Edit plug-in in a preset
Click the "Pencil & Paper" button on the selected preset slot will enter to the plug-in rack screen where you would see 6 different routing blocks.
1. ProDriver Input routing block with orange connections
Depended on the number of I/O that your audio interface equipped, you will see a number of connections in orange, they are representing the input channels of the audio interface.
2. ProDriver Output routing block with orange connections
Depended on the number of I/O that your audio interface equipped, you will see a number of connections in orange, they are representing the output channels of the audio interface.
3. ProDriver MIDI Input routing block with green connection
Depended on if your audio interface has equipped with MIDI I/O, you will see a connection in green, it is representing the MIDI input channel of the audio interface.
4. ProDriver MIDI Output routing block with green connection
Depended on if your audio interface has equipped with MIDI I/O, you will see a connection in green, it is representing the MIDI output channel of the audio interface.
5. Mute routing block
This is a routing block intended for the use of Mute function. Right click the block will show up the plug-in pull-down menu for all the available plug-in, click the desire plug-in to select. To use the block as the "Mute" function, normally you have to add. We have created a small activate shortcut button on the ProDriver floating icon. Simply click the "M" button would activate or deactivate the function (plugin).
Tip: Except using it as a Mute function, you may consider to use it for any other function that you wish by insert a correspondence plugin.
Diagram 45
6. Voice Over routing block
This is a routing block intended for the use of Voice Over function. Right click the block will show up the plug-in pull-down menu for all the available plug-in, click the desire plug-in to select. To use the block as the "Voice Over" function, normally you have to add . We have created a small activate shortcut button on the ProDriver floating icon. Simply click the "V" button would activate or deactivate the function (plugin).
Tip: Except using it as a Voice Over function, you may consider to use it for any other function that you wish by insert a correspondence plugin.
Import all your available plug-in
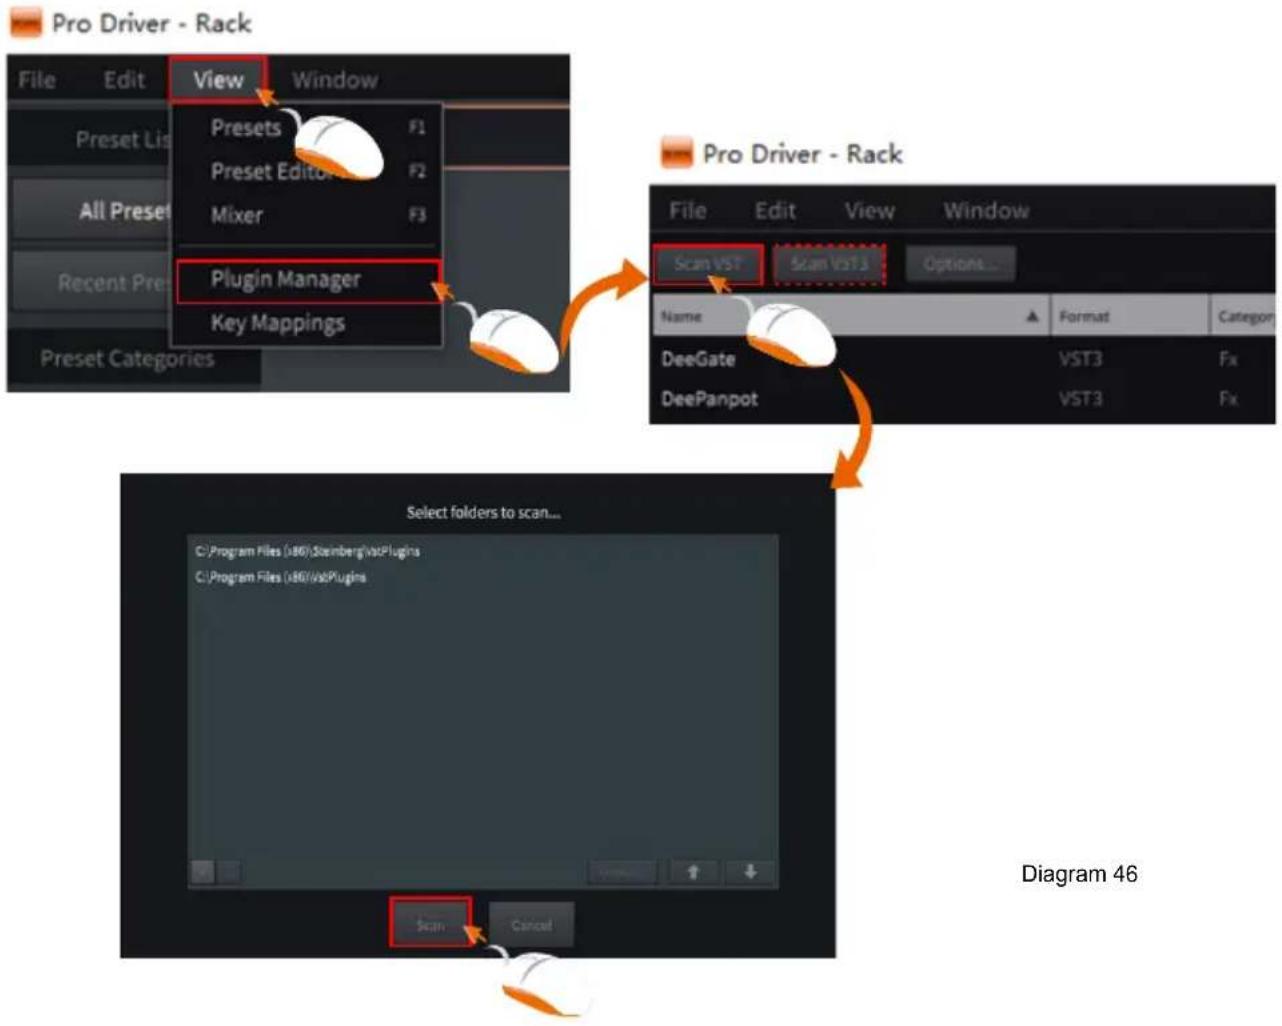
To import all you available plug-in, click "View" tab on the top menu bar and click "Plugin Manager" to launch the Plugin Manager window. Click "Scan VST" or "Scan VST3" to scan your computer all the available correspondence plugin automatically. A list of all available plugins will be shown and they have imported automatically and ready to be used in ProDriver.
flowchart
graph TD
    A["File Edit View Window"] --> B["Preset List Presets"]
    B --> C["Preset Editor Presets"]
    C --> D["Mixer Mixed"]
    D --> E["Plugin Manager Key Mappings"]
    E --> F["Pro Driver Rack"]
    F --> G["File Edit View Window"]
    G --> H["Scan VST Scan VST3 Options..."]
    H --> I["Name Format Category"]
    I --> J["DeeGate VST3 Fx"]
    I --> K["DeePanpot VST3 Fx"]
    L["Select folders to scan..."] --> M["C:\Program Files\180\Stanberg/VstPlugins\nC:\Program Files\180/VstPlugins"]
    M --> N["Scan Cancel"]
Add plug-in and make routing
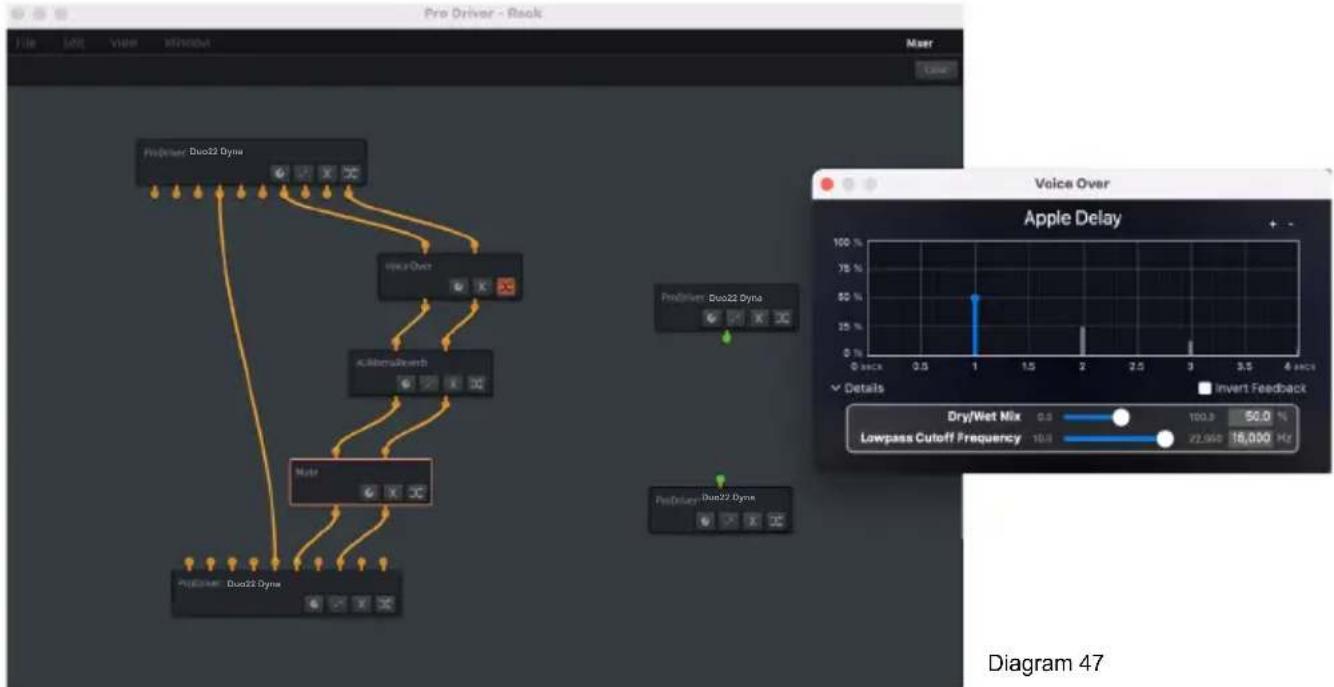
It is extremely easy to add plug-ins and make any routing between input channels to any plug-in to output channels. Just simply pull & drag the connection cable from connection point to point. To add a plug-in, right click your mouse, you will see all the available plug-ins that you have in your computer in the pull-down menu, then simply just click the plug-in to select.
flowchart
graph TD
    A["PreDriver: Duo22 Dyne"] --> B["Multi-Over"]
    B --> C["Multi-Over"]
    C --> D["Multi-Over"]
    D --> E["Multi-Over"]
    E --> F["Multi-Over"]
    F --> G["Multi-Over"]
    G --> H["Multi-Over"]
    H --> I["Multi-Over"]
    I --> J["Multi-Over"]
    J --> K["Multi-Over"]
    K --> L["Multi-Over"]
    L --> M["Multi-Over"]
    M --> N["Multi-Over"]
    N --> O["Multi-Over"]
    O --> P["Multi-Over"]
    P --> Q["Multi-Over"]
    Q --> R["Multi-Over"]
    R --> S["Multi-Over"]
    S --> T["Multi-Over"]
    T --> U["Multi-Over"]
    U --> V["Multi-Over"]
    V --> W["Multi-Over"]
    W --> X["Multi-Over"]
    X --> Y["Multi-Over"]
    Y --> Z["Multi-Over"]
    Z --> AA["Multi-Over"]
    AA --> AB["Multi-Over"]
    AB --> AC["Multi-Over"]
    AC --> AD["Multi-Over"]
    AD --> AE["Multi-Over"]
    AE --> AF["Multi-Over"]
    AF --> AG["Multi-Over"]
    AG --> AH["Multi-Over"]
    AH --> AI["Multi-Over"]
    AI --> AJ["Multi-Over"]
    AJ --> AK["Multi-Over"]
    AK --> AL["Multi-Over"]
    AL --> AM["Multi-Over"]
    AM --> AN["Multi-Over"]
    AN --> AO["Multi-Over"]
    AO --> AP["Multi-Over"]
    AP --> AQ["Multi-Over"]
    AQ --> AR["Multi-Over"]
    AR --> AS["Multi-Over"]
    AS --> AT["Multi-Over"]
    AT --> AU["Multi-Over"]
    AU --> AV["Multi-Over"]
    AV --> AW["Multi-Over"]
    AW --> AX["Multi-Over"]
    AX --> AY["Multi-Over"]
    AY --> AZ["Multi-Over"]
    AZ --> BA["Multi-Over"]
    BA --> BB["Multi-Over"]
    BB --> BC["Multi-Over"]
    BC --> BD["Multi-Over"]
    BD --> BE["Multi-Over"]
    BE --> BF["Multi-Over"]
    BF --> BG["Multi-Over"]
    BG --> BH["Multi-Over"]
    BH --> BI["Multi-Over"]
    BI --> BJ["Multi-Over"]
    BJ --> BK["Multi-Over"]
    BK --> BL["Multi-Over"]
    BL --> BM["Multi-Over"]
    BM --> BN["Multi-Over"]
    BN --> BO["Multi-Over"]
    BO --> BP["Multi-Over"]
    BP --> BQ["Multi-Over"]
    BQ --> BR["Multi-Over"]
    BR --> BS["Multi-Over"]
    BS --> BT["Multi-Over"]
    BT --> BU["Multi-Over"]
    BU --> BV["Multi-Over"]
    BV --> BW["Multi-Over"]
    BW --> BX["Multi-Over"]
    BX --> BY["Multi-Over"]
    BY --> BZ["Multi-Over"]
    BZ --> CA["Multi-Over"]
    CA --> CB["Multi-Over"]
    CB --> CC["Multi-Over"]
    CC --> CD["Multi-Over"]
    CD --> CE["Multi-Over"]
    CE --> CF["Multi-Over"]
    CF --> CG["Multi-Over"]
    CG --> CH["Multi-Over"]
    CH --> CI["Multi-Over"]
    CI --> CJ["Multi-Over"]
    CJ --> CK["Multi-Over"]
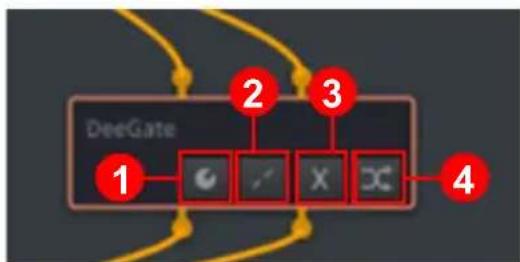
Buttons
1、Click to launch the actual plug-in control panel for making settings.
2、Click to delete all the virtual connections that connected to the block.
3、Click to delete the routing /plugin block
4、Click to activate or deactivate the routing/plugin block
flowchart
graph TD
    A["1"] --> B["Button 1"]
    B --> C["Button 2"]
    C --> D["Button 3"]
    D --> E["Button 4"]
Diagram 48
Hardware Connections
Connect the Duo22 Dyna digital audio interface outputs to your amplifier, powered monitors.
If you are monitoring through headphones, connect your headphones to the device's headphone output.
Connect your microphone/guitar to the device's analog input.
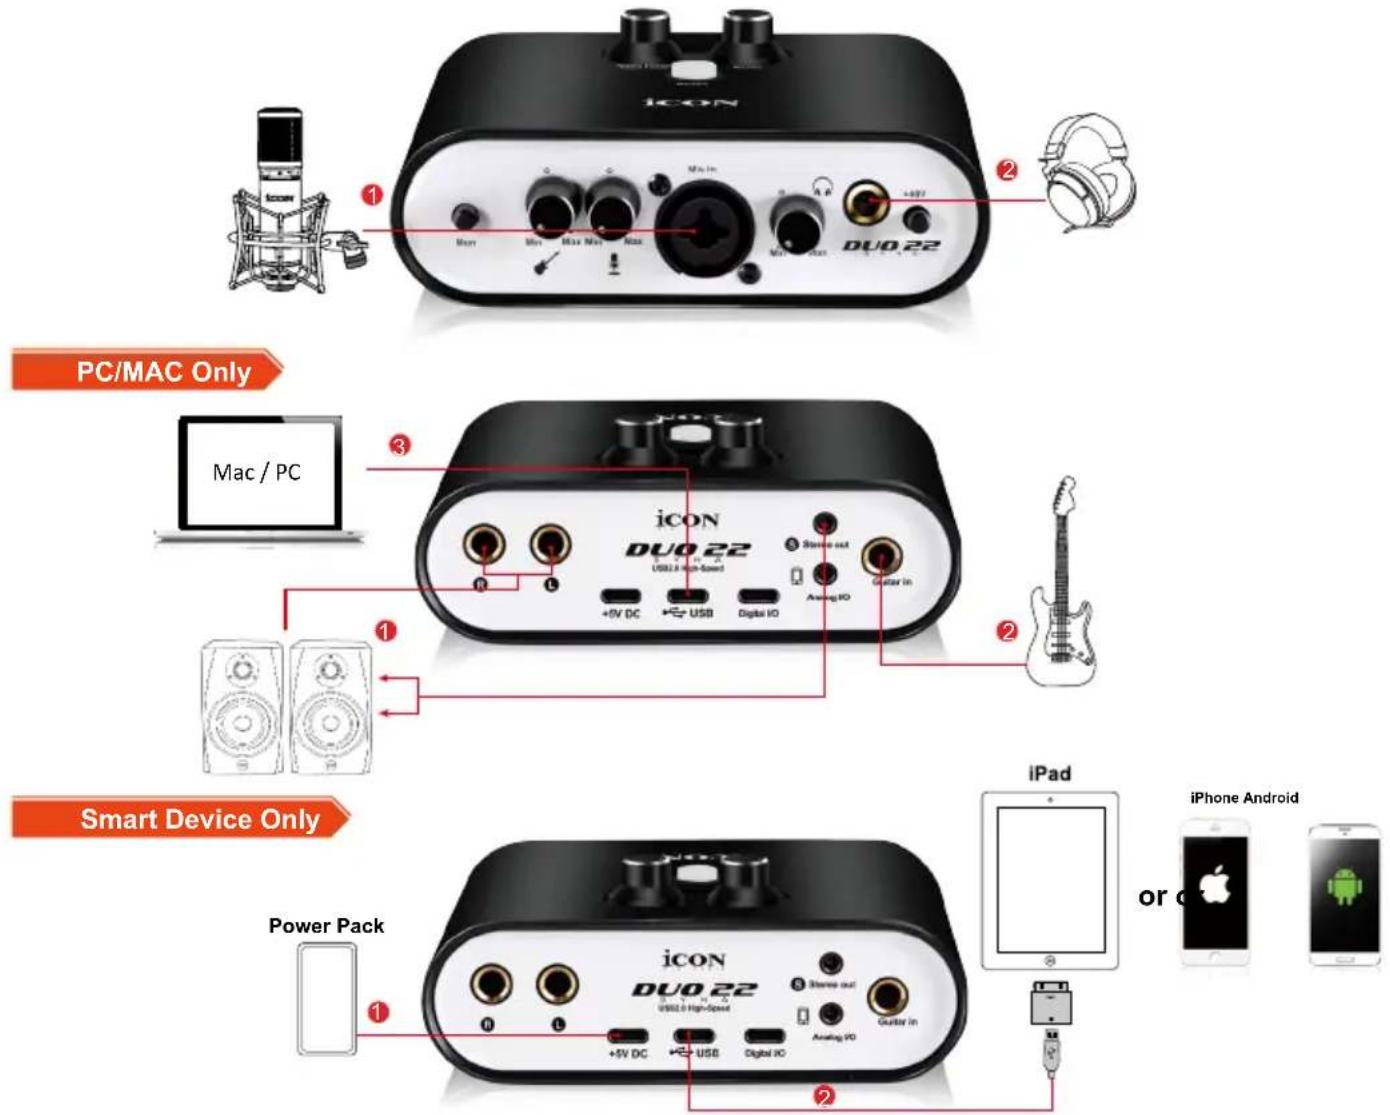
PC/MAC Smart Device Simultaneously
Different types of microphone connection method diagram
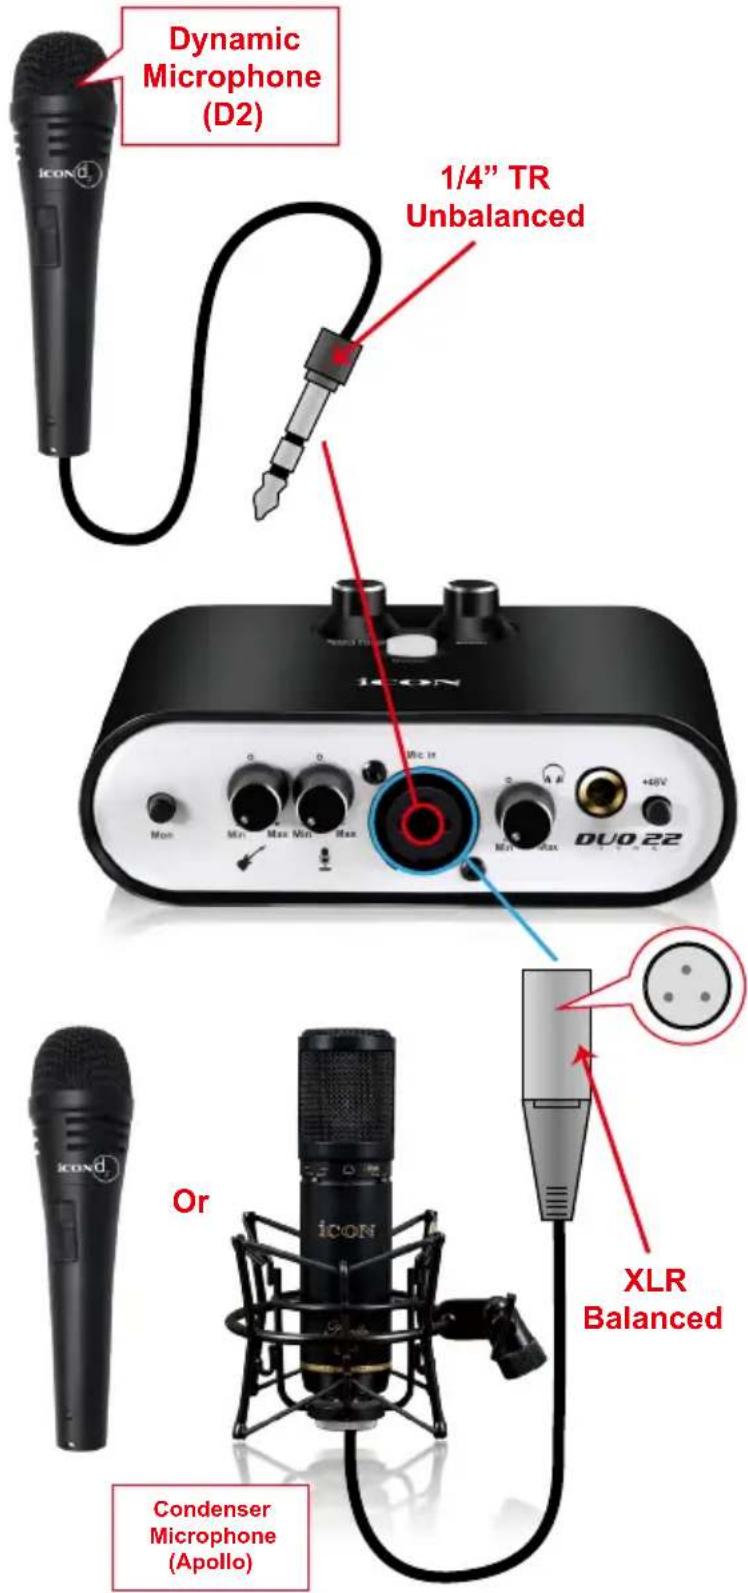
Note: For dynamic microphone user, please make sure +48V phantom power switch is “OFF” before you plug in your microphone, otherwise it may cause damage to your microphone.
Specifications
Mic Input:
Frequency Response: 22Hz to 22kHz (+/-0.1dB)
Dynamic Range: 112dB, A-weighte
Signal-to-Noise Ratio: -112dB, A-weighted
THD+N: -98dB
Crosstalk: -97dB @ 1kHz
Input Impedance: Mic in: 1.8K Ohms, typical
Adjustable Gain: ....+34dB
Inst Input:
Frequency Response: 22Hz to 22kHz (+/-0.1dB)
Dynamic Range: 112dB, A-weighte
Signal-to-Noise Ratio: -112dB, A-weighted
THD+N: -98dB
Crosstalk: -97dB @ 1kHz
Input Impedance:....Inst in: 500K Ohms, typical;
Adjustable Gain: ....+31dB
Line Outputs 1/2 (Stereo, Unbanced):
Frequency Response: 22Hz 22kHz (+/-0.1dB)
Dynamic Range: 114dB, A-weighted
Signal-to-Noise Ratio: -114dB, A-weighted
THD+N: -100 dB
Crosstalk: -97dB @ 1kHz
Nominal Output Level:......Unbalanced: +4dBV, typical;
Maximum Output Level:.... +11dBV, typical;
Output Impedance: 150 Ohm
Load Impedance:....600 Ohm minimum
Headphone Outputs: (at Maximum Volume; Into 100 Ohm load):
Frequency Response: 22Hz to 22kHz (+/-1dB)
Power into Ohms: 90 mW into 100 Ohms
THD+N: <0.06% (-66dB)
Signal-to-Noise Ratio: -100dB, A-weighted
Max Output Level into 100 Ohms:....+2.0dBV, typical
Output Impedance: 75 Ohm
Load Impedance: 32 to 600 Ohms
Services
If your Duo22 Dyna needs servicing, follow these instructions.
Check our online Help Center at http://support.iconproaudio.com/hc/en-us, for information, knowledge, and downloads such as:
- FAQ
- Download
- Learn More
- Forum
Very often you will find solutions on these pages. If you don't find a solution, create a support ticket at our online Help Center at the link below, and our technical support team will assist you as soon as we can.
Navigate to http://support.iconproaudio.com/hc/en-us and then sign in to submit a ticket.
As soon as you have submitted an inquiry ticket, our support team will assist you to resolve the problem with your ICON ProAudio device as soon as possible.
To send defective products for service:
- Ensure the problem is not related to operation error or external system devices.
- Keep this owner's manual. We don't need it to repair the unit.
- Pack the unit in its original packaging including end card and box. This is very important. If you have lost the packaging, please make sure you have packed the unit properly. ICON is not responsible for any damage that occurs due to non-factory packing.
- Ship to the ICON tech support center or the local return authorization. See our service centers and distributor service points at the link below:
If you are located in US
Send the product to:
North America
Mixware, LLC – U.S. Distributor
11070 Fleetwood Street – Unit F.
Sun Valley, CA 91352; USA
Tel.: (818) 578 4030
Contact: www.mixware.net/help
If you are located in Europe
Send the product to:
Sound Service
GmbH European
HeadquarterMoriz-Seeler-Straße
3D-12489 Berlin
Telephone: +49 (0)30 707 130-0
Fax: +49 (0)30 707 130-189
E-Mail: info@sound-service.eu
If you are located in Hong Kong
Send the product to:
ASIA OFFICE:
Unit F, 15/F., Fu Cheung Centre,
No. 5-7 Wong Chuk Yueng Street, Fotan,
Sha Tin, N.T., Hong Kong.
Tel: (852) 2398 2286
Fax: (852) 2789 3947
Email: info.asia@icon-global.com
- For additional update information please visit our website at:
ICON Pro Audio

Support

support.iconproaudio.com
Dashboard

iconproaudio.com/dashboard/
www.iconproaudio.com


- Important Safety Instructions
- Contents
- Introduction
- What's in the package?
- Register your ICON ProAudio product to your personal account
- Check serial number of your device
- Log in to your personal account page for existing user or sign up for new user
- Download all useful materials
- Features
- Front Panel
- Rear Panel
- USB 2.0 connector (Type C)
- HI-Z input
- Line outputs L/R
- Stereo output L/R
- Smart Device I/O (Digital - Type C & Analog - 3.5mm TRRS)
- Power supply connector (USB Type C)
- Top Panel
- Direct Monitor button
- Smart Phone Input Level Control
- Master Level Control
- Mac driver installation
- Install ProDriver 4 with LoopBack function
- Click "Continue"
- Click "Continue"
- Click "Read License" to read the lincense terms or click "Agree" to start the installation
- Select the disk where you would like ProDriver to be installed and then click "Continue"
- Click "Install"
- Input your password or tap your finger print to start the installation.
- Installation started and click "Close" after it has completed.
- Please connect your audio interface at this state to you Mac and then click the ICON logo as shown.
- Mixer control panel(Mac)
- HW In 1/2 level metering
- HW Out 1/2 level metering
- LoopBack In 1-8 level metering
- LoopBack Out 1-8 level metering
- Link switch
- Mute switch
- "0dB" switch
- Gain control fader
- Inputs & Outputs Matrix switches
- Mixer Presets
- Device Preferences
- Output
- Input
- Active output channels
- Active output channels
- Sample rate
- Audio buffer size
- Windows driver installation
- Turn on your computer
- Download the Windows driver from your "Personal User Page at www.iconproaudio.com" (Please refer to P.5 "register your ICON ProAudio product to your personal account" for creating your persoanl user portal)
- Installation Wizard appears
- License Agreement
- Select components for installation
- Preparing installation files
- Click "Install" to proceed.
- Setup completed
- Launch the software control panel
- Connect your Duo22 Dyna digital audio interface
- ProDriver4
- Mixer control panel(Windows)
- HW IN (Hardware Channel IN)
- HW Out (Hardware Channel OUT)
- VC Out (Virtual Channel OUT)
- VC Out (Virtual Channel IN)
- LoopBack (LoopBack Channel)
- Duo22 Dyna Hardware channels (HW In 1/2 & HW Out 1/2)
- Duo22 Dyna Virtual channels (VC In 1/2, 3/4 and 5/6), (VC Out 1/2, 3/4 and 5/6)
- Duo22 Dyna Loopback channels (LB 1/2, 3/4 and 5/6)
- VSC Music In 1/2 (Virtual) input level metering
- VSC Out 1/2 (Virtual) output level metering
- VSC Music Out 1/2 (Virtual) output level metering
- Loopback 1/2
- Loopback 3/4
- Loopback 5/6
- Link switch
- Mute switch
- "0dB" switch
- Gain control fader
- Inputs & Outputs Matrix switches
- Mixer Presets
- Settings (Sample rate and latency settings)
- Sample rate setting
- Latency settings
- ASIO buffer Size
- Streaming buffer Size
- Streaming buffer volume
- ProDriver hosting rack (Mac/Windows)
- Session & Preset
- 1、Create a New Session
- 2、Open a saved Session
- 3、Save a Session
- Create a New Preset
- Duplicate Current Preset
- Delete a Preset
- Grouping a Preset
- Edit plug-in in a preset
- ProDriver Input routing block with orange connections
- ProDriver Output routing block with orange connections
- ProDriver MIDI Input routing block with green connection
- ProDriver MIDI Output routing block with green connection
- Mute routing block
- Voice Over routing block
- Import all your available plug-in
- Add plug-in and make routing
- Buttons
- Hardware Connections
- Different types of microphone connection method diagram
- Specifications
- Mic Input:
- Inst Input:
- Line Outputs 1/2 (Stereo, Unbanced):
- Headphone Outputs: (at Maximum Volume; Into 100 Ohm load):
- Services
Brand : icon
Model : Duo22 Live
Category : Hi-Fi System