
iDJ - DJ Equipment icon - Free user manual and instructions
Find the device manual for free iDJ icon in PDF.


| Product Type | DJ Controller |
| Dimensions (W x D x H) | 250 mm x 180 mm x 30 mm |
| Weight | 0.5 kg |
| Power Supply | USB bus-powered |
| Connectivity | USB, 3.5mm headphone jack, 3.5mm microphone input |
| Main Functions | Two-channel mixer, jog wheels, performance pads, crossfader, EQ knobs |
| Software Compatibility | Virtual DJ, Serato DJ Lite, Mixxx |
| Audio Output | Stereo RCA (master), 3.5mm headphone |
| Audio Input | Microphone (3.5mm) |
| Sample Rate | 44.1 kHz / 48 kHz |
| Bit Depth | 16-bit |
| Number of Pads | 8 backlit performance pads per deck |
| Fader Types | Analog crossfader, channel faders |
| Case Material | Plastic with rubberized sides |
| Cleaning | Wipe with dry or slightly damp cloth, avoid solvents |
| Storage | Keep in a dry place, avoid extreme temperatures |
| Safety | Do not expose to water, use only included USB cable |
| Spare Parts Availability | Contact icon support for faders and knobs |
| Repairability | Repairable by authorized service center |
| Warranty | 1 year limited warranty |
Frequently Asked Questions - iDJ icon
User questions about iDJ icon
0 question about this device. Answer the ones you know or ask your own.
Ask a new question about this device
Download the instructions for your DJ Equipment in PDF format for free! Find your manual iDJ - icon and take your electronic device back in hand. On this page are published all the documents necessary for the use of your device. iDJ by icon.
USER MANUAL iDJ icon

USB MIDI DJ Controller with OptiSen™ optical scratch wheels




The lightning flash with arrowhead symbol within an equilateral triangle is intended to alert the user to the presence of uninsulated dangerous voltage within the product's enclosure, that may be of sufficient magnitude to electric shock to persons. Le symbol-clair avec point de fl che l'int-rieur d'un triangle quilat ral est utilis pour alerler l'utilisateur de la pr sence l'int rieur du coffret de vottage dangereux non isol d ampleur suff
Important Safety Instructions
- Read these instructions.
- Keep these instructions.
- Heed all warnings.
- Follow all instructions.
- Do not use this apparatus near water.
-
Clean only with dry cloth.
-
Do not block any ventilation openings. Install in accordance with the manufacture's instructions.
-
Do not install near any heat sources such as radiators, heat registers, stoves, or other apparatus (including amplifiers) that produce heat.
-
Only use attachments/accessories specified by the manufacturer.
Contents
Introduction
What's in the package.... 1
Features 2
Front Panel Layout 3-4
Side Panel Layout 5
Getting Started
Connecting your iDJ controller 5-6
Installing iMap™ Software for Mac OSX 7
Installing iMap™ Software for Windows 8-9
Assigning MIDI functions with iMap ^TM 10
iMap™ iDJ software panel 10-12
Restore the factory default settings 12
Daisy chain your iDJ to other i-series controllers 13
Specifications 14
Services 15

Introduction
Thank you for purchasing the ICON iDJ USB MIDI DJ controller. We sincerely trust this product will provide years of satisfactory service, but if anything is not to your complete satisfaction, we will endeavor to make things right.

In these pages, you'll find a detailed description of the features of the iDJ, as well as a guided tour through its front and side panels, step-by-step instructions for its setup and use, and full specifications.
You'll also find a warranty card enclosed---please don't forget to fill it out and mail it so that you can receive online technical support at: www.icon-global.com. And so we can send you updated information about these and other ICON products in the future. As with most electronic devices, we strongly recommend you retain the original packaging. In the unlikely event the product must be returned for servicing, the original packaging (or reasonable equivalent) is required.
With proper care and adequate air circulation, your iDJ will operate without any trouble for many years. We recommend that you record your serial number in the space provided below for future reference.
Please write your serial number here for future reference:
Purchased at:
Date of purchase:
What's in the package?
- iDJ USB MIDI controller x 1
- Software CD x 1
- Quick Start Guide
- USB2.0 Cable

iDJ
Software CD

natural_image
Simple geometric shape: a black diagonal line inside a red square outline (no text or symbols)Quick Start Guide
USB2.0 Cable
Features


Main features include:
- Touch-sensitive scratch wheels with high resolution pulse sensor Touch sensor scratch wheel platters give high resolution to experiencing an analog feel when scratching and mixing.
- Touch wheel sensitivity adjustable
• Vertical volume control faders
• Vertical tempo control faders
• Horizontal cross fader control
- 2x3-band EQ control knobs - Hi, Mid and Low (assignable)
• Balance control knobs (assignable)
• Gain control knobs (assignable)
- 8 assignable backlit buttons including "Vinyl Mode", "Sync", "Loop >", "Loop <", "Out", "In" and "Cue".
- 4 extra assignable knobs for effect control
- 8 extra assignable backlit buttons
- iMap™ midi mapping software included for reassigning midi mapping
- Extremely compact and perfect match with MacBook™
- Class-compliant with Windows XP, Vista (32-bit), and Mac OS X
- USB bus-powered
• Available in black and white
- Different colors aluminum cover is available (optional)
- Custom laser-engraving service for aluminum cover is available at online purchase (optional)
Front Panel Layout

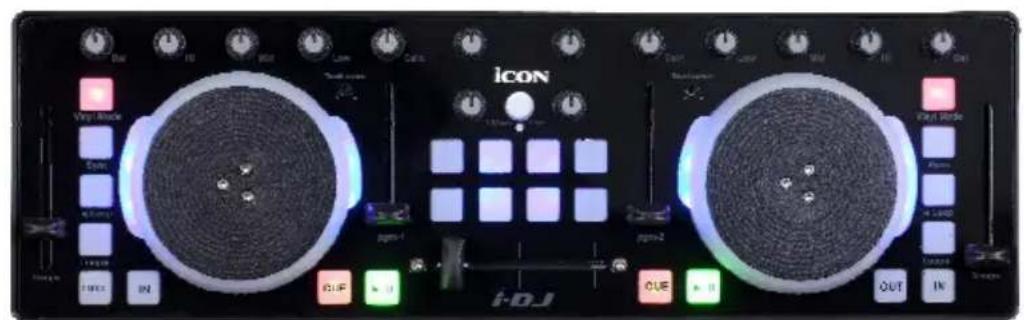
① Touch-sensitive scratch wheel with high resolution pulse sensor
The scratch wheel is constructed with high resolution pulse sensor with touch-sensitive and non-sensitive elements. These together enable user control functions such as “search”, “pitch bend”, “stop & go”, and “scratch” etc. with high accuracy and effectively.
② Scratch wheel touch sensitivity level control
Adjust the sensitivity of the scratch wheels for different environments and users. Rotate it with a small screwdriver while touching the scratch wheel until the backlight of the scratch wheel changes from blue to red.
③ Tempo fader
Adjust the tempo ( playback speed) of each deck at your software.
④ Vinyl mode button
Press to activate the vinyl mode of each desk at your software.
⑤ Sync button
Press this button to activate the Auto-Sync function of each desk at your software.
⑥ Loop control buttons (Loop<, Loop>, IN & OUT)
These buttons control the corresponding looping buttons found on each desk at your software.
⑦ Transport buttons (CUE, Play/Pause)
Press to activate the CUE, Play/Pause functions of each desk at your software.
⑧ Mixer knobs (Bal, Hi, Mid, Low & Gain)
These adjust the channel balance, gain, the high-frequency, mid-range, low-frequency EQ settings of each desk at your software.
Front Panel Layout
⑨ Crossfader
This slider controls the crossfader at your software. Slide to control the transition between songs. The crossfader curve setting is adjustable. Please refer to the "C.F.Curve" button below for details.
⑩ C.F.Curve / Layer button
This is a multi functional button. It can be used to adjust the crossfader curve, switching the layer from one to four or restore the iDJ to factory default settings.
Adjust the crossfader curve
Activate the button (red light turns on) and slide the crossfader to your preferred cross point. This would be your "A" cross point and "B" cross point will be mirror symmetric. The section between your cross points "A" & "B" is the center value.
Tip: In general, a gentle curve is more suitable for long mixes (larger distance between A/B as diagram A shown) and a sharp curve is more suitable for scratching (i.e. less distance between A/B as diagram B shown).

Diagram A

Diagram B
Switching between the 4 layers
You may pre-map your iDJ to 4 layers with different midi mapping at each layer. To switch between these layers, activate the Layer button and press the 4 buttons below to change the layers from 1 to 4.
Restore iDJ to factory default
Press and hold the button for more than 3 seconds (all the iDJ lights will flash one time), this will restore all iDJ settings to factory default values.
⑪ User defined buttons
These buttons are intended for user to self-define the usage. Please use iMap software to assign their functions.
Tip: Except "Vinyl Mode", "C.F.Curve", "CUE" & "Play/Pause" buttons are not assignable, all other buttons, sliders and knobs on your iDJ are assignable with the provided iMap MIDI mapping software.

Side Panel Layout


① USB port (B-Type)
Functions as a MIDI port to your notebook (or computer) and compatible software. Also provides power to your iDJ.
Getting Started
Connecting your iDJ controller
① Connect the iDJ to your Mac/PC via the USB port
Choose a USB port on your Mac/PC and insert the wide (flat) end of the USB cable. Connect the cable's small jack end to the iDJ. Your Mac/PC should automatically "detect" the new hardware and notify you that it is ready to use.
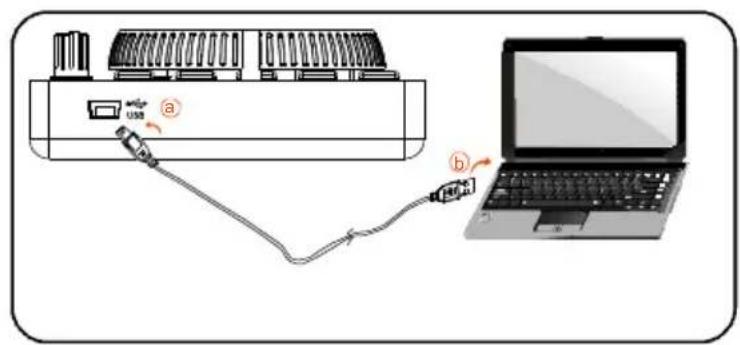
Diagram 1

Diagram 2
② Setup your DJ software
Activate the ICON iDJ controller in your DAW or MIDI software using "MIDI setup" or "MIDI devices".
(Note: Every application does this a little different, so refer to your software user manual for the settings.)
③ Import the preset template for the DJ software
To avoid all hassles to set the midi mapping for your DJ software. We have created preset templates on some DJ software. By importing this template to your DJ software, your iDJ is ready to use immediately. These templates are stored on the CD with your package under the “Templates” folder. Also, we will update and create more templates for different DJ software. Please check our official website for updates.
(Note: You may reassign your midi mapping with the provided iMap ^TM software. (Refer to page 10 for "Assign the MIDI functions with "iMap ^TM " software")

Installing iMap ^TM Software for MAC OSX
Please follow the procedures below step-by-step to install your iMap ^TM software to Mac OS X

① Turn on your MAC.
② Insert the Utility CD in your CD-Rom and double click "iSeries iMap" icon.

Diagram 1
③ iMap "Device select" window pop-up, click the device button accordingly to launch the iMap™ software.

Diagram 2
Installing iMap™ Software for Windows
Please follow the procedures below step-by-step to install your iMap ^TM software.
① Turn on your PC.
② Insert the Utility CD in your CD-Rom After you have inserted the CD into your CD-Rom, an installation screen should appear as shown in diagram 1; click "iMap™ installation".
(Note: If the installation screen not appear automatically go to the CD folder and double click on "Setup")

Diagram 1
③ Setup Wizard appear Setup wizard appears, please click "Next"

Diagram 2
④ Choose Install Location Choose your preferred install location for iMap ^TM or use the default location and click "Next"

Diagram 3
⑤ Select shortcut Select the start menu folder in which you would like to create the iMap™ shortcut. Then click "Next"

Diagram 4
Installing iMap ^TM Software for Windows(continues)

⑥ Create a shortcut on your desktop
Please untick the box if you do not want to place a shortcut icon on your desktop for iMap™, otherwise click "Next"

Diagram 5
⑦ iMap ^TM started to install
The iMap ^TM installation has now started, wait for it to finish. Then click "Finish"

Diagram 6
⑧ Installation finished
Click "Finish" to complete the iMap ^TM software installation.

Diagram 7
Assigning MIDI functions with iMap ^TM
You can use iMap ^TM to assign the MIDI functions of your iDJ easily. Please launch the iMap ^TM software, a device selector screen will appear as shown in diagram 1. Then click the "iDJ" button.

Diagram 1

Note: If your iDJ is not connected to your Mac/PC, a message of "There are no MIDI input devices" will appear. Please connect iDJ to your Mac/PC with the provided USB cable.

Diagram 2
iMap ^TM iDJ software panel
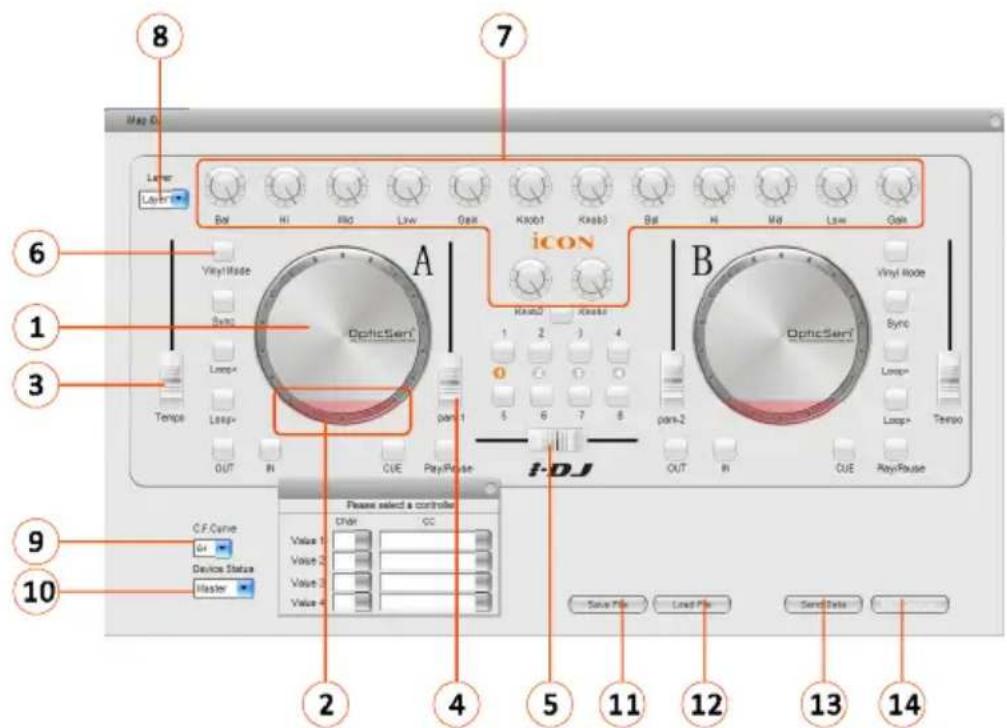
iMap ^TM iDJ software panel(continues)
① Assign the MIDI channel & CC number to the scratch wheel (A & B)
Select your desired MIDI channel (1-16) and CC number (0-127) in the pull-down menu for each scratch wheel. There are four values that you could set for each scratch wheel as below:
1) Value 1: Setting the midi data for rotating the scratch wheel (right or left direction) with "Vinyl Mode" button activated.
2) Value 2: Setting the midi data for rotating the scratch wheel (right or left direction)
3) Value 3: Setting the midi data for rotating the scratch wheel's rubber ring (right direction).
4) Value 4: Setting the midi data for rotating the scratch wheel's rubber ring (left direction).
② Assign the MIDI channel & CC number to the touch-sensitive element (scratch wheel A & B)
Select your desired MIDI channel (1-16) and CC number (0-127) in the pull-down menu for the touch sensitive element.
③ Assign the MIDI channel & CC number to the fader (Tempo)
Select your desired MIDI channel (1-16) and CC number (0-127) in the pull-down menu for the fader. There are two values that you can set for this fader as below:
1). Value 1 – Setting the midi data for sliding the fader.
2). Center – Setting the midi data for sliding past the center position of the fader.
④ Assign the MIDI channel & CC number to the fader (PGM1 & PGM 2)
Select your desired MIDI channel (1-16) and CC number (0-127) in the pull-down menu for the fader.
⑤ Assign the MIDI channel & CC number to the fader (crossfader)
Select your desired MIDI channel (1-16) and CC number (0-127) in the pull-down menu for the fader.
⑥ Assign the MIDI channels and CC number to the control buttons
There are 24-control buttons on iDJ you may assign. Select your desired MIDI channel (1-16) and CC number (0-127) for the control buttons.
⑦ Assign the MIDI channels and CC number to the knobs
There are 14 control knobs on iDJ you may assign. Select your desired MIDI channel (1-16) and CC number (0-127) for the knobs. There are two values that you can set for each knob as below:
1). Value 1 – Setting the midi data for rotating the knob.
2). Center – Setting the midi data for rotating past the center position of the knob.

iMap ^TM iDJ software panel(continues)
⑧ Select the 4 different layers and choose the desired settings for each layer. You may have 4 different “Layers” for different applications. Each “Layer” can have its own control settings.
⑨ Select the crossfader curve value
You may select the curve characteristic from 0 to 64 for the crossfader.

C.F. curve set to value "0"

C.F. curve set to value "64"

⑩ Set iDJ as a Master or Slave device
You may cascade your iDJ with other ICON's i-series controllers (refer to p.13 for details). Set the iDJ as "Master" device if used on its own. Set it to "Slave" if it is connect to another i-series controller.
⑪ "Save file" button
Click this button to save your current settings for the iDJ. The file is an ".icon" file.
⑫ "Load file" button
Click this button to load a previously saved ".icon" setting file for your iDJ.
⑬ "Send Data" button
Click this button to upload the iMap ^TM software settings to your iDJ via USB connection.
(Note: You must have connected your iDJ to your Mac/PC, otherwise the settings upload will not be successful.)
⑭ "MIDI Devices" button
Click this button, a MIDI device select window will appear as shown in diagram 1. Please select "ICON iDJ" for the MIDI Out Devices.

Diagram 1
Restore the factory default settings
By holding down the “C.F. Curve/Layer” more than 4sec., the settings of the iDJ will return to its factory default condition.
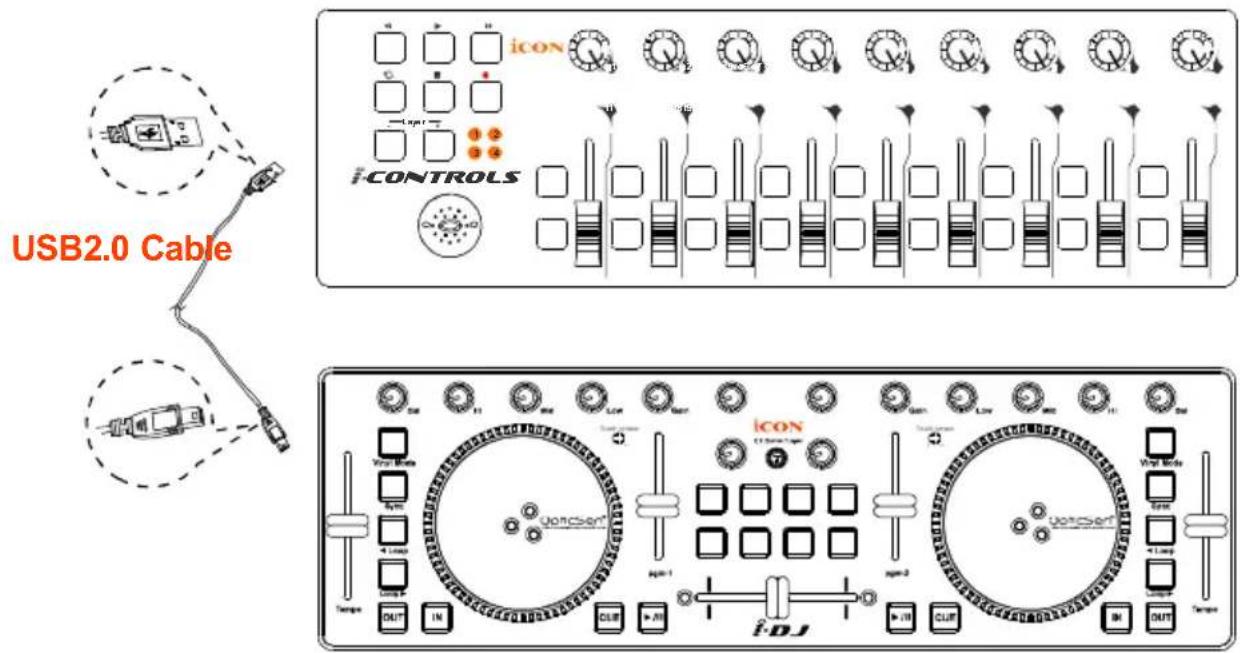
Daisy chain your iDJ to other i-series controllers
You may daisy chain your iDJ to other ICON i-series controllers such as iControls. iDJ would always come to the last of the chain.
① Connect the first unit of i-series controller such as iControls to your Mac/PC via the USB port
Choose a USB port on your Mac/PC and insert the wide (flat) end of the USB cable and the other small end (B-type USB pack) to iControls.

Connect to iDJ
Insert the wide (flat) end of the USB cable to the iControls's second USB port and the other small end (B-type USB jack) to the iDJ's USB port.
Specifications
Connector: To computer
USB connector (mini B type)
Power supply:
USB bus power
Current consumption:
100mA or less
Weight:
0.81kg (1.8lb)
Dimensions:
If your iDJ needs servicing, follow these instructions.
- Ensure the problem is not related to operation error or external system devices.

-
Keep this owner's manual. We don't need it to repair the unit.
-
Pack the unit in its original packaging including end card and box. This is very important. If you have lost the packaging, please make sure you have packed the unit properly. ICON is not responsible for any damage that occurs due to non-factory packing.
-
Ship to the ICON tech support center or the local return authorization.
U.S. OFFICE:
ICON Digital Corporation.
2222 Pleasant View Road,
Suite #1 Middleton,
WI 53562
Tel: 608-829-3450 Fax: 608-829-1972
infous@icon-global.com
ASIA OFFICE:
ICON International Digital Limited
Suite Nos. 7-10,
8th Floor, Sunley Centre,
No.9 Wing Yin Street,
Kwai Chun. N.T.
Hong Kong
Tel: 852-2398-2286 Fax: 852-2789-3947
infoasia@icon-global.com
For additional update information please visit our website at:
www.icon-global.com
iCON®
www.icon-global.com
info@icon-global.com


- Important Safety Instructions
- Contents
- Introduction
- Getting Started
- What's in the package?
- Features
- Main features include:
- Front Panel Layout
- ⑨ Crossfader
- ⑩ C.F.Curve / Layer button
- Adjust the crossfader curve
- Switching between the 4 layers
- Restore iDJ to factory default
- ⑪ User defined buttons
- Side Panel Layout
- ① USB port (B-Type)
- Connecting your iDJ controller
- ① Connect the iDJ to your Mac/PC via the USB port
- ② Setup your DJ software
- ③ Import the preset template for the DJ software
- Installing iMap TM Software for MAC OSX
- Installing iMap™ Software for Windows
- Installing iMap TM Software for Windows(continues)
- ⑥ Create a shortcut on your desktop
- ⑦ iMap TM started to install
- ⑧ Installation finished
- Assigning MIDI functions with iMap TM
- iMap TM iDJ software panel
- iMap TM iDJ software panel(continues)
- ① Assign the MIDI channel & CC number to the scratch wheel (A & B)
- ② Assign the MIDI channel & CC number to the touch-sensitive element (scratch wheel A & B)
- ③ Assign the MIDI channel & CC number to the fader (Tempo)
- ④ Assign the MIDI channel & CC number to the fader (PGM1 & PGM 2)
- ⑤ Assign the MIDI channel & CC number to the fader (crossfader)
- ⑥ Assign the MIDI channels and CC number to the control buttons
- ⑦ Assign the MIDI channels and CC number to the knobs
- Restore the factory default settings
- Daisy chain your iDJ to other i-series controllers
- Connect to iDJ
- Specifications
- iCON®
Brand : icon
Model : iDJ
Category : DJ Equipment