
JamMan Stereo - Uncategorized DIGITECH - Free user manual and instructions
Find the device manual for free JamMan Stereo DIGITECH in PDF.


| Brand | Digitech |
| Model | JamMan Stereo |
| Product Type | Stereo Looper Pedal |
| Dimensions | 12.2 x 8.1 x 3.5 inches (approx) |
| Weight | 2.2 lbs (approx) |
| Power Supply | 9V DC, 600mA (center negative) |
| Memory Capacity | Up to 4 hours of loop time (via SD card) |
| Number of Loops | Up to 99 loops |
| Sampling Rate | 44.1 kHz, 16-bit |
| Frequency Response | 20 Hz - 20 kHz |
| Inputs | 2 x 1/4" instrument (L/Mono, R), 1 x 1/8" aux in |
| Outputs | 2 x 1/4" (L, R), 1 x 1/8" headphone |
| Controls | Footswitch, rotary knobs for volume, mix, loop level |
| Main Functions | Loop record, overdub, play, stop, undo, erase, and reverse |
| Storage Media | SD/SDHC card (up to 32 GB) |
| Additional Features | Built-in rhythms, drum patterns, USB for backup |
| LED Indicators | Power, loop status, level |
| Construction | Metal chassis |
| Maintenance | Wipe with dry cloth; keep away from liquids |
| Safety | Use only specified power adapter; avoid extreme temperatures |
| Spare Parts & Repairability | Contact Digitech support; no user-serviceable parts |
| General Information | Professional stereo looper for guitarists and performers |
Frequently Asked Questions - JamMan Stereo DIGITECH
User questions about JamMan Stereo DIGITECH
0 question about this device. Answer the ones you know or ask your own.
Ask a new question about this device
Download the instructions for your Uncategorized in PDF format for free! Find your manual JamMan Stereo - DIGITECH and take your electronic device back in hand. On this page are published all the documents necessary for the use of your device. JamMan Stereo by DIGITECH.
USER MANUAL JamMan Stereo DIGITECH
IMPORTANT SAFETY INFORMATION
text_image
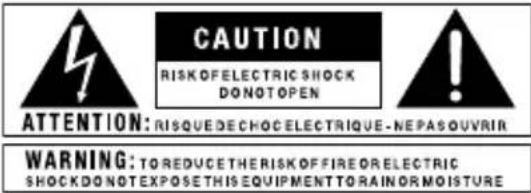
CAUTION RISK OF ELECTRIC SHOCK DONOTOPEN ATTENTION: RISQUE DE CHOCELECTRIQUE - NEPASOUVRIR WARNING: TO REDUCETHERISK OFF FIRE ORELECTRIC SHOCK DO NOT EXPOSE THIS EQUIPMENT TO RAIN OR MOISTUREThe symbols shown above are internationally accepted symbols that warn of potential hazards with electrical products. The lightning flash with arrowpoint in an equilateral triangle means that there are dangerous voltages present within the unit. The exclamation point in an equilateral triangle indicates that it is necessary for the user to refer to the owner's manual.
These symbols warn that there are no user serviceable parts inside the unit. Do not open the unit. Do not attempt to service the unit yourself. Refer all servicing to qualified personnel. Opening the chassis for any reason will void the manufacturer's warranty. Do not get the unit wet. If liquid is spilled on the unit, shut it off immediately and take it to a dealer for service. Disconnect the unit during storms to prevent damage.
SAFETY INSTRUCTIONS
NOTICE FOR CUSTOMERS IF YOUR UNIT IS EQUIPPED WITH A POWER CORD.
WARNING: THIS APPLIANCE SHALL BE CONNECTED TO A MAINS SOCKET OUTLET WITH A PROTECTIVE EARTHING CONNECTION.
The cores in the mains lead are coloured in accordance with the following code:
GREEN and YELLOW - Earth BLUE - Neutral BROWN - Live
As colours of the cores in the mains lead of this appliance may not correspond with the coloured markings identifying the terminals in your plug, proceed as follows:
- The core which is coloured green and yellow must be connected to the terminal in the plug marked with the letter E, or with the earth symbol, or coloured green, or green and yellow.
- The core which is coloured blue must be connected to the terminal marked N or coloured black.
- The core which is coloured brown must be connected to the terminal marked L or coloured red.
This equipment may require the use of a different line cord, attachment plug, or both, depending on the available power source at installation. If the attachment plug needs to be changed, refer servicing to qualified service personnel who should refer to the table below. The green/yellow wire shall be connected directly to the units chassis.
| CONDUCTOR | WIRE COLOR | |
| Normal Alt | ||
| L LIVE BROWN BLACK | ||
| N NEUTRAL BLUE WHITE | ||
| E EARTH GND | GREEN/YEL | GREEN |
WARNING: If the ground is defeated, certain fault conditions in the unit or in the system to which it is connected can result in full line voltage between chassis and earth ground. Severe injury or death can then result if the chassis and earth ground are touched simultaneously.
WARNING FOR YOUR PROTECTION READ THE FOLLOWING:
KEEP THESE INSTRUCTIONS
HEED ALL WARNINGS
FOLLOW ALL INSTRUCTIONS
THE APPARATUS SHALL NOT BE EXPOSED TO DRIPPING OR SPLASHING LIQUID AND NO OBJECT FILLED WITH LIQUID, SUCH AS VASES, SHALL BE PLACED ON THE APPARATUS
CLEAN ONLY WITH A DRY CLOTH.
DO NOT BLOCK ANY OF THE VENTILATION OPENINGS. INSTALL IN ACCORDANCE WITH THE MANUFACTURER'S INSTRUCTIONS.
DO NOT INSTALL NEAR ANY HEAT SOURCES SUCH AS RADIATORS, HEAT REGISTERS, STOVES, OR OTHER APPARATUS (INCLUDING AMPLIFIERS) THAT PRODUCE HEAT.
ONLY USE ATTACHMENTS/ACCESSORIES SPECIFIED BY THE MANUFACTURER.
UNPLUG THIS APPARATUS DURING LIGHTNING STORMS OR WHEN UNUSED FOR LONG PERIODS OF TIME.
Do not defeat the safety purpose of the polarized or grounding-type plug. A polarized plug has two blades with one wider than the other. A grounding type plug has two blades and a third grounding prong. The wide blade or third prong are provided for your safety. If the provided plug does not fit your outlet, consult an electrician for replacement of the obsolete outlet.
Protect the power cord from being walked on or pinched particularly at plugs, convenience receptacles, and the point where they exit from the apparatus.
Refer all servicing to qualified service personnel. Servicing is required when the apparatus has been damaged in any way, such as power-supply cord or plug is damaged, liquid has been spilled or objects have fallen into the apparatus, the apparatus has been exposed to rain or moisture, does not operate normally, or has been dropped.
MAINS DISCONNECT: The plug shall remain readily operable. For rack-mount or installation where plug is not accessible, an all-pole mains switch with a contact separation of at least 3 mm in each pole shall be incorporated into the electrical installation of the rack or building.
IMPORTANT SAFETY INFORMATION
ELECTROMAGNETIC COMPATIBILITY
This device complies with part 15 of the FCC Rules and the Product Specifications noted on the Declaration of
Conformity. Operation is subject to the following two conditions:
- this device may not cause harmful interference, and
- this device must accept any interference received, including interference that may cause undesired operation.
Operation of this unit within significant electromagnetic fields should be avoided.
• use only shielded interconnecting cables.
U.K. MAINS PLUG WARNING
A molded mains plug that has been cut off from the cord is unsafe. Discard the mains plug at a suitable disposal facility. NEVER UNDER ANY CIRCUMSTANCES SHOULD YOU INSERT A DAMAGED OR CUT MAINS PLUG INTO A 13 AMP POWER SOCKET.
Do not use the mains plug without the fuse cover in place. Replacement fuse covers can be obtained from your local retailer. Replacement fuses are 13 amps and MUST be ASTA approved to BS1362.

If you want to dispose this product, do not mix it with general household waste. There is a separate collection system for used electronic products in accordance with legislation that requires proper treatment, recovery and recycling.
Private household in the 25 member states of the EU, in Switzerland and Norway may return their used electronic products free of charge to designated collection facilities or to a retailer (if you purchase a similar new one).
For Countries not mentioned above, please contact your local authorities for a correct method of disposal. By doing so you will ensure that your disposed product undergoes the necessary treatment, recovery and recycling and thus prevent potential negative effects on the environment and human health.
DECLARATION OF CONFORMITY
Manufacturer's Name: Harman Music Group
Manufacturer's Address: 8760 S. Sandy Parkway Sandy, Utah 84070, USA
declares that the product:
Product name: JamMan Stereo
Product option: all (requires Class II power adapter that conforms to the requirements of EN60065, EN60742, or equivalent.)
conforms to the following Product Specifications:
Safety: IEC 60065-01+Amd 1
EMC: EN 55022:2006
FCC Part 15
EN
55024:1998
Supplementary Information:
The product herewith complies with the requirements of the:
Low Voltage Directive 2006/95/EC
EMC Directive 2004/108/EC.
RoHS Directive 2002/95/EC
WEEE Directive 2002/96/EC
EC Regulation 278/2009
With regard to Directive 2005/32/EC and EC Regulation
1275/2008 of 17 December 2008, this product is designed, produced, and classified as Professional Audio Equipment and thus is exempt from this Directive.
Director, Engineering
Signal Processing
8760 S. Sandy Parkway
Sandy, Utah 84070, USA
Date: April 28, 2011
European Contact: Your local DigiTech Sales and Service Office or
Harman Music Group
8760 South Sandy Parkway
Sandy, Utah
84070 USA
Ph: (801) 566-8800
Fax: (801) 568-7583
Warranty
We at DigiTech® are very proud of our products and back up each one we sell with the following warranty:
I. The warranty registration card must be mailed within ten days after purchase date to validate this warranty, or you can register via our website (www.digitech.com).
-
DigiTech warrants this product, when used solely within the U.S., to be free from defects in materials and workmanship under normal use and service.
-
DigiTech liability under this warranty is limited to repairing or replacing defective materials that show evidence of defect, provided the product is returned to DigiTech WITH RETURN AUTHORIZATION, where all parts and labor will be covered up to a period of one year (this warranty is extended to a period of six years when the product has been properly registered by mail or through our website). A Return Authorization number may be obtained from DigiTech by telephone. The company shall not be liable for any consequential damage as a result of the product's use in any circuit or assembly.
-
Proof-of-purchase is considered to be the burden of the consumer.
-
DigiTech reserves the right to make changes in design, or make additions to, or improvements upon this product without incurring any obligation to install the same on products previously manufactured.
-
The consumer forfeits the benefits of this warranty if the product's main assembly is opened and tampered with by anyone other than a certified DigiTech technician or, if the product is used with AC voltages outside of the range suggested by the manufacturer.
-
The foregoing is in lieu of all other warranties, expressed or implied, and DigiTech neither assumes nor authorizes any person to assume any obligation or liability in connection with the sale of this product. In no event shall DigiTech or its dealers be liable for special or consequential damages or from any delay in the performance of this warranty due to causes beyond their control.
NOTE: The information contained in this manual is subject to change at any time without notification. Some information contained in this manual may also be inaccurate due to undocumented changes in the product or operating system since this version of the manual was completed. The information contained in this version of the owner's manual supersedes all previous versions.
Table of Contents
Overview....3
Quick Start 4
Guided Tour - Front Panel....10
Guided Tour - Rear Panel....16
Making Connections ....19
Selecting a Loop....22
Recording a Loop - Inst/Mic Input 24
Auto Record Mode....26
Recording a Loop Using Auto Record....28
Recording Overdubs 30
Undo, Redo, and Clear 32
Undo an Overdub....32
Redo an Overdub 32
Clear Overdubs/Unstored Phrases ....32
Recording a Loop - Aux Input 34
Stop Modes 36
Using Auto-Quantizing Looping 37
Storing/Copying Phrases 38
Store Changes to a Loop....38
Copy a Loop to a Different Memory Location....38
Time Signature....40
Setting a Loop Tempo for Recording 42
Time Stretching a Loop 44
Time Stretch a Loop that is Stopped....44
Time Stretch a Loop that is Playing....44
Loop / Single Phrases......46
Rhythm Type 48
Rhythm Out 49
Deleting Individual Loop Phrases....50
Erase All Loops - Internal Memory ....52
Using Optional SD/SDHC Memory Cards ....54
Formatting SD Cards 55
Unformatted Cards....55
Erase All Loops - Memory Card ....56
Specifications....61
Overview
Congratulations and special thanks from DigiTech® for choosing the DigiTech JamMan® Stereo Looper/Phrase Sampler.
The JamMan Stereo Looper can store 35 minutes of CD-quality loops in 99 internal memories and has an SD memory card expansion slot so you can store over 16 hours of material in an additional 99 slots. The JamMan Stereo features true stereo looping, reverse playback, and a mic input making it perfect for backing tracks or DJ applications.
The JamMan Stereo features USB connectivity and will sync to DigiTech's free JamManager™ software that organizes and saves your JamMan Stereo's loops to a PC or Mac. The JamManager also lets you quickly create custom JamLists to take to your gig.
Features:
• Store over 35 minutes of stereo, CD-Quality loops in 99 internal memories
- Optional SDHC card can store over 16 hours* of CD-quality audio in 99 additional memories (198 total memories)
- Reverse Playback
- Downloadable JamManager™ librarian for PC and Mac archives and organizes your loops over USB.
• Auto Quantized looping
• Aux Input lets you import music from CD and MP3 players
• 3 Stop modes (Stop, Finish, and Fade)
• Time Stretching lets you slow down or speed up loops without changing pitch
• Balanced XLR mic input with dedicated gain control is perfect for dynamic and self-powered microphones
• Metronome with multiple rhythm sounds and time signatures
• Automatic recording
- Optional footswitch adds additional Hands-Free™ functionality
Quick Start
I. Get Connected
text_image
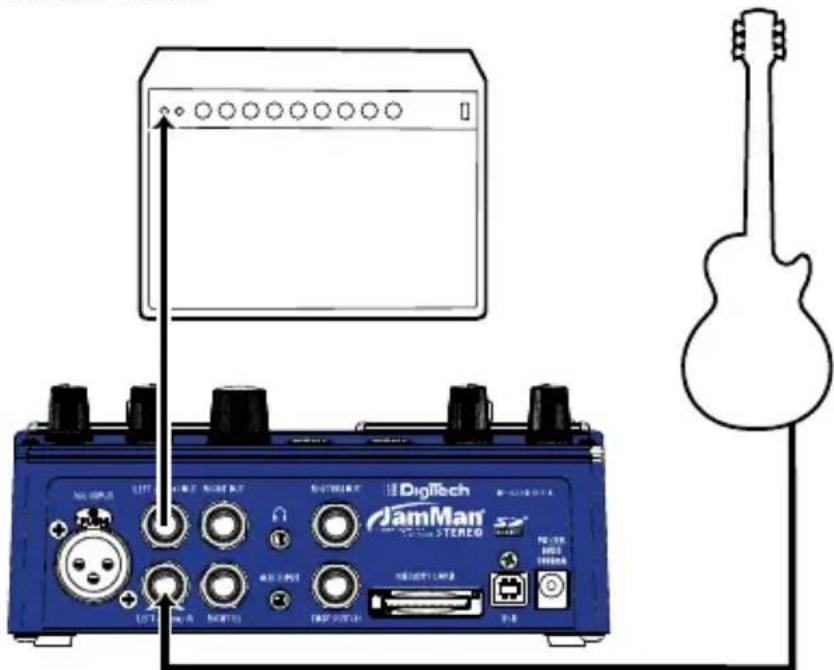
Diagram showing connections between a digital audio testing device and a guitar silhouette, with labeled ports and control buttons.Before powering up your JamMan® Stereo:
a. Make Connections
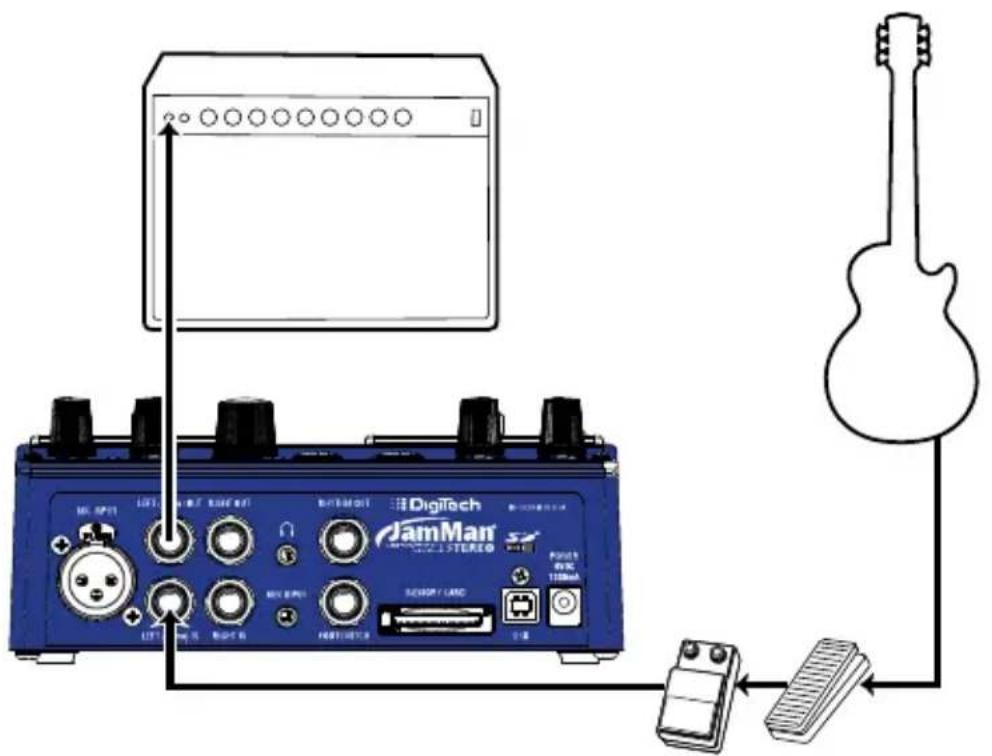
I. Connect a guitar or bass to the LEFT (Mono) IN jack on the JamMan Stereo's rear panel.
- Connect the JamMan Stereo's LEFT (Mono) OUT to the input of an amplifier or a channel of a mixer.
b. Connect the Power Supply
I. Start with your amplifier and the JamMan turned off or the mixer faders at their minimum position.
-
Turn the LOOP LEVEL, RHYTHM LEVEL, MIC LEVEL, and INST LEVEL knobs all the way down on the JamMan Stereo.
-
Connect the power supply to the POWER jack on the JamMan Stereo.
-
Connect the other end of the power supply to an AC outlet.
-
Turn your amplifier on and turn up its volume to a normal playing level or bring up the mixer's faders to a nominal level.
Quick Start
2. Select an Empty Loop
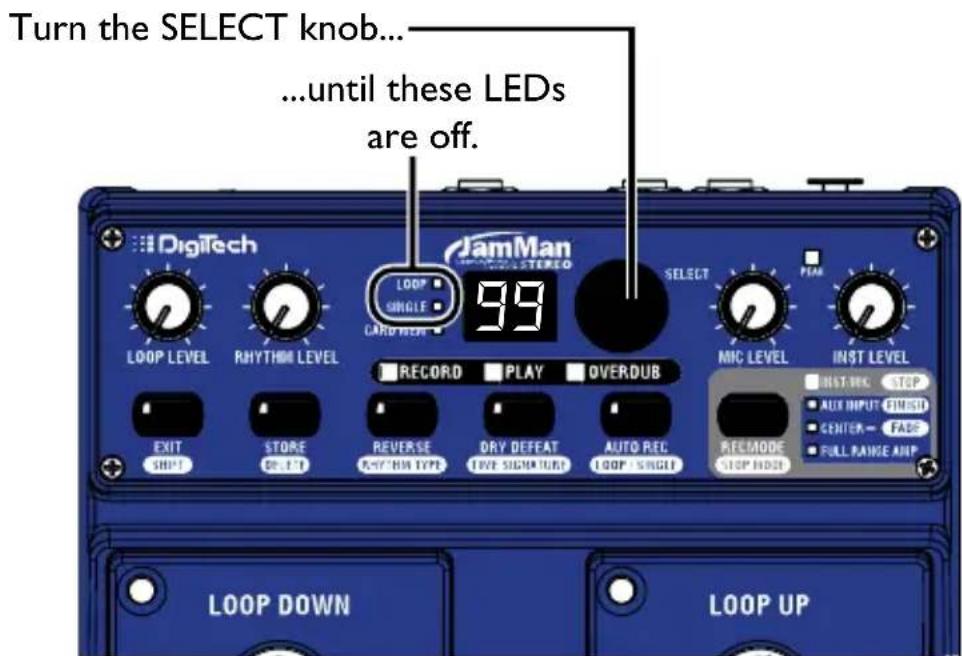
Rotate the SELECT knob or use the LOOP UP/LOOP DOWN footswitches until the LOOP LED and the SINGLE LED are off.
text_image
Turn the SELECT knob... ...until these LEDs are off. Loop LEVEL RHYTHM LEVEL JamMan 99 LOOP SINGLE CARD VIEW SELECT PLAN RECORD PLAY OVERDUB MIC LEVEL INST LEVEL EXIT SHIFT STORE SELECT REVERSE RHYTHM TYPE DRY DEFEAT LIVE SIGNATURE AUTO REC LOOP / SINGLE RECMODE STOP NODE LOOP DOWN LOOP UP3. Select the Record Mode
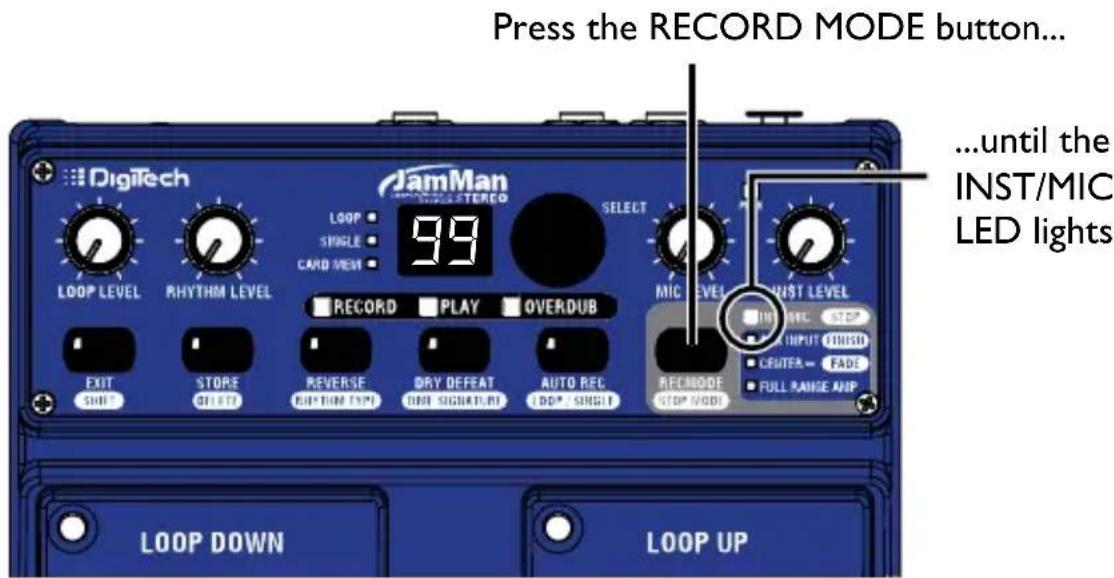
Press the REC MODE button repeatedly until the INST/MIC LED lights.
text_image
Press the RECORD MODE button... ...until the INST/MIC LED lights JimMan DIGITech LOOP LEVEL RHYTHM LEVEL LOOP SINGLE CARD VIEW 99 SELECT RECORD PLAY OVERDUB MIC LEVEL FIRST LEVEL EXIT SHUT STORE DELETT REVERSE RHYTHM EQUITY DRY DEFEAT ONI SIGNATURE AUTO REC DDP SINGIT REEMODE STOP MODE LOOP DOWN LOOP UPQuick Start
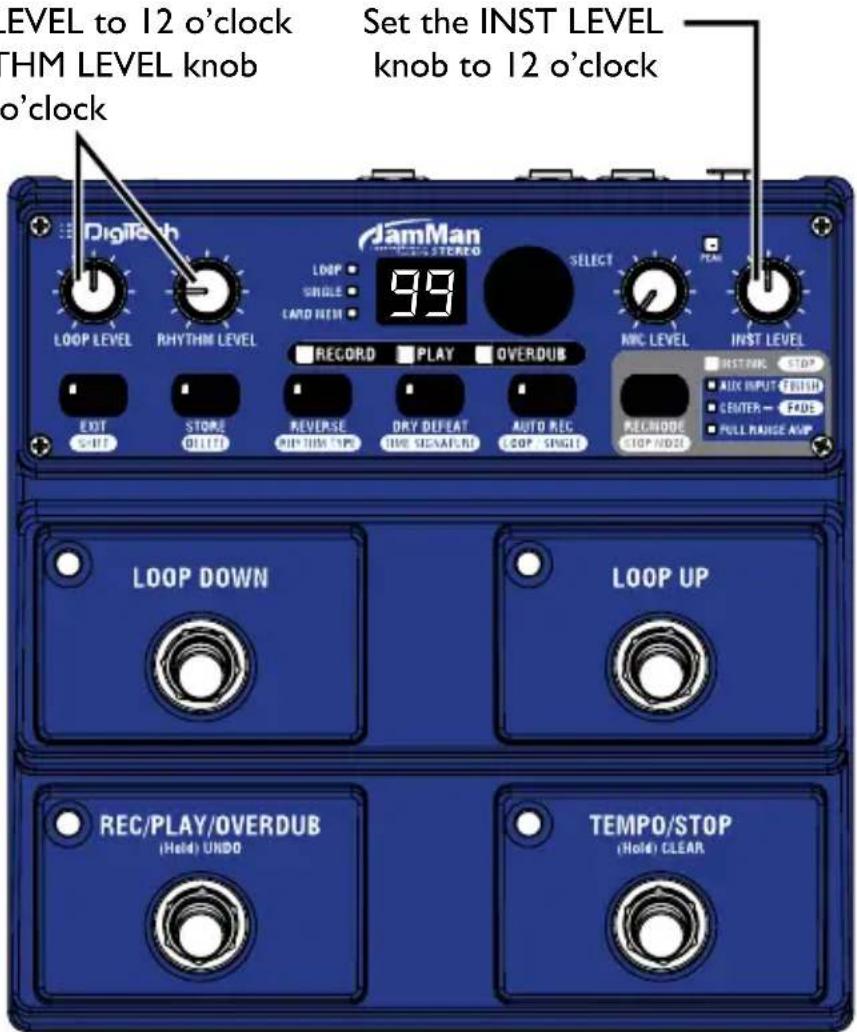
4. Adjust the Recording Level
Set the INST LEVEL and LOOP LEVEL knobs to 12 o'clock. Set the RHYTHM LEVEL knob to the 9 o'clock position.
Set the LOOP LEVEL to 12 o'clock and the RHYTHM LEVEL knob to 9 o'clock
Set the INST LEVEL knob to 12 o'clock
text_image
LEVEL to 12 o'clock THM LEVEL knob o'clock Set the INST LEVEL knob to 12 o'clock Digital JamMan LOOP LEVEL RHYTHM LEVEL SELECT 99 LOOP SINGLE LAND HATH RECORD PLAY OVERDUB NMC LEVEL INST LEVEL EXIT START DELETE REVERSE RHYTHM TYPE DRY DEFEAT LINE SIGNATURE AUTO REC LOOP SINGLE RECHODE STOP NODE INST NAME STOP AUX INPUT FINISH CENTER = FADD FULL RANGE AVP LOOP DOWN LOOP UP REC/PLAY/OVERDUB (Hold) UNDO TEMPO/STOP (Hold) CLEARQuick Start
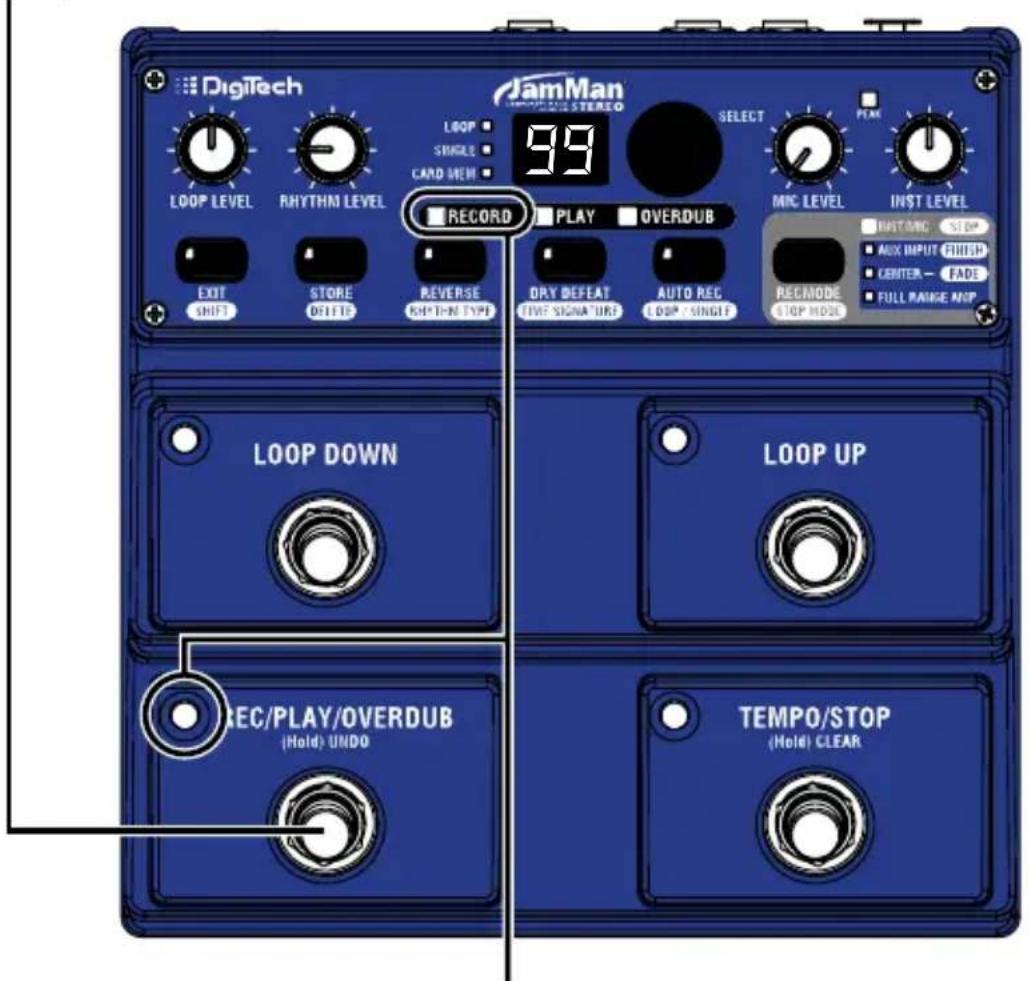
5. Start Recording
Press the REC/PLAY/OVERDUB (lower left) footswitch to start recording. While recording, the REC/PLAY/OVERDUB footswitch and RECORD LEDs will light red.
Press the REC/PLAY/OVERDUB
(lower left) footswitch.
text_image
Digitech JamMan LOOP LEVEL RHYTHN LEVEL LOOP SINGLE CARD MEIN 99 RECORD PLAY OVERDUB SELECT PEAR MIC LEVEL INST LEVEL EXIT SHIFT STORE OUTDO REVERSE RHYTHN TYPE DRY DEFEAT TIVE SIGNATURE AUTO REC LOOP SINGIT REEMODE STOP MODE LOOP DOWN LOOP UP REC/PLAY/OVERDUB (Hold) UNDO TEMPO/STOP (Hold) CLEARWhile recording, the RECORD and REC/PLAY/OVERDUB LEDs light solid red.
Quick Start
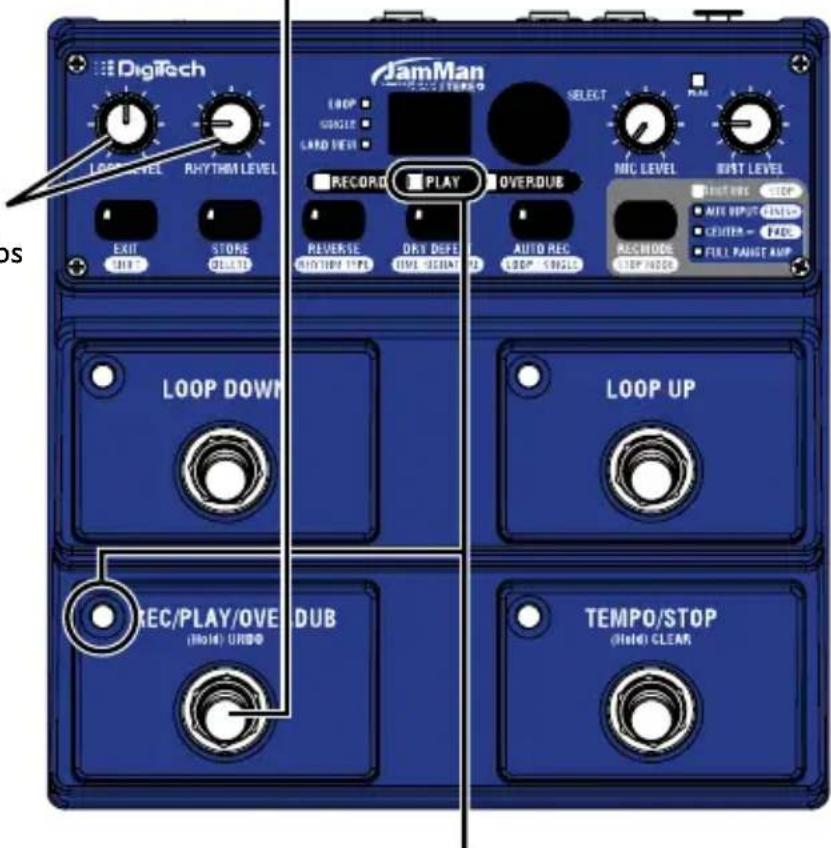
6. Start Loop Playback
Press the REC/PLAY/OVERDUB (lower left) footswitch while recording to set the loop point and start playing back from the beginning. The REC/PLAY/OVERDUB footswitch and PLAY LEDs light green. Adjust the LOOP LEVEL and RHYTHM LEVEL knobs as needed.
Press the REC/PLAY/OVERDUB (lower left) footswitch while recording to stop recording and start playback.
Adjust the LOOP LEVEL and RHYTHM LEVEL knobs as necessary.
text_image
Digitech LOOP LEVEL RHYTHM LEVEL EXIT STORE DELETE JAMMan LOGIC STRAW LOOP SINGLE LAND VIEW RECORD PLAY OVERDUB REVERSE DRY DEF RHYTHM TYPE TIME SEANT AUTO REC LOOP SINGLE MIC LEVEL FIRST LEVEL RIGHT REC STOP AVG OUTPUT CENTER CENTER - FADD FULL RANGE AMP LOOP DOWN LOOP UP REC/PLAY/OVE DUB (Hold) URO® TEMPO/STOP (Hold) CLEARDuring playback, the PLAY and REC/PLAY/OVERDUB LEDs light solid green.
Quick Start
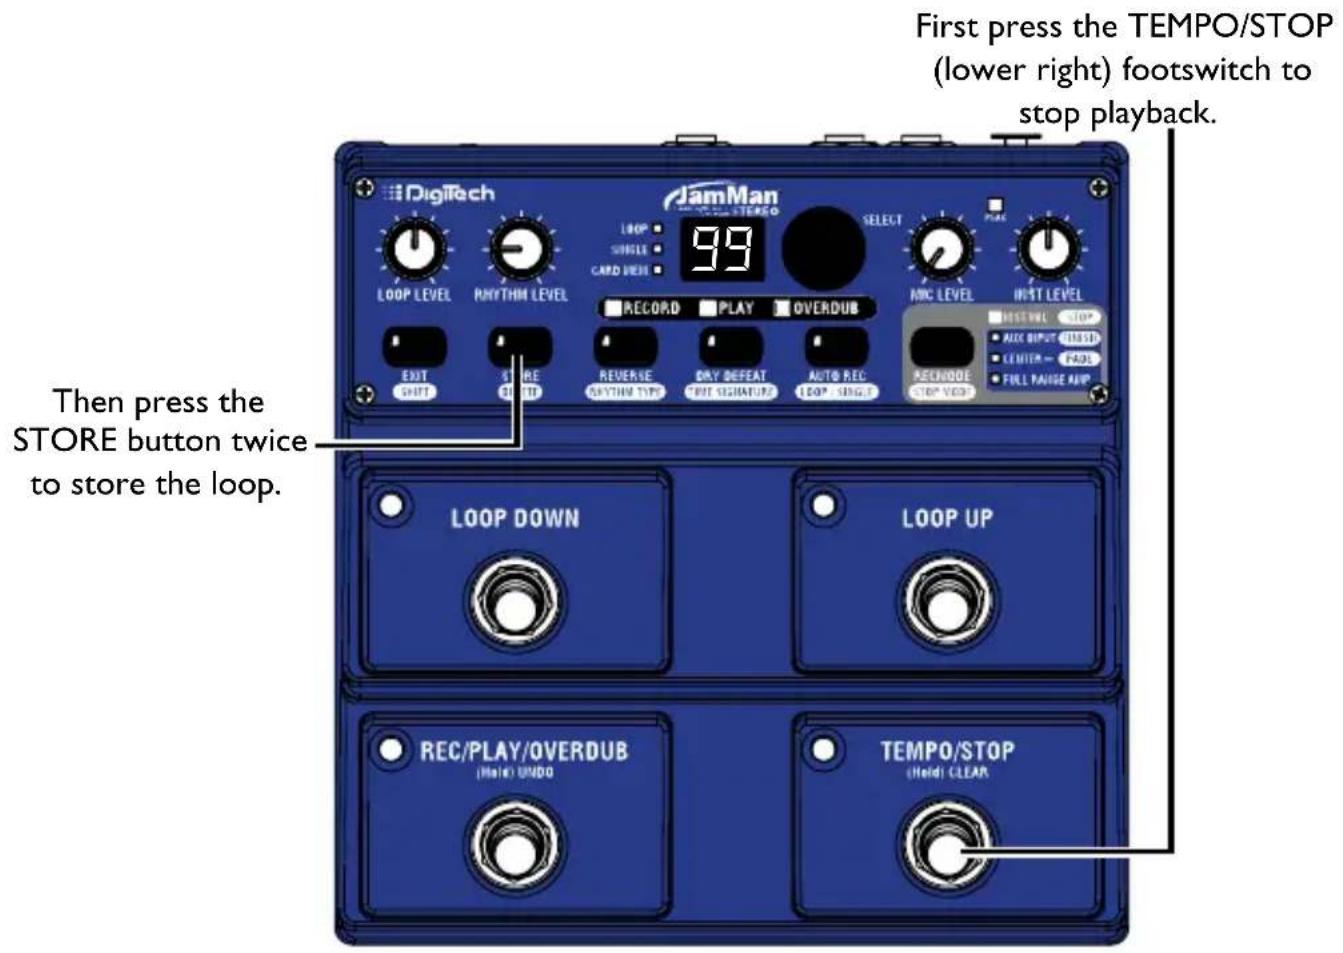
7. Stop Playback/Store the Loop
Press the TEMPO/STOP (lower right) footswitch to stop playback, then press the STORE button twice to store the loop.
text_image
First press the TEMPO/STOP (lower right) footswitch to stop playback. Then press the STORE button twice to store the loop. JamMan DIGITech LOOP LEVEL RHYTHM LEVEL LOOP SINGLE CARD VESH 99 SELECT MIC LEVEL INST LEVEL LOOP DOWN LOOP UP REC/PLAY/OVERDUB (Hole) UNDO TEMPO/STOP (Hold) CLEARGuided Tour - Front Panel
text_image
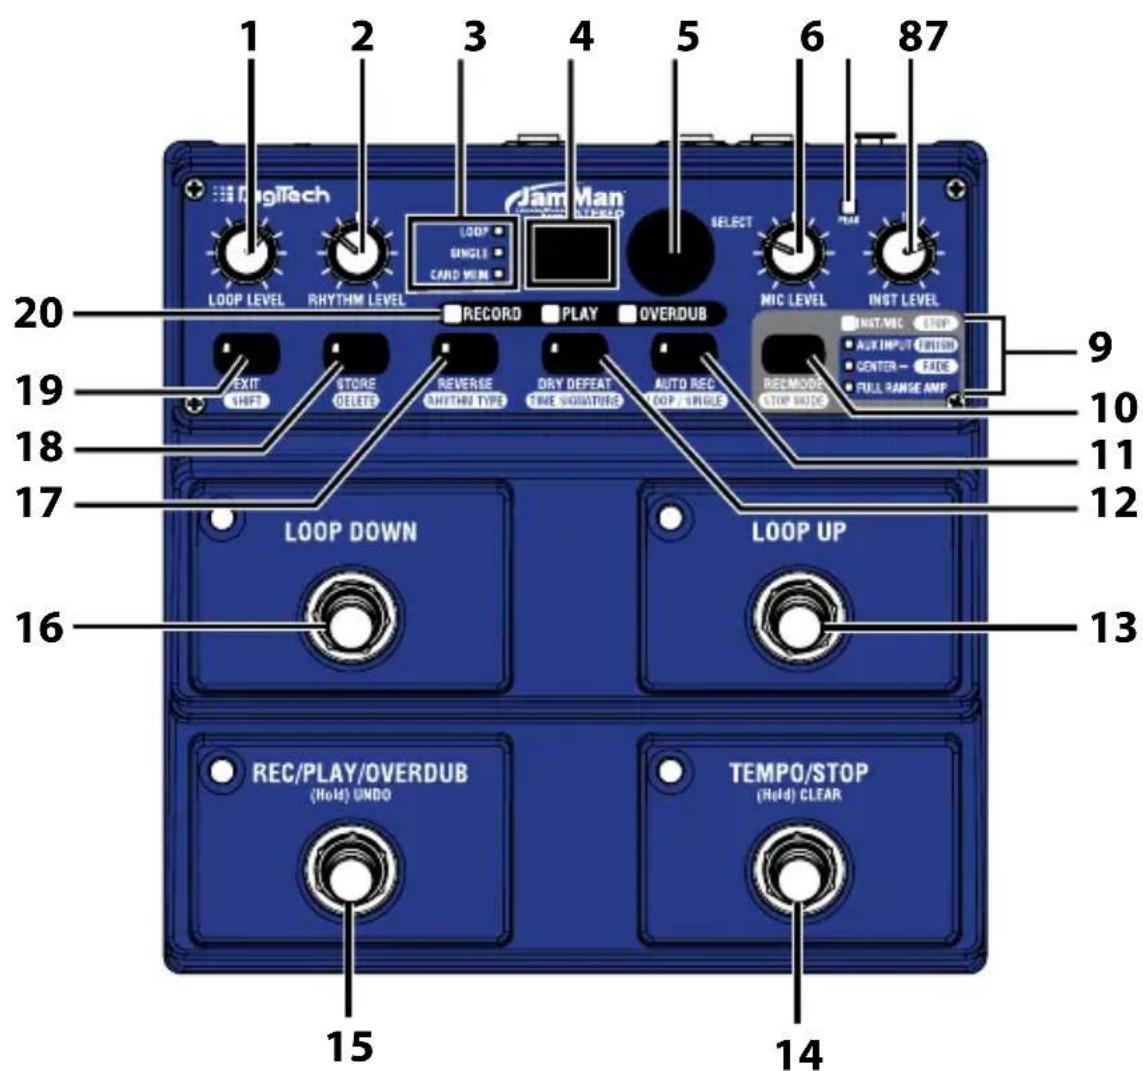
1 2 3 4 5 6 87 20 Loop Level RHYTHM LEVEL LOOP SINGLE CARD MIN Jam Man LOOP LOOP RECORD PLAY OVERDUB SELECT NIC LEVEL INST LEVEL EXIT NHD STORE DELETE REVERSE RHYTHM TYPE DRY DEEAT TIME SIGNATURE AUTO REC LOOP / SINGLE RECMODE STOP MODE 9 AUTY INPUT FLASH CENTER - FACE FULL RANGE AMP 10 11 12 13 15 16 LOOP DOWN LOOP UP REC/PLAY/OVERDUB (Hold) UNDO TEMPO/STOP (Hold) CLEARI. Loop Level
Controls the playback level of the loop phrase.
2 Rhythm Level
Controls the level of the Rhythm guide track.
3. Loop/Single/Card Mem LEDs
LoopLED
This green LED indicates the current phrase memory is set to playback continuously as a loop when play is initiated. Loop is the default setting when a phrase is recorded meaning any audio that is
Guided Tour - Front Panel
recorded will be recorded as a loop phrase. Loop phrases can be converted to Single phrases and vice versa. The Loop LED will also flash during processes where the internal memory or optional SD memory is being accessed (loading a loop, Time Stretching, or store/ copy procedure).
Single
This yellow LED indicates the current phrase memory is set to playback only once when play is initiated. Single phrases can be converted to Loop phrases and vice versa. The Single LED will also flash during processes where the internal memory or optional SD memory is being accessed (loading a loop, Time Stretching, or store/ copy procedure).
Card Mem
This red LED is lit when you are selecting loop memories on the optional SD/SDHC memory card. When this LED is off, loops are being selected from the JamMan® Stereo's internal memory.
4. Display
The Display shows the currently selected loop memory location. It also shows information during store/copy procedures, during Time Signature and Rhythm Type setup, file deletion, and card formatting procedures.
5. Select Knob
The Loop Select knob is used for selecting different loop memories and making selections when in other modes (such as Time Signature and Rhythm Type).
Guided Tour - Front Panel
6. Mic Level Knob
This knob controls the input signal level from the XLR Mic Input jack.
7. Peak LED
This LED lights when Instrument, Mic, or Aux Input signals are detected by the JamMan® Stereo. This LED will light green when a signal is present, yellow when approaching the A/D clipping point, and red when clipping is present.
A good practice is to set the Inst Level and Loop Level controls at the 12 o'clock position when using an electric guitar or bass. This provides a unity gain signal through the JamMan Stereo when connected to your amplifier.
For all other uses, set the Input Level controls so the green and yellow LEDs light regularly but rarely lights the red LED. If the Aux Input is being used, adjust the output level of the audio source to set the input level appropriately.
8. Instrument Level Knob
This knob controls the input signal level from the Left (Mono) and Right Input jacks.
9. Record Mode/Stop Mode LEDs
Inst/Mic (Stop) LED
This LED indicates the Instrument/Mic inputs are selected for recording. When the Shift button is enabled, this LED will light when the “Stop” stop mode is selected for the Loop (see page 36).
Guided Tour - Front Panel
Aux Input (Finish) LED
This LED indicates the Aux Input is selected for recording (see page 34). When the Shift button is enabled, this LED will light when the “Finish” stop mode is selected for the Loop.
Center – (Fade) LED
This LED lights when the Aux Input is selected for recording with the Center – (center minus) option applied (see page 34). When the Shift button is enabled, this LED will light when the “Fade” stop mode is selected for the Loop.
Full Range Amp LED
This LED lights when the Aux Input is selected for recording. The program material will be recorded with an equalization curve so that when it is played through a guitar amp it will more closely retain its original frequency response (see page 34).
10. Record Mode (Stop Mode) Button
Press this button to select the inputs that are to be recorded: Inst/Mic or Aux Input with options of “Center Minus” and/or Full Range Amp (indicated by the LEDs next to the button).
Press this button while the Shift button is lit to select one of three Stop Modes: Stop, Finish, or Fade, indicated by the LEDs next to the button (see page 36).
II. Auto Record (Loop/Single) Button
Press this button to enable Auto Record for all empty loop memories. When Auto Record is enabled, you can arm the JamMan® Stereo to record but recording only starts when you begin playing (see page 26).
Guided Tour - Front Panel
Press this button while the Shift button is lit to change the playback status of a recorded phrase. When the Loop LED is lit the phrase will play back in an endless loop. When the Single LED is lit, the phrase will play once and stop.
12. Dry Defeat (Time Signature) Button
Press and hold this button to defeat dry signal through the JamMan® Stereo. Dry Defeat should be used when connecting to parallel effects loops of amps that have them or when the JamMan is used in an Aux Send of a mixer.
Press this button while the Shift button is lit to change the Time Signature (see page 40). Note that Time Signature can only be changed for a memory location that has no phrase recorded in it.
13. Loop Up Footswitch
This footswitch selects the next higher loop memory. Press and hold this footswitch to scroll quickly through internal and optional SD card memories.
14. Tempo/Stop (Hold) Clear Footswitch
This footswitch Stops recording, playback and overdubbing of the phrase. It is also used to set the tempo before recording a loop or for changing the tempo of a stored loop. Press and hold this footswitch for two seconds to clear any audio in a loop that has not been stored. Pressing and holding this footswitch can also restore the stored tempo if it has been changed.
15. Rec/Play/Overdub (Hold) Undo Footswitch
This footswitch is used for recording, playing, and overdubbing loops. Pressing and holding this footswitch for two seconds will undo or redo the last overdub.
Guided Tour - Front Panel
16. Loop Down Footswitch
This footswitch selects the next lower loop memory. Press and hold this footswitch to scroll quickly through internal and optional SD card memories.
17. Reverse (Rhythm Type) Button
Press this button to make the recorded loop phrase play back in reverse.
Press this button while the Shift button is lit to change the Rhythm Type. Turn the Loop Select knob to change the active rhythm guide track. You can hear the different rhythm types as they are selected only if Rhythm Level is turned up and a loop is playing or when a tempo is being set in an empty phrase memory (see page 48).
18. Store (Delete) Button
Press to store/copy changes made to a memory location. This button will light when a change has been made indicating the change must be stored for later recall. Changes that are not stored will be lost when a different loop is selected or the JamMan® Stereo is turned off. Press this button while the Shift button is lit to delete the contents of the current memory location (see page 50).
19. Exit (Shift) Button
Press this button to exit procedures like Store and Delete or to enable and disable the secondary Shift button functions. Shift is active when this button is lit.
20. Record/Play/Overdub Status LEDs
Indicates which function is active during performance.
Guided Tour - Rear Panel
text_image
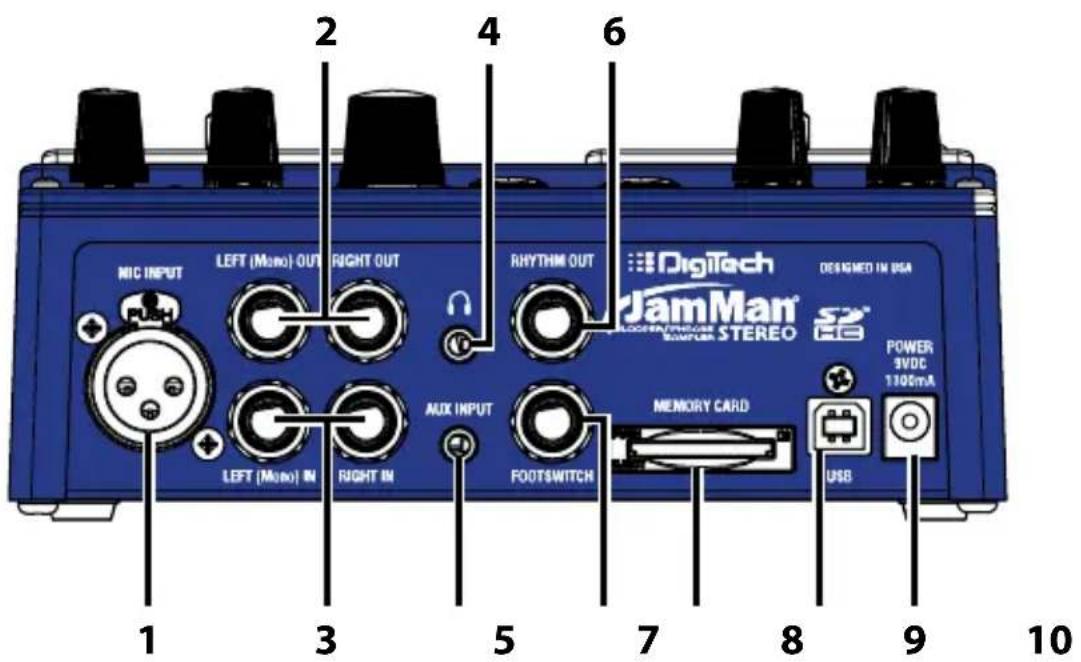
2 4 6 NIC INPUT LEFT (Mono) OUT RIGHT OUT RHYTHM OUT DIGITech JamMan® S2® DESIGNED IN USA LEFT (Mono) IN RIGHT IN AUX INPUT FOOT/SWITCH MEMORY CARD POWER SVDC 1300mA USB 1 3 5 7 8 9 101. Mic Input
Connect a microphone here. The mic input accepts low impedance dynamic or self-powered condenser microphones. The mic input is recorded to both left and right channels of a loop recorded in the JamMan® Stereo.
2 Left (Mono) and Right Outputs
Connect the Left (Mono) output to the input of a guitar amplifier, mixer channel, another pedal's input, or amp effects return.
Connect the Right output to the input of a second guitar amplifier when a second amp is being used or to a second mixer channel.
3. Left (Mono) and Right Inputs
Connect your instrument, another pedal's output, or an amp effects send to the Left (Mono) input jack. Signals are heard at both outputs when only the Left (Mono) jack is used.
Guided Tour - Rear Panel
Connect a second instrument or second output from a previous pedal for stereo operation. Left and Right inputs are processed separately through the looper and then fed to the Left and Right outputs to keep true stereo separation between channels.
4. HeadphoneOutput
This is a stereo headphone output that lets the JamMan® Stereo be used without having to connect to an amp or mixer. This output uses the same mix as presented at the 1/4" outputs, meaning if a single cable is plugged into the Left (Mono) Output, the headphone output will also be in mono.
5. Aux Input
Plug your portable MP3/CD player in here. When the Aux Input Minus Center option is selected, any stereo source is summed to mono when recorded (see page 34).
6. Rhythm Output Jack
Use this jack to isolate the Rhythm Output from the looped audio. Plugging into this output will defeat the Rhythm guide track in the left and right outputs (see page 49).
7. Footswitch Jack
Plug the optional FS3X Footswitch in here. FS3X footswitches select Undo, Reverse, and Tempo (see page 59).
8. SD/SDHC Card Slot
The JamMan Stereo is compatible with optional SD/SDHC memory cards up to 32GB in size for expanding the total amount of loop storage time available. Adding an SD card also increases the number of available loops from 99 to 198. New cards should be formatted
Guided Tour - Rear Panel
in the JamMan ^® Stereo before use (see page 55). The JamMan Stereo ships with 35 minutes of internal stereo loop memory.
9. USB Jack
The USB jack provides a connection to a Windows or Mac computer for transferring loop files to and from the JamMan Stereo via the downloadable JamManager™ loop librarian application.
10. PowerJack
Connect the included power supply here. The JamMan Stereo can only be powered by using the external adapter.
Making Connections
Instrument - Mono
text_image
Diagram showing connections between a digital audio amplifier, a digital microphone, and an acoustic guitar via a switch.Instrument - Stereo
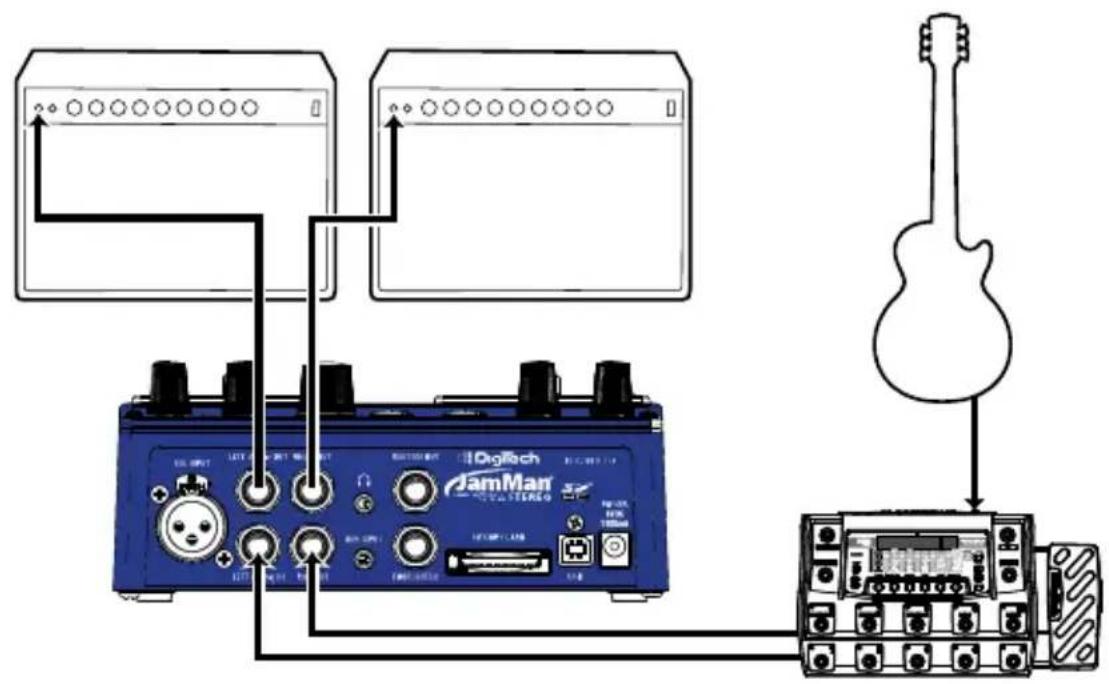
text_image
Diagram showing audio equipment connections between a GamMan device and an acoustic guitar, with labeled ports and signal paths.Making Connections
Mic/Vocal Performance
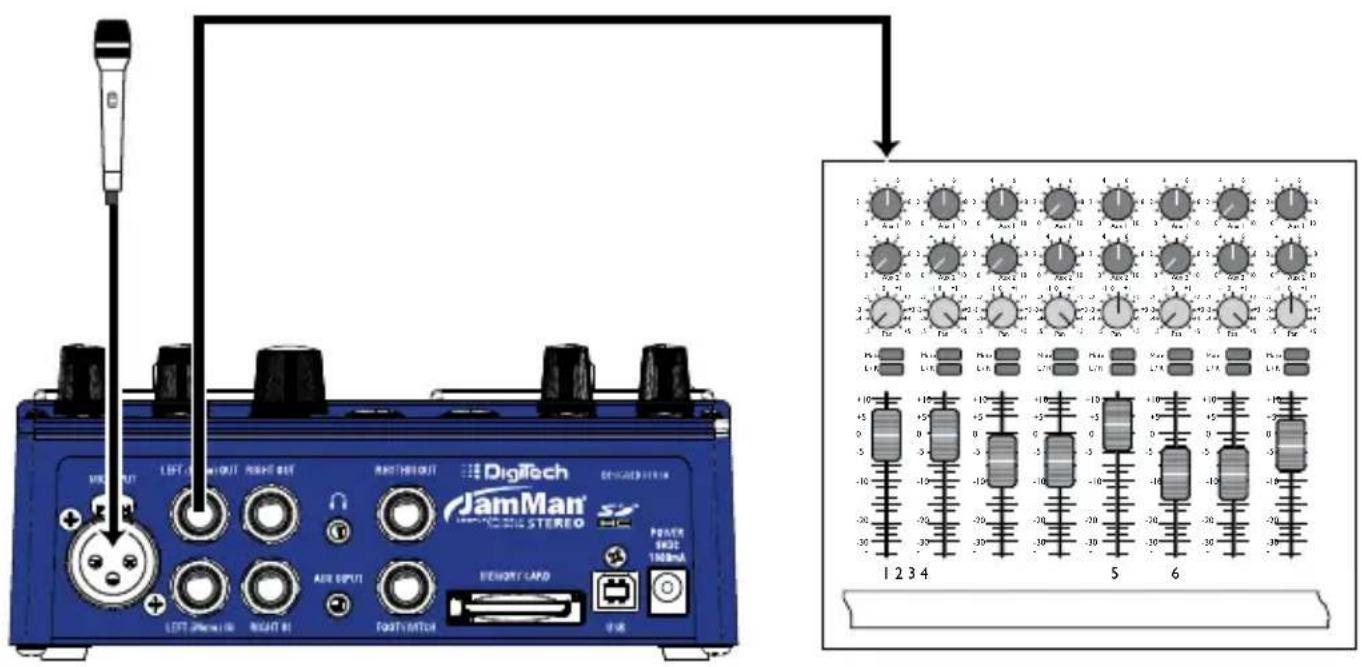
text_image
DIGITech JamMan® STEREO LEFT OUTPUT RIGHT OUT ANTHORNOUT PETER MODE 100mA AIRE OUTPUT MEMORY CARD LEFT PATTERN RIGHT OUT FAST SWITCH 1234 5 6DJ Setup
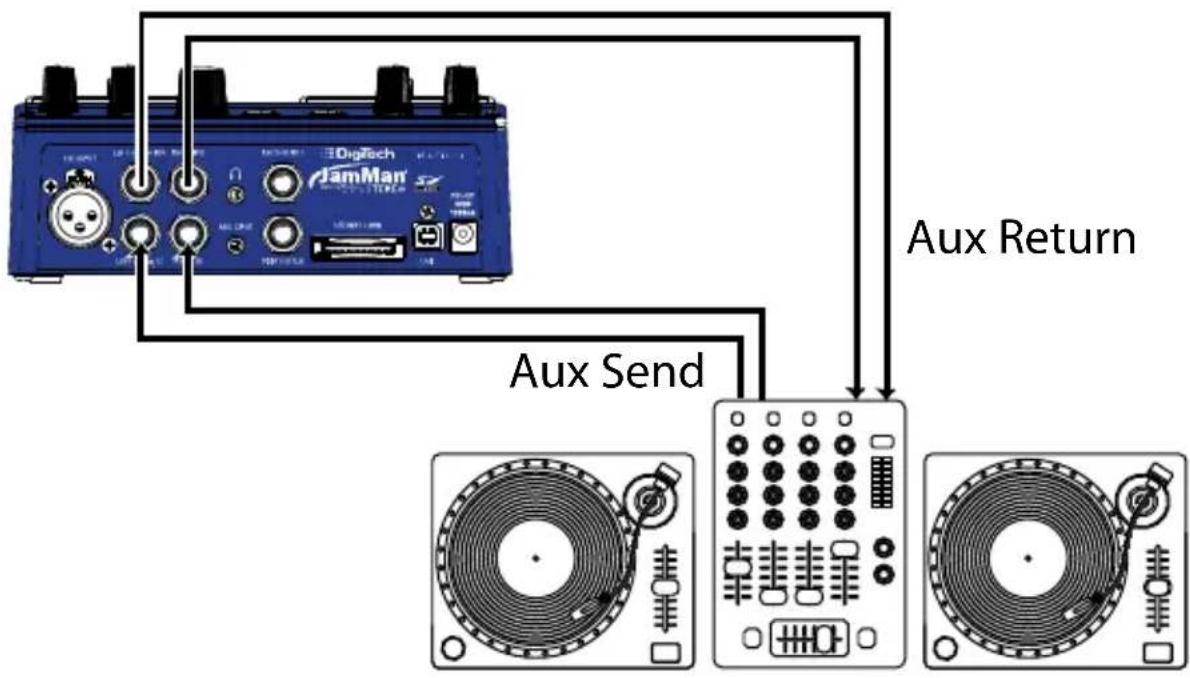
flowchart
graph TD
    A["Digital Device"] -->|Aux Return| B["Dial 1"]
    A -->|Aux Return| C["Dial 2"]
    A -->|Aux Send| D["Dial 3"]
    B --> E["Output Display"]
    C --> F["Output Display"]
    D --> G["Output Display"]
Making Connections
MP3 Player/Headphones
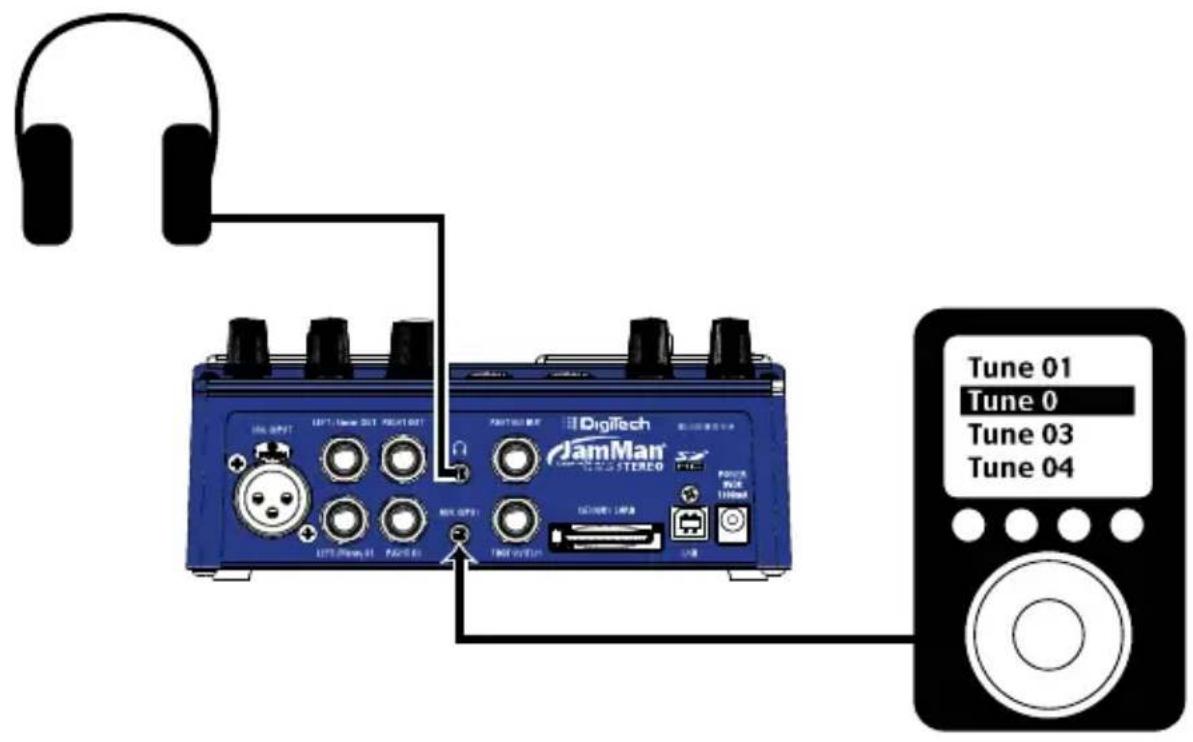
text_image
DigiTech JamMan® Tune 01 Tune 0 Tune 03 Tune 04Backing Tracks
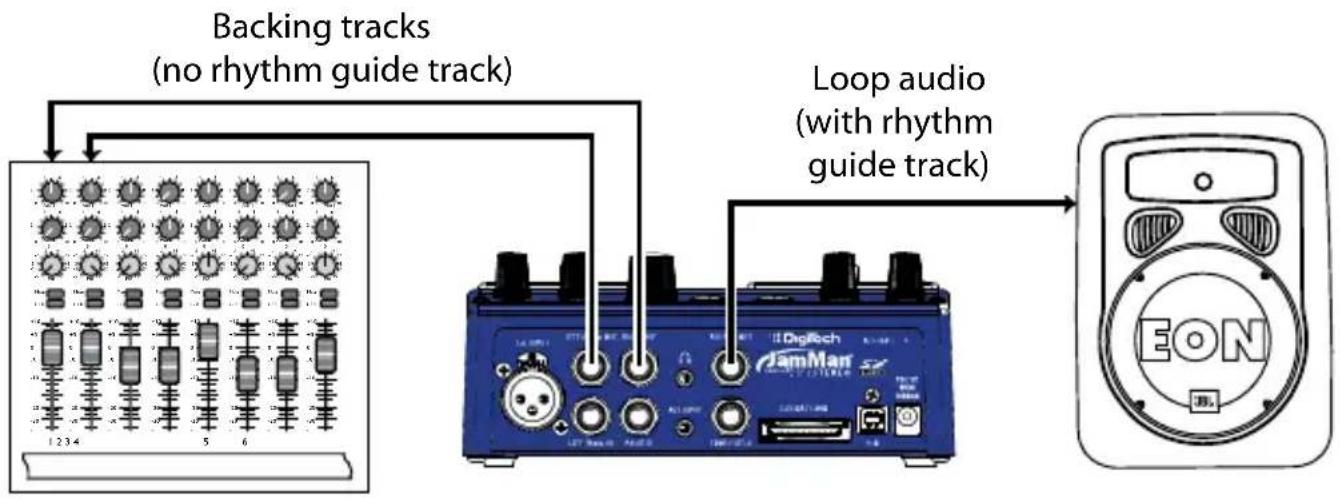
flowchart
graph TD
    A["Backing tracks (no rhythm guide track)"] --> B["1234"]
    A --> C["5"]
    A --> D["6"]
    E["Loop audio (with rhythm guide track)"] --> F["1234"]
    E --> G["5"]
    E --> H["6"]
    I["DigiTech"] --> J["JamMan"]
    J --> K["1234"]
    J --> L["5"]
    J --> M["6"]
    N["EON"] --> O["1234"]
    N --> P["5"]
    N --> Q["6"]
Selecting a Loop
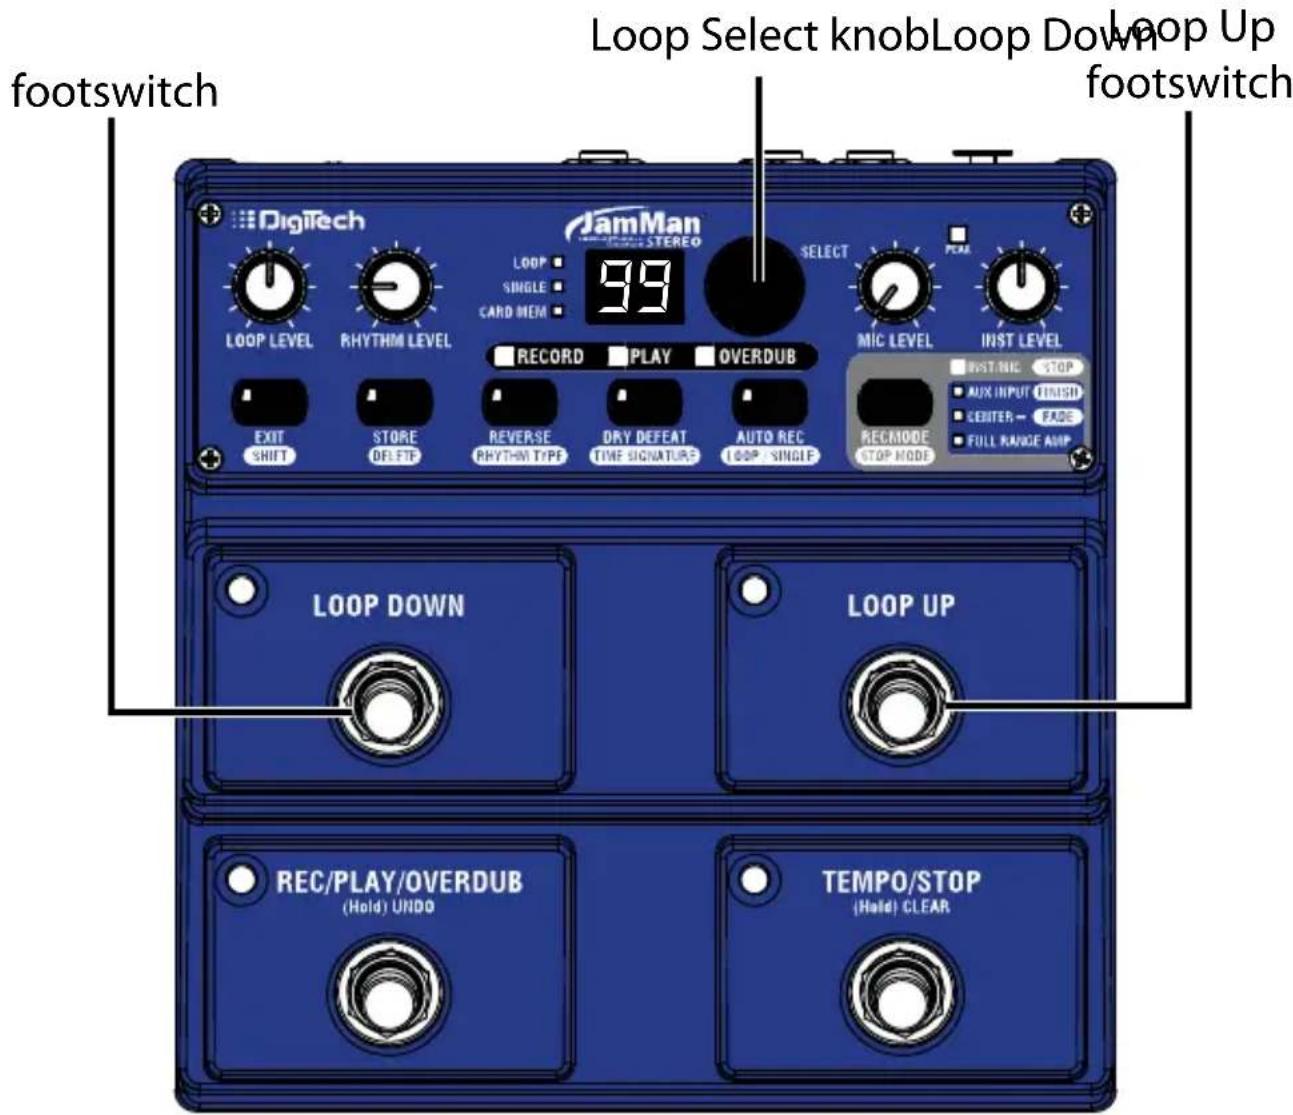
The JamMan ^® Stereo has two banks of loop memory, internal and optional card memory. There are 99 memory locations available in each of these banks for a total of 198 memories when an optional SD/SDHC memory card is installed. The card memory bank is only available when a memory card is installed.
To select loops, Press either the LOOP UP or LOOP DOWN footswitches or use the LOOP SELECT knob next to the DISPLAY.
Pressing the LOOP UP footswitch will select the next loop above the current loop. Pressing the LOOP DOWN footswitch will select the previous loop below. Pressing and holding either of these footswitches will scroll through the loop memories in its respective direction. The DISPLAY will show the memory location number as these buttons are pressed.
When Loop 99 is reached, pressing the LOOP UP footswitch will return to the first memory location (1 will be shown in the display). Likewise, if Loop I is reached, pressing the LOOP DOWN footswitch will return to the last memory location (99 will be shown in the DISPLAY). If an optional memory card is installed, pressing the LOOP UP or LOOP DOWN footswitches will alternate through one bank of memories and then the next (I-99 internal and then I-99 card). The CARD MEM LED will light when memories are selected on the optional external card.
As loops are selected, the LOOP or SINGLE LED will flash as the loop is loaded from internal or optional card memory. Trying to store, copy, or change the loop tempo during this time is ignored (bu will be displayed indicating the JamMan Stereo is busy loading a loop from memory).
Selecting a Loop
text_image
footswitch Loop Select knob Loop Down loop Up footswitch DigiTech JamMan STEREO LOOP LEVEL RHYTHM LEVEL LOOP SINGLE CARD MEM 99 SELECT FOM RECORD PLAY OVERDUB MIC LEVEL INST LEVEL EXIT SHIFT STORE DELETE REVERSE RHYTHM TYPE DRY DEFEAT TIME SIGNATURES AUTO REC LOOP / SINGLE RECMODE STOP MODE INST/INC STOP AUX INPUT FINISH CENTER - FADS FULL RANGE AMP LOOP DOWN LOOP UP REC/PLAY/OVERDUB (Hold) UNDO TEMPO/STOP (Hold) CLEARRecording a Loop - Inst/Mic Input
The JamMan ^® Stereo is designed to be very simple to use right out of the box. This section explains how to record a phrase and play it back as a continuous loop. You should have an instrument or audio device connected to the 1/4" inputs or a mic connected to the XLR mic input before proceeding.
NOTE: The maximum loop time the JamMan Stereo can record or play is 10 minutes.
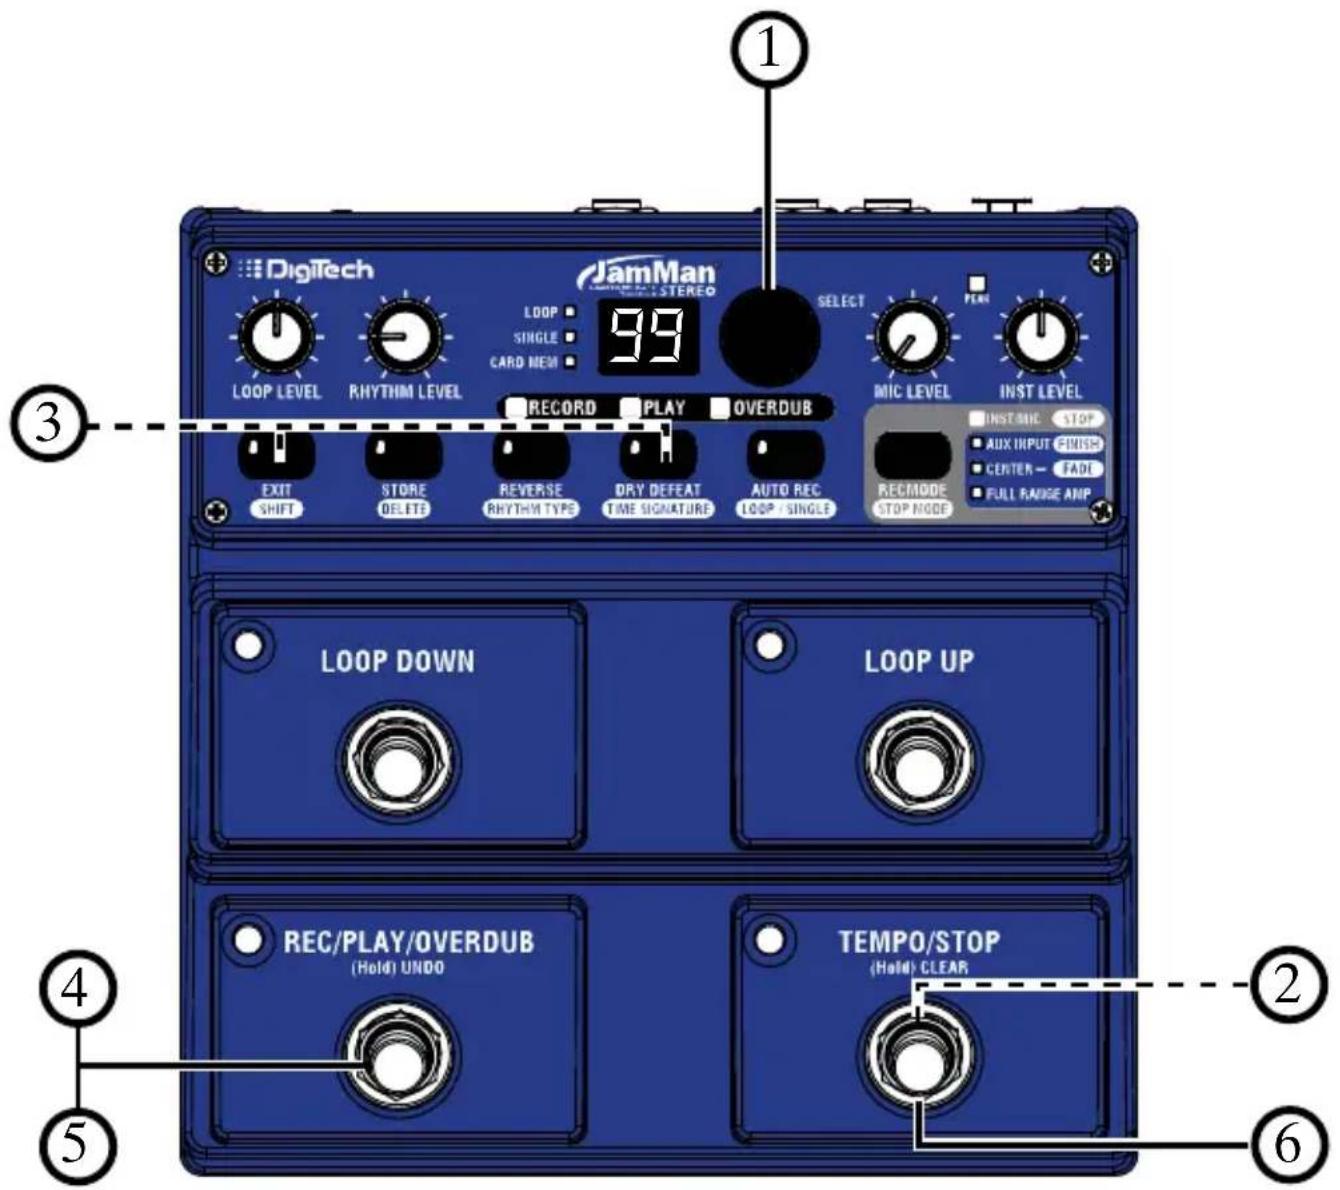
I. Select an empty memory location using the LOOP SELECT knob or the LOOP UP/LOOP DOWN footswitches (the LOOP and SINGLE LEDs will be off).
2. (Optional) If you would like to perform to a guide track, you must set a tempo. The rhythm guide track will not be heard until a tempo has been set. You can set a tempo by tapping the TEMPO/STOP footswitch. Adjust the RHYTHM LEVEL knob to a suitable volume. The TEMPO/STOP footswitch will now be flashing at the set tempo (see page 42).
3. (Optional) Set the Time Signature to something other than 4/4, if desired (see page 40).
4. Press the REC/PLAY/OVERDUB footswitch and begin playing or singing to start recording. If a tempo has been set, there will be a single measure count-in indicated by the TEMPO footswitch before recording begins. The REC/PLAY/OVERDUB footswitch will then light solid red, the LOOP LED will light, and recording will start. If no tempo has been set, recording will begin instantly after the REC/PLAY/OVERDUB footswitch is pressed and you begin playing.
5. When you are ready to set the loop point for your phrase, press the REC/PLAY/OVERDUB footswitch to set the loop point and have the phrase play back in a repeating loop. The REC/PLAY/OVERDUB footswitch and PLAY status LEDs will light solid green.
6. Press the TEMPO/STOP footswitch to stop the loop playback.
Once you are finished recording, the STORE button will be lit indicating the phrase must be stored to memory to be recalled later.
Recording a Loop - Inst/Mic Input
text_image
Digitech JamMan STUDIO STEREO LOOP LEVEL RHYTHM LEVEL LOOP SINGLE CARD MEM 99 SELECT FEAR RECORD PLAY OVERDUB MIC LEVEL INST LEVEL EXIT SHIFT STORE DELETE REVERSE RHYTHM TYPE DRY DEFEAT TIME SIGNATURE AUTO REC LOOP / SINGLE INST MIC STOP AUX INPUT TIME CENTER - FADE FULL RANGE AMP RECMODE STOP NODE LOOP DOWN LOOP UP REC/PLAY/OVERDUB (Hold) UNDO TEMPO/STOP (Hold) CLEAR ① ③ ④ ⑤ ⑥Auto Record Mode
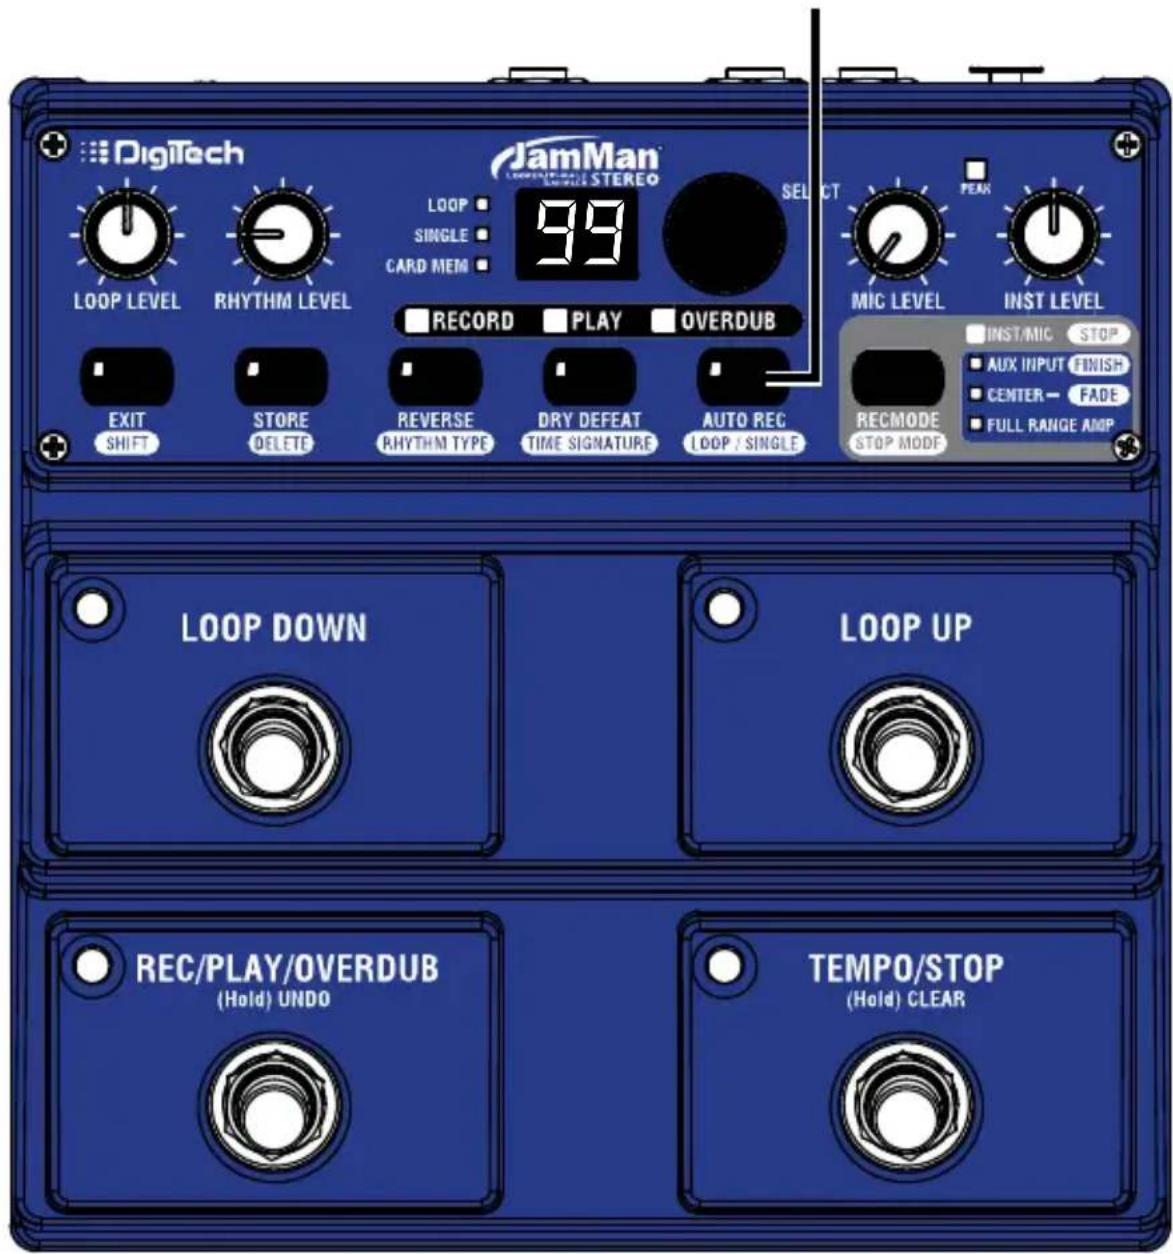
The JamMan® Stereo's Auto Record feature lets the JamMan automatically begin recording when you begin playing or when audio is detected at the JamMan Stereo's inputs. When enabled, Auto Record works globally on all empty loop memories; you cannot use Auto Record with an existing loop. When the REC/PLAY/OVERDUB footswitch is pressed, the JamMan Stereo is armed for recording but won't start recording until you start playing (the RECORD status and REC/PLAY/OVERDUB footswitch LEDs flash red to show that the JamMan is armed). The JamMan monitors the input level and starts the recording when it detects an audio signal.
If you've tapped in a tempo while Auto Record is enabled, the rhythm guide track will begin playing. Pressing the REC/PLAY/OVERDUB footswitch will arm the JamMan Stereo for recording. As soon as signal is detected, recording will begin immediately.
Changing to an empty loop memory while AUTO REC is enabled will preserve the AUTO REC state (the AUTO REC button will turn off when a memory that has a loop already stored in it is selected).
To turn off Auto Record, press the AUTO REC button until it turns off.
Auto Record Mode
Auto Record button
text_image
Digitech JamMan LOOP LEVEL RHYTHM LEVEL LOOP SINGLE CARD MEM 39 SELECT RECORD PLAY OVERDUB EXIT SHIFT STORE DELETE REVERSE RHYTHM TYPE DRY DEFEAT TIME SIGNATURE AUTO REC LOOP / SINGLE MIC LEVEL INST LEVEL INST/MIC STOP AUX INPUT FINISH CENTER- FADE FULL RANGE AMP RECMODE STOP MODE LOOP DOWN LOOP UP REC/PLAY/OVERDUB (Hold) UNDO TEMPO/STOP (Hold) CLEARRecording a Loop Using Auto Record
The JamMan® Stereo has an Auto Record feature that automatically starts recording when signal is detected at any of the JamMan Stereo's inputs.
NOTE: The maximum loop time the JamMan Stereo can record or play is 10 minutes. You can't auto-record on an existing loop; Auto Record is only available when an empty loop memory is selected.
Here is how to use Auto Record when recording a loop.
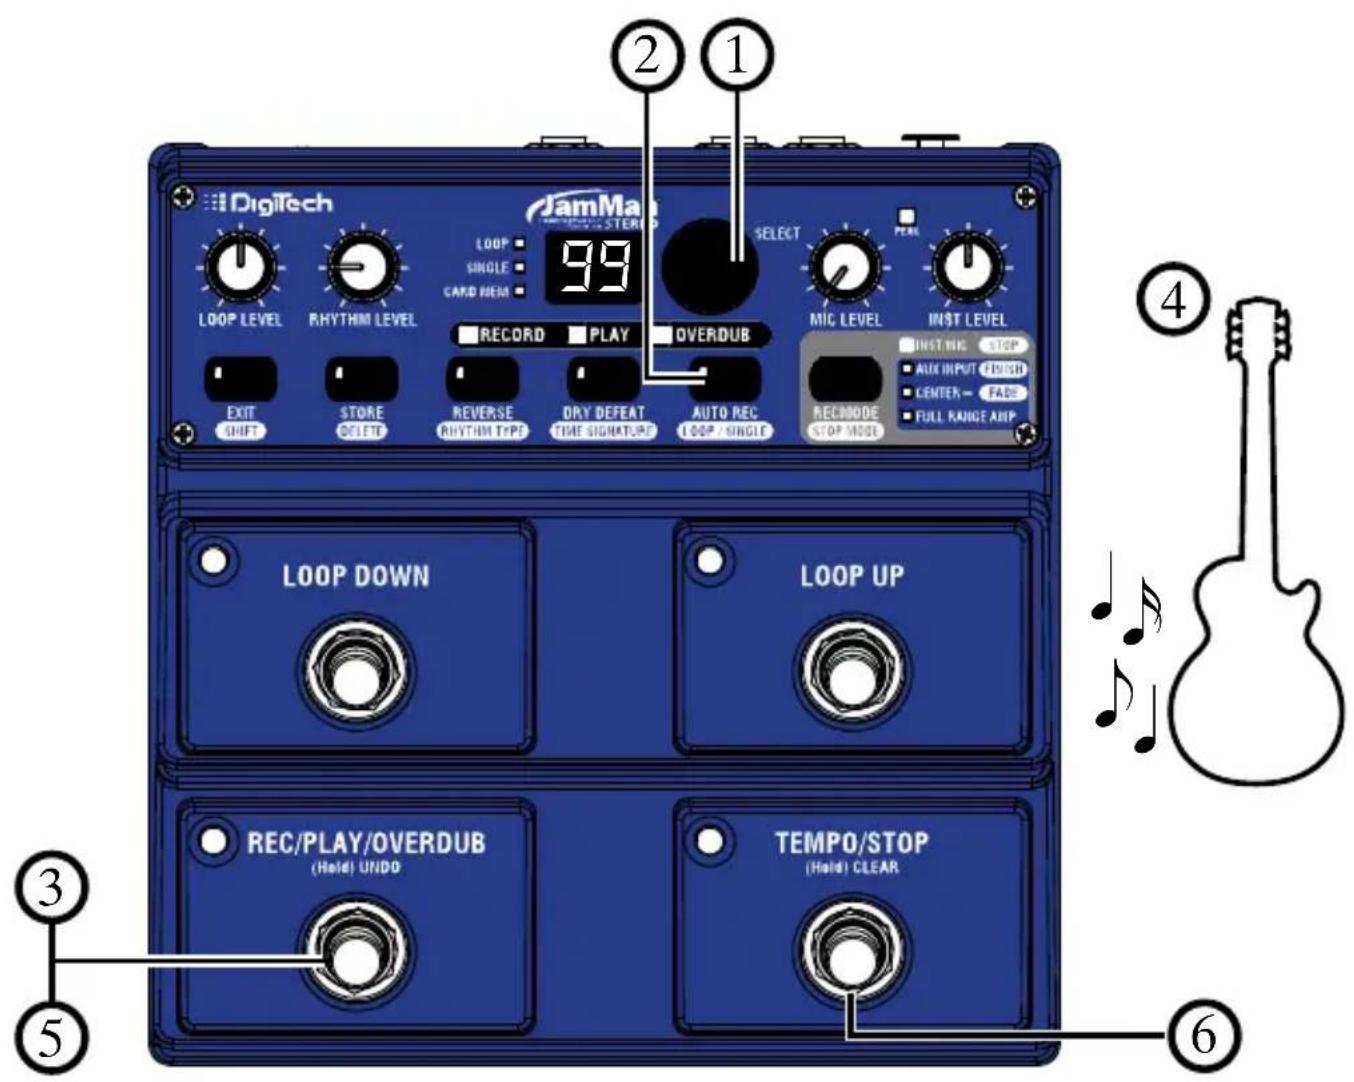
I. Select an empty memory location using the LOOP SELECT knob or LOOP UP/LOOP DOWN footswitches (the LOOP and SINGLE LEDs will be off). If the CARD MEM LED is lit, you have selected an empty location on the optional memory card.
2 Press the AUTO REC button so it is lit.
3. Press the REC/PLAY/OVERDUB footswitch to arm record. The REC/PLAY/OVERDUB footswitch and RECORD status LEDs will be quickly flashing red indicating the JamMan Stereo is armed for recording.
4. Begin playing a phrase on your guitar. The REC/PLAY/OVERDUB footswitch and RECORD status LEDs will light solid red to indicate recording is now taking place.
5. When you are finished recording, press the REC/PLAY/OVERDUB footswitch once to set the loop point and have the phrase play back in a repeating loop. The REC/PLAY/OVERDUB footswitch and PLAY status LEDs will light solid green.
6. Press the TEMPO/STOP footswitch to stop the loop playback.
Once you are finished recording, the STORE button will be lit indicating the phrase must be stored to memory to be recalled later.
Recording a Loop Using Auto Record
text_image
DigiTech JamMax 1 2 1 LOOP LEVEL RHYTHM LEVEL LOOP SINGLE CARD MEM 99 SELECT RECORD PLAY OVERDUB MIC LEVEL INST LEVEL EXIT SHIFT STORE DELETE REVERSE RHYTHM TRP DRY DEFEAT TIME SIGNATURE AUTO REC LOOP / SINGLE LOOP DOWN LOOP UP REC/PLAY/OVERDUB (Hold) UNDO TEMPO/STOP (Hold) CLEAR ④ ③ ⑤ ⑥Recording Overdubs
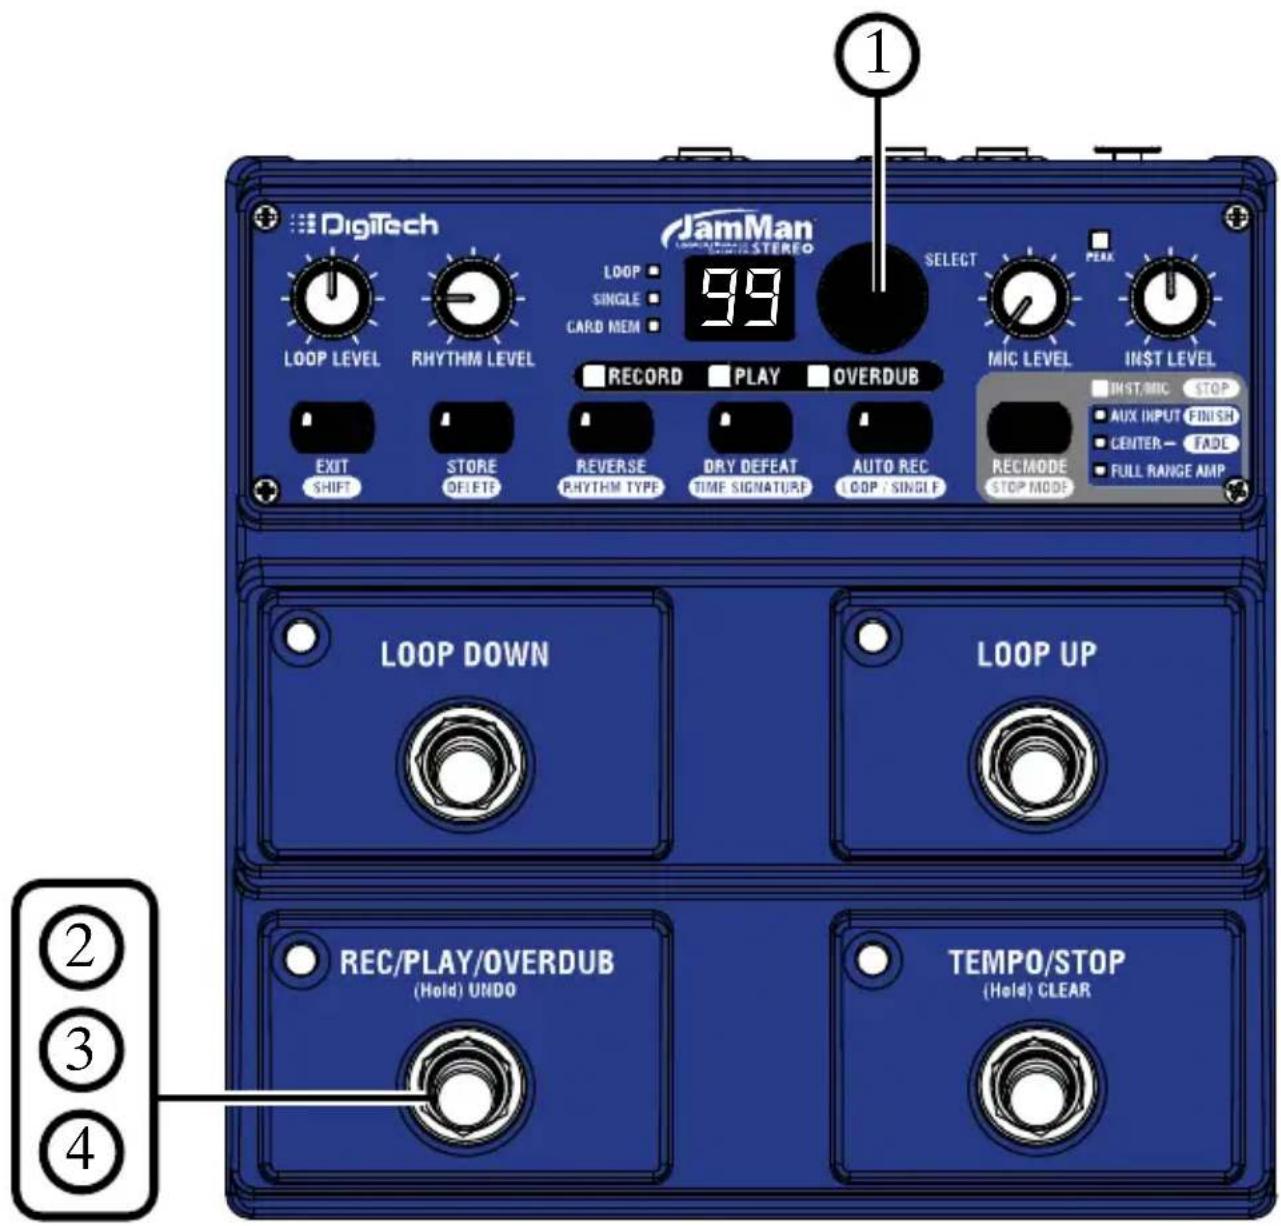
Once a loop phrase is recorded, you can add overdubs over the top of it. Overdubs can only be recorded to Loop phrases and not to Single phrases.
I. Use the SELECT knob or the LOOP UP/LOOP DOWN footswitches to select a previously recorded Loop phrase, or use a newly recorded phrase that has not yet been stored. The LOOP LED must be lit if a previously recorded phrase is selected. If the CARD MEM LED is lit, you have selected a loop on the optional memory card.
2. Press the REC/PLAY/OVERDUB footswitch. This footswitch and the PLAY status LEDs will light solid green and the phrase will begin playing.
3. Press and release the REC/PLAY/OVERDUB footswitch again to begin overdub recording. This footswitch and the OVERDUB status LEDs will now light solid yellow and any audio introduced on the selected input will be added to the audio the playback.
4. When you have an overdub you are happy with, press the REC/PLAY/OVERDUB footswitch to disable overdubbing and continue playback (this footswitch and the PLAY status LEDs will light solid green).
You can continue adding overdubs by continuing to press the REC/PLAY/OVERDUB footswitch. Each time an overdub is added, the last overdub is merged with the original loop and it can no longer be undone using the Undo functions (see page 32).
Once you are finished with overdubbing, press the TEMPO/STOP footswitch to stop playback/overdubbing.
NOTE: Changing loops discards any overdubs that have not been stored to memory. Storing overdubs will remove the ability to undo or clear overdubs.
Recording Overdubs
text_image
DigTech JamMan LOOP LEVEL RHYTHM LEVEL LOOP SINGLE CARD MEM 99 SELECT PERK RECORD PLAY OVERDUB MIC LEVEL INST LEVEL EXIT SHIFT STORE DELETE REVERSE RHYTHM TYPE DRY DEFEAT TIME SIGNATURE AUTO REC LOOP / SINGLE REC/MODE STOP MODE INST/MIC STOP AUX INPUT FINISH CENTER - FADL FULL RANGE AMP LOOP DOWN LOOP UP REC/PLAY/OVERDUB (Hold) UNDO TEMPO/STOP (Hold) CLEAR ② ③ ④Undo, Redo, and Clear
You can undo or redo an overdub anytime you remain in the current memory where the overdub was recorded. You can also use a footswitch to clear all unstored loop phrase audio.
NOTE: Changing loops discards any unstored overdubs. Storing the overdubs will also remove the ability to undo or clear overdubs.
Undo an Overdub
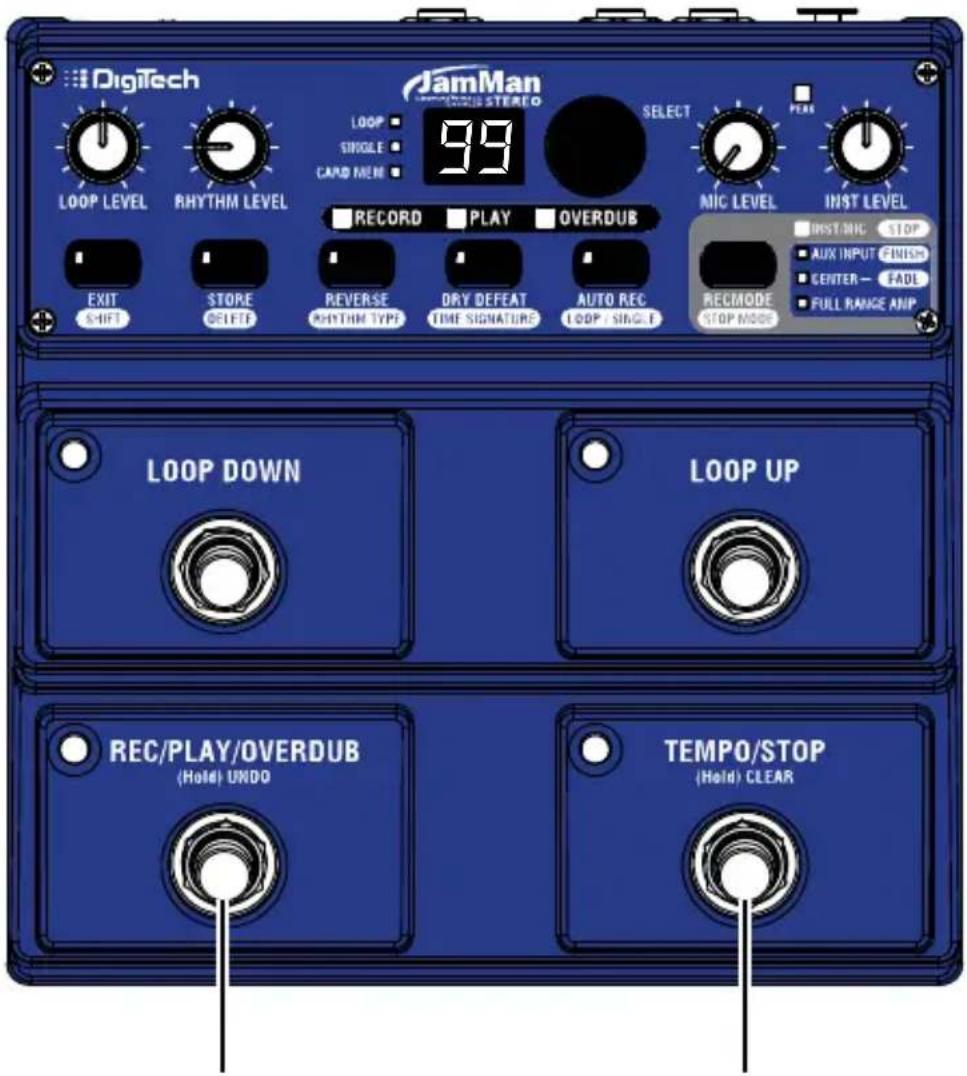
Press and hold the REC/PLAY/OVERDUB footswitch for two seconds to undo your last overdub. The REC/PLAY/OVERDUB and OVERDUB status LEDs flash yellow and the display briefly shows und when the undo takes place.
Redo an Overdub
Press and hold the REC/PLAY/OVERDUB footswitch to redo the last undone overdub; the REC/PLAY/OVERDUB and OVERDUB status LEDs flash yellow and the display briefly shows r to indicate a redo has been performed.
Clear Overdubs/Unstored Phrases
Press and hold the TEMPO/STOP footswitch for two seconds to clear the unstored recording/overdubs. The RECORD status LED will flash and the display will show L to confirm the clearing. If the loop had been previously stored, the clear action will only clear unstored phrases and overdubs but leave the original loop that had been stored untouched.
Changing to a different loop also clears any unstored phrases and overdubs.
Undo, Redo, and Clear
text_image
Digitech JamMan 100000 STEREO LOOP SINGLE CAPD MENS 99 SELECT PERI LOOP LEVEL RHYTHM LEVEL RECORD PLAY OVERDUB NIC LEVEL INST LEVEL EXIT SHIFT STORE DELETE REVERSE HYTHM TYPE DRY DEFEAT TIME SIGNATURE AUTO REC LOOP / SINGLE RECMODE STOP MODE INST INC STOP AUX INPUT FINISH CENTER - FADE FULL RANGE ANP LOOP DOWN LOOP UP REC/PLAY/OVERDUB (Hold) UNDO TEMPO/STOP (Hold) CLEARPress and hold to undo or redo an overdub.
Press and hold to clear overdubs and unstored phrases.
Recording a Loop - Aux Input
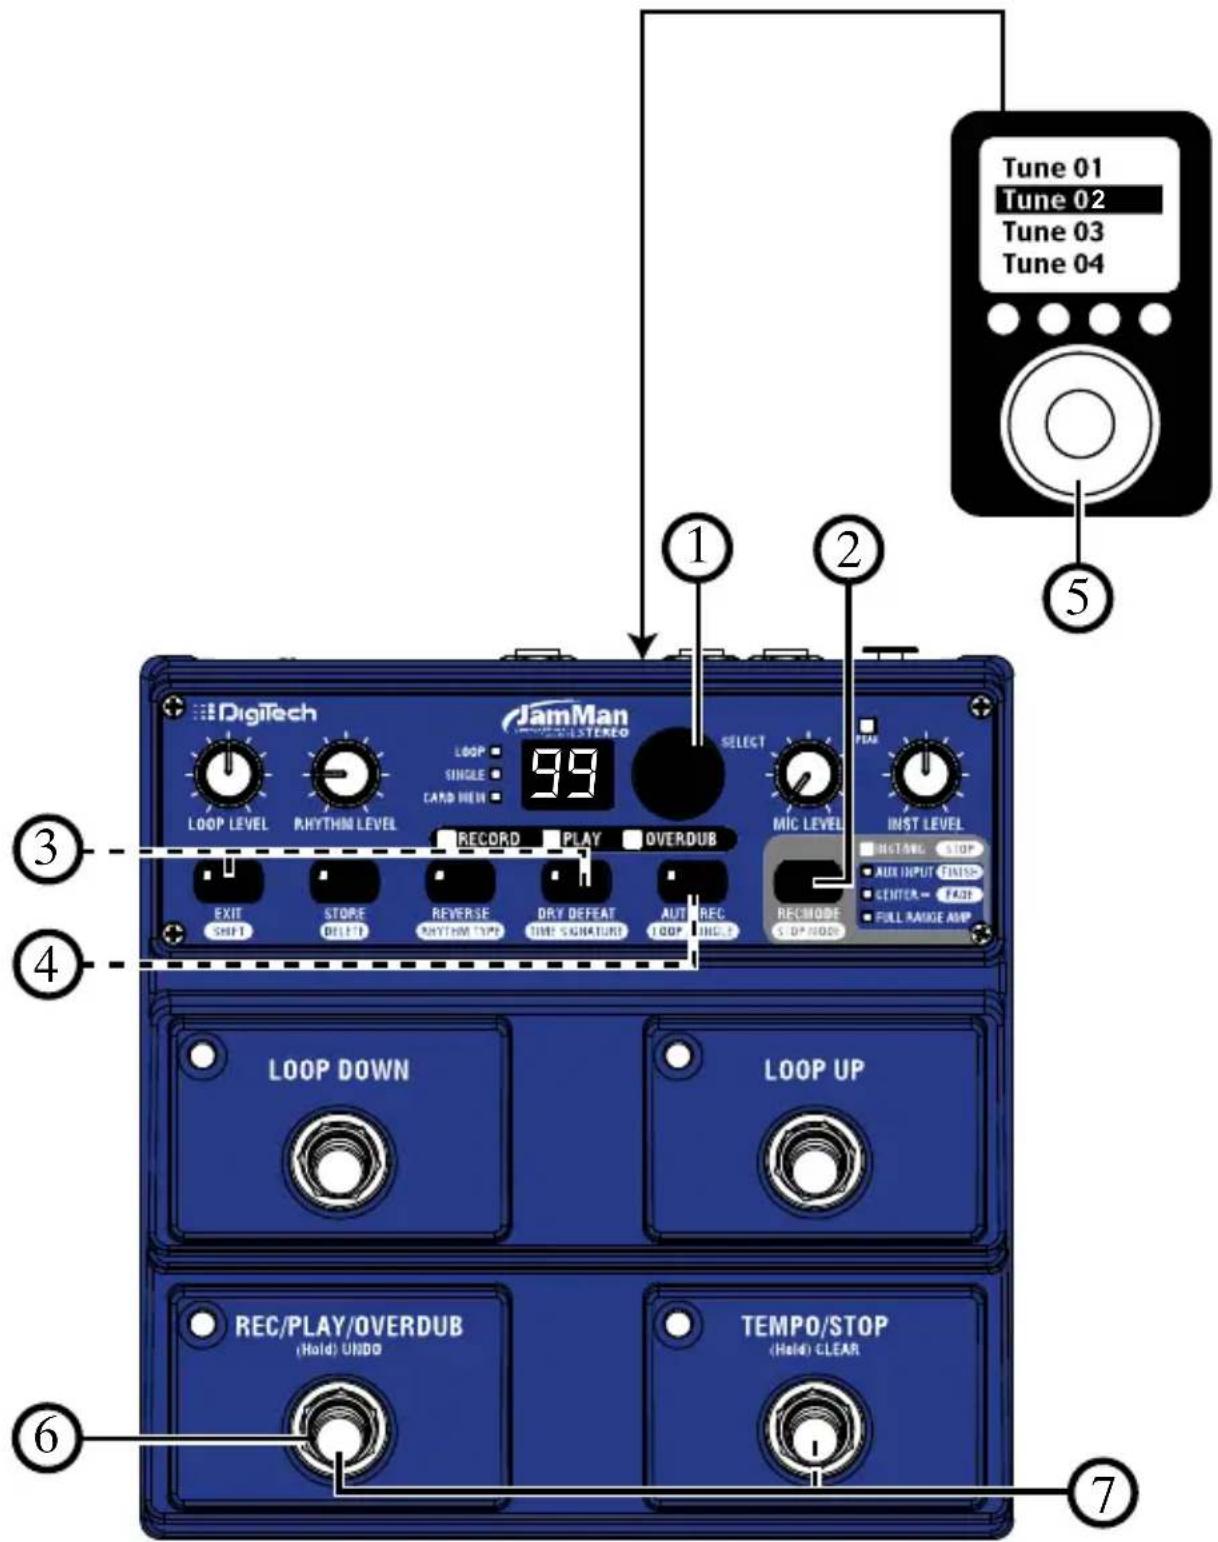
The JamMan ^® Stereo can record directly from an MP3 or CD player. This feature is useful for learning and practicing new songs as well as creating backing tracks. You should have an audio source connected to the AUX INPUT before proceeding.
I. Select an empty memory location using the SELECT knob or LOOP UP/LOOP DOWN footswitches (the LOOP and SINGLE LEDs will be off).
2. Press the RECORD MODE button and choose one of four AUX INPUT modes:
a. AUX INPUT only lit: The unit will record the program material just as it comes from the source.
b. AUX INPUT and CENTER - lit: Audio will be summed to mono and any material that is common to both stereo channels (usually lead vocals or instruments) will be removed from the recording. Any stereo processing of the center channel (reverb, for instance) might not be removed completely.
c. AUX INPUT and FULL RANGE AMP lit: The program material will be recorded in stereo with an equalization curve so that when it is played through a guitar amp it will more closely retain its original frequency response.
d. AUX INPUT, CENTER -, and FULL RANGE AMP lit: Audio will be summed to mono and remove center channel material and apply a compensating equalization as in the two previous modes.
- (Optional) Set the Time Signature to something other than 4/4, if desired. (See page 40 for more information about Time Signatures.)
- (Optional) Turn the AUTO REC button on if you want the JamMan Stereo to begin recording when the audio source begins playback
- Play back the audio source and set its output level so that the PEAK LED lights green and yellow but doesn't light red.
- Press the REC/PLAY/OVERDUB footswitch to start recording. This footswitch and the RECORD status LED will light solid red and recording will begin. If Auto Record is enabled, the REC/PLAY/OVERDUB and RECORD status LED will flash red after the footswitch is pressed indicating it is armed for recording. Recording will automatically begin once the audio source starts playing.
- When you are finished, press either the REC/PLAY/OVERDUB footswitch to have the phrase play back in a repeating loop or press the TEMPO/STOP footswitch to stop recording.
Once you are finished recording, the STORE button will be lit indicating the phrase must be stored to memory to be recalled later (see the Storing/Copying Phrases section on page 38).
Recording a Loop - Aux Input
text_image
DigiTech JamMan Tune 01 Tune 02 Tune 03 Tune 04 LOOP LEVEL RHYTHM LEVEL LOOP SINGLE CARD MEN 99 SELECT RECORD PLAY OVERDUB MIC LEVEL INST LEVEL INSTALL STOP AUX INPUT FANSS CENTER - FATH FULL RANGE AMP EXIT SHIFT STORE GREEN REVERSE RHYTHM TEMP DRY DEEAT LINE SIGNATURE AUTO REC LOOP HICKY RECHODE GND/HDID LOOP DOWN LOOP UP REC/PLAY/OVERDUB (Hold) UNDO TEMPO/STOP (Hold) CLEAR ① ② ③ ④ ⑤ ⑥ ⑦Stop Modes
Loop Phrases can be stopped in three ways after the TEMPO/STOP footswitch is pressed:
• STOP: Stops the phrase immediately when Stop is pressed.
• FINISH: Finishes playing to the end of the phrase and stops after Stop is pressed.
- FADE: Fades the phrase volume to 0 and then stops after Stop is pressed.
To change Stop Modes, follow these steps:
I. Press the SHIFT button. It will now be lit.
2. Press the STOP MODE button to select the LED which is labeled with the Stop Mode you want to use.. The three Stop Modes are labeled to the right of the RECORD MODE LEDs.
3. Press the EXIT button.
4. Press the STORE button twice to store the changes, if desired.
NOTE: Stop modes must be stored with each phrase individually.

text_image
DigTech LOOP LEVEL RHYTHM LEVEL JAMMan 99 LOOP 100Ω LAND NOTE RECORD PLAY OVERDUB EXIT START CLOCK REVERSE PARTITION TYPE OXY DIFEAT BIL SEPARATION AUTO REC LOOP - INSULD REC LEVEL BUST LEVEL LOOP DOWN LOOP UP REC/PLAY/OVERDUB (Hold) UNID TEMPO/STOP (Hold) CLEARUsing Auto-Quantize Looping
There are two ways you can record loops using the JamMan® Stereo, free-form looping or using the JamMan Stereo's Auto-Quantize feature.
Free-form looping (see page 24) is the standard way loopers have been used since their inception. You initiate recording, play, and then set the loop point when you reach the end of your passage. The loop point is set exactly when you press the pedal and the tempo for the loop is then calculated and displayed. Getting an accurately timed and seamless loop takes practice but offers the flexibility experienced loopers need.
Auto-Quantized looping makes getting accurately timed loop points easy. Begin by first setting the Tempo you want before recording the loop's first pass. This is done by using the TEMPO/STOP footswitch (see page 42). Once the tempo is established, initiate record, play in time with the set tempo, and then set the loop point at the end of a measure.
If your timing was a little early or late when setting the loop point, not to worry. The JamMan Stereo automatically adjusts the loop length exactly to the measure length set by the Tempo and Time Signature.
Storing/Copying Phrases
Anytime a change is made to a loop memory location (Rhythm Type, Tempo, Time Signature, Record, Overdubs etc.) the STORE button will immediately light. This indicates that the changes will be lost unless a store procedure is performed before selecting a new loop memory location, turning off the power.
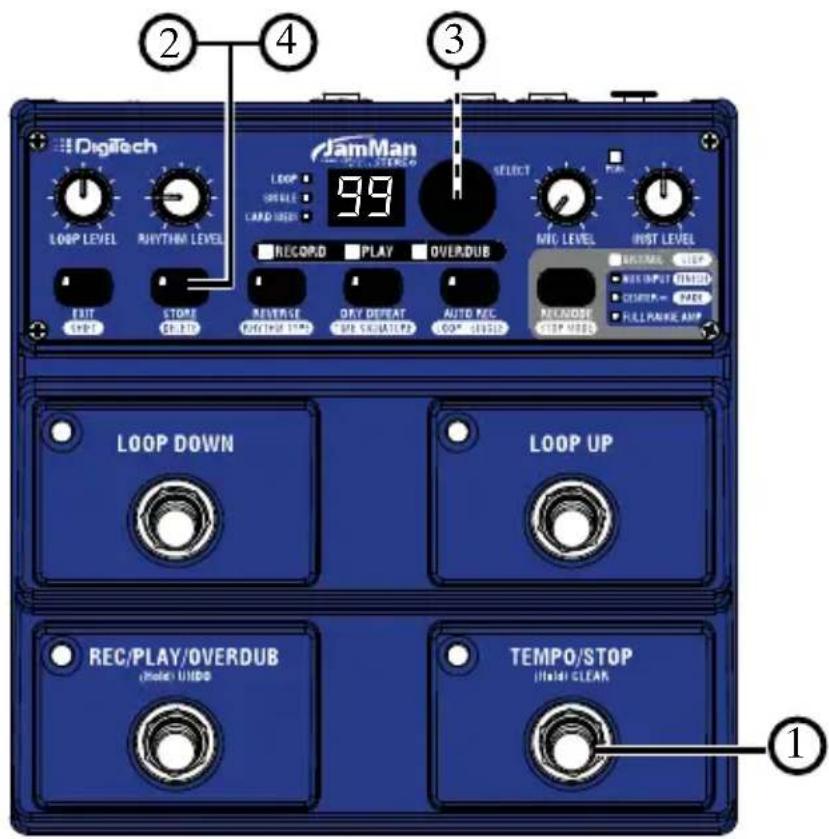
Store Changes to a Loop
I. Stop any recording activity using the TEMPO/STOP footswitch.
2. Press the STORE button. The STORE button and the DISPLAY will begin to flash (the DISPLAY shows the current loop memory location).
3. (Optional) Turn the SELECT knob to select an empty loop memory location to store the loop with its changes (the LOOP or SINGLE LEDs are off), or press EXIT to abort.
4. Press the STORE button again. The changes are now saved and the STORE button turns off.
Copy a Loop to a Different Memory Location
I. Stop any playback or record activity using the TEMPO/STOP footswitch.
2. Turn the SELECT knob to select a memory location that contains a loop (either the LOOP or SINGLE LED is lit).
3. Press the STORE button. The DISPLAY and the STORE button will begin to flash.
4. Turn the SELECT knob until an empty memory location is selected (the LOOP and SINGLE LEDs are off), or press EXIT to abort.
5. Press the STORE button again. The loop is now copied to the new memory location.
NOTE: The Clear and Overdub Undo/Redo functions cannot be performed to the loop after a Store/Copy procedure.
Storing/Copying Phrases
Store Changes to a Loop
text_image
Digitech LOBP LEVEL RHYTHM LEVEL JAMMan 99 LOOP DOUBLE CARD USE RECORD PLAY OVERDUB SELECT MIC LEVEL INST LEVEL LOOP DOWN LOOP UP REC/PLAY/OVERDUB (Hole) UNDO TEMPO/STOP (Hole) CLEAR ① ② ③ ④Copy a Loop to a Different Memory Location
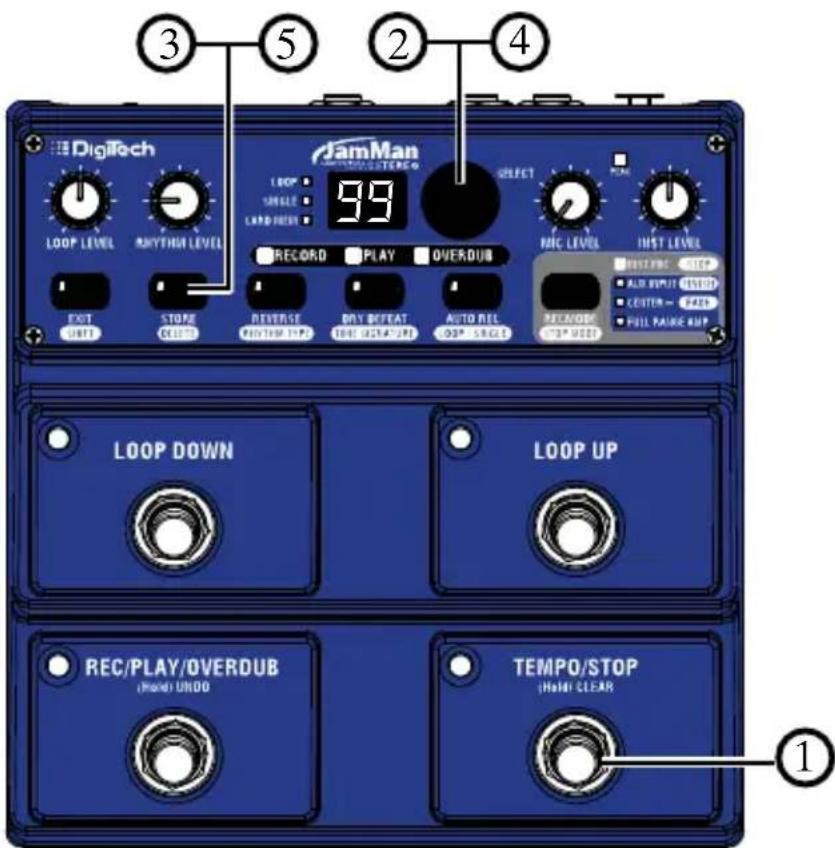
text_image
3 5 2 4 DigiTech Loop LEVEL RHYTHN LEVEL JamMan 99 SELECT LOOP UNLESS LOAD/RESET RECORD PLAY OVERDUB HIC LEVEL INST LEVEL EXIT START STOP COLD REVERSE RHYTHN TIPS DRY BIFFEAT BEET USA#UP AUTO REL OP SINGLE RECA/DOB STOP USES LOOP DOWN LOOP UP REC/PLAY/OVERDUB (Hand) UNDD TEMPO/STOP (Hand) CLEAR 1Time Signature
The JamMan ^® Stereo is capable of recording in different Time Signatures. A Time Signature must be set up prior to recording in a memory location. Once a phrase has been recorded, Time Signature cannot be changed. To set the Time Signature, follow these steps:
I. Use the SELECT knob or LOOP UP/DOWN footswitches to select a new memory location. (The LOOP LED and SINGLE LED will be off.)
2 Press the SHIFT button. It will now be lit.
3. Press the TIME SIGNATURE button. The DISPLAY will now show the number 4 indicating the default Time Signature of four beats per measure.
4. Use the SELECT knob to change the Time Signature. You can select from two to 15 beats per measure. This means if you want to record in 5/4 time, select 5. To record in 7/8 time, select 7, and so forth.
5. Press the EXIT button.
The STORE button will light when Time Signature is changed but you can immediately begin recording without having to store this change first. If a tempo has been set up the TEMPO/STOP footswitch LED will light red for the downbeat and then green for the rest of the beats of the measure.
When accessing the Time Signature setting of a loop (newly recorded or stored), the loop's Time Signature appears in the DISPLAY, but it cannot be changed.
Time Signature
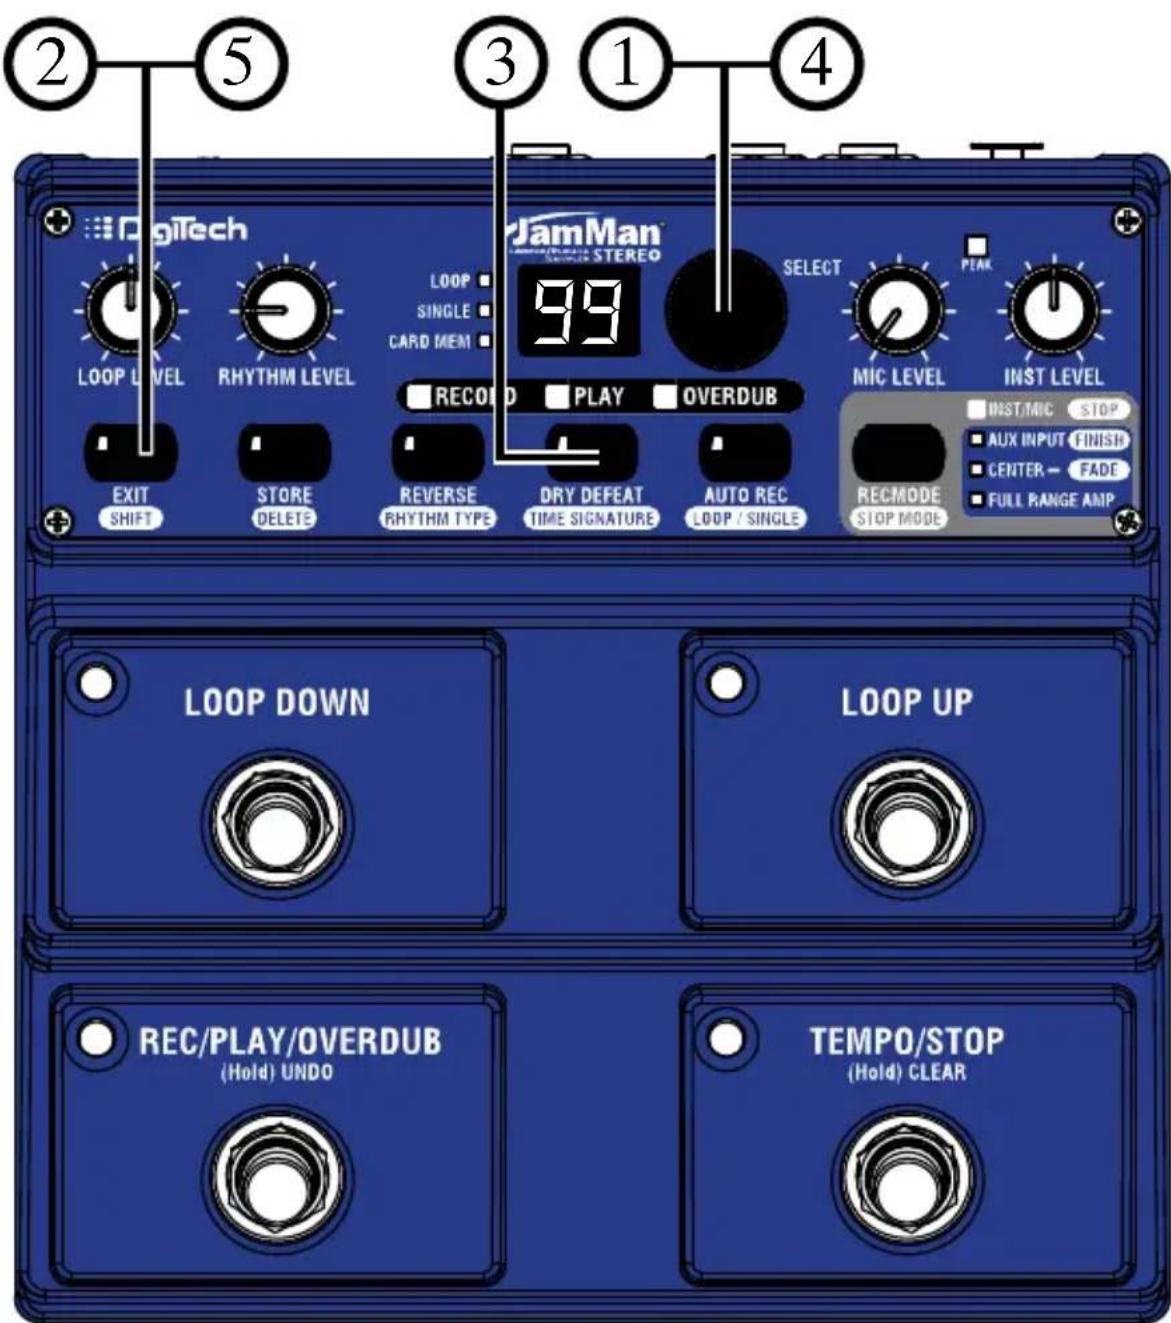
text_image
② ⑤ ③ ① ④ ① JamMan STEREO LOOP SINGLE CARD MEM RECO PLAY OVERDUB SELECT MIC LEVEL INST LEVEL INST/MIC STOP AUX INPUT FINISH CENTER- FADE FULL RANGE AMP EXIT SHIFT STORE DELETE REVERSE RHYTHM TYPE DRY DEFEAT TIME SIGNATURE AUTO REC LOOP / SINGLE RECMODE STOP MODE LOOP DOWN LOOP UP REC/PLAY/OVERDUB (Hold) UNDO TEMPO/STOP (Hold) CLEARSetting a Loop Tempo for Recording
Before you begin recording a phrase, you may want to set a tempo at which you want to record the loop at. Setting the tempo in an empty loop memory location automatically starts playing the rhythm guide track (Rhythm Level must be turned up to hear the guide track). You can use the rhythm guide track as a metronome for recording against to help keep a consistent tempo of your performance. To set the tempo for recording, follow these steps:
I. Use the SELECT knob to select a new memory location. (The LOOP LED and SINGLE LED will be off.)
2. Tap the TEMPO/STOP footswitch at least 2 times (4 or more times is recommended). The TEMPO/STOP footswitch LED will begin flashing at the tempo that has been tapped in. The first downbeat of the measure flashes red and the other beats flash green.
3. Turn up the RHYTHM LEVEL knob (if it hasn't been already) to hear the rhythm guide track.
4. To begin recording, press the REC/PLAY/OVERDUB footswitch and begin playing.
If you want to set up a memory location with a tempo but not record to it, you can just follow steps 1 and 2, but you must then store the new tempo using the Store procedure. When you return to the empty loop location, the tempo will already be set as indicated by the TEMPO/STOP footswitch LED flashing.
Setting a Loop Tempo for Recording
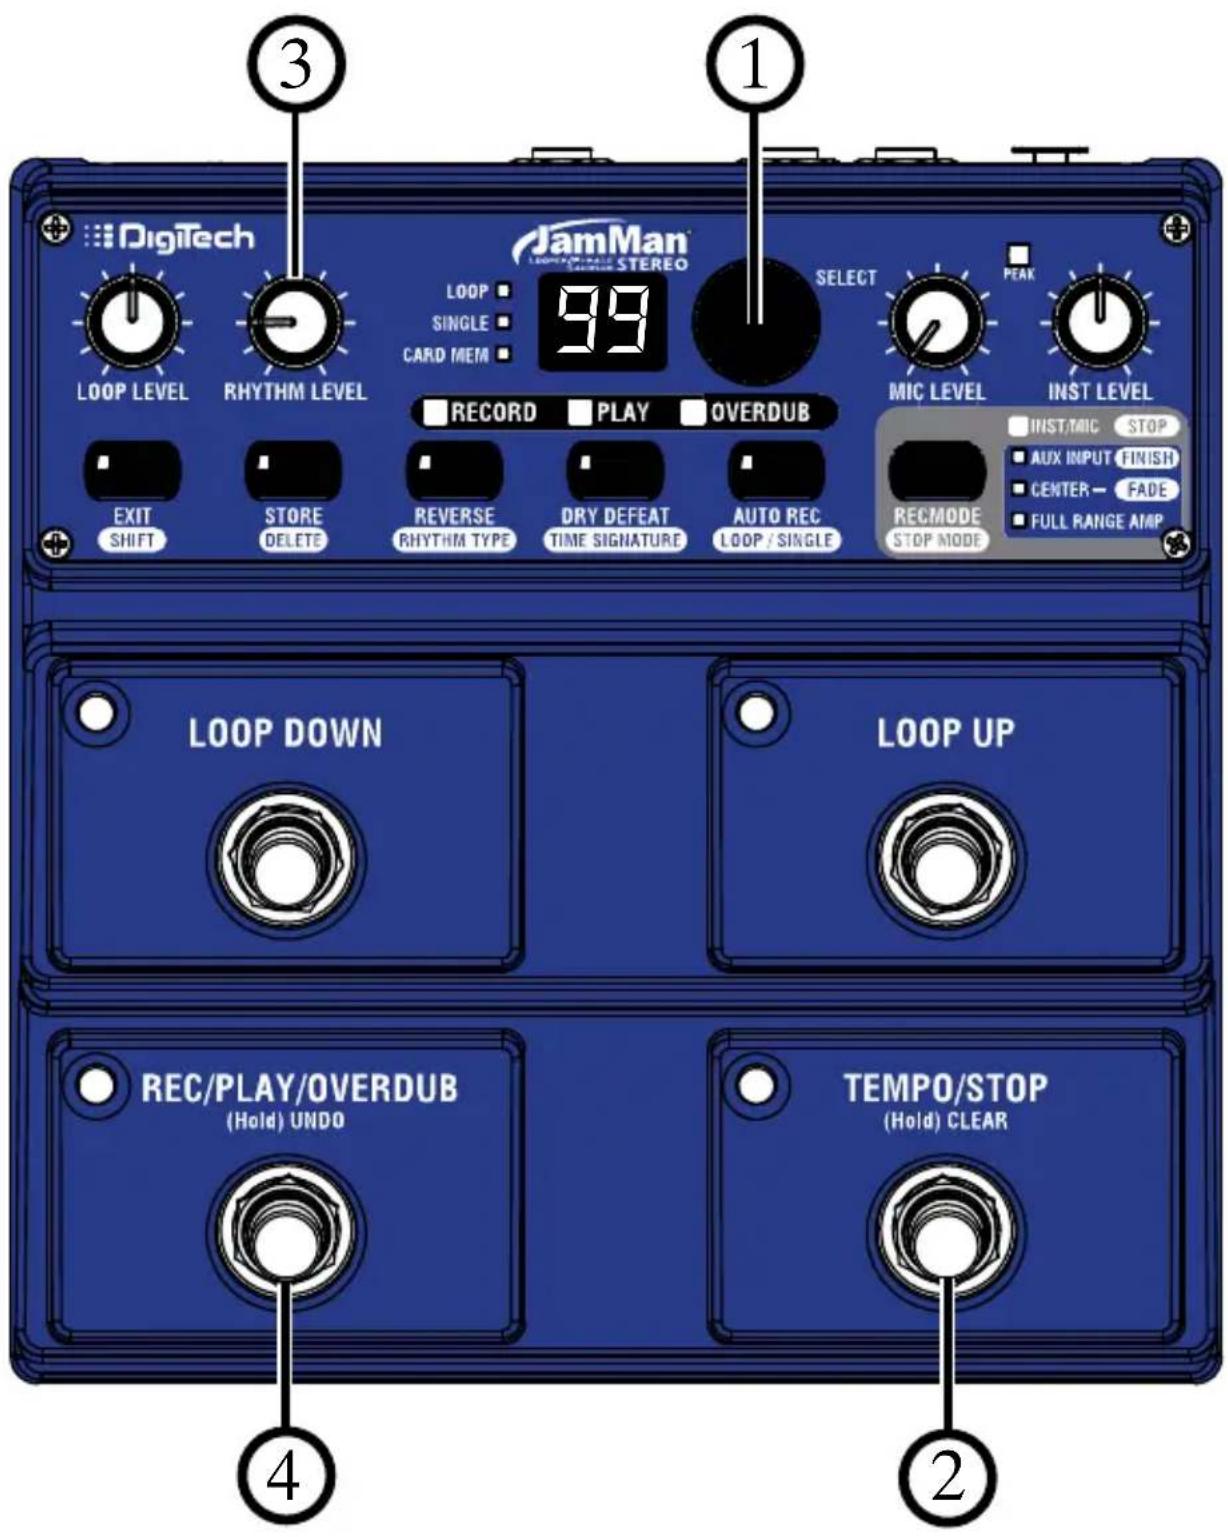
text_image
3 1 Digitech JamMan LOOP LEVEL RHYTHM LEVEL LOOP SINGLE CARD MEM 99 SELECT PEAK LOOP LEVEL RECORD PLAY OVERDUB MIC LEVEL INST LEVEL EXIT SHIFT STORE DELETE REVERSE RHYTHM TYPE DRY DEFEAT TIME SIGNATURE AUTO REC LOOP / SINGLE RECMODE STOP MODE INST/MIC STOP AUX INPUT FINISH CENTER - FADE FULL RANGE AMP LOOP DOWN LOOP UP REC/PLAY/OVERDUB (Hold) UNDO TEMPO/STOP (Hold) CLEAR 4 2Time Stretching a Loop
Once a loop phrase is recorded, you can change the playback tempo which speeds up or slows down the playback of the phrase without changing its pitch (Time Stretch). Time Stretching a loop is a very useful feature in case the band is playing slightly slower or faster than normal or you just want to change the pace of a backing track slightly. You can Time Stretch a loop while stopped or during playback. To Time Stretch a loop, follow these steps:
Time Stretch a Loop that is Stopped
I. Select a previously recorded Loop phrase (LOOP or SINGLE LED is lit) using the LOOP UP/DOWN footswitches or LOOP SELECT knob. The TEMPO/STOP footswitch LED will begin flashing at the phrase's stored tempo.
2. Tap the TEMPO/STOP footswitch two or more times. Tapping quicker than the stored tempo rate will speed up playback while tapping slower than the stored tempo rate will slow down playback.
3. To return to the original tempo, press and hold the TEMPO/STOP footswitch for two seconds and the phrase will return to the original stored tempo.
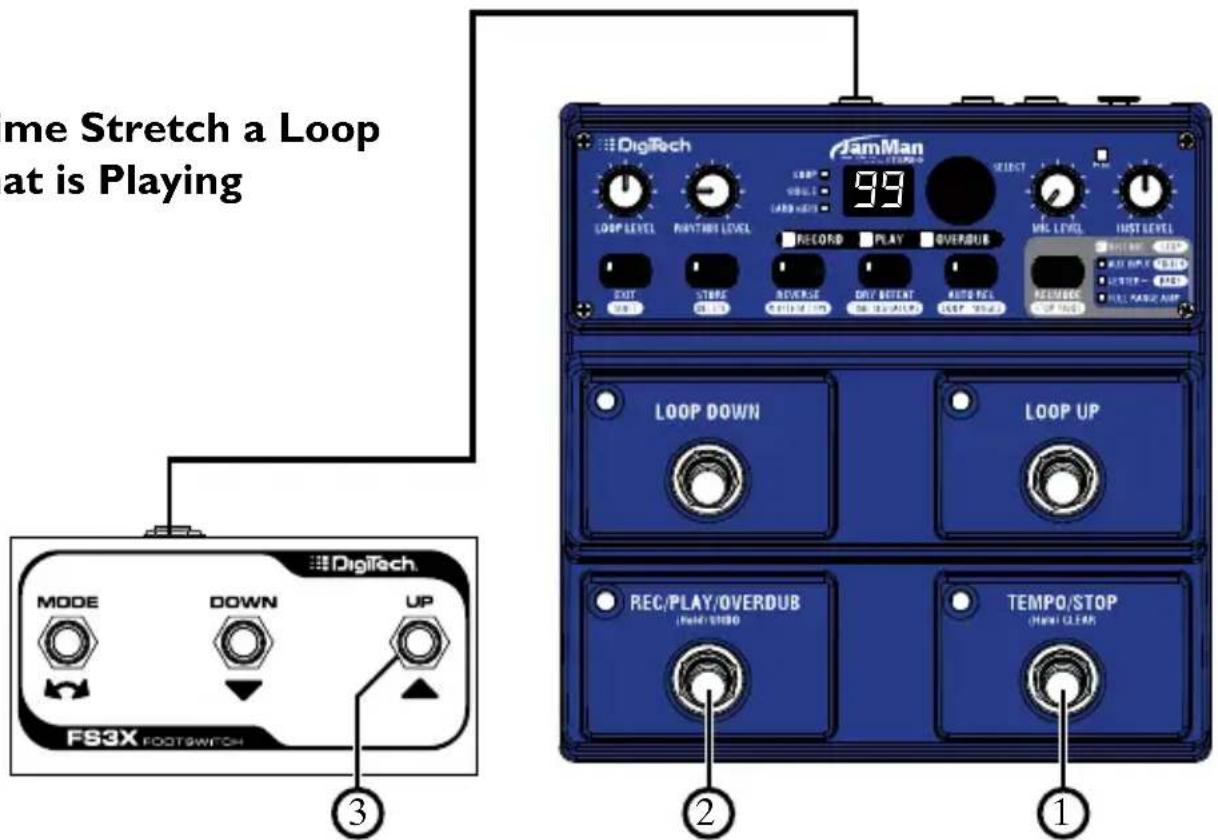
Time Stretch a Loop that is Playing
To time stretch a loop while it is playing requires an optional FS3X footswitch to be connected to the footswitch jack on the rear panel of the JamMan ^® Stereo.
I. Begin from a stopped state.
2. Press the REC/PLAY/OVERDUB footswitch to begin playback.
3. Tap in a new tempo using the UP footswitch on the FS3X. You will hear the tempo changes in real time. To return to the original tempo, press and hold the UP footswitch for two seconds and the phrase will return to the original stored tempo.
Press the STORE button twice to store the changes if desired. You can play along with the adjusted playback speed and still be in tune since the pitch does not change based on playback speed.
NOTE: Restoring the tempo by pressing and holding the TEMPO/STOP footswitch will also clear any newly recorded audio and overdubs.
Time Stretching a Loop
Time Stretch a Loop that is Stopped
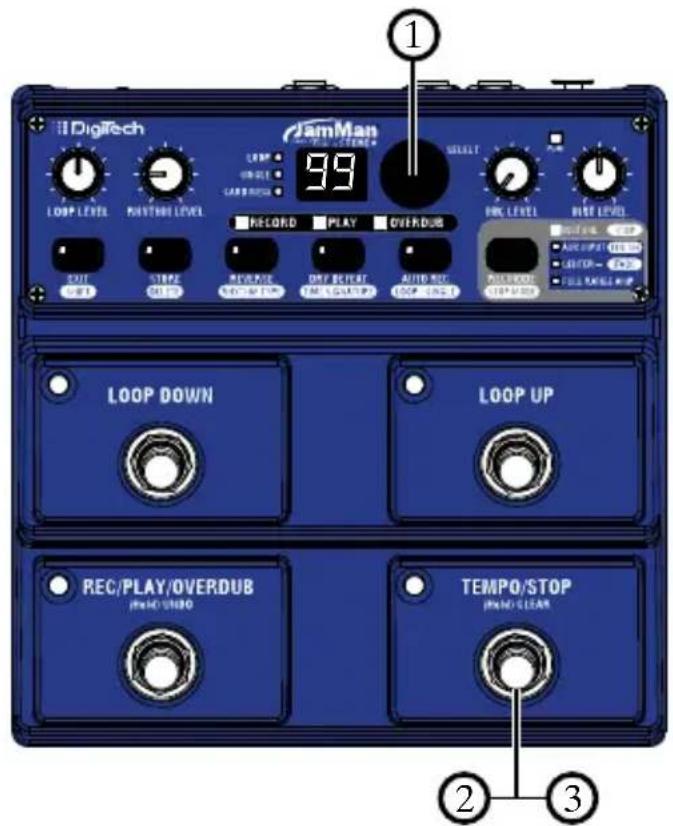
text_image
11 Digitech JamMan 99 SELECT LOOP LEVEL PAINTURE LEVEL RECORD PLAY OVERDUB OUT STOP RECORD OFF/UP OFF/UP ADD RED LOAD LEVEL LOOP DOWN LOOP UP REC/PLAY/OVERDUB JINIO/UNDO TEMP0/STOP JINIO-CLEAR ② ③Time Stretch a Loop that is Playing
text_image
me Stretch a Loop at is Playing DigTech JamMan LOGP LEVEL PLAY/THI LEVEL LOOP 199 LOAD RECORD PLAY OVERDUB OUT STORE RESET DAY RESET AUTO REL MODE INSLEVEL EXIT OUT LOOP DOWN LOOP UP MODE DOWN UP REC/PLAY/OVERDUB (PAGE)/STUDIO TEMP0/STOP (HAWI) CLEAR FS3X FOOTSWITCH ① ② ③Loop / Single Phrases
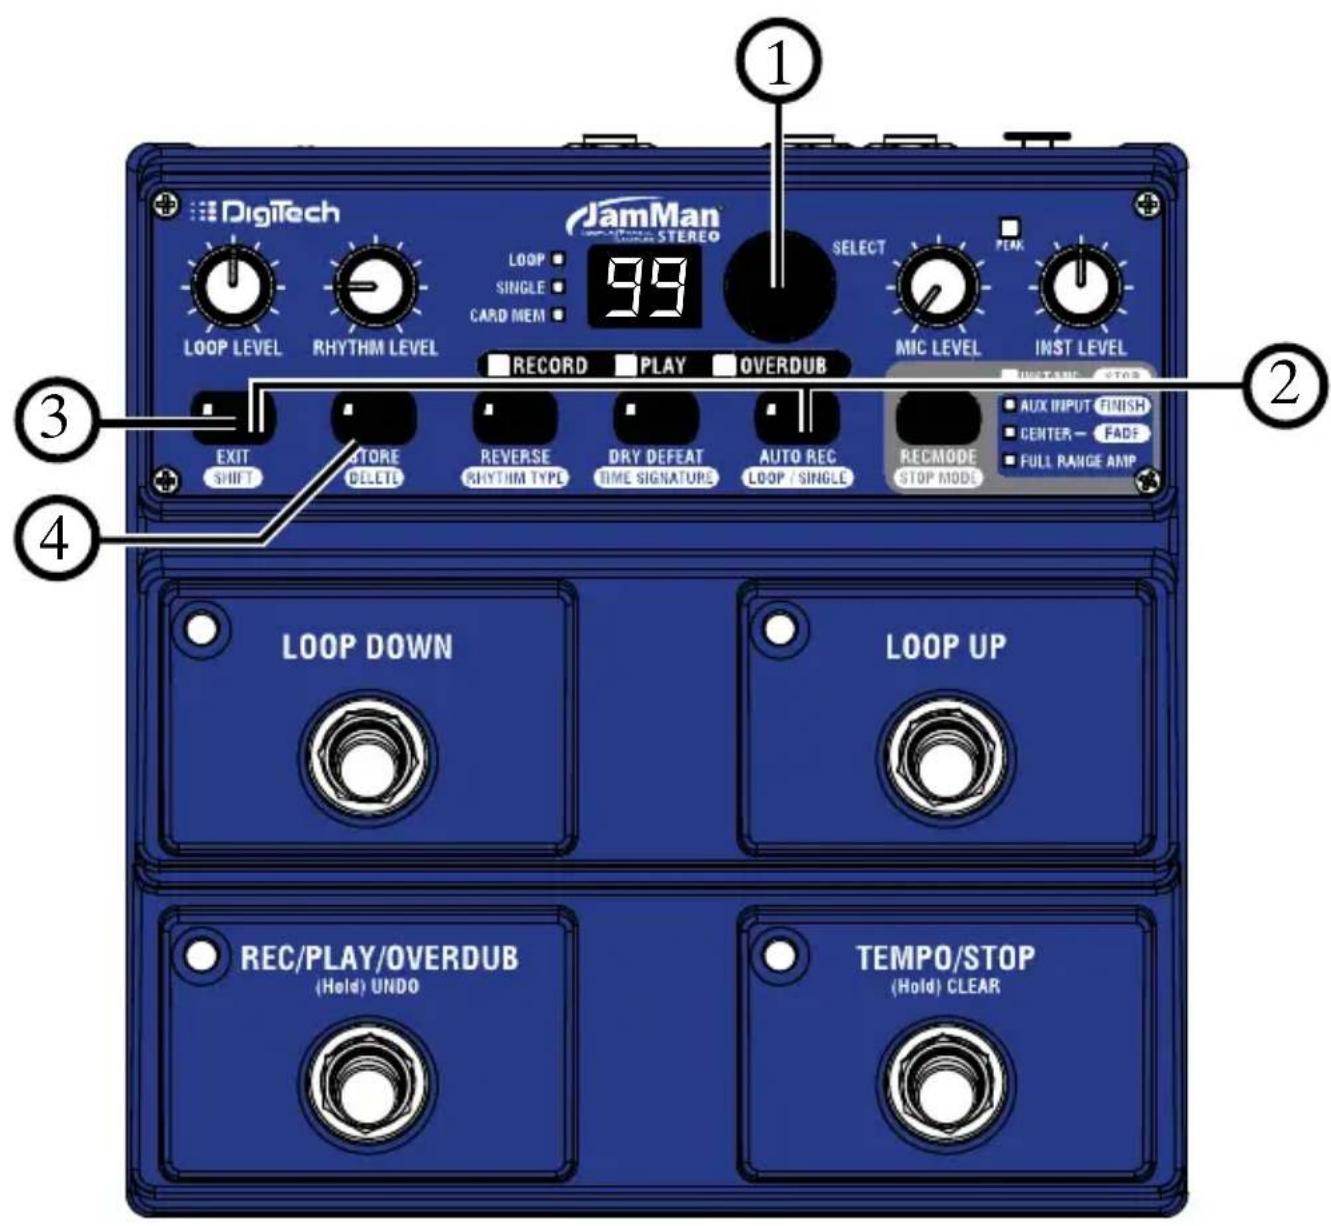
Any phrase recorded into the JamMan ^® Stereo can be played in two ways: Either as a continuous Loop, or as a Single “one-shot” sample.
Single phrases are designed to play the recorded phrase only once and stop. All phrases are recorded as loops by default but they can be changed to a Single phrase if desired. You can always change Single phrases back to Loops later without harming the phrase. To change between Single and Loop, follow these steps:
I. Select a previously recorded Loop phrase (LOOP LED is lit) using the LOOP UP/LOOP DOWN footswitches or SELECT knob. If the CARD MEM LED is lit, you have selected a memory location on the optional memory card.
2. Enable the SHIFT button and then press the LOOP/SINGLE button to select the SINGLE LED or the LOOP LED depending on how you want the phrase to play back.
3. Press EXIT.
4. The STORE button will light to indicate this change must be stored if it is to be recalled later. Press the STORE button twice to store the changes, if desired.
Single phrases cannot have overdubs added to them. Repeated presses of the REC/PLAY/OVERDUB footswitch will just restart the Single phrase playback from the beginning.
Loop / Single Phrases
text_image
1 2 3 4 DigiTech JamMan STEREO LOOP LEVEL RHYTHM LEVEL LOOP SINGLE CARD MEM 99 SELECT PEAK MIC LEVEL INST LEVEL RECORD PLAY OVERDUB INSTALLING STOP EXIT SHIFT STORE DELETE REVERSE RHYTHM TYPE DRY DEFEAT TIME SIGNATURES AUTO REC LOOP / SINGLE RECMODE STOP MODE AUX INPUT FINISH CENTER - FADE FULL RANGE AMP LOOP DOWN LOOP UP REC/PLAY/OVERDUB (Hold) UNDO TEMPO/STOP (Hold) CLEARRhythm Type
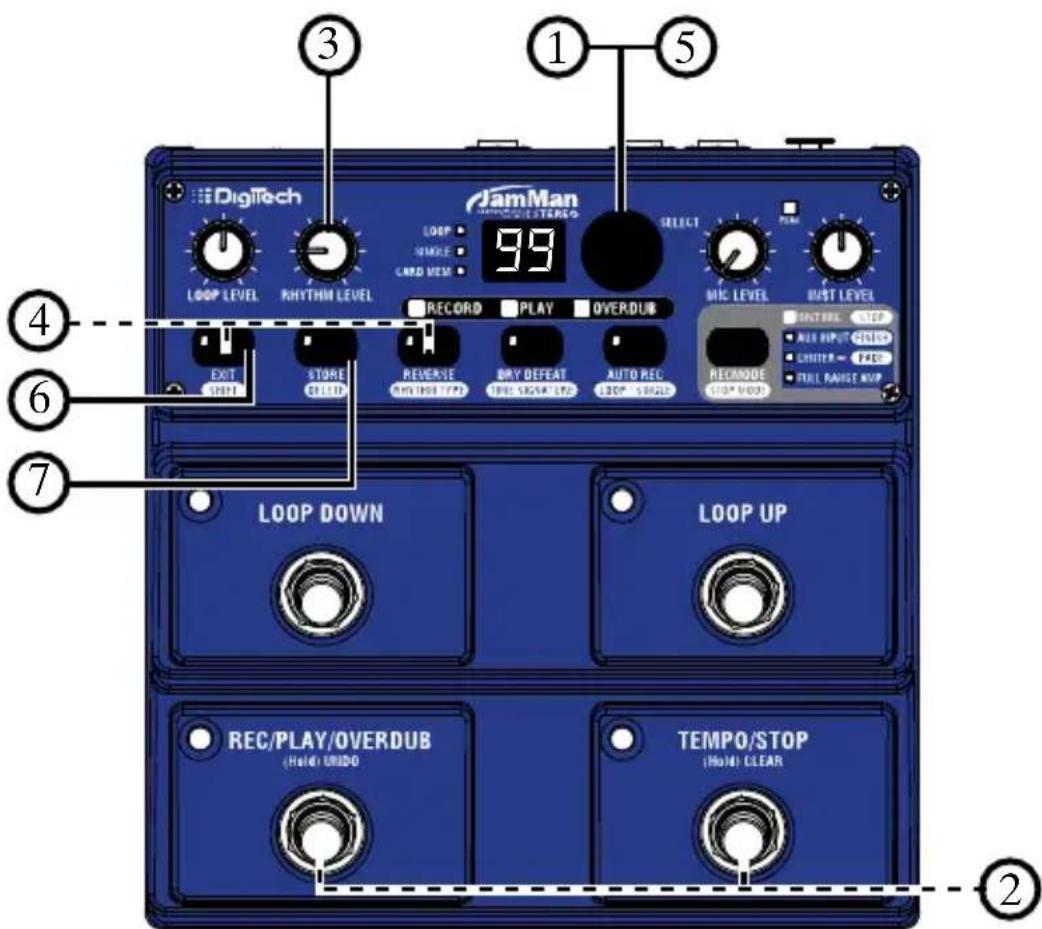
The JamMan® Stereo's guide track has 9 rhythm types to select from. These range from a simple click metronome to various drum samples as the rhythm guide (a tempo must be defined and the RHYTHM LEVEL knob must be turned up to hear the guide track). To change the Rhythm Type, follow these steps:
I. Select a memory location using the SELECT knob.
2. If the memory location is empty (LOOP and SINGLE LEDs are off), set a tempo using the TEMPO/STOP footswitch. If the memory location contains a loop (LOOP or SINGLE LED is on), press the REC/PLAY/OVERDUB footswitch to start playback.
3. Turn up the RHYTHM LEVEL knob to hear the guide track.
4. Enable the SHIFT button and then the RHYTHM TYPE button. The DISPLAY will now show r5 indicating the default RHYTHM TYPE.
5. Use the SELECT knob to choose your desired rhythm sound (designated by F (off), and r - 1 - r9 in the DISPLAY). Selecting F turns the rhythm sound off even if the RHYTHM LEVEL knob is turned up.
6. PressEXIT.
7. The STORE button will light to indicate this change must be stored if it is to be recalled later. Press the STORE button twice to store the changes, if desired.
Rhythm Types are:
| oF – Off | r5 – Studio Kick / High Hat |
| r1 – Wood Blocks | r6 – Techno Kick / High Hat |
| r2 – Sticks | r7 – Cowbell |
| r3 – Click | r8 – Conga |
| r4 – Alternative Kick / High Hat | r9 – Tambourine |
Rhythm Type
text_image
3 1 5 DigiTech JamMan LOGO LEVEL RHYTHM LEVEL LOOP SINGLE CARD VIEW 99 SELECT MIC LEVEL INST LEVEL RECORD PLAY OVERDUB OUTA REC RECOMMANDE STOP VOUT EXIT START STORE CHANGE REVERSE AND INCOME BRY DEFEAT FREE SIGNAL END LOOP DOWN LOOP UP REC/PLAY/OVERDUB (Held) GRID0 TEMPO/STOP (Ho/H) CLEAR 2Rhythm Output
The Rhythm Output isolates the rhythm guide track from the left and right outputs and provides a mono mix of the JamMan® Stereo's looped audio. This is useful for someone like a drummer in the band who needs to follow a click track but also wants to hear the looped audio. It also prevents the rhythm guide track from being heard by the audience through an amp or PA system connected to the left and right outputs. The Rhythm Output does not pass any of the input signal. Only looped audio, overdubbed audio, and rhythm guide track will be heard here.
To isolate the rhythm guide track from the main left and right outputs, just connect a mono TS cable to this output. You can now feed this signal to a mixer or powered monitor for anyone who needs to use this feature.
Deleting Individual Loop Phrases
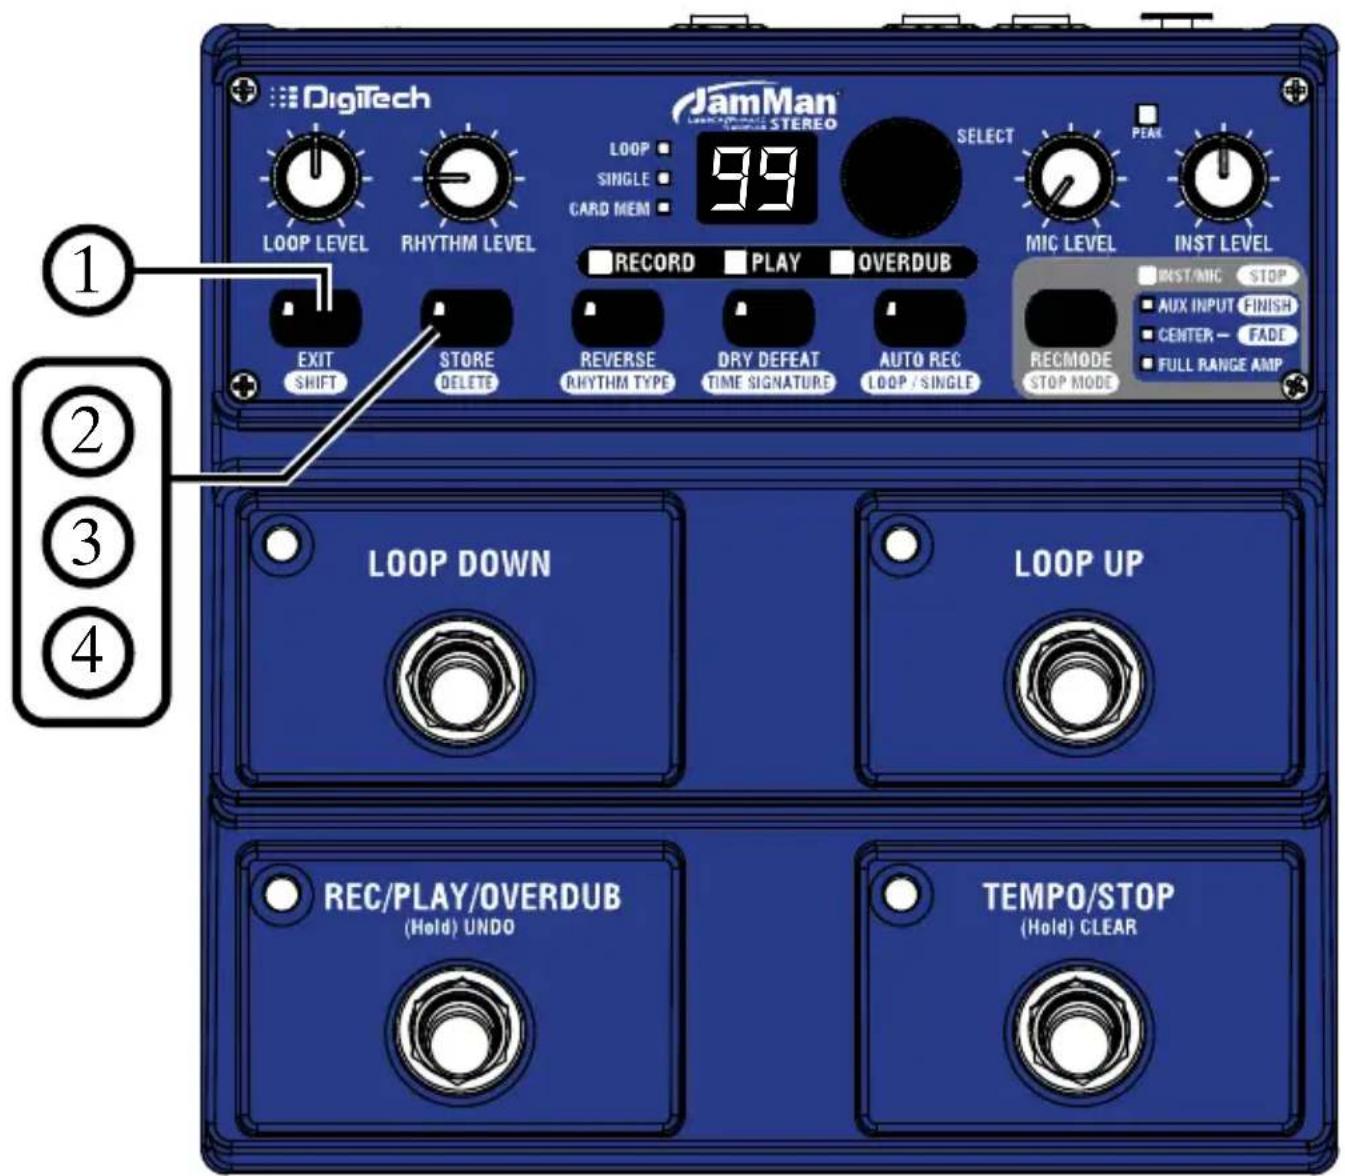
The JamMan ^® Stereo has 99 memory locations and at some time you may need to delete the contents of a memory location so it may be reused or to free up memory. To delete a loop from a memory location, follow these steps:
I. Press the SHIFT button. It will now be lit.
2. Press the DELETE button. The DISPLAY shows EL (Erase Loop). The button will begin flashing waiting for a delete confirmation.
NOTE: If the DISPLAY shows E or EC, you have held the DELETE button too long and need to abort this procedure and start over. Press the EXIT button at this point to abort the Delete procedure.
-
Press the DELETE button again. The DISPLAY reads E? (Erase Loop?). The button will continue to flash. To abort this procedure at any time, press the EXIT button at any time.
-
If you want to delete the contents from this memory location and return it to its default state, press and hold DELETE button for two seconds. The DISPLAY will briefly read dE. When the delete procedure is complete the display will return to the memory number and the EXIT and DELETE buttons will turn off.
Warning: Deleting a memory location is irreversible and will erase any recorded information that resides here. Use the Delete function with caution.
Deleting Individual Loop Phrases
text_image
Digitech JamMan STEREO LOOP LEVEL RHYTHM LEVEL LOOP SINGLE CARD MEN 99 SELECT PEAK LOOP LEVEL RHYTHM LEVEL RECORD PLAY OVERDUB MIC LEVEL INST LEVEL EXIT SHIFT STORE DELETE REVERSE RHYTHM TYPE DRY DEFEAT TIME SIGNATURE AUTO REC LOOP / SINGLE RECMODE STOP MODE INST/MIC STOP AUX INPUT FINISH CENTER - FADE FULL RANGE AMP LOOP DOWN LOOP UP REC/PLAY/OVERDUB (Hold) UNDO TEMPO/STOP (Hold) CLEARErase All Loops - Internal Memory
The JamMan ^® Stereo uses both internal memory and optional card memory for the storage of loop files. You can erase all loops from internal memory or from card memory without having to delete them one at a time.
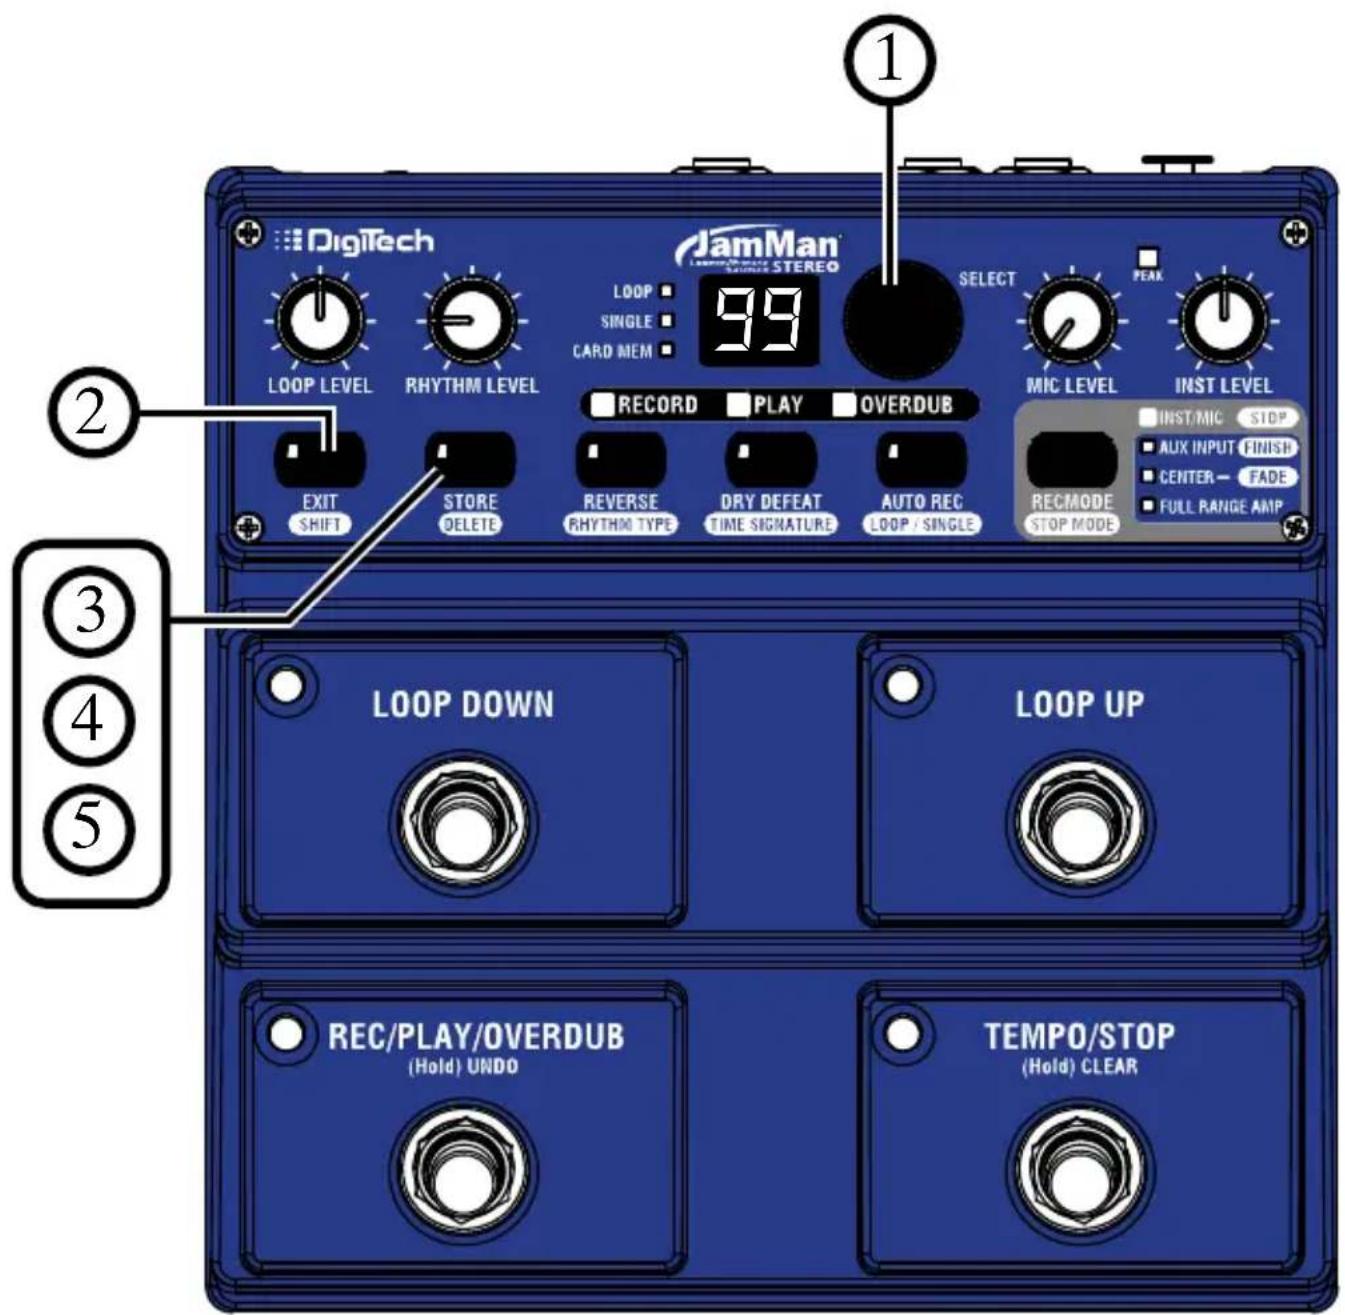
To erase all loops from internal memory, follow these steps:
I. Select a loop memory location that does not light the CARD MEM LED.
2 Enable the SHIFT button.
3. Press and hold the DELETE button for four seconds until (Erase Internal Memory Loops) appears in the Display and release ( will show briefly first but keep holding the button until (appears). The DELETE button will begin flashing.
4. Press the DELETE button again. The DISPLAY reads E? (Erase Loops?). The DELETE button will continue to flash. To abort this procedure, press the EXIT button.
5. To erase all internal loop memories, press and hold the DELETE button for two more seconds. The DISPLAY will show bu indicating the internal memory is being erased. When the delete procedure is complete the display will return to the memory number and the EXIT and DELETE buttons will turn off.
Erase All Loops - Internal Memory
text_image
DigTech JamMan LOOP LEVEL RHYTHM LEVEL LOOP SINGLE CARD MEM 99 RECORD PLAY OVERDUB SELECT PEAK MIC LEVEL INST LEVEL EXIT SHIFT STORE DELETE REVERSE RHYTHM TYPE DRY DEFEAT TIME SIGNATURE AUTO REC LOOP / SINGLE RECMODE STOP MODE INST/MIC STOP AUX INPUT FINISH CENTER - FADE FULL RANGE AMP LOOP DOWN LOOP UP REC/PLAY/OVERDUB (Hold) UNDO TEMPO/STOP (Hold) CLEARUsing Optional SD/SDHC Memory Cards
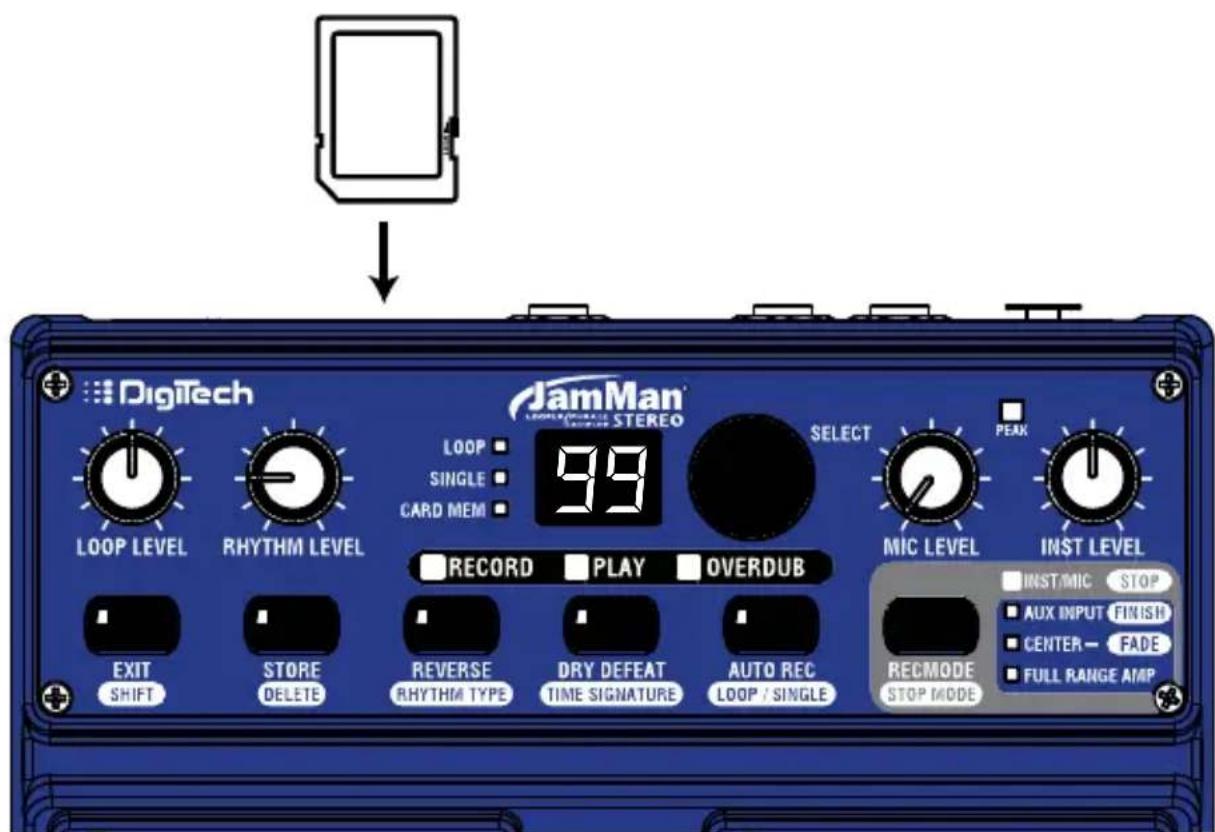
The JamMan® Stereo offers 35 minutes of total built-in loop memory storage. You can increase the loop memory by installing an optional SD/SDHC memory card in the memory card slot on the rear panel. The JamMan Stereo is compatible with SD/SDHC card sizes up to 32GB for over 16 hours of total loop memory.
The first time a memory card is inserted into the JamMan Stereo, it is recommended that you format the card using the JamMan Stereo's format procedure (see page 55).
To install an optional SD/SDHC memory card into the JamMan Stereo, insert the card into the Memory Card slot on the back panel with the label face up and the angled part of the card pointing toward the chassis.
text_image
DigTech JamMan LOUR/ROCK/S STEREO LOOP SINGLE CARD MEM 99 SELECT PEAK LOOP LEVEL RHYTHM LEVEL RECORD PLAY OVERDUB MIC LEVEL INST LEVEL EXIT SHIFT STORE DELETE REVERSE RHYTHM TYPE DRY DEFEAT TIME SIGNATURE AUTO REC LOOP / SINGLE RECMODE STOP MODE INST/MIC STOP AUX INPUT FINISH CENTER- FADE FULL RANGE AMPUsing Optional SD/SDHC Memory Cards
Formatting SD Cards
A memory card that is inserted into the JamMan® Stereo for the first time should be formatted using the JamMan Stereo's format procedure. To format an SD/SDHC Card in the JamMan Stereo, follow these steps:
I. Enable the SHIFT button and then press and hold the DELETE button for four seconds. The DISPLAY will show F0 (Format) and this button will begin flashing.
2. Press the DELETE button again. The DISPLAY will read F? (Format ?) and the DELETE button will continue to flash. To abort this procedure, press the EXIT button at any time.
3. To initiate the card formatting procedure, press and hold the DELETE button again for two seconds. The DISPLAY will show bu indicating the card is being formatted.
Unformatted Cards
If a memory card is inserted into the JamMan Stereo that does not have a valid format, the JamMan Stereo will not recognize it and the DISPLAY will read nF. The card must be formatted before the JamMan Stereo can use it. To format the card, follow these steps:
I. While the DISPLAY reads nF, the STORE button will begin flashing prompting for a format confirmation.
2. Press the flashing STORE button. The DISPLAY will read F7 and the STORE button will continue to flash. You can press the EXIT button to abort the procedure.
3. To initiate the card formatting procedure, press and hold the STORE button for two seconds. The DISPLAY will show ☐ indicating the card is being formatted. Once completed, the DISPLAY will read ☐ and the card is now ready for recording.
Erase All Loops - Memory Card
The following Erase Loops procedure only erases JamMan Stereo loop data from a memory card. All other data and files on the card are left untouched.
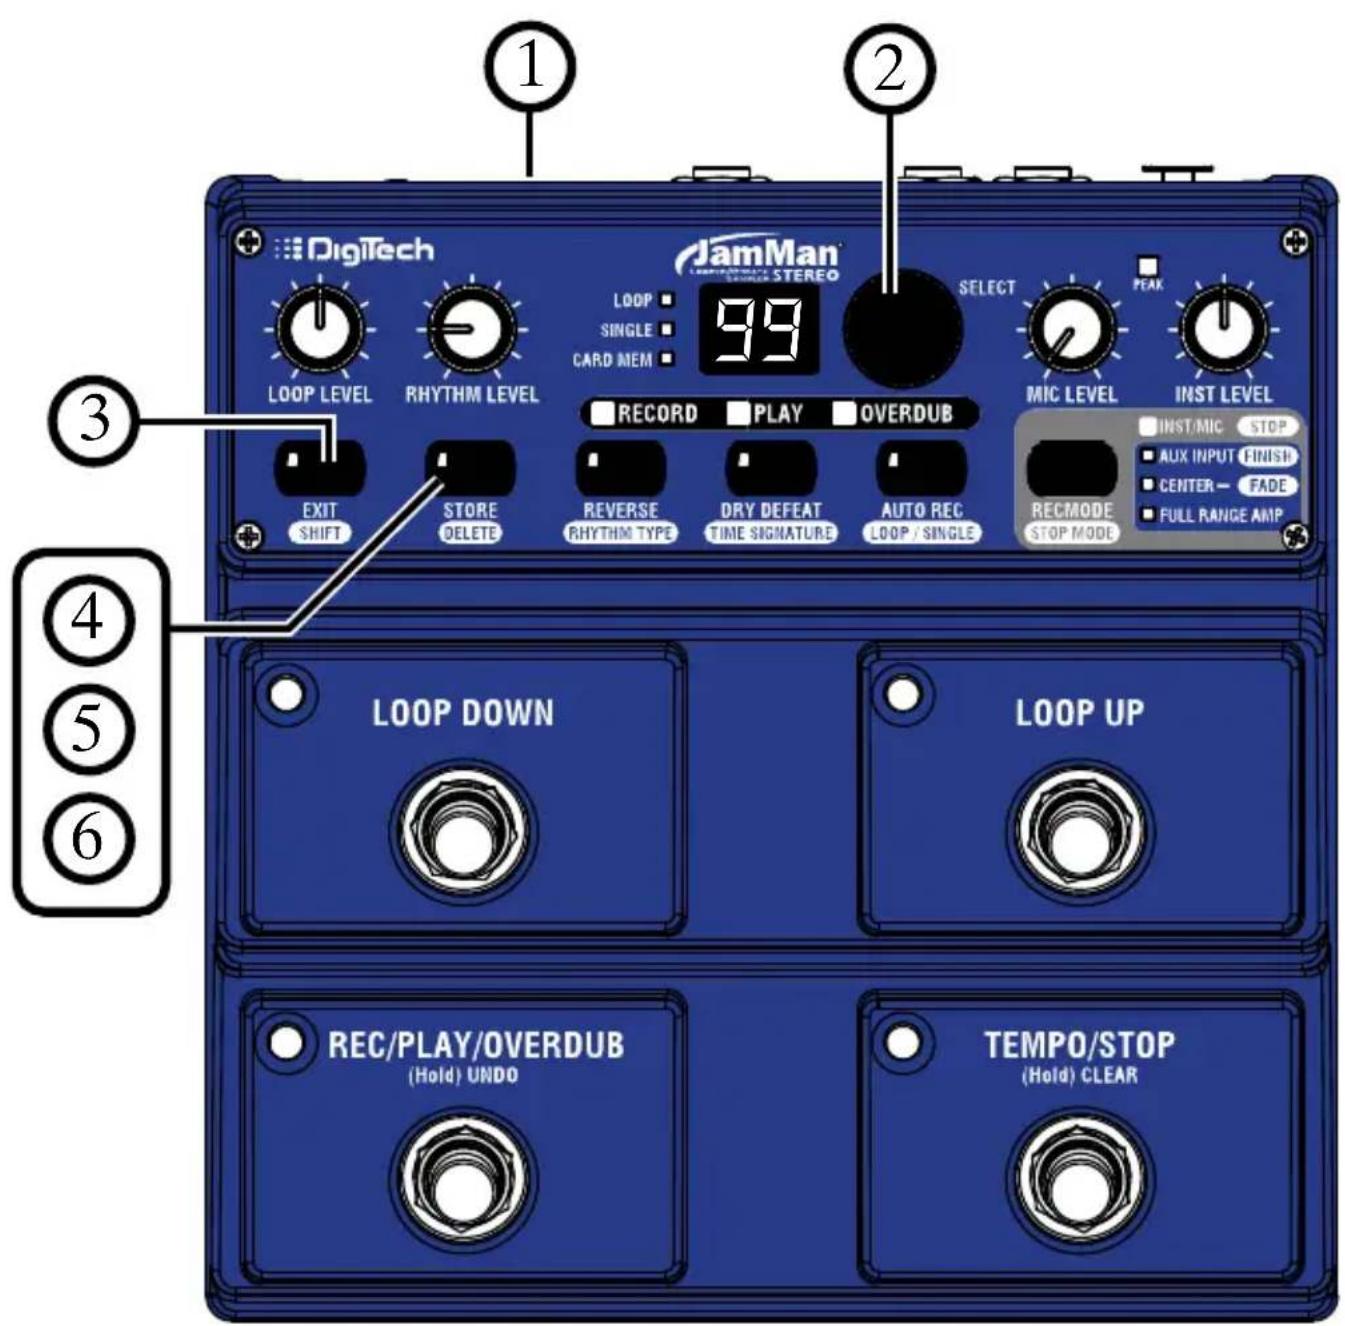
To erase all loops from an optional SD/SDHC memory card, follow these steps:
I. Install an optional SD/SDHC memory card in the JamMan Stereo's memory card slot on the rear panel.
2. Select a loop memory location that lights the CARD MEM LED.
3. Enable the SHIFT button.
4. Press and hold the DELETE button for four seconds until E (Erase Memory Card Loops) appears in the DISPLAY and release ( E will show briefly first but keep holding the button until E appears). The DELETE button will begin flashing.
5. Press the DELETE button again. The DISPLAY reads E? (Erase Loops?). The DELETE button will continue to flash. To abort this procedure, press the EXIT button.
6. To erase all loop data, press and hold the DELETE button for two more seconds. The DISPLAY will show bu indicating the card is being erased. When the delete procedure is complete the display will return to the memory number and the EXIT and DELETE buttons will turn off.
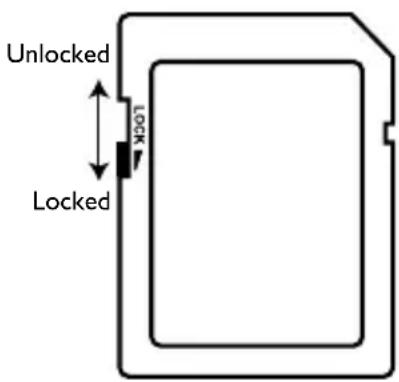
NOTE: If when you try to delete a loop from SD card the display flashes CP, the SD copy protection switch is in the “Locked” position.
text_image
Unlocked Locked LockedErase All Loops - Memory Card
text_image
DigTech JamMan STEREO LOOP LEVEL RHYTHM LEVEL LOOP SINGLE CARD MEM 99 SELECT PEAK RECORD PLAY OVERDUB MIC LEVEL INST LEVEL EXIT SHIFT STORE DELETE REVERSE RHYTHM TYPE DRY DEFEAT TIME SIGNATURE AUTO REC LOOP / SINGLE RECMODE STOP MODE INST/MIC STOP AUX INPUT FINISH CENTER - FADE FULL RANGE AMP LOOP DOWN LOOP UP REC/PLAY/OVERDUB (Hold) UNDO TEMPO/STOP (Hold) CLEARFactory Restore
This procedure will return the JamMan ^® Stereo to its original factory settings. All internal loop memories will be reformatted and the original 10 loops that shipped with the JamMan Stereo will be restored. Factory Restore does not affect any loops on the optional external SD memory card.
WARNING: The Factory Restore procedure will erase all loops from the JamMan Stereo internal memory and restore it to its factory state. This procedure is permanent and cannot be reversed. Use the Factory Restore procedure with caution. It is recommended you back up your internal loops to your computer with the JamManager™ software and USB connection.
I. Press and hold the STORE button while powering up the JamMan Stereo.
2. When the display shows Fr, release the STORE button which will now be flashing.
3. Press the STORE button again. This display will now show r ? asking if you are sure you want to restore the internal memory to its factory state. To abort this procedure at this time, press the EXIT button.
4. To confirm the restore procedure, press and hold the STORE button until appears in the Display. The JamMan Stereo will return to normal operation shortly as indicated by loop memory 1 being shown in the Display.
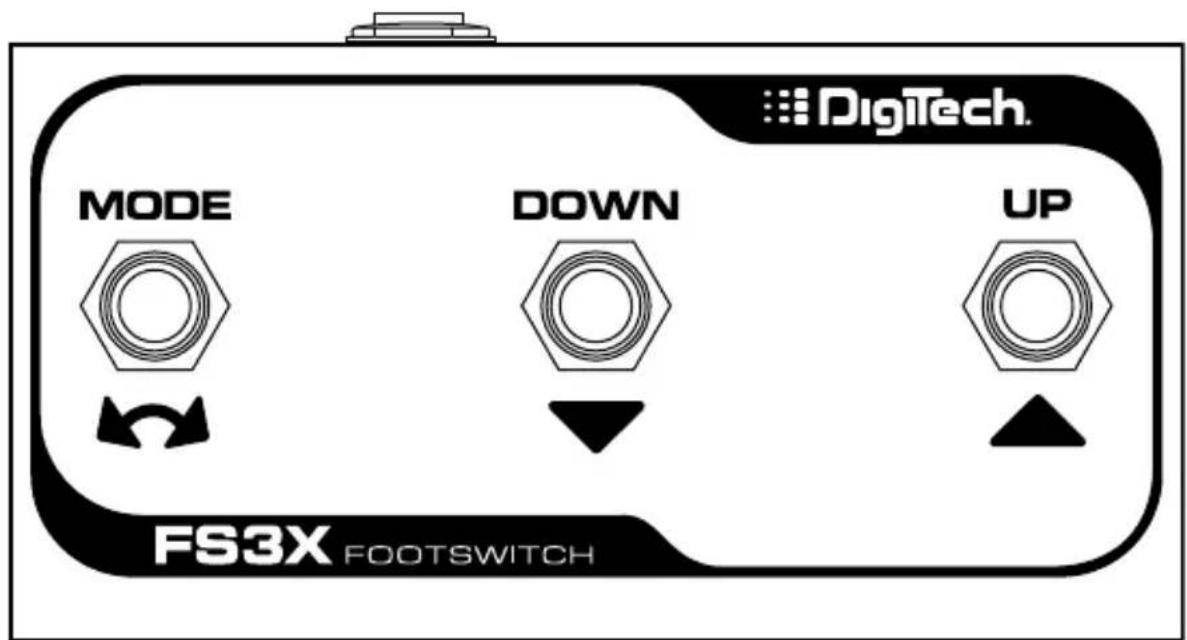
Optional FS3X Footswitch
The optional FS3X Footswitch gives you hands-free control over loop selection, tempo, and stop functions.
Mode Switch
This footswitch is used for immediately undoing and redoing the last recorded overdub.
Down Switch
This footswitch is used to play the recorded phrase in reverse.
Up Switch
This footswitch can be used to set the tempo of a new loop or change the tempo (Time Stretch) of a stored loop. Playback Tempo can be changed even while the loop is playing using this footswitch.
text_image
DigTech. MODE DOWN UP FS3X FOOTSWITCHJamManager™ Librarian Software
The JamManager™ loop librarian software is available as a free download from the DigiTech website. This application runs on both Windows XP/Vista/7 and Mac OS X computer systems, and lets you archive and transfer loops between the JamMan® Stereo and your computer. For more information, visit www.digitech.com.
System Requirements
Windows® Vista (32/64-bit), 7 (32/64-bit), XP Home/Professional (32-bit)
Intel ^® or AMD ^® XP Processor
IGB of memory (2GB recommended)
Microsoft ^® Silverlight ^TM 4.0 installed
Available USB port
Internet connection (for updates)
Mac® OS 10.5.8 or later
Intel ^® Core Processor
IGB of memory (2GB recommended)
Microsoft ^® Silverlight ^TM 4.0 installed
Available USB port
Internet connection (for updates)
Specifications
Digital
A/D/A Conversion: 24-bit
Sampling Frequency: 44.1 kHz
Loop File Format: 44.1 kHz, 16-bit (stereo), uncompressed
WAVfile
USB: 2.0 High Speed (USB I.1 compatible)
Connector Type: 4-pin Type B
Max. Individual Loop Time: 10 minutes
Internal Memory Capacity: Over 35 minutes total loop time (up to
99 loops total)
External Memory Type: SD/SDHC up to 32GB (optional)
External Memory Capacity: Over 16 hours (10.6MB/minute) of
recording time, when using 16GB or
larger SDHC card (up to 99 loops total)
Inputs/Outputs
Microphone Input
Connector Type: Female XLR Pin 2 Hot (no phantom power)
Input Impedance: 1 kΩ Balanced
Maximum Gain: 41 dB (150 Ω source)
EIN: -125 dBu A-weighted (max gain, 150 Ω source)
Left(Mono)/Right Inputs
Connector Type: I/4" Unbalanced (Tip-Sleeve)
Input Impedance: 500 kΩ Mono/I MΩ Stereo
Unity Gain Input to Output: Inst Level knob set to 12 o'clock position
Max Input Level at Unity: 4 dBu DFS
Maximum Gain: 14.5 dB
Aux Input
Connector Type: 1/8" Stereo (Tip-Ring-Sleeve)
Input Impedance: 20 kΩ
Maximum Input Level: I dBu DFS
Footswitch Input
Connector Type: I/4" Stereo (Tip-Ring-Sleeve), compatible
with optional DigiTech® FS3X 3-button
footswitch
Specifications
Left(Mono)/Right/Rhythm Outputs
Connector Type: I/4" Unbalanced (Tip-Sleeve)/Balanced
(Tip-Ring-Sleeve)
Output Impedance: 100 Ω Unbalanced/ 200 Ω Balanced
Maximum Output Level: 10 dBu DFS
Playback Unity Gain: Loop Level knob set to 12 o'clock position
Headphone Output:
Connector Type: 1/8" Stereo (Tip-Ring-Sleeve)
Output Power: 87.5 mW per channel at 50 Ω
Line Inputs to Outputs
Dynamic Range: 105 dB A-weighted (at unity gain)
Frequency Response: +0/-3 dB 20-20 kHz
Voltage Rails +/-14 V
General
Power:<9 Watts
Current Draw: < I A
Dimensions: 6.84" (L) × 6.70" (W) × 2.89" (H)
173.6 mm (L) × 170.1 mm (W) × 73.4 mm (H)
Weight: 2.22 lbs, 1.01 kg
Adapter:
*IMPORTANT NOTE: There are two different models of this product. If purchasing a replacement power supply, ensure that you properly match the power requirements screening on the back panel of the product with the corresponding adapter model listed below.
Power Requirements: 9 VAC 1.3 A*
| Country (Voltage) | Adapter Model |
| Japan (100VAC, 50/60 Hz): | PS0913B-100* |
| US and Canada (120 VAC, 60 Hz): | PS0913B-120* |
| Europe (230 VAC, 50 Hz): | PS0913B-230* |
| UK (240 VAC, 50 Hz): | PS0913B-240* |
| Australia (240VAC, 50 Hz): | PS0913B-240-AU* |
Power Requirements: 9 VDC 1.3 A*
| Country (Voltage) | Adapter Model |
| US, Canada, Europe, Japan (100-240 VDC, 50/60 Hz): | PS0913DC-01* |
| Australia & UK (100-240VDC, 50/60 Hz): | PS0913DC-02* |
Specifications
DigiTech ^® engineers are constantly working to improve the quality of our products. Specifications are therefore subject to change without notice.
DigiTech®
8760 South Sandy Parkway
Sandy, Utah 84070
PH (801) 566-8800
FAX (801) 566-7005
www.digitech.com
JamMan® Stereo Owner's Manual 18-0707V-B
Printed in China
DigiTech® and JamMan® Stereo are registered trademarks of HARMAN. All other product name and trademarks are the property of their respective owners, which are in no way associated with DigiTech.
©2011 HARMAN. All rights reserved

text_image
Digitech by HARMAN