
Walkman WM-FX513 - Cassette player SONY - Free user manual and instructions
Find the device manual for free Walkman WM-FX513 SONY in PDF.


User questions about Walkman WM-FX513 SONY
0 question about this device. Answer the ones you know or ask your own.
Ask a new question about this device
Download the instructions for your Cassette player in PDF format for free! Find your manual Walkman WM-FX513 - SONY and take your electronic device back in hand. On this page are published all the documents necessary for the use of your device. Walkman WM-FX513 by SONY.
USER MANUAL Walkman WM-FX513 SONY
Radio Cassette player
Operating instructions
Sony Corporation © 1995 Printed in Japan
WALKMAN
WALKMAN is a registered trademark of Sony Corporation. WALKMAN es marca registrada de Sony Corporation.
WARNING
To prevent fire or shock hazard, do not expose the unit to rain or moisture.
ADVERTENCIA
For customers in the USA
Owner's Record
The model number is located at the rear and the serial number is located inside the tape holder. Record these numbers in the space provided below: Refer to them whenever you call upon your Sony dealer regarding this product.
Model No. ____ Serial No. ____
WARNING
This equipment has been tested and found to comply with the limits for a Class B digital device, pursuant to Part 15 of the FCC Rules. These limits are designed to provide reasonable protection against harmful interference in a residential installation. This equipment generates, uses, and can radiate radio frequency energy and, if not installed and used in accordance with the instructions, may cause harmful interference to radio communications. However, there is no guarantee that interference will not occur in a particular installation. If this equipment does cause harmful interference to radio or
, television reception, which can be determined by turning the equipment off and on, the user is encouraged to try to correct the interference by one or more of the following measures:
- Reorient or relocate the receiving antenna.
- Increase the separation between the equipment and receiver.
- Connect the equipment into an outlet on a circuit differentnt from that to which the receiver is connected.
- Consult the dealer or an experienced radio/TV technician for help.
This device complies with Part 15 of the FCC Rules. Operation is subject to the following two conditions: (1) This device may not cause harmful interference, and (2) this device must accept any interference received, including interference that may cause undesired operation.
You are cautioned that any changes or modifications not expressly approved in this manual could void your authority to operate this equipment.
The illustrations in this manual are for the FX513. The difference between the FX511 and FX513 is that the FX513 is supplied with a remote control.
text_image
HOLD Indicator HOLD Indicator HOLD HOLDD
a
b
text_image
REPEAT VOL REPEAT VOL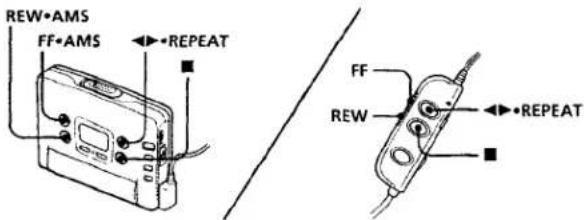
text_image
REW•AMS FF•AMS REPEAT FF REW REPEAT©
text_image
BL SKIP MODE NR ON ON MEGA BASS AVLS FM MODE MENU SET BATTWelcome!
Thank you for purchasing the Sony WM-FX511/513 Radio Cassette Player.
Some features are:
• LCD Menu function that lets you select and switch functions in the display window of the main unit.
• Auto Memory Scanning function that lets you store and recall up to 16 stations for FM and 8 stations for AM automatically.
• AMS (Automatic Music Sensor) function that searches the beginning of the current and 2 previous tracks, and succeeding 3 tracks at high speed.
• Useful remote control (FX513)
▶Getting Started
Preparing a Power Source
Choose either dry battery or house current as the power source. For the tourist model, the supplied rechargeable battery can be used.
Dry Battery (see Fig. A-③)
1 Open the battery compartment lid, and insert an R6 (size AA) dry battery (not supplied) by matching the + and - on the battery to the diagram inside the battery compartment.
When to replace the battery (see Fig. A-⑥)
Replace the battery with a new one when the BATT lamp dims.
| Battery life | (Approx. hours) |
| Sony | Sony |
| alkaline | R6P |
| LR6 (SG) | (SR) |
| Tape playback | 15 | 3.5 |
| Radio reception | 22 | 7 |
For maximum performance we recommend that you use an alkaline battery.
Notes
- Do not charge a dry battery. - When you do not use the Walkman for a long time, remove the battery to avoid any damage caused by battery leakage and subsequent corrosion.
Rechargeable Battery (see Fig. A-©) (Tourist model only)
1 Set the voltage selector to the correct position with the right operating voltage using a screwdriver, etc.
2 Insert the supplied rechargeable battery (NC-AA) for the tourist model only into the charger with correct polarity.
3 Plug in the charger to the wall outlet. Full charging takes about 4 hours. If the plug does not fit your mains, attach the supplied AC plug adaptor (for the tourist model only).
4 Insert the fully charged battery into the battery compartment (see Fig. A-②).
When to charge the battery (see Fig. A-⑥)
Charge the battery when the BATT lamp dims. You can charge the battery about 300 times.
Battery life (Approx. hours)
| Rechargeable battery (NC-AA) | |
| Tape playback | 6 |
| Radio reception | 8.5 |
Notes
- Do not tear off the film on the rechargeable battery.
- Use the Sony NC-AA rechargeable battery only with the supplied battery charger (for the tourist model only).
- Do not leave the charger plugged in for more than 20 hours. Overcharging may damage the rechargeable battery.
• The battery charger and the rechargeable battery may become warm during charging, but it is not a problem.
House Current (mains) (see Fig. A-①)
Connect the AC power adaptor (AC-E15HG not supplied) to the DC IN 1.5 V jack and to the mains. Do not use any other AC power adaptor.
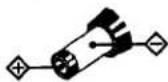
Polarity of the plug
Connecting the Headphones (see Fig. B-①)
1 Connect the headphones to ⚠REMOTE (FX513) or ⚠ (FX511). You can put the longer headphone cord behind your neck.
To use the supplied clip (FX513) (excluding the U.S.A. model)
(see Fig. B-⑥)
Position the headphones cord through the guides on the supplied clip as shown. Fasten the clip to your clothes.
For the customers in the U.S.A.
The supplied headphones are different from those explained and illustrated above.
Releasing HOLD (see Fig. ©)
The HOLD function locks the Walkman and the remote control separately to prevent them from operating when you accidentally press a button. Unlock it before operating.
1 Slide HOLD in the opposite direction of the arrow on the Walkman, or slide HOLD on the remote control so that the yellow HOLD indicator is hidden.
To lock the Walkman
Slide HOLD in the direction of the arrow on the Walkman, or slide HOLD on the remote control so that the HOLD indicator turns yellow.
▶Operating the Walkman
Playing a Tape (see Fig. D-⑧)
The Auto tape selector automatically selects the tape (normal (TYPE I), CrO₂ (TYPE II) or metal (TYPE IV)) for playback.
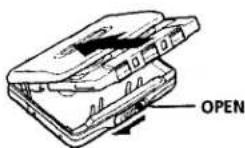
1 Insert a cassette.
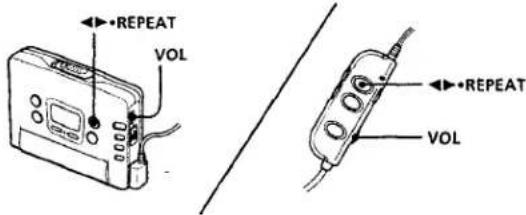
2 Press ◀▶•REPEAT to start playing then adjust the volume.
When adjusting the volume on the Walkman (FX513)
Set the VOL control on the remote control at maximum.
When adjusting the volume on the remote control (FX513)
Set the VOL control on the Walkman to around 6.
| To | Press (see Fig. D-8) |
| Play the other side | ◀▶•REPEAT during playback |
| Stop playback | ■ |
| Fast forward | FF•AMS during stop |
| Rewind | REW•AMS during stop |
| Repeat the track you are listening to (Repeat Single Track function) | ◀▶•REPEAT for two seconds or more during playback To stop a single repeat, press it again. |
| Find the beginning of the next track/ succeeding 3 tracks (AMS*) | FF•AMS once/repeatedly during playback |
| Find the beginning of the current track/ previous 2 tracks (AMS) | REW•AMS once/repeatedly during playback |
| Play the same side from the beginning (Auto Rewind Play function) | REW•AMS for two seconds or more during stop |
| Play the other side from the beginning (Skip Reverse function) | FF•AMS for two seconds or more during stop |
* Automatic Music Sensor
Note on Beeps during AMS operations
- The beeps differ in relation to the track number being searched. When finding the beginning of the next 3 tracks during AMS operations, beeps “• - - -” (beep followed by three long beeps) are emitted repeatedly. Likewise, when finding the beginning of the previous 2 tracks, beeps “• • - - -” are emitted repeatedly. While the remaining tracks are reduced, the number of long beeps are reduced accordingly.
To skip a long blank space between musics. (BL SKIP\* function) (see Fig. D-©)
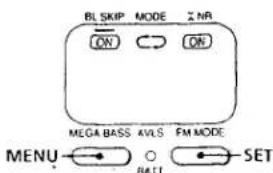
Press MENU repeatedly to set the cursor to BL SKIP in the display. Then press SET to show "ON".
• The Walkman fast forwards the tape to the next track if there is a blank space longer than 12 seconds.
To select playback mode (see Fig. D-©)
Press MENU repeatedly to set the cursor to MODE in the display. Then press SET to select the desired mode.
| To play | Select |
| Both sides repeatedly | |
| Both sides once from the side facing the cassette holder |
Note on AMS, REPEAT Single Track and BL SKIP
• To operate the AMS and the REPEAT Single Track functions, you need a blank of 4 seconds or longer between the tracks. For the BL SKIP function, you need a blank of 12 seconds or longer. Therefore, if there is noise between the tracks, these functions will not detect the blank and will not operate. Likewise, if the recording level is moderately low within a track, these functions may inaccurately operate.
To play a tape recorded with Dolby NR system (see Fig. D-©)
Press MENU repeatedly to set the cursor to ☐ NR (Dolby noise reduction) in the display. Then press SET to show "ON".
(turn over)
¡Bienvenido!
Listening to the Radio (see Fig. E-①)
1 Press RADIO ON•BAND to turn on the radio.
2 Press RADIO ON·BAND repeatedly to select AM or FM.
3 Press TUNING+/- to tune in to the desired station.
If you keep pressing TUNING+/- for a few seconds, the Walkman will start tuning the stations automatically.
To turn off the radio Press ■•RADIO OFF.
To improve the broadcast reception
- For AM: The Walkman has a built-in antenna. Reorient the Walkman horizontally to obtain optimum AM reception. For FM (see Fig. E-①): Extend the headphones cord, the aerial. If the reception is still not good, press MENU repeatedly to set the cursor to FM MODE in the display. Then press SET to show "MONO" (monaural). For the U.S.A. model, press SET to show "LOCAL".
- If a tape with metallic shell or labels is inserted in the unit, remove it. Such a tape may cause interference.
Note
- Do not remove the power sources while listening to the radio, or the received stations may not be stored.
Presetting Radio Stations
Once you store your favorite stations in memory, you can play them easily. You can preset up to 16 stations for FM and 8 stations for AM of each mode (Eur, JPn, USA).
Tuning in to and Storing Radio Stations Automatically (Auto-Memory Scanning function) (see Fig. E-©)
1 Press RADIO ON•BAND to turn on the radio.
2 Press RADIO ON·BAND repeatedly to select AM or FM.
3 Press ENTER until "A" appears in the display.
The Walkman starts searching and storing stations.
4 After the preset number appears, tune in a station using PRESET+/-.
Storing Radio Stations Manually (Manual- Memory function) (see Fig. E-①)
You can preset the stations in any order.
1 Turn on the radio and select the desired band.
2 Press ENTER.
The frequency digits and a preset number flash in the display.
3 While the frequency digits and the preset number are flashing, tune in to a station you wish to store using TUNING+/-, and select a preset number on which you wish to store a station using PRESET+/-.
4 While the frequency digits and the preset number are flashing, press ENTER.
5 Tune in to a station using PRESET+/-.
Notes
- If you cannot complete step 3 or 4 while the indications are flashing, repeat from step 2.
- If you preset a new station to the same preset number, a previously stored station will be erased.
To cancel the stored station Follow the procedure above and in step 3, instead of tuning in to a station, press and hold TUNING+/ - until "----" is displayed. Press ENTER while "----" is flashing.
Receiving Stations Outside Your Country (see Fig. E-©)
The frequency range differs depending on the area (see the chart "Area indication and frequency range"). If you listen to the radio in an area of different frequency range, change the area indication.
1 Press RADIO ON·BAND to turn on the radio.
2 Press ENTER.
3 Press and hold RADIO ON•BAND until the area indication flashes in the display.
4 Press RADIO ON·BAND repeatedly to select the following area "Eur", "JPn" or "USA" and press ENTER.
5 Tune in to and store stations as necessary following the procedure of the "Listening to the Radio" and "Presetting Radio Stations".
Area indication and frequency range
| Area* | Frequency range | |
| FM (MHz) | AM(kHz) | |
| Eur | 87.5-108.0 | 531-1,602 |
| Jpn | 76.0-90.0 | 531-1,710 |
| USA | 87.5-108.0 | 530-1,710 |
* Eur : European and other countries JPn : Japan USA : USA and Canada
Using Other Functions (see Fig. F)
Emphasizing Bass (MEGA BASS)
1 Press MENU repeatedly to set the cursor to MEGA BASS in the display. Then, press SET to select the desired mode. With each press, the indications change as follows.
■ : emphasizes bass sound
■ : emphasizes deeper bass sound
No message: off (normal)
Note
• If the sound is distorted with the
mode "◀", select the mode "◀" or no message.
Protecting Your Hearing (AVLS)
When you set the AVLS (Automatic Volume Limiter System) function to activate, the maximum volume is kept down to protect your ears.
1 Press MENU repeatedly to set the cursor to AVLS in the display. Then press SET to show "💡".
Notes
- If the sound is distorted when you listen to the bass-boosted sound with the AVLS function, turn down the volume.
• The setting is stored as long as the battery is not replaced.
▶ Additional Information
Precautions
On rechargeable battery and charger (Tourist model only)
- If the rechargeable battery is new or has not been used for a long time, it may not be charged completely until you use it several times.
- The nameplate indicating the operating voltage, power consumption, etc. is located on the bottom exterior of the battery. charger.
On batteries
Do not carry the dry or rechargeable batteries with coins or other metallic objects. It can generate heat if the positive and negative terminals of the batteries are accidentally contacted by a metallic object.
On the unit
• The CE mark on the unit is valid only for products marketed in the European Union.
- Do not drop the unit or give a shock to the unit, or it may cause a malfunction.
- Do not leave the unit in a location near heat sources, or in a place subject to direct sunlight, excessive dust or sand, moisture, rain, mechanical shock, or in a car with its windows closed.
- If the unit has not been used for long, set it in the playback mode and warm it up for a few minutes before inserting a tape.
On tapes longer than 90 minutes
We do not recommend the use of tapes longer than 90 minutes except for a long continuous playback. They are very thin and tend to be stretched easily.
On the remote control (FX513)
Use the supplied remote control only with this unit.
On headphones
Road safety
Do not use headphones while driving, cycling, or operating any motorized vehicle. It may create a traffic hazard and is illegal in some areas. It can also be potentially dangerous to play your headsets at high volume while walking, especially at pedestrian crossings. You should exercise extreme caution or discontinue use in potentially hazardous situations.
Preventing hearing damage Do not use headphones at high volume. Hearing experts advise against continuous, loud and extended play. If you experience a ringing in your ears, reduce volume or discontinue use.
Caring for others
Keep the volume at a moderate level. This will allow you to hear outside sounds and to be considerate to the people around you.
Maintenance
To clean the tape head and path
Use the cleaning cassette CHK-1 (not supplied) every 10 hours of use.
To clean the exterior
Use a soft cloth slightly moistened in water. Do not use alcohol, benzine or thinner.
Note
- Clean the headphones plug periodically.
Troubleshooting
The cassette holder does not open.
- If the tape is playing, stop and then slide OPEN.
- This condition may occur when you remove the power sources during playback, or when you use exhausted dry or rechargeable battery. Set the power sources again or replace the exhausted battery with new one.
The tape fast forwards by itself during playback.
If "ON" appears for BL SKIP, press SET so that "ON" disappears.
The volume is not turned up. If “💡” appears for AVLS, press SET so that “💡” disappears.
Specifications
Radio section
Frequency range
For "USA" indication FM: 87.5-108 MHz AM: 530-1,710 kHz
For "Eur" indication FM: 87.5–108 MHz AM: 531–1,602 kHz
Tape section
Frequency response
(Dolby* NR off) Playback: 20–18,000 Hz
Output Headphones (Ω REMOTE jack for FX513/Ω for FX511) Load impedance 8–300 ohms
Power output
5 mW + 5 mW (16 ohms) • Dolby noise reduction manufactured under license from Dolby Laboratories Licensing Corporation. "DOLBY" and the double-D symbol □□ are trademarks of Dolby Laboratories Licensing Corporation.
General
Power requirements
1.5 V One R6 (size AA) battery Rechargeable battery (for the tourist model)
Dimensions (w/h/d) Approx. 109 x 78.3 x 30.7 mm, incl. projecting parts and controls
Mass Approx. 145 g FX513: Approx. 235 g incl. battery, headphones with remote control and cassette FX511: Approx. 220 g incl. battery, headphones and cassette
Supplied accessories Stereo headphones with remote control (1) (FX513)
Stereo headphones (1) (FX511) Clip (1) (FX513)
Battery charger (1) (for the FX513 tourist model)
AC plug adaptor (1) (for the FX513 tourist model)
Rechargeable battery (NC-AA) (1) (for the FX513 tourist model)
Battery R6P (SR) (1) (for the FX513 tourist model)
Carrying pouch (1)
Design and specifications are subject to change without notice.