
STR-DA5ES - Receiver SONY - Free user manual and instructions
Find the device manual for free STR-DA5ES SONY in PDF.


User questions about STR-DA5ES SONY
0 question about this device. Answer the ones you know or ask your own.
Ask a new question about this device
Download the instructions for your Receiver in PDF format for free! Find your manual STR-DA5ES - SONY and take your electronic device back in hand. On this page are published all the documents necessary for the use of your device. STR-DA5ES by SONY.
USER MANUAL STR-DA5ES SONY
FM Stereo FM-AM Receiver
Operating Instructions
Owner's Record
The model and serial numbers are located on the rear panel. Record the serial number in the space provided below. Refer to them whenever you call upon your Sony dealer regarding this product.
Model No. Serial No. ____ ____
STR-DA5ES
STR-DA3ES
WARNING
To prevent fire or shock hazard, do not expose the unit to rain or moisture.
To prevent fire, do not Cover the ventilation of the apparatus with news papers, table-cloths, curtains, etc. And don't place lighted candles on the apparatus.
To prevent fire or shock hazard, do not place objects filled with liquids, such as vases, on the apparatus.
Don't throw a battery, dispose it as the injurious wastes.
Do not install the appliance in a confined space, such as a bookcase or built-in cabinet.
For customers in the United States
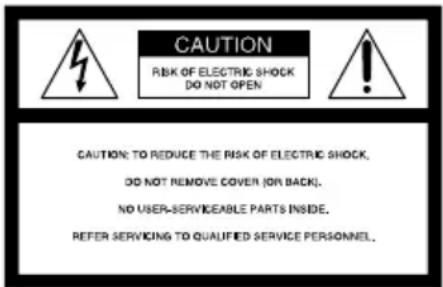
text_image
CAUTION RISK OF ELECTRIC SHOCK DO NOT OPEN CAUTION: TO REDUCE THE RISK OF ELECTRIC SHOCK, DO NOT REMOVE COVER (ON BACK), NO USER-SERVICEABLE PARTS INSIDE, REFER SERVICING TO QUALIFIED SERVICE PERSONNEL.
This symbol is intended to alert the user to the presence of uninsulated “dangerous voltage” within the product’s enclosure that may be of sufficient magnitude to constitute a risk of electric shock to persons.

This symbol is intended to alert the user to the presence of important operating and maintenance (servicing) instructions in the literature accompanying the appliance.
WARNING
This equipment has been tested and found to comply with the limits for a Class B digital device, pursuant to Part 15 of the FCC Rules. These limits are designed to provide reasonable protection against harmful interference in a residential installation. This equipment generates, uses, and can radiate radio frequency energy and, if not installed and used in accordance with the instructions, may cause harmful interference to radio communications. However, there is no guarantee that interference will not occur in a particular installation. If this equipment does cause harmful interference to radio or television reception, which can be determined by turning the equipment off and on, the user is encouraged to try to correct the interference by one or more of the following measures:
– Reorient or relocate the receiving antenna.
- Increase the separation between the equipment and receiver.
- Connect the equipment into an outlet on a circuit different from that to which the receiver is connected.
- Consult the dealer or an experienced radio/TV technician for help.
CAUTION
You are cautioned that any changes or modification not expressly approved in this manual could void your authority to operate this equipment.
Note to CATV system installer:
This reminder is provided to call CATV system installer's attention to Article 820-40 of the NEC that provides guidelines for proper grounding and, in particular, specifies that the cable ground shall be connected to the grounding system of the building, as close to the point of cable entry as practical.

ENERGY STAR ^® is a U.S. registered mark.
As an ENERGY STAR ^® partner, Sony Corporation has determined that this product meets the ENERGY STAR ^® guidelines for energy efficiency.
For customers in Canada
CAUTION
TO PREVENT ELECTRIC SHOCK, DO NOT USE THIS POLARIZED AC PLUG WITH AN EXTENSION CORD, RECEPTACLE OR OTHER OUTLET UNLESS THE BLADES CAN BE FULLY INSERTED TO PREVENT BLADE EXPOSURE.
If you have any questions about this product, you may call; Sony Customer Information Center 1-800-488-7669.
The Number below is for the FCC related matters only.
Regulatory Information
Declaration of Conformity
Trade name: SONY
Model No.: STR-DA5ES/STR-DA3ES
Responsible Party: Sony Electronics Inc.
Address: 680 Kinderkamack Road, Oradell NJ 07649 U.S.A.
Telephone No.: 201-930-6972
This device complies with Part 15 of the FCC Rules. Operation is subject to the following two conditions:
(1) This device may not cause harmful interference, and (2) this device must accept any interference received, including interference that may cause undesired operation.
Table of Contents
Features 4
Parts Identification
Main unit 5
Hooking Up the Components
Required cords.... 6
Antenna hookups 7
Audio component hookups.... 8
Video component hookups 9
Digital component hookups...... 10
Multi channel input hookups 12
Other hookups 13
Hooking Up and Setting Up the Speaker System
Speaker system hookup 16
Performing initial setup operations ..... 19
Multi channel surround setup ...... 19
Checking the connections.... 25
Basic Operations
Selecting the component ...... 26
Setting to the 7.1 channel mode ...... 28
Listening to the sound in another room 29
Changing the display 30
Enjoying Surround Sound
Selecting a sound field 31
Understanding the multi channel surround displays 36
Customizing sound fields 38
Adjusting the equalizer.... 42
Receiving Broadcasts
Direct tuning 44
Automatic tuning 44
Preset tuning 45
Other Operations
Naming preset stations and program sources 46
Recording 46
Using the Sleep Timer 47
Adjustments using the SET UP button 48
CONTROL A1 II control system...... 51
Operations using the remote\*
Before you use your remote 53
Location of parts and basic remote operations .... 54
Using the lists 62
Using the remote RM-US105 75
Additional Information
Precautions 82
Troubleshooting.... 82
Specifications 85
Tables of settings using SURROUND, LEVEL, EQ, and SET UP buttons .. 87
Adjustable parameters for each sound field 90
* STR-DA5ES only.
This receiver incorporates Dolby* Digital and Pro Logic Surround and the DTS** Digital Surround System.
* Manufactured under license from Dolby Laboratories. “Dolby”, “Pro Logic” and the double-D symbol are trademarks of Dolby Laboratories.
**“DTS”, “ES”, “DTS Digital Surround”, “DTS-ES Extended Surround”, and “Neo: 6” are trademarks of Digital Theater Systems, Inc.
Features
7.1 channel mode
This receiver incorporates a 6 channel amplifier. It can reproduce the sound of movies (etc.) encoded in 6.1 channel audio through front (L/R), center, surround (L/R), surround back, and sub woofer speakers. This receiver also lets you enjoy a 7.1 channel mode. The 7.1 channel mode uses DSP (Digital Signal Processor) technology to reproduce the Surround Back channel in stereo (L/R) (page 28).
Compatible with a variety of audio formats and modes
This receiver is compatible with the following audio formats.
| STR-DA5ES STR-DA3ES Page | ||||
| Dolby Digital EX | 35 | |||
| Dolby Pro Logic II 39 | ||||
| DTS Neo:6 39 | ||||
| DTS-ES Matrix 6.1 | * | 3 | 5 | |
| DTS-ES Discrete 6.1 35 | ||||
* DTS-ES compatible
About This Manual
The instructions in this manual are for models STR-DA5ES and STR-DA3ES. Check your model number by looking at the lower right corner of the front panel. In this manual, the STR-DA5ES (area code U) is used for illustration purposes unless stated otherwise. Any difference in operation is clearly indicated in the text, for example, “STR-DA5ES only”.
Tip
The instructions in this manual describe the controls on the receiver. You can also use the controls on the supplied remote if they have the same or similar names as those on the receiver. For details on the use of your remote, see pages 53–81 (STR-DA5ES) or refer to the separate operating instructions supplied with the remote (STR-DA3ES).
About area codes
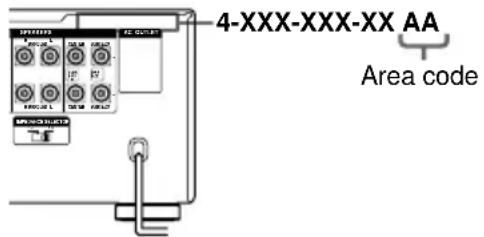
The area code of the receiver you purchased is shown on the upper portion of the rear panel (see the illustration below).
text_image
4-XXX-XXX-XX AA Area codeAny differences in operation, according to the area code, are clearly indicated in the text, for example, “Models of area code AA only”.
Parts Identification
The items are arranged in alphabetical order.
Refer to the pages indicated in parentheses ( ) for details.
Main unit
text_image
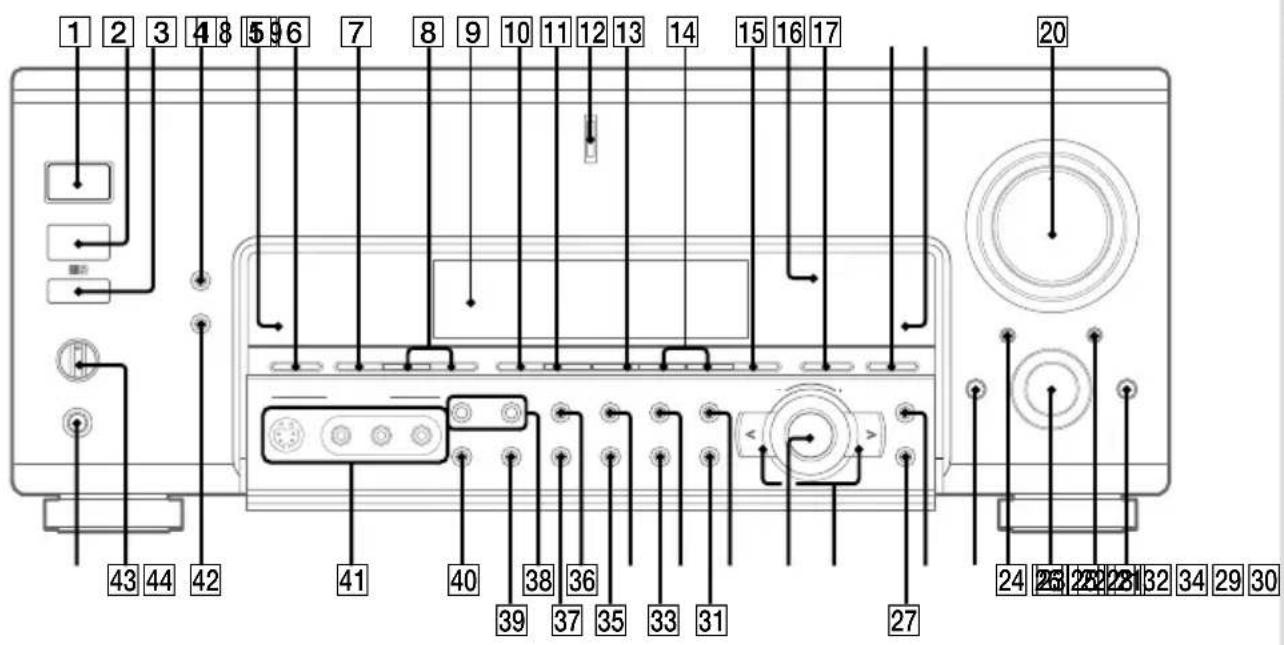
1 2 3 4 8 5 9 6 7 8 9 10 11 12 13 14 15 16 17 20 43 44 42 41 40 38 36 39 37 35 33 31 27 24 25 22 28 32 34 29 302CH 15 (31, 33)
2ND ROOM (STR-DA3ES only) 36 (29, 30)
2ND/3RD ROOM (STR-DA5ES only) 36 (29, 30)
6.1CH indicator 19
6.1CH DECODING 18 (34)
A.F.D. 10 (31, 33)
AUDIO SPLIT 24 (26)
CINEMA STUDIO EX 11 (31)
Cursor buttons ( 28 (20, 25, 38, 40, 46, 48)
Digital Cinema Sound indicator 16 (31)
DIGITAL CONCERT HALL 13 (32)
DIMMER 42 (30)
Display 9 (36)
DISPLAY 4 (30)
DOOR OPEN 25
ENTER 27 (46)
EQ 31 (43)
EQUALIZER 35 (43)
FM/AM 7 (44)
FM MODE 40 (44)
FUNCTION 23 (25, 26, 44–46)
INPUT MODE 22 (27)
IR emitter (STR-DA5ES only) 3
IR receptor 2
Jog dial 29 (20, 29, 38, 40, 42, 46, 48)
LEVEL 30 (25, 40)
MASTER VOLUME 20 (25, 27)
MEMORY 39 (45)
MODE +/- 14 (31, 42)
MULTI/2CH ANALOG DIRECT 17 (27, 31, 33, 47)
MULTI CHANNEL DECODING indicator 12
MUTING 21 (27)
NAME 33 (46)
NIGHT MODE 6 (35)
NIGHT MODE indicator 5
ON SCREEN 34 (9)
PHONES jack 44 (28)
PRESET TUNING +/- 8 (42)
SET UP 26 (20, 48)
SLEEP 37 (47)
SPEAKERS switch 43 (27, 29, 30)
SURROUND 32 (38)
TUNING +/− 38 (44)
VIDEO 3 INPUT jacks 41
I/⏻ (power) 1 (19, 25, 42)
Required cords
Before you get started
- Turn off the power to all components before making any connections.
- Do not connect the AC power cord until all of the connections are completed.
- Be sure to make connections firmly to avoid hum and noise.
- Do not bend or tie the optical digital cord.
- When connecting an audio/video cord, be sure to match the color-coded pins to the appropriate jacks on the components: yellow (video) to yellow; white (left, audio) to white; and red (right, audio) to red.
- When connecting optical digital cords, take the caps off the connectors and insert the cord plugs straight in until they click into place.
A Audio cord (not supplied)

B Audio/video cord (not supplied)

text_image
Yellow (video) Yellow (video) White (L/audio) White (L/audio) Red (R/audio) Red (R/audio)©Video cord (not supplied)
You can use the video cord of the supplied audio/video/control S cord.
Yellow (video) Yellow (video)
DOptical digital cord (not supplied)

E Coaxial digital cord (not supplied)

F Monaural audio cord (not supplied)

G Audio/video/control S cord (1)
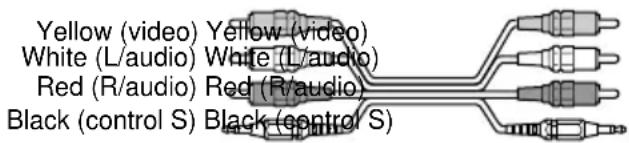
text_image
Yellow (video) Yellow (video) White (L/audio) White (L/audio) Red (R/audio) Red (R/audio) Black (control S) Black (control S)HControl S cord (mini jack) (1)

Antenna hookups
text_image
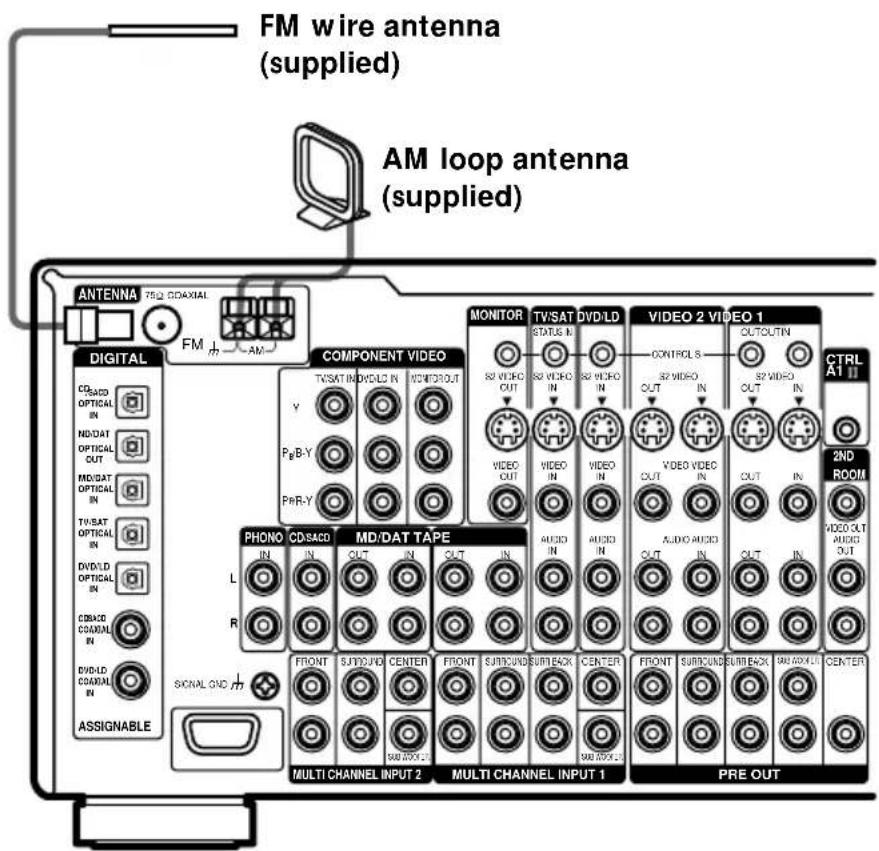
FM wire antenna (supplied) AM loop antenna (supplied) ANTENNA 75Ω CDAXIAL FM AM DIGITAL CD3ACD OPTICAL IN ND/DAT OPTICAL OUT MD/DAT OPTICAL IN TV/SAT OPTICAL IN DVD/LD OPTICAL IN CC3ACD CDAXIAL IN DVD/LD CDAXIAL IN ASSIGNABLE COMPONENT VIDEO TV/SAT IN DIV/OLD IN Y P_B-Y P_R-Y MONITOR TV/SAT STATUS IN S2 VIDEO OUT S2 VIDEO IN S2 VIDEO IN VIDEO OUT VIDEO IN VIDEO IN VIDEO OUT VIDEO IN CONTROL S S2 VIDEO OUT S2 VIDEO IN C7L A1 II 2ND ROOM VIDEO OUT AUDIO OUT OUT IN R PHONO CD3ACD MD/DAT TAPE L FRONT SURROUND CENTER FRONT SURROUND CENTER FRONT SURROUND CENTER PRE OUT MULTI CHANNEL INPUT 2 MULTI CHANNEL INPUT 1Notes on antenna hookups
• To prevent noise pickup, keep the AM loop antenna away from the receiver and other components.
- Be sure to fully extend the FM wire antenna.
• After connecting the FM wire antenna, keep it as horizontal as possible.
- Do not use the SIGNAL GND terminal for grounding the receiver.
Audio component hookups
For details on the required cords (A - H), see page 6.
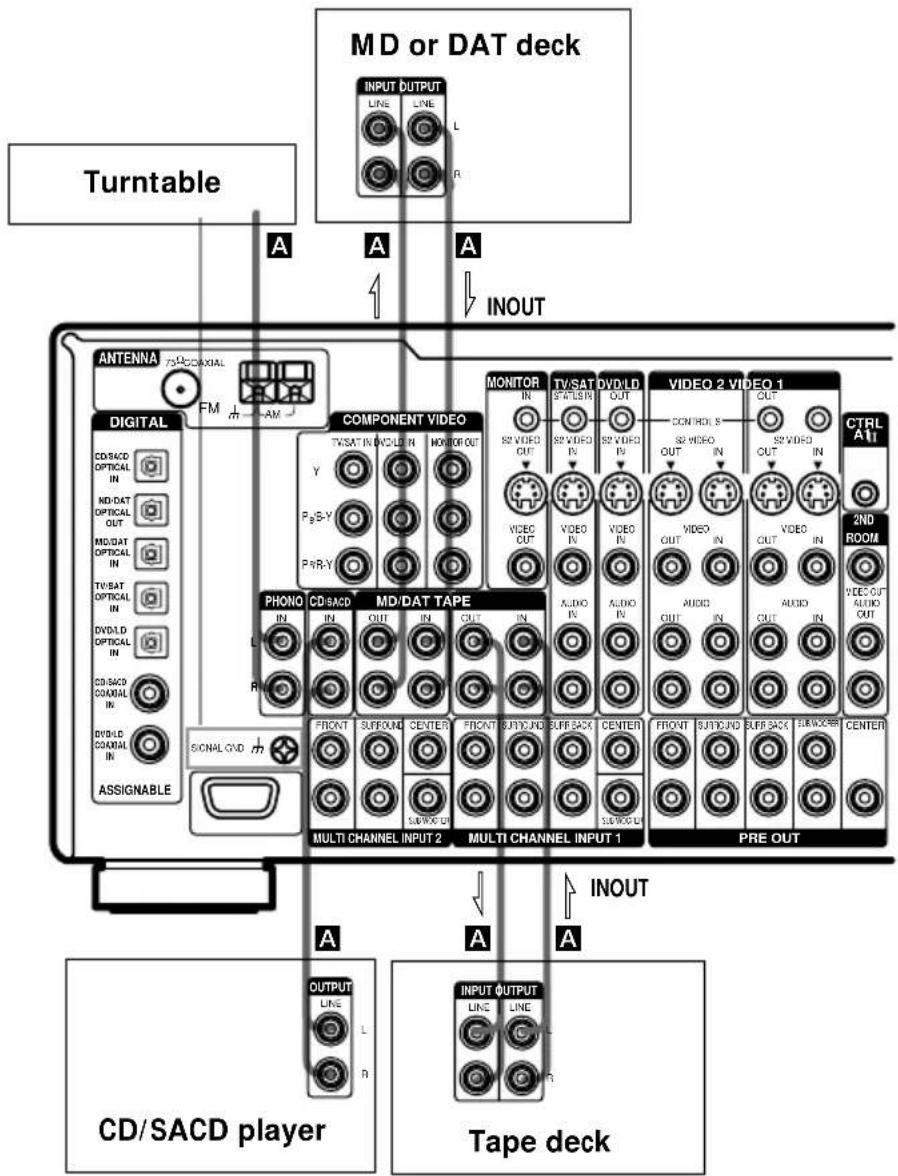
text_image
MD or DAT deck Turntable A A A INOUT ANTENNA FM DIGITAL COMPONENT VIDEO MONITOR TV/SAT DVD/LD VIDEO 2 VIDEO 1 CONTROL S/R/DVD OUT OUT CONTROL S/R/DVD OUT OUT CONTROL S/R/DVD OUT OUT CONTROL S/R/DVD OUT OUT CONTROL S/R/DVD OUT OUT CONTROL S/R/DVD OUT OUT CONTROL S/R/DVD OUT OUT CONTROL S/R/DVD OUT OUT CONTROL S/R/DVD OUT OUT CONTROL S/R/DVD OUT OUTNote on audio component hookups
If your turntable has a ground wire, connect it to the 1m SIGNAL GND terminal.
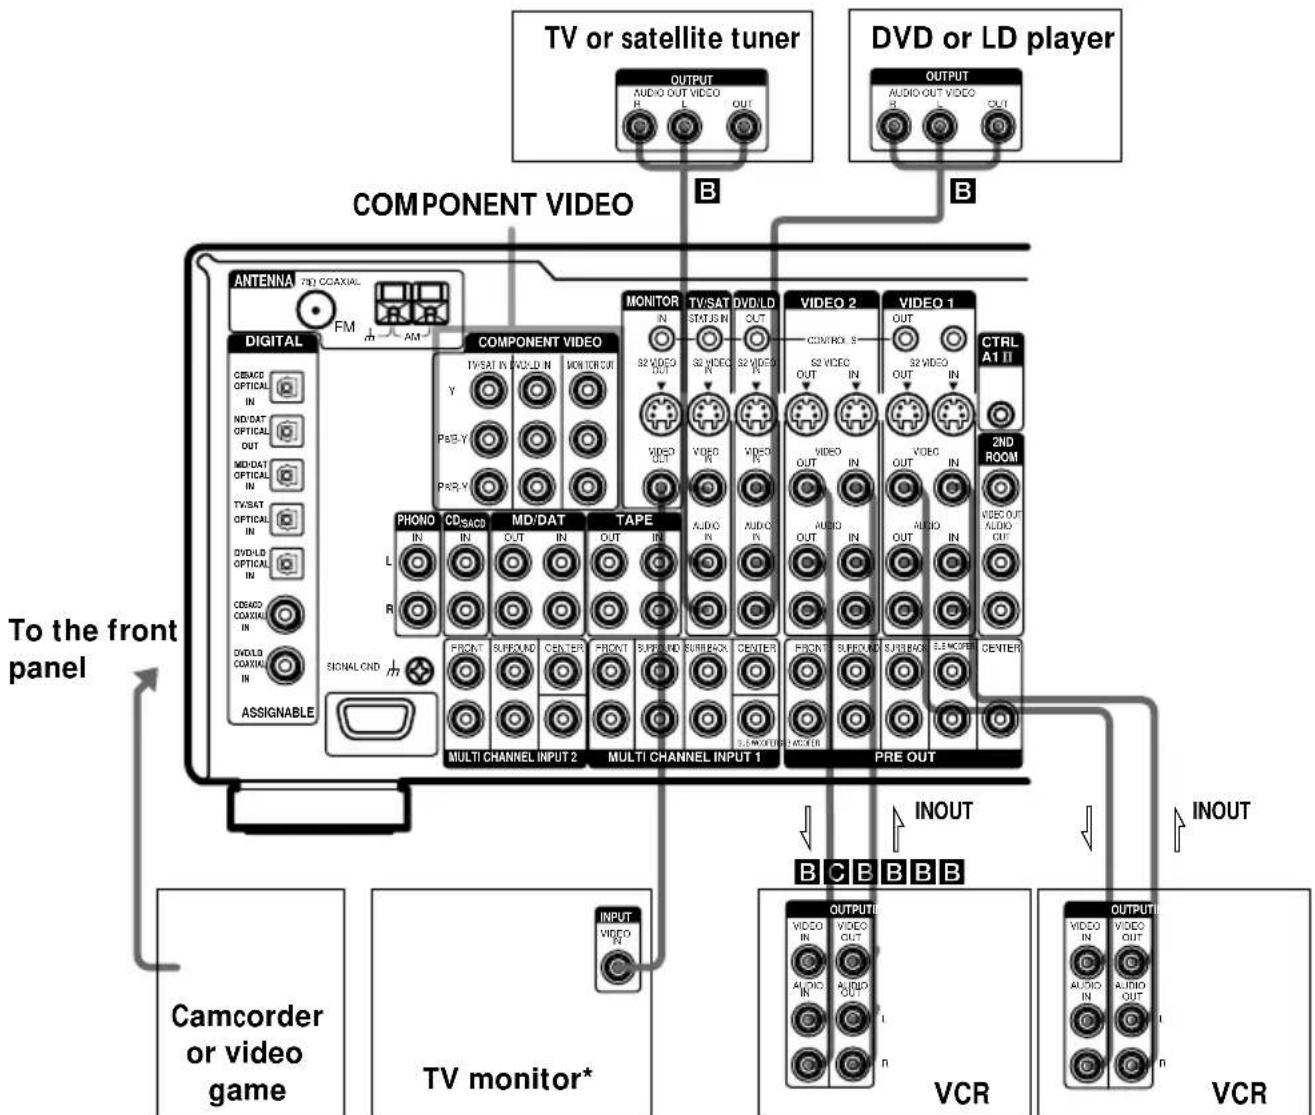
Video component hookups
flowchart
graph TD
    A["TV or satellite tuner"] --> B["OUTPUT"]
    C["DVD or LD player"] --> D["OUTPUT"]
    B --> E["COMPONENT VIDEO"]
    D --> E
    E --> F["COMPONENT VIDEO"]
    F --> G["MONITOR"]
    G --> H["TV/SAT STATUS IN"]
    G --> I["DVD/LD OUT"]
    G --> J["VIDEO 2"]
    G --> K["VIDEO 1"]
    G --> L["VIDEO 2"]
    L --> M["CONTROL S"]
    L --> N["S2 VIDEO OUT"]
    L --> O["S2 VIDEO IN"]
    L --> P["VIDEO OUT"]
    L --> Q["VIDEO IN"]
    L --> R["VIDEO OUT"]
    L --> S["VIDEO OUT"]
    L --> T["VIDEO OUT"]
    L --> U["VIDEO OUT"]
    L --> V["VIDEO OUT"]
    L --> W["VIDEO OUT"]
    L --> X["VIDEO OUT"]
    L --> Y["VIDEO OUT"]
    L --> Z["VIDEO OUT"]
    L --> AA["VIDEO OUT"]
    L --> AB["VIDEO OUT"]
    L --> AC["VIDEO OUT"]
    L --> AD["VIDEO OUT"]
    L --> AE["VIDEO OUT"]
    L --> AF["VIDEO OUT"]
    L --> AG["VIDEO OUT"]
    L --> AH["VIDEO OUT"]
    L --> AI["VIDEO OUT"]
    L --> AJ["VIDEO OUT"]
    L --> AK["VIDEO OUT"]
    L --> AL["VIDEO OUT"]
    L --> AM["VIDEO OUT"]
    L --> AN["VIDEO OUT"]
    L --> AO["VIDEO OUT"]
    L --> AP["VIDEO OUT"]
    L --> AQ["VIDEO OUT"]
    L --> AR["VIDEO OUT"]
    L --> AS["VIDEO OUT"]
    L --> AT["VIDEO OUT"]
    L --> AU["VIDEO OUT"]
    L --> AV["VIDEO OUT"]
    L --> AW["VIDEO OUT"]
    L --> AX["VIDEO OUT"]
    L --> AY["VIDEO OUT"]
    L --> AZ["VIDEO OUT"]
    L --> BA["VIDEO OUT"]
    L --> BB["VIDEO OUT"]
    L --> BC["VIDEO OUT"]
    L --> BD["VIDEO OUT"]
    L --> BE["VIDEO OUT"]
    L --> BF["VIDEO OUT"]
    L --> BG["VIDEO OUT"]
    L --> BH["VIDEO OUT"]
    L --> BI["VIDEO OUT"]
    L --> BJ["VIDEO OUT"]
    L --> BK["VIDEO OUT"]
    L --> BL["VIDEO OUT"]
    L --> BM["VIDEO OUT"]
    L --> BN["VIDEO OUT"]
    L --> BO["VIDEO OUT"]
    L --> BP["VIDEO OUT"]
    L --> BQ["VIDEO OUT"]
    L --> BR["VIDEO OUT"]
    L --> BS["VIDEO OUT"]
    L --> BT["VIDEO OUT"]
    L --> BU["VIDEO OUT"]
    L --> BV["VIDEO OUT"]
    L --> BW["VIDEO OUT"]
    L --> BX["VIDEO OUT"]
    L --> BY["VIDEO OUT"]
    L --> BZ["VIDEO OUT"]
* You can display the SET UP, SURROUND, LEVEL, EQ parameters and selected sound field by pressing ON SCREEN.
Note on video component hookups
You can connect your TV's audio output jacks to the TV/SAT AUDIO IN jacks on the receiver and apply sound effects to the audio from the TV. In this case, do not connect the TV's video output jack to the TV/SAT VIDEO IN jack on the receiver. If you are connecting a separate TV tuner (or satellite tuner), connect both the audio and video output jacks to the receiver as shown above.
If you have a satellite tuner, DVD player, or LD player with COMPONENT VIDEO (Y, B-Y, R-Y) output jacks and a monitor with COMPONENT VIDEO input jacks, use a video cord (not supplied) to connect to the receiver.
Tip
When using the S-video jacks instead of the video jacks, your monitor must also be connected via an S-video jack. S-video signals are on a separate bus from the video signals and will not be output through the video jacks.
Notes
- If you make COMPONENT VIDEO connections, nothing is displayed on the on-screen display.
- On this receiver, the component video signals are not compatible with S-video signals nor video signals.
Digital component hookups
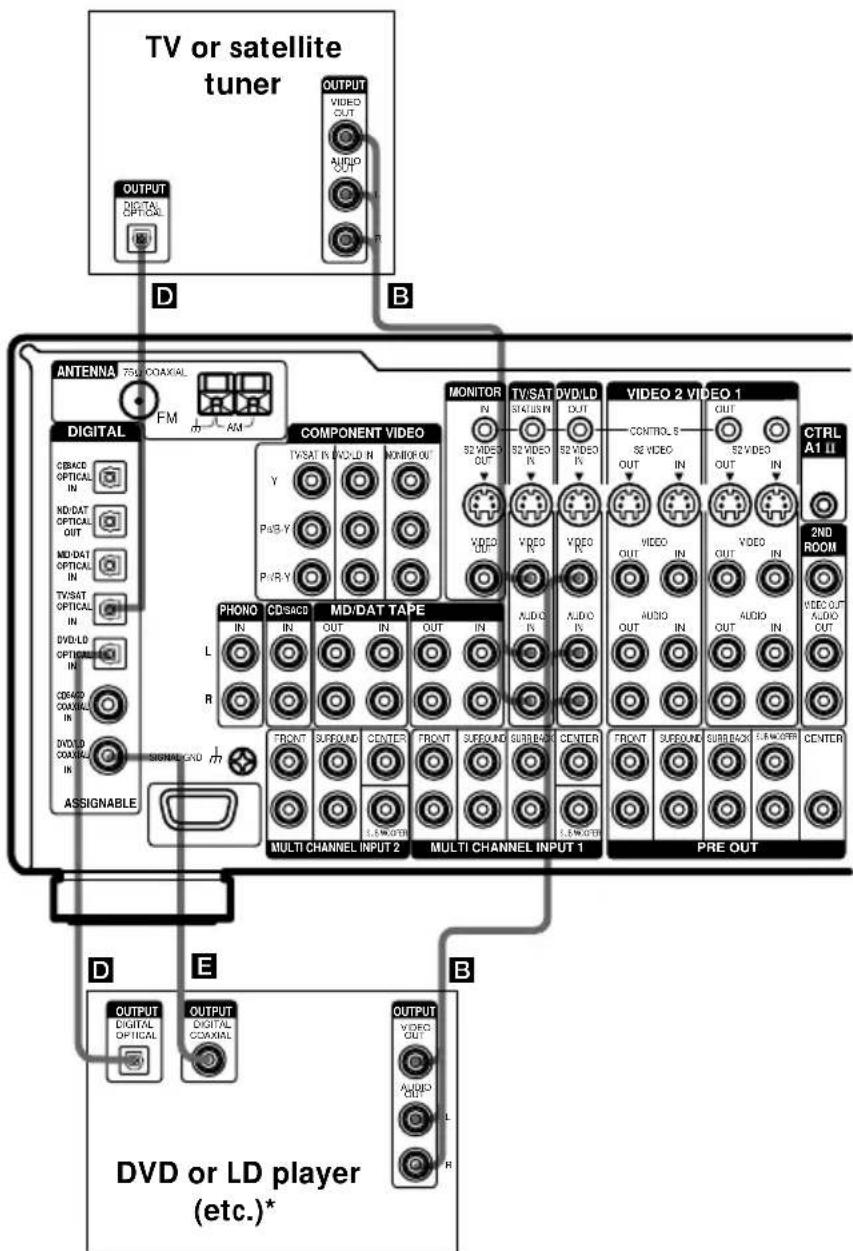
Connect the digital output jacks of your DVD player and satellite tuner (etc.) to the receiver's digital input jacks to bring the multi channel surround sound of a movie theater into your home. To fully enjoy multi channel surround sound, five speakers (two front speakers, two surround speakers, and a center speaker) and a sub woofer are required. For 6.1 channel surround sound, you will also need a surround back speaker. You can also connect an LD player with an RF OUT jack via an RF demodulator, like the Sony MOD-RF1 (not supplied).
Tip
You can select the input mode for your digital components. See "INPUT MODE" on page 27.
Note
You cannot connect an LD player's DOLBY DIGITAL RF OUT jack directly to this unit's digital input jacks. You must first convert the RF signal to either an optical or coaxial digital signal. For details, see "Troubleshooting" on page 82.
flowchart
graph TD
    A["TV or satellite tuner"] --> B["OUTPUT DIGITAL OPTICAL"]
    A --> C["OUTPUT VIDEO CUT"]
    A --> D["OUTPUT AUDIO OUT"]
    A --> E["OUTPUT RADIO OUT"]
    A --> F["OUTPUT VIDEO OUT"]
    A --> G["OUTPUT AUDIO OUT"]
    A --> H["OUTPUT VIDEO OUT"]
    A --> I["OUTPUT AUDIO OUT"]
    A --> J["OUTPUT VIDEO OUT"]
    A --> K["OUTPUT AUDIO OUT"]
    A --> L["OUTPUT VIDEO OUT"]
    A --> M["OUTPUT AUDIO OUT"]
    A --> N["OUTPUT VIDEO OUT"]
    A --> O["OUTPUT AUDIO OUT"]
    A --> P["OUTPUT VIDEO OUT"]
    A --> Q["OUTPUT AUDIO OUT"]
    A --> R["OUTPUT VIDEO OUT"]
    A --> S["OUTPUT AUDIO OUT"]
    A --> T["OUTPUT VIDEO OUT"]
    A --> U["OUTPUT AUDIO OUT"]
    A --> V["OUTPUT VIDEO OUT"]
    A --> W["OUTPUT AUDIO OUT"]
    A --> X["OUTPUT VIDEO OUT"]
    A --> Y["OUTPUT AUDIO OUT"]
    A --> Z["OUTPUT VIDEO OUT"]
    A --> AA["OUTPUT AUDIO OUT"]
    A --> AB["OUTPUT VIDEO OUT"]
    A --> AC["OUTPUT AUDIO OUT"]
    A --> AD["OUTPUT VIDEO OUT"]
    A --> AE["OUTPUT AUDIO OUT"]
    A --> AF["OUTPUT VIDEO OUT"]
    A --> AG["OUTPUT AUDIO OUT"]
    A --> AH["OUTPUT VIDEO OUT"]
    A --> AI["OUTPUT AUDIO OUT"]
    A --> AJ["OUTPUT VIDEO OUT"]
    A --> AK["OUTPUT AUDIO OUT"]
    A --> AL["OUTPUT VIDEO OUT"]
    A --> AM["OUTPUT AUDIO OUT"]
    A --> AN["OUTPUT VIDEO OUT"]
    A --> AO["OUTPUT AUDIO OUT"]
    A --> AP["OUTPUT VIDEO OUT"]
    A --> AQ["OUTPUT AUDIO OUT"]
    A --> AR["OUTPUT VIDEO OUT"]
    A --> AS["OUTPUT AUDIO OUT"]
    A --> AT["OUTPUT VIDEO OUT"]
    A --> AU["OUTPUT AUDIO OUT"]
    A --> AV["OUTPUT VIDEO OUT"]
    A --> AW["OUTPUT AUDIO OUT"]
    A --> AX["OUTPUT VIDEO OUT"]
    A --> AY["OUTPUT AUDIO OUT"]
    A --> AZ["OUTPUT VIDEO OUT"]
* Make either coaxial or optical connections. We recommend making coaxial connections instead of optical connections.
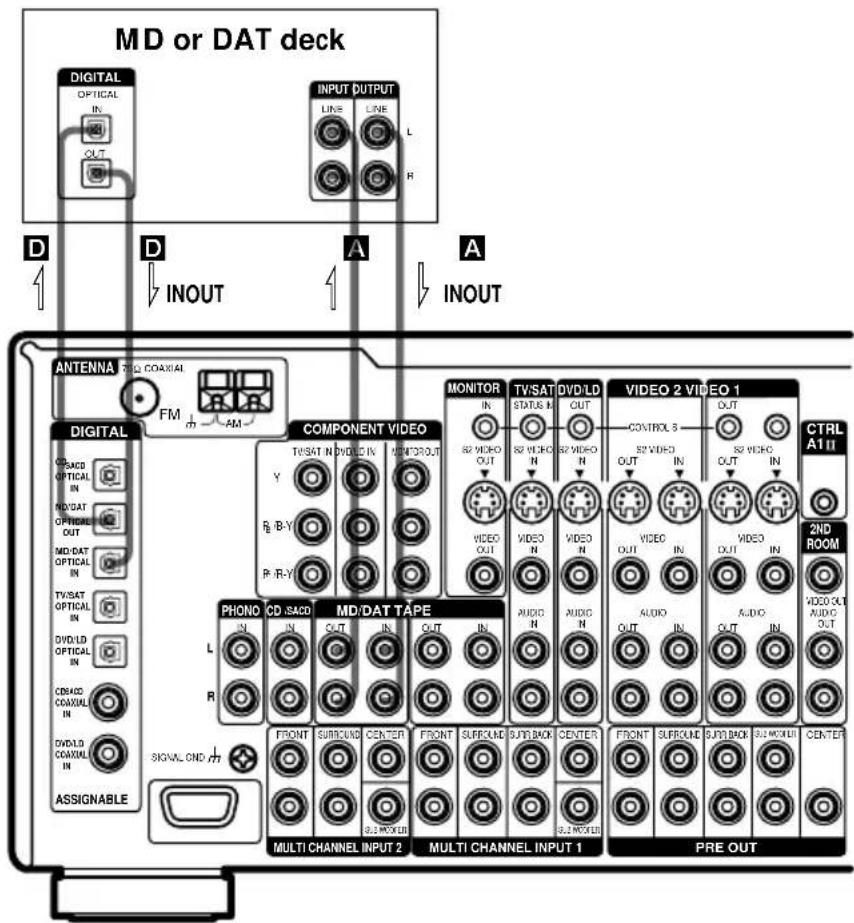
Connect the digital output jacks of your MD or DAT deck to the receiver's digital input jack and connect the digital input jacks of your MD or DAT deck to the receiver's digital output jack. These connections allow you to make digital recordings of TV broadcasts, etc.
text_image
MD or DAT deck DIGITAL OPTICAL IN OUT D D INPUT OUTPUT LINE LINE L H A A INOUT ANTENNA FM COMPONENT VIDEO TV-SAT N DVD IN MONITOR OUT MONITOR IN S2 VIDEO OUT TV-SAT STATUS M OUT VIDEO 2 VIDEO 1 CONTROL S S2 VIDEO OUT S2 VIDEO IN VIDEO 2 VIDEO 1 CONTROL S S2 VIDEO OUT 2ND ROOM VIDEO OUT AUDIO OUT 2ND ROOM AUDIO OUT 2ND ROOM 2ND ROOM 2ND ROOM 2ND ROOM 2ND ROOM 2ND ROOM 2ND ROOM 2ND ROOM 2ND ROOM 2ND ROOM 2ND ROOM 2ND ROOM 2ND ROOM 2ND ROOM 2ND ROOM 2ND ROOM 2ND ROOM 2ND ROOM 2ND ROOM 2ND ROOM 2ND ROOM 2ND ROOM 2ND ROOM 2ND ROOM 2ND ROOM 2ND Room PHONO CD SACD MD/DAT TAPE L IN OUT IN OUT IN AUDICN N AUDIO N AUDIO N AUDIO IN R FRONT SURROUND CENTER FRONT SURROUND SURBACK CENTER FRONT SURROUND SUPERBACK SUPERBACK CENTER SUPERBACK SUPERBACK SUPERBACK SUPERBACK SUPERBACK SUPERBACK SUPERBACK SUPERBACK SUPERBACK SUPERBACK SUPERBACK SUPERBACK SUPERBACK SUPERBACK SUPERBACK SUPERBACK SUPERBACK SUPERBACK SUPERBACK SUPERBACK SUPERBACK SUPERBACK SUPERBACK SUPERBACK SUPERBACK SUPERBACK SUPERBACK SUPERBACK SUPERBACK SUPERBACK SUPERBACK SUPERBACK SUPERBACK SUPERBACK SUPERBACK SUPERBACK SUPERBACK SUPERBACK SUPERBACK SUPERBACK SUPERBACK SUPERBACK SUPERBACK SUPERBACK SUPERBACK SUPERBACK SUPERBACK SUPERBACK SUPERBACK SUPERBACK SUPERACUMBERGALUUMERGALUUMERGALUUMERGALUUMERGALUUMERGALUUMERGALUUMERGALUUMERGALUUMERGALUUMERGALUUMERGALUUMERGALUUMERGALUUMERGALUUMERGALUUMERGALUUMERGALUUMERGALUUMERGALUUMERGALUUMR GALLI GALLI GALLI GALLI GALLI GALLI GALLI GALLI GALLI GALLI GALLI GALLI GALLI GALLI GALLI GALLI GALLI GALLI GALLI GALLI GALLI GALLI GALLI GALLI GALLI GALLI GALLI GALLI GALLI GALLI GALLI GALLI GALLI GALLI COLDING PROCESSED PROCESSED PROCESSED PROCESSED PROCESSED PROCESSED PROCESSED PROCESSED PROCESSED PROCESSED PROCESSED PROCESSED PROCESSED PROCESSED PROCESSED PROCESSED PROCESSED PROCESSED PROCESSED PROCESSED PROCESSED PROCESSED PROCESSED PROCESSED PROCESSED PROCESSED PROCESSED PROCESSED PROCESSED PROCESSED PROCESSED PROCESSED PROCESSED PROCESSED PROVINCUSPROVINCUSPROVINCUSPROVINCUSPROVINCUSPROVINCUSPROVINCUSPROVINCUSPROVINCUSPROVINCUSPROVINCUSPROVINCUSPROVINCUSPROVINCUSPROVINCUSPROVINCUSPROVINCUSPROVINCUSPROVINCUSPROVINCUSPROVINCUSPROVINCUSPROVINCUSPROVINCUSPROVINCUSPROVINCUS PROVINCUS PROVINCUS PROVINCUS PROVINCUS PROVINCUS PROVINCUS PROVINCUS PROVINCUS PROVINCUS PROVINCUS PROVINCUS PROVINCUS PROVINCUS PROVINCUS PROVINCUS PROVINCUS PROVINCUS PROVINCUS PROVINCUS PROVINCUS PROVINCUS PROVINCUS PROVINCUS PROVINCUS PROVINCUSPROVINC USGALUUMERGALUUMERGALUUMERGALUUMERGALUUMERGALUUMERGALUUMERGALUUMERGALUUMERGALUUMERGALUUMERGALUUMERGALUUMERGALUUMERGALUUMERGALUUMERGALUUMERGALUUMERGALUUMERGALUUMERCUL UCCOL UCCOL UCCOL UCCOL UCCOL UCCOL UCCOL UCCOL UCCOL UCCOL UCCOL UCCOL UCCOL UCCOL UCCOL UCCOL UCCOL UCCOL UCCOL UCCOL UCCOL UCCOL UCCOL UCCOL UCCOL UCCOL UCCOL UCCOL UCCOL UCCOL UCCOL UCCOL UCCOL UCCOLNotes
- You cannot make a digital recording of digital multi channel surround signals.
- All the OPTICAL and COAXIAL jacks are compatible with 96 kHz, 48 kHz, 44.1 kHz and 32 kHz sampling frequencies.
- It is not possible to record analog signals to the components connected to TAPE and VIDEO jacks with only digital connections. To record analog signals, make analog connections. To record digital signals, make analog and digital connections.
- The sound is not output when you play a SACD disc on the SACD player connected to the CD/SACD OPTICAL IN jack on this unit. Connect to the analog input jacks (CD/SACD IN jacks). Refer to the operating instructions supplied with the SACD player.
Multi channel input hookups
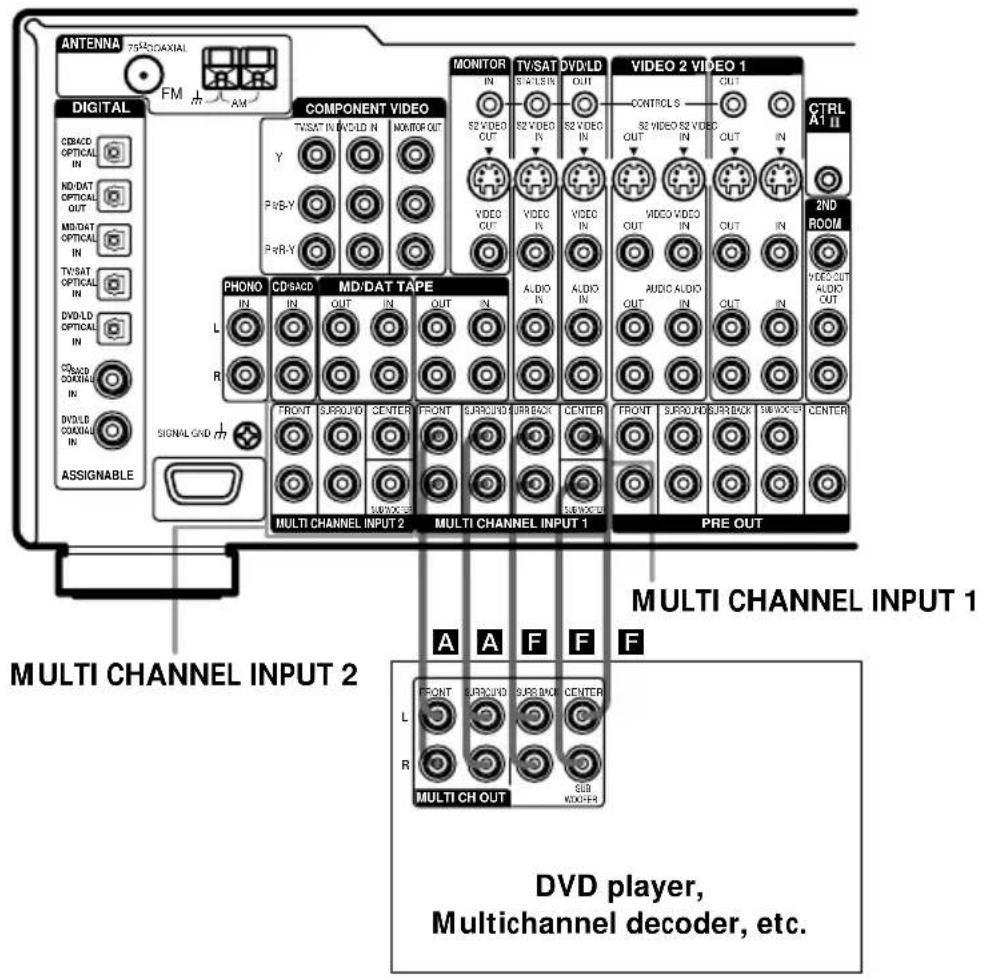
Although this receiver incorporates a multi channel decoder, it is also equipped with multi channel input jacks. These connections allow you to enjoy multi channel software encoded in formats other than Dolby Digital and DTS. If your DVD player is equipped with multi channel output jacks, you can connect them directly to the receiver to enjoy the sound of the DVD player's multi channel decoder. Alternatively, the multi channel input jacks can be used to connect an external multi channel decoder.
To fully enjoy multi channel surround sound, five speakers (two front speakers, two surround speakers, and a center speaker) and a sub woofer are required. For 6.1 channel surround sound, you will also need a surround back speaker. Refer to the operating instructions supplied with your DVD player, multi channel decoder, etc., for details on the multi channel hookups.
Notes
- When using the connections described below, adjust the level of the surround speakers and sub woofer from the DVD player or multi channel decoder.
• See page 16 for details on speaker system hookup.
text_image
ANTENNA 75Hz/04AXIAL FM AM DIGITAL COMPONENT VIDEO TV/SAT IN WORLD IN MONITOR OUT S2 VIDEO OUT TV/SAT STABLE IN S2 VIDEO IN DVD/LD CONTROL S S2 VIDEO S2 VIDEO OUT IN VIDEO 2 VIDEO 1 CONTROL S S2 VIDEO S2 VIDEO OUT IN CTRL A1 II 2ND ROOM VIDEO OUT AUDIO OUT VIDEO OUT AUDIO IN AUDIO IN AUDIO IN AUDIO IN AUDIO IN AUDIO IN AUDIO IN AUDIO IN AUDIO IN AUDIO IN AUDIO IN AUDIO IN AUDIO IN AUDIO IN AUDIO IN AUDIO IN AUDIO IN AUDIO IN AUDIO IN AUDIO IN AUDIO IN AUDIO IN AUDIO IN AUDIO IN AUDIO IN AUDIO IN AUDIO IN AUDIO IN AUDIO IN AUDIO IN AUDIO IN AUDIO IN AUDIO IN AUDIO IN PHONO CD/SACD MD/DAT TAPE L R R FRONT SURROUND CENTER FRONT SURROUND SURBACK CENTER FRONT SURROUND SURBACK SWITCH CENTER SUBVOCER SUBVOCER SUBVOCER SUBVOCER SUBVOCER SUBVOCER SUBVOCER SUBVOCER SUBVOCER SUBVOCER SUBVOCER SUBVOCER SUBVOCER SUBVOCER SUBVOCER SUBVOCER SUBVOCER SUBVOCER SUBVOCER SUBVOCER SUBVOCER SUBVOCER SUBVOCER SUBVOCER SUBVOCER SUBVOCER SubVOCER SUBVOCER SUBVOCER SUBVOCER SUBVOCER SUBVOCER SUBVOCER SUBVOCER SUBVOCER SUBVOCER SUBVOCER SUBVOCER SUBVOCER SUBVOCER SUBVOCER SUBVOCER SUBVOCER SUBVOCER SUBVOCER SUBVOCER SUBVOCER SUBVOCER SUBVOCER SUBVOCER SUBVOCER/subVOCER/subVOCER/subVOCER/subVOCER/subVOCER/subVOCER/subVOCER/subVOCER/subVOCER/subVOCER/subVOCER/subVOCER/subVOCER/subVOCER/subVOCER/subVOCER/subVOCER/subVOCER/subVOCER/subVOCER/subVOCER/subVOCER/subVOCER/subVOCER/subVOCER sub VDC player, Multichannel decoder, etc.Other hookups
text_image
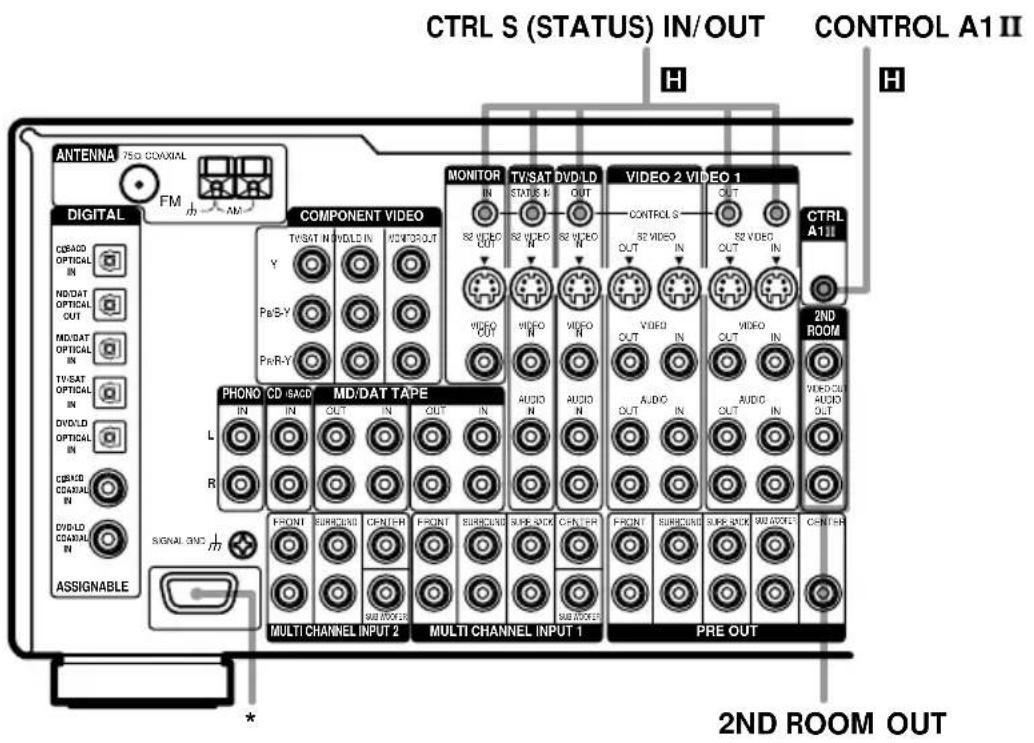
CTRL S (STATUS) IN/OUT CONTROL A1 II H H ANTENNA 75G CDAXIAL FM DIGITAL COMPONENT VIDEO MONITOR TV/SAT DVD/LD IN STATUS IN OUT S2 VIDEO OUT S2 VIDEO N S2 VIDEO N CONTROL S OUT S2 VIDEO IN S2 VIDEO OUT VIDEO OUT VICO N VICO N VIDEO OUT VICO IN VICO OUT VIDEO OUT VICO IN VICO OUT CTRL A1 II 2ND ROOM PHONO CD-SACD MD/DAT TAPE IN IN OUT IN OUT IN L R R F- FRONT SURCUND CENTER F- FRONT SURCUND SIDE STOCK CENTER F- FRONT SURCUND SIDE STOCK MULTICOUNT CENTER SIGNAL OUT MULTI CHANNEL INPUT 2 MULTI CHANNEL INPUT 1 PRE OUT ASSIGNABLE * 2ND ROOM OUT* This jack is intended only for use in the manufacturing and servicing of the unit.
CONTROL A1 IIhookup
- If you have a CONTROL A1 Compatible Sony CD player, SACD player, tape deck, or MD deck
Use a CONTROL A1 cord (mini jack) (not supplied) to connect the CONTROL A1II jack on the CD player, SACD player, tape deck, or MD deck to the CONTROL A1II jack on the receiver. Refer to “CONTROL A1II control system” on page 51 and the operating instructions supplied with your CD player, SACD player, tape deck, or MD deck for details.
Note
If you make CONTROL A11 connections from the receiver to an MD deck that is also connected to a computer, do not operate the receiver while using the "Sony MD Editor" software. This may cause a malfunction.
- If you have a Sony CD changer with a COMMAND MODE selector
If your CD changer's COMMAND MODE selector can be set to CD 1, CD 2, or CD 3, be sure to set the command mode to "CD 1" and connect the changer to the CD jacks on the receiver.
If, however, you have a Sony CD changer with VIDEO OUT jacks, set the command mode to "CD 2" and connect the changer to the VIDEO 2 jacks on the receiver.
continued
Other hookups (continued)
S-LINK CONTROL S hookup
If you have a S-LINK CONTROL S-compatible Sony TV, satellite tuner, monitor, DVD player or VCR, use an audio/video/control S connecting cord (supplied) or a control S connecting cord (supplied) to connect the CTRL S (STATUS) IN (for TV, satellite tuner, or monitor) or OUT (for VCR, etc.) jack on the receiver to the appropriate S-LINK jack on the respective component. Refer to the operating instructions supplied with your TV, satellite tuner, monitor, VCR, etc., for details.
The following illustration is an example of S-LINK CONTROL S hookups between the receiver, a TV, a VCR, and a DVD player. When your TV is connected to the receiver as shown below, the TV input mode will change to video input whenever you turn on the receiver. When you connect the receiver as shown below, input mode of the receiver changes to VIDEO 1 or DVD/LD whenever you play your VCR or DVD.
The following connections also change the input mode of the receiver to TV whenever you operate your TV.
TV
OUTIN
Receiver


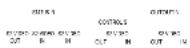


VCR 1


DVD
player


* Pull the video cord away from the supplied audio/video/control S cable.
Note
Refer to the operating instructions supplied with your TV for details regarding the operations you can control from your TV.
2ND ROOM hookup
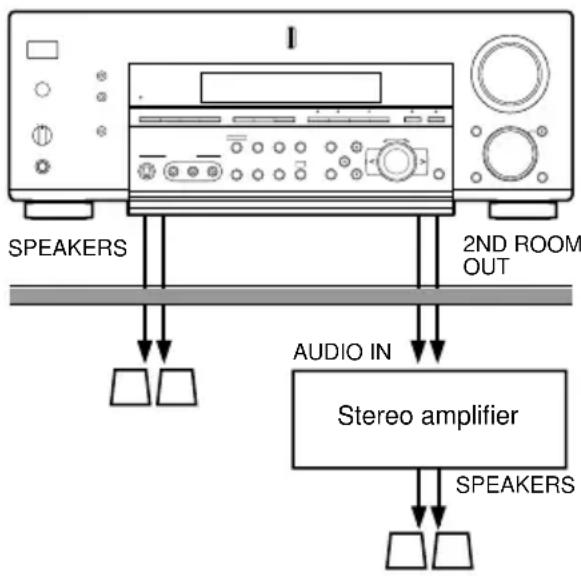
You can use the 2ND ROOM OUT jacks to output the audio/video signals of the selected component to a stereo amplifier located in another room (see page 29).
Connecting the AC power cord
Before connecting the AC power cord of this receiver to a wall outlet, connect the speaker system to the receiver (see page 16).
Connect the AC power cord(s) of your audio/video components to a wall outlet.
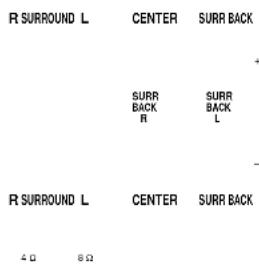
AC OUTLET*
text_image
R SURROUND L CENTER SURR BACK + SURR BACK R Surr BACK L - R SURROUND L CENTER SURR BACK 4Ω 8Ω
AC IN terminal (STR-DA5ES only)
* The configuration, shape, and number of AC outlets vary according to the model and country to which the receiver is shipped.
If you connect other audio/video components to the AC OUTLET(s) on the receiver, the receiver will supply power to the connected component(s), allowing you to turn the whole system on or off when you turn the receiver on or off.
Caution
Make sure that the total power consumption of the component(s) connected to the receiver's AC OUTLET(s) does not exceed the wattage stated on the rear panel. Do not connect high-wattage electrical home appliances such as electric irons, fans, or TVs to this outlet.
(STR-DA5ES only)
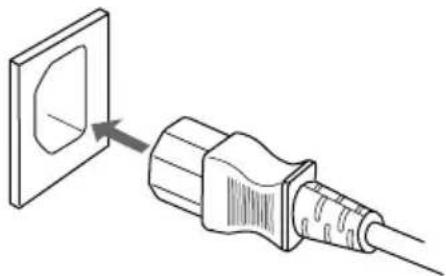
Connect the supplied power cord to the AC IN terminal on this unit.
natural_image
Diagram of a plug connecting a socket to a wall socket (no text or symbols)Speaker system hookup
Required cords
A Speaker cords (not supplied)
(+) (+)
(一)

(
-)
B Monaural audio cord (not supplied)
Black Black
C Audio cord (not supplied)

flowchart
graph TD
    A["Active sub woofer"] --> B["INPUT AUDIO IN"]
    B --> C["VIDEO 2 VIDEO 1"]
    C --> D["PRE OUT"]
    D --> E["AC OUTLET R"]
    E --> F["SPEAKERS 3RD ROOM"]
    F --> G["IMPEDANCE SELECTOR"]
    G --> H["Center speaker*"]
    C --> I["TOP 150A OUT"]
    I --> J["Back speaker*"]
    style A fill:#f9f,stroke:#333
    style B fill:#ccf,stroke:#333
    style C fill:#cfc,stroke:#333
    style D fill:#fcc,stroke:#333
    style E fill:#cff,stroke:#333
    style F fill:#ffc,stroke:#333
    style G fill:#cfc,stroke:#333
    style H fill:#fcc,stroke:#333
    style I fill:#cfc,stroke:#333
    style J fill:#fcc,stroke:#333
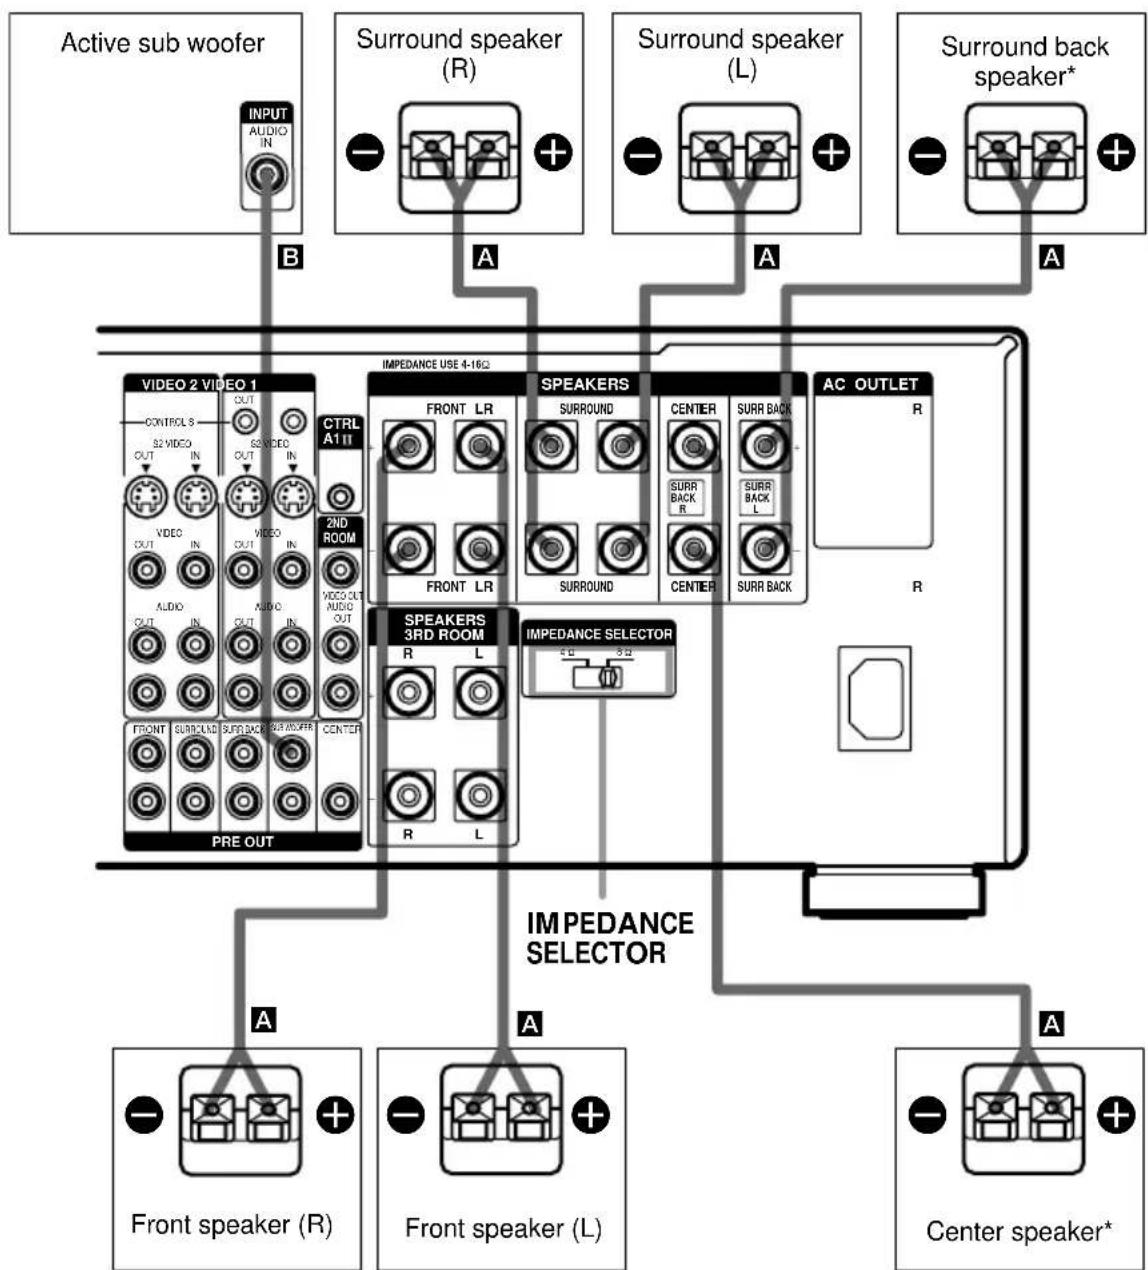
* You can use the connected center and surround back speakers as surround back right and left speakers. (See "Setting to the 7.1 channel mode" on page 28.) Make sure to connect correctly as indicated on the rear panel.
Tips
- You can connect an active sub woofer to either of the two jacks. The remaining jack can be used to connect a second active sub woofer. As the active sub woofer does not have the directivity, you can place it wherever you want.
- To connect certain speakers to another power amplifier, use the PRE OUT jacks. The same signal is output from both the SPEAKERS jacks and the PRE OUT jacks. For example, if you want to connect just the front speakers to another amplifier, connect that amplifier to the PRE OUT FRONT L and R jacks.
7.1 channel speaker hookup
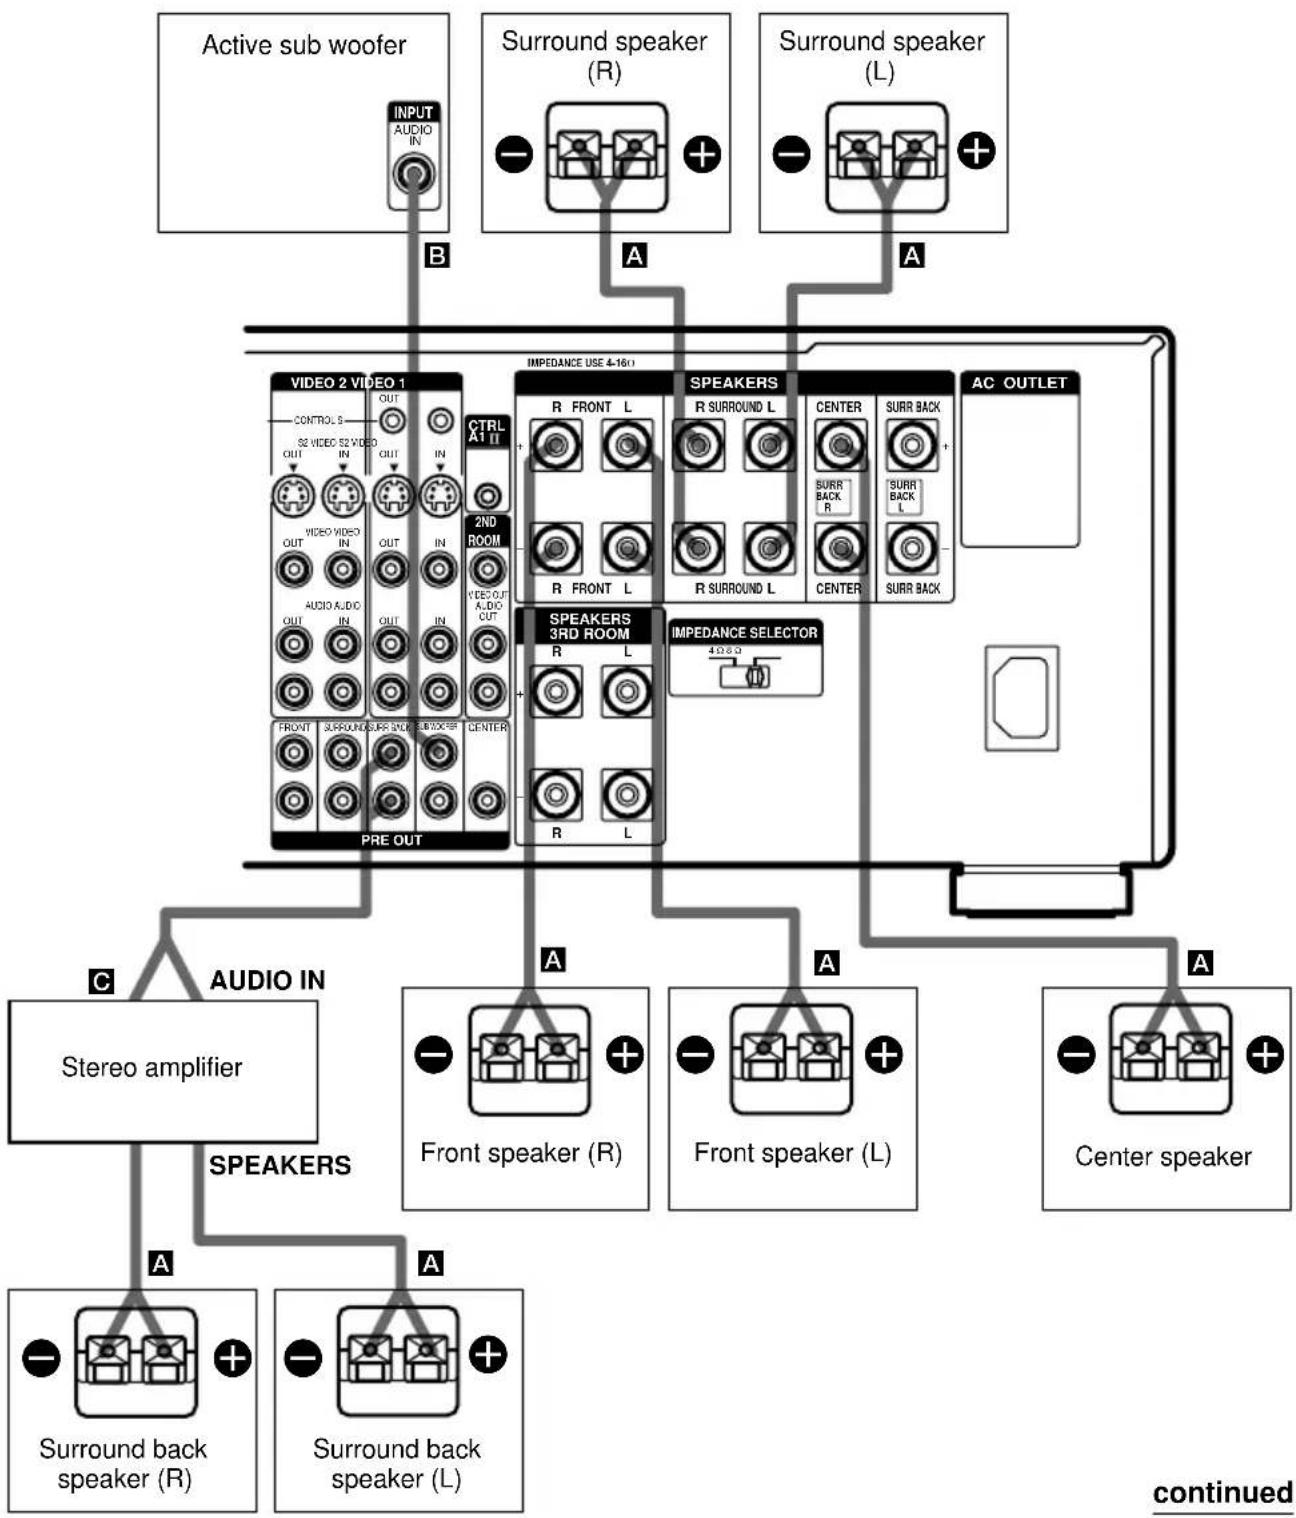
Connect the speakers as follows to enjoy 7.1 channel mode using real speakers for all 7.1 channels. These connections require an additional power amplifier. Connect the additional power amplifier to the PRE OUT SURR BACK terminals on this receiver. Then connect the surround back (L/R) speakers to the additional amplifier. For details on the 7.1 channel mode, see page 28.
flowchart
graph TD
    A["Active sub woofer"] --> B["INPUT AUDIO IN"]
    B --> C["VIDEO 2 VIDEO 1"]
    C --> D["CONTROL S OUT"]
    C --> E["CONTROL S OUT"]
    C --> F["CONTROL S OUT"]
    C --> G["CONTROL S OUT"]
    C --> H["CONTROL S OUT"]
    C --> I["CONTROL S OUT"]
    C --> J["CONTROL S OUT"]
    C --> K["CONTROL S OUT"]
    C --> L["CONTROL S OUT"]
    C --> M["CONTROL S OUT"]
    C --> N["CONTROL S OUT"]
    C --> O["CONTROL S OUT"]
    C --> P["CONTROL S OUT"]
    C --> Q["CONTROL S OUT"]
    C --> R["CONTROL S OUT"]
    C --> S["CONTROL S OUT"]
    C --> T["CONTROL S OUT"]
    C --> U["CONTROL S OUT"]
    C --> V["CONTROL S OUT"]
    C --> W["CONTROL S OUT"]
    C --> X["CONTROL S OUT"]
    C --> Y["CONTROL S OUT"]
    C --> Z["CONTROL S OUT"]
    C --> AA["CONTROL S OUT"]
    C --> AB["CONTROL S OUT"]
    C --> AC["CONTROL S OUT"]
    C --> AD["CONTROL S OUT"]
    C --> AE["CONTROL S OUT"]
    C --> AF["CONTROL S OUT"]
    C --> AG["CONTROL S OUT"]
    C --> AH["CONTROL S OUT"]
    C --> AI["CONTROL S OUT"]
    C --> AJ["CONTROL S OUT"]
    C --> AK["CONTROL S OUT"]
    C --> AL["CONTROL S OUT"]
    C --> AM["CONTROL S OUT"]
    C --> AN["CONTROL S OUT"]
    C --> AO["CONTROL S OUT"]
    C --> AP["CONTROL S OUT"]
    C --> AQ["CONTROL S OUT"]
    C --> AR["CONTROL S OUT"]
    C --> AS["CONTROL S OUT"]
    C --> AT["CONTROL S OUT"]
    C --> AU["CONTROL S OUT"]
    C --> AV["CONTROL S OUT"]
    C --> AW["CONTROL S OUT"]
    C --> AX["CONTROL S OUT"]
    C --> AY["CONTROL S OUT"]
    C --> AZ["CONTROL S OUT"]
    C --> BA["CONTROL S OUT"]
    C --> BB["CONTROL S OUT"]
    C --> BC["CONTROL S OUT"]
    C --> BD["CONTROL S OUT"]
    C --> BE["CONTROL S OUT"]
    C --> BF["CONTROL S OUT"]
    C --> BG["CONTROL S OUT"]
    C --> BH["CONTROL S OUT"]
    C --> BI["CONTROL S OUT"]
    C --> BJ["CONTROL S OUT"]
    C --> BK["CONTROL S OUT"]
    C --> BL["CONTROL S OUT"]
    C --> BM["CONTROL S OUT"]
    C --> BN["CONTROL S OUT"]
    C --> BO["CONTROL S OUT"]
    C --> BP["CONTROL S OUT"]
    C --> BQ["CONTROL S OUT"]
    C --> BR["CONTROL S OUT"]
    C --> BS["CONTROL S OUT"]
    C --> BT["CONTROL S OUT"]
    C --> BU["CONTROL S OUT"]
    C --> BV["CONTROL S OUT"]
    C --> BW["CONTROL S OUT"]
    C --> BX["CONTROL S OUT"]
    C --> BYB["CONTROL S OUT"]
    C --> BZ["BV: CONTROLS, 52 VIDEO, 52 VIDEO, 2ND ROOM, 2ND ROOM, 2ND ROOM, 2ND ROOM, 2ND ROOM, 2ND ROOM, 2ND ROOM, 2ND ROOM, 2ND ROOM, 2ND ROOM, 2ND ROOM, 2ND ROOM, 2ND ROOM, 2ND ROOM, 2ND ROOM, 2ND ROOM, 2ND ROOM, 2ND ROOM, 2ND ROOM, 2ND ROOM, 2ND Room, 2ND Room, 2ND Room, 2ND Room, 2ND Room, 2ND Room, 2ND Room, 2ND Room, 2ND Room, 2ND Room, 2ND Room, 2ND Room, 2ND Room, 2ND Room, 2ND Room, 2ND Room, 2ND Room, 2ND Room, 2ND Room, 2ND Room, 2ND Floor<br>    C --> R[R FRONT L"]
    C --> R["SURR BACK R"]
    C --> R["SURR BACK L"]
    C --> R["SURR BACK L"]
    C --> R["SURR BACK L"]
    C --> R["SURR BACK L"]
    C --> R["SURR BACK L"]
    C --> R["SURR BACK L"]
    C --> R["SURR BACK L"]
    C --> R["SURR BACK L"]
    C --> R["SURR BACK L"]
    C --> R["SURR BACK L"]
    C --> R["SURR BACK R"]
    C --> R["SURR BACK R"]
    C --> R["SURR BACK R"]
    C --> R["SURR BACK R"]
    C --> R["SURR BACK R"]
    C --> R["SURR BACK R"]
    C --> R["SURR BACK R"]
    C --> R["SURR BACK R"]
    C --> R["SURR BACK R"]
    C --> R["SURR BACK R"]
    C --> R["SURR BACK L"]
    C --> R["SURR BACK L"]
    C --> R["SURR BACK L"]
    C --> R["SURR BACK L"]
    C --> R["SURR BACK L"]
    C --> R["SURR BACK L"]
    C --> R["SURR BACK L"]
    C --> R["SURR BACK L"]
    C --> R["SURR BACK R"]
    C --> R["SURR BACK L"]
    C --> R["SURR BACK L"]
    C --> R["SURR BACK L"]
    C --> R["SURR BACK L"]
    C --> R["SURR BACK L"]
    C --> R["SURR BACK L"]
    C --> R["SURR BACK L"]
    C --> R["SURR BACK L"]
    C --> R["SURR Back R"]
    C --> R["SURR Back L"]
Speaker system hookup (continued)
Another room hookups
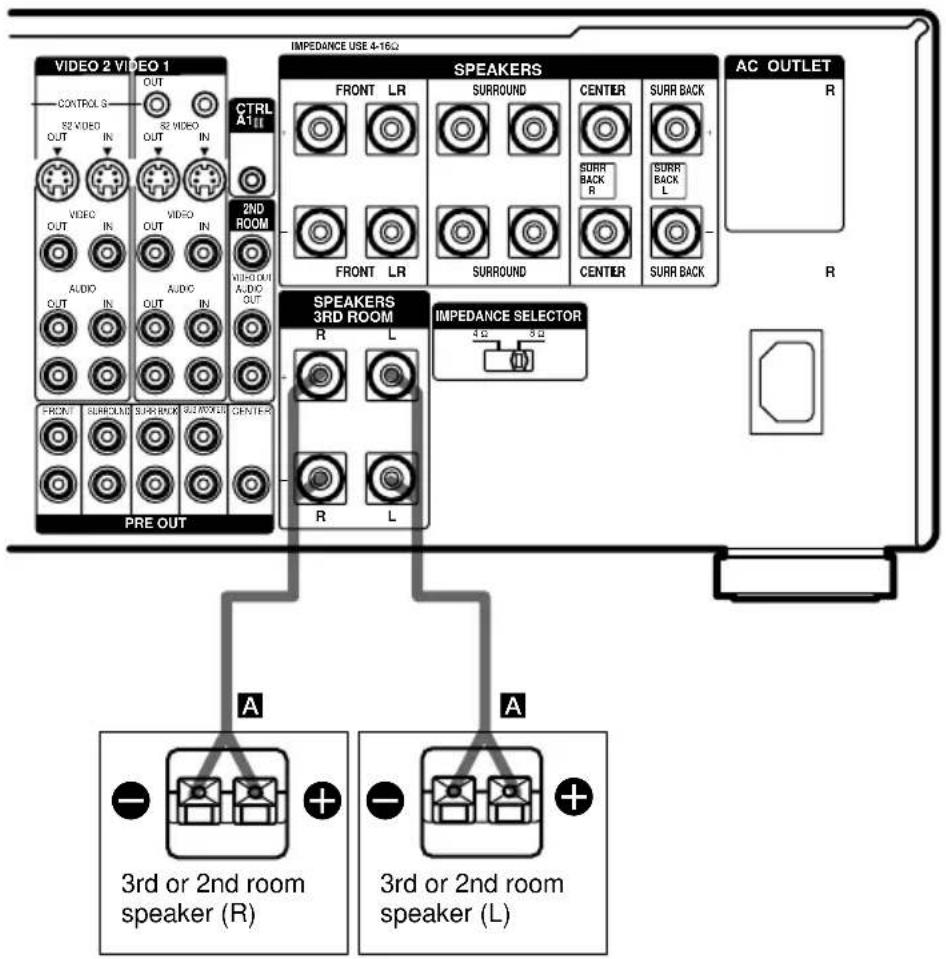
You can connect the speakers to use in another room to the SPEAKERS 3RD ROOM jacks (STR-DA5ES) or the SPEAKERS 2ND ROOM jacks (STR-DA3ES). Make sure to connect correctly as indicated on the rear panel.
flowchart
graph TD
subgraph "PRE OUT"
A["3rd or 2nd room speaker (R)"] --> B["A"]
C["3rd or 2nd room speaker (L)"] --> D["A"]
end
subgraph "PRE OUT"
E["2ND ROOM"] --> F["SPEAKERS"]
E --> G["SPEAKERS 3RD ROOM"]
E --> H["AC OUTLET"]
end
subgraph "PRE OUT"
I["CONTROL S OUT IN OUT OUT OUT OUT OUT OUT OUT OUT OUT OUT OUT OUT OUT OUT OUT OUT OUT OUT OUT OUT OUT OUT OUT OUT OUT OUT OUT OUT OUT OUT OUT OUT OUT OUT OUT OUT OUT OUT OUT OUT OUT OUT OUT OUT OUT OUT OUT OUT OUT OUT OUT OUT OUT OUT OUT OUT OUT OUT OUT OUT OUT OUT OUT OUT OUT OUT OUT OUT OUT OUT OUT OUT OUT OUT OUT OUT OUT OUT OUT OUT OUT OUT OUT OUT OUT OUT OUT OUT OUT OUT OUT OUT OUT OUT OUT OUT OUT OUT OUT OUT UTR<br> end<br> subgraph "PRE OUT"<br> J[FRONT LR FRONT LR FRONT LR FRONT LR FRONT LR FRONT LR FRONT LR FRONT LR FRONT LR FRONT LR FRONT LR FRONT LR FRONT LR FRONT LR FRONT LR FRONT LR FRONT LR FRONT LR FRONT LR FRONT LR FRONT LR FRONT LR FRONT LR FRONT LR FRONT LR FRONT LR FRONT LR FRONT LR FRONT LR FRONT LR FRONT LR FRONT LR FRONT LR FRONT LR FRON<br> end<br> subgraph "PRE OUT"<br> K[3rd or 2nd room speaker (R)"]
L["3rd or 2nd room speaker (L)"]
end
subgraph "PRE OUT"
M["AC Outlet R"]
N["AC Outlet L"]
end
subgraph "PRE OUT"
O["AC Outlet R"]
P["AC Outlet L"]
end
style A fill:#f9f,stroke:#333
style B fill:#ccf,stroke:#333
style C fill:#ccf,stroke:#333
style D fill:#ccf,stroke:#333
style E fill:#ccf,stroke:#333
style F fill:#ccf,stroke:#333
style G fill:#ccf,stroke:#333
style H fill:#ccf,stroke:#333
style I fill:#ccf,stroke:#333
style J fill:#cfc,stroke:#333
style K fill:#cfc,stroke:#333
style L fill:#cfc,stroke:#333
style M fill:#cfc,stroke:#333
style N fill:#cfc,stroke:#333
style O fill:#cfc,stroke:#333
style P fill:#cfc,stroke:#333
Speaker impedance
To enjoy multi channel surround, connect front, center, surround, and surround back speakers with a nominal impedance of 8 ohms or higher, and set the IMPEDANCE SELECTOR to "8Ω". Check the operating instructions supplied with your speakers if you're not sure of their impedance. (This information is usually printed on a label on the back of the speaker.)
You may connect a pair of speakers with a nominal impedance between 4 and 8 ohms to all of the speaker terminals. However, even if one speaker within this range is connected, set the IMPEDANCE SELECTOR to “4Ω”.
Note
Be sure to turn the power off when setting the IMPEDANCE SELECTOR.
Performing initial setup operations
Once you have hooked up the speakers and turned on the power, clear the receiver's memory. Then specify the speaker parameters (size, position, etc.) and perform any other initial setup operations necessary for your system.
Tip
To check the audio output during settings (to set up while outputting the sound), check the connection (see page 25).
Clearing the receiver's memory
Before using your receiver for the first time, or when you want to clear the receiver's memory, do the following.
1 Turn off the receiver.
2 Hold down I/⏻ for 5 seconds.
“ENTER to Clear All” appears in the display.
3 Press ENTER.
After “MEMORY CLEARING...” appears in the display for a while, “MEMORY CLEARED!” appears. All of the following items are reset or cleared:
- All preset stations are reset or cleared.
- All sound field parameters are reset to their factory settings.
- All index names (of preset stations and program sources) are cleared.
- All SET UP parameters are reset to their factory settings.
- The sound field memorized for each program source and preset stations are cleared.
Performing initial setup operations
Before using your receiver for the first time, adjust SET UP parameters so that the receiver correspond to your system. For the adjustable parameters, see the table on page 90. See pages 19–25 for speaker settings and pages 48–50 for other settings.
Multi channel surround setup
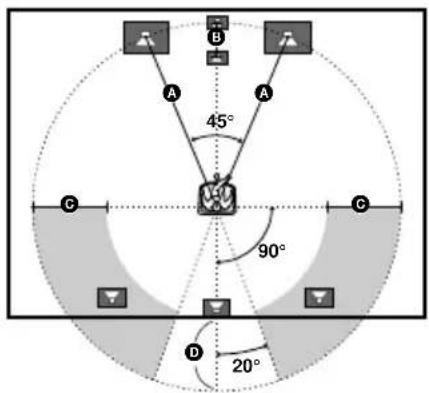
For the best possible surround sound, all speakers should be the same distance from the listening position (A).
However, the receiver lets you to place the center speaker up to 5 feet closer (B), the surround speakers up to 15 feet closer (C) and the surround back speakers up to 15 feet closer (D) to the listening position.
The front speakers can be placed from 3 to 40 feet from the listening position (A).
You can place the surround speakers either behind you or to the side, depending on the shape of your room (etc.).
You can use the center and surround back speakers as surround back right and left speakers.
When placing surround speakers to your side

text_image
A B A 45° 90° D 20°continued
Multi channel surround setup (continued)
When placing surround speakers behind you
text_image
A B A 45° C 90° D 20°Note
Do not place the center speaker farther away from the listening position than the front speakers.
Tip
When setting up the surround back speaker, set the speaker at least 3 feet behind the listening position. It is recommended to place the speaker at an equal distance from the surround left and right speakers. If there is no space behind the listening position, set the speaker above the listening position by placing it on a stand or hanging it from the ceiling. To prevent speaker damage or injury in case the speaker falls, make sure that it is properly fixed in place.
Specifying the speaker parameters
1 Press SET UP.
2 Press the cursor buttons (<or ) to select the parameter you want to adjust.
3 Turn the jog dial to select the setting you want.
The setting is entered automatically.
4 Repeat steps 2 and 3 until you have set all of the parameters that follow.
Initial settings
| Parameter Initial setting | |
| FRONT SP LARGE | |
| CENTER SP LARGE | |
| SURROUND SP LARGE | |
| SURR BACK SP LARGE | |
| SURR BACK L/R NO | |
| SUB WOOFER YES | |
| FRONT 16 feet | |
| CENTER 16 feet | |
| SURROUND 11 feet | |
| SURR BACK 11 feet | |
| SUB WOOFER 16 feet | |
| S.W PHASE NORMAL | |
| DISTANCE UNIT feet | |
| SURR POSI. SIDE | |
| SURR HEIGHT LOW | |
| SURR BACK HGT. | LOW |
| FRONT SP > | STD (120 Hz) |
| CENTER SP > STD (120 Hz) | |
| SURROUND SP > | STD (120 Hz) |
| SURR BACK SP > | STD (120 Hz) |
| LFE HIGH CUT > STD (120 Hz) | |
* When the speakers are set to SMALL only.
■ Front speaker size (FRONT)
- If you connect large speakers that will effectively reproduce bass frequencies, select "LARGE". Normally, select "LARGE".
- If the sound is distorted, or you feel a lack of surround effects when using multi channel surround sound, select “SMALL” to activate the bass redirection circuitry and output the front channel bass frequencies from the sub woofer.
- When the front speakers are set to “SMALL”, the center, surround, and surround back speakers are also automatically set to “SMALL” (unless previously set to “NO”).
■Center speaker size (CENTER)
- If you connect a large speaker that will effectively reproduce bass frequencies, select “LARGE”. Normally, select “LARGE”. However, if the front speakers are set to “SMALL”, you cannot set the center speaker to “LARGE”.
- If the sound is distorted, or you feel a lack of surround effects when using multi channel surround sound, select “SMALL” to activate the bass redirection circuitry and output the center channel bass frequencies from the front speakers (if set to “LARGE”) or sub woofer.* ^1
- If you do not connect a center speaker, select "NO". The sound of the center channel will be output from the front speakers. ^2
■Surround speaker size (SURROUND)
- If you connect large speakers that will effectively reproduce bass frequencies, select “LARGE”. Normally, select “LARGE”. However, if the front speakers are set to “SMALL”, you cannot set the surround speakers to “LARGE”.
- If the sound is distorted, or you feel a lack of surround effects when using multi channel surround sound, select “SMALL” to activate the bass redirection circuitry and output the surround channel bass frequencies from the sub woofer or other “LARGE” speakers.
- If you do not connect surround speakers, select "NO".*3
Tip
*1-*3 correspond to the following Dolby Pro Logic modes
*1 NORMAL
*2 PHANTOM
*3 3 STEREO
■Surround back speaker size (SURR BACK)
- If you connect a large speaker that will effectively reproduce bass frequencies, select “LARGE”. Normally, select “LARGE”. However, if the front speakers are set to “SMALL”, you cannot set the surround back speaker to “LARGE”.
- If the sound is distorted, or you feel a lack of surround effects when using multi channel surround sound, select “SMALL” to activate the bass redirection circuitry and output the center channel bass frequencies from the front speakers (if set to “LARGE”) or sub woofer.
- If you do not connect a surround back speaker, select "NO".
Tip
Internally, the LARGE and SMALL settings for each speaker determine whether or not the internal sound processor will cut the bass signal from that channel. When the bass is cut from a channel, the bass redirection circuitry sends the corresponding bass frequencies to the sub woofer or other “LARGE” speakers.
However, since bass sounds have a certain amount of directionality, it is best not to cut them, if possible. Therefore, even when using small speakers, you can set them to “LARGE” if you want to output the bass frequencies from that speaker. On the other hand, if you are using a large speaker, but prefer not to have bass frequencies output from that speaker, set it to “SMALL”.
If the overall sound level is lower than you prefer, set all speakers to “LARGE”. If there is not enough bass, you can use the equalizer to boost the bass levels. To adjust the equalizer, see page 42.
continued
Multi channel surround setup (continued)
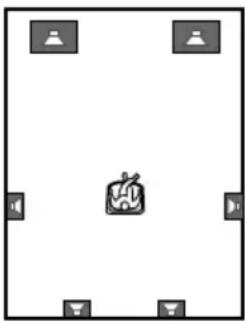
■Surround back speaker single or double (SURR BACK L/R)
- When the center speaker is set to “NO” and you use the center speaker as a surround back right speaker and use the surround back speaker as a surround back left speaker, select “YES”.
- If you use only a surround back speaker, select "NO".
natural_image
Simple diagram with four speaker icons and a central play button (no text or symbols)■Sub woofer selection (SUB WOOFER)
- If you connect a sub woofer, select "YES".
- If you do not connect a sub woofer, select “NO”. This activates the bass redirection circuitry and outputs the LFE signals from other speakers.
- In order to take full advantage of the Dolby Digital bass redirection circuitry, we recommend setting the sub woofer's cut off frequency as high as possible.
■Front speaker distance (FRONT)
Set the distance from your listening position to the front speakers (A on page 19).
■Center speaker distance (CENTER)
Set the distance from your listening position to the center speaker. Center speaker distance should be set from a distance equal to the front speaker distance (A on page 19) to a distance 5 feet closer to your listening position (B on page 19). When this range is exceeded, the display blinks. If you make the setting while the display blinks, you cannot fully enjoy the surround effect.
■Surround speaker distance (SURROUND)
Set the distance from your listening position to the surround speakers. Surround speaker distance should be set from a distance equal to the front speaker distance (A on page 19) to a distance 15 feet closer to your listening position (C on page 19). When this range is exceeded, the display blinks. If you make the setting while the display blinks, you cannot fully enjoy the surround effect.
■Surround back speaker distance (SURR BACK)
Set the distance from your listening position to the surround back speaker(s). Surround back speaker distance should be set from a distance equal to the front speaker distance (A on page 19) to a distance 15 feet closer to your listening position (D on page 19). When this range is exceeded, the display blinks. If you make the setting while the display blinks, you cannot fully enjoy the surround effect.
■Sub woofer distance (SUB WOOFER)
Set the distance from your listening position to the sub woofer.
Tip
The receiver allows you to input the speaker position in terms of distance. However, it is not possible to set the center speaker further than the front speakers. Also, the center speaker cannot be set more that 5 feet closer than the front speakers.
Likewise, the surround and surround back speakers can not be set farther away from the listening position than the front speakers. And they can be no more than 15 feet closer.
This is because incorrect speaker placement is not conducive to the enjoyment of surround sound.
Please note that, setting the speaker distance closer than the actual location of the speakers will cause a delay in the output of the sound from that speaker. In other words, the speaker will sound like it is farther away.
For example, setting the center speaker distance
3–6 feet closer than the actual speaker position will create a fairly realistic sensation of being “inside” the screen. If you cannot obtain a satisfactory surround effect because the surround speakers are too close, setting the surround speaker distance closer (shorter) than the actual distance will create a larger sound stage.
Adjusting these parameter while listening to the sound often results in much better surround sound.
Give it a try!
■Sub woofer phase polarity (S.W PHASE)
Set the sub woofer phase polarity. There is usually no problem when the sub woofer phase polarity is set to “NORMAL”. However, depending on the type of front speakers, the position of the sub woofer, and the cut-off frequency of the sub woofer, setting the phase polarity to “REVERSE” may produce better bass. Besides bass reproduction, the richness and tightness of the overall sound may also be affected. While listening from the main listening position, select the setting that best suits your environment.
■Distance unit (DISTANCE UNIT)
Lets you select either feet or meters as the unit of measure for setting distances.
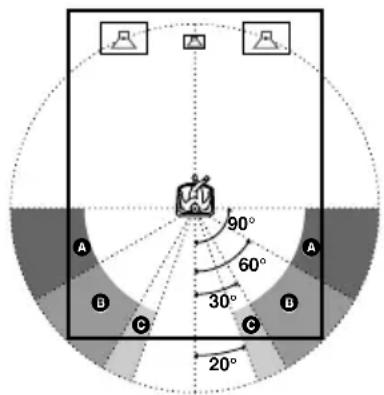
■Surround speaker position (SURR POSI.)\*
This parameter lets you specify the location of your surround speakers for proper implementation of the Digital Cinema Sound surround modes in the “VIRTUAL” sound fields. Refer to the illustration below.
- Select “SIDE” if the location of your surround speakers corresponds to section A.
- Select “MIDDLE” if the location of your surround speakers corresponds to section B.
- Select “BEHIND” if the location of your surround speakers corresponds to section ©. This parameter is available only when the surround back speaker size is set to “NO”.
This setting only effects the surround modes in the “VIRTUAL” sound fields.
text_image
A B C 90° 60° 30° 20° A B C* These parameters are not available when "Surround speaker size (SURROUND)" is set to "NO".
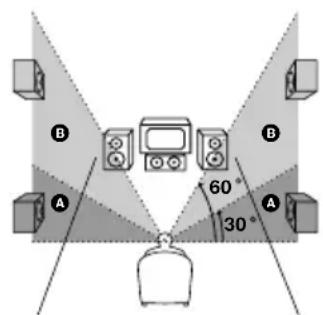
■Surround speaker height (SURR HEIGHT)\*/Surround back speaker height (SURR BACK HGT.)\*\*
This parameter lets you specify the height of your surround and surround back speaker(s) for proper implementation of the Digital Cinema Sound surround modes in the “VIRTUAL” sound fields. Refer to the illustration below.
This setting only effects the surround modes in the “VIRTUAL” sound fields.
text_image
B A 60° 30° A BMulti channel surround setup (continued)
* These parameters are not available when "Surround speaker size (SURROUND)" is set to "NO".
** This parameter is not available when “Surround back speaker size (SURR BACK)” is set to “NO”.
Tip
The surround/surround back speaker position parameter is designed specifically for implementation of the Digital Cinema Sound modes in the “VIRTUAL” sound fields.
With the Digital Cinema Sound modes, speaker position is not as critical as other modes. All of the modes in the “VIRTUAL” sound fields were designed under the premise that the surround speaker would be located behind the listening position, but presentation remains fairly consistent even with the surround speakers positioned at a rather wide angle. However, if the speakers are pointing toward the listener from the immediate left and right of the listening position, the “VIRTUAL” sound fields will not be effective unless the surround speaker position parameter is set to “SIDE”.
Nevertheless, each listening environment has many variables, like wall reflections, and you may obtain better results using “BEHIND” or “MIDDLE” if your speakers are located high above the listening position, even if they are to the immediate left and right.
Therefore, although it may result in a setting contrary to the “Surround speaker position” explanation, we recommend that you playback multi channel surround encoded software and listen to the effect each setting has on your listening environment. Choose the setting that provides a good sense of spaciousness and that best succeeds in forming a cohesive space between the surround sound from the surround speakers and the sound of the front speakers. If you are not sure which sounds best, select “BEHIND” and then use the speaker distance parameter and speaker level adjustments to obtain proper balance.
■Front speaker crossover frequency (FRONT SP >)
Lets you adjust the front speaker bass crossover frequency when the front speakers are set to "SMALL".
■Center speaker crossover frequency (CENTER SP >)
Lets you adjust the center speaker bass crossover frequency when the center speaker is set to “SMALL”.
■Surround speaker crossover frequency (SURROUND SP >)
Lets you adjust the surround speaker bass crossover frequency when the surround speakers are set to “SMALL”.
■Surround back speaker crossover frequency (SURR BACK SP >)
Lets you adjust the surround back speaker bass crossover frequency when the surround back speaker is set to “SMALL”.
Note
You can set the FRONT, CENTER, SURROUND and SURR BACK parameters when the speaker size is set to "SMALL".
■LFE high cut filter (LFE HIGH CUT >)
Lets you select the cut off frequency of the LFE channel high cut filter. Normally, select “STD”. When using a passive sub woofer powered by a separate power amplifier, it may be better to change the cut off frequency.
Adjusting the speaker level
Use the remote while seated in your listening position to adjust the level of each speaker.
Note
The receiver incorporates a new test tone with a frequency centered at 800 Hz for easier speaker level adjustment.
1 Press I/ ^① to turn on the receiver.
2 Press TEST TONE on the remote.
You will hear the test tone from each speaker in sequence.
3 Adjust the LEVEL parameters so that the level of the test tone from each speaker sounds the same when you are in your main listening position (page 71).
4 Press TEST TONE again to turn off the test tone.
To output the test tone from a selected speaker
Use the LEVEL menu to set “TEST TONE” to “FIX” (page 41). The test tone is output only from the selected speaker.
For more precise speaker level adjustment
You can output the test tone or sound source from two adjacent speakers to adjust balance, phase, and equalization. Set the SET UP menu to test tone (T.TONE) and select the sound to be output (test tone or sound source) (page 50). Then, select the test tone parameter from the the LEVEL menu to select the two speakers you want to adjust (page 41).
Tips
- You can adjust the level of all speakers at the same time. Turn MASTER VOLUME on the main unit or press MASTER VOL +/- on the remote.
- You can use the jog dial on the receiver for the adjustment.
Notes
- The adjusted value are shown in the display during adjustment.
- Although these adjustments can also be made via the front panel using the LEVEL menu (when the test tone is output, the receiver switches to the LEVEL menu automatically), we recommend you follow the procedure described above and adjust the speaker levels from your listening position using the remote.
- When you select analog audio using the MULTI/2CH ANALOG DIRECT button, the power of the digital circuits is turned off.* Therefore, when you output the test tone in this setting, it requires a few seconds to output the test tone. However, this is not a malfunction.
* When “D.POWER” is set to “AUTO OFF” in the SET UP menu.
Checking the connections
After connecting all of your components to the receiver, do the following to verify that the connections were made correctly.
1 Press I/⏻ to turn on the receiver.
2 Turn on the component that you connected (e.g., CD player or tape deck).
3 Rotate FUNCTION to select the component (program source).
4 Start playing.
If you do not obtain normal sound output after performing this procedure, see
“Troubleshooting” on page 82 and take the appropriate measures to correct the problem.
Basic Operations
Selecting the component
FUNCTION control
Turn FUNCTION control to select the component you want to use.
To select Rotate to light
DVD or LD player DVD/LD
| TV or satellite tuner TV/SAT |
Tape deck TAPE
| MD or DAT deck MD/DAT |
CD/SACD player CD/SACD
| Built in tuner TUNER |
Turntable PHONO
After turning on the component you selected, select the component and play the program source.
- After selecting VCR, camcorder, video game, DVD player, or LD player, turn on the TV and set the TV's video input to match the component you selected.
AUDIO SPLIT
Press AUDIO SPLIT to assign the audio input for each function. This function is convenient when you are using a number of digital components. You can select the audio input assigned by this function using INPUT MODE (page 27).
You cannot assign the audio input for TUNER.
1 Turn FUNCTION to select the source for audio input assignment.
2 Press AUDIO SPLIT.
3 Turn FUNCTION to select the audio input. The audio input you can assign differs depending on the function.
DVD/LD, CD/SACD
| NO ASSIGN → DIGITAL: ONLY COAX → DIGITAL: ONLY OPT → ONLY ANALOG INPUT |
TV/SAT, MD/DAT
| NO ASSIGN → DVD/LD (COAXIAL) →CD/SACD (COAXIAL) → ONLY ANALOGINPUT |
Analog functions except for PHONO
| NO ASSIGN → DVD/LD (COAXIAL) → |
| DVD/LD (OPTICAL) → TV/SAT (OPTICAL) |
| → MD/DAT (OPTICAL) → CD/SACD |
| (COAXIAL) → CD/SACD (OPTICAL) |
PHONO
| NO ASSIGN → VIDEO 1 → VIDEO 2 →VIDEO 3 → DVD/LD (ANALOG) →TV/SAT (ANALOG) → TAPE → MD/DAT(ANALOG) → CD/SACD (ANALOG) |
4 Press AUDIO SPLIT.
If you do not press AUDIO SPLIT within 8 seconds, the receiver automatically assigns the selected audio input.
Tips
- If you do not assign, select "NO ASSIGN".
- If you select “DIGITAL: ONLY COAX” or “DIGITAL: ONLY OPT” for DVD/LD, only coaxial or optical digital input is automatically selected for DVD/LD.
INPUT MODE
Press INPUT MODE to select the input mode for your digital components. You can also select the COAXIAL or OPTICAL audio input of other functions assigned by AUDIO SPLIT. Each time you press the button, the input mode of the currently selected component switches.
Select To
| AUTO 2CH Give priority to the analogaudio signals input to theAUDIO IN (L/R) jackswhen there is no digitalsignals. |
| COAXIAL FIXED Specify the digital audiosignals input to theDIGITAL COAXIAL inputjacks. |
| OPTICAL FIXED Specify the digital audiosignals input to theDIGITAL OPTICAL inputjacks. |
| ANALOG 2CH FIXED Specify the analog audiosignals input to the AUDIOIN (L/R) jacks. |
When the MULTI CH 1 or 2 is assigned to a specific function using SET UP menu (page 48), the followings are displayed instead of “AUTO 2CH” and “ANALOG 2CH FIXED”.
| Select | To |
| AUTO MULTI CH 1 or 2 | Give priority to the analog audio signals input to the MULTI CH IN 1 or 2 jacks when there is no digital signals. |
| MULTI CH 1 or 2 FIXED | Specify the analog audio signals input to the MULTI CH IN 1 or 2 jacks. |
MULTI/2CH ANALOG DIRECT
Press MULTI/2CH ANALOG DIRECT to enjoy the audio source connected to the MULTI CH IN 1 or 2 jacks or analog 2 channel input jacks. Only volume control and the front speaker balance can be adjusted when set to 2CH ANALOG DIRECT. When set to MULTI CH 1 or 2 DIRECT, you can adjust balance and level of all the speakers. When this function is on, the surround effects are turned off.
| Select | To |
| MULTI CH 1 or 2 DIRECT | Enjoy the audio source connected to the MULTI CH IN 1 or 2 jacks. MULTI CH IN 1 or 2 indicator lights up in the display. This mode is suitable for enjoying high quality analog source. |
| 2CH ANALOG DIRECT | Enjoy the audio source connected to analog 2 channel jacks. This mode is suitable for enjoying high quality analog source. |
SPEAKERS switch
| Select | To |
| MAIN | Output the sound from the speakers in the main room |
| MAIN+3RD ROOM (STR-DA5ES only) | Output the sound from the speakers in the main room and 3rd room. |
| MAIN+2ND ROOM (STR-DA3ES only) | Output the sound from the speakers in the main room and 2nd room. |
| OFF | No speaker output |
MUTING
Press MUTING to mute the sound.
“MUTING” appears in the display when the sound is muted. The muting function is canceled when you turn the MASTER VOLUME clockwise to turn the volume up.
continued
Selecting the component (continued)
PHONES
Use to connect headphones.
When the headphones are connected, selectable sound fields are HEADPHONE (2CH), HEADPHONE (DIRECT), and HEADPHONE THEATER (see page 33).
Note
When “HEADPHONE (MULTI 1)” or “HEADPHONE (MULTI 2)” appears in the display while the headphones are connected, only the front L/R signals of the multi channels are output from the headphones. Press MULTI/2CH ANALOG DIRECT to cancel “MULTI CH 1 (or 2) DIRECT” (page 27).
Selecting the 7.1 channel mode
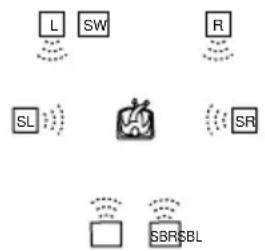
The 7.1 channel mode applies DSP (Digital Signal Processor) technology to 6.1 channel encoded audio in order to reproduce the surround back channel in stereo (L/R). There are two ways to select the 7.1 channel mode. Make speaker connections and settings as described below.
When using only the speakers connected to this receiver
You can enjoy the 7.1 channel mode sound using only the actual 6.1 channel speakers connected to this receiver. Select the center speaker to be used as the surround back right speaker, and set the surround back speaker to be used as the surround back left speaker. The sound of the center channel will be downmixed to other channels.
flowchart
graph TD
    L -->|Signal| A["Central Apple"]
    SW -->|Signal| A
    R -->|Signal| A
    SL -->|Signal| A
    SR -->|Signal| A
    SBRSL -->|Signal| A
To connect the speakers
See page 16.
Before using the 7.1 channel mode
Set “Center speaker size (CENTER)” to “NO” and set “Surround back speaker single or double (SURR BACK L/R)” to “YES”. For details on the setting, see pages 21–23.
When connecting an additional amplifier to reproduce all 7.1 channels using real speakers
If you have another stereo power amplifier, you can enjoy the 7.1 channel mode using real speakers for all 7.1 channels. Connect the Surround back (L/R) speakers through your other amplifier.

flowchart
graph TD
    A["L"] --> B["SW"]
    A["C"] --> B
    A["R"] --> B
    B --> C["SL"]
    B --> D["SR"]
    E["SBR"] --> F["SL"]
    G["SBR"] --> H["SL"]
    I["STR-DA5ES/DA3ES"] --> J["PRE OUT"]
    K["Stereo amplifier"] --> L["SL"]
    M["SBR"] --> N["SL"]
    O["SL"] --> P["SBR"]
    Q["SL"] --> R["SBR"]
    S["SL"] --> T["SBR"]
    U["SL"] --> V["SBR"]
    W["SL"] --> X["SBR"]
    Y["SL"] --> Z["SBR"]
To connect the speakers and the amplifier
See page 17.
Before using the 7.1 channel mode
Set “Center speaker size (CENTER)” to “LARGE” or “SMALL” according to the connected center speaker, then set “Surround back speaker single or double (SURR BACK L/R)” to “YES”. For details on the setting, see pages 21–23.
Note
No sound is output from the SPEAKERS SURR BACK terminals.
Listening to the sound in another room
flowchart
graph TD
    A["Speaker"] --> B["2ND ROOM OUT"]
    B --> C["AUDIO IN"]
    C --> D["Stereo amplifier"]
    D --> E["SPEAKERS"]
    style A fill:#f9f,stroke:#333
    style B fill:#ccf,stroke:#333
    style C fill:#cfc,stroke:#333
    style D fill:#fcc,stroke:#333
    style E fill:#ffc,stroke:#333
You can select the analog audio signals for output to a stereo amplifier or speakers in another room. For details on the connection, see pages 14 and 18.
To output the sound using the 2ND ROOM OUT jacks (2nd room)
1 (STR-DA5ES) Press 2ND/3RD ROOM repeatedly to select "2ND ROOM". (STR-DA3ES) Press 2ND ROOM.
2 Turn the jog dial to select the analog audio signals.
The audio source changes cyclically as follows:
$$ \begin{array}{l} \text {SOURCE*} \longrightarrow \text {VIDEO 1} \longrightarrow \text {VIDEO 2} \longrightarrow \ \text {VIDEO 3} \longrightarrow \text {DVD / LD} \longrightarrow \text {TV / SAT} \longrightarrow \ \text {TAPE} \longrightarrow \text {MD / DAT} \longrightarrow \text {CD / SACD} \longrightarrow \ \text {TUNER} \end{array} $$
* The audio signals of the current function is output.
Tips
- When “SOURCE” is selected, the signals input to the MULTI CH IN jacks are not output from the 2ND ROOM OUT jacks even when MULTI/2CH ANALOG DIRECT is set to MULTI CH 1 or 2 DIRECT. The analog audio signals of the current function are output.
- Only signals from components connected to the analog input jacks are output through the 2ND ROOM OUT jacks. No signals are output from components connected to only the digital input jacks.
To output the sound using the SPEAKERS terminals (3rd room)
(For STR-DA5ES)
You can output the different source to the 2nd room and the 3rd room.
1 Set the SPEAKER switch to "MAIN + 3RD ROOM".
The indicator lights up.
2 Press 2ND/3RD ROOM repeatedly to select "3RD ROOM", then turn the jog dial to select the analog audio signals.
The audio source changes cyclically as follows:
$$ \begin{array}{l} \text {SOURCE} ^ {*} \longrightarrow \text {VIDEO 1} \longrightarrow \text {VIDEO 2} \longrightarrow \ \text {VIDEO 3} \longrightarrow \text {DVD / LD} \longrightarrow \text {TV / SAT} \longrightarrow \ \text {TAPE} \longrightarrow \text {MD / DAT} \longrightarrow \text {CD / SACD} \longrightarrow \ \text {TUNER} \end{array} $$
* The audio signals of the current function is output.
3 Adjust the volume using the remote.
Set the remote to the 3rd room mode. For details, see page 73.
continued
Listening to the sound in another room (continued)
(For STR-DA3ES)
The same source is output to the 2nd and the 3rd room.
1 Set the SPEAKER switch to "MAIN + 2ND ROOM".
The indicator lights up.
2 Press 2ND ROOM, then turn the jog dial to select the analog audio signals.
The audio source changes cyclically as follows:
SOURCE* → VIDEO 1 → VIDEO 2 →
VIDEO 3 → DVD/LD → TV/SAT →
TAPE → MD/DAT → CD/SACD →
TUNER
* The audio signals of the current function is output.
3 Adjust the volume using the remote.
Set the remote to the 3rd room mode. For details, refer to the instruction manual supplied with the remote.
Tips
- To cancel the output of the sound from SPEAKERS 3RD ROOM terminals (SPEAKERS 2ND ROOM terminals for STR-DA3ES), set “3RD ROOM SP” (“2ND ROOM SP” for STR-DA3ES) to “OFF” in the SET UP menu (page 48). The indicator turns off.
- When “SOURCE” is selected, the signals input to the MULTI CH IN jacks are not output from the SPEAKERS 3RD ROOM jacks (For STR-DA3ES, the SPEAKERS 2ND ROOM jacks) even when MULTI/2CH ANALOG DIRECT is set to MULTI CH 1 or 2 DIRECT. The analog audio signals of the current function are output.
Note
If you turn off the receiver when the SPEAKER switch is set to “MAIN + 3RD ROOM” (or “MAIN + 2ND ROOM”), then turn on again, “3RD ROOM SP” (or “2ND ROOM SP”) in the SET UP menu automatically set to “OFF” and the sound is not output from the speakers. (The indicator also turns off.) The sound will be output when you press I/½ on the remote whose command mode is set to “3RD ROOM”, or set “3RD ROOM SP” (or “2ND ROOM SP”) to “ON”.
Changing the display
DISPLAY
Press repeatedly to change the information on the display window.
DIMMER
Press DIMMER repeatedly to adjust the brightness of the display (5 steps). DIMMER indicator lights when the dimmer function is activated.
Enjoying Surround Sound
You can take advantage of surround sound simply by selecting one of the receiver's pre-programmed sound fields. They bring the exciting and powerful sound of movie theaters and concert halls into your home. You can also customize the sound fields to obtain the sound you want by changing the various surround parameters.
To fully enjoy surround sound, you must register the number and location of you speakers. See “Multi channel surround setup” starting from page 19 to set the speaker parameters before enjoying surround sound.
Selecting a sound field
You can enjoy surround sound simply by selecting one of the pre-programmed sound fields according to the program you want to listen to.
Press MODE +/- repeatedly to select the sound field you want.
The current sound field is indicated in the display. See pages 31–33 for information on each sound field.
To turn the surround effect off
Press A.F.D., 2CH, or MULTI/2CH ANALOG DIRECT (page 33).
Tips
- You can identify the encoding format of program software by looking at its packaging.
Dolby Digital discs are labeled with the DOLBY DIGITAL
logo, and Dolby Surround encoded programs are labeled with the ☐☐ [DOLBY SURROUND PRO·LOGIC] logo. - When sound signals with a sampling frequency of more than 48 kHz are input, the sound signals are output in stereo automatically, and the sound field is turned off.
- You can change the name of the sound field (see page 46).
About DCS (Digital Cinema Sound)
The sound fields with DCS marks use DCS technology. When these sound fields are selected, “Digital Cinema Sound” indicator in the display lights up.
DCS is the concept name of the surround technology for home theater developed by Sony. DCS uses the DSP (Digital Signal Processor) technology to reproduce the sound characteristics of an actual cinema cutting studio in Hollywood.
When played at home, DCS will create a powerful theater effect that mimics the artistic combination of sound and action as envisioned by the movie director.
■NORMAL SURROUND
Software with multi channel surround audio signals is played back according to the way it was recorded. Software with 2 channel audio signals is decoded with Dolby Pro Logic to create surround effects.
■CINEMA STUDIO EX A-C 1)2) D C S
Uses 3D sound imaging of V. MULTI DIMENSION (page 32) to create 5 sets of virtual speakers surrounding the listener from a single pair of actual surround speakers. Though this receiver incorporates the 6.1 channel amplifier, you can reproduce the 6.1 channel surround sound with the 5.1 channel speaker settings by creating the virtual surround back speaker through the “VIRTUAL MATRIX 6.1” playback function (page 34).
- CINEMA STUDIO EX A reproduces the sound characteristics of Sony Pictures Entertainment's classic editing studio.
- CINEMA STUDIO EX B reproduces the sound characteristics of Sony Pictures Entertainment's mixing studio which is one of the most up-to-date facilities in Hollywood.
- CINEMA STUDIO EX C reproduces the sound characteristics of Sony Pictures Entertainment's BGM recording studio.
continued
Selecting a sound field (continued)
■SEMI C.STUDIO EX A–C ^1) (Semi Cinema Studio EX A–C) DCS
Uses 3D sound imaging of V. SEMI M. DIMENSION to create 5 sets of virtual speakers surrounding the listener from the sound of the front speakers (without using actual surround speakers).
You can reproduce the 6.1 channel surround sound by creating the virtual surround back speaker through the “VIRTUAL MATRIX 6.1” playback function (page 34).
- SEMI C.STUDIO EX A reproduces the sound characteristics of Sony Pictures Entertainment's classic editing studio.
- SEMI C.STUDIO EX B reproduces the sound characteristics of Sony Pictures Entertainment's mixing studio which is one of the most up-to-date facilities in Hollywood.
- SEMI C.STUDIO EX C reproduces the sound characteristics of Sony Pictures Entertainment's BGM recording studio.
NIGHT THEATER
Allows you to retain a theater like environment while listening at low volume levels, such as late at night.
■MONO MOVIE
Creates a theater like environment from movies with monaural soundtracks.
■STEREO MOVIE
Creates a theater like environment from movies recorded with stereo soundtracks.
■V.MULTI DIMENSION ^1) (Virtual Multi Dimension) D C S
Uses 3D sound imaging to create an array of virtual surround speakers positioned higher than the listener from a single pair of actual surround speakers. This mode creates 5 sets of virtual speakers surrounding the listener at approximately a 30^ angle of elevation.
■VIRTUAL MULTI REAR 1) (Virtual Multi Rear) DCS
Uses 3D sound imaging to create 3 sets of virtual surround speakers from 1 set of actual surround speakers.
■V.SEMI M.DIMENSION ^1) (Virtual Semi Multi Dimension) D C S
Uses 3D sound imaging to create virtual surround speakers from the sound of the front speakers without using actual surround speakers. This mode creates 5 sets of virtual speakers surrounding the listener at a 30^ angle of elevation.
■VIRTUAL ENHANCED A ^1) (Virtual Enhanced Surround A) DCS
Uses 3D sound imaging to create 3 sets of virtual surround speakers from the sound of the front speakers without using actual surround speakers.
■VIRTUAL ENHANCED B ^1) (Virtual Enhanced Surround B) DCS
Uses 3D sound imaging to create 1 set of virtual surround speakers from the sound of the front speakers without using actual surround speakers.
■D.CONCERT HALL A, B 2) (Digital Concert Hall A, B)
Reproduces the acoustics of a concert hall using multi-speaker system and 3D sound imaging for software with 2 channel signals like CDs.
• D.CONCERT HALL A reproduces the sonic character of the CONCERTGEBOUW in Amsterdam, which is famous for its large sound stage due to its reflectivity.
• D.CONCERT HALL B reproduces the sonic character of the MUSIKVEREIN in Vienna, which is famous for its hall resonance and unique reverberative sound.
■CHURCH
Reproduces the acoustics of a stone church.
■OPERA HOUSE
Reproduces the acoustics of an opera house.
JAZZ CLUB
Reproduces the acoustics of a jazz club.
DISCO/CLUB
Reproduces the acoustics of a discotheque/dance club.
■LIVE HOUSE
Reproduces the acoustics of a 300-seat live house.
ARENA
Reproduces the acoustics of a 1000-seat concert hall.
■STADIUM
Reproduces the feeling of a large open-air stadium.
GAME
Obtains maximum audio impact from video game software.
When headphones are connected, you can select the following sound fields only:
■HEADPHONE (2CH)
Outputs the sound in 2 channel (stereo).
Standard 2 channel (stereo) sources completely bypass the sound field processing. Multi channel surround formats are downmixed to 2 channel.
■HEADPHONE (DIRECT)
Outputs the analog signals without digital processing by the equalizer, sound field, etc.
■HEADPHONE THEATER
Allows you to experience a theater like environment while listening through a pair of headphones.
1) “VIRTUAL” sound field: Sound field with virtual speakers. However, setting the SURROUND menu “VIR. SPEAKERS” parameter to “OFF” when using “CINEMA STUDIO EX A–C” or “SEMI C.STUDIO EX A–C” reproduces the sound characteristics of each cinema production studio without virtual speakers.
2) You can select directly by pressing the buttons on the front panel.
Notes
- The effects provided by the virtual speakers may cause increased noise in the playback signal.
- When listening with sound fields that employ the virtual speakers, you will not be able to hear any sound coming directly from the surround speakers.
Use the buttons on the front panel to operate the following modes.
A.F.D. (Auto Format Decoding)
Automatically detects the type of audio signal being input (Dolby Digital, DTS, or standard 2 channel stereo) and performs the proper decoding if necessary. This mode presents the sound as it was recorded/encoded, without adding any effects (ex. reverberation).
However, if there are no low frequency signals (Dolby Digital LFE, etc.) it will generate a low frequency signal for output to the sub woofer.
2CH (2 Channel)
Outputs the sound from the front left and right speakers only. Standard 2 channel (stereo) sources completely bypass the sound field processing. Multi channel surround formats are downmixed to 2 channel.
There is no sound from the sub woofer.
MULTI/2CH ANALOG DIRECT (Multi/2ch Analog Direct)
The analog input signal is not digitally processed. You can enjoy high quality analog source. Only volume control and the front speaker balance can be adjusted when set to 2CH ANALOG DIRECT. When set to MULTI CH 1 or 2 DIRECT, you can adjust balance and level of all the speakers. When this function is on, the equalizer, sound field (etc.) are turned off.
continued
Selecting a sound field (continued)
NIGHT MODE
Allows you to retain a theater like environment, at low volume levels even late at night. Even at a low volume level, you can clearly hear the dialogues and adjust the volume in small steps. This function can be used with other sound field (pages 31–33).
While this function is on, BASS, TREBLE, and EFFECT level rises, and D.RANGE COMP. is automatically set to “MAX”.
This function does not work while MULTI/2CH ANALOG DIRECT is on.
Note
No sound is output from the sub woofer when “2CH” is selected. To listen to 2 channel (stereo) sources using the front left and right speakers and a sub woofer, select “A.F.D.”
6.1CH DECODING
Press 6.1CH DECODING to select the 6.1 channel decoding mode. You can use the SET UP menu to select the parameter (page 48).
This function works only for the multi channel format [3/2] , [3/2+1] or [3/3] .
This function is effective for all the sound fields.
Note
When you select “A.F.D.”, 6.1CH DECODING setting automatically switches to “AUTO”, even if previously set to “ON” or “OFF” in a different sound field. When you switch back to one of the other sound fields, 6.1CH DECODING setting returns to its previous setting (“ON” or “OFF”).
About DVD encoding and playback of Surround EX (6.1 Channel) movies
The Surround EX System used in movie theaters employs a matrix system to produce 6.1 channels from a 5.1 channel film soundtrack. The matrix system reproduces the soundtrack as intended by the filmmaker. All DVD software encoded with Dolby Digital, DTS-ES Matrix 6.1, and DTS-ES Discreet 6.1 includes the 5.1 channel soundtrack designed for use in movie theaters. Therefore it is possible to change the soundtrack to the one designed for use in movie theaters.
To enjoy 6.1 channel surround sound ("VIRTUAL MATRIX 6.1" playback function)
You can experience 6.1 channel surround sound as if you are in a real theater.
- If you have a 2.0, 2.1, 3.0, 3.1, 5.0, 5.1 channel speaker system
Use the “VIRTUAL MATRIX 6.1” playback function.
To effectively enjoy “VIRTUAL MATRIX 6.1” playback, use the 6.1CH DECODING function when you select “CINEMA STUDIO EX A–C” or “SEMI C.STUDIO EX A–C”. The sound characteristics of CINEMA STUDIO and the 3D sound imaging create a virtual surround back speaker, and you can experience the surround effect as if you are in a real theater. You can select AUTO/ON/OFF using the 6.1CH DECODING button.
- If you have a 6.1 channel speaker system When “NORMAL SURROUND” is selected, set 6.1CH DECODING to “ON”.
About 6.1 channel decoding mode
| 6.1CH Input Output Applied 6.1 channelDECODING stream channel decoder | ||
| OFF Dolby Digital 5.1 NO | ||
| Dolby Digital EX ^1) | 5.1 NO | |
| DTS 5.1 5.1 NO | ||
| DTS-ES Matrix 6.1 ^2) | 5.1 NO | |
| DTS-ES Discrete 6.1 ^3) | 5.1 NO | |
| AUTO Dolby Digital 5.1 NO | ||
| Dolby Digital EX 6.1 Sony DCMD | 4) | |
| DTS 5.1 5.1 NO | ||
| DTS-ES Matrix 6.1 6.1 DTS matrix decoder*/Sony DCMD** | ||
| DTS-ES Discrete 6.1 6.1 DTS discrete decoder*/Sony DCMD** | ||
| ON Dolby Digital 6.1 Sony DCMD | ||
| Dolby Digital EX 6.1 Sony DCMD | ||
| DTS 5.1 6.1 Sony DCMD | ||
| DTS-ES Matrix 6.1 6.1 Sony DCMD | ||
| DTS-ES Discrete 6.1 6.1 Sony DCMD | ||
* STR-DA5ES
**STR-DA3ES
1) Dolby Digital EX
Dolby Digital DVD that includes a Surround EX flag. The Dolby Corporation web page can help you distinguish Surround EX films. Set 6.1 Channel Decoding to “ON” when enjoying these movies.
2) DTS-ES Matrix 6.1
Software encoded with a flag to denote it has both Surround EX and 5.1 channel signals.
Set 6.1 Channel Decoding to “AUTO” to activate the matrix decoder provided by DTS Corporation. Set to “ON” to activate Sony DCMD.
3) DTS-ES Discrete 6.1
Software encoded with both 5.1 channel signals and an extension stream designed for returning those signals to 6.1 discrete channels. Discrete 6.1 channel signals are DVD specific signals not used in movie theaters.
Set 6.1 Channel Decoding to “AUTO” to play the discrete 6.1 channel signals. Set 6.1 Channel Decoding to “ON” to activate Sony DCMD and play 6.1 channel signals equivalent to those that would be used in a movie theater.
4) Sony DCMD (Digital Cinema Matrix Decoder) system
Sony DCMD is a high fidelity 6.1 channel matrix decoder developed by Sony. This decoder has the same function as that used in movie theaters. It can be used with all Surround EX formats (Dolby Digital EX, DTS-ES Matrix 6.1, and DTS-ES Discreet 6.1). Sony DCMD conforms to Dolby Digital EX.
Understanding the multi channel surround displays
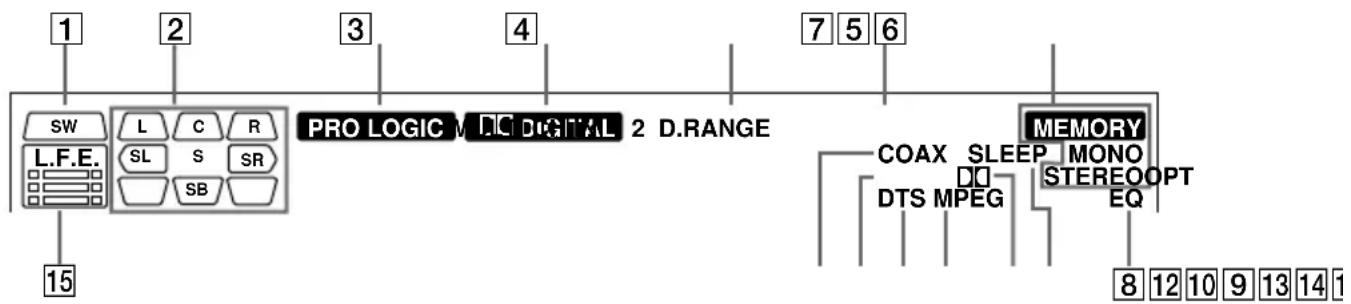
flowchart
graph TD
    A["SW"] --> B["L.F.E."]
    C["L"] --> D["SL"]
    E["C"] --> F["S"]
    G["R"] --> H["SR"]
    I["SB"] --> J["SB"]
    K["PRO LOGIC"] --> L["MDC DIGITAL 2 D.RANGE"]
    M["MEMORY"] --> N["COAX SLEEP MONO STEREOOPT EQ"]
    O["DTS MPEG"] --> P["DTS MPEG"]
    Q["8 12 10 9 13 14 1"] --> R["8 12 10 9 13 14 1"]
1 SW: Lights up when sub woofer selection is set to “YES” and the receiver detects that the disc being played back does not contain the LFE channel signal. While this indicator lights up, the receiver creates a sub woofer signal based on the low frequency components of the front channels.
②Playback channel indicators: The letters (L, C, R, etc.) indicate the channels being played back. The boxes around the letters vary to show how the receiver downmixes the source sound (based on the speakers settings). When using sound fields like “DIGITAL CONCERT HALL”, the receiver adds reverberation based on the source sound.
L (Front Left), R (Front Right), C (Center (monaural)), SL (Surround Left), SR (Surround Right), S (Surround (monaural or the surround components obtained by Pro Logic processing)), SB (Surround Back (the surround back components obtained by 6.1 matrix decoding))
Example:
Recording format (Front /Surround): 3/2 Output channel: Surround speakers absent Sound Field: A.F.D.
3PRO LOGIC: Lights up when the receiver applies Pro Logic processing to 2 channel signals in order to output the center and surround channel signals. For STR-DA5ES, this indicator also lights when the Pro Logic II movie/music decoder is in active. However, this indicator does not light if the center and surround speakers are set to “NO”, and “A.F.D.” or “NORMAL SURROUND” is selected.
4 DIGITAL: Lights up when a sound field other than “2CH” is selected and the receiver is decoding signals recorded in the Dolby Digital format.
5 MULTI CH IN 1/2: Lights up when MULTI CH IN 1 or 2 is selected.
6D.RANGE: Lights up when dynamic range compression is activated. See page 41 to adjust the dynamic range compression.
7Tuner indicators: Light up when using the receiver to tune in radio stations, etc. See pages 44–45 for tuner operations.
8EQ: Lights up when the equalizer functions.
9 SLEEP: Lights up when sleep timer is activated.
10 ☐: Lights up when Dolby Digital signals are input.
11MPEG: Lights up when MPEG signals are input.
Note
Only the front 2 channels are compatible with MPEG format. Multi channel surround sound is downmixed and output from the front 2 channels.
12DTS: Lights up when DTS signals are input. When playing a DTS format disc, be sure that you have made digital connections and that INPUT MODE is NOT set to ANALOG 2CH FIXED (see page 27).
13 OPT: Lights up when the source signal is a digital signal being input through the OPTICAL terminal.
14 COAX: Lights up when the source signal is a digital signal being input through the COAXIAL terminal.
15L.F.E.: Lights up when the disc being played back contains the LFE (Low Frequency Effect) channel. When the sound of the LFE channel signal is actually being reproduced, the bars underneath the letters lights up to indicate the level. Since the LFE signal is not recorded in all parts of the input signal the bar indication will fluctuate (and may turn off) during playback.
11MPEG: Lights up when MPEG signals are input. Note Only the front 2 channels are compatible with MPEG format. Multi channel surround sound is downmixed and output from the front 2 channels. 12DTS: Lights up when DTS signals are input. When playing a DTS format disc, be sure that you have made digital connections and that INPUT MODE is NOT set to ANALOG 2CH FIXED (see page 27). 13OPT: Lights up when the source signal is a digital signal being input through the OPTICAL terminal. 14COAX: Lights up when the source signal is a digital signal being input through the COAXIAL terminal. 15L.F.E.: Lights up when the disc being played back contains the LFE (Low Frequency Effect) channel. When the sound of the LFE channel signal is actually being reproduced, the bars underneath the letters lights up to indicate the level. Since the LFE signal is not recorded in all parts of the input signal the bar indication will fluctuate (and may turn off) during playback.
Customizing sound fields
By adjusting the surround parameters and the equalization of the front, center, surround, and surround back speakers, you can customize the sound fields to suit your particular listening situation.
Once you customize a sound field, the changes are stored in the memory indefinitely. You can change a customized sound field any time by making new adjustments to the parameters.
See the tables starting from page 90 for the parameters available in each sound field.
To get the most from multi channel surround sound
Position your speakers and do the procedures described in “Multi channel surround setup” starting from page 18 before you customize a sound field.
Adjusting the surround parameters
The SURROUND menu contains parameters that let you customize various aspects of the current sound field. The settings are stored individually for each sound field.
1 Start playing a program source encoded with multi channel surround sound.
2 Press SURROUND.
The button lights up and the first parameter is displayed.
3 Press the cursor buttons (<or ) to select the parameter you want to adjust.
4 Turn the jog dial to select the setting you want.
The setting is entered automatically.
Initial settings
| Parameter Initial setting | |
| 2CH DECODING ^1) | (depends on the sound field) |
| 2CH MODE ^1) | PRO LOGIC |
| C.WIDTH L__C__R ^1)2) | 3 |
| DIMENSION F__I__S ^1)2) | Midpoint |
| PANORAMA MODE ^1)2) | OFF |
| PRO LOGIC ^3) | AUTO |
| EFFECT LEVEL | (depends on the sound field) |
| WALL S__I__H Midpoint | |
| REVERB S__I__L Midpoint | |
| FRONT REVERB STD (STANDARD) | |
| SCREEN DEPTH MID | |
| VIR.SPEAKERS ON | |
| SUR.ENHANCER ON | |
| BASS GAIN 0 dB | |
| BASS FREQ. 250 Hz | |
| TREBLE GAIN 0 dB | |
| TREBLE FREQ. 2.5 kHz | |
1) STR-DA5ES only.
2) You can set this parameter only when the 2ch decode mode is set to "PL II MUSIC".
3) STR-DA3ES only.
2ch decode type (2CH DECODING)
(STR-DA5ES only) Lets you specify the settings for decoding Digital PCM, analog input, or the 2 channel audio signals of [2/0] format sound.
- When set to “AUTO”, the receiver performs the decoding when the Dolby Surround or DTS Surround encode flag is on.
- When set to “ON”, the receiver performs the decoding for the 2 channel source, regardless of the encode flag.
- When set to "OFF", the receiver does not perform the decoding.
Note
When “NORMAL SURROUND” is selected, the receiver is automatically set to “ON” setting. When “A.F.D.” is selected, the receiver automatically set to “AUTO” setting. In either case, this parameter is not displayed in the SURROUND menu.
2ch decode mode (2CH MODE)
(STR-DA5ES only) Lets you specify the type of decoding for the 2 channel source. This receiver incorporates with Dolby Surround Pro Logic II, and DTS Neo:6. Each of these has movie mode and music mode, and the receiver can reproduce the 2 channel sound in 5.1 channel through Dolby Surround Pro Logic II, or 6 channel through DTS Neo:6.
- When set to “PRO LOGIC”, the receiver performs the Pro Logic decoding. The source recorded in 2 channel is decoded into 4 channels.
- When set to “PL II MOVIE”, the receiver performs the Pro Logic II movie mode decoding. This setting is ideal for the movies encoded in Dolby Surround. Besides, this mode can reproduce the sound in 5.1 channel when watching the videos of old movies or in the dubbed language.
- You can set to “PL II MUSIC” only when “NORMAL SURROUND” is selected. When set to “PL II MUSIC”, the receiver performs the Pro Logic II music mode decoding. This setting is ideal for the normal stereo sources, such as CDs. You can make further adjustments using center width control, dimension control, and panorama mode parameters.
- When set to “Neo: Cinema”, the receiver performs the DTS Neo:6 movie mode decoding. This setting is ideal for the movies encoded in DTS Surround.
- You can set to “Neo: Music” only when “NORMAL SURROUND” is selected. When set to “Neo: Music”, the receiver performs the DTS Neo:6 music mode decoding. This setting is ideal for the normal stereo sources, such as CDs.
Note
Dolby Surround Pro Logic II and DTS Neo:6 do not function for DTS or MPEG format signals.
Center width control (C WIDTH)
(STR-DA5ES only) You can set this parameter only when 2ch decode mode is set to “PL II MUSIC”. You can adjust the distribution of the center channel signal, generated through the Dolby Surround Pro Logic II decoding, to the L/R speakers.
Dimension control (DIMENSION)
(STR-DA5ES only) You can set this parameter only when 2ch decode mode is set to “PL II MUSIC”. You can adjust the difference between the front channels and the surround channels.
Panorama mode (PANORAMA MODE)
(STR-DA5ES only) You can set this parameter only when 2ch decode mode is set to “PL II MUSIC”. You can enjoy the surround sound by spreading the sound field of front speakers to the left and right of the listening position.
Pro Logic (PRO LOGIC)
(STR-DA3ES only) Lets you specify the Pro Logic decoding setting.
- To set the receiver to perform Pro Logic decoding if Dolby surround encoded flag is ON or if Pro Logic decoding produces a better sound field, select “AUTO”.
- To set the receiver to perform Pro Logic decoding on surround signals, regardless of the Dolby surround encoded flag, select “ON”.
- To set the receiver not to perform Pro Logic decoding, select "OFF".
continued
Customizing sound fields (continued)
Effect level (EFFECT LEVEL)
Lets you adjust the “presence” of the current surround effect.
Wall type (WALL)
Lets you control the level of the high frequencies to alter the sonic character of your listening environment by simulating a softer (S) or harder (H) wall. The midpoint designates a neutral wall (made of wood).
Reverberation (REVERB)
Lets you control the spacing of the early reflections to simulate a sonically longer (L) or shorter (S) room. The midpoint designates a standard room with no adjustment.
Front reverberation (FRONT REVERB)
This parameter can be used when “DIGITAL CONCERT HALL A, B” is selected. This parameter lets you adjust the amount of reverberations to add to the front signals according to the original reverberations in the source.
- To increase front reverberations, select "WET".
- To decrease front reverberations, select "DRY".
Screen depth (SCREEN DEPTH)
In a movie theater, sound seems to come from inside the image reflected on the movie screen. This parameter lets you create the same sensation in your listening room by shifting the sound of the front speakers “into” the screen. “DEEP” provides the greatest amount of screen depth.
Virtual speakers (VIR. SPEAKERS)
Allows you turn the virtual speakers created by “CINEMA STUDIO EX A, B, C” and “SEMI C.STUDIO EX A, B, C” off or on.
Surround reflection enhancer (SUR. ENHANCER)
This is a setup that adds the effect of a broader sound obtained from the sound of the surround channel even when the surround channel sound is monaural. This setting operates in CINEMA STUDIO EX A, B, C and SEMI C.STUDIO EX A, B, C.
- When ON is set, the effect is automatically applied to sources recorded in Dolby Pro Logic, Dolby Digital [2/1], [3/1] or dts [2/1], [3/1], etc. surround channel.
- When OFF is set, there is no effect added.
Bass adjustment (Gain/Frequency)
Unlike the equalizer in the equalizer menu (which allows you to individually adjust the overall sound quality of each set of speakers), these parameters allow you to individually adjust the tonal quality of each sound field.
1 Press the cursor buttons ( ◀r ) > repeatedly to select the gain (dB) or frequency (Hz).
2 Turn the jog dial to adjust.
Repeat until you achieve the sound you desire.
Treble adjustment (Gain/Frequency)
Adjust as described in “Bass adjustment”.
Adjusting the level parameters
The LEVEL menu contains parameters that let you adjust the balance and volumes of each speaker. The settings are applied to all sound fields.
1 Start playing a program source encoded with multi channel surround sound.
2 Press LEVEL.
The button lights up and the first parameter is displayed.
3 Press the cursor buttons (<or) to select the parameter you want to adjust.
4 Turn the jog dial to select the setting you want.
The setting is entered automatically.
Initial settings
| Parameter Initial setting |
| TEST TONE OFF |
| PHASE NOISE OFF |
| PHASE AUDIO* OFF |
| FRONT L__I__R Center |
| SURROUND L__I__R Center |
| SUR.BACK L__I__R Center |
| CENTER LEVEL 0 dB |
| SURROUND LEVEL 0 dB |
| SUR.BACK LEVEL 0 dB |
| S.WOOFER LEVEL 0 dB |
| LFE MIX LEVEL 0 dB |
| D.RANGE COMP. OFF |
* One of these parameters appears depending on the test tone mode (T.TONE) parameter in the SET UP menu (page 50).
Test tone (TEST TONE)
Lets you output the test tone from each speaker in sequence. When set to “AUTO”, the test tone is output from each speaker automatically. When set to “FIX”, you can select the speaker to output the test tone.
Test tone (PHASE NOISE)
Lets you output the test tone from two adjacent speakers at a time in sequence.
Test tone (PHASE AUDIO)
Lets you output the source sound instead of the test tone from two adjacent speakers at a time in sequence.
Front balance (FRONT)
Lets you adjust the balance between front left and right speakers.
Surround balance (SURROUND)
Lets you adjust the balance between surround left and right speakers.
Surround back balance (SUR.BACK)
Lets you adjust the balance between surround back left and right speakers when surround back L/R speakers are set to “YES”.
Center level (CENTER LEVEL)
Lets you adjust the level of the center speaker.
Surround level (SURROUND LEVEL)
Lets you adjust the level of the surround left and right speakers.
Surround back level (SURR BACK LEVEL)
Lets you adjust level of the surround back (left and right) speaker(s).
Sub woofer level (S. WOOFER LEVEL)
Lets you adjust the level of the sub woofer.
LFE (Low Frequency Effect) mix level (LFE MIX)
Lets you attenuate the level of the LFE (Low Frequency Effect) channel output from the sub woofer without effecting the level of the bass frequencies sent to the sub woofer from the front, center or surround channels via the Dolby Digital or DTS bass redirection circuitry.
- For LFE mix level, “0 dB” outputs the full LFE signal at the mix level determined by the recording engineer.
- To mute the sound of the LFE channel from the sub woofer, select “OFF”. However, the low frequency sounds of the front, center, or surround speakers are output from the sub woofer according to the settings made for each speaker in the speaker setup (page 20–21).
continued
Customizing sound fields (continued)
Dynamic range compressor (D. RANGE COMP.)
Lets you compress the dynamic range of the sound track. This may be useful when you want to watch movies at low volumes late at night. We recommend using the “MAX” setting.
- To reproduce the sound track with no compression, select "OFF".
- To reproduce the sound track with the dynamic range intended by the recording engineer, select "STD".
- To compress the dynamic range in small steps to achieve the sound you desire, select “0.1”–“0.9”.
- To reproduce a dramatic compression of the dynamic range, select “MAX”.
Notes
- Dynamic range compression is possible with Dolby Digital sources only.
- While NIGHT MODE is activated, D.RANGE COMP. is automatically set to MAX and is not displayed in the LEVEL menu.
Resetting customized sound fields to the factory settings
1 If the power is on, press I/⏻ to turn off the power.
2 Hold down MODE + and press I/⏻.
“S.F Initialize” appears in the display and all sound fields are reset at once.
Adjusting the equalizer
The EQ menu lets you adjust the equalization of the front, center, surround and surround back speakers individually. The equalizer bank lets you store up to 5 different equalizer settings.
The following menu is only available after pressing EQUALIZER and selecting one of the equalizers (EQ PRESET [1]–[5]).
1 Start playing a program source encoded with multi channel surround sound.
2 Press EQUALIZER repeatedly to select the equalizer you want to adjust (EQ PRESET [1]–[5]).
3 Press EQ.
The button lights up and the first parameter is displayed.
4 Press the cursor buttons (<or ) to select the parameter you want to adjust.
5 Turn the jog dial to select the setting you want.
The setting is entered automatically.
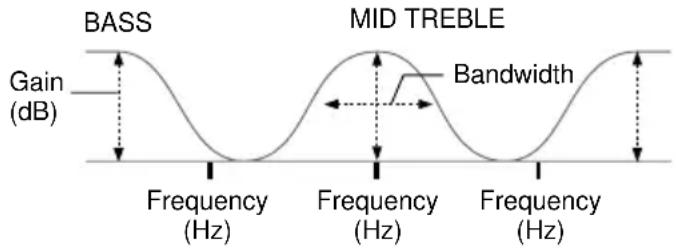
line
| Frequency (Hz) | Gain (dB) |
|---|---|
| Low | High |
| High | Low |
Tip
You can turn off the equalization without erasing the equalizer. Press EQUALIZER repeatedly to select "EQ PRESET [OFF]".
Front speaker bass adjustment (Gain/Frequency)
Lets you adjust the gain and frequency of bass.
Front speaker midrange adjustment (Gain/Frequency)
Lets you adjust the gain and frequency of midrange.
Front speaker midrange bandwidth
Lets you adjust the width of the midrange band.
- “WIDE” provides a wide band centered on the selected frequency, for general adjustments.
- “MIDDLE” provides a normal band.
- “NARROW” provides a narrow band centered on the selected frequency, for specific adjustments.
Front speaker treble adjustment (Gain/Frequency)
Lets you adjust the gain and frequency of treble.
Center speaker bass adjustment (Gain/Frequency)
Lets you adjust the gain and frequency of bass.
Center speaker midrange adjustment (Gain/Frequency)
Lets you adjust the gain and frequency of midrange.
Center speaker midrange bandwidth
Lets you adjust the width of the midrange band.
- “WIDE” provides a wide band centered on the selected frequency, for general adjustments.
- “MIDDLE” provides a normal band.
- “NARROW” provides a narrow band centered on the selected frequency, for specific adjustments.
Center speaker treble adjustment (Gain/Frequency)
Lets you adjust the gain and frequency of treble.
Surround speaker bass adjustment (Gain/Frequency)
Lets you adjust the gain and frequency of bass.
Surround speaker treble adjustment (Gain/Frequency)
Lets you adjust the gain and frequency of treble.
Surround back speaker bass adjustment (Gain/Frequency)
Lets you adjust the gain and frequency of bass.
Surround back speaker treble adjustment (Gain/Frequency)
Lets you adjust the gain and frequency of treble.
Clearing Stored Equalizer Settings
1 Press EQUALIZER repeatedly to select the equalizer you want to clear (EQ PRESET [1]–[5]).
2 Press EQ.
3 Press the cursor buttons (◀or ) to display "PRESET x CLEAR [NO]" ("x" is the number of the current equalizer preset).
4 Turn the jog dial to display "PRESET x CLEAR [YES]" and press ENTER. "Are you sure? [NO]" is displayed.
5 Once again, turn the jog dial to display "[YES]" and press ENTER.
“PRESET x CLEARED!” is displayed and the contents of the selected equalizer bank are restored to the factory presets.
Receiving Broadcasts
Before receiving broadcasts, make sure you have connected FM and AM antennas to the receiver (see page 7).
Direct tuning
You can enter a frequency of the station you want directly by using the numeric buttons on the supplied remote.
1 Rotate FUNCTION to select TUNER.
The last received station is tuned in.
2 Press FM/AM to select the FM or AM band.
3 (For STR-DA5ES) Select TUNER from the FUNCTION list, then select "DIRECT TUNING" from the SUB menu (page 60).
(For STR-DA3ES) Press TUNER on the remote, then press D.TUNING on the remote.
4 Press the numeric buttons to enter the frequency.
Example 1: FM 102.50 MHz

Example 2: AM 1350 kHz (You don't have to enter the last "0" when the tuning scale is set to 10 kHz.)

If you cannot tune in a station and the entered numbers flash
Make sure you've entered the right frequency. If not, repeat steps 3 and 4. If the entered numbers still flash, the frequency is not used in your area.
5 If you've tuned in an AM station, adjust the direction of the AM loop antenna for optimum reception.
6 Repeat steps 2 to 5 to receive another station.
Tips
- If you do not remember the precise frequency, press TUNING + or TUNING – after entering the value close to the frequency you want. The receiver automatically tunes in the station you want. If the frequency seems to be higher than the entered value, press TUNING +, and if the frequency seems to be lower than the entered value, press TUNING –.
- If “STEREO” flashes in the display and the FM stereo reception is poor, press FM MODE to improve the sound. You will not be able to enjoy the stereo effect, but the sound will be less distorted.
Note
If “STEREO” does not appear at all when an FM broadcast is received normally, press FM MODE to turn on the “STEREO” indication.
The tuning scale is:
FM: 100 kHz
AM: 10 kHz*
* The AM tuning scale can be changed (see page 86).
Automatic tuning
If you don't know the frequency of the station you want, you can let the receiver scan all available stations in your area.
1 Rotate FUNCTION to select TUNER.
The last received station is tuned in.
2 Press FM/AM to select the FM or AM band.
3 Press TUNING + or TUNING -.
Press TUNING + to scan from low to high; press TUNING - to scan from high to low. The receiver stops scanning whenever a station is received.
When the receiver reaches either end of the band
Scanning is repeated in the same direction.
4 To continue scanning, press TUNING + or TUNING – again.
Preset tuning
After you have tuned in stations using Direct Tuning or Automatic Tuning, you can preset them to the receiver. Then you can tune in any of the stations directly by entering its 2-character preset code using the supplied remote. Up to 30 FM or AM stations can be preset. The receiver will also scan all the stations that you have preset.
Before tuning to preset stations, be sure to preset them by performing steps on “Presetting radio stations”.
Presetting radio stations
1 Rotate FUNCTION to select TUNER.
The last received station is tuned in.
2 Tune in the station that you want to preset using Direct Tuning (page 44) or Automatic Tuning (page 44).
3 Press MEMORY.
“MEMORY” appears in the display for a few seconds.
Do steps 4 to 5 before “MEMORY” goes out.
4 Press PRESET TUNING + or PRESET TUNING – to select a preset number.
If “MEMORY” goes out before you press the preset number, start again from step 3.
5 Press MEMORY again to store the station.
If “MEMORY” goes out before you can store the station, start again from step 3.
6 Repeat steps 2 to 5 to preset another station.
Tuning to preset stations
You can tune the preset stations by either of the following two ways.
Scanning the preset stations
1 Rotate FUNCTION to select TUNER.
The last received station is tuned in.
2 Press PRESET TUNING + or PRESET TUNING – repeatedly to select the preset station you want.
Each time you press the button, the receiver tunes in one preset station at a time, in the corresponding order and direction as follows:

flowchart
graph LR
    A0 --> B1
    B1 --> B2
    B2 --> B0
    C0 --> C1
    C1 --> C2
    A1 <--> A2 <--> ... <--> A0 <--> B1 <--> B2 <--> ... <--> B0
Using the preset codes
Use the supplied remote to perform the following operations. For details on the buttons used in this section, see page 63.
1 Rotate FUNCTION to select TUNER.
The last received station is tuned in.
2 Select the preset station you want from the list displayed on the supplied remote.
Naming preset stations and program sources
You can enter a name of up to 8 characters for preset stations and program sources. These names (for example, “VHS”) appear in the receiver’s display when a station or program source is selected. Note that no more than one name can be entered for each preset station or program source.
This function is useful for distinguishing components of the same kind. For example, two VCRs can be specified as “VHS” and “8mm”, respectively. It is also handy for identifying components connected to jacks meant for another type of component, for example, a second CD player connected to the MD/DAT jacks.
Besides, you can change the names of the sound fields up to 18 characters.
1 To name a preset station Rotate FUNCTION to select TUNER, then tune in the preset station you want to create an index name for.
The last station you received is tuned in. If you are not familiar with how to tune in preset stations, see “Tuning to preset stations” on page 45.
To name a program source Select the program source (component) to be named.
To change the name of the sound field Select the sound field you want to change the name.
2 Press NAME once to index preset stations and program sources, press NAME twice to change the name of the sound field.
3 Create an index name by using the jog dial and cursor buttons:
Turn the jog dial to select a character, then press > to move the cursor to the next position.
To insert a space
Turn the jog dial until a blank space appears in the display.
If you've made a mistake
Press or repeatedly until the character to be changed flashes, then turn the jog dial to select the right character.
4 Press ENTER.
5 Repeat steps 2 to 4 to assign index name for another station or program source.
Recording
Before you begin, make sure you've connected all components properly.
Recording on an audio tape or MiniDisc
You can record on a cassette tape or MiniDisc using the receiver. See the operating instructions of your cassette deck or MD deck if you need help.
1 Select the component to be recorded.
2 Prepare the component for playing. For example, insert a CD into the CD player.
3 Insert a blank tape or MD into the recording deck and adjust the recording level, if necessary.
4 Start recording on the recording deck, then start playback on the playback component.
Notes
- You cannot record a digital audio signal using a component connected to the analog TAPE OUT or MD/DAT OUT jacks. To record a digital audio signal, connect a digital component to the DIGITAL MD/DAT OUT jacks.
- Sound adjustments do not affect the signal output from the TAPE OUT or MD/DAT OUT jacks.
- The analog audio signals of the current function is output from the REC OUT jacks. When you use AUDIO SPLIT to assign a digital audio input (for example, MD/DAT OPTICAL), the analog audio signals of the assigned audio (for example, MD/DAT ANALOG) is output.
- The signals input to the MULTI CH IN jacks are not output from the REC OUT jacks even when MULTI/2CH ANALOG DIRECT is set to MULTI CH 1 or 2 DIRECT. The analog audio signals of the current function are output.
- No signals are output from DIGITAL OUT jacks (MD/DAT OPTICAL OUT) when you set MULTI/2CH ANALOG DIRECT to 2CH ANALOG DIRECT. The digital circuitry power is cut off to ensure a superior sound quality.
Recording on a video tape
You can record from a VCR, a TV, or an LD player using the receiver. You can also add audio from a variety of audio sources when editing a video tape. See the operating instructions of your VCR or LD player if you need help.
1 Select the program source to be recorded.
2 Prepare the component for playing.
For example, insert the laser disc you want to record into the LD player.
3 Insert a blank video tape into the VCR (VIDEO 1 or VIDEO 2) for recording.
4 Start recording on the recording VCR, then start playing the video tape or laser disc you want to record.
Tip
You can record the sound from any audio source onto a video tape while copying from a video tape or laser disc. Locate the point where you want to start recording from another audio source, select the program source, then start playback. The audio from that source will be recorded onto the audio track of the video tape instead of the audio from the original medium. To resume audio recording from the original medium, select the video source again.
Notes
- Make sure to make both digital and analog connections to the TV/SAT and DVD/LD inputs. Analog recording is not possible if you make only digital connections.
- Some sources contain copy guards to prevent recording. In this case, you may not be able to record from the sources.
- The analog audio signals of the current function is output from the REC OUT jacks. When you use AUDIO SPLIT to assign a digital audio input (for example, MD/DAT OPTICAL), the analog audio signals of the assigned audio (for example, MD/DAT ANALOG) is output.
- The signals input to the MULTI CH IN jacks are not output from the REC OUT jacks even when MULTI/2CH ANALOG DIRECT is set to MULTI CH 1 or 2 DIRECT. The analog audio signals of the current function are output.
Using the Sleep Timer
You can set the receiver to turn off automatically at a specified time.
Press SLEEP while the power is on.
Each time you press the button, the display changes cyclically as follows:
$$ \begin{array}{l} 2: 0 0: 0 0 \longrightarrow 1: 3 0: 0 0 \longrightarrow 1: 0 0: 0 0 \longrightarrow 0: 3 0: 0 0 \longrightarrow \ \text { OFF } \end{array} $$
While using Sleep Timer, “SLEEP” lights up in the display.
Tips
- You can freely specify the time. After pressing SLEEP, specify the time you want using the jog dial and cursor buttons (or) on the receiver. The sleep time changes in 1 second intervals. You can specify up to 5 hours.
- To check the remaining time before the receiver turns off, press SLEEP. The remaining time appears in the display.
Adjustments using the SET UP button
The SET UP button allows you to make the following adjustments.
1 Press SET UP.
2 Press the cursor buttons (<or) to select the parameter you want to adjust.
3 Turn the jog dial to select the setting you want.
The setting is entered automatically.
4 Repeat steps 2 and 3 until you have set all of the parameters that follow.
Initial settings
| Parameter Initial setting | |
| 6.1CH DECODING AUTO | |
| MULTI CH 1 or 2 NONE | |
| D.POWER AUTO OFF | |
| V.POWER AUTO OFF | |
| S.FIELD LINK ON | |
| DECODE FORMAT AUTO | |
| AUTO FUNCTION ON | |
| 2ND ROOM SP ^1) | ON |
| 3RD ROOM SP ^2) | ON |
| 2 WAY REMOTE ^3) | ON |
| COMMAND MODE AV1 | |
| T.TONE NORMAL | |
| OSD COLOR | |
| OSD H.POSITION 4 | |
| OSD V.POSITION 4 | |
1) When the SPEAKER switch is set to “MAIN+2ND ROOM” only. (STR-DA3ES only)
2) When the SPEAKER switch is set to “MAIN+3RD ROOM” only. (STR-DA5ES only)
3) STR-DA5ES only.
■6.1ch decoding mode (6.1CH DECODING)
You can set this parameter using 6.1CH DECODING on the front panel (page 34).
- When set to “AUTO”, the receiver performs 6.1 channel decoding only if 6.1 channel signals decode flag is ON.
- When set to “ON”, the receiver performs 6.1 channel decoding only if the surround signals are multi channel format [3/2], [3/2+1] or [3/3], regardless of the 6.1 channel decode flag.
- When set to "OFF", the receiver does not perform 6.1 channel decoding.
Tip
The 6.1 channel decoding flag is the information recorded on the software (DVD, etc).
■Multi channel assignment (MULTI CH 1 or 2)
Lets you assign a function to MULTI CH 1 or 2. You cannot assign TUNER or PHONO.
You cannot assign the same function to both MULTI CH 1 and 2.
■Digital power management (D.POWER)
Lets you enjoy the analog source without the influence of digital circuits.
- “ AUTO OFF” turns off the power of the unnecessary digital circuits automatically when you use analog inputs or functions that bypass digital processing when MULTI/2CH ANALOG DIRECT function is used.
- “ ALWAYS ON” keeps the power of digital circuits on. Select if you do not like the time lag that occurs with the “AUTO OFF” setting when digital circuits are turned on, etc.
■Video power management (V.POWER)
Lets you enjoy the sound without the influence of the video circuits.
- “AUTO OFF” turns off the power of video circuits automatically when it is unnecessary.
- “ ALWAYS ON” keeps the power of video circuits on. Depending on the monitor, noise may be produced or the picture may be distorted when the power of the video circuits is turned on. In this case, select “ ALWAYS ON”.
■Sound field link (S.FIELD LINK)
Lets you apply the last selected sound field to a program source whenever it is selected. For example, if you listen to CD with STADIUM as the sound field, change to a different program source, then return to CD, STADIUM will be applied again.
■Digital input decode mode (DECODE FORMAT)
Lets you specify the decode type for the signal input to the digital audio jacks.
- “AUTO” switches between DTS, Dolby Digital, or PCM decoding automatically.
- “ PCM” decodes all the input signals as PCM signals. If a Dolby Digital, DTS, or MPEG (etc.) signal is input, no sound will be heard. When set to “AUTO”, and the sound from the digital audio jacks (for CD, etc.) is interrupted when playback starts, set to “PCM”.
■CONTROL A1 auto function (AUTO FUNCTION)
Lets you switch the function of this receiver to the Sony components connected via CONTROL A1 cords (see page 13) automatically when the connected component is set to play mode.
■2nd room speaker (2ND ROOM SP) (STR-DA3ES only)
Lets you set whether you would output the sound from the speakers in the 2nd room or not.
The setting is automatically set to “ON” when the SPEAKER switch is set to “MAIN+2ND ROOM”.
■3rd room speaker (3RD ROOM SP) (STR-DA5ES only)
Lets you set whether you would output the sound from the speakers in the 3rd room or not. The setting is automatically set to “ON” when the SPEAKER switch is set to “MAIN+3RD ROOM”.
continued
Adjustments using the SET UP button (continued)
■2-way remote (2 WAY REMOTE)
(STR-DA5ES only) This receiver is shipped from the factory with the 2 way remote control system set to “ON”. Normally, you can use the receiver as is. However, if you want to use this receiver together with another component that is also compatible with the 2 way remote control system, be sure to perform the following operation to limit response to signals sent from the remote controls.
First select one component for the 2 way remote control, then set the 2 way remote control system for the component to “ON”. For other components, set the 2 way remote control system to “OFF”. With these settings, the component for which the 2 way remote control system is set to “OFF” cannot be used.
Therefore, connect the CONTROL A1 IIacks of both components with monaural (2P) miniplug cord.
■Selecting the command mode of the remote (COMMAND MODE)
Lets you select the command mode of the remote. Change the command mode when you use 2 Sony receivers in the same room.
■Test tone mode (T.TONE)
Lets you select the test tone output mode (page 25).
- “NORMAL” output the test tone from each speaker in sequence.
- “ PHASE NOISE” output the test tone from two adjacent speakers at a time in sequence.
- “PHASE AUDIO” output the source sound instead of the test tone from two adjacent speakers at a time in sequence.
■Color of the on-screen display (OSD)
Lets you select the color of the on-screen display.
■OSD horizontal position (OSD H.POSITION)
Lets you adjust the position of the on-screen display horizontally.
■OSD vertical position (OSD V.POSITION)
Lets you adjust the position of the on-screen display vertically.
CONTROL A1 I control system
Getting Started
This section explains the basic functions of the CONTROL A1 IControl System. Certain components have special functions, like "CD Synchro Dubbing" on cassette decks, that require CONTROL A1 Iconnections. For detailed information regarding specific operations, be sure to also refer to the Operating Instructions supplied with your component(s).
The CONTROL A1 II Control System was designed to simplify the operation of audio systems composed of separate Sony components. CONTROL A1 II connections provide a path for the transmission of control signals which enable automatic operation and control features usually associated with integrated systems.
Currently, CONTROL A1 II connections between a Sony CD player, amplifier (receiver), MD deck and cassette deck provide automatic function selection and synchronized recording.
In the future, the CONTROL A1 II connection will work as a multifunction bus allowing you to control various functions for each component.
Notes
- The CONTROL A1 IControl System is designed to maintain upward compatibility as the Control System is upgraded to handle new functions. In this case, however, older components will not be compatible with the new functions.
- Do not operate a 2 way remote control unit when the CONTROL A1Ijacks are connected via a PC interface kit to a personal computer running “MD Editor” or similar application. Also, do not operate the connected component in a manner contrary to the functions of the application, as this may cause the application to operate incorrectly.
CONTROL A1Ⅱ and CONTROL A1 compatibility
The CONTROL A1 control system has been updated to the CONTROL A1 which is the standard system in the Sony 300 disc CD changer and other recent Sony components. Components with CONTROL A1 jacks are compatible with components with CONTROL A1 and can be connected to each other. Basically, the majority of the functions available with the CONTROL A1 control system will be available with the CONTROL A1 control system.
However, when making connections between components with CONTROL A1 jacks and components with CONTROL A1II jacks, the number of functions that can be controlled may be limited depending on the component. For detailed information, refer to the operating instructions supplied with the component(s).
Connections
Connect monaural (2P) mini-plug cords in series to the CONTROL A1 II jacks on the back of each component. You can connect up to 10 CONTROL A1 II compatible components in any order. However, you can connect only one of each type of component (i.e., 1 CD player, 1 MD deck, 1 tape deck and 1 receiver).
(You may be able to connect more than one CD player or MD deck, depending on the model. Refer to the operating instructions supplied with the respective component for details.)
Example

flowchart
graph LR
    A[" "] --> B[" "]
    B --> C[" "]
    C --> D[" "]
    D --> E[" "]
    E --> F["..."]
Amplifier (Receiver)
CD player
MD deck
Tape deck
Other component
In the CONTROL A1 II control system, the control signals flow both ways, so there is no distinction of IN and OUT jacks. If a component has more than one CONTROL
A1Ⅱ jack, you can use either one, or connect different components to each jack.
continued
CONTROL A1 II control system (continued)
Jacks and connection examples
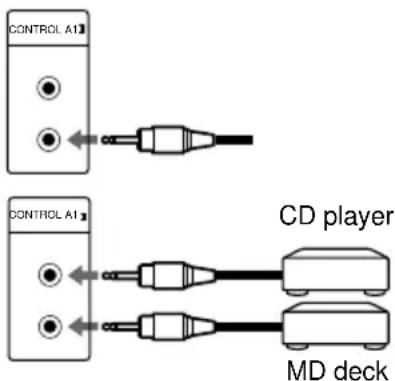
text_image
CONTROL A13 CONTROL A13 CD player MD deckOn CONTROL A1 jacks and connections
It is possible to make connections between CONTROL A1 and CONTROL A1 II jacks. For details regarding particular connections or set up options, refer to the operating instructions supplied with the component(s).
About the connecting cord
Some CONTROL A1 compatible components are supplied with a connecting cord as an accessory. In this case, use the connecting cord for your connection.
When using a commercially available cord, use a monaural (2P) mini-plug cord less than 2 meters long, with no resistance (like the Sony RK-G69HG).
Basic Functions
The CONTROL A1 Ifunctions will operate as long as the component you want to operate is turned on, even if all of the other connected components are not turned on.
Automatic function selection
When you connect a CONTROL A1 II compatible Sony amplifier (or receiver) to other Sony components using monaural mini-plug cords, the function selector on the amplifier (or receiver) automatically switches to the correct input when you press the play button on one of the connected components.
Notes
- You must connect a CONTROL A1 compatible amplifier (receiver) using a monaural mini-plug cord in order to take advantage of the automatic function selection feature.
- This function only works when the components are connected to the amplifier (or receiver) inputs according to the names on the function buttons. Certain receivers allow you to switch the names of the function buttons. In this case, refer to the operating instructions supplied with the receiver.
- When recording, do not play any components other than the recording source. It will cause the automatic function selection to operate.
Synchronized recording
This function lets you conduct synchronized recording between the selected source and recorder components.
1 Set the function selector on the amplifier (or receiver) to the source component.
2 Set the source component to pause mode (make sure both the ▶ and Ⅱ indicators light together).
3 Set the recorder component to the REC-PAUSE mode.
4 Press PAUSE on the recorder component.
The source component is released from the pause mode, and recording begins shortly thereafter.
When playback ends from the source component, recording stops.
Notes
- Do not set more than one component to the pause mode.
- Certain recorder components may be equipped with a special synchronized recording function that uses the CONTROL A1IControl System, like “CD Synchro Dubbing”. In this case, refer to the operating instructions supplied with the recorder component.
Operations using the remote
(STR-DA5ES only)
Two remotes are supplied with STR-DA5ES (RM-LJ305, RM-US105). For details, refer to the following pages respectively.
RM-LJ305: pages 53–74
RM-US105: pages 75–81
For the remote (RM-PP505L) supplied with STR-DA3ES, refer to the separate operating instructions.
Before you use your remote
Inserting batteries into the remote
Insert three LR6 (size-AA) alkaline batteries with the + and - properly oriented in the battery compartment. When using the remote, point it at the remote sensor 📁 on the receiver.
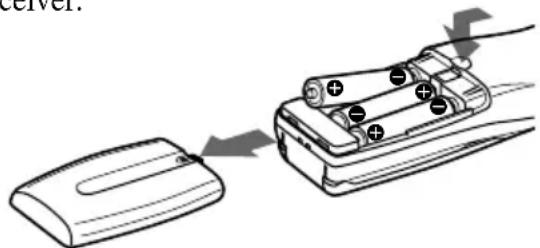
natural_image
Diagram showing a computer mouse transitioning to battery pack with arrows indicating process (no text or symbols)Tip
Under normal conditions, the batteries should last for about 3 months. When the remote no longer operates the receiver, replace all the batteries with new ones.
Notes
- Do not leave the remote in an extremely hot or humid place.
- Do not use a new battery with old ones.
- Do not mix the alkaline batteries and other kinds of batteries. This remote is designed for use with the alkaline batteries only.
- Do not expose the remote sensor of the receiver to direct sunlight or lighting apparatuses. Doing so may cause a malfunction.
- If you don't use the remote for an extended period of time, remove the batteries to avoid possible damage from battery leakage and corrosion.
Understanding the 2 way remote system
This remote operates under a 2 way remote system. With the two way remote system, the component responds to signals sent from the remote by sending additional signals (information about the status of the component, text data, etc.) back to the remote. Thus, operations are performed as a result of communication between the remote and the component.

flowchart
graph LR
    A["Remote"] <--> B["Component"]
When using a home entertainment system comprised of several components compatible with the 2 way remote system, please restrict 2 way remote system operation to a single component. Normally, turn off the 2 way remote system on all components except the receiver.
If you would like to turn off the receiver's 2 way remote system, set “2-way remote” using the SET UP button (page 50).
The COMMAND MODE
If the receiver's COMMAND MODE and the remote's COMMAND MODE do not match, transmission is not possible between the remote and the receiver. If you have not changed the COMMAND MODE of the remote and the receiver after purchase, it is not necessary to set the COMMAND MODE. For details, see page 73.
continued
Before you use your remote (continued)
Setting up the remote
At the time of shipping, the remote has not been customized to your receiver yet. Before you use the remote for the first time, do the procedure below to set up the remote so that it can control your receiver properly.
1 Press I/⏻ on the receiver to turn it on.
2 Point the remote towards the receiver and press SOUND FIELD, FUNCTION, or SUB.
and appear in the display window of the remote while it communicates with the receiver and identifies the receiver model. When the communication ends, the remote is customized and provides the operation lists that match your receiver.
Location of parts and basic remote operations
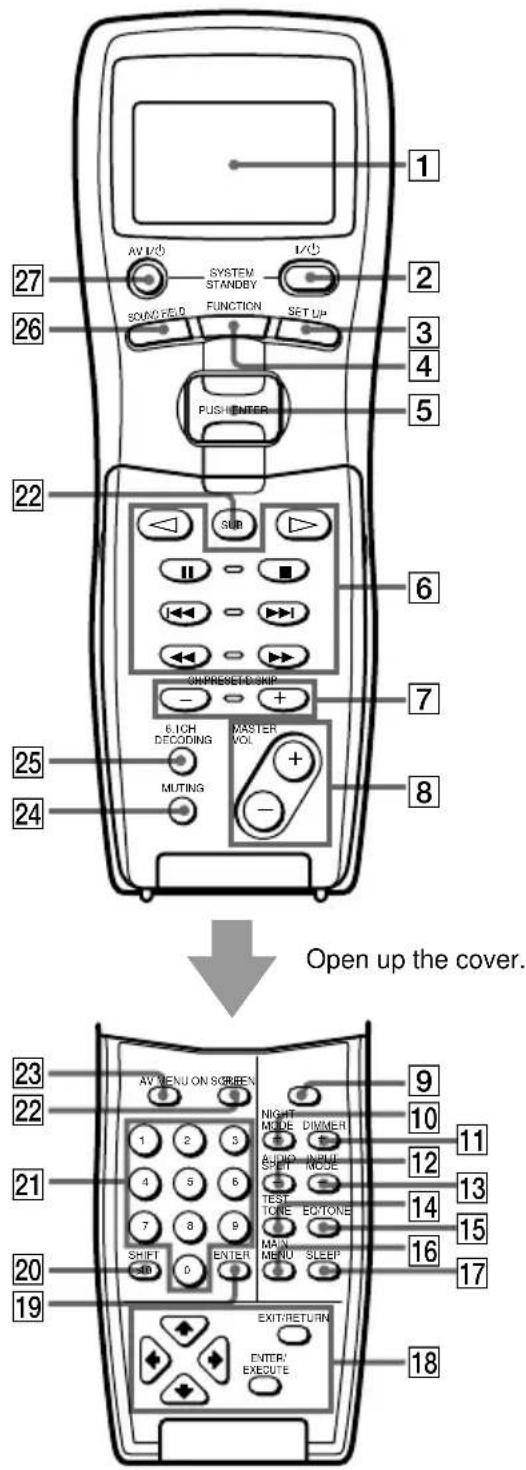
text_image
1 2 3 4 5 AV M/O SYSTEM STANDBY 1/0 SOUND FIELD FUNCTION SET UP PUSH ENTER 27 26 22 SUB II ■ ON/PRESET/SHIP + - 6 7 6.ICH DECODING MASTER VOL. MUTING + - 8 25 24 Open up the cover. 23 22 21 20 19 AV MENU ON SCREEN NIGHT MODE DIMMER 1 2 3 6.100 INGLE MODE 4 5 6 SHIFT MODE TEST TONE EC/TONE 7 8 9 MAIN MENU SLEEP 0 EXIT/RETURN ENTER/ EXECUTE 9 10 11 12 13 14 15 16 17 18Parts Description
1 Display window
The current status of the selected component or a list of selectable items appears here.
Note
Characters other than letters of the alphabet or numbers may be displayed incorrectly on the remote, even if they appear correctly in the display window on the main unit.
2 I/ ^1 switch
Press to turn the receiver on or off.
3 SET UP button
Press to display the set up list. Press again to revert back to the component information.
4 FUNCTION button
Press to display the function (component) list. Press again to revert back to the component information.
See the table on page 58 for information on the buttons you can use to control each component.
If you want to change the contents of the function list to match your particular components, do the procedure "Programming the Remote" on page 64.
5 Easy scroll key
While displaying a list, move up or down to select an item from the list, and then press to enter the selection.
6 Tape/disc operation buttons
The following table shows what components are operated by each button and the function of the buttons.
Button(s) Function
▷Starts play of the playback medium.
Starts play on the reverse side of the cassette.
■Pauses play or recording or starts recording when the component is in recording standby.
■Stops play.
|◀◀/▶▶|Skips tracks.
◀◀/▶▶Fastwinds or rewinds.
Searches tracks in the forward or backward direction.
See the table on page 58 for information on the buttons that you can use to control each component.
7 CH/PRESET/D.SKIP +/- buttons
Press repeatedly to select a preset station, channel, track, or a disc.
8 MASTER VOL +/- buttons
Press to adjust the volume level of all speakers at the same time.
9 ON SCREEN button
The function of this button is same as the ON SCREEN button on the receiver. See page 9.
10 NIGHT MODE button
The function of this button is same as the NIGHT MODE button on the receiver. See page 33.
continued
Location of parts and basic renite operations (continued)
11 DIMMER button
The function of this button is same as the DIMMER button on the receiver. See page 30.
12 AUDIO SPLIT button
The function of this button is same as the AUDIO SPLIT button on the receiver. See page 26.
13 INPUT MODE button
The function of this button is same as the INPUT MODE button on the receiver. See page 27.
14 TEST TONE button
Press to output a test tone.
15 EQ/TONE button
The function of this button is same as the EQUALIZER button on the receiver. See page 42.
16 MAIN MENU button
Press repeatedly to select a menu, SURROUND etc.
17 SLEEP button
Press repeatedly to activate the sleep function and select the duration after which the receiver turns off automatically.
18 Cursor buttons (↑/↓/←/→)
After pressing MAIN MENU, use the cursor buttons to make specific settings.
To perform menu operations on the VCR, DVD player, or SAT tuner, do the procedure below. If you do not do this, the cursor buttons merely operate the receiver.
1 Press FUNCTION and move the easy scroll key to select the VCR, DVD player, or SAT tuner.
2 Open up the cover on the remote. CURSOR TYPE list appears.
If the list has disappeared before you go on to step 3, press any of the cursor buttons to restore the list.
3 Move the easy scroll key to select the component that you selected in step 1, then press the key to enter the selection.
ENTER/EXECUTE button
After pressing AV MENU, use the cursor buttons to select a menu item, press ENTER/EXECUTE to enter the selection.
EXIT/RETURN button
Press to return to the previous menu or exit the menu while VCR, DVD, or SAT menu is displayed on the TV screen.
19 ENTER button
After selecting a channel, disc, or track using the numeric buttons, press this button to enter the selection. For details, refer to the operation manual supplied with the respective components.
20SHIFT >10 button
If you have selected tuner:
Press repeatedly to select a memory page for presetting radio stations or tuning to preset stations.
If you selected VCR, TV, tape deck, LD player, video CD player, MD deck, or CD player:
Press before inputting a channel, disc, or track number of eleven or higher. For details, refer to the operation manual supplied with the respective components.
21Numeric buttons (1 to 0)
Inputs the corresponding numeric value. On some components, pressing 0 selects 10. For details, refer to the operation manual supplied with the respective components.
22SUB button
While operating a component, press to display a list of operations that the corresponding buttons are not found on the remote. Then move the easy scroll key to select the operation, and then press the key to enter the selection. Press again to revert back to the component information.
See the table on pages 59–60 for information on the operations that appear when you press SUB.
23 AV MENU button
When you have selected the VCR, DVD player, or SAT tuner, press this button to display VCR, DVD, or SAT menu on the TV screen. Then use the cursor buttons to perform the menu operations (see “18 Cursor buttons (↑/↓/←/→),” “ENTER/ EXECUTE button,” and “EXIT/RETURN button”).
Note
When you have selected VCR, the remote is set to control the VCR that corresponds with VCR 1 after you press AV MENU. Before pressing the button, make sure to set the VCR input mode to VCR 1.
24 MUTING button
The function of this button is same as the MUTING button on the receiver. See page 27.
256.1CH DECODING button
The function of this button is same as the 6.1CH DECODING button on the receiver. See page 34.
26 SOUND FIELD button
Press to display the sound field list. Press again to revert back to the component information.
27 AV I/ switch
Press to turn on or off the components that the remote is programmed to operate. For details on programming procedure, see “Programming the Remote” on page 64. If you press the I/① switch (②) at the same time, it will turn off the main component and other Sony audio/video components (SYSTEM STANDBY).
Note
The function of the AV I/ switch changes automatically each time you press FUNCTION (4). Depending on the component, the above operation may not be possible or may operate differently than described.
continued
Location of parts and basic renite operations (continued)
Table of buttons used to control each component
When you program the remote to control the following Sony or non-Sony components, you can use the buttons on the remote that are marked with circles. Note, however, that some buttons may not operate your component.
| Component VCR TV LD DVD | Video CD player player player player deck deck (A and B) | CD MD Tape DAT | Tuner Cable Satellite Projector box tuner | ||||||||||||
| Button | |||||||||||||||
| AV I/○●●●●●●●●●● | |||||||||||||||
| SUB1) | ● | ● | ● | ● | ● | ● | ● | ● | ● | ● | ● | ● | ● | ● | ● |
| <△ | ● | ||||||||||||||
| ▷ | ● | ● | ● | ● | ● | ● | ● | ● | ● | ||||||
| || | ● | ● | ● | ● | ● | ● | ● | ● | ● | ||||||
| ■ | ● | ● | ● | ● | ● | ● | ● | ● | ● | ||||||
| |◀◀/▶▶| | ● | ●●●●●● | ● | 2) | ● | ||||||||||
| ◀◀/▶▶ | ● | ●●●●●●●● | |||||||||||||
| CH | ● | ● | ● | ● | |||||||||||
| PRESET | ● | ||||||||||||||
| D.SKIP +/-3) | ● | ● | ● | ● | |||||||||||
| Cursor buttons | ● | ● | ● | ● | |||||||||||
| AV MENU | ● | ● | ● | ● | |||||||||||
| Numeric buttons | ● | ● | ● | ● | ● | ● | ● | ● | ● | ● | ● | ● | ● | ||
| SHIFT | ● | ||||||||||||||
| >10 | ● | ● | ● | ● | ● | ● | |||||||||
| ENTER | ● | ● | ● | ● | ● | ● | ●4) | ● | ● | ● | |||||
| EXIT | ● | ||||||||||||||
| RETURN | ● | ● | ● | ||||||||||||
| ENTER/EXECUTE | ● | ● | ● | ● | |||||||||||
^1) For information on the operations that become available when you press the button, see the table on pages 59–60.
^2) Deck B only.
^3) Multi disc changer only.
^4) RMS/START.
Table of operations that appear when you press the SUB button
Press SUB to display a list of operations that the corresponding buttons are not found on the remote. The contents of the lists will vary according to the currently selected component. The following table shows the items in each list and the function of each item.
| Component | Item(s) Function |
| VCR DISPLAY Selects informationdisplayed on the TV screen. | |
| REC Starts recording. | |
| TV MUTING Mutes the sound. | |
| Component | Item(s) Function | |
| LD Player DISPLAY Selects information | ||
| displayed on the TV screen. | ||
| SIDE A^a) | Selects side A of the disc. | |
| SIDE B^a) | Selects side B of the disc. | |
| PROGRAM | Programs the tracks. | |
| REPEAT | Repeats current track or programmed tracks. | |
| DVD player | DISPLAY Selects information | |
| displayed on the TV screen. | ||
| TITLE Displays the Title menu.For details on the menu operation, see the tip on page 61. | ||
| SET UP | Displays the Set up menu. For details on the menu operation, see the tip on page 61. | |
| SUBTITLE Changes the Subtitle CHG. | Language. | |
| SUBTITLE Displays the Subtitles. | ||
| AUDIO CHANGE | Changes the sounds. | |
| SEARCH MODE | Changes the search mode. | |
| CLEAR | Returns to the Continuous Play etc. | |
| INDEX + INDEX - | Selects a index. | |
continued
Location of parts and basic renite operations (continued)
| Component | Item(s) Function | |
| VIDEO CD | TIME Changes the time player information. | |
| INDEX + INDEX - | Selects a index. | |
| CD Player | DISC Selects a disc. | d) |
| TRACK Selects a track. | d) | |
| CONTINUE Selects Continuous Play. | ||
| SHUFFLE Selects Shuffle Play. | ||
| PROGRAM Selects Program Play. | ||
| REPEAT Selects Repeat Play. | ||
| MD deck | DISPLAY Changes the information on the display. | |
| CONTINUE Selects Continuous Play. | ||
| SHUFFLE Selects Shuffle Play. | ||
| PROGRAM Selects Program Play. | ||
| REPEAT Selects Repeat Play. | ||
| MENU(EDIT)/ NO | Selects editing operation or cancels editing. | |
| YES Performs editing operation. | ||
| CLEAR Erases a track in the program etc. | ||
| REC Pauses for recording. | ||
| Tape deck | A-REC | Makes deck A pause for recording. |
| B-REC | Makes deck B pause for recording. | |
| DAT deck | REC Pauses for recording. | |
| REPEAT Starts Repeat Play. | ||
| CLEAR Erases a track in the program etc. | ||
| Tuner | DIRECT TUNING | Enters Direct Tuning mode. |
| FM/AM | Selects the FM or AM band. | |
| Cable box | ||
| Component | Item(s) Function | |
| Satellite tuner | GUIDE | Displays the SAT guide. |
| JUMP | Toggles between the previous and current channels. | |
| DISPLAY Selects information displayed on the TV screen. | ||
| FAVORITE Displays the Favorite Station Guides. | ||
| CATEGORY | Displays the Guide Category list. | |
| INDEX | Displays the Station Index. | |
| -/-- | Selects the channel of eleven or higher. | |
| EPG Displays the EPG (Electronic Program Guide). | ||
| Projector | POWER ON | Turn on the projector. |
| POWER OFF | Turn off the projector. | |
| INPUT A | Switch to the input from INPUT A jacks. | |
| INPUT B | Switch to the input from INPUT B jacks. | |
| INPUT VIDEO | Switch to the input from VIDEO jacks. | |
| INPUT SELECT | Switch to the input from VIDEO IN or S VIDEO IN jacks. | |
| MEMORY Store the adjusted data in memory. | ||
| BRIGHT +BRIGHT - | Adjust the brightness. | |
| CONTRAST +CONTRAST - | Adjust the contrast. | |
| ZOOM +ZOOM - | Adjust the zoom of the picture. | |
| SHIFT +SHIFT - | Adjust the lens shift of the picture. | |
| FOCUS +FOCUS - | Adjust the focus of the picture. | |
a) “SIDE A/B” appears for non-Sony LD players.
b) Only with Sony TVs with the picture-in-picture function.
c) Only with Sony TVs that supports the wide-picture mode.
d) Only with the Sony CD changer.
Note
If you have programmed the remote to control non-Sony components, note the following:
- All the items may not appear when you select a component.
- All the items displayed may not function.
Tip
Do the following procedure to perform title and set up menu operations on the DVD player.
1 Select the DVD player from the function list.
2 Press SUB.
3 Move the easy scroll key to select "TITLE" (for the title menu) or "SET UP" (for the set up menu), then press the key to enter the selection.
4 Open up the cover on the remote and move the easy scroll key to select "DVD" from the CURSOR TYPE list, then press the key to enter the selection.
5 Use the cursor buttons and the ENTER/EXECUTE button to perform menu operations on the DVD player.
To exit the menu operation, press SUB, move the easy scroll key to select “TITLE” or “SET UP”, then press the key to enter the selection.
To display the DVD menu, use the AV MENU button. For details, see “23 AV MENU button” on page 57.
Tip
You can freely assign codes to SUB1 through SUB5. Select when you transmit learned codes. For details, see “Learning the commands of your components” on page 68.
Using the lists
Chart of lists
See the treelike chart below for the list hierarchy. Details on how to access each list is given from page 63. Some items have sub-lists that appear when you press SUB (see pages 59–60).
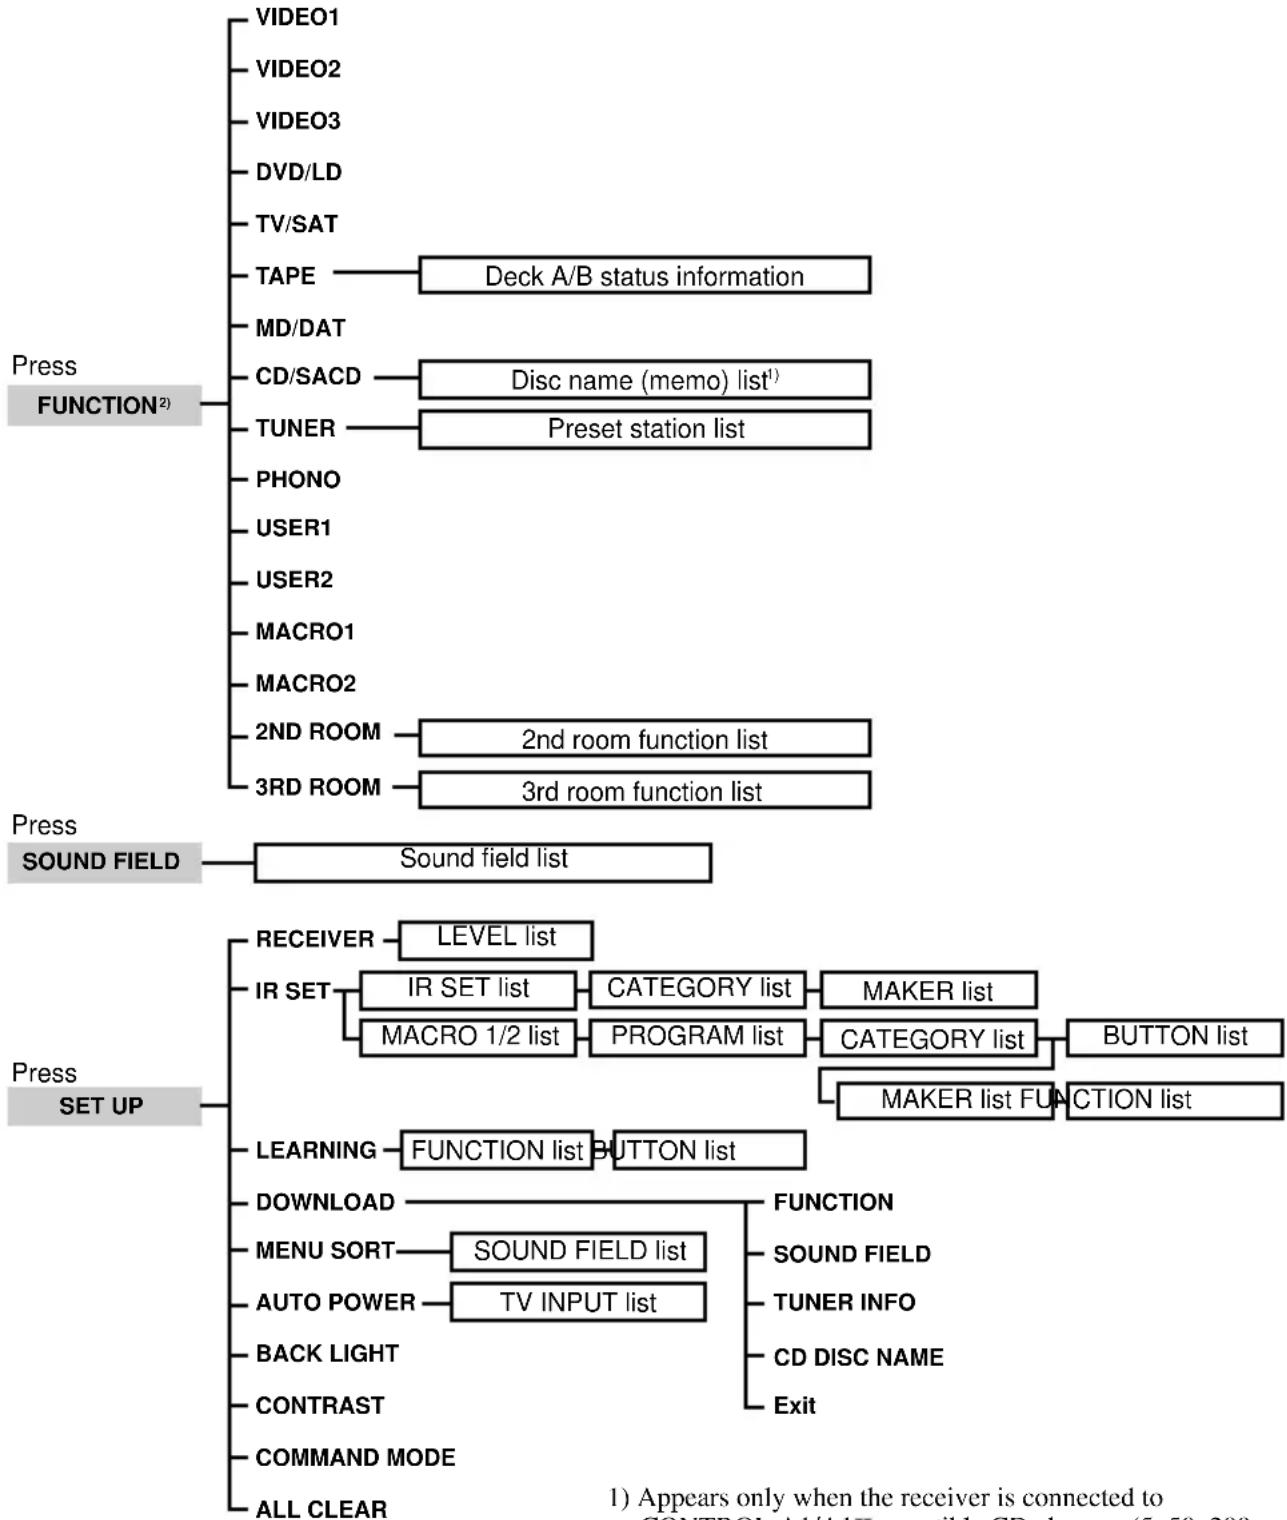
flowchart
graph TD
    A["Press FUNCTION²"] --> B["VIDEO1"]
    A --> C["VIDEO2"]
    A --> D["VIDEO3"]
    A --> E["DVD/LD"]
    A --> F["TV/SAT"]
    A --> G["TAPE"]
    G --> H["Deck A/B status information"]
    A --> I["MD/DAT"]
    I --> J["CD/SACD"]
    J --> K["Disc name (memo) list¹"]
    A --> L["TUNER"]
    L --> M["Preset station list"]
    A --> N["PHONO"]
    N --> O["USER1"]
    N --> P["USER2"]
    A --> Q["MACRO1"]
    Q --> R["MACRO2"]
    A --> S["2ND ROOM"]
    S --> T["2nd room function list"]
    A --> U["3RD ROOM"]
    U --> V["3rd room function list"]

    W["Press SOUND FIELD"] --> X["Sound field list"]

    Y["Press SET UP"] --> Z["RECEIVER"]
    Z --> AA["LEVEL list"]
    Z --> AB["IR SET"]
    AB --> AC["IR SET list"]
    AC --> AD["CATEGORY list"]
    AD --> AE["MAKER list"]
    AB --> AF["MACRO 1/2 list"]
    AF --> AG["PROGRAM list"]
    AG --> AH["CATEGORY list"]
    AH --> AI["BUTTON list"]
    AG --> AJ["MAKER list FUNCTION list"]

    Y --> AK["LEARNING"]
    AK --> AL["FUNCTION list"]
    AK --> AM["BUTTON list"]

    Y --> AN["DOWNLOAD"]
    AN --> AO["SOUND FIELD list"]
    AO --> AP["FUNCTION"]
    AP --> AQ["SOUND FIELD"]
    AP --> AR["TUNER INFO"]
    AP --> AS["CD DISC NAME"]
    AP --> AT["EXIT"]

    Y --> AU["AUTO POWER"]
    AU --> AV["TV INPUT list"]

    Y --> AW["BACK LIGHT"]
    AW --> AX["CONTRAST"]

    Y --> AY["COMMAND MODE"]
    Y --> AZ["ALL CLEAR"]

    style W fill:#f9f,stroke:#333
    style Y fill:#f9f,stroke:#333
1) Appears only when the receiver is connected to CONTROL A1/A1 compatible CD changer (5, 50, 200, 300 or 400 discs).
2) When the COMMAND MODE is set to "3RD ROOM", only the 3rd room function list appears.
Selecting a component
Basic procedure for selecting a component
Do the procedure below to select a component from the function list.
1 Press FUNCTION.
The function list appears. The items in the list correspond with the jacks on the receiver.
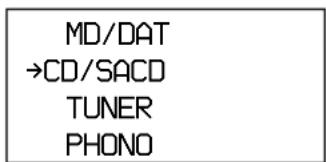
text_image
MD/DAT →CD/SACD TUNER PHONO2 Move the easy scroll key to select a component from the list, then press the key to enter the selection.
Information about the component appears in the display window.
A display example

text_image
Tips
- You can modify the category indication. The category indication tells you what component is actually connected to the jacks on the receiver. If a component is connected to jacks for which they are not originally meant, you can modify the category indication to match the component. For details, see “Programming the Remote” on page 64.
- You can set the remote to automatically turn on a component when it is selected from the function list. For details, see “Using the auto power function” on page 72.
Depending on the component that you selected, you may have to do an additional procedure, or you may be able to obtain detailed information about the component by doing an additional procedure. For details, see “Additional procedures after selecting a component” on this page.
Additional procedures after selecting a component
If you selected tuner
Do the procedure below after you have selected the tuner.
1 Move the easy scroll key.
The preset station list appears.
2 Move the easy scroll key to select the preset station, then press the key to enter the selection.
The current status of the component appears in the display window.
Note
If you have changed the contents of the preset station memory of the receiver, be sure to download the preset station memory from the receiver (see page 69) before you tune in to a preset station.
If you selected CD player, tape deck, or MD deck
Detailed information about the component appears in the display window of the remote only if the component is compatible with CONTROL A1/A1II.
The information that appears is as follows:
| If you have selected | The following information appears |
| CD player | The first 12 characters of the disc memo, track number, and track text |
| MD deck | The first 12 characters of the disc name, track number, and track name |
| Tape deck, CD player, or MD deck | The current deck operation (▶, ▶ or ■) to the right of the component indication |
continued
Using the lists (continued)
If you selected a Sony CD changer
1 Move the easy scroll key.
The DISC MEMO list appears.
2 Move the easy scroll key to select a disc, then press the key to enter the selection.
3 Start playback.
Note
If you have changed the discs in the changer, be sure to download the CD memos from the receiver (see page 69) or play the newly inserted disc(s) before you select a disc from the changer.
If you selected the tape deck
Move the easy scroll key to display the information about deck A or B.
Note
When the remote is programmed to control a non-Sony tape deck, the following may occur:
- The information about deck B is not displayed and you cannot switch between tape deck A and B. - “TAPE A/B” is displayed and tape deck A and B switch automatically each time you press the easy scroll key, etc.
If you selected 2ND ROOM or 3RD ROOM
Move the easy scroll key to select the source for 2nd room or 3rd room, then press the key.
Selecting a sound field
Do the procedure below to select a sound field from the sound field list.
1 Press SOUND FIELD. The sound field list appears.
2 Move the easy scroll key to select the sound field, then press the key to enter the selection.
A display example
| NORMAL SURROUND |
| C.STUDIO EX A |
| C.STUDIO EX B |
| →C.STUDIO EX C |
To turn off the sound field
Move the easy scroll key to select either “2CH STEREO” or “A.F.D.” in the sound field list in the display.
Tip
You can sort the sound field (page 71).
Programming the remote
You can customize the remote to match the components connected to your receiver. You can even program the remote to control non-Sony components and also Sony components that the remote is normally unable to control.
The procedure below uses as an example a case in which a Kenwood LD player is connected to the VIDEO 2 jacks on the receiver.
Before you begin note that:
- You cannot change the settings of TUNER and PHONO.
- The remote can control only components that accept infrared wireless control signals.
Be sure to turn on the receiver and point the remote towards the receiver when performing the following procedure.
1 Press SET UP.
The set up list appears.
→RECEIVER
IR SET
LEARNING
DOWNLOAD
2 Move the easy scroll key to select "IR SET", then press the key to enter the selection.
The IR SET list appears.
[VIDEO 1]
→[VIDEO 2]
[VIDEO 3]
3 Move the easy scroll key to select the component ("VIDEO 2", for example), then press the key to enter the selection.
The category list appears.
Category?
→VCR
T ∪
L D
4 Move the easy scroll key to select the category (i.e., the component that is actually connected to the corresponding jacks; in this case, "LD"), then press the key to enter the selection.
The maker list appears.
Maker?
Sony
DENON
→Kenwood
5 Move the easy scroll key to select the maker of the component (“Kenwood”, for example), then press the key to enter the selection.
When programming the remote to control Sony component
Select "Sony."
Programming is now completed.
To cancel programming
Move the easy scroll key to select “Exit” or “Cancel” during any step, then press the key to enter the selection.
Tip
You can freely assign any component to USER 1 and 2 items in the IR SET list
1 Do steps 1 and 2 in "Programming the Remote".
2 Move the easy scroll key to select "USER 1" or "USER 2," then press the key to enter the selection.
3 Continue from step 3 in “Programming the Remote” to select the category and maker of the component.
Note
If you select “IR SET” for a component that already has a learned button setting, the learned codes for that component are cleared. Furthermore, if the cleared learned button is used in a Macro Play setting, the setting for that button will be changed to “NO SET”.
Performing several commands in sequence automatically (Macro Play)
The Macro Play function lets you link several IR codes in a sequential order as a single command. The remote provides 2 macro lists (MACRO 1 and 2). You can specify up to 16 IR codes for each macro list.
Setting the sequence of IR codes
1 Press SET UP.
The set up list appears.
→RECEIVER
IR SET
LEARNING
DOWNLOAD
2 Move the easy scroll key to select "IR SET", then press the key to enter the selection.
The IR SET list appears.
→MACRO1
MACRO2
Exit
continued
Using the lists (continued)
3 Move the easy scroll key to select "MACRO1" (or "MACRO2"), then press the key to enter the selection.
The program list appears.
<MACRO1>
→ 1-NO SET
2-NO SET
3-NO SET
4 Move the easy scroll key to select the macro step number ("1-NO SET" for example) then press the key to enter the selection.
The category list appears.
Category?
Common
Button
→VCR
5 Move the easy scroll key to select the component category ("VCR" for example), then press the key to enter the selection.
The maker list appears.
Maker?
→Sony VTR1
Sony VTR2
Sony VTR3
6 Move the easy scroll key to select the maker, then press the key to enter the selection.
The function list appears.
Function?
→*POWER
*PLAY
*STOP
7 Move the easy scroll key to select the IR code for the operation you want to perform, then press the key to enter the selection.
The program list reappears.
<MACRO1>
→ 1-POWER
2-NO SET
3-NO SET
8 Repeat steps 4 through 7 to program up to 16 IR codes.
When you have finished programming IR codes, select "Exit" in step 7.
To use learned codes under the Macro Play function
1 In step 4, move the easy scroll key to select "Button", then press the key to enter selection.
2 Move the easy scroll key to select the button of the learned codes.
When selecting a button, you can press the button directly, instead of scrolling down the list, to jump to the desired button in the list and transmit the IR code.
To delay the output of an IR code
1 In step 4, move the easy scroll key to select "Common", then press the key to enter selection.
2 Move the easy scroll key to select "WAIT TIME", then press the key to enter selection.
3 Move the easy scroll key to select the time to delay the output of an IR code, then press the key to enter selection. You can specify from 1 to 10 second delay (in 1 second increments).
To erase a programmed IR code
1 In step 4, move the easy scroll key to select "Common", then press the key to enter selection.
2 Move the easy scroll key to select "NO SET", then press the key to enter selection.
To turn off all Sony components (SYSTEM STANDBY)
1 In step 4, move the easy scroll key to select "Common", then press the key to enter selection.
2 Move the easy scroll key to select "ALL OFF", then press the key to enter selection. However, this function cannot be applied to some Sony components.
To cancel programming
Move the easy scroll key to select “Exit” or “Cancel” during any step, then press the key to enter the selection.
Tips
- In step 6, when “*” is displayed in front of the function, the function is pre-programmed.
- In step 3 and 7, when “NO SET” is displayed after the program number, the codes have not been programmed.
Note
If you select “IR SET” for a component that already has a learned button setting, the learned codes for that component are cleared. Furthermore, if the cleared learned button is used in a Macro Play setting, the setting for that button will be changed to “NO SET”.
Starting macro play
1 Press FUNCTION.
The function list appears.
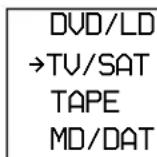
2 Move the easy scroll key to select "MACRO1" or "MACRO2", then press the key to enter the selection.
The IR codes appear in the display window as they are performed.
Notes
- Pressing any of the following buttons during a macro play operation will cancel the macro play sequence before it is complete.
- AV I/①
-1/① - SYSTEM STANDBY
- SOUND FIELD
- FUNCTION
- SET UP
- When the Macro Play function does not work properly, set “WAIT TIME” between each operation.
continued
Using the lists (continued)
Learning the commands of your components
By using the Learning function, it is possible for this commander to perform learned operations.
Setting remote control codes that are not stored in the commander
When a remote control code is not one of the presets stored in the commander, it is possible for the commander to learn the code using the Learning function.
1 Press SET UP and move the easy scroll key to select "LEARNING", then press the key to enter the selection.
The function list appears.
<LEARNING>
[VIDEO 1]
→[VIDEO 2]
[VIDEO 3]
2 Move the easy scroll key to select the function you want to use the Learning function, then press the key to enter the selection.
The button list appears.
[VIDEO 2]
* POWER
→REVERSE
* PLAY
3 Move the easy scroll key to select the button you want to use for the Learning function, then press the key to enter the selection.
The learning display appears.
[VIDEO 2] (REVERSE) → Learning Start Cancel
Function Button
4 Point the remote code receiver section of the commander toward the receiver/transmitter on the remote control to be learned.
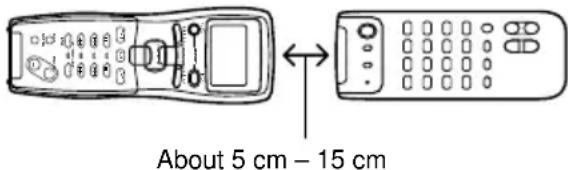
text_image
About 5 cm - 15 cm5 Move the easy scroll key to select "Learning Start", then press the key to enter the selection.
“Learning Now!!” is displayed.
6 Press the appropriate button on the remote control to send the remote control code.
Lightly pressing the button once should be sufficient. In about 3 to 5 seconds, it is displayed whether learning was successful or not.
When the learning completes successfully, "Learning OK!", the number of keys, and the capacity used for learning are displayed.
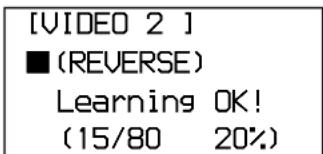
text_image
[VIDEO 2 ] ■ (REVERSE) Learning OK! (15/80 20%)When the learning does not complete successfully, the cause is displayed.
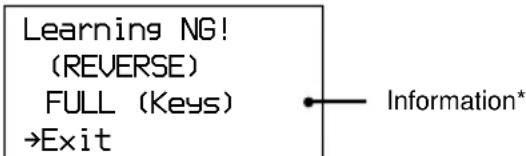
text_image
Learning NG! (REVERSE) FULL (Keys) →Exit Information** FULL (Keys): shortage of buttons FULL (memory): shortage of memory ERROR: other causes
To enter a name for SUB 1-5
1 In step 5, move the easy scroll key to select "Name", then press the key to enter selection.
2 Use the easy scroll key to create a name (up to 8 characters).
+/-: select a character
</>: move the cursor
Insert: insert a space
Delete: delete a character
To cancel learning
Move the easy scroll key to select “Exit” or “Cancel” during any step, then press the key to enter the selection.
To erase the learned code
In step 5 above, move the easy scroll key to select “Clear”, then press the key to enter the selection. Again, move the easy scroll key to select “Yes”, then press the key to enter the selection. The number of buttons and the capacity used for learning are displayed.
Tips
- The marks that are displayed in front of the button name indicate the following
■ : already learned
*: pre-programmed
- In step 3, learned buttons can be selected directly. If you press the button you want to use for the Learned function, the list will jump to the same button.
- The Learned function can be applied to the SUB menus. SUB 1–5 can be learned.
Notes
- You can program up to 80 buttons for the Learned function. However, in some cases, you may not be able to program even if you have not programmed 80 buttons.
- If you select “IR SET” for a component that already has a learned button setting, the learned codes for that component are cleared. Furthermore, if the cleared learned button is used in a Macro Play setting, the setting for that button will be changed to “NO SET”.
Using a command that has been learned
When selecting a learned function, press the button used to learn that function.
Downloading data from the Receiver
The remote communicates with the receiver every time a button is pressed on the remote and displays the current operation status of the receiver on the display window. The remote can also download index names of the program sources, preset stations, CD disc names (memos)*, and information indicating the presence or absence of a CD in each slot of a CD changer* from the receiver.
* Appears only when you have selected a Sony CD changer (5, 50, 200, 300, or 400 discs) connected to the receiver using the CONTROL A1 cable.
Be sure to turn on the receiver and point the remote towards the receiver when performing the following procedure.
1 Press SET UP.
The set up list appears.
2 Move the easy scroll key to select "DOWNLOAD", then press the key to enter the selection.
The DOWNLOAD list appears.
→FUNCTION
SOUND FIELD
TUNER INFO
3 To download index names
Move the easy scroll key to select "FUNCTION", then press the key to enter the selection.
To download sound field names
Move the easy scroll key to select “SOUND FIELD”, then press the key to enter the selection.
To download preset stations
Move the easy scroll key to select “TUNER INFO”, then press the key to enter the selection.
continued
Using the lists (continued)
To download CD disc names (memos) and information on the presence or absence of a CD in each slot of a CD changer
This function is available only when the category for the CD function in the IR SET list is set to “CD2” or “CD3”. When the category is set to “CD1”, CD DISC NAME does not appear in the DOWNLOAD list.
1 Move the easy scroll key to select “CD DISC NAME” then press the key to enter the selection.
The SORT menu appears in the display.
<SORT? >
→NUMBER
ALPHABET
2 Move the easy scroll key to select "NUMBER" or "ALPHABET", then press the key to enter the selection.
The remote starts to download the data.
<LOADING>
[■■■]
→Cancel
To cancel the downloading process
Move the easy scroll key to select “Exit” from the DOWNLOAD list, then press the key to enter the selection.
Notes
- If you have changed the discs in the CD changer, be sure to download the CD disc names (memos) from the receiver or play the newly inserted disc(s) before you select a disc from the changer.
- You can download the data only from the Sony CD changer (5, 50, 200, 300, or 400 discs) connected to the receiver using the CONTROL A1 cable.
- CD DISC NAME is available for up to 400 discs.
Note on downloading CD disc names from the CD players
You can download CD disc names (memos) only from the CONTROL A1/A1Hcompatible Sony CD players. Depending on the CD player setting, it may take several minutes to download CD disc names (memos). For faster transmission, make the following CD player settings.
When an CONTROL A1/A1 compatible Sony CD player is connected to the receiver
Set the category for the CD function in the IR SET list to “CD1”. When using the Sony CD changer, set it to “CD2” (or “CD3”). Be sure to set the category to only one of “CD1”, “CD2” or “CD3”. You can check the current category setting by selecting a component from the function list (see page 64).
When multiple CONTROL A1/A1H compatible Sony CD players are connected to the receiver
When you use two CD players, set the COMMAND MODE selector on the back panel of the CD players to “CD1” or “CD2,” respectively, and set the category in the IR SET list to match the corresponding player’s COMMAND MODE selector position (see page 64). When you use three CD players, set the COMMAND MODE selector to “CD1,” “CD2,” or “CD3,” respectively, and set the category in the IR SET list to match the corresponding player’s COMMAND MODE selector position.
When using the Sony CD changer, be sure to set to "CD2" or "CD3".
When setting category for the CD players, do not skip the number or select the same number to the multiple players.
When an CONTROL A1/A1 compatible Sony CD player and a non-compatible Sony CD player are connected to the receiver
Set the COMMAND MODE selector on the back panel of the CONTROL A1/A1Hcompatible CD player to "CD2" and set the category in the IR SET list for the player to "CD2" (see page 64).
Set the COMMAND MODE selector on the back panel of the non-compatible CD player to "CD1" and set the category in the IR SET list for the player to "CD1" (see page 64).
When using a non-Sony CD player in conjunction with Sony CD players
Program the remote to control the non-Sony CD player (see page 64).
See the sections above for settings of the Sony CD players.
Adjusting the level parameters
1 Press SET UP.
The set up list appears.
→RECEIVER
IR SET
LEARNING
DOWNLOAD
2 Move the easy scroll key to select "RECEIVER", then press the key to enter the selection.
The RECEIVER list appears.
<RECEIVER>
→LEVEL
Exit
3 Move the easy scroll key to select "LEVEL", then press the key to enter the selection.
The LEVEL list appears.
<LEVEL>
→FRONT BAL
SURR BAL
SURR BACK BAL
4 Move the easy scroll key to select the menu you want to adjust, then press the key to enter the selection.
5 To adjust the balance
Move the easy scroll key to select the channel (L or R) you want to increase the level, then press the key to enter the selection.
To adjust the level
Move the easy scroll key to select + (to increase the level) or - (to decrease the level), then press the key to enter the selection.
To cancel adjusting
Move the easy scroll key to select “Exit” during any step, then press the key to enter the selection.
Other Operations
Sorting the menu
You can arrange the order of sound field list.
1 Press SET UP.
The set up list appears.
IR SET
LEARNING
DOWNLOAD
→MENU SORT
2 Move the easy scroll key to select "MENU SORT", then press the key to enter the selection.
The MENU SORT list appears.
<MENU SORT>
→SOUND FIELD
Exit
3 Move the easy scroll key to select "SOUND FIELD", then press the key to enter the selection.
The sort list appears.
Sort?
→A.F.D.
2CH STEREO
MULTI/2CH A.DIR
4 Move the easy scroll key to select the menu you want to move, then press the key to enter selection.
When you press the key, “→” changes to “=”.
Sort?
A.F.D.
= 2CH STEREO
MULTI/2CH A.DIR
5 Move the easy scroll key to select the position you want to move the menu to, then press the key to enter selection.
When you press the key, “=” changes to “→”.
Sort?
NORMAL SURROUND
C.STUDIO EX A
→2CH STEREO
continued
Using the lists (continued)
Using the auto power function
With the auto power function turned on, the commander sends numerous codes to the appropriate Sony AV components when you select a video function. Automatically, the components and the TV you have done IR setting turn on and the TV switches to the selected input mode. This function works for Sony components only.
1 Press SET UP.
The set up list appears.
LEARNING
DOWNLOAD
MENU SORT
→AUTO POWER
2 Move the easy scroll key to select "AUTO POWER", then press the key to enter the selection.
The AUTO POWER list appears.
→On
Off
3 Move the easy scroll key to select "On" or "Off", then press the key to enter the selection.
When you select “On”, the TV INPUT list appears.
→TV-VIDEO1
TV-VIDEO2
TV-VIDEO3
4 Move the easy scroll key to select the video input of the TV, then press the key to enter the selection.
Notes
- Switching to VIDEO 1–4 input may not be automatic on all Sony TVs. This is because some TVs cannot receive remote control codes immediately after being turned on.
- When you select “(Off)” in step 4, the TV input does not switch.
Turning the backlight on or off
Each time you press a button on the remote, the backlight turns on. If you do the procedure below to turn off the backlight, you can make the batteries last longer.
1 Press SET UP.
The set up list appears.
DOWNLOAD
MENU SORT
AUTO POWER
→BACK LIGHT
2 Move the easy scroll key to select "BACK LIGHT", then press the key to enter the selection.
The BACK LIGHT list appears.
→On
Off
3 Move the easy scroll key to select "On" or "Off", then press the key to enter the selection.
Adjusting the contrast of the display
You can adjust the contrast of the display.
1 Press SET UP.
The set up list appears.
MENU SORT
AUTO POWER
BACK LIGHT
→CONTRAST
2 Move the easy scroll key to select "CONTRAST", then press the key to enter the selection.
→+
-

3 Move the easy scroll key to select “+” or “−”, then press the key to enter the selection.
Each time you press the key, the contrast of the display changes. To cancel adjusting, move the easy scroll key to select “Exit”, then press the key to enter the selection.
Switching the COMMAND MODE
You can switch the command mode (AV SYSTEM1 or AV SYSTEM2) of the remote. If the command mode of the receiver and the remote is different, you cannot use the remote to operate the receiver.
1 Press SET UP.
The set up list appears.
AUTO POWER
BACK LIGHT
CONTRAST
→COMMAND MODE
2 Move the easy scroll key to select "COMMAND MODE", then press the key to enter the selection.
The COMMAND MODE list appears.
→AV SYSTEM1
AV SYSTEM2
3RD ROOM
3 Move the easy scroll key to select "AV SYSTEM1" or "AV SYSTEM2", then press the key to enter the selection.
Tip
When the remote is turned on, the COMMAND MODE appears in the first line of the display.
Setting to the 3rd room mode
You can use the remote to select the function for the 3rd room and adjust the volume in the 3rd room (3rd room mode).
1 Press SET UP.
The set up list appears.
AUTO POWER
BACK LIGHT
CONTRAST
→COMMAND MODE
2 Move the easy scroll key to select "COMMAND MODE", then press the key to enter the selection.
The COMMAND MODE list appears.
AV SYSTEM1
AV SYSTEM2
→3RD ROOM
3 Move the easy scroll key to select "3RD ROOM", then press the key to enter the selection.
The 3RD ROOM list appears.
<3RD ROOM>
→OK
SET UP
Cancel
4 Move the easy scroll key to select "OK", then press the key to enter the selection.
continued
Using the lists (continued)
To operate the tuner of the receiver in the main room
To operate the tuner built in the receiver in the main room in the 3rd room mode, select the same command mode of the receiver in the SERVER list.
1 Do steps 1 to 3 in “Setting to the 3rd room mode”.
2 Move the easy scroll key to select "SET UP", then press the key to enter the selection.
The 3-SET UP list appears.
3 Move the easy scroll key to select "SERVER", then press the key to enter the selection.
The SERVER list appears.
4 Move the easy scroll key to select "AV SYSTEM1" or "AV SYSTEM2", then press the key to enter the selection.
Clearing all the contents of remote's memory
Be sure to turn on the receiver and point the remote towards the receiver when performing the following procedure.
1 Press SET UP.
The set up list appears.
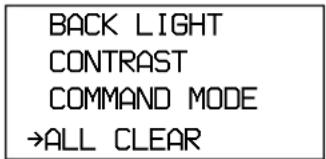
text_image
BACK LIGHT CONTRAST COMMAND MODE →ALL CLEAR2 Move the easy scroll key to select "ALL CLEAR", then press the key to enter the selection.
The ALL CLEAR list appears.
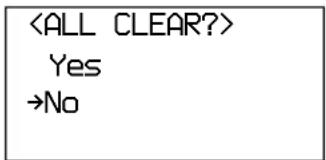
text_image
3 Move the easy scroll key to select "Yes", then press the key to enter the selection.
"CLEAR OK?!" appears.
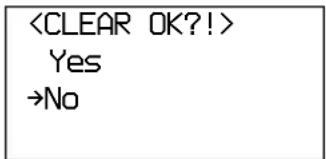
text_image
4 Move the easy scroll key to select "Yes" again, then press the key.
All the contents of the remote's memory (i.e., all the programmed data) are cleared.
Using the remote RM-US105
This remote can be used in the following 3 ways.
■ When using as a simplified remote
This remote can be used as a simplified substitute of the supplied remote (RM-LJ305) to operate STR-DA5ES. The following operations are possible:
- Adjusting the volume.
- Switching the power to on or off.
- Switching sources.
- Controlling each component.
- Selecting a sound field.
When using this remote, the command mode of the remote and the receiver should be the same. For details, see “To switch the command mode of the remote” (page 79).
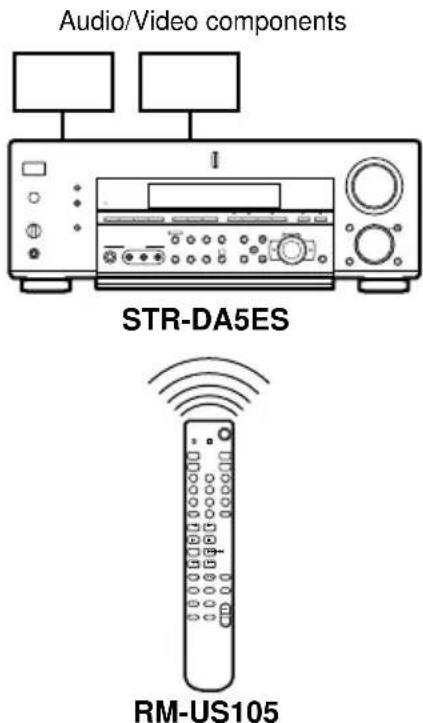
text_image
Audio/Video components STR-DA5ES RM-US105continued
■ When using in the 2nd room
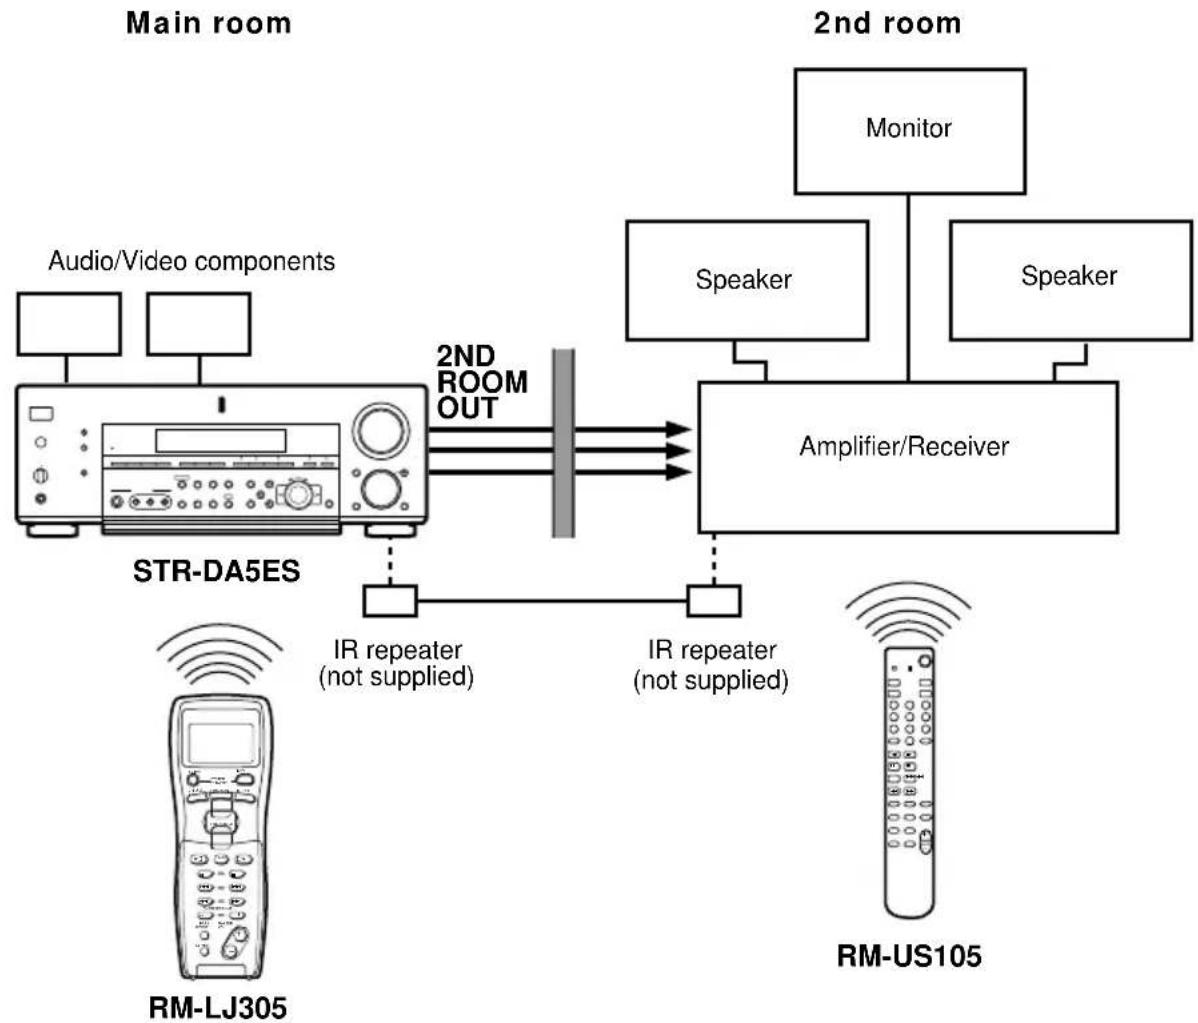
flowchart
graph TD
    A["Main room"] --> B["Audio/Video components"]
    A --> C["STR-DA5ES"]
    C --> D["IR repeater (not supplied)"]
    C --> E["IR repeater (not supplied)"]
    F["2nd room"] --> G["Monitor"]
    F --> H["Speaker"]
    F --> I["Speaker"]
    G --> J["Amplifier/Receiver"]
    H --> J
    I --> J
    J --> K["RM-US105"]
    L["RM-LJ305"] --> M["IR repeater (not supplied)"]
    M --> N["IR repeater (not supplied)"]
Using the optional IR repeater as shown above
You can switch the output source of the 2ND ROOM jacks of STR-DA5ES in the main room. Set the command mode of this remote to 2nd room mode. For details, see “To set to the 2nd room mode” (page 80).
When using this remote in the 2nd room, set the different command modes to the receivers in the main room and the 2nd room. For example, if you cannot switch the command mode of the Sony receiver in the 2nd room (ex. “AV1” (“AV SYSTEM 1”)), set the command mode of the receiver in the main room (STR-DA5ES) to “AV2” (“AV SYSTEM 2”). If the command modes of the two receivers are the same, the volume of the receiver in the main room will increase when you raise the volume of the receiver in the 2nd room.
Tip
When you are using a Sony receiver in the 2nd room, you can adjust volume or switch the source by setting the same command modes to the remote and the receiver. Besides, you can set the remote to control the power on/off, adjust volume, and so on while the remote is set to 2nd room mode. For details, see “To change the button assignments for the 2nd room mode” (page 80).
■ When using in the 3rd room
Main room
Audio/Video components
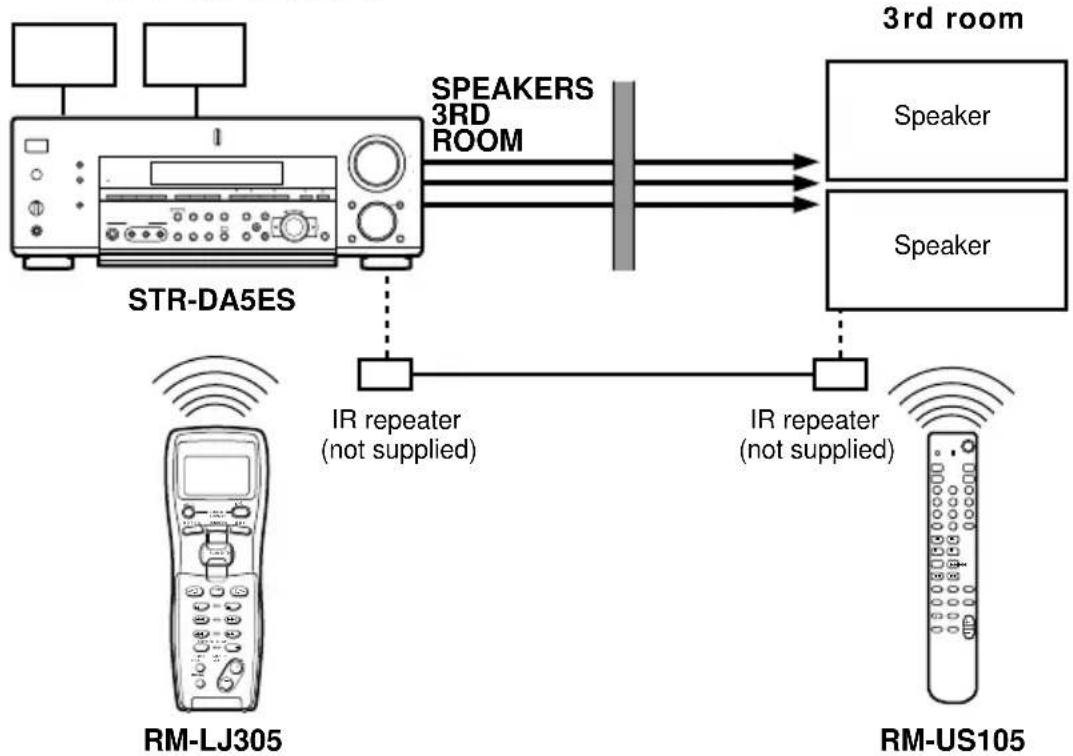
flowchart
graph TD
    A["STR-DA5ES"] -->|SPEAKERS 3RD ROOM| B["3rd room"]
    B --> C["Speaker"]
    B --> D["Speaker"]
    E["IR repeater (not supplied)"] --> F["3rd room"]
    G["IR repeater (not supplied)"] --> H["3rd room"]
    I["RM-LJ305"] --> J["IR repeater (not supplied)"]
    K["RM-US105"] --> L["IR repeater (not supplied)"]
Using the optional IR repeater as shown above
You can turn on/off the sound output from SPEAKERS 3RD ROOM jacks, switch the sources, or adjust the volume of the STR-DA5ES in the main room. Set the command mode of the remote to the 3rd room mode. For details, see “To set to the 3rd room mode” (page 80).
Inserting batteries into the remote
Insert two R6 (size-AA) batteries with the + and - properly oriented in the battery compartment.
When using the remote, point it at the remote sensor F on the receiver.
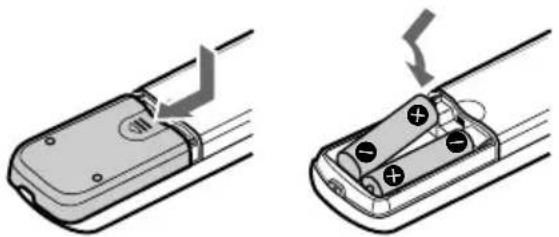
natural_image
Two-step diagram showing a remote control device with battery and plug, no text or symbols presentTip
Under normal conditions, the batteries should last for about 6 months. When the remote no longer operates the receiver, replace both batteries with new ones.
Notes
- Do not leave the remote in an extremely hot or humid place.
- Do not use a new battery with an old one.
- Do not expose the remote sensor of the receiver to direct sunlight or lighting apparatuses. Doing so may cause a malfunction.
- If you don't use the remote for an extended period of time, remove the batteries to avoid possible damage from battery leakage and corrosion.
Using the RM-US105 remote (continued)
Location of parts
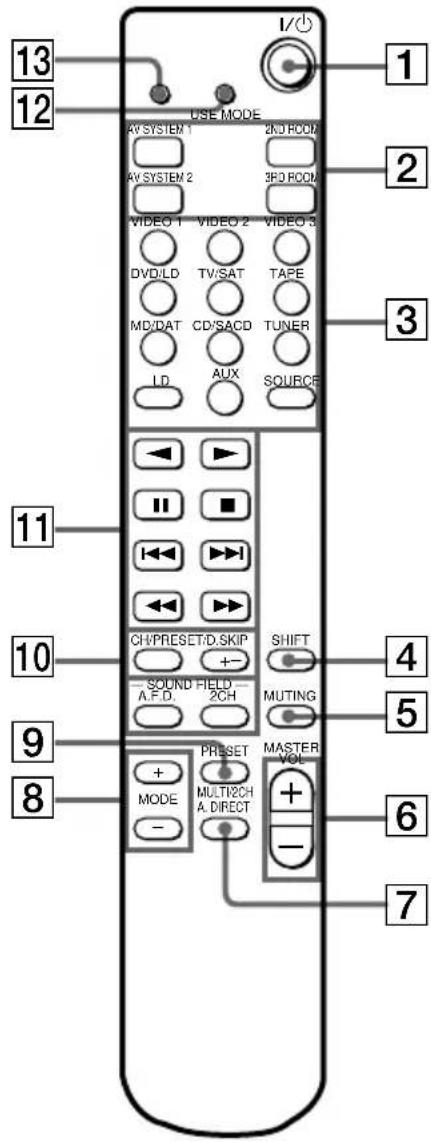
text_image
13 12 USE MODE AV SYSTEM 1 AV SYSTEM 2 VIDEO 1 DVD/LD MD/DAT LD 2ND ROOM VIDEO 2 TV/SAT CD/SACD AUX 2ND ROOM VIDEO 3 VIDEO 3 TAPE TUNER SOURCE 1 2 3 4 5 6 7 8 9 10 CH/PRESET/D.SKIP +- SOUND FIELD A.F.D. 2CH SHIFT MUTING +- MODE +- PRESET MULTI2CH A. DIRECT MASTER VOL1I/ switch*
Press to turn the receiver on or off.
2 Remote mode buttons
Press to select the remote mode.
3 Function buttons
The function changes according to the mode of the remote.
AV SYSTEM 1/2: Press to select the source of the receiver.
2ND ROOM: Press to select the source you want to output from the 2ND ROOM jacks.
3RD ROOM: Press to select the source you want to output from the SPEAKERS 3RD ROOM jacks.
Press one of the buttons to select the component you want to use. When you press any of the function buttons, the receiver turns on. The components are factory assigned to the buttons as follows.
When you want to assign other components, program the remote following the steps in "To change the button assignments".
Button Assigned component
| VIDEO1 VCR (VTR mode 3) |
| VIDEO2 VCR (VTR mode 1) |
| VIDEO3 VCR (VTR mode 2) |
| DVD/LD DVD player |
| TV/SAT TV tuner |
| TAPE Tape deck B |
| MD/DAT MD deck |
| CD/SACD CD/SACD player |
| TUNER Built-in tuner ^1) |
| LD LD player |
| AUX — |
| SOURCE 2ND ROOM, 3RD ROOM only |
^1) The setting cannot be changed.
* These buttons operate receivers with COMMAND MODE set to "AV SYSTEM1" or other Sony receivers.
4 SHIFT button
When the tuner is selected, press repeatedly to select a memory page for presetting radio stations or tuning to preset stations.
5 MUTING button\*
The function of this button is same as the MUTING button on the receiver. See page 27.
6 MASTER VOL +/- buttons\*
Press to adjust the volume level of all speakers at the same time.
7 MULTI/2CH A. DIRECT button
The function of this button is same as the MULTI/2CH ANALOG DIRECT button on the receiver. See page 27.
8 MODE +/- buttons
The function of this button is same as the MODE +/- buttons on the receiver. See page 31.
9 PRESET button
Press to select CINEMA STUDIO A–C or D.CONCERT HALL A, B.
10CH/PRESET/D.SKIP/+/− buttons\*\*
Press repeatedly to select a preset station or channel. When using a multi-disc changer, press to skip a disc.
11Operation buttons\*\*
The following table describes the function of the buttons.
Button(s) Function
| Starts play. (Starts play on thefront side of the cassette.) |
| Starts play on the reverse side of the cassette. |
| ■Pauses play or recording, and starts recording when the component is in recording standby. |
| ■Stops play. |
| |◀◀/▶▶|Skips tracks. |
| ◀◀/▶▶Fast forwards or rewinds. |
12 USE MODE button
Press to change the mode of the remote or to change the category of the buttons.
13 USE MODE indicator
* These buttons operate receivers with COMMAND MODE set to "AV SYSTEM1" or other Sony receivers.
**The function of these buttons switches automatically each time you press the function buttons (3). The above explanation is intended to serve as an example only. Therefore, depending on the component, the above operation may not be possible or may operate differently than described.
Tip
To clear all programmed signals, press I/ and USE MODE at the same time. The remote is reset to its factory-setting.
To switch the command mode of the remote
When operating the STR-DA5ES, set the same command mode to the remote and the STR-DA5ES.
When controlling Sony receivers in the 2nd room
Switch to AV SYSTEM 1. You can switch sources on the receiver.
1 Press USE MODE.
The current remote mode button slowly lights up 5 times. The default setting is “AV SYSTEM 1”.
2 Press AV SYSTEM 1 or AV SYSTEM 2 while the button blinks.
The command mode has been changed.
Tips
• Each time you press a function button or other operation buttons on the remote, the current remote mode button lights up.
- You can switch the remote mode temporarily. For example, when set to AV SYSTEM 1, if you press CD/SACD while holding down AV SYSTEM 2, the signal for AV SYSTEM 2 mode is output.
continued
Using the RM-US105 remote (continued)
To set to the 2nd room mode
1 Press USE MODE.
The current remote mode button slowly lights up 5 times.
2 Press 2ND ROOM while the button blinks.
The command mode has been set to the 2nd room mode.
To change the button assignments for the 2nd room mode
When the remote is set to the 2nd room mode, you can set the remote to turn on/off the receiver or adjust the volume.
You can assign the following buttons:
I/∅, MUTING, MASTER VOL +, MASTER VOL -
Example: To set the command mode of above 4 buttons to “AV SYSTEM 1” while in the 2nd room mode.
1 Press USE MODE more than 2 seconds.
The indicator remains lit.
2 Press 2ND ROOM.
3 Press AV SYSTEM 1.
4 Press SOURCE.
The indicator slowly lights up twice, then goes off.
For the above 4 buttons, the signals for AV SYSTEM 1 are output even in the 2nd room mode. Besides, you can operate the receiver whose command mode is “AV SYSTEM 1”.
To set to the 3rd room mode
1 Press USE MODE.
The current remote mode button slowly lights up 5 times.
2 Press 3RD ROOM while the button blinks.
The command mode has been set to the 3rd room mode.
Buttons that can be used in the 3rd room mode
Button(s) Function
| I/Turns on/off the sound output from the SPEAKERS 3RD ROOM jacks. |
| Function buttons Switch the source output from the SPEAKERS 3RD ROOM jacks. |
MUTING Mutes the sound.
MASTER VOL +/- Adjusts the volume.
To change the button assignments
You can change the factory settings of the function buttons to suit the components in your system. For example, if you connect a LD player to the VIDEO 2 jacks on the receiver, you can set the VIDEO2 button on this remote to control the LD player.
Note, however, that the settings of the TUNER button cannot be changed.
1 Press USE MODE for more than 2 seconds.
The indicator remains lit.
2 Press the function button you want to change the assignment of.
The indicator turns off when a valid button is pressed. Only the first function button that is pressed will be registered.
Example: Press VIDEO2.
3 Press the function button for which you want to change the assignment to.
See the table below for the factory assigned categories of each button. To select “2nd pressed” or “3rd pressed” categories, press the same button twice or three times. The indicator turns off when a valid button is pressed.
Example: Press DVD/LD twice.
4 Press SOURCE.
The new assignment is registered.
The indicator slowly lights up twice, then goes off.
Tip
If the operation is unsuccessful, the indicator flashes twice and the remote automatically exits the button assignment mode. In this case, the new assignment is not registered and the previous setting remains.
Notes
- If you do not press a button during step 2 through 4 within thirty seconds, the remote automatically exits the button assignment mode. Start again from step 1.
- In step 3, if you press the same button more than the possible number of categories that can be selected, only the last category is registered for the new assignment.
- In step 3, if you press several function buttons, the category of the last pressed button is selected.
Valid buttons and the corresponding categories
| Categories* | |
| Button 1st pressed 2nd pressed 3rd pressed | |
| VIDEO1 VTR1 VTR4 — | |
| VIDEO2 VTR2 VTR5 — | |
| VIDEO3 VTR3 VTR6 — | |
| DVD/LD DVD player LD player — | |
| TV/SAT TV SAT — | |
| TAPE Tape deck A Tape deck B — | |
| MD/DAT MD deck DAT deck — | |
| CD/SACD CD player 1 CD player 2 CD player 3 |
* To assign to VIDEO CD, press VIDEO 1 first, then press CD/SACD.
Precautions
On safety
Should any solid object or liquid fall into the cabinet, unplug the receiver and have it checked by qualified personnel before operating it any further.
On power sources
- Before operating the unit, check that the operating voltage is identical with your local power supply. The operating voltage is indicated on the nameplate at the rear of the receiver.
- The unit is not disconnected from the AC power source (mains) as long as it is connected to the wall outlet, even if the receiver itself has been turned off.
- If you are not going to use the receiver for a long time, be sure to disconnect the receiver from the wall outlet. To disconnect the AC power cord, grasp the plug itself; never pull the cord.
- One blade of the plug is wider than the other for the purpose of safety and will fit into the wall outlet only one way. If you are unable to insert the plug fully into the outlet, contact your dealer.
- AC power cord must be changed only at the qualified service shop.
On heat buildup
Although the unit heats up during operation, this is not a malfunction. If you continuously use this unit at a large volume, the cabinet temperature of the top, side and bottom rises considerably. To avoid burning yourself, do not touch the cabinet.
On placement
- Place the receiver in a location with adequate ventilation to prevent heat buildup and prolong the life of the receiver.
- Do not place the receiver near heat sources, or in a place subject to direct sunlight, excessive dust or mechanical shock.
- Do not place anything on top of the cabinet that might block the ventilation holes and cause malfunctions.
On operation
Before connecting other components, be sure to turn off and unplug the receiver.
On cleaning
Clean the cabinet, panel and controls with a soft cloth slightly moistened with a mild detergent solution. Do not use any type of abrasive pad, scouring powder or solvent such as alcohol or benzine.
If you have any question or problem concerning your receiver, please consult your nearest Sony dealer.
Troubleshooting
If you experience any of the following difficulties while using the receiver, use this troubleshooting guide to help you remedy the problem. Also, see “Checking the connections” on page 25 to verify that the connections are correct. Should any problem persist, consult your nearest Sony dealer.
There is no sound no matter which component is selected.
- Check that both the receiver and all components are turned on.
- Check that the MASTER VOLUME control is not set at - dB.
- Check that the SPEAKERS switch is not set to OFF (see page 27).
- Check that all speaker cords are connected correctly.
- Press MUTING to cancel the muting function.
"Not PCM" appears in the display and no sound is heard.
- Set “DECODE FORMAT” to “AUTO” in the SET UP menu (page 49).
There is no sound from a specific component.
- Check that the component is connected correctly to the audio input jacks for that component.
- Check that the cord(s) used for the connection is (are) fully inserted into the jacks on both the receiver and the component.
There is no sound from one of the front speakers.
- Connect a pair of headphones to the PHONES jack to verify that sound is output from the headphones (see page 28).
If only one channel is output from the headphones, the component may not be connected to the receiver correctly. Check that all the cords are fully inserted into the jacks on both the receiver and the component.
If both channels are output from the headphones, the front speaker may not be connected to the receiver correctly. Check the connection of the front speaker which is not outputting any sound.
There is no sound or only a very low-level sound is heard.
- Check that the speakers and components are connected securely.
- Check that you have selected the correct component on the receiver.
- Check that the SPEAKERS selector is not set to OFF (see page 27).
- Check that the headphones are not connected.
- Press MUTING to cancel the muting function.
- The protective device on the receiver has been activated because of a short circuit. Turn off the receiver, eliminate the short-circuit problem and turn on the power again.
- When only a very low-level sound is heard, check to see if NIGHT MODE is activated (see page 35).
The left and right sounds are unbalanced or reversed.
- Check that the speakers and components are connected correctly and securely.
- Adjust balance parameters in the LEVEL menu.
There is severe hum or noise.
- Check that the speakers and components are connected securely.
- Check that the connecting cords are away from a transformer or motor, and at least 3 meters away from a TV set or fluorescent light.
- Move your TV away from the audio components.
- Make sure you have grounded SIGNAL GND terminal (only when a turntable is connected).
- The plugs and jacks are dirty. Wipe them with a cloth slightly moistened with alcohol.
There is no sound from the center speaker.
- Make sure the sound field function is on (press MODE +/-).
- Select a sound field containing the word "CINEMA" or "VIRTUAL" (see pages 31–32).
- Adjust the speaker level (see page 25).
- Make sure the center speaker size parameter is set to either “SMALL” or “LARGE” (see page 21).
There is no sound or only a very low-level sound is heard from the surround/surround back speakers.
- Make sure the sound field function is on (press MODE +/-).
- Select a sound field containing the word "CINEMA" or "VIRTUAL" (see pages 31–32).
- Adjust the speaker level (see page 25).
- Make sure the surround/surround back speaker size parameter is set to either “SMALL” or “LARGE” (see page 21).
The surround effect cannot be obtained.
- Make sure the sound field function is on (press MODE +/-).
- Sound fields do not function for the signals with a sampling frequency of more than 48 kHz.
- When the INPUT MODE is set to “AUTO MULTI CH 1 or 2” and no digital signal is input, or INPUT MODE is set to “MULTI CH 1 or 2 FIXED”, you cannot change the sound field (page 27).
Dolby Digital or DTS multi channel sound is not reproduced.
- Check that the playing DVD, etc. is recorded in Dolby Digital or DTS format.
- When connecting the DVD player, etc. to the digital input jacks of this receiver, check the audio setting (settings for the audio output) of the connected component.
Recording cannot be done.
- Check that the components are connected correctly.
- Select the source component with FUNCTION control.
- When recording from a digital component, make sure the INPUT MODE is set to ANALOG 2CH FIXED (see page 27) before recording with a component connected to the analog MD/DAT or TAPE terminals.
- When recording from a digital component, make sure the INPUT MODE is set to COAXIAL FIXED or OPTICAL FIXED (see page 27) before recording with the component connected to the DIGITAL MD/DAT OUT terminals.
continued
Troubleshooting (continued)
To connect an LD player via an RF demodulator
- Connect the LD player to the RF demodulator, then connect the RF demodulator's optical or coaxial digital output to the receiver's DVD/LD OPTICAL IN or COAXIAL jack. When making this connection, be sure to set INPUT MODE manually (see page 27). The receiver may not operate correctly if INPUT MODE is set to AUTO 2CH.
For details on DOLBY DIGITAL RF hookups, see the operating instructions supplied with your RF demodulator.
The FM reception is poor.
- Use a 75-ohm coaxial cable (not supplied) to connect the receiver to an outdoor FM antenna as shown below. If you connect the receiver to an outdoor antenna, ground it against lightning. To prevent a gas explosion, do not connect the ground wire to a gas pipe.
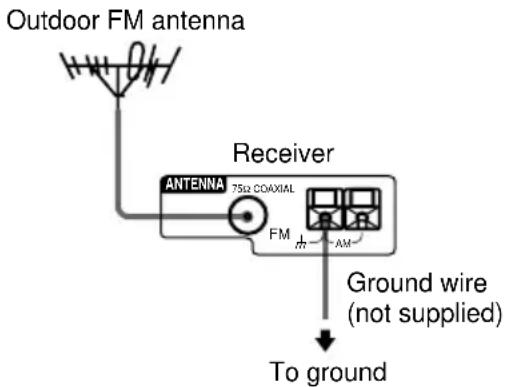
text_image
Outdoor FM antenna Receiver ANTENNA 75Ω COAXIAL FM Ground wire (not supplied) To groundRadio stations cannot be tuned in.
- Check that the antennas are connected securely. Adjust the antennas and connect an external antenna if necessary.
- The signal strength of the stations is too weak (when tuning in with automatic tuning). Use direct tuning.
- Make sure you set the tuning interval correctly (when tuning in AM stations with direct tuning).
- No stations have been preset or the preset stations have been cleared (when tuning by scanning preset stations). Preset the stations (see page 45).
- Press DISPLAY so that the frequency appears in the display.
There is no picture or an unclear picture appears on the TV screen or monitor.
- Select the appropriate function on the receiver.
- Set your TV to the appropriate input mode.
- Move your TV away from the audio components.
Remote control
The remote does not function.
- Point the remote at the remote sensor the receiver.
- Remove any obstacles in the path between the remote and the receiver.
- Replace all the batteries in the remote with new ones, if they are weak.
- If the receiver's COMMAND MODE and the remote's COMMAND MODE do not match, transmission is not possible between the remote and the receiver.
- Make sure you select the correct function on the remote.
- When you operate a programmed non-Sony component, the remote may not function properly depending on the model and the make of the component.

When using RM-US105, the buttons for the tuner operation do not work.
- The command mode of the remote is set to “2nd room” or “3rd room”. Set the command mode correctly.
The component names appearing in the function list do not correspond to the jacks on the receiver./The sound field list does not appear.
- The remote has not been initialized. Turn on the receiver, point the remote at the receiver, and press SOUND FIELD, FUNCTION, or SUB on the remote (see page 54).
appears in the display window of the remote.
- The batteries are running out. Replace all the batteries with new ones.
The function names that appear in the display windows of the receiver and the remote are different.
- Select the correct function using the remote.
When the CD player, tape deck, or MD deck is connected to the receiver via CONTROL A1/A1 II jacks, Auto Function does not work properly.
- Reprogram the remote (see page 64).
Reference sections for clearing the memory
| To clear See |
| All memorized settings page 19 |
| Customized sound fields page 42 |
| All the settings in the remote page 74 |
Specifications
AUDIO POWER SPECIFICATIONS
POWER OUTPUT AND TOTAL HARMONIC DISTORTION:
With 8 ohm loads, both channels driven, from 20 – 20,000 Hz; rated 100 watts per channel minimum RMS power, with no more than 0.09 % total harmonic distortion from 250 milliwatts to rated output.
Amplifier section
POWER OUTPUT
Rated Power Output at Stereo Mode
(8 ohms 20 Hz - 20 kHz, THD 0.05 %)
STR-DA5ES: 110 W + 110 W
STR-DA3ES: 100 W + 100 W
(4 ohms 20 Hz - 20 kHz, THD 0.09 %)
STR-DA5ES: 90 W + 90 W
STR-DA3ES: 80 W + 80 W
Reference Power Output
(8 ohms 20 Hz - 20 kHz, THD 0.05 %)
STR-DA5ES: FRONT ^1) : 110 W + 110 W
CENTER ^1) : 110 W
SURR^1) : 110 W + 110 W
SURR BACK ^1) : 110 W
STR-DA3ES: FRONT ^1) : 100 W + 100 W
CENTER ^1) : 100 W
SURR^1) : 100 W + 100 W
SURR BACK ^1) : 100 W
(4 ohms 20 Hz - 20 kHz, THD 0.09 %)
STR-DA5ES: FRONT ^1) : 90 W + 90 W
CENTER ^1) : 90 W
SURR^1) : 90 W + 90 W
SURR BACK ^1) : 90 W
1): 80 W + 80 W
CENTER ^1) : 80 W
SURR^1) : 80 W + 80 W
SURR BACK ^1 : 80 W
1) Depending on the sound field settings and the source, there may be no sound output.
Frequency response
| PHONO | RIAA equalization curve ±0.5 dB |
| CD/SACD, TAPE, MD/DAT, TV/SAT, DVD/LD, VIDEO 1, 2, 3 | 10 Hz - 100 kHz +0.5/-2 dB (with sound field, equalizer, and bass boost bypassed) |
Inputs (Analog)
| PHONO | Sensitivity: 2.5 mVImpedance: 50 kilohms S/N^2) : 86 dB (A, 2.5 mV^3) ) |
| MULTI CHANNEL | Sensitivity: 150 mV |
| INPUT 1, 2, CD/SACD, TAPE, MD/DAT, DVD/LD, TV/SAT, VIDEO 1, 2, 3 | Impedance: 50 kilohms S/N^2) : 100 dB(A, 150 mV^3) ) |
2) INPUT SHORT.
3) Weighted network, input level.
Inputs (Digital)
| CD/SACD, DVD/LD (Coaxial) | Sensitivity: - Impedance: 75 ohms S/N: 100 dB (A, 20 kHz LPF) |
| DVD/LD, TV/SAT, MD/DAT (Optical) | Sensitivity: - Impedance: - S/N: 100 dB (A, 20 kHz LPF) |
Outputs
| TAPE, MD/DAT(REC OUT), VIDEO1, 2 (AUDIO OUT) | Voltage: 150 mVImpedance: 10 kilohms |
| FRONT L/R,CENTER,SURROUND L/R,SURROUND BACK,SUB WOOFER | Voltage: 2 VImpedance: 1 kilohms |
EQ
BASS: 99 Hz\~1.0 kHz
(21 steps)
MID (FRONT L/R, CENTER only):
198 Hz\~10 kHz
(36 steps)
TREBLE: 1.0 kHz\~10 kHz
(23 steps)
Gain levels: ±10 dB, 1 dB step
continued
Specifications (continued)
FM tuner section
Tuning range 87.5 - 108.0 MHz
Antenna terminals 75 ohms, unbalanced
Sensitivity
Mono: 18.3 dBf, 2.2 μV/75 ohms
Stereo: 38.3 dBf, 22.5 V/75 ohms
Usable sensitivity 11.2 dBf, 1 μV/75 ohms
S/N
Mono: 76 dB
Stereo: 70 dB
Harmonic distortion at 1 kHz
Mono: 0.3%
Stereo: 0.5%
Separation 45 dB at 1 kHz
Frequency response 30 Hz – 15 kHz, +0.5/-2 dB
Selectivity 60 dB at 400 kHz
AM tuner section
Tuning range
With 10-kHz tuning scale: 530 - 1710 kHz ^4)
With 9-kHz tuning scale: 531 - 1710 kHz ^4)
Antenna Loop antenna
Usable sensitivity 50 dB/m (at 1,000 kHz or 999 kHz)
S/N 54 dB (at 50 mV/m)
Harmonic distortion 0.5 % (50 mV/m, 400 Hz)
Selectivity
At 9 kHz: 35 dB
At 10 kHz: 40 dB
4) You can change the AM tuning scale to 9 kHz or 10 kHz. After tuning in any AM station, turn off the receiver. Hold down TUNING + and press I/☐. All preset stations will be erased when you change the tuning scale. To reset the scale to 10 kHz (or 9 kHz), repeat the procedure.
Video section
Inputs
Video: 1 Vp-p, 75 ohms
S-video: Y: 1 Vp-p, 75 ohms
C: 0.286 Vp-p, 75 ohms
Outputs
Video: 1 Vp-p, 75 ohms
S-video: Y: 1 Vp-p, 75 ohms
C: 0.286 Vp-p, 75 ohms
Remote control RM-LJ305
Remote control system
Infrared control
Power requirements 4.5 V DC with three LR6
(size-AA) alkaline batteries
Dimensions 175 · 62 · 33 mm
Mass (approx.) 135 g excluding batteries
Remote control RM-US105
Remote control system
Infrared control
Power requirements 3 V DC with two R6
(size-AA) batteries
Dimensions 210 · 45 · 25 mm
Mass (approx.) 95 g excluding batteries
General
Power requirements 120 V AC, 60 Hz
Power consumption
Models of area code U
STR-DA5ES: 420 W
STR-DA3ES: 410 W
Models of area code CA
STR-DA5ES: 470 W
STR-DA3ES: 450 W
Power consumption (during standby mode)
1 W
AC outlets 2 switched, 120 W/1A
Dimensions 430 · 174 · 465 mm including projecting parts and controls
Mass (Approx.)
STR-DA5ES: 20.0 kg
STR-DA3ES: 20.0 kg
Supplied accessories
FM wire antenna (1)
AM loop antenna (1)
Audio/video/control S cord (1)
Control S cord (mini jack) (1)
Remote commander RM-LJ305 (STR-DA5ES) (1)
Remote commander RM-US105 (STR-DA5ES) (1)
Remote commander RM-PP505L (STR-DA3ES) (1)
R6 (size-AA) batteries (2)
LR6 (size-AA) batteries (3) (STR-DA5ES only. For RM-LJ305)
For details on the area code of the component you are using, see page 4.
Design and specifications are subject to change without notice.
Tables of settings using SURROUND, LEVEL, EQ, and SET UP buttons
You can make various settings using the LEVEL, SURROUND, EQ, SET UP buttons, jog dial, and cursor buttons. The tables below show each of the settings that these buttons can make.
| Press Press or to select Turn jog dial to select Page | ||
| SURROUND 2CH DECODING1) | AUTO, ON, OFF 38 | |
| 2CH MODE1) | PRO LOGIC, PL II MOVIE, PL II MUSIC, Neo: Cinema, Neo: Music | |
| C.WIDTH L_C_R1)2) | (8 steps) | |
| DIMENSION F_I_S1)2) | -3 to +3 (1 increment steps) | |
| PANORAMA MODE1)2) | ON, OFF | |
| PRO LOGIC3) | AUTO, ON, OFF | |
| EFFECT LEVEL 0 to 150 % (5 % steps) | ||
| WALL S_I_H -8 to +8 (1 increment steps) | ||
| REVERB S_I_L -8 to +8 (1 increment steps) | ||
| FRONT REVERB DRY, WET, STD | ||
| SCREEN DEPTH DEEP, MID, OFF | ||
| VIR.SPEAKERS ON, OFF | ||
| SUR.ENHANCER ON, OFF | ||
| BASS GAIN -10 dB to +10 dB (1 dB steps) | ||
| BASS FREQ. 99 Hz to 1.0 kHz (21 steps) | ||
| TREBLE GAIN | -10 dB to +10 dB (1 dB steps) | |
| TREBLE FREQ. | 1.0 kHz to 10.0 kHz (23 steps) | |
| LEVEL | TEST TONE4) | OFF, AUTO, FIX 40 |
| PHASE NOISE4) | OFF, [L-C], [C-R], [R-SR], [SL-SR], [SR-SBR], [SBR-SBL], [SBL-SL], [SL-L] | |
| PHASE AUDIO4) | OFF, [L-C], [C-R], [R-SR], [SL-SR], [SR-SBR], [SBR-SBL], [SBL-SL], [SL-L] | |
| FRONT L_I_R | -8 to +8 (1 increment steps) | |
| SURROUND L_I_R | -8 to +8 (1 increment steps) | |
| SUR.BACK L_I_R | -8 to +8 (1 increment steps) | |
| CENTER LEVEL (OFF), -20 dB to +10 dB (1 dB steps) | ||
| SURROUND LEVEL | (OFF), -20 dB to +10 dB (1 dB steps) | |
| SUR.BACK LEVEL | (OFF), -20 dB to +10 dB (1 dB steps) | |
| S.WOOFER LEVEL | (OFF), -20 dB to +10 dB (1 dB steps) | |
| LFE MIX LEVEL | (OFF), -20 dB to 0 dB (1 dB steps) | |
| D.RANGE COMP. | OFF, 0.1 to 0.9 (0.1 steps), STD, MAX | |
1) STR-DA5ES only.
2) You can set this parameter only when the 2ch decode mode is set to "PL II MUSIC".
3) STR-DA3ES only.
4) One of these parameters appears depending on the T.TONE parameter in the SET UP menu.
Tables of settings using SURROUND, LEVEL, EQ, and SET UP buttons (continued)
| Press Press or to select Turn jog dial to select Page | |
| EQ FRONT BASS GAIN -10 dB to +10 dB (1 dB steps) 42 | |
| FRONT BASS FREQUENCY 99 Hz to 1.0 kHz (21 steps) | |
| FRONT MID GAIN -10 dB to +10 dB (1 dB steps) | |
| FRONT MID FREQUENCY 198 Hz to 10 kHz (37 steps) | |
| FRONT MID BANDWIDTH WIDE, MID, NARR | |
| FRONT TREBLE GAIN -10 dB to +10 dB (1 dB steps) | |
| FRONT TREBLE FREQUENCY 1.0 kHz to 10 kHz (23 steps) | |
| CENTER BASS GAIN -10 dB to +10 dB (1 dB steps) | |
| CENTER BASS FREQUENCY 99 Hz to 1.0 kHz (21 steps) | |
| CENTER MID GAIN -10 dB to +10 dB (1 dB steps) | |
| CENTER MID FREQUENCY | 198 Hz to 10 kHz (37 steps) |
| CENTER MID BANDWIDTH | WIDE, MID, NARR |
| CENTER TREBLE GAIN | -10 dB to +10 dB (1 dB steps) |
| CENTER TREBLE FREQUENCY | 1.0 kHz to 10 kHz (23 steps) |
| SURROUND BASS GAIN | -10 dB to +10 dB (1 dB steps) |
| SURROUND BASS FREQUENCY 99 Hz to 1.0 kHz (21 steps) | |
| SURROUND TRE. GAIN | -10 dB to +10 dB (1 dB steps) |
| SURROUND TRE. FREQUENCY | 1.0 kHz to 10 kHz (23 steps) |
| SURR BACK BASS GAIN | -10 dB to +10 dB (1 dB steps) |
| SURR BACK BASS FREQUENCY | 99 Hz to 1.0 kHz (21 steps) |
| SURR BACK TRE. GAIN | -10 dB to +10 dB (1 dB steps) |
| SURR BACK TRE. FREQUENCY | 1.0 kHz to 10 kHz (23 steps) |
Press Press or to select Turn jog dial to select Page
| SET UP FRONT SP LARGE, SMALL 20 | |
| CENTER SP LARGE, SMALL, NO | |
| SURROUND SP LARGE, SMALL, NO | |
| SURR BACK SP LARGE, SMALL, NO | |
| SURR BACK L/R YES, NO | |
| SUB WOOFER YES, NO | |
| FRONT 3 feet to 40 feet (1 foot steps) | |
| CENTER 3 feet to 40 feet (1 foot steps) | |
| SURROUND 3 feet to 40 feet (1 foot steps) | |
| SURR BACK 3 feet to 40 feet (1 foot steps) | |
| SUB WOOFER 3 feet to 40 feet (1 foot steps) | |
| S.W PHASE | NORMAL, REVERSE |
| DISTANCE UNIT | feet, meter |
| SURR POSI. SIDE, MIDDLE, BEHIND | |
| SURR HEIGHT | HIGH, LOW |
| SURR BACK HGT. | HIGH, LOW |
| FRONT SP > ^1) | 40 Hz to 200 Hz (10 Hz steps) |
| CENTER SP > ^1) | 40 Hz to 200 Hz (10 Hz steps) |
| SURROUND SP > ^1) | 40 Hz to 200 Hz (10 Hz steps) |
| SURR BACK SP > ^1) | 40 Hz to 200 Hz (10 Hz steps) |
| LFE HIGH CUT > | 40 Hz to 200 Hz (10 Hz steps) |
| 6.1CH DECODING | AUTO, ON, OFF |
| MULTI CH 1/2 | NONE, Every function (except for TUNER and PHONO) |
| D.POWER | AUTO OFF, ALWAYS ON |
| V.POWER | AUTO OFF, ALWAYS ON |
| S.FIELD LINK | ON, OFF |
| DECODE FORMAT | AUTO, PCM |
| AUTO FUNCTION | ON, OFF |
| 2ND ROOM SP ^2) | ON, OFF |
| 3RD ROOM SP ^3) | ON, OFF |
| 2 WAY REMOTE ^4) | ON, OFF |
| COMMAND MODE | AV1, AV2 |
| T.TONE | NORMAL, PHASE NOISE, PHASE AUDIO |
| OSD | COLOR, MONOCHROME |
| OSD H.POSITION | 0 to 64 (1 steps) |
| OSD V.POSITION | 0 to 32 (1 steps) |
^1) When the speakers are set to SMALL only.
2) When the SPEAKER switch is set to "MAIN+2ND ROOM" only. (STR-DA3ES only)
3) When the SPEAKER switch is set to "MAIN+3RD ROOM" only. (STR-DA5ES only)
4) STR-DA5ES only.
Adjustable parameters for each sound field
The adjusted SURROUND parameters are stored in each sound field.
The adjusted LEVEL parameters are applied to all the sound fields.
| < SURROUND > | ||||||||
| 2CH 2CH PRO EFFECT WALL REVERB FRONT SCREEN VIRTUAL SUR. BASS/DECODING* MODE* LOGIC** LEVEL TYPE TIME REVERB DEPTH SPEAKERS ENHANCER TREBLE | ||||||||
| 2CH | ● | |||||||
| A.F.D. | AUTO | ● | ● | |||||
| NORMAL SURROUND | ON ● | ● | ||||||
| CINEMA STUDIO EX A | ● | ● | ● | ● | ● | ● | ||
| CINEMA STUDIO EX B | ● | ● | ● | ● | ● | ● | ||
| CINEMA STUDIO EX C | ● | ● | ● | ● | ● | ● | ||
| SEMI C.STUDIO EX A | ● | ● | ● | ● | ● | ● | ||
| SEMI C.STUDIO EX B | ● | ● | ● | ● | ● | ● | ||
| SEMI C.STUDIO EX C | ● | ● | ● | ● | ● | ● | ||
| NIGHT THEATER | ● | ● | ● | ● | ● | ● | ||
| MONO MOVIE | ● | ● | ● | ● | ● | ● | ||
| STEREO MOVIE | ● | ● | ● | ● | ● | ● | ||
| V.MULTI DIMENSION | ● | ● | ● | |||||
| VIRTUAL MULTI REAR ● | ● | ● | ||||||
| V.SEMI M.DIMENSION | ● | ● | ● | |||||
| VIRTUAL ENHANCED A | ● | ● | ● | |||||
| VIRTUAL ENHANCED B | ● | ● | ● | |||||
| D.CONCERT HALL A | ● | ● | ● | ● | ● | |||
| D.CONCERT HALL B | ● | ● | ● | ● | ● | |||
| CHURCH | ● | ● | ● | ● | ● | ● | ||
| OPERA HOUSE | ● | ● | ● | ● | ● | ● | ||
| JAZZ CLUB | ● | ● | ● | ● | ● | ● | ||
| DISCO/CLUB | ● | ● | ● | ● | ● | ● | ||
| LIVE HOUSE | ● | ● | ● | ● | ● | ● | ||
| ARENA | ● | ● | ● | ● | ● | ● | ||
| STADIUM | ● | ● | ● | ● | ● | ● | ||
| GAME | ● | ● | ● | ● | ● | ● | ||
| HEADPHONE (2CH) | ● | |||||||
| HEADPHONE (DIRECT) | ||||||||
| HEADPHONE (MULTI 1/2) | ||||||||
| HEADPHONE THEATER ● | ● | ● | ● | |||||
| MULTI CH IN 1 | ||||||||
| MULTI CH IN 2 | ||||||||
| 2CH ANALOG DIRECT | ||||||||
| PCM96K (more than 48 kHz) | ||||||||
* STR-DA5ES only.
**STR-DA3ES only.
| < LEVEL > | |||||||||
| FRONT SURR SURR BACK CENTER SURR SURR BACK S. WOOFER LFE D.RANGE BAL BAL BAL LEVEL LEVEL LEVEL MIX | 1) | COMP1) | |||||||
| 2CH ● | ● | ● | |||||||
| A.F.D. | ● | ● | ● | ● | ● | ● | ● | ● | ● |
| NORMAL SURROUND | ● | ● | ● | ● | ● | ● | ● | ● | ● |
| CINEMA STUDIO EX A | ● | ● | ● | ● | ● | ● | ● | ● | ● |
| CINEMA STUDIO EX B | ● | ● | ● | ● | ● | ● | ● | ● | ● |
| CINEMA STUDIO EX C | ● | ● | ● | ● | ● | ● | ● | ● | ● |
| SEMI C.STUDIO EX A | ● | ● | ● | ● | ● | ||||
| SEMI C.STUDIO EX B | ● | ● | ● | ● | ● | ||||
| SEMI C.STUDIO EX C | ● | ● | ● | ● | ● | ||||
| NIGHT THEATER | ● | ● | ● | ● | ● | ● | ● | ● | ● |
| MONO MOVIE | ● | ● | ● | ● | ● | ● | ● | ● | ● |
| STEREO MOVIE | ● | ● | ● | ● | ● | ● | ● | ● | ● |
| V.MULTI DIMENSION | ● | ● | ● | ● | ● | ● | ● | ● | ● |
| VIRTUAL MULTI REAR | ● | ● | ● | ● | ● | ● | ● | ● | ● |
| V.SEMI M.DIMENSION | ● | ● | ● | ● | ● | ||||
| VIRTUAL ENHANCED A | ● | ● | ● | ● | ● | ||||
| VIRTUAL ENHANCED B | ● | ● | ● | ● | ● | ||||
| D.CONCERT HALL A | ● | ● | ● | ● | ● | ● | ●2) | ● | ● |
| D.CONCERT HALL B | ● | ● | ● | ● | ● | ● | ●2) | ● | ● |
| CHURCH | ● | ● | ● | ● | ● | ● | ●2) | ● | ● |
| OPERA HOUSE | ● | ● | ● | ● | ● | ● | ●2) | ● | ● |
| JAZZ CLUB | ● | ● | ● | ● | ● | ● | ●2) | ● | ● |
| DISCO/CLUB | ● | ● | ● | ● | ● | ● | ● | ● | ● |
| LIVE HOUSE | ● | ● | ● | ● | ● | ● | ●2) | ● | ● |
| ARENA | ● | ● | ● | ● | ● | ● | ●2) | ● | ● |
| STADIUM | ● | ● | ● | ● | ● | ● | ●2) | ● | ● |
| GAME | ● | ● | ● | ● | ● | ● | ● | ● | ● |
| HEADPHONE (2CH) | ● | ● | |||||||
| HEADPHONE (DIRECT) | ● | ||||||||
| HEADPHONE (MULTI 1/2) | ● | ||||||||
| HEADPHONE THEATER | ● | ● | |||||||
| MULTI CH IN 1 | ● | ● | ● | ● | ● | ● | |||
| MULTI CH IN 2 | ● | ● | ● | ● | ● | ||||
| 2CH ANALOG DIRECT | ● | ||||||||
| PCM96K (more than 48 kHz) | ● | ||||||||
^1) These parameters may not operate depending on the source or adjustments. For details, see each item in “Adjusting the level parameters” (page 40).
2) When these sound fields are selected, there is no sound output from the sub woofer if the front speaker size is set to “LARGE”. However, sound will be output from the sub woofer if the digital input signal contains L.F.E. signals.
continued
| < | E | Q | ||||||
| < FRONT >BASS BASS MID MID TREBLE TREBLEGAIN FREQ GAIN FREQ SLOPE GAIN FREQ | ||||||||
| 2CH ● | ● | ● | ● | ● | ● | ● | ||
| A.F.D. ● | ● | ● | ● | ● | ● | ● | ||
| NORMAL SURROUND ● | ● | ● | ● | ● | ● | ● | ||
| CINEMA STUDIO EX A ● | ● | ● | ● | ● | ● | ● | ||
| CINEMA STUDIO EX B | ● | ● | ● | ● | ● | ● | ● | |
| CINEMA STUDIO EX C | ● | ● | ● | ● | ● | ● | ● | |
| SEMI C.STUDIO EX A | ● | ● | ● | ● | ● | ● | ● | |
| SEMI C.STUDIO EX B | ● | ● | ● | ● | ● | ● | ● | |
| SEMI C.STUDIO EX C | ● | ● | ● | ● | ● | ● | ● | |
| NIGHT THEATER | ● | ● | ● | ● | ● | ● | ● | |
| MONO MOVIE | ● | ● | ● | ● | ● | ● | ● | |
| STEREO MOVIE | ● | ● | ● | ● | ● | ● | ● | |
| V.MULTI DIMENSION | ● | ● | ● | ● | ● | ● | ● | |
| VIRTUAL MULTI REAR | ● | ● | ● | ● | ● | ● | ● | |
| V.SEMI M.DIMENSION | ● | ● | ● | ● | ● | ● | ● | |
| VIRTUAL ENHANCED A | ● | ● | ● | ● | ● | ● | ● | |
| VIRTUAL ENHANCED B | ● | ● | ● | ● | ● | ● | ● | |
| D.CONCERT HALL A | ● | ● | ● | ● | ● | ● | ● | |
| D.CONCERT HALL B | ● | ● | ● | ● | ● | ● | ● | |
| CHURCH | ● | ● | ● | ● | ● | ● | ● | |
| OPERA HOUSE | ● | ● | ● | ● | ● | ● | ● | |
| JAZZ CLUB | ● | ● | ● | ● | ● | ● | ● | |
| DISCO/CLUB | ● | ● | ● | ● | ● | ● | ● | |
| LIVE HOUSE | ● | ● | ● | ● | ● | ● | ● | |
| ARENA | ● | ● | ● | ● | ● | ● | ● | |
| STADIUM | ● | ● | ● | ● | ● | ● | ● | |
| GAME | ● | ● | ● | ● | ● | ● | ● | |
| HEADPHONE (2CH) | ● | ● | ● | ● | ● | ● | ● | |
| HEADPHONE (DIRECT) | ||||||||
| HEADPHONE (MULTI 1/2) | ||||||||
| HEADPHONE THEATER | ● | ● | ● | ● | ● | ● | ● | |
| MULTI CH IN 1/2 | ||||||||
| 2CH ANALOG DIRECT | ||||||||
| PCM96K (more than 48 kHz) | ||||||||
| < | E | Q | |||||
| <CENTER>BASS BASS MID MID MTDREBLE TREBLEGAIN FREQ GAIN FREQ SLOPE GAIN FREQ | |||||||
| 2CH | |||||||
| A.F.D. | ● | ● | ● | ● | ● | ● | |
| NORMAL SURROUND | ● | ● | ● | ● | ● | ● | ● |
| CINEMA STUDIO EX A | ● | ● | ● | ● | ● | ● | ● |
| CINEMA STUDIO EX B | ● | ● | ● | ● | ● | ● | ● |
| CINEMA STUDIO EX C | ● | ● | ● | ● | ● | ● | ● |
| SEMI C.STUDIO EX A | ● | ● | ● | ● | ● | ● | ● |
| SEMI C.STUDIO EX B | ● | ● | ● | ● | ● | ● | ● |
| SEMI C.STUDIO EX C | ● | ● | ● | ● | ● | ● | ● |
| NIGHT THEATER | ● | ● | ● | ● | ● | ● | ● |
| MONO MOVIE | ● | ● | ● | ● | ● | ● | ● |
| STEREO MOVIE | ● | ● | ● | ● | ● | ● | ● |
| V.MULTI DIMENSION | ● | ● | ● | ● | ● | ● | ● |
| VIRTUAL MULTI REAR | ● | ● | ● | ● | ● | ● | ● |
| V.SEMI M.DIMENSION | ● | ● | ● | ● | ● | ● | |
| VIRTUAL ENHANCED A | ● | ● | ● | ● | ● | ● | ● |
| VIRTUAL ENHANCED B | ● | ● | ● | ● | ● | ● | ● |
| D.CONCERT HALL A | ● | ● | ● | ● | ● | ● | ● |
| D.CONCERT HALL B | ● | ● | ● | ● | ● | ● | ● |
| CHURCH | ● | ● | ● | ● | ● | ● | ● |
| OPERA HOUSE | ● | ● | ● | ● | ● | ● | ● |
| JAZZ CLUB | ● | ● | ● | ● | ● | ● | ● |
| DISCO/CLUB | ● | ● | ● | ● | ● | ● | ● |
| LIVE HOUSE | ● | ● | ● | ● | ● | ● | ● |
| ARENA | ● | ● | ● | ● | ● | ● | ● |
| STADIUM | ● | ● | ● | ● | ● | ● | ● |
| GAME | ● | ● | ● | ● | ● | ● | ● |
| HEADPHONE (2CH) | |||||||
| HEADPHONE (DIRECT) | |||||||
| HEADPHONE (MULTI 1/2) | |||||||
| HEADPHONE THEATER | |||||||
| MULTI CH IN 1/2 | |||||||
| 2CH ANALOG DIRECT | |||||||
| PCM96K (more than 48 kHz) | |||||||
continued
| < | E | Q | |
| < SURROUND/SURROUND BACK >BASS BASS TREBLE TREBLEGAIN FREQ GAIN FREQ | |||
| 2CH | |||
| A.F.D. ● | ● | ● | ● |
| NORMAL SURROUND ● | ● | ● | |
| CINEMA STUDIO EX A ● | ● | ● | |
| CINEMA STUDIO EX B ● | ● | ● | |
| CINEMA STUDIO EX C ● | ● | ● | |
| SEMI C.STUDIO EX A | |||
| SEMI C.STUDIO EX B | |||
| SEMI C.STUDIO EX C | |||
| NIGHT THEATER ● | ● | ● | |
| MONO MOVIE ● | ● | ● | |
| STEREO MOVIE ● | ● | ● | |
| V.MULTI DIMENSION ● | ● | ● | |
| VIRTUAL MULTI REAR ● | ● | ● | |
| V.SEMI M.DIMENSION | |||
| VIRTUAL ENHANCED A | |||
| VIRTUAL ENHANCED B | |||
| D.CONCERT HALL A ● | ● | ● | |
| D.CONCERT HALL B | ● | ● | |
| CHURCH | ● | ● | |
| OPERA HOUSE | ● | ● | |
| JAZZ CLUB | ● | ● | |
| DISCO/CLUB | ● | ● | |
| LIVE HOUSE | ● | ● | |
| ARENA | ● | ● | |
| STADIUM | ● | ● | |
| GAME | ● | ● | |
| HEADPHONE (2CH) | |||
| HEADPHONE (DIRECT) | |||
| HEADPHONE (MULTI 1/2) | |||
| HEADPHONE THEATER | |||
| MULTI CH IN 1/2 | |||
| 2CH ANALOG DIRECT | |||
| PCM96K (more than 48 kHz) | |||