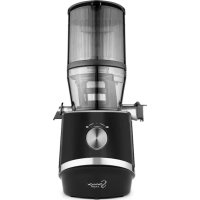
EUJ-606 - Juicer Sana - Free user manual and instructions
Find the device manual for free EUJ-606 Sana in PDF.


| Product Type | Slow Masticating Juicer |
| Model | EUJ-606 |
| Brand | Sana |
| Dimensions (W x D x H) | Approx. 40 cm x 20 cm x 30 cm |
| Weight | 5 kg |
| Power Consumption | 150 W |
| Motor Speed | 80 RPM |
| Main Functions | Juices fruits, vegetables, leafy greens, wheatgrass; also makes nut milk, sorbets |
| Feed Chute Size | Wide enough for whole apples (approx. 5 cm) |
| Construction Material | BPA-free Tritan plastic body, stainless steel screen and auger |
| Cleaning & Maintenance | Included cleaning brush; most parts dishwasher safe (top rack) |
| Safety Features | Non-slip rubber feet, safety locking arm, overload protection |
| Included Accessories | Juicing screen (fine), pulp container, juice jug, cleaning brush, recipe booklet |
| Spare Parts Availability | Replacement screens, augers, and jugs available separately |
| Repairability | Modular design; motor unit can be serviced |
| Warranty | 10 years (motor) / 2 years (parts) |
| Certifications | CE, RoHS, FDA approved materials |
Frequently Asked Questions - EUJ-606 Sana
User questions about EUJ-606 Sana
0 question about this device. Answer the ones you know or ask your own.
Ask a new question about this device
Download the instructions for your Juicer in PDF format for free! Find your manual EUJ-606 - Sana and take your electronic device back in hand. On this page are published all the documents necessary for the use of your device. EUJ-606 by Sana.
USER MANUAL EUJ-606 Sana
text_image
Sana JUICER® BY OmegaA Legendary
Name in
Fresh Juice
Extraction.
natural_image
Line drawing of a manual electric shaver with handle and blade (no text or symbols)INSTRUCTION MANUAL FOR THE MASTICATING JUICER
EUJ606
Important Safeguards
- Read all instructions.
- To protect against risk of electrical shock, do not put the main body (motor) in water or any other liquid.
- Close supervision is necessary when any appliance is used by or near children.
- Unplug from outlet when not in use, before assembling or taking off parts and before cleaning.
Avoid contact with moving parts. - Do not operate appliance with a damaged cord or plug or after the appliance malfunctions, or is dropped or damaged in any manner. Return appliance to the nearest authorized service facility for examination, repair or electrical or mechanical adjustment.
The use of attachments not recommended or sold by the manufacturer may cause fire, electric shock or injury.
Do not let cord hang over edge of table or counter. - Always make sure juicer locking clip is locked while juicer is in operation.
- Be sure to turn switch to OFF position after each use of your juicer. Make sure the motor stops completely before disassembling.
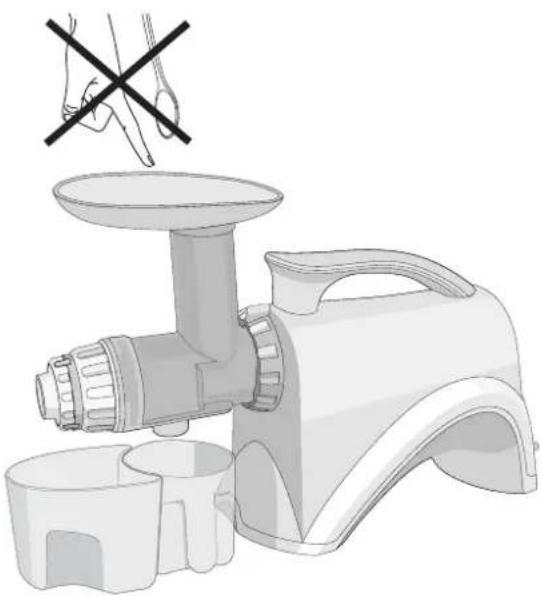
Do not put your fingers or other objects into the juicer while it is in operation. If food becomes lodged in the opening, use food plunger or another piece of fruit or vegetable to push it down. When this method is not possible, turn the motor off and disassemble juicer to remove the remaining food.
Read all the instructions and operating procedures before plugging in and using appliance.
Do not unplug from electrical outlet by pulling on the cord. To unplug, grasp the plug, not the 13. cord, and pull.
Turn off all controls before unplugging from or plugging into an electrical outlet.
14.
021
SANA Juicer by Omega (EUJ606)
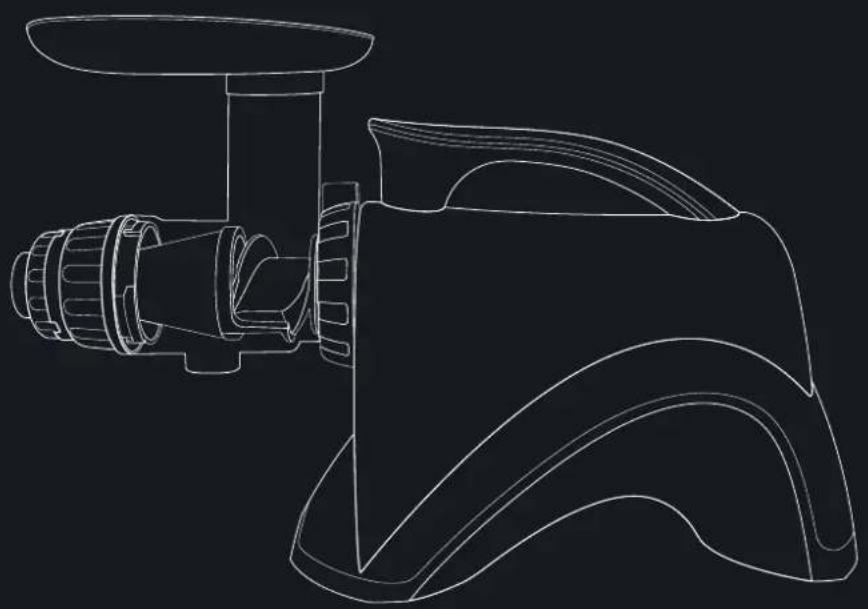
This heavy-duty juicer features a patented, stone mill-like auger, made of hygienic U.S. FDA-approved Ultem.
The Sana Juicer by Omega (EUJ606) working at low speed of 63-75 RPMs ensures full taste and the highest nutritional value.
The Sana Juicer by Omega (EUJ606) is easy to assemble and disassemble for quick cleaning.
The Sana Juicer by Omega (EUJ606) assures you many years of trouble-free, dependable service.
15-year warranty on all parts and labor.
Multi-Purpose Juicer/Food Processor
1. Fruit Juice Extractor
The Sana juicer efficiently juices soft and hard fruits, even citrus fruits, one of the hardest fruits to juice.
2. Vegetable Juice Extractor
The Sana efficiently juices all kinds of vegetables, including celery, carrots, peppers, radishes, and cabbage without destroying the natural flavor and nutrition. Fresh taste and full nutrition is guaranteed with this unique extraction process.
3. Grass Juice Extractor
Wheat grasses, aloe leaves and pine tree leaves are just some of the other natural products you can juice with the Sana juicer. Enjoy the best that nature offers in raw foods of all kinds. Juice them for full nutritional benefits.
4. Processing /Chopper Functions
The Sana also chops and processes, garlic, scallions, red pepper, ginger, radish and many other foods, including herbs and seasonings, providing natural flavor and nutrition. Soft foods for babies and geriatric patients are quick and easy to prepare with the processing strainer.
5. Pasta Maker
Make fresh noodles in just minutes with the pasta nozzles. See page 14 for more information.
6. Homogenizer
Make fresh frozen desserts, natural baby food, and nut butters.
7. Grinder
Grind coffee beans and flour.

text_image
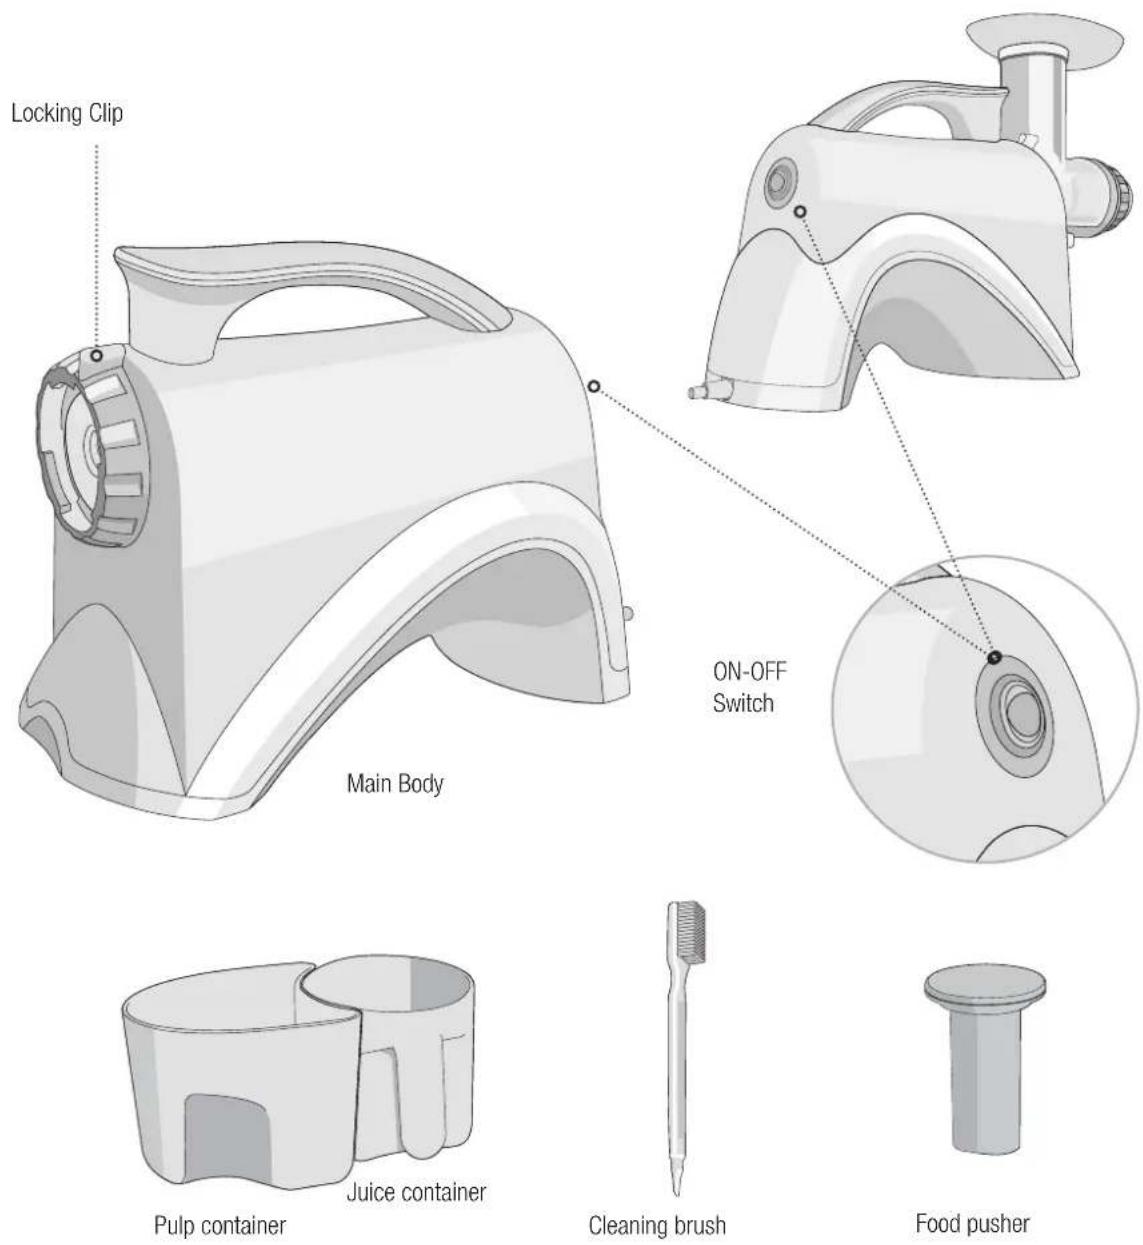
Locking Clip ON-OFF Switch Main Body Pulp container Juice container Cleaning brush Food pusher
Parts for juicing

text_image
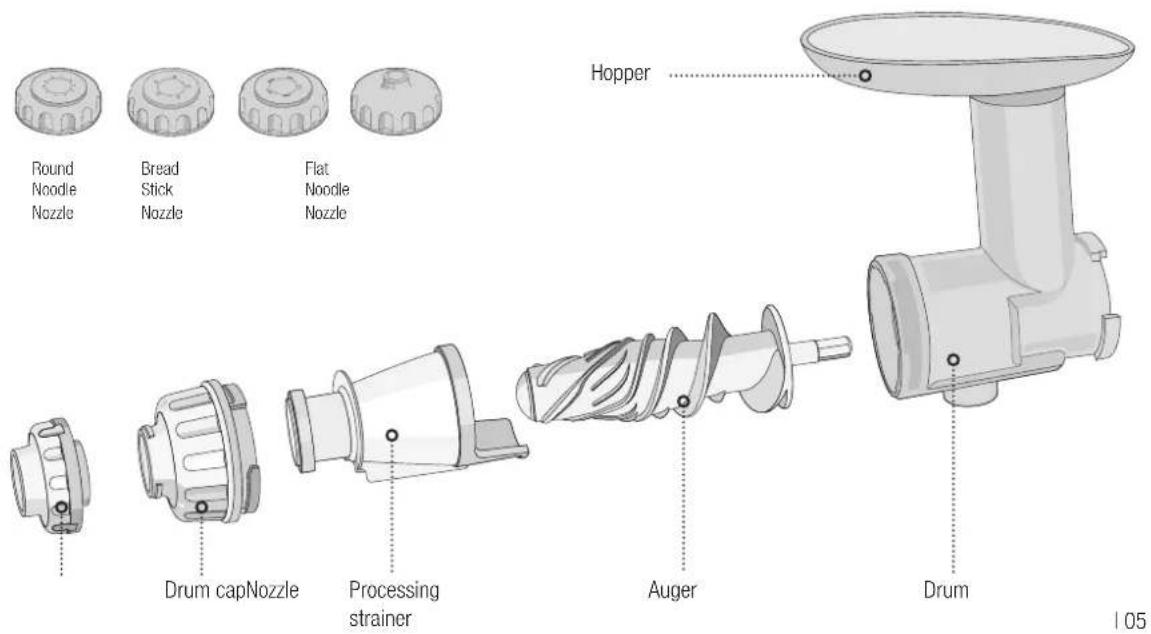
Hopper Pressure Cap Drum Cap Adjustable Juicing strainer Auger DrumParts for Processing
text_image
Round Noodle Nozzle Bread Stick Nozzle Flat Noodle Nozzle Hopper Drum capNozzle Processing strainer Auger Drum 105Juice fruits and vegetables
Juice grasses
Mince herbs & seasonings
Make noodles and bread sticks
Make baby food and sorbets
Specifications
| Model Name | Sana Juicer by OMEGA EUJ606 |
| Dimensions | Length: 484 mmWidth: 183 mmHeight: 320 mm |
| Voltage | 230V/50Hz (200W power) |
| Motor | Single-phase induction |
| Auger RPM | 63-75 |
| Fuse | 250V 5A 50T |
| Certified | CE |
Parts and Accessories Included with Your Juicer
| 1 User Manual | 1 Processing Strainer |
| 2 Container | 1 Food Pusher |
| 2 Round Noodle Nozzle | 1 Hopper + Drum |
| 1 Bread Noodle Nozzle | 1 Cleaning Brush |
| 1 Flat Noodle Nozzle | 1 Drum Cap |
| 1 Auger | 1 Adjustable pressure cap consisting of juicing nozzle with a tube ring. |
| 1 Juicing Strainer |
Total of 15 parts including this manual

- Thoroughly wash unpeeled fruit and vegetables before juicing.
- Cut fruit or vegetables into small pieces (about 2 inches) so juice may be extracted more thoroughly.
- Turn on the machine. Let it run without interruption until all the juice has been extracted.
- If the juicer starts to vibrate slightly during operation, turn off the machine. Empty the drum set. Re-assemble and resume normal operation.
- After placing the last pieces of fruits or vegetables into the hopper, keep the machine running for a few seconds to ensure the machine has extracted the last drops of juice.
- Turn off machine.
- Clean drum set after each use.
- Do NOT run the machine for more than 30 minutes at a time.
Cleaning Instructions
Wash the auger and parts in warm, soapy water in your kitchen sink and rinse well.
Do not place parts or accessories in your dishwasher.
Do not immerse unit in water. Clean with a damp cloth.
Making Juice
text_image
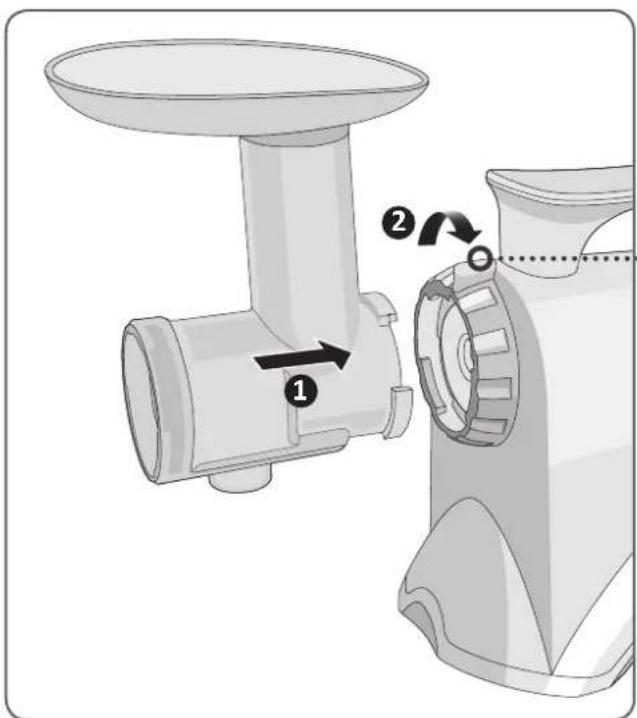
Diagram of a food grater with labeled parts and directional arrows indicating processing stepsAssembly 1
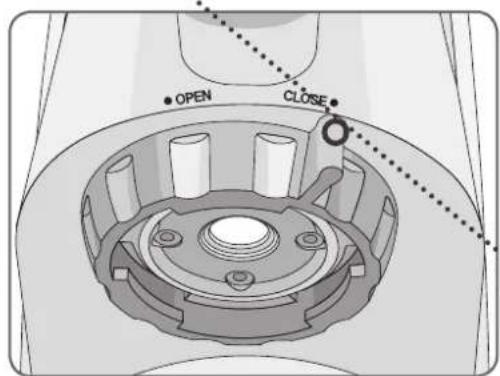
Connect drum with main body by turning locking clip clockwise (about 60°).
Place hopper onto guide.
text_image
OPEN CLOSE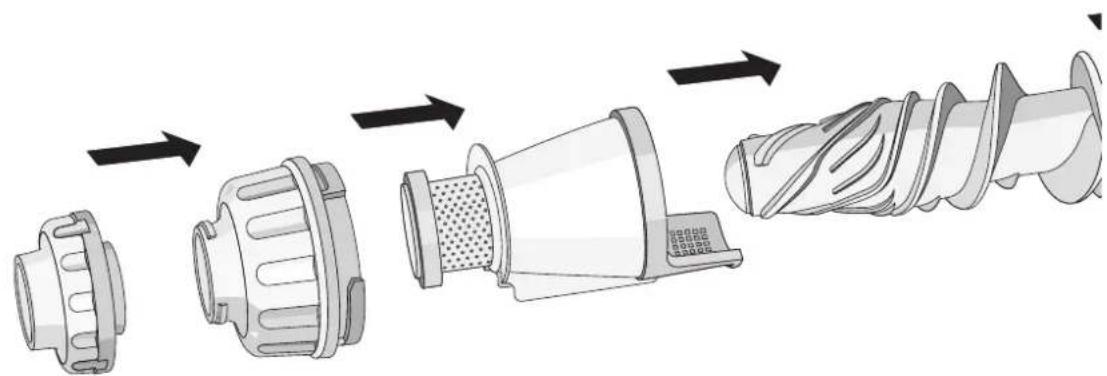
natural_image
Exploded view diagram of a mechanical component showing sequential assembly from raw material to final spiral (no text or symbols)Assembly 2
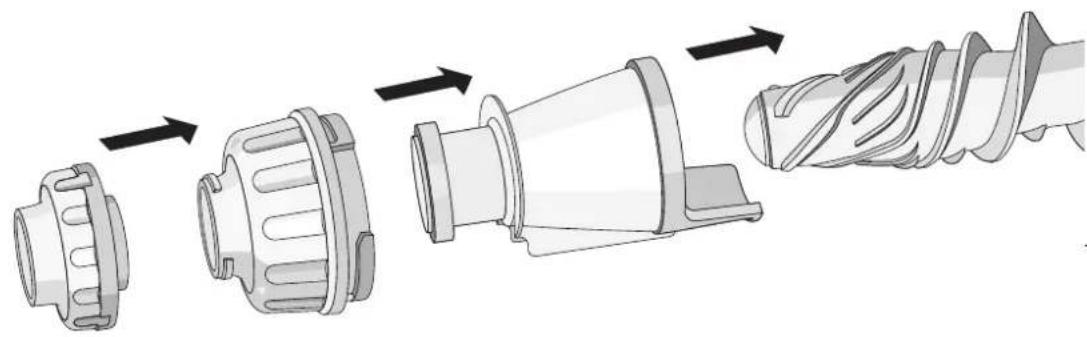
For juicing function:
Place the auger into the drum.
Insert the juicing strainer into the drum.
Place the drum cap onto the drum end and turn it counter clockwise until it clicks firmly into place.
Attach adjustable pressure cap to the drum cap end.
Turn to "5" on the adjustable pressure cap for maximum pressure. This is best for carrot, beetroot and the leafygreens.
Turn to "1" or "2" for soft fruits like orange, strawberry etc.
natural_image
Technical illustration of a sewing machine showing the blade, handle, and base components (no text or symbols)Assembly Instructions
Food Processor Function
For processing function,
Place the auger into the drum.
Insert the processing strainer into the drum.
Place the drum cap onto the drum end and turn it counter-clock-wise until it clicks firmly into place.
If interested in making pasta, u-dong or noodles, please refer to the "Making Pasta" section.
natural_image
Exploded view diagram of a mechanical component showing progressive assembly from raw gear to final spiral drill (no text or labels)Assembly 3
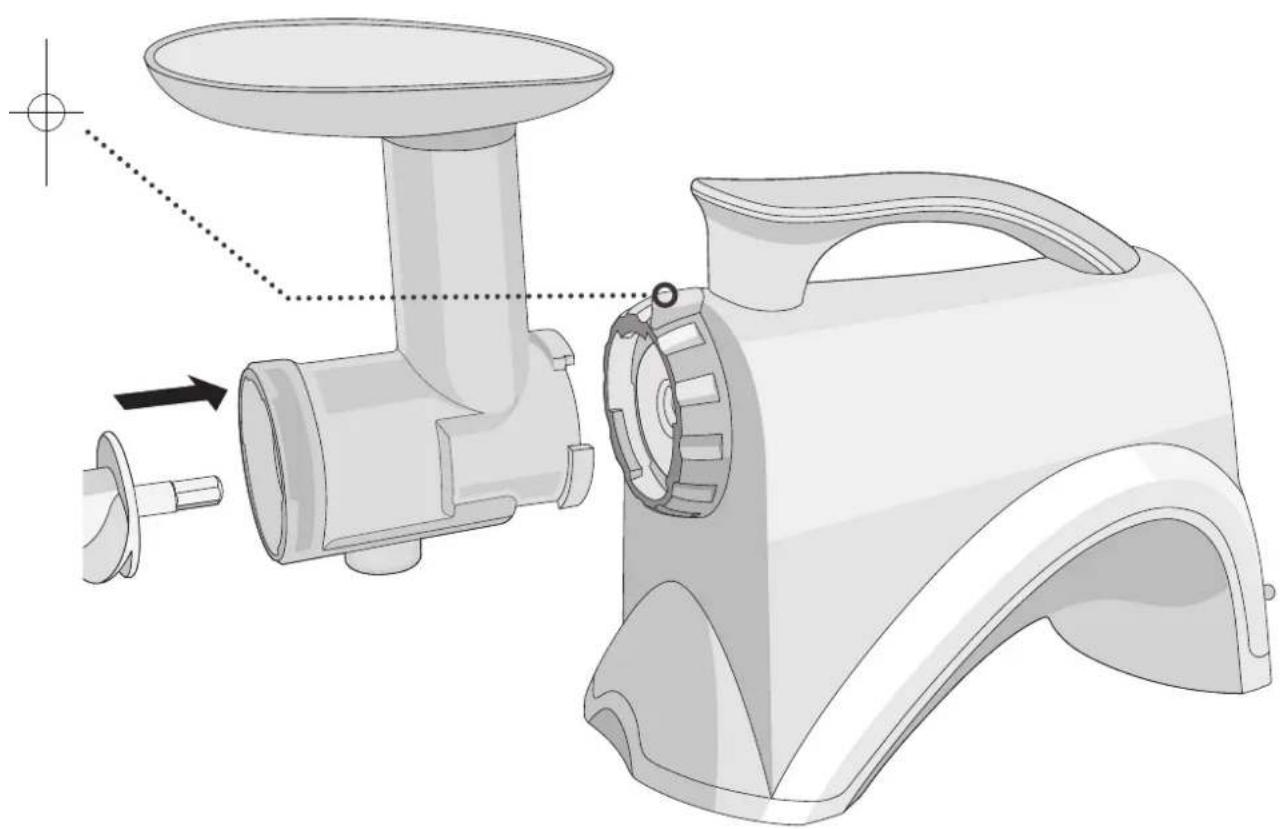
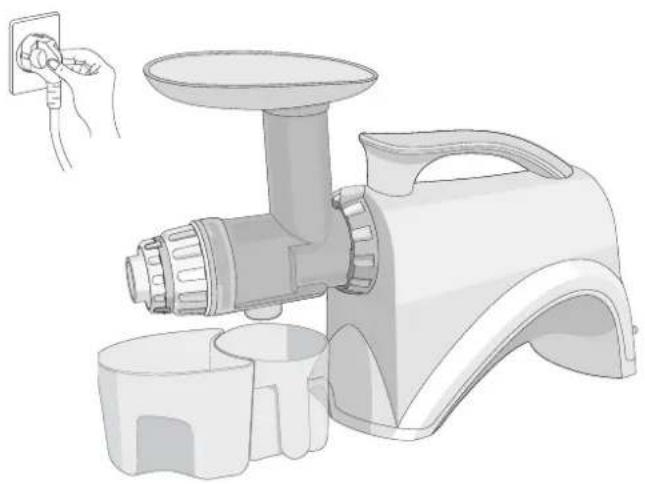
When juicing, place juice bowl and pulp bowl under drum set. When processing, you won't need the juice bowl. Plug power cord into wall outlet.
natural_image
Illustration of a hand inserting a plug into a manual electric shaver (no text or symbols present)
natural_image
Pure geometric diagram showing a rectangle with centerline and perpendicular lines, no text or symbols present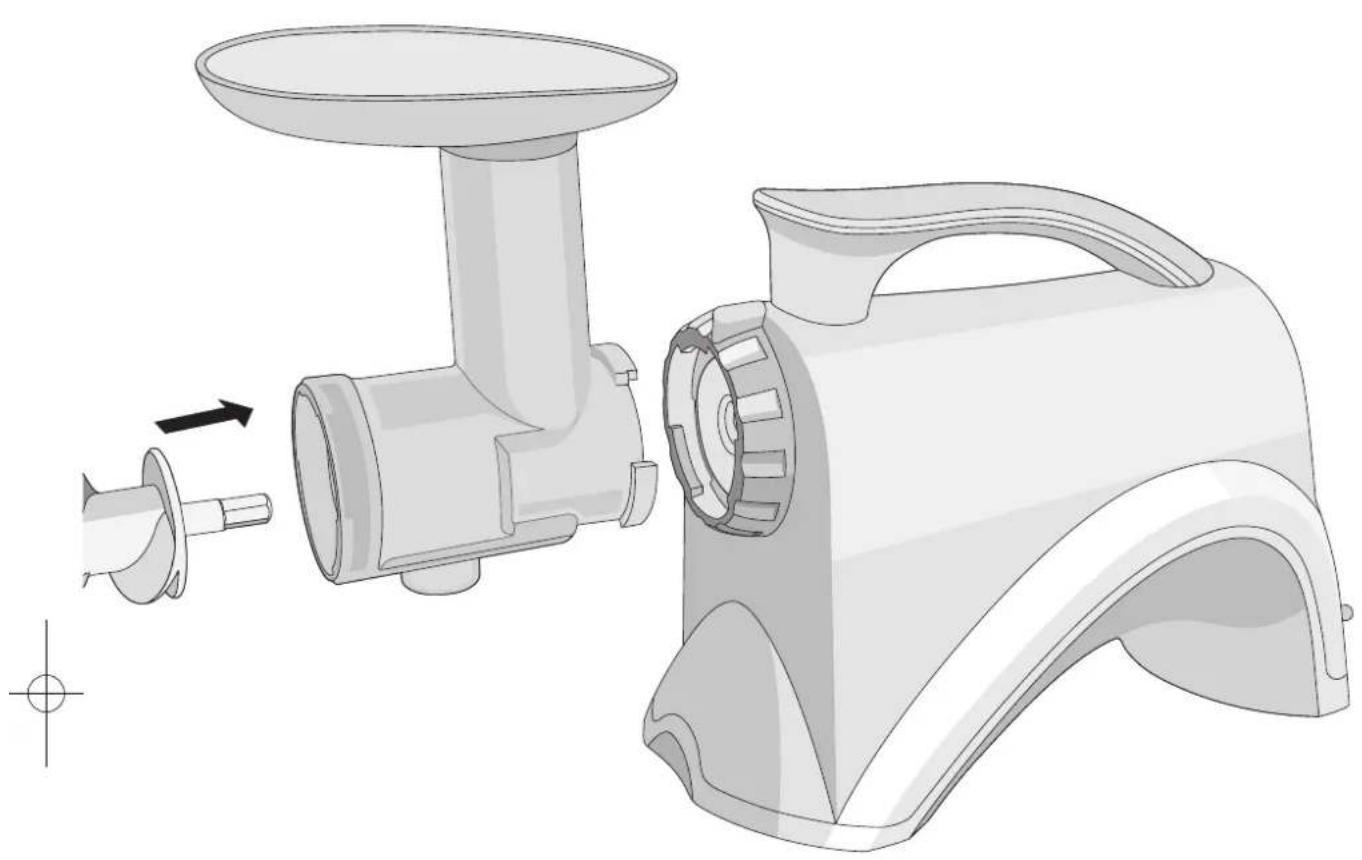
natural_image
Technical illustration of a kitchen feedstock showing the blade and side view (no text or symbols)Assembly 4
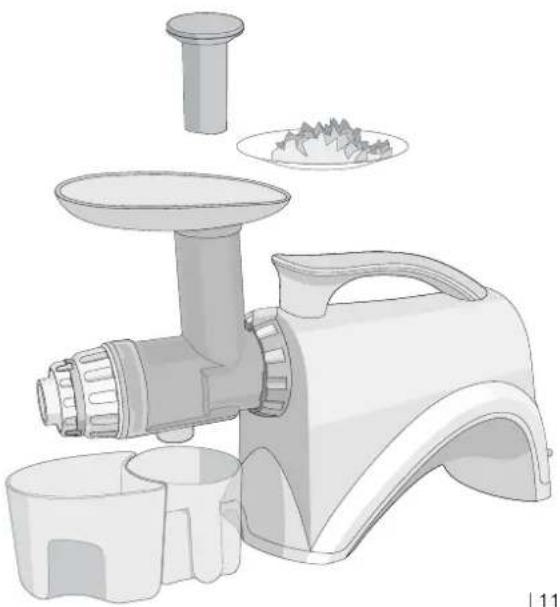
Press the ON button. Place a few pieces of cut fruit or vegetables, one at a time into the guide. Use the food pusher to press the fruit or vegetables gently down the guide. Leave the machine on as you feed in the fruits/vegetables.
natural_image
Illustration of a manual hand mixer with a brush, no text or symbols presentAssembly Instructions
Assembly 5
DO NOT place any metal objects into the hopper. If the drum set is clogged or the machine stops operating, press the reverse button 2 to 3 times which will clear the clogging. Press the on button again to resume normal operation.
natural_image
Illustration of a hand washing the hair feeder with a crossed-out fork (no text or symbols)Assembly 6
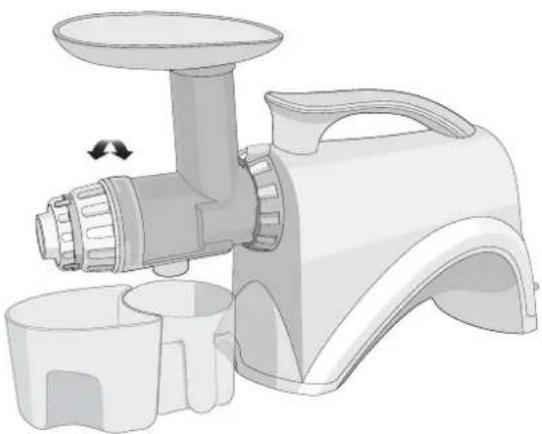
Switch the juicer OFF before changing accessories or touching any moving parts.
Remove the drum set from the main body by turning the locking clip counter-clock wise. Pull the auger forward to disassemble it from the drum set. After juicing, wash all parts in warm soapy water. Do NOT place any of the juicer accessories in the dishwasher.
natural_image
Illustration of a white manual hand mixer with a side arm and cup base (no text or symbols)Assembly 7
Do NOT run juicer for more than 30 minutes continuously at any one time.
Making Pasta, U-dong, Noodle, Breadstick
Assembly 1
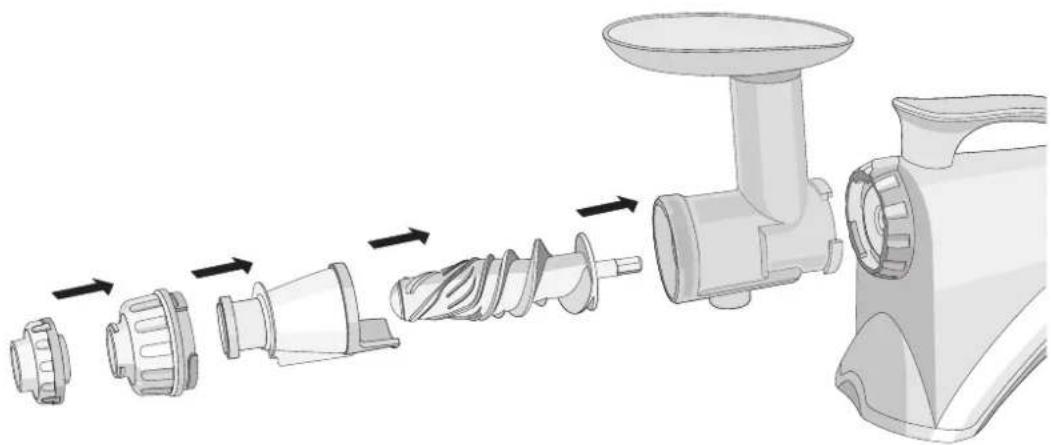
Open drum cap
Replace juicing strainer with processing strainer.
Place the desired nozzle into the front end of the processing
strainer. Turn drum cap counter-clock-wise until it clips firmly into place.
natural_image
Illustration of a robotic knockdown motor with labeled parts and directional arrows indicating assembly (no text or symbols present)Assembly 2
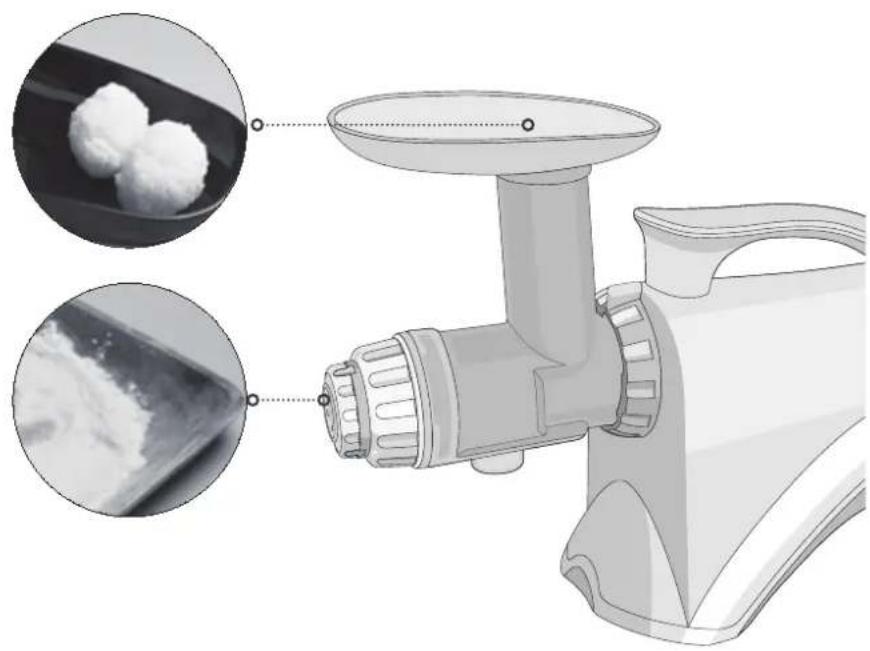
Sprinkle a small amount of wheat flour on the holding dish placed under the spout.
Press ON button.
Push pasta dough through the food guide without stopping.
natural_image
Illustration of a food cleaning brush with close-up insets showing raw material and processing steps (no text or symbols)Assembly 3
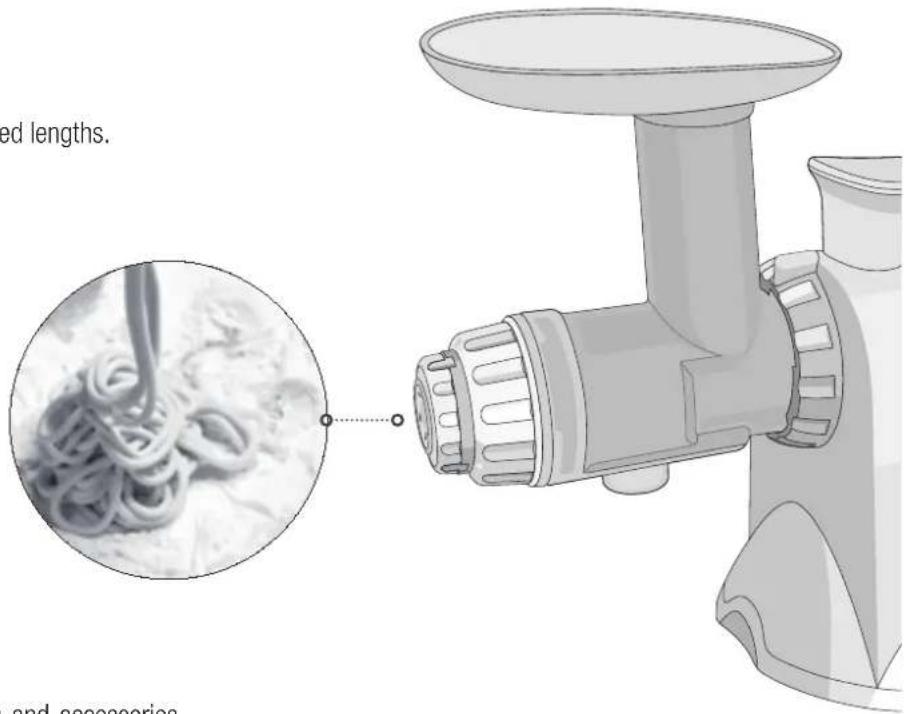
Use scissors to cut the pasta to desired lengths.
Cook according to recipe used.
text_image
ed lengths. and accessoriesAssembly 4
Disassemble unit and rinse all parts and accessories first in cold water. Then wash in warm soapy water in your sink – NOT in your dishwasher.
Choosing the Right Strainer
| Material | Strainer |
| Apples, Oranges, Pears, Grapes, Strawberries, Kiwi fruit, Tomatoes, Avocados, Aloe, plant, pine tree leaves, kale, Radishes, Beet tops,(fruit)spinach, carrots, yams, wheat grass. | Juicing strainer |
| Red/ green pepper, garlic, ginger, herbs, soaked rice and beans. | Processing strainer |
| Pasta, U-dong, Noodle Breadstick, Ice cream, Nut butter | Processing strainer |