ST-MC9181 - Multicooker Saturn - Free user manual and instructions
Find the device manual for free ST-MC9181 Saturn in PDF.


| Product Type | Electric Pressure Multicooker |
| Brand | Saturn |
| Model | ST-MC9181 |
| Power Consumption | 1000 W |
| Rated Voltage | 220-240 V ~ 50 Hz |
| Rated Current | 4.5 A |
| Capacity | 6 L |
| Dimensions (approx.) | 30 x 30 x 30 cm |
| Weight (approx.) | 5 kg |
| Cooking Functions | Rice, Cake, Chicken, Fry, Beef, Soup, Pizza, Bean, Tendon, Porridge, Baby Food, Fish, Thaw |
| Preset Timer | Yes, up to 23 hours 55 minutes |
| Keep Warm Function | Automatic after cooking, up to 24 hours |
| Safety Features | Pressure relief valve, floating valve, safety pressure release, temperature-limiting cut-off, lid lock |
| Inner Pot Coating | Non-stick coating |
| Cleaning | Removable inner pot, lid, seal ring, water collector; body wipe clean |
| Replaceable Parts | Seal belt, seal ring for floating valve, inner pot, lid |
| Warranty | 2 years (refer to terms) |
| Manual Languages | EN, RU, UK |
Frequently Asked Questions - ST-MC9181 Saturn
User questions about ST-MC9181 Saturn
0 question about this device. Answer the ones you know or ask your own.
Ask a new question about this device
Download the instructions for your Multicooker in PDF format for free! Find your manual ST-MC9181 - Saturn and take your electronic device back in hand. On this page are published all the documents necessary for the use of your device. ST-MC9181 by Saturn.
USER MANUAL ST-MC9181 Saturn
Dear Buyer! We congratulate you on having bought the device under trade name "Saturn". We are sure that our devices will become faithful and reliable assistance in your housekeeping.
Avoid extreme temperature changes. Rapid temperature change (e.g. when the unit is moved from freezing temperature to a warm room) may cause condensation inside the unit and a malfunction when it is switched on. In this case leave the unit at room temperature for at least 1.5 hours before switching it on. If the unit has been in transit, leave it indoors for at least 1.5 hours before starting operation.
Thank you for your choice in this product. Please read this manual carefully for proper use of this product.
Table of Contents:
1) Product Features
2) Circuit Diagram
3) Product Structure
4) How to Use This Product
5) Cleaning Methods
6) Safety Rules
7) Malfunctions and their solutions
1) Product Features
The electric pressure cooker is a brand-new kitchen tool, developed using our latest technology. The product has combined the fine qualities of the pressure cooker, electric cooker and braising cooker. It features programmable temperature and control with a new and distinctive structure and outlook design. It is reliable and safe to operate, power saving and delivers quality cooking. It is an ideal cooking tool for a modern family and an excellent substitute for conventional pressure cooker. This product has the uniqueness as follow:
- Multi-function: easy operate
* Multi-function: cooking of rice, porridge and soup; stewing; steaming;
* Just a soft press on the menu button, the utensil will work automatically. A reminder ring will be heard after cooking finished and the cooker will start heat preservation automatically.
2. Fast cooking: time saving and use of energy efficient
* Fast cooking in high pressure: save much more time and energy comparing to the traditional cooking ways.
3. Retains nutrition: more delicious and healthy;
* Airproof cooking: conserve nutrition and ensure more delicious food;
* Cooking with high temperature (110 ^0 C\~116 ^0 C):
More healthy;
- Patented inner structure: much more safe operation than any other similar products.
* Safety set for opening or closing lid; When the lid fails to fit the inner pot well, the inner pot cannot get to high pressure; if there is pressure inside, the lid cannot be opened.
* Safety pressure regulator.
If pressure (temperature) control is out of work and the pressure inside over maximum working pressure, the relief valve will exhaust automatically for safety.
* Safety pressure release set If pressure regulator is out of work and the pressure inside over the maximum working pressure, the pressure release set will release pressure from the edge of the lid to avoid burst.
* Safety temperature-limiting set In case the inner pot is empty or over- temperature in cooking, the power will be automatically cut off. Service life - 2 years
PLEASE READ THIS MANUAL FOR PROPER USAGE OF THE COOKER.
2) Circuit Diagram
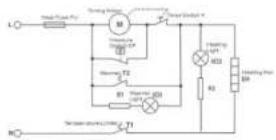
Computer Elementary Diagram

3) Product Structure

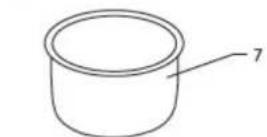

measuring cup



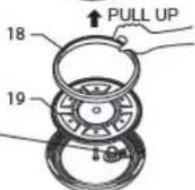
1. Handle Cover
2. Handle
3. Lid
4. Floating Valve
5. Relief Valve
-
Auto Bolt
-
Inner Pot
-
Housing
-
Upper Edge
-
Control Panel
-
Heating Plate
-
Unit Base
-
Floater
-
Water Collector
-
Power Cord
-
Seal Ring for Floating Valve
-
Filter
-
Seal Belt
-
Aluminum Lid
4) How To Use This Product
- Open the lid.
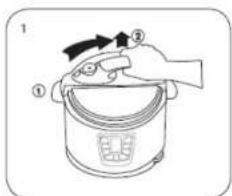
Hold the handle firmly, turn it clockwise to the clamping position and then lift it. (See Figure 1.)
- Take out the inner pot and place and water in. The amount of food and water shall not exceed 4/5 of the height of inner pot. For food that will expand in water, the level should not exceed 3/5 of the inner pot. The minimum allowable level would be 1/5 of the inner pot. (See Figure 2.)

In case of cooking rice, the maximum amount of rice allowed 12 cups.
Normally one cup of rice will need one cup of water for cooking rice.
But this can be changed according to the taste of different individuals.
3. Clean the inner pot and heating plate before cooking; be sure there are no sundries left inside the outer pot or on the surface of heating plate; turn the inner pot slightly to fit it well with the heating plate. (See Figure 3.)
In case of cooking rice, the maximum amount of rice allowed 12 cups.
Normally one cup of rice will need one cup of water for cooking rice.
But this can be changed according to the taste of different individuals.
- Clean the inner pot and heating plate before cooking; be sure there are no sundries left inside the outer pot or on the surface of heating plate; turn the inner pot slightly to fit it well with the heating plate. (See Figure 3.)

natural_image
Line drawing of a rice cooker with hands holding the lid and rotating around it (no text or symbols)- Close the lid
*Make sure the seal belt fitted onto the Aluminum lid;
*Move the seal belt to make sure it fit snugly in place in the lid;
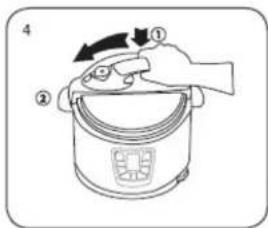
*Close the lid and turn the handle counter-clockwise till a sound of clamping is heard. (See Figure 4.)
- Fix the pressure relief valve in place; turn it to 'Airproof' position and check whether the floater has fallen down (the floater should be down in place before heating) (See Figure 5.)

- Switch power on and a sound 'Bi' will be heard, display shows "00:00" in red,
indicates that this product is ready for menu setting.
- Menu setting.

According to the food, choose one of the buttons on the control panel. For more desired menu, press "MENU". After selecting desired menu, timer indicator and menu indicator flash synchronously. At this moment, you can press "UP+" or "-DOWN" to adjust the cooking time. Please refer below "COOKING
GUIDE". \* PRESET
a) If preset time is not required, pass this step.
b) If present time is required, press "PRESET" button once to increase the timer by 5 minutes. The maximum preset time is 23 hours and 55 minutes. After 23 hours and 55 minutes, the time will start a new cycle again. You can long-press the button to increase the preset time quickly. Display shows the preset time which user want to delay the cooking process started. Cooking process will start after preset time is over.
\* RICE
Press "RICE", the display indicating the default time (12 minutes). After timer indicator 5 times flash, cook process start. Anytime, you can press "UP+" or "-DOWN" to adjust the cooking time.
\* CAKE
Press "CAKE", the display indicating the default time (25 minutes'). After timer indicator 5 times flashing, cook process
start. Anytime, you can press "UP+" or "-DOWN" to adjust the cooking time.
\* CHICKEN
Press "CHICKEN", the display indicating the default time (10 minutes). After timer indicator 5 times flashing, cook process start. Anytime, you can press "UP +" or "-DOWN" to adjust the cooking time.
\* FRY
Press "FRY", the display indicating the default time (60 minutes). After timer indicator 5 times flashing, cook process start. Anytime, you can press "UP +" or "-DOWN" to adjust the cooking time.
\* More Cook Functions (Beef, Soup, Pizza, Bean, Tendon, Porridge, Baby's Food, Fish, Thaw)
Press "MENU" to selecting desired cook function, the display indicating the cook function and the corresponding default time. After timer indicator 5 times flashing, cook process start. Anytime, you can press "UP +" or "-DOWN" to adjust the cooking time. Press time of "MENU" for different cook function:
BEEF -- 1 time
BEAN -- 4 times
SOUP -- 2 times
TENDON -- 5 times
PIZZA -- 3 times
PORRIDGE -- 6 times
BABY'S FOOD -- 7 times
FISH -- 8 times
THAW -- 9 times
\* Off / Keep Warm
a) When the cooking process is over, the product will signal 3 times and the display will be on continual warm function.
b) At any stage, you can just press "OFF/ KEEP WARM" button to stop the current operation menu and return back to original stage.
c) Before any setting of the parameters or the commencement of the cooking process, by pressing the "OFF/KEEP WARM" button, its display will indicating "WARM" and the product will go into keep warm state. With the second press
on this button, the product no longer in the keep warm state.
\* Take Out The Food
a) When the cooking process are over, the product will signal 3 times and the display will be on continual warm function.
b) Press "OFF / KEEP WARM" button to stop keeping warm.
c) Turn the pressure relief valve to "EXHAUST" position to release steam till the floating valve is down in place. (See Figure 6.)
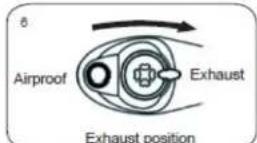
For liquid food (Porridge, Soup and etc.), the pressure relief valve cannot be moved to "EXHAUST" position to release pressure. This is to avoid the liquid of food to spurt out from the vent hold. User should wait for the temperature to drop and Floater to sink in order to take out the food. Wet towel can be placed on the lid to increase the speed of cooling down.
d) Unplug the power supply.
e) Hold the handle firmly, turn it clockwise to the clamping position and then lift it. (See Figure 1).
| Cooking timeRange Food/Functions | Minimum | Default Time | Maxi-mum |
| Rice 5 | minutes | 12 minutes | 15 minutes |
| Cake 1 minute 25 | minutes | 99 minutes | |
| Chicken 1 minute 10 | minutes | 25 minutes | |
| Fry 1 minute 60 | minutes | 99 minutes |
| Beef 1 minute 30 | minutes | 50 minutes | |
| Soup 1 minute 25 | minutes | 40 minutes | |
| Pizza 1 minute 30 | minutes | 99 minutes | |
| Bean 1 minute 30 | minutes | 50 minutes | |
| Tendon 1 minute 40 | minutes | 60 minutes | |
| Porridge 1 minute 15 | minutes | 35 minutes | |
| Baby's food | 1 minute 8 | minutes | 20 minutes |
| Fish 1 minute 10 | minutes | 15 minutes | |
| Thaw | 1 minute 5 | minutes | 25 minutes |
5) Cleaning Methods
- Remove the plug before cleaning
- Clean the lid, including seal belt, pressure relief valve, filter, vent, floater, floating valve and wipe it with towel.
-
Clean the body with soft towel. Never soak it in water for cleaning or spay water over it.
-
Take off the water collector and clean it with a wet towel.
-
Clean the inner pot with a sponge or non-metal soft brush, and then dry it with towel.
-
Clean the pressure relief valve and the holes with soft brush to ensure smooth flow of steam during the cooking process.
6) Safety Rules
-
Never use the utensil along with inflammable products or in a humid location.
-
The amount of water or food added to the inner pot should be determined in line with step 2 in the section "HOW TO USE THIS PRODUCT".
-
Never damage the seal belt or replace it with other rubber belt or tension belt.
-
Never twist the inner steel ring with hand or other tools with force. If the
steel ring slips off place, do stop using and replace a new lid.
-
Clean anti-blocking case regularly.
-
Never attempt to open the lid with force until the floating valve falls dow
-
Never put any weight on the pressure relief valve or replace it with other substitutes.
-
The bottom of inner pot and heating plate surface should be kept clean. Never heat the inner pot on other thermal sources or have it replaced with other cookers.
-
The inner pot is covered with anti-sticking coating. To avoid scratch, wooden or plastic ladles are recommended.
-
The maximum period for heat preservation is 24 hours. However, the duration less than 6 hours is recommended to ensure delicious taste.
-
It is abnormal if there is large amount of steam escaping from the edge of lid during cooking. Remove the plug immediately and send the utensil to authorized service station for maintenance.
-
In cooking, if an alarm sound is heard and the following malfunction code is displayed, stop using immediately and send the utensil to authorized service station for maintenance.
-
In transit, it is recommended to hold the ears instead of the handles for safety.
-
Never disassemble the utensil by yourself or make replacement with accessories other than ours.
| Malfunction Code | Problems / Causes |
| E1 Open circuit of | the sensor |
| E2 Short circuit of | the sensor |
| E3 Overheating | |
| E4 Signal switch m | mal-function |
7) Malfunctions And Their Solutions
| Number | Situation | Causes | Solution |
| 1 Difficul-ty in closing the lid | Seal belt is not properly fitted | Fit in the seal belt properly | |
| Floating valve stuck on the bar | Push the bar lightly | ||
| 2 Difficul-ty in opening the lid | Floating valve has not sunk | Press the valve slightly with chop-sticks | |
| 3 Dirty seal | Steam leaking out around the lid | Seal belt is not in place | Fit in the seal belt |
| belt | Clean the seal belt | ||
| Damaged seal belt | Replace the seal belt | ||
| Lid is not closed tightly | Close the lid according to the instructions | ||
| 4 Steam | leakage from the floating valve | Dirty seal ring for floating valve | Clean the seal ring for floating valve |
| Damaged seal ring for floating valve | Replace the seal ring for floating valve | ||
| 5 Float-ing valve is not rising up | The amount of food and water is lower than the | Determine the amount of food according to the in- | |
| minimum level | structions | ||
| Steam leakage around the lid or from pressure relief valve | Send the product to the Service Center for checking purposes |
Set
Multi-Cooker 1
Instruction Manual
with Warranty Book 1
Package
Specification
Power: 1000 W
Rated Voltage: 220-230 V
Rated Frequency: 50 Hz
Rated Current: 4.5 A
Capacity: 6
Environment friendly disposal

You can help protect the environment! Please remember to respect the local regulations: hand in the non-working electrical equipments to an appropriate waste disposal centre.
The manufacturer reserves the right to change the specification and design of goods.
RU
Мультиварка


natural_image
Line drawing of a rice cooker with arrows indicating rotation (no text or symbols)The Warranty is provided for the period of 2 years or more if the Law on User Right of the country where the appliance was bought provides for a greater minimum warranty period.
All terms of warranty comply with to the Law on Protection of the Consumer Rights and are governed by the legislation of the country where the product was bought.
The warranty and free of charge repair are provided in any country where the product is delivered to by Saturn Home Appliances or authorized representative thereof, and where no restriction of import or other legal provisions interfere with rendering of warranty services and free of charge repair.
Cases uncovered by the warranty and free of charge repair:
-
Guarantee coupon is filled in improperly.
-
The product has become inoperable because of the Buyer's nonobservance of the service regulations indicated in the instruction.
-
The product was used for professional, commercial or industrial purposes (except for the models, specially intended for this purpose that is indicated in the instruction).
-
The product has external mechanical damage or damage caused by penetration of the liquid inside, dust, insects and other foreign objects.
-
The product has damages caused by non-observance of the rules of power supply from batteries, mains or accumulators.
-
The product was exposed to opening, repair or modification of design by the persons, unauthorized to repair; independent cleaning of internal mechanisms etc. was made.
-
The product has natural wear of parts with limited service life, expendables etc.
-
The product has deposits of scale inside or outside of fire-bar elements, irrespective of used water quality.
-
The product has damages caused by effect of high (low) temperatures or fire on non-heat resistant parts of the product.
-
The product has damages of accessories and nozzles which are included into the complete set of product shipment (filters, grids, bags, flasks, cups, covers, knives, sealing rings, graters, disks, plates, tubes, hoses, brushes, and also power cords, headphone cords etc.).
On the warranty service and repair, please contact the authorized service centers of "Saturn Home Appliances".
CZ
MEZINÁRODNÍ ZÁRUKA
When purchasing the product,
please require its checking before you;
BE SURE
that the goods sold to you, are functional and complete
and that the warranty coupon is filled in correctly.
This warranty coupon confirms the absence of any defects in the product you purchased and provides for free of charge repair of the product failed through the fault of the manufacturer throughout the period of warranty service and free of charge repair.
Failing the presentation of this coupon, in case of its improper filling in, infringement of factory seals (if any), and also in cases indicated in the warranty obligations, the claims are not accepted, and no warranty service and free of charge repair is made!
The warranty coupon is valid only in the original copy with the stamp of trading organization, signature of the seller, date of sale and signature of the buyer.
CZ
ZÁRUČNÍ LIST
Při koupi výrobku
- Thank you for your choice in this product. Please read this manual carefully for proper use of this product.
- Table of Contents:
- 1) Product Features
- More healthy;
- PLEASE READ THIS MANUAL FOR PROPER USAGE OF THE COOKER.
- GUIDE". \* PRESET
- \* RICE
- \* CAKE
- \* CHICKEN
- \* FRY
- \* More Cook Functions (Beef, Soup, Pizza, Bean, Tendon, Porridge, Baby's Food, Fish, Thaw)
- \* Off / Keep Warm
- \* Take Out The Food
- 5) Cleaning Methods
- 6) Safety Rules
- Set
- Specification
- Environment friendly disposal
- RU
- Мультиварка
- Cases uncovered by the warranty and free of charge repair:
- MEZINÁRODNÍ ZÁRUKA
- ZÁRUČNÍ LIST
Brand : Saturn
Model : ST-MC9181
Category : Multicooker