
RS-B755 - Cassette player TECHNICS - Free user manual and instructions
Find the device manual for free RS-B755 TECHNICS in PDF.


| Product Type | Stereo Cassette Deck |
| Brand | Technics |
| Model | RS-B755 |
| Dimensions (Approx.) | 430 mm (W) x 120 mm (H) x 300 mm (D) |
| Weight | Approx. 5 kg |
| Power Supply | AC 120V/240V, 50/60 Hz |
| Power Consumption | 20 W |
| Frequency Response | 20 Hz - 18 kHz (Metal tape) |
| Signal-to-Noise Ratio | 60 dB (Dolby B) |
| Wow and Flutter | 0.05% WRMS |
| Cassette Compatibility | Type I (Normal), Type II (CrO2), Type IV (Metal) |
| Noise Reduction | Dolby B/C |
| Inputs | Line In (RCA), Microphone (1/4" jack) |
| Outputs | Line Out (RCA), Headphone (1/4" jack) |
| Additional Functions | Auto Stop, Tape Counter, Pitch Control, Music Search |
| Cleaning | Clean tape heads and pinch rollers with isopropyl alcohol |
| Safety | Do not expose to humidity; disconnect power before cleaning |
| Spare Parts | Belts, pinch rollers, heads available from service centers |
| Repairability | Repairable by qualified technician; user-serviceable parts limited |
| Country of Origin | Japan |
Frequently Asked Questions - RS-B755 TECHNICS
User questions about RS-B755 TECHNICS
0 question about this device. Answer the ones you know or ask your own.
Ask a new question about this device
Download the instructions for your Cassette player in PDF format for free! Find your manual RS-B755 - TECHNICS and take your electronic device back in hand. On this page are published all the documents necessary for the use of your device. RS-B755 by TECHNICS.
USER MANUAL RS-B755 TECHNICS
- Specifications differ according to the area code.
●The "EB" area code, for example, indicates United Kingdom specifications.
●The "EB" indication is shown on the packing case and serial number tag.
Dear Stereo Fan
We want to thank you for selecting this product and to welcome you to the growing family of satisfied Technics product owners around the world.
We feel certain you will get maximum enjoyment
from this new addition to your home.
Please read these operating instructions carefully, and be sure to keep them handy for convenient reference.
Contents
●Suggestions for Safety 2
●For United Kingdom 3
-Accessories 3
- Connections 3
●Front Panel Controls and Functions ..... 4
●Playback 6
●Recording 10
●Recording with High Tone Quality ..... 12
- Timer Recording/Playback 15
●After Recording 16
- About Cassette Tapes 16
●Maintenance 17
●Technical Specifications 17
●Troubleshooting Guide 18
Suggestions for Safety
■ Use a standard AC wall outlet
-
Use from an AC power source of high voltage, such as for an air conditioner, is very dangerous. There is the possibility that a fire might be caused by making such a connection.
-
A DC power source cannot be used. Be sure to check the power source carefully, especially on a ship or other place where DC is used.
■ Grasp the plug when disconnecting the power supply cord
-
Wet hands are dangerous. A dangerous electric shock may result if the plug is touched by wet hands.
-
Never place heavy items on top of the power supply cord, and never force it to bend sharply.
■ Place the unit where it will be well ventilated Place this unit at least 10 cm (4") away from wall surfaces, etc.
■ Avoid places such as the following:
In direct sunlight or in other places where the temperature is high.
In places where there is excessive vibration or humidity. Such conditions might damage the cabinet and/or other component parts and thereby shorten the unit's service life.
■ Be sure to place the unit on a flat, level surface If the surface is inclined, a malfunction may result.
■ Never attempt to repair or reconstruct this unit A serious electric shock might occur if this unit is repaired, disassembled or reconstructed by unauthorized persons, or if the internal parts are accidentally touched.
■ Take particular care if children are present Never permit children to put anything, especially metal, inside this unit. A serious electric shock or malfunction could occur if articles such as coins, needles, screwdrivers, etc. are inserted through the ventilation holes, etc. of this unit.
■ If water is spilled on the unit
Be extremely careful if water is spilled on the unit, because a fire or serious electric shock might occur. Immediately disconnect the power cord plug, and consult with your dealer.
■ Avoid spray-type insecticides
Insecticides might cause cracks or "cloudiness" in the cabinet and plastic parts of this unit. The gas used in such sprays might, moreover, be ignited suddenly.
■ Never use alcohol or paint thinner
These and similar chemicals should never be used, because they might cause flaking or cloudiness of the cabinet finish.
■ Disconnect the power supply cord if the unit will not be used for a long time
If the unit is left for a long time with the power ON, this will not only shorten its useful operation life, but may also cause other troubles.
■ If trouble occurs
If, during operation, the sound is interrupted or indicators no longer illuminate, or if abnormal odor or smoke is detected, immediately disconnect the power cord plug, and contact your dealer or an Authorized Service Center.
For United Kingdom
("EB" area code model only)
The "EB" indication is shown on the name plate.
Important
THE WIRES IN THIS MAINS LEAD ARE COLOURED IN ACCORDANCE WITH THE FOLLOWING CODE.
BLUE: NEUTRAL
BROWN: LIVE
As the colours of the wires in the mains lead of this apparatus may not correspond with the coloured markings identifying the terminals in your plug proceed as follows. The wire which is coloured BLUE must be connected to the terminal which is marked with the letter N or coloured BLACK.
The wire which is coloured BROWN must be connected to the terminal which is marked with the letter L or coloured RED.
This apparatus was produced to BS 800: 1983.
Accessories
- Stereo connection cables 2

natural_image
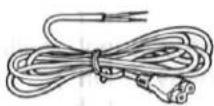
Illustration of two bundles of bundled cables with terminal connectors (no text or symbols)- AC power supply cord 1
Connections
Make connections in the numbered sequence by using the included cables.
1 Connect the stereo connection cables.
2 Connect the AC power supply cord.

AC power supply cord (2)
The configuration of the AC outlet and AC power supply cord differs according to area.
For United Kingdom
Household AC outlet

Placements hints
If this unit is placed near a receiver or a tuner, a "hum" noise may be heard during tape playback, recording, or AM reception of the receiver or the tuner.
If this occurs, leave as much space as possible between the units, or place them where there is the least amount of "hum".
Note:
Place on a flat, level surface so that the front-rear inclination does not exceed 5°.
Front Panel Controls and Functions
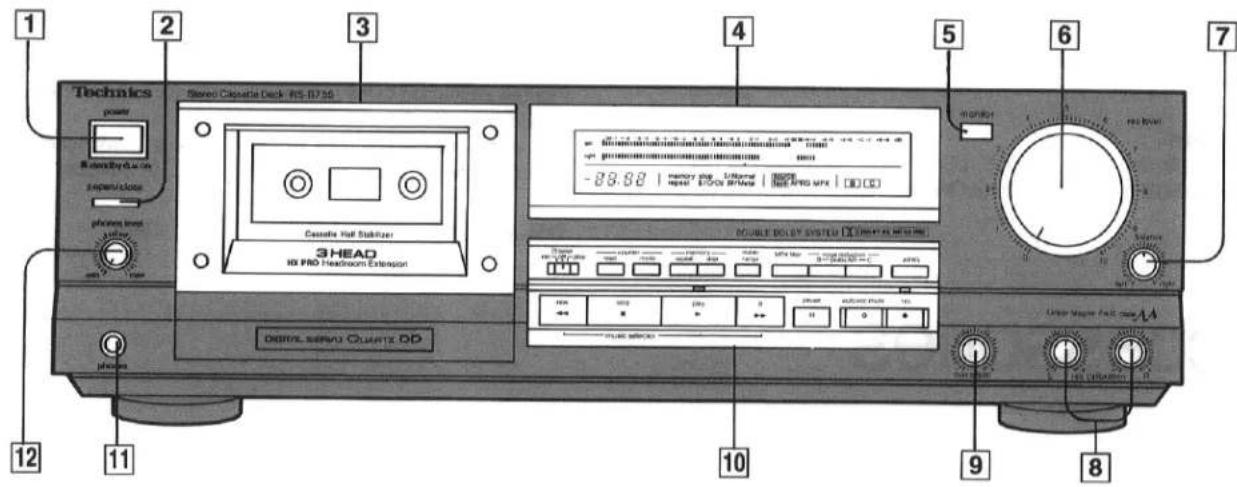
1 Power "standby ⏻/on" switch (power "standby ⏻/on")
This switch switches ON and OFF the secondary circuit power only. The unit is in the "standby" condition when this switch is set to the "standby" position. Regardless of the switch setting, the primary circuit is always "live" as long as the power cord is connected to an electrical outlet.
2 Open/close button (▲ open/close)
This button can be used to open or close the cassette holder.
3 Cassette holder
4 Display section
5 Monitor switch (monitor)
In order to monitor the tape (check the recording condition), the sound on the tape (immediately after recording) and the sound of the sound source (the original sound, before recording) can be alternately selected by pressing this button. (The corresponding indicator will illuminate.)
6 Recording-level control (rec level)
This control can be used to regulate the recording level and the peak level.
7 Recording-balance control (balance)
This control can be used to balance the left and right sound levels during recording.
8 Recording-calibration adjustment controls (rec calibration)
The sensitivity differences (high or low recording levels) for each tape type can be corrected by using these controls.
9 Bias-adjustment control (bias adjust)
The frequency response for each tape type can be equalized by using this control.
10 Operation section
11 Headphones jack (phones)
12 Headphones volume control (phones level)
Display section

A Input level meter
During playback, this meter indicates the level of the recorded sound.
During recording, it indicates the level being recorded, adjusted by the recording-level control.
B Tape/Linear counter
Indicates the amount of tape movement or elapsed time.
C Memory-mode indicators (memory repeat/stop)
Each indicator illuminates to show which of the memory mode was set by the memory-mode buttons.
D Tape-select indicators
The type of tape being used will be automatically detected and the indicator will illuminate.
E Monitor indicators (source/tape)
Each indicator illuminates to show which of the monitor was set by the monitor switch.
F APRS indicator (APRS)
Illuminates to indicate that the "APRS" is set to "on" in the recording stand-by mode.
G Multiplex filter indicator (MPX)
Illuminates to indicate that the multiplex filter is set to "on".
H Dolby noise-reduction indicators (B, C)
Each indicator illuminates to show the type of Dolby noise-reduction system selected by pressing one of the Dolby noise-reduction buttons.
Operation section

flowchart
graph TD
    A["1 timer rec-off-play"] --> B["2 counter reset"]
    B --> C["3 memory repeat stop"]
    C --> D["4 meter range"]
    D --> E["5 MPX filter"]
    E --> F["6 noise reduction B—Dolby NR—C"]
    F --> G["7 APRS"]
    H["rew"] <--_I["stop"] --> J["play"] --> K["ff"] --> L["pause"]
    M["music selector"] --> N["12"]
    O["11"] --> P["13"]
    Q["11"] --> R["12"]
    S["10"] --> T["9"]
    U["8"] --> V["●"]
1 Timer switch (☐ timer)
This switch is used to automatically begin a tape recording or tape playback at a certain time, selected by a timer (not included). (Refer to page 15.)
2 Counter buttons (counter reset/mode)
reset: This button can be used to reset the tape/linear counter indication to "000_"/"00.00".
mode: This button can be used to select the tape/linear counter indication.
3 Memory-mode buttons (memory repeat/stop)
repeat: This button can be used to set this unit to the "A-B repeat" mode.
(Refer to page 9.)
stop: This button can be used to rewind the tape to the preset "0000" point when the rewind (◀◀) button is pressed. (Refer to pages 8 and 11.)
4 Meter-range selector (meter range)
This selector can be used to select the meter-range display of the input level meter.
5 Multiplex filter switch (MPX filter)
This switch can be used during the recording of an FM stereo broadcast that employs Dolby noise reduction so as to prevent misoperation of the Dolby noise reduction.
(Refer to page 14.)
6 Dolby noise-reduction buttons (noise reduction)
These buttons are used to reduce the hissing noise heard from the tape. This unit is provided with both the B-type and C-type noise-reduction systems. (Refer to pages 6\~7.)
7 APRS button (APRS)
This button can be used to hold the peak level while monitoring the input sound. (Refer to page 12.)
8 Record button and indicator (rec/●)
This button can be used to change the tape deck to the recording stand-by mode.
This indicator illuminates to indicate that this tape deck is in the recording stand-by mode, or is recording.
9 Automatic-record-muting button (auto rec mute/☐)
This button can be used to make a silent interval on the tape being recorded on tape deck.
10 Pause button (pause/II)
This button can be used to temporarily stop the tape playback or recording of tape deck.
11 Rewind/fast-forward/search buttons (rew/◄◄, ff/►►)
These buttons can be used to fast forward or rewind the tape, or to easily search for the tune's beginning of the tape quickly.
12 Playback button and indicator (play/▶)
This button can be used to start the playback or recording of the cassette.
(The tape will then begin moving in the left-to-right direction.)
When this indicator illuminates steadily, it indicates that this tape deck is in the playback mode or the recording mode. When it flashes continually, this is an indication that this tape deck is in the pause mode or the recording stand-by mode.
13 Stop button (stop/■)
This button can be used to stop tape movement.
Playback

1 Switch the amplifier ON, and select its "tape" input source.
2 timer Switch OFF the timer switch.
3 power Switch ON the power "standby ⏻ /on" switch.
4 open/close
Press the open/close button to open the cassette holder, and then insert the cassette tape.
(The part of the cassette where the tape is exposed should face downward.)

Press the open/close button again to close the cassette holder.
5 play Press the playback button.
(The playback indicator will illuminate, and playback will begin.)
- You can close the cassette holder and begin the playback automatically, when pressing the playback, fast-forward or rewind button before pressing the open/close button to close the cassette holder.
■ To temporarily stop playback pause Press the pause button.
(The playback indicator will begin flashing.)
To resume playback, press the playback button.
■ To stop playback
stop Press the stop button.
(The playback indicator will switch OFF.)
To listen to a Dolby NR recorded tape

Press if the tape was recorded by the type-B Dolby NR system. (The "B" Dolby noise-reduction indicator will then illuminate.)

Press if the tape was recorded by the type-C Dolby NR system. (The "C" Dolby noise-reduction indicator will then illuminate.)
- To switch OFF the Dolby noise-reduction system, press the button corresponding to the Dolby noise-reduction indicator that is illuminated. (The indicator will then switch OFF.)
About the Dolby noise-reduction recording/ playback system
The Dolby noise-reduction system is a system designed to effectively reduce the annoying high-frequency "hissing" noise typically heard from tapes if this system is not used. During recording, the system functions to increase the level of the high-frequency part of the sound, and then, during playback, that same portion is weakened and returned to the previous level. This unit includes two types of Dolby noise-reduction systems, the Dolby B NR-type and C NR-type, and Dolby HX PRO headroom extension system.
■ Dolby B-type noise-reduction system
Noise is reduced to about one-third.
Use this system when playing back tapes recorded by the Dolby B noise-reduction system, such as prerecorded music tapes, etc.
■ Dolby C-type noise-reduction system
Noise is reduced to about one-tenth.
Use this system for the recording and playback of sound sources that have a wide dynamic range and good tone quality, such as FM broadcasts of live performances, etc., and for playing back such tapes.
■ Dolby HX PRO headroom extension system
By functioning to improve the maximum output level of the tape's high-frequency range, this system permits recordings without a drop of the level of the sound source's high-frequency range. In addition, by using the system in parallel with this unit's noise-reduction system, recording and playback with a greatly extended dynamic range is possible.
Dolby noise reduction and HX Pro headroom extension manufactured under license from Dolby Laboratories Licensing Corporation. HX Pro originated by Bang & Olufsen.
"DOLBY", the double-D symbol □□ and "HX PRO" are trademarks of Dolby Laboratories Licensing Corporation.
Tape/Linear counter display
The counter-mode button can be pressed to select either of the counter-display modes (see below): the tape-counter display or the linear-counter display.
(Note that the linear-counter display appears when the unit is turned ON.)
When the counter-reset button is pressed, "0000" is reset, regardless of the setting of the counter-mode button.
■ Tape-counter display:

This display shows the amount of tape movement as a series of consecutive numbers.

The display changes alternate-ly each time the counter-mode button is pressed.
■ Linear-counter display:

This display shows the amount of tape movement as expressed minutes and seconds.
- The linear-counter display is particularly convenient when you want to know how much time is remaining for a tune now playing or you want to know how much recording time is remaining.
Notes:
- The counter reading will return to "0000" when the unit is turned OFF.
- The linear counter of this unit does not function as a clock. Depending on the length of the tape used, the diameter of the cassette's hubs, etc., there may be a difference between the time displayed by the counter and the actual recording or playback time.
| Cassette type | Approx. difference |
| C46 (large hub), C60, C90 | -30~+30 seconds |
| C46 (small hub) | +2 or 3 minutes |
- The linear counter will display a minus reading if the counter is reset to "0000" and the tape is then rewound.

Playback
(continued)
To locate and play a certain tune
■ To find a tune's beginning
("music select" function)
Press the rewind/fast-forward/search button during playback. After the tune's beginning is located, the tune will begin playing. (The playback indicator will flash rapidly while the tune's beginning is being located.)
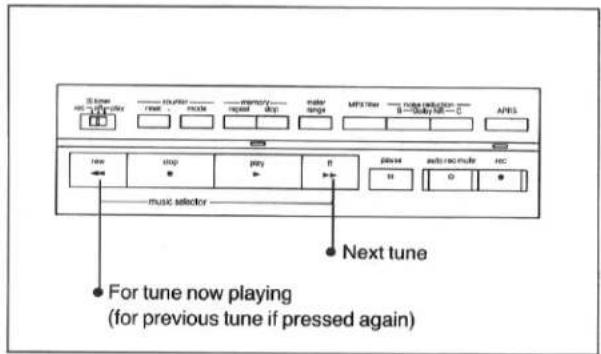
To locate a certain tune that is several tunes before (or after) the tune now playing, repeat the same steps as many times as necessary.
Note:
Note that this feature might not function correctly under the following circumstances:
- If there is noise between tunes.
- If the silent interval between tunes is less than 4 seconds.
- If there is a particularly low level of sound, or a silent interval, at any place within the tune.
- If less than 10 seconds separate the program you are listening to and the next program.
Music select system manufactured under license of Starr S.A., Bruxelles, Belgium.
■ To fast-forward or rewind the tape
While in the stop mode, press the appropriate button according to the following figures.

Playback after "memory stop"
The tape is rewound to the designated point and then play can be begun from that point.

To set the playback start point
1 Press the memory-stop button and then begin the playback.
(The memory-stop indicator will illuminate.)
2 Press the counter-reset button at the point to which you want the tape to rewind.
(The counter will be reset to "0000".)
To begin playback from the set point
3 Press the stop button.
4 Press the rewind (◀◀) button.
The tape will be rewound to the set point, and then will be automatically stopped.
5 Press the playback button to begin the playback once again.
▶To cancel the "memory stop" function, press the memory stop button once again.
(The memory stop indicator will be switched OFF.)
Notes:-
- The "memory stop" function can be used while either the tape counter or the linear counter is displayed, but a change from one to the other cannot be made during the "memory stop" mode.
- There may be a slight difference (maximum +4 seconds) between the point where the tape counter was reset and the point where the tape actually stops during rewind.
A←→B repeat play ("memory repeat")
By simply designating the beginning ("0000") and the end of the part that you want to play repeatedly, that part can be repeatedly played for as many as 16 times.
(This repeat-play feature can be used only in the playback mode.)
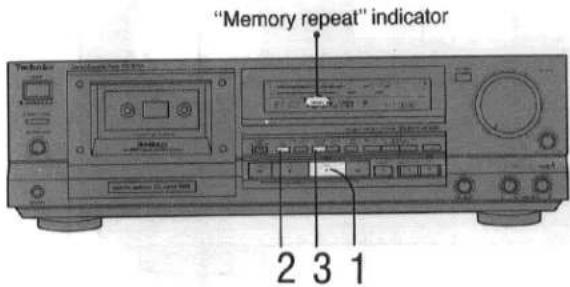
1 Press the playback button.
(The playback indicator will illuminate, and playback will begin.)
2 Press the counter-reset button at the place (A) where you want the repeat play to start.
(The counter will be reset to "0000".)
3 Press the memory-repeat button at the place (B) where you want the repeat play to end.
(The memory-repeat indicator will illuminate.)
When the memory-repeat button is pressed, the tape will be rewound to point (A), and the repeat play will then begin.
Place where counter-reset button was pressed
Place where memory-repeat button was pressed

▶To cancel the repeat-play function before it stops (after 16 repeats), press the memory-repeat button.
(The memory-repeat indicator will switch OFF.)
▶To change the setting of point (B), first cancel the repeat-play operation (see above), and then press the memory-repeat button at the new place.
Notes:
- The repeat-play function will be cancelled if the stop button or the rewind/fast-forward/search button is pressed during repeat play. To stop temporarily, press the pause button.
- Repeat play is possible while either the tape counter or the linear counter is displayed, but a change from one to the other cannot be made while repeat play is in progress.
- If, after setting point (A), the tape is rewound to set point (B), the repeat play will be of the part between the tape beginning and point (B).
(The linear counter reading will be a minus reading.)

- There may be a slight difference (maximum ±4 seconds) between the settings made for points (A) and (B) and the points at which the tape is actually played during repeat play.
To listen through headphones
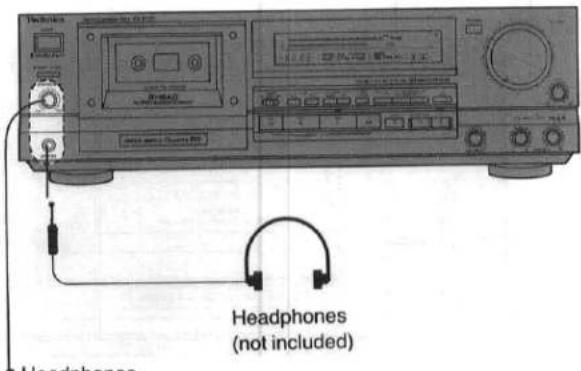
Headphones volume control
1 Set the headphones volume control to low position before connecting headphones.
2 Connect headphones (not included) to the headphones jack.
3 Use the headphones volume control to adjust the volume while listening to music.
Plug type: 6 mm (1/4") phone plug, stereo type.
Note:
Avoid listening for a long time that it irritates the ears.
Automatic-tape-select function
The unit is equipped with the automatic-tape-select feature; it automatically detects the type of tape being used, and then makes the suitable adjustments accordingly of the bias and equalization. (The tape-select indicator will illuminate.)
Recording

1 Switch the amplifier ON, and select the input source.
2 timer Switch OFF the timer switch.
3 power
Switch ON the power "standby ⏻ /on"
switch.
4 open/close
Press the open/close button to open the cassette holder, and then insert the cassette to be used for recording.
(The part of the cassette where the tape is exposed should face downward.)

Press the open/close button again to close the cassette holder.
5 noise reduction Press the button corresponding to the Dolby noise-reduction system (B or C) to be used.
[The Dolby noise-reduction ("B" or "C") indicator will illuminate.]
If neither Dolby noise-reduction system is to be used, press the Dolby noise-reduction button corresponding to the Dolby noise-reduction indicator that is illuminated. (The indicator will then switch OFF.)
6 The sound source to be recorded should be played before the recording is started in order to adjust the recording level.
7 rec Press the record button.
(The recording indicator will illuminate and the playback indicator will flash continuously; the unit will be in the recording stand-by mode.)
- When the cassette with no erase-prevention tab is inserted and the record button is pressed, the cassette holder will open automatically.
8 rec level Adjust the recording level. Adjust so that the indication of the input level meter occasionally is as high as shown below.
| Normal tape CrO_2 tape | Metal tape | |
| ●Dolby NR B • C●NR off | +6 |
For additional precision of the recording level adjustment
Press the meter-range selector to display -7 to +8 of the input level meter. (The level will be displayed in 1 dB increments.)
9 balance
Adjust the left/right volume balance.
10 Stop the play being done so as to adjust the recording level, and begin playing the sound source once again.
11 play
Press the playback button.
(The playback indicator will illuminate steadily, and the recording will begin.)
■ To temporarily stop recording
pause Press the pause button.
(The playback indicator will begin flashing.)
To resume recording, press the playback button.
■ To stop recording
stop Press the stop button.
To monitor a recording
The monitor switch can be used while the recording is in progress to monitor playback sound (to check the recording condition), if this unit is connected to the amplifier that has the tape monitor switch or recording selector.
Be sure to set the monitor switch on the amplifier to the "tape" setting. (The tape sounds cannot be monitored at the "source" setting.)

The sound being monitored (source sound or recorded sound) can be selected by pressing this button; the selected sound changes ("source" to "tape" to "source", etc.) each time the switch is pressed.
(The corresponding indicator will illuminate.)
■ "source": For sound source (input signals)
■ "tape": For tape sound (output signals)
Recording after "memory stop"
If a recording is started but the timing is incorrect, the tape can be rewound to the start point by pressing the rewind button, where the tape will stop automatically and the recording can be started again.

1 Press the memory-stop button.
(The memory-stop indicator will illuminate.)
2 Press the counter-reset button.
(The counter will be reset to "0000" and the start point will be set.)
3 Follow steps 5 through 11 in "Recording" to begin the recording.
(Refer to page 10.)
4 To begin the recording again from the beginning, press the rewind (◀◀) button.
(The tape will be rewound to the set position where the counter was reset, and the tape will automatically stop.)
5 Begin the recording once again.
(Follow steps 7, 10\~11 in "Recording".)
▶ To cancel the "memory stop" operation, press the memory-stop button once again.
(The memory-stop indicator will be switched OFF.)
Notes:
- The "memory stop" function can be used while either the tape counter or the linear counter is displayed, but a change from one to the other cannot be made during the "memory stop" mode.
- There may be a slight difference (maximum +4 seconds) between the point where the tape counter was reset and the point where the tape actually stops during rewind.
Automatic-record-muting function
By simply pressing the automatic-record-muting button while a recording is being made, a silent (which is necessary for locating the beginning of a tune) can be made.
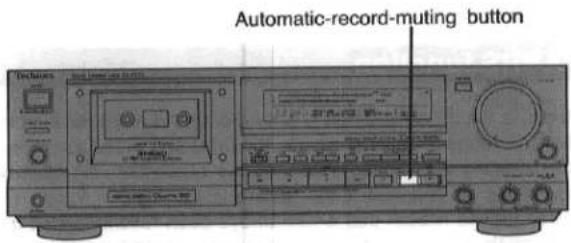
This feature is also convenient for omitting, during recording, unwanted material such as commercial messages, etc.

Recording with High Tone Quality

APRS function
Because the dynamic range of cassette tape is narrower than the dynamic range of a digital source, the recording will be too noisy if the recording level setting is too low, and, conversely, the recorded sound will be distorted if the setting is too high. It was for this reason that it has always been recommended that the signals to be recorded be first (before recording) input to the cassette deck and the recording level then be set while watching the level meter, but, for former conventional level meter equipped with the peak-hold function, it was necessary to re-adjust and input the signals again if the level setting was too high or too low.
This unit, however, is equipped with the APRS: Advanced Precise Recording-level System, which holds and displays the maximum peak of the input signal level, so that once the peak level of the source is held, there is no necessity to re-input the source signals, and the optimum recording level can be set.
- The APRS function can be used only during the recording-standby mode.
1 Prepare for recording as described in steps 1 to 6 of the "Recording" section. (Refer to page 10.)
2 rec Press the record button. (The recording indicator will illuminate and the playback indicator will flash continuously; the unit will be in the recording stand-by mode.)
3 rec level/balance
Set the recording-level control and the recording-balance control to the suitable position for the sound source.
4 APRS
Press the APRS button.
(The APRS indicator will illuminate.)
5 Play the sound source to be recorded, from beginning to end.
[The peak level (the highest level of the input signal) of the sound source will be displayed and held on the input-level meter.]
Input level meter

Note:
The range within which the peak level can be held is -8 dB to +16 dB. Note that the APRS indicator will flash continuously if the peak level of the sound source is input at a level that exceeds the maximum recording level (+16 dB).
If that happens, press the APRS button to cancel the APRS function, and then reset the recording level and set the APRS once again.
6 rec level Using th
rec level
Using the recording-level control, adjust the peak level to the desired setting.
The peak level will move to the right when the recording-level control is turned to the right, and will move to the left when the recording-level control is turned to the left.
- The recording-balance control cannot be used to adjust the peak level.
7 Begin playing the sound source from the beginning once again.
8 play Pres
play
Press the playback button.
(The playback indicator will illuminate steadily, and the recording will begin.)
The APRS indicator will switch OFF, and the indication of the input-level meter will return to the ordinary peak-hold mode.
Recording-level adjustment hints
When recordings are made at the same recording level and by using different brands of tape, even though the type of tape (regular or "normal" tape, for example) is used, when these recordings are played back the listener may notice that the high-frequency sounds are not as distinct on one tape or the other, etc.
The reason that such differences may be noticed is because there are differences of the sensitivity (the magnitude of the recording level) and of the frequency response (particularly in the treble range) between cassette tapes of the various manufacturers of tape.
Although, for recordings and playback in which a noise-reduction system is used, it is the principle for such recordings that the recording and playback processes be at the same recording level, if, as a result of the reason described above, there is a difference of the recording level or of the frequency response, there will result a difference in the processes for recording and for playback, and correct recordings and playback cannot be accomplished.
In order to overcome this problem, this unit includes recording-calibration controls (for compensation of differences of the recording level) and a bias-adjustment control (for compensation of the frequency response) so that the recording level can be set to the most appropriate level during recording.
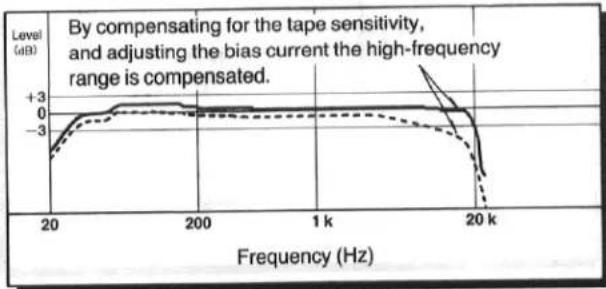
line
| Frequency (Hz) | Level (dB) | | -------------- | ---------- | | 20 | -3 | | 200 | 0 | | 1k | 0 | | 20k | -3 |During recording
1 Make a recording as explained in steps 1 through 11 of "Recording". (Refer to page 10.)
2 While pressing the monitor switch to select "source" (the original sound source) and "tape" (the just-recorded sound), use the recording-calibration controls to adjust so that the magnitude of the sound is the same at both the "source" setting and the "tape" setting.
The recording-calibration adjustment should be made by both the left (L) and right (R) recording-calibration controls.
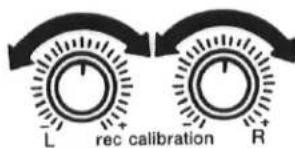
The level meters can be used as a convenient reference when making this adjustment. Also note that the adjustment can be made more precisely by listening through headphones while making the adjustment. Connect the headphones to the headphones jack of this unit.
3
While then pressing the monitor switch to select "source" (the original sound source) and "tape" (the just-recorded sound), use the bias-adjustment control to adjust so that tone quality in the treble range is the same at both the "source" setting and the "tape" setting. When making this adjustment it may be helpful to use as a reference the changes made (by the bias-adjustment control) of the between-station noise heard on the FM band.
Bias becomes shallower; the treble characteristic increases.
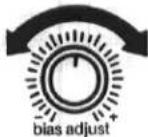
Bias becomes deeper; the treble characteristic decreases.
4
Adjust the magnitude of the sound again by using the recording-calibration controls.
5
Rewind the tape and then begin the recording once again.
Notes:
- The adjustments for the bias does not need to be made again so long as you continue to use the same type and brand of tape that was used when these adjustments are first made.
- When making the recording-calibration adjustment (the adjustment of the difference in level for recording and playback), an even more precise adjustment can be made if your tuner has a built-in oscillator for adjustment of the recording calibration.
Monitor Switch
This unit is of 3-head type, and the record head is independent of the playback head. Also, the sound before recording can be compared with the recorded sound by use of the monitor switch, therefore the state of recording can be easily checked.

flowchart
graph TD
    A["Tape"] --> B["REC HEAD"]
    A --> C["RECAV"]
    A --> D["PLAYBACK HEAD"]
    B --> E["MONITOR SWITCH"]
    C --> E
    D --> F["PLAYBACK AMP"]
    E --> G[""source" POSITION"]
    F --> H[""tape" POSITION"]
    G --> I["LINE INPUT JACK (REC)"]
    H --> J["LINE OUTPUT JACK (Playback)"]
Recording with High Tone Quality (continued)
MPX filter
Because the pilot signals*, etc. included with FM stereo broadcast signals are subjected to Dolby noise-reduction processing in the same way as the music signals when an FM stereo broadcast is being recorded, there is apt to be deterioration of the tone quality, and the noise-reduction effect is reduced.
This unit, however, is provided with an MPX filter that filters out the 19 kHz frequency, which is the frequency of the pilot signal. Note that there is virtually no audible effect upon the tone quality as a result of the use of the MPX filter.

This switch can be used during the recording of an FM stereo broadcast that employs Dolby noise reduction so as to prevent misoperation of the Dolby noise reduction.
This switch, however, should be switched OFF when a sound source other than the FM broadcast is being recorded, such as, for example, a sound source that has a wide frequency range, such as a compact disc, etc.
•Pilot signal
The pilot signal is a signal that is used to separate FM broadcast signals in stereo (left and right channels); this signal is generated on a frequency that is very close to the 19 kHz music band.
Linear Magne-Field deep AA
The recording-equalizer amplifier is an amplifier for supplying (to the head) the current necessary for recording. Usually, loads such as the recording head and bias trap circuitry (circuitry for control of the bias current) would be applied to the output of this amplifier, with the result that complex changes of the current phase occur, causing distortion of the recording signal.
The recording-equalizer amplifier used in this unit, however, is a linear magne-field class AA amplifier that is a combination of class A voltage-control amplifier circuitry and current-drive amplifier circuitry. (See the figure below.) As a result, a current flow that is equivalent to the current flowing in the pure resistance of the current-drive amplifier can be supplied to the recording head. Consequently, a magnetic field that corresponds to the input signals is produced at the head and is recorded on the tape, which means that recorded sounds are faithful to the original sound source, without fluctuations of the current phase.

Timer Recording/Playback
If an audio timer (not included) is connected to this unit, recording of a radio broadcast, or tape playback, will automatically begin at the preset time.
Timer recording or playback is also possible by using a tuner with timer.
Connect the AC power cord of this unit to the power source outlet of the timer. (See the operating instructions of the timer for detailed information.)
Timer recording
1 Prepare for recording.
Follow steps 1 through 9 of "Recording" on page 10. After adjusting the recording level, press the stop button.
2 Set the timer to the desired recording-start time.
(Power "standby ⏻ /on" switch will be "standby ⏻" position.)
3 Set the timer switch to the "rec" position.
(At the set time, the power "standby ⏻/on" switch will come on and the broadcast will be recorded.)
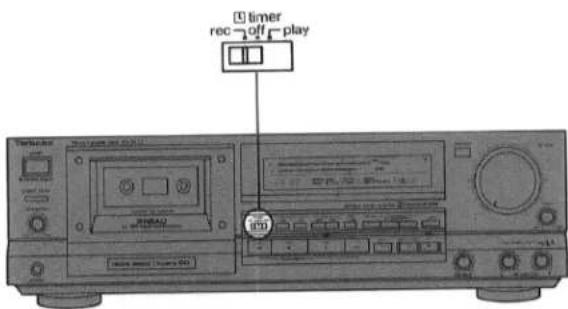
■ After setting the timer
Check to be sure that the power "standby ⏻/on" switch is set to the "on" position.
Timer playback
1 Rewind the tape to the position from which you want playback to begin.
(Refer to pages 6–8.)
2 Set the timer to the desired playback-start time.
(Power "standby ⏻ /on" switch will be "standby ⏻" position.)
3 Set the timer switch to the "play" position.
(At the set time, power "standby ⏻ /on" switch will come on and the playback will begin.)

■ After setting the timer
Check to be sure that the power "standby ⏻/on" switch is set to the "on" position.
After Recording
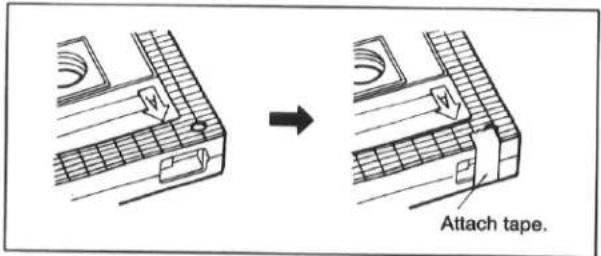
To prevent erasure of recorded sounds
Remove the erase-prevention tabs (thus preventing recording).

■ To re-record on a protected cassette
Cover the slot with adhesive tape.
To erase recorded sounds
When new recordings are made on a recorded tape, all sounds recorded on that portion of the tape are automatically erased. To erase a tape without making a new recording, follow the steps below.
1 Insert the recorded cassette into the cassette holder of tape deck.
2 Set the recording-level control to "0".
3 Press the Dolby noise-reduction button corresponding to the Dolby noise-reduction indicator that is illuminated. (This indicator will then switch OFF.)
4 Press the record button.
5 Press the playback button.
About Cassette Tapes
Avoid the following types of tapes
- 120-minute (or longer) tapes
Because this tape is very thin, it might stretch during use, become tangled with rotating parts in this unit, and/or tape movement might not be stable.
-Fe-Cr tape (TYPE III)
The high range will be emphasized and a flat frequency response characteristic cannot be obtained.
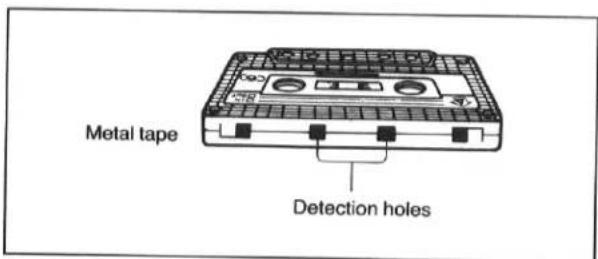
•Metal tape without detection holes in the cassette
Recordings will be very distorted. (There is no playback problem, however.)
Notes about the handling of cassettes
If the tape in the cassette is loose, the tape can easily break during use or otherwise be damaged.
Never touch the tape itself, or attempt to pull it out of the cassette.
Use a pencil or similar object to take up the slack.

natural_image
Illustration of a cassette tape with a knob and eraser (no text or symbols)Avoid tape storage in the following places
Tape can be damaged if it is stored in places such as described below.
- Where the temperature is high (95°F/35°C or higher) or where the humidity is high (80% or higher).
- Where there is a strong magnetic field (near a speaker, on top of a TV, etc.).
•In direct sunlight.
Maintenance
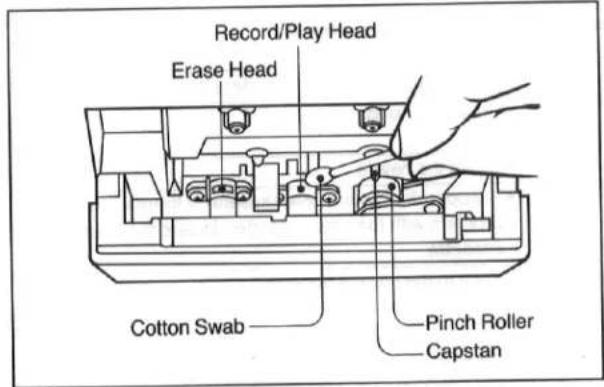
Head care
To assure good sound quality for recording and playback, be sure to clean the heads after approximately every 10 hours of use.
1) Press the open/close button.
2) Press the power "standby ⏻ /on" switch to turn the unit off.
3) Clean the heads, pinch roller and the capstan shaft with a cotton swab (or with a soft, lint-free cloth) slightly moistened with alcohol.
Do not use any solution other than alcohol for head cleaning.
Head demagnetization
In order to maintain good sound quality during recording and playback, it is recommended that the heads should be demagnetized if distortion or poor sound quality persist after cleaning the heads.
If the heads become magnetized, they could create noise in recordings, loss of high-frequency response, or erasure of valuable recordings. Several types of head demagnetizers are available and may be purchased at local electronics supply stores. Follow the instructions that are supplied with the device.
- Do not bring any type of metal objects or tools such as magnetic screwdrivers in contact with the head assembly.
Maintenance of external surfaces
To clean this unit, use a soft, dry cloth.
For very dirty surfaces, dip a soft cloth in a weak soap-and-water solution and wring well. After cleaning, wipe with a soft, dry cloth. Never use alcohol, paint thinner, benzine, or a chemically treated cloth to clean this unit.
Such chemicals may damage the unit's finish.
Technical Specifications
■ CASSETTE DECK SECTION
| Deck system | Stereo cassette deck |
| Track system | 4-track, 2-channel |
| Heads | |
| Record | Permalloy (Combination) |
| Playback | Permalloy (Combination) |
| Erasure | Double-gap ferrite |
| Motors | |
| Capstan drive | Quartz DD motor |
| Reel table drive | DC motor |
| Cassette holder open/close | DC motor |
| Recording system | AC bias |
| Bias frequency | 80 kHz |
| Erasing system | AC erase |
| Tape speed | 4.8 cm/sec. (17/8 ips) |
| Frequency response | |
| NORMAL | 20 Hz~19 kHz |
| 20 Hz~18 kHz (DIN) | |
| CrO2 | 20 Hz~20 kHz |
| 20 Hz~19 kHz (DIN) | |
| METAL | 20 Hz~21 kHz |
| 20 Hz~20 kHz (DIN) | |
| S/N (signal level=max recording level, CrO2 type tape) | |
| Dolby C NR on | 74 dB (CCIR) |
| Dolby B NR on | 66 dB (CCIR) |
| Dolby NR off | 57 dB (A weighted) |
| Wow and flutter | 0.05% (WRMS) ±0.14% (DIN) |
| Fast forward and rewind times |
| Approx. 90 seconds with C-60 cassette tape |
| Input sensitivity and impedance | |
| LINE | 60 mV/47 kΩ |
| Output voltage and impedance | |
| LINE | 400 mV/800Ω |
| HEADPHONES | 125 mV/8Ω(8Ω~600Ω) |
| GENERAL | |
| Power consumption | 21 W |
| Power supply | AC 50 Hz/60 Hz, 240 V |
| Dimensions (W×H×D) | 430×135×290 mm(16 ^15/_16 "×5 ^1/_8 "×11 ^13/_32 ") |
| Weight | 5.3 kg (11.7 lb.) |
Note:
Specifications are subject to change without notice.
Weight and dimensions are approximate.
Troubleshooting Guide
Before requesting service for this unit, check the chart below for a possible cause of the problem you are experiencing. Some simple checks or a minor adjustment on your part may eliminate the problem and restore proper operation. If you are in doubt about some of the check points, or if the remedies indicated in the chart do not solve the problem, refer to the directory of Authorized Service Centers (enclosed with this unit) to locate a convenient service center, or consult your Technics dealer for instructions.
| Problem | Probable cause(s) | Suggested remedy |
| While using the tape deck | ||
| Tape moves but no sound is heard. | The volume control of the amplifier is set to its minimum position. | ●Adjust the volume control to the desired level. |
| The input selector of the amplifier is not set the “tape” position. | ●Set to the “tape” positon. | |
| Distorted sound. | The recording level is too high. | ●Select the appropriate recording level. |
| Previously recorded sound has not been erased. | Erase head is dirty. | ●Clean the head. |
| Sound output is hoarse or unsteady. | Heads are dirty. | ●Clean the heads. |
| Tape is damaged. | ●Try operation with a new cassette; if there is no problem with the new cassette, discard the damaged cassette. | |
| Poor sound quality (especially in the high treble and low bass ranges). | The correct Dolby noise-reduction button is not set. | ●Set it to the correct position. |
| Sound is low, poor tone, intermittent sound, noise. | Heads, capstan and/or pinch roller are dirty or tape is damaged. | ●Clean the heads, capstan and/or pinch roller, or try a new cassette. |
| Recording is not possible. | The recording level control is at the “0” position. | ●Select the appropriate recording level. |
MEMO
Matsushita Electric Industrial Co., Ltd.
Central P.O. Box 288, Osaka 530-91, Japan
- Dear Stereo Fan
- Contents
- Suggestions for Safety
- ■ Use a standard AC wall outlet
- ■ Grasp the plug when disconnecting the power supply cord
- ■ Place the unit where it will be well ventilated Place this unit at least 10 cm (4") away from wall surfaces, etc.
- ■ Avoid places such as the following:
- ■ Be sure to place the unit on a flat, level surface If the surface is inclined, a malfunction may result.
- ■ If water is spilled on the unit
- ■ Avoid spray-type insecticides
- ■ Never use alcohol or paint thinner
- ■ Disconnect the power supply cord if the unit will not be used for a long time
- ■ If trouble occurs
- For United Kingdom
- Important
- Accessories
- Connections
- AC power supply cord (2)
- Placements hints
- Note:
- Front Panel Controls and Functions
- Display section
- E Monitor indicators (source/tape)
- F APRS indicator (APRS)
- G Multiplex filter indicator (MPX)
- H Dolby noise-reduction indicators (B, C)
- Timer switch (☐ timer)
- Counter buttons (counter reset/mode)
- Memory-mode buttons (memory repeat/stop)
- Meter-range selector (meter range)
- Multiplex filter switch (MPX filter)
- Dolby noise-reduction buttons (noise reduction)
- APRS button (APRS)
- Record button and indicator (rec/●)
- Automatic-record-muting button (auto rec mute/☐)
- Pause button (pause/II)
- Rewind/fast-forward/search buttons (rew/◄◄, ff/►►)
- Playback button and indicator (play/▶)
- Stop button (stop/■)
- Playback
- To listen to a Dolby NR recorded tape
- About the Dolby noise-reduction recording/ playback system
- ■ Dolby B-type noise-reduction system
- ■ Dolby C-type noise-reduction system
- ■ Dolby HX PRO headroom extension system
- Tape/Linear counter display
- ■ Tape-counter display:
- ■ Linear-counter display:
- Notes:
- To locate and play a certain tune
- ■ To find a tune's beginning
- ■ To fast-forward or rewind the tape
- Playback after "memory stop"
- To set the playback start point
- To begin playback from the set point
- Notes:-
- A←→B repeat play ("memory repeat")
- To listen through headphones
- Automatic-tape-select function
- Recording
- For additional precision of the recording level adjustment
- To monitor a recording
- Recording after "memory stop"
- Automatic-record-muting function
- Recording with High Tone Quality
- APRS function
- Recording-level adjustment hints
- Monitor Switch
- Recording with High Tone Quality (continued)
- MPX filter
- •Pilot signal
- Linear Magne-Field deep AA
- Timer Recording/Playback
- Timer recording
- ■ After setting the timer
- Timer playback
- After Recording
- To prevent erasure of recorded sounds
- ■ To re-record on a protected cassette
- To erase recorded sounds
- About Cassette Tapes
- Avoid the following types of tapes
- Notes about the handling of cassettes
- Avoid tape storage in the following places
- Maintenance
- Head care
- Head demagnetization
- Maintenance of external surfaces
- Technical Specifications
- Troubleshooting Guide
- MEMO
Brand : TECHNICS
Model : RS-B755
Category : Cassette player