
BQ9 B2L - Fridge BAUKNECHT - Free user manual and instructions
Find the device manual for free BQ9 B2L BAUKNECHT in PDF.


| Product Type | French Door Bottom Mount Refrigerator |
| Brand | Bauknecht |
| Model | BQ9 B2L |
| Power Supply | 220–240 V, 10 A, 50–60 Hz |
| Climate Class | SN (10–32°C), N (16–32°C), ST (16–38°C), T (16–43°C) |
| Refrigerant | R600a (Isobutane) |
| Defrost | Automatic (refrigerator, freezer, and multi-temperature sections) |
| Ice Maker | Manual ice tray with ejector knob |
| Lighting | LED (non-replaceable by user; contact service if defective) |
| Control Panel | Touch-activated on left refrigerator door; includes temperature, mode, and lock buttons |
| Functions | Super Cool (2 hours), Super Freeze (50 hours auto-off), Holiday Mode (refrigerator at 12°C), Demo Mode (cooling off), Key Lock, Sound ON/OFF, Door Open Alarm |
| Shelves | Adjustable glass shelves; four total (including middle and bottom) |
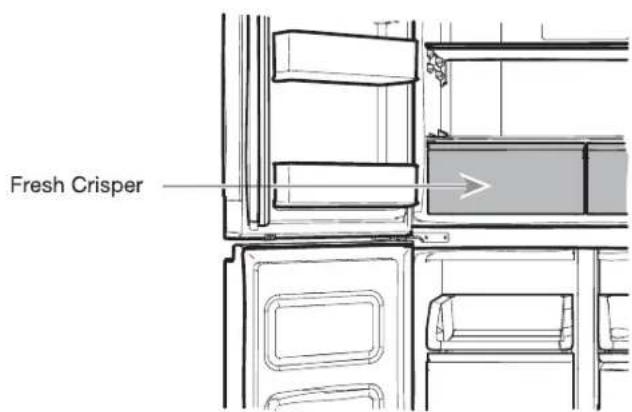
| Crisper | Fresh Crisper drawer for fruits and vegetables |
| Freezer Compartments | Super Freezer drawer and Multi Temperature drawer (settings: Traditional -18°C, Mild -12°C, Soft -7°C, Coolest -20°C) |
| Door Features | Left door with hinged seal; both doors open separately or together |
| Door Alarm | Sounds after door open for 2 minutes; repeats every 5 minutes; can be muted |
| Key Lock | Press and hold Lock button for 3 seconds to lock/unlock control panel |
| Holiday Mode | Sets refrigerator compartment to 12°C; press and hold Mode button for 3 seconds to activate/deactivate |
| Demo Mode | Turns off cooling; press and hold Sound + Lock simultaneously for 3 seconds |
| Cleaning | Use soft cloth and mild detergent; avoid abrasive cleaners, ammonia, bleach, or flammable fluids |
| Safety | Child safety warnings; requires earthed outlet; do not use extension cords; flammable refrigerant (R600a); keep ventilation clear |
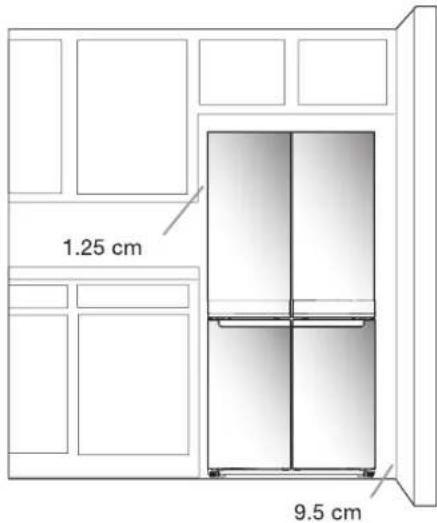
| Installation | Minimum door opening 838 mm (33"); leave 1.25 cm (0.5") sides/top, 5 cm (2") rear, 9.5 cm (3.75") side for door swing |
Frequently Asked Questions - BQ9 B2L BAUKNECHT
User questions about BQ9 B2L BAUKNECHT
0 question about this device. Answer the ones you know or ask your own.
Ask a new question about this device
Download the instructions for your Fridge in PDF format for free! Find your manual BQ9 B2L - BAUKNECHT and take your electronic device back in hand. On this page are published all the documents necessary for the use of your device. BQ9 B2L by BAUKNECHT.
USER MANUAL BQ9 B2L BAUKNECHT
natural_image
Pure technical line drawing of a four-panel cabinet or enclosure structure without any text, numbers, or symbolsEnglish REFRIGERATOR USER INSTRUCTIONS....3
Deutsch KÜHLSCHRANK BENUTZERHANDBUCH....26
Dansk BRUGERVEJLEDNING TIL K∅LE-/FRYSESKABET 50
Bauknecht
FRENCH DOOR BOTTOM MOUNT REFRIGERATOR USE AND CARE GUIDE
Table of Contents
FRENCH DOOR BOTTOM MOUNT REFRIGERATOR ....3
USE AND CARE GUIDE....3
REFRIGERATOR SAFETY......4
Proper Disposal of Your Old Refrigerator 7
INSTALLATION INSTRUCTIONS......8
Getting Started....8
Unpack the Refrigerator 8
Location Requirements....9
Electrical Requirements....9
Remove and Replace Refrigerator Doors ....10
Remove and Replace Freezer/Multi Temperature Door....12
Refrigerator Levelling....13
PARTS AND FEATURES ....14
Using the Controls 15
Lighting the Refrigerator....16
REFRIGERATOR USE 17
Opening and Closing Doors 17
SHELVES, BINS AND DRAWERS....18
Freezer Storage Compartments....19
Audio Reference 19
Accessories....19
Assistance or Service 19
REFRIGERATOR CARE ....20
Cleaning 20
Lights....21
Holiday and Moving Care 21
TROUBLESHOOTING 22
REFRIGERATOR SAFETY
Your safety and the safety of others are very important.
We have provided many important safety messages in this manual and on your appliance. Always read and obey all safety messages.
This is the safety alert symbol.
This symbol alerts you to potential hazards that can kill or hurt you and others.
All safety messages will follow the safety alert symbol and either the word "DANGER" or "WARNING."
These words mean:
! DANGER
You can be killed or seriously injured if you don't immediately follow instructions.
WARNING
You can be killed or seriously injured if you don't follow instructions.
All safety messages will tell you what the potential hazard is, tell you how to reduce the chance of injury, and tell you what can happen if the instructions are not followed.
SAFETY INSTRUCTIONS
Before using the appliance, read these safety instructions. Keep them nearby for future reference. These instructions and the appliance itself provide important safety warnings, to be observed at all times. The manufacturer declines any liability for failure to observe these safety instructions, for inappropriate use of the appliance or incorrect setting of controls.
⚠️Very young children (0-3 years) should be kept away from the appliance. Young children (3-8 years) should be kept away from the appliance unless continuously supervised. Children from 8 years old and above and persons with reduced physical, sensory or mental capabilities or lack of experience and knowledge can use this appliance only if they are supervised or have been given instructions on safe use and understand the hazards involved. Children must not play with the appliance. Cleaning and user maintenance must not be carried out by children without supervision.
PERMITTED USE
⚠️ CAUTION: The appliance is not intended to be operated by means of an external switching device, such as a timer, or separate remote controlled system.
This appliance is intended to be used in household and similar applications such as: staff kitchen areas in shops, offices and other working environments; farm houses; by clients in hotels, motels, bed & breakfast and other residential environments.
This appliance is not for professional use. Do not use the appliance outdoors.
The appliance is designed for operation in places where the ambient temperature comes within the following ranges, according to the climatic class given on the rating plate. The appliance may not work properly if it is left for a long time at a temperature outside the specified range.
Climatic Class Amb. T. (°C)
SN: From 10 to 32 °C; N: From 16 to 32 °C
ST: From 16 to 38 °C; T: From 16 to 43 °C
This appliance does not contain CFCs. The refrigerant circuit contains R600a (HC). Appliances with Isobutane (R600a): isobutane is a natural gas without environmental impact, but is flammable. Therefore, make sure the refrigerant circuit pipes are not damaged, especially when emptying the refrigerant circuit.
⚠ WARNING: Do not damage the appliance refrigerant circuit pipes.
⚠ WARNING: Keep ventilation openings, in the appliance enclosure or in the built-in structure, clear of obstruction.
IMPORTANT TO BE READ AND OBSERVED
⚠ WARNING: Do not use mechanical, electric or chemical means other than those recommended by the Manufacturer to speed up the defrost process.
⚠ WARNING: Do not use or place electrical devices inside the appliance compartments if they are not of the type expressly authorised by the Manufacturer.
⚠ WARNING: Ice makers and/or water dispensers not directly connected to the water supply must be filled with potable water only.
⚠ WARNING: Automatic ice-makers and/or water dispensers must be connected to a water supply that delivers potable water only, with mains water pressure between 0.17 and 0.81 MPa (1.7 and 8.1 bar).
Do not store explosive substances such as aerosol cans with a flammable propellant in this appliance.
Do not swallow the contents (non-toxic) of the ice packs (provided with some models). Do not eat ice cubes or ice lollies immediately after taking them out of the freezer since they may cause cold burns.
⚠ For products designed to use an air filter inside an accessible fan cover, the filter must always be in position when the refrigerator is in function.
Do not store glass containers with liquids in the freezer compartment since they may break. Do not obstruct the fan (if included) with food items. After placing the food check that the door of the compartments closes properly, especially the freezer door.
⚠ Damaged gaskets must be replaced as soon as possible.
Use the refrigerator compartment only for storing fresh food and the freezer compartment only for storing frozen food, freezing fresh food and making ice cubes.
Avoid storing unwrapped food in direct contact with internal surfaces of the refrigerator or freezer compartments. Appliances could have special compartments (Fresh Food Compartment, Zero Degree Box, etc.). Unless specified in the specific booklet of product, they can be removed, maintaining equivalent performances.
INSTALLATION
The appliance must be handled and installed by two or more persons - risk of injury. Use protective gloves to unpack and install - risk of cuts.
⚠ Installation, including water supply (if any) and electrical connections, and repairs must be carried out by a qualified technician. Do not repair or replace any part of the appliance unless specifically stated in the user manual. Keep children away from the installation site.
After unpacking the appliance, make sure that it has not been damaged during transport. In the event of problems, contact the dealer or your nearest After-sales Service. Once installed, packaging waste (plastic, styrofoam parts etc.) must be stored out of reach of children - risk of suffocation. The appliance must be disconnected from the power supply before any installation operation - risk of electric shock. During installation, make sure the appliance does not damage the power cable - risk of fire or electric shock. Only activate the appliance when the installation has been completed.
⚠ Be careful not to damage the floors (e.g. parquet) when moving the appliance. Install the appliance on a floor or support strong enough to take its weight and in a place suitable for its size and use. Make sure the appliance is not near a heat source and that the four feet are stable and resting on the floor, adjusting them as required, and check that the appliance is perfectly level using a spirit level. Wait at least two hours before switching the appliance on, to ensure that the refrigerant circuit is fully efficient.
To guarantee adequate ventilation, leave a space on both sides and above the appliance. The distance between the rear of the appliance and the wall behind the appliance should be 50mm, to avoid access to hot surfaces. A reduction of this space will increase the Energy consumption of product.
⚠ WARNING: To avoid a hazard due to instability, positioning or fixing of the appliance must be done in accordance with the manufacturer instructions. It is forbidden to place the refrigerator in such way that the metal hose of gas stove, metal gas or water pipes, or electrical wires are in contact with the refrigerator back wall (condenser coil).
⚠️ If it is necessary to replace the doors, please contact the Technical Assistance Center.
ELECTRICAL WARNINGS
⚠ It must be possible to disconnect the appliance from the power supply by unplugging it if plug is accessible, or by a multi-pole switch installed upstream of the socket in accordance with the wiring rules and the appliance must be earthed in conformity with national electrical safety standards.
⚠ Do not use extension leads, multiple sockets or adapters. The electrical components must not be accessible to the user after installation. Do not use the appliance when you are wet or barefoot. Do not operate this appliance if it has a damaged power cable or plug, if it is not working properly, or if it has been damaged or dropped.
⚠ If the supply cord is damaged, it must be replaced with an identical one by the manufacturer, its service agent or similarly qualified persons in order to avoid a hazard - risk of electric shock.
⚠ WARNING: When positioning the appliance, ensure the supply cord is not trapped or damaged.
⚠ WARNING: Do not locate multiple portable socket-outlets or portable power supplies at the rear of the appliance.
CLEANING AND MAINTENANCE
⚠ WARNING: Ensure that the appliance is switched off and disconnected from the power supply before performing any maintenance operation; never use steam cleaning equipment - risk of electric shock.
⚠ Do not use abrasive or harsh cleaners such as window sprays, scouring cleansers, flammable fluids, cleaning waxes, concentrated detergents, bleaches or cleansers containing petroleum products on plastic parts, interior and door liners or gaskets. Do not use paper towels, scouring pads, or other harsh cleaning tools.
DISPOSAL OF PACKAGING MATERIALS
The packaging material is 100% recyclable and is marked with the recycle symbol ⚙.
The various parts of the packaging must therefore be disposed of responsibly and in full compliance with local authority regulations governing waste disposal.
DISPOSAL OF HOUSEHOLD APPLIANCES
This appliance is manufactured with recyclable or reusable materials. Dispose of it in accordance with local waste disposal regulations. For further information on the treatment, recovery and recycling of household electrical appliances, contact your local authority, the collection service for household waste or the store where you purchased the appliance. This appliance is marked in compliance with European Directive 2012/19/EU, Waste Electrical and Electronic Equipment (WEEE). By ensuring this product is disposed of correctly, you will help prevent negative consequences for the environment and human health.
The symbol on the product or on the accompanying documentation indicates that it should not be treated as domestic waste but must be taken to an appropriate collection center for the recycling of electrical and electronic equipment.
ENERGY SAVING TIPS
Install the appliance in a dry, well ventilated room far away from any heat source (eg. radiator, cooker, etc.) and in a place not exposed directly to the sun. If required, use an insulating plate.
To guarantee adequate ventilation follow installation instructions. Insufficient ventilation at the back of the product increases energy consumption and decreases cooling efficiency.
Frequent door opening might cause an increase in Energy Consumption. The internal temperature of the appliance and the Energy Consumption may be affected also by the ambient temperature, as well as location of the appliance. Temperature setting should take into consideration these factors.
Reduce door opening to a minimum.
When thawing frozen food, place in the refrigerator. The low temperature of the frozen products cools the food in the refrigerator. Allow warm food and drinks to cool down before placing in the appliance.
Positioning of the shelves in the refrigerator has no impact on the efficient usage of energy. Food should be placed on the shelves in such way to ensure proper air circulation (food should not touch each other and distance between food and rear wall should be kept).
You can increase storage capacity of frozen food by removing baskets and, if present, Stop Frost shelf.
Do not worry about noises coming from the compressor which are described as normal noises in this product's Quick Guide.
Proper Disposal of Your Old Refrigerator
WARNING
Suffocation Hazard
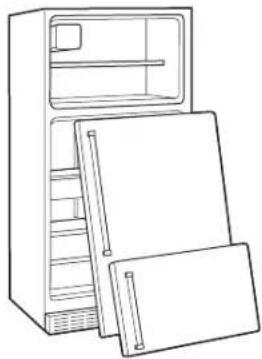
Remove doors from your old refrigerator.
Failure to do so can result in death or brain damage.
IMPORTANT: Child entrapment and suffocation are not problems of the past. Scrapped or abandoned refrigerators are still dangerous—even if they will sit for "just a few days." If you are getting rid of your old refrigerator, please follow these instructions to help avoid accidents.
Before You Throw Away Your Old Refrigerator or Freezer:
■ Take off the doors.
■ Leave the shelves in place so that children cannot easily climb inside.
natural_image
Line drawing of a refrigerator with open doors and shelves (no text or symbols)Important information to know about disposal of refrigerants:
Dispose of refrigerator in accordance with Federal and Local regulations. Refrigerants must be evacuated by a licensed, refrigerant technician in accordance with established procedures.
INSTALLATION INSTRUCTIONS
Getting Started
INSTALLATION CHECKLIST
√ Electrical Power
WARNING
Electrical Shock Hazard
Plug into a grounded (earthed) outlet.
Do not remove ground prong.
Do not use an adapter.
Do not use an extension cord.
Failure to follow these instructions can result in death, fire, or electrical shock.
■ Plug refrigerator into a earthed socket.
√ Doors
If doors need to be removed during installation, see the "Remove and Replace Refrigerator Doors" and "Remove and Replace Freezer Door Fronts" sections.
IMPORTANT: This operation has to be performed by qualified person.
■ Doors seal completely.
■ Refrigerator is level. Adjust leveling feet so they are snug against the floor.
■ Doors are even across the top. (Use door alignment feature if necessary.)
√ Final Checks
■ Remove all shipping material.
■ Set temperature controls to the recommended setting.
■ Save instructions and other literature.
In order to receive a more complete assistance, please register your product on http://www.bauknecht.eu/register.
Unpack the Refrigerator
WARNING
Excessive Weight Hazard
Use two or more people to move and install refrigerator.
Failure to do so can result in back or other injury.
Refrigerator Delivery
A minimum door opening of 838 mm (33") is required. If door opening is 914 mm (36") or less, then removal of doors, drawer and hinges is required.
Cart the refrigerator from the side for all door openings.
When Moving Your Refrigerator:
Your refrigerator is heavy. When moving the refrigerator for cleaning or service, be sure to cover the floor with cardboard or hardboard to avoid floor damage. Always pull the refrigerator straight out when moving it. Do not wiggle or "walk" the refrigerator when trying to move it, as floor damage could occur.
Remove the Packaging
■ Remove tape and glue residues from surfaces before turning on the refrigerator. Rub a small amount of liquid dish detergent over the adhesive with your fingers. Wipe with warm water and dry.
■ Do not use sharp instruments, rubbing alcohol, flammable fluids, or abrasive cleaners to remove tape or glue. These products can damage the surface of your refrigerator.
■ Dispose of/recycle all packaging materials.
Clean Before Using
After you remove all of the packaging materials, clean inside of your refrigerator before using it. See cleaning instructions in the "Refrigerator Care" section.
Important information to know about glass shelves and covers:
Do not clean glass shelves or covers with warm water when they are cold. Shelves and covers may break if exposed to sudden temperature changes or impact, such as bumping. Tempered glass is designed to shatter into many small, pebble-size pieces. This is normal. Glass shelves and covers are heavy. Use both hands when removing them to avoid dropping.
Location Requirements
WARNING
Explosion Hazard
Keep flammable materials and vapors, such as gasoline, away from refrigerator.
Failure to do so can result in death, explosion, or fire.
To ensure proper ventilation for your refrigerator, allow for a 1.25 cm space on each side and at the top. Allow for a 5 cm space behind the refrigerator. If your refrigerator has an ice maker, allow extra space at the back for the water line connections. When installing your refrigerator next to a fixed wall, leave a 9.5 cm minimum space between the refrigerator and wall to allow the door to swing open.
NOTE: This refrigerator is intended for use in a location where the temperature ranges from a minimum of 10^ C to a maximum of 43^ C. The preferred room temperature range for optimum performance, which reduces electricity usage and provides superior cooling, is between 15^ C and 32^ C. It is recommended that you do not install the refrigerator near a heat source, such as an oven or radiator.
text_image
1.25 cm 9.5 cmElectrical Requirements
WARNING
Electrical Shock Hazard
Plug into a grounded (earthed) outlet.
Do not remove ground prong.
Do not use an adapter.
Do not use an extension cord.
Failure to follow these instructions can result in death, fire, or electrical shock.
IMPORTANT: Installation and the electrical connection must be carried out by a qualified technician according to the manufacturer's instructions and in compliance with the local safety regulations.
■ The refrigerator is designed to operate on a separate 220-240 V, 10 A, 50-60 Hz circuit.
■ Make sure the voltage specified on the rating plate corresponds to that of your home.
It must be possible to disconnect the appliance from the power supply by unplugging it or by means of a main two pole switch installed upstream of the socket.
If the supply cord is damaged, it must be replaced by the manufacturer, its service agent or similarly qualified persons in order to avoid a hazard.
Before you move your refrigerator into its final location, it is important to make sure you have the proper electrical connection:
Recommended Earthing Method
220-240 V 50 Hz, 220 V 60 Hz, or 230/240 V 50 Hz AC only 10 A fused and earthed electrical supply is required.
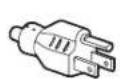

Type B
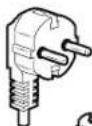

Type E and F
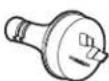

Type I
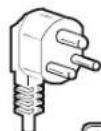

Type M
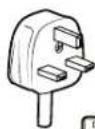

Type G
For Australia and New Zealand:
Your new appliance has been especially manufactured to meet all Australian Standards and Conditions.
Some notations in the installation instructions may refer to electrical requirements in other countries, so we draw your particular attention to these specific notes.
Your appliance needs to be plugged into a 230/240 V, 50 Hz AC only 10 A earthed socket.
Remove and Replace Refrigerator Doors
This operation has to be performed by qualified person.
NOTE: Measure the width of your door opening to see whether or not you need to remove refrigerator doors to move refrigerator into your home. If door removal is necessary, see the following instructions.
IMPORTANT: If refrigerator was previously installed and you are moving it out of the home, turn refrigerator control off before you begin removing the doors. Unplug refrigerator or disconnect power. Remove food and adjustable door or utility bins from doors.
Gather required tools and read all instructions before removing doors.
TOOLS NEEDED: 6 mm socket wrench, 5 mm socket wrench and a #2 Phillips screwdriver.
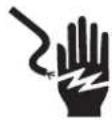
WARNING
Electrical Shock Hazard
Disconnect power before removing doors.
Failure to do so can result in death or electrical shock.
Top Left Hinge Cover
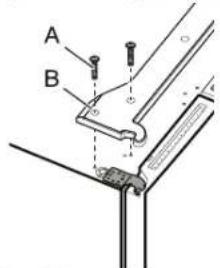
text_image
A BA. Top Hinge Cover screws B. Top Hinge Cover
Top Left Hinge
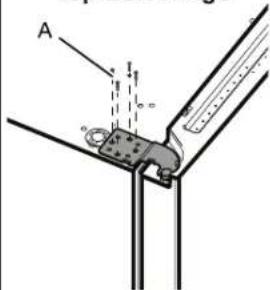
text_image
AA. 5 mm socket screws
Middle Left Hinge
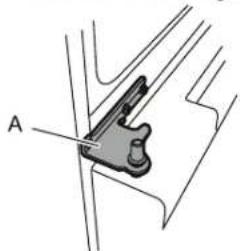
natural_image
Mechanical component diagram showing a lever mechanism with labeled point A (no text or symbols beyond label)A. Hinge
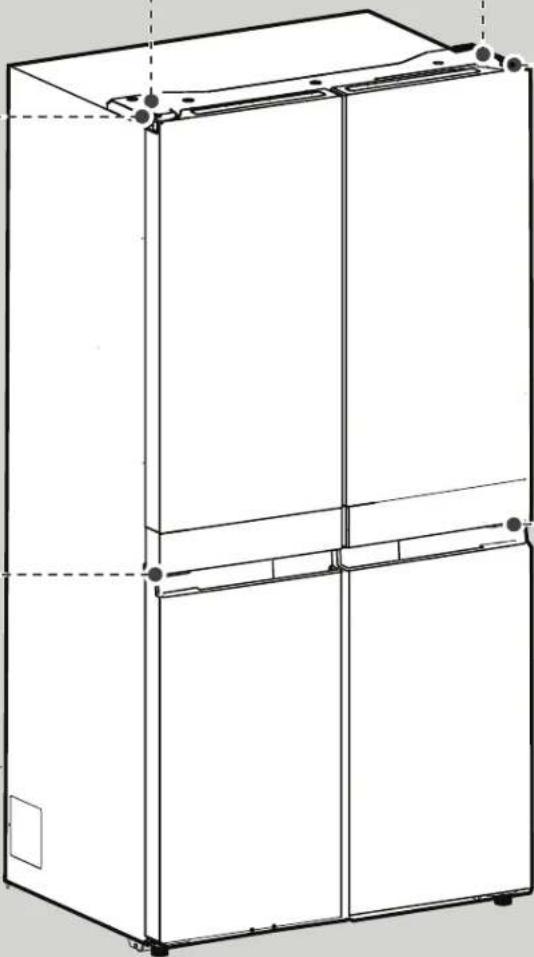
natural_image
Line drawing of a three-tier refrigerator cabinet (no text or labels)Top Right Hinge Cover
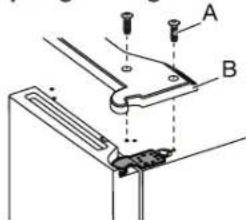
text_image
Technical diagram showing mechanical assembly with labeled parts A and B, likely for assembly or maintenance instructions.A. Top Hinge Cover screws
B. Top Hinge Cover
Top Right Hinge
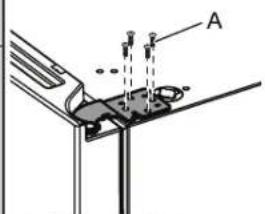
text_image
AA. 5 mm socket screws
Middle Right Hinge
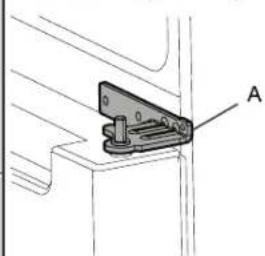
natural_image
Technical line drawing of a mechanical bracket or clamp assembly with labeled component A (no text or symbols beyond label)A. Hinge
WARNING
Excessive Weight Hazard
Use two or more people to lift the refrigerator door.
Failure to do so can result in back or other injury.
Remove Refrigerator Doors
WARNING
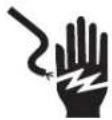
Electrical Shock Hazard
Disconnect power before removing doors.
Failure to do so can result in death or electrical shock.
Remove Right-Hand Door
- Unplug refrigerator or disconnect power.
- Keep refrigerator doors closed until you are ready to lift them free from the cabinet.
NOTE: Provide additional support for refrigerator door while hinges are being removed. Do not depend on door gasket magnets to hold door in place while you are working. - Using a Phillips screwdriver, remove cover from top hinge.
- Using 5 mm socket wrench, remove four screws from top hinge and set aside.
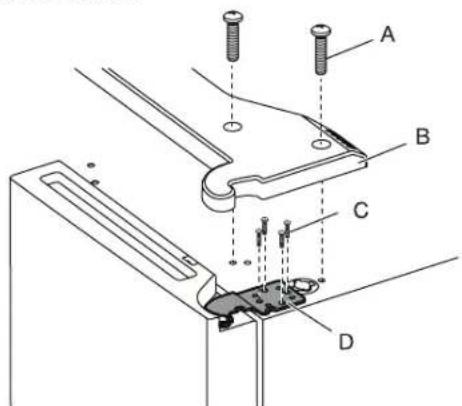
text_image
Technical diagram of a mechanical assembly with labeled parts A, B, C, and DA. Top hinge cover screw
C. 5 mm socket screws
B. Top hinge cover
D. Top hinge
- Lift refrigerator door from middle hinge pin. The top hinge will come away with door.
Remove Left-Hand Door
IMPORTANT: The wiring for the UI run through left-hand door hinge, so they must be disconnected before removing door.
- Using a Phillips screwdriver, remove cover from top hinge.
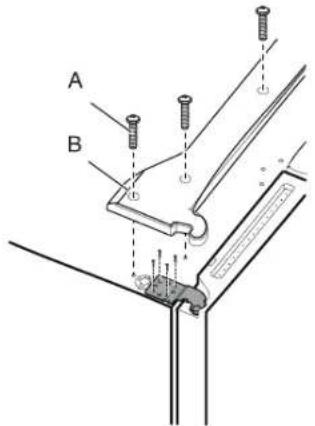
text_image
A BA. Top hinge cover screw
B. Top hinge cover
- Disconnect two wiring plugs located on top of door hinge.
- Grasp each side of wiring plugs. With your left thumb, press down to release catch and pull sections of the plugs apart.
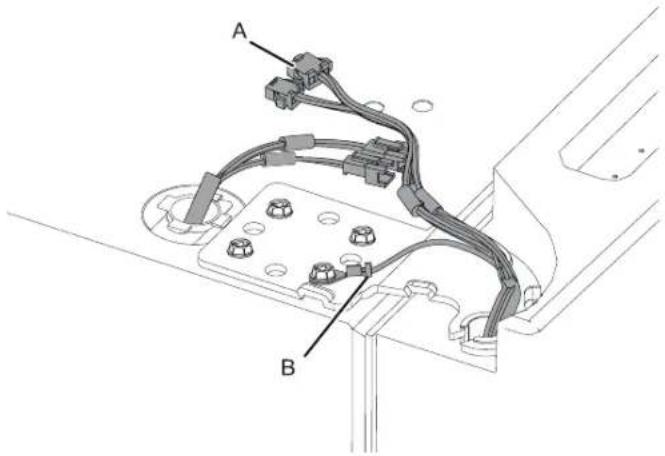
text_image
A BA. Wiring Plug
B. Ground (earth) connector
- Using 5 mm socket wrench, remove four internal screws from top hinge and set aside.
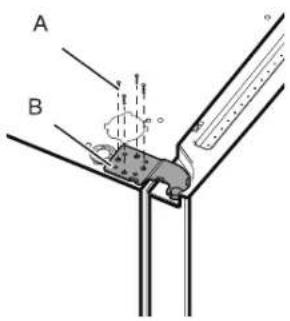
text_image
A BA. 5 mm socket screws
B. Top Hinge
NOTE: Provide additional support for refrigerator door while hinges are being removed. Do not depend on door gasket magnets to hold door in place while you are working.
- Lift refrigerator door from bottom hinge pin. The top hinge will come away with door.
NOTE: It may not be necessary to remove bottom hinges and brake feet assemblies to move refrigerator through a doorway.
■ Only if necessary, use 6 mm socket wrench and #2 Phillips screwdriver to remove middle hinge.
Replace Right-Hand Refrigerator Door
- Set right-hand door onto middle hinge pin.
- Insert top hinge pin into open hole in top of refrigerator door.
- Using four 5 mm socket screws, fasten hinge to cabinet. Do not tighten screws completely.
Replace Left-Hand Refrigerator Door
- Set left-hand door onto middle hinge pin.
- Using four 5 mm socket screws, fasten hinge to cabinet. Do not tighten screws completely.
- Reconnect electrical wiring.
■ Push together two sections of wiring plug.
■ Reconnect earth wire to hinge screw.
Final Steps
- Completely tighten eight 5 mm socket screws.
- Replace top hinge covers.
Remove and Replace Freezer/Multi Temperature Door
- Keep freezer doors closed until you are ready to lift them free from the cabinet.
NOTE: Provide additional support for freezer door while hinges are being removed. Do not depend on door gasket magnets to hold door in place while you are working.
■ Using #2 Phillips screwdriver and 6 mm socket wrench to remove middle hinge from cabinet.
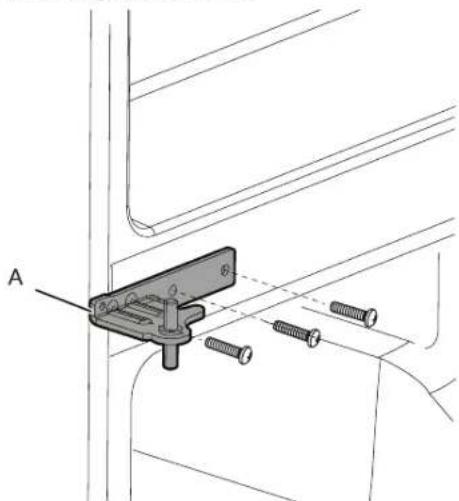
natural_image
Technical line drawing of a mechanical clamp or bracket assembly with screws and a labeled component (no text or symbols present)A. Middle hinge
■ Lift freezer door from bottom hinge pin.
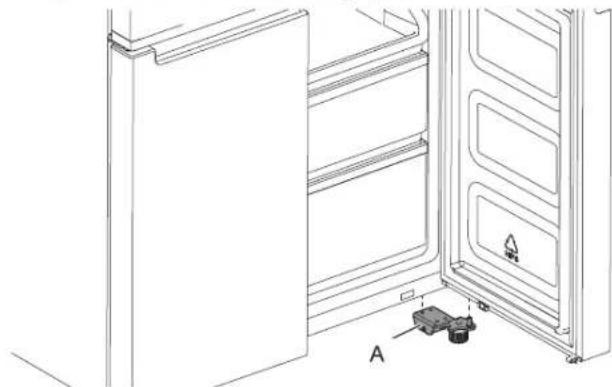
natural_image
Line drawing of a refrigerator interior showing door, front panel, and side panel with labeled component A (no text or symbols beyond labels)A. Bottom hinge
WARNING
Electrical Shock Hazard
Plug into a grounded (earthed) outlet.
Do not remove ground prong.
Do not use an adapter.
Do not use an extension cord.
Failure to follow these instructions can result in death, fire, or electrical shock.
- Plug into an grounded (earthed) socket.
- Return all removable parts and food to drawers.
Refrigerator Levelling
- Move refrigerator to its final location.
- Using hand, rotate brake feet. Turn them counterclockwise until rollers are off floor and both brake feet are snug against the floor. This keeps the refrigerator from rolling forward when opening doors.
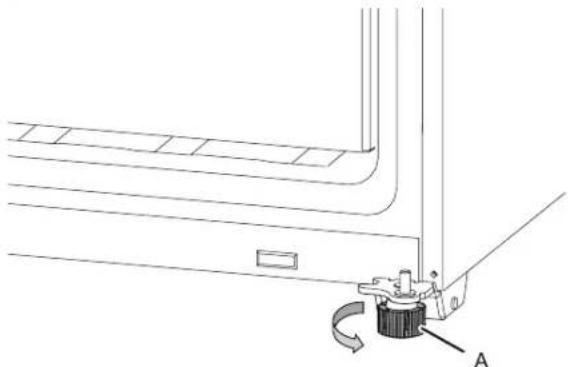
natural_image
Technical line drawing of a mechanical assembly with a knob and curved arrow (no text or symbols)A. Brake feet
IMPORTANT: If you need to make further adjustments involving the brake feet, you must turn both brake feet the same amount to keep the refrigerator level.
- Use a level to make sure refrigerator is level from side to side and front to back.
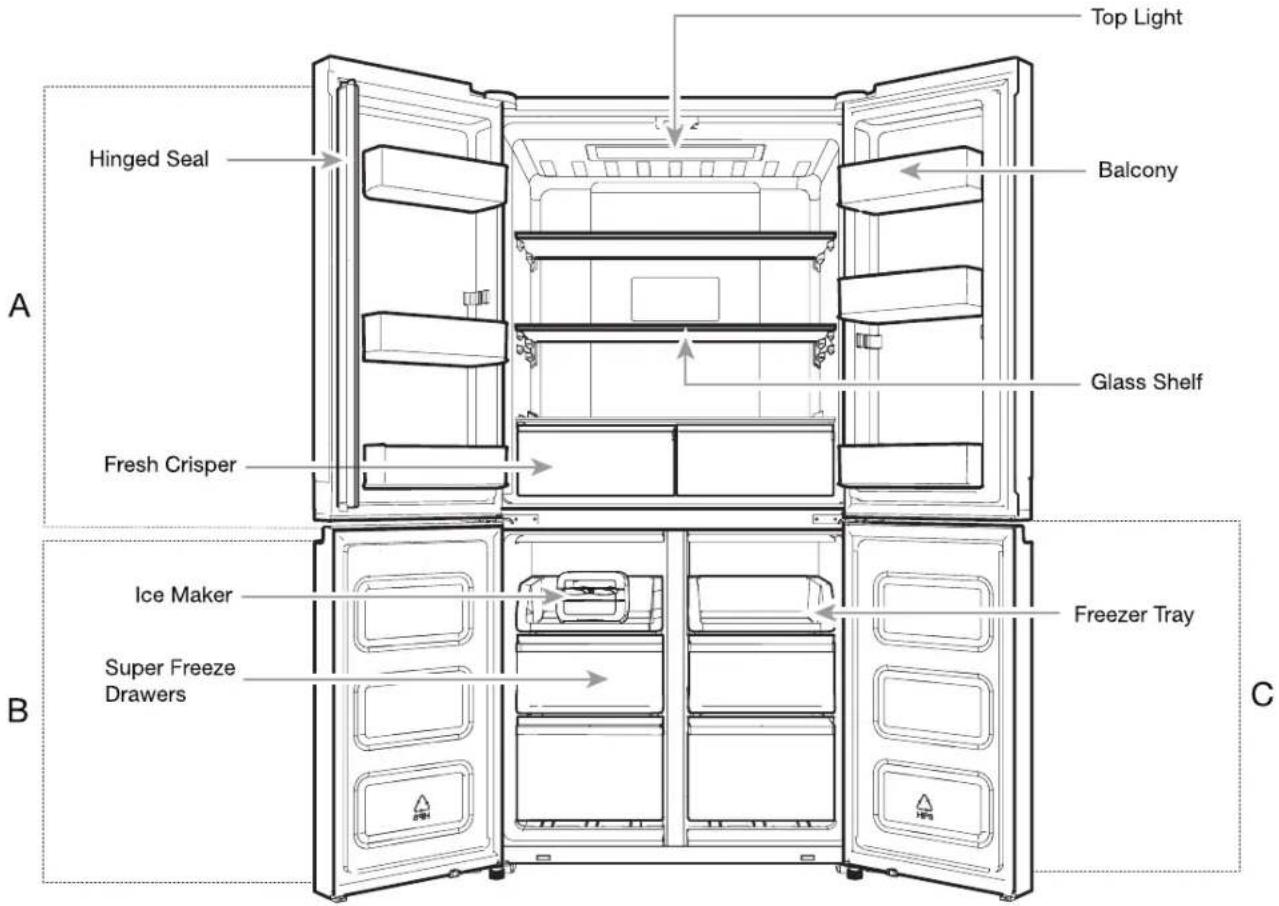
PARTS AND FEATURES
text_image
Top Light Balcony Hinged Seal Glass Shelf Fresh Crisper Ice Maker Super Freeze Drawers Freezer Tray A B CA. Refrigerator
B. Freezer
C. Multi Temperature
Using the Controls
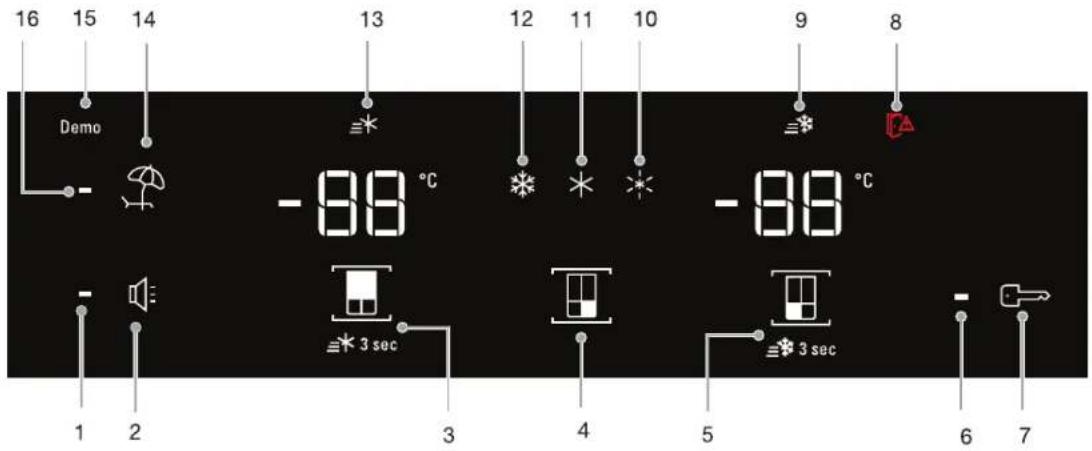
The touch-activated controls are located on the left hand refrigerator door. The control panel includes information about various buttons and indicators. Refrigerator and freezer temperature indicator shows the last temperature set point.
text_image
16 15 14 Demo -88 °C -88 °C 1 2 3 4 5 6 7 3 sec 3 sec- Sound Indicator
- Sound ON/OFF Button
- Refrigerator Temperature Button (hold 3 sec for Super Cool)
- Multi Temperature Preset Temperature Button
- Freezer Temp Button (hold 3 sec for Super Freeze)
- Key Lock Indicator
- Key Lock Button
- Door Open Indicator
The Control Panel will automatically turn off after one minute of inactivity. To turn on the control panel, press any key.
- 日日 Viewing and Adjusting Temperature Set Points
Adjusting Refrigerator and Freezer Compartment Temperature:
For your convenience, your refrigerator and freezer controls are preset at the factory.
When you first install your refrigerator, make sure that controls are still set to recommended set points. The factory recommended set points are 3°C for refrigerator and -18°C for freezer.
Pressing Refrigerator or Freezer Temperature button will toggle through temperature set points in Celsius (°C)
IMPORTANT:
■ Wait 24 hours before you put food into refrigerator. If you add food before refrigerator has cooled completely, your food may spoil.
NOTE: Adjusting the set points to a colder-than recommended setting will not cool the compartments any faster.
If temperature is too warm or too cold in refrigerator or freezer, first check air vents to be sure they are not blocked before adjusting controls.
■ The recommended settings should be correct for normal household use. The controls are set correctly when milk or juice is as cold as you like and when ice cream is firm.
NOTE: Areas such as a garage, basement or porch may have higher humidity or extreme temperatures. You may need to adjust temperature away from recommended settings to accommodate for these conditions.
■ Wait at least 24 hours between adjustments. Recheck temperatures before other adjustments are made.
- Super Freeze Indicator
- Soft Freeze Indicator
- Mild Freeze Indicator
- Traditional Freeze Indicator
- Super cool Indicator
- Holiday Mode Button
- Demo mode Indicator
- Holiday Indicator (hold 3 sec)
ity. To turn on the control panel, press any key.
\* \* \* Multi Temperature Setting
Multi Temperature function allows you to toggle preset temperature for Multi Temperature compartment.
| Symbol | Function | Temperature |
| Traditional freezer | -18°C | |
| Mild freezer | -12°C | |
| Soft freezer | -7°C |
* To activate/deactivate Coolest setting (-20°C), press Multi Temperature Preset Temperature Button
for 3 seconds. When the Coolest setting is activated, all three icons * * * will be lit.
Adjusting Multi Temperature Setting
■ Traditional freezer (-18°C): Food already frozen and fresh food (max 12 months)
■ Mild freezer (-12°C): Food already frozen (max 1 month)
■ Soft freezer (-7°C): Food already frozen (max 1 week)
■ If Multi Temperature Zone is set with lower temperature than freezer, freezer will set at same temperature of Multi Temperature Zone.
■ Multi Temperature Freezer compartment temperature might not be able to reach -7^ when the ambient temperature is around 10^ or colder.
NOTE: Before change temperature setting, make sure that new temperature suits food which is already inside and food you would like to introduce into Flexi Freeze.
When adjusting temperature set points, use the following chart as a guide:
| CONDITION | TEMPERATURE ADJUSTMENT |
| Refrigerator too cold | Refrigerator setting 1° higher |
| Refrigerator too warm | Refrigerator setting 1° lower |
| Freezer too cold | Freezer setting 1° higher |
| Freezer too warm/too little ice | Freezer setting 1° lower |

Super Cool
The Super Cool feature assists with periods of high refrigerator use, full grocery loads, or temporarily warm room temperatures.
■ To turn on the Super Cool feature, press and hold the Refrigerator Temperature button ☑ for 3 seconds. When feature is activated, the Super Cool icon will be illuminated. The Super Cool feature will remain on for 2 hours unless manually turned off.
■ To manually turn off the Super Cool feature, press and hold the Refrigerator Temperature button ■ for 3 seconds. The Super Cool icon will turn off when the feature is not activated.
■ Adjusting refrigerator temperature will automatically turn off the Super Cool feature.

Super Freeze
The amount of fresh food (in kg) that can be frozen in 24 hours is indicated on the appliance rating plate.
■ Press Freezer Temperature button 📋 for 3 seconds (until the Super Freeze Indicator lights up), 24 hours before placing fresh food in the freezer. After placing fresh food in the freezer, 24 hours on Super Freeze function is generally sufficient; After 50 hrs the Super freeze function automatically deactivates.
■ To manually turn off the Super Freeze feature, press and hold the Freezer Temperature button ☑ for 3 seconds. The Super Freeze icon will turn off.
■ Adjusting the freezer temperature will automatically turn off the Super Freeze feature.

Holiday Mode
This mode is designed to avoid your appliance from wasting energy during times when it's not in regular use (when you are in holiday for example).
By selecting this function the temperature of refrigerator compartment (RC) will automatically be set to 12°C.
■ To use Holiday mode, press mode button and hold for 3 seconds until Holiday mode indicator is lit on the display.
■ To exit Holiday mode, press mode button and hold for 3 seconds until no mode icon is lit on display.
■ Adjusting the refrigerator temperature will automatically turn off the Holiday Mode feature.
IMPORTANT: If this mode is selected then all food and drinks must be removed from the refrigerator compartment.

Sound ON-OFF
Press button to activate/deactivate Sound Feedback.

Key Lock
■ Press and hold Lock button for 3 seconds to activate lock feature.
■ To deactivate lock, press and hold Lock button for 3 seconds.
The lock feature will ignore all interaction with control panel until user unlocks the control panel. This feature is meant to avoid unintentional changing of settings.
Demo Mode
This mode is used when refrigerator is on display in a retail shop or if you want to turn the cooling off and deactivate all other functions (except interior lighting).
Demo mode can be used when going on extended holiday. See the "Holiday and Moving Care" section for proper steps on leaving your refrigerator in this mode for long periods of time.
■ If you turn on Demo mode, the "Demo" icon will light up on the display.
■ Enter or exit Demo mode by pressing and holding the Sound On or Off button and the Lock button simultaneously for 3 seconds.
NOTE: Remove all food from both refrigerator, freezer and Multi Temperature Zone if present.
Additional features
Door Open Alarm
■ The Door Open Alarm feature sounds an alarm and blinks the "Door Open" icon ☑ when any of the four doors is open for 2 minutes or more.
■ The alarm will repeat every 5 minutes. Close all doors to turn it off.
NOTE: To mute audible alarm while keeping doors open, such as while cleaning inside of refrigerator, touch any button on the control panel. The alarm sound will be temporarily turned off, but the Door Open icon will still be displayed on the control panel.
Lighting the Refrigerator
The refrigerator has an interior light that comes on any time door is opened.
NOTE: The light is LED which does not need to be replaced. If the LED does not illuminate when the door is opened, call service to replace the light.
REFRIGERATOR USE
Opening and Closing Doors
Warm up of side panel is normal at first product start up. Temperature will decrease after some hours.
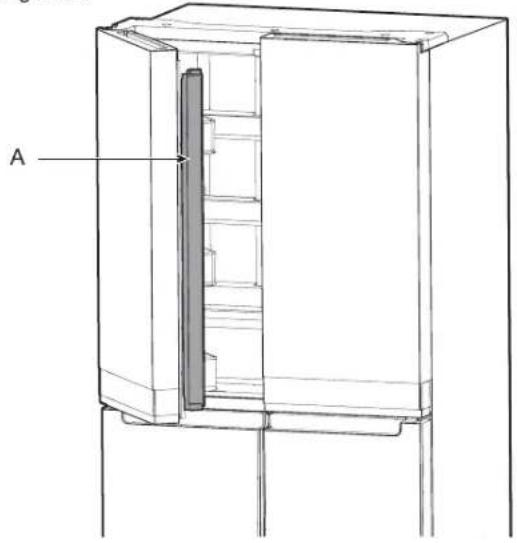
There are two refrigerator compartment doors. The doors can be opened and closed either separately or together. There is a vertically hinged seal on left refrigerator door.
■ When left-side door is opened, hinged seal automatically folds inward so that it is out of the way.
■ When both doors are closed, hinged seal automatically forms a seal between the two doors.
NOTE: When closing the door, the hinged seal should be in correct position (be bent inside). Otherwise it will hit the right door or the fixing shaft.
natural_image
Technical line drawing of a cabinet or enclosure with a vertical panel and labeled component 'A' (no text or symbols beyond label)A. Hinged seal
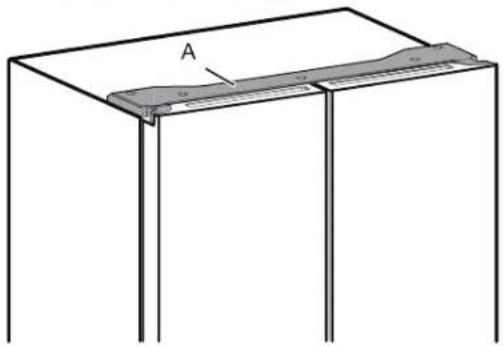
The refrigerator compartment door switch is located in top left and right hinge cover.
■ For Freezer and Multi Temperature Zone, door switch is located in bottom mullion.
■ The door switch uses magnet to sense door opening/closing.
■ Ensure there are no magnet or electronic devices (Speaker, Coolvox® etc.) within 7.62 cm of the hinge cap.
NOTE: The light not turn on if the door opening is not detected.
natural_image
Simple line drawing of a rectangular frame with a labeled component 'A' on top, no text or symbols present.A. Hinge cover
Ice Maker
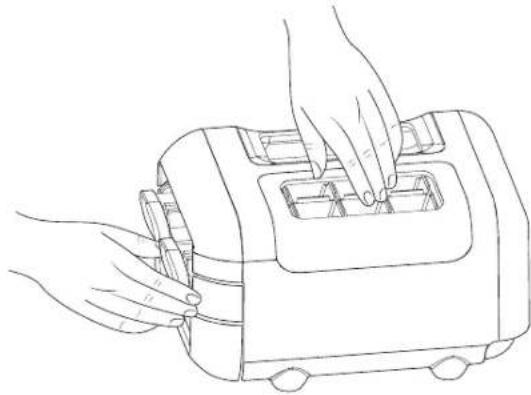
■ To make ice, fill ice tray with purified water and place Manual Ice maker into Freezer top shelf. Allow time till ice gets formed and once ice is ready, turn the knobs in clockwise direction to eject ice cubes into the ice container.
natural_image
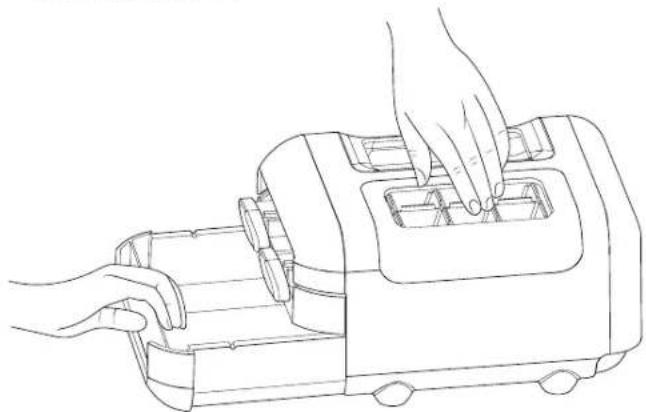
Line drawing of hands operating a portable toaster (no text or symbols)■ Lift ice container slightly and pullout ice container to get access to ice cubes.
natural_image
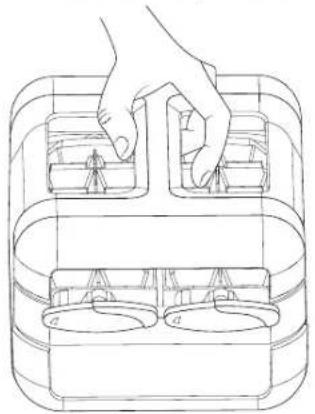
Line drawing of hands operating a portable device with internal compartments (no text or symbols)Manual ice maker assembly can be taken out of the freezer when ice is not required to make more compartment in freezer.
natural_image
Line drawing of a hand placing objects into a container with two circular compartments (no text or symbols)SHELVES, BINS AND DRAWERS
Important information to know about glass shelves and covers:
Do not clean glass shelves or covers with warm water when they are cold. Shelves and covers may break if exposed to sudden temperature changes or impact, such as bumping. Tempered glass is designed to shatter into many small, pebble-size pieces. This is normal. Glass shelves and covers are heavy. Use both hands when removing them to avoid dropping.
Shelf Height Adjustment
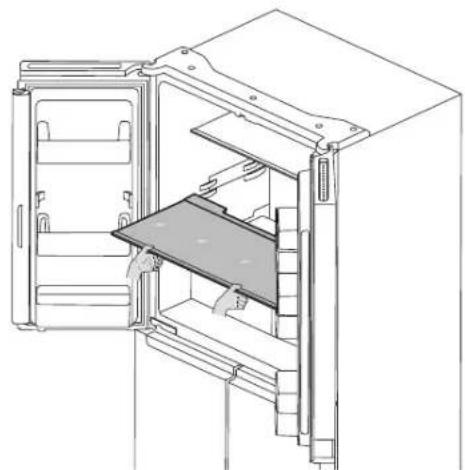
Shelf height can be adjusted by changing its location from bottom support to upper support and vice versa
text_image
135° 135°■ Take shelf out of refrigerator and place it to desired mounting position.
natural_image
Technical line drawing of a refrigerator interior showing door, front panel, and side shelves (no text or labels)■ Ensure shelf is properly seated on shelf mounts.
Shelves and Shelf Frames
The shelves in your refrigerator are adjustable to meet your individual storage needs.
Storing similar food items together in your refrigerator and adjusting the shelves to fit different heights of items will make finding the exact item you want easier. It will also reduce the amount of time the refrigerator door is open and save energy.
To remove and replace shelves:
- Open the right side door and left side door to its full opening.
- Remove middle shelf or top shelf by lifting it up and out of shelf supports. Then pull shelf forward and tilt down to a vertical position. Turn shelf at an angle and pull out of refrigerator.
- Remove bottom shelf by lifting it up and out of shelf supports. Then pull shelf forward and tilt up to a vertical position. Turn the shelf at an angle and pull out of refrigerator.
- Replace middle and top shelves by putting shelf in refrigerator at an angle with shelf front down. Lift front of shelf up and slide in until the rear of shelf drops into shelf supports. Lower front of shelf and make sure that shelf is in position.
- Replace bottom shelf by putting shelf in the refrigerator at an angle with shelf up. Lift front of shelf down and slide in until rear shelf drops into shelf supports. Lower front of shelf and make sure that shelf is in position.
Fresh Crisper
text_image
Fresh CrisperTo remove and replace the Fresh Crisper:
- Grasp handle of the Fresh Crisper and slide the Fresh Crisper straight out to the stop. Lift the Fresh Crisper off bottom guide.
- Replace/putting back the Fresh Crisper by placing it on the bottom Fresh Crisper guide and pushing it past the Fresh Crisper stop into position.
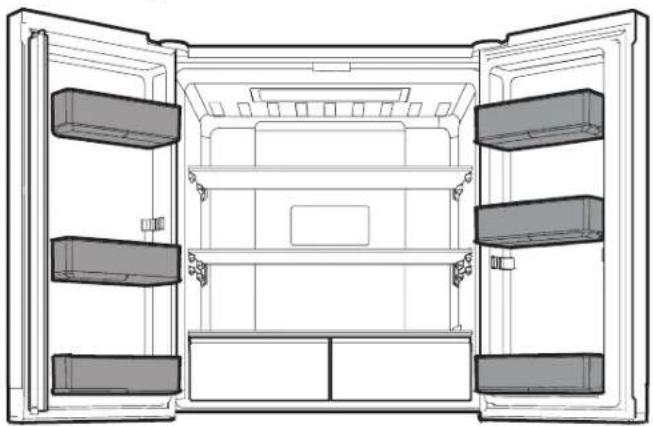
Refrigerator Balconies
The balcony on your refrigerator door are adjustable to meet your individual storage needs.
natural_image
Line drawing of an open refrigerator interior showing front, back, and side compartments (no text or symbols)Freezer Storage Compartments
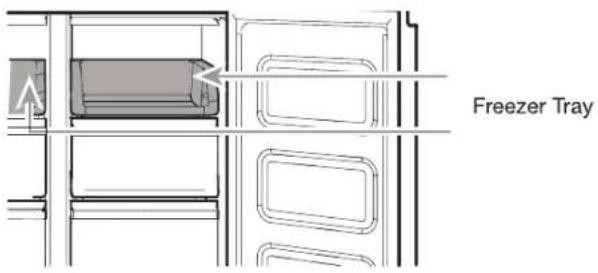
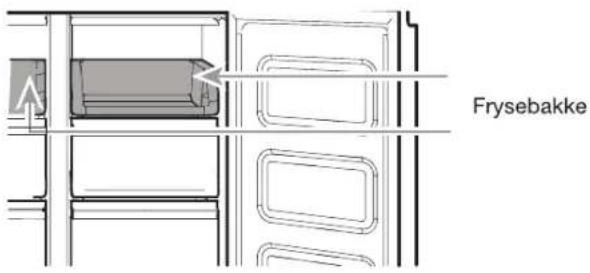
Freezer Tray
text_image
Freezer TrayFreezer tray is useful to easily access frequently used products, freeze or simply store leftovers or small items.
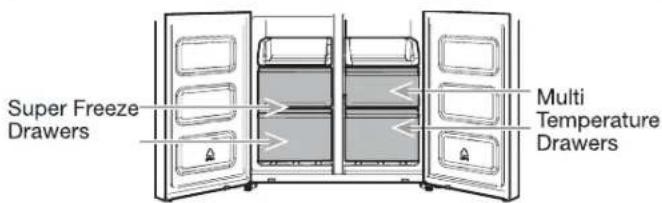
Freezer Drawers
text_image
Super Freeze Drawers Multi Temperature DrawersSuper Freeze compartment
■ Super Freezer drawers allows you to conveniently store big volume items.
■ Super Freeze option allows you to store all your frozen food safely and transparently.
NOTE: Super Freezer temperature might be cooled down to be same as Multi Temperature Compartment, when Super Freezer set to warmer than Multi Temperature compartment.
Multi Temperature Compartment
Multi Temperature Compartment allows you to select one of three freezer temperature levels: -7^ , -12^ and -18^ to provide best storing conditions for different types of food.
For maximum freezer capacity, you may remove the freezer drawer to expose the freezer shelf.
To remove the upper drawer:
- Grasp the handle of drawer and slide drawer straight out to stop. Lift drawer off bottom guide.
- Replace/putting back drawer by placing it on bottom drawer guide and pushing it past drawer stop into position.
Freezer Shelf
To maximize freezer capacity, you may remove mid drawer to expose freezer shelf beneath. You can then store upper drawer and load food directly on top of shelf.
Audio Reference
Tone Assignment
| Tone Name | Usage Examples |
| Power On | Cooling system is turned on every time product is powered on. |
| Key Press | User presses a valid button. |
| Invalid (Error) | User presses two or more valid buttons at the same time. Count-down interruption for press-and-hold buttons. |
| Engage | Acknowledgement of entry into any mode. |
| Disengage | Acknowledgement of exit from any mode. |
| Alert | Door Ajar alert. |
This table is for quick reference only. See corresponding sections for details. In case of inconsistency, section details will prevail.
Accessories
To order accessories, contact the dealer from whom you purchased your refrigerator.
Assistance or Service
Before calling for assistance or service, please check the "Troubleshooting" section. It may save you cost of a service call. If you still need help, follow the instructions below.
If you need replacement parts
To locate factory-specified replacement parts in your area, contact the dealer from whom you purchased your refrigerator.
REFRIGERATOR CARE
Cleaning
WARNING
Explosion Hazard
Use nonflammable cleaner.
Failure to do so can result in death, explosion, or fire.
All of the Refrigerator, Freezer and Multi Temperature sections defrost automatically. However, clean all the sections about once a month to avoid build-up of odours. Wipe up spills immediately.
Exterior Cleaning
Please see the exterior cleaning information specific to your model.
Style 1 - Smooth Door
IMPORTANT: Damage to smooth finish due to improper use of cleaning products or using non-recommended cleaning products is not covered under the warranty. Sharp or blunt instruments will mar the finish.
| DO USE | DO NOT USE |
| √ Soft, clean cloth | ✗ Abrasive cloths✗ Paper towels or newsprint✗ Steel-wool pads |
| √ Warm, soapy water with a mild detergent | ✗ Abrasive powders or liquids✗ Window sprays✗ Ammonia✗ Acidic or vinegar-based Cleaners✗ Oven cleaners✗ Flammable fluids |
NOTE: Paper towels scratch and may dull the clear coat of the painted door. To avoid possible damage, use only soft, clean clothes to polish and wipe the doors.
Style 2 — Stainless Steel IMPORTANT:
■ Use recommended stainless steel cleaners and cloths only. Damage to stainless steel finish due to improper use of cleaning products or using non-recommended cleaning products is not covered under the warranty.
■ Avoid exposing stainless steel appliances to caustic or corrosive elements such as high-salt, high-moisture, or high-humidity environments. Damage due to exposure to these elements is not covered under the warranty.
| DO USE | DO NOT USE |
| √ Soft, clean cloth | ✕ Abrasive cloths✕ Paper towels or newsprint✕ Steel-wool pads |
| √ Warm, soapy water with a mild detergent | ✕ Abrasive powders or liquids✕ Ammonia✕ Citrus-based cleaners✕ Acidic or vinegar-based cleaners✕ Oven cleaners |
| √ For heavy soil, use only a stainless steel cleaner designed for appliances. To order the cleaner, contact the dealer from whom you purchased your refrigerator. | ✕ Stainless steel cleaner is for stainless steel parts only. Do not allow the stainless steel cleaner and polish to come into contact with any plastic parts such as the trim pieces, dispenser covers, or door gaskets. |
Style 3 — Fingerprint-Resistant Stainless IMPORTANT:
■ Avoid exposing stainless steel appliances to caustic or corrosive elements such as high-salt, high-moisture, or high-humidity environments. Damage due to exposure to these elements is not covered under the warranty.
| DO USE | DO NOT USE |
| √ Soft, clean cloth | ✕ Abrasive cloths✕ Paper towels or newsprint✕ Steel-wool pads |
| √ Warm, soapy water with a mild detergent | ✕ Abrasive powders or liquids✕ Window sprays✕ Ammonia✕ Acidic or vinegar-based cleaners✕ Oven cleaners✕ Flammable fluids |
NOTES:
If unintentional contact does occur, clean plastic part with a sponge and mild detergent in warm water. Dry thoroughly with a soft cloth.
■ Just because a cleaner is a liquid does not mean it is non-abrasive. Many liquid cleansers formulated to be gentle on tile and smooth surfaces still damage stainless steel.
■ Citric acid permanently discolours stainless steel.
■ To avoid damaging the finish of your stainless steel refrigerator:
Do not allow these substances to remain on the finish:
✗ Mustard
✗ Citrus-based sauces
✗ Tomato juice
✗ Citrus-based products
✗ Marinara sauce
Interior Cleaning
- Unplug refrigerator or disconnect power.
- Hand wash, rinse, and dry removable parts and interior surfaces thoroughly. Use a clean sponge or soft cloth and a mild detergent in warm water.
NOTE: Do not use abrasive or harsh cleaners such as window sprays, scouring cleansers, flammable fluids, cleaning waxes, concentrated detergents, bleaches, or cleansers containing petroleum products on plastic parts, interior and door liners, or gaskets.
- Plug in refrigerator or reconnect power.
Condenser
This refrigerator has skin condenser on both sides of refrigerator. It is normal to feel warm on the sides.
Lights
The lights in both refrigerator and freezer compartments are LEDs which do not need to be replaced. If lights do not illuminate when door is opened, contact dealer from whom you purchased your refrigerator.
Holiday and Moving Care
Holidays
If You Choose to Leave the Refrigerator On While You're Away:
- Use up any perishables and freeze other items.
- If your refrigerator has an automatic ice maker and is connected to the household water supply, turn off water supply to the refrigerator. Property damage can occur if the water supply is not turned off.
- If you have an automatic ice maker, turn off ice maker.
■ Press the switch to Off (O) for the door ice maker.
- Empty ice bin.
If You Choose to Turn Off the Refrigerator Before You Leave:
NOTE: Put refrigerator in Demo Mode while on Holiday. See the "Using the Controls" section.
- Remove all food from the refrigerator.
- If your refrigerator has an automatic ice maker:
■ Turn off water supply to the ice maker at least 1 day ahead of time.
■ When last load of ice drops, press the switch to Off (O) for display to be unlit on the top inside of refrigerator, depending on your model.
- Empty ice bin.
- Turn off temperature controls. See the "Using the Controls" section.
- Clean refrigerator, wipe it and dry well.
- Tape rubber or wood blocks to the tops of both doors to prop them open far enough for air to get in. This stops odours and mould from building up.
Moving
When you are moving your refrigerator to a new home, follow these steps to prepare it for the move.
- If your refrigerator has an automatic ice maker:
■ Turn off water supply to the ice maker at least 1 day ahead of time.
■ Disconnect water line from the back of the refrigerator.
■ When last load of ice drops, press the switch to Off (O) either on ice maker or the control, depending on your model.
- Remove all food from the refrigerator and pack all frozen food in dry ice.
- Empty ice bin.
- Unplug refrigerator.
- Clean, wipe and dry thoroughly.
- Take out all removable parts, wrap them well and tape them together so they don't shift and rattle during the move.
- Depending on model, raise the front of the refrigerator so it rolls more easily or raise the levelling screws so they do not scrape the floor. See the "Adjust the Doors" or "Refrigerator Levelling and Door Closing" sections.
- Tape doors closed and tape the power cable to back of the refrigerator.
When you get to your new home, put everything back and refer to the "Installation Instructions" section for preparation instructions. Also, if your refrigerator has an automatic ice maker, remember to reconnect the water supply to the refrigerator.
TROUBLESHOOTING
First try the solutions suggested here to possibly avoid a service call.
WARNING
Electrical Shock Hazard
Plug into a grounded (earthed) outlet.
Do not remove ground prong.
Do not use an adapter.
Do not use an extension cord.
Failure to follow these instructions can result in death, fire, or electrical shock.
| If you experience | Possible Causes | Solution |
| Refrigerator Operation | ||
| The refrigerator will not operate. | Check electrical supply. | Plug the power cable into an earthed socket. |
| Do not use an extension cable. | ||
| Make sure there is power to the socket. Plug in a lamp to see if the socket is working. | ||
| Reset a tripped circuit breaker. Replace any blown fuses.NOTE: If problems continue, contact an electrician. | ||
| Check controls. | Make sure the controls are turned on. See the “Using the Controls” section. | |
| New installation | Allow 24 hours following installation for refrigerator to cool completely.NOTE: Adjusting temperature controls to the coldest setting will not cool either compartment more quickly. | |
| Refrigerator control is in Demo mode (on some models). | If the refrigerator is in Demo mode, cooling is turned off and “Demo” will be illuminated on the control panel. See the “Using the Controls” section for more information. | |
| The motor seems to run too much. | High-efficiency compressor and fans | Larger, more efficient refrigerators run longer at lower, more energy efficient speeds. |
| The room or outdoor temperature is hot. | It is normal for refrigerator to work longer under these conditions. For optimum performance, place refrigerator in an indoor, temperature-controlled environment. See the “Location Requirements” section. | |
| A large amount of warm food has been recently added. | Warm food will cause refrigerator to run longer until the air cools to the desired temperature. | |
| The door(s) are opened too frequently or for too long. | Warm air entering refrigerator causes it to run more. Open the door less often. | |
| The refrigerator door or freezer drawer is open. | Make sure refrigerator is level. See the “Refrigerator Levelling and Door Closing” section. Keep food and containers from blocking the door. | |
| The refrigerator control is set too cold. | Adjust refrigerator control to a less-cold setting until refrigerator temperature is as desired. | |
| The door or drawer gasket is dirty, worn, or cracked. | Clean or change gasket. Leaks in the door seal will cause refrigerator to run longer in order to maintain desired temperatures. | |
TROUBLESHOOTING
First try the solutions suggested here to possibly avoid a service call.
| If you experience | Possible Causes | Solution |
| The lights do not work. | Your refrigerator is equipped with LED lighting which does not need to be replaced. | If there is power to refrigerator and lights do not illuminate when a door or drawer is opened, call for service or assistance. |
| Doors have been open longer than 10 minutes. | Close the doors and drawer to reset and open to resume lighted task. | |
| The door switch is not sensing the door opening. | Ensure there are no magnets or electronic devices within 7.6 cm (3") of the hinge cover. | |
| The Temperature Control UI does not turn on. | The Temperature Control UI went to sleep | Press any button on the UI to wake up the The Temperature Control UI. |
| The Temperature Control UI buttons are not working well. | Try cycling power on the refrigerator to make the buttons reset. If problem continuous, call for service or assistance. | |
| The Temperature Control UI is not receiving power. | Check the wiring harness at the door hinge. | |
| Unable to adjust setting on The Temperature Control UI. | Door is open and Door ajar alarm is activated. | Close the door. |
| Unusual Noise | ||
| To listen to normal refrigerator sounds, go to the Product Help/FAQ section of the brand website and search for "normal sounds." Below are listed some normal sounds with explanations. | ||
| The refrigerator seems noisy. | The compressor in your new refrigerator regulates temperature more efficiently while using less energy and operates quietly. | Due to this reduction in operating noise, you may notice unfamiliar noises that are normal. |
| Sound of the compressor running longer than expected. | High-efficiency compressor and fans. | Larger, more-efficient refrigerators run longer at lower, more energy efficient speeds. |
| Pulsating/Whirring | Fans/compressor adjusting to optimize performance during normal compressor operation. | This is normal. |
| Popping | Contraction/expansion of inside walls, especially during initial cool down. | This is normal. |
| Hissing/Dripping | Flow of refrigerant or flow of oil in the compressor. | This is normal. |
| Vibration | The refrigerator may not be steady. | Adjust the levelling screws and lower the levelling foot firmly against the floor. See the "Refrigerator Levelling and Door Closing" section. |
| Sizzling | Water dripping on the heater during Defrost cycle. | This is normal. |
| Water running/Gurgling | May be heard when ice melts during the Defrost cycle and water runs into the drain pan. | This is normal. |
TROUBLESHOOTING
First try the solutions suggested here to possibly avoid a service call.
| If you experience | Possible Causes | Solution |
| Temperature and Moisture | ||
| Temperature is too warm. | The refrigerator has just been installed. | Allow 24 hours following installation for the refrigerator to cool completely. |
| The controls are not set correctly for the surrounding conditions. | Adjust the controls a setting colder. Check the temperature in 24 hours. See the "Using the Controls" section. | |
| The door(s) are opened often or not closed completely. Allows warm air to enter refrigerator. | Minimize door openings and keep doors fully closed. | |
| A large load of food was recently added. | Allow several hours for refrigerator to return to normal temperature. | |
| Demo mode is on. | Turn off the Demo mode. See the "Using the Control" section. | |
| Holiday mode is on. | Turn off the Holiday mode. See the "Using the Control" section. | |
| Temperature is too cold in the refrigerator/crisper. | The refrigerator air vent(s) are blocked. | If the air vent located in the middle rear of refrigerator compartment is blocked by items placed directly in front of it, refrigerator will get too cold. Move items away from the air vent. |
| The controls are not set correctly for the surrounding conditions. | Adjust the controls a setting warmer. Check temperature in 24 hours. See the "Using the Controls" section. | |
| Temperature is too cold in the temperature controlled drawer. | The control is not set correctly for the items stored in drawer. | Adjust temperature setting. See the "Using the Controls" in the "Refrigerator Use" section. |
| There is interior moisture build-up.NOTE: Some moisture build-up is normal. | The room is humid. | A humid environment contributes to moisture build-up. |
| The door(s) are opened often or not closed completely. Allows humid air to enter the refrigerator. | Minimize door openings and close doors completely. | |
| The door(s) are blocked open. | Move food packages away from door. | |
| A bin or shelf is in the way. | Push bin or shelf back into the correct position. | |
| Storing liquid in open containers. | This adds humidity to the refrigerator interior. Keep all containers tightly covered. | |
| There is frost/ice build-up in the freezer compartment. | The door is opened often or left open. | Minimize door openings and close drawer completely after use. |
| The door has poor door seal. | Ensure door seals are making full contact with the refrigerator cabinet to allow for an adequate seal. | |
| Temperature controls are not set correctly. | See the "Using the Controls" section for recommended temperature settings. | |
TROUBLESHOOTING
First try the solutions suggested here to possibly avoid a service call.
WARNING
Explosion Hazard
Use nonflammable cleaner.
Failure to do so can result in death, explosion, or fire.
To view an animation showing how to adjust and align the doors, refer to the Product Help/FAQ section of the brand website and search for "Door Closing and Door Alignment."
| If you experience | Possible Causes | Solution |
| Doors | ||
| The doors will not close completely. | The door is blocked open. | Move food packages away from door. |
| A bin or shelf is in the way. | Push bin or shelf back into correct position. | |
| Recently installed. | Remove all packaging materials. | |
| The doors are difficult to open. | The door gaskets are dirty or sticky. | Clean gaskets and contact surfaces with mild soap and warm water. Rinse and dry with soft cloth. |
| The doors appear to be uneven. | The doors need to be aligned or the refrigerator needs to be levelled. | If you need to align door please call for service. |
| The refrigerator is unsteady or it rolls forward when opening and closing doors. | The refrigerator brake feet are not snug against the floor. | Turn both brake feet (one on each side) counterclockwise, the same amount, until they are snug against the floor. See the “Refrigerator Levelling and Door Closing” section. |
Bauknecht
INTEGRIERTE KÜHLKOMBI (FRENCH DOOR BOTTOM MOUNT REFRIGERATOR) BENUTZUNG UND PFLEGE
Inhalt
INTEGRIERTE KÜHLKOMBI (FRENCH DOOR BOTTOM MOUNT REFRIGERATOR) BENUTZUNG UND PFLEGE......26
PFLEGE DES KÜHLSCHRANKS......44
Reinigung 44
Leuchten 45
natural_image
Line drawing of a refrigerator with open doors and shelves (no text or symbols)natural_image
Line drawing of a three-tier refrigerator cabinet (no text or labels)text_image
Technical diagram showing mechanical assembly with labeled parts A and B, likely from an engineering or manufacturing context.text_image
Technical diagram showing a mechanical assembly with labeled component A and force indicatorsScharnier Mitte links
natural_image
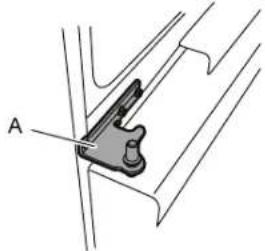
Technical diagram of a mechanical clamp or bracket assembly with labeled point A (no text or symbols beyond label)A. Scharnier
natural_image
Technical line drawing of a mechanical clamp or bracket assembly (no text or symbols)A. Scharnier
⚠️WARNUNG
text_image
Technical diagram showing labeled mechanical components with annotations A, B, C, and D indicating parts of a device or assembly.natural_image
Line drawing of a refrigerator interior showing door, front panel, and base with a warning symbol (no text or labels)natural_image
Technical line drawing of a mechanical assembly with a knob and curved arrow indicating rotation (no text or symbols)A. Bremsfuß
natural_image
Technical line drawing of a cabinet or enclosure with a vertical panel and labeled component 'A' (no text or symbols beyond label)natural_image
Simple line drawing of a rectangular frame with a labeled section 'A' and a small protrusion on the side (no text or symbols beyond label)natural_image
Line drawing of hands operating a portable toaster (no text or symbols)natural_image
Line drawing of a hand using a portable device to press or install a tray (no text or symbols)natural_image
Line drawing of a hand placing objects into a container with two circular compartments (no text or symbols)text_image
135° 135°natural_image
Technical line drawing of a refrigerator interior showing door, front panel, and side shelf (no text or symbols)text_image
Fresh Crisper Schubladenatural_image
Line drawing of an open refrigerator interior showing front, back, and side compartments (no text or symbols)First try the solutions suggested here to possibly avoid a service call.
WARNING
First try the solutions suggested here to possibly avoid a service call.
First try the solutions suggested here to possibly avoid a service call.
First try the solutions suggested here to possibly avoid a service call.
WARNING

Explosionsgefahr
natural_image
Line drawing of a refrigerator with open doors and shelves (no text or symbols)natural_image
Line drawing of a multi-tiered refrigerator cabinet with mounting holes and ventilation slots (no text or labels)natural_image
Technical diagram of a mechanical assembly with labeled component A (no text or symbols present)A. 5 mm unbrakoskruer
natural_image
Technical line drawing of a mechanical clamp or bracket assembly (no text or symbols)A. Hængsel
ADVARSEL
Meget tung - fare
text_image
Technical diagram of a mechanical assembly with labeled parts A, B, C, and Dnatural_image
Technical line drawing of a mechanical clamp or bracket assembly with screws and a labeled component (no text or symbols present)natural_image
Line drawing of a refrigerator interior showing door, front panel, and side panel with labeled component A (no text or symbols beyond labels)A. Nederste hængsel
ADVARSEL
natural_image
Technical line drawing of a mechanical assembly with a knob and curved arrow indicating rotation (no text or symbols)A. Bremsefod
text_image
16 15 14 Demo -88 °C -88 °C 3 sec 3 sec 6 7- Indikator for lyd
- Til/fra-knap for lyd
- Knap for temperatur i køleafdelingen (hold inde i 3 sek. for Super Cool)
- Knap for forudindstillet temperatur i multi-temperatur
- Knap for temperatur i fryseafdeling (hold inde i 3 sek. for Super Freeze)
- Indikator for Tastelås
-
Knappen Tastelås
-
Indikator for åben dør
- Super Freeze-indikator
- Soft Freeze-indikator
- Mild Freeze-indikator
- Traditionel Freeze-indikator
- Super Cool-indikator
- Knap for Ferie-funktion
- Demotilstandsindikator
- Ferie-ndikator (hold inde i 3 sek.)
natural_image
Technical line drawing of a refrigerator with labeled component A (no text or symbols beyond label)natural_image
Simple line drawing of a rectangular frame with a labeled component 'A' on top, no text or symbols present.A. Hængselsdæksel
Ismaskine
natural_image
Line drawing of hands operating a small kitchen grater (no text or symbols present)natural_image
Line drawing of hands operating a portable kitchen appliance (no text or symbols)natural_image
Line drawing of a hand placing objects into a container with two circular compartments (no text or symbols)HYLDER, D∅RHYLDER OG SKUFFER
text_image
135° 135°natural_image
Line drawing of an open refrigerator with a tray and door, showing internal compartments and ventilation slots (no text or symbols)natural_image
Line drawing of an open refrigerator interior showing front, rear, and side compartments (no text or symbols)Fryseafdelingens opbevaringsrum
Frysebakke
text_image
FrysebakkeFirst try the solutions suggested here to possibly avoid a service call.
ADVARSEL
First try the solutions suggested here to possibly avoid a service call.
First try the solutions suggested here to possibly avoid a service call.
First try the solutions suggested here to possibly avoid a service call.
ADVARSEL
Eksplosionsfare