CR106R - Alarm clock radio Tesco - Free user manual and instructions
Find the device manual for free CR106R Tesco in PDF.


User questions about CR106R Tesco
0 question about this device. Answer the ones you know or ask your own.
Ask a new question about this device
Download the instructions for your Alarm clock radio in PDF format for free! Find your manual CR106R - Tesco and take your electronic device back in hand. On this page are published all the documents necessary for the use of your device. CR106R by Tesco.
USER MANUAL CR106R Tesco
IMPORTANT SAFETY INFORMATION
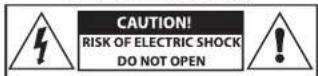
TO REDUCE THE RISK OF ELECTRIC SHOCK DO NOT REMOVE COVER (OR BACK)
This symbol indicates that there are important operating and maintenance instructions in the literature accompanying this unit.
This symbol indicates that dangerous voltage constituting a risk of electric shock is present within this unit.
Read these instructions.
Keep these instructions.
Heed all warnings.
Follow all instructions.
Do not use this apparatus near water.
Clean only with a slightly damp cloth.
Do not block any ventilation openings.
Install in accordance with the manufacturer's instructions.
Do not install or operate near any heat sources such as radiators, stoves, or other apparatus that produce heat.
Unplug this apparatus during lightning storms or when unused for long periods of time.
Refer all servicing to qualified service personnel. Servicing is required when the apparatus has been damaged in any way, such as the power-supply cord or plug is damaged, liquid has been spilled or objects have fallen into the apparatus, the apparatus has been exposed to rain or moisture, does not operate normally, or has been dropped.
Warning: To reduce the risk of fire or electrical shock, do not expose this product to rain or moisture. The product must not be exposed to dripping and splashing and no object filled with liquids such as a vase of flowers should be placed on the product.
No naked flame sources such as candles should be placed on the product. Batteries (a battery pack or installed batteries) shall not be subject to excessive heat such as sunshine, fire or the like.
Caution: Changes or modifications not expressly approved by the manufacturer could void the user's authority to operate this device. Caution: Usage of controls or adjustments or performance of procedures other than those specified herein may result in hazardous exposure.
IMPORTANT
This equipment generates, uses and can radiate radio frequency energy and, if not installed and used in accordance with the instructions, may cause harmful interference to radio communication. However, this is no guarantee that interference will not occur in a particular installation. If this equipment does cause harmful interference to radio or television reception, which can be determined by turning the equipment off and on, the user is encouraged to try to correct the interference by one of the following measures:
- Regrient or relocate the receiving antenna.
- Increase the separation between the equipment and receiver. - Connect the equipment into an outlet on a circuit different from that to which the receiver is connected.
- Consult the dealer or an experienced radio/TV technician for help.
ELECTRICAL INFORMATION
Mains Supply: The mains operating voltage is marked on a rating plate under the radio.
The means of disconnecting this appliance from the mains supply is the AC mains plug. This should be unobstructed and readily operable at all times.
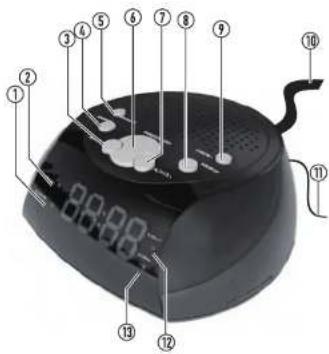
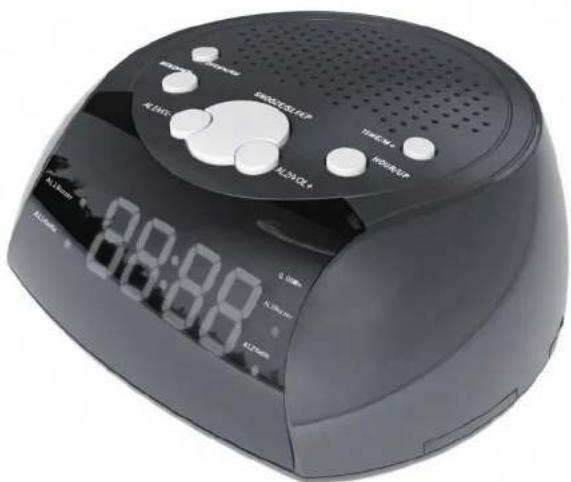
LOCATION OF CONTROLS
-
Alarm 1 radio mode indicator
-
Alarm 1 buzzer mode indicator
-
Alarm 1/Volume down button
-
Minute/Down button
-
Off/FM/AM selector button
-
Snooze/Sleep button
-
Alarm 2/Volume-up
-
Alarm 2 Volume up button
-
Hour/Up button
-
Time set/M+ button
-
Power cable
-
FM Aerial cable
-
Alarm 2 buzzer mode indicator
-
Alarm 2 radio mode indicator
text_image
Diagram of a digital alarm clock with numbered parts for identificationCR106R
UNPACKING
Carefully unpack the unit. If it is damaged, please return it to your nearest Tesco store for replacement. Remember to take your purchase receipt with you.
Retain the User Handbook. If you pass the unit on to a third party make sure you pass on the handbook.
We suggest you retain the packaging. If you dispose of it, do so having regard to any recycling regulations in your area.
BACK-UP BATTERIES
The unit requires back-up batteries to retain its settings in the event of a power cut. You will need to purchase 2 x AA batteries. Unwrap the batteries, remove the battery cover from the clock radio and insert the batteries observing polarity.
Replace the battery cover.
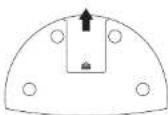
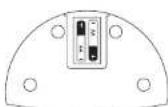
NOTE: Never allow the batteries to become fully exhausted - replace them periodically. Dispose of used batteries according to all recycling regulations in your area. Never throw used batteries into the general rubbish, or a fire.
WARNING - CARE OF BATTERIES
Handle batteries with care. Do not short batteries out with metal objects. Do not leave batteries lying around or expose to fire or water. When disposing of batteries do not throw them in the general rubbish, a fire or in water. Dispose of them in full accord with recycling regulations that are applicable in your area.
PRELIMINARIES
Before connecting the power, check that the mains voltage on the rating plate under the radio is the same as the voltage in your area.
- Place the unit on a stable surface away from heat and damp.
• Unwrap the FM antenna cable and extend it fully
• Uncoil the mains cable fully.
• Plug the mains plug into the wall socket and switch the mains power on.
Your unit is now ready for use.
CLOCK SETTING
The Clock is a 24 hour clock; e.g. 6 pm is entered as 18:00 hours.
- Hold the TIME SET/M+ button down until the display flashes. - Release the TIME SET/M+ button.
- Press the HOUR/UP button repeatedly until the hour is set correctly.
- Press the MIN/DOWN button repeatedly until the minutes are set correctly.
• Press the TIME SET/M+ button to save the time setting.
The time is now set.
RADIO OPERATION
- To turn the radio on, press the OFF/FM/AM button repeatedly to select FM or AM operation.
- Press the HOUR/UP or MIN/DOWN button to tune up or down the band.
- Move the FM antenna to improve FM signal quality. To improve AM reception, move the radio around or rotate it.
- To turn the radio off, press and hold the OFF/FM/AM button until the radio switches off and the clock is displayed.
STATION PRESETS
Your radio can store up to 20 of your favourite stations as presets (10 FM, 10 AM) for quick recall.
To store a preset station:
Tune to the station you want to store as a preset.
• Press and hold the TIME/M+ button.
'P01' will flash on the display.
- Press the HOUR/UP or MIN/DOWN button to select the preset number you want to store.
- Press the TIME/M+ button to store the preset.
To tune to a preset station:
- Press the TIME/M+ button repeatedly to step through the presets available.
ADJUSTING THE VOLUME
- Press the AL2/VOL+ button to increase the volume level or press the AL1/VOL- button to decrease the volume.

SETTING THE ALARM TIME
Example: set Alarm 1 or Alarm 2 to ring at 8:22 AM.
- Press and hold the AL1/VOL- button to set Alarm 1 or the AL2/VOL+ button to set Alarm 2.
The alarm time will flash on the display.
- Release the button.
- Press the HOUR/UP button repeatedly until the alarm hour is set correctly (8 in the example).
- Press the MIN/DOWN button repeatedly until the alarm minutes are set correctly (22 in the example).
The alarm time is now set.
- After setting the alarm time, press the AL1/VOL- or AL2/VOL+ button repeatedly to step through the Alarm wake up modes (Off/Radio/Buzzer) for Alarm 1 or Alarm 2.
The Alarm 1 or 2 indicators will come on and indicate the wake-up mode.
- Switch the radio off.
When the time comes the buzzer or radio will sound.
WHEN THE ALARM SOUNDS
To switch the alarm off:
- Press the OFF/FM/AM button to switch the alarm OFF.
THE SNOOZE FUNCTION
When the alarm goes off:
• Press the SNOOZE/SLEEP button
The alarm will switch off temporarily
After 9 minutes the alarm will sound again.
THE SLEEP FUNCTION
When the radio is playing you can programme the clock to switch off after a predetermined time.
- Set the radio to play.
• Press the SNOOZE/SLEEP button.
The sleep time of 90 minutes appears
- Press the SNOOZE/SLEEP button repeatedly to set the sleep time you want in the range 10 - 90 minutes.
After the preset time the radio will switch off.
If you have set the alarm, the radio will switch on again at the alarm time.
CARE AND CLEANING
UNPLUG the unit from the mains power. The surface of the unit can be cleaned with a barely damp cloth and then dried carefully. Never use abrasives, abrasive cloths or chemical solvents.
SPECIFICATIONS
Supply Voltage: 220 - 240V \~ 50 Hz
Backup Battery: 3V === (2 x AA)
RF Range: FM 87.5 - 108 MHz: AM 522 - 1620 kHz
Weight: 0.314 kg
Class II construction double insulated. This product must not be connected to earth
WARRANTY
Your Tesco appliance is covered by a warranty for 12 months from the date of purchase. If a fault develops during this period, please contact the TESCO electrical help line on 0845 456 6767. Please have your original purchase receipt with you when you call. This warranty in no way affects your consumer rights.

UK: Waste electrical products /batteries should not be disposed of with household waste. Separate disposal facilities exist, for your nearest facilities.
See www.recycle-more.co.uk or in-store for details. ROI: Produced after 13th August 2005. Waste electrical products/batteries should not be disposed of with household waste. Please recycle where facilities exist. Check with your Local Authority or retailer for recycling advice.

Tesco Stores Ltd, Delamare Road, Cheshunt, Herts, EN8 9SL
CR106 EN V1.3

natural_image
Black digital alarm clock with LCD display and control buttons (no visible text or symbols on the device body)CR106R