
G-Shock DW-5900BB-1ER - Watch CASIO - Free user manual and instructions
Find the device manual for free G-Shock DW-5900BB-1ER CASIO in PDF.


User questions about G-Shock DW-5900BB-1ER CASIO
0 question about this device. Answer the ones you know or ask your own.
Ask a new question about this device
Download the instructions for your Watch in PDF format for free! Find your manual G-Shock DW-5900BB-1ER - CASIO and take your electronic device back in hand. On this page are published all the documents necessary for the use of your device. G-Shock DW-5900BB-1ER by CASIO.
USER MANUAL G-Shock DW-5900BB-1ER CASIO
Operation Guide 3465
CASIO®
ENGLISH
Congratulations upon your selection of this CASIO watch.
To ensure that this watch provides you with the years of service for which it is designed, carefully read and follow the instructions in this manual, especially the information under "Operating Precautions" and "User Maintenance".
E
About This Manual
text_image
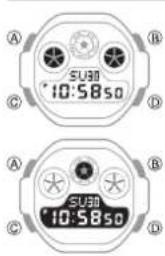
A B C SU30 10:58s0 D A B C SU30 10:58s0 D- Depending on the model of your watch, display text appears either as dark figures on a light background or light figures on a dark background. All sample displays in this manual are shown using dark figures on a light background.
- Button operations are indicated using the letters shown in the illustration.
- Note that the product illustrations in this manual are intended for reference only, and so the actual product may appear somewhat different than depicted by an illustration.
E-1
Contents
About This Manual E-1
General Guide E-6
Timekeeping....E-9
To set the time and date E-10
To toggle the Timekeeping Mode time between DST and Standard Time .... E-13
World Time E-14
To view the time in another city code....E-14
To toggle a city code time
between Standard Time and Daylight Saving Time E-15
Stopwatch E-17
To measure times with the stopwatch....E-18
E-2
Countdown Timer....E-19
To use the countdown timer E-19
To set the countdown start time E-20
Alarms....E-21
To set an alarm time E-22
To test the alarm....E-23
To turn an alarm on and off E-24
To turn the Hourly Time Signal on and off E-25
Illumination....E-26
To illuminate the display E-27
To specify the illumination duration....E-27
Other Settings E-28
To turn the button operation tone on and off E-28
Specifications....E-30
E-3
Operating Precautions E-32
User Maintenance E-42
E-5E-4
General Guide
- Press © to change from mode to mode.
• In any mode, press Ⓑ to illuminate the display.
Timekeeping Mode
World Time Mode
Countdown Timer Mode
Alarm Mode Stopwatch Mode

flowchart
graph LR
    A["SUB0 10:58s0"] -->|C| B["NYC 8:58s0"]
    B -->|C| C["STM 00:0000"]
    C -->|C| D["TMR 0:0000"]
    D -->|C| E["AL-1 12:00oF"]
    E -->|C| A
E-6
E-7
Auto Return Features
- If you leave the watch in the Alarm Mode for two or three minutes without performing any operation, it automatically changes to the Timekocoping Mode. - If you leave a screen with flashing digits or a cursor on the display for two or three minutes without performing any operation, the watch automatically saves any settings you have made up to that point and exits the setting screen.
Scrolling
The Ⓑ and Ⓓ buttons are used in various modes and setting screens to scroll through data on the display. In most cases, holding down these buttons during a scroll operation scrolls at high speed.
Initial Screens
When you enter the World Time or Alarm Mode, the data you were viewing when you last exited the mode appears first.
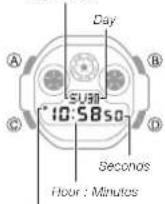
Timekeeping
Day of week
PM Indicator
Use the Timekeeping Mode to set and view the current time and date.
Read this before you set the time and date! The times displayed in the Timekeeping Mode and World Time Mode are linked. Because of this, make sure you select a city code for your Home City (the city where you normally use the watch) before you set the time and date.
- To view the current Home City code setting, press (A) while in the Timekeeping Mode.
- For full information on city codes, see the "City Code Table" at the back of this manual.
E-9
F-8
Operation Guide 3465
CASIO®
Month
Year
To set the time and date
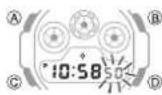
In the Timekeeping Mode, hold down (A) until the seconds start to flash, which indicates the setting screen.
- Press © to move the flashing in the sequence shown below to select other settings.

flowchart
graph LR
    A["Seconds"] --> B[" "] --> C[" "] --> D[" "] --> E["MinutesHourDSTCity"]
    F["Day 12/24 Hour Format"] --> G[" "] --> H[" "]
    H --> I[" "]
    I --> J[" "]
    J --> K[" "]
    K --> L[" "]
    L --> M[" "]
    M --> N[" "]
    N --> O[" "]
    O --> P[" "]
    P --> Q[" "]
    Q --> R[" "]
    R --> S[" "]
    S --> T[" "]
    T --> U[" "]
    U --> V[" "]
    V --> W[" "]
    W --> X[" "]
    X --> Y[" "]
    Y --> Z[" "]
    Z --> A
- When the setting you want to change is flashing, use Ⓓ and Ⓑ to change it as described below.
| Screen To do this: Do this: | ||
| 50 | Raset the seconds to 00 | Press 1. |
| TYO | Change the city code | Use 1 (east; and 3 (west). |
| OF | Toggle between Daylight Saving Time (On)and Standard Time (OF) | Press 1. |
| 10:58Code | Change the hour or minutes | Use 1 (+) and 1 (-). |
| 12 H | Toggle between 12 hour (12H); and 24-hour(24H); timekeeping | Press 1. |
| 6:3020 19 | Change the year, month, or day | Use 1 (+) and 1 (-). |
- See "Daylight Saving Time (DST)" (page E-13) for details about the DST setting.
E-10
E-11
-
Press Ⓐ to exit the setting screen.
-
Resetting the seconds to 00 while the current count is in the range of 30 to 59 causes the minutes to be increased by 1. In the range of 00 to 29, the seconds are reset to 00 without changing the minutes.
- With the 12-hour format, the P (PM) indicator appears to the left of the hour digits for times in the range of noon to 11:59 p.m. and no indicator appears to the left of the hour digits for times in the range of midnight to 11:59 a.m.
- With the 24-hour format, times are displayed in the range of 0:00 to 23:59, without any indicator.
- The 12-hour/24-hour timekeeping format you select in the Timekeeping Mode is applied in all modes.
• The year can be set in the range of 2000 to 2099. - The watch's built-in full automatic calendar makes allowances for different month lengths and leap years. Once you set the date, there should be no reason to change it except after you have the watch's battery replaced.
- The day of the week is automatically displayed in accordance with the date (year, month, and day) settings.
Daylight Saving Time (DST)
Daylight Saving Time (summer time) advances the time setting by one hour from Standard Time. Remember that not all countries or even local areas use Daylight Saving Time.
To toggle the Timekeeping Mode time between DST and Standard Time
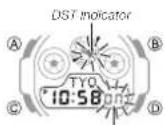
On/Off status
- In the Timekeeping Mode, hold down Ⓐ until the seconds start to flash, which indicates the setting screen.
- Press © twice to display the DST setting screen.
- Press ⓝ to toggle between Daylight Saving Time (On) and Standard Time (OF).
- Press Ⓐ to exit the setting screen.
- The DST indicator is displayed on the Timekeeping Mode and Alarm Mode screen while Daylight Saving Time is turned on.
E-13
E-12
World Time
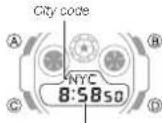
Current time in the zone of the selected city code
World Time shows the current time in 48 cities (29 time zones) around the world.
- All of the operations in this section are performed in the World Time Mode, which you enter by pressing © (page E-6).
To view the time in another city code
In the World Time Mode, press Ⓓ to scroll through the available city codes. Holding down the button scrolls at high speed.
- For full information about city codes, see the "City Code Table" at the back of this manual.
- If the current time shown for a city is wrong, check your Timekeeping Mode time and Home City code settings and make the necessary changes.
To toggle a city code time between Standard Time and Daylight Saving Time
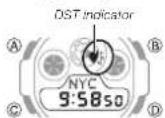
- In the World Time Mode, use Ⓓ to display the city code (time zone) whose Standard Time/Daylight Saving Time setting you want to change.
- Hold down Ⓐ for about one second to toggle between Daylight Saving Time (DST indicator displayed) and Standard Time (DST indicator not displayed).
- The DST Indicator is on the display whenever you display a city code for which Daylight Saving Time is turned on.
- Note that the DST/Standard Time setting affects only the currently displayed city code. Other city codes are not affected.
- In the World Time Mode, you can switch the city code you currently have selected as your Timekeeping Mode Home City between Standard Time and DST. The setting you select in the World Time Mode will also be applied in the Timekeeping Mode.
E-14
E-15
Note
- The seconds count of the World Time is synchronized with the seconds count of the Timekeeping Mode.
- All World Time Mode times are calculated from the current Home City time in the Timekeeping Mode using UTC time differential values.
- The UTC differential is a value that indicates the time difference between a
reference point in Greenwich, England and the time zone where a city is located. - The letters "UTC" is the abbreviation for "Coordinated Universal Time", which is the world-wide scientific standard of timekeeping. It is based upon carefully maintained atomic (cosium) clocks that keep time accurately to within microseconds. Leap seconds are added or subtracted as necessary to keep UTC in sync with the Earth's rotation.
Stopwatch
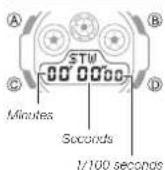
The stopwatch lets you measure elapsed time, split times, and two finishes.
• The display range of the stopwatch is 59 minutes, 59.99 seconds.
• The stopwatch continues to run, restarting from zero after it reaches its limit, until you stop it.
- The stopwatch measurement operation continues even if you exit the Stopwatch Mode.
- Exiting the Stopwatch Mode while a split time is frozen on the display clears the split time and returns to elapsed time measurement.
- All of the operations in this section are performed in the Stopwatch Mode, which you enter by pressing © (page E-7).
E-16
E-17
To measure times with the stopwatch
Elapsed Time

Split Time

Two Finishes

First runner finishes. Display time of first runner.
F-18
Countdown Timer
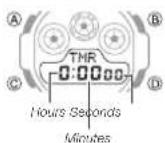
The countdown timer can be set within a range of one minute to 24 hours. An alarm sounds when the countdown reaches zero.
- The countdown operation continues even if you exit the Countdown Timer Mode.
- All of the operations in this section are performed in the Countdown Timer Mode, which you enter by pressing © (page E-7).
To use the countdown timer
Press Ⓓ while in the Countdown Timer Mode to start the countdown timer.
- When the end of the countdown is reached, the alarm sounds for 10 seconds or until you stop it by pressing any button. The countdown time is automatically reset to its starting value after the alarm stops.
E-19
- Press (D) while a countdown operation is in progress to pause it. Press (D) again to resume the countdown.
- To completely stop a countdown operation, first pause it (by pressing ①), and then press ②. This returns the countdown time to its starting value.
To set the countdown start time
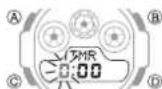
- In the Countdown Timer Mode, hold down Ⓐ until the hours of the countdown start time start to flash, which indicates the setting screen.
- Press © to move the flashing between the hours and minutes.
- While a setting is flashing, use Ⓓ (1) or Ⓑ (-) to change it. • To set the starting value of the countdown time to 24 hours, set 0:00.
- Press Ⓐ to exit the setting screen.
Alarms
Alarm number
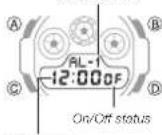
Alarm time (Hour : Minutes)
The Alarm Mode gives you a choice of five daily alarms, one of which is a snooze alarm. Also use the Alarm Mode to turn the Hourly Time Signal (SIG) on and off.
- The snooze alarm screen is indicated by SNZ, while the other alarm screens are numbered AL-1 through AL-4. The Hourly Time Signal screen is indicated by SIG.
- All of the operations in this section are performed in the Alarm Mode, which you enter by pressing © (page E-7).
E-20
E-21
To set an alarm time
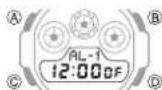
- In the Alarm Mode, use Ⓓ to scroll through the alarm screens until the one whose time you want to set is displayed.
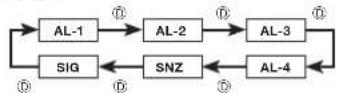
- To set an alarm time, display the applicable alarm screen (AL-1 through AL-4, or SNZ).
• The snooze alarm operation repeats every five minutes.
- After you select an alarm, hold down Ⓐ until the hour setting of the alarm time starts to flash, which indicates the setting screen. • This operation turns on the alarm automatically.
E-22
- Press © to move the flashing between the hour and minute settings.
- While a setting is flashing, use Ⓓ (+) and Ⓑ (−) to change it.
- When setting the alarm time using the 12-hour format, take care to set the time correctly as a.m. (indicator not displayed) or p.m. (P indicator).
- Press Ⓐ to exit the setting screen.
Alarm Operation
The alarm sounds at the preset time for about 10 seconds, regardless of the mode the watch is in. In the case of the snooze alarm, the alarm operation is performed a total of seven times, every five minutes, or until you turn the alarm off (page E-24). To stop the alarm tone after it starts to sound, press any button.
- Performing any one of the following operations during a 5-minute interval between snooze alarms cancels the current snooze alarm operation. Displaying the Timekeeping Mode setting screen (page E-10) Displaying the snooze alarm setting screen (page E-22)
To test the alarm
In the Alarm Mode, hold down Ⓓ to sound the alarm.
E-23
To turn an alarm on and off
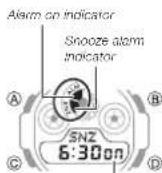
On/Off status
- In the Alarm Mode, use Ⓓ to select an alarm.
- Press Ⓐ to toggle it on (On displayed) and off (OF displayed).
- Turning on an alarm (AL-1, AL-2, AL-3, AL-4 or SNZ) displays the alarm on indicator on its Alarm Mode screen.
- In all modes, the alarm on indicator is shown for any alarm that is currently turned on.
- The alarm on indicator flashes while the alarm is sounding.
• The snooze alarm indicator flashes during the 5-minute intervals between alarms.
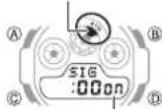
To turn the Hourly Time Signal on and off
Hourly time signal on indicator
- In the Alarm Mode, use Ⓓ to select the Hourly Time Signal (SIG).
- Press Ⓐ to toggle it on (On displayed) and off (OF displayed).
- The Hourly Time Signal on indicator is shown on the display in all modes while the Hourly Time Signal is turned on.
On/Off status
E-24
E-25
Illumination
This watch has an EL (electro-luminescent) panel that causes the entire display to glow for easy reading in the dark.
Illumination Precautions
- The electro-luminescent panel that provides illumination loses power after very long use.
- Illumination may be hard to see when viewed under direct sunlight.
- The watch may emit an audible sound whenever the display is illuminated. This is due to vibration of the EL panel used for illumination, and does not indicate malfunction.
- Illumination automatically turns off whenever an alarm sounds.
• Frequent use of illumination runs down the battery.
To illuminate the display
In any mode, press Ⓑ to turn on illumination.
- You can use the procedure below to select either 1.5 seconds or 3 seconds as the illumination duration. When you press Ⓑ, the illumination will remain on for about 1.5 seconds or 3 seconds, depending on the current illumination duration setting.
To specify the illumination duration
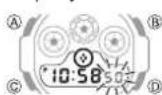
- In the Timekeeping Mode, hold down Ⓐ until the seconds start to flash, which indicates the setting screen.
- While the seconds are flashing, press Ⓑ to toggle the illumination duration between 1.5 seconds (♦) and 3 seconds (♦).
- Press Ⓐ to exit the setting screen.
E-27
E-26
Other Settings
Button Operation Tone
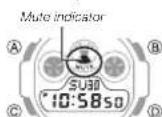
The button operation tone sounds any time you press one of the watch's buttons. You can turn the button operation tone on or off as desired.
- Even if you turn off the button operation tone, the alarm, Hourly Time Signal, and Countdown Timer Mode alarm all operate normally.
To turn the button operation tone on and off
In any mode (except when a setting screen is on the display), hold down Ⓒ to toggle the button operation tone on (Mute indicator not displayed) and off (Mute indicator displayed).
- Holding down © to turn the button operation tone on or off also causes the watch's current mode to change.
- The Mute indicator is displayed in all modes when the button operation tone is turned off.
F-28
E-29
Specifications
Accuracy at normal temperature: ±15 seconds a month
imekeeping: Hour, minutes, seconds, a.m./p.m. (P), day, day of the week
Time format: 12-hour and 24-hour
Calendar system: Full Auto-calendar pre-programmed from the year 2000 to
2099
Other: Home City code (can be assigned one of 48 city codes); Daylight Saving
Time (summer time)/Standard Time
World Time: 48 cities (29 time zones)
Other: Daylight Saving Time/Standard Time
Stopwatch
Measuring unit: 1/100 seconds
Measuring capacity: 59'59.99
Measuring modes: Elapsed time, split time, two finishes
E-30
Countdown Timer
Measuring unit: 1 second
Input range: 1 minute to 24 hours (1-minute increments and 1-hour increments)
Time up alert duration: 10 seconds
Alarms: 5 daily alarms (with 1 snooze alarm); Hourly Time Signal
Illumination: EL Backlight (electro-luminescent panel); Selectable illumination
duration
Other: Button operation tone on/off
Battery: One lithium battery (Type: CR2025)
Approximately 5 years on type CR2025 (assuming alarm operation 10 seconds
per day, and one illumination operation 1.5 seconds per day)
Frequent use of illumination can shorten battery operating time.
Specifications are subject to change without notice.
Operating Precautions
Water Resistance
- The information below applies to watches with WATER RESIST or WATER RESISTANT marked on the back cover.
| Water Resistance Under Daily Use | Enhanced Water Resistance Under Daily Use | ||||
| 5 Atmospheres | 10 Atmospheres | 20 Atmospheres | |||
| Marking | On watch front or on back cover | No BAR mark | 5BAR 100BAR 20BAR | ||
| Example of Daily Use | Hand washing, rain Yes | Yes Yes Yes | |||
| Water-related work, swimming | No Yes | Yes Yes | |||
| Windsurfing No No Yes | Yes | ||||
| Skin diving No No Yes Yes | Yes | ||||
Do not use your watch for scuba diving or other types of diving that requires air tanks.
E-32
OPUM-E
E-31
- Watches that do not have WATER RESIST or WATER RESISTANT marked on the back cover are not protected against the effects of sweat. Avoid using such a watch under conditions where it will be exposed to large amounts of sweat or moisture, or to direct splashing with water.
- Even if a watch is water resistant, note the usage precautions described below. Such types of use reduce water resistance performance and can cause fogging of the glass.
- Do not operate the crown or buttons while your watch is submersed in water or
wet.
- Avoid wearing your watch while in the bath.
- Do not wear your watch while in a heated swimming pool, sauna, or any other
high temperature/high humidity environment.
- Do not wear your watch while washing your hands or face, while doing
housework, or while performing any other task that involves soaps or detergents.
• After submersion in seawater, use plain water to rinse all salt and dirt from your
watch.
- To maintain water resistance, have the gaskets of your watch replaced periodically (about once every two or three years).
E-33
- A trained technician will inspect your watch for proper water resistance whenever you have its battery replaced. Battery replacement requires the use of special tools. Always request battery replacement from your original retailer or from an authorized CASIO service center.
- Some water-resistant watches come with fashionable leather bands. Avoid swimming, washing, or any other activity that causes direct exposure of a leather band to water.
- The inside surface of the watch glass may fog when the watch is exposed to a sudden drop in temperature. No problem is indicated if the fogging clears up relatively quickly. Sudden and extreme temperature changes (such as coming into an air conditioned room in the summer and standing close to an air conditioner outlet, or leaving a heated room in the winter and allowing your watch to come into contact with snow) can cause it to take longer for glass fogging to clear up. If glass fogging does not clear up or if you notice moisture inside of the glass, immediately stop using your watch and take it to your original retailer or to an authorized CASIO service center.
- Your water-resistant watch has been tested in accordance with International Organization for Standardization regulations.
E-34
Band
- Tightening the band too tightly can cause you to sweat and make it difficult for air to pass under the band, which can lead to skin irritation. Do not fasten the band too tightly. There should be enough room between the band and your wrist so you can insert your finger.
- Deterioration, rust, and other conditions can cause the band to break or come off of your watch, which in turn can cause band pins to fly out of position or to fall out. This creates the risk of your watch falling from your wrist and becoming lost, and also creates the risk of personal injury. Always take good care of your band and keep it clean.
- Immediately stop using a band if you even notice any of the following: loss of band flexibility, band cracks, band discoloration, band looseness, band connecting pin flying or falling out, or any other abnormality. Take your watch to your original retailer or to a CASIO service center for inspection and repair (for which you will be charged) or to have the band replaced (for which you will be charged).
E-35
Temperature
- Never leave your watch on the dashboard of a car, near a heater, or in any other location that is subject to very high temperatures. Do not leave your watch where it will be exposed to very low temperatures. Temperature extremes can cause your watch to lose or gain time, to stop, or otherwise malfunction.
- Leaving your watch in an area hotter than +60^ (140°F) for long periods can lead to problems with its LCD. The LCD may become difficult to read at temperatures lower than 0^ (32°F) and greater than +40^ (104°F).
Impact
- Your watch is designed to withstand impact incurred during normal daily use and during light activity such as playing catch, tennis, etc. Dropping your watch or otherwise subjecting it to strong impact, however, can lead to malfunction. Note that watches with shock-resistant designs (G-SHOCK, BABY-G, G-MS) can be worn while operating a chain saw or engaging in other activities that generate strong vibration, or while engaging in strenuous sports activities (motocross, etc.)
E-36
Magnetism
- Though a digital watch normally is not affected by magnetism, very strong magnetism (from medical equipment, etc.) should be avoided because it can cause malfunction and damage to electronic components.
Electrostatic Charge
- Exposure to very strong electrostatic charge can cause your watch to display the wrong time. Very strong electrostatic charge even can damage electronic components.
- Electrostatic charge can cause the display to go blank momentarily or cause a rainbow effect on the display.
Chemicals
- Do not allow your watch to come into contact with thinner, gasoline, solvents, oils, or fats, or with any cleaners, adhesives, paints, medicines, or cosmetics that contain such ingredients. Doing so can cause discoloration of or damage to the resin case, resin band, leather, and other parts.
E-37
Storage
- If you do not plan to use your watch for a long time, thoroughly wipe it free of all dirt, sweat, and moisture, and store it in a cool, dry place.
Resin Components
- Allowing your watch to remain in contact with other items or storing it together with other items for long periods while it is wet can cause color on resin components to transfer to the other items, or the color of the other items to transfer to the resin components of your watch. Be sure to dry off your watch thoroughly before storing it and make sure it is not in contact with other items.
- Leaving your watch where it is exposed to direct sunlight (ultraviolet rays) for long periods or failure to clean dirt from your watch for long periods can cause it to become discolored.
- Friction caused by certain conditions (strong external force, sustained rubbing, impact, etc.) can cause discoloration of painted components.
- If there are printed figures on the band, strong rubbing of the printed area can cause discoloration.
E-38
- Leaving your watch wet for long periods can cause fluorescent color to fade. Wipe the watch dry as soon as possible after it becomes wet.
- Semi-transparent resin parts can become discolored due to sweat and dirt, and if exposed to high temperatures and humidity for long periods.
- Daily use and long-term storage of your watch can lead to deterioration, breaking, or bending of resin components. The extent of such damage depends on usage conditions and storage conditions.
Leather Band
- Allowing your watch to remain in contact with other items or storing it together with other items for long periods while it is wet can cause the color of the leather band to transfer to the other items or the color of the other items to transfer to the leather band. Be sure to dry off your watch thoroughly with a soft cloth before storing it and make sure it is not in contact with other items.
E-39
Operation Guide 3465
CASIO®
- Leaving a leather band where it is exposed to direct sunlight (ultraviolet rays) for long periods or failure to clean dirt from a leather band for long periods can cause it to become discolored.
CAUTION: Exposing a leather band to rubbing or dirt can cause color transfer and discoloration.
Metal Components
- Failure to clean dirt from metal components can lead to formation of rust, even if components are stainless steel or plated. If metal components exposed to sweat or water, wipe thoroughly with a soft, absorbent cloth and then place the watch in a well-ventilated location to dry.
- Use a soft toothbrush or similar tool to scrub the metal with a weak solution of water and a mild neutral detergent, or with soapy water. Next, rinse with water to remove all remaining detergent and then wipe dry with a soft absorbent cloth. When washing metal components, wrap the watch case with kitchen plastic wrap so it does not come into contact with the detergent or soap.
E-40
Bacteria and Odor Resistant Band
- The bacteria and odor resistant band protects against odor generated by the formation of bacteria from sweat, which ensures comfort and hygiene. In order to ensure maximum bacteria and odor resistance, keep the band clean. Use an absorbent soft cloth to thoroughly wipe the band clean of dirt, sweat, and moisture. A bacteria and odor resistant band suppresses the formation of organisms and bacteria. It does not protect against rash due to allergic reaction, etc.
Liquid Crystal Display
- Display figures may be difficult to read when viewed from an angle.
Note that CASIO COMPUTER CO., LTD. assumes no responsibility for any damage or loss suffered by you or any third party arising through the use of your watch or its malfunction.
E-41
User Maintenance
Caring for Your Watch
Remember that you wear your watch next to your skin, just like a piece of clothing. To ensure your watch performs at the level for which it is designed, keep it clean by frequently wiping with a soft cloth to keep your watch and band free of dirt, sweat, water and other foreign matter.
- Whenever your watch is exposed to sea water or mud, rinse it off with clean fresh water.
- For a metal band or a resin band with metal parts, use a soft toothbrush or similar tool to scrub the band with a weak solution of water and a mild neutral detergent, or with soapy water. Next, rinse with water to remove all remaining detergent and then wipe dry with a soft absorbent cloth. When washing the band, wrap the watch case with kitchen plastic wrap so it does not come into contact with the detergent or soap.
- For a resin band, wash with water and then wipe dry with a soft cloth. Note that sometimes a smudge like pattern may appear on the surface of a resin band. This will not have any effect on your skin or clothing. Wipe with a cloth to remove the smudge pattern.
E-42
- Clean water and sweat from a leather band by wiping with a soft cloth.
- Not operating a watch crown, buttons, or rotary bezel could lead to later problems with their operation. Periodically rotate the crown and rotary bezel, and press buttons to maintain proper operation.
Dangers of Poor Watch Care
Rust
- Though the metal steel used for your watch is highly rust-resistant, rust can form if your watch is not cleaned after it becomes dirty. - Dirt on your watch can make it impossible for oxygen to come into contact with the metal, which can lead to breakdown of the oxidization layer on the metal surface and the formation of rust.
- Rust can cause sharp areas on metal components and can cause band pins to fly out of position or to fall out. If you ever notice any abnormality immediately stop using your watch and take it to your original retailer or to an authorized CASIO service center.
E-43
- Even if the surface of the metal appears clean, sweat and rust in crevasses can soil the sleeves of clothing, cause skin irritation, and even interfere with watch performance.
Premature Wear
• Leaving sweat or water on a resin band or bezel, or storing your watch an area subject to high moisture can lead to premature wear, cuts, and breaks.
Skin Irritation
- Individuals with sensitive skin or in poor physical condition may experience skin irritation when wearing a watch. Such individuals should keep their leather band or resin band particularly clean. Should you ever experience a rash or other skin irritation, immediately remove your watch and contact a skin care professional.
Battery Replacement
- Leave battery replacement up to your original retailer or authorized CASIO service center.
- Have the battery replaced only with the type specified in the User's Guide. Use of a different battery type can cause malfunction.
E-44
- When replacing the battery, also request a check for proper water resistance. - Ornamental resin components may become worn, cracked, or bent over time when subjected to normal daily use. Note that if cracking or any other abnormality indicating possible damage is noticed in a watch submitted for battery replacement, your watch will be returned with an explanation of the abnormality, without the requested servicing being performed.
Initial Battery
- The battery that comes loaded in your watch when you purchase it is used for function and performance testing at the factory.
- The test battery may go dead quicker than the normally rated battery life as noted in the User's Guide. Note that you will be charged for replacement of this battery, even if replacement is required within your watch's warranty period.
E-45
Low Battery Power
- Low battery power is indicated by large timekeeping error, by dim display contents, or by a blank display.
- Operation while battery power is low can result in malfunction. Replace the battery as soon as possible.
E-46
City Code Table
City Code Table
| City Code | City | UTC Offset/ GMT Differential |
| PPG | Pago Pago -11 | |
| HNL | Honolulu -10 | |
| ANC | Anchorage -9 | |
| YVR | Vancouver | -8SFO San |
| LAX | Los Angeles | |
| DEN | Denver -7 | |
| MEX | Mexico City | -6 |
| CHI | Chicago | |
| MIA | Miami | -5 |
| NYC | New York | |
| CCS | Caracas | -4 |
| YYT | St. Johns | -3.5 |
| RIO | Rio De Janeiro | -3 |
| RAI | Praia | -1 |
| City Code | City | UTC Offset/GMT Differential |
| LIS | Lisbon | 0 |
| LON | London | |
| BCN | Barcelona | +1 |
| PAR | Paris | |
| RNF | Milan | |
| ROM | Rome | |
| BER | Berlin | |
| ATH | Athens | +2 |
| JNB | Johannesburg | |
| IST | Istanbul | |
| CAI | Cairo | |
| JRS | Jerusalem | |
| MOW | Moscow | +3 |
| JED | Jeddah | |
| THR | Tehran | +3.5 |
L-1
Operation Guide 3465
CASIO®
| City Code | City | UTC Offset/GMT Differential |
| DXB Dubai +4 | ||
| KBL Kabul +4.5 | ||
| KHI Karachi | +5 | |
| MLE Male | ||
| DEL Delhi +5.5 | ||
| DAC Dhaka +6 | ||
| RGN Yangon +8.5 | ||
| BKK Bangkok +7 | ||
| SIN Singapore | +9HKG Hor | |
| BJS Beijing | ||
| SEL Seoul | +9 | |
| TYO Tokyo | ||
| ADL Adelaide | +9.5 |
| City Code | City | UTC Offset/GMT Differential |
| GUM Guam | +10 | |
| SYD | Sydney | |
| NOU Nournea +11 | ||
| WLG | Wellington | +12 |
- Based on data as of July 2018.
- The rules governing global times (UTC offset and GMT differential) and summer time are determined by each individual country.
L-2
CASIO®
CASIO COMPUTER CO., LTD.
6-2, Hon-machi 1-chome
Shibuya-ku, Tokyo 151-8543, Japan