
G-Shock GST-W130BC-1A3ER - Watch CASIO - Free user manual and instructions
Find the device manual for free G-Shock GST-W130BC-1A3ER CASIO in PDF.


User questions about G-Shock GST-W130BC-1A3ER CASIO
0 question about this device. Answer the ones you know or ask your own.
Ask a new question about this device
Download the instructions for your Watch in PDF format for free! Find your manual G-Shock GST-W130BC-1A3ER - CASIO and take your electronic device back in hand. On this page are published all the documents necessary for the use of your device. G-Shock GST-W130BC-1A3ER by CASIO.
USER MANUAL G-Shock GST-W130BC-1A3ER CASIO
Operation Guide 5515
CASIO®
ENGLISH
Congratulations upon your selection of this CASIO watch.
Note that CASIO COMPUTER CO., LTD. assumes no responsibility for any damage or loss suffered by you or any third party arising through the use of your watch or its malfunction.
E-1
About This Manual
text_image
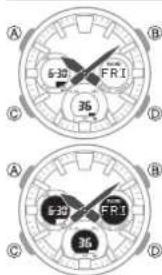
A B 6-30 FRI 35 C D A B 6-30 FRI 35 C D- Depending on the model of your watch, display text appears either as dark figures on a light background, or light figures on a dark background. All examples in this manual are shown using dark figures on a light background.
- Button operations are indicated using the letters shown in the illustration.
- Note that the product illustrations in this manual are intended for reference only, and so the actual product may appear somewhat different than depicted by an illustration.
E-3E-2
Things to check before using the watch
1. Check the battery power level.

flowchart
graph TD
    A["Is H or M indicated as the battery power indicator (page E-15)?"] --> B{YES}
    B --> C["The watch is charged. For details about charging, see "Charging the Watch" (page E-12)."]
    C --> D["Next"]
    D --> E["Go to step 2."]
    F["Battery power indicator"] --> G{NO}
    G --> H["Power is low. Charge the watch by placing it in a location where it is exposed to light. For details, see "Charging the Watch" (page E-12)."]
E-4
E-5
2. Check the Home City and the daylight saving time (DST) setting.
Use the procedure under "To configure Home City settings" (page E-42) to configure your Home City and daylight saving time settings.
Important!
- Proper time calibration signal reception and World Time Mode data depend on correct Home City, time, and date settings in the Timekeeping Mode. Make sure you configure these settings correctly.
3. Set the current time.
• To set the time using a time calibration signal
See "To get ready for a receive operation" (page E-26).
• To set the time manually
See "Configuring Current Time and Date Settings Manually" (page E 48).
E-6
E-7
Contents
About This Manual....E-2
Things to check before using the watch E-4
Charging the Watch E-12
To recover from the sleep state E-20
Radio Controlled Atomic Timekeeping E-21
To get ready for a receive operation....E-26
To perform manual receive E-29
To check the latest signal reception results E-33
To turn auto receive on and off E-34
Mode Reference Guide E-37
Timekeeping....E-41
F-8
The watch is now ready for use.
- For details about the watch's radio controlled timekeeping feature, see "Radio Controlled Atomic Timekeeping" (page E-21).
Configuring Home City Settings E-42
To configure Home City settings E-42
To change the Daylight Saving Time (summer time) setting E-45
Configuring Current Time and Date Settings Manually E-48
To change the current time and date settings manually....E-48
Using the World Time Mode E-53
To enter the World Time Mode....E-53
To view the time in another time zone E-53
To specify standard time or daylight saving time (DST) for a city .... E-54
To swap your Home Time and World Time Cities E-55
Using the Stopwatch E-57
To enter the Stopwatch Mode E-57
To perform an elapsed time operation E-58
To pause at a split time....E-58
To measure two finishes F-58
E-9
Operation Guide 5515
CASIO®
Using the Countdown Timer E-60 To enter the Countdown Timer Mode E-60
To specify the countdown start time ....E-60
To perform a countdown timer operation....E-62
To stop the alarm....E-62
Using the Alarm....E-63
To enter the Alarm Mode....E-63
To set an alarm time....E-64
To test the alarm....E-65
To turn an alarm and the Hourly Time Signal on and off....E-66
To stop the alarm....E-66
Illumination....E-68
To turn on illumination manually....E-68
To change the illumination duration....E-69
To turn the auto light switch on and off....E-73
E-10
Hand Home Position Adjustment....E-76 To adjust home positions manually....E-76
Moving the Hands for Easy Viewing of the Digital Dials....E-79
To move the hands to view a digital dial....E-80
To return the hands to their normal positions.... E-81
Other Settings E-82
To turn the button operation tone on and off....E-82
To turn Power Saving on and off....E-84
Troubleshooting....E-86
Specifications....E-93
E-11
Charging the Watch
The face of the watch is a solar panel that generates power from light. The generated power charges a built-in rechargeable battery, which powers watch operations. The watch charges whenever it is exposed to light.
Charging Guide

Whenever you are not wearing the watch, leave it in a location where it is exposed to light.
• Best charging performance is achieved by exposing the watch to the strongest light available.
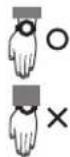
When wearing the watch, make sure that its face is not blocked from light by the sleeve of your clothing.
• The watch may enter a sleep state (page E-19) if its face is blocked by your sleeve even only partially.
Warning!
Leaving the watch in bright light for charging can cause it to become quite hot. Take care when handling the watch to avoid burn injury. The watch can become particularly hot when exposed to the following conditions for long periods.
- On the dashboard of a car parked in direct sunlight
- Too close to an incandescent lamp
• Under direct sunlight
Important!
- Allowing the watch to become very hot can cause the digital displays to black out. The appearance of the LCD should become normal again when the watch returns to a lower temperature.
- Turn on the watch's Power Saving function (page E-19) and keep it in an area normally exposed to bright light when storing it for long periods. This helps to ensure that power does not run down.
E-13
E-12
- Storing the watch for long periods in an area where there is no light or wearing it in such a way that it is blocked from exposure to light can cause power to run down. Expose the watch to bright light whenever possible.
Power Levels
You can get an idea of the watch's power level by observing the battery power indicator in the lower digital dial.
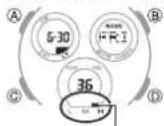
Battery power indicator
E-14
| Level | Battery Power Indicator | Function Status |
| 1(H) | All functions enabled. | |
| 2(M) | All functions enabled. | |
| 3(L and LOW) | Auto and manual receive, illumination, and cheaper disabled.Except for Timekeeping Mode, all other modes disabled. | |
| 4(CHG) | All functions and display indicators disabled except for timekeeping and display at CHG (charge) in the lower digital diet.I Hour and minute hands stopped at 12 o'clock. | |
| 5 | All functions disabled. |
- The flashing LOW message at Level 3 (L) tells you that battery power is very low, and that exposure to bright light for charging is required as soon as possible.
E-15
- At Level 5, all functions are disabled and settings return to their initial factory defaults. Once the battery reaches Level 2 (M) after falling to Level 5, reconfigure the current time, date, and other settings.
- Display indicators reappear as soon as the battery is charged from Level 5 to Level 2 (M).
- Leaving the watch exposed to direct sunlight or some other very strong light source can cause the battery power indicator to show a reading temporarily that is higher than the actual battery level. The correct battery level should be indicated after a few minutes.
- The current time and all other settings return to their initial factory defaults whenever battery power drops to Level 5 and when you have the battery replaced.
Power Recovery Mode
- Performing multiple illumination, bosper, and/or high-speed hand movement operation during a short period may cause all of the battery power indicators (H, M, and L) to start flashing in the lower digital dial. This indicates that the watch is in the power recovery mode. Illumination, alarm, countdown timer alarm, and hourly time signal operations will be disabled until battery power recovers.
- Battery power will recover in about 15 minutes. At this time, the battery power indicators (H, M, L) will stop flashing. This indicates that the functions listed above are enabled again.
- If all of the battery power indicators (H, M, L) are flashing and the CHG (charge) message also is flashing, it means the battery level is very low. Expose the watch to bright light as soon as possible.
- Frequent flashing of all of the battery power indicators (H, M, L) probably means that remaining battery power is low. Leave the watch in bright light to allow it to charge.
E-16
E-17
Charging Times
| Exposure Level (Brightness) | Daily Operation *1 | Level Change *2 | ||
| Level 5 Level 4 Level 3 Level | 2 Level 1 | |||
| Outdoor sunlight (50,000 lux) | 8 min. 3 hours | 22 hours 6 hours | ||
| Window sunlight (10,000 lux) | 30 min. 7 hours | 84 hours 23 hours | ||
| Window sunlight on cloudy day (5,000 lux) | 48 min. 10 hours | 136 hours | 37 hours | |
| Indoor fluorescent lighting (500 lux) | 6 hours 125 hours | |||
* 1 Approximate exposure each day to generate power for normal daily operation. * 2 Approximate exposure time (in hours) required to take power up one level.
- The above exposure times all are for reference only. Actual exposure times depend on lighting conditions.
F-18
- For details about the operating time and daily operating conditions, see the "Power Supply" (page E-95) section of the Specifications.
Power Saving
When turned on, Power Saving enters a sleep state automatically whenever the watch is left for a certain period in an area where it is dark. The table below shows how watch functions are affected by Power Saving.
- For information about enabling and disabling power saving, see "To turn Power Saving on and off" (page E-84).
- There actually are two sleep state levels: "display sleep" and "function sleep".
| Elapsed Time in Dark Digital Dials Operation | ||
| 60 to 70 minutes (display clock) Blank | Digital dials are off, but all functions are enabled. | |
| 6 or 7 days (function clock) Blank | Hour and minute hands stop at 12 o'clock. All functions are disabled, but timekeeping is maintained. | |
E-19
- The watch will not enter a sleep state between 6:00 AM and 9:59 PM. If the watch is already in a sleep state when 6:00 AM arrives, however, it will remain in the sleep state.
- The watch will not enter a sleep state while it is in the Stopwatch Mode or Countdown Timer Mode.
To recover from the sleep state
Move the watch to a well-lit area or press any button.
Radio Controlled Atomic Timekeeping
This watch receives a time calibration signal and updates its time setting accordingly. However, when using the watch outside of areas covered by time calibration signals, you will have to adjust the settings manually as required. See "Configuring Current Time and Date Settings Manually" (page E-48) for more information. This section explains how the watch updates its time settings when the city code selected as the Home City is in Japan, North America, Europe, or China, and is one that supports time calibration signal reception.
E-20
E-21
| If your Home City Code setting is this: | The watch can receive the signal from the transmitter located here: |
| LIS, LON, MAD, PAR, ROM, BER, STO, ATH, MOW | Anthorn (England), Maintlingen (Germany) |
| HKG, BUS Shanggu City (China) | |
| TPE, SEL, TYD Fukushima (Japan), Fukuoka | Saga (Japan) |
| HNL, ANC, YVR, LAX, YEA, DEN, MEX, CHI, NYC, YHZ, YYT | Fort Collins, Colorado (United States) |
Important!
- The areas covered by MOW, HNL and ANC are quite far from the calibration signal transmitters, so certain conditions may cause reception problems.
- When HKG or BJS is selected as the Home City, only the time and date are adjusted according to the time calibration signal. You need to switch manually between standard time and daylight saving time (DST) if required. See "To configure Home City settings" (page E 42) for information about how to do this.
E-22
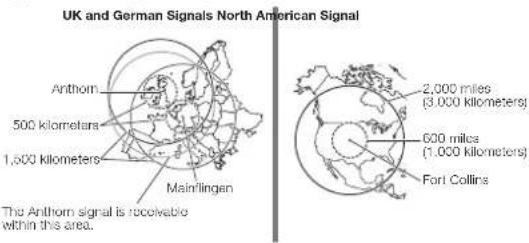
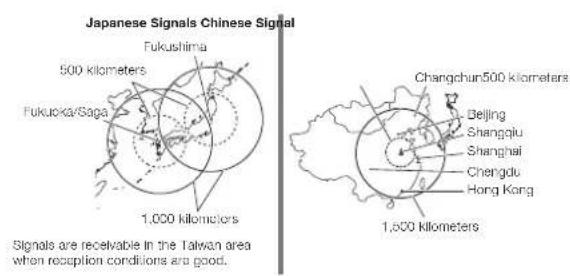
Approximate Reception Ranges
text_image
UK and German Signals North American Signal Anthon 500 kilometers 1,000 kilometers Mainlingen The Anthem signal is receivable within this area. 2,000 miles (3,000 kilometers) 600 miles (1,000 kilometers) Fort CollinsE-23
text_image
Japanese Signals Chinese Signal Fukushima 500 kilometers Fukuoka/Saga 1,000 kilometers Changchun 500 kilometers Beijing Shanghai Shanghai Chengdu Hong Kong 1,500 kilometers Signals are receivable in the Taiwan area when reception conditions are good.E-24
- Even when the watch is within range of a transmitter, signal reception may be impossible due to the effects of geographic contours, structures, weather, the time of year, the time of day, radio interference, etc. The signal becomes weaker at distances of approximately 500 kilometers, which means that the influence of the conditions listed above becomes even greater.
- Signal reception may not be possible at the distances noted below during certain times of the year or day. Radio interference may also cause problems with reception.
- Mainflingen (Germany) or Anthom (England) transmitters: 500 kilometers (310 miles)
- Fort Collins (United States) transmitter: 600 miles (1,000 kilometers)
- Fukushima or Fukuoka/Saga (Japan) transmitters: 500 kilometers (310 miles)
- Shangqiu (China) transmitter: 500 kilometers (310 miles)
- As of July 2016, China does not use Daylight Saving Time (DST). If China does go to the Daylight Saving Time system in the future, some functions of this watch may no longer operate correctly.
E-25
To get ready for a receive operation
- Confirm that the watch is in the Timekeeping Mode. If it isn't, use Ⓒ to enter the Timekeeping Mode (page E-38).
- The antenna of this watch is located on its 12 o'clock side. Position the watch with 12 o'clock facing towards a window as shown in the nearby illustration. Make sure there are no metal objects nearby.
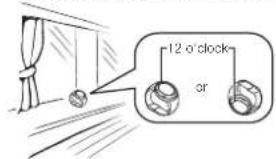
text_image
12 o'clock or• Signal reception normally is better at night.
- The receive operation takes from three to eight minutes, but in some cases it can take as long as 16 minutes. Take care that you do not perform any button operation or move the watch during this time.
E-26
- Signal reception may be difficult or even impossible under the conditions described below.
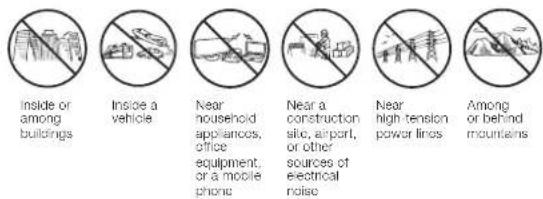
-
What you should do next depends on whether you are using Auto Receive or Manual Receive.
-
Auto Receive: Leave the watch over night in the location you selected in step 2. See "Auto Receive" below for details.
- Manual Receive: Perform the operation under "To perform manual receive" on page E-29.
Auto Receive
- With Auto Receive, the watch performs the receive operation each day automatically up to six times (up to five times for the Chinese calibration signal) between the hours of midnight and 5 a.m. (according to the Timokooping Mode time). When any receive operation is successful, none of the other receive operations for that day are performed.
- When a calibration time is reached, the watch will perform the receive operation only if it is in the Timekeeping Mode or World Time Mode. The receive operation is not performed if a calibration time is reached while you are configuring settings, while a countdown timer operation is in progress, or while the hands have been moved for easier viewing of the digital dials (page E-80).
F-28
- You can use the procedure under "To turn auto receive on and off" (page E-34) to enable or disable auto receive.
To perform manual receive
Receiving
RCVD indicator
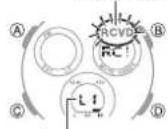
Signal level indicator
In the Timekeeping Mode, hold down Ⓓ until the watch beeps.
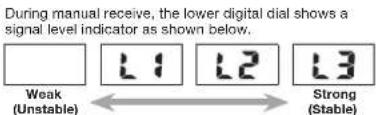
- A signal level indicator (L1, L2, or L3, see page E-32) appears in the lower digital dial after reception starts. Do not move the watch or perform any button operation until GET or ERR appears in the right digital dial.
E-27
E-29
Operation Guide 5515
CASIO®
Receive successful
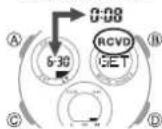
- If the receive operation is successful, the reception date and time appear in the left digital dial. The watch will return to the Timekeeping Mode if you press (i) or if you do not perform any button operation for about one or two minutes.
Receive failed
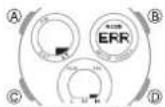
If there was a previously successful reception
- If the current reception fails but a previous reception (within the last 24 hours) was successful, the right digital dial will show RCVD and ERR. If only ERR is displayed (without RCVD), it means that all of the receive operations over the past 24 hours have failed. The watch will return to the Timekeeping Mode without changing the time setting if you press Ⓡ or if you do not perform any button operation for about one or two minutes.
Note
• To interrupt a receive operation and return to the Timekeeping Mode, press any button.
E-30
E-31
Signal Level Indicator
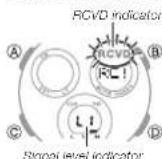
text_image
During manual receive, the lower digital dial shows a signal level indicator as shown below. Weak (Unstable) L1 L2 L3 Strong (Stable)As you watch the indicator, keep the watch in a location that best maintains stable reception.
• Even under optimum reception conditions, it can take about 10 seconds for reception to stabilize.
- Note that weather, the time of day, surroundings, and other factors all can affect reception.
To check the latest signal reception results
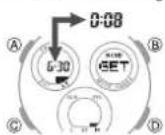
In the Timekeeping Mode, press (page E-41). - When receive is successful, the left digital dial shows the time and date that receive was successful. - : - indicates that none of the receive operations were successful. - To return to the Timekeeping Mode, press (D).
Note
- RCVD will not be displayed in the right digital dial if you have adjusted the time or date setting manually since the last receive operation.
E-32
E-33
To turn auto receive on and off
RCVD indicator
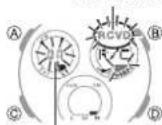
On/Off status
- In the Timekeeping Mode, press Ⓓ (page E-41).
-
Hold down Ⓐ until the current auto receive setting (On or OFF) and RCVD indicator start to flash. This is the setting mode.
-
Whenever you enter the setting mode, the analog hands will automatically move to positions that allow easier viewing of the digital dials.
- Note that the watch will not enter the setting mode if the currently selected Home City is one that does not support time calibration reception.
-
Press Ⓞ to toggle between auto receive on (On) and off (OFF).
-
Press Ⓐ to exit the setting mode.
- Exiting a setting mode will normally cause the hands to return to regular timekeeping automatically. However, if you manually move the hands (page E-80) and then enter a setting mode, they will not return to regular timekeeping automatically when you exit the setting mode. In this case, you will need to return the hands to their normal positions manually (page E-81).
Radio-controlled Atomic Timekeeping Precautions
- Strong electrostatic charge can result in the wrong time setting.
- Even if a receive operation is successful, certain conditions can cause the time setting to be off by up to one second.
- The watch is designed to update the date and day of the week automatically for the period January 1, 2000 to December 31, 2009. Updating of the date by signal reception will no longer be performed starting from January 1, 2100.
- If you are in an area where signal reception is not possible, the watch keeps time with the precision noted in "Specifications" (page E-93).
E-34
E-35
• The receive operation is disabled under any of the following conditions.
- While power is at Level 3 (L) or lower (page E-15)
- While the watch is in the power recovery mode (page E-17)
- When the watch is in the function sleep state ("Power Saving", page E-19)
- While a countdown timer operation is in progress (page E-60)
- While the hands are in positions to allow easier viewing of the digital dials (page E-80)
- A receive operation is cancelled if an alarm sounds while it is being performed.
- The Home City setting reverts to the initial default of TYO (Tokyo) whenever the battery power level drops to Level 5 or when you have the rechargeable battery replaced. If this happens, change the Home City to the setting you want (page E-42).
Mode Reference Guide
Your watch has "five modes". The mode you should select depends on what you want to do.
| To do this: Enter this mode; See: | ||
| · View the current date in the Home City· Configure Home City and dayght saving time (DST) settings· Configure time and date settings manually· Perform a time calibration receive operation· Check whether the last receive operation was successful· Switch between 12-hour and 24-hour timekeeping· Display an alarm countdown | Timekeeping Moda | E-41 |
| View the current time in one of 48 cities (31 time zones) around the globe | World Time Moda E-53 | |
| Use the stopwatch to measure elapsed time Stocwatch Moda E-57 | ||
| Use the countdown timer Countdown Timer Mose E-80 | ||
| Set an alarm time Alarm Moda E-83 | ||
E-36
E-37
Selecting a Mode
- The illustration below shows which buttons you need to press to navigate between modes.
- To return to the Timkeeping Mode from any other mode, hold down © for at least four seconds.
Timekeeping Mode World Time Mode
Countdown Timer Mode
Alarm Mode Stopwatch Mode

flowchart
graph LR
    A["F-38"] --> B["WTI"]
    B --> C["NYC"]
    C --> D["STW"]
    D --> E["TMR"]
    E --> F["AL1"]
    F --> G["E-39"]
    style A fill:#f9f,stroke:#333
    style G fill:#f9f,stroke:#333
F-39
General Functions (All Modes)
The functions and operations described in this section can be used in all of the modes.
Auto Return Features
- The watch returns to the Timekeeping Mode automatically if you do not perform any button operation for two or three minutes in the Alam Mode.
- If you leave the watch in a setting mode (with flashing digits) for two or three minutes without performing any operation, the watch will exit the setting mode automatically.
Initial Screens
When you enter the World Time or Alarm Mode, the data you were viewing when you last exited the mode appears first.
Scrolling
The ⑧ and ⑪ buttons are used in the setting mode to scroll through data. In most cases, holding down these buttons during a scroll operation scrolls through the data at high speed.
E-40
Timekeeping
text_image
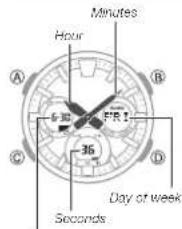
Minutes Hour A B F'R C -36 D Day of week SecondsMonth Day
Use the Timekeeping Mode to set and view the current time and date.
- When viewing a digital dial, you can move the analog hands for an unobstructed view.
- Press Ⓐ to toggle the left digital dial between month/day and hour/minutes.
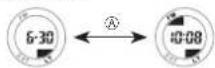
E-41
Configuring Home City Settings
There are two Home City settings: actually selecting the Home City, and selecting either standard time or daylight saving time (DST).
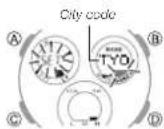
To configure Home City settings
- In the Timekeeping Mode, hold down Ⓐ for about two seconds until ADJ appears in the right digital dial. When you release Ⓐ, the city code and city name will scroll across the right digital dial. This is the setting mode.
- The watch will exit the setting mode automatically if you do not perform any operation for about two or three minutes.
- For details about city codes, see the "City Code Table" at the back of this manual.
- Whenever you enter a setting mode, the analog hands will automatically move to positions that allow easier viewing of the digital clials.
E-42
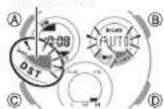
DST indicator
-
Use (East) and (West) to scroll through the city codes in the right digital dial until the one you want to use as your Home City is displayed.
-
Press © so the DST indicator is flashing in the left digital dial, which indicates the DST setting mode.
-
Use Ⓓ to cycle through the DST settings in the right digital dial in the sequence shown below.
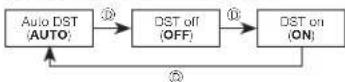
- The Auto DST (AUTO) setting will be available only when a city code that supports time calibration signal reception (page E-21) is selected as the Home City. While Auto DST is selected, the DST setting will be changed automatically in accordance with time calibration signal data.
E-43
- Note that you cannot switch between standard time and daylight saving time (DST) while UTC is selected as your Home City.
- After the setting is the way you want, press Ⓐ to return to the Timekeeping Mode.
• The DST indicator appears to indicate that Daylight Saving Time is turned on.
- Exiting a setting mode will normally cause the hands to return to regular timekeeping automatically. However, if you manually move the hands (page E-80) and then enter a setting mode, they will not return to regular timekeeping automatically when you exit the setting mode. In this case, you will need to return the hands to their normal positions manually (page E-81).
Note
- After you specify a city code, the watch will use UTC® offsets in the World Time Mode to calculate the current time for other time zones based on the current time in your Home City. * Coordinated Universal Time, the world-wide scientific standard of timekeeping. The reference point for UTC is Greenwich, England.
E-44
- Selecting some city codes automatically makes it possible for the watch to receive the time calibration signal for the corresponding area. See page E-21 for details.
To change the Daylight Saving Time (summer time) setting
DST Indicator
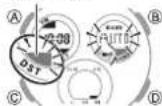
- In the Timekeeping Mode, hold down Ⓐ for about two seconds until ADJ appears in the right digital dial. When you release Ⓐ, the city code and city name will scroll across the right digital dial. This is the setting mode.
- Whenever you enter a setting mode, the analog hands will automatically move to positions that allow easier viewing of the digital dials.
- Press Ⓒ to enter the DST setting mode.
E-45
- Use (D) to cycle through the DST settings in the sequence shown below.
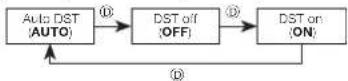
- The Auto DST (AUTO) setting will be available only when a city code that supports time calibration signal reception (page E-21) is selected as the Home City. While Auto DST is selected, the DST setting will be changed automatically in accordance with time calibration signal data.
- After the setting is the way you want, press Ⓐ to return to the Timekeeping Mode.
- The DST indicator appears to indicate that Daylight Saving Time is turned on.
E-46
- Exiting a setting mode will normally cause the hands to return to regular timekeeping automatically. However, if you manually move the hands (page E-80) and then enter a setting mode, they will not return to regular timekeeping automatically when you exit the setting mode. In this case, you will need to return the hands to their normal positions manually (page E-81).
Configuring Current Time and Date Settings Manually
You can configure current time and date settings manually when the watch is unable to receive a time calibration signal.
To change the current time and date settings manually
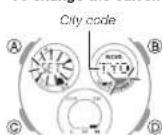
- In the Timekeeping Mode, hold down (A) for about two seconds until ADJ appears in the right digital dial. When you release (A), the city code and city name will scroll across the right digital dial. This is the setting mode.
- Whenever you enter a setting mode, the analog hands will automatically move to positions that allow easier viewing of the digital dials.
E-47
- Press © to move the flashing in the sequence shown below to select the other settings.
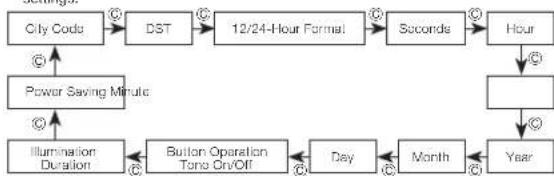
flowchart
graph TD
    A["City Code"] --> B["DST"]
    B --> C["12/24-Hour Format"]
    C --> D["Seconds"]
    D --> E["Hour"]
    E --> F["Year"]
    F --> G["Month"]
    G --> H["Day"]
    H --> I["Button Operation Tono On/Off"]
    I --> J["Illumination Duration"]
    J --> K["Power Saving Minute"]
    K --> A
- The following steps explain how to configure timekeeping settings only.
F-48
F-49
Operation Guide 5515
CASIO®
- When the timekeeping setting you want to change is flashing, use Ⓓ and/or Ⓔ to change it as described below.
| Screen To do this: Do this: | ||
| TYO:TOKYO | Change the city code | Use 1 (East) and 2 (West). |
| AUTO | Cycle between Auto DST (AUTO), Daylight Saving Time (ON) and Standard Time (OFF). | Press 1. |
| 12H | Toggle between 12-hour (12H) and 24-hour (24H); Imlekooping | |
| 3G | Reset the seconds to 00 | |
| Change the hour or minute | Use 1 (1) and 2 (-). | |
| 6-30 20 17 | Change the year, month, or day | |
| MUTE | Toggle between button operation tone on (KEY.) and off (MUTE). | Press 1. |
| LT1 | Toggle the illumination duration between three seconds (LT3) and 1.5 seconds (LT1) | |
E-50
-
Press Ⓐ to exit the setting mode.
-
The watch automatically adjusts its analog setting to match the current time displayed in the left digital dial.
- Exiting a setting mode will normally cause the hands to return to regular timekeeping automatically. However, if you manually move the hands (page E-80) and then enter a setting mode, they will not return to regular timekeeping automatically when you exit the setting mode. In this case, you will need to return the hands to their normal positions manually (page E-81).
Note
- For information about selecting a Home City and configuring the DST setting, see "Configuring Home City Settings" (page E-12).
- While 12-hour format is selected for timekeeping, a PM indicator will appear for times from noon to 11:59 p.m. No indicator appears for times from midnight to 11:59 a.m. With 24-hour format, time is displayed from 0:00 to 23:59, without any PM indicator.
E-51
- The watch's built-in full automatic calendar makes allowances for different month lengths and leap years. Once you set the date, there should be no reason to change it except after you have the watch's rechargeable battery replaced or after power drops to Level 5 (page F-15).
• The day of the week changes automatically when the date changes. -
Refer to the pages shown below for more information on Timekeeping Mode settings.
-
Button operation tone or/off: "To turn the button operation tone on and off" (page E-82)
- Enabling and disabling power saving: "To turn Power Saving on and off" (page E-84)
- The illumination duration: "To change the illumination duration" (page E-69)
Using the World Time Mode
Currently selected World Time City
You can use the World Time Mode to view the current time in one of 31 time zones (48 cities) around the globe. The city that is currently selected in the World Time Mode is called the "World Time City".
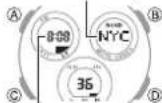
Current time in the currently selected World Time City
To enter the World Time Mode
Use © to select the World Time Mode as shown on page E-38.
- The right digital dial will show WT for about one second. After that, the city code and city name will scroll once across the right digital dial, and then the three-letter corresponding city code will be displayed.
To view the time in another time zone
In the World Time Mode, use Ⓓ (East) to scroll through city codes.
E-52
E-53
To specify standard time or daylight saving time (DST) for a city
DST indicator
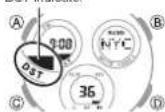
- In the World Time Mode, use Ⓐ (East) to scroll through the city codes in the right digital dial until the one whose Standard Time/Daylight Saving Time setting you want to change is displayed.
- Hold down Ⓐ for about two seconds until the watch beeps.
- This toggles the city code you selected in step 1 between Daylight Saving Time (DST indicator displayed in the left digital dial) and standard time (DST indicator not displayed).
- Using the World Time Mode to change the DST setting of the city code that is selected as your Home City also will change the Timekeeping Mode time DST setting.
- Note that you cannot switch between standard time/daylight saying time (DST) while UTC is selected as the World Time City.
E-54
- The standard time/daylight saving time (DST) setting affects only the currently selected time zone. Other time zones are not affected.
To swap your Home Time and World Time Cities
- In the World Time Mode, use Ⓓ to select the city you want to use as your new Home City.
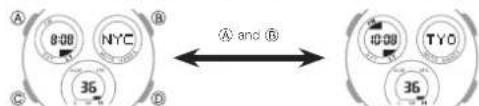
- To swap, hold down Ⓐ and Ⓑ at the same time until the watch beeps.
flowchart
graph LR
    A["800"] --> B["NYC"]
    B --> C["35"]
    C --> D["D"]
    D --> E["1000"]
    E --> F["TYO"]
    F --> G["35"]
    G --> H["D"]
    H --> I["A and B"]
- This will make the World Time City you selected in step 1 (NYC (New York)) your new Home City.
- Your previous Home City (TYO (Tokyo)) will be your new World Time City.
E-55
Note
- If you are using the watch in Japan, be sure to select TYO (Tokyo) as your Home City. Selecting another city code will make it impossible to receive the time calibration signal, which will cause the watch's time setting to be off.
Using the Stopwatch
The stopwatch measures elapsed time, split times, and two finishes.
Minutes Seconds
To enter the Stopwatch Mode
Use Ⓗ to select the Stopwatch Mode (STW) as shown on page E-39.
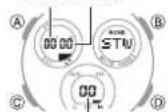
1/100 second
E-56
E-57
To perform an elapsed time operation
Start Stop Resume (Stop) Reset
To pause at a split time
Start Split → [SPL displayed] → Split release Stop Reset
To measure two finishes
Start Split (A) D(A) (SPL displayed) First runner finishes. Display time of first runner. Stop Second runner finishes. Split release Display time of second runner. Reset
F-58
Note
- The Stopwatch Mode can indicate elapsed time up to 59 minutes, 59.99 seconds.
- An ongoing elapsed time measurement operation will continue internally even if you change to another mode. However, if you exit the Stopwatch Mode while a split time is displayed, the split time will not be displayed when you return to the Stopwatch Mode.
E-59
Operation Guide 5515
CASIO®
Using the Countdown Timer
The countdown timer can be set within a range of one minute to 100 minutes. An alarm sounds when the countdown reaches zero.
Countdown time (Minutes, seconds)
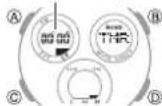
To enter the Countdown Timer Mode
Use © to select the Countdown Timer Mode (TMR) as shown on page E-39.
To specify the countdown start time
- Enter the Countdown Timer Mode,
- If a countdown is in progress (indicated by the seconds counting down in the left digital dial), press ① to stop it and then press ② to reset to the current countdown start time.
- If a countdown is paused, press Ⓐ to reset to the current countdown start time.
E-60
- Hold down Ⓐ until the minute setting of the current countdown start time starts to flash. This is the setting mode.
- Whenever you enter a setting mode, the analog hands will automatically move to positions that allow easier viewing of the digital dials.
-
Press © to move the flashing between the minute and second settings.
-
Use (D) (+) and (B) (-) to change the flashing item.
- To set the starting value of the countdown time to 100 minutes, set 00'00".
- Press Ⓐ to exit the setting mode.
- Exiting a setting mode will normally cause the hands to return to regular timekeeping automatically. However, if you manually move the hands (page E-80) and then enter a setting mode, they will not return to regular timekeeping automatically when you exit the setting mode. In this case, you will need to return the hands to their normal positions manually (page E-81).
E-61
To perform a countdown timer operation

Start Stop Resume (Stop) Reset
- Before starting a countdown timer operation, check to make sure that a countdown operation is not in progress (indicated by the seconds counting down). If it is, press (D) to stop it and then (A) to reset to the countdown start time.
- An alarm sounds for 10 seconds when the end of the countdown is reached. This alarm will sound in all modes. The countdown time is reset to its starting value automatically when the alarm sounds.
To stop the alarm
Press any button.
Using the Alarm
Alarm number
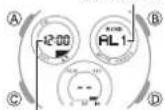
Alarm time (Hour: Minutes)
You can set five independent daily alarms. When a daily alarm is turned on, an alarm tone will sound for about 10 seconds each day when the time in the Timekeeping Mode reaches the preset alarm time. This is true even if the watch is not in the Timekeeping Mode.
You can also turn on an Hourly Time Signal, which will cause the watch to beep twice every hour on the hour.
To enter the Alarm Mode
Use © to select the Alarm Mode as shown on page E-39.
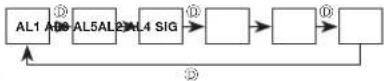
- The right digital dial will show ALM for about one second and then the indicator for the currently selected alarm (AL1 through AL5, or SIG) will appear.
- When you enter the Alarm Mode, the data you were viewing when you last exited the mode appears first.
E-62
E-63
To set an alarm time
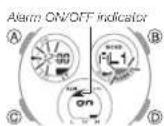
- In the Alarm Mode, use Ⓓ to scroll through the alarm indicators (AL1 to AL5, SIG) in the right digital dial until the one whose time you want to set is displayed.
- Hold down Ⓐ for about two seconds until the alarm time starts to flash. This is the setting mode.
- Whenever you enter the setting mode, the analog hands will automatically move to positions that allow easier viewing of the digital cials.
- Press © to move the flashing between the hour and minute settings.
E-64
- While a setting is flashing, use Ⓓ (+) and Ⓔ (-) to change it.
- When setting the alarm time using the 12-hour format, take care to set the time correctly as a.m. (no indicator) or p.m. (PM indicator).
- Press Ⓐ to exit the setting mode
- Exiting a setting@mode will normally cause the hands to return to regular timekeeping automatically. However, if you manually move the hands (page E-80) and then enter a setting mode, they will not return to regular timekeeping automatically when you exit the setting mode. In this case, you will need to return the hands to their normal positions manually (page E-81).
To test the alarm
In the Alarm Mode, hold down Ⓓ to sound the alarm.
E-65
To turn an alarm and the Hourly Time Signal on and off
Hourly Time Signal on indicator
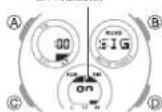
-
In the Alarm Mode, use Ⓓ to scroll through the alarm indicators (AL1 to AL5, SIG) in the right digital dial until the one you want is displayed.
-
When the alarm or the Hourly Time Signal you want is selected, press Ⓐ to toggle it between on and off.
- The alarm on indicator (when any alarm is on) and the Hourly Time Signal on indicator (when the Hourly Time Signal is on) are displayed in all modes.
To stop the alarm
Press any button.
Alarm Countdown
Alarm Countdown
Alarm ON/OFF indicator
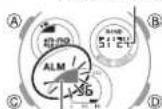
When the current time reaches one hour before an alarm time setting, the alarm on/off indicator (in the lower digital dial) will flash and a countdown of the final 60 minutes will be displayed in the right digital dial while the watch is in the Timekeeping Mode.
Note
- Pressing (A) while an alarm countdown is in progress will display the day of the week in the right digital dial for about two seconds. After that, the dial will return to the countdown.
- When you enter the Timekeeping Mode from another mode while an alarm countdown is in progress, the day of the week will appear in the right digital dial for two seconds. After that, the countdown will appear.
- If an alarm countdown for another alarm starts while a previous alarm countdown is already in progress, it will be displayed after the ongoing countdown reaches zero and its alarm sounds.
E-66
E-67
Illumination
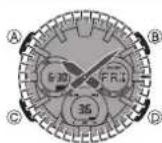
The face of the watch is illuminated for easy reading in the dark. The watch's auto light switch turns on illumination automatically when you angle the watch towards your face.
- The auto light switch must be turned on (page E-73) for it to operate.
To turn on illumination manually
Press Ⓑ in any mode to illuminate the face of the watch.
- You can use the procedure below to select either 1.5 seconds or three seconds as the illumination duration. When you press Ⓐ, the face will remain illuminated for about 1.5 seconds or three seconds, depending on the current illumination duration setting.
F-68
- The above operation turns on illumination regardless of the current auto light switch setting.
- Illumination is disabled during time calibration signal reception.
Important!
- The light source of the analog hand area is an ultraviolet light emitting diode. Do not look directly at the light source lens.
- Do not attempt to remove the light source from this watch to use it for another purpose.
- Do not look directly into the light source located at 6 o'clock.
To change the illumination duration
- In the Timekeeping Mode, hold down Ⓐ for about two seconds until ADJ appears in the right digital dial. When you release Ⓐ, the city code and city name will scroll across the right digital dial. This is the setting mode.
- Whenever you enter a setting mode, the analog hands will automatically move to positions that allow easier viewing of the digital dials.
E-69
- Use © to cycle through the settings in the right digital dial until the current illumination duration (LT1 or LT3) is shown.
- See the sequence in step 2 of the procedure under "To change the current time and date settings manually" (page E-48) for information about how to scroll through setting mode.
- Press Ⓓ to toggle the illumination duration between three seconds (LT3 displayed) and 1.5 seconds (LT1 displayed).
- After all of the settings are the way you want, press Ⓐ to exit the setting mode.
- Exiting a setting mode will normally cause the hands to return to regular timekeeping automatically. However, if you manually move the hands (page E-80) and then enter a setting mode, they will not return to regular timekeeping automatically when you exit the setting mode. In this case, you will need to return the hands to their normal positions manually (page E-81).
E-70
About the Auto Light Switch
Turning on the auto light switch causes illumination to turn on, whenever you position your wrist as described below in any mode.
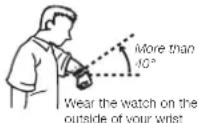
Moving the watch to a position that is parallel to the ground and then tilting it towards you more than 40 degrees causes illumination to turn on.
Warning!
• Always make sure you are in a safe place whenever you are reading the face of the watch using the auto light switch. Be especially careful when running or engaged in any other activity that can result in accident or injury. Also take care that sudden illumination by the auto light switch does not startle or distract others around you.
- When you are wearing the watch, make sure that its auto light switch is turned off before riding on a bicycle or operating a motorcycle or any other motor vehicle. Sudden and unintended operation of the auto light switch can create a distraction, which can result in a traffic accident and serious personal injury.
E-71
Note
- This watch features a "LED", so the auto light switch operates only when available light is below a certain level. It does not illuminate the face under bright light.
- The auto light switch is always disabled, regardless of its on/off setting, when any one of the following conditions exists.
While an alarm is sounding While a receive operation is in progress
To turn the auto light switch on and off
Auto light switch on indicator
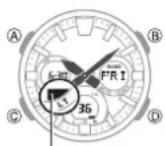
In the Timekeeping Mode, hold down Ⓑ for about three seconds to toggle the auto light switch on (indicator displayed in the right digital dial) and off (indicator not displayed).
- The auto light switch on indicator appears in all modes while the auto light switch is turned on.
- The auto light switch turns off automatically whenever battery power drops to Level 4 (page E-15).
Illumination Precautions
• LED panel that provides illumination loses power after very long use.
- Illumination may be hard to see when viewed under direct sunlight.
- Illumination turns off automatically whenever an alarm sounds.
- Frequent use of illumination runs down the battery.
E-73
E-72
Auto light switch precautions
- Wearing the watch on the inside of your wrist, movement of your arm, or vibration of your arm can cause frequent activation of the auto light switch and illumination of the face. To avoid running down the battery, turn off the auto light switch whenever engaging in activities that might cause frequent illumination of the face.
- Note that wearing the watch under your sleeve while the auto light switch is turned on can cause frequent illumination of the face and can run down the battery.

- Illumination may not turn on if the face of the watch is more than 15 degrees above or below parallel. Make sure that the back of your hand is parallel to the ground.
- Illumination turns off after the preset illumination duration (page E-69), even if you keep the watch pointed towards your face.
- Static electricity or magnetic force can interfere with proper operation of the auto light switch. If illumination does not turn on, try moving the watch back to the starting position (parallel with the ground) and then till it back towards your face again. If this does not work, drop your arm all the way down so it hangs at your side, and then bring it back up again.
E-74
- You may notice a very faint clicking sound coming from the watch when it is shaken back and forth. This sound is caused by mechanical operation of the auto light switch, and does not indicate a problem with the watch.
Hand Home Position Adjustment
Strong magnetism or impact can cause the hands of the watch to be off, even if the watch is able to perform the signal receive operation.
- Home position adjustment is not necessary when the analog time and digital time are the same time in the Timekeeping Mode.
To adjust home positions manually
-
In the Timekeeping Mode, hold down Ⓐ and keep it depressed for about five seconds until H.SET appears in the right digital dial.
-
The hour and minute hands should all move to 12 o'clock, which is their home position.
- Though ADJ will appear in the right digital dial about two seconds after you hold down Ⓐ, do not release the button yet. Keep it depressed until H.SET appears. When H.SET appears in the right digital dial, release the Ⓐ button. This will cause the hour and minute hands to move to 12 o'clock.
E-76
- The watch will return to regular timekeeping automatically if you do not perform any operation for about two or three minutes. Any changes you have made to settings up to that point will be saved. If the hour and minute hands are all at 12 o'clock, which is their home position, jump to step 3.
-
Use Ⓓ (+) and Ⓑ (−) to adjust the hour and minute hand positions.
-
Holding down either button will cause the hand to move at high speed. Once started, high-speed hand movement will continue even if you release the button. To stop high-speed hand movement, press any button.
- High-speed hand movement started with the Ⓓ (-) button will stop automatically after 12 revolutions of the minute hand. If started with the Ⓑ (-) button, it will stop after one revolution of the minute hand.
- Press Ⓐ to exit home position correction and return to regular timekeeping.
E-75
Moving the Hands for Easy Viewing of the Digital Dials
You can use the procedure below to move the analog hands in order to better view a digital dial.
Note
• The analog hands will not move while battery power is low.
- Time calibration signal reception is disabled while the hands are in positions to allow easier viewing of the digital dials (page E-80).
Note
- After performing home position adjustment, enter the Timekeeping Mode and check to make sure that the analog hands and the digital dial indicate the same time. If they do not, perform home position adjustment again.
E-78
E-79
Operation Guide 5515
CASIO®
To move the hands to view a digital dial
Hold down © for about two seconds until HAND appears.
Releasing © will cause the HANDS indicator to flash and the hands will move away from the digital dial.
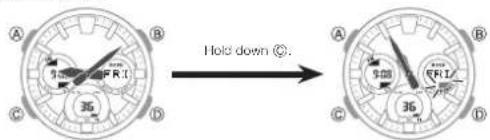
text_image
A B C D Hold down Ⓐ. A B C D 9.00 FR1 9.00 FR1 35 36To return the hands to their normal positions
Hold down © for about two seconds until HAND appears.
Note
- The hands will also return to their normal positions if you do not perform any operation for about one hour.
- The hands also will move away from the digital dial automatically whenever you enter a setting mode in the Timekeeping Mode, Timer Mode, or Alarm Mode.
- Time calibration signal reception is disabled while the hands are in positions to allow easier viewing of the digital dials (page E-B0).
- Hold down © for about four seconds to return the hands to their normal positions and switch to the Timekeeping Mode.
E-80
E-81
Other Settings
The button operation tone sounds any time you press one of the watch's buttons. You can turn the button operation tone on or off as desired. - Even if you turn off the button operation tone, the alarm, Hourly Time Signal, and Countdown Timer Mode alarm all operate normally.
To turn the button operation tone on and off

In the Timekeeping Mode, hold down Ⓐ for about two seconds until ADJ appears in the right digital dial. When you release Ⓐ, the city code and city name will scroll across the right digital dial. This is the setting mode.
- Whenever you enter a setting mode, the analog hands will automatically move to positions that allow easier viewing of the digital dials.
E-82
- Use © to cycle through settings in the right digital dial until the current button operation tone (MUTE or KEY) is displayed. • See the sequence in step 2 of the procedure under "To change the current time and date settings manually" (page E-48) for information about how to scroll between settings.
- Press Ⓓ to toggle the button operation tone on (KEY) and off (MUTE).
- After all of the settings are the way you want, press Ⓐ to exit the setting mode. • Exiting a setting mode will normally cause the hands to return to regular timekeeping automatically. However, if you manually move the hands (page E-80) and then enter a setting mode, they will not return to regular timekeeping automatically when you exit the setting mode. In this case, you will need to return the hands to their normal positions manually (page E-81).
Note
- The mute indicator is displayed in all modes when the button operation tone is turned off.
E-83
To turn Power Saving on and off
Power saving on indicator
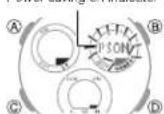
. In the Timekeeping Mode, hold down Ⓐ for about two seconds until ADJ appears in the right digital dial. When you release Ⓐ, the city code and city name will scroll across the right digital dial. This is the setting mode.
- Whenever you enter a setting mode, the analog hands will automatically move to positions that allow easier viewing of the digital dials.
- Use © to cycle through the settings in the right digital dial unit the current power saving setting (PSON or PSOF) is displayed.
- See the sequence in step 2 of the procedure under "To change the current time and date settings manually" (page E-48) for information about how to scroll between settings.
- Press Ⓓ to toggle Power Saving on (PSON) and off (PSOF).
E-84
- After all of settings are the way you want, press Ⓐ to exit the setting mode.
- Exiting a setting mode will normally cause the hands to return to regular timekeeping automatically. However, if you manually move the hands (page E-80) and then enter a setting mode, they will not return to regular timekeeping automatically when you exit the setting mode. In this case, you will need to return the hands to their normal positions manually (page E-81).
E-85
Troubleshooting
Time Setting
See "Radio Controlled Atomic Timekeeping" (page E-21) for information about adjusting the time setting according to a time calibration signal.
■ The current time setting is off by hours.
Your Home City setting may be wrong (page E-42). Check your Home City setting and correct it, if necessary.
■ The current time setting is off by one hour.
If you are using the watch in an area where time calibration signal reception is possible, see "To configure Home City settings" (page E-42).
If you are using in the watch in an area where time calibration signal reception is not possible, you may need to change your Home City's standard time/daylight saving time (DST) setting manually. Use the procedure under "To change the current time and date settings manually" (page E-48) to change the standard time/daylight saving time (DST) setting.
E-86
■ The hands are off.
This could indicate that the watch has been exposed to magnetism or strong impact, which has caused problems with proper hand alignment. Adjust the watch's hand home position alignment (page E-76).
■ The analog hands are not indicating the correct time.
If the HANDS indicator is displayed on the right digital dial, it means that the analog hands have been moved for easier viewing of the digital dials. Hold down © for about four seconds to return to the Timekeeping Mode.
World Time Mode
■ The time for my World Time City is off in the World Time Mode.
This could be due to incorrect switching between standard time and daylight saving time. See "To specify standard time or daylight saving time (DST) for a city" (page E-54) for more information.
E-87
Charging
■ The watch does not resume operation after I expose it to light.
This can happen after the power level drops to Level 5 (page E-15). Continue exposing the watch to light until the battery power indicator shows H or M.
Time Calibration Signal
The information in this section applies only when LIS, LON, MAD, PAR, ROM, BER, STO, ATH, MOW, HKG, BJS, HNL, ANC, YVR, LAX, YEA, DEN, MEX, CHI, NYC, YHZ, YYT, SEL, or TYO is selected at the Home City. You need to adjust the current time manually when any other city is selected as the Home City.
■ The watch can't receive a time calibration signal. The RCVD indicator does not appear.
| Possible Cause Remedy Page | ||
| You are wearing or moving the watior performing a button operationduring the signal receive operation.The watch is in an area with pooreception conditions. | Keep the watch in an area wherereception conditions are good whilethe signal receive operation is beingperformed. | E 26 |
| You are in an area where signareception is not possible for somereason. | See "Approximate Reception Ranges". E 23 | |
| The calibration signal is not beingtransmitted for some reason. | Check the website of the organizationthat maintains the time calibrationsignal in your area for informationabout its down times.Try again later. | - |
F-88
E-89
Operation Guide 5515
CASIO®
■ The current time setting changes after I set it manually.
You may have the watch configured for Auto Receive of the time calibration signal (page E-28), which will cause the time to be adjusted automatically according to your currently selected Home City. If this results in the wrong time setting, check your Home City setting and correct it, if necessary (page E-42).
■ The current time setting is off by one hour.
| Possible Cause Remedy Page | ||
| Signal reception on a day for switching between standard time/daylight saving time (DST) may have failed for some reason. | Perform the operation under "To get ready for a receive operation".The time setting will be adjusted automatically as soon as signal reception is successful. | E 26 |
| If you are unable to receive the time calibration signal, change the standard time/daylight saving time (DST) setting manually. | E 45 |
E-90
■ Auto Receive is not performed or you cannot perform Manual Receive.
| Possible Cause Remedy Page | ||
| The watch is not in the Timekeeping Mode or World Time Mode, a countdown timer operation is in progress, or the hands have been moved to a position to allow easier viewing of the digital dials. | Auto receive is performed only while the watch is in the Timekeeping Mode or World Time Mode. Switch to either of these two modes.If a countown timer operation is in progress, stop it. If the hands have been moved for easier viewing, return them to their normal positions. | E 36 |
| Your Home City setting is wrong. | Check your Home City setting and correct it, if necessary. | E 42 |
| There is not enough power for signal reception. | Expose the watch to light to charge it. E-12 | |
E-91
■ Signal reception is being performed successfully, but the time and/or day is wrong.
| Possible Cause Remedy Page | ||
| Your Home City setting is wrong. | Check your Home City setting and correct it, if necessary. | E-42 |
| The DST setting may be Incorrect. Change the DST setting to Auto DST. E 42 | ||
Specifications
Accuracy at normal temperature: ±15 seconds a month (with no signal calibration)
Timekeeping: Hour, minutes, seconds, p.m. (PM), year, month, day, day of the week, alarm countdown
Time format: 12-hour and 24-hour
Calendar system: Full Auto-calendar pre-programmed from the year 2000 to 2099
Other: Home City code (can be assigned one of 48 city codes); Standard Time/Daylight Saving Time (summer time)
Time Calibration Signal Reception: Auto receive 6 times a day (5 times a day for the Chinese calibration signal); Remaining auto receives cancelled as soon as one is successful; Manual receive
E-92
E-93
Receivable Time Calibration Signals: Mainflingen, Germany (Call Sign: DCF77, Frequency: 77.5 kHz); Anthorn, England (Call Sign: MSF, Frequency: 60.0 kHz); Fort Collins, Colorado, the United States (Call Sign: WWVB, Frequency: 60.0 kHz); Fukushima, Japan (Call Sign: JJY, Frequency: 40.0 kHz); Fukuoka/Saga, Japan (Call Sign: JJY, Frequency: 60.0 kHz); Shangqiu City, Henan Province, China (Call Sign: BPC, Frequency: 68.5 kHz)
World Time: 48 cities (31 time zones) Other: Daylight Saving Time/Standard Time
Stopwatch:
Measuring unit: 1/100 second
Measuring capacity: 59' 59.99"
Measuring modes: Elapsed time, split time, two finishes
Countdown Timer:
Measuring unit: 1 second
Countdown range: 100 minutes
Countdown start time setting range: 1 to 100 minutes (1-second increments)
Alarms: 5 Daily alarms; Hourly Time Signal
E-94
Illumination: LED light (LCD), ultraviolet LED light (analog hand area); Selectable illumination duration; Auto Light Switch (Full Auto LED Light operates only in the dark)
Other: Battery power indicator; Power Saving; Button operation tone on/off
Power Supply: Solar panel and one rechargeable battery
Approximate battery operating time: 6 months (from full charge to Level 4) under the following conditions:
• Watch not exposed to light
• Internal timekeeping
- Display on 18 hours per day, sleep state 6 hours per day
• 1 illumination operation (1.5 seconds) per day
• 10 seconds of alarm operation per day
• 4 minutes of signal reception per day
- 1 hand movement for easy viewing of the digital dials per day
Frequent use of illumination runs down the battery.
Specifications are subject to change without notice.
E-95
City Code Table
| City Code | City | UTC Offset/GMT Differential |
| PPG | Pago Pago | -11 |
| HNL | Honolulu | -10 |
| ANC | Anchorage | -9 |
| YVR | Vancouver | -8 |
| LAX | Los Angeles | |
| YEA | Edmonton | -7 |
| DEN | Denver | |
| MEX | Mexico City | -6 |
| CHI | Chicago | |
| NYC | New York | -5 |
| SCL | Santiago | -4 |
| YHZ | Halifax | |
| YYT | St. Johns | -3.5 |
| RIO | Ro De Janeiro | -3 |
| FEN | Fernando De Norona | -2 |
L-2
| City Code | City | UTC Offset/GMT Differential |
| RAI | Pala | -1 |
| UTC | 0 | |
| LIS | Lisbon | |
| LON | London | |
| MAD | Madrid | +1 |
| PAR | Paris | |
| ROM | Rome | |
| BER | Berlin | |
| STO | Stockholm | |
| ATH | Athens | +2 |
| CAI | Cairo | |
| JRS | Jerusalem | |
| MOW | Moscow | +3 |
| JED | Jeddah | |
| THR | Tehran | +3.5 |
| City Code | City | UTC Offset/ GMT Differential |
| DXB | Dubai +4 | |
| KBL | Kabul +4.5 | |
| KHI | Karachi +5 | |
| DEL | Delhi +5.5 | |
| KTM | Kathmandu | +5.75 |
| DAC | Dhaka | +6 |
| RGN | Yangon | +6.5 |
| BKK | Bangkok | +7 |
| SIN | Singapore | |
| HKG | Hong Kong | +8 |
| BJS | Beijing | |
| TPE | Taipei | |
| SEL | Seoul | +9 |
| TYO | Tokyo | |
| ADL | Adelaide | +9.5 |
| City Code | City | UTC Offset/GMT Differential |
| GUM | Guam | +10 |
| SYD | Sydney | |
| NOU | Noumea | +11 |
| WLG | Wellington | +12 |
• This table shows the city codes of this watch. (As of July 2016)
- The rules governing global times (UTC offset and GMT differential) and summer time are determined by each individual country.
L-3