
G-Shock GW-B5600BL-1ER - Watch CASIO - Free user manual and instructions
Find the device manual for free G-Shock GW-B5600BL-1ER CASIO in PDF.


User questions about G-Shock GW-B5600BL-1ER CASIO
0 question about this device. Answer the ones you know or ask your own.
Ask a new question about this device
Download the instructions for your Watch in PDF format for free! Find your manual G-Shock GW-B5600BL-1ER - CASIO and take your electronic device back in hand. On this page are published all the documents necessary for the use of your device. G-Shock GW-B5600BL-1ER by CASIO.
USER MANUAL G-Shock GW-B5600BL-1ER CASIO
Operation Guide 3459/3461
CASIO®
Contents
Before Getting Started...
Indicators
Navigating Between Modes
Solar Charging
Useful Features
Time Adjustment
Time Adjustment Using a Time Signal
Overview
Appropriate Signal Reception Location
Time Signal Reception Ranges
Auto Time Signal Receive
Manual Time Signal Receive
Receive Level Indicator
Signal Reception Precautions
Using Watch Operations to Adjust the Time Setting
Using the Watch in a Medical Facility or Aircraft
Using Mobile Link with a Mobile Phone
Getting Ready
① Install the required app on your phone.
② Configure Bluetooth settings.
③ Pair the watch with a phone.
Auto Time Adjustment
Configuring Reminder Settings
Configuring World Time Settings
Phone Finder
Configuring Watch Settings
Changing the Home City Summer Time Setting
Checking the Watch Charge Level
Recording Your Current Location (TIME & PLACE)
Connection
Connecting with a Phone
Disconnecting from a Phone
Unpairing
If you purchase another phone
Reminders
Recording an Appointment or Anniversary
Checking Reminder Notifications
World Time
Checking World Time
World Time City Setting
Swapping Your Home City Time and World Time
Alarms and Hourly Time Signal
Configuring Alarm Settings
Enabling/Disabling an Alarm or the Hourly Time Signal
Stopping an Alarm
Determining an Alarm's On/Off Status
Stopwatch
Measuring Elapsed Time
Measuring a Split Time
Timing the First and Second Place Finishers
Timer
Setting the Time
Using the Timer
Light
Illuminating the Display Manually
Auto Light
Configuring the Auto Light Setting
Specifying the Illumination Duration
Other Settings
Switching between 12-hour and 24-hour Timekeeping
Changing the Date Display Format
Specifying the Day of the Week Language
Enabling the Button Operation Tone
Configuring Power Saving Function Settings
Returning the Watch to Its Factory Default Settings
Moving to Another Time Zone
Other Information
City Table
Summer Time Table
Supported Phones
Specifications
Mobile Link Precautions
Copyrights and Registered Copyrights
Troubleshooting
Before Getting Started...
This section provides an overview of the watch and introduces convenient ways it can be used.
Note
- The illustrations included in this operation guide have been created to facilitate explanation. An illustration may differ somewhat from the item it represents.
Indicators
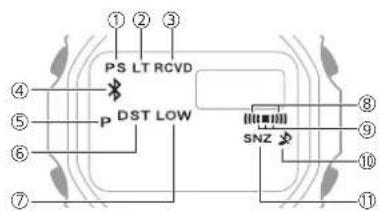
text_image
PS LT RCVD P DST LOW SNZ① Displayed while Power Saving is enabled.
② Displayed while Auto Light is enabled.
③ Displayed after time adjustment using time signal reception or connection with a phone was successful.
- The [RCVD] indicator will disappear in the cases below.
- After you use watch operations to change Home City settings (time and date, city, summer time)
After the watch switches between standard time and summer time - After a time signal receive operation fails
- After a phone-based time adjustment operation fails
④ Displayed while there is connection between the watch and a phone.
⑤ Displayed during p.m. times while 12-hour timekeeping is being used.
⑥ Displayed while the watch is indicating summer time.
⑦ Displayed while battery power is low
⑧ Displayed while an alarm is turned on.
⑨ Displayed while the hourly time signal is enabled.
⑩ Displayed while the operation tone is muted.
⑪ Displayed while the snooze alarm is enabled.
Navigating Between Modes
Press (C) to cycle between modes.
- In any mode, hold down (C) for about one second to enter the Timekeeping Mode.
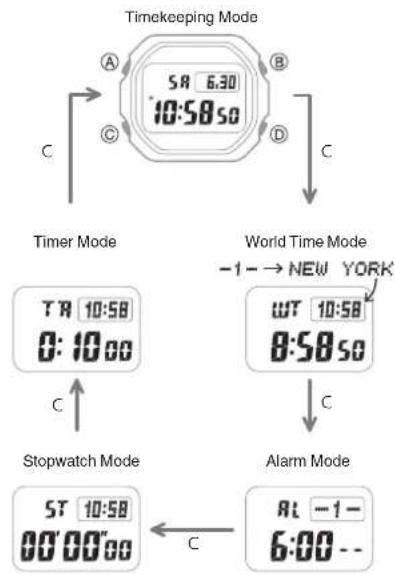
flowchart
graph TD
    A["Timekeeping Mode"] --> B["Timer Mode"]
    B --> C["Stopwatch Mode"]
    C --> D["Alarm Mode"]
    D --> E["World Time Mode"]
    E --> F["Directional Arrow: -1 → NEW YORK"]
    style A fill:#f9f,stroke:#333
    style B fill:#ccf,stroke:#333
    style C fill:#cfc,stroke:#333
    style D fill:#fcc,stroke:#333
    style E fill:#cff,stroke:#333
    style F fill:#ffc,stroke:#333
● Connecting with a Phone
Hold down (C) for about three seconds to establish a connection with a phone.
• To disconnect, press any button.
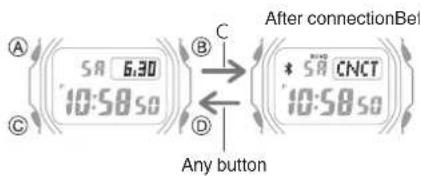
text_image
A 6:30 10:58.50 C B C After connectionBel * 58 CNCT 10:58.50 D Any buttonSolar Charging
This watch runs on power supplied from a rechargeable (secondary) battery that is charged by a solar panel. The solar panel is integrated into the face of the watch, and power is generated whenever the face is exposed to light.
● Charging the Watch
When you are not wearing the watch, put it in a location where it is exposed to bright light.
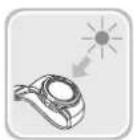
While you are wearing the watch, make sure that its face (solar panel) is not blocked from the light by the sleeve of your clothing. Power generation efficiency is reduced even when the face of the watch is blocked only partially.
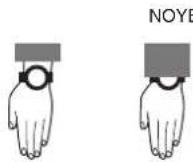
Important!
- Depending on light intensity and local conditions, the watch may become hot to the touch when exposed to light for charging. Take care to avoid burn injury after charging. Also, avoid charging the watch under high-temperature conditions like the ones described below.
- On the dashboard of a vehicle parked in the sun
Near an incandescent light bulb or other source of heat
Under direct sunlight or in other hot areas for long periods
Operation Guide 3459/3461
CASIO®
● Low Battery
A low battery will cause [LOW] to flash and will disable the functions below.
• Time signal reception
- Illumination
- Sounds (alarms, etc.)
- Connection with a phone
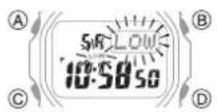
If the charge level drops even further, [CHG] will flash. If this happens, all functions are disabled.
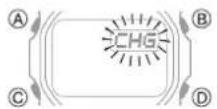
- Dead Battery
The digital display will go blank if the battery goes dead. Memory data is lost, and watch settings are returned to their initial factory defaults.
Important!
- Should the battery go low or go dead, expose the face (solar panel) to light as soon as possible.
- Exposing the watch to light while its battery is dead will cause [CHG] to start flashing. Keep the watch exposed to light until the current time appears on the display.
Note
- If [R] is flashing, it means that all functions, except for timekeeping, are disabled due to high momentary battery power consumption.
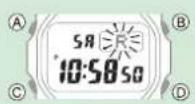
● Charging Time Guidelines
The table below shows guidelines for approximate charging times.
Required Charging Time for 1-day Use
| Light Intensity | Approximate Charging Time | |
| High↓Low | 1 | 8 minutes |
| 2 | 30 minutes | |
| 3 | 48 minutes | |
| 4 | 8 hours | |
Time Required to Achieve Next Charge Level
3459
| Light Intensity | Approximate Charging Time | ||
| Charge Level 1 | Charge Level 2 | ||
| High ↓ Low | 1 | 3 hours 45 hours | |
| 2 | 10 hours 168 hours | ||
| 3 | 16 hours 270 hours | ||
| 4 | 208 hours - | ||
3461
| Light Intensity | Approximate Charging Time | ||
| Charge Level1 | Charge Level2 | ||
| High↓Low | 1 | 3 hours 45 hours | |
| 2 | 10 hours 169 hours | ||
| 3 | 16 hours 274 hours | ||
| 4 | 210 hours - | ||
Charge Level 1 :
Time from dead battery until hand movement starts
Charge Level 2 :
Time from hand movement start until a full charge
Light Intensity
① Sunny day, outdoors (50,000 lux)
② Sunny day, near a window (10,000 lux)
③ Overcast day, near a window (5,000 lux)
④ Indoor fluorescent lighting (500 lux)
Note
• Actual charging time depends on the local charging environment.
● Power Saving Function
Leaving the watch in a dark location for about one hour between the hours of 10 p.m. and 6 a.m. will cause the display to go blank, and the watch to enter Level 1 power saving. If the watch is left in this condition for six or seven days, the watch will enter Level 2 power saving.
Power Saving Level 1 :
Digital display goes blank to save power. The watch can connect with a phone at this level.
Power Saving Level 2 :
Digital display goes blank to save power. All functions are disabled.
Recovering from Power Saving Operation
Use one of the operations below to exit power saving.
- Press any button.
- Move the watch to a bright location.
- Trigger auto light by angling the watch towards your face.
Note
- The watch will not enter power saving in the cases below.
- Alarm Mode
While in the Stopwatch Mode - While in the Timer Mode
- You can enable or disable Power Saving.
Configuring Power Saving Function Settings - Note that the watch also may enter power saving if its face is blocked from light by your sleeve while you are wearing it.
Useful Features
Pairing the watch with your phone makes a number of the watch's features easier to use.
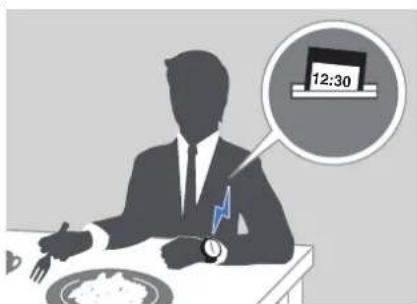
Auto Time Adjustment
Auto Time Adjustment
text_image
12:30Operation Guide 3459/3461
CASIO®
Selection of More Than 300 World Time Cities
Configuring World Time Settings
natural_image
Illustration of a world map with a smartphone, a watch, and lightning bolt, symbolizing global technology (no text or symbols present)Recording of Anniversaries and Appointments
Configuring Reminder Settings
text_image
Diagram showing a grid with numbered cells and icons of a smartphone and a watch, likely illustrating a smart device interface or app interaction.In addition, a number of other watch settings can be configured using your phone.
For transfer data to a watch and to configure settings, you first need to pair the watch with your phone.
Getting Ready
Time Adjustment
Your watch can obtain date and time information by connecting with a phone and by receiving time signals, which it uses to adjust its settings.
Important!
- Disable auto time adjustment whenever you are inside an aircraft or in any other area where radio wave reception is prohibited or restricted.
Using the Watch in a Medical Facility or Aircraft
Referring to the information below, configure the time setting in accordance with the method that suits your own lifestyle.
Do you use a phone?
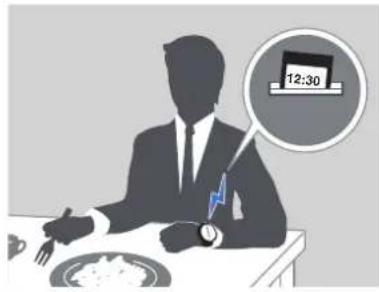
Time adjustment by connecting with your phone is recommended.
Auto Time Adjustment
text_image
12:30Can you receive a time signal in your area?
While the watch's Home Time City setting is one where a time signal can be received, the watch's time and day settings can be adjusted in accordance with the signal.
Time Signal Reception Ranges
Setting a Home Time City
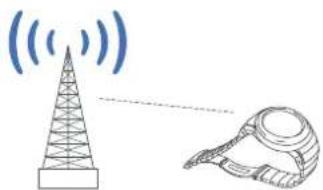
natural_image
Diagram showing a tower emitting signal waves and a satellite helmet emitting a beam of light (no text or symbols)Other than the above.
If you are unable to connect with a phone and are unable to receive a time signal, you can perform watch button operations to adjust its time setting.
○ Using Watch Operations to Adjust the Time Setting
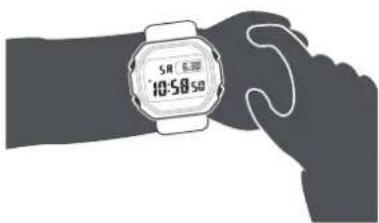
natural_image
Silhouette of a hand wearing a smartwatch with a digital display showing time (no text or symbols on the watch face)Time Adjustment Using a Time Signal
Overview
The watch's time and day settings can be adjusted in accordance with a received time signal.
Important!
- If you are in a location where a time signal can be received and you want to receive the signal, select a city in your time zone that supports time signal reception as your Home City. The watch will not indicate the correct time if the Home City setting is wrong.
- The watch will normally not perform auto signal receive while it is paired with a phone. However, auto receive will be performed if there is no connection between the watch and phone for more than one day.
Note
- Areas where time signal reception is supported are limited. When the watch in an area where time signal reception is not possible, connect with a phone to adjust time and day settings.
Time Signal Reception Ranges
Appropriate Signal Reception Location
A time calibration signal can be received while the watch is near a window.
- Position the watch so its 12 o'clock side is facing the window.
- Keep metal objects away from the watch.
- Do not move the watch.
- Do not perform any operation on the watch.
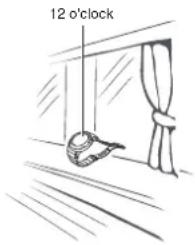
natural_image
Simple line drawing of a window with curtains and a bird, no text or symbols presentNote
- You may experience time calibration signal reception problems in the areas described below.
Among or near buildings - While riding in a vehicle
- Near household appliances, office machines, mobile phones, etc.
On a construction site, in an airport, or any other location where radio wave interference occurs - Near high-voltage lines
- In mountainous areas or behind a mountain
Time Signal Reception Ranges
Time calibration signal reception is supported in the areas shown below.
● Japan Time Calibration Signal (JJY)
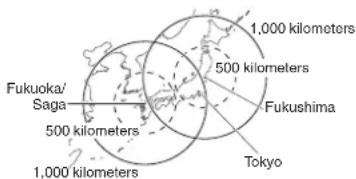
text_image
Fukuoka/ Saga 500 kilometers 1,000 kilometers 1,000 kilometers 500 kilometers Fukushima Tokyo● Chinese Time Calibration Signal (BPC)
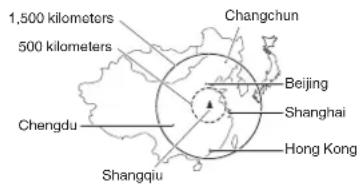
text_image
1,500 kilometers 500 kilometers Changchun Beijing Chengdu Shanghai Hong Kong Shangqiu● U.S. Time Calibration Signal (WWVB)
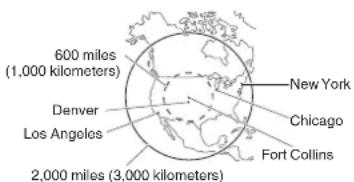
text_image
600 miles (1,000 kilometers) Denver Los Angeles 2,000 miles (3,000 kilometers) New York Chicago Fort Collins● U.K. (MSF) and German (DCF77) Time Calibration Signal
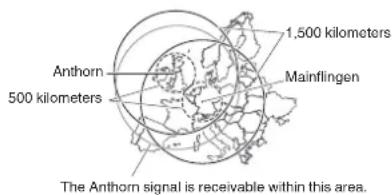
text_image
1,500 kilometers Anthorn 500 kilometers Mainflingen The Anthon signal is receivable within this area.Note
- Even if you are within the normal reception range of a time calibration signal, reception may be made impossible by the following factors: geographic contours, weather, the season, the time of day, wireless noise.
Auto Time Signal Receive
An automatic time calibration signal receive operation is performed and the time and day settings are adjusted between midnight and 5:00 a.m. Once a signal receive operation is successful, no more auto receive operations are performed that day.
Getting Ready
Enter the Timekeeping Mode.
Navigating Between Modes
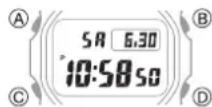
Place the watch near a window or some other location appropriate for signal reception.
- [RCVD] flashes while time signal reception is in progress.
- When the receive operation is successful, the time and day settings are adjusted automatically and the [RCVD] indicator appears.
Note
- Reception takes anywhere from about two minutes to about 10 minutes. It can take as long as 20 minutes.
Manual Time Signal Receive
- Place the watch near a window or some other location appropriate for time signal reception.
- Enter the Timekeeping Mode.
Navigating Between Modes - Hold down (D) for about two seconds. Release the button after [RCVD] starts flashing.
This indicates that time signal reception has started.
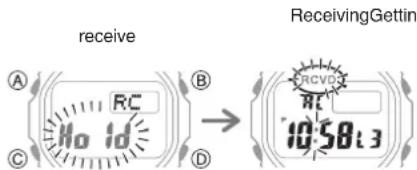
text_image
receive A RC B C No Id D ReceivingGettin RCVD RC 10.58 L3Note
- When a receive operation is successful, [RCVD] will appear, and the time and day settings will be adjusted automatically.
- If a receive operation fails for some reason, [RCVD] will disappear and [NG] or [ERR] will be displayed. To return to the unadjusted timekeeping display, press any button.
- Time signal reception is not possible if your Home City is one where time signal reception is not possible or if your phone's location information acquisition is turned off.
Receive Level Indicator
While a receive operation is in progress, its current status is indicated on the display as shown below. The level indicator changes in accordance with the signal quality. Use the level indicator to find a location where signal reception is stable.
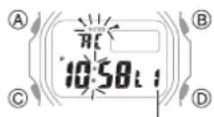
Receive level indicator
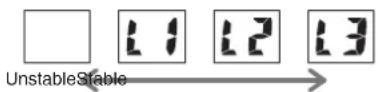
Signal Reception Precautions
- When the watch is unable to adjust its time in accordance with a calibration signal for some reason, average timekeeping accuracy is within ± 15 seconds per month.
- Note that an internal decoding process the watch performs after it receives a signal may cause the time setting to be slightly off (by less than one second).
- Time signal reception is not possible when any one of the conditions below exists.
-
While battery power is low
-
While the watch is in the Stopwatch Mode, Timer Mode, or Alarm Mode
-In Power Saving Level 2
– Timer countdown operation in progress - While auto time adjustment is disabled
- While the Home City setting is one where time signal reception is not possible
-
While the watch is outside the time signal reception range
-
If the receive operation is successful, the time and day settings will be adjusted automatically in accordance with the Home City and summer time settings. Summer time will not be applied correctly in the cases described below.
- When the summer time start date and time, end date and time, or other rules are changed by authorities
- If your watch is connected with a phone, settings must be configured so G-SHOCK Connected can acquire location information. Even if you are in an area that is within the reception range of a time signal, reception will not be performed if settings are configured in a way that makes signal reception impossible.
- As of July 2018, China does not observe summer time. If China starts to observe summer time in the future, the time displayed by the watch for China may not be correct.
Using Watch Operations to Adjust the Time Setting
- Setting a Home Time City
Use the procedure in this section to select a city to use as your Home City. If you are in an area that observes summer time, you can also enable or disable summer time.
Note
- The initial factory default summer time setting for all cities is [AUTO]. In many cases, the [AUTO] setting lets you use the watch without switching between summer time and standard time.
- Hold down (A) for about two seconds until [HT] flashes.
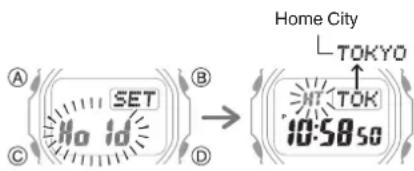
text_image
Home City TOKYO 10:58:58- Use (D) and (B) to change the Home City setting.
- For details refer to the information below.
City Table
- Press (C).
- Use (D) to select a summer time setting. Each press of (D) cycles through available settings in the sequence shown below.
• [AUTO]
The watch switches between standard time and summer time automatically.
• [OFF]
The watch always indicates standard time.
• [ON]
The watch always indicates summer time.
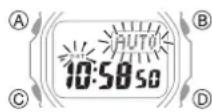
- Press (A) to exit the setting screen.
- Setting the Time/Date
- Hold down (A) for about two seconds until [HT] flashes.
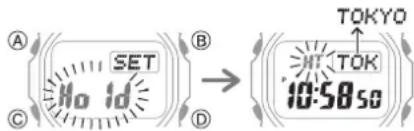
text_image
A B C D SET No Id → TOKYO 10:58:58- Keep pressing (C) until the setting you want to change is flashing.
• Each press of (C) moves the flashing to the next setting in the sequence shown below.
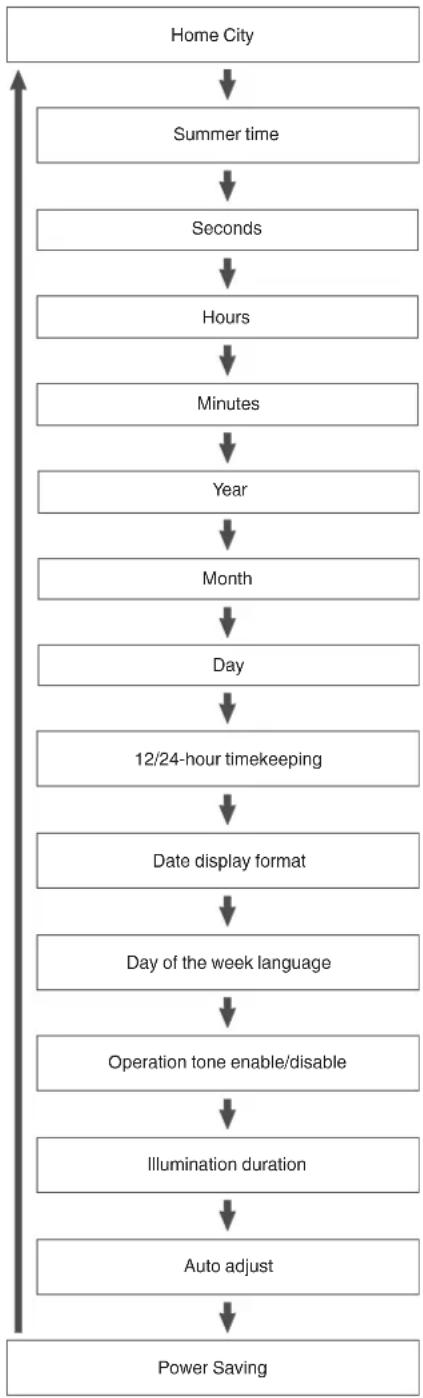
flowchart
graph TD
    A["Home City"] --> B["Summer time"]
    B --> C["Seconds"]
    C --> D["Hours"]
    D --> E["Minutes"]
    E --> F["Year"]
    F --> G["Month"]
    G --> H["Day"]
    H --> I["12/24-hour timekeeping"]
    I --> J["Date display format"]
    J --> K["Day of the week language"]
    K --> L["Operation tone enable/disable"]
    L --> M["Illumination duration"]
    M --> N["Auto adjust"]
    N --> O["Power Saving"]
-
Configure the date and time settings.
-
To reset the seconds to 00: Press (D). 1 is added to the minutes when the current count is between 30 and 59 seconds.
-
Use (D) and (B) to change the other settings.
-
Repeat steps 2 and 3 to configure the other settings.
- Press (A) to exit the setting screen.
Using the Watch in a Medical Facility or Aircraft
Whenever you are in a hospital, on an aircraft, or in any other location where auto signal receive or connection with a phone may cause problems, you can perform the procedure below to disable it. To re-enable auto time adjustment, perform the same operation again.
- Hold down (A) for about two seconds until [HT] flashes.
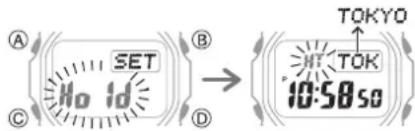
text_image
A B C NO ID D TOKYO H TOK 10:58:50- Press (C) 13 times.
This displays [RECEIVING].
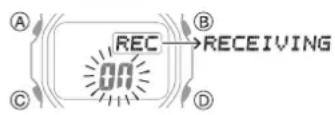
- Press (D) to select the auto time adjustment setting you want.
[OFF]: Auto time adjustment disabled.
[On]: Enable auto time adjustment.
- Press (A) to exit the setting screen.
Using Mobile Link with a Mobile Phone
While there is a Bluetooth connection between the watch and phone, the watch time setting is adjusted automatically. You can also change the watch's other settings.
Note
- This function is available only while G-SHOCK Connected is running on the phone.
- This section describes watch and phone operations.
: Watch operation
☐ : Phone operation
Getting Ready
① Install the required app on your phone.
In Google Play or the App Store, search for the CASIO "G-SHOCK Connected" app and install it on your phone.
② Configure Bluetooth settings.
Enable the phone's Bluetooth.
Note
- For details about setting procedures, see your phone documentation.
③ Pair the watch with a phone.
Before you can use the watch in combination with a phone, you first need to pair them.
- Move the phone to be paired with close to (within one meter of) the watch.
- ☐ On the Home Screen, tap the "G-SHOCK Connected" icon.
- ☐ Perform the operation shown on the phone screen to be paired with.
- If a pairing prompt message appears, perform the operation shown on the phone screen.
- If pairing fails for some reason, [NG] or [ERR] will appear on the display momentarily and then the timekeeping screen will appear. Perform the pairing procedure again from the beginning.
Pairing complete.Pa
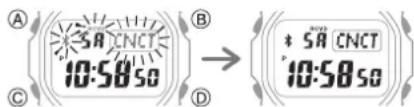
text_image
A SA CNCT 10:50:50 B C D * SA CNCT 10:50:50Note
- The first time you start up G-SHOCK Connected, a message will appear on your phone asking if you want to enable location information acquisition. Configure settings to allow background use of location information.
Operation Guide 3459/3461
CASIO®
Auto Time Adjustment
You can configure watch settings to connect with a phone at preset times each day and adjust its time settings in accordance with information obtained from an online time server.
● Using Auto Adjust
Your watch adjusts its time setting four times a day according to a preset schedule. If you leave your watch in the Timekeeping Mode, it will perform the adjustment operation automatically as you go about your daily life, without any operation required by you.
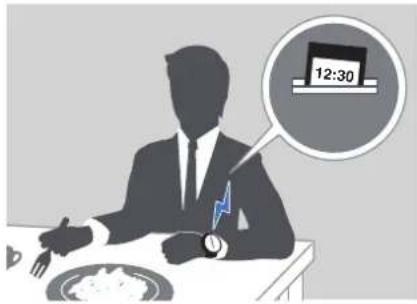
text_image
12:30Important!
- The watch may not be able to perform auto time adjustment under the conditions described below.
- While the watch is too far away from its paired phone
- While communication is not possible due to radio interference, etc.
- While the phone is updating its system
Note
- If there is a World Time City specified with G-SHOCK Connected, its time will also be adjusted automatically.
- The watch will connect with the phone and perform auto time adjustment at around 12:30 a.m., 6:30 a.m., 12:30 p.m. and 6:30 p.m. The connection is automatically terminated after auto time adjustment is complete.
- Time signal auto receive will be performed if there has been no auto time adjustment based on connection between the watch and phone for more than one day.
● Triggering Immediate Time Adjustment
The watch's time setting will be adjusted automatically whenever you establish a connection between the watch and a phone. Whenever you want to adjust the watch's time setting based on your phone's time, perform the procedure below to connect with a phone.
-
Move the phone close to (within one meter of) the watch.
-
On the watch, enter the Timekeeping Mode.
Navigating Between Modes
- Press (D).
[TIME] flashes to indicate that the watch has started the connection operation. Once the watch and phone are connected, [OK] will appear, and then the watch will adjust its time setting based on information from the phone.
Trying to connect
Following time adjustment
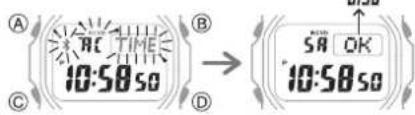
text_image
A B C D 10:50SO SA OK 10:50SONote
• The connection is terminated automatically after time adjustment is complete.
- If time adjustment fails for some reason, [NG] or [ERR] will appear.
- [RCVD] flashes when the receive operation starts, and [RCVD] appears after it is complete.
Configuring Reminder Settings
After you use G-SHOCK Connected to create a reminder for an appointment, anniversary, or some other event you don't want to forget, the watch will remind you when that day is reached.
- You can have up to five reminders registered.
- Tap the "G-SHOCK Connected" icon.
- Hold down (C) for about three seconds until & and [CNCT] flash on the display. When a connection is established between the watch and phone, & and [CNCT] will stop flashing.
- If connection fails for some reason, [NG] or [ERR] will appear on the display momentarily and then the watch will return to the Timekeeping Mode.
Trying to connect Connected
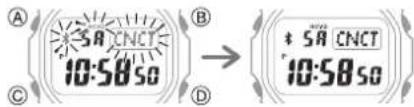
text_image
A B C D * SA CNCT 10:58:50 * SA CNCT 10:58:50- ☐ Follow the instructions that appear on the screen to configure reminder settings.
- You can input up to 18 alphanumeric characters as a reminder title.
Configuring World Time Settings
Specifying a World Time City with G-SHOCK Connected causes the watch's World Time City to change accordingly. Watch settings can be configured for auto summer time switching for the World Time City.
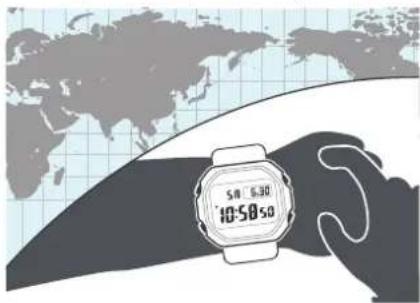
text_image
5:00 6:30 10:50 5:0Note
• G-SHOCK Connected World Time lets you select from among approximately 300 cities as the World Time City.
Operation Guide 3459/3461
CASIO®
- Selecting a World Time City
- Tap the "G-SHOCK Connected" icon.
- Hold down (C) for about three seconds until & and [CNCT] flash on the display. When a connection is established between the watch and phone, & and [CNCT] will stop flashing.
- If connection fails for some reason, [NG] or [ERR] will appear on the display momentarily and then the watch will return to the Timekeeping Mode.
Trying to connect Connected
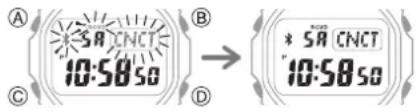
text_image
A B C D * 58 CNCT 10:58:50 * 58 CNCT 10:58:50- Perform the operation shown on the phonescreen. The World Time setting will be reflected on the watch.
- Creating a User City
In addition to the approximately 300 cities available with G-SHOCK Connected, you can specify a location on an on-screen map and create a user city.
- Tap the "G-SHOCK Connected" icon.
- Hold down (C) for about three seconds until & and [CNCT] flash on the display. When a connection is established between the watch and phone, & and [CNCT] will stop flashing.
- If connection fails for some reason, [NG] or [ERR] will appear on the display momentarily and then the watch will return to the Timekeeping Mode.
Trying to connect Connected

text_image
A B C D * 58 CNCT 10:58:50 * 58 CNCT 10:58:50- Perform the operation shown on the phonescreen. The World Time setting will be reflected on the watch.
Note
- You can have up to five locations registered as user cities.
- You can assign a name up to 18 characters long to each user city.
● Configuring the Summer Time Setting
- Tap the "G-SHOCK Connected" icon.
- Hold down (C) for about three seconds until ≥slant and [CNCT] flash on the display. When a connection is established between the watch and phone, ≥slant and [CNCT] will stop flashing.
- If connection fails for some reason, [NG] or [ERR] will appear on the display momentarily and then the watch will return to the Timekeeping Mode.
Trying to connect Connected
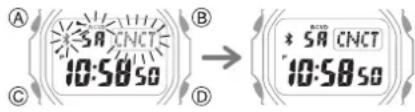
text_image
A B C D * SA CNCT 10:50:50 * SA CNCT 10:50:50-
Perform the operation shown on the phone screen to select a summer time setting.
-
"Auto" The watch switches between standard time and summer time automatically.
- "OFF" The watch always indicates standard time.
- "ON" The watch always indicates summer time.
Note
- While the summer time setting is "Auto", the watch will switch between standard time and summer time automatically. You do not need to switch between standard time and summer time manually. Even if you are in an area that does not observe summer time, you can leave the watch's summer time setting as "Auto".
- Changing the time setting manually with a watch operation will cancel auto standard time/summer time switching.
- For information about summer time periods, refer the “Summer Time Table” or G-SHOCK Connected.
● Swapping Your World Time and Home Time
- Tap the "G-SHOCK Connected" icon.
- Hold down (C) for about three seconds until × and [CNCT] flash on the display. When a connection is established between the watch and phone, × and [CNCT] will stop flashing.
- If connection fails for some reason, [NG] or [ERR] will appear on the display momentarily and then the watch will return to the Timekeeping Mode.
Trying to connect Connected
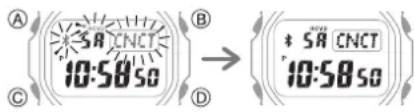
text_image
A SA CNCT 10:50:50 B C D * SA CNCT 10:50:50- ☐ Perform the operation shown on the phone screen to swap your Home Time with your World Time.
Note
- Auto time adjustment does not work for 24 hours after swapping of the Home Time and World Time.
Phone Finder
You can use phone finder to trigger a tone on the phone to make it easy to find. The tone is forced to sound even if the phone is in vibrate mode.
Important!
- Do not use this function in areas where phone call tones are restricted.
-
The tone sounds at a high volume. Do not use this function when listening to phone output over earphones.
-
☑ If the watch is connected with a phone, press any button to terminate the connection.
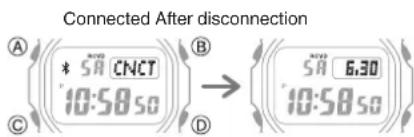
text_image
Connected After disconnection A (* SA CNCT) 10:58 so B → SA 6.30 10:58 so C D- ☐ If the watch is in any mode besides the Timekeeping Mode, hold down (C) for about two seconds to enter the Timekeeping Mode.
- Hold down (D) for about five seconds until × and [FIND] flash on the display. The phone will sound a tone when it establishes a connection with the watch. • It will take a few seconds before the phone tone sounds.
Preparing to search for the phone
Searching for the phone
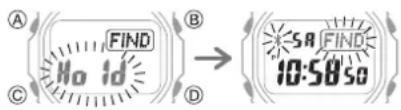
text_image
A C B FIND No id D → SA FIND 10:50:50- ☐ Press any button to stop the tone.
- You can press any watch button to stop the phone tone only during the first 30 seconds after it starts to sound.
Configuring Watch Settings
Alarm time, timer start time, and other settings can also be configured using G-SHOCK Connected.
- Tap the "G-SHOCK Connected" icon.
- Hold down (C) for about three seconds until × and [CNCT] flash on the display. When a connection is established between the watch and phone, × and [CNCT] will stop flashing.
- If connection fails for some reason, [NG] or [ERR] will appear on the display momentarily and then the watch will return to the Timekeeping Mode.
Trying to connect Connected
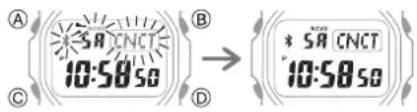
text_image
A B C D * SA CNCT 10:58:50 * SA CNCT 10:58:50- ☐ Select the setting you want to change and then perform the operation shown on the phone screen.
Changing the Home City Summer Time Setting
- Tap the "G-SHOCK Connected" icon.
- Hold down (C) for about three seconds until ≥slant and [CNCT] flash on the display. When a connection is established between the watch and phone, ≥slant and [CNCT] will stop flashing.
- If connection fails for some reason, [NG] or [ERR] will appear on the display momentarily and then the watch will return to the Timekeeping Mode.
Trying to connect Connected
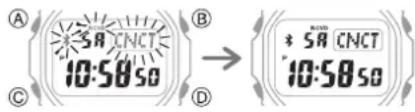
text_image
A 38 CNCT 10:50:50 B C D * 58 CNCT 10:50:50- ☐ Perform the operation shown on the phone screen to change your Home City summer time setting.
Checking the Watch Charge Level
Use the procedure below to check the current charge level with G-SHOCK Connected.
- Tap the "G-SHOCK Connected" icon.
- Hold down (C) for about three seconds until and [CNCT] flash on the display. When a connection is established between the watch and phone, and [CNCT] will stop flashing.
- If connection fails for some reason, [NG] or [ERR] will appear on the display momentarily and then the watch will return to the Timekeeping Mode.
Trying to connect Connected
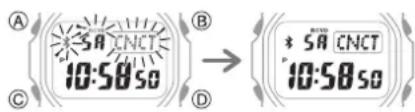
text_image
A SA CNCT 10:50 so B C D * SA CNCT 10:50 so- ☐ Use G-SHOCK Connected to check the charge level.
Recording Your Current Location (TIME & PLACE)
You can use the procedure below to record your current location, along with the time and date, while traveling or otherwise on the go. Recorded location information can be viewed on a G-SHOCK Connected map while your watch is connected with the phone.
● Recording Your Current Location
- Enter the Timekeeping Mode. Navigating Between Modes
- ☑ When you are in the location you want to record, press (D).
This records, in phone memory, the latitude and longitude of the location you are in when you press (D), along with the date and time of the recording.
● Viewing a Recorded Location on a Map
- Tap the "G-SHOCK Connected" icon.
- Hold down (C) for about three seconds until × and [CNCT] flash on the display. When a connection is established between the watch and phone, × and [CNCT] will stop flashing.
- If connection fails for some reason, [NG] or [ERR] will appear on the display momentarily and then the watch will return to the Timekeeping Mode.
Trying to connect Connected
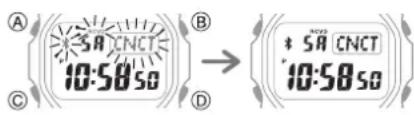
text_image
A SA CNCT 10:50:50 B C D * SA CNCT 10:50:50- Perform the operation shown on the phone screen to view recorded location information.
Note
- You can use G-SHOCK Connected to delete recorded location information.
Connection
Connecting with a Phone
This section explains how to establish a Bluetooth connection with a phone that is paired with the watch.
- If the watch is not paired with the phone you want to connect with, refer to the information below and pair them.
③ Pair the watch with a phone.
- Move the phone close to (within one meter of) the watch.
- Hold down (C) for about three seconds until × and [CNCT] flash on the display.
When a connection is established between the watch and phone, & and [CNCT] will stop flashing.
- If connection fails for some reason, [NG] or [ERR] will appear on the display momentarily and then the watch will return to the Timekeeping Mode.
Trying to connect Connected
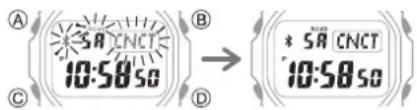
text_image
A B C D * SA CNCT 10:58:50 * SA CNCT 10:58:50Important!
- If you have problems establishing a connection, it could mean that G-SHOCK Connected is not running on the phone. On the phone's home screen, tap the "G-SHOCK Connected" icon. After the app starts up, hold down the watch's (C) button for about three seconds.
Note
- The connection will be terminated if you do not perform any operation on the watch or phone for a fixed amount of time. To specify the connection limit time, perform the following operation with G-SHOCK Connected: "Watch settings"→"Connection time". Next, select a setting of 3 minutes, 5 minutes, or 10 minutes.
Disconnecting from a Phone
Pressing any button will terminate a Bluetooth connection and return to the Timekeeping Mode.
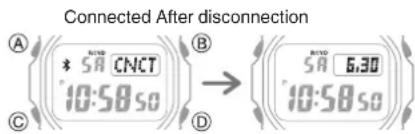
text_image
Connected After disconnection A * SA CNCT 10:50 so B SA 6,30 10:50 so C DUnpairing
- ☑ If the watch is connected with a phone, press any button to terminate the connection.
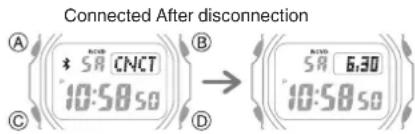
text_image
Connected After disconnection A B C D $ SA CNCT 10:58 so SA 6.30 10:58 so- Tap the "G-SHOCK Connected" icon.
- ☐ Perform the operation shown on the phone screen to unfair.
If you purchase another phone
You need to perform the pairing operation whenever you want to establish a Bluetooth connection with a phone for the first time.
③ Pair the watch with a phone.
Reminders
If you use G-SHOCK Connected to record an appointment, anniversary, or some other event you don't want to forget, the watch will remind you when that day is reached.
Getting Ready
Enter the Timekeeping Mode.
Navigating Between Modes
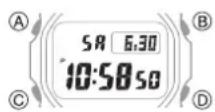
Recording an Appointment or Anniversary
You can connect the watch with a phone and use G-SHOCK Connected to record appointments and anniversaries.
Configuring Reminder Settings
Checking Reminder Notifications
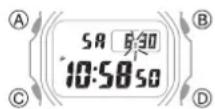
[REM] flashes on the display during a day is when there is an anniversary or event that was created with G-SHOCK Connected. Pressing any button other than (B) will the display the title assigned to the reminder.
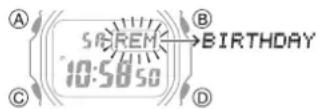
After the title is displayed once, the date of the reminder will appear with the dot between the month and day flashing. Pressing (A) while the dot is flashing will display the title again.
Note
- If you turn on display illumination on a reminder date, the display light will flash red for a few seconds after illumination automatically turns off.
World Time
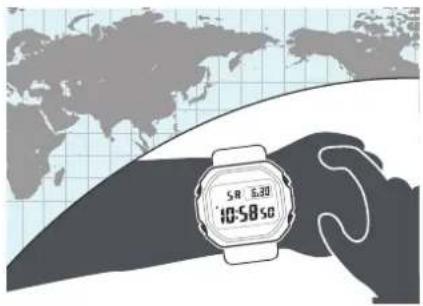
World Time lets you look up the current time in any one of 39 cities around the globe, and UTC (Universal Coordinated Time).
text_image
5.8 6.30 10-58.50Getting Ready
Enter the World Time Mode.
Navigating Between Modes
Checking World Time
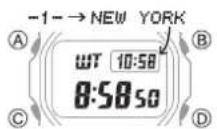
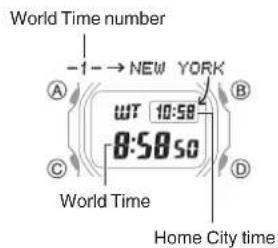
Entering the World Time Mode causes the World Time number and city name to appear first. After that, the display will appear as shown below.
text_image
World Time number -1 → NEW YORK A B WT 10:58 8:58 so C D World Time Home City time- Pressing (A) displays the city for the displayed time.
• To change the selected World Time city, press (D).
World Time City Setting
You can specify up to five cities as your World Time favorites. If you are in an area that observes summer time, you can also enable or disable summer time.
Note
- The initial factory default summer time setting for all cities is [AUTO]. In many cases, the [AUTO] setting lets you use the watch without switching between summer time and standard time.
- Use (D) to display the World Time number whose setting you want to configure.
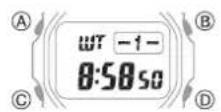
- Hold down (A) for about two seconds. This causes [WT] to flash on the display.
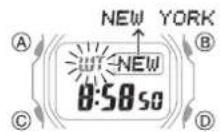
- Use (D) and (B) to display the city you want to assign to the World Time number.
- If you want to change the summer time setting, press (C).
- Use (D) to select a summer time setting. Each press of (D) cycles through available settings in the sequence shown below.
• [AUTO]
The watch switches between standard time and summer time automatically.
• [OFF]
The watch always indicates standard time.
• [ON]
The watch always indicates summer time.
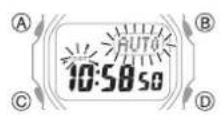
- Press (A) to exit the setting screen.
Note
- While [UTC] is selected as the city, you will not be able to change or check the summer time setting.
Swapping Your Home City Time and World Time
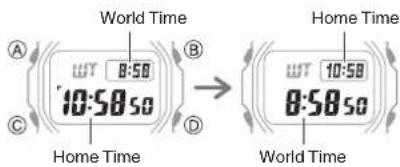
Press (A) and (B) at the same time to swap your Home City time and World City time.
After swappingBefore
text_image
World Time A 8:50 C 10:50.50 D Home Time B → World Time Home Time 8:50.50Note
- This function comes in handy when you need to move to another time zone. For details about how to use it, go to the section below. - Moving to Another Time Zone
Alarms and Hourly Time Signal
The watch will beep when the alarm time is reached. You can configure up to four standard daily alarms, and one daily alarm with snooze. The hourly time signal causes the watch to beep every hour on the hour.
- Snooze causes the alarm to sound up to seven times, at five-minute intervals.
• The alarm sound is muted in the cases described below.
- When battery power is low
When watch is at Level 2 power saving
Power Saving Function
Getting ready
Enter the Alarm Mode.
Navigating Between Modes
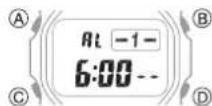
Configuring Alarm Settings
- Use (D) to display the alarm screen (alarm number [1] to [4] or [SNZ]) whose setting you want to change.
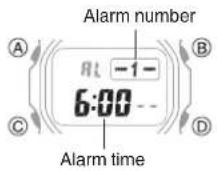
- Hold down (A) for about two seconds. This causes the hours digits to flash.
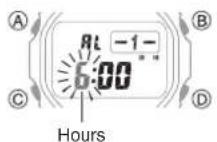
- Use (D) and (B) to change the hour setting.
- If you are using 12-hour timekeeping, [P] indicates p.m.
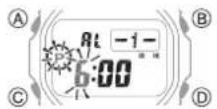
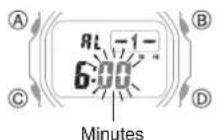
- Press (C). This causes the minutes digits to flash.
-
Use (D) and (B) to change the minute setting.
-
Press (A) to exit the setting screen.
-
Press (C) three times to return to the Timekeeping Mode.
Note
- You can also use G-SHOCK Connected to configure alarm time settings.
Enabling/Disabling an Alarm or the Hourly Time Signal
- Use (D) to display the item whose on/off setting you want to change: alarm number [1] to [4] or [SNZ], or the hourly time signal ([SIG]) screen.
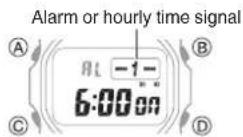
- Press (A) to toggle the displayed alarm or the hourly time signal between on and off.
Stopping an Alarm
Pressing any button while the beeper is sounding stops it.
Determining an Alarm's On/Off Status
Turning on an alarm or the hourly time signal causes the corresponding indicator to appear on the display.
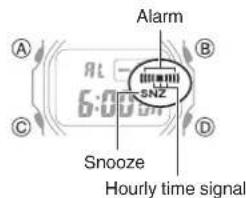
text_image
Alarm SNZ Snooze Hourly time signalStopwatch
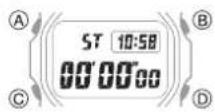
The stopwatch can measure elapsed time up to 23 hours, 59 minutes, 59 seconds (24 hours).
Getting ready
Enter the Stopwatch Mode.
Navigating Between Modes
Measuring Elapsed Time
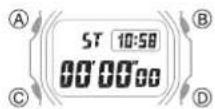
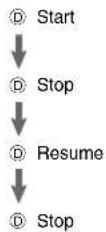
- Use the operations below to measure elapsed time.
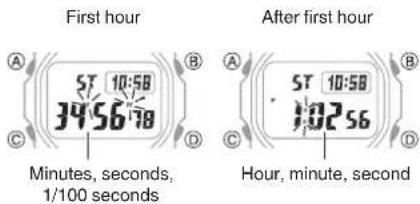
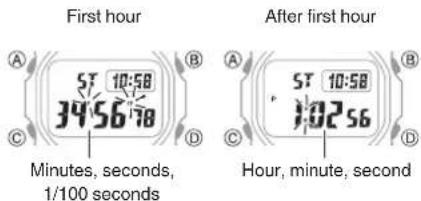
- Elapsed time is shown in 1/100-second units for the first hour of the measurement. After the first hour, elapsed time is shown in one-second units.
text_image
First hour A 57 10:58 B 3456:58 C D Minutes, seconds, 1/100 seconds After first hour A 57 10:58 B 102:56 C D Hour, minute, second- Press (A) to reset the elapsed time to all zeros.
Measuring a Split Time
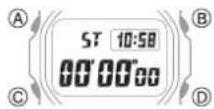
- Use the operations below to measure elapsed time.
• Each press of (D) causes the elapsed time up to that point (split time) to be indicated.
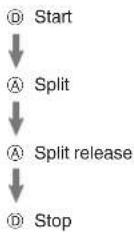
- Elapsed time is shown in 1/100-second units for the first hour of the measurement. After the first hour, elapsed time is shown in one-second units.
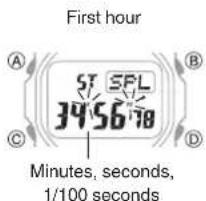
text_image
First hour A ST SFL 3956:78 B C D Minutes, seconds, 1/100 seconds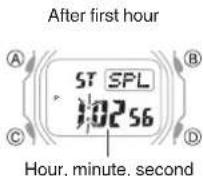
- Press (A) to reset the elapsed time to all zeros.
Timing the First and Second Place Finishers
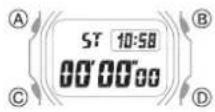
- Use the operations below to measure elapsed time.
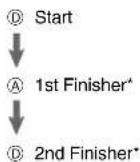
* This displays the time of the first finisher. • Elapsed time is shown in 1/100-second units for the first hour of the measurement. After the first hour, elapsed time is shown in one-second units.
text_image
First hour 57 10:58 3456:58 Minutes, seconds, 1/100 seconds After first hour 57 10:58 102:56 Hour, minute, second-
Press (A) to display the time of the second finisher.
-
Press (A) to reset the elapsed time to all zeros.
Timer
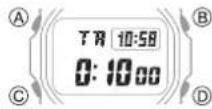
The timer counts down from a start time specified by you. A beeper sounds when the end of the countdown is reached.
- The beeper is muted in the cases described below. - When battery power is low
Getting Ready
Enter the Timer Mode.
Navigating Between Modes
Setting the Time
The countdown start time can be set in 1-second units up to 24 hours.
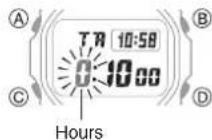
- Hold down (A) for about two seconds. This causes the hours digit to flash.
-
Use (D) and (B) to change the timer hours setting.
-
Press (C). This causes the minutes digits to flash.
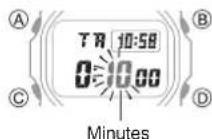
-
Use (D) and (B) to change the timer minutes setting.
-
Press (C). This causes the seconds digits to flash.
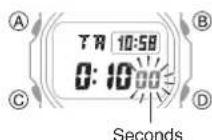
-
Use (D) and (B) to change the target time seconds setting.
-
Press (A) to exit the setting screen.
Note
- You can also use G-SHOCK Connected to configure timer settings.
Using the Timer
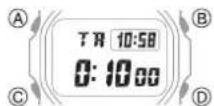
- Use the operations below to perform a timer operation.
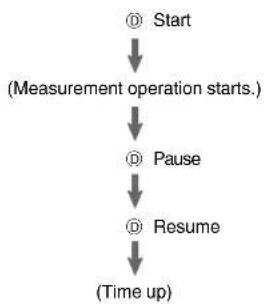
flowchart
graph TD
    A["Start"] --> B["(Measurement operation starts.)"]
    B --> C["Pause"]
    C --> D["Resume"]
    D --> E["(Time up)"]
- A beeper will sound for 10 seconds to let you know when the end of a countdown is reached.
-
To reset a paused countdown to the start time, press (A).
-
Press any button to stop the tone.
Light
The watch has an LED light that you can use to illuminate the display for about two seconds for viewing in the dark. When turned on, illumination becomes gradually brighter and then gradually dimmer.
The watch also has an auto light function that automatically illuminates the display whenever the watch is angled for reading in the dark.
Illuminating the Display Manually
Pressing (B) turns on illumination.
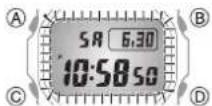
- The LED light will turn off automatically if the alarm starts to sound.
Auto Light
If Auto Light is enabled, display illumination will turn on automatically whenever the watch is positioned at an angle of 40 degrees or more when it is dark.
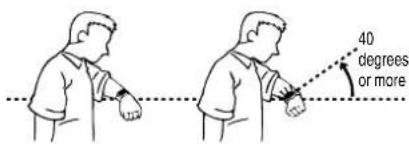
text_image
40 degrees or moreImportant!
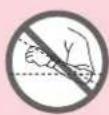
- Auto Light may not operate properly when the watch is at a horizontal angle of 15 degrees or greater from horizontal as shown in the illustration below.
- Auto Light may operate unintentionally and run down the battery if the watch is blocked from light by your sleeve.
- Electro-static charge or magnetism can interfere with proper auto light operation. If this happens, try lowering your arm and then angle it towards your face again.
- When moving the watch you may note a slight rattling sound. This is due to operation of the auto light switch, which determines the current orientation of the watch. It does not indicate malfunction.
Note
- Auto Light is disabled when any one of the conditions below exists.
- Alarm, timer alert, or other beeper sounding
Configuring the Auto Light Setting
- Enter the Timekeeping Mode. ○ Navigating Between Modes
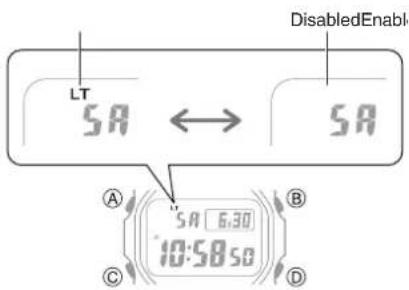
- Hold down (B) for about three seconds.
• Each time (B) is held down for about three seconds, Auto Light will toggle between enabled and disabled.
text_image
DisabledEnable LT SA ↔ SA A SA 6:30 10:58:50 C DSpecifying the Illumination Duration
You can select either two seconds or four seconds as the illumination duration.
- Enter the Timekeeping Mode. ○ Navigating Between Modes

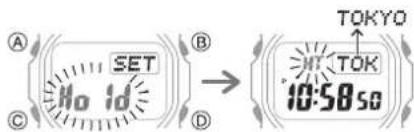
- Hold down (A) for about two seconds until [HT] flashes.
text_image
A B C No Id D TOKYO TOK 10:58:58- Press (C) 12 times to display [LIGHT].
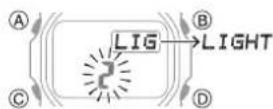
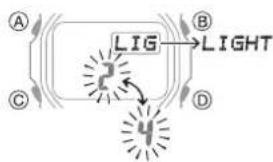
- Press (D) to toggle between the two illumination duration settings.
[2]: 2-second illumination
[4]: 4-second illumination
text_image
A B LIG LIGHT C D- Press (A) to exit the setting screen.
Other Settings
This section explains other watch setting you can configure.
Getting Ready
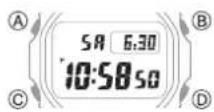
Enter the Timekeeping Mode.
Navigating Between Modes
Switching between 12-hour and 24-hour Timekeeping
You can specify either 12-hour format or 24-hour format for the time display.
- Hold down (A) for about two seconds until [HT] flashes.
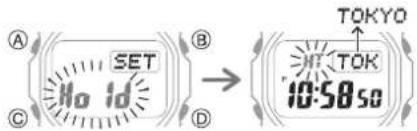
text_image
A B C No Id D TOKYO 10:58:50- Press (C) eight times.
This causes [12H] or [24H] to flash on the display.
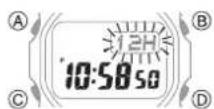
- Press (D) to toggle the setting between [12H] (12-hourtimekeeping) or [24H] (24-hour timekeeping).
24-hour timekeeping1
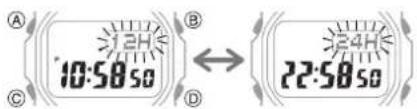
text_image
A B C 12H 10:50:50 D 24H 22:50:50- Press (A) to exit the setting screen.
Changing the Date Display Format
You can select either month/day or day/month as the date display format.
- Hold down (A) for about two seconds until [HT] flashes.
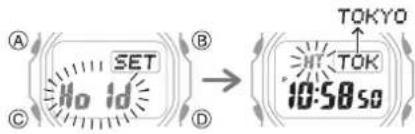
text_image
A B C NO ID D TOKYO H TOK 10:58:50- Press (C) nine times.
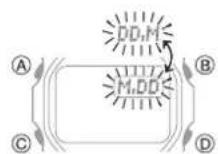
This causes [M.DD] or [DD.M] to flash on the display.
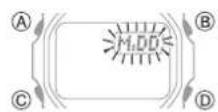
- Use (D) to select either [M.DD] (month/day) or [DD.M] (day/month).
- Press (A) to exit the setting screen.
Specifying the Day of the Week Language
You can select any one of six languages for the day of the week display in the Timekeeping Mode.
- Hold down (A) for about two seconds until [HT] flashes.
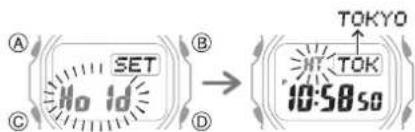
text_image
A B C NO 1d D TOKYO TOK 10:58:50- Press (C) 10 times.
This causes the language setting to flash.
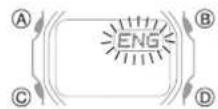
-
Use (D) to select a language.
-
Press (A) to exit the setting screen.
Enabling the Button Operation Tone
Use the procedure below to enable or disable the tone that sounds when you press a button.
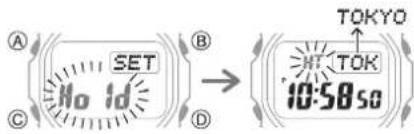
- Hold down (A) for about two seconds until [HT] flashes.
text_image
A B C NO Id D TOKYO TOK 10:58:58- Press (C) 11 times.
This causes [KEY] or [MUTE] to flash on the display.
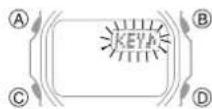
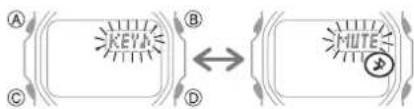
- Use (D) to select [KEY] or [MUTE].
[KEY]: Operation tone enabled.
[MUTE]: Operation tone muted.
flowchart
graph LR
    A["Block A"] --> B["Block B"]
    B --> C["Block C"]
    B --> D["Block D"]
    style A fill:#f9f,stroke:#333
    style B fill:#ccf,stroke:#333
    style C fill:#cfc,stroke:#333
    style D fill:#fcc,stroke:#333
- Press (A) to exit the setting screen.
Note
- Note that alarm and timer tones will still sound even while the operation tone is muted.
Operation Guide 3459/3461
CASIO®
Configuring Power Saving Function Settings
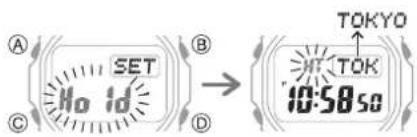
- Hold down (A) for about two seconds until [HT] flashes.
text_image
A B C No ID D TOKYO TOK 10:58:50- Press (C) 14 times.
This displays [POWER SAVING].
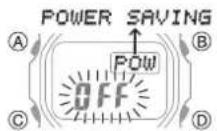
- Press (D) to toggle the setting between enabled (on) and disabled (off).
[ON]: Power Saving enabled.
[OFF]: Power Saving disabled.
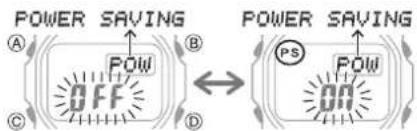
text_image
POWER SAVING A B POW OFF C D POWER SAVING PS POW ON- Press (A) to exit the setting screen.
Note
- For details about Power Saving, refer to the information below.
Power Saving Function
Returning the Watch to Its Factory Default Settings
This section explains how to return the watch settings below to their initial factory defaults.
- Watch Settings
- Reminders
- Alarm
-
Stopwatch
-
Hold down (A) for about two seconds until [HT] flashes.
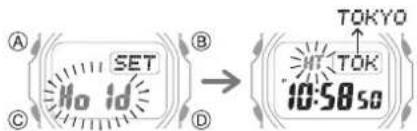
text_image
A B C No ID D TOKYO TOK 10:58:50- Press (C) twice.
This causes the seconds to flash.
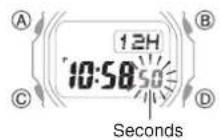
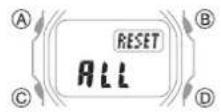
- Hold down (B) for about seven seconds.
Hold down the button until [ALL] stops flashing on the display.
Moving to Another Time Zone
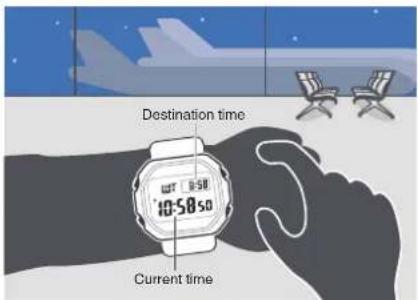
Use the procedure below to easily change day and time settings of the watch to a destination location.
● Before Boarding
- Configure the World Time to the current time at your destination.
text_image
Destination time 10:58:50 Current timeUsing G-SHOCK Connected to Configure Settings
Using Watch Operations to Configure Settings
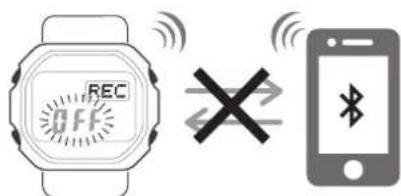
- Disable auto time adjustment.
text_image
REC OFF X SmartphoneUsing the Watch in a Medical Facility or Aircraft
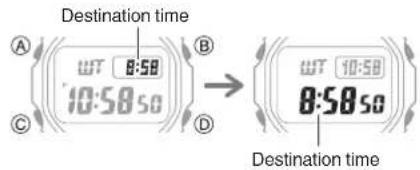
● In the aircraft, before arriving at your destination
- Swap the origin time zone time with the destination time zone time.
After swappingBefo
text_image
Destination time A B C 10:50 10:50 D Destination timeUsing G-SHOCK Connected to Configure Settings
Using Watch Operations to Configure Settings
● After Arriving
- Adjust the time setting.
Triggering Immediate Time Adjustment
- Enable auto time adjustment.
Using the Watch in a Medical Facility or Aircraft
Operation Guide 3459/3461
CASIO®
Other Information
This section provides non-operational information you also need to know. Refer to this information as required.
City Table
| City Offset | ||
| UTC | Coordinated Universal Time | 0 |
| LONDON London | 0 | |
| PARIS Paris +1 | ||
| ATHENS Athens | +2 | |
| JEDDAH Jeddah | +3 | |
| TEHRAN Tehran | +3.5 | |
| DUBAI Dubai +4 | ||
| KABUL Kabul +4.5 | ||
| KARACHI Karachi | +5 | |
| DELHI Delhi +5.5 | ||
| KATHMANDU Kathmandu | +5.75 | |
| DHAKA Dhaka | +6 | |
| YANGON | Yangon +6.5 | |
| BANGKOK | Bangkok | +7 |
| HONG KONG | Hong Kong | +8 |
| PYONGYANG Pyongyang | +8.5 | |
| EUCLA | Eucla | +8.75 |
| TOKYO Tokyo | +9 | |
| ADELAIDE | Adelaide | +9.5 |
| SYDNEY Sydney | +10 | |
| LORD HOWE ISLAND | Lord Howe Island | +10.5 |
| NOUMEA | Noumea +11 | |
| WELLINGTON | Wellington | +12 |
| CHATHAM ISLANDS | Chatham Islands | +12.75 |
| NUKUALOFA | Nuku'alofa | +13 |
| KIRITIMATI | Kiritimati +14 | |
| BAKER ISLAND | Baker Island | -12 |
| PAGO PAGO | Pago Pago | -11 |
| HONOLULU | Honolulu | -10 |
| MARQUESAS ISLANDS | Marquesas Islands | -9.5 |
| ANCHORAGE | Anchorage | -9 |
| LOS ANGELES | Los Angeles | -8 |
| DENVER Denver | -7 | |
| CHICAGO | Chicago | -6 |
| NEW YORK | New York | -5 |
| HALIFAX | Halifax | -4 |
| ST. JOHN'S | St. John's | -3.5 |
| RIO DE JANEIRO | Rio de Janeiro | -3 |
| F. DE NORONHA | Fernando de Noronha | -2 |
| PRAIA Praia -1 | ||
- The information in the above table is current as of January 2018.
- Time zones may change and UTC differentials may become different from those shown in the table above. If this happens, connect the watch with a phone to update the watch with the latest time zone information.
Summer Time Table
When “AUTO” is selected for a city that observes summer time, switching between standard time and summer time will be performed automatically at the timing shown in the table below.
Note
- Summer time start and end dates for your current location may be different from those shown below. If this happens, you can have new summer time information for your Home City and World Time city sent to the watch by connecting the watch with a phone. If the watch is not connected with a phone, you can change the summer time setting manually.
| City Name | Summer Time Start | Summer Time End |
| London | 01:00, last Sunday in March | 02:00, last Sunday in October |
| Paris | 02:00, last Sunday in March | 03:00, last Sunday in October |
| Athens | 03:00, last Sunday in March | 04:00, last Sunday in October |
| Tehran | 00:00, March 22 or 21 | 00:00, September 22 or 21 |
| Sydney, Adelaide | 02:00, first Sunday in October | 03:00, first Sunday in April |
| Lord Howe Island | 02:00, first Sunday in October | 02:00, first Sunday in April |
| Wellington | 02:00, last Sunday in September | 03:00, first Sunday in April |
| Chatham Islands | 02:45, last Sunday in September | 03:45, first Sunday in April |
| Anchorage | 02:00, second Sunday in March | 02:00, first Sunday in November |
| Los Angeles | 02:00, second Sunday in March | 02:00, first Sunday in November |
| Denver | 02:00, second Sunday in March | 02:00, first Sunday in November |
| Chicago | 02:00, second Sunday in March | 02:00, first Sunday in November |
| New York | 02:00, second Sunday in March | 02:00, first Sunday in November |
| Halifax | 02:00, second Sunday in March | 02:00, first Sunday in November |
| St. John's | 02:00, second Sunday in March | 02:00, first Sunday in November |
| Rio de Janeiro | 00:00, third Sunday in October | 00:00, third Sunday in February or 00:00, fourth Sunday in February |
- The information in the above table is current as of January 2018.
Supported Phones
For information about phones that can connect with the watch, visit the CASIO website.
https://world.casio.com/os_mobile/wat/
Specifications
Accuracy at normal temperature :
±15 seconds per month average when time adjustment by time calibration signal reception or by communication with a phone is not possible.
Timekeeping :
Hour, minute, second, year, month, day, day of the week
a.m./p.m.(P)/24-hour timekeeping
Full Auto Calendar (2000 to 2099) *
* Year display on setting screen only.
Signal Receive Functions :
Auto receive, manual receive
Auto summer time switching
Auto transmitter selection (for JJY, MSF/DCF77)
Receivable call signs:
JJY (40 kHz/60 kHz), WWVB (60 kHz), MSF
(60 kHz), DCF77 (77.5 kHz), BPC (68.5 kHz)
OFF: Signal receive disabled
World Time :
Displays current time in 39 cities (39 time zones) and for UTC, auto summer time setting
Home City/World Time City swapping
Stopwatch :
Measurement unit: 1/100 seconds (first hour); 1 second (after first hour)
Measurement range: 23 hours, 59 minutes, 59 seconds (24 hours)
Measurement functions: Elapsed time, split time, two finishes
Alarm :
Time alarms
Alarms: 5 (with one snooze alarm)
Setting units: Hours, minutes
Beeper: 10 seconds
Hourly time signal
Beeps every hour on the hour
Timer :
Measuring unit: 1 second
Countdown range: 24 hours
Setting unit: 1 second
Time up: 10-second beeper
Mobile Link :
Auto Time Adjustment
Time setting adjusted automatically at preset time.
One-touch Time Correction
Manual connection and time adjustment
Phone finder
Watch operation sounds the alert sound of the mobile phone.
World Time
Current time for approximately 300 cities selected for the watch
Home Time/World Time swapping
Original city function (location and name settings)
Auto Summer Time Switching
Automatic switching between standard time and summer time.
Timer Settings
Alarm Settings
Reminder
Reminds you of anniversaries and other important dates.
Data Communication Specifications Bluetooth®
Frequency Band: 2400MHz to 2480MHz
Maximum Transmission: 0 dBm (1 mW)
Communication range: Up to 2 meters (depends on environment)
Other :
LED light, light duration setting, Full Auto
Light, Power Saving, Button operation tone on/off, Month/day order, Day of the week language, Auto time adjustment on/off
Power Supply :
Solar panel and one rechargeable battery Battery operating time: Approximately 10 months
Conditions:
Not exposed to light under the conditions below.
Auto time adjustment: 4 times/day
Alarm: Once (10 seconds)/day
Illumination: Once (2 seconds)/day
Power Saving: 6 hours/day
Specifications are subject to change without notice.
Mobile Link Precautions
● Legal Precautions
- This watch complies with or has received approval under the radio laws of various countries and geographical areas. Using this watch in an area where it does not comply with or has not received approval under applicable radio laws may be a criminal offense. For details, visit the CASIO Website. https://world.casio.com/ce/BLE/
- Use of this watch inside of aircraft is restricted under the aviation laws of each country. Be sure to follow the instructions of airline personnel.
● Precautions when using Mobile Link
- When using this watch in combination with a phone, keep the watch and phone close to each other. A range of two meters is recommended as a guideline, but the local environment (walls, furniture, etc.), the structure of a building, and other factors may require a much closer range.
- This watch can be affected by other devices (electrical devices, audio-visual equipment, office equipment, etc.) In particular, it can be affected by operation of a microwave oven. The watch may not be able to communicate normally with a phone if a microwave oven is operating nearby. Conversely, this watch may cause noise in radio reception and the video image of a TV.
- Bluetooth of this watch uses the same frequency band (2.4 GHz) as wireless LAN devices, and use of such devices in close proximity of this watch may result in radio interference, slower communication speeds and noise for the watch and the wireless LAN device, or even communication failure.
● Stopping Radio Wave Emission by This Watch
The watch is emitting radio waves whenever
* is flashing or displayed.
In addition, the watch also connects phone automatically four times a day to adjust its time setting.
When in a hospital, on an aircraft, or in any other area where the use of radio waves is not allowed, use the operations below to stop radio wave generation.
- Stopping Radio Wave Generation
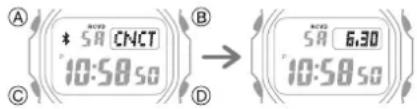
Press any button to terminate the Bluetooth connection.
Connected After disconnection
text_image
A * 58 CNCT 10:58 so B C D 58 6.30 10:58 so- Disabling Auto Time Adjustment Configure G-SHOCK Connected settings to disable time adjustment between the watch and phone.
Using the Watch in a Medical Facility or Aircraft
Copyrights and Registered Copyrights
- The Bluetooth® word mark and logos are registered trademarks owned by the Bluetooth SIG, Inc. and any use of such marks by CASIO Computer Co., Ltd. is under license.
- iPhone and App Store are registered trademarks of Apple Inc. in the United States and other countries.
- iOS is a trademark or registered trademark of Cisco Systems, Inc.
• GALAXY is a registered trademark of Samsung Electronics Co., Ltd. - Android and Google Play™ are trademarks or registered trademarks of Google LLC.
- Other company names and product names used herein are trademarks or registered trademarks of their respective companies.
Troubleshooting
Signal Reception (Time Calibration Signal)
Q1 The watch cannot perform a receive operation.
Is the watch's battery charged?
Signal reception is not possible while battery power is low. Keep the watch exposed to light until it recharges sufficiently.
Solar Charging
Is the watch in the Timekeeping Mode?
Time signal receive is performed only while the watch is in the Timekeeping Mode. Return to the Timekeeping Mode.
Navigating Between Modes
Is your Home City setting correct for your location?
The watch will not indicate the correct time if the Home City setting is wrong. Change your Home City setting so it correctly reflects your location.
Setting a Home Time City
Is the watch connected with a phone?
Auto receive of signals by the watch is disabled while it is connected with a phone.
Time Adjustment Using a Time Signal
After checking the above, the watch still cannot perform a receive operation.
Time calibration signal reception is not possible under the conditions described below.
- When watch is at Level 2 power saving
- Timer countdown operation in progress If successful reception is not possible for some reason, you can adjust the time and day settings manually.
Q2 The signal receive operation always fails.
Is the watch in a location that is appropriate for signal reception?
Check your surroundings and move the watch to a location where signal reception is better.
Appropriate Signal Reception Location
Did you avoid touching the watch while the receive operation was in progress?
Minimize movement of the watch and do not perform any watch operation while a receive operation is in progress.
Is there an alarm configured to sound during the same period that the signal receive operation is performed?
Receive stops if an alarm operation starts while it is being performed. Disable the alarm.
Enabling/Disabling an Alarm or the Hourly Time Signal
Is the signal transmitter in your area transmitting a signal?
The transmitter of the time calibration may not be transmitting a signal. Try again later.
Q3 Signal reception should have been successful, but the watch's time and/or day is wrong.
Adjust time and day settings manually.
Using Watch Operations to Adjust the Time Setting
Operation Guide 3459/3461
CASIO®
I can't pair the watch with a phone.
Q1 I've never been able to establish a (pairing) connection between the watch and phone.
Are you using a supported phone model?
Check if the phone model and its operating system are supported by the watch.
For information about supported phone models, visit the CASIO Website.
https://world.casio.com/os_mobile/wat/
Did you install G-SHOCK Connected on your phone?
G-SHOCK Connected needs to be installed on your phone in order to connect with the watch.
① Install the required app on your phone.
Are your phone's Bluetooth settings configured correctly?
Configure the phone's Bluetooth settings. For details about setting procedures, see your phone documentation.
iPhone Users
- "Settings"→"Bluetooth"→ On
- "Settings"→"Privacy"→"Bluetooth Sharing"→"G-SHOCK Connected"→On
Android Users
- Enable Bluetooth.
Other than the above.
Some phones need to have BT Smart disabled to use G-SHOCK Connected. For details about setting procedures, see your phone documentation.
On the Home Screen, tap: "Menu" → "Settings" → "Bluetooth" → "Menu" → "BT Smart settings" → "Disable".
I can't reconnect the watch and phone.
Q1 The watch will not re-connect with the phone after they are disconnected.
Is G-SHOCK Connected running?
The watch cannot re-connect with the phone unless G-SHOCK Connected is running on the phone. On the phone's Home Screen, tap the "G-SHOCK Connected" icon. Then on the watch, hold down the MODE button (C) for about three seconds.
Have you tried turning your phone off and then back on again?
Turn the phone off and then back on, and then tap the "G-SHOCK Connected" icon. Next, on the watch, hold down the MODE button (C) for about three seconds.
Q2 I can't connect while my phone is in the Airplane Mode.
Connection with the watch is not possible while the phone is in the Airplane Mode. After exiting the phone's Airplane Mode, go to its Home Screen and tap the "G-SHOCK Connected" icon. Then on the watch, hold down the MODE button (C) for about three seconds.
Q3 I changed the phone's Bluetooth from enabled to disabled, and now I can't connect anymore.
On the phone, re-enable Bluetooth, and then go to the Home Screen and tap the "G-SHOCK Connected" icon. Next, on the watch, hold down the MODE button (C) for about three seconds.
Q4 I can't connect after turning off the phone.
Turn on the phone and tap the "G-SHOCK Connected" icon. Then on the watch, hold down the MODE button (C) for about three seconds.
Phone-Watch Connection
Q1 I can't establish a connection between the phone and watch.
Have you tried turning your phone off and then back on again?
Turn the phone off and then back on, and then tap the "G-SHOCK Connected" icon. Next, on the watch, hold down the MODE button (C) for about three seconds.
Has the watch been re-paired with the phone?
After deleting pairing information from G-SHOCK Connected, re-pair them.
↓ Unpairing
If you are unable to establish a connection...
Use the procedure below to delete the pairing information from the watch, and then re-pair the watch and phone.
① Hold down (A) for at least two seconds until [HT] starts to flash.
② Press (C) twice.
③ Hold down (B) for at least three seconds. Release the button when [CLR] appears.
Changing to a Different Phone Model
Q1 Connecting the current watch to another phone.
Pair the watch with the phone.
If you purchase another phone
Auto Time Adjustment by Bluetooth Connection (Time Adjustment)
Q1 When does the watch adjust its time?
The watch will connect with the phone and perform auto time adjustment at around 12:30 a.m., 6:30 a.m., 12:30 p.m. and 6:30 p.m. The connection is automatically terminated after auto time adjustment is complete. Also, time signal auto receive will be performed if there has been no auto time adjustment based on connection between the watch and phone for more than one day.
Q2 Auto time adjustment is not performed at a scheduled time.
Is auto time adjustment not being performed according to its normal schedule?
Note that auto time adjustment is not performed for 24 hours after swapping of the Home Time and World Time, or after the time setting is adjusted manually on the watch. Auto time adjustment will resume 24 hours after either of the above operations is performed.
Is a timer countdown operation in progress?
Auto time adjustment will not start at the scheduled times if a timer countdown operation is in progress. Stop the timer countdown operation.
Timer
Is auto time adjustment enabled?
Auto time adjustment will not be performed at the scheduled times unless it is enabled. Enable auto time adjustment.
Using the Watch in a Medical Facility or Aircraft
Q3 The watch does not connect with a phone and adjust its time when I press (D).
The watch will not adjust its time if you press (D) while a timer countdown operation is in progress. Stop the timer countdown operation and then press (D) again.
Q4 Time is not displayed correctly.
The phone's time setting may be incorrect because it is unable to connect with its network due to being out of range, etc. If this happens, connect the phone to its network and then adjust the time setting.
Alarms
Q1 The alarm does not sound.
Is the watch's battery charged?
Keep the watch exposed to light until it recharges sufficiently.
Solar Charging
Is the alarm enabled?
Enable the alarm.
Enabling/Disabling an Alarm or the Hourly Time Signal