FWF X71253W - Washing machine WHIRLPOOL - Free user manual and instructions
Find the device manual for free FWF X71253W WHIRLPOOL in PDF.


| Product Type | Freestanding Washing Machine |
| Loading Type | Front Load |
| Capacity | 7 kg |
| Spin Speed | 1200 rpm |
| Dimensions (H x W x D) | 85 x 59.5 x 54.3 cm |
| Weight | 68 kg |
| Power Supply | 220-240 V, 50 Hz, 10 A |
| Energy Efficiency Class | A+++ |
| Main Programs | Cotton, Synthetics, Delicates, Wool, Quick Wash, Eco |
| Special Functions | Delay Start, Extra Rinse, Pre-wash, Rinse Hold |
| Noise Level (Wash/Spin) | 56 dB / 76 dB |
| Annual Water Consumption | 9990 L/year |
| Annual Energy Consumption | 199 kWh/year |
| Display Type | LED Display |
| Door Opening | Left hinge, 180° |
| Child Lock | Yes |
| Self-Cleaning | Drum Clean Program |
| Spare Parts Availability | 7 years minimum |
| Manual Languages | EN, FR, DE, IT, ES, NL, PT, PL, RU, AR, TR |
Frequently Asked Questions - FWF X71253W WHIRLPOOL
User questions about FWF X71253W WHIRLPOOL
0 question about this device. Answer the ones you know or ask your own.
Ask a new question about this device
Download the instructions for your Washing machine in PDF format for free! Find your manual FWF X71253W - WHIRLPOOL and take your electronic device back in hand. On this page are published all the documents necessary for the use of your device. FWF X71253W by WHIRLPOOL.
USER MANUAL FWF X71253W WHIRLPOOL
natural_image
Simple line drawing of a washing machine inside a rounded square frame (no text or symbols)User Manual

THANK YOU FOR BUYING A WHILPOOL PRODUCT. In order to receive a more complete assistance, please register your appliance on www.whirlpool.eu/register
INDEX
HEALTH & SAFETY GUIDE.... 3
Safety Instructions....3
USER MANUAL....5
Product description....5
Detergent dispenser 5
Technical data for water connection 5
Control panel 6
Programmes....6
options & Functions....7
Programme chart 8
Door....8
Accessories 8
How to use the appliance....9
First time use 9
Daily use....9
Indicators....11
Hints and tips....11
Cleaning & maintenance....12
Cleaning the outside of the washing machine....12
Checking the water supply hose....12
Cleaning the mesh filters in the water supply hose 13
Cleaning the detergent dispenser 13
Cleaning the water filter / draining residual water 14
Troubleshooting....15
Door – how to open it in case of a failure, to take out your laundry....16
Transport and handling 16
After-sales service 17
INSTALLATION GUIDE....18
SAFETY INSTRUCTIONS IMPORTANT TO BE READ AND OBSERVED
Before using the appliance, read these safety instructions. Keep them nearby for future reference. These instructions and the appliance itself provide important safety warnings, to be observed at all times. The manufacturer declines any liability for failure to observe these safety instructions, for inappropriate use of the appliance or incorrect setting of controls.
⚠️ Very young children (0-3 years) should be kept away from the appliance. Young children (3-8 years) should be kept away from the appliance unless continuously supervised. Children from 8 years old and above and persons with reduced physical, sensory or mental capabilities or lack of experience and knowledge can use this appliance only if they are supervised or have been given instructions on safe use and understand the hazards involved. Children must not play with the appliance. Cleaning and user maintenance must not be carried out by children without supervision.
Never open the door forcibly or use it as a step.
PERMITTED USE
⚠️ CAUTION: The appliance is not intended to be operated by means of an external switching device, such as a timer, or separate remote controlled system. ⚠️ This appliance is intended to be used in household and similar applications such as: staff kitchen areas in shops, offices and other working environments; farm houses; by clients in hotels, motels, bed & breakfast and other residential environments.
⚠ Do not load the machine above the maximum capacity (kg of dry cloth) indicated in the programme table.
⚠ This appliance is not for professional use. Do not use the appliance outdoors.
Do not use any solvents (e.g. turpentine, benzene), detergents containing solvents, scouring powder, glass or general purpose cleaners, or flammable fluids; do not machine wash fabrics that have been treated with solvents or flammable liquids.
INSTALLATION
The appliance must be handled and installed by two or more persons - risk of injury. Use protective gloves to unpack and install - risk of cuts.
If you want to stack a dryer on top of your washing machine, first contact our After-Sales Service or your specialist dealer to verify whether this is possible. This is only possible if the dryer is attached to the washing machine by means of appropriate stacking kit available through our After- Sales Service or your specialist dealer.
⚠ Move the appliance without lifting it by the worktop or top lid.
⚠️ Installation, including water supply (if any) and electrical connections and repairs must be carried out by a qualified technician. Do not repair or replace any part of the appliance unless specifically stated in the user manual. Keep children away from the installation site. After unpacking the appliance, make sure that it has not been damaged during transport. In the event of problems, contact the dealer or your nearest After-sales Service. Once installed, packaging waste (plastic, styrofoam parts etc.) must be stored out of reach of children - risk of suffocation. The appliance must be disconnected from the power supply before any installation operation - risk of electric shock. During installation, make sure the appliance does not damage the power cable - risk of fire or electric shock. Only activate the appliance when the installation has been completed.
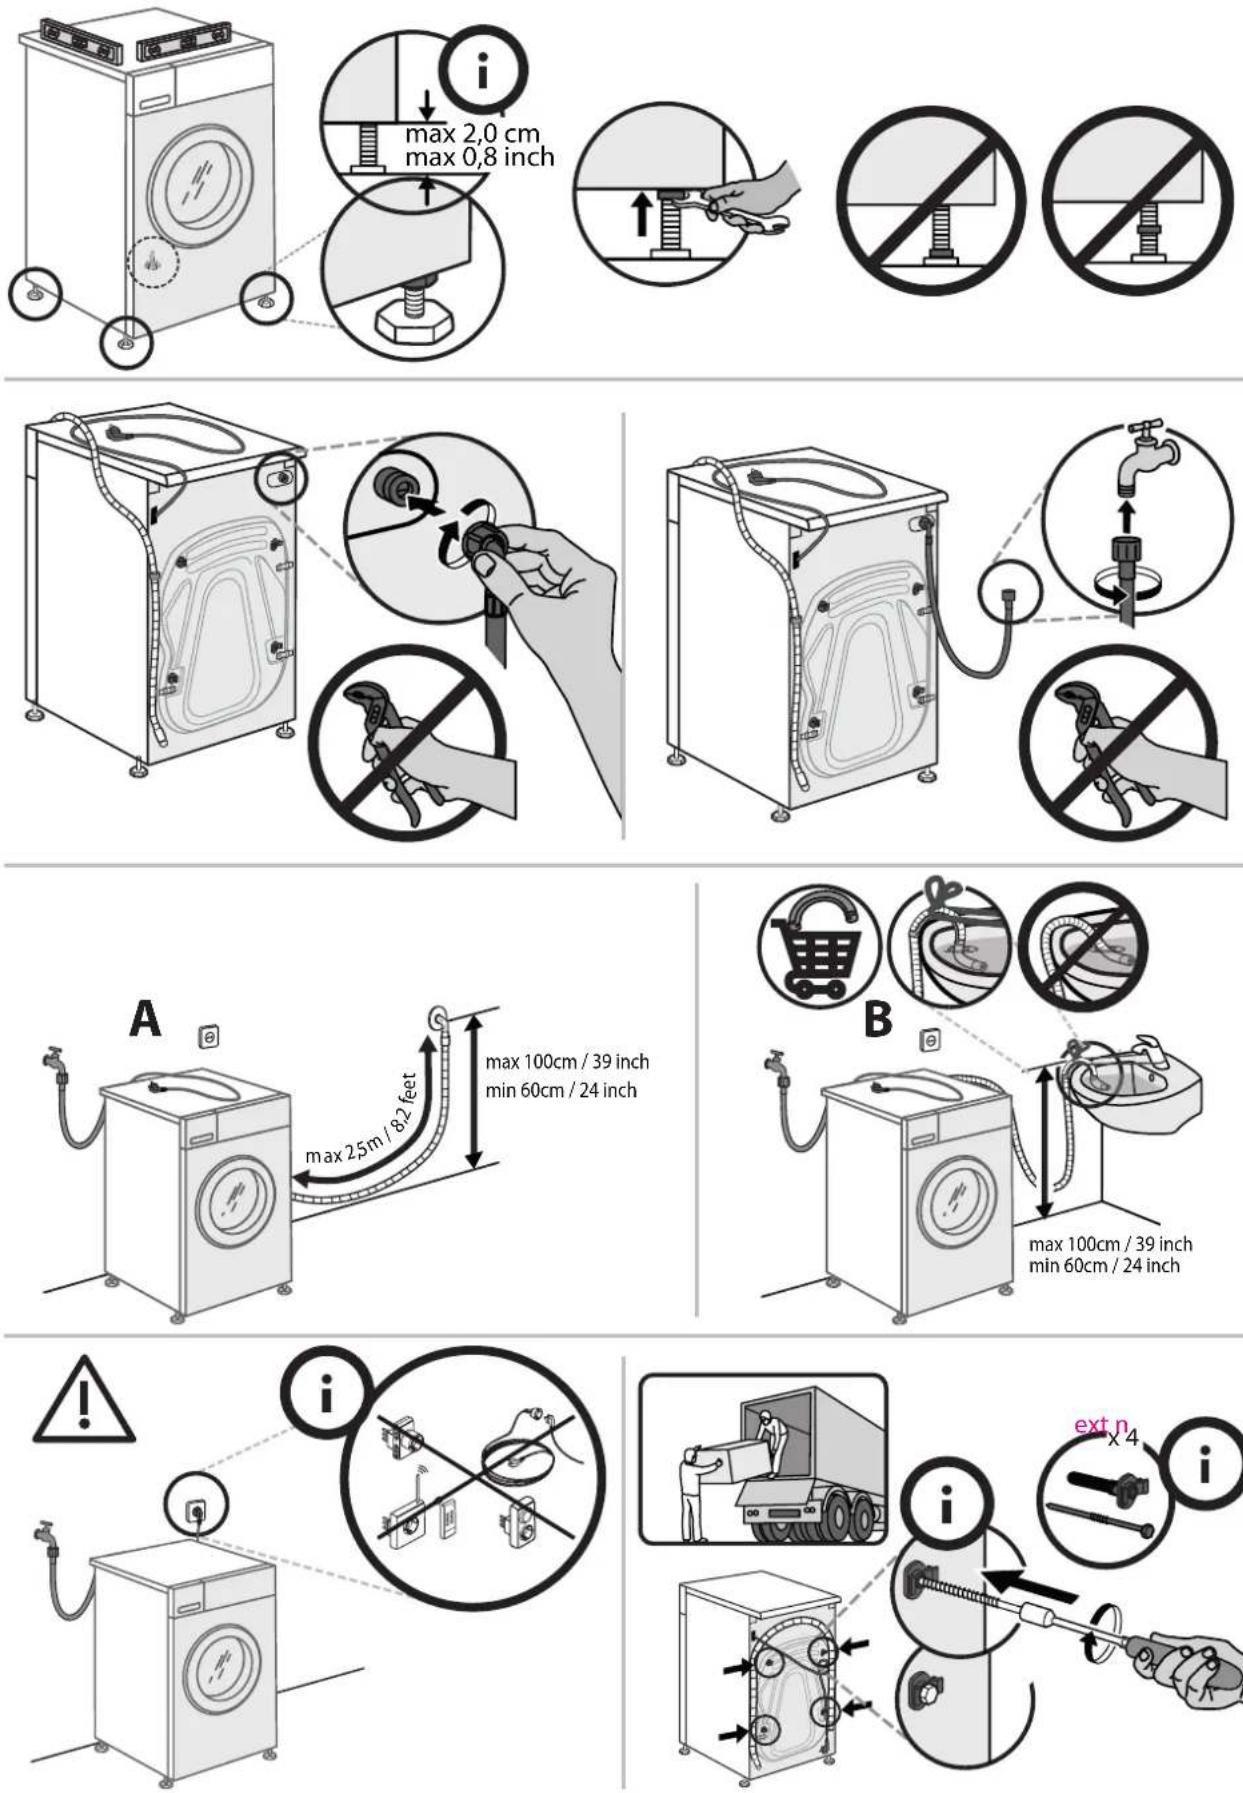
⚠ Do not install your appliance where it may be exposed to extreme conditions, such as: poor ventilation, temperatures below 5 °C or above 35 °C. ⚠ When installing the appliance make sure that the four feet are stable and resting on the floor, adjusting them as required, and check that the appliance is perfectly to level using a spirit level.
⚠️ If the appliance is being installed on wood or "floating" floors (certain parquet and laminate materials), secure a 60 x 60 x 3 cm (at least) sheet of plywood to the floor then place the appliance on top of this.
⚠️ Connect the water inlet hose(s) to the water supply in accordance with the regulations of your local water company.
⚠ For cold fill only models: do not connect to the hot water supply.
⚠ For models with hot fill: the hot water inlet temperature must not exceed 60 °C.
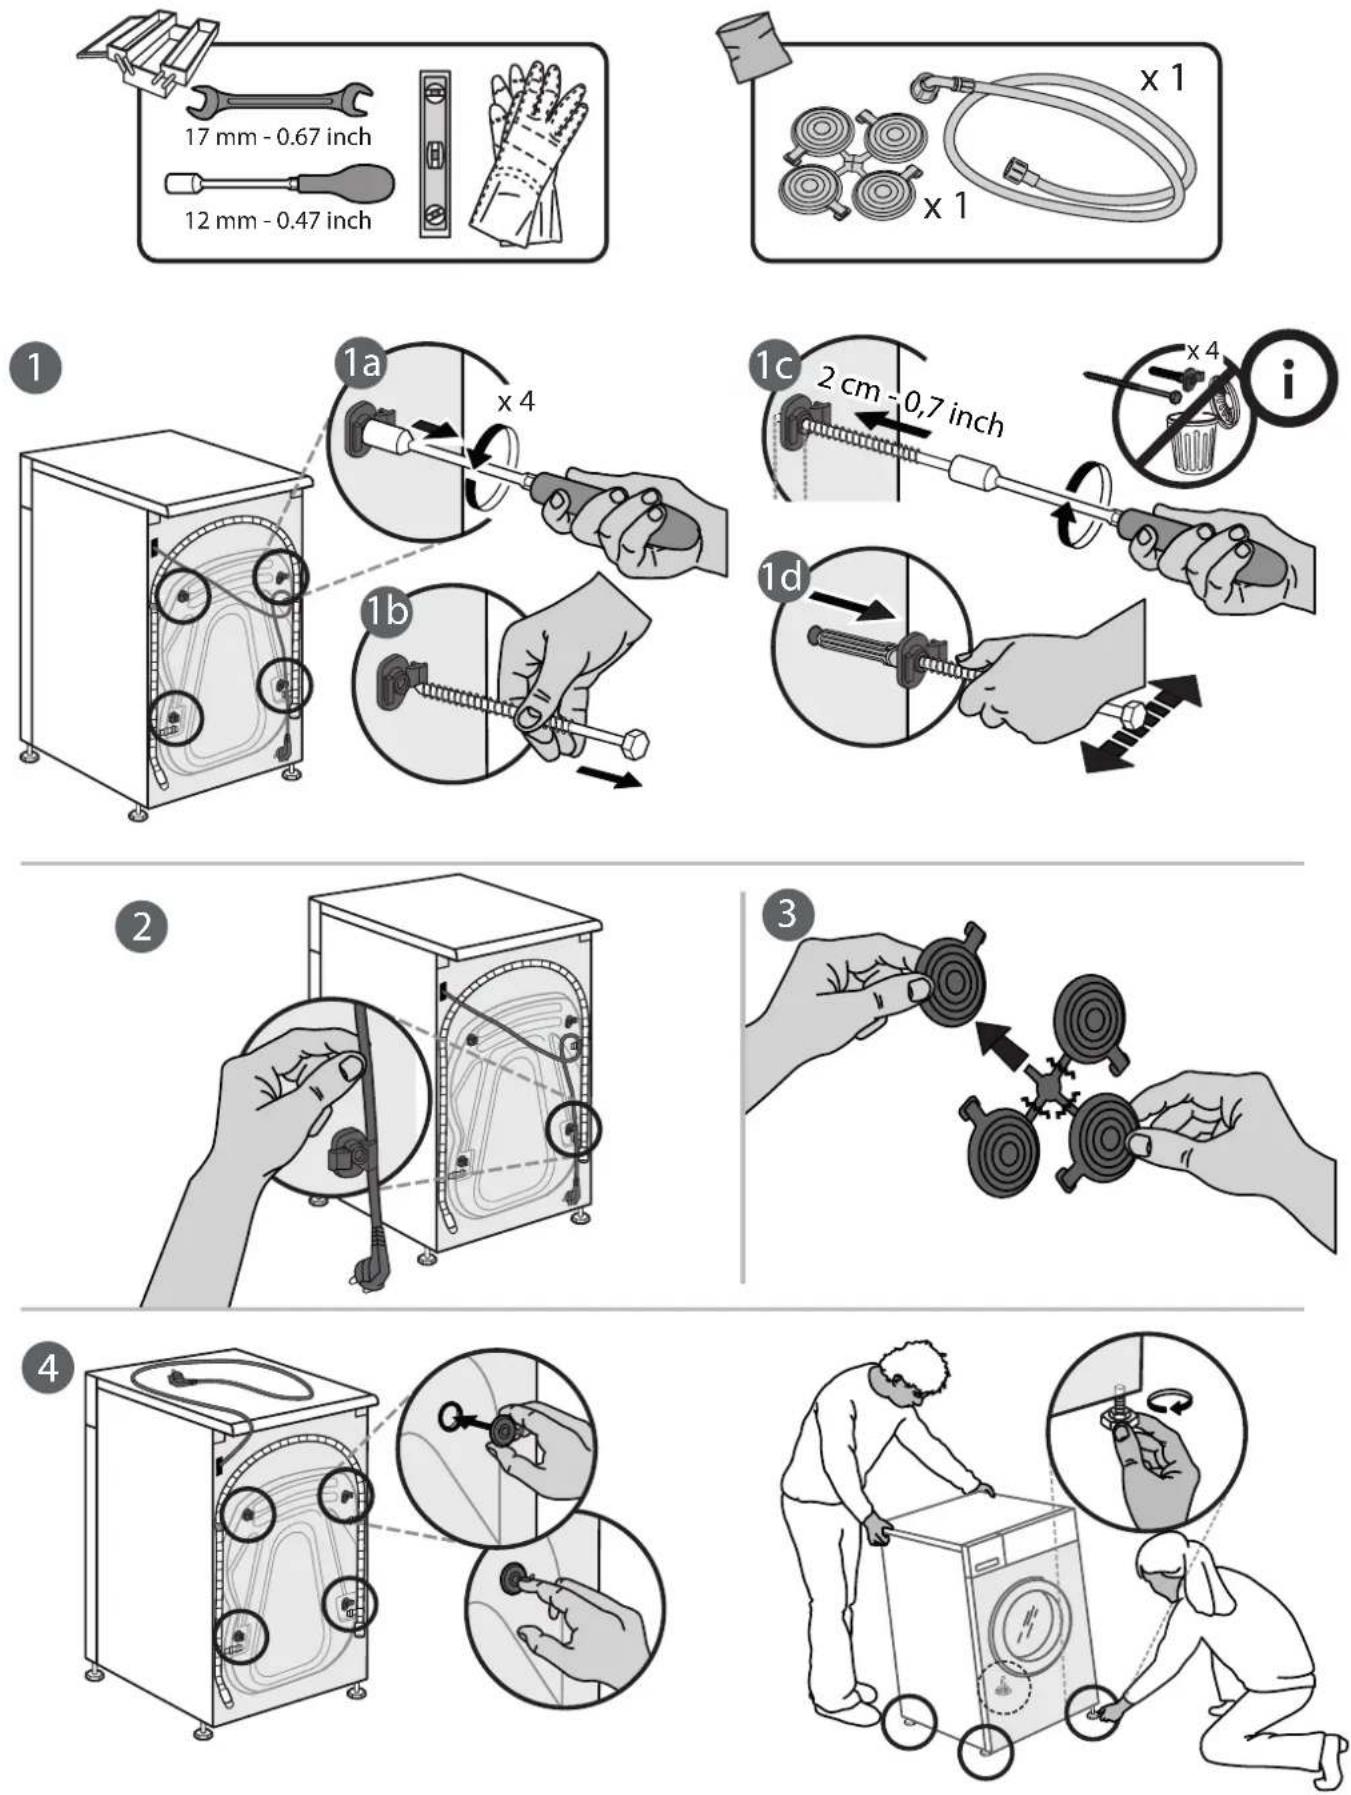
The washing machine is fitted with transport bolts to prevent any possible damage to the interior during transport. Before using the machine, it is imperative that the transport bolts are removed. After their removal, cover the openings with the 4 enclosed plastic caps.
⚠️ After installation of the device, wait a few hours before starting it so that it acclimates to the environmental conditions of the room.
⚠ Make sure that the ventilation openings in the base of your washing machine (if available on your model) are not obstructed by a carpet or other material.
⚠ Use only new hoses to connect the appliance to the water supply. The old hose-sets should not be reused.
⚠ The supply water pressure must be in the 01-1 Mpa range.
ELECTRICAL WARNINGS
⚠ It must be possible to disconnect the appliance from the power supply by unplugging it if plug is accessible, or by a multi-pole switch installed upstream of the socket in accordance with the wiring rules and the appliance must be earthed in conformity with national electrical safety standards.
⚠ Do not use extension leads, multiple sockets or adapters. The electrical components must not be accessible to the user after installation. Do not use the appliance when you are wet or barefoot. Do not operate this appliance if it has a damaged power cable or plug, if it is not working properly, or if it has been damaged or dropped.
⚠️ If the supply cord is damaged, it must be replaced with an identical one by the manufacturer, its service agent or similarly qualified persons in order to avoid a hazard - risk of electric shock.
CLEANING AND MAINTENANCE
⚠ WARNING: Ensure that the appliance is switched off and disconnected from the power supply before performing any maintenance operation; never use steam cleaning equipment - risk of electric shock.
DISPOSAL OF PACKAGING MATERIALS
The packaging material is 100% recyclable and is marked with the recycle symbol 🌐
The various parts of the packaging must therefore be disposed of responsibly and in full compliance with local authority regulations governing waste disposal.
DISPOSAL OF HOUSEHOLD APPLIANCES
This appliance is manufactured with recyclable or reusable materials. Dispose of it in accordance with local waste disposal regulations. For further information on the treatment, recovery and recycling of household electrical appliances, contact your local authority, the collection service for household waste or the store where you purchased the appliance. This appliance is marked in compliance with European Directive 2012/19/EU, Waste Electrical and Electronic Equipment (WEEE). By ensuring this product is disposed of correctly, you will help prevent negative consequences for the environment and human health.
The symbol 📄 on the product or on the accompanying documentation indicates that it should not be treated as domestic waste but must be taken to an appropriate collection center for the recycling of electrical and electronic equipment.
PRODUCT DESCRIPTION
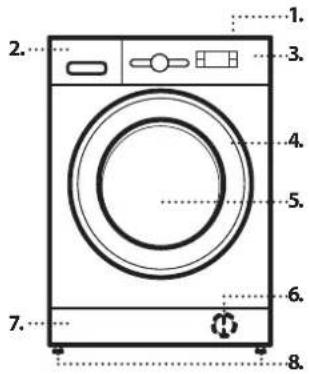
text_image
1. 2. 3. 4. 5. 6. 7. 8.- Worktop
- Detergent dispenser
- Control panel
- Door handle
- Door
- Water filter - behind plinth
- Plinth (removable)
- Adjustable feet (4)
DETERGENT DISPENSER
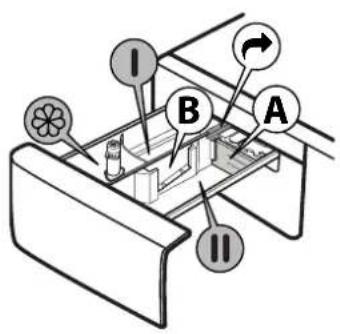
text_image
I B A II- Main wash compartment
• Detergent for the main wash
- Stain remover
- Water softener
- For a liquid detergent it is recommended to use removable plastic partition A (supplied) for a proper dosage. If powder detergent is used, place the partition into slot B.
- Prewash compartment
• Detergent for the prewash
-
Softener compartment
-
Fabric softener
-
Liquid starch Pour softener or starch solution only up to the "MAX" mark.
-
Release button ↗
(press to remove the detergent dispenser for cleaning)
TECHNICAL DATA FOR WATER CONNECTION
Water connection
Water supply Cold
Water tap 3/4" threaded hose connector
Minimum water supply pressure 100 kPa (1 bar)
Maximum water supply pressure 1000 kPa (10 bar)
CONTROL PANEL
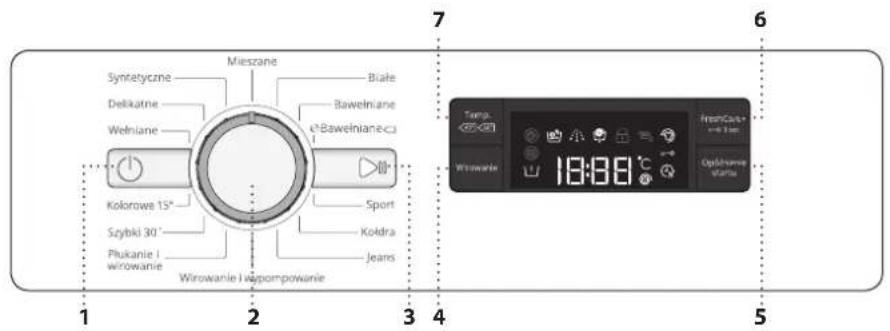
1 "ON/OFF" button ⏻
2 Programme selector
3 "Start/Pause" button
4 "Spin" button
5 "Start delay" button
6 "FreshCare+/
"Key lock"button =
7 "Temperature" button
PROGRAMMES
For choosing the appropriate programme for your kind of laundry, always respect the instructions on the care labels of the laundry. The value given in the tub symbol is the maximum temperature possible for washing the garment.
MIXED
For washing lightly to normally soiled resilient garments in cotton, linen, synthetic fibres and mixed fibres.
WHITE
For washing normally to heavily soiled towels, underwear, table and bed linen, etc in resilient cotton and linen. Only when the temperature is selected at 90^ C the cycle is provided with a prewash phase before main washing phase. In this case it is recommended to add detergent both, in the prewash and main wash section.
COTTON
Normally to heavily soiled and robust cottons.
e COTTON
For washing normally soiled cotton garments. At 40°C and 60°C, this is the standard cotton programme and the most efficient in terms of water and energy consumption.
SPORT
For washing lightly soiled sports clothing (tracksuits, shorts, etc.). For best results, we recommend not exceeding the maximum load indicated in the "PROGRAMME CHART". We recommend using liquid detergent, and adding the amount suitable for half-load.
DUVET
Designed for washing eiderdown padded items such as double or single duvets, cushions and anoraks. It is recommended to load such padded items in the drum with the edges folded inwards and not to exceed 34 of the drum's volume. For optimal washing, we recommend using a liquid detergent.
JEANS
Turn garments inside-out before washing and use a liquid detergent.
SPIN & DRAIN
Spins the load then empties the water. For resilient garments. If you exclude the spin cycle, the machine will drain only
RINSE & SPIN
Rinses and the spins. For resilient garments.
RAPID 30'
For washing lightly soiled garments quickly. This cycle lasts only 30 minutes, saving time and energy.
COLOURS 15°
This cycle helps protect colours by washing in cold water (15°C) and uses less energy to heat the water while still offering satisfactory wash results. Suitable for lightly soiled, unstained garments. This cycle offers wash results comparable to 40°C mixed at just 15°C
WOOL
All wool garments can be washed using programme, "Wool" even those carrying the "hand-wash only" label. For best results, use special detergents and do not exceed max kg declaration of laundry.
DELICATES
For washing particularly delicate garments. Preferably turn garments inside out before washing.
SYNTHETICS
For washing normally soiled garments made from synthetic fibres (such as polyester, polyacrylic, viscose etc.) or cotton/ synthetic blends.
OPTIONS
! If the selected function is incompatible with the set programme, the incompatibility will be signalled by a buzzer (3 beeps). ! If the selected function is incompatible with another previously set function the function will not be enabled.
START DELAY
To set the selected programme to start at a later time, press the button to set the desired delay time. The symbol lights on the display when this function is enabled. To cancel the delayed start, press the button again until the value, "0" is shown on the display.
FRESHCARE+
This option enhances washing performance by generating steam to inhibit the proliferation of the main bad odour sources inside the machine. After steam phase, the washing machine will perform gentle tumbling through slow rotations of the drum. FreshCare+ option starts after the cycle ends for a maximum duration of 6h and you can interrupt it at any time by pressing any button on control panel or turning the knob. Wait around 5 minutes before door can be opened.
TEMPERATURE
Every programme has a predefined temperature. If you want to change the temperature, press the "temperature" button. The value appears on the display.
SPIN
Every programme has a predefined spin speed. If you want to change the spin speed, press the "Spin" button. The value appears on the display.
FUNCTIONS

ON/OFF
To switch on the washing machine: press the
"ON/OFF" button, the "Start/Pause" button light up. To switch off the washing machine during the wash cycle, press and hold the button for approximately 3 seconds. If the button is pressed briefly or accidentally the machine will not switch off. To switch off the washing machine after programme end: press the "ON/OFF" button until the lights go off.
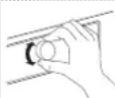
KNOB
To select and confirm programmes. Turn to select.

START/PAUSE
To start the programme, after you have finished your settings. To pause a running programme. To continue a paused programme.

KEY LOCK
To lock the control panel, press and hold the
"Key lock" button for approximately 3 seconds. The symbol will light up on the display to indicate that the control panel has been locked (with the exception of the "ON/OFF" button). This prevents unintentional changes to programmes, especially with children near the machine. To unlock the control panel, press and hold the "Key lock" button for approximately 3 seconds.
BLEACHING
If you wish to bleach the laundry, load the washing machine and set the "Rinse & Spin" programme. Start the machine and wait for it to complete the first water filling cycle (roughly 2 minutes). Put the machine in pause mode by pressing the "Start/Pause" button, open the detergent drawer and pour the bleach (observe the recommended doses indicated on the package) into the main wash compartment where the partition was previously mounted. Restart the cycle by pressing the "Start/Pause" button. If desired, it is possible to add fabric softener into the appropriate compartment of the detergent drawer.
DEMO MODE
This function is only used for sales presentations. By this you can interact with washing machine and see it working without water. To enter Demo mode, switch the washing machine ON and OFF again. Press and hold "Start/Pause" button, then within 5 seconds press also "ON/OFF" button and hold both buttons for 10 seconds. To deactivate this function, switch the washing machine OFF. Than press and hold "Start/Pause" button, within 5 seconds press also "ON/OFF" button and hold both buttons for 2 seconds.
PROGRAMME CHART
| Max load 7 KgPower consumption in off-mode 0.5 W / in left-on mode 8.0 W | Detergents and additives | Recommended detergent | Residual * dampness % | Energy consumption kWh | Total water lt | |||||||||
| Programme | Temperatures | Max. spin speed (rpm) | Max load (kg) | Duration (Minutes) | Pre-wash | Main wash | Softener | Powder | Liquid | |||||
| Default | Range | I | II | ☀ | ||||||||||
| Mieszane Mixed | 40°C | 48°C 1000 | 3.5 ** — | ● | ○ | — | √ | — — | — | |||||
| Białe White | 60°C | 98°C 1200 | 7.0 ** | ● (90°) | ●○√√ | — — | — | |||||||
| Bawełniane Cotton | 40°C | 69°C 1200 | 7.0 220 | — | ●○√√ | 53 0.98 | 75 | |||||||
| e Bawełniane ☐ | e Cotton ☐ | 60°C | ☒ - 60°C 1 | 200 7.0 | 275 | — | ●○√√ | 53 0.99 | 52.5 | |||||
| ☒ - 40°C 1 | 200 7.0 | 220 | — | ●○√√ | 53 0.98 | 75 | ||||||||
| Sport | Sport | 40°C | 48°C | 600 3.5 | ** — | ● | ○ | — | √ | — — | — | |||
| Kołdra | Duvet | 30°C | 39°C 1000 | 2.0 ** — | ● | ○ | — | √ | — — | — | ||||
| Jeans | Jeans | 40°C | 48°C | 800 3.5 | ** — | ● | ○ | — | √ | — — | — | |||
| Wirowanie i wypompowanie | Spin & Drain | — | — | 1200 | 7.0 | ** | — | — | — | — | — | — | — | — |
| Płukanie i wirowanie | Rinse & Spin | — | — | 1200 | 7.0 | ** | — | — | ○ | — — | — — | — — | ||
| Szybki 30' | Rapid 30' | 30°C | 39°C | 800 | 3.0 | ** | — | ● | ○ | — | √ | — — | — | |
| Kolorowe 15° | Colours 15° | 15°C | 15°C | 1000 | 3.5 | ** | — | ● | ○ | — | √ | — — | — | |
| Wełniane | Wool | 40°C | 48°C | 800 1.5 | ** — | ● | ○ | — | √ | — — | — | |||
| Delikatne Delicates | 30°C | 39°C | — 1.0 ** — | ● | ○ | — | √ | — — | — | |||||
| Syntetyczne | Synthetics | 40°C | 69°C 1200 | 4.0 195 | — | ●○√√ | 33 0.75 | 72 | ||||||
| ● Dosing required ○ Dosing optional | ||||||||||||||
e Cotton □ - Test wash cycles in compliance with regulations 1061/2010
These are the reference programs for the energy label. Set this wash cycles with a temperature of 40^ C or 60^ C. They are the most efficient programmes in terms of energy and water consumption for washing normally soiled cotton laundry. The actual water temperature may differ from the declared one.
For all Test Institutes
Long wash cycle for cottons: set wash cycle Cotton with a temperature of 40^ C.
Synthetic program along: set wash cycle Synthetics with a temperature of 40^ C.
This data may differ in your home due to changing conditions in inlet water temperature, water pressure etc. Approximate programme duration values refer to the default setting of the programmes, without options.
* After programme end and spinning with maximum selectable spin speed, in default programme setting.
** The duration of the programme is shown on the display.
The washer adapts water, energy and programme duration to your wash load
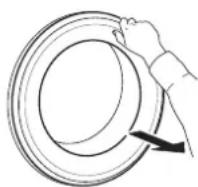
DOOR
To open the door, pull the handle.
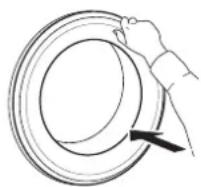
To close the door, hold the handle and push so that you can hear it click shut.
ACCESSORIES
Contact our After-Sales Service to check if the following accessories are available for your washing machine (and dryer) model
STACKING KIT SHELF
By which your dryer can be fixed on top of your washing machine to save space and to facilitate loading and unloading your dryer in the higher position.
HOW TO USE THE APPLIANCE
FIRST TIME USE
Remove any manufacturing debris:
- Select the "Cotton" programme at a temperature of 60^ .
- Pour a small quantity of detergent powder into the main wash compartment of the detergent dispenser (maximum 1/3 of the quantity the detergent manufacturer recommends for lightly soiled laundry).
DAILY USE
PREPARING THE LAUNDRY

Empty pockets
- Coins, paper clips, etc. could damage the load and the washing machine components.
- Tissues will break down during the wash cycle, and the fragments will have to be subsequently removed by hand.

Close all zippers, buttons, and hooks. Tie all ribbons or belts
- Insert the smaller garments (e.g. nylon hosiery, belts, etc.) and garments with hooks (e.g. braziers) into a fabric bag or a pillowcase with a zipper. Remove any rings from curtains, or else place the curtains inside a fabric bag together with the rings.
HOW TO USE THE WASHING MACHINE
1. Load laundry

Open the door and load the laundry. Load the articles one at a time loosely into the drum, without overfilling. Observe the load sizes given in the
"PROGRAMME CHART" table. Overloading the machine will result in unsatisfactory washing results and creased laundry.
2. Close door


Make sure that no laundry gets stuck between door glass and rubber seal. Close the door so that you can hear it click shut.
3. Open water tap

Make sure that the washing machine is connected to the water mains. Open the water tap.
Switch on washing machine
Press the "ON/OFF", the "Start/Pause" lamp flashes slowly.
4. Set the desired programme

Select the required programme with the "Programme selector" dial. The duration of the wash cycle is shown on the display. The washing machine automatically
displays the maximum temperature and spin speed settings possible for the selected programme. Adjust the temperature and/or spin speed settings if needed with the relative buttons.
- Start the programme without adding any laundry (with empty drum).
- See section "DAILY USE" for more information on how to select and start a programme.
Fabric type / Symbol on the wash label
- Cottons, mixed fibres, easy care/synthetics, wool, handwash items.
- Colour Separate coloured and white items. Wash new coloured articles separately.
- Size Wash items of different sizes in the same wash load, to improve washing efficiency and distribution of the articles in the drum.
- Delicates
- Wash delicate items separately; they require gentle treatment.
Change temperature, if needed
°C Press the "Temperature" button to progressively lower the temperature setting until cold wash has been set ("-" will be shown on the display). Pressing the button again sets the highest possible setting.
Change spin speed, if needed
Press the "Spin" button to progressively decrease the spin speed until the spin cycle is turned off ("0" will be shown on the display). Pressing the button again sets the highest possible setting.
Select options, if needed
Press the button to select the option; the respective symbol on display illuminates.
Press the button again to cancel the option; the light extinguishes.
! If the selected option is incompatible with the programme set, the incompatibility will be signalled by a buzzer (3 beeps) and the corresponding indicator light will flash.
! If the selected option is incompatible with another previously set option, only the most recent selection will remain active.
5. Add detergent


Pull out the detergent dispenser and add detergent (and additives/softener) into the relative compartments as described in section "DETERGENT DISPENSER". Observe the dosing recommendations
on the detergent pack.
Correct dosing of detergent / additives is important, because:
- it optimizes the cleaning result
- it avoids irritating residues of surplus detergent in your laundry
- it saves money by avoiding waste of surplus detergent
- it protects the washing machine by avoiding calcification of components
- it respects the environment by avoiding unnecessary environmental burden.
6. Delaying the start of a programme
- To set a programme to start at a later time, see the section "OPTIONS/ START DELAY"
7. Start programme
- Press the "Start/Pause" The relative indicator lamp illuminates, the door locks and the "Door locked" indicator lights up.
- To avoid overflow, do not open the detergent dispenser during a running programme anymore.
- The remaining programme duration can vary. Factors like unbalance in the wash load, or foam formation, can have an effect on the programme duration.
8. Change the settings of a running programme, if needed
You can still change the settings while a programme is running. The changes will be applied, provided the respective programme phase has not finished yet.
To change the settings of a running programme:
- Press "Start/Pause" to put the running programme on pause.
- Change your settings.
- Press "Start/Pause" again to continue the programme.
If you have changed the programme, do not add detergent for the new programme.
To prevent that a running programme is changed by accident (for instance by children), use the "Key lock" = (see section "FUNCTIONS").
Pause a running programme and open the door, if needed
- Press "Start/Pause" to pause a running programme.
- Provided water level or temperature is not too high, the "Door locked" indicator light turns off. You can open the door, for example to add more laundry, or to remove laundry which was loaded by mistake.
- Press "Start/Pause" to proceed with the programme.
9. Cancelling a running programme, if needed
- Press and hold the "ON/OFF" button until the washing machine stops.
- If the water level and temperature are low enough, the door unlocks and may be opened.
- The door remains locked if there is water in the drum. To unlock the door, switch the washing machine on, select the "Spin & Drain" programme and turn the spin option off by setting the spin speed to "0".
- The water is emptied and the door unlocks at the end of the programme.
10. Switch off the washing machine after programme End
- At the end of the cycle, the message "END" is shown on the display.
- The door can only be opened when the symbol "Door locked" light turns off.
- Check that the "Door locked" indicator is off, then open the door and take out the laundry.
- Press "ON/OFF" to switch the washing machine off.
To save energy, if the washing machine is not switched off manually with the button, it turns off automatically approximately 30 minutes after the end of the programme. Leave the door ajar to let the interior of the washing machine to dry.
DISPLAY INDICATORS
 | Door locked | This indicator will light up:• after you have started a programme• the porthole door is locked | ||
 | FreshCare+ | This indicator will light up:• after you set the Freshcare+ option | ||
 | Start delay | This indicator will light up:• after you set the Start delay option | ||
 | Key lock | This indicator will light up:• after you set the Key lock option | ||
 |  |  | Washing phase indicator | This indicator shows the current programme phase, running from left to right through wash, rinse and drain. The illuminated indicator light shows which phase is in progress. |
 | Call Service | Failure: Call After-sales service• Refer to Troubleshooting section• If the indicator persist, call After-sales service | ||
 | Water filter clogged | Failure: Water filter clogged• Water cannot be drained; water filter might be blocked | ||
 | No water | Failure: No water• No or not sufficient inlet water. | ||
HINTS AND TIPS
RULES FOR SEPARATING LAUNDRY
- Fabric type / indications on label (cotton, mixed fibres, synthetic, wool, handwash items)
- Colour (separate coloured garments from whites, wash new coloured items separately)
- Size (wash items of different sizes in the same load to improve washing efficacy and weight distribution in the drum)
- Delicates (place small items – such as nylon stockings – and garments with clasps – such as braziers – in a laundry bag or in a pillow case with a zip).
WASH SYMBOLS ON GARMENT LABELS
The value given in the tub symbol is the maximum temperature possible for washing the garment.
Normal mechanical action
Reduced mechanical action
Much reduced mechanical action
Hand wash only
Do not wash
CLEAN THE WATER FILTER REGULARLY
- This is needed to prevent the filter from blocking and preventing the water from draining correctly.
SAVING ENERGY AND PROTECTING THE ENVIRONMENT
- Keeping within the load limits indicated in the "PROGRAMM CHART" will optimise energy, water and detergent consumption and reduce washing times.
- Do not exceed the detergent quantities recommended by the detergent manufacturer.
- Save energy by using a 60 °C instead of a 90 °C wash programme, or by using a 40 °C instead of a 60 °C wash programme. We recommend using the "eCotton" the 60 °C programme for cotton garments, which is longer, but uses less energy.
- To save energy and time when washing, select highest spin speed available for the programme to reduce the residual water remaining in the garments at the end of the wash cycle.
- Pretreat any stains with an appropriate stain remover, or else dampen any dried-on stains with water prior to washing, as this will reduce the need to use a high temperature wash programme.
- Use the "Colours 15" programme for lightly soiled coloured garments; this will reduce the amount of energy used to heat the water.
CLEANING & MAINTENANCE
For any cleaning and maintenance, switch off and unplug the washing machine. Do not use flammable fluids to clean the washing machine.
CLEANING THE OUTSIDE OF THE WASHING MACHINE
Use a soft damp cloth to clean the outer parts of the washing machine.
Do not use glass or general purpose cleaners, scouring powder or similar to clean the control panel – these substances might damage the printing.
CHECKING THE WATER SUPPLY HOSE
Check the inlet hose regularly for brittleness and cracks. If damaged, replace it by a new hose available through our After-Sales Service or your specialist dealer. Depending on the hose type:
If the inlet hose has a transparent coating, periodically check if the colour intensifies locally. If yes, the hose may have a leak and should be replaced.
For water stop hoses: check the small safety valve inspection window (see arrow). If it is red, the water stop function was triggered, and the hose must be replaced by a new one. For unscrewing this hose, press the release button (if available) while unscrewing the hose.
CLEANING THE MESH FILTERS IN THE WATER SUPPLY HOSE
- Close water tap and unscrew the inlet hose.
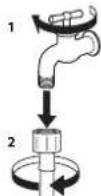
- Clean the mesh filter at the hose's end carefully with a fine brush.
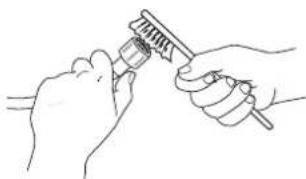
natural_image
Line drawing of two hands using a tool to apply a circular object (no text or symbols present)- Now unscrew the inlet hose on the back of the washing machine by hand. Pull out the mesh filter from the valve on the back of the washing machine with pliers and carefully clean it.
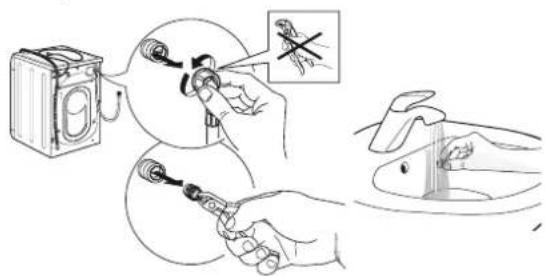
text_image
Diagram illustrating a medical procedure for using a device to adjust eye position, with magnified inset showing the insertion step.- Insert the mesh filter again. Connect the inlet hose to water tap and washing machine again. Do not use a tool to connect the inlet hose. Open the water tap and check that all connections are tight.
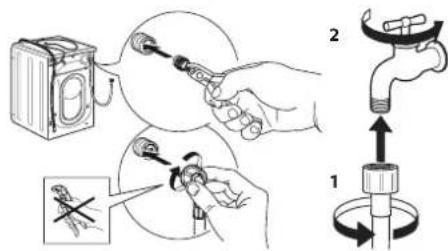
text_image
Diagram illustrating a mechanical assembly process with labeled steps 1 and 2, showing tool application and component insertion.CLEANING THE DETERGENT DISPENSER
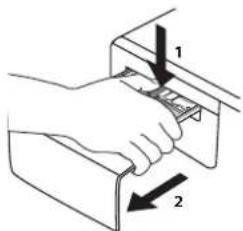
- Remove the detergent dispenser by pressing on the release button and at the same time pulling out the detergent dispenser.
text_image
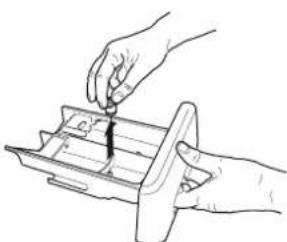
Diagram showing a hand pressing a component with labeled parts 1 and 2, indicating a process or assembly step.- Remove the insert from the softener compartment.
natural_image
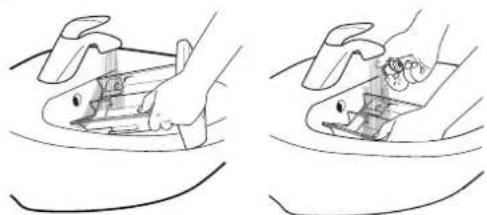
Line drawing of hands assembling a mechanical component (no text or symbols)- Clean all parts under running water, removing all detergent or softener residues.
natural_image
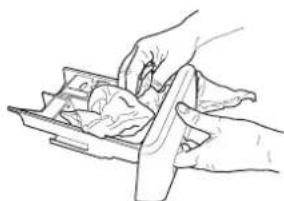
Two-step line drawing showing hands performing a manual task on a sink (no text or symbols present)- Wipe the parts dry with a soft cloth.
natural_image
Line drawing of hands handling a tray with food items (no text or symbols)- Reinstall the detergent dispenser and push it back into the detergent compartment.
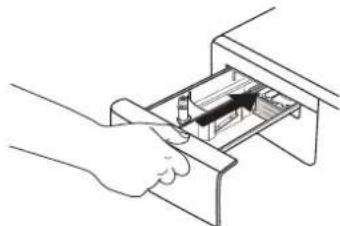
natural_image
Illustration of a hand inserting a device into a device with an arrow indicating direction (no text or symbols)CLEANING THE WATER FILTER / DRAINING RESIDUAL WATER
Switch off and unplug the washing machine before cleaning the water filter or draining residual water. If you used a hot wash programme, wait until the water has cooled down before draining any water.
Clean the water filter regularly, to avoid that the water cannot drain after the wash due to obstruction of the filter. If the water cannot drain, the display indicates that the water filter may be clogged.
- Remove the kick panel: Using a screwdriver, do that which is shown in the following figure.
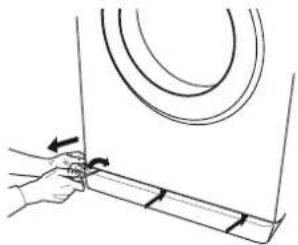
natural_image
Hand holding a rectangular object with arrows indicating motion or force direction (no text or symbols)- Container for the drained water: Place a low and wide container under the water filter in order to collect the residual water.
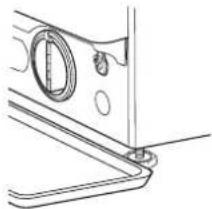
natural_image
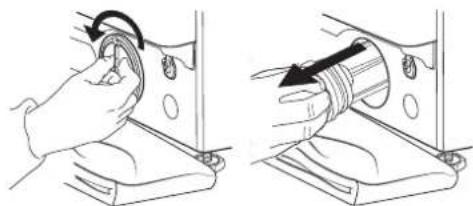
Technical line drawing of a mechanical component with no visible text or symbols- Drain the water: Slowly turn the filter counter-clockwise until all the water has come out. Allow the water to flow out without removing the filter. Once the container is full, close the water filter by turning it clockwise. Empty the container. Repeat the procedure until all the water has been drained.
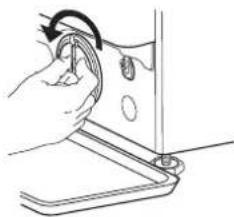
natural_image
Line drawing of a hand holding a tool or device with a circular component, no text or symbols present- Remove filter: Lay a cotton cloth beneath the water filter, which can absorb a small amount of rest water. Then remove the water filter by turning it out anticlockwise.
natural_image
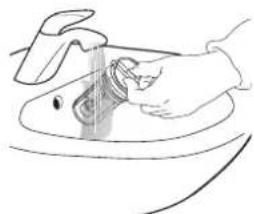
Illustration of two hands performing a mechanical operation, showing a rotating knob and a sliding ring (no text or symbols)- Clean the water filter: remove residues in the filter and clean it under running water.
natural_image
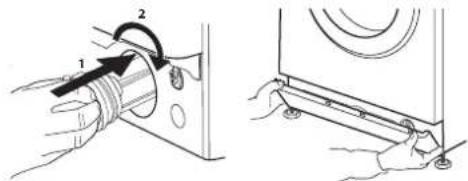
Line drawing of hands washing a sink with a cloth (no text or symbols)- Insert the water filter and reinstall the plinth: Reinsert the water filter again by turning it in clockwise direction. Make sure to turn it in as far as it goes; the filter handle must be in vertical position. To test water tightness of the water filter, you can pour about 1 liter of water into the detergent dispenser. Then reinstall the plinth.
text_image
Technical diagram showing mechanical assembly steps with labeled components and directional arrowsTROUBLESHOOTING
Your washing machine is equipped with various automatic safety and feedback functions. They enable failures and needed maintenance to be detected and indicated accordingly.
These failures are frequently so minor that they can be removed within a few minutes.
| Anomalies: Possible causes / Solution: | |
| The washing machine does not turn on. | · The plug is not inserted into the electrical outlet, or not enough to make contact.· There has been a power failure.· The door is not fully closed. |
| The wash cycle does not start. | · The “ON/OFF” button has not been pressed.· The “Start/Pause” button has not been pressed.· The water tap is not open.· A “Start delay” has been set. |
| The washing machine does not fill with water (the message “h2o” is shown on the display). “Beep” sound every 5 seconds. | · The water intake hose is not connected to the tap.· The hose is bent.· The water tap is not open.· The mains water supply has been shut off.· There is not enough pressure. |
| The washing machine loads and drains water continuously. | · The “Start/Pause” button has not been pressed.· The drain hose has not been installed at 65 to 100 cm from the ground.· The end of the drain hose is immersed in water.· The drain connector on the wall does not have an air vent.· If the problem persists after having performed these checks, close the water tap, shut off the washing machine, and call the After-sales service. If the dwelling is located on one of the uppermost floors of a building, a siphon effect can sometimes occur, thus causing the washing machine to load and drain water continuously. Special anti-siphon valves are available on the market to prevent these types of problems. |
| The washing machine does not drain or does not spin. | · The programme does not include the draining function: with certain programmes it must be activated manually.· The drain hose is bent.· The drain line is obstructed. |
| The washing machine vibrates excessively during the spin cycle. | · At the time of installation, the drum was not properly unblocked.· The washing machine is not level.· The washing machine is squeezed between furniture and the wall. |
| The washing machine leaks water. | · The water intake hose has not been tightened properly.· The detergent dispenser is clogged.· The drain hose has not been properly fastened. |
| The machine is locked and the display flashes, indicating an error code (e.g. F-01, F-..). | · Shut off the machine, disconnect the plug from the outlet, and wait about 1 minute before turning it back on.· If the problem persists, call the After-sales service. |
| Too much foam is formed. | · The detergent is not compatible with the washing machine (it must bear the wording “for washing machines”, “for hand washing and washing machines”, or something similar).· The dosage was excessive. |
| Door is locked, with or without failure indication, and the programme does not run. | · Door is locked in case of power breakdown. Programme will continue automatically as soon as the mains is available again.· Washing machine is in a standstill. Programme will continue automatically after the origin of the standstill does not persist anymore. |
TRANSPORT AND HANDLING
Never lift the washing machine by holding it at the worktop.
- Pull out the mains plug, and close the water tap.
- Make sure that door and detergent dispenser are properly closed.
-
Disconnect the inlet hose from the water tap, and remove the drain hose from your draining point. Remove all rest water from the hoses, and fix them so that they cannot get damaged during transport.
-
Refit the transport bolts. Follow the instructions for removing the transport bolts in the "Installation Guide" in reverse order.
Important: Do not transport the washing machine without having fixed the transport bolts.
AFTER-SALES SERVICE
BEFORE CALLING THE AFTER-SALES SERVICE
-
See if you can solve the problem by yourself with the help of the suggestions given in the TROUBLESHOOTING
-
Switch the appliance off and back on again to see if the fault persists.
IF AFTER THE ABOVE CHECKS THE FAULT STILL OCCURS, GET IN TOUCH WITH THE NEAREST AFTER-SALES SERVICE
To receive assistance, call the number shown on the warranty booklet or follow the instructions on the website www.whirlpool.eu
When contacting our Client After-sales service, always specify:
• a brief description of the fault;
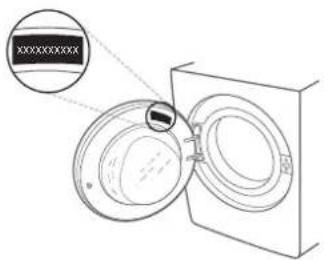
• the type and exact model of the appliance;
natural_image
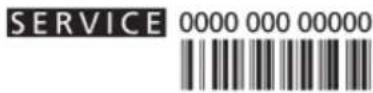
Diagram of a washing machine with a close-up view of the lid (no text or symbols present)- the service number (number after the word Service on the rating plate).
- your full address;
- your telephone number.
If any repairs are required, please contact an authorised after-sales service (to guarantee that original spare parts will be used and repairs carried out correctly).