
40PFL6606D - TV PHILIPS - Free user manual and instructions
Find the device manual for free 40PFL6606D PHILIPS in PDF.


User questions about 40PFL6606D PHILIPS
0 question about this device. Answer the ones you know or ask your own.
Ask a new question about this device
Download the instructions for your TV in PDF format for free! Find your manual 40PFL6606D - PHILIPS and take your electronic device back in hand. On this page are published all the documents necessary for the use of your device. 40PFL6606D by PHILIPS.
USER MANUAL 40PFL6606D PHILIPS
Register your product and get support at
www.philips.com/welcome
40PFL58×6D
32PFL66×6D
40PFL66×6D
32PFL76×6D
40PFL76×6D
46PFL76×6D
EN User Manual
Contents
1 Get started 3
TV tour 3
Important 6
Environmental efforts 8
Position the TV 9
Help and support 10
2 Use your TV 11
Controls 11
Watch TV 14
Watch a connected device 16
Ambilight 18
Browse PC through DLNA 19
Browse Net TV 21
Rent online video 23
3 Use more of your TV 25
Digital TV interactive 25
Pause TV 25
Set locks and timers 27
Display closed caption 28
View Scenea 28
Set universal access 29
Use EasyLink 30
4 Set up your TV 33
Settings assistant 33
Picture and sound 33
Channels 34
Menu language 36
Other settings 36
Update software 37
Reinstall the TV 38
5 Connect your TV 39
About cables 39
Connect devices 40
Connect more devices 47
Computers and the Internet 49
6 Troubleshooting 54
Contact Philips 54
General TV 54
TV channel 54
Picture 55
Sound 55
HDMI 56
USB 56
Network 56
7 Product specifications 57
Power and reception 57
Display and sound 57
Display resolutions 57
Multimedia 58
Connectivity 59
Dimensions 59
Help version 60
8 Index 61
1 Get started
TV tour
Remote control
text_image
-4+—To adjust the volume.
chemical
Chemical structure diagram showing CH- and CH+ ion positions with labeled carbon atomsTo switch TV channels.
natural_image
Diagram showing a house with an arrow pointing to a device, no text or symbols presentTo open or close the Home menu.
In the Home menu, access connected devices, picture and sound settings, and other useful features.
text_image
SOURCE SOL/FREETo open or close the Source menu.
In the Source menu, access connected devices.
text_image
FIND FINDTo open or close the Find menu.
In the Find menu, access the channel list.
text_image
ADJUST AdjustTo open or close the Adjust menu.
In the Adjust menu, access a range of frequently used settings.
text_image
OPTIONS OPTIONSTo open or close the Options menu.
Options menus offer convenient settings for TV channel or program.
natural_image
Diagram of a device with a curved arrow pointing to a circular component (no text or symbols)To return to the previous menu page or to exit from a TV function.
Press and hold to return to watching TV.
text_image
EXIT EXITTo exit from menu or TV function.
natural_image
Diagram of a red object interacting with a device, possibly a sensor or indicator, against a black background (no text or symbols)To select a red menu option, access Digital Interactive TV services*, or watch TV demonstration clips.
*Available on certain models only.
natural_image
Diagram of a handheld device with a green indicator light and circular pattern, no text or symbols presentTo select a green menu option or to access energy efficient settings.
natural_image
Diagram of a device with a yellow rod and circular components, no text or symbols presentTo select a yellow menu option or to access the electronic user manual.
Read more about the remote control in Use your TV > Controls > Remote control (Page 11).
Alternatively, look at the index in Search for...
Press ▲ to select the next TV tour.
Connect devices
text_image
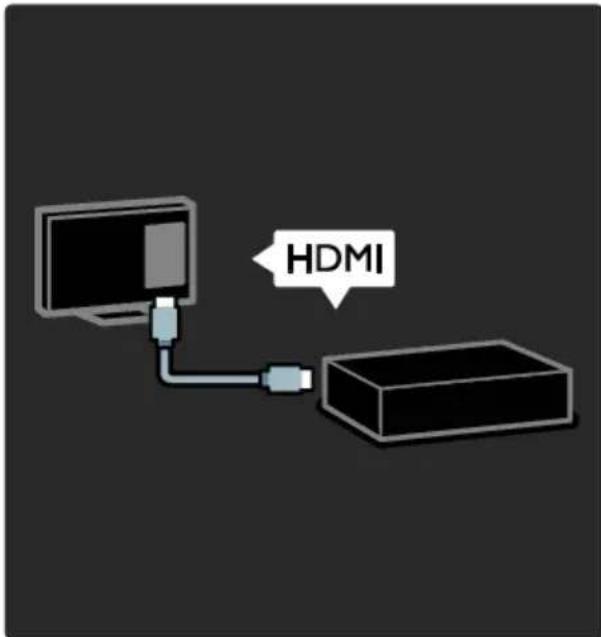
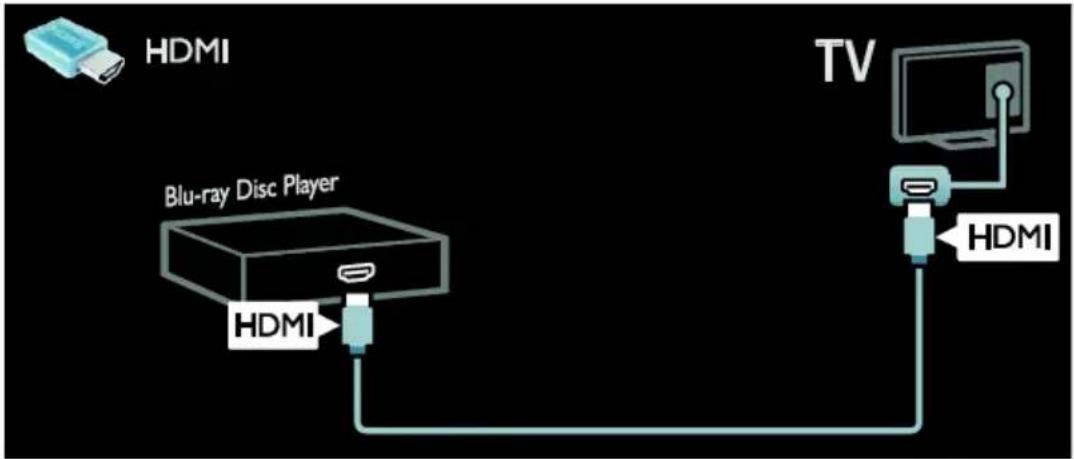
HDMIFor the best picture and sound quality, connect a DVD, Blu-ray disc player, or game console through HDMI (TM).
To watch a non EasyLink compliant device, add it to the Home menu.
-
Press ⬆ [Add your devices].
-
Follow the onscreen instructions.
Note: If you are prompted to select the TV connection, select the connector that this device uses. See Connect your TV >
Connect devices (Page 40) for information on connection.
If an EasyLink or HDMI-Consumer Electronic Control (HDMI-CEC) compliant device is connected to the TV, it is automatically added to the Home menu when both devices are switched on.
To watch a connected device
-
Press
-
Select the newly added device icon.
You can learn more on device connections in Connect your TV > Connect devices.
flowchart
graph TD
    A["HDMI"] --> B["Blu-ray Disc Player"]
    B --> C["TV"]
    C --> D["HDMI"]
    style A fill:#f9f,stroke:#333
    style B fill:#ccf,stroke:#333
    style C fill:#cfc,stroke:#333
    style D fill:#fcc,stroke:#333
High Definition TV
For high-definition (HD) picture quality, watch HD programs.
On standard-definition (SD) programs, the picture quality is standard.
You can watch HD video content in these ways and more:
- a Blu-ray disc player, connected with a HDMI cable, playing a Blu-ray disc
- an upscaling DVD player, connected with a HDMI cable, playing a DVD disc
- an over-the-air HD broadcaster (SBTVD-T)
- a digital HD receiver, connected with an HDMI cable, playing HD content from a cable or satellite operator
• a HD channel on your network - a HD game console (for example, X-Box 360 or PlayStation 3), connected with an HDMI cable, playing a HD game
HD video clip
To experience the stunning sharpness and picture quality of HD TV, watch the HD video clip from the Home menu.
Press ⬆ > [Setup] > [Watch demos].
Watch Demo is on the second page of the setup menu.
For more information about the availability of HD channels in your country, contact your Philips dealer or visit www.philips.com/support.
Ambilight
*Available on certain models only.
Ambilight gives a more relaxed viewing experience. It automatically adjusts the color and brightness of the light to match the TV picture.
Read more in Use your TV > Ambilight (Page 18).
Network
flowchart
graph LR
    TV["TV"] --> Router["Router"]
    Router --> PC["PC"]
    Router --> Internet["Internet"]
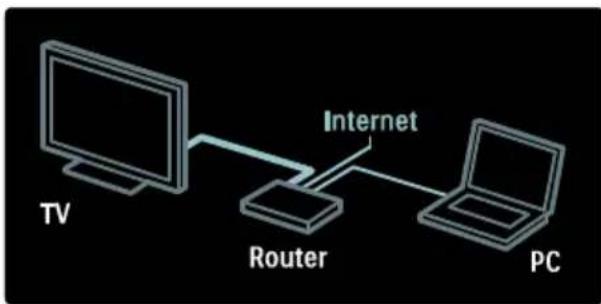
Connect your TV to your home network to play music, photos, and videos from a computer or other media server on the same network.
Read more in Connect your TV >
Computers and the Internet (Page 49).
Net TV
If your home network is connected to the Internet, you can connect your TV to Net TV. Net TV offers movies, pictures, music, and much more.
Read more in Use your TV > Browse Net TV (Page 21).
Digital TV interactive
(Available on certain models only.)
Digital TV interactive is an interactive TV service provided by digital TV broadcasters. If your TV is connected to a home network with internet connection, you can experience true interactivity and respond directly to the interactive services.
Read more in Use your TV > Digital TV interactive (Page 25).
Important
Safety
Read and understand all instructions before you use your TV. If damage is caused by failure to follow instructions, the warranty does not apply.
Risk of electric shock or fire!
- Never expose the TV to rain or water. Never place liquid containers, such as vases, near the TV. If liquids are spilt on or into the TV, disconnect the TV from the power outlet immediately. Contact Philips Consumer Care to have the TV checked before use.
- When the TV is swiveled, ensure that no strain is exerted on the power cord. Strain on the power cord can loosen connections and cause arcing.
- To disconnect the TV from the mains power, the power plug of the TV must be disconnected. When disconnecting the power, always pull the power plug, never the cord. Ensure that you have full access to the power plug, power cord and outlet socket at all times.
- Never insert objects into the ventilation slots or other openings on the TV.
- Never place the TV, remote control or batteries near naked flames or other heat sources, including direct sunlight. To prevent the spread of fire, keep candles or other flames away from the TV, remote control and batteries at all times.

text_image
Prohibition sign with a white circle and crossed-out candle, indicating no lighting or fire resistance.Risk of short circuit or fire!
- Never expose the remote control or batteries to rain, water or excessive heat.
- Avoid force coming onto power plugs. Loose power plugs can cause arcing or fire.
Risk of injury or damage to the TV!
- Two people are required to lift and carry a TV that weighs more than 25kg or 55lbs.
- When stand mounting the TV, use only the supplied stand. Secure the stand to the TV tightly. Place the TV on a flat, level surface that can support the combined weight of the TV and the stand.
- When wall mounting the TV, use only a wall mount that can support the weight of the TV. Secure the wall mount to a wall that can support the combined weight of the TV and wall mount. Koninklijke Philips Electronics N.V. bears no responsibility for improper wall mounting that results in accident, injury or damage.
- If you need to store the TV, disassemble the stand from the TV. Never lie the TV on its back with the stand installed.
- Before you connect the TV to the power outlet, ensure that the power voltage matches the value printed on the back of the TV. Never connect the TV to the power outlet if the voltage is different.
- Parts of this product can be made of glass. Handle with care to avoid injury and damage.
Risk of injury to children!
Follow these precautions to prevent the TV from toppling over and causing injury to children:
- Never place the TV on a surface covered by a cloth or other material that can be pulled away.
- Ensure that no part of the TV hangs over the edge of the surface.
- Never place the TV on tall furniture, such as a bookcase, without anchoring both the furniture and TV to the wall or a suitable support.
- Educate children about the dangers of climbing on furniture to reach the TV.
Risk of swallowing batteries!
- The product/remote control may contain a coin type battery, which can be swallowed. Keep the battery out of reach of children at all times!
Risk of overheating!
- Never install the TV in a confined space. Always leave a space of at least 4 inches or 10 cm around the TV for ventilation. Ensure that curtains or other objects never cover the ventilation slots on the TV.
Risk of injury, fire or power cord damage!
- Never place the TV or any objects on the power cord.
- Disconnect the TV from the power outlet and aerial before lightning storms. During lightning storms, never touch any part of the TV, power cord or aerial cable.
Risk of hearing damage!
- Avoid using earphones or headphones at high volumes or for prolonged periods of time.
Low temperatures
- If the TV is transported in temperatures below 5°C or 41°F, unpack the TV and wait until the TV temperature matches room temperature before connecting the TV to the power outlet.
Screen care
- Risk of damage to the TV screen! Never touch, push, rub or strike the screen with any object.
- Unplug the TV before cleaning.
- Clean the TV and frame with a soft damp cloth. Never use substances such as alcohol, chemicals or household cleaners on the TV.
- To avoid deformations and color fading, wipe off water drops as soon as possible.
- Avoid stationary images as much as possible. Stationary images are images that remain onscreen for extended periods of time. Stationary images include onscreen menus, black bars, time displays, etc. If you must use stationary images, reduce screen contrast and brightness to avoid screen damage.
Environmental efforts
Energy efficiency
Philips continuously focus on lowering the environmental impact of our innovative consumer products. We aim our efforts towards environmental improvements during manufacturing, reduction of harmful substances, energy-efficient use, end-of-life instructions and product recycling.
To access energy efficient settings:
While you watch TV, press the green button on the remote control.
These energy efficient settings include:
- Energy saving picture settings: You can apply a combination of energy saving picture settings. While you watch TV, press the green button and select [Energy saving].
- Power switch: You can completely cut-off power to the TV with the power switch. It is located at the base of the set.
- Screen off: If you only want to listen to audio from the TV, you can turn off the TV display. Other functions continue to operate normally.
- Light sensor: The built-in ambient light sensor lowers the brightness of the TV screen when the surrounding light darkens.
- Low standby power: The advanced power circuitry brings down the power consumption of the TV to an extremely low level, without losing out on the constant standby functionality.
- Power management: The advanced power management of this TV ensures the most efficient use of its energy. To view how your personalized TV settings affect the TV's relative power consumption, press and select [Setup] > [Watch demos] > [Active Control].
End of use
Your product is designed and manufactured with high quality materials and components, which can be recycled and reused.
natural_image
Recycling symbol (three chasing arrows) on black background, no text or numbers presentWhen this crossed-out wheeled bin symbol is attached to a product it means that the product is covered by the European Directive 2002/96/EC. Please inform yourself about the local separate collection system for electrical and electronic products.
natural_image
Symbolic illustration of a trash bin with crossed arms and a horizontal bar, set against a black background (no text or symbols)Please act according to your local rules and do not dispose of your old products with your normal household waste. Correct disposal of your old product helps to prevent potential negative consequences for the environment and human health.
Your product contains batteries covered by the European Directive 2006/66/EC, which cannot be disposed with normal household waste. Please inform yourself about the local rules on separate collection of batteries because correct disposal helps to prevent negative consequences for the environmental and human health.
natural_image
Symbol of a trash bin crossed with a diagonal line, representing waste sorting or disposal (no text or numbers present)Position the TV
Placement
- Before you position the TV, read all safety precautions. See Get Started > Important > Safety (Page 6).
- Position the TV where light does not shine directly on the screen.
- The ideal distance to watch TV from, is three times its diagonal screen size. For example, if the diagonal screen size of the TV is 116cm / 46", the ideal viewing distance is \~3.5m / \~138" from the front of the screen.
- While seated, your eyes should be level with the center of the screen.
Stand mount or wall mount
To apply the best settings for your TV, select wall mount or stand mount.
- In the [Preferences] menu, select
[TV placement]. - Select [On a TV stand] or [Wall mounted], then press OK.
Wall mount
Warning: Follow all instructions provided with the TV mount. Koninklijke Philips Electronics N.V. bears no responsibility for improper TV mounting that results in accident, injury or damage.
Before you mount the TV:
• Purchase a Philips TV mount or a compatible TV mount.
- For certain models, remove the wall mount plugs from the back of the TV.
- To prevent damage to cables and connectors, leave a gap of at least 5.5 cm or 2.2 inches from the back of the TV.
- Check your TV screen size and match it against the list for the type of wall mount to purchase:
81 cm / 32 inches: 200mm × 200mm, M6 102 cm / 40 inches: 400mm × 400mm, M6 117 cm / 46 inches: 400mm × 400mm, M6
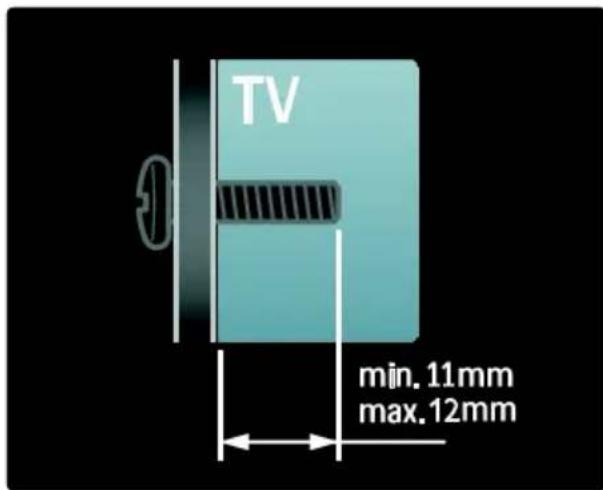
Screw length
Before you wall mount the TV, find the correct length of the screw by adding the thickness of your wall mount to the screw length.
For 32 inch to 46 inch TV:
text_image
TV min. 11mm max. 12mmLocation
A range of TV settings are applied to suit the location of the TV.
Shop or home mode
Set the TV location to Home mode to access all TV settings. In Shop mode, you can access only a few settings.
- While you watch TV, press
- Select [Setup] > [TV settings] >
[Preferences].
- Select [Location] > [Home] or [Shop], then press OK.
- Restart the TV.
Lock the TV
Your TV is equipped with a Kensington security slot at the base of the TV. Purchase a Kensington anti-theft lock (not supplied) to secure the TV.

natural_image
Simple line drawing of a computer monitor connected to a lock icon (no text or symbols)Help and support
Use Help
You can access onscreen [Help] from the Home menu by pressing the Yellow button.
You can also switch between the [Help] menu and the TV menu by pressing the Yellow button.
Online support
If you can't find what you need in the onscreen [Help], consult our online support at www.philips.com/support.
Follow the website instructions to select your language, then enter your product model number.
At our support website, you can also:
• find answers to frequently asked questions
- download a printable PDF version of this user manual to read
- email us a specific question
- chat online with one of our support personnel (available in certain countries only)
Contact Philips
If you like, you can contact Philips Consumer Care in your country for support. You can find the contact number in the leaflet accompanying the TV.
Before you contact Philips, note down your TV model and serial number. You can find this information on the back of your TV or on its packaging.
2 Use your TV
Controls
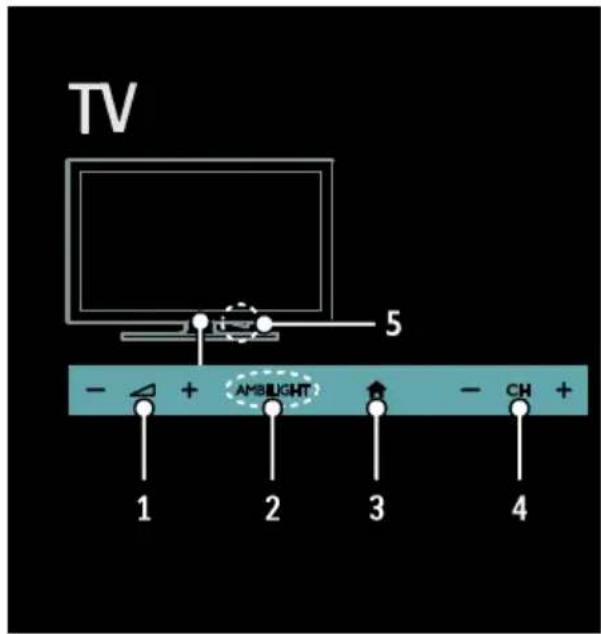
TV controls
text_image
TV 5 - + AMBIUGHT - CH + 1 2 3 4- 4-: Increase or decrease volume.
- AMBILIGHT: Switch Ambilight on or off. Ambilight is available on certain models only.
- ⚠(Home): Access the Home menu. Press again to launch an activity in the Home menu.
- CH +/-: Switch to the next or previous channel.
- Power: Switch the TV on or off.
Indicators
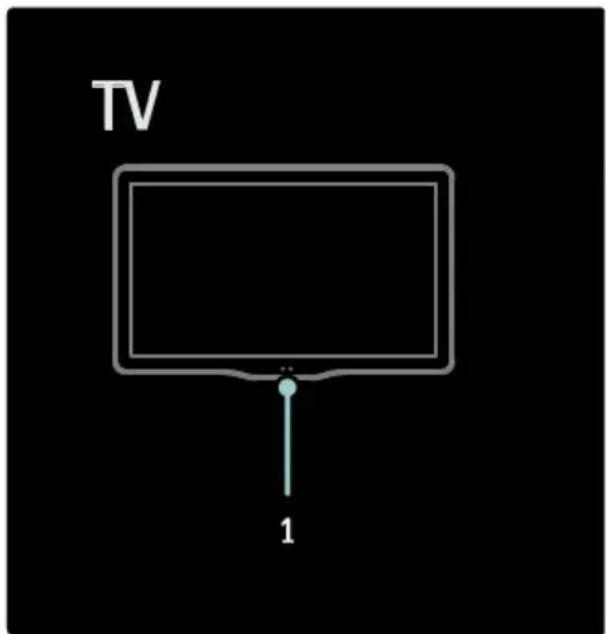
text_image
TV 1- Ambient sensor / remote control sensor Ambient sensor is available on certain models only.
Remote control
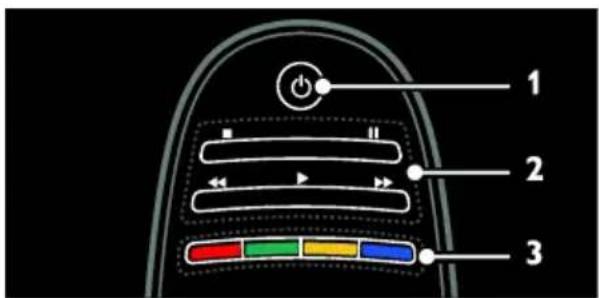
text_image
1 2 3- ⏻(Standby): Switch the TV on or to standby.
- Play buttons: Control video or music play.
- Color buttons: Select tasks or options.
The buttons function according to the services offered by the service provider.
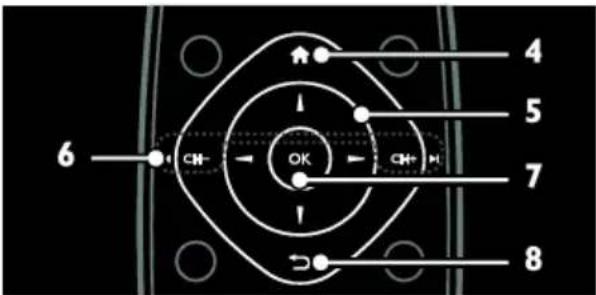
text_image
4 5 6 OK 7 8- ⚠(Home): Access the Home menu.
- ▲(Navigation buttons): Navigate through menus and select items.
- ◀CH - / CH + ▶(Previous/Next): Switch channels, navigate through menu pages, tracks, albums, or folders.
- OK: Confirm an entry or selection.
- ←(Back): Return to the previous menu page.
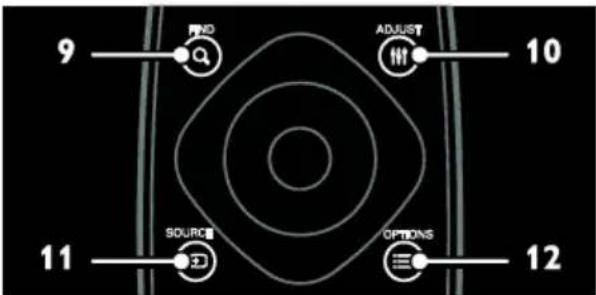
flowchart
graph TD
    A["FND"] --> B["ADJUST"]
    B --> C["SOURCE"]
    C --> D["OPTIONS"]
    D --> E["10"]
    E --> F["11"]
    F --> G["12"]
    style A fill:#f9f,stroke:#333
    style B fill:#ccf,stroke:#333
    style C fill:#cfc,stroke:#333
    style D fill:#fcc,stroke:#333
    style E fill:#cff,stroke:#333
    style F fill:#ffc,stroke:#333
    style G fill:#cfc,stroke:#333
- QFIND: Access the menu to select TV channel list.
- ⌘ADJUST: Access the menu to adjust settings.
- SOURCE: Select connected devices.
- OPTIONS: Access options for the current activity or selection.
text_image
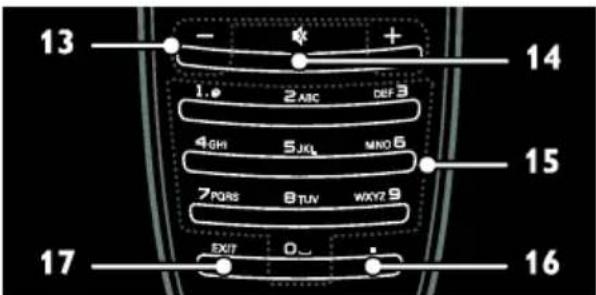
13 - + 14 1.0 2 ABC DEF 3 4 GM 5 JKL MNO 6 15 7 PORS 8 TUN WXYZ 9 17 EXIT 0_ 16- +/- (Volume): Adjust volume.
- ⭐(Mute): Mute or restore audio.
- 0-9 (Numeric buttons): Select channels.
- . (Dot): Use for digital channels input.
- EXIT: Exit from menus or TV functions.
Batteries
Warning: Risk of swallowing batteries!
The product/remote control may contain a coin type battery, which can be swallowed.
Keep the battery out of reach of children at all times!
Caution: The battery contains perchlorate material, handle it with care. For information, see
www.dtsc.ca.gov/hazardouswaste/perchlorate.
If your remote control signal is weak, replace the batteries:
-
Open the battery cover.
-
Remove the old batteries from the battery compartment, and replace them with fresh batteries.
Make sure that the ends of the batteries line up correctly with the +/- markings in the battery compartment.
Notes:
Dispose of batteries according to environmental directives. Read Get started
Environmental efforts > End of use (Page 8).
Remove batteries from the remote control if you will not use it for an extended period of time.
The type of battery varies according to RC model:
For remote control with AAA batteries (end to end):
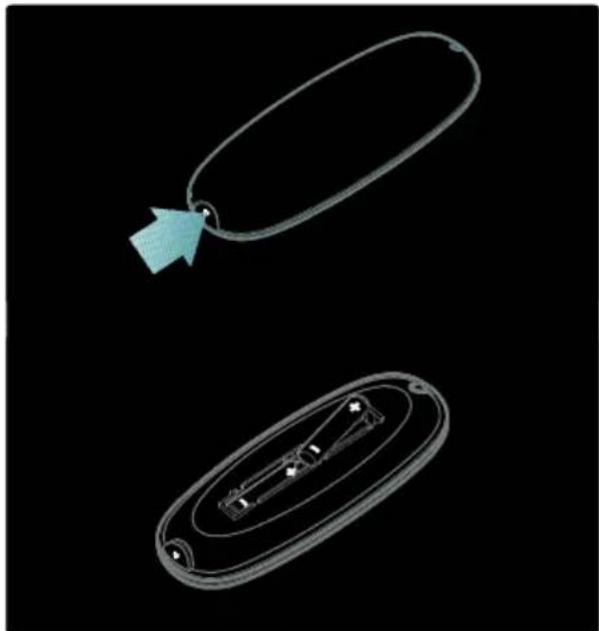
natural_image
Two technical line drawings of a mechanical component, one with a highlighted section and arrow, the other showing internal components (no text or symbols)For remote control with AAA batteries (side by side):
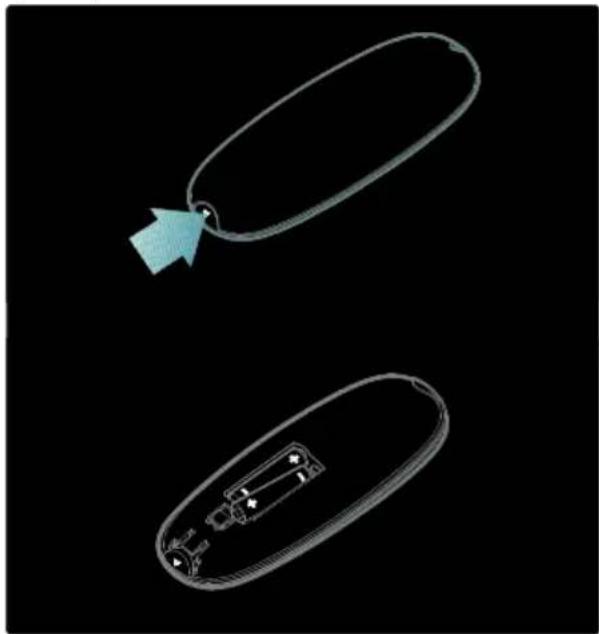
natural_image
Two technical line drawings of a device with a highlighted component, shown against a black background (no text or symbols)For remote control with CR2032 (3V) batteries:
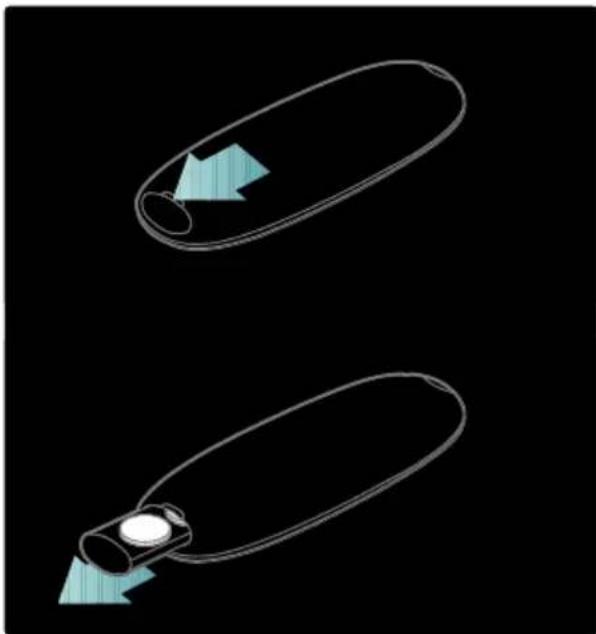
natural_image
Two abstract curved shapes with a light blue arrow pointing to one, against a black background (no text or symbols)EasyLink controls
Note: EasyLink controls are available when the connected device is HDMI-CEC compliant.
EasyLink allows you to control your TV and other HDMI-CEC devices with one remote control.
Access EasyLink controls
-
While you view content from a connected HDMI-CEC device, press OPTIONS.
-
Select [Show device keys], then press OK.
-
Select the EasyLink control button, then press OK.
Read more on EasyLink in Use more of your TV > Use EasyLink (Page 30).
Smartphone control
Use your smartphone as a secondary remote, and even as a keyboard. You can also view a slideshow of the images in your smartphone on the TV. To download the application 'Philips My Remote', visit the Apple Apps store or the Android Market. Follow the instructions provided at the applications store.
Ensure that your TV and smartphone is connected to the same local network. Read more on network connections at Connect your TV > Computers and the Internet (Page 49).
Watch TV
Switch TV on or off
text_image
TV 1 2Switch the TV on
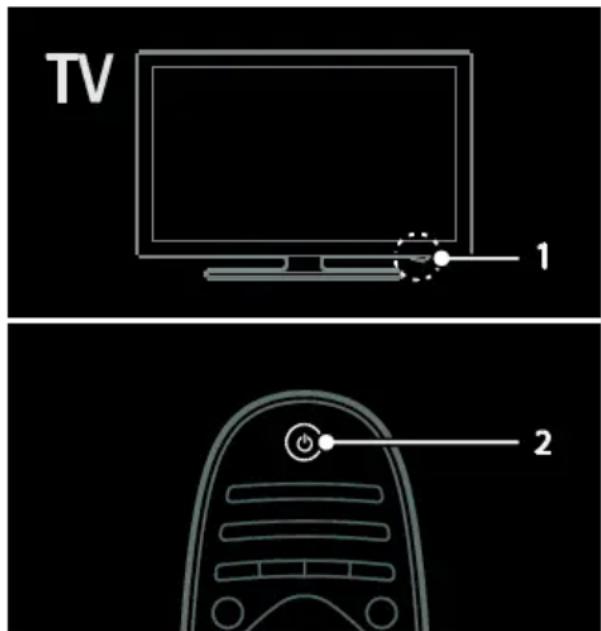
- Press the power switch at the base of the TV to the ON position.
- If the TV is in standby, press on the remote control.
Note: There is a short delay before the TV responds.
Tip: If you cannot find your remote control and want to switch on the TV from standby, press CH +/- on the front of the TV.
Though your TV consumes very little energy in standby, it does use some energy. If you are not going to use the TV for an extended period of time, switch it off to cut off the power.
Switch TV to standby
Press ☐ on the remote control. The remote control sensor on the TV switches to red.
Switch off the TV
Press the power switch at the base of the TV to the OFF position.
The TV no longer consumes energy.
Automatic switch off
This TV is designed with energy efficiency settings. If there is no user interaction (such as pressing a remote control button or a control on the front panel) for four hours, the TV will automatically switch to standby.
To disable automatic switch off,
While you watch TV, press the green button on the remote control. Select [Auto switch off] and press OK. An on screen message confirms that automatic switch off is disabled.
Adjust TV volume
Increase or decrease the TV volume
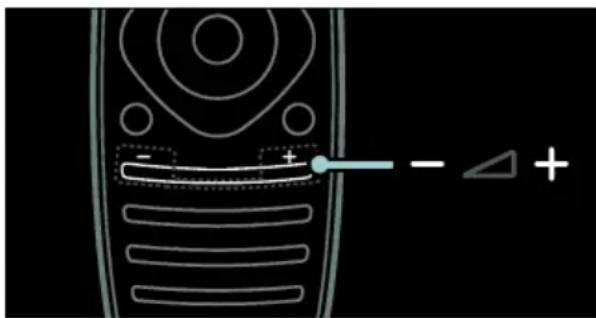
- Press +/- on the remote control.
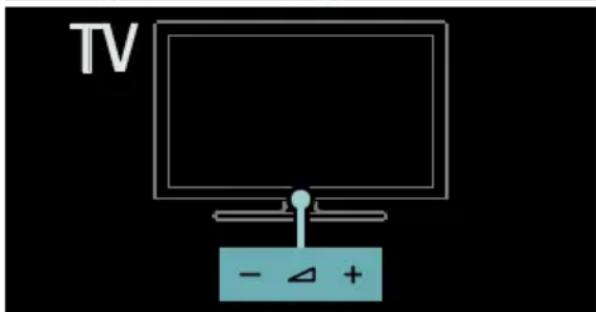
- Press △+/- on the front of the TV.
text_image
- - +
text_image
TV - △ +Mute or unmute the TV volume
- Press to mute the TV, or
- Press again to restore the volume.
Switch TV channels
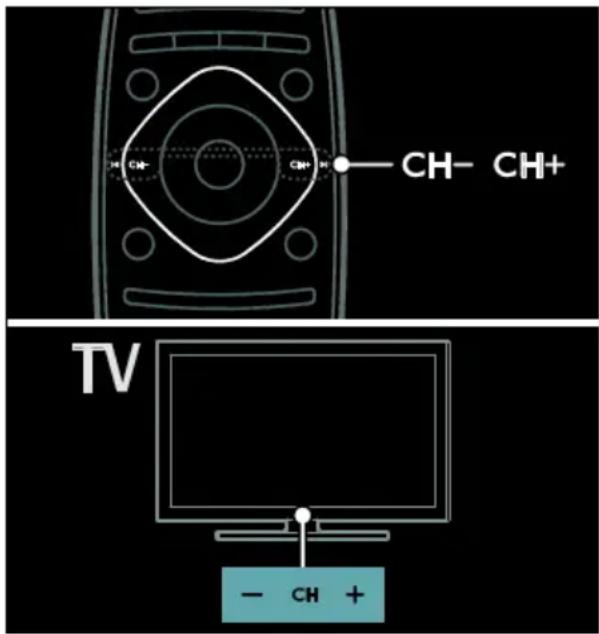
- Press on the remote control.
- Press CH +/- on the TV.
- Press the Numeric buttons to enter a channel number.
Manage channel lists
You can view all channels, or only a list of your favorite channels. Press QFIND to access the channel list.
Create a list of your favorite channels
- Press QFIND.
- Select the channel to mark as favorite and press OPTIONS.
- Select [Mark as favourite] and press OK.
The selected channel is marked with a star.
To deselect a channel, select [Unmark as favourite], and then press OK.
Select a channels list
- In the channel list, press OPTIONS.
- Select [Select list] > [Favourites] to display channels in the favorite list; or [All] to display all channels.
- Press OK to confirm.
View only analog or digital TV channels
You can use the channel list to access only analog or digital channels.
- In the channel list, press OPTIONS.
- Select [Select list] > [Analogue] or [Digital], then press OK.
Depending on your selection, only analog or digital channels are available.
View program guide
The program guide displays information about digital TV channels, for example:
- Channel schedules
- Synopsis of programs
Note: TV program guides are available in certain countries only.
Access the TV program guide
- Press
- Select [Programme guide], then press OK.
If you are viewing the program guide for the first time, select [Yes] when prompted for confirmation to proceed.
Update program guide
-
In program guide menu, press: OPTIONS.
-
Select [Update Programme guide], then press OK.
Use TV program guide options
You can customize the displayed information to:
- Remind you when programs start
• Display only preferred channels - In the program guide, press OPTIONS.
- Select one of these settings, then press OK:
- [Set reminder]: Set program reminders. - [Clear reminder]: Clear program reminders.
- [Change day]: Select the day to display.
• [More info]: Display program information.
- [Search by genre]: Search TV programs by genre.
- [Scheduled reminders]: List programs reminders.
- [Update Programme guide]: Update the latest program information.
Use smart picture settings
Select your preferred picture setting.
- While you watch TV, press ⏻ADJUST.
- Select [Smart picture].
-
Select one of the following settings, then press OK:
-
[Personal]: Apply your personalized picture settings.
- [Vivid]: Rich and dynamic settings, ideal for daytime viewing.
• [Natural]: Natural picture settings.
• [Cinema]: Ideal settings for movies.
• [Game]: Ideal settings for games. - [Energy saving]: Settings that conserve the most energy.
- [Standard]: Default settings that suit most environments and types of video.
• [Photo]: Ideal settings for photos. - [Custom]: Customize and store your own picture settings.
Use smart sound settings
Select your preferred sound setting.
- While you watch TV, press ⏻HADJUST.
- Select [Smart sound].
-
Select one of the following settings, then press OK:
-
[Personal]: Apply your preferred setting in the sound menu.
- [Standard]: Settings that suit most environments and types of audio.
- [News]: Ideal settings for spoken audio, such as the news.
• [Movie]: Ideal settings for movies.
• [Game]: Ideal settings for games.
• [Drama]: Ideal settings for drama programs.
• [Sports]: Ideal settings for sports.
Change picture format
Change the picture format to suit your preference.
- Press ⏻ADJUST.
- Select [Picture format], then press OK.
- Select a picture format, then press OK to confirm.
The available picture formats depend on the video source:
- [Auto fill]: Adjust the picture to fill the screen (subtitles remain visible). Recommended for minimal screen distortion but not for HD or PC.
- [Auto zoom]: Enlarge the picture to fill the screen. Recommended for minimal screen distortion but not for HD or PC.
- [Super zoom]: Remove the black bars on the sides of 4:3 broadcasts. Not recommended for HD or PC.
- [Movie expand 16:9]: Scale 4:3 format to 16:9. Not recommended for HD or PC.
- [Wide screen]: Stretch 4:3 format to 16:9.
- [Unscaled]: Provide maximum detail for PC. Only available when PC mode is enabled in the picture menu.
• [16:9 stretch]: Stretch to 16:9 format, and logos are removed.
Watch a connected device
Add new device
Notes:
- Before you watch a connected device, you must add its icon to the Home menu. See Connect your TV > Connect device (Page 40).
-
If you connect an HDMI-CEC compliant device to the TV through HDMI connector and switch it on, the device is automatically added to the Home menu.
-
Connect and switch on the device.
- Press
- Select [Add your devices], then press OK.
- Follow the onscreen instructions.
- Select your device.
- Select the connector.
Note: If you are prompted to select the TV connection, select the connector that this device uses.
Select a source
From Home menu
After you have added the new device to the Home menu, select the new device icon to view its contents.
- Press
- Select the device icon from the Home menu.
- Press OK to confirm.
From Source menu
You can also press -SOURCE to display a list of connector names. Select the connector that connects the device to the TV.
- Press SOURCE.
- Press the Navigation buttons to select a connector in the list.
- Press OK to confirm.
Remove device
You can remove device icons that are not in use.
- Press
- Select the device icon from the Home menu.
- Press OPTIONS, then select [Remove this device].
- Select OK to confirm.
Play from USB
If you have photos, videos or music files on a USB storage device, you can play the files on TV.
Caution: Philips is not responsible if the USB storage device is not supported, nor is it responsible for damage or loss of data in the device.
Do not overload the USB port. If you connect a HDD device that consumes more than 500mA power, make sure that it is connected to its own external power supply.
Access the USB content browser as follows:
- While you watch TV, connect the USB device to the USB connector on the TV.
- Press, select [Browse USB], then press OK.
Watch video
Press the Navigation buttons to select a video file, then press OK.
- Press on to search forward or backward within a video.
- Press EXIT to exit the content browser.
While you play video, press OPTIONS to access the following video options:
• [Show info]: Display the file information.
- [Stop]: Stop playback.
• [Repeat]: Repeat a video.
- [Shuffle on] / [Shuffle off]: Enable or disable random play of videos.
Listen to music
Press the Navigation buttons to select a music track, then press OK.
- Press /◀ to search forward or backward within a track.
- Press EXIT to exit the content browser.
Press OPTIONS to access or exit the following music options:
- [Stop]: Stop audio play.
• [Repeat]: Repeat a track or an album.
• [Play once]: Play the track once. - [Shuffle on] / [Shuffle off]: Enable or disable random play of tracks.
View picture
Press the Navigation buttons to select a picture, then press OK.
• To pause or stop play, press OK.
- To skip to the previous or next file, press ◀br ▶
- Press EXIT to exit the content browser.
Press OPTIONS to access or exit the following picture options:
• [Show info]: Display the file information.
- [Stop]: Stop slideshow.
• [Rotate]: Rotate the file.
• [Repeat]: Repeat the slideshow.
• [Play once]: Play the file once.
- [Shuffle off] / [Shuffle on]: Enable or disable random display of pictures in the slideshow.
- [Slideshow speed]: Set the display time for each picture in the slideshow.
- [Slideshow transition]: Set the transition from one picture to the next.
- [Set as Scenea]: Set the selected picture as wallpaper on TV.
Ambilight
What you can do
*Available on certain models only.
Ambilight gives a more relaxed viewing experience. It automatically adjusts the color and brightness of the light to match the TV picture.
What you need
- For the best Ambilight effect, position the TV 25 cm away from the wall.
- Keep the remote control away from the TV, as it can interfere with the infrared signals.
- Dim the light in the room.
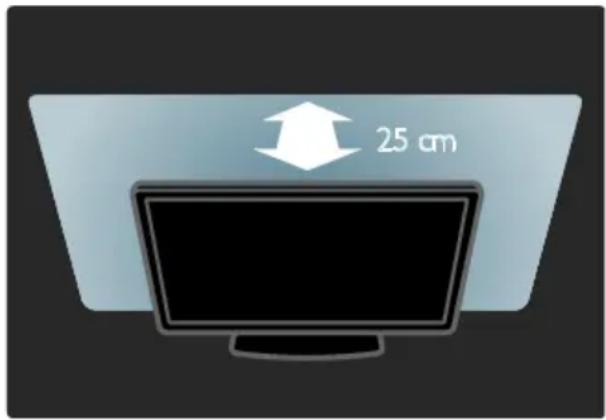
text_image
25 cmSwitch on
- Press ⏻ADJUST.
- Select [Ambilight], then press OK.
- To switch Ambilight on or off, select [On] or [Off].
You can also press AMBILIGHT on the TV to switch Ambilight on or off.
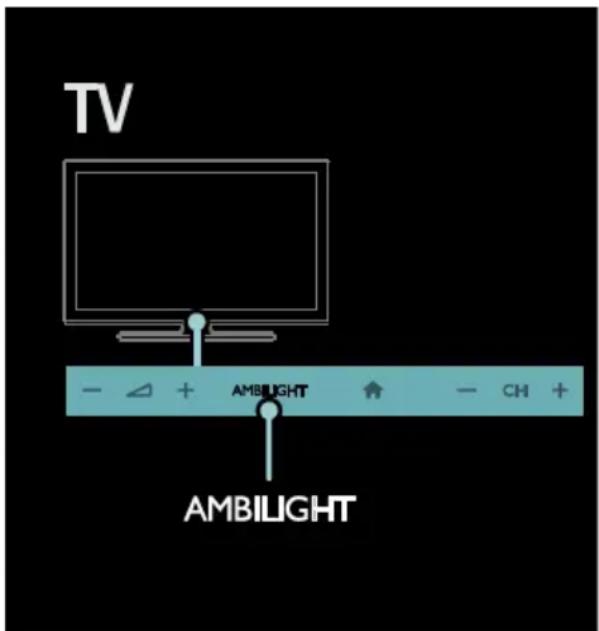
text_image
TV - △ + AMBILIGHT ↑ - CH + AMBILIGHTChange settings
In the Ambilight menu, you can access more Ambilight settings.
- While you watch TV, press ⬆ [Setup].
- Select [TV settings] > [Ambilight].
- Select a setting to adjust:
- [Dynamic]: Adjust Ambilight between relaxed and dynamic levels. Available only if Ambilight [Colour] is set to [Dynamic].
- [Brightness]: Adjust the brightness of Ambilight.
• [Colour]: Select a predefined color. - [Custom colour]: Set your own Ambilight colour. To access this option, set [Ambilight] > [Colour] > [Custom].
- [Separation]: Adjust the difference in color levels on each side of the TV. Turn off this feature for a dynamic and uniform Ambilight color.
- [TV switch off]: Select how Ambilight switches off when the TV is switched off.
- [Lounge light mood]: Select a lounge light mode. The lounge light comes on when the TV is in standby.
- [Scenea lounge light]: Switch Scenea lounge light on or off when Scenea is enabled.
- [Wall colour]: Select the color of the wall behind the TV. Ambilight corrects its colors to suit the color of the wall.
Use lounge light
When the TV is in standby, press Ambilight on the front of the TV to create a lounge light effect in your room.
Note: It may take more than 5 seconds for the lounge light to switch on.
To select another lounge light color, see Use your TV > Ambilight > Change settings (Page 19).
Browse PC through DLNA
What you can do
If you have photos, videos, or music files stored on a computer connected through a home network, you can play the files on your TV.
What you need
- A wired or wireless home network, connected with a Universal Plug and Play (uPnP) router.
- A Philips wireless USB adapter or a LAN cable that connects your TV to your home network.
- A media server such as: PC running Windows Media Player 11 or higher; or Mac running Twonky Media Server.
- Make sure that your computer firewall allows you to run the media server software program.
You will also need to set up the network connection:
- Connect your TV and the computer to the same home network. See Connect your TV > Computers and the Internet (Page 49).
- Switch on your computer and the router.
Proceed to set up a media sharing server with Windows Media Player 11 or higher, or Twonky Media Server.
Note: For help to use other media servers, such as TVersity, see the web site of the media server.
If the apparatus does not return to DLNA mode due to external electrical disturbances (e.g. electrostatic discharge), user intervention is required.
Enable sharing on Windows Media Player 11
- Start Windows Media Player on your computer.
-
Select Library > Media Sharing.
-
The first time you select Media Sharing, a pop-up screen appears. Check the Share my media box and click OK.
- A device marked as Unknown Device appears in the Media Sharing screen. If the unknown device does not appear after a minute or so, make sure that your PC firewall is not blocking the connection.
- From the Media Sharing screen, select the unknown device and click Allow.
A green tick appears next to the device.
- By default, Windows Media Player shares files from these folders: My Music, My Pictures, and My Videos.
- If your files are in other folders, select Library > Add to Library, and then follow the onscreen instructions to add the folders.
- If necessary, select Advanced options to display a list of monitored folders.
- Select Library > Apply Media Information Changes to activate the changes.
Enable sharing on Windows Media Player 12
- Start Windows Media Player on your computer.
- In Windows Media Player, select the Stream tab, and then select Turn on media streaming.
The Media streaming options screen appears.
- Click Turn on media streaming. Return to the Windows Media Player screen.
-
Click Stream > More streaming options.
-
The Media streaming options screen appears.
-
A media program appears in the local network screen. If the media program does not appear, make sure that your PC firewall is not blocking the connection.
-
Select the media program and click Allowed.
-
A green arrow appears next to the media program.
-
By default, Windows Media Player shares files from these folders: My Music, My Pictures, and My Videos.
-
If your files are in other folders, select Organize tab and select Manage libraries > Music.
Follow the onscreen instructions to add the folders that contain your media files.
Enable sharing on Twonky Media
- Visit www.twonkymedia.com to purchase the software, or download a free 30-day trial to your Macintosh.
- Start Twonky Media on the Macintosh.
- In the Twonky Media Server screen, select Basic Setup and First steps.
The First steps screen appears.
- Type a name for your media server, and then click Save changes.
- Back in the Twonky Media screen, select Basic Setup > Sharing.
- Browse and select folders to share, and then select Save Changes.
Your Macintosh rescans the folders automatically so that they are ready to share.
Play files from computer
Note: Before you play multimedia content from the computer, make sure that the TV is connected to the home network, and the media server software is properly set up.
- Switch on the computer and the router.
- Switch on your TV.
-
Press ↑ on the remote control.
-
Select [Browse PC], then press OK. If the network installation starts, follow the onscreen instructions.
-
If the content browser is displayed, select a file, then press OK.
The file starts to play. - Press the Play buttons on the remote control to control play.
View pictures
- To play a picture slideshow, select a photo, then press OK.
- To pause or stop playback, press OK again.
- To play the previous or next file, press ◀ or ▶.
Press OPTIONS to access one of the following options:
• [Show info]: Display the file information.
- [Stop]: Stop slideshow.
• [Rotate]: Rotate the file.
• [Repeat]: Repeat the slideshow.
Browse Net TV
What you can do
Enjoy Internet Applications (Apps), specially adapted internet websites for your TV. You can control the Apps with the TV remote control. For example, you can:
- Read newspaper headlines
- Watch videos
- Check weather forecasts
Use the catch-up TV feature to watch TV programs that you missed. Availability of catch-up TV Apps differ for each country. To find out which TV programs are available, access the Net TV program guide.
Find out more on Net TV services at the Net TV forum website, www.supportforum.philips.com.
Notes:
• Each country has different Net TV services.
- Certain websites may not display completely. Some functions are not available, for example file download, or functions that require plug-ins.
- Net TV services are updated automatically. To view the latest updates, change All to New in the App Gallery.
- Net TV displays one page at a time, in full screen.
- Koninklijke Philips Electronics N.V. bears no responsibility regarding the content and the quality of the content provided by the content service providers.
What you need
To enjoy Net TV, complete these tasks:
- On your home network, connect the TV to the Internet
- On your TV, configure Net TV.
- On your PC, register with Philips to enjoy exclusive benefits and receive updates on product information. You can register now or later.
Notes:
- You can lock Net TV Applications (Apps) with a 4 digit pin-code. All adult Apps can be locked as one selection.
- When you lock an adult Application, the advertisements and Web pages not adapted for Net TV remain accessible.
Connect the TV to the Internet
On your home network, connect the following:
- Connect a router with a high-speed connection to the Internet.
- Switch on the router.
- Install the network. See Connect the TV
Computers and the Internet (Page 49).
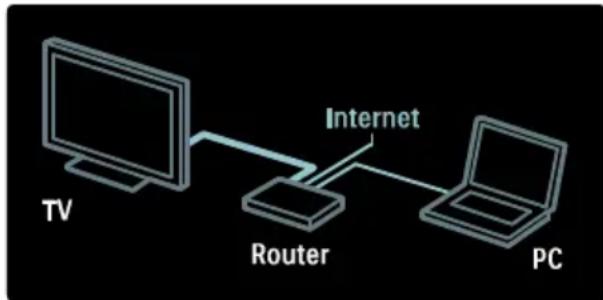
flowchart
graph LR
    TV["TV"] --> Router["Router"]
    Router --> PC["PC"]
    Router --> Internet["Internet"]
Configure Net TV
- Press ⚠,select [Browse Net TV], and then press OK to confirm.
The terms and conditions of use are displayed. - To agree to the terms and conditions, press OK.
The registration menu is displayed. - To register with Club Philips, select [Register], then press OK.
- Confirm the onscreen message.
A prompt asks if you want to lock adult services. - To lock adult services, select [Lock], then press OK.
- Enter a 4-digit code, then press OK.
- Re-enter the 4-digit code, then press OK. The Net TV start page is displayed.
Access Net TV Applications (Apps)
The first page shown is the Net TV home page. The icons on this page represent the applications (Apps).
- Browse internet websites with the Internet Apps.
Press the Navigation buttons to select an App, then press OK to confirm. - Read the Net TV quick guide for more information.
- Access the App Gallery to add more Apps to your home screen.
- You can change country settings and select Apps from other countries.
Access website
- Select an Internet App, then press OK.
- Use the Numeric buttons on the TV remote control to enter a web address.
Onscreen keyboard
Select the area to enter the web address, then press OK.
A keyboard appears on the screen.
Use this to enter a web address.
Clear Net TV memory
Warning: This option resets Net TV completely.
You can clear the Net TV memory completely, including your favorites, the parental control code, passwords, cookies and history.
- Press
- Select [Setup] > [Network settings].
- Select [Clear Net TV memory], then press OK.
Options
Press OPTIONS to select the following:
- Remove App
- Lock App
- Unlock App
- Move App
Show remote control
Keys such as play▶, rewind ◀ and fast forward ▶ can be called up with [Show remote control].
Press OPTIONS and select [Show remote control]. Use the onscreen keys to operate the connected audio or video player.
Select a key and press OK to carry out its function. Press ← to hide the onscreen keys.
Select P+ and P- to scroll up and down on a web page.
Zoom page
To zoom in and out on an Internet page, press OPTIONS and select [Zoom page]. Use the slider bar to set the enlargement.
To scroll through an Internet page, use the Navigation buttons to jump from highlight to highlight.
Reload page
If a page does not load correctly, reload it. Press: OPTIONS and select [Reload page].
Security info
To view security information about a page, press OPTIONS and select [Security info].
Rent online video
What you can do
With this TV, you can rent a video from an online video store.
- Open a video store. You may need to register or enter your log-in.
- Select a video.
- Make the online payment.
- Download a video.
What you need
To rent and download a video, you need a high-speed Internet connection to the TV. Read more about network connections in Connect your TV > Computers and the Internet (Page 49).
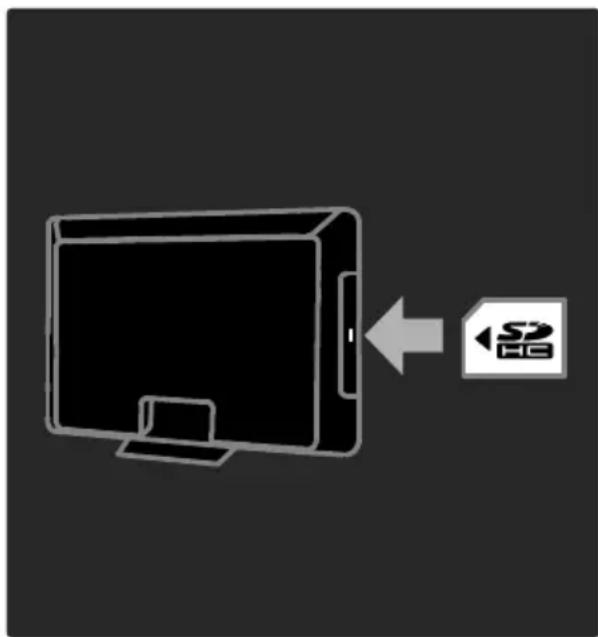
You also need an SD memory card to insert into the TV SD card slot.
SD memory size
Use a blank SD memory card of type SDHC class 6, with at least 4 GB of storage capacity.
For high-definition video, make sure that you use an SDHC card with at least 8 GB of storage capacity.
Note: If the write speed is insufficient for video transfer, the TV rejects the SD card.
Caution: This TV has a standard SD card slot that can be used only for renting video.
Follow the instructions described here. If you insert the card incorrectly, you might damage the card. All existing content on the SD card is erased before you download rented videos.
text_image
雷Format an SD card
Before you download rented videos, your SD card must be formatted.
- Switch on the TV.
- As illustrated, insert the SD memory card into the SD card slot on the side of the TV. The TV automatically starts formatting the card.
- After formatting, leave the SD card in the slot.
Rent
View a video store
- Press
- Select [Browse Net TV] and press OK.
- Access the App Gallery to search for available video stores in your country.
- Press the Navigation buttons to select a store, then press OK to confirm.
The icon of the video store is added to the home page. - To view a store, select its icon and press OK.
Rent a video
To rent a video, select its icon on the video store page and press OK. In most cases you can rent a video for one day or for a couple of days or even just 1 hour. The way you select and rent a video varies from store to store.
Payment
The store prompts you to log-in or to open a new account if you do not have one. The login might consist of your email address and a personal PIN code. When you are logged in, you can select the payment method, a credit card, or a value code in most cases.
Consult the video store website for more information on their payment terms.
- To enter a number code (PIN), use the Numeric buttons on the remote control.
- To enter an email address, select the text field on the page and press OK. Select a character on the keyboard and press OK to enter.
Download the video
When you have paid, you can download the video on to the video memory. During the download, you can continue to watch a TV program until the TV notifies you that the video is ready to play.
If you cancel a download, you can still download the video until the rental period expires.
Watch video
- Press ↑, select [Browse Net TV].
The available video stores are displayed. - Select the video store where you rented the video, then press OK.
- With your log-in information, enter the online video store.
- Select the video from the list of downloaded videos, then press OK to play.
3 Use more of your TV
Digital TV interactive
What you can do
Available on certain models only.
Digital TV interactive is an interactive TV service provided by digital TV broadcasters. If your TV is connected to a home network with internet connection, you can experience true interactivity and respond directly to the interactive services.
Here are some examples of interactive activities you can enjoy:
• view TV program information
- join a quiz or contest
- play games
- vote
- chat
What you need
To enjoy digital TV interactive services, you need the following:
• digital channels with interactive services
- a wired or wireless home network, connected with a Universal Plug and Play router (uPnP).
For network connection, see Setup your TV
Computers and the Internet (Page 49).
To find out what interactive services are available, contact your broadcasters.
Access application
- Switch to a channel with digital TV interactive services.
A blinking symbol is displayed when the application is loading. Once complete, an icon is displayed. - Press the Red or OK button to launch the interactive application.
- Follow the onscreen instructions to use the application.
- To exit, press EXIT.
Pause TV
What you can do
While watching a digital channel, you can pause a program to answer an urgent phone call or to have a break. The broadcast is stored on a USB hard disk that is connected to the TV; you can replay the broadcast instantly.
Note:
- The maximum time span you can pause a TV broadcast is 90 minutes.
What you need
To pause a TV broadcast, do the following:
- Tune your TV to receive digital channels. Pause TV works only on digital TV channels. See Set up your TV > Channels > Automatic install (Page 35).
- Connect a USB hard disk to the TV. Use a USB 2.0 compatible hard disk with a minimum hard disk space of 32 gigabyte and a minimum transfer speed of 30 megabytes per second.
Hard disk installation
Before you can pause a broadcast, you must connect a USB hard disk to the TV and format it.
Caution:
- Philips is not responsible if the USB hard device is not supported, nor is it responsible for damage or loss of data in the device.
- Formatting removes all existing data on the hard disk.
- If you need extra USB connectors, use a USB hub. Do not connect any other USB device to the TV when you are formatting the hard disk.
- Do not overload the USB port. If you connect a USB hard disk device that consumes more than 500 mA power, ensure that it is connected to its own external power supply.
- Once the USB hard disk device is formatted for this TV, you cannot use it on another TV or PC. Keep it connected permanently to the TV.
- Connect the USB hard disk to the USB connector on the side of the TV.
- Switch on the TV, and if necessary the hard disk, if it has an external power source.
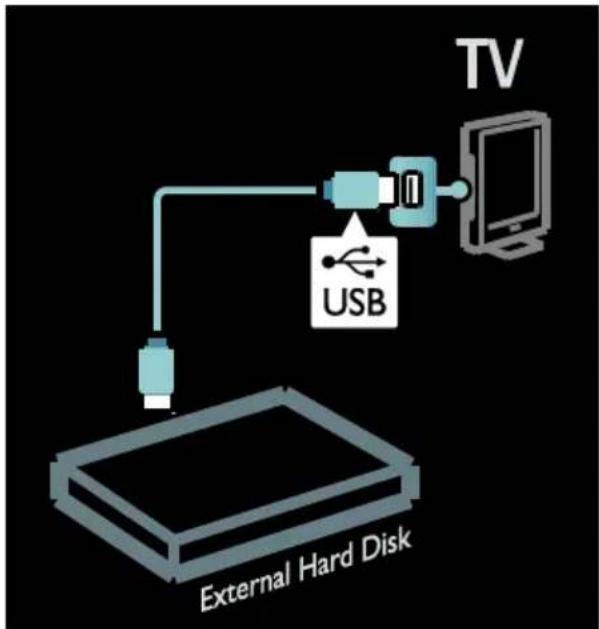
flowchart
graph TD
    A["External Hard Disk"] --> B["USB"]
    B --> C["TV"]
- Switch to a digital TV channel and press (pause) to start formatting.
- Follow the onscreen instructions.
Warning:
The formatting process may take some time. Do not switch off the TV or disconnect the USB hard disk until this process is complete.
Pause a live TV broadcast
text_image
TV 07:24 08:31 07:24 07:55:06 08:31 A B C-
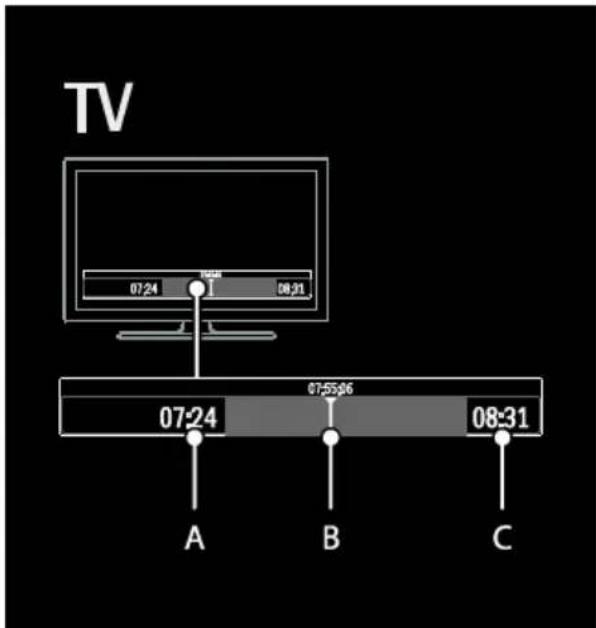
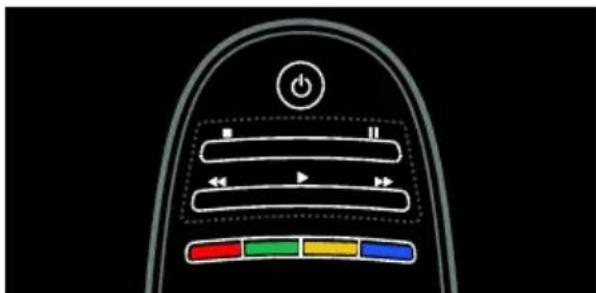
On a digital channel, press ||(pause) to pause a TV broadcast.
-
Press ▶(play) to continue watching.
The status bar shows the following time indicators:
A. When the program is paused for the first time.
B. Where the paused program is currently playing.
C. Where the live program is currently playing.
- Press (reverse) or (forward) to select where you want to start viewing the stored broadcast. - Press (■op) to switch to live TV broadcast again.
text_image
Diagram of a device control panel with labeled buttons and indicator lightsThe stored broadcast on the USB hard disk is cleared if you do one of the following:
- Disconnect the USB hard disk.
- Switch the TV to standby.
- Switch to another channel.
- Switch source to watch from a connected device - a Blu-ray disc player or digital receiver.
To change playback speed
Press ◀ or repeatedly.
To jump back to the beginning of the TV broadcast
Press the left navigation button repeatedly until you reach the beginning of the broadcast storage.
Set locks and timers
Clock
You can display a clock on the TV screen. The clock displays the time that is broadcast by your TV service operator.
Display the TV clock
- While you watch TV, press OPTIONS.
- Select [Status], then press OK.
The clock is displayed on the lower right hand corner of the TV screen.
Change the clock mode
The clock mode is automatically synchronized to the Coordinated Universal Time (UTC). If your TV cannot receive UTC transmissions, change the clock mode to [Manual].
- While you watch TV, press
- Select [Setup] > [TV settings] >
- Select [Clock] > [Auto clock mode].
- Select [Automatic], [Manual] or [Country dependent], then press OK.
[Preferences].
Set the clock manually
If clock mode is set to [Manual], set the date and time manually.
- In the [Clock] menu, select [Date] or [Time], then press OK.
- Use the Navigation buttons to make your selection.
- Select [Done], then press OK.
Sleeptimer
Sleeptimer switches the TV to standby after a specified time. You can switch off your TV earlier or reset the sleeptimer during the countdown.
- Press
-
Select [Setup] > [TV settings] > [Preferences] > [Sleeptimer].
-
Press the Navigation buttons to set the sleeptimer.
The sleeptimer can be set up to 180 minutes, in steps of five minutes. The sleeptimer is switched off if it is set to zero minutes.
- Press OK to activate the sleeptimer. The TV switches to standby after the specified time.
Child lock
To protect children from unsuitable TV programs, you can lock the TV or block age rated programs.
Set or change the child lock code
- Press
- Select [Setup] > [Channel settings] > [Child lock].
- Select [Set code], or [Change code].
- Enter the code with the Numeric buttons.
Tip: If you forget your code, enter '8888' to override any existing codes.
Lock or unlock channels
- In the child lock menu, select [Channel lock].
- Enter the child lock code with the Numeric buttons. The [Channel lock]
menu appears. - Select channels to lock or unlock.
Parental rating
Some digital broadcasters rate their programs according to age. You can set your TV to display only programs with age ratings lower than your child's age.
-
Press
-
Select [Setup] > [Channel settings].
-
Select [Child lock] > [Age ratings lock].
A message prompts you to enter the child lock code.
- Enter the child lock code with the
Numeric buttons.
- Select an age rating, then press OK.
All programs above the selected age rating are blocked.
For information on child lock codes, see Use more of your TV > Set locks and timers > Child lock (Page 27).
Display closed caption
You can select to display closed caption at all times or only when the TV is muted.
Note:
If Digital TV Interactive application is activated, closed caption text is hidden.
Not all TV programs and commercials include closed caption information.
Refer to the TV program listings in your area for information on closed caption text. The captioned programs are usually list with service marks, such as 'CC' in the TV listings.
[Closed captions].
- While you watch TV, press OPTIONS.
- Use the Navigation buttons to select
- Select an option, and then press OK.
- Press OPTIONS.
- Select [Caption service].
- Select the correct type of closed caption, and then press OK.
View Scenea
What you can do
You can display a default picture as the wallpaper on your TV. You can also load another picture as the wallpaper.
If the sleeptimer is off, the wallpaper is displayed for 240 minutes. Otherwise, it is displayed for the duration of the sleeptimer.
What you need
To use another picture as the wallpaper, you need a USB storage device that contains a picture that is less than 1 MB in size.
Switch on
- Press
- Select [Scenea], then press OK.
The default picture is displayed.
Note: The wallpaper is displayed for the duration of the sleeptimer. For more information on sleeptimer, see Use more of your TV > Set locks and timers > Sleptimer (Page 27).
Set TV wallpaper
You can load another picture as the wallpaper.
Note: Loading a new picture overrides the existing picture.
- Connect the USB storage device to the TV.
- Press
- Select [Browse USB], then press OK.
- Select a picture, then press OPTIONS.
- Select [Set as Scenea], then press OK.
- Select [Yes], then press OK.
- Press any button to exit Scenea.
Set Scenea lounge light
When the TV is in standby, you can switch on Ambilight and create a lounge light effect with your wallpaper. Ambilight is available on certain models only.
When the TV is in standby, press AMBILIGHT on the front of the TV.
Note: It can take more than 5 seconds for the lounge light to switch on.
To select another color for the lounge light, see Use your TV > Ambilight > Setup (Page 19).
Set universal access
Switch on
Some digital TV broadcasters provide special audio and subtitle features for people who are hearing or visually impaired.
To enable these features, turn on universal access in the preference menu.
- Press
- Select [Setup] > [TV settings] > [Preferences].
- Select [Universal access] > [On], then press OK.
Hearing impaired
Tip: To verify whether a hearing impaired audio language is available, press :
OPTIONS and select [Audio language].
Languages with an ear icon support hearing-impaired audio.
To switch on hearing impaired audio and subtitles
- While you watch TV, press OPTIONS.
- Press one of the following buttons to select an option:
• Red: Switch hearing impaired on or off.
- Green: Switch on hearing impaired audio and subtitles.
- Press EXIT to exit.
Visually impaired
Tip: To verify whether visually impaired audio is available, press OPTIONS and select [Audio language]. Languages with an eye icon support visually-impaired audio.
To switch on visually impaired audio (if available)
- While you watch TV, press OPTIONS.
- Press the green button to select [Visually impaired].
-
Press one of the following buttons to select an option:
-
Red - [Off]: Turn off visually impaired audio.
- Yellow - [Headphones]: Hear visually impaired audio from headphones only. (if applicable)
- Green - [Speakers]: Hear visually impaired audio from speakers only.
-
Blue - [Speakers + headphones]: Hear visually impaired audio from speakers and headphones.
-
Press EXIT to exit.
Note: If the EasyLink remote control is enabled, you cannot select the green or yellow buttons. To disable, see Use more of your TV > Use EasyLink > Switch on (Page 30).
Adjust volume for the visually impaired
- In the [Universal access] menu, press the yellow button to select [Mixed volume].
- Press the Navigation buttons to move the slider up or down, then press OK.
- Press EXIT to exit.
Audio feedback for the visually impaired
This feature enables audio feedback when buttons are pressed on the remote control or TV.
- In the [Universal access] menu, press the blue button to select [Key beep].
- Press the green button to turn on audio feedback, or press the red button to turn it off.
- Press EXIT to exit.
Use EasyLink
What you can do
Get the most out of your HDMI-CEC-compliant devices with Philips EasyLink enhanced control features. If your HDMI-CEC compliant devices are connected through HDMI, you can control them at the same time with your TV remote control.
Note: Other brands describe HDMI-CEC functionality differently. Some examples are Anynet (Samsung), Aquos Link (Sharp) or BRAVIA Sync (Sony). Not all brands are fully compatible with Philips EasyLink.
After you switch on Philips EasyLink, these features are available:
One-touch play
When you play a HDMI-CEC compliant device, the TV switches on from standby, and switches to the correct source.
One-touch standby
When you press don the TV remote control, the TV and all HDMI-CEC compliant devices switch to standby mode.
System audio control
If you connect a HDMI-CEC compliant device that includes speakers, you can choose to hear the TV from those speakers instead of the TV speakers.
For more information about TV audio output, see Use more of your TV > Use EasyLink > Select speaker output (Page 31).
EasyLink remote control
You can control multiple HDMI-CEC compliant devices with your TV remote control.
To switch on EasyLink Remote Control, see Use more of your TV > Use EasyLink > Control devices simultaneously (Page 31).
Retain picture quality
If your TV picture quality is affected by the picture-processing features of other devices, switch on Pixel Plus Link.
To switch on Pixel Plus Link, see Use more of your TV > Use EasyLink > Retain picture quality (Page 32).
Maximize display for subtitled video
While you view subtitles in a video, you can maximize the video display area. Some subtitles can create a separate subtitle bar under the video, which limits the video display area. After you switch on auto subtitle shift, the subtitles display on top of the video image, which maximizes the video display area.
To switch on auto subtitle shift, see Use more of your TV > Use EasyLink > Maximize display for video with subtitles (Page 32).
Hear another device at standby
You can hear a connected HDMI-CEC compliant device through the TV speakers, even when the TV is in standby.
To switch on, see Use more of your TV > Use EasyLink > Hear another device at TV standby (Page 32).
What you need
To benefit from Philips EasyLink advanced control features, make sure that you do the following:
- Connect at least two HDMI-CEC compliant devices through HDMI
- Configure each HDMI-CEC compliant device properly
- Switch on EasyLink
Switch on
To switch on or off EasyLink
Note: If you do not intend to use Philips Easylink, switch it off.
- Press
- Select [Setup] > [TV settings] > [EasyLink].
- Select [On] or [Off], then press OK.
Control devices simultaneously
If you connect multiple HDMI-CEC devices that support this setting, all the devices respond to the TV remote control.
Caution: This is an advanced setting. Devices that do not support this setting will not respond to the TV remote control.
- Press
- Select [Setup] > [TV settings] > [EasyLink].
- Select [EasyLink Remote Control] > [On] or [Off].
- Press OK to activate.
Notes:
- To switch back to TV control, press , then select [Watch TV].
- To control another device, press , then select the device from the Home menu.
Press EXIT to exit.
EasyLink buttons
Control HDMI-CEC compliant devices with the following buttons on the TV remote control.
- OK: Start, pause or resume play on the connected device, activate a selection, or access the device menu.
- (Previous) / ▶ (Next): Search backwards and forwards on the connected device.
- Numeric buttons: Select a title, chapter or track.
- Play buttons: Control video or music play.
- Standby: Display the menu of the connected device.
• : Display the TV menu. - (Standby): Switch the TV and the connected device to standby.
Other EasyLink buttons are available through the On-Screen Remote Control (OSRC).
To access the OSRC
- While you view content from a connected device, press OPTIONS.
- Select [Show device keys], then press OK.
- Select an onscreen button, then press OK.
- Press EXIT to exit.
Select speaker output
If the connected device is HDMI Audio Return Channel (HDMI ARC) compliant, you can output TV audio through HDMI cable. Additional audio cable is not required. Make sure you connect the device to the HDMI ARC connector on the TV. See
Connect your TV > About cables > HDMI (Page 39).
Configure TV speakers
- Press
- Select [Setup] > [TV settings] >
[EasyLink] > [TV speakers].
- Select one of the following options, then press OK:
• [Off]: Switch off TV speakers.
• [On]: Switch on TV speakers.
- [EasyLink]: Stream TV audio through the connected HDMI-CEC device. Switch the TV audio to the connected HDMI-CEC audio device through the adjust menu.
- [EasyLink autostart]: Turn off TV speakers automatically and stream TV audio to the connected HDMI-CEC audio device.
Select speaker output with Adjust menu If [EasyLink] or [EasyLink autostart] are selected, access the adjust menu to switch the TV audio.
- While you watch TV, press ⏻ADJUST.
- Select [Speakers], then press OK.
- Select one of the following, then press OK;
• [TV]: On by default.
Stream TV audio through TV and the connected HDMI-CEC audio device until the connected device switches to system audio control. TV audio is then streamed through the connected device.
- [Amplifier]: Stream audio through the connected HDMI-CEC device. If system audio mode is not enabled on the device, audio continues to stream from the TV speakers. If [EasyLink autostart] was enabled, the TV prompts the connected device to switch to system audio mode.
Retain picture quality
If your TV picture quality is affected by the picture-processing features of other devices, switch on Pixel Plus Link.
To switch on Pixel Plus Link
- Press
- Select [Setup] > [TV settings] > [EasyLink].
- Select [Pixel Plus link] > [On], then press OK.
Maximize video display
Some subtitles can create a separate subtitle bar under the video, which limits the video display area. After you switch on auto subtitle shift, the subtitles display over the video image, which maximizes the video display area.
Switch on auto subtitle shift
- Press
- Select [Setup] > [TV settings] > [EasyLink] > [Auto subtitle shift].
- Select [On], then press OK to activate.
Note: Make sure that the picture format of the TV is set to [Auto format] or [Movie expand 16:9].
Hear another device at TV standby
You can hear a connected HDMI-CEC compliant device through the TV speakers, even when the TV is in standby.
- Press ⬆IADJUST to receive audio from the connected Philips EasyLink device. If available, audio only mode is enabled.
- Accept the prompt on the TV to turn off the TV screen.
- Control the audio playback with the TV remote control.
4 Set up your TV
Settings assistant
Use the settings assistant to guide you through the picture and sound settings.
- While you watch TV, press
- Select [Setup] > [Quick picture and sound settings], then press OK.
- Select [Start], then press OK.
- Follow the onscreen instructions to choose your preferred settings.
Picture and sound
More picture settings
- Press
-
Select [Setup] > [TV settings] >
[Picture], then press OK. -
Select a setting to adjust:
- [Smart picture]: Access predefined smart picture settings.
- [Reset]: Reset to default settings.
- [Contrast]: Adjust the intensity of the bright areas, keeping dark areas unchanged.
- [Brightness]: Adjust the intensity and details of the dark areas.
• [Colour]: Adjust color saturation.
- [Tint]: Compensate color variations in NTSC encoded transmissions.
- [Sharpness]: Adjust sharpness in the image.
- [Noise reduction]: Filter and reduce noise in the image.
- [Colour Temperature]: Adjust the color balance in the image.
- [Custom colour temperature]: Customize color balance.
- [Pixel Plus HD] / [Pixel Precise HD]: Access advanced settings, including [HD Natural Motion], *[Clear LCD], [Advanced sharpness], [Dynamic contrast], [Dynamic backlight], [MPEG artefact reduction], [Colour enhancement], [Gamma].
*Available on certain models only.
- [PC mode]: Enable picture settings adjustment when a PC is connected to the TV via HDMI. If enabled, you can select [Picture format] > [Unscaled] which provides maximum detail for display of PC content.
• [Light sensor]: Adjust settings dynamically to match lighting conditions.
- [Picture format]: Change the picture format.
• [Screen edges]: Change the picture size.
- [Picture shift]: Adjust the position of the picture. You cannot select this setting if the selected picture format is Auto zoom or Wide screen.
More sound settings
- Press
- Select [Setup] > [TV settings] > [Sound], then press OK.
- Select a setting to adjust:
- [Smart sound]: Access predefined smart sound settings.
- [Reset]: Reset to factory default settings.
• [Bass]: Adjust the bass level.
• [Treble]: Adjust the treble level.
• [Surround]: Enable spatial sound.
- [Auto volume leveling]: Automatically reduce sudden volume changes, for example, when switching channels.
• [Balance]: Adjust the balance of the left and right speakers.
Audio settings
Select audio language
If the TV channel has multiple or dual sound broadcast, you can select the preferred audio language.
While you watch TV, press OPTIONS.
• [Audio language]: Select the audio language for digital channels.
• [Dual I-II]: Select the audio language.
Digital TV channels may stream several audio languages. If multiple languages are available, select the preferred language.
- Press
-
Select [Setup] > [Channel settings] > [Language].
-
Select one of the following settings, then press OK:
• [Primary audio] / [Secondary audio]: Select the available audio language.
Set a secondary language in the same menu. If the primary language is unavailable, the TV receives this language.
- [Preferred audio format]: Select to receive standard audio format (MPEG) or advanced audio formats (AAC, EAC-3 or AC-3 if available).
-
[Mono/Stereo]: Select mono or stereo audio if stereo broadcasting is available.
-
Press EXIT to exit.
Reset to factory settings
You can restore default picture and sound settings, while the channel installation settings remain the same.
- While you watch TV, press
- Select [Setup] > [TV settings] > [Factory settings], then press OK.
TV settings are reset to default.
Channels
Rename channels
After the channels are installed, you can rename them to your preference.
- While you watch TV, press QFIND. The channel list is displayed.
-
Select the channel to rename and press ≡ OPTIONS.
-
Select [Rename], then press OK.
- In the entry screen, press the Navigation buttons or Numeric buttons to edit the name, then press OK.
Tip: You can press OK in the entry screen to enable the Onscreen Keyboard.
- Once complete, press the Navigation buttons to select [Done].
• To clear the entry, select [Clear].
- To cancel, select [Cancel].
-
Press OK to confirm.
-
Press EXIT to exit.
Hide or unhide
Hide channels
To prevent unauthorized access to channels, hide them from the channel list.
- While you watch TV, press qFIND.
- Select the channel to hide, then press:≡ OPTIONS.
- Select [Hide channel], then press OK. The channel is hidden.
Unhide channels
- While you watch TV, press QFIND.
- Press OPTIONS.
- Select [Show hidden channels], then press OK.
Hidden channels appear in the channel list, but the channel information is not displayed.
-
Select a hidden channel, then press:≡ OPTIONS.
-
Select [Unhide all], then press OK. All hidden channels are displayed.
Automatic install
When the TV was switched on for the first time, a full installation of channels was performed. You can run this full installation again to set your language, country and install all available TV channels.
Select network
You need to switch to the respective network to install cable or antenna channels.
- While you watch TV, press
- Select [Setup] > [Channel settings].
-
Select [Channel installation] > [Antenna connection].
-
Select one of the following settings:
- [Antenna]: Access free-to-air antenna channels.
• [Cable]: Access cable channels.
-
Press OK to confirm.
-
Press EXIT to exit.
Start installation
- Press
-
Select [Setup] > [Search for channels] > [Reinstall channels], then press OK.
-
Follow the onscreen instructions to complete the channel installation.
-
Once complete, select [Finish], then press OK.
Tip: Press QFIND to see the channel list.
Notes:
- During installation, leave settings unchanged unless your digital provider provides you with the specific values to enter.
- When digital TV channels are found, the list of installed channels may display empty channel numbers. You can rename or uninstall these channels.
Install digital channels
You can reposition your antenna to improve the reception. You need to know the correct frequency to tune. For best results, contact the service provider or get a professional installer.
- Press
- Select [Setup] > [Channel settings] > [Channel installation].
- Select [Digital: Reception test] > [Search], then press OK.
- Press the Numeric buttons to enter the channel frequency.
-
Select [Search], then press OK.
-
When the correct channel is located, select [Store], then press OK.
-
Press EXIT to exit.
Notes: If the reception is poor, reposition your antenna and repeat the procedure.
Reinstall channels
ATTENTION: This feature is intended for dealers and service personnel.
You can copy channel lists from one Philips TV to another through a USB storage device. You do not need to search for channels or install them again on the second TV. The channel list file is small enough to fit on any USB storage device.
What you need
The 2 Philips TVs must have:
- same country setting,
- same year range,
- same hardware type, as indicated by the sticker on the back of the TV, (for example Qxxx.xx.Lx), and
- compatible software versions.
An onscreen message will notify you if the channel list cannot be copied to the second TV.
Note: If you are prompted to enter a code, enter '8888'.
Copy channel list to USB
- Connect a USB storage device to the TV with the channels installed on it.
- Press
- Select [Setup] > [TV settings] > [Preferences] > [Channel list copy] >
[Copy to USB], then press OK. The channel list is copied to the USB storage device. - Unplug the USB storage device.
Copy channel list to TV with no channels installed
- Switch on the TV with no channels installed on it, to start the initial installation. Select the language and country. The country setting must be the same as that of the TV whose channel list you want to copy. Skip the search for channels.
- Connect the USB storage device containing the channel list to the TV.
- Press
- Select [Setup] > [TV settings] > [Preferences] > [Channel list copy] > [Copy to TV], then press OK. The channel list is copied to the TV.
- Unplug the USB storage device.
Copy channel list to TV with channels installed
- Switch on the TV on which you want to copy the channel list.
- Press
- Select [Setup] > [Search for channels] > [Reinstall channels], then press OK.
You will be prompted to select the country where the TV was installed. Make a note of the current setting and press followed by [Cancel] to exit. - If the country setting on the TV is different from that of the TV whose channel list you want to copy, reinstall the TV and select the country setting to match the first TV. See Set up your TV > Reinstall the TV (Page 38).
-
Connect the USB storage device containing the channel list to the TV where you want to copy the channel list.
-
Select [Setup] > [TV settings] > [Preferences] > [Channel list copy] > [Copy to TV], then press OK. The channel list is copied to the TV.
- Unplug the USB storage device.
Menu language
- While you watch TV, press ⬆
- Select [Setup] > [TV settings] > [Preferences] > [Menu language].
- Select a menu language from the list, then press OK.
Other settings
TV demo
Start a demo to find out more about your TV's features.
Note: Demos are not supported on MHEG channels.
- While you watch TV, press ⬆
- Select [Setup] > [Watch demos], then press OK.
- Select a demo, then press OK.
- Press EXIT to exit.
Update software
TV software
Check software version
-
Press
-
Select [Setup] > [Software settings] > [Current software info], then press OK.
The version of the current software is displayed.
Caution: Do not install a lower version of software than the current version installed on your product. Philips cannot be held liable or be made responsible for problems caused by a software downgrade.
Update the software through one of these options:
- update with USB flash drive
- update from digital broadcast
- update from the Internet
For more information, see the following pages.
Update with USB
Before performing this procedure, make sure that you have the following:
- Spare time to complete the entire update.
- A USB flash drive that has at least 256MB of storage space, is FAT or DOS formatted, and has its write protection disabled.
- Access to a computer with a USB port and internet access.
Note: Do not use a USB hard drive.
- Press
- Select [Setup] > [Update software], then press OK.
The update assistant starts. - Follow the onscreen instructions to start the update.
Note: The update assistant directs you to the Philips support website. Refer to the installation instructions on the website to complete the update.
Update from the Internet
To update the TV software directly from the Internet, connect the TV to the Internet through a router with a high-speed connection.
- Press ⬆ > [Setup] > [Update software], then press OK.
- Select [Internet], then press OK.
- Follow the onscreen instructions to start the update.
When the update is complete, the TV switches off and back on again automatically. Wait for the TV to switch back on. Do not use the power switch on the TV or the remote control.
Note: If the TV is connected to the Internet, the TV displays the availability of new software at startup.
Update from digital broadcast
When available, your TV can receive software updates through digital broadcasts. A message appears prompting you to update the software. We strongly recommend that you update the software when prompted. Follow the instructions on screen.
Note: If you choose to update the software at a later time, select ⬆ [Setup] > [Software settings] > [Local updates].
Onscreen Help
What you need
Before you update the onscreen [Help], make sure that you have the following:
- A USB storage device that is FAT or DOS-formatted.
• A PC with Internet access. - An archive utility that supports the ZIP file format (for example, WinZip for Microsoft Windows or StuffIt for Macintosh).
Note: Do not use a USB hard drive.
Download the latest file
- Insert a USB storage device into the USB connector on your PC.
- Create a folder named 'upgrades' in the root directory of the USB storage device.
- In your web browser, navigate to www.philips.com/support.
-
At the Philips Support site, find your product and locate the [Help] file for your TV. The file (a *.upg file) is compressed into a *.zip archive.
-
If the [Help] file is a later version than the file in your TV, click it.
-
Save it to your PC.
-
Using an archive utility, extract the *.upg file from the *.zip file.
-
Save the *.upg file to the 'upgrades' folder in the USB storage device.
-
Disconnect the USB storage device from the PC.
Update [Help]
- Do not switch off the TV or remove the USB storage device during the update.
- If a power failure occurs during the update, do not remove the USB storage device from the TV. The TV continues to update as soon as power is restored.
-
If an error occurs during the update, retry the procedure. If the error reoccurs, contact Philips Consumer Care.
-
Switch on the TV.
- Disconnect all other USB devices from the TV.
- Connect the USB storage device containing the *.upg file to the USB connector on the TV.
- Press
- Select [Setup] > [Software settings] > [Local updates].
The updates screen appears. - Select the '*.upg' file and press OK.
A message displays the update status. - Follow the onscreen instructions to complete the update and restart your TV.
Reinstall the TV
Reinstall your TV to reset all picture and sound settings and reinstall all TV channels.
- Press
-
Select [Setup] > [TV settings] > [Reinstall TV], then press OK.
-
Follow the onscreen instructions.
5 Connect your TV
About cables
Cable quality
Overview
Before you connect devices to the TV, check the available connectors on the device.
Connect the device to the TV with the highest quality connection available. Good quality cables ensure a good transfer of picture and sound.
The connections shown in this user manual are recommendations only. Other solutions are possible.
HDMI
An HDMI connection has the best picture and sound quality.
- An HDMI cable combines video and audio signals. Use HDMI for high-definition (HD) TV signals, and to enable EasyLink.
- An HDMI Audio Return Channel (ARC) connector allows output of TV audio to an HDMI ARC compliant device.
- Do not use an HDMI cable longer than 5 meters / 16.4 feet.
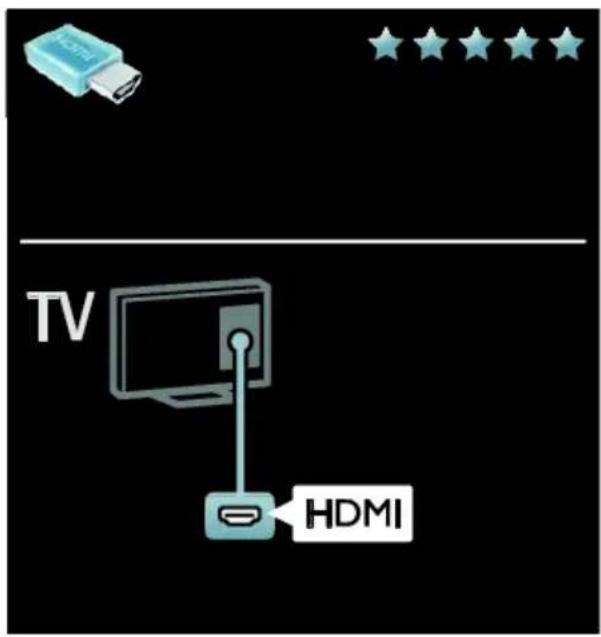
text_image
TV HDMIEnglish
Y Pb Pr
Use the Component Video (Y Pb Pr) connection together with an Audio Left and Right connection for sound.
Y Pb Pr can handle high-definition (HD) TV signals.
Match the Y Pb Pr connector colors to the cable plugs.
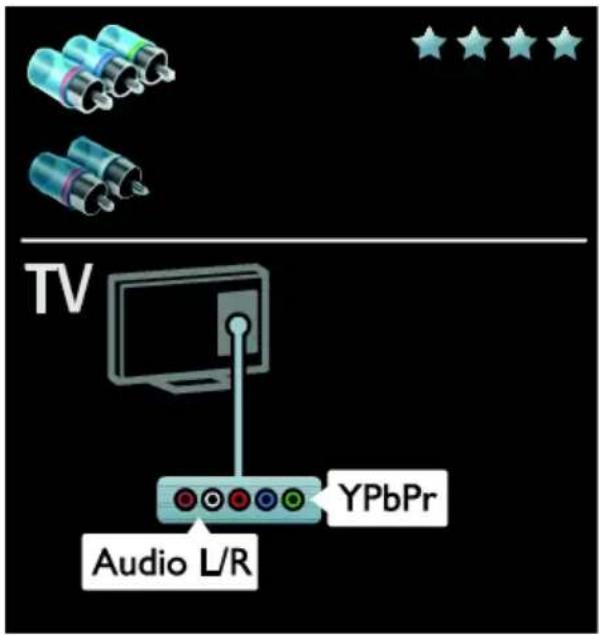
text_image
TV Audio L/R YPbPrVideo
CVBS connections provides standard picture quality.
Connect CVBS together with an audio L/R cable for both video and sound signals.
On certain models, the video input socket on your TV is labelled as VIDEO, A/V IN or COMPOSITE.
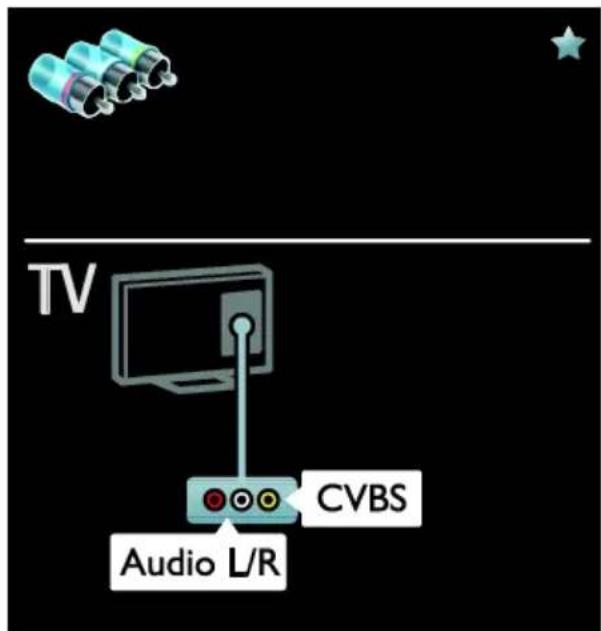
text_image
TV Audio L/R CVBSVGA
Use this connection to display PC content on the TV.
For video and sound, use the VGA and AUDIO IN connectors.
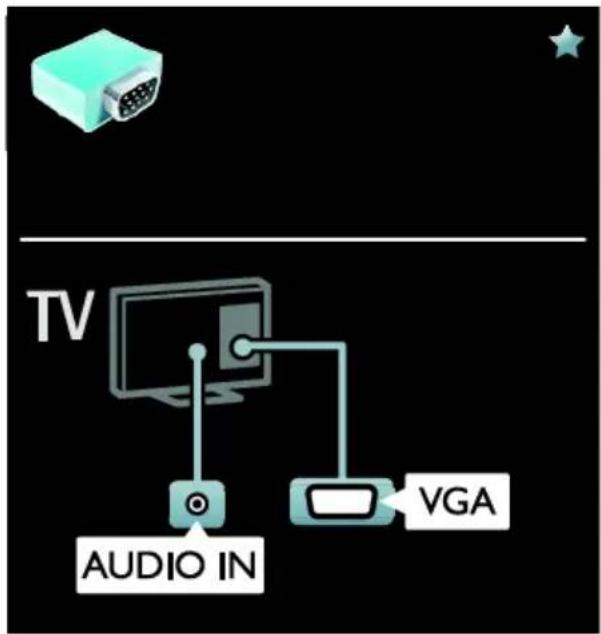
flowchart
graph TD
    TV["TV"] -->|AUDIO IN| VGA["VGA"]
    TV -->|VGA| Monitor["Monitor"]
    Monitor -->|VGA| Display["Display"]
Connect devices
Overview
You can connect your devices to the TV with any of the following options. After connection, press ⚠ > [Add your devices].
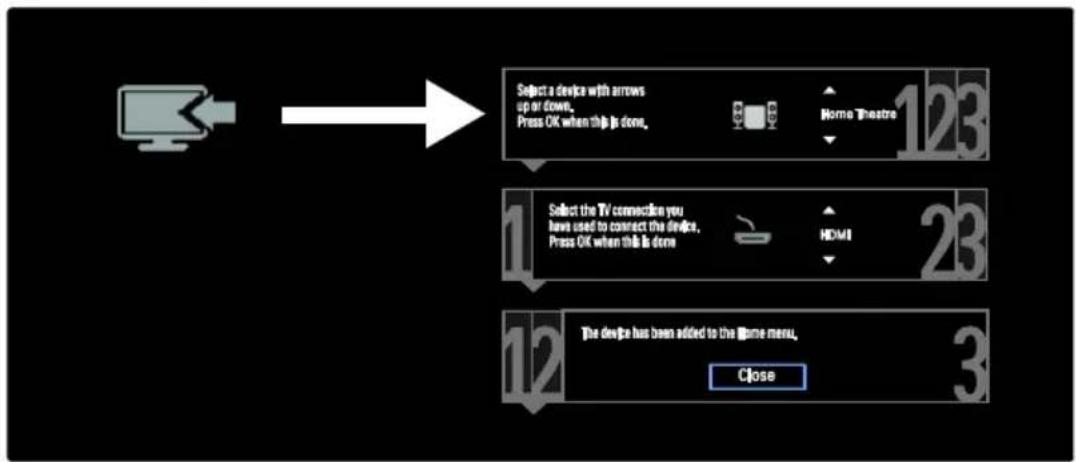
flowchart
graph TD
    A["Computer"] --> B["Select a device with arrows up or down.<br>Press OK when this is done."]
    B --> C["Home Theatre 123"]
    B --> D["Home Theatre 23"]
    B --> E["Home Theatre 12"]
    B --> F["Home Theatre 3"]
    B --> G["Home Theatre 12"]
    B --> H["Home Theatre 23"]
    B --> I["Home Theatre 12"]
    B --> J["Home Theatre 3"]
    B --> K["Home Theatre 12"]
    B --> L["Home Theatre 23"]
    B --> M["Home Theatre 12"]
    B --> N["Home Theatre 3"]
    B --> O["Home Theatre 12"]
    B --> P["Home Theatre 23"]
    B --> Q["Home Theatre 12"]
    B --> R["Home Theatre 3"]
    B --> S["Home Theatre 12"]
    B --> T["Home Theatre 23"]
    B --> U["Home Theatre 12"]
    B --> V["Home Theatre 23"]
    B --> W["Home Theatre 12"]
    B --> X["Home Theatre 23"]
    B --> Y["Home Theatre 12"]
    B --> Z["Home Theatre 23"]
    B --> AA["Home Theatre 12"]
    B --> AB["Home Theatre 23"]
    B --> AC["Home Theatre 12"]
    B --> AD["Home Theatre 23"]
    B --> AE["Home Theatre 12"]
    B --> AF["Home Theatre 23"]
    B --> AG["Home Theatre 12"]
    B --> AH["Home Theatre 23"]
    B --> AI["Home Theatre 12"]
    B --> AJ["Home Theatre 23"]
    B --> AK["Home Theatre 12"]
    B --> AL["Home Theatre 23"]
    B --> AM["Home Theatre 12"]
    B --> AN["Home Theatre 23"]
    B --> AO["Home Theatre 12"]
    B --> AP["Home Theatre 23"]
    B --> AQ["Home Theatre 12"]
    B --> AR["Home Theatre 23"]
    B --> AS["Home Theatre 12"]
    B --> AT["Home Theatre 23"]
    B --> AU["Home Theatre 12"]
    B --> AV["Home Theatre 23"]
    B --> AW["Home Theatre 12"]
    B --> AX["Home Theatre 23"]
    B --> AY["Home Theatre 12"]
    B --> AZ["Home Theatre 23"]
    B --> BA["Home Theatre 12"]
    B --> BB["Home Theatre 23"]
    B --> BC["Home Theatre 12"]
    B --> BD["Home Theatre 23"]
    B --> BE["Home Theatre 12"]
    B --> BF["Home Theatre 23"]
    B --> BG["Home Theatre 12"]
    B --> BH["Home Theatre 23"]
    B --> BI["Home Theatre 12"]
    B --> BJ["Home Theatre 23"]
    B --> BK["Home Theatre 12"]
    B --> BL["Home Theatre 23"]
    B --> BM["Home Theatre 12"]
    B --> BN["Home Theatre 23"]
    B --> BO["Home Theatre 12"]
    B --> BP["Home Theatre 23"]
    B --> BQ["Home Theatre 12"]
    B --> BR["Home Theatre 23"]
    B --> BS["Home Theatre 12"]
    B --> BT["Home Theatre 23"]
    B --> BU["Home Theatre 12"]
    B --> BV["Home Theatre 23"]
    B --> BW["Home Theatre 12"]
    B --> BX["Home Theatre 23"]
    B --> BY["Home Theatre 12"]
    B --> BZ["Home Theatre 23"]
Blu-ray or DVD disc player
Connect the disc player with a HDMI cable to the TV.
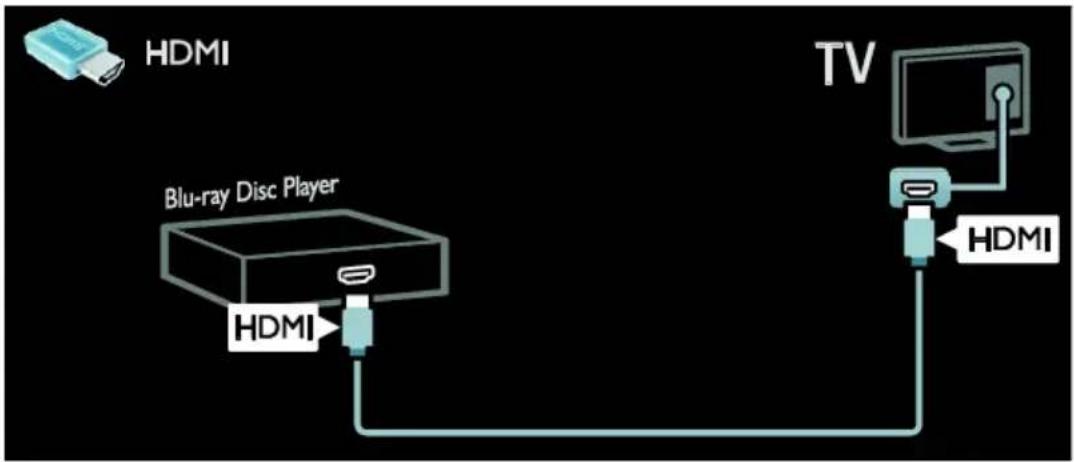
flowchart
graph TD
    A["HDMI"] --> B["Blu-ray Disc Player"]
    B --> C["TV"]
    C --> D["HDMI"]
Connect the disc player with a component cable (Y Pb Pr) and an audio L/R cable to the TV.
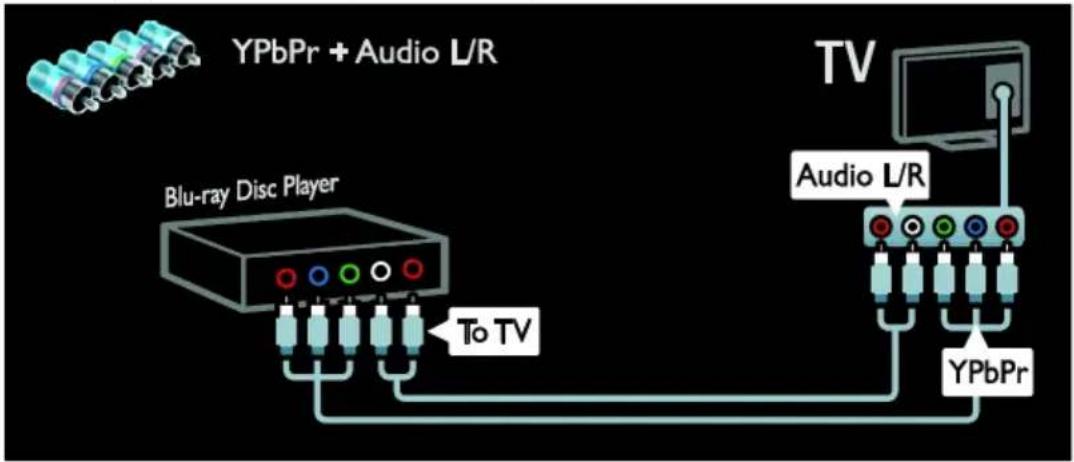
flowchart
graph TD
    A["Blu-ray Disc Player"] -->|To TV| B["TV"]
    B --> C["Audio L/R"]
    C --> D["YPbPr"]
    style A fill:#f9f,stroke:#333
    style B fill:#ccf,stroke:#333
    style C fill:#cfc,stroke:#333
    style D fill:#fcc,stroke:#333
Connect the disc player with a composite cable (CVBS) and an audio L/R cable to the TV.
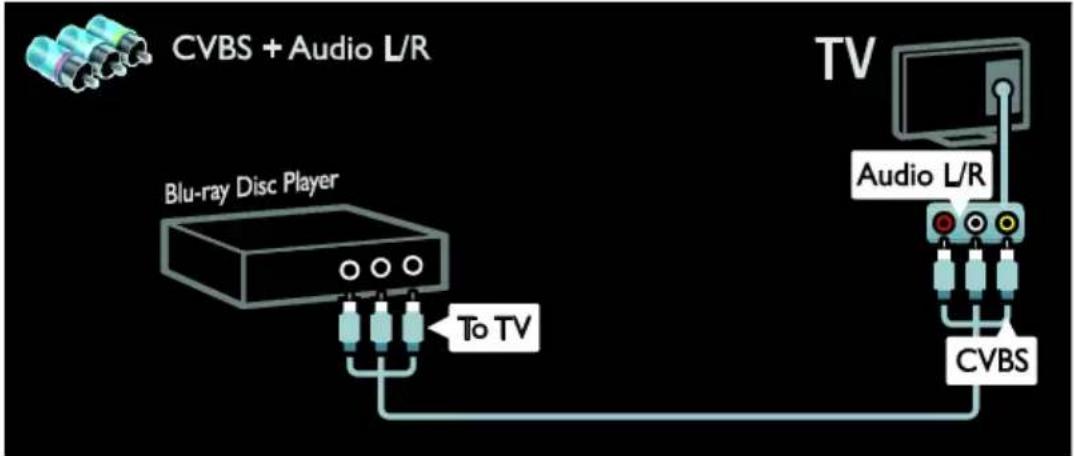
text_image
CVBS + Audio L/R Blu-ray Disc Player To TV TV Audio L/R CVBSTV receiver
Connect the satellite or digital TV receiver with an antenna cable to the TV. (SAT is available on certain models only.)
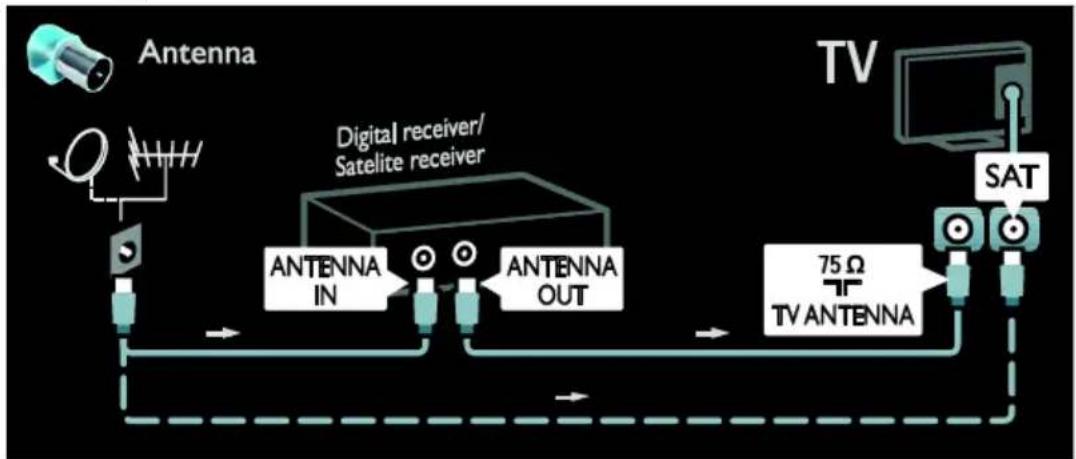
flowchart
graph LR
    A["Antenna"] --> B["Antenna IN"]
    B --> C["Digital receiver/Satellite receiver"]
    C --> D["Antenna OUT"]
    D --> E["TV ANTENNA"]
    E --> F["Sat"]
    F --> G["TV"]
    style A fill:#f9f,stroke:#333
    style G fill:#bbf,stroke:#333
Connect the satellite or digital TV receiver with a HDMI cable to the TV.
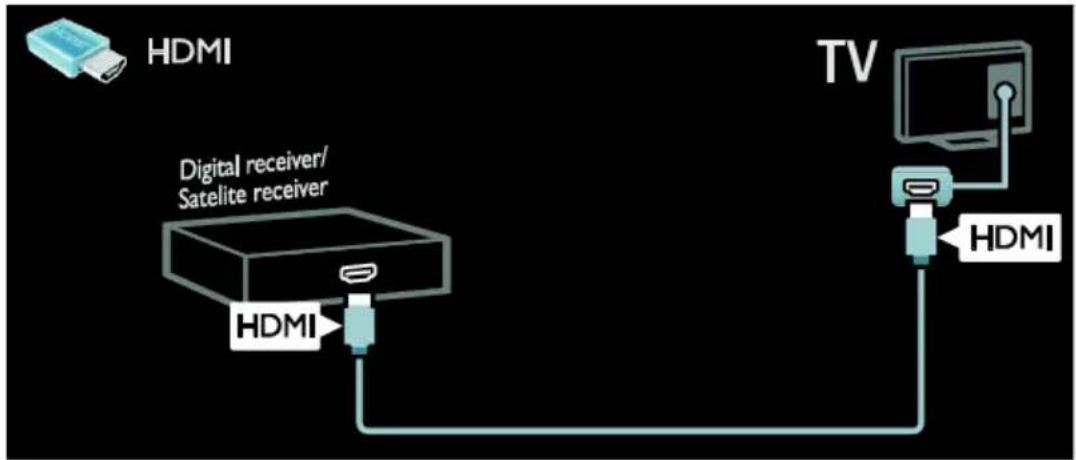
flowchart
graph TD
    A["HDMI"] --> B["Digital receiver/Satellite receiver"]
    B --> C["TV"]
    C --> D["HDMI"]
Connect the satellite or digital TV receiver with a component cable (Y Pb Pr) and an audio L/R cable to the TV.
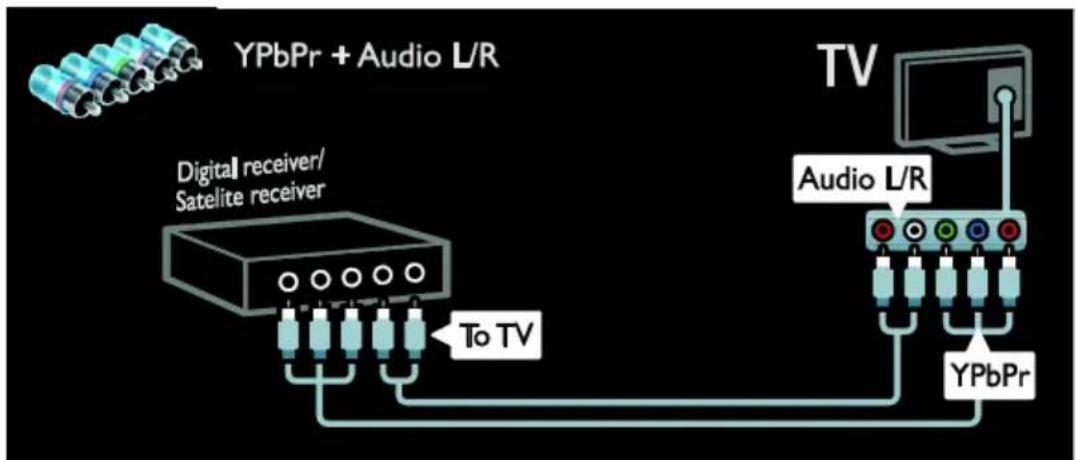
flowchart
graph TD
    A["Digital receiver/Satellite receiver"] --> B["To TV"]
    C["Audio L/R"] --> D["To TV"]
    E["YPbPr"] --> F["To TV"]
    G["TV"] --> H["To TV"]
    style A fill:#f9f,stroke:#333
    style C fill:#f9f,stroke:#333
    style E fill:#f9f,stroke:#333
    style G fill:#f9f,stroke:#333
Connect the satellite or digital TV receiver with a composite cable (CVBS) and an audio L/R cable to the TV.
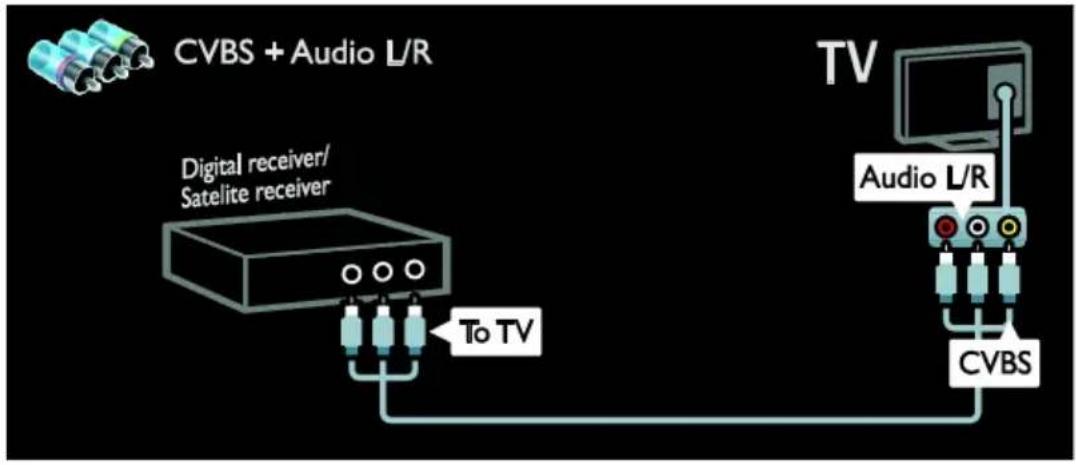
flowchart
graph TD
    A["CVBS + Audio L/R"] --> B["Digital receiver/Satellite receiver"]
    B --> C["To TV"]
    C --> D["TV"]
    D --> E["Audio L/R"]
    E --> F["CVBS"]
Recorder
Connect the recorder with an antenna cable to the TV. (SAT is available on certain models only.)
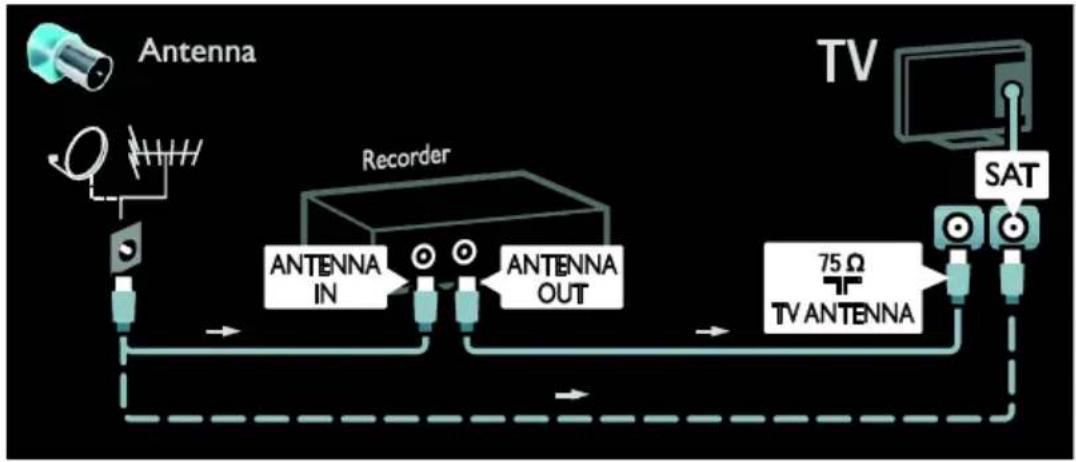
flowchart
graph LR
    A["Antenna"] --> B["Recorder"]
    B --> C["TV Antenna"]
    C --> D["SAT"]
    D --> E["Antenna IN"]
    E --> F["Antenna OUT"]
    F --> G["75 Ω TV Antenna"]
Connect the recorder with a component cable (Y Pb Pr) and an audio L/R cable to the TV.
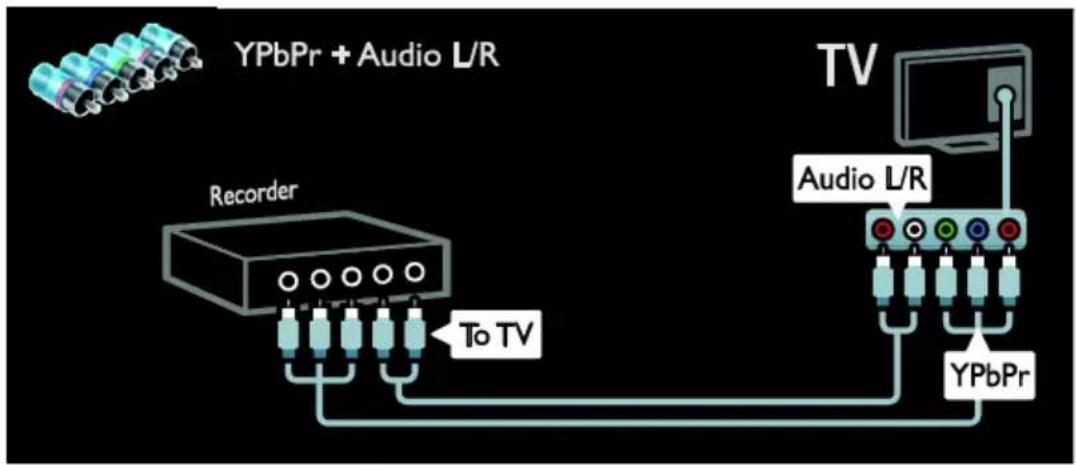
text_image
YPbPr + Audio L/R TV Recorder To TV Audio L/R YPbPrConnect the recorder with a composite cable (CVBS) and an audio L/R cable to the TV.
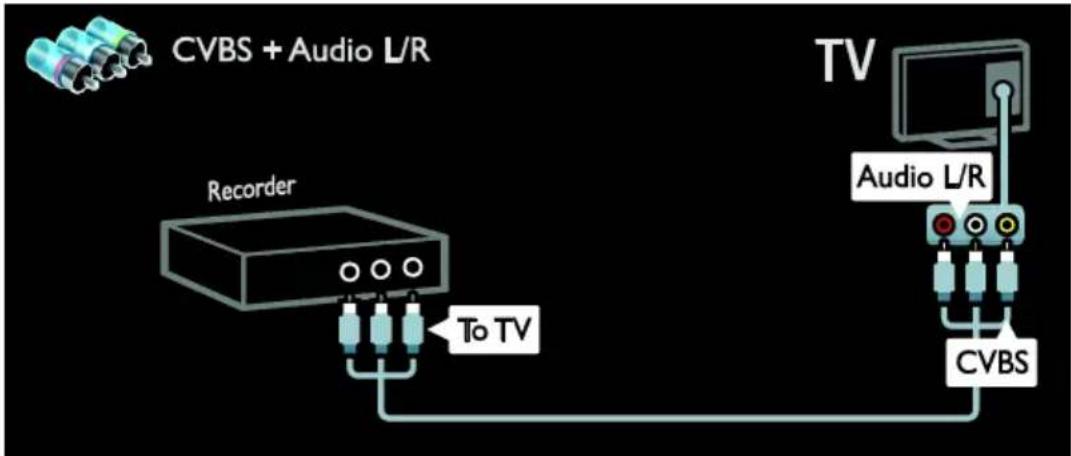
flowchart
graph TD
    A["CVBS + Audio L/R"] --> B["Recorder"]
    B --> C["To TV"]
    C --> D["TV"]
    D --> E["Audio L/R"]
    E --> F["CVBS"]
Game console
The most practical connectors for a game console are on the side of the TV. However, you can also use the connectors at the back of the TV.
For best gaming experience, set the TV to game mode.
- Press ⬆ADJUST.
- Select [Smart picture] > [Game], then press OK.
- Press EXIT to exit.
Connect the game console with a HDMI cable to the TV.
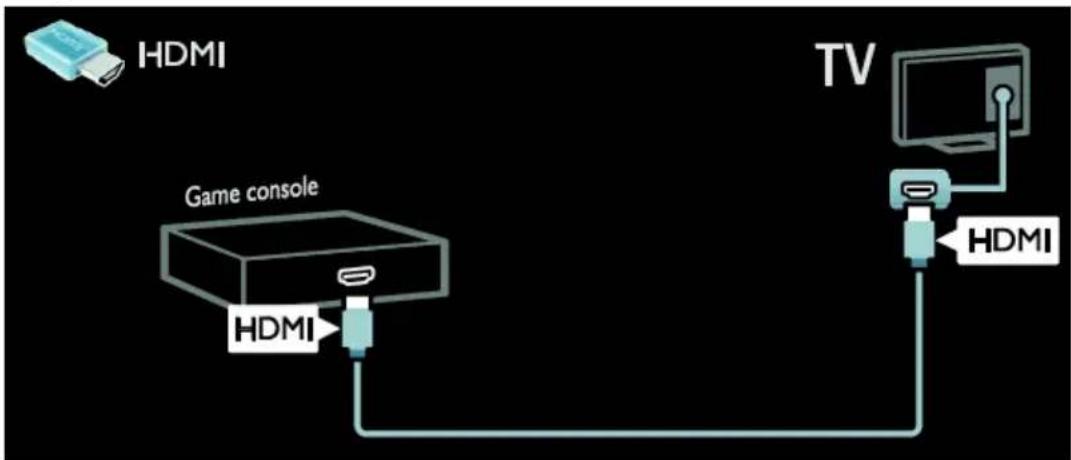
flowchart
graph TD
    A["HDMI"] --> B["Game console"]
    B --> C["TV"]
    C --> D["HDMI"]
    style A fill:#f9f,stroke:#333
    style B fill:#ccf,stroke:#333
    style C fill:#cfc,stroke:#333
    style D fill:#fcc,stroke:#333
Connect the game console with a component cable (Y Pb Pr) and an audio L/R cable to the TV.
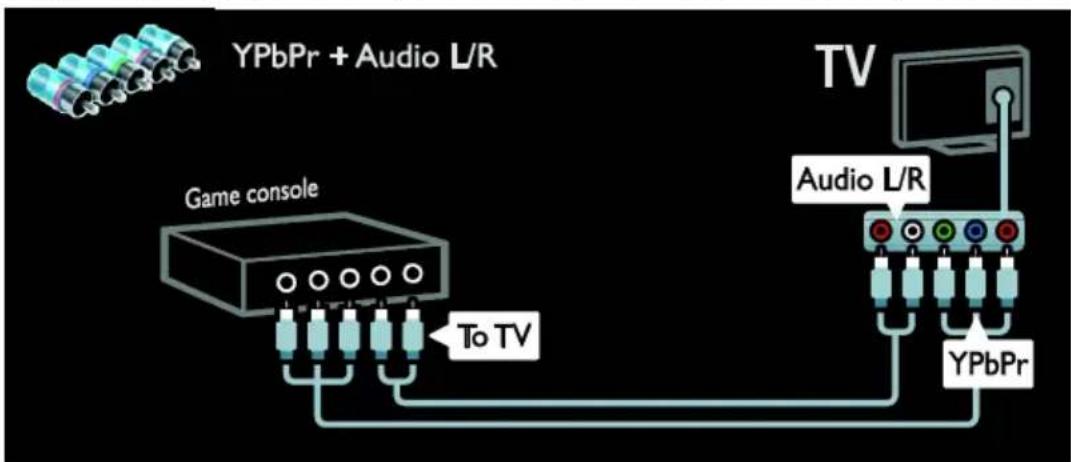
flowchart
graph TD
    A["Game console"] -->|To TV| B["Audio L/R"]
    B --> C["YPbPr"]
    D["YPbPr + Audio L/R"] --> B
    style A fill:#f9f,stroke:#333
    style B fill:#ccf,stroke:#333
    style C fill:#cfc,stroke:#333
Connect the game console with a composite cable (CVBS) and an audio cable to the TV.
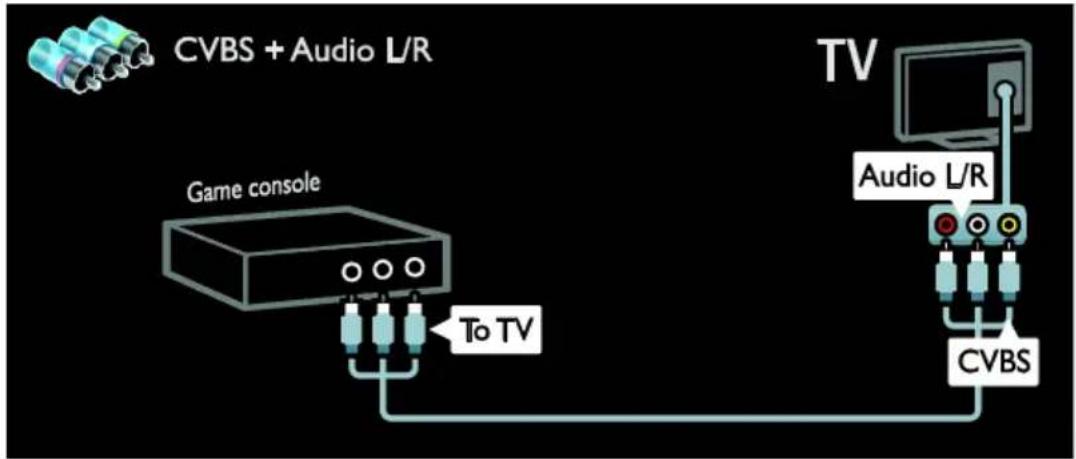
flowchart
graph TD
    A["Game console"] -->|To TV| B["TV"]
    B --> C["Audio L/R"]
    C --> D["CVBS"]
Home theater system
Connect the home theater with an HDMI cable and an audio cable to the TV.
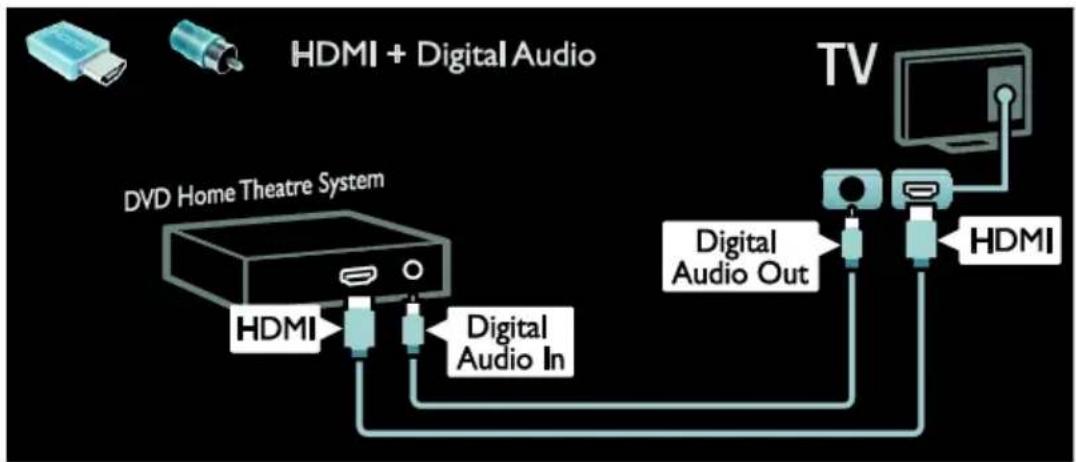
flowchart
graph TD
    A["HDMI"] --> B["Digital Audio In"]
    B --> C["Digital Audio Out"]
    C --> D["TV"]
    style A fill:#f9f,stroke:#333
    style D fill:#bbf,stroke:#333
Connect the home theater with a component cable (Y Pb Pr) and an audio L/R cable to the TV.
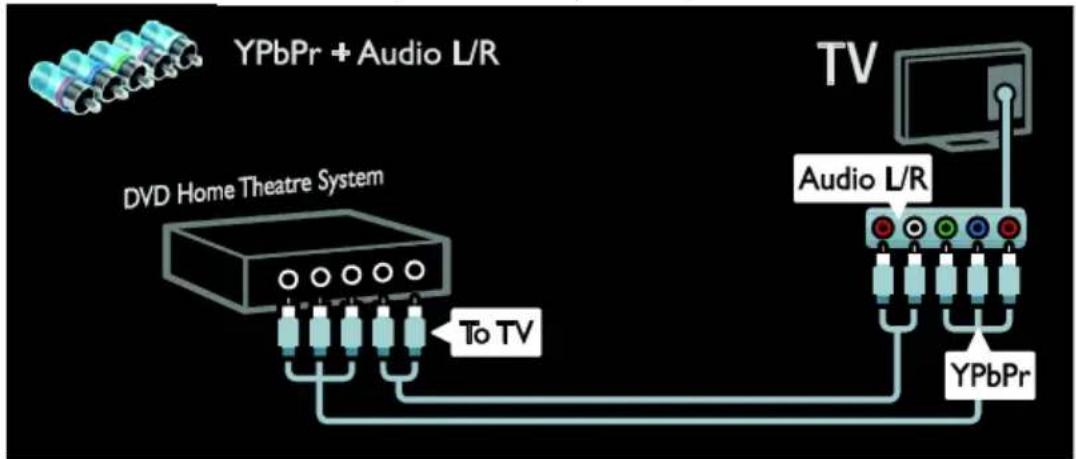
flowchart
graph TD
    A["Yellow USB Drive"] --> B["DVD Home Theatre System"]
    C["Video Module"] --> D["To TV"]
    D --> E["Audio L/R"]
    E --> F["TV"]
    G["Video Module"] --> H["To TV"]
    H --> I["Audio L/R"]
    I --> J["TV"]
    K["Video Module"] --> L["To TV"]
    L --> M["Audio L/R"]
    M --> N["TV"]
Connect the home theater with a composite cable (CVBS) and an audio L/R cable to the TV.
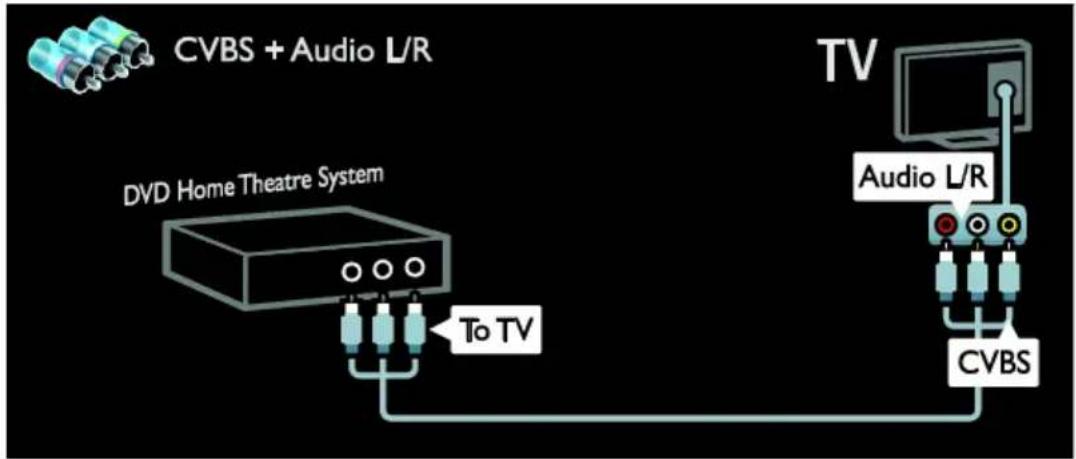
flowchart
graph TD
    A["DVH + Audio L/R"] --> B["To TV"]
    C["TV"] --> D["CVBS"]
    D --> E["To TV"]
    style A fill:#f9f,stroke:#333
    style C fill:#ccf,stroke:#333
    style D fill:#cfc,stroke:#333
Digital camera
Connect the digital camera with a USB cable to the TV.
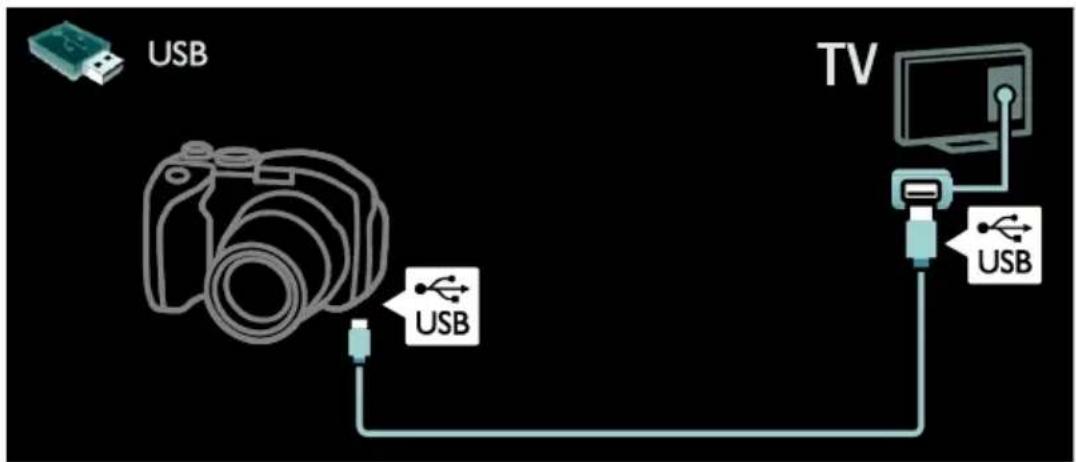
text_image
USB TV USB USBDigital camcorder
Connect the digital camera with a HDMI cable to the TV.
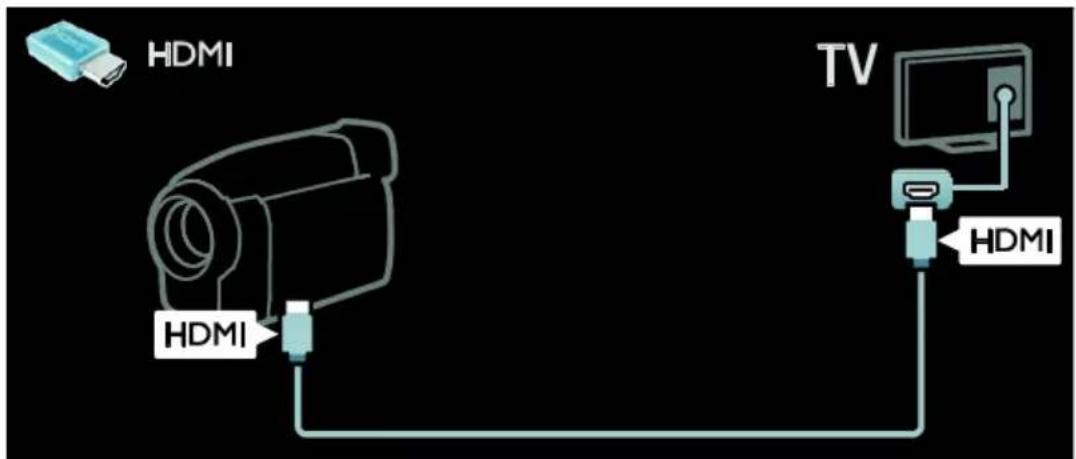
text_image
HDMI HDMI TV HDMIConnect the digital camcorder with a component cable (Y Pb Pr) and an audio L/R cable to the TV.
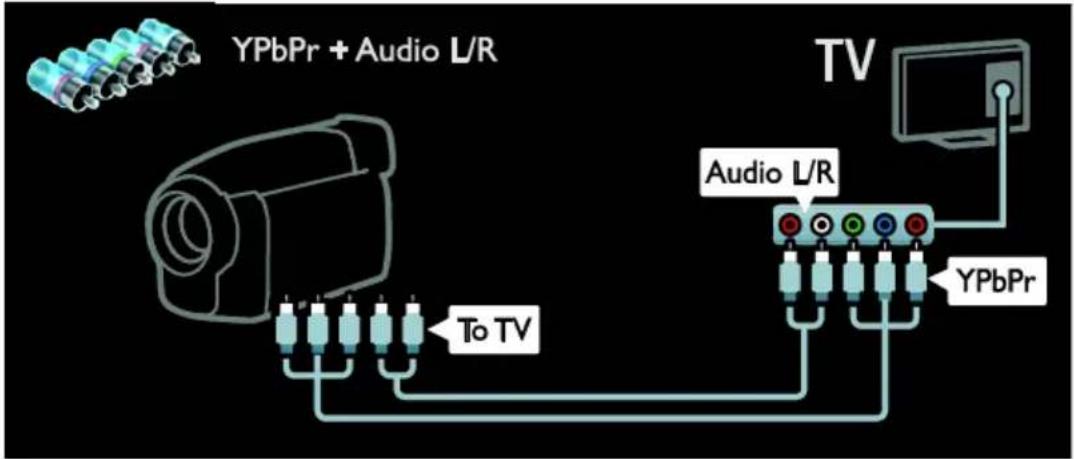
text_image
YPbPr + Audio L/R To TV Audio L/R YPbPr TVEnglish
Connect the digital camcorder with a composite cable (CVBS) and an audio L/R cable to the TV.
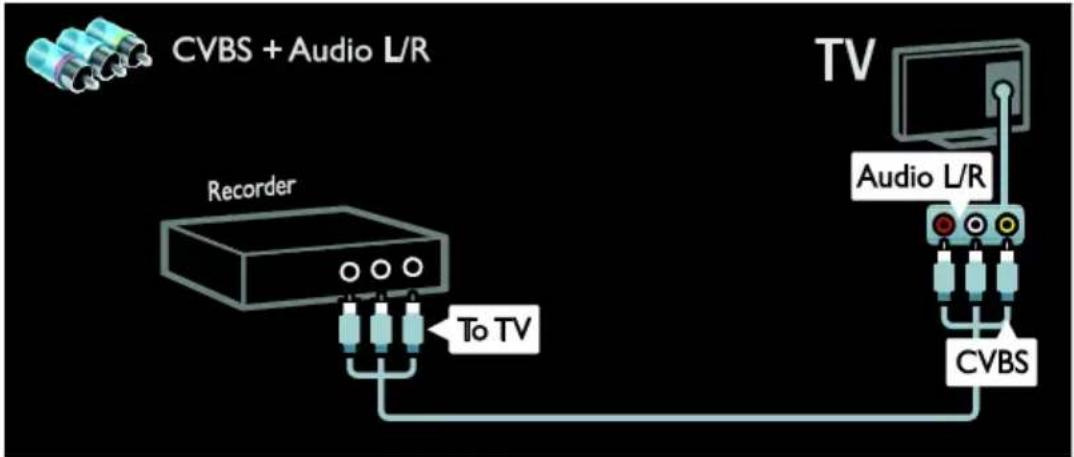
flowchart
graph TD
    A["CVBS + Audio L/R"] --> B["Recorder"]
    B --> C["To TV"]
    C --> D["TV"]
    D --> E["Audio L/R"]
    E --> F["CVBS"]
Connect more devices
External hard disk
Connect the external hard disk with a USB cable to the TV.
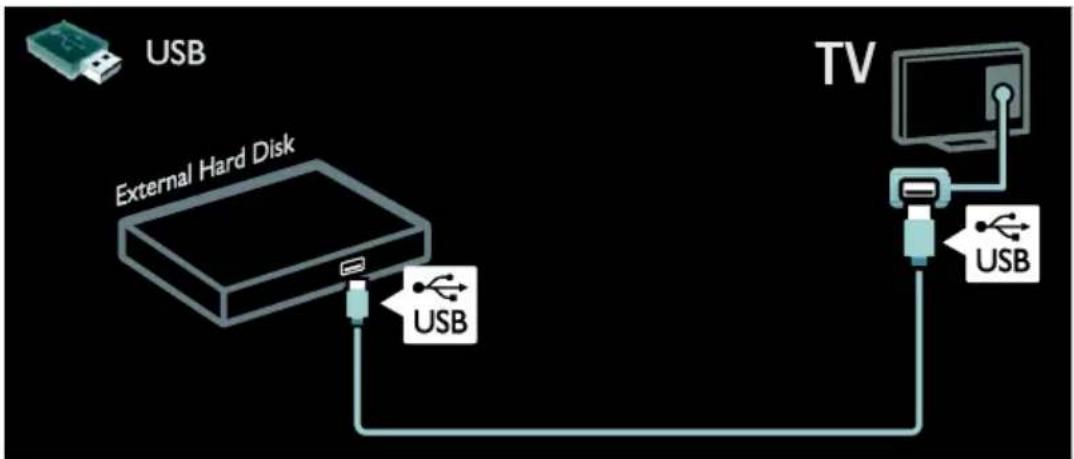
flowchart
graph TD
    A["USB"] --> B["External Hard Disk"]
    B --> C["USB"]
    C --> D["TV"]
    D --> E["USB"]
Computer
Connect the computer with a HDMI cable to the TV.
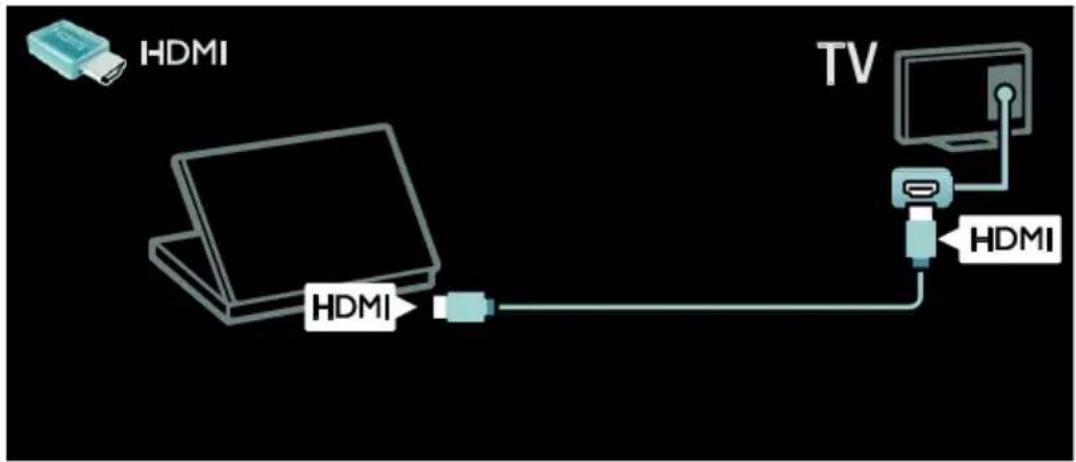
text_image
HDMI HDMI TV HDMIConnect the computer with a DVI-HDMI cable to the TV.
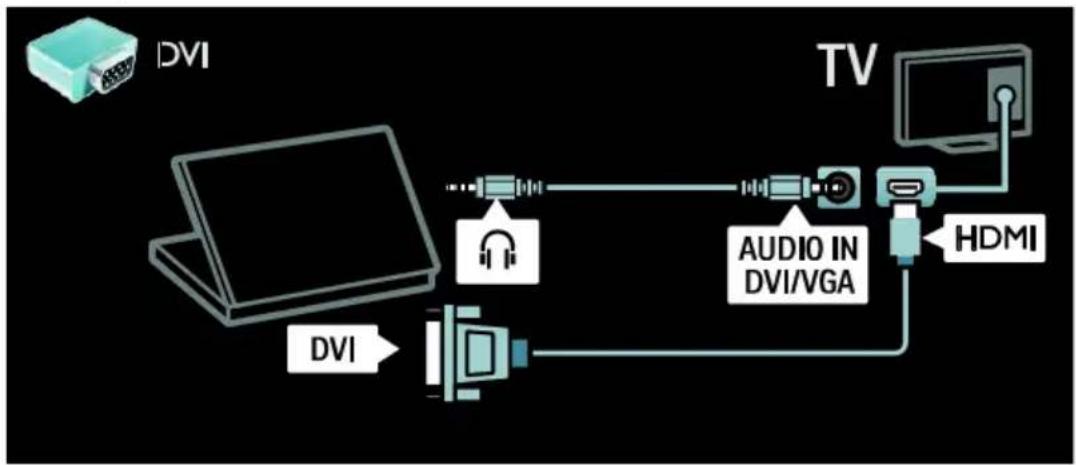
flowchart
graph LR
    A["DVI"] --> B["TV"]
    B --> C["AUDIO IN DVI/VGA"]
    C --> D["HDMI"]
    D --> B
    B --> E["DVI"]
Connect the computer with a VGA cable and an audio cable to the TV.
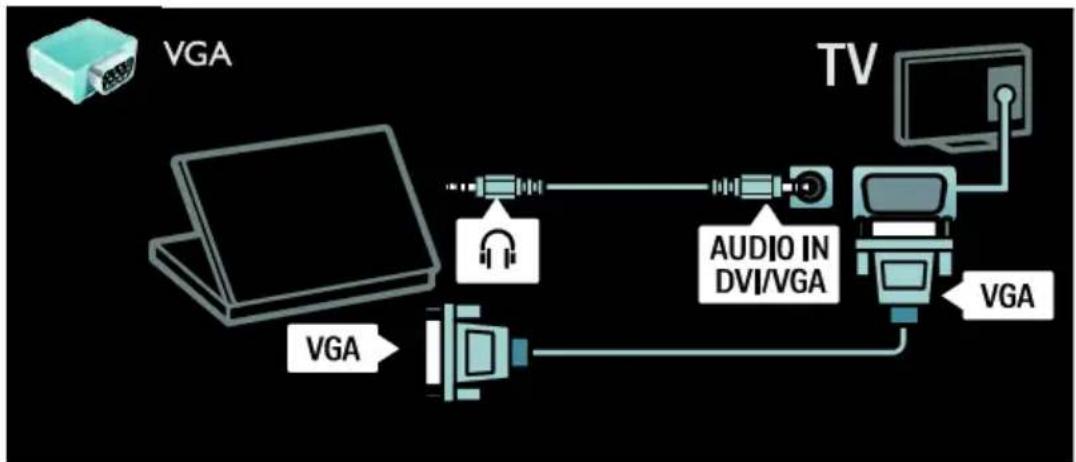
flowchart
graph LR
    A["TV"] --> B["VIDEO IN DVI/VGA"]
    B --> C["VGA"]
    C --> D["Computer"]
    D --> E["TV"]
    style A fill:#f9f,stroke:#333
    style B fill:#ccf,stroke:#333
    style C fill:#cfc,stroke:#333
    style D fill:#fcc,stroke:#333
    style E fill:#cff,stroke:#333
Keyboard and mouse
USB keyboard
*Available on certain models only. You can connect a USB keyboard to enter text on the TV. You can also type in a new channel name or subject name in the YouTube application within Net TV.
To install the USB keyboard
Switch on the TV. Connect the USB keyboard to the USB connector on the side of the TV. If you need extra USB connectors, use a USB hub.
Once the TV detects the keyboard, select the keyboard layout and test your selection.
If you have selected a Cyrillic or Greek keyboard layout first, you can also add a second keyboard with Latin layout.
To change the keyboard layout setting, press
[Setup] > [TV settings] > [Preferences] > [USB mouse and keyboard] > [Keyboard settings] and press OK.
TV keys on your keyboard
To rename a channel, you can use these keys:
- Enter ← : OK
- Backspace : delete a character before the cursor
- Navigation keys : navigate within a text field
- (if a second keyboard layout is set) to switch between different keyboard layouts, press the Alt and Shift keys simultaneously.
Net TV keys on your keyboard
- Tab : Next
• Tab and Shift : Previous
• Home : scroll to the top of the page
• End : scroll to the bottom of the page
• Page Up : jump one page up
• Page Down : jump one page down
• +/- : zoom in or out one step
• * : fit to width
USB mouse
*Available on certain models only. You can connect a USB mouse to navigate pages on the Internet. On an Internet page, you can select and click on links more easily. The USB mouse cannot navigate in Net TV application pages nor navigate in the TV menus.
To install the USB mouse
Switch the on TV. Connect the USB mouse to the USB connector on the side of the TV. If you need extra USB connectors, use a USB hub. You can also connect the USB mouse to a connected USB keyboard.
Once the TV detects the mouse, set the tracking speed. Navigate into the test area to check the speed.
To use the USB mouse with your TV
- Left mouse button (left-click) : OK
- Right mouse button (right-click) : (Back)
- Scroll wheel : to scroll up and down an internet page.
Computers and the Internet
What you can do
Browse PC
If you connect the TV to a home network, you can play photos, music and videos from your computer or storage device. Once the network is installed on the TV, you can find and play the files from your PC on the TV screen. See Use your TV > Browse PC through DLNA (Page 19).
Note: If the apparatus does not recover in DLNA mode due to external electrical disturbances (e.g. electrostatic discharge), user intervention is required.
Net TV
If you connect the TV to a home network with an Internet connection, you can link up the TV to Net TV. Net TV offers Internet services and websites tailored to your TV. Play music and videos, consult infotainment, rent movies and much more. Once the network is installed, you can enjoy the best of the Internet for your TV. See Use your TV > Browse Net TV (Page 21).
Interactive TV
If you connect the TV to the Internet, you can enjoy the full benefits of Interactive TV. Systems such as HbbTV, MHP, DTVi, etc use the Internet to communicate with the TV. The availability of these systems depends on your local service provider.
Wi-Fi MediaConnect
With Wi-Fi MediaConnect you can bring up (project) your PC screen on the TV screen wirelessly. You start Wi-Fi MediaConnect from your PC. See Connect your TV > Computers and the Internet > (Page 52).
What you need
To connect your TV to computers, the Internet, or both, you need:
- An ethernet cable that is shorter than 3 meters.
- A computer network that includes: a) A universal plug-and-play (UnPnP) router and b) A computer with one of these operating systems: Microsoft Windows XP, Microsoft Windows Vista, Mac OSX, or Linux.
- To connect your TV to computers, you also need media server software that is set to share files with your TV. See Use your TV > Browse PC through DLNA (Page 19).
- To connect your TV to the Internet, you also need a high-speed connection to the Internet.
Note: This DLNA1.5 network feature supports these computer operating systems: Microsoft Windows XP or Vista, Intel Mac OSX or Linux.
Connect
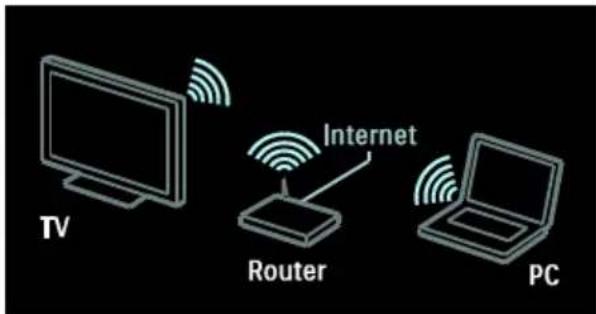
text_image
TV Router Internet PC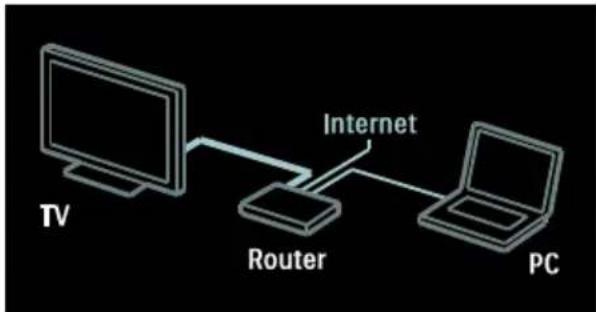
flowchart
graph LR
    TV["TV"] --> Router["Router"]
    Router --> PC["PC"]
    Router --> Internet["Internet"]
You can connect this TV to your home network through a wired or wireless connection.
- To make a wired connection, see Connect your TV > Computers and the Internet > Wired connection (Page 50).
- To make a wireless connection, see Connect your TV > Computers and the Internet > Wireless connection (Page 51).
Wired connection
- Switch on the router and switch on its DHCP setting.
- Connect the router with an ethernet cable to the TV.
- Press ⚠, select [Setup] > [Connect to network], then press OK.
- Follow the on screen instructions to install the network.
- Wait for the TV to find the network connection.
- If you are prompted, agree to the End User License Agreement.
Wireless LAN ready
This section is only for wireless ready TVs.
With the Wireless USB adapter PTA01 accessory (sold separately), you can connect the TV to your home network wirelessly.
You can enjoy the best of the web from Net TV services, and sharing of content between your devices connected to the home network using Wi-Fi MediaConnect or DLNA, seamlessly and hassle free.
Note:
- The wireless network operates in the same 2.4GHz frequency spectrum as common household devices, such as Dect phones, microwave ovens or Bluetooth devices, which can cause WiFi interferences. Move these devices away from the TV with the connected Wireless USB adapter.
- You should turn off any unused network equipment in the home network as this increases network traffic.
- Reception quality is dependent on the location of the wireless router, as well as the quality of services provided by the local Internet Service Provider.
- When playing video over your wireless home network, we recommend that you use an IEEE 802.11 N router. The connection speed may differ according to the operating environment of your wireless home network.
Make your TV wireless
- Switch on your wireless network router.
- Insert the USB adapter PTA01 into the USB connection at the side of the TV. The wireless installation starts automatically.
- Follow the on screen instructions.
WPS - Wi-Fi Protected Setup
If your router supports WPS (Wi-Fi Protected Setup), press the WPS button on the router. Return to the TV in 2 minutes, select [WPS] and press OK. The TV connects to your network. This takes about 2 minutes. Complete the installation.
Most new wireless routers have the WPS system and carry the WPS logo. The WPS system uses WPA security encryption and cannot be combined with devices on your network that use the WEP security encryption. If you still need this WEP device in your network, install with [Scan] >
[Custom].
Scan for routers
If you have several routers in your network, you can select the network you need. To select a specific network router, press [Scan] on the first page of the installation.
The routers with WPS and the strongest signal are shown first in the list on screen.
Select the router you need. If you are connecting a WPS router, select [WPS] at the TV.
- If you have set the PIN code in your router software, select [WPS pincode:] and enter the code.
- To enter the encryption key manually, select [Custom] and enter the key.
PIN code
To set the secured connection with a PIN code, select the PIN code and press OK. Write down the 8 digit PIN code shown on TV and enter it in the router software on your PC. See the router manual on where to enter the PIN code.
Custom
To enter the encryption key (the security key) manually, select [Custom] and press OK. If you have WPA security on your router, enter the passphrase with the remote control.
To access the on-screen keyboard, select the text entry field and press OK. If you have WEP security encryption, the TV asks for the WEP encryption key in hexadecimal numbers.
Find this hexadecimal key in the router software on your PC. Write down the first key of the WEP keys list and enter it on TV with the remote control. If the security key is accepted, the TV is connected with the wireless router.
If asked, agree to the End User License Agreement.
If you are using the Wireless USB adapter, keep it connected to the USB connector on the TV.
Wi-Fi MediaConnect
What you can do
With Wi-Fi MediaConnect, you can project your PC screen on the TV wirelessly. With the *Wi-Fi MediaConnect CD-ROM, you can download the software for free. Wi-Fi MediaConnect is only available for PC.
*The Wi-Fi MediaConnect CD-ROM is supplied with the Wireless USB adapter, PTA01.
What you need
To use Wi-Fi MediaConnect, you need the following:
- Connect the TV to your home network
- A wireless router
- A wireless USB adapter - PTA01 (For non-Wi-fi integrated TVs only).
For the availability of the wireless USB adapter, check with your local retailers or buy online at www.philips.com/tv.
Install Wi-Fi MediaConnect (with CD-ROM)
- Insert the Wi-Fi MediaConnect CD-ROM in your PC.
-
Your PC starts the Internet browser and opens the Wi-Fi MediaConnect download page - www.philips.com/wifimediaconnect.
On the website, you can check the necessary PC system requirements. -
Enter the code printed on the CD-ROM envelope.
- Click the 'Download now' button to download the free Wi-Fi MediaConnect software.
- Once downloaded, start the file 'Wi-Fi MediaConnect_setup.exe'. Follow the instructions on your PC.
TV network name
If you have more than one TV in your home network, you can rename this TV. To rename this TV in the network, press
[Setup] > [Network settings] and select TV network name.
To enter the name, press OK to open the on-screen keyboard or use the remote control keypad.
Start projecting
To start projecting the PC screen on TV, click on the small TV like icon in the taskbar at the bottom right of the PC screen. Your PC screen appears on your TV screen.
Stop projecting
To stop projecting, click on the TV icon again.
Project your PC: Help
To read the Wi-Fi MediaConnect Help, right-click the program icon in the notification tray of the PC and select Help.
Specifics
You can project high-definition (HD) or standard-definition (SD) video, depending on the processing power of your PC.
- Due to output content protection, certain commercial DVD or Blu-ray discs may not be projected.
- The TV shows PC media files with a small delay.
- Wi-Fi MediaConnect is available for PC only.
Project your PC: PC requirements
Minimum specifications
- Windows XP, Vista, Windows 7 (PC only)
• Intel Pentium Core 2 Duo 1.8GHz - 512MB RAM
• 200MB free hard disk space - Wi-Fi 802.11g
- Internet connection
Project your PC: PC requirements
Recommended specifications
- Windows XP, Vista, Windows 7 (PC only)
• Intel Pentium Core 2 Duo 2.1GHz - 1GB RAM
• 200MB free hard disk space - Wi-Fi 802.11n
- Internet connection
6 Troubleshooting
Contact Philips
Warning: Do not attempt to repair the TV yourself. This may cause severe injury, irreparable damage to your TV or void your warranty.
If you cannot resolve your problem, refer to the frequently asked questions (FAQs) for this TV at www.philips.com/support.
You can also contact Philips Consumer Care in your country for support. You can find the contact number in the leaflet that accompanies the TV.
Take a note of your TV model and serial number before you contact Philips. These numbers are printed on the back of the TV and on the packaging.
General TV
The TV does not switch on:
- Disconnect the power cable from the power outlet. Wait for one minute then reconnect it.
• Make sure that the power cable is securely connected.
• Make sure that the power switch at the base or back of the TV is switched on.
The TV does not respond to remote control or front controls when switched on
The TV requires some time to start up. During this time, the TV does not respond to the remote control or front controls. This is normal behavior.
The standby light on the TV blinks red:
Disconnect the power cable from the power outlet. Wait until the TV cools down before you reconnect the power cable. If the blinking reoccurs, contact Philips Consumer Care.
You forgot the code to unlock the child lock feature:
Enter '8888'.
The TV menu is in the wrong language:
Change the TV menu to your preferred language.
For more information, see Set up your TV > Menu language (Page 36).
When you are turning the TV on, off or to standby, you hear a creaking sound from the TV chassis:
No action is required. The creaking sound is due to the normal expansion and contraction of the TV as it cools and warms up. This does not affect performance.
When the TV is in standby, a startup splash screen is displayed, then returns to standby mode:
This is normal behavior. When the TV is disconnected and reconnected to the power supply, the startup screen is displayed at the next startup.
To switch on the TV from standby, press ⏻ on the remote control or press any key on the front of the TV.
TV channel
Previously installed channels do not appear in the channel list:
Make sure that the correct channel list is selected.
No digital channels were found during the installation:
• Make sure that the TV supports SATVD-T or SBTVD-T in your country.
- Make sure that the antenna is properly connected and the correct network is selected.
Picture
The TV is on, but there is no picture or the picture is distorted:
- Make sure that the antenna is properly connected to the TV.
- Make sure that the correct device is selected as the display source.
- Make sure that the external device or source is properly connected.
There is sound but no picture:
Make sure that the picture settings are set correctly.
There is poor TV reception from an antenna connection:
- Make sure that the antenna is properly connected to the TV.
- Loud speakers, unearthed audio devices, neon lights, high buildings, and other large objects can influence reception quality. If possible, try to improve the reception quality by changing the antenna direction or moving devices away from the TV.
- If reception on only one channel is poor, fine-tune this channel.
There is poor picture quality from connected devices:
- Make sure that the devices are connected properly.
- Make sure that the picture settings are set correctly.
The TV did not save your picture settings:
Make sure that the TV location is set to Home. You can change and save settings in this mode.
The picture does not fit the screen; it is too big or too small:
Try a different picture format.
The picture position is incorrect:
Picture signals from some devices may not fit the screen correctly. Check the signal output of the device.
The picture from broadcasts is scrambled:
You may need a Conditional Access Module to access content. Check with your service operator.
An "e-sticker" banner displaying information appears on the TV display: The TV is in [Shop] mode. To remove the e-sticker, set the TV to [Home] mode, then restart the TV. Position the TV > Location (Page 10).
The computer display on the TV is not stable:
- Make sure that your PC uses the supported resolution and refresh rate. See Product specifications > Display resolutions (Page 57).
- Set the TV picture format to [Unscaled].
Sound
There is picture but no sound from the TV: If no audio signal is detected, the TV automatically switches the audio output off — this does not indicate malfunction.
- Make sure that all cables are properly connected.
- Make sure that the volume is not muted or set to zero.
- Make sure that the TV speakers setting is selected. Press ⌘IADJUST, select [Speakers], and then select TV.
- Make sure that the TV audio output is connected to the audio input on the HDMI-CEC enabled or EasyLink compliant home theater device. Sound should be heard from the home theater speakers.
There is picture but sound quality is poor: Make sure that the sound settings are correctly set.
There is picture but sound comes from one speaker only:
Make sure that sound balance is set to the center.
HDMI
There are problems with HDMI devices:
- Note that HDCP (High-bandwidth Digital Content Protection) support can delay the time taken for a TV to display content from a HDMI device.
- If the TV does not recognize the HDMI device and no picture is displayed, switch the source from one device to another and back again.
- If there are intermittent sound disruptions, make sure that output settings from the HDMI device are correct.
- If you use an HDMI-to-DVI adapter or HDMI to DVI cable, make sure that an additional audio cable is connected to AUDIO L/R or AUDIO IN (mini-jack only).
You cannot use EasyLink features:
Make sure that your HDMI devices are HDMI-CEC compatible. EasyLink features only work with devices that are HDMI-CEC compatible.
If a HDMI-CEC compliant audio device is connected to the TV and the TV does not display any mute or volume icon when the volume is muted, increased or decreased.
This behavior is normal when a HDMI-CEC audio device is connected.
USB
USB device content is not displayed:
- Make sure that the USB storage device is set to Mass Storage Class compliant, as described in the storage device's documentation.
- Make sure that the USB storage device is compatible with the TV.
- Make sure that the audio and picture file formats are supported by the TV.
Audio and picture files do not play or display smoothly:
The transfer performance of the USB storage device may limit the data transfer rate to the TV which causes poor playback.
Network
Net TV does not work
If the connection to the router is properly set up, check the router connection to the Internet.
Browse PC or Net TV access is slow.
Refer to your router's user manual for information on transfer rate and other factors of signal quality.
You need a high-speed Internet connection for your router.
Wireless network is distorted or not found.
- Make sure that the wireless network is not disturbed by microwave ovens, DECT phones, or other neighboring Wi-Fi devices.
- If the wireless network is not working, try a wired network connection.
- For DLNA connection, click on How does sharing change firewall settings in the Media Sharing window for the Help file.
7 Product specifications
Power and reception
Product specifications are subject to change without notice.
Power
- Mains power: AC 110-240 V\~, 50-60 Hz
- Standby power: <0.15 W
- Ambient temperature : 5 to 35 degree Celsius
For power consumption, see the product specifications at www.philips.com/support.
Reception
• Antenna input: 75 ohm coaxial (F-type)
• TV system: PAL M, PAL N, NTSC M, SATVD-T, SBTVD-T
• Video playback: NTSC, PAL
Display and sound
Picture / Display
• Display type: LCD Full HD W-UXGA
- Diagonal size:
- 81 cm / 32 inch
- 102 cm / 40 inch
- 117 cm / 46 inch
- Aspect ratio: Widescreen 16:9
• Panel resolution: 1920 × 1080 p
• Picture enhancement: Pixel Precise HD
• 1080 p 24 / 25 / 30 / 50 / 60 Hz processing
- Perfect Motion Rate:
- For 6000/7000 series: 480 Hz PMR
- For 5800 series: 240 Hz PMR
Picture / Display
- HD Natural Motion
• Perfect Natural Motion - Ambilight: Ambilight Spectra 2
Sound
• Output power: 20 W (RMS) @ 10%
THD
- Incredible Surround
- Clear Sound
• Dynamic Bass Enhancement
- Mono / Stereo / NICAM
Display resolutions
Computer formats - HDMI (Resolution - refresh rate)
640 × 480 - 60 Hz
800 × 600 - 60 Hz
1024 × 768 - 60 Hz
1280 × 1024 - 60 Hz
1360 × 768 - 60 Hz
1600 × 1200 - 60 Hz
1920 × 1080 - 60 Hz
Computer formats - VGA (Resolution - refresh rate)
640 × 480 - 60 Hz
800 × 600 - 60 Hz
1024 × 768 - 60 Hz
1280 × 1024 - 60 Hz
1360 × 768 - 60 Hz
1600 × 1200 - 60 Hz
1920 × 1080 - 60 Hz
Video formats
(Resolution - refresh rate)
480i - 60 Hz
480p - 60 Hz
576i - 50 Hz
576p - 50 Hz
720p - 50Hz, 60 Hz
1080i - 50Hz, 60 Hz
1080p - 24Hz, 25Hz, 30Hz, 50Hz, 60 Hz
Multimedia
Supported multimedia connections
- USB : NTFS, FAT 16, FAT 32. Connect only USB devices which consumes 500mA of power or less.
• SD card (Videostore)
- Ethernet LAN RJ-45
Supported image files
- JPEG (*.jpg)
Supported audio/video files
Multimedia file names must not exceed 128 characters.
| File Extension | Container | Video Codec | Max. Resolution | Max. Frame Rate (fps) | Max. Bit Rate (Mbps) | Audio Codec | USB | DUNA | Net TV | Open Internet | Video Store |
| avi | AVI | MPEG4 SP | 640x180p | 30 | 3 | AAC | Yes | Yes | No | No | No |
| MPEG4 ASP | 720x576p | 30 | 8 | MP3MPBG1 L2/AC3 | Yes | Yes | No | No | No | ||
| mkv | MKV | H264 | 1920x1080p | 24 | 20 | HB-AAC, AC3, MP3, PCM | Yes | Yes | No | No | No |
| psfwmv | ASF | WMV9WC1 SP | 352x288p | 15 | 0,384 | WMA | Yes | Yes | Yes | No | Yes |
| WMV9WC1 MP | 1920x1080p | 25/30 | 20 | WMA | Yes | Yes | Yes | No | Yes | ||
| WMV9WC1 AP | 1920x1080p | 24/30/60 | 20 | WMA | Yes | Yes | Yes | No | Yes | ||
| mp4 | MP4 | H264 BP | 720x576l | 15/30 | 5 | AAC/HB-AAC (v1&v2)/AC3 | Yes | Yes | Yes | No | Yes |
| H264 MP | 720x576l | 15/30 | 10 | AAC/HB-AAC (v1&v2)/AC4 | Yes | Yes | Yes | No | Yes | ||
| H264 HP | 1920x1080l | 15/30 | 20 | AAC/HB-AAC (v1&v2)/AC5 | Yes | Yes | Yes | No | Yes | ||
| MPEG4 SP | 640x180p | 30 | 3 | AAC | Yes | Yes | Yes | No | Yes | ||
| MPEG4 ASP | 720x576l | 30 | 8 | AAC | Yes | Yes | Yes | No | Yes |
Supported audio/video files
Multimedia file names must not exceed 128 characters.
| File Extension | Container | Video Codec | Max. Resolution | Max. Frame Rate (fps) | Max. Bit Rate (Mbps) | Audio Codec | USB | DINA | Net TV | Open Internet | Video Store |
| 1s | T5 | MPEG2 | 1920x1080p | 30 | 20 | MPEG2 L2/MPEG1 | Yes | Yes | No | No | No |
| mpeg mpeg yob | PS | MPEG2 | 1920x1080p | 30 | 20 | MPEG2 L2/ MPEG1 L2/AC3 LPCM | Yes | Yes | No | No | No |
| MPEG1 | 352x288 | 30 | 1.5 | MPEG1 L2 | Yes | Yes | No | No | No |
Supported DLNA-compliant media server software
- Windows Media Player (for Microsoft Windows)
- Twonky Media (for Microsoft Windows and Mac OS X)
- Sony Vaio Media Server (for Microsoft Windows)
• TVersity (for Microsoft Windows) -
Nero MediaHome
• DiXiM (for Microsoft Windows XP) -
Macrovision Network Media Server (for Microsoft Windows)
- Fuppes (for Linux)
- uShare (for Linux)
Connectivity
Rear
• CVI: Audio L/R, Component (Y Pb Pr)
• AV IN: Audio L/R, Composite (CVBS)
• SERV.U: Service port
• AUDIO IN: DVI/VGA stereo 3.5mm mini-jack
Bottom
• Network: Ethernet
• DIGITAL AUDIO OUT: Coaxial
- HDMI 2 / 3: HDMI
• HDMI ARC: HDMI Audio Return Channel
• Antenna: 75 ohm coaxial
- VGA: PC input
Side
- USB
• HDMI - SD card
Dimensions
Note: Dimensions and weights are approximate values only. Design and specifications are subject to change without notice.
Legend for TV dimensions
The legends used to indicate the TV dimensions are as follows:
(): 81 cm / 32 inch TV
{}: 102 cm / 40 inch TV
[ ]: 117 cm / 46 inch TV
Take a note of the legend that corresponds to your TV. Then, go to the next page to view the dimensions.
Use your TV legend to note the dimensions of your TV (with and without the stand).
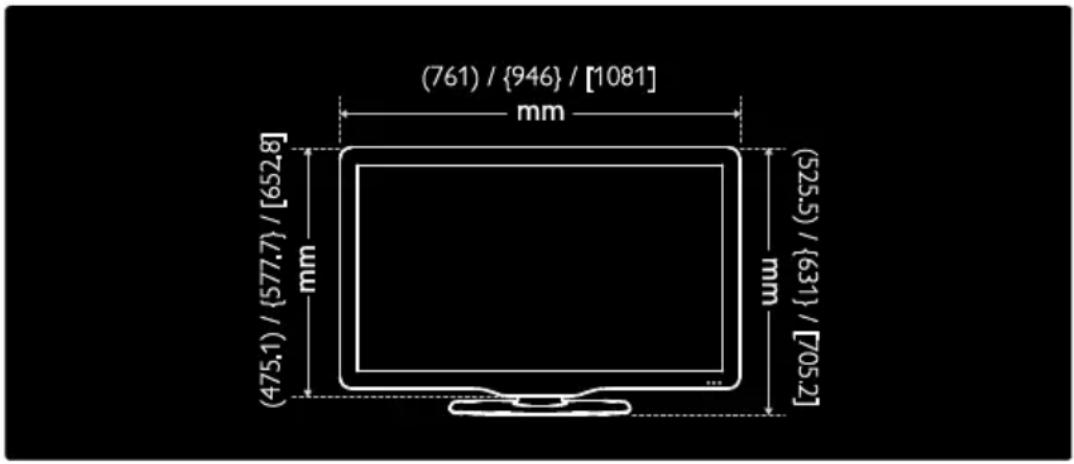
text_image
(761) / {946} / [1081] mm (525.5) / {631} / [705.2] mm (475.1) / {577.7} / [652.8]Use your TV legend to note the thickness of your TV (with and without the stand).
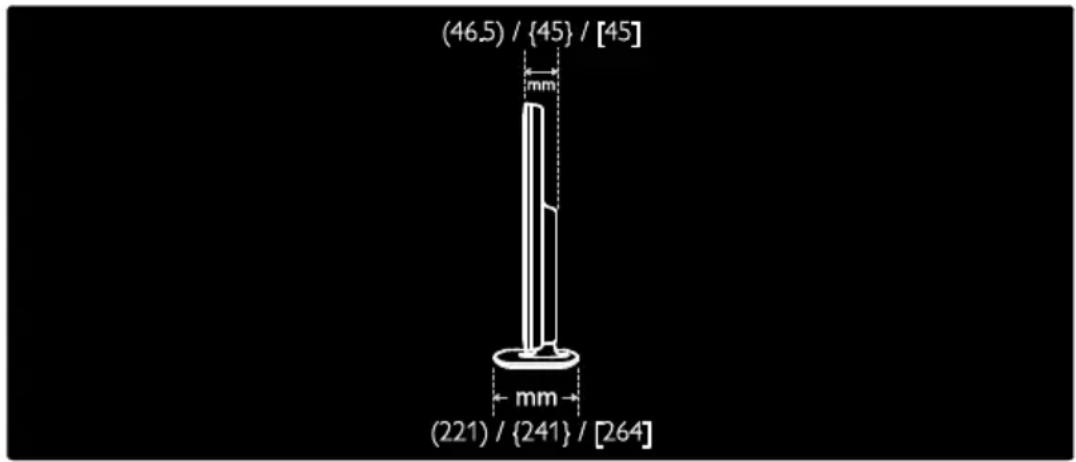
text_image
(46.5) / {45} / [45] mm mm (221) / {241} / [264]Use your TV legend to note the weight of the TV without the stand.
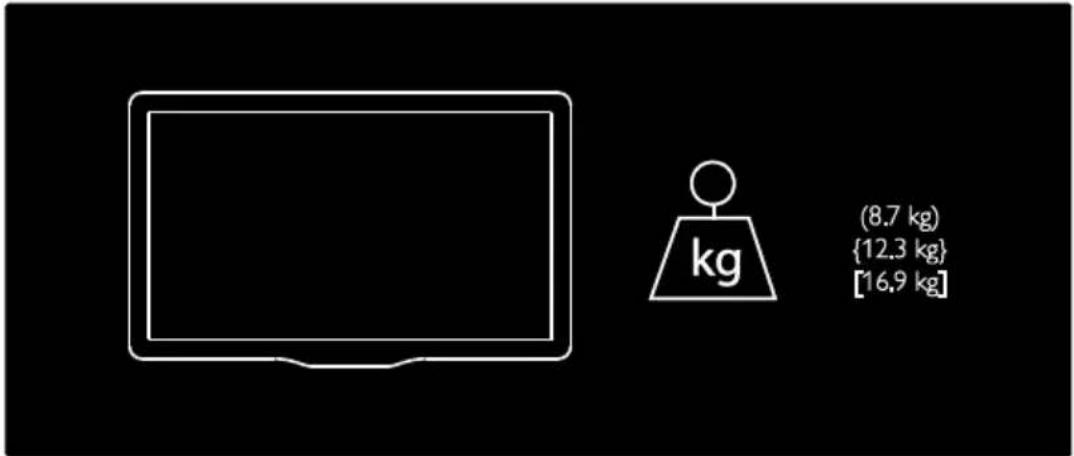
text_image
(8.7 kg) {12.3 kg} [16.9 kg]Use your TV legend to note the weight of the TV with stand.
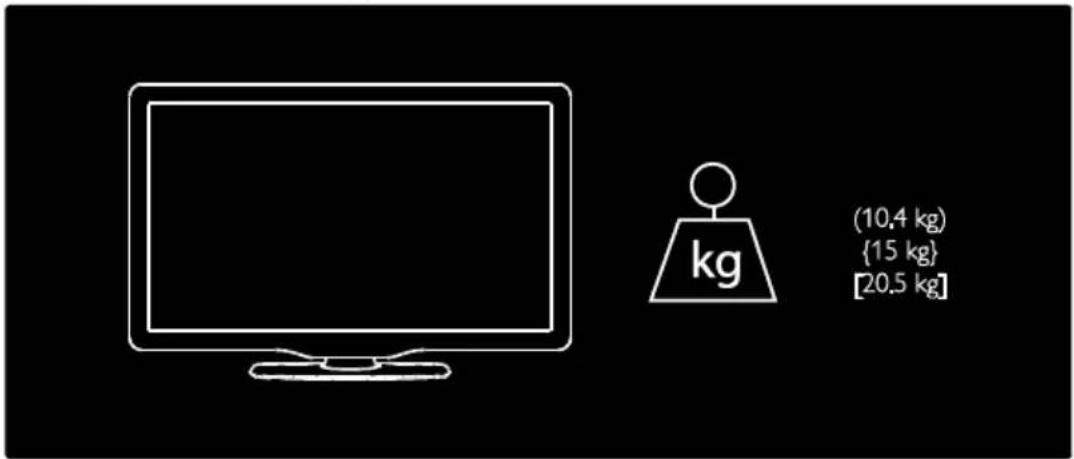
text_image
(10.4 kg) {15 kg} [20.5 kg]Help version
UMv 3139 137 04134 - 20110713
8 Index
A
age rating • 28
audio language • 34
C
care • 7
channel list • 15
channels, favorites • 15
channels, hide or unhide • 34
channels, install (automatic) • 35
channels, reinstall • 35
channels, rename • 34
channels, switch • 15
child lock • 27
clock • 27
closed caption • 28
computer, play files • 20
computer, see PC • 49
connect device • 40
connect, PC • 48
connect, USB • 17
connectors • 4
contact information, on Internet • 10
contact Philips • 10
controls • 11
D
demo • 36
devices, add • 16
devices, watch • 17
digital channels • 35
digital channels, fine-tune • 35
Digital TV Interactive • 25
dimensions • 59
display • 57
display resolution • 57
DLNA • 19
E
EasyLink, controls • 31
EasyLink, enable • 30
EasyLink, features • 30
EasyLink, RC key forward • 30
EasyLink, TV speakers • 31
Electronic Program Guide • 15
end of use • 8
environment efforts • 8
environment, recycle • 8
EPG, Electronic Programme Guide • 15
F
factory settings • 34
favorites list, add • 15
H
HDMI • 39
HDMI ARC • 39
hearing impaired • 29
help, onscreen • 10
high-definition (HD), content • 5
home menu • 3
home mode • 10
|
install channels (automatic) • 35
install channels (manual) • 35
K
kensington lock • 10
L
language, menu • 36
location, home or shop • 10
M
media server software • 19
media server software (Mac) • 20
media server software (PC) • 20
multimedia • 58
multimedia, play files • 17
mute TV speakers • 31
N
Net TV, browse • 21
network, connect • 49
O
online video, rent • 23
P
Pause TV • 25
PC, connect • 48
PC, display resolutions • 57
picture format • 33
picture settings • 33
Pixel Plus link • 32
placement, stand or wall mount • 9
position the TV • 9
power • 57
R
recycle • 8
register product • 10
reinstall TV • 38
remote control • 11
remote control, batteries • 12
remote control, onscreen • 31
remote control, overview • 11
rename channels • 34
S
safety • 6
Scenea, enable • 28
Scenea, see screen saver • 28
screen saver • 28
SD card, format • 23
SD card, memory size • 23
settings, assistant • 33
settings, picture • 33
settings, sound • 33
shop mode • 10
sleeptimer • 27
smart picture • 16
smart sound • 33
software, digital update • 37
software, Internet update • 37
software, version • 37
sound settings • 33
switch TV on, off • 14
U
universal access, enable • 29
universal access, hearing impaired • 29
universal access, visually impaired • 29
USB keyboard • 49
USB mouse • 49
V
visually impaired • 29
volume • 11
W
wall mount • 9
wallpaper • 28
Wi-Fi MediaConnect • 52
Wireless LAN ready • 51
Specifi cations are subject to change without notice. Trademarks are the property of Koninklijke Philips Electronics N.V. or their respective owners. Philips reserves the right to change products at any time without being obliged to adjust earlier supplies accordingly.
The material in this manual is believed adequate for the intended use of the system. If the product, or its individual modules or procedures, are used for purposes other than those specified herein, confirmation of their validity and suitability must be obtained. Philips warrants that the material itself does not infringe any United States patents. No further warranty is expressed or implied.
Philips cannot be held responsible neither for any errors in the content of this document nor for any problems as a result of the content in this document. Errors reported to Philips will be adapted and published on the Philips support website as soon as possible.
Pixel characteristics
This LCD product has a high number of color pixels. Although it has effective pixels of 99.999% or more, black dots or bright points of light (red, green or blue) may appear constantly on the screen. This is a structural property of the display (within common industry standards) and is not a malfunction.
Terms of warranty
No components are user serviceable. Do not open or remove covers to the inside of the product. Repairs may only be done by Philips Service Centres and offi cial repair shops. Failure to do so shall void any warranty, stated or implied.
Any operation expressly prohibited in this manual, any adjustments, or assembly procedures not recommended or authorised in this manual shall void the warranty.
Compliance with EMF
Koninklijke Philips Electronics N.V. manufactures and sells many products targeted at consumers, which, like any electronic apparatus, in general have the ability to emit and receive electromagnetic signals.
One of Philips' leading Business Principles is to take all necessary health and safety measures for our products, to comply with all applicable legal requirements and to stay well within the Electro Magnetic Field (EMF) standards applicable at the time of producing the products.
Philips is committed to develop, produce and market products that cause no adverse health effects. Philips confi rms that if its products are handled properly for their intended use, they are safe to use according to scientific evidence available today.
Philips plays an active role in the development of international EMF and safety standards, enabling Philips to anticipate further developments in standardisation for early integration in its products.
Open source software
Philips Electronics Singapore Pte Ltd hereby offers to deliver, upon request, a copy of the complete corresponding source code for the copyrighted open source software packages used in this product for which such offer is requested by the respective licenses. This offer is valid up to three years after product purchase to anyone in receipt of this information. To obtain source code, please contact open. source@philips.com. If you prefer not to use email or if you do not receive confirmation receipt within a week after mailing to this email address, please write in English to “Open Source Team, Philips Intellectual Property & Standards, P.O. Box 220, 5600 AE Eindhoven, The Netherlands”. If you do not receive timely confirmation of your letter, please email to the email address above. The texts of the licenses and acknowledgements for open source software used in this product are included on a separate leaflet.
Copyright
Windows Media is either a registered trademark or trademark of Microsoft Corporation in the United States and/or other countries.
DOLBY
DIGITAL PLUS
PULSE
Manufactured under license from Dolby Laboratories. Dolby and the double-D symbol are trademarks of Dolby Laboratories.

dlna
CERTIFIED
DNA, the DLNA Logo and DLNA
CERTIFIED® are trademarks, service marks, or certification marks of the Digital Living Network Alliance.
HDMI
HDMI, and HDMI logo, and High-Definition Multimedia Interface are trademarks or registered trademarks of HDMI licensing LLC in the United States and other countries.

® Kensington and Micro Saver are registered US trademarks of ACCO World corporation with issued registrations and pending applications in other countries throughout the world.
All other registered and unregistered trademarks are the property of their respective