FRITZ!Box Fon WLAN 7140 - Router AVM - Free user manual and instructions
Find the device manual for free FRITZ!Box Fon WLAN 7140 AVM in PDF.


User questions about FRITZ!Box Fon WLAN 7140 AVM
0 question about this device. Answer the ones you know or ask your own.
Ask a new question about this device
Download the instructions for your Router in PDF format for free! Find your manual FRITZ!Box Fon WLAN 7140 - AVM and take your electronic device back in hand. On this page are published all the documents necessary for the use of your device. FRITZ!Box Fon WLAN 7140 by AVM.
USER MANUAL FRITZ!Box Fon WLAN 7140 AVM
This manual and the software it describes are protected by copyright. AVM grants the non-exclusive right to use the software, which is supplied exclusively in what is known as object code format. The licensee may create only one copy of the software, which may be used exclusively for backup use.
AVM reserves all rights that are not expressly granted to the licensee. Without previous approval in writing, and except for in cases permitted by law, it is particularly prohibited to
- copy, propagate or in any other manner make this documentation or this software publicly accessible, or
- process, disassemble, reverse engineer, translate, decompile or in any other manner open the software and subsequently copy, propagate or make the software publicly accessible in any other manner
Please consult the LICENSE.TXT file on the product CD included in the package for specifics about the licensing conditions.
This documentation and software have been produced with all due care and checked for correctness in accordance with the best available technology. AVM GmbH disclaims all liability and warranties, whether express or implied, relating to the AVM product's quality, performance or suitability for any given purpose which deviates from the performance specifications contained in the product description. The licensee bears all risk in regard to hazards and impairments of quality which may arise in connection with the use of this product.
AVM will not be liable for damages arising directly or indirectly from the use of the manual or the software, nor for incidental or consequential damages, except in case of intent or gross negligence. AVM expressly disclaims all liability for the loss of or damage to hardware or software or data as a result of direct or indirect errors or destruction and for any costs (including connection charges) related to the documentation and the software and due to incorrect installations not performed by AVM itself.
The information in this manual and the software are subject to change without notice for the purpose of technical improvement.
We offer a manufacturer's warranty for this original product. The conditions of this warranty are contained in the WARRANTY.PDF file in the INFO folder on the product CD included with delivery.

© AVM GmbH 2006. All rights reserved. Documentation release 08/2006
AVM in the Internet: www.avm.de/en/
Trademarks: Unless otherwise indicated, all trademarks mentioned are legally protected trademarks owned by AVM GmbH. This is especially true for product names and logos. Microsoft, Windows and the Windows logo are trademarks owned by Microsoft Corporation in the USA and/or other countries. Bluetooth is a trademark of Bluetooth SIG, Inc. licensed to AVM GmbH. All other product and company names are trademarks of their respective owners.
Contents
1 This Is FRITZ!Box Fon WLAN 7140 9
1.1 Package Contents.... 11
1.2 Operation Requirements.... 11
2 FRITZ!Box Fon WLAN 7140: Connecting 12
2.1 Mounting FRITZ!Box Fon WLAN 14
2.2 Connecting FRITZ!Box Fon WLAN to the Power Supply ..... 14
2.3 Connecting FRITZ!Box Fon WLAN to the DSL Line ..... 15
2.4 Connecting the Computer(s) 16
2.5 Connecting Computer(s) to a LAN Port 17
2.6 Connecting to a Computer Wirelessly via WLAN....18
2.7 Connecting FRITZ!Box Fon WLAN to the ISDN Line ..... 22
2.8 Connecting FRITZ!Box Fon WLAN to the Analog Telephone Line....23
2.9 Connecting Telephone, Fax, Answering Machine.... 24
3 Opening the User Interface 26
4 Configuring Internet Connections 27
4.1 FRITZ!Box Fon WLAN as a DSL Router 27
4.2 FRITZ!Box Fon WLAN as a DSL Modem 29
5 Configuring FRITZ!Box Fon WLAN for Telephone Connections 31
5.1 Entering Account Information and Internet Numbers for Internet Telephony.... 31
5.2 Entering Numbers for Calls over Fixed Lines ..... 32
5.3 Configuring Analog Equipment 33
5.4 Dialing Rules for Internet and Fixed-Line Telephony ..... 34
5.5 Selecting the Type of Connection Manually 35
5.6 How Does Internet Telephony Work? 35
6 FRITZ!DSL: The Software Suite 37
6.1 FRITZ!DSL Internet 38
6.2 FRITZ!DSL Protect 39
6.3 FRITZ!Box....39
6.4 Update....40
6.5 FRITZ!DSL Diagnosis....40
6.6 Web Test ....40
7 U S B D e v i c e s 4 1
7.1 Connecting USB Devices 41
7.2 USB Mass Storage 42
7.3 USB Printers 43
7.4 FRITZ!WLAN USB Stick 46
7.5 USB Hub 47
8 WLAN: Wireless Local Area Networks 48
8.1 Standards ....48
8.2 Security....49
8.3 Frequency Range 52
9 Network Settings 53
9.1 Basics 53
9.2 IP Address....58
9.3 DHCP Server....60
9.4 Subnetwork....62
10 Troubleshooting 65
10.1 Errors Opening the User Interface....65
10.2 The WLAN Adapter Cannot Find FRITZ!Box Fon WLAN .....69
10.3 WLAN Connection Is Not Established 70
10.4 IP Settings....72
11 Removing the FRITZ!Box Fon WLAN 77
11.1 Ending the Connection to the Computer....77
11.2 Removing the Program Group 77
11.3 Removing the FRITZ!DSL Software....78
11.4 Uninstallation of the Printer Port....80
12 Configuration and Operation by Telephone 82
12.1 Operating FRITZ!Box Fon WLAN 7140 by Phone ..... 83
12.2 Configuring FRITZ!Box Fon WLAN by Phone 91
12.3 Advanced Features....94
13 Product Details 115
13.1 The FRITZ!Box Fon WLAN LEDs.... 115
13.2 Audible Signals 116
13.3 Cables and Sockets 116
13.4 WLAN Switch.... 118
13.5 Technical Specifications of FRITZ!Box Fon WLAN 118
14 Customer Service Guide 120
14.1 Product Documentation.... 120
14.2 Information in the Internet 121
14.3 Updates 121
14.4 Support from the AVM Service Team....122
Index 124
Declaration of CE Conformity 127
Symbols and Highlighting
This manual uses the following symbols for warnings and tips:
The hand indicates important instructions that must be observed to avoid malfunctions.

FRITZ! marks useful hints to assist you in working with the product.
The table below explains the highlighting used in this manual.
| Highlighting Function Example | |
| Quotation marks Keys, buttons, icons, tabs, menus, commands | “Start / Programs” or “Enter” |
| Capital letters Path and file names in running text | SOFTWARE\INFO.PDF or README.DOC |
| Pointed brackets Variables | |
| Typewriter font Information to be typed in using the keyboard | a:\setup |
| Gray italics Tips, instructions and warnings | ...for more information, see... |
The Telephone Keypad
| 0...9 | Numeric keys |
| * | Asterisk key |
| R | Hold or Flash key |
| # | Pound sign key |
Instructions for Operation at the Telephone
| Dial a number. | |
| Pick up the handset. | |
| Hang up the handset. | |
| Talk. | |
| Three-party Conference Call | |
| Wait for the acknowledgement tone. | |
| You hear the ring tone. | |
| Ext Enter an extension number (Ext.). In the place of the abbreviation “Ext.” used here, enter the number “1”, “2”, or a higher number, corresponding to the extension you would like to configure. | |
| MSN Enter an ISDN number (MSN). In place of the abbreviation “MSN” used here, enter the complete MSN desired, without any dialing prefix. | |
| XNo./Ext. Enter the external number (XNo.) or extension number (Ext.) to which your calls are to be diverted. In the place of the abbreviation “XNo.”, enter the complete number of the external line. | |
Icons Designating the Functions and Features
| ISDN analog VoIP | The functions and features can be used for analog and ISDN fixed-line connections as well as for Internet telephony (VoIP). |
| ISDN analog | The functions and features can be used for analog and ISDN fixed-line connections. |
| ISDN | The functions and features can be used only for ISDN fixed-line connections. |
| analog | The functions and features can be used only for analog fixed-line connections. |
Safety Instructions

When working with FRITZ!Box Fon WLAN, follow the instructions below to protect yourself and the FRITZ!Box Fon WLAN from injury.
- Do not install FRITZ!Box Fon WLAN during an electrical storm. Disconnect FRITZ!Box Fon WLAN from the power supply during electrical storms.
- Never let liquids get inside the FRITZ!Box Fon WLAN. Otherwise, electric shocks or short circuits may result.
- FRITZ!Box Fon WLAN is intended for indoor use only.
- Do not open the FRITZ!Box Fon WLAN housing. The device contains hazardous components and should only be opened by authorized repair technicians.
Disposal Instructions

After use, please subject this product to orderly disposal as electronic scrap in accordance with the current EU disposal regulations.
1 This Is FRITZ!Box Fon WLAN 7140
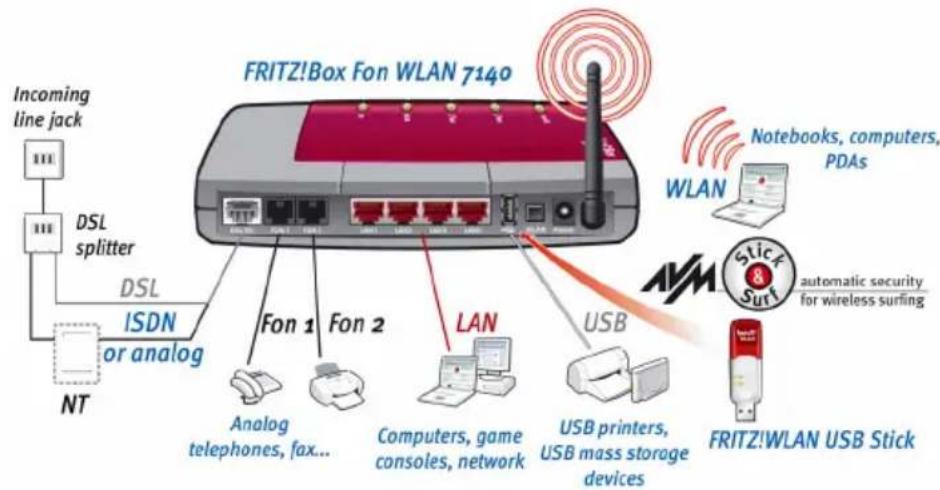
FRITZ!Box Fon WLAN is a Private Branch Exchange (PBX) for making telephone calls via the Internet and the fixed-line network. FRITZ!Box Fon WLAN connects one or more computers directly with your DSL line. Each connected computer can establish an Internet connection over FRITZ!Box Fon WLAN. As a WLAN access point, FRITZ!Box Fon WLAN offers you the possibility of connecting your computer to the DSL line wirelessly.
text_image
Incoming line jack DSL splitter DSL ISDN or analog NT FRITZ!Box Fon WLAN 7140 Fon 1 Fon 2 LAN Analog telephones, fax... Computers, game consoles, network USB printers, USB mass storage devices Notebooks, computers, PDAs WLAN Stick & Surf automatic security for wireless surfing FRITZ!WLAN USB StickPossibilities for connecting FRITZ!Box Fon WLAN
PBX for Internet and Fixed-Line Telephony
FRITZ!Box Fon WLAN 7140 is a PBX for the connection of analog terminal devices. You can connect two analog telephones to FRITZ!Box Fon WLAN and make phone calls via the Internet, ISDN, or the analog fixed-line network.
Connecting One or More Computers
Four computers can be connected directly to the FRITZ!Box Fon WLAN using the four LAN ports. Using WLAN you can connect multiple computers with FRITZ!Box Fon WLAN wirelessly.
You can also connect a network hub or switch to the LAN ports so that even more computers can be connected to FRITZ!Box Fon WLAN.
All computers connected to FRITZ!Box Fon WLAN are networked together and can access shared files and printers.
Internet Connection for All Computers
All of the computers connected to FRITZ!Box Fon WLAN can surf the web.
Protection by the Integrated Firewall
When FRITZ!Box Fon WLAN is operated as a DSL router, the integrated firewall protects your network from attacks from the Internet.
Connecting USB Devices
The FRITZ!Box Fon WLAN is equipped with a USB host controller to which you can connect a USB mass storage device (hard drive, stick), a printer, a FRITZ!WLAN USB Stick or a USB hub. For connecting a printer, FRITZ!Box Fon WLAN has a printer server.
AVM Stick & Surf technology is provided by the FRITZ!WLAN USB Stick. This technology allows security settings to be read from the FRITZ!Box Fon WLAN automatically.
Port for Network Devices
Network devices can be connected to the FRITZ!Box Fon WLAN LAN port along with network hubs or switches, including game consoles.
WLAN Access Point
FRITZ!Box Fon WLAN is a WLAN access point. Computers equipped with a WLAN adapter can be wirelessly connected to FRITZ!Box Fon WLAN.
1.1 Package Contents
The package contains:
- FRITZ!Box Fon WLAN 7140
- one AC power adapter with cable for connection to the power mains
- one 4.25 m combined DSL-telephone cable (gray/black) for connecting FRITZ!Box Fon WLAN to the DSL splitter and the ISDN network terminator (NT) or the analog telephone line
- one network cable (red) for connecting FRITZ!Box Fon WLAN to a computer or network hub
• one FRITZ!Box Fon WLAN CD with - Installation Help
- documentation for all enclosed AVM components
1.2 Operation Requirements
In order to operate FRITZ!Box Fon WLAN, you must have the following:
- a Web browser that supports Java Script (for instance, Internet Explorer from version 6.0 or Netscape 4.0)
- an ISDN point-to-multipoint line in accordance with the Euro ISDN protocol DSS1, or an analog telephone line
- If you would like to connect the FRITZ!Box Fon WLAN via the LAN port of the computer, you need a computer with a network adapter (standard Ethernet 10/100 Base-T).
- A DSL line must be available: Standard ITU G.992.1 Annex A or B (depending on the FRITZ!Box Fon WLAN model)
- If you would like to connect FRITZ!Box Fon WLAN wirelessly using WLAN, you will need a computer equipped with a WLAN adapter (in accordance with IEEE 802.11b/g), for instance, a FRITZ!WLAN USB Stick.
2 FRITZ!Box Fon WLAN 7140: Connecting
This chapter contains instructions on the following topics:
- Launching FRITZ!Box Fon WLAN operation: recommended procedure
- Mounting FRITZ!Box Fon WLAN
- Connecting FRITZ!Box Fon WLAN to electrical power, DSL and ISDN or the analog telephone line
- Connecting analog terminal devices to the FRITZ!Box Fon WLAN
- Connecting one or several computers to FRITZ!Box Fon WLAN
- Opening the FRITZ!Box Fon WLAN user interface
Using the Installation Help on the CD
If you have a computer with a Windows operating system, you can use the Installation Help contained on the FRITZ!Box Fon WLAN CD.
The Installation Help on the FRITZ!Box Fon WLAN CD presents instructions on the screen, instructing you about the steps required to launch operation of the FRITZ!Box Fon WLAN.
- Insert the FRITZ!Box Fon WLAN CD in the CD-ROM drive of your computer.
The Installation Help starts automatically.
If the installation help is not displayed automatically, double-click the file SETUP.EXE in the root directory of the FRITZ!Box Fon WLAN CD. Follow the instructions in the Installation help to connect the FRITZ!Box Fon WLAN to your computer.
- Follow the instructions in the Installation Help to prepare the FRITZ!Box Fon WLAN for operation.

We recommend using the Installation Help on the FRITZ!Box Fon WLAN CD when launching operation of the FRITZ!Box Fon WLAN for the first time.
Launching Operation without the CD Installation Help
If you do not use the Installation Help on the CD, then comply with the sequence of steps recommended below.
- Set up the FRITZ!Box Fon WLAN hardware: see the section "Mounting FRITZ!Box Fon WLAN" on page 14.
- Connect FRITZ!Box Fon WLAN to the power supply: see the section “Connecting FRITZ!Box Fon WLAN to the Power Supply” on page 14.
- Connect FRITZ!Box Fon WLAN to the computer(s): see the section “Connecting the Computer(s)” from page 16.
- Connect FRITZ!Box Fon WLAN to DSL: see the section "Connecting FRITZ!Box Fon WLAN to the DSL Line" on page 15.
- If you want to make telephone calls with the fixed-line network using FRITZ!Box Fon WLAN: connect to the fixed-line network.
ISDN fixed-line network: Connect FRITZ!Box Fon WLAN with the ISDN line: see the section “Connecting FRITZ!Box Fon WLAN to the ISDN Line” from page 22.
Analog fixed-line network: Connect FRITZ!Box Fon WLAN with the analog telephone line: see the section “Connecting FRITZ!Box Fon WLAN to the Analog Telephone Line” from page 23.
- If you want to make telephone calls via the Internet and/or the fixed-line network using FRITZ!Box Fon WLAN: Connect analog terminal devices to the FRITZ!Box Fon WLAN: see the section "Connecting Telephone, Fax, Answering Machine" from page 24.
2.1 Mounting FRITZ!Box Fon WLAN
Set or hang up FRITZ!Box Fon WLAN in a dry, dust-free location shaded from any direct sunlight.
Please note the following:
- If you would like to connect the device using the USB or network cable supplied with the package, remember to consider the maximum length of the cable and select a location close to your computer.
- If you would like to establish wireless connections to FRITZ!Box Fon WLAN from computers, set up or mount the device in a central location in the office or at home.
Make sure to keep sufficient distance from potential interference sources like microwave devices or electric devices with large metal housings.
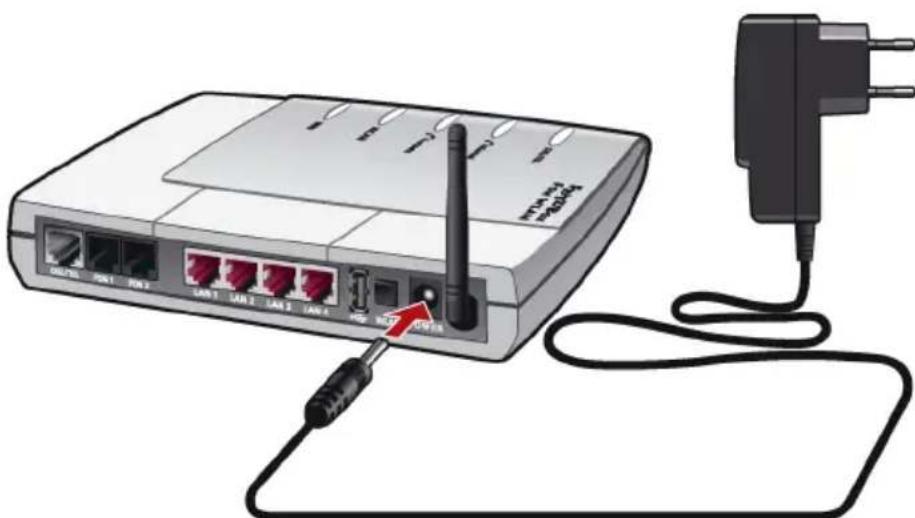
2.2 Connecting FRITZ!Box Fon WLAN to the Power Supply
natural_image
Illustration of a wireless router connected to a power plug via cable (no text or symbols visible)Connecting FRITZ!Box Fon WLAN to the power supply
Connect the FRITZ!Box Fon WLAN to the power supply as described below:
-
Remove the power supply unit from the FRITZ!Box Fon WLAN package.
-
Connect the mains adapter to the socket labeled "Pow-er", located at the far right of the back panel of FRITZ!Box Fon WLAN.
-
Plug the other end into an AC power outlet.
The green "Power/DSL" LED begins flashing after a few seconds.
2.3 Connecting FRITZ!Box Fon WLAN to the DSL Line
text_image
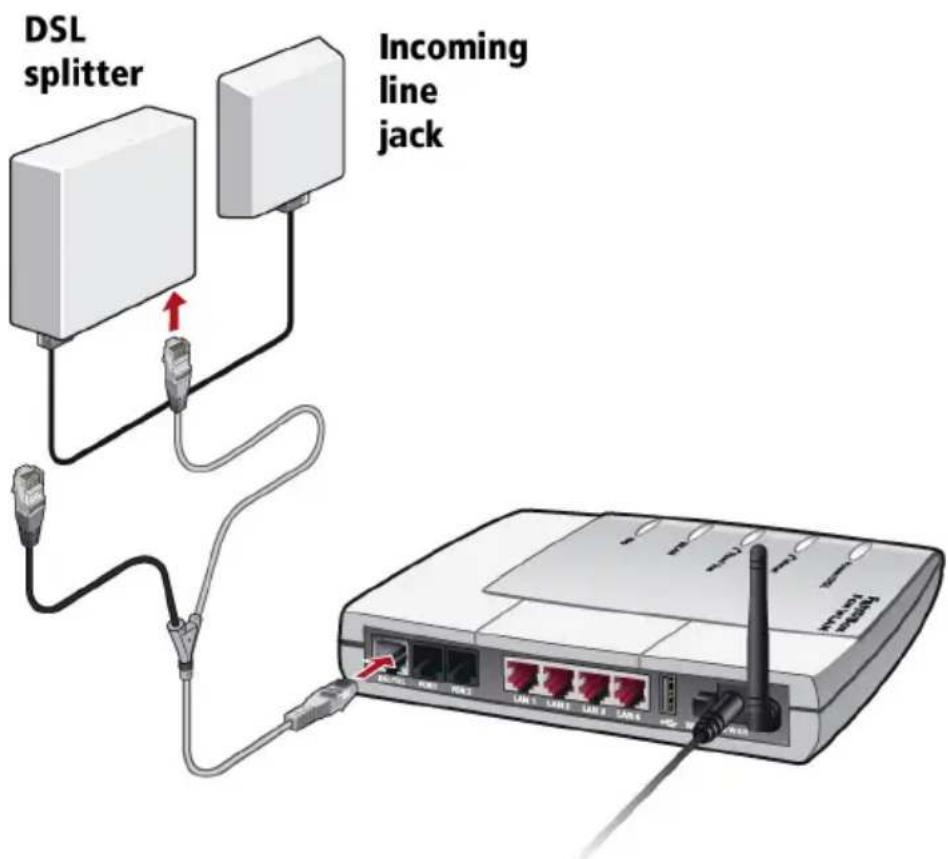
DSL splitter Incoming line jackConnecting FRITZ!Box Fon WLAN to the DSL splitter
Cables
The gray and black Y-shaped cable is for connecting to the DSL splitter. This cable is a combination of a DSL cable and a telephone cable.
Connecting
-
Connect the longer, gray end of the cable to the socket labeled "DSL/TEL", located at the far left of the back panel of the FRITZ!Box Fon WLAN.
-
Then connect the gray end of the Y-branch to the socket on the DSL splitter labeled "DSL".
The black end of the cable's Y-branch is not needed for connection to the DSL splitter.
The green “Power” LED stops flashing after a short time and remains lit to signalize that FRITZ!Box Fon WLAN is ready for Internet connections over DSL.
2.4 Connecting the Computer(s)
If you would like to surf the web using the FRITZ!Box Fon WLAN or to open the FRITZ!Box Fon WLAN user interface, then you must connect a computer with the FRITZ!Box Fon WLAN.
A computer can be connected with the FRITZ!Box Fon WLAN in two different ways:
• using a LAN port of the FRITZ!Box Fon WLAN
- wirelessly via WLAN
One computer can be connected to FRITZ!Box Fon WLAN by only one of these means.
One computer can be connected to each of the four LAN ports of FRITZ!Box Fon WLAN, and several computers can be connected with FRITZ!Box Fon WLAN at the same time via WLAN.
The way a computer is connected to the FRITZ!Box Fon WLAN is the same regardless of the operating system on the computer.
All of the computers connected with the FRITZ!Box Fon WLAN constitute a network.
2.5 Connecting Computer(s) to a LAN Port

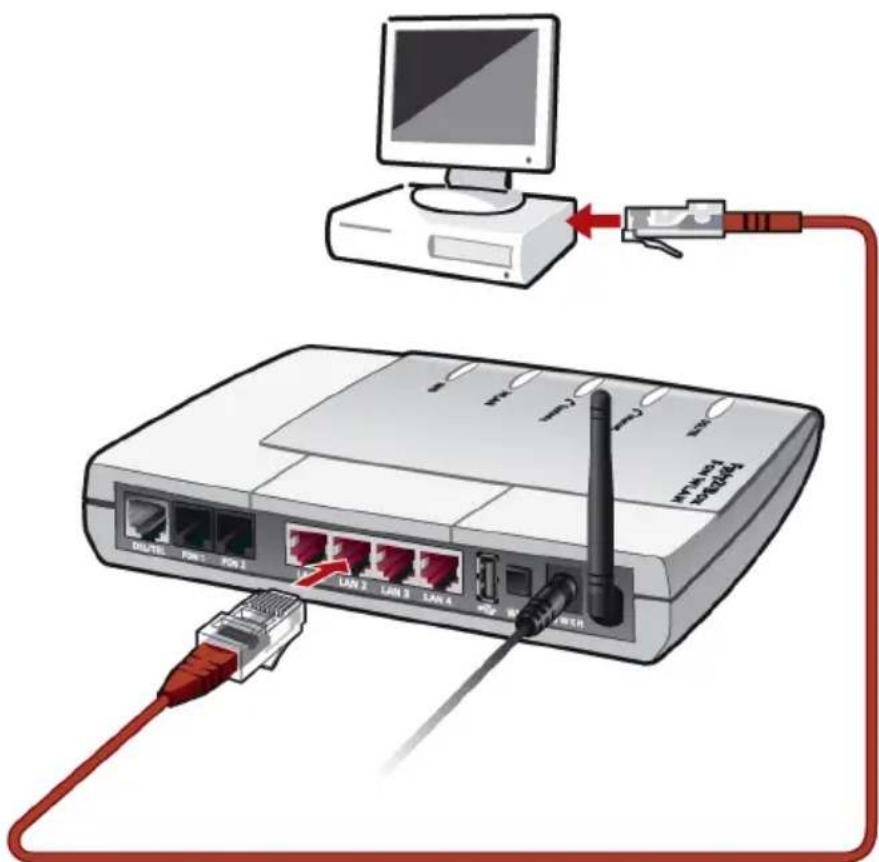
If you want to connect a computer to one of the four LAN ports on the FRITZ!Box Fon WLAN, make sure that your computer is equipped with a network adapter. A LAN port is usually designated by the icon at left or labeled “LAN”.
text_image
Diagram showing network connection between a desktop computer and a router, with labeled ports and cables.Connecting a computer to a LAN port on the FRITZ!Box Fon WLAN
Cable
A red network cable for connecting a computer is included in the FRITZ!Box Fon WLAN package.
Connecting
-
Remove the network cable from the package.
-
Switch on your computer.
If you work with a Linux operating system, use YaST to configure your network card with the setting "DHCP", if this setting is not already configured.

- Insert one end of the LAN cable to the computer's network adapter.
- Connect the other end of the LAN cable to a socket on the FRITZ!Box Fon WLAN labeled "LAN 1", "LAN 2", "LAN 3" or "LAN 4".
No additional driver installation is necessary on the computer.
Connecting More Computers to the LAN Ports
Additional cables are required to connect further computers. In purchasing a LAN cable, note the instructions in the section “Network Cable” on page 117.
You can connect a computer to any of the four LAN ports of the FRITZ!Box Fon WLAN at any time.
If you need to connect more than four computers using the LAN ports of FRITZ!Box Fon WLAN, you can connect a network hub or network switch to expand the number of ports.
2.6 Connecting to a Computer Wirelessly via WLAN
FRITZ!Box Fon WLAN can be connected to a computer wirelessly using WLAN.
The wireless WLAN connection is identical for all operating systems. Each computer to be connected to FRITZ!Box Fon WLAN via WLAN must support WLAN, by means of a compatible WLAN adapter, for instance the FRITZ!WLAN USB Stick.
For more information on WLAN, see the section “WLAN: Wireless Local Area Networks” from page 48.
Presettings in FRITZ!Box Fon WLAN
The FRITZ!Box Fon WLAN is delivered with preset values for WLAN security. These values must also be entered on the computer with the WLAN adapter in order to be able to establish a successful WLAN connection.
The following values are configured in the FRITZ!Box Fon WLAN factory settings:
| Setting Preset Value | |
| SSID(name of the WLAN radio network) | FRITZ!Box Fon WLAN 7140 |
| Encryption methods TKIP (WPA) | |
| Encryption WPA PSK | |
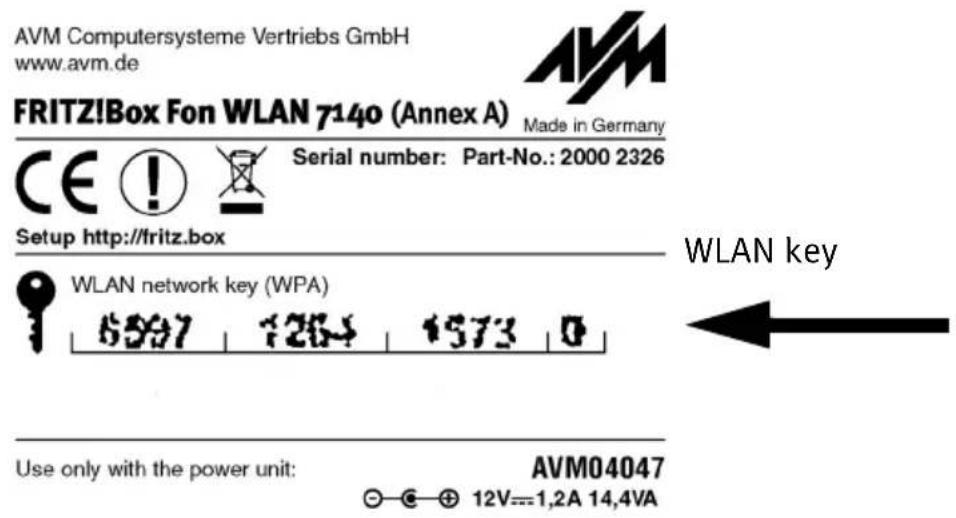
| Key The key is printed on the stickerson the base of the device and onthe cover of the FRITZ!Box FonWLAN CD. | |
| Network mode Infrastructure | |
| Channel | 6 |
Connecting FRITZ!Box Fon WLAN to the FRITZ!WLAN USB Stick
If you use a FRITZ!WLAN USB Stick as a WLAN adapter, AVM Stick & Surf technology provides you with a convenient procedure for connecting your computer wirelessly to FRITZ!Box Fon WLAN:
- Insert the FRITZ!WLAN USB Stick in the port of the USB host controller of the FRITZ!Box Fon WLAN. The “INFO” LED on the FRITZ!Box Fon WLAN begins flashing rapidly. The WLAN security settings are transmitted automatically to the FRITZ!WLAN USB Stick.
As soon as the “INFO” LED stops flashing, transmission of the settings has been concluded. You can now remove the stick.
- Now insert the FRITZ!WLAN USB Stick in the USB port of the computer. The security settings saved on the stick are applied to the computer.
See the FRITZ!WLAN USB Stick manual for details.
Connecting FRITZ!Box Fon WLAN Using a WLAN Adapter from Another Manufacturer
- Switch on your computer.
- Install the WLAN adapter in your computer along with the appropriate software. Please take note of the instructions in the documentation of the adapter.
- Once installation has been completed, you generally have a user interface available to control your WLAN connections. In the Windows operating systems you can open the user interface by clicking an icon in the taskbar (specific to each manufacturer) or from the start menu.
- To establish a WLAN connection to FRITZ!Box Fon WLAN, you can use the WLAN software available in the operating system or use the user interface provided by the manufacturer.
Setting up a WLAN Connection Using the Manufacturer's User Interface
This description uses the values given in the section “Presettings in FRITZ!Box Fon WLAN” on page 18. If you would like to establish a WLAN connection using these preset values, then your WLAN adapter must support WPA.
- Select the SSID (WLAN radio network) "FRITZ!Box I WLAN 7140" in the user interface.
If the radio network is not displayed, please follow the instructions in the section “The WLAN Adapter Cannot Find FRITZ!Box Fon WLAN” from page 69.
-
Set "Infrastructure" as the network mode.
-
Select "WPA PSK" as encryption or authentication.
-
Enter the preset key in the "Network Key" field. The key is printed on the sticker on the base of the device and on the cover of the FRITZ!Box Fon WLAN CD.
text_image
AVM Computersysteme Vertriebs GmbH www.avm.de FRITZ!Box Fon WLAN 7140 (Annex A) Made in Germany CE ! Serial number: Part-No.: 2000 2326 Setup http://fritz.box WLAN network key (WPA) 5597 1264 1573 0 Use only with the power unit: AVM04047 €—€—⊕ 12V---1,2A 14,4VA WLAN keySticker with sample values
- Confirm your entries using the relevant button in the user interface (for instance, "OK", "Send", "Submit" or "Connect").
- Now read the information in section "Opening the User Interface" on page 26 and follow the security instructions in the section "Security" from page 49.
If the WLAN Adapter Does Not Support the WPA Mechanism
If your WLAN adapter does not support WPA, you must change the WLAN settings in the FRITZ!Box Fon WLAN. To do so, proceed as follows:
- Connect FRITZ!Box Fon WLAN and the computer using the network cable (see the section "Connecting Computer(s) to a LAN Port" on page 17).
- Open the FRITZ!Box Fon WLAN user interface (see the section "Opening the User Interface" on page 26.
- In the "WLAN / WLAN Security" menu, select WEP encryption and enter a network key.
- Click the "Apply" button.
A window is displayed with the WLAN security settings. Print out the page by clicking "Print this Page".
- Close the user interface and clear the connection between the FRITZ!Box Fon WLAN and the computer. Remove the network cable.
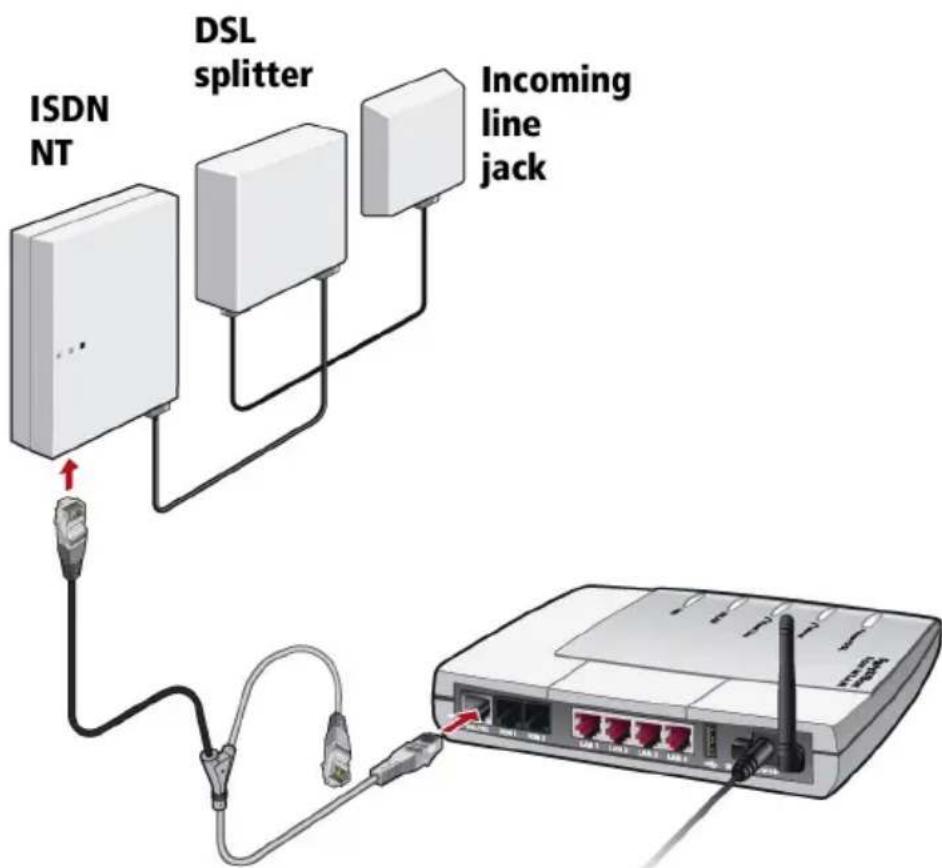
2.7 Connecting FRITZ!Box Fon WLAN to the ISDN Line
You only have to connect the FRITZ!Box Fon WLAN with the ISDN line if you have an ISDN line and want to FRITZ!Box Fon WLAN for ISDN fixed-line telephony.
text_image
ISDN NT DSL splitter Incoming line jackConnecting FRITZ!Box Fon WLAN to the ISDN NT
Cable
The gray and black Y-shaped cable is for connecting to the ISDN line. This cable is a combination of a DSL cable and a telephone cable.
Connecting
-
Connect the longer, gray end of the cable to the socket labeled "DSL/TEL", located at the far left of the back panel of the FRITZ!Box Fon WLAN.
-
Insert the black end of the Y-branch of the cable into the socket of your ISDN NT.
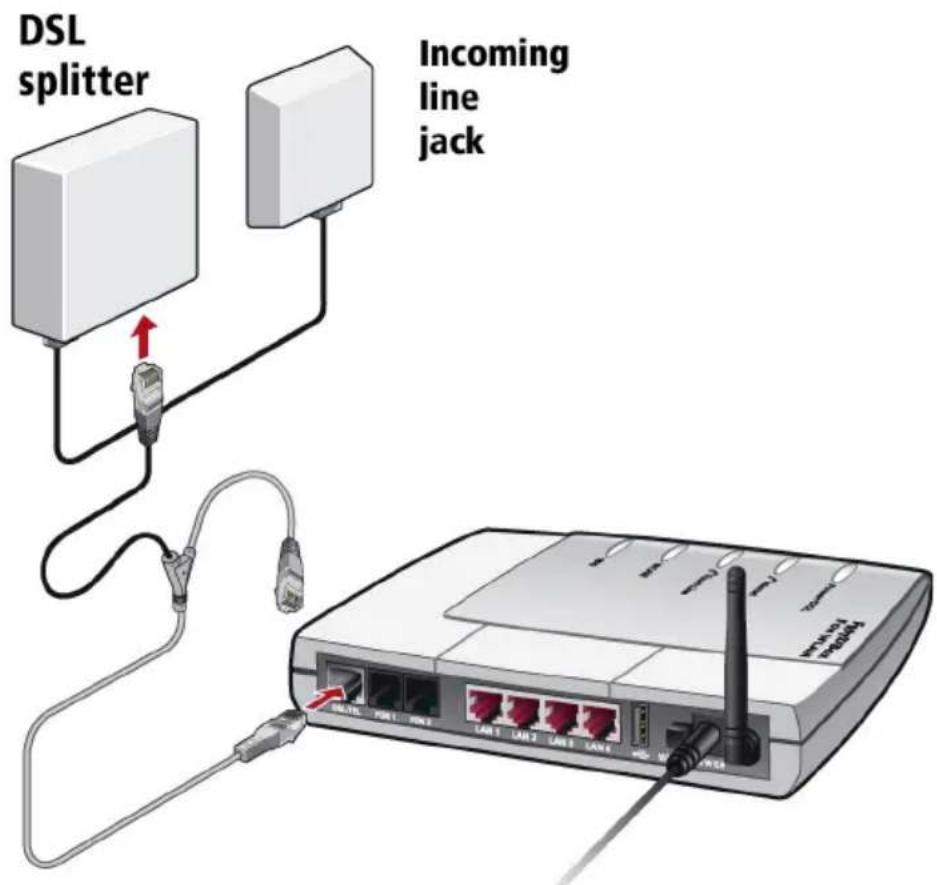
2.8 Connecting FRITZ!Box Fon WLAN to the Analog Telephone Line
You only have to connect the FRITZ!Box Fon WLAN with the analog line if you have an analog line and want to use the FRITZ!Box Fon WLAN for analog fixed-line telephony.
text_image
DSL splitter Incoming line jack LANT 1 LANT 2 LANT 3 LANT 4 LANT 5 LANT 6 LANT 7 LANT 8 LANT 9 LANT 10 LANT 11 LANT 12 LANT 13 LANT 14 LANT 15 LANT 16 LANT 17 LANT 18 LANT 19 LANT 20 LANT 21 LANT 22 LANT 23 LANT 24 LANT 25 LANT 26 LANT 27 LANT 28 LANT 29 LANT 30 LANT 31 LANT 32 LANT 33 LANT 34 LANT 35 LANT 36 LANT 37 LANT 38 LANT 39 LANT 40 LANT 41 LANT 42 LANT 43 LANT 44 LANT 45 LANT 46 LANT 47 LANT 48 LANT 49 LANT 50 LANT 51 LANT 52 LANT 53 LANT 54 LANT 55 LANT 56 LANT 57 LANT 58 LANT 59 LANT 60 LANT 61 LANT 62 LANT 63 LANT 64 LANT 65 LANT 66 LANT 67 LANT 68 LANT 69 LANT 70 LANT 71 LANT 72 LANT 73 LANT 74 LANT 75 LANT 76 LANT 77 LANT 78 LANT 79 LANT 80 LANTConnecting FRITZ!Box Fon WLAN to the analog telephone line via the DSL splitter
Cable
The gray and black Y-shaped cable is for connecting to the analog line. This cable is a combination of a DSL cable and a telephone cable.
Connecting
- Connect the longer, gray end of the cable to the socket labeled "DSL/TEL", located at the far left of the back panel of the FRITZ!Box Fon WLAN.
- Then insert the black plug into the appropriate jack of your DSL splitter.
2.9 Connecting Telephone, Fax, Answering Machine
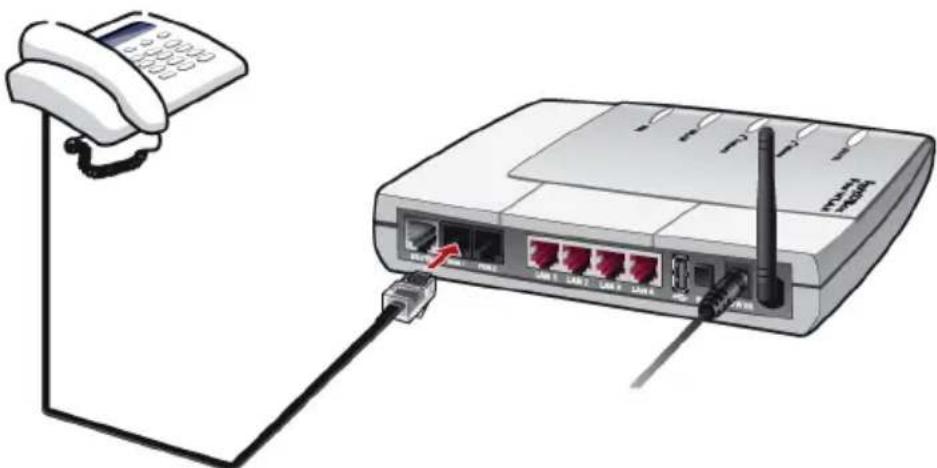
If you would like to use analog equipment like your telephone, fax or answering machine for Internet or fixed-line telephony with the FRITZ!Box Fon WLAN, this equipment must be connected to the FRITZ!Box Fon WLAN.
In order to use the ISDN fixed-line network, the FRITZ!Box Fon WLAN must be connected with the ISDN line (see the section "Connecting FRITZ!Box Fon WLAN to the ISDN Line" from page 22).
In order to use the analog fixed-line network, the FRITZ!Box Fon WLAN must be connected with the analog fixed line (see the section “Connecting FRITZ!Box Fon WLAN to the Analog Telephone Line” from page 23).
natural_image
Illustration of a wireless router connected to a landline telephone (no text or symbols visible)Connecting an analog telephone to FRITZ!Box Fon WLAN
Connecting
To connect analog terminal devices like a telephone, fax device or answering machine, insert the plugs of your analog devices into the “FON 1” or “FON 2” socket on FRITZ!Box Fon WLAN 7140.
Connecting a Second Analog Device
You can connect a second analog device at any time by the same method.
3 Opening the User Interface
Once you have connected FRITZ!Box Fon WLAN with one or more computers, or with a network hub or switch, you c configure the settings for operation with FRITZ!Box Fon WLAN.
The settings are configured on the FRITZ!Box Fon WLAN user interface. This interface can be accessed from any of the computers connected with FRITZ!Box Fon WLAN. The settings are saved in FRITZ!Box Fon WLAN.
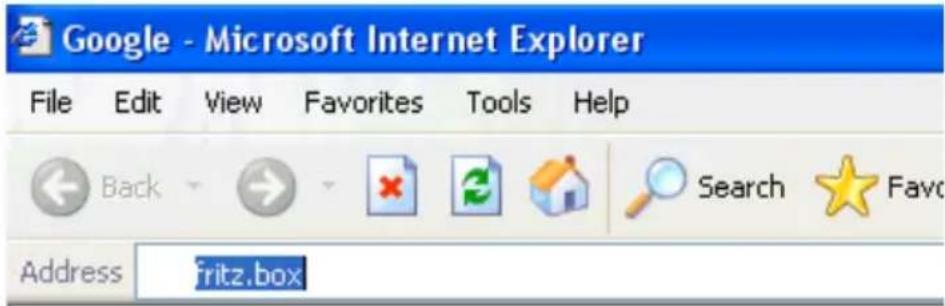
Open your Internet browser on the computer and enter "fritz.box".
text_image
Google - Microsoft Internet Explorer File Edit View Favorites Tools Help Back Search Favoc Address fritz.boxThe "fritz.box" address entry in the address field of an Internet browser
When the FRITZ!Box Fon WLAN user interface is started, FRITZ!Box Fon WLAN is ready for operation.
The FRITZ!Box Fon WLAN user interface has several pages, each of which can be accessed directly by clicking the menu command on the left edge.

If the user interface does not open, see the instructions in the section “Errors Opening the User Interface” from page 65.
See the section “Configuring Internet Connections” from page 27 for instructions on configuring Internet connections for FRITZ!Box Fon WLAN.
4 Configuring Internet Connections
There are two different ways for FRITZ!Box Fon WLAN to connect to the Internet. In both cases you need account information from an Internet Service Provider:
- The FRITZ!Box Fon WLAN establishes the connection with the Internet and makes it available to all of the computers connected with the FRITZ!Box Fon WLAN. In this mode the FRITZ!Box Fon WLAN functions as a DSL router.
For information about how to configure FRITZ!Box Fon WLAN for this operating mode, see the section "FRITZ!Box Fon WLAN as a DSL Router" from page 27.
- The computers connected to FRITZ!Box Fon WLAN establish the Internet connections themselves. In this case FRITZ!Box Fon WLAN works like a DSL modem and is responsible only for forwarding data.
How to configure the FRITZ!Box Fon WLAN and the computers connected with it for this operating mode is described in the section “FRITZ!Box Fon WLAN as a DSL Modem” from page 29.
4.1 FRITZ!Box Fon WLAN as a DSL Router
So that the FRITZ!Box Fon WLAN can establish the Internet connection itself, an Internet connection must be configured with the account information from your Internet Service Provider in the FRITZ!Box Fon WLAN. All connected computers can then use this Internet connection at the same time. It is not necessary to install any additional Internet access software on the other connected computers.
In this mode FRITZ!Box Fon WLAN works like a DSL router and uses the Internet Service Provider's account information.
Configuring an Internet Connection in FRITZ!Box Fon WLAN
To configure the Internet connection, enter the Internet account data from your Internet Service Provider in the FRITZ!Box Fon WLAN. To do so, proceed as follows:
- Have the Internet access information you received from your Internet Service Provider handy.
- Open the FRITZ!Box Fon WLAN user interface and select the "Internet / Account Information" menu.
- Select the setting "Use account data (FRITZ!Box works as a DSL router)" if this setting is not already configured.
- Enter the account data you received in the appropriate fields.
- Click the "Apply" button to transmit your entries to the FRITZ!Box Fon WLAN.
The FRITZ!Box Fon WLAN is now configured as a DSL router and all connected computers can use the Internet access at the same time.

Use the “Clear Internet connection automatically” function if your Internet connection is charged for online time. This function clears an idle connection after the period specified here.
Establishing the Internet Connection
No further steps are necessary to establish an Internet connection. Simply start an Internet browser on any of the computers connected to FRITZ!Box Fon WLAN and start surfing the Net.

Make sure FRITZ!Box Fon WLAN automatically assigns IP addresses to all computers that are supposed to use this Internet connection. For instructions, see the section "IP Settings" from page 72.
4.2 FRITZ!Box Fon WLAN as a DSL Modem
For the computers connected to the FRITZ!Box Fon WLAN to be able to establish their Internet connections themselves and use the FRITZ!Box Fon WLAN as a DSL modem, two prerequisites must be fulfilled:
- FRITZ!Box Fon WLAN is configured as a DSL modem.
- An Internet connection must be configured on each computer, using the Internet access software and the account information from an Internet Service Provider.
If your Internet Service Provider supplies its own access software, you can use this software for your computers.
It is generally not permitted to establish more than one Internet connection at a time using the same account information from an Internet Service Provider.
A separate Internet connection must be set up on each computer if all connected computers are to be allowed Internet access at the same time. This means that you need separate account information for each computer. Each computer then establishes its own Internet connection, subject to its own charges.
If you connected multiple computers with FRITZ!Box Fon WLAN and would like to allow Internet access for all of them, it is advisable to operate FRITZ!Box Fon WLAN as a DSL router.
Configuring FRITZ!Box Fon WLAN as a DSL Modem
- Open the FRITZ!Box Fon WLAN user interface and select the "Internet / Account Information" menu.
- Disable the setting "Use account data (FRITZ!Box works as a DSL router)".
- Click the "Apply" button to transmit the setting to the FRITZ!Box Fon WLAN.
Now the FRITZ!Box Fon WLAN can be used as a DSL modem by all of the computers connected to it.

Configuring an Internet Connection on a Computer
- Have the Internet access information you received from your Internet Service Provider handy.
- Install the Internet access software on the computer.
- Start the Internet access software and enter the account data.
Establishing Internet Connections
Use the Internet access software to establish a connection to your Internet Service Provider. As soon as the connection is established, you can start an Internet browser on your computer and surf the Internet.
5 Configuring FRITZ!Box Fon WLAN for Telephone Connections
This chapter describes how to set up FRITZ!Box Fon WLAN for fixed-line and Internet telephony. The following steps are necessary:
- Entering account information and Internet numbers for Internet telephony
- Entering numbers for calls over fixed lines
- Configuring connected analog equipment
Information on the following topics is also presented here:
- Dialing rules for Internet and fixed-line telephony
- How does Internet telephony work with FRITZ!Box Fon WLAN?
5.1 Entering Account Information and Internet Numbers for Internet Telephony
If you configured the Internet connection and Internet telephony using the FRITZ!Box Fon WLAN Configuration Wizard, the required data are already entered.
You can set up additional Internet numbers in FRITZ!Box Fon WLAN. To do this you will need the corresponding account information from your Internet telephony provider.
Proceed as follows to set up an additional Internet number:
- Start a web browser.
- Enter "fritz.box" in the address field.
- Click the "Internet Telephony" command in the "Telephony" menu.
- Click the "New Internet Number" button.
-
Enter the account information you received from your Internet telephony provider in the appropriate fields.
-
Click the "Apply" button.
The new number is added to the list of Internet numbers.
5.2 Entering Numbers for Calls over Fixed Lines
Your fixed-line numbers must be set up in FRITZ!Box Fon WLAN for fixed-line telephony. Proceed as follows:
- Start a web browser.
- Enter "fritz.box" in the address field.
- Click the “Extensions” command in the “Telephony” menu.
- Click the "Fixed-line Numbers" button.
- On the “Fixed-line Numbers” page, specify whether your fixed line is an ISDN line or an analog line.
- Enter the ISDN numbers (MSNs) or the analog number in the corresponding fields.
- Click the "Apply" button.
5.3 Configuring Analog Equipment
FRITZ!Box Fon WLAN is configured so that you can make calls to the analog network immediately after connecting analog terminal devices, without any additional settings required.
The following settings are preconfigured on the analog lines "FON 1" and "FON 2":
- calls can be accepted on both lines: connected terminal devices will ring at the same time
- outgoing calls can be conducted on both lines
If the connected terminal devices are to react only to certain numbers, numbers must be assigned to the extensions. The number defined as “Number of the extension” also defines whether calls from this extension will be conducted using the fixed-line network or the Internet.
To do this, perform the following steps:
- Start a web browser.
- Enter "fritz.box" in the address field.
- Click the “Extensions” command in the “Telephony” menu.
- In the “Analog Extensions” area, click the “Change Settings” button next to the number of the extension.
- Select a number from the "Number of the extension" drop-down menu in the "Extension FON 1" area.
The terminal device connected to the “FON 1” extension reacts to incoming calls placed to this number and uses the kind of connection specified for outgoing connections with this number.
-
If you would like to assign additional numbers to the extension, select from the “Additional numbers” dropdown menus any other numbers the terminal device at the “FON 1” line should react to for incoming calls.
-
Click the "Apply" button.
-
Configure the "Extension FON 2" if necessary.
5.4 Dialing Rules for Internet and Fixed-Line Telephony
Dialing rules specify when calls are conducted on the fixed-line network, and when they take place over the Internet.
Perform the following steps to define dialing rules:
- Start a web browser.
- Enter "fritz.box" in the address field.
- Click the “Dialing Rules” command in the “Telephony” menu.
- In the “Dialing Rules” area you can define the kind of connection for ranges of numbers.
All connections to number ranges for which a dialing rule has been defined are established using the specified connection type.
-
Click the "New Dialing Rule" button to define as many dialing rules as desired.
-
Click the "Apply" button.
5.5 Selecting the Type of Connection Manually
If you would like to use a certain kind of connection (Internet or fixed-line) for a call, dial the following keys on the telephone keypad before the number:
Fixed-line Connections
| 111\# establishes a fixed-line connection | |
| Internet Connections | |
| 12\# establishes an Internet connection. The Internet number used is the Internet number set for line 1. | |
| 12P\# establishes an Internet connection for a selected Internet number. For “P”, enter the position of the Internet number in the “List of Internet Numbers”. |
5.6 How Does Internet Telephony Work?
All kinds of data transmission in the Internet use the Internet Protocol (IP). IP is packet-oriented. This means that the data are broken down into data packets for transmission and IP takes care of the transport of the individual data packets through the Internet. Language is also transmitted in the Internet in this manner.
In opposition to this, fixed-line telephony transmits data in a line-oriented manner. In this case data are transmitted in a coherent data stream.
For packet-oriented transmission in the Internet, the loss of packets cannot be ruled out completely. Under unfavorable conditions this can lead to speech quality in Internet telephony that is inferior to that in fixed-line telephony.
Telephony Scenarios
If you have configured both a fixed-line number and an Internet number in FRITZ!Box Fon WLAN, you can make calls in all directions:
• from the fixed-line network into the fixed-line network
• from the Internet into the fixed-line network
• from the Internet into the Internet
and receive calls from all directions as well.
Bandwidth Management with FRITZ!Box Fon WLAN
FRITZ!Box Fon WLAN is equipped with integrated bandwidth management. This function ensures that the speech quality during telephone calls over the Internet is not reduced by surfing activity. FRITZ!Box Fon WLAN adjusts all uploads and downloads to the currently available bandwidth. Because FRITZ!Box Fon WLAN also places a higher priority on Internet telephony connections over Internet data connections, unwelcome interference is largely avoided. However, this is also true for Internet telephony: once the conversation capacity has been reached, the remote site will receive a busy signal.
6 FRITZ!DSL: The Software Suite

The FRITZ!DSL software suite is included in your FRITZ!Box Fon package. The software includes a number of programs and tools we will introduce briefly in this chapter.
Once you have installed FRITZ!DSL, the "Start Center" icon appears on your desktop. All of the programs in the FRITZ!DSL software suite can be started from the FRITZ!DSL Start Center.
To install FRITZ!DSL after the rest of the software, insert the FRITZ!Box Fon CD in your drive and select "View CD Contents / Install FRITZ!DSL".
The Start Center contains the following buttons:

Internet
Click the “Internet” button to start the FRITZ!DSL Internet program. FRITZ!DSL Internet is the Internet access and Internet monitoring software with features to ensure security, speed and control.

Internet
The “Protect” button starts the FRITZ!DSL Protect program. FRITZ!DSL Protect controls outgoing connections to the Internet and complements the firewall functions of FRITZ!Box Fon and FRITZ!DSL Internet.

FRITZ1Box
Click the "FRITZ!Box" button to open the user interface of FRITZ!Box in your web browser.

Update
Click the "Update" button to check whether a firmware update for your FRITZ!Box Fon is available on the AVM web site.

Diagnosis
The “Diagnosis” button starts the FRITZ!DSL Diagnosis. It displays all data relevant to your DSL connection, checks the installation and connection of FRITZ!Box Fon to simplify the possible search for a error.

Webtest
Click the "Web Test" button to start the WebWatch program. WebWatch can measure the quality of your Internet connection to any remote site.

For detailed information on configuring and using FRITZ!DSL programs, see the corresponding Online Help programs.
6.1 FRITZ!DSL Internet
FRITZ!DSL Internet is the Internet access and Internet monitoring software with features to ensure security, speed and control. For instructions on how to configure FRITZ!DSL Internet and use it to connect to the Internet, see the Online Help on FRITZ!DSL Internet.
Use with FRITZ!Box Fon Configured as a DSL Router
If FRITZ!DSL Internet is used in combination with a router, the program displays the connection status, provides information about the course of data transmissions, and allows the Internet connection of FRITZ!Box Fon to be established or cleared from the computer.
FRITZ!Box Fon takes care of dialing into the Internet, firewall protection from unauthorized incoming connections, and keeping track of transmission volume and online time. The FRITZ!DSL Protect program can also be implemented to provide added protection against unauthorized connections to the Internet.
Use with FRITZ!Box Fon Configured as a DSL Modem
FRITZ!DSL Internet makes surfing convenient and secure. The Short-Hold Mode with its automatic idle timeout ensures that the Internet connection is cleared as soon as no new access to Internet pages is requested for the specified amount of time. When you do request new data, FRITZ!DSL Internet establishes a new connection in the background within seconds so that you can continue surfing. This saves connection charges. The integrated traffic shaping optimizes DSL transmission, allowing full DSL speed to be exploited even when uploading and downloading data at the same time.
To protect your computer from attacks from the Internet, FRITZ!DSL Internet is equipped with firewall functions. This protects your computer from unauthorized access, even when the computer is online for long periods of time. The
FRITZ!DSL Protect program can also be implemented to provide added protection against unauthorized connections to the Internet.
6.2 FRITZ!DSL Protect
FRITZ!DSL Protect protects your PC from unwanted Internet connections. You can specify or prohibit Internet access for each program individually. If an unknown program attempts to establish and Internet connection, you will be asked whether you wish to allow such a connection.
An overview shows the programs already set up in FRITZ!DSL Protect along with their access rights. A Journal grants you an overview of all successful and rejected attempts to access the Internet.
One of the most convenient functions offered by FRITZ!DSL Protect works in combination with the UPnP capability of the FRITZ!Box. If you have enabled the option “Allow changes to security settings over UPnP” in the FRITZ!Box, FRITZ!DSL Protect can release ports for incoming connections on the FRITZ!Box whenever they are needed by programs. For this capability you must activate the “Use Port Forwarding” option in the “Settings” of FRITZ!DSL Protect. This means you can participate in online activities like gaming without having to reconfigure the FRITZ!Box firewall manually.
6.3 FRITZ!Box
Click the “FRITZ!Box” button to open the user interface of FRITZ!BoxFRITZ!Box Fon in your web browser. FRITZ!Box Fon user interface you can set up a shared Internet access for all connected computers and change the FRITZ!Box Fon settings.
6.4 Update
New firmware updates for FRITZ!Box Fon are provided by AVM at regular intervals, free of charge. The updates can add new functions to your FRITZ!Box Fon.
Click the “Update” button to check whether there is a new update available for the FRITZ!Box Fon firmware.
When the FRITZ!DSL Start Center is started, it checks the AVM web site for new updates every 30 days. You will be informed when a new update is available.
6.5 FRITZ!DSL Diagnosis
FRITZ!DSL Diagnosis reports comprehensively about all of the details of the DSL connection, including data transmission and the activated fast-path mode. The integrated comprehensive DSL diagnosis makes it possible to monitor the FRITZ!Box Fon connection and installation.
6.6 Web Test
Click the “Web Test” button to start the WebWatch program. WebWatch is a simple program to determine the quality of an Internet connection.
WebWatch displays the quality of the current Internet connection and the data packets' path through the Internet.
Once a URL is entered, WebWatch sends a signal to the destination address. The response times are measured and evaluated and then displayed in a diagram.
7 U S B D e v i c e s
The FRITZ!Box Fon WLAN has a built-in USB host controller. A USB host controller provides a USB port to which you can connect USB devices. The USB host controller is suitable for connecting the following USB devices:
- USB mass storage devices (hard drives or memory sticks)
- USB printers
• FRITZ!WLAN USB Sticks - USB hubs
7.1 Connecting USB Devices
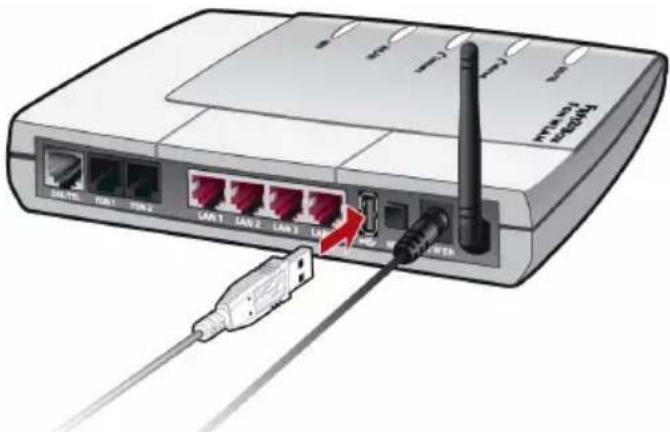
Some of the USB devices, such as memory sti FRITZ!WLAN USB Stick, are inserted directly into the USB port of the USB host controller. Other devices like USB printers are connected to the USB host controller by means of a USB cable.
To connect a USB device via a USB cable, insert the end of the cable with the flat plug into the USB port of the USB host controller.
The end of the cable with the square plug goes into the USB port of your USB device.
text_image
Diagram of a network switch with labeled ports and connection points, showing connections via USB cable to a power outlet.Connecting a USB cable to the USB host controller
7.2 USB Mass Storage
USB mass storage devices include hard drives and memory sticks.
File Systems Supported
The USB host controller supports the mass-storage file systems FAT and FAT32.
Connecting the USB Mass Storage Device
A USB mass storage device can be connected either directly to the USB host controller, or via the USB hub (see the section “USB Hub” on page 47).
Configuring Access Rights and Password Protection for the USB Mass Storage Devices
On the FRITZ!Box Fon WLAN user interface you can configure access rights and a password to protect the USB mass storage devices.
- Open a web browser on one of the computers connected to the FRITZ!Box Fon WLAN.
- Open the FRITZ!Box Fon WLAN user interface (see the section "Opening the User Interface" on page 26.
- Set up the access rights and password protection for the USB mass storage devices in the “USB Devices / Mass Storage Device” menu.

The access rights and password are valid for all USB mass storage devices. It is not possible to assign a different password for each individual mass storage device.
Accessing the Data in the USB Mass Storage Device
USB mass storage devices connected to the FRITZ!Box Fon WLAN directly or via a USB hub are displayed with their device name in the “USB Devices / Mass Storage Device” menu on the user interface.
The data saved on the USB mass storage devices are accessed by means of FTP (File Transfer Protocol):
- Click the name of the mass storage device in the “USB Devices / Mass Storage Device” menu or open a web browser and enter “FTP://fritz.box” in the address field.
- The folder structure of the USB mass storage device is displayed in your web browser.
If you are using Microsoft Internet Explorer, you can simply copy files from your mass storage device to your computer and vice versa (by means of “drag and drop”, for instance). If you use a different browser, see the corresponding documentation for instructions about exchanging files via FTP.
Files from the mass storage device cannot be executed or opened in a suitable program until they have been copied to your computer or your local network.
7.3 USB Printers
The FRITZ!Box Fon WLAN is equipped with a printer server that allows you to use a USB printer connected to the USB host controller as a network printer. The printer is then available to all computers connected with the FRITZ!Box Fon WLAN.
Please note the following when connecting the printer:
- Only printers that can be addressed with the de class “Printer” are supported. Please note that many multi-function devices (like fax-scanner-printer combinations) can not be addressed with the USB device class “Printer”.
- Host-based printers, like those that work according to the GDI system, are not supported for operation with the FRITZ!Box Fon WLAN.
- For multi-function devices (printers with additional functions like fax or scanning), only the printing function is supported.
- If your printer is equipped with a status monitor, you may not be able to use this.
The printer connection must be configured, and the suitable printer drivers installed, on every computer from which you want to use the network printer. Print jobs are forwarded to the IP address of the printer server in the local network via the printer port.
Configuring the Printer Port in the Windows Operating Systems
If the “FRITZ!Box” entry is already listed in the “Programs” group of the start menu of the computer, this means that the printer port is already configured on this computer.
Otherwise, work through the following steps to create the entry in the start menu and thus configure the printer port:
- Make sure that the FRITZ!Box Fon WLAN is connected to the computer and accessible.
The FRITZ!Box Fon WLAN is accessible whenever you can open the user interface (see the section “Opening the User Interface” on page 26).
- Insert the FRITZ!Box Fon WLAN CD in your CD-ROM drive.
The Installation Help for starting operation of the FRITZ!Box Fon WLAN is started.
-
Click the "View CD Contents" button.
-
Click the "Start Menu Entry" button.
The printer port designated “AVM: (FRITZ!Box USB Printer Port)” will be configured.
Now you can install the printer drivers of the printer connected to FRITZ!Box Fon WLAN for this printer port.
Installing Printer Drivers in Windows XP/2000
-
Open the start menu of the computer and click the "Printers and Faxes" entry (Windows XP) or click "Start / Settings / Printer" (Windows 2000).
-
In the “Printers and Faxes” window, click “Add a printer” in the “Printer Tasks” area on the left hand side. In Windows 2000, click “Add Printer” in the “Printers” window.
The Add Printer Wizard will be started.
-
Click "Next".
-
Select the option “Local printer attached to this computer” (Windows XP) or “Local Printer” (Windows 2000) and make sure that the setting “Automatically detect and install my Plug and Play printer” is disabled.
You must make this selection because the printer port on the computer functions as a local port.
-
Click "Next".
-
In the “Select a Printer Port” window, select the option “Use the following port” and select “AVM: (FRITZ!Box USB Printer Port)” from the list field. Click “Next”.
-
Select the manufacturer for the USB printer connected to the FRITZ!Box Fon WLAN from the “Manufacturer” list and then select the exact model from the “Printer” list.
If the manufacturer or the model is not included in the lists, use an installation disk or CD with the required files and click “Have Disk...”.
- In the “Name Your Printer” window, answer the question “Do you want to use this printer as the default printer?” (Windows XP) or “Do you want your Windows-based programs to use this printer as the default printer?” (Windows 2000) with “No”.
Installing Printer Drivers in Windows Me/98
- In the “Start / Settings” menu, click the “Printers” entry.
- In the "Printers" window, click "Add Printer".
The Add Printer Wizard is started.
- Click "Next".
- Select the option "Local printer" and then click "Next".
- Select the manufacturer for the USB printer connected to the FRITZ!Box Fon WLAN from the “Manufacturers” list and then select the exact model from the “Printers” list.
If the manufacturer or the model is not included in the lists, use an installation disk or CD with the required files and click “Have Disk...”.
- Click "Next".
- From the list of "Available ports", select the entry "AVM: (FRITZ!Box USB Printer Port)" and click "Next".
- Continue by following the instructions on the and conclude the installation of the printer driver with "Finish".
7.4 FRITZ!WLAN USB Stick
The FRITZ!WLAN USB Stick is a WLAN adapter for connection to a computer. Using this WLAN adapter you can connect the computer wirelessly with any FRITZ!Box Fon WLAN.
AVM Stick & Surf Technology
With this technology, the FRITZ!WLAN USB Stick can be inserted in the FRITZ!Box Fon WLAN to automatically transmit the WLAN security settings from the FRITZ!Box Fon WLAN to the FRITZ!WLAN USB Stick.
-
Insert the Stick in the port on your FRITZ!Box Fon WLAN for the USB host controller.
-
The "INFO" LED on the FRITZ!Box Fon WLAN begins flashing rapidly. The WLAN security settings are being transferred to the FRITZ!WLAN USB Stick.
- As soon as the "INFO" LED stops flashing, transmission of the settings has been concluded. You can now remove the stick.
After the security settings have been transmitted automatically, you can insert the FRITZ!WLAN USB Stick in a computer and establish a connection to the WLAN access point. No manual settings are necessary.
7.5 USB Hub
A USB hub can be connected to the USB host controller. A USB hub is a device to extend existing USB ports.
You can connect two USB mass storage devices and one USB printer, or three USB mass storage devices (like a hard drive or memory stick) to the USB hub.

If more than one USB device without its own power supply is connected to the FRITZ!Box Fon WLAN, please note that, in accordance with the USB specification, the total current consumption may not exceed a value of 500 mA.
8 WLAN: Wireless Local Area Networks
WLAN is a radio technology that allows Ethernet networks and access to the Internet to be provided without cable connections. This allows multiple users to share one wireless Internet connection. A notebook and a WLAN adapter is all you need for an Internet connection at locations with public WLAN access points, for instance at airports.
8.1 Standards
The WLAN standards IEEE 802.11b, IEEE 802.11g and IEEE 802.11i were developed by the Institute of Electrical and Electronic Engineers (IEEE).
IEEE 802.11b and IEEE 802.11g
The two standards IEEE 802.11b and IEEE 802.11g define the transmission rate within a wireless LAN. These standards differentiate between gross and net transmission rates. The net speed describes the transmission rate of the user data.
- A transmission rate of up to 11 Mbit/s can be attained using 802.11b technology.
- With 802.11g technology, gross transmission rates of up to 54 Mbit/s are possible. The net rate can reach up to 25 Mbit/s.
The FRITZ!Box Fon WLAN supports both standards. WLAN adapters based on either of these standards can be used for WLAN connections with the FRITZ!Box Fon WLAN.
The range within a given WLAN depends to a high degree on the WLAN adapter used as well as the physical surroundings of the network.
802.11g++
The transmission rate within a wireless LAN can be boosted with the 802.11g++ standard. Gross rates of up to 125 Mbit/s are possible; net transmission rates can reach up to 35 Mbit/s.
IEEE 802.11i
The WPA2 security mechanism is defined in the IEEE 802.11i standard. WPA2 is an extension of the fam mechanism WPA (Wi-Fi Protected Access).
The main feature of the extension of WPA to WPA2 is the AES-CCM encryption process.
- The WPA mechanism stipulates the TKIP (Temporary Key Integrity Protocol) for encryption.
- Besides TKIP, the WPA2 mechanism also defines the AES-CCM encryption procedure, which is based on the extremely secure AES (Advanced Encryption Standard) procedure. CCM (Counter with CBC-MAC) defines how the AES procedure is applied to WLAN packets.
FRITZ!Box Fon WLAN supports the AES encryption procedure as part of the WPA2 mechanism, and the TKIP encryption procedure as part of the WPA mechanism. This means that the FRITZ!Box Fon WLAN can be used in combination with any WLAN adapters that also support WPA2 with AES or WPA with TKIP.
8.2 Security
Security is of utmost importance within radio networks. Radio signals can also be received outside of office or residential spaces and abused for criminal purposes.
Therefore it is important that no unauthorized users can register in a WLAN to use its Internet access or shared network resources.
FRITZ!Box Fon WLAN includes settings on various levels that contribute to the security of your WLAN and thus to the security of your computers.
Encryption
The most important security setting is encryption. FRITZ!Box Fon WLAN supports the security mechanisms WEP (Wired Equivalent Privacy), WPA (Wi-Fi Protected Access) and WPA2 as follows:
- As part of the WEP mechanism a static key is d mined to serve for the encryption of the user data. The key must also be entered in the WLAN settings of the WLAN clients.
- The WPA and WPA2 mechanisms provide for authentication while the connection is being established. For this a WPA password must be defined.
Select an encryption method to be used to encrypt the user data:
TKIP or AES, depending on which is supported by your WLAN adapter.
The user data are encrypted using an automatically generated key. This key is regenerated at regular intervals.
The WPA password used may be 8 to 63 characters in length. For increased security, however, the password should be at least 20 characters long. Use numerals, letters and special characters and combine capitals and lower-case letters.
In the FRITZ!Box Fon WLAN a WPA encryption with the TKIP encryption method is preconfigured. It is advisable to change the preconfigured WLAN settings as soon as possible. Changes to the settings can be configured on the FRITZ!Box Fon WLAN user interface.
The encryption method you set in FRITZ!Box Fon WLAN must also be supported by your WLAN adapter. To configure the best security settings possible with FRITZ!Box Fon WLAN and your WLAN adapter, please note the following recommendations:
- Your WLAN adapter supports WPA2 (i.e., it supports the 802.11i standard):
Select the WPA mechanism and the AES encryption procedure. - Your WLAN adapter supports the WPA mechanism, but not the WPA2 mechanism:
Select the WPA mechanism and the TKIP encryption method, and replace the WPA network key preconfigured in FRITZ!Box Fon WLAN with your own key value. - Your WLAN adapter supports neither the WPA nor the WPA2 mechanism:
Select the WEP mechanism.
We strongly recommend the use of a WLAN adapter that supports WPA or WPA2 (for instance, the FRITZ!WLAN USB Stick). WEP is out of date and data encrypted with WEP can be deciphered within a few hours.
WLAN Radio Network Name (SSID)
The factory settings of FRITZ!Box Fon WLAN include a value of "FRITZ!Box Fon WLAN 7140" preset for the SSID (Service Set Identifier). Change the SSID as soon as possible.

8.3 Frequency Range
WLAN uses the frequency range around 2.4 GHz in the ISM band. WLAN thus works in the high-frequency range, like Bluetooth. Microwave devices and cordless telephones use this range as well. Thus interference can occur within WLANs operated in the vicinity of such devices. Generally the only adverse effects are to the transmission rate; aborted connections and data losses are rare.
In Europe, 13 channels are provided for WLAN in the 2.4 GHz range. One channel has a bandwidth of 22 MHz. A 5-MHz interval is left empty between adjacent channels. That means that channels located directly next to each other can overlap and result in mutual interference. If several WLANs are operated within a small space, a distance of at least 5 channels should be left empty between each two channels used. For instance, if channel 1 is selected for one WLAN, the channels 7 through 13 can be selected for a second WLAN. This maintains the minimum distance between channels.
Should interference in a WLAN persist, the first step should be to select a different channel. Additional tips on interference in the WLAN radio network are presented in the section “Eliminating Disturbances caused by Another WLAN Radio Network” from page 70.
WLAN channels in the 2.4 GHz range:
| Channel | Frequency (MHz) | Channel | Frequency (MHz) | ||
| 1 2412 8 2447 | |||||
| 2 | 2 | 4 | 1 | 7 | |
| 3 | 2422 | 10 | 2457 | ||
| 4 | 2 | 4 | 2 | 7 | 1 |
| 5 | 2432 | 12 | 2467 | ||
| 6 | 2437 | 13 | 2472 | ||
| 7 | 2442 | ||||
9 Network Settings
Upon delivery, the network settings of the FRITZ!Box Fon WLAN are preconfigured as follows:
| Factory Settings | |
| All computers are located in the same IP net-work | enabled |
| IP address 192.168.178.1 | |
| Subnet mask 255.255.255.0 | |
| DHCP server enabled | |
According to these settings, all computers connected with the FRITZ!Box Fon WLAN are located in the same subnetwork.
You can change any of these settings, but should only do so if you are well-versed in network settings. If you do not have much experience in setting up networks, please read this chapter in full.
- The “Basics” section explains terms and concepts having to do with IP networks.
- The sections “IP Address”, “DHCP Server” and “Subnetwork” explain when it may make sense to change the preconfigured network settings, what the effects of these changes are, and how to make the changes.
9.1 Basics
What Is IP?
IP is the abbreviation for Internet Protocol.
The IP Internet Protocol is the most important basic protocol for the control of data exchange in local networks and in the Internet. The Internet protocol works without a connection; in other words, data packets are transmitted from the sender to the recipient without previous consultation. The addresses of the recipient and the sender in the data packets are given as IP addresses.
IP Network
A network in which data exchange takes place on the basis of the Internet Protocol is called an IP network.
What Is an IP Address?
The term IP address is the abbreviation for Internet Protocol address.
The IP address corresponds to the “postal” address of a device located in the Internet or in a local IP network. So that data packets are sure to be delivered to the right address, each IP address may be assigned only once within the Internet or a local IP network.
The IP address consists of four three-digit groups of numerals (e.g. 192.168.178.254). Each group of numbers can assume values between 000 and 255.
Every IP address contains two components: the network address and the host address. These two components can be read out of an IP address only if the subnet mask is also specified.
IP addresses can be public or private, and also fixed or assigned dynamically.
Public IP Address
A public IP address is an IP address valid in the Internet. Every computer or router participating in the Internet must have a public IP address. This address is usually negotiated dynamically with the Internet provider when a connection to the Internet is dialed. The Internet provider assigns the negotiated IP address to the computer or router for the duration of an Internet session.
Private IP Address
Private IP addresses are used for computers and other network devices within local IP networks.
Since many local IP networks are not connected to the Internet except via single computers or routers (gateway), certain address ranges are excluded from the publicly available IP
addresses so that they are available for assignment in local IP networks. An IP address may only be assigned once within the local network. A private IP address may exist in any number of other local networks.
Fixed IP Address
Fixed IP addresses are IP addresses which are permanently assigned to a computer or another device like a network printer.
Assigning fixed IP addresses makes sense in cases where a local network has a sufficiently large pool of IP addresses available, or when a computer is always supposed to be accessible at a certain address (such as a web server or e-mail server).
Dynamic IP Address
A dynamic IP address is an IP address valid only for the duration of one Internet or network session.
Every computer participating in the Internet must have a uniquely assigned public IP address. Since only a limited number of such IP addresses is available, they must be used sparingly. That is why most of the Internet participants who dial in to the Internet receive a dynamic IP address. They are called dynamic because every participant receives a new public address that has not been assigned yet each time he or she dials in to the Internet.
By contrast, dynamic addresses are usually used in local IP networks because they are easy to handle, and because using them avoids incorrect IP address entries or unintentional double assignments. The DHCP service is responsible for assigning unique dynamic IP addresses.
Subnetwork
A local IP network can consist of one subnetwork or be divided into multiple subnetworks. The division into subnetworks is performed when the local IP network is configured. The subnetworks of a local IP network are also IP networks.
Subnet Mask
The subnet mask indicates which part of an IP address is the network address and which the address of the computer. The network address defines what is called the subnet.
| Example 1 | |
| IP Address: 192.168.178.254 | |
| Subnet mask: 255.255.255.0 | |
| The assignment of the first three groups of numerals in the subnet mask indicates that the first three groups of numerals in the IP address define the network. The following addresses result: | |
| Network address of the subnet: | 192.168.178.0 |
| Address of the computer in the subnet: | 192.168.178.254 |
| IP address pool in the sub-net: | 192.168.178.0 - 192.168.178.255The IP addresses 192.168.178.0 and 192.168.178.255 are reserved. This means that the addresses from 192.168.178.1 to 192.168.178.254 are available for assignment to the com-puters. |
| Example 2 | |
| IP Address: 192.168.178.254 | |
| Subnet mask: 255.255.0.0 | |
| The assignment of the first two groups of numerals in the subnet mask indicates that the first two groups of numerals in the IP address define the network. The following addresses result: | |
| Network address (subnet): 192.168.0.0 | |
| Address of the computer in the subnet: | 192.168.178.254 |
| IP address pool in the sub-net: | 192.168.0.0 - 192.168.255.255The IP addresses 192.168.0.0 and 192.168.255.255 are reserved. This means that the addresses from 192.168.0.1 to 192.168.255.254 are available for assignment to the com-puters. |
What Is DHCP?
DHCP is the abbreviation for Dynamic Host Configuration Protocol.
DHCP is a protocol for the dynamic negotiation of the operating parameters for the TCP/IP protocol (TCP is a transport protocol based on the Internet protocol). The computers of a local IP network (DHCP clients) access the DHCP server as part of their operating systems' start procedure.
The DHCP server assigns each client an IP address that it has not yet been assigned at the present time. The DHCP server also informs the client of the IP addresses of the DNS server to be used and of the default gateway. In assigning the IP addresses the DHCP server selects from a prescribed pool of IP addresses.
The central administration of the TCP/IP operation parameters makes it possible to avoid address conflicts due to IP addresses accidentally assigned more than once.
9.2 IP Address
The FRITZ!Box Fon WLAN is delivered with an IP address preset.
| Factory Settings | |
| All computers are located in the same IP net-enabled work | |
| IP address 192.168.178.1 | |
| Subnet mask 255.255.255.0 | |
| DHCP server enabled | |
| The IP address and the corresponding subnet mask automatically yield the following values: | |
| Network address of the subnet 192.168.178.0 | |
| Entire IP address pool for the computers | 192.168.178.2 - 192.168.178.253 |
You can change the preset IP address.
When Does It Make Sense to Change the IP Address?
You should change the IP address of the FRITZ!Box Fon WLAN if the following apply to your network:
- You have an existing local IP network, one subnet with several computers.
- Fixed IP addresses are registered in the network settings of the computer, and you do not want to or are not permitted to change these addresses.
- You want to connect the FRITZ!Box Fon WLAN to the subnet in order to make the FRITZ!Box Fon WLAN features available to all of the computers in the subnet.
What IP Address Must You Assign for the FRITZ!Box Fon WLAN and What Else Must Be Taken into Consideration?
- The IP address must come from the address range of your existing subnet.
- The subnet mask must correspond with that of the connected subnet.
- When the DHCP server of the FRITZ!Box Fon WLAN is enabled, the addresses 20 through 200 in the fourth group of numerals of the IP address are reserved for the DHCP server. If none of the computers in your network has an address from this pool, the DHCP server can remain switched on. If one of the computers has a fixed address assigned from this pool, you should switch off the DHCP server.
- If you can no longer open the FRITZ!Box Fon WLAN user interface after entering the IP address, see the information in the section “Open the FRITZ!Box Fon WLAN User Interface via a LAN Connection” from page 68.
Reserved IP Addresses
The following address range is reserved in FRITZ!Box Fon WLAN for internal purposes.
192.168.180.1 - 192.168.180.254
IP addresses from this range may not be assigned to FRITZ!Box Fon WLAN.
How Can the IP Address Be Changed?
- Open the FRITZ!Box Fon WLAN user interface (see the section "Opening the User Interface" on page 26.
- Click “Expert Mode” in the “System” menu, enable the setting “Show expert settings” and confirm this setting by clicking “Apply”.
- Open the "System / Network Settings" menu.
-
Click the "IP Addresses" button.
-
Make the changes on the "IP Settings" page and then click "Apply".
9.3 DHCP Server
FRITZ!Box Fon WLAN is equipped with its own DHCP server. The DHCP server is enabled by default in the factory settings. Every time the operating system on a computer connected with FRITZ!Box Fon WLAN is started, it is assigned an IP address by the DHCP server.

Only one DHCP server may be active within any network.
| Factory Settings | |
| All computers are located in the same IP net-work | enabled |
| IP address 192.168.178.1 | |
| Subnet mask 255.255.255.0 | |
DHCP server enabled
The IP address, the corresponding subnet mask and the activated DHCP server automatically yield the following values:
Network address of the subnet 192.168.178.0
Entire IP address pool for the computers 192.168.178.2 - 192.168.178.253
Address pool of the DHCP server: 192.168.178.20 - 200
In every subnet of the FRITZ!Box Fon WLAN, the addresses 20 through 200 in the fourth group of numerals of the IP address are reserved for the DHCP server.
Assigning the IP addresses via the DHCP server ensures that all of the computers connected with the FRITZ!Box Fon WLAN are located in a single subnet.

The computers can receive their IP addresses from the DHCP server only if the setting “Obtain an IP address automatically” is enabled in the their IP settings. For more information, see the section “IP Settings” from page 72.
Fixed IP Addresses when the DHCP Server Is Enabled
If you would like to assign fixed IP addresses to individual computers connected with FRITZ!Box Fon WLAN, despite the fact that the DHCP server is enabled, then you must disable the option “Obtain an IP address automatically” in this computer’s network settings and enter the fixed IP address manually.
Which IP Addresses Can You Assign to the Computers?
- The IP addresses must be from the same subnet as FRITZ!Box Fon WLAN.
- The IP addresses may not come from the address pool of the DHCP server.
If the factory settings are not changed, that means the following IP addresses are available:
192.168.178.2 - 192.168.178.19
192.168.178.201 - 192.168.178.253
Each IP address can be assigned only once.
Disabling the DHCP Server
You can switch off the DHCP server.
To make sure that all computers remain in the same subnet as the FRITZ!Box Fon WLAN even when the DHCP server is disabled, you must enter the IP addresses manually in the computers' network settings. First disable the option "Obtain an IP address automatically" and then enter the IP address manually in the appropriate field.
In the case of the preset IP address of the FRITZ!Box Fon WLAN, the following IP addresses are available for assignment to the computers:
192.168.178.2 - 192.168.178.253
Each IP address can be assigned only once.
Changing the DHCP Server Settings
Proceed as follows to open the DHCP server settings:
- Open the FRITZ!Box Fon WLAN user interface (see the section "Opening the User Interface" on page 26.
- Click “Expert Mode” in the “System” menu, enable the setting “Show expert settings” and confirm this setting by clicking “Apply”.
- Open the "System / Network Settings" menu.
- Click the "IP Addresses" button.
The “IP Settings” page is opened. Here you can make the settings for the DHCP server.
9.4 Subnetwork
By default the option “All computers are located in the same IP network” is enabled in the FRITZ!Box Fon WLAN.
| Factory Settings | |
| All computers are located in the same IP net- enabled work | |
| IP address 192.168.178.1 | |
| Subnet mask 255.255.255.0 | |
| DHCP server enabled |
If the factory settings were not changed, this setting has the following effect:
The DHCP server of the FRITZ!Box Fon WLAN assigns all of the computers connected with the FRITZ!Box Fon WLAN an IP address from the address pool of the DHCP server.
Address pool of the DHCP server: 192.168.178.20 - 200
This means that all of the computers connected with the FRITZ!Box Fon WLAN are located in the same subnet.
"All computers are located in the same IP network" is Disabled
If you switch off the setting “All computers are located in the same IP network”, the interfaces of the FRITZ!Box Fon WLAN will receive their own IP addresses. The following settings are configured by default:
| Interface | IP Address | Subnet Mask | DHCP Server |
| LAN 1 | 192.168.178.1 The subnet | The DHCP server is enabled at every interface. | |
| LAN 2 | like LAN 1 | mask | |
| LAN 3 | like LAN 1 | 255.255.255.0 is set at every interface. | |
| LAN 4 | like LAN 1 | ||
| WLAN 192.168.182.1 | |||
This the following address ranges are available to the DHCP server:
| Interface Address Range of the DHCP Server at the Inter-face |
| LAN 1 192.168.178.20 - 200 |
| LAN 2 like LAN 1 |
| LAN 3 like LAN 1 |
| LAN 4 like LAN 1 |
| WLAN 192.168.182.20 - 200 |
Computers connected with the FRITZ!Box Fon WLAN via different interfaces are located in different subnets.
| Interface Network Address of the Subnet |
| LAN 1 192.168.178.0 |
| LAN 2 like LAN 1 |
| LAN 3 like LAN 1 |
| LAN 4 like LAN 1 |
| WLAN 192.168.182.0 |
Disabling the Setting "All computers are located in the same IP network"
Proceed as follows to open the DHCP server settings:
- Open the FRITZ!Box Fon WLAN user interface (see the section "Opening the User Interface" on page 26.
- Click “Expert Mode” in the “System” menu, enable the setting “Show expert settings” and confirm this setting by clicking “Apply”.
- Open the "System / Network Settings" menu.
- Click the "IP Addresses" button.
The “IP Settings” page is opened. Here you can change the setting “All computers are located in the same IP network”.
10 Troubleshooting
This chapter provides advice if you are not able to open the user interface of your FRITZ!Box Fon WLAN, if you are having problems with the WLAN connection, or if you want to change the IP settings on your computer.
10.1 Errors Opening the User Interface
If you see an error message when you open the user interface, work through the following steps to find the source of the error and resolve the error.
Checking the Cable Connections
Make sure that all cable connections are plugged in securely. The LED labeled “Power/DSL” must be lit up.
Entering the IP Address of the FRITZ!Box Fon WLAN in the Internet Browser
In the Internet browser, enter the following IP address in place of "fritz.box":
192.168.178.1
Obtaining an IP Address Automatically
The IP addresses of the connected computers must be assigned automatically (see “IP Settings” from page 72).
Checking the Internet Browser Settings
Check the settings of the Internet browser:
- The browser must use the network connection between the computer and FRITZ!Box when the user interface is opened. For this the automatic establishment of a Dial-Up Networking connection must be disabled.
-
The Internet browser must be in online operation.
-
If the Internet browser uses a proxy server, the DNS name and the IP address of the FRITZ!Box must be entered as exceptions in the proxy settings of the Internet browser.
- The user interface must be allowed to execute CGI scripts.
Example: Checking the Settings of Internet Explorer 6
Here is how to disable the automatic establishment of a Dial-Up Networking connection:
- Select the “Connections” settings page under “Tools / Internet Options...”.
- In the “Dial-up and Virtual Private Network settings” section, enable the option “Never dial a connection”.
- As a final step, click "Apply" and then "OK".
Here is how to set online operation for the the Internet Explorer 6:
- Open the "File" menu.
- If a checkmark is displayed in front of "Work Offline", click this line. The checkmark will be removed and Internet Explorer will switch to online operation.
Here is how to enter the DNS name and IP address of FRITZ!Box as exceptions in the proxy settings of the web browser:
- Select the “Connections” settings page under “Tools / Internet Options...”.
- Click the “LAN Settings...” button in the section “Local Area Network (LAN) settings”, and in the next window, click the “Advanced...” button in the “Proxy server” section.
- Enter as "Exceptions": fritz.box; 192.168.178.1 and click "OK".
To allow CGI scripts to be executed on the user interface:
- Select "Tools / Internet Options... / Security".
If the “Default Level” button is not available for selection, the “Medium” security level is already configured, which means that CGI scripts can be executed on the user interface.
Proceed as follows if the “Default Level” button is available for selection:
-
Select the "Local Intranet" icon and click the "Sites..." button.
-
In the next window, click the “Advanced...” button and enter in the “Add this Web site to the zone:” field:
fritz.box
- Disable the option “Require server verification (https:) for all sites in this zone”.
Check Protection Software
Protection software like firewalls and security software can block access to the FRITZ!Box Fon WLAN user interface. Set exceptions for the FRITZ!Box Fon WLAN in all active protection software.
If you would like to exit protection software to test access to the FRITZ!Box Fon WLAN, remove the DSL cable first! After testing, first start the protection software before reinserting the DSL cable and connecting to the Internet!
Restarting the FRITZ!Box Fon WLAN
Restart the FRITZ!Box Fon WLAN. Remove the mains cable from the socket. Wait five seconds before reconnecting to the power supply.
If these points are all in order but you still have no access to the user interface, work through the following instructions:

Open the FRITZ!Box Fon WLAN User Interface via a LAN Connection
FRITZ!Box Fon WLAN is equipped with a fixed IP address that cannot be changed. FRITZ!Box Fon WLAN always can be reached at this IP address. This fixed IP address is:
192.168.178.254
Proceed as follows to open the FRITZ!Box Fon WLAN user interface using this IP address:
-
Connect FRITZ!Box Fon WLAN and the computer using the red LAN cable (see the section “Connecting Computer(s) to a LAN Port” from page 17).
-
Take note of the computer's current IP settings.
-
Change the IP settings by entering the following fixed IP address:
192.168.178.250
- Start your Internet browser and enter FRITZ!Box Fon WLAN's fixed IP address:
192.168.178.254
The FRITZ!Box Fon WLAN user interface opens.
-
Once you have reached the FRITZ!Box Fon WLAN user interface again, you should check the FRITZ!Box Fon WLAN settings and correct them if necessary.
-
Enter the settings you noted in the computer's IP settings dialog.
10.2 The WLAN Adapter Cannot Find FRITZ!Box Fon WLAN
If the “FRITZ!Box Fon WLAN 7140” radio network is not found by the WLAN adapter of a computer, work through the following steps to find the source of the error and resolve it.
Making Sure that the WLAN Adapter Is Ready for Operation
Make sure that the WLAN adapter is ready for operation. Some of the WLAN adapters installed in notebooks must be activated by flipping a switch on the notebook.
For questions on the WLAN adapter of your computer, please contact the manufacturer.

Enabling WLAN in the FRITZ!Box Fon WLAN
If the “WLAN” LED on the FRITZ!Box Fon WLAN is not lit up or is flashing, this means that WLAN is not enabled.
Press the WLAN switch on the back panel of the FRITZ!Box Fon WLAN. The “WLAN” LED begins flashing and then lights constantly. This means that the WLAN function is enabled.
Announce Name of the Radio Network
Make sure that the settings “Announce name of the radio network (SSID)” is enabled in the WLAN settings of the FRITZ!Box Fon WLAN.
- Connect the FRITZ!Box Fon WLAN to a computer using a network cable. Proceed as described in the section "Connecting Computer(s) to a LAN Port" from page 17.
- Open an Internet browser and enter fritz.box in the address field.
The FRITZ!Box Fon WLAN user interface opens. - Select the "WLAN" menu and enable the setting "Announce name of the radio network".
-
Click the "Apply" button.
-
Clear the cable connection between the FRITZ!Box Fon WLAN and the computer by removing the network cable.
Eliminating Disturbances caused by Another WLAN Radio Network
If there is another WLAN radio network in the direct vicinity of your FRITZ!Box Fon WLAN, you must ensure that there are at least five channels between the radio channels used by the two networks. Otherwise the frequency bands of the two radio networks will overlap and mutual interference may occur. A total of thirteen radio channels are reserved for WLAN.
If there is another WLAN radio network in the direct vicinity of your FRITZ!Box Fon WLAN, test a different radio channel for your FRITZ!Box Fon WLAN.
- Connect the FRITZ!Box Fon WLAN to a computer using a network cable. Proceed as described in the section "Connecting Computer(s) to a LAN Port" from page 17.
- Open an Internet browser and enter fritz.box in the address field.
- Select the "WLAN / General" menu.
- Select a different radio channel from the “Select radio channel” list.
- Click the "Apply" button.
- Clear the cable connection between the FRITZ!Box Fon WLAN and the computer by removing the network cable.
10.3 WLAN Connection Is Not Established
Comparing the Security Settings for WLAN
Make sure that the WLAN security settings registered in the FRITZ!Box Fon WLAN agree with the security settings of the WLAN adapter.
Here is how to view the WLAN security settings of the FRITZ!Box Fon WLAN and print them out.
- Connect the FRITZ!Box Fon WLAN to a computer using a network cable. Proceed as described in the section "Connecting Computer(s) to a LAN Port" from page 17.
- Open an Internet browser and enter fritz.box in the address field.
- Select the "WLAN / Security" menu.
- Click the "Apply" button.
A window is displayed with the WLAN security settings. Print out this page by clicking the “Print Page” button at the upper left of the page. - Clear the cable connection between the FRITZ!Box Fon WLAN and the computer by removing the network cable.
Testing the WLAN Connection without Security Settings
Disable the WLAN security settings to test whether a WLAN connection between the FRITZ!Box Fon WLAN and the WLAN adapter is possible at all.
- Connect the FRITZ!Box Fon WLAN to a computer using a network cable. Proceed as described in the section "Connecting Computer(s) to a LAN Port" from page 17.
- Click the “WLAN / Security” command and select “enable non-encrypted access”. As a final step, click “Apply”.
This non-secured condition should be used only for testing, to find out whether a WLAN connection is possible at all.
- Clear the cable connection between the FRITZ!Box Fon WLAN and the computer by removing the network cable.
If this attempt is not successful either, check the installation of the WLAN adapter and contact the manufacturer of the WLAN adapter if necessary.

10.4 IP Settings
FRITZ!Box Fon WLAN is equipped with its own DHCP server. This means that FRITZ!Box Fon WLAN assigns the connected computers their IP addresses. The connected computers must be configured such that they can receive their IP addresses automatically from FRITZ!Box Fon WLAN. The steps for checking and adjusting this option differ among the operating systems. See the relevant section for your operating system.

If FRITZ!Box Fon WLAN is operated in a network, no other DHCP server may be activated in this network. If you need to operate a DHCP server, please disable the DHCP feature in the “Advanced System Settings”.
Linux
For comprehensive information and tips on the topic of network configuration in Linux, see:
http://www.linux.org/docs/ldp/howto/NET3-4-HOWTO-5.html
Obtaining an IP Address Automatically in Windows XP
Proceed as follows in Windows XP:
- Go to “start / Control Panel / Network and Internet Connections / Network Connections” and double-click the LAN connection icon of the network adapter connected to FRITZ!Box Fon WLAN.
- Click the "Properties" button.
- Select “Internet Protocol (TCP/IP)” in the list of items used in this network connection and click “Properties”.
- Enable the options "Obtain an IP address automatically" and "Obtain DNS server address automatically".
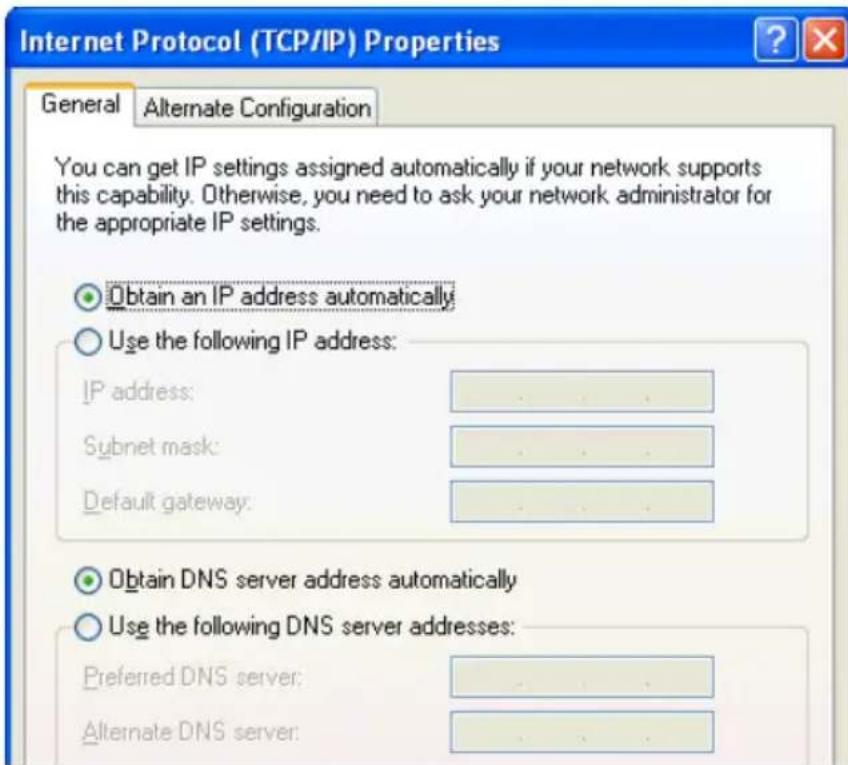
text_image
Internet Protocol (TCP/IP) Properties General Alternate Configuration You can get IP settings assigned automatically if your network supports this capability. Otherwise, you need to ask your network administrator for the appropriate IP settings. Obtain an IP address automatically Use the following IP address: IP address: ...... Subnet mask: ...... Default gateway: ...... Obtain DNS server address automatically Use the following DNS server addresses: Preferred DNS server: ...... Alternate DNS server: ......Properties of the Internet protocol (TCP/IP)
- Confirm your selection by clicking "OK".
The computer now receives an IP address from FRITZ!Box Fon WLAN.
Obtaining an IP Address Automatically in Windows Me/98
Proceed as follows in Windows Me/98:
Keep your Windows CD handy, as this may be required for changes to your network settings.
- Select "Start / Settings / Control Panel".
- Double-click the "Network" entry to open it.
- In the list, double-click to select the binding designated with an arrow, "TCP/IP -> <network adapter bound to FRITZ!Box Fon WLAN 7140)".
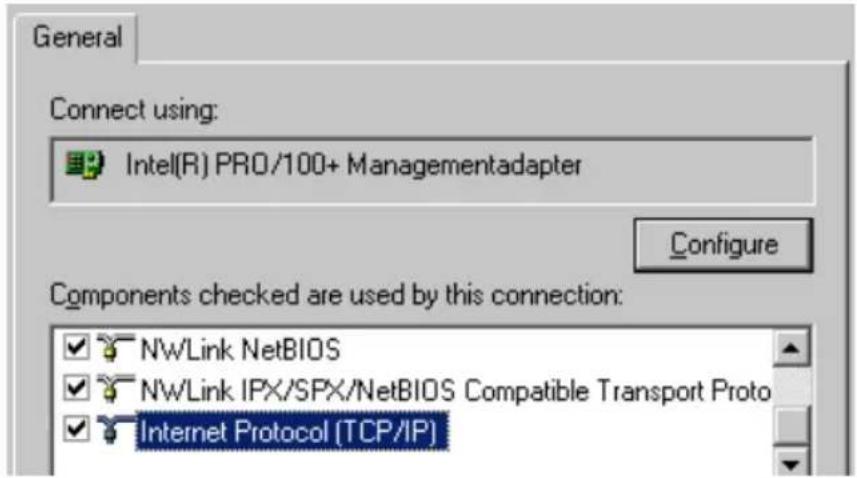
text_image
General Connect using: Intel(R) PRO/100+ Managementadapter Configure Components checked are used by this connection: NwLink NetBIOS NwLink IPX/SPX/NetBIOS Compatible Transport Proto Internet Protocol [TCP/IP]
TCP/IP binding to a network adapter
- Enable the option "Obtain an IP address automatically".
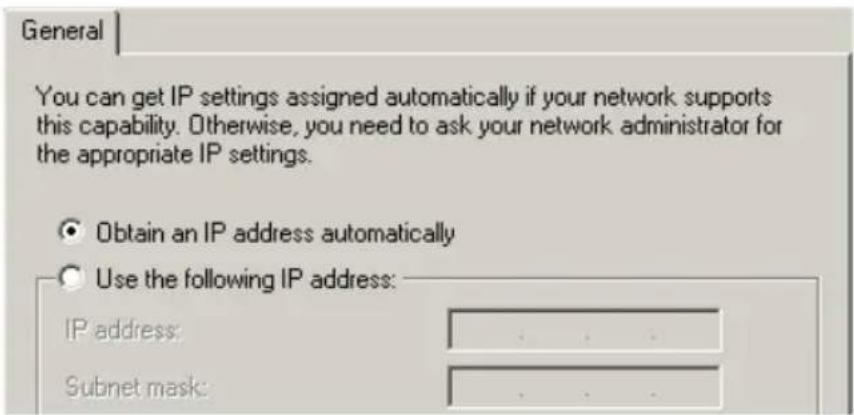
text_image
General You can get IP settings assigned automatically if your network supports this capability. Otherwise, you need to ask your network administrator for the appropriate IP settings. Obtain an IP address automatically Use the following IP address: IP address: .... Subnet mask: ....The "Obtain an IP address automatically" option
- On the "DNS Configuration" settings page, enable the "Disable DNS" option.
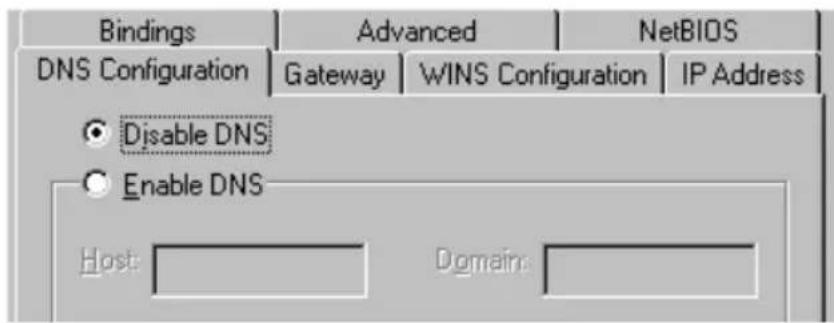
text_image
Bindings Advanced NetBIOS DNS Configuration Gateway | WINS Configuration | IP Address Disable DNS Enable DNS Host: Domain:The "Disable DNS" option
- Confirm your selection by clicking "OK".
The computer now receives an IP address from FRITZ!Box Fon WLAN.
Obtaining an IP Address Automatically in Windows 2000
Proceed as follows in Windows 2000:
- Select "Start / Settings / Control Panel / Network and Dial-up Connections".
- Double-click to select the Local Area Network connection with the network adapter bound to FRITZ!Box Fon WLAN.
- Click the "Properties" button.
- Double-click to select "Internet Protocol (TCP/IP)" in the list of network components.
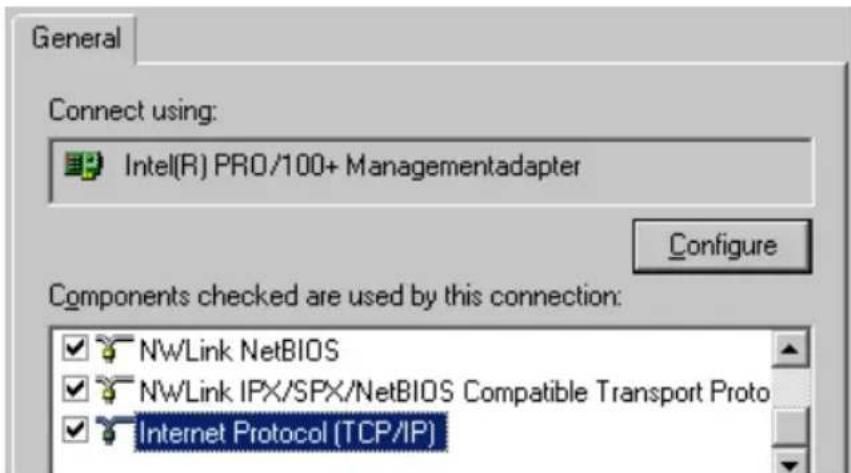
text_image
General Connect using: Intel(R) PRO/100+ Managementadapter Configure Components checked are used by this connection: NwLink NetBIOS NwLink IPX/SPX/NetBIOS Compatible Transport Proto Internet Protocol (TCP/IP)Properties of the LAN connection of a network adapter
- Enable the options "Obtain an IP address automatically" and "Obtain DNS server address automatically".
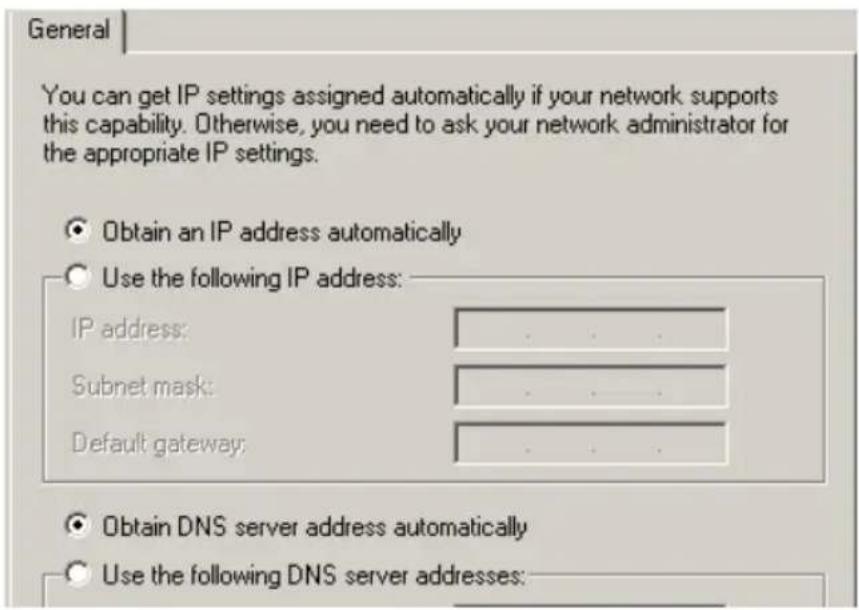
text_image
General You can get IP settings assigned automatically if your network supports this capability. Otherwise, you need to ask your network administrator for the appropriate IP settings. Obtain an IP address automatically Use the following IP address: IP address: Subnet mask: Default gateway: Obtain DNS server address automatically Use the following DNS server addresses:The "Obtain an IP address automatically" option
- Confirm your selection by clicking "OK".
The computer now receives an IP address from FRITZ!Box Fon WLAN.
Obtaining an IP Address Automatically in Mac OS X
In the Mac OS X operating system, proceed as follows to set the TCP/IP properties:
- Select the "System Preferences" in the Apple menu.
- In the "System Preferences" window, click the "Network" icon.
- In the "Network" window, select the "Built-in Ethernet" entry from the "Show:" drop-down menu.
- Switch to the "TCP/IP" settings page and select the "Using DHCP:" option from the "Configure" drop-down menu.
- Click "Apply Now".
11 Removing the FRITZ!Box Fon WLAN
If you would like to clear the connection between the FRITZ!Box Fon WLAN and a computer, please take note of the information in this chapter.
11.1 Ending the Connection to the Computer
LAN Ports
If the computer is connected to one of the LAN ports on the FRITZ!Box Fon WLAN, simply remove the network cable.
If the computer is connected to the FRITZ!Box Fon WLAN via a network hub or switch, remove the network cable between the computer and the network hub or switch.
WLAN
If the computer is connected to the FRITZ!Box Fon WLAN wirelessly via WLAN, deactivate the WLAN connection to FRITZ!Box Fon WLAN in the WLAN adapter of the computer.
11.2 Removing the Program Group
If the “FRITZ!Box” program group is installed on a computer and you would like to remove it, perform an uninstallation using the Windows Control Panel.
Removing the Program Group in Windows XP
Proceed as follows to remove the “FRITZ!Box” program group in Windows XP:
-
Open “start / Control Panel / Add or Remove Programs”. Make sure that the “Change or Remove Programs” button is selected in the column at left.
-
Select the "AVM FRITZ!Box" entry from the list of "Currently installed programs".
-
Click the "Change/Remove" button.
This completes uninstallation of the program group.
Removing the Program Group in Windows Me and 98
Proceed as follows to remove the “FRITZ!Box” program group:
- Open “Start / Settings / Control Panel / Add/Remove Programs”.
- Select the “AVM FRITZ!Box” entry from the list of currently installed programs.
- Click the "Add/Remove..." button.
Rebooting the computer concludes the uninstallation of the program group.
Removing the Program Group in Windows 2000
Proceed as follows to remove the “FRITZ!Box” program group in Windows 2000:
-
Open “Start / Settings / Control Panel / Add/Remove Programs”. Make sure that the “Change or Remove Programs” button is selected in the column at left.
-
Select the “AVM FRITZ!Box” entry from the list of “Currently installed programs”.
-
Click the "Change/Remove" button.
This completes uninstallation of the program group.
11.3 Removing the FRITZ!DSL Software
If the FRITZ!DSL software package is installed on a computer and you would like to remove it, perform an uninstallation using the Windows Control Panel.
Removing the FRITZ!DSL Software Package in Windows XP
Proceed as follows to remove the FRITZ!DSL software package in Windows XP:
-
Open “start / Control Panel / Add or Remove Programs”. Make sure that the “Change or Remove Programs” button is selected in the column at left.
-
Select the “AVM FRITZ!DSL” entry from the list of “Currently installed programs”.
- Click the "Change/Remove" button.
This completes uninstallation of the FRITZ!DSL software package.
Removing the FRITZ!DSL Software Package in Windows Me and 98
Proceed as follows to remove the FRITZ!DSL software package:
- Open "Start / Settings / Control Panel / Add/Remove Programs".
- Select the “AVM FRITZ!DSL” entry from the list of currently installed programs.
- Click the "Add/Remove..." button.
Rebooting the computer concludes the uninstallation of the FRITZ!DSL software package.
Removing the FRITZ!DSL Software Package in Windows 2000
Proceed as follows to remove the FRITZ!DSL software package in Windows 2000:
- Open “Start / Settings / Control Panel / Add/Remove Programs”. Make sure that the “Change or Remove Programs” button is selected in the column at left.
- Select the “AVM FRITZ!DSL” entry from the list of “Currently installed programs”.
- Click the "Change/Remove" button.
This completes uninstallation of the FRITZ!DSL software package.
11.4 Uninstallation of the Printer Port
If the AVM FRITZ!Box printer port is installed on a computer and you would like to remove it, perform an uninstallation using the Windows Control Panel.
Removing the Printer Port in Windows XP
Proceed as follows to remove the “AVM FRITZ!Box Printer Port” in Windows XP:
- Open “start / Control Panel / Add or Remove Programs”. Make sure that the “Change or Remove Programs” button is selected in the column at left.
- Select the “AVM FRITZ!Box Printer Port” entry from the list of “Currently installed programs”.
- Click the "Change/Remove" button.
This completes the uninstallation of the printer port.
Removing the Printer Port in Windows Me and 98
Proceed as follows to remove the “AVM FRITZ!Box Printer Port”:
- Open “Start / Settings / Control Panel / Add/Remove Programs”.
- Select the “AVM FRITZ!Box Printer Port” entry from the list of currently installed programs.
- Click the "Add/Remove..." button.
Rebooting the computer concludes the uninstallation of the printer port.
Removing the Printer Port in Windows 2000
Proceed as follows to remove the “AVM FRITZ!Box Printer Port” in Windows 2000:
- Open “Start / Settings / Control Panel / Add/Remove Programs”. Make sure that the “Change or Remove Programs” button is selected in the column at left.
- Select the "AVM FRITZ!Box Printer Port" entry from the list of "Currently installed programs".
- Click the "Change/Remove" button.
This completes the uninstallation of the printer port.
12 Configuration and Operation by Telephone
Many of the FRITZ!Box Fon WLAN functions and features can be configured and used over a telephone connected to a FRITZ!Box Fon WLAN extension. Only tone-dialing (dual-tone multifrequency = DTMF) telephones can be used in configuration and operation. Pulse dialing telephones are not suitable.

The telephone network features can be used only if they are supported by your telephone network carrier and enabled on your telephone line.
Entries input on the telephone are confirmed with an acknowledgement tone. Entries made correctly are confirmed with a positive acknowledgement tone (a single tone of one second in length). An error, such as an incorrequence, is indicated by a failure tone, an intermittent tone at intervals of about 0.25 seconds.
For more information on the audible signals, see the section “Audible Signals” on page 116.
Designation of the Functions and Features
Functions and features whose application has direct effects on the connection are marked with icons. The icons indicate the connection types with which the function or feature can be used or applied.
Functions and features that have no effect on the connection are not marked.
An overview of all of the icons used in this manual is presented in the section “Symbols and Highlighting” from page 6 of this manual.
12.1 Operating FRITZ!Box Fon WLAN 7140 by Phone
This section describes how you can use the FRITZ!Box Fon WLAN features via your telephone keypad.
Shortening the Dialing Procedure
FRITZ!Box Fon WLAN automatically recognizes when a number has been entered, but not until a few seconds after the final digits are entered.
To shorten the dialing procedure, enter the “#” character after the last digit of a number.
| indicates to FRITZ!Box Fon WLAN that the number can be dialed immediately (can shorten the dialing procedure) |
Enabling/Disabling WLAN
The WLAN function of FRITZ!Box Fon WLAN can be switched on and off using the telephone keypad. This is especially comfortable when the WLAN function has been switched off. Simply use your telephone to turn it back on. This means that the WLAN function can be enabled without having use a wired connection to open the FRITZ!Box Fon WLAN user interface.
| #96*1* | enables the WLAN function of FRITZ!Box Fon WLAN |
| #96*0* | disables the WLAN function of FRITZ!Box Fon WLAN |
ISDN analog VoIP
Do Not Disturb
You can enable the Do Not Disturb function for any telephone connected to FRITZ!Box Fon WLAN in the user interface. When Do Not Disturb is enabled, the telephone will not ring.
Enabling Do Not Disturb Effective Immediately
Use the following combination of keys to enable Do Not Disturb at an extension immediately. Do Not Disturb will remain enabled until you switch it off.
| #81<Ext.>*0* | immediately enables Do Not Disturb for extension “Ext.”. |
Enabling Do Not Disturb for a Prescribed Period
On any extension you can enter a Do Not Disturb period during which the telephone will not ring.
At the extension for which a Do Not Disturb period is to be configured, define the period during which the phone should not ring and save your entries. Then enable Do Not Disturb. Do Not Disturb will be switched on daily at the time entered in the “Start” field and switched off again at the time defined in the “End” field.
Example: Do Not Disturb should be configured fr p.m. until 7:00 a.m. daily. Enter the value 2000 for
| #80<Ext.>* | defines the period for Do Not Disturb at extension “Ext.”. |
| #91** | saves the settings in the FRITZ!Box Fon WLAN. |
| #81<Ext.>*1* | enables Do Not Disturb for the defined period. |
Disabling Do Not Disturb
| #81<Ext.>*6* | turns off Do Not Disturb for extension“Ext.” |
Alarm
The FRITZ!Box Fon WLAN includes an alarm clock function. The alarm clock can be configured individually for each connected telephone.
Configuring the Alarm for a Telephone
First enter on the telephone the time at which you would like to be awakened and save this entry. Then enable the alarm function.
Example: The telephone should ring to wake you at 7:00 a.m. Enter the value 0700 as the
| #881*<Time>*<Ext.> | defines for the extension Ext. the time at which the telephone should ring |
| #91** | saves the settings in the FRITZ!Box Fon WLAN |
Enabling/Disabling the Alarm Function
| #881** | enables the alarm function for all extensions on which a time was configured |
| #881# | disables the alarm function for all extensions |
ISDN analog VoIP
Selecting the Outgoing Number and the Type of Connection
For outgoing connections you can specify the kind of connection that should be used. For this entry you can use settings already made in FRITZ!Box Fon WLAN or circumvent the settings currently configured in FRITZ!Box Fon WLAN.
Defining the Connection Type
You have the option of specifying the type of outgoing connection independent of the settings configured on the system. In this case the dialing rules are suspended for the given dialing procedure. To do this, enter one of the following keypad codes before dialing a number on your telephone:
| 111\# number | dials up this connection using the fixed-line |
| 12\# number | dials up this connection using the Internet (Internet number for access 1) |
Connecting Using a Selected Internet Number
By placing an Internet Number ID before the number you can specify which of your Internet numbers should be used to conduct a telephone call.
If you enter an Internet number in the FRITZ!Box Fon WLAN user interface, an ID for the Internet number is created automatically. The Internet Number ID is display "Telephony / Internet Telephony" menu of the user interface, in the "Internet Number ID" column of the list of Internet numbers.
| establishes a connection for this call using the Internet number specified by theNumber ID |
Dialing Internal Calls
Dialing Internal Calls with Automatic Outside Dialing
| 💡 | Pick up the handset. You hear the external dial tone immediately, since the extension is set for automatic outside dialing. |
| 💡 or 🔊 | Press the Hold button, or press the asterisk key twice. You now hear the internal dial tone. |
| 💡 | Dial the desired extension number. |
Dialing Internal Calls Without Automatic Outside Dialing
| Pick up the handset. You hear the internal dial tone. | |
| Dial the desired extension number. |
Group Call
The FRITZ!Box Fon WLAN “Group Call” feature allows you to ring all other extensions at the same time. To do so, you must first configure the extension for internal dialing. Your call is connected with whichever extension answers first.
| ➊ | Pick up the handset. |
| ➉ | Instead of an extension number, dial “9”. All extensions that are not busy ring. |
ISDN analog VoIP
Alternating Between Calls
Whenever you have an active call 1 and one caller 2 on hold, you can switch from one call to the other as often as you want using the Hold button.
To alternate between two connections, proceed as follows:
| Call 1 | You are talking to Caller 1. |
| ➊ | Press the Hold button. Call 1 is now on hold. |
| ➌ | To establish a second call, simply dial either the desired extension number or the outside line access “o” followed by the desired external number. |
| Call 2➌ | If the call is answered, you can consult with caller 2 on this line. Call 1 is still on hold. |
| ➌➂ | To switch back from Call 2 to Call 1, dial the sequence shown at left. |
| Call 1➌ | Call 1 is now active again and Call 2 is on hold. |
| ➌➂ | To switch back again from Call 2 to Call 1, dial the same sequence. In this way you can alternate between Call 1 and 2. |
The alternating connections can be ended in a number of ways:
| T | The caller on hold hangs up. You can continue talking on the active connection. |
| R1 | You end the active connection by dialing the sequence shown at left. The call that was on hold is now active again. |
| T | You can also return to the call on hold by hanging up the handset: this ends the currently active connection. In this case the phone rings as soon as you hang up. Pick up the handset again to return to the last call that was on hold. |
| Call |
Picking up a Call from the Answering Machine
You can use this function to pick up incoming calls on your telephone after they have been accepted by the answering machine at a different extension. The other extension must be configured as an answering machine in the FRITZ!Box Fon WLAN.
To pick up a call from another extension, proceed as follows:
| ➊ | Pick up the handset. |
| *➉ 9 | Dial the sequence shown at left. |
| ➌ | The call is now connected to your extension, and you can talk to the caller. |
ISDN analog VoIP
Transferring Calls
The “Call Transfer” function allows you to transfer a connection from one of FRITZ!Box Fon WLAN extension’s to the other. To do so, proceed as follows:
| Call 1 | You are talking to Caller 1. |
| # | |
| R | Press the Hold button. Caller 1 is now on hold. |
| # | To connect to another internal user, dial her or his extension number. |
| Call 2 | You can now talk with caller 2. |
| # | |
| # | To transfer the call with caller 1 to caller 2, simply hang up the handset. |
ISDN analog VoIP
Consultation / Hold
The “Consultation/Hold” feature allows you to place an existing call on hold. You then may consult with someone else at your workplace or dial a second call. The party hold does not hear the second conversation. Once you have finished the consultation, you can return to the original connection.
To place a call on hold and then reactivate it, proceed as follows:
| Call 1 | You are talking to Caller 1. |
| # | Press the Hold button. Call 1 is now on hold and you can consult someone else. |
| # | To dial a second call, simply dial either the desired extension number or the outside line access “o” followed by the desired external number. |
| Call 2 | If the call is answered, you can consult with caller 2 on this line. Call 1 is still on hold. |
| # | If the line you called is busy or the call is not answered, press the Hold button again to return to Call 1. |
| #1 | To switch back to Call 1 from Call 2, dial the sequence shown at left. Call 1 is now active again. |

If you end the consultation by pressing the Hold button, the connection to Caller 2 is not cleared down until he or she hangs up. Connection charges continue to accrue.
| Call 1 | Instead of entering the keyboard shortcut, you can simply hang up the handset to end Call 2 yourself. In this case, your phone rings as soon as you hang up. Pick up the handset to return to Call 1 again. |
| 💡 | |
| 💡 | Hang up the handset to end the connection. |
12.2 Configuring FRITZ!Box Fon WLAN by Phone
Restoring Factory Settings
The FRITZ!Box Fon WLAN can be reset to its condition upon delivery. All settings you made in the FRITZ!Box Fon WLAN are then deleted.
After restoring factory settings FRITZ!Box Fon WLAN is then restarted.
| #991*15901590* | resets FRITZ!Box FonWLAN to its condition up-on delivery. |
Saving New Settings
In this section, saving refers to all current settings. It is not necessary to save the configuration after each setting is made. You may first configure all of your FRITZ!Box Fon WLAN's settings as desired, and then save them permanently.
Saving Permanently
| ✝ | Pick up the handset. |
| #91* * | Save all settings made to your FRITZ!Box Fon WLAN permanently by dialing the sequence shown at left. |
| ✝ | Hang up the handset. |

Permanent saving cannot be reversed. However, you can reset the PBX to its factory settings or program it with different settings.
Disabling Automatic Outside Dialing
| ➊ | Pick up the handset. |
| #1 Ext. *0* | Dial the sequence shown at left. |
| #9 1** | Save your settings if desired by dial-ing the sequence shown at left. |
| ➇ | Hang up the handset. |
Call Waiting Option
Call waiting can be switched on or off for each extension. Some older terminal equipment connected to extensions may misinterpret the call waiting signal. This is especially true of fax machines and modems. If communication errors occur, you should disable call waiting for fax and modem extensions.
See section “Call Waiting” on page 107 for information about how to accept a call while another connection is active.

When “Call Waiting” is enabled, modem and fax connections may be interrupted.
Disabling Call Waiting
| 💡 | Pick up the handset. |
| #2 Ext. *1* | Dial the sequence shown at left. |
| #91** | Save your settings if desired by dial-ing the sequence shown at left. |
| 💡 | Hang up the handset. |
Enabling Call Waiting
| ➊ | Pick up the handset. |
| ➊2 Ext. ⭐0 ❄ | Dial the sequence shown at left. |
| ➊91 ❄ | Save your settings if desired by dial-ing the sequence shown at left. |
| ➊ | Hang up the handset. |
ISDN analog
Call Rejection on Busy (Busy on Busy)
Calls for an extension can be rejected using the “Busy on Busy” feature. This means that the user receives a busy signal whenever the extension is busy.
Enabling the Busy on Busy Function
| ➊ | Pick up the handset. |
| ➁52Ext. *1* | Dial the sequence shown at left.Type in the number of the extension in the “Ext.” field. |
| ➁91** | Save your settings if desired by dial-ing the sequence shown at left. |
| ➂ | Hang up the handset. |
Disabling the Busy on Busy Function
| ↑ | Pick up the handset. |
| #52Ext. *0* | Dial the sequence shown at left.Type in the number of the extension in the “Ext.” field. |
| #91** | Save your settings if desired by dial-ing the sequence shown at left. |
| ↓ | Hang up the handset. |
Room Monitoring (Baby Monitor)
The following key combination enables the function for monitoring the sound level in a room. First enter the volume level (a value between 1 and 8). Enter a telephone number. Do not hang up the handset! When the volume in the room reaches the specified level, the number you entered will be dialed. When the telephone rings and you pick up the handset, you will be connected with the telephone on which you enabled the room monitoring function.

It is preferable to use the speaker phone function.
You can disable the function by simply hanging up the handset of the telephone at which you enabled it.
| Pick up the handset or activate the speaker phone function of your telephone. | |
| 4 LevelNumber# | Dial the sequence shown at left. For “Level”, enter a number between “1” (the most sensitive sound level) and “8”. For “Number”, enter the number to be called. This may be the number of another internal extension, a “9” for an internal group call, or any external number desired. |
| Wait for the acknowledgement tone. The baby monitoring phone function is now enabled. | |
| Do not hang up the handset! |
Dial the number of the extension to listen in at an extension with room monitoring activated.
After initiating a room monitoring phone call, the PBX cannot generate a new call until at least one minute has lapsed.
12.3 Advanced Features
ISDN analog VoIP
Call Diversion over FRITZ!Box Fon WLAN
Incoming calls to the FRITZ!Box Fon WLAN telephones can be diverted to a different extension or to an external number. In contrast to call diversion over FRITZ!Box Fon WLAN, there is also call forwarding (call diversion via the central exchange). How to use call forwarding by phone is described in the section “Call Forwarding (Call Diversion via the Central Exchange)” from page 98.

Do not activate both call forwarding and call diversion at the same time.
Call diversion over FRITZ!Box Fon WLAN allows you to forward calls to an external line or to another extension. This kind of diversion is organized inside FRITZ!Box Fon WLAN so that
diversions to another extension are free of charge. Calls are diverted to an external number over your ISDN line's second B channel and are subject to normal transmission charges. If the FRITZ!Box Fon WLAN is operated on an analog telephone line, incoming calls can only be diverted to a different extension or to numerical Internet numbers.
You can specify the conditions under which an incoming call will be diverted over FRITZ!Box Fon WLAN. You can select one of six different options. Different settings may be saved for each extension.
Note that only numerical Internet numbers can be entered for diversion to an Internet number.
Call Diversion Immediately (Without Ringing)
| 💡 | Pick up the handset. |
| #41 Ext. ✱ XNo./Ext. ✱ | Dial the sequence shown at left. |
| #91 ✱ ✱ | Save your settings if desired by dial-ing the sequence shown at left. |
| 💡 | Hang up the handset. |
Call Diversion After the Third Ring
| ➊ | Pick up the handset. |
| ➁42 Ext. ✱ XNo./Ext. ✱ | Dial the sequence shown at left. |
| ➁91 ✱ ✱ | Save your settings if desired by dialing the sequence shown at left. |
| ➂ | Hang up the handset. |
Call Diversion When Busy
| ➊ | Pick up the handset. |
| ➁43 Ext. ✱ XNo./Ext. ✱ | Dial the sequence shown at left. |
| ➁91 ✱ ✱ | Save your settings if desired by dial-ing the sequence shown at left. |
| ➂ | Hang up the handset. |

Call Diversion After the Third Ring or When Busy
| ➊ | Pick up the handset. |
| ➁44 Ext. ✱ XNo./Ext. ✱ | Dial the sequence shown at left. |
| ➁91 ✱ ✱ | Save your settings if desired by dial-ing the sequence shown at left. |
| ➂ | Hang up the handset. |
Call Diversion Immediately by Ringing
| ➊ | Pick up the handset. |
| ➁45 Ext. ✝ XNo./Ext. ✝ | Dial the sequence shown at left. |
| ➁91 ✝ ✝ | Save your settings if desired by dial-ing the sequence shown at left. |
| ➂ | Hang up the handset. |
Disabling Call Diversion
| ➊ | Pick up the handset. |
| ➁4➁ Ext. * * | Dial the sequence shown at left. |
| ➁9➁ * * | Save your settings if desired by dial-ing the sequence shown at left. |
| ➂ | Hang up the handset. |
ISDN analog VoIP
Three-Party Conference Call
FRITZ!Box Fon WLAN allows you to hold telephone conferences with two other people at once. Two external and one internal party, or two internal and one external party can conduct a conference call with each other.
You can set up a three-party conference as follows:
| T | Pick up the handset. |
| Dial the external number of the first party. Talk. | |
| R | Press the Hold button. |
| To dial a second call, simply dial either the desired extension number or the outside line access “o” followed by the desired external number. You can now talk to the second subscriber while your first call is on hold. | |
| R3 | Dial the sequence shown at left to begin a three-party conference call. |
| Now all three participants can confer together. If either of the other two parties hangs up, your connection with the remaining participant remains active. | |
| You can end the three-party call by hanging up the handset. | |
| R2 | You can also switch from the three-party call back to the original two-party connection. Dial the sequence shown at left. This ends the three-party conference. The connection that was active last before your initiated the three-party conference is now active again. The other call is on hold. You can alternate between the two connections by dialing the same sequence again. |
analog
Using FRITZ!Box Fon WLAN Features on the Analog Line
When FRITZ!Box Fon WLAN is connected to an analog line, a feature can be activated directly at the switching station only if the line is set for this kind of configuration.
| ↑ | Pick up the handset. |
| * # | Dial the sequence shown at left. |
| Next enter the keyboard shortcut your network provider has defined for the desired feature. The given keyboard shortcut must be obtained from your network provider. |
ISDN analog
Call Forwarding (Call Diversion via the Central Exchange)
Call forwarding is performed by the ISDN operator's switching station. To use call forwarding, FRITZ!Box Fon WLAN must be connected to an ISDN line. Then this feature can be used to forward calls to an external line. Call forwarding is subject to charges by the network provider and cannot be used for forwarding calls to an Internet number.
In addition to call forwarding, there is also call diversion via FRITZ!Box Fon WLAN. Use this kind of call diversion to divert calls to internal and external lines. See the section “Call Diversion over FRITZ!Box Fon WLAN” from page 94 for more information.

Do not activate both call forwarding and call diversion at the same time.
For call forwarding you may specify whether you want incoming calls to be forwarded unconditionally, after the fifth ring, or when busy. Different settings may be configured separately for each number.
Call Forwarding Immediately
Incoming calls for the given MSN are always diverted immediately to the specified number. Call forwarding can only be used to forward incoming calls to an external line. Call forwarding is subject to charges by the network provider and cannot be used for forwarding calls to Internet numbers.
Call Forwarding Immediately for Your Extension's Outgoing Caller ID
| 💡 | Pick up the handset. |
| ❄️21❄ XNo. # | Dial the sequence shown at left. |
| 💡 | Wait for the acknowledgement tone. |
| 💡 | Hang up the handset. |
Call Forwarding Immediately for Any MSN
| ↑ | Pick up the handset. |
| ★21★ XNo. ★ MSN # | Dial the sequence shown at left. |
| ●● | Wait for the acknowledgement tone. |
| T | Hang up the handset. |
Call Forwarding Immediately for All MSNs
| 💡 | Pick up the handset. |
| ⭐21⭐ XNo.⭐# | Dial the sequence shown at left. |
| +++ | Wait for the acknowledgement tone. |
| 💡 | Hang up the handset. |
Disable Call Forwarding Immediately for Your Extension's Outgoing Caller ID
| 💡 | Pick up the handset. |
| ❄️21❄️# | Dial the sequence shown at left. |
| 💡 | Wait for the acknowledgement tone. |
| 💡 | Hang up the handset. |
Disable Call Forwarding Immediately for Any MSN
| 💡 | Pick up the handset. |
| ❄️21❄️MSN # | Dial the sequence shown at left. |
| #### | Wait for the acknowledgement tone. |
| 💡 | Hang up the handset. |
Disable Call Forwarding Immediately for All MSNs
| 💡 | Pick up the handset. |
| ❄️21❄️❄️# | Dial the sequence shown at left. |
| 💡 | Wait for the acknowledgement tone. |
| 💡 | Hang up the handset. |
Call Forwarding When Busy
Incoming calls are only forwarded to the specified number if the extension dialed is busy. You can define call diversion for the local outgoing call number. The local outgoing call number is the first number you assigned to an extension. You can also define call diversion for any other number, e.g. a telephone at the other extension of FRITZ!Box Fon WLAN, or for all numbers. All settings can be disabled at any time.
Call Forwarding When Busy for Your Extension's Outgoing Caller ID
| ↑ | Pick up the handset. |
| ★67★ XNo. # | Dial the sequence shown at left. |
| ↔ | Wait for the acknowledgement tone. |
| ↓ | Hang up the handset. |
Call Forwarding When Busy for Any MSN
| ↑ | Pick up the handset. |
| ★67★ XNo. ★ MSN # | Dial the sequence shown at left. |
| +++ | Wait for the acknowledgement tone. |
| T | Hang up the handset. |
Call Forwarding When Busy for All MSNs
| ✝ | Pick up the handset. |
| ✝67✝ XNo.✝# | Dial the sequence shown at left. |
| ÷ | Wait for the acknowledgement tone. |
| ✝ | Hang up the handset. |
Disable Call Forwarding When Busy for Your Extension's Outgoing Caller ID
| ↑ | Pick up the handset. |
| *67*# | Dial the sequence shown at left. |
| ++ | Wait for the acknowledgement tone. |
| T | Hang up the handset. |
Call Forwarding When Busy for Any MSN
| 💡 | Pick up the handset. |
| ✿67✿✿MSN # | Dial the sequence shown at left. |
| ⊕⊕ | Wait for the acknowledgement tone. |
| 💡 | Hang up the handset. |
Disable Call Forwarding When Busy for All MSNs
| ➊ | Pick up the handset. |
| *67**# | Dial the sequence shown at left. |
| ➌ | Wait for the acknowledgement tone. |
| ➇ | Hang up the handset. |
Call Forwarding Delayed
Incoming calls are forwarded to the specified number if not answered at the number originally dialed within 20 seconds (about five rings). Call forwarding can be configured for your extension's outgoing caller ID (the first number assigned to an extension), for any number (for instance, a telephone at the other FRITZ!Box Fon WLAN extension), or for all numbers. All settings can be disabled at any time.
Call Forwarding Delayed for Your Extension's Outgoing Caller ID
| ➊ | Pick up the handset. |
| ➊➊➌➌ XNo. # | Dial the sequence shown at left. |
| ➌➌ | Wait for the acknowledgement tone. |
| ➌ | Hang up the handset. |
Call Forwarding Delayed for Any MSN
| 💡 | Pick up the handset. |
| ⭐61⭐ XNo.⭐ MSN # | Dial the sequence shown at left. |
| ### | Wait for the acknowledgement tone. |
| 💡 | Hang up the handset. |
Call Forwarding Delayed for All MSNs
| T | Pick up the handset. |
| ★61★ XNo. ★#Dial the sequence shown at left. | |
| ●● | Wait for the acknowledgement tone. |
| T | Hang up the handset. |
Disable Call Forwarding Delayed for Your Extension's Outgoing Caller ID
| ↑ | Pick up the handset. |
| *61*# | Dial the sequence shown at left. |
| +++ | Wait for the acknowledgement tone. |
| ↓ | Hang up the handset. |
Disable Call Forwarding Delayed for Any MSN
| ↑ | Pick up the handset. |
| *61**MSN # | Dial the sequence shown at left. |
| +++ | Wait for the acknowledgement tone. |
| ↑ | Hang up the handset. |
Disable Call Forwarding Delayed for All MSNs
| ↑ | Pick up the handset. |
| *61**# | Dial the sequence shown at left. |
| → | Wait for the acknowledgement tone. |
| ↓ | Hang up the handset. |
ISDN analog VoIP
Caller ID Suppression for Outgoing Calls (CLIR)
The CLIR (Calling Line Identification Restriction) function prevents your telephone number being displayed on the other party's phone during outgoing calls.
The CLIR function is disabled in the factory settings. You have the option of enabling this function permanently and then disabling it again. CLIR can also be used for individual connections.
Enabling CLIR Permanently
| ➊ | Pick up the handset. |
| ➁5➁ Ext. ❄➁➁ | Dial the sequence shown at left.Type in the number of the extension in the “Ext.” field. |
| ➁9➁ ❄ ❄ | Save your settings if desired by dial-ing the sequence shown at left. |
| ➂ | Hang up the handset. |
Disabling CLIR Permanently
| 💡 | Pick up the handset. |
| #51 Ext. *0* | Dial the sequence shown at left.Type in the number of the extension in the “Ext.” field. |
| #91** | Save your settings if desired by dial-ing the sequence shown at left. |
| 💡 | Hang up the handset. |
ISDN analog VoIP
Displaying the Incoming Caller ID (CLIP)
The CLIP (Calling Line Identification Presentation) function makes the number of callers—external and internal—visible on your telephone display.

This feature is only effective if your telephone supports CLIP.
The CLIP function is enabled in the factory settings. This function can be permanently disabled and enabled again.
Enabling CLIP
| ↑ | Pick up the handset. |
| #50 Ext. *1* | Dial the sequence shown at left.Type in the number of the extension in the “Ext.” field. |
| #91** | Save your settings if desired by dial-ing the sequence shown at left. |
| ↓ | Hang up the handset. |
Disabling CLIP
| ↑ | Pick up the handset. |
| #50 Ext. *0* | Dial the sequence shown at left.Type in the number of the extension in the “Ext.” field. |
| #91** | Save your settings if desired by dial-ing the sequence shown at left. |
| ↑ | Hang up the handset. |
ISDN
Connected Line Identification Restriction and Presentation (COLR / COLP)
By default, a caller's display always shows the Multiple Subscriber Number (MSN) of the extension she or he dialed. If you accept the call at another extension, the MSN of this extension will be displayed, as long as the caller is using an ISDN phone with the COLP feature enabled. If you do not want the caller to know that the call has been picked up at another extension (see page 89) and thus do not wish this number to be displayed, you have the option of suppressing transmission of the connected line. The caller's display will continue to show the number she or he called.
Transmission of the connected line's number can be switched on and off for each extension individually. Transmission of the connected line's number is permanently enabled in the PBX factory settings.
Enabling Connected Line Identification Restriction Permanently
To permanently disable transmission of the connected line's number (COLR), proceed as follows:
| ↑ | Pick up the handset. |
| #53Ext.*1* | Dial the sequence shown at left to disable transmission of the connected line number. Type in the number of the extension in the “Ext.” field. |
| #91** | Save your settings if desired by dialing the sequence shown at left. |
| ↑ | Hang up the handset. |
Enabling Connected Line Identification Presentation Permanently
To permanently enable transmission of the connected line's number (COLP), proceed as follows:
| ↑ | Pick up the handset. |
| #53Ext.*0* | Dial the sequence shown at left to enable transmission of the connected line number. Type in the number of the extension in the “Ext.” field. |
| #91** | Save your settings if desired by dialing the sequence shown at left. |
| ↑ | Hang up the handset. |
ISDN analog VoIP
Call Waiting
Enable the “Call Waiting” feature to be notified during a call if a second caller is dialing your line. An acoustic signal in your telephone handset notifies you that a second call is waiting. You can accept the connection with the new caller within 30 seconds. If you ignore the signal, the waiting call is rejected after 30 seconds.
For instructions on how to turn the “Call Waiting” function on and off, see the section “Call Waiting Option” on page 92.
| R2 | To accept a waiting call, dial the sequence shown at left. Your original call is now on hold. |
| R1 | To return to your original connection, dial the sequence shown at left. You can also accept the waiting call by hanging up your existing connection, i.e., by hanging up the handset. In this case the phone rings as soon as you have hung up. Pick up the handset again to accept the waiting call. |
| R0 | To reject a waiting call, dial the sequence shown at left. |
ISDN analog VoIP
Explicit Call Transfer (ECT)
With this feature you can connect two external parties with each other, when one connection has been active and the other has been on hold. Then you can end your own connection while the other two parties continue their conversation.
Explicit Transfer of One Active and One Held Connection
| Pick up the handset. | |
| Dial the external number of the first party. Talk. | |
| Press the Hold button. | |
| To dial a second call, simply dial either the desired extension number or the outside line access “o” followed by the desired external number. You can now talk to the second subscriber while your first call is on hold. | |
| To clear your connections while allowing the external parties to continue the call, connect the parties with each other. | |
| Dial the sequence shown at left. The connection on hold and the active connection are connected with each other. The external parties continue the call while you clear the connection. | |
| Hang up the handset. |
Explicit Call Transfer from a Three-party Conference Call
| T | Pick up the handset. |
| Dial the external number of the first party. Talk. | |
| R | Press the Hold button. |
| To dial a second call, simply dial either the desired extension number or the outside line access “o” followed by the desired external number. You can now talk to the second subscriber while your first call is on hold. | |
| R3 | Dial the sequence shown at left to begin a three-party conference call. |
| Now all three participants can confer together. If either of the other two parties hangs up, your connection with the remaining participant remains active. | |
| To clear your connections while allowing the external parties to continue the call, connect the parties with each other. | |
| R2 | You can also switch from the three-party call back to the original two-party connection. Dial the sequence shown at left. This ends the three-party conference. The connection that was active last before your initiated the three-party conference is now active again. The second external call is on hold. You can alternate between the two connections by dialing the same sequence again. |
| R4 | Dial the sequence shown at left. The connection on hold and the active connection are connected with each other. The external parties continue the call while you clear the connection. |
| T | Hang up the handset. |
ISDN
One-time Explicit (External) Call Transfer
Explicit Call Transfer (ECT) is an ISDN feature that must be enabled by your ISDN provider and thus usually is subject to extra charges. If ECT has not been enabled on your line, you can program the PBX to initiate a one-time explicit call transfer before connecting to two parties. When you end the connection, the other two parties will be connected to each other. Proceed as follows:
| ↑ | Pick up the handset. |
| *32# | Dial the sequence shown at left. You hear the external dial tone. |
| # | Dial the external number of the first party. Talk. |
| R | Press the Hold button. |
| # | To dial a second call, simply dial either the desired extension number or the outside line access “o” followed by the desired external number. You can now talk to the second subscriber while your first call is on hold. |
| To clear your connections while allowing the external parties to continue the call, connect the parties with each other. | |
| R4 | Dial the sequence shown at left. The connection on hold and the active connection are connected with each other. The external parties continue the call while you clear the connection. |
| T | Hang up the handset. |

With this type of external transfer, both parties are connected to each other over your PBX. This means that channels on your ISDN line remain busy with this connection as long as the parties are connected to each other.
ISDN
Call-back on Busy (CCBS)
When you dial a number and it is busy, enable this feature.
As soon as the line is free, your telep 20 seconds, as it would for an external call. When you pick up your handset, the number of desired party will be dialed automatically.
This feature is supported for both external and internal connections.
A maximum of five call-back requests can be enabled for each extension at any given time.
To enable this feature, proceed as follows:
| You have just dialed a number and now you hear the busy signal. | |
| 5 | If the call is not answered, within twenty seconds, either dial the number “5” or |
| R*37# | the sequence shown at left. |
| Wait for the acknowledgement tone. | |
| Hang up the handset. | |
| As soon as the subscriber you dialed hangs up, your telephone will ring. | |
| Pick up the handset. The subscriber’s number is dialed again automatically. |
ISDN
Call-back on no Response (CCNR)
This function can be used when you dial a number and the party does not respond. Once the party can be reached again and conducts a call from her or his phone, this function recognizes when this conversation is ended. When the subscriber you dialed hangs up, your telephone rings for 20 seconds, as it would for an incoming call. When you pick up your handset, the number of the desired party is automatically dialed again.
This feature is supported for both external and internal connections.
This command can be activated five times for each port.
To enable this feature, proceed as follows:
| You have just dialed a number and hear a ring tone. | |
| 5 | If the call is not answered, within twenty seconds,either dial the number “5”or |
R*37# the sequence shown at left.
| Wait for the acknowledgement tone. | |
| Hang up the handset. As soon as the party you dialed conducts a conversation from her or his phone and this call is ended, your phone rings. | |
| Pick up the handset. The number of the remote party is dialed automatically. |
Callback requests can also be deleted manually, with the oldest callback request being deleted first.
| ➊ | Pick up the handset. |
| #37# | Dial the sequence shown at left. |
| ➇ | Hang up the handset. |
ISDN
Suspend/Resume
The “Suspend/Resume” feature, also known technically as “Terminal Portability”, allows you to suspend an existing connection and resume it at another point on the S_0 bus. The connection can be resumed at a different ISDN terminal device (such as an ISDN telephone) that is connected to your BRI line along with FRITZ!Box Fon WLAN.
To suspend a call, proceed as follows:
| J | You are talking to Caller 1. |
| R | Press the Hold button. Call 1 is now suspended. |
| ★1PC★ | Dial the sequence shown at left. Type in the parked-call ID as “PC”. The parked-call ID can be any number between o and 99. You will need to enter this ID again when you resume the call. |
You will hear an acknowledgement tone to indicate that the call has been successfully suspended. If you hear the failure tone, this may indicate that you made a mistake, or that the Suspend/Resume feature is not enabled on your line. It is also possible that the parked-call ID you chose is already in use.
| +++ | After the acknowledgement tone, the connection is suspended. You can hang up the handset. The call remains suspended at the ISDN provider’s local switch for two minutes. |
| T |
To resume the connection, proceed as follows:
| ✝ | Pick up the handset again. (You may not have a call on hold. Otherwise, FRITZ!Box Fon WLAN will attempt to suspend it.) |
| ✝1PC✝ | Dial the sequence shown at left. Type in the parked-call ID as “PC”. The parked-call ID is the number you entered when you suspended the call. |
ISDN
Call Tracing (MCID)
During a call or after the caller hangs up, dial the following sequence:
R*39# Dial the sequence shown at left.
For more information about this feature, contact your ISDN provider.
ISDN
Using Keypad Messages
FRITZ!Box Fon WLAN offers the “keypad” function. This function allows ISDN services and features to be controlled entering characters and strings on the telephone keypad. These keyboard entries are called keypad messages. Keypad sequences allow you to use ISDN services and features that may not be supported by your ISDN terminal device.
Ask your ISDN provider for the specific keypad messages to access ISDN features.
Entering Keypad Messages on an Extension with Automatic Outside Dialing

Pick up the handset.

Seq Dial the sequence shown at left. “Seq” stands for the keypad sequence you received from your ISDN provider.
Entering Keypad Messages on an Extension without Automatic Outside Dialing

Pick up the handset.
Seq Dial the sequence shown at left. "Seq" stands for the keypad sequence you received from your ISDN provider.
13 Product Details
This chapter provides you with product details on FRITZ!Box Fon WLAN. You receive detailed technical data and information on the LEDs.
13.1 The FRITZ!Box Fon WLAN LEDs
The LEDs on your FRITZ!Box Fon WLAN indicate the following conditions:
| LED State Event Type | |
| Power/ DSL | on FRITZ!Box Fon WLAN 7140 ready for operation; power supply is connected and the DSL line is ready for operation |
| flashes Power supply connected;the connection to DSL is being established or has been interrupted | |
| Internet on a telephone connection to the Internet is active | |
| flashes there are messages in your mailbox (this function must be supported by your Internet telephony provider) | |
| Fixed Line | on a telephone connection to the fixed-line network is active |
| flashes there are messages in your mailbox (this function must be supported by your telephony provider) | |
| WLAN on the WLAN function is enabled | |
| flashes the WLAN function is being enabled or disabled | |
| INFO flashes firmware is being updated or the value specified for the online meter has been reached | |
| on a telephone connection between two Internet telephony subscribers is active, the call is free of charge (this function must be supported by your Internet telephony provider) | |
13.2 Audible Signals
The following diagram illustrates the duration and intervals of the various handset and ring signals on the connected telephones.
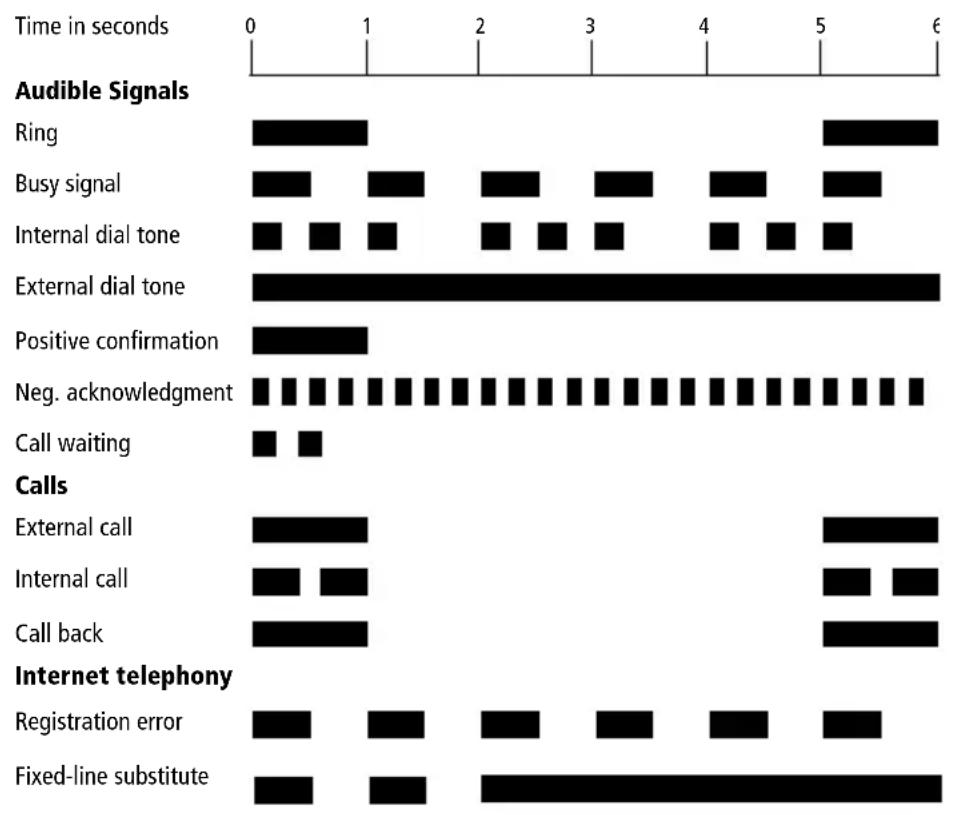
bar
| Event Type | Time in seconds | | ---------------------- | --------------- | | Audible Signals | 0 | | Ring | 1 | | Busy signal | 2 | | Internal dial tone | 3 | | External dial tone | 4 | | Positive confirmation | 5 | | Neg. acknowledgment | 6 | | Call waiting | 7 | | Calls | 8 | | External call | 9 | | Internal call | 10 | | Call back | 11 | | Internet telephony | 12 | | Registration error | 13 | | Fixed-line substitute | 14 |Handset and ring patterns on FRITZ!Box Fon WLAN
13.3 Cables and Sockets
See the information in the following section on the individual cables and sockets on the FRITZ!Box Fon WLAN 7140.
DSL/Telephone Cable
The DSL/telephone cable is a special combined cable 4.25m in length, developed by AVM to connect the FRITZ!Box Fon WLAN 7140 to the DSL splitter and the ISDN NT or analog telephone line.
If you would like to extend the cable, you have the following possibilities:
DSL Cable Extension
To extend the gray end of the combined cable, the one labeled "DSL", you will need the following components:
- 1 standard network cable
• 1 standard RJ45 CAT5 double coupling
All components are available from specialized vendors.
Remember that the quality of the line may be decrease as the distance from the central switching station increases.
AVM recommends that the standard network cable be extended by no more than 20 meters.
Telephone Cable Extension
To extend the black end of the combined cable you will need the following components:
- 1 standard network cable
• 1 standard RJ45 CAT5 double coupling
Both components are available from specialized vendors.
AVM recommends that the standard network cable be extended by no more than 10 meters.
Network Cable
Additional network cable is required if you would like to use more than one of the FRITZ!Box Fon WLAN network ports.
The FRITZ!Box Fon WLAN network cable is a standard Ethernet cable. If you need a replacement cable, a longer cable or an extension, use a standard STP-type (Shielded Twisted Pair, 1:1) CAT5 Ethernet cable. To extend the cable you will also need a standard CAT5 double coupling link to RJ45.
All components are available from specialized vendors.
AVM recommends using a network cable no more than 100 meters long.


13.4 WLAN Switch
The FRITZ!Box Fon WLAN 7140 is equipped with a WLAN switch on its rear panel.
The WLAN switch can be used to activate and deactivate WLAN.
13.5 Technical Specifications of FRITZ!Box Fon WLAN
Ports and Interfaces
- one port for the connection to the DSL / fixed line Fixed line for connecting to the analog network or ISDN
- four LAN ports via RJ45 sockets (standard Ethernet, 10/100 base-T)
● one USB host controller (USB version 1.1) - two a/b ports for connecting two extensions via RJ11 sockets
WLAN
WLAN access point with support for radio networks in accordance with IEEE 802.11b (11 Mbit/s) and IEEE 802.11g (54 Mbit/s) The 802.11g++ standard is also supported and can be used when a compatible WLAN adapter is installed.
Router Function
- DSL router
- DHCP server
- firewall with IP masquerading/NAT
User Interface and Display
- configuration and status messages via an Internet browser of a connected computer
- five LEDs indicate the condition of the device
Physical Specifications
- dimensions (WxDxH): approx. 185 x 140 x 35 mm
● supply voltage: 230 V / 50 Hz
• maximum power consumption: 12 W
● average power consumption: 9 W - DSL transmission rate: max. 8 Mbit/s (downstream), 1 Mbit/s (upstream)
- firmware can be updated
• conforms to CE standards
14 Customer Service Guide
AVM provides numerous sources of information to assist you should any questions or problems arise. Here you will find the important information you need, in the form of manuals, updates and support.

In many cases problems which arise during operation can be resolved by installing the current Microsoft Service Pack for your operating system. The current service pack can be obtained free of charge from Microsoft.
14.1 Product Documentation
To take advantage of all commands and features of your FRITZ!Box Fon WLAN, consult the following information resources:

- Manual for FRITZ!Box Fon WLAN
The manual is included in the "Info" for FRITZ!Box Fon WLAN CD.

You can install the Acrobat reader to view PDF documents from the "Info" folder of the FRITZ!Box Fon WLAN CD.

- Readme for FRITZ!Box Fon WLAN
The Readme file contains current information which was not yet available at the time the manual was completed. The Readme file is included on the FRITZ!Box Fon WLAN CD and in the “FRITZ!Box Fon WLAN” entry in the start menu.
Hlfe
- Help for FRITZ!Box Fon WLAN
In the FRITZ!Box Fon WLAN user interface you can open the detailed Online Help by clicking the "Help" buttons.
14.2 Information in the Internet
On its web site AVM presents comprehensive information on all AVM products as well as new product announcements and new product versions.
Frequently Asked Questions (FAQs)
We would like to make our products as easy to use as possible. If you still have problems, sometimes a little tip is all you need to resolve them. That is why we present you with a selection of frequently asked questions.
The FAQs can be viewed at the following address:
www.avm.de/en/service/FAQs
14.3 Updates
AVM provides updates of the firmware for free downloading over the Internet.
Use your FRITZ!Box Fon WLAN user interface to update your firmware. Use the “System / Firmware Update” command to download the firmware conveniently from the Internet and perform the update.
Go to the following URL to download the current driver software:
www.avm.de/en/download
Experienced users can also download updates from the AVM FTP server. Click the “FTP Server” link in the download area, or enter the following address:
www.avm.de/ftp
14.4 Support from the AVM Service Team
Should problems with your FRITZ!Box Fon WLAN arise, we recommend taking the following steps:
- If your have questions about starting operation of your FRITZ!Box Fon WLAN, please consult the chapter "FRITZ!Box Fon WLAN 7140: Connecting" from page 12.
Please see the information in the section “Product Details” from page 115. - If anything does not work, please start by consulting the chapter "Troubleshooting" from page 65.
This section also presents useful tips on problems with establishing connections. - The next step is to consult the FAQs in the Internet: www.avm.de/en/service/FAQs. This site contains answers to questions our customers have frequently asked our Support team.
- If you do not find an answer to your question in the existing FAQs, the AVM Support Team will assist you with tips and resolutions for working with the FRITZ!Box Fon WLAN. The support desk can be reached by e-mail or by fax.
Please take advantage of the information sources described above before contacting AVM support.
The support desk can be reached by e-mail or by fax. AV Support then will contact you to assist in solving your problem. You will receive an e-mail or a fax.
Support by E-mail
You can send us an e-mail request at any time using the Service area of our website. The Service area can be reached at:
www.avm.de/en/service/index.html
Then select the product for which you need support from the “Support” area. You can use the e-mail form available at the “Mail Form” link. Fill out the form and send it to AVM support by clicking the “Send” button. Our Support team will respond by mail as quickly as possible.

Support by Fax
If necessary, you can reach AVM Support at the fax number:
+49 (0)30 / 39 97 62 66
The following information should be included in your fax to the Support team:
- Your name and address.
- An e-mail address or fax number at which you can be reached.
● the serial number of the FRITZ!Box Fon WLAN
The serial number is printed on the sticker attached to the base of the device. Support staff will always check this number to ensure that you are a registered user. - Which operating system do you use? For instance, Windows XP or Windows 98?
- How is the FRITZ!Box Fon WLAN connected to your computer, with a network cable or via WLAN?
- At what step of the installation or in which application does an error occur or an error message appear? What is the exact wording of any error message returned?
- Which firmware does FRITZ!Box Fon WLAN use? The firmware version is displayed on the “Overview” page of the FRITZ!Box Fon WLAN user interface.
Once you have gathered this information, please fax it to AVM Support. The Support team will assist you in resolving your problem.
Index
A
alarm 85
alternating between calls 88
analog terminal equipment 24
B
baby monitor 93
bandwidth management 36
busy on busy 93
C
cables 116
network 11
call diversion 94
call diversion via the central exchange 98
call forwarding 98
call tracing (MCID) 113
call waiting 107
call waiting option 92
call-back on busy 111
call-back on no response 111
calls on fixed lines 32
CCBS, see call-back on busy
CCNR, see call-back on no re- sponse
CLIP, see displaying the incoming caller ID (CLIP)
CLIR, see suppressing caller ID
COLP, see restriction and presentation of number dialed (COLR/COLP)
COLR, see restriction and presentation of number dialed (COLR/COLP)
combination cable 11
configuring the printer port 44
connecting to WLAN 11
consultation 89
D
declaration of CE
conformity 127
defining connection type 85
DHCP server 60 , 72
dialing 85
dialing internal calls 87
with automatic outside dial- ing configured 87
without automatic outside dialing configured 87
displaying the incoming caller ID (CLIP) 104
disposal 8
documentation 120
DSL cable 11
DSL modem 27, 29
DSL router 27
DSL/telephone cable 116
E
ECT, see explicit call transfer
enabling/disabling WLAN 83
explicit call transfer 108 , 110
F
factory settings 91
FAQs 121
firewall 118
firmware 121
frequently asked
questions 121
G
game consoles 10
group call 87
H
hold 89
hub 18
|
information in the Internet 121
installation help 11
installation prerequisites 11
Internet account information 27
Internet telephony 31 , 35
IP address 72 dynamic 28
IP masquerading 118
K
keypad messages 113
L
LAN port 11 16,
LEDs 115 , 118
M
Mac OS X 76
MCID, see call tracing
N
NAT 118
network cable 11 , 117
network hub 18
network port 16
network switch 18
0
opening user interface 26
P
package contents 11 picking up calls 89
printer driver installation
in Windows Me/98 46
in Windows XP/2000 45
R
recycling 8
regulations and norms 127
restriction and presentation of number dialed (COLR/COLP) 105
room monitoring 93
router 27
S
safety instructions 8
selecting the outgoing number 85
serial number 123
service 122
shortening the dialing procedure 83
sockets 116
supply voltage 119
suppressing caller ID 104
suspend/resume 112
switch 18
T
technical specifications 118 telephony scenarios 36
transferring calls 89
U
updates 121
USB devices 41 FRITZ!WLAN USB Stick 41
USB hubs 41
USB mass storage 41
USB printers 41
W
WLAN
encryption 50
frequency range 52
presettings 18
security 49
WLAN switch 118
Declaration of CE Conformity
The manufacturer AVM GmbH
Address Alt-Moabit 95
D-10559 Berlin
herewith declares that the product
Product FRITZ!Box Fon WLAN 7140
Type ADSL-WLAN Router
Complies with the following directives:
- 1999/5/EC R&TTE Directive: Radio Equipment and Telecommunications Terminal Equipment
- 89/336/EEC EMC Directive: Electromagnetic Compatibility
- 73/23/EEC Low Voltage Directive: Electrical equipment designed for use within certain voltage limits
The following norms were consulted to assess conformity:
EN 60950-1:2001/A11
• CTR 3/1998.06.17
• ETSI TS 101 388
ITU-T G.992.1
ITU-T G.992.5
ITU-T G.994.1
• ETSI ETR 328
• EN 301 489-17 V1.2.1 (2002)
EN 301489-1 V1.5.1 (2004)
EN 55024/9.98 + A1/10.01 + A2/01.03
• EN 300 328 V1.6.1 (11.2004)
CE !
The CE symbol confirms that this product conforms with the above mentioned norms and regulations..

Berlin, 10/04/2006 Peter Faxel, Technical Director
Indication of Countries
This device is designed for use in all countries of the European Union and in Switzerland, Norway and Iceland. In France only indoor operation is permitted.