Scarabeo 400 (2006) - Scooter APRILIA - Free user manual and instructions
Find the device manual for free Scarabeo 400 (2006) APRILIA in PDF.


| Product Type | Scooter |
| Brand / Model | Aprilia Scarabeo 400 (2006) |
| Overall Dimensions (L x W x H) | 2263 mm x 790 mm x 1419 mm |
| Wheelbase | 1535 mm |
| Saddle Height | 785 mm |
| Ground Clearance | 215 mm |
| Kerb Weight | 194 kg |
| Maximum Load (rider + passenger + luggage) | 190 kg |
| Engine Type | Single-cylinder, 4-stroke, 4 valves, SOHC |
| Engine Displacement | 398.9 cm³ |
| Bore x Stroke | 85.8 mm x 69 mm |
| Fuel Type | Unleaded premium petrol, min. 95 RON |
| Fuel Tank Capacity (incl. reserve) | 13.2 L |
| Fuel Reserve | 3 L |
| Transmission | Automatic CVT with V-belt |
| Front Tyre | 110/70-16" 56S Tubeless |
| Rear Tyre | 150/70-14" 66S Tubeless |
| Front Brake | 260 mm disc, hydraulic |
| Rear Brake | Combined disc: front 260 mm & rear 240 mm |
| Battery | 12V, maintenance-free |
| Engine Oil Capacity (with filter change) | 1500 cm³ |
| Coolant Capacity (50/50 water/antifreeze) | 1.7 L |
| Transmission Oil Capacity | ~250 cm³ |
| Front Fork Oil (per leg) | 230 cm³ |
Frequently Asked Questions - Scarabeo 400 (2006) APRILIA
User questions about Scarabeo 400 (2006) APRILIA
0 question about this device. Answer the ones you know or ask your own.
Ask a new question about this device
Download the instructions for your Scooter in PDF format for free! Find your manual Scarabeo 400 (2006) - APRILIA and take your electronic device back in hand. On this page are published all the documents necessary for the use of your device. Scarabeo 400 (2006) by APRILIA.
USER MANUAL Scarabeo 400 (2006) APRILIA
APRILIA WOULD LIKE TO THANK YOU
for choosing one of its products. We have drawn up this booklet to provide a comprehensive overview of your vehicle's quality features. Please, read it carefully before riding the vehicle for the first time. It contains information, tips and precautions for using your vehicle. It also describes features, details and devices to assure you that you have made the right choice. We believe that if you follow our suggestions, you will soon get to know your new vehicle well and will use it for a long time at full satisfaction. This booklet is an integral part of the vehicle, and should the vehicle be sold, it must be transferred to the new owner.
aprilia WIL U BEDANKEN
The instructions in this booklet are intended to provide a clear, simple guide to using your vehicle; brief descriptions of maintenance procedures and periodical controls to be carried out on the vehicle by authorised aprilia Dealers or Workshops have been also included. This booklet also contains instructions for simple repairs. Any operations not specifically described in this booklet require the use of special tools and/or particular technical knowledge: for these operations, please take your vehicle to an authorised aprilia Dealer or Workshop.
Failure to completely observe these instructions will result in serious risk of personal injury.
Sections marked with this symbol indicate the correct use of the vehicle to prevent damaging the environment.
Beschermingtvan
The incomplete or non-observance of these regulations leads to the risk of serious damage to the vehicle and sometimes even the invalidity of the guarantee.
Staattvanthettvoertuig
1 Vehicle / 1 Voerturing
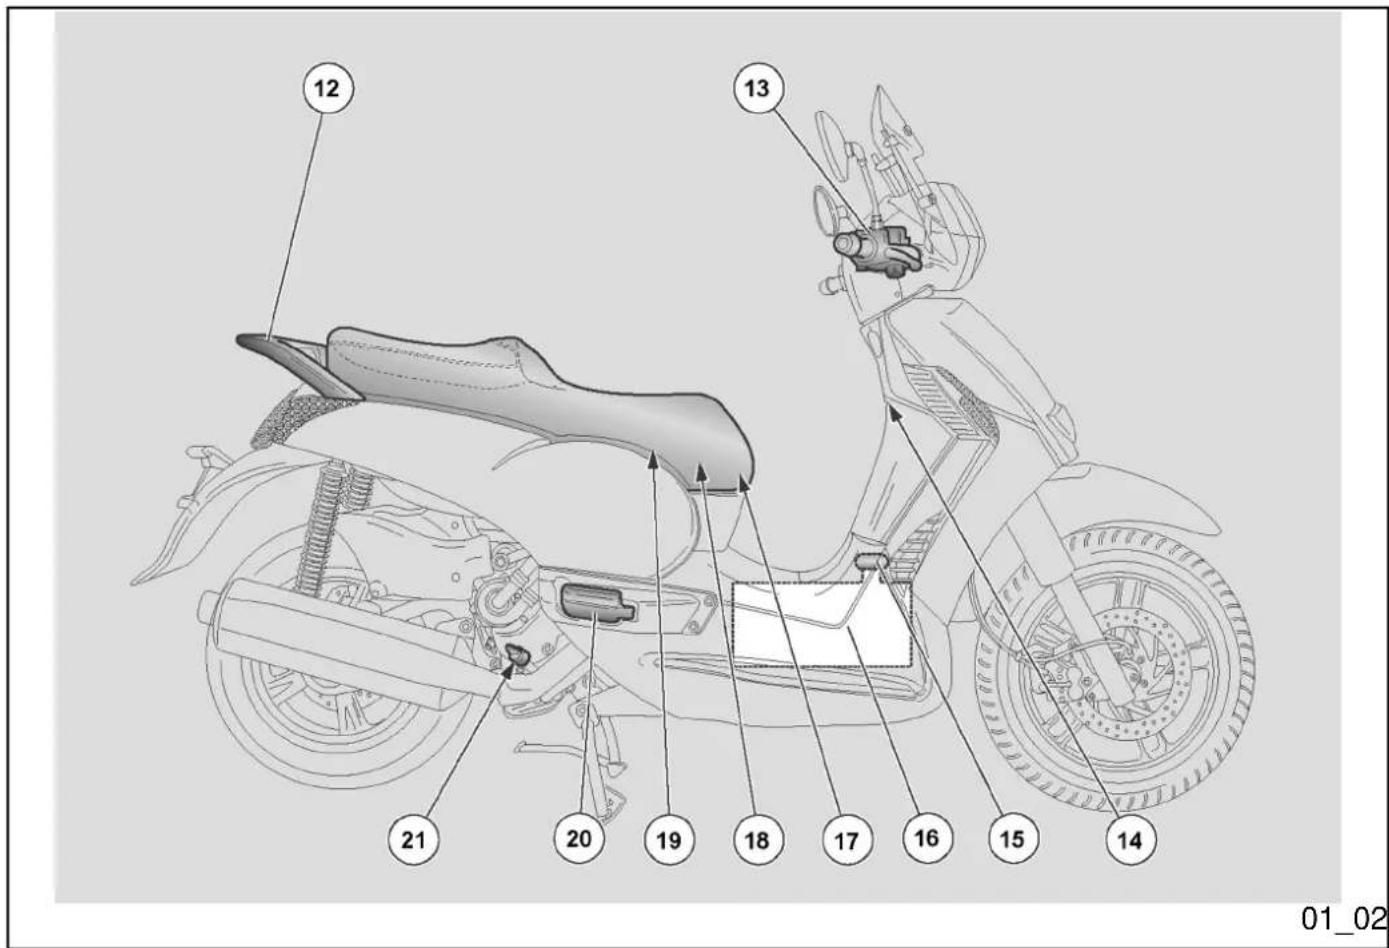
Arrangementtoftthetmain componentst(01\_01,t01\_02)
KEY:
1.tExpansion tank
-
Coolant expansion tank cap
-
Rear brake fluid reservoir
4.tAir filter
5.tTransmission cover
-
t Left passenger footrest
-
Centre stand
-
Side stand
-
Spark plug
10.tCentral inspection cover
11.tHorn
12.tPassenger handgrip
- Front brake liquid tank
14.tSaddle opening switch
15.tFuel tank cap
16.tFuel tank
- Battery
18.Secondary fusebox
19.tMain fuseboxes
- t Left passenger footrest
- Controls on the left-hand side of the handlebar
- Combined brake lever (front and rear)
- Left rear-view mirror
- Instruments and gauges
- | Front brake lever
- Right rear-view mirror
- I Throttle grip
- Electrical controls on the right-hand side of the handlebar
- Ignition switch / steering lock (ON-OFF-LOCK-GLOVE BOX OPENING-FUEL TANK OPENING)
Legenda (01\_03)
- Red oil pressure warning light
- IBlue high-beam warning light
- Green turn indicator warning light
- ICoolant temperature gauge
5.ISpeedometer - Multifunction LCD display
- IFuel gauge
8.IMODE Button - Yellow amber low fuel warning light
10.IEFI Warning light
11.IAntitheft indicator (IMMOBILIZER) - Red coolant high temperature warning light
High-beamtwarningtlightt"2"
Turnslonlwhenlthelfrontlheadlamphigh-beamlbulblislactivatedlorlwhenlthelhigh-beam light is flashed (PASSING).
Enginetoiltpressuretwarningtlightt"1"
Turnslonleveryltimelthelignitionlswitchlislset to "ON" and the engine has not been started, thistestsILEDloperation.IThelwarninglight shouldlturn offlaslsoonlas thelenginelisstarted.
CAUTION

IFtTHEtWARNINGtLIGHTtTURNStON WHILEtTHEtENGINEItSTWORKINGtPROPERLY,tTHIStMEANStTHATtTHEtOILtPRESSUREtINtTHEtCIRCUItIStNOTtENOUGH. IFtTHIStOCCURStSTOPtTHEtENGINEtAT ONCEtANDtCONTACTtANTOFFICIAL APRILAtDEALER.
Electronictfueltinjectiont(EFI)twarning lightt"10"
Turns on for about three seconds every time the ignition switch is set to "ON" and the engine has not been started, this tests the injection system operation. The warning light should turn off as soon as the engine is started.
CAUTION

IFtTHEtWARNINGtLIGHTtTURNStON WHILEtTHEtENGINEtIStWORKINGtPROPERLY,tTHISTMEANSTHATtTHEREtIStA FAILUREtINtTHEtELECTRONICtFUELtINJECTIONtSYSTEM.tIFtTHISTOCCURS STOPtTHEtENGINEtATtONCEtANDtCONTACTtANTOFFICIALtAPRILAtDEALER.
Controlelamptvantdetelektronische benzine-injectiet(EFI)t«10»
Only for vehicles fitted with this wiring. When the scooter is off, it flashes as a deterrent against thieves.
Confirms that the antitheft system is on.
Fueltgauget«7»
Controlelamp vanthettantidiefstalsysteem (immobilizer)t«11»
Shows the approximate fuel level in the tank. When the needle reaches the red area, there are about 2 litres of fuel left. If this occurs, refill the tank as soon as possible.
Lowtfueltwarningtlightt«9»
Turnslonlwhenltherelislal2-litrelfuellreserve in the tank.
Digitalclockt«6»
View time and date in this display.
Speedometert«5»
Shows riding speed
Digitalttotaltodometert«6»
Shows|theltotallnumberloflkilometres covered, partial kilometres (TRIP 1, TRIP 2).
Coolantttemperaturetgauget«4»
Showslthelapproximateltemperatureloflthe coolantlinlthelengine.IWhenlthelneedle startsltolmovelawaylfromlthel«MIN»Imark, theltemperatureisladequateltolridelthe scooter.IThelnormalloperationalltemperature islwhenlthelneedlelislatcentrallarealoflthe scale. If the needle enters the red area or the warningllightturnslon,Istoplthelengineland check the coolant level.
CAUTION

IFtTHEtTEMPERATUREtEXCEEDStTHE MAXIMUMtALLOWEDt("MAX"tREDtAREA OFtTHEtSCALE), tTHEtENGINEtCANtBE
Indicatortvanthettbrandstofpeilt«7»
Turns on when the coolant temperature indicator reaches the red area. Stop the engine at once and check the coolant level.
CAUTION

IFtTHEtTEMPERATUREtEXCEEDStTHE MAXIMUMtALLOWEDtFORtAtLONGtTIME, THEtENGINEtCANtBEtSERIOUSLYtDAMAGED.
Controlelamptvantdethogettemperatuur vantdetkoelvloeistoft«12»
The display shows digital clock, odometer,
MultifunctioneeltLCDtdisplayt«6»
measurement unit, trip odometer, scheduled maintenance indication, fuel level.
DigitaltIcdtdisplayt(01\_05, 01\_06)
Turning the ignition key «1» to «ON», activates all the segments on the multifunction LCD(this checks components correct operation) and displays the last function set after switching off the engine is.
CAUTION
THEtSERVICEtICONtStDISPLAYEDtON THEtLCDtAFTERtRIDINGtTHEtFIRSTt1000 KMtANDtTHENtAFTERtEVERYt10000tKM. THEtSERVICEtICONtFLASHESTFOR ABOUTt5tSECONDStAFTERtTHEtIGNI- TIONtCHECK,t300tKMTOtTHEtNEXTtSER- VICE.tONCEtTHEtMILEAGEtFORtAtSER- VICEtHASTBEENTREACHED,tTHEtICON WILLtBEtSTEADILYtONtUNTlTTHEtSER- VICEtIStCARRIEDtOUT.tIfthISTOCCURS TAKEtYOURtSCOOTERtTOtANTOFFICIAL APRILIAtDEALERtTOcARRYtOUTtMAIN- TENANCEtOPERATIONStSPECIFIEDtIN THEtPERIODICtMAINTENANCEtCHART.
Several functions can be selected and viewed on the display using the MODE button «2» on the controls on the left hand side of the handlebar.
The segments of the multifunction LCD display are the following:
- digital clock «3»,
- odometer indicator «4»,
- unit of measurement in km «5»,
- unit of measurement in miles «6» (USA and UK versions),
- trip odometer indicator «7»,
- scheduled maintenance service indicator «8»,
- fuel gauge «9».
Settingtthettotaltandttrip odometerst(01\_07,t01\_08) DIGITALtODOMETER
These are the segments of the digital odometer functions on the LCD display:
lconttotdisplayttriptodometer,tsixtdigits
PERIODIEKtONDERHOUD.
Pressing|the|MODE|button1"2"Idisplayslin sequence the modes:
- Trip odometer
- TRIP
- Battery voltage
-IPress|the|MODE|button|"2" |to|select|the trip odometer function.
-IPresslandlholdltheIMODElbuttonl"2"Ifor more than three seconds.
NOTE
THISTONLYtRESETStTHEtFUNCTIONtDISPLAYED.
OPNULSTELLINGtVANTHETtHODOGRAM PARTIEEL
- Pressing the mode button «2» key for more than three seconds will activate the clock adjustment.
- The first adjustment which can be set will be the hour. Repeatedly pressing the MODE «2» button sets the desired hour.
- Pressing the MODE button «2» for more than three seconds activates the minutes adjustment.
- To adjust the minutes press the MODE button«2» until the desired minutes are displayed.
- Once the clock has been adjusted do not press any key for three seconds to leave this function.
NOTE
THEtCLOCKtCANtBEtSETtONLYtWHEN THEtENGINEtIStOFFtORtVEHICLEtIStATtA STANDSTILLtANDtWITHtORtWITHOUT THEtENGINEtRUNNING.
Regelingtvantdetklok:
ENTDUSTMETtDEtTOERENTVANtDE MOTORtOFtDEtSNELHEIDtGELIJKtAAN NUL.
Keytswitcht(01\_10)
Thelignition|switchl"1"lislfoundlon|the|right side, near the headstock.
NOTE
THEtKEYtACTIVATEStTHEtIGNITION/STEERINGtLOCKtSWITCH,tTHEtSADDLELOCKtANDtTHEtGLOVEBOXtLID.
NOTE
TWOtKEYStAREtSUPPLIEDtWITHtTHE VEHICLEt(AtSPAREtONE).
KEEPtTHEtSPAREtKEYtINtAtDIFFERENT PLACE,tNOTtWITHtTHEtVEHICLE.
OFF: Thelengine and lights I cannot belset to work. The ignition key can be extracted.
ON:tThelenginelandllightslcanlbelsetlto work. It is not possible to withdraw the key.
LOCK:tThelsteeringlislocked.IThelengine
and lights cannot be set to work. The ignition key can be extracted.
To lock the steering:
- Turn the handlebar completely to the left.
- Turn the ignition key to the "LOCK" position.
CAUTION

AVOIDINGtLOSINGtCONTROLtOFtTHE VEHICLE,tNEVERtTURNtTHEtKEYtTO "LOCK"tWHILEtRIDING.
Inschakelingtvanthet stuurslot
Om de stuurinrichting te blokkeren:
Move the switch "2" to the left, to indicate a left turn; move the switch "2" to the right, to indicate a right turn.. Pressing the central part of the switch deactivates the turn indicator. While the vehicle is in motion the system automatically deactivates the turn indicator system after 40 seconds or 500 m.
NOTE
ELECTRICALtCOMPONENTStFUNCTION ONLYtWHENtTHEtIGNITIONtKEYtlStSET TOt"ON"
Pressing the button "1" activates the horn.
NOTE
ELECTRICALtCOMPONENTStFUNCTION ONLYtWHENtTHEtIGNITIONtKEYtISTSET TOt"ON"
Drukknoptclaxont(01\_12)
If|thellight|switch|3"lis|set|tol"B",Ithis|activates|thelhigh-beam|light;lif|tl|is|set|tol"A", this activates the low-beam light.
Turninglthelightlswitchltol"C"lthelhigh-beam light flashes.
NOTE
ELECTRICALtCOMPONENTStFUNCTION ONLYtWHENTTHEtIGNITIONtKEYtlStSET TOt"ON"
NOTE
ONCEtTHEtLIGHTtSWITCHtlStRELEASED FROMtTHEtPASSINGtMODEtINt"C"THE HIGH-BEAMtLIGHTtSTOPStFLASHING.
Using|the|HAZARDtswitchl"4"litlis|possible to activate/deactivate the hazard lights.
ACTIVATION
With the ignition switch in "ON".
PressItolactivateIthelfourlarrows.1Nowlitlis possibleItolturnIthelignitionIswitchItol"OFF" and withdraw the key.
DEACTIVATION
Insert the key in the ignition switch and turn it to "ON", I press the HAZARD switch again to deactivate the system.
NOTE
ACTIVATEtANDtDEACTIVATEtTHEtHAZ-ARDtLIGHTStONLYtWHENtTHEtIGNITION KEYtISTSETtT0t"ON"
Inschakelknoptalarmlichten (01\_14)
Bylpressing|thelstart-uplbutton1"2",lthe starter motor makes the engine rotate.
NOTE
ELECTRICALtCOMPONENTStFUNCTION ONLYtWHENtTHEtIGNITIONtKEYtIStSET TOt"ON"
Startknopt(01\_15)
Itlactslaslanlengine|cut-offlorlemergency stop|switch. |With|thelswitch|«1»|in|«B» RUN, it is possible to start the engine; pressing the switch when set to «A» OFF will stop the engine.
NOTE
ELECTRICALtCOMPONENTStFUNCTION ONLYtWHENtTHEtIGNITIONtKEYtIStSET TOt"ON"
CAUTION

DOtNOTtACTIVATEtTHEtENGINEtSTOP SWITCHtWHILEtRIDINGtTHEtVEHICLE.
CAUTION
WITHtTHEtENGINEtOFFtANDtTHEtIGNITIONtSWITCHtSETtTTo«ON»tTHEtBAT-
01_17
Fuelttankt(01\_17)
To reach the fuel tank cap:
- Insert the key "1" into the fuel tank compartment lock.
• Turn the key "1" anticlockwise.
• Unscrew the tank cap "2".
Benzinetankt(01\_17)
OmideldoplvanIdelbrandstoftanklte bereiken:
Powertsupplytsocket (01\_18)
- There is a 12V socket inside of the glovebox "3" and a lever "4" to open the saddle manually..
- The 12V socket can be used to power equipment with a maximum power of 180 W (mobile telephones, hand lamp, etc.).
CAUTION
USINGtTHISTSOCKETtFORtAtLONGtPERIODtCANtRESULTtINtAtFULLYtDISCHARGEDtBATTERY.
Stopcontactt(01\_18)
- To unlock the saddle automatically: press the button "1" on the remote control.
- To unlock the saddle manually: open the glovebox.
- Pull the lever to unlock the saddle manually.
- To lock the saddle, lower and press (without force) to trip the lock.
CAUTION

Hettzadelt(01\_19)
Write down the chassis and engine numbers in the specific space in this manual.
The chassis number can be used to order spare parts.
NOTE
ALTERINGtIDENTIFICATIONtNUMBERS CANtBEtSERIOUSLYtPUNISHEDtBYtLAW, PARTICULARLYtMODIFYINGtTHE CHASSISTNUMBERtWILLtIMMEDIATELY INVALIDATetTHEtWARRANTY.
Chassistnumber
The chassis number is stamped on the central chassis bar. To read the chassis number it will be necessary to open the glovebox and remove the snap-on protection.
Chassis No.: ....
Identificatiet(01\_20,t01\_21)
ThelengineNumberliststampedlinearthelrear shock absorber lower support.
Engine No.: ....
Motornummer
HetlmotornummerlislgedruktlinIdelnabijheid vanIdelonderstelsteunlvanIdelachterste schokdemper.
Motornummer:
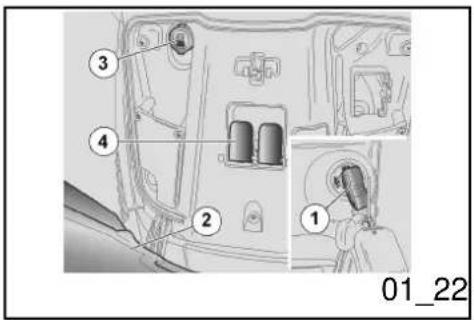
Rearttoptboxtopening (01\_22)
ThanksItolthelgloveboxlitlislnotInecessarylto carrylwithlyoulbulkylitemslwhenlyoulpark your scooter.
- Insert the key into the lock "1".
- This will automatically open the lid "2" of the glovebox.
Penentvantdetkoffertvoor (01\_22)
Itwillbelnecessaryltolchecklthelsteering clearance from time to time.
To check:
• Rest the scooter on its centre stand.
- Place some spongy material and set the support under the scooter in such a way that the front wheel has free space to move and the vehicle is secure from falling.
NOTE
PROVIDEtAtSUPPORTtWITHtAtSuitABLE HEIGHTtANDtBASEtT0tSAFELYtHOLD THEtVEHICLE.
- Shake the fork in the riding direction.
- If there is excessive clearance, contact an Official aprilia Dealer to re-establish the optimum conditions for use.
CAUTION
Controlest(02\_01,t02\_02, 02\_03)
Controletvantdetstuurinrichting
MAKEtSUREtTHEtVEHICLEtlStSTABLE.
NOTE
WHENTSHAKINGtTHEtFORKtINtEXCESS THEtSTANDtMOVEMENTtCANtBEtSEEN ANDtANTINCORRECTtCLEARANCEtBE FOUND.tREPEATtTHEtPRECEDINGtOP- ERATIONtVARIOUStTIMES.
VOERTUIG.
N.B.
WANNEERtMENTEXCESSIEFtAANTDE VORKtSCHUDT,tZOUtMENTtDEtBEWEGING VANTDETSTANDAARDtKUNNEN OPMERKEN,tENTEENTONCORRECTE SPELINGtVASTSTELLEN.tHERHAALTDE VORIGEtHANDELINGtENKELETMALEN.
Enginetfulcrumtaxistcheck
CheckIfrequentlyIthelexistingIclearance among the bushings of the engine pin.
To check:
• Rest the scooter on its centre stand.
- Shake the wheel crosswise to the riding direction.
• If clearance is found contact an Official aprilia Dealer to, re-establish the optimum conditions of use.
Controletvantdetdraaipuntastvantde motor
VoerlperiodiekIdelcontroleluitIvanIdelspeling tussenIdelbeslagringenIvanIdelpinIvanIde motor.
Voor de controle:
| Front and rear disc brake | Check for proper operation.Check brake lever empty travel and brake fluid level. Check for leaks. Check brake pads for wear.If necessary top-up with brake fluid. |
VOORBEREIDENDEtCONTROLES
| KenmerktBeschrijvingt/tWaarde | |
| Voorste en achterste schijfrem | Controleer de werking, de lege loop van de commandohendels, het peil van de vloeistof en eventuele lekken. Controleer de slijtage van de pastilles. Indien nodig vult men remvloeistof bij. |
| Brake levers | Check they function smoothly. Lubricate the joints if necessary. |
| Throttle grip | Check it functions smoothly and that it can be fully opened and closed at all steering positions. Adjust and/or lubricate if necessary. |
| Engine oil | Check and/or top-up as required. |
| Wheels/tyres | Check that tyres are in good conditions. Check inflation pressure, tyre wear and potential damage. |
| Steering | Check that the rotation is homogeneous, smooth and there are no signs of clearance or slackness. |
| Centre and side stands | Check that they work smoothly and they go back to their normal position when the springs are released. Lubricate couplings and joints if necessary. |
| Clamps | Check that the clamping elements are not loose. Adjust or tighten them as required. |
| Fuel tank | |
CARRY OUT REFILLING AND MAINTENANCE OPERATIONS IN A WELL VENTILATED PLACE AND WITH THE ENGINE OFF.
DO NOT SMOKE WHILE REFUELLING OR WHEN CLOSE TO FUEL VAPOURS, AVOID CONTACT WITH NAKED FLAMES, SPARKS OR ANY OTHER SOURCE THAT MAY CAUSE FUEL TO CATCH FIRE OR EXPLODE.
AVOID SPILLING FUEL OFF THE FILLER AS IT MAY CATCH FIRE IN CONTACT WITH THE ENGINE HOT SURFACES. IN CASE OF ACCIDENTAL FUEL SPILLS, CHECK THAT THE AREA IS COMPLETELY DRY BEFORE STARTING THE VEHICLE.
FUEL EXPANDS WHEN EXPOSED TO HEAT OR SUN RAYS, THEREFORE BE CAREFUL AND DO NOT REFILL THE TANK UP TO THE TOP.
CLOSE THE CAP ADEQUATELY AFTER REFUELLING. BE CAREFUL FUEL DOES NOT GET INTO CONTACT WITH THE SKIN. DO NOT INHALE VAPOURS OR SWALLOW FUEL. DO NOT TRANSFER FUEL FROM ONE CONTAINER TO ANOTHER USING A HOSE.
BRANDBAAR EN KAN EXPLOSIEF WORDEN IN BEPAALDE OMSTANDIGHEDEN.
VOER HET TANKEN EN DE ONDERHOUDSHANDELINGEN UIT IN EEN GEVENTILEERDE ZONE EN MET DE MOTOR UIT.
ROOK NIET TIJDENS HET TANKEN EN IN DE NABIJHEID VAN BRANDSTOFDAMPEN, EN VERMIJDT ABSOLUUT CONTACT MET VRIJE VLAMMEN, VONKEN EN EENDER WELKE ANDER BRON DIE HET VLAM VATTEN OF EXPLODEREN ERVAN KAN VEROORZAKEN.
VERMIJDT BOVENDIEN HET UITSTROMEN VAN BRANDSTOF UIT DE KLEP, OMDAT HIJ KAN VLAM VATTEN IN CONTACT MET DE GLOEIEND HETE OPPERVLAKKEN VAN DE MOTOR. WANNEER ER ONVRIJWILLIG BRANDSTOF WORDT GEMORST, CONTROLEERT MEN OF DE ZONE COMPLEET DROOG IS, VOORDAT MEN HET VOERTUIG START.
BRANDSTOF ZET UIT INDIEN BLOOTGESTELD AAN WARMTE EN ZONNESTRALEN, DUS MAG MEN DE TANK NOOIT VULLEN TOT AAN DE RAND.
CAUTION

DO NOT DISPOSE OF FUEL INTO THE ENVIRONMENT.
CAUTION

KEEP OUT OF THE REACH OF CHILDREN
CAUTION

PETROL DAMAGES THE PLASTIC PARTS OF THE BODYWORK.
CAUTION

DO NOT USE THE SCOOTER TO THE COMPLETE EXHAUSTION OF THE FUEL; IN THE EVENT THAT THIS SHOULD OC-CUR, DO NOT ATTEMPT TO START THE ENGINE. TURN THE KEY SWITCH TO OFF AND TOP-UP THE TANK AS SOON AS POSSIBLE. THE FAILURE TO FOLLOW THESE GUIDELINES COULD CAUSE DAMAGE TO THE FUEL PUMP AND/OR THE CATALYSER.
SLUIT ZORGVULDIG DE DOP NA HET TANKEN. VERMIJDT DAT DE BRANDSTOF IN CONTACT KOMT MET DE HUID, VERMIJDT HET INADEMEN VAN DE DAMPEN, HET INSLIKKEN, EN HET OVERGIETEN VAN EEN TANK NAAR EEN ANDERE MET BEHULP VAN EEN BUIS.
LET OP

LOOS DE BRANDSTOF NIET IN HET MILIEU.
LET OP

BUITEN BEREIK VAN KINDEREN HOUDEN
LET OP

DE BENZINE BESCHADIGT HET PLASTIC VAN DE CARROSSERIE.
LET OP

HET VOERTUIG NIET GEBRUIKEN TOT WANNEER ER GEEN BRANDSTOF MEER IN DE TANK IS; INDIEN DIT TOCH VOORVALT, MAG MEN NIET BLIJVEN PROBEREN OM TE STARTEN, MAAR
PLAATSTtMENtDE
SLEUTELSCHAKELAARTINT«OFF»tEN
TANKTtMENTzOtVLUGtMOGELIJK
BENZINE.tHETtNIETtRESPECTERENTVAN
DEZEtNORMtKANtDEtPOMPtVANtDE
VOEDINGtEN/OFtVANtDEtKATALYSATOR
BESCHADIGEN.
Use unleaded premium petrol only with minimum octane rating of 95 (NORM) and 85 (NOMM)
Characteristic
Fuelttanktcapacityt(reservetincluded)
13.21
tanktreserve
31
This vehicle is fitted with tyres without inner tubes (Tubeless).
CAUTION

CHECKtFREQUENTLYtTYREtPRESSURE WITHtTYREStATtAMBIENTtTEMPERAT-
Bandenspanningt(02\_04)
BANDEN
CONSULT YOUR DEALER ON METHODS TO CHECK WEAR. CARRY OUT A VISUAL INSPECTION FOR TYRE CONSUMPTION. REPLACE TYRES IF WORN. OLD TYRES
OMGEVINGSTEMPERATUUR.
WANNEER DE BANDEN WARM ZIJN, IS DE METING NIET CORRECT. VOOR DE METING UIT VOORAL VÓÓR EN NA EEN LANGE REIS.
WANNEER DE SPANNING TE HOOG IS, WORDT DE ONEFFENHEID VAN HET TERREIN NIET GEDEMPT, EN DUS NAAR DE STUURINRICHTING VERSTUURT, ZODAT HET RIJCOMFORT VERMINDERT EN DE WEGLIGGING IN BOCHTEN VERSLECHTERT.
WANNEER VICEVERSA DE BANDENSPANNING ONVOLDOENDE IS, WERKEN DE ZIJKANTEN «1» VAN DE BANDEN MEER, EN KAN HET ZIJN DAT DE BAND OP DE VELG SLIPT OF LOSKOMT, MET ALS GEVOLG DAT MEN DE CONTROLE OVER HET VOERTUIG VERLIEST. WANNEER MEN BRUUSK REMT KUNNEN DE BANDEN UIT DE VELGEN KOMEN. IN BOCHTEN KAN HET VOERTUIG GAAN SLIPPEN.
CONTROLEER DE STAAT VAN HET RIJOPPERVLAK EN DE SLIJTAGE, OMDAT SLECHTE BANDENCONDITIES DE WEGLIGGING EN DE MANOEUVREERBAARHEID VAN HET VOERTUIG KUNNEN SCHADEN. ENKELE BANDENTYPES, DIE GEHOMOLOGEERD ZIJN VOOR DIT VOERTUIG, HEBBEN EEN SLIJTAGE-INDICATOR. ER BESTAAN
THAT ARE NOT FULLY WORN CAN GET HARD RESULTING IN LACK OF GRIP. REPLACE TYRES IF THIS OCCURS. REPLACE TYRES WHEN WORN OR IF THE TREAD HAS A HOLE BIGGER THAN 5 MM. AFTER A TYRE IS MENDED, BALANCE THE WHEELS. USE ONLY TYRE SIZES INDICATED BY THE MANUFACTURER. DO NOT FIT TYRES WITH INNER TUBES ON RIMS FOR TUBELESS TYRES OR VICE VERSA. CHECK THAT THE INFLATION VALVES HAVE THEIR CAPS FITTED IN ORDER TO AVOID UNEXPECTED FLAT TYRES.
REPLACEMENT, REPAIR, MAINTENANCE AND BALANCING OPERATIONS ARE HIGHLY IMPORTANT AND SO THEY SHOULD BE CARRIED OUT USING THE SPECIFIC TOOLS AND WITH THE ADEQUATE KNOWLEDGE. IT IS THEREFORE ESSENTIAL TO TAKE YOUR VEHICLE TO AN OFFICIAL APRILIA DEALER OR SPECIALISED TYRE WORKSHOP TO CARRY OUT THE OPERATIONS ABOVE. NEW TYRES CAN BE COVERED BY A SLIPPERY COAT: RIDE WITH CAUTION DURING THE FIRST KILOMETRES. DO NOT APPLY UNSUITABLE LIQUIDS ON TYRES.
VERSCHILLENDE TYPES VAN SLIJTAGE-INDICATORS.
VOOR INFORMATIE IN VERBAND MET DE CONTROLE VAN DE SLIJTAGE, WENDT MEN ZICH TOT DE VERKOPER. CONTROLEER VISIEF DE SLIJTAGE VAN DE BANDEN, EN VERVANG ZE INDIEN ZE VERSLETEN ZIJN. WANNEER DE BANDEN OUD ZIJN, EN OOKAL ZIJN ZE NIET VERSLETEN, KUNNEN ZE VERHARDEN EN DUS DE WEGLIGGING SCHADEN. IN DIT GEVAL VERVANGT MEN DE BANDEN VERVANG DE BANDEN WANNEER ZE VERSLETEN ZIJN, OF WANNEER ER EEN EVENTUEEL GAT IS IN DE ZONE VAN HET RIJVLAK DAT GROTER IS DAN 5 MM. NADAT MEN DE BAND HEEFT LATEN HERSTELLEN, LAAT MEN DE WIELEN BALANCEREN. GEBRUIK UITSLUITEND DE MAAT VAN BANDEN DIE WORDT AANGEDUID DOOR HET HUIS. PLAATS GEEN BANDEN VAN HET TYPE MET BINNENBAND OP VELGEN VOOR TUBELESS BANDEN, EN VICEVERSA. CONTROLEER OF DE KLEPPEN VOOR HET OPBLAZEN STEEDS HUN DOPJES HEBBEN, OM HET PLOTSELING LEEGLOPEN VAN DE BANDEN TE VERMIJDEN.
DE HANDELINGEN VAN HET VERVANGEN, HERSTELLEN, ONDERHOUD EN BALANCEREN ZIJN ZEER BELANGRIJK, EN MOETEN DUS
UITGEVOERDtWORDENTMETtGESCHIKTE GEREEDSCHAPPENTENTMETtDEtNODIGE ERVARING.tDAAROMtRAADTtMENTAAN OMtZICHtTEtWENDENTOTtEEN OFFIClÉLEtAPRILIAtDEALERtOftEEN BANDENSPECIALISTtVOORtHET UITVOERENTVANTVOORAFGAANDE HANDELINGEN.tWANNEERtDEtBANDEN NIEUWtZIJN,tKUNNENTzETBEDEKTtZIJN METtEENTGLADDEtLAAG:tDEtEERSTE KILOMETERStMOETtMENTVOORZICHTIG RIJDEN.tSMEERtDEtBANDENTNIETtIN METtONGESCHIKTEtVLOEISTOFFEN.
CAUTION
NEVERtEXCEEDtTHEtMAXIMUMtWEIGHT ALLOWEDtTOtBEtTRANSPORTED.tOVERLOADINGtTHEtSCOOTERtMAYtRESULT INtLACKtOfTSTABILITY,tPOORtHANDLINGtANDtTYREtDAMAGE.
Characteristic
MAXtload
190 kg.
LETtOP
OVERSCHRIJDTtDEtMAXIMUMtLIMIET VANthETtVERVOERBAARtGEWICHT NIET.thETtOVERBELASTENTvANthET VOERTUIGtSCHAADTtDEtSTABILITIEIT ENtDEtHANDELBAARHEID,tENTKAN SCHADEtAANtDEtBANDEN VEROORZAKEN.
Frontttyretpressuret(ridertonly)
Rearttyretpressuret(ridertonly)
2.2 bar
Fronttyretpressuret(passengert+trider)
2.2 bar
Rearttyretpressuret(passengert+trider)
2.3 bar
2,2 bar
Spanningtvantdetachterbandt(enkel bestuurder)
2,2 bar
Shocktabsorbertadjustment (02\_05,t02\_06)
The rear suspension consists of twin double-acting shock absorbers (compression/extension braking), with silent-block engine mount.
The manufacturer has set the standard suspension adjustment for a rider weighing about 70 kg. For other weights, use a hook spanner (supplied) on the ring nut «1» to define the ideal running settings.
NOTE
ADJUSTtSHOCKtABSORBERStATtTHE SAMEtPOSITION.
Regelingtvantde schokdemperst(02\_05, 02\_06)
According to the indications in the PERIOD-ICIMAIN TENANCEICHART, I carry out the following checks:
- With the front brake lever pulled, press repeatedly on the handlebar lowering the fork.
- The travel should be progressive and there should be no signs of oil on the stems.
- Check that all organs are tightened and the joints of the front and rear suspension work properly.
CAUTION
Engine run-in lis essential to len surel engine long lifeland l correct l operation. Il fl possible, ridonl roadsl with ll lots lo fl bends land/or slopes tol test l that l the engine, Is suspensions and brakes perform efficiently.
Follow these indications:
- Do not twist the throttle grip fully at low rpm whether during or after run-in.
• 0-100 km (0-62 miles) During the
Inrijden
first 100 km (62 miles) step carefully on the brakes to avoid rough and long braking. That is to permit the adequate adjustment of the pad friction material to the brake disc.
- 0-500tkmt(0-312tmiles)tDuring the first 500 km (312 miles) do not ride the scooter over 80% of the predetermined maximum speed.
- AVOID KEEPING A CONSTANT SPEED ALONG LONG SECTIONS OF ROAD.
- Aftertthetfirstt1000tkmt(625 miles), tgradually increase the speed until the maximum performance is reached.
CAUTION

ALWAYStSIGNALtCHANGEStINtDIRECTIONtWITHtTHEtAPPROPRIATEtDEVICES ANDtWELLtINtADVANCE,tAVOIDtABRUPT ANDtDANGEROUSTMANOEUVRES.tTURN OFFtTHEtDEVICEStIMMEDIATELYtAFTER THEtCHANGEtINtDIRECTION.tRIDetWITH EXTREMEtCAUTIONtWHENtOVERTAKING ORtBEINGtOVERTAKENtBYtOTHER VEHICLES.tWHENTITRAINS,tSPRAY CAUSEDtBYtLARGEtVEHICLEStREDUCEStVISIBILITY;tAIRtSHIFTStMAY CAUSEtLOSSToFCONTROLtONtYOUR VEHICLE.
AFTER THE FIRST 1000 KM (625 MILES) IN OPERATION, PERFORM THE CHECKS IN THE "RUN-IN END" COLUMN IN THE PERIODIC MAINTENANCE CHART TO AVOID INJURIES TO ONESELF AND OTHERS AND/OR DAMAGING THE VEHICLE.
NOTE
ONLY AFTER THE FIRST RUN-IN 1000 KM (625 MILES) IT IS POSSIBLE TO ATTAIN THE BEST SPEED AND ACCELERATION PERFORMANCE OF YOUR SCOOTER.
ANDERE VOERTUIGEN, MOET MEN ZEER VOORZICHTIG ZIJN. BIJ REGEN WORDT HET ZICHT VERMINDERD DOOR HET OPSTUIVEN VAN WATER, DAT WORDT VEROORZAAKT DOOR GROTE VOERTUIGEN; DOOR DE LUCHTVERPLAATSING KAN MEN DE CONTROLE OVER HET VOERTUIG VERLIEZEN.

NA DE EERSTE 1000 KM (625 MI) VAN WERKING, VOERT MEN DE CONTROLES UIT DIE MEN VINDT IN DE KOLOM "EINDE VAN DE PROEFPERIODE" VAN DE KAART VAN HET PERIODIEK ONDERHOUD, OM LETSELS AAN ZICHZELF OF ANDEREN EN/OF SCHADE AAN HET VOERTUIG TE VOORKOMEN.
N.B.
ENKEL NA DE EERSTE 1000 KM (625 MI) VAN HET INRIJDEN, IS HET MOGELIJK OM DE BESTE PRESTATIES VAN HET ACCELERATIEVERMOGEN EN DE SNELHEID VAN HET VOERTUIG TE VERKRIJGEN.
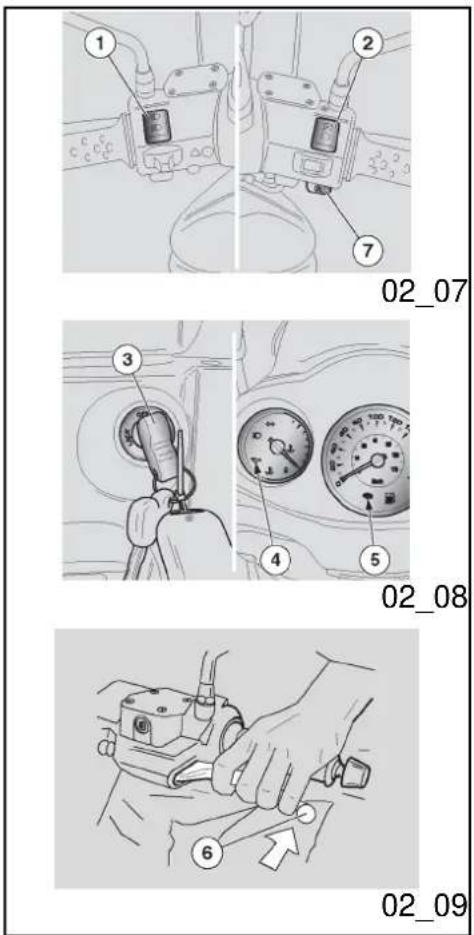
Startingtuptthetengine (02_07,t02_08,t02_09, 02_10,t02_11,t02_12,t02_13)
CAUTION

EXHAUSTtFUMESTCONTAINtCARBON MONOXIDE,tANTEXTREMELYtHARMFUL SUBSTANCE tIftINHALED.tNEVERtSTART THEtENGINEItNtCLOSEDtORtNOTtWELL- VENTILATEDtROOMS.
FAILURETTOBSERVETHISTWARNING COULDtLEADtTOTUNCONSCIOUSNESS ANDtEVENTDEATHtCAUSEDtBYtSUFFOCATION.
DOtNOTtCLIMBtONtTHEtVEHICLEtTO STARTtlTtUP.tDOtNOTtSTARTtTHEtEN- GINEtWHILEtTHEtVEHICLEtRESTStON ITStSIDEtSTAND.
- To start the engine, rest the vehicle on its centre stand and check that the side stand has been complete retracted to its position.
• Make sure that the light switch "1" is set to "low-beam". - Set the engine cut-off switch "2" to "RUN".
Startentdestmotorst(02_07, 02_08,t02_09,t02_10,t02_11, 02_12,t02_13)
LETtOP

DEtUITLAATGASSENTBEVATTEN KOOLMONOXIDE,tEENTUITERST SCHADELIJKETSTOFtWANNEERTZE WORDTtingEADEMD.tVERMIJDTtHET STARTENTVANTDEtMOTORtINtGESLOTEN OFtONVOLDOENDEtGEVENTILEERDE RUIMTEN.
WANNEERtMENTDITtADVIESTNIET OPVOLGT,tKANTMENTFLAUWVALLENtEN OOKtSTERVENtDOORtVERSTIKKING.
GANtNIETtOPtHETtVOERTUIGtZITTEN VOORtDEtSTART.tSTARTtDEtMOTOR NIETtWANNEERtHETtVOERTUIGtOPtDE LATERALEtSTANDAARDtlStGEPLAATST.
02_10
02 11
natural_image
Illustration of a hand using a tool to adjust or install a mechanical component (no text or symbols visible)02_12
- Turn the key "3" and set the ignition switch to "ON".
CAUTION

NOW:
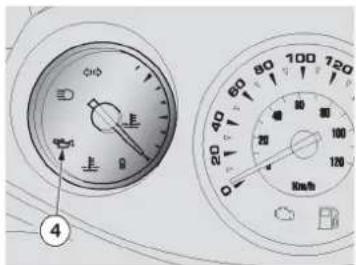
THE ENGINE OIL PRESSURE WARNING LIGHT "4" TURNS ON THE INSTRUMENT PANEL AND REMAINS SO UNTIL THE ENGINE STARTS UP.
THE ENGINE FUEL INJECTION (EFI) WARNING LIGHT "5" REMAINS ON FOR THREE SECONDS ON THE INSTRUMENT PANEL AFTER ALL THE OTHER WARNING LIGHTS HAVE TURNED OFF.
IF THIS WARNING LIGHT DOES NOT TURN ON OR AFTER THREE SECONDS THE WARNING LIGHTS DO NOT TURN OFF, CONTACT AN OFFICIAL APRILIA DEALER.
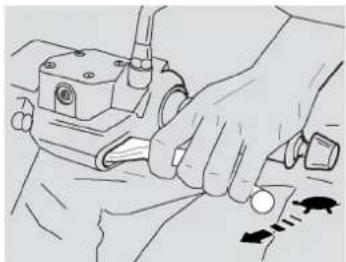
- Keep at least one brake lever operated and accelerate only when setting off.
• Get on the scooter and keep at least one foot on the ground for stability.
- Adjust the angle of rear-view mirrors adequately.
CAUTION

WITH THE VEHICLE AT A STANDSTILL, PRACTICE USING THE REAR-VIEW MIRRORS. THE MIRROR REFLECTING SURFACE IS CONVEX SO OBJECTS MAY SEEM FARTHER THAN THEY REALLY ARE. THESE MIRRORS OFFER A WIDE-ANGLE VIEW AND ONLY EXPERIENCE HELPS YOU JUDGE THE DISTANCE SEPARATING YOU AND THE VEHICLE BEHIND.
Om te vertrekken:
- Release the brake lever and accelerate, gradually twisting the throttle grip; the scooter starts moving forward.
DO NOT SET OFF SUDDENLY WHEN THE ENGINE IS COLD.
TO MINIMISE THE EMISSION OF AIR POLLUTING SUBSTANCES AND FUEL CONSUMPTION, WARM UP THE ENGINE BY RIDING THE FIRST KILOMETRES AT A LIMITED SPEED.
LET OP

VERTREK NIET BRUUSK WANNEER DE MOTOR KOUD STAAT.
OM DE EMISSIE VAN VERVUILENDE STOFFEN IN DE LUCHT EN HET BRANDSTOFVERBRUIK TE BEPERKEN, RAADT MEN AAN OM DE MOTOR OP TE WARMEN, DOOR DE EERSTE KILOMETERS AF TE LEGGEN AAN EEN BEPERKTE SNELHEID.
CAUTION

NEVER ACCELERATE AND DECELERATE REPEATEDLY AND CONTINUOUSLY AS YOU MAY INADVERTENTLY LOSE CONTROL OF YOUR VEHICLE.
IF YOU HAVE TO BRAKE, DECELERATE AND OPERATE BOTH BRAKES TO OB-
LET OP

NIET HERHAALDELIJK EN VOORTDUREND GAS GEVEN EN VERTRAGEN, OMDAT MEN DE CONTROLE OVER HET VOERTUIG ONOPZETTELIJK KAN VERLIEZEN.
WANNEER MEN REMT, VERTRAAGT, OF
TAIN A UNIFORM BRAKING, CAREFULLY ACTIVATING THE BRAKING PARTS IN AN ADEQUATE MANNER.
OPERATING ONLY EITHER THE FRONT OR THE REAR BRAKE SIGNIFICANTLY DECREASES THE BRAKING POWER AND A WHEEL MAY GET BLOCKED RESULTING IN LACK OF GRIP. IN CASE OF STOP IN ASCENT, FULLY DECELERATE AND ONLY USE THE BRAKES TO KEEP THE VEHICLE STOPPED. USING THE ENGINE TO KEEP THE VEHICLE STOPPED MAY CAUSE THE VARIATOR TO OVERHEAT.
BEIDE REMMEN ACTIVEERT OM UNIFORM TE VERTRAGEN, DOSEERT MEN OP GESCHIKTE WIJZE DE DRUK OP DE REMMEN.
WANNEER MEN ENKEL DE VOORREM OF DE ACHTERREM ACTIVEERT, VERMINDERT MEN DE REMKRACHT AANZIENLIJK, EN LOOPT MEN HET RISICO DAT EEN WIEL BLOKKEERT, MET ALS GEVOLG HET VERLIES VAN GRIP. WANNEER MEN MOET STOPPEN OP EEN HELLING, VERTRAAGT MEN VOLLEDIG EN GEBRUIKT MEN ENKEL DE REMMEN OM HET VOERTUIG STIL TE LATEN STAAN. WANNEER ME DE MOTOR GEBRUIKT OM HET VOERTUIG STIL TE LATEN STAAN, KAN DE VARIATOR OVERVERHIT RAKEN.
CAUTION

BEFORE GETTING INTO A BEND, REDUCE SPEED OR BRAKE; WHILE BENDING, RIDE AT THE SAME MODERATE AND CONSTANT SPEED OR SLIGHTLY ACCELERATE; DO NOT BRAKE IN EXCESS: THERE IS HIGH RISK OF SKIDDING.
BRAKING CONTINUOUSLY WHILE GO- ING DOWNHILL MAY RESULT IN FRIC-
LET OP

VOORALEER MEN EEN BOCHT NEEMT, VERMINDERT MEN SNELHEID OF REMT MEN, ZODAT MEN DE BOCHT MET GEMATIGDE EN CONSTANTE SNELHEID OF LICHT VERTRAAGD INGAAT; VERMIJDT OM HARD TE REMMEN: HET IS GOED MOGELIJK DAT MEN GAAT SCHUIVEN.
WANNEER MEN TIJDENS EEN DALING
TIONtGASKETtOVERHEATINGtANDtCONSEQUENTLYtINtPOORtBRAKING.tTAKE ADVANTAGEtOFtTHEtENGINEtCOMPRESSIONtUSINGtTHEtBRAKEStALTERNATIVELY.tWHENtGOINGtDOWNHILL NEVERtRIDEtWITHtTHEtENGINEtOFF.WHENtRIDINGtONtWETtSURFACEStOR WITHtPOORtGRIPt(SNOW,tICE,tMUD, ETC.)tATtAtMODERATEtSPEEDtAVOIDINGtsUDDENTbRAKINGtORtMAN-OEUVRESTTHATtMAYtLEADtTOTLACKtOF GRIPtANDtCONSEQUENTLYtTOTFALLS. PAYtATTENTIONTTOtOBSTACLEStONtOR VARIATIONStINtTHEtROADtSURFACE. UNEVENTROADS,tRUTS,tDRAINS, TRAFFICTSIGNSTPAINTEDtONTHE ROADS,tPIPEWORKtMETALTSHEETS MAYtBECOMETSLIPPERYtWHENtlT RAINS.tCROSSTOVERtTHEMtWITHtEX-TREMEtCAUTION,tRIDEtCAREFULLY ANDtINCLINEtTHEtVEHICLEtTHEtLEAST POSSIBLE.
VOORTDURENDtREMT,tKUNNENTDE WRIJVINGSPAKKINGENTOVERVERHIT RAKEN,tZODATtDEtDOELTREFFENDHEID VANTHETtREMMENTVERMINDERT. GEBRUIKtDEtCOMPRESSIETVANtDE MOTOR,tDOORtPERIODIEKtGEBRUIKtTE MAKENTVANtBEIDtREMEN.tTIJDENS EENTDALINGtMAGtMENTNIETtRIJDEN METtDEtMOTORUIT.tOPtEENTNATTE ONDERGROND,tOFtALLESZINSTMET WEINIGtGRIPt(SNEEUW,tIJS,tMODDER, ENZ),tRIJDTtMENTtMETtEENTGEMATIGDE SNELHEID,tENTVERMIJDTtMENTOM BRUUSKtTEtREMMENTENTOM MANOEUVRESTuitTtTEtVOERENTDIE GRIPVERLIESTVEROORZAKEN,tENTDUS HETtVALLENtTOTtGEVOLGtHEBBEN. LETtOPtVOORtEENDERtWELK OBSTAKELtOFtVERANDERINGtVANtDE GEOMETRIETVANtHETtWEGDEK. ONVERHARDEtWEGEN,tRAILS, PUTDEKSELS,tGESCHILDERDE SIGNALERINGENTOPtHETtWEGDEKtEN METALENTPLATENTVANtWERVEN WORDENTGLADtWANNEERtHET REGENT,tENTDAAROMtMOETENTDEZE ZEERtVOORZICHTIGtWORDEN BENADERD,tENTMAGtMENTNIETtBRUUSK RIJDENTENTZOTWEINIGtMOGELIJKtHET VOERTUIGtDOENTHELLEN.
The fuel supply system can control ignition based on the engine condition (hot/cold) or the ambient temperature and pressure.
- Release the throttle grip (pos. A) and gradually operate the brakes to stop the scooter.
• While at a temporary halt, keep at least one brake operated. - Stop the scooter.
CAUTION

WHENEVERtPOSSIBLE,tAVOIDtROUGH BRAKING,tSUDDENTDECELERATION ANDtBRAKINGtlNtEXCESS.
CAUTION

PARKtONTSAFEtANDtLEVELtGROUNDtTO PREVENTtTHEtVEHICLEtFROMtFALLING.
DOtNOTtLEANtTHEtVEHICLEtONtAtWALL ORtLAYtONtTHEtGROUND.
Hettstilleggentvantdetmotor (02\_14,t02\_15)
- Set the engine cut-off switch "1" to "B" "OFF".
CAUTION

WITH THE ENGINE OFF AND THE IGNITION SWITCH SET TO «ON» THE BATTERY MAY GET DISCHARGED.
switch "3" to "LOCK" and extract the key "2".
CAUTION
DOtNOTtLEAVEtTHEtKEYt"2"tINSERTED INtTHEtIGNITIONTSWITCH.
NOTE
WHENtTHEtSTEERINGtLOCKtlStEN- GAGEDtTHEtENGINEtCANNOTtBEtSTAR- TEDtlFtTHEtKEYtlStNOTtlINSERTEDtlN THEtGLOVEBOX.
Scooter owners are warned that the law may prohibit the following:
- the removal of any device or element belonging to a new scooter or any other action by anyone leading to render it non-operating, if not for maintenance, repair or replacement reasons, in order to control noise emission before the sale or delivery of the vehicle to the ultimate buyer or while it is used;
• using the scooter after that device or element has been removed or rendered non-operating.
Check the muffler/exhaust silencer and the
Katalysator
Iflexhaust noiselincreases, Itake yourlscooter at once to an Official aprilia Dealer.
NOTE
DOTNOTTAMPERtWITHtTHEtEXHAUST SYSTEM.
02_16
Standt(02\_16,t02\_17,t02\_18)
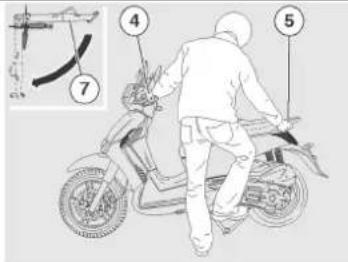
CENTREtSTAND
- Hold the left handgrip "4" and the passenger handgrip "5".
- Push the stand lever "6".
SIDEtSTAND
- Hold the left handgrip "4" and the passenger handgrip "5".
- Push the side stand "7" with your right foot, and extend it completely.
- Lean the scooter until the stand touches the ground.
• Turn the handlebar fully left.
Standaardt(02\_16,t02\_17, 02\_18)
CENTRALEtSTANDAARD
MAKEtSUREtTHEtVEHICLEtlStSTABLE.
02_17
02 18
Standtchecking
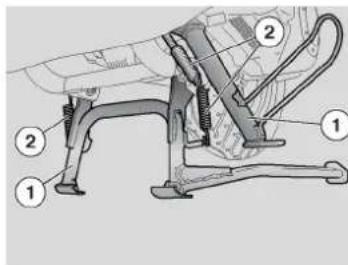
The rotation of the stand "1" should be free of obstacles.
Carry out the following checks:
• The springs "2" should not be damaged, worn, rusty or slacken.
• The stand should turn freely, grease the joint if necessary.
CAUTION

FORtTHEtSIDEtSTANDtONLY.tRISKtOF FALLINGtORtROLLINGtOVER.
NOTE
THE FOLLOWING INFORMATION REFERStTOtONEtSTANDtBUTtlStVALID FORtBOTH.
volledig uit.
NEVER leave the ignition key in the lock and always use the steering lock.
Parklthelscooterlinlalsafelplacelsuchlasla garage or a place with guards.
Wheneverlpossible,luselthelaprilial"Body-Guard"larmouredlcablelorlan additionallanti-theft device.
Makelsurelaallscooterldocumentslarelinlorder and the road tax paid.
Writeldownlyourlpersonalldetailslandlte-phonelnumberlonlthislpageltolhelplidenti-inglthelownerlinlcaseloflscooterlretrieval after a theft.
LAST NAME: ....
NAME: ....
ADDRESS: ....
TELEPHONE No: ....
IMPORTANT InImanylcases, stolenlvehicles canIbelidentifiedlthroughIdatalindicatedlin the use and maintenance manual.
Tipsttegentdiefstal
Safetdrivingt(02_19,t02_20, 02_21,t02_22,t02_23,t02_24, 02_25,t02_26,t02_27,t02_28, 02_29,t02_30)
MAINtSAFETYtRULES
Tolridelthelvehiclelitlisnecessaryltolcomply withlalllegalrequirementsl(drivinglicense, minimumldrivinglage,lpsychophysicalperformance,insurance,ltaxeslandlfees,registration, license plate, etc.).
You should I practise using the vehicle in traffic-freel areas and/or private property until you have become thoroughly acquainted with the vehicle.
Drivinglunderlthelinfluencelofmedication, lalcohollandlnarcoticldrugslorlpsychotropic substancesldramaticallylincreaseslthelrisklof accidents.
Dolnotlridelyourlvehiclelifyoulfeelltiredlor drowsylandlalwayslkeeplsafelpsychophysical riding conditions.
The main cause of motorcycle accidents is users' inexperience.
NEVERlend|thelve|tolbeginnerslandalways|makelsurelthat|the|rider|complies|with all necessary requirements for a safe riding.
StrictlylobeylallInationallandIlocalItraffic
Hettveiligtrijdent(02_19, 02_20,t02_21,t02_22,t02_23, 02_24,t02_25,t02_26,t02_27, 02_28,t02_29,t02_30)
FUNDAMENTELEtVEILIGHEIDSREGELS
Avoid any abrupt and dangerous swerves for your own as well as others' safety (for example: rearing up on the back wheel, riding over the speed limit, etc.). Besides, always assess and bear in mind the road surface conditions, visibility, etc.
Do not knock obstacles that can damage the vehicle or cause loss of control.
Do not ride on the course of the vehicle in front just to improve your own speed.
CAUTION

ALWAYS RIDE WITH BOTH HANDS ON THE HANDLEBAR AND FEET ON THE FOOTRESTS (OR THE RIDER'S FOOTRESTS) IN THE ADEQUATE RIDING POSITION.
Never stand on your feet or stretch yourself while riding.
The rider should always be attentive, never get distracted or influenced by people, things or actions (never smoke, eat, drink, read,
In caseloflanlaccidentlorlafterlthelvehicle haslfallenldownlorlsufferedlalsuddenlbump, makelsurelthelcontrolllevers,lpiping,lcables, brakelcircuitlandlmainpartslofthelvehicle have not been damaged.
If necessary, Itakelthelvehicleltolanl Official aprilial DealerItolchecklespeciallylthelframe, handlebar, Isuspensions, Isafetycomponents and lanyl deviceItheluserl cannotlassess without the aid of a specialist.
Report any malfunction to the engineers and/or mechanics in order to facilitate their work.
Never ride the vehicle if the damage jeopardises safety.
Dolnotlmodifylthelposition, langlelorlcolour of: llicenselplate, Iturnlindicators, Lighting devices and horn.
Any changes to the vehicle will void the warranty.
Any change introduced to the vehicle and the removallofloriginalpartsImayljeopardiselthe vehicle|performancelandlthereforelreduce safetylorlevenlrenderlthelvehiclelinappropriate for legal riding.
ComplylwithlallInationallandllocalllawsland regulations on vehicle equipment.
In particular, I do not introduce technical changes leading to improvement performance and under no circumstances alter the original specifications of the vehicle.
Never race with vehicles.
Never ride off-road.
Before riding off, remember to put on the helmetlandlfastenlitlcorrectly. lMakelsurelitlisla homologatedlmodel, lthatlit islandamaged, lof the right size and that the visor is clean.
Wearlappropriatelprotectivelclothes, I preferably light-colouredland/or in reflectivematerial. In this way you will be easily visible to other drivers, I thus reducing the risk of being hit,
KLEDING
and you will be better protected in case of falling.
Always wear tight-fitting clothes without open cuffs; avoid hanging strings, belts or ties; these or any other objects should not interfere with a safe riding when getting entangled with the riding elements or due to a special movement.
Never carry in your pockets objects that can be potentially dangerous in case of fall, like: pointed objects such as keys, pens, glass containers, etc. (the same rule applies to passengers).
User is personally responsible for the installation and use of the accessories.
While assembling accessories, make sure that they do not cover the sound or light alarm devices or affect their correct functioning, do not limit the suspension travel or the steering angle, do not obstruct control actuation or reduce the ground clearance and inclination angle at corners.
Do not use accessories that hinder access to the controls as they may increase the reaction time in case of an emergency.
Fairings and large windshields fitted to the
ACCESSOIRES
vehicle may cause aerodynamic forces that affect the vehicle stability while riding, mainly at high speeds.
Make sure the accessory is firm and secured to the vehicle and that it does not pose any risks while riding the vehicle.
Do not add or modify electrical equipment that exceed the vehicle capacity as this may result in a sudden stop or a dangerous lack of power required to keep the sound and light alarm devices operative.
aprilia advises using original accessories (aprilia genuine accessories).
Do not overload your vehicle. Keep packages as close as possible to the vehicle centre of gravity and distribute load evenly on both sides to minimise imbalance. Check also that the load is firm and secured to the vehicle, mainly for long trips.
Do not hang anything from your vehicle's
BELASTING
handlebars, mudguards or forks, such as protruding, bulky, heavy and/or dangerous objects: this will slow the vehicle performance when turning and will upset the handling of your vehicle.
Do not carry packages that protrude from vehicle sides as this may hit people or objects and result in loss of control of your vehicle.
Never carry packages that are not securely fastened to the vehicle.
Do not carry packages that protrude from the luggage rack or which cover any of the sound and light alarm devices.
Never carry animals or small children on the glove-box or the luggage rack.
Never exceed the maximum weight allowed for each luggage rack.
Overloading the vehicle may result in lack of stability and poor handling.
TakelyourlscooterItolan|Officialtaprilia Dealer to have the oil changed
CAUTION

HANDLINGtOILtFORtPROLONGEDtPERIODStANDtONtAtREGULARtBASISTCAN CAUSEtSERIOUSTSKINTDAMAGE.
WASHTYOURtHANDStCAREFULLYtAFTER HANDLINGtOIL.
WHENTCARRYINGtOUTtMAINTENANCE OPERATIONS,tITtISTADVISABLEtTO WEARTLATEXtGLOVES.
KEEPtOUTtOFtTHEtREACHtOFtCHILDREN
DOtNOTtDISPOSEtOftOILtINTOtTHEtENVIRONMENT.
CAUTION

Peiltvantdetmotorolie
Controleer hetlpeillvanlde motorieloplbasis vanldeIKAARTIVANIHETIPERIODIEK ONDERHOUD.
LaatIdelolielvanIdelmotorlvervangenlop basisIvanIdelKAARTIVANIHETIPERIODIEK ONDERHOUD.
03 04
natural_image
Technical diagram of a mechanical assembly with numbered component (no readable text or symbols)03 05
natural_image
Mechanical assembly diagram showing a component with labeled parts (no readable text or symbols)03 06
PROCEEDtWITHtCAUTION.
DOtNOTtSPILLtOIL.
BEtCAREFULtNOTtT0tDIRTYtCOMPONENTS,tTHEtWORKINGtORtSURROUNDINGtAREA.
THOROUGHLYtWASHtOUTtANYtOIL TRACE.
INTCASEtOFtOILtLEAKStORtMALFUNCTIONING,tTAKEtYOURtVEHICLEtTOTAN OFFICIALtAPRILIAtDEALER.
NOTE
DOTNOTEXCEEDTHEt"MAX"tMARK WHENTOPPING-UPTENGINEtOIL.
NOTE
USEtOILtOFtTHEtTYPEtSPECIFIEDtINTHE RECOMMENDEDtPRODUCTStTABLE.
• Rest the vehicle on its centre stand.
CAUTION

Controletvanthettpeil (03\_01,t03\_02)
- Stop the engine and let it cool off so that the oil in the crankcase flows down and cools as well.
NOTE
FAILURE TO FOLLOW THESE OPERATIONS MAY RESULT IN AN INCORRECT READING OF THE ENGINE OIL LEVEL.
LET OP

PLAATS HET VOERTUIG OP EEN VASTE EN VLAKKE ONDERGROND.
LET OP

DE MOTOR EN DE ONDERDELEN VAN DE UITLAATINSTALLATIE WORDEN ZEER WARM EN BLIJVEN WARM VOOR EEN ZEKERE PERIODE, OOK NADAT DE MOTOR WORDT UITGEZET. VOORALEER MEN DEZE ONDERDELEN HANTEERT, DRAAGT MEN ISOLERENDE HANDSCHOENEN, OF WACHT MEN TOT DE MOTOR EN DE UITLAATINSTALLATIE AFGEKOELD ZIJN.
- Unscrew and take out the measuring cap-dipstick «1».
- Clean the area in contact with oil with a clean cloth.
- Screw the cap-dipstick «1» fully down into its tube «
• 2». - Extract the cap-dipstick «1» again and read the oil level on the cap-dipstick:
MAX = maximum level;
MIN = minimum level.
TheldifferencebetweenIMAXlandIMINIis about 400 cc
- The level is correct when it is close to the MAX level marked on the measuring dipstick.
- Top-up if necessary.
CAUTION

IN ORDER TO AVOID DAMAGING THE ENGINE, OIL LEVEL MUST NEVER EXCEED THE «MAX» MARK OR FALL BELOW THE «MIN» MARK.
- Pour a little oil through the dipstick tube "2" and wait one minute so that the oil flows uniformly into the crankcase.
- Check oil level and top-up if necessary.
- Do so with small quantities of oil at a time until the specified level is reached.
• After finishing this operation, screw and tighten the tap/dipstick "1".
CAUTION

DOTNOTRIDEtTHEtVEHICLEtWITHtINSUFFICIENTtLUBRICATIONtORtWITHtCONTAMINATEDtORTINCORRECTtLUBRICANTStASTHIStACCELERATESTTHEWEARTANDtTEARTOFTHETMOVINGPARTSTANDtCANTCAUSEtIRRETRIEV-ABLEtDAMAGE.
• Park the vehicle on its centre stand.
Vervangingtvantdetolie (03\_04,t03\_05,t03\_06)
- Stop the engine and let it cool down. This will allow the oil to settle into the crankcase and cool down.
NOTE
FAILURE TO FOLLOW THESE OPERATIONS MAY RESULT IN AN INCORRECT READING OF THE ENGINE OIL LEVEL.
standaard.
LET OP

PLAATS HET VOERTUIG OP EEN VASTE EN VLAKKE ONDERGROND.
LET OP

DE MOTOR EN DE ONDERDELEN VAN DE UITLAATINSTALLATIE WORDEN ZEER WARM EN BLIJVEN WARM VOOR EEN ZEKERE PERIODE, OOK NADAT DE MOTOR WORDT UITGEZET. VOORALEER MEN DEZE ONDERDELEN HANTEERT, DRAAGT MEN ISOLERENDE HANDSCHOENEN, OF WACHT MEN TOT DE MOTOR EN DE UITLAATINSTALLATIE AFGEKOELD ZIJN.
Take your scooter to an Official aprilia Dealer to carry out the replacement.
- Unscrew and take out the measuring cap-dipstick «1».
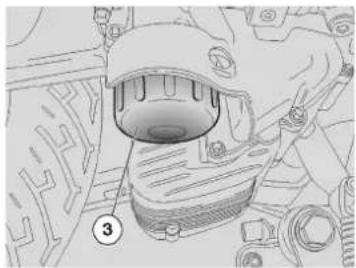
- Unscrew and remove the engine oil cartridge filter «3».
CAUTION

RIDING THE VEHICLE WITH INSUFFICIENT LUBRICATION OR CONTAMINATED OR NOT RECOMMENDED LUBRICANTS ACCELERATES THE WEAR AND TEAR OF MOVING PARTS AND CAN CAUSE IRRETRIEVABLE DAMAGE.
CAUTION

AS USED OIL HAS SUBSTANCES HARMFUL TO THE ENVIRONMENT, TAKE YOUR SCOOTER TO AN OFFICIAL APRILIA DEALER TO HAVE THE OIL CHANGED. THESE CENTRES CAN CARRY OUT ENVIRONMENTALLY-FRIENDLY DISPOSAL OF USED OIL IN COMPLIANCE WITH REGULATIONS IN FORCE.
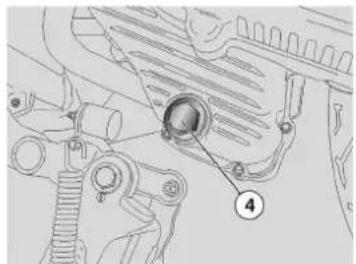
- Unscrew and remove the oil drainage plug «4» and let all engine oil drain out.
- Fit a new cartridge filter oil «3» and take special care to lubricate with oil the sealing O-rings of the filter.
- Screw and tighten the engine oil drainage plug «4».
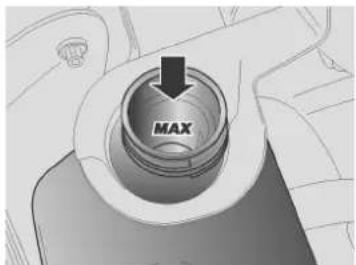
• Refill through the filling hole «2» with about 1700 cc of engine oil. - Screw and tighten the oil level dipstick «1».
- Start the scooter and leave it running for a few minutes. Switch the engine off and leave it to cool off. Check engine oil level again using the dipstick «1» and if necessary top up without exceeding the MAX level.
Recommended product:
Use new loillof theltypelspecifiedlinlthelrecommendedlproductsltablelatleveryltop-up or change.
Check transmission loill level according to the indications in the PERIODICIM AINTENANCE CHART.
Changeltransmissionloillaccordingltolthelin-dicationslinlthelPERIODICIMAINTENANCE CHART.
TakelyourlscooterItolan!Official aprilia Dealer tolhaveltheloillcontrolledland changed.
CAUTION

HANDLING OIL FOR PROLONGED PERIODS AND ON A REGULAR BASIS CAN CAUSE SERIOUS SKIN DAMAGE.
WASH YOUR HANDS CAREFULLY AFTER HANDLING OIL.
WHEN CARRYING OUT MAINTENANCE OPERATIONS, IT IS ADVISABLE TO WEAR LATEX GLOVES.
KEEP OUT OF THE REACH OF CHILDREN
DO NOT DISPOSE OF OIL INTO THE ENVIRONMENT.
CAUTION
• Park the scooter on its centre stand.
CAUTION

PARKtTHEtVEHICLEtONtSAFEtAND LEVELtGROUND.
CAUTION

THEtENGINEtANDtTHEtEXHAUSTtSYS- TEMtCOMPONENTStCANtGETtVERYtHOT

- Unscrew and take out the measuring tap-dipstick "1".
- Clean the area in contact with oil with a clean cloth.
- Screw the tap-dipstick "1" fully down into its tube.
- Extract the tap-dipstick "1" again and read the oil level on the tap-dipstick:
MAX = maximum level;
MIN = minimum level.
- The level is correct when it is close to the MAX level marked on the measuring dipstick.
CAUTION

DO NOT GO BEYOND THE MAX AND BELOW THE MIN LEVEL MARKS TO AVOID SEVERE ENGINE DAMAGE.
- Pour a little oil through the dipstick tube and wait one minute so that the oil flows uniformly into the crank-case.
- Check oil level and top up if necessary.
- Do so with small quantities of oil at a time until the specified level is reached.
• After finishing this operation, screw in and tighten the cap-dipstick "2".
UselnewloilloftheltypelspecifiedlinltheIrecommendedlproductsltablelatleveryltop-up or change.
CAUTION

RIDING THE VEHICLE WITH INSUFFICIENT LUBRICATION OR CONTAMINATED OR NOT RECOMMENDED LUBRICANTS ACCELERATES THE WEAR AND TEAR OF MOVING PARTS AND CAN CAUSE IRRETRIEVABLE DAMAGE.
Bijvulling
• Rest the scooter on its centre stand.
CAUTION

PARKtTHEtVEHICLEtONtSAFEtAND LEVELtGROUND.
CAUTION

THEtENGINEtANDtTHEtEXHAUSTtSYSTEMtCOMPONENTStCANtGETtVERYtHOT ANDtREMAINTsOTFORtSOMEtTIMEtEVEN AFTERtTHEtENGINEtIStTURNEDtOFF. WEARTINSULATINGtGLOVESTBEFORE HANDLINGtTHESEtPARTStORtWAITtUN-TILtTHEtENGINEtANDtTHEtEXHAUST SYSTEMtCOOLtDOWN.
- Stop the engine and let it cool off so that the oil in the crankcase flows
Vervangingtvantdetolietvantde transmissie
down and cools as well.
CAUTION

FAILURE TO FOLLOW THESE OPERATIONS MAY RESULT IN AN INCORRECT READING OF THE TRANSMISSION OIL LEVEL.
TAKE YOUR SCOOTER TO AN OFFICIAL APRILIA DEALER TO CARRY OUT THE REPLACEMENT.
CAUTION

WHEN CHANGING THE TRANSMISSION OIL, AVOID THE OIL COMING INTO CONTACT WITH THE REAR BRAKE DISC.
• Refill with about 250 cc of transmission oil of the type specified in the lubricants table.
- Screw and tighten the measuring cap-dipstick «1».
- Check transmission oil level again using the cap-dipstick «1» and if necessary top up without exceeding the MAX level.
capacitieit.
This vehicle is fitted with tyres without inner tubes (Tubeless).
CAUTION

CHECK FREQUENTLY TYRE PRESSURE WITH TYRES AT AMBIENT TEMPERATURE.
THE MEASUREMENT MAY BE INCORRECT IF TYRES ARE WARM. CHECK PRESSURE MAINLY BEFORE AND AFTER LONG TRIPS.
Banden (03\_10, 03\_11)
BANDEN
natural_image
Cross-sectional diagram of a mechanical component with an inset showing a circular feature labeled '2' (no text or symbols present)03 11
IF TYRE PRESSURE IS TOO HIGH, THE SURFACE UNEVENNESS IS NOT CUSHIONED AND IS SENT TO THE HANDLE-BAR, RESULTING IN UNPLEASANT RIDING AND POOR ROAD GRIP SPECIALLY WHEN TURNING.
CONVERSELY, WITH INADEQUATE TYRE PRESSURE, TYRE SIDES «1» BEAR MORE STRESS AND THE TYRE CAN SLIDE ON THE RIM OR EVEN GET DETACHED RESULTING IN LOSS OF CONTROL OVER THE VEHICLE. IN CASE OF SHARP BRAKING, TYRES CAN EVEN GET OFF THE RIMS. LASTLY, THE VEHICLE MIGHT SKID IN A BEND. INSPECT THREAD SURFACE AND CHECK IT FOR WEAR. BADLY WORN TYRES ADVERSELY AFFECT TRACTION AND HANDLING. SOME TYRE TYPES HOMOLOGATED FOR THIS VEHICLE FEATURE WEAR INDICATORS. THERE ARE SEVERAL TYPES OF WEAR INDICATORS.
CONSULT YOUR DEALER ON METHODS TO CHECK WEAR. CARRY OUT A VISUAL INSPECTION FOR TYRE CONSUMPTION. REPLACE TYRES IF WORN. OLD TYRES THAT ARE NOT FULLY WORN CAN GET HARD RESULTING IN LACK OF GRIP. REPLACE TYRES IF THIS OCCURS. REPLACE TYRES WHEN WORN OR IF THE TREAD HAS A HOLE BIGGER THAN 5 MM. AFTER A TYRE IS MENDED, BALANCE THE WHEELS. USE ONLY TYRE
WANNEER DE SPANNING TE HOOG IS, WORDT DE ONEFFENHEID VAN HET TERREIN NIET GEDEMPT, EN DUS NAAR DE STUURINRICHTING VERSTUURT, ZODAT HET RIJCOMFORT VERMINDERT EN DE WEGLIGGING IN BOCHTEN VERSLECHTERT.
WANNEER VICEVERSA DE BANDENSPANNING ONVOLDOENDE IS, WERKEN DE ZIJKANTEN «1» VAN DE BANDEN MEER, EN KAN HET ZIJN DAT DE BAND OP DE VELG SLIPT OF LOSKOMT, MET ALS GEVOLG DAT MEN DE CONTROLE OVER HET VOERTUIG VERLIEST. WANNEER MEN BRUUSK REMT KUNNEN DE BANDEN UIT DE VELGEN KOMEN. IN BOCHTEN KAN HET VOERTUIG GAAN SLIPPEN. CONTROLEER DE STAAT VAN HET RIJOPPERVLAK EN DE SLIJTAGE, OMDAT SLECHTE BANDENCONDITIES DE WEGLIGGING EN DE MANOEUVREERBAARHEID VAN HET VOERTUIG KUNNEN SCHADEN. ENKELE BANDENTYPES, DIE GEHOMOLOGEERD ZIJN VOOR DIT VOERTUIG, HEBBEN EEN SLIJTAGE-INDICATOR. ER BESTAAN VERSCHILLENDE TYPES VAN SLIJTAGE-INDICATORS.
VOOR INFORMATIE IN VERBAND MET DE CONTROLE VAN DE SLIJTAGE, WENDT MEN ZICH TOT DE VERKOPER. CONTROLEER VISIEF DE SLIJTAGE VAN
SIZES INDICATED BY THE MANUFACTURER. DO NOT FIT TYRES WITH INNER TUBES ON RIMS FOR TUBELESS TYRES OR VICE VERSA. CHECK THAT THE INFLATION VALVES HAVE THEIR CAPS FITTED IN ORDER TO AVOID UNEXPECTED FLAT TYRES.
REPLACEMENT, REPAIR, MAINTENANCE AND BALANCING OPERATIONS ARE HIGHLY IMPORTANT AND SO THEY SHOULD BE CARRIED OUT USING THE SPECIFIC TOOLS AND WITH THE ADEQUATE KNOWLEDGE. IT IS THEREFORE ESSENTIAL TO TAKE YOUR VEHICLE TO AN OFFICIAL APRILIA DEALER OR SPECIALISED TYRE WORKSHOP TO CARRY OUT THE OPERATIONS ABOVE. NEW TYRES CAN BE COVERED BY A SLIPPERY COAT: RIDE WITH CAUTION DURING THE FIRST KILOMETRES. DO NOT APPLY UNSUITABLE LIQUIDS ON TYRES.
DE BANDEN, EN VERVANG ZE INDIEN ZE VERSLETEN ZIJN. WANNEER DE BANDEN OUD ZIJN, EN OOKAL ZIJN ZE NIET VERSLETEN, KUNNEN ZE VERHARDEN EN DUS DE WEGLIGGING SCHADEN. IN DIT GEVAL VERVANGT MEN DE BANDEN VERVANG DE BANDEN WANNEER ZE VERSLETEN ZIJN, OF WANNEER ER EEN EVENTUEEL GAT IS IN DE ZONE VAN HET RIJVLAK DAT GROTER IS DAN 5 MM. NADAT MEN DE BAND HEEFT LATEN HERSTELLEN, LAAT MEN DE WIELEN BALANCEREN. GEBRUIK UITSLUITEND DE MAAT VAN BANDEN DIE WORDT AANGEDUID DOOR HET HUIS. PLAATS GEEN BANDEN VAN HET TYPE MET BINNENBAND OP VELGEN VOOR TUBELESS BANDEN, EN VICEVERSA. CONTROLEER OF DE KLEPPEN VOOR HET OPBLAZEN STEEDS HUN DOPJES HEBBEN, OM HET PLOTSELING LEEGLOPEN VAN DE BANDEN TE VERMIJDEN.
DE HANDELINGEN VAN HET VERVANGEN, HERSTELLEN, ONDERHOUD EN BALANCEREN ZIJN ZEER BELANGRIJK, EN MOETEN DUS UITGEVOERD WORDEN MET GESCHIKTE GEREEDSCHAPPEN EN MET DE NODIGE ERVARING. DAAROM RAADT MEN AAN OM ZICH TE WENDEN TOT EEN OFFICIÈLE APRILIA DEALER OF EEN BANDENSPECIALIST VOOR HET UITVOEREN VAN VOORAFGAANDE
HANDELINGEN.tWANNEERtDEtBANDEN NIEUWtZIJN,tKUNNENTzEtBEDEKTtZIJN METtEENTGLADDEtLAAG:tDEtEERSTE KILOMETERStMOETtMENTVOORZICHTIG RIJDEN.tSMEERtDEtBANDENtNIETtIN METtONGESCHIKTetVLOEISTOFFEN.
TREADtDEPTHtMINIMUMtTHRESHOLDt«2»
| SpecificationDesc./Quantity |
| Front: 2 mm |
| Rear 2 mm |
MINIMUMtDIEPTELIMIETtVANtHETtRIJVLAKt«2»
TYREtWEARtMINIMUMtTHRESHOLDt"2"t(USA VERSION)
| SpecificationtDesc./Quantity |
| Front (USA version) 3 mm |
| Rear (USA version) 3 mm |
MINIMUMtDIEPTELIMIETtVANtHETtRIJVLAKt《2》 (VERSIE USA)
After a thorough analysis aprilia has approved only the tyres listed below for this model:
03_12
natural_image
Diagram of a curved mechanical component with an arrow indicating direction and numbered label (2), no readable text or symbols present.03_13
Sparktplugtdismantlement (03\_12,t03\_13,t03\_14, 03\_15)
Check the spark plug according to the indications in the PERIODICIMAIN TENANCE CHART.
RemovelthelsparkIplugIregularly, Icleanloff carbon scales, and replace it if necessary.
To access the spark plug remove the inspection cover as follow:
- Lift the saddle.
- Remove the battery cover and un-screw the two fixing screws «2» on the central inspection cover.
- Lower the saddle.
- Unscrew and remove the bottom central fixing screws «2».
- Slide off the central inspection cover.
For removal and cleaning:
CAUTION

Demonterentvantdetbougie (03\_12,t03\_13,t03\_14, 03\_15)
ControleerIdelbougieloplbasisIvanIde KAARTIVANIHETIPERIODIEK ONDERHOUD.
DemonteerlperiodiekIdelbougie,Ireiniglze van koolstofafzettingen, en vervang ze indien nodig.
- Disconnect the cap "1" of the high voltage cable from the spark plug.
- Clean off any trace of dirt from the spark plug base. Unscrew it using the spanner supplied in the tool kit and remove it from its place, being careful not to let dust or any other substance into the cylinder.
- Check that the spark plug electrode and centre porcelain are free of carbon deposits or signs of corrosion. If necessary, clean using suitable spark plug cleaners, a wire and/or metal brush.
- Blow with a strong air blast to avoid removed dirt getting into the engine. Replace the spark plug if there are cracks on the spark plug insulating material, corroded electrodes or large deposits.
- Check electrode gap with a thickness gauge and adjust if necessary by carefully bending the earth elec-

VOORALEER MEN DE VOLGENDE HANDELINGEN UITVOERT, LAAT MEN DE MOTOR EN DE UITLAAT AFKOELEN TOT DEZE DE
OMGEVINGSTEMPERATUUR HEBBEN BEREIKT, OM MOGELIJKE BRANDWONDEN TE VERMIJDEN.
- Make sure the washer is in good conditions. Once the washer is fitted, manually screw the spark plug to avoid damaging the thread.
- Tighten using the spanner supplied in the tool kit, make the spark plug complete 1/2 a turn to press the washer.
- Insert the spark plug tube correctly so that it does not detach with engine vibrations.
• Refit the right inspection cover.
CAUTION

TIGHTENTHEtSPARKtPLUGtCORRECTLY.tOTHERWISE,tTHEtENGINEtMAY OVERHEATtANDtGETtlIRRETRIEVABLE DAMAGED.tUSEtSPARKtPLUGStOfTHERECOMMENDEDtTYPEtONLY;tOTHER-WISEtENGINEtPERFORMANCEtANDtLIFE COULDtBEtCOMPROMISED.
Characteristic
Sparkplugtelectrodetgap
0.7 - 0.8 mm
Sparktplugttighteningttorque:
12 ÷ 14 Nm (1.2 ÷ 1.4 kg).
- Remove the filtering element from the scooter for cleaning.
- Place the scooter on its central stand.
- Unscrew and remove the nine screws "3".
- Remove the filter housing cover "4" together with the filtering element "5".
- Check the filtering element "5" and replace it if necessary.
- Clean the filtering element "5" with a blast of pressurised air.
CAUTION

DOtNOTtUSEtPETROLtORtFLAMMABLE SOLVENTStT0tCLEANtTHEtFILTERING ELEMENTtT0tAVOIDtRISKtOFtFIREtOR EXPLOSION.
DOtNOTtUSEtADDITIVEStORtLIQUIDS WHENTCLEANINGtTOTAVOIDtHUMIDITY INSIDEtTHEtFILTERtHOUSING.tUSEtCOM- PRESSEDtAIRtONLY.
CAUTION

DOtNOTtOILtTHEtFILTERINGtELEMENT ORtOILtMAYtGETtINTOtTHEtBELTtHOUS- INGtANDtDAMAGEtORtMAKEItTtSLIDE.
Reinigingtvantdetluchtfilter
03 18
03 19
Coolingtfluidtlevelt(03\_18, 03\_19)
Checklthelcoolantlevel;laccordingltolthelindicationslinltheIPERIODICIMAINLENANCE CHART.
ThelcoolantIsolutionIconsistslof150%Iwater and150%IantifreezeIfluid.IThislmixturelis ideallforlmostIoperatingItemperaturesland providelalgoodIprotectionlagainstICorrosion. ItlisladvisableItoluselthelsamelmixtureleven inlhotweatherlaslthislminimiseslllossIduelto evaporationlandlthelneedloflfrequentItop-ups.IThus,lmineralsaltIdepositslformedlin theladiatorlbylevaporatedlwaterlarelalso minimisedlandlthelefficiencyloflthelcooling systemlisInotla affected.IWhenltheexternal temperaturelislbelowlzeroldegreeelcenti-grade,Ichecklthelcoolinglsystemlfrequently andliflnecessaryladdlalhigherIconcentration of antifreeze fluid (up to 60% maximum).
Useldistilled waterforlthe coolantlsolution so as not to damage the engine.
CAUTION

DOtNOTtUSEtYOURtVEHICLEtlFtTHE COOLANTtLEVELtlStBELOWtTHEtMINIM- UMtLEVELtMARKEDt"MIN".
CAUTION

Peiltvantdetkoelvloeistof (03\_18,t03\_19)
ControleerlhetlpeillvanIdelkoelvloeistof;lop basisIvanIdeITABELIVANIHETIPERIODIEK ONDERHOUD.
COOLANT IS TOXIC IF INGESTED; CONTACT WITH YOUR EYES OR SKIN MAY CAUSE IRRITATION. IF THE FLUID GETS IN CONTACT WITH THE EYES OR SKIN, RINSE REPEATEDLY WITH ABUNDANT WATER AND SEEK MEDICAL ADVICE. IF SWALLOWED, INDUCE VOMITING, RINSE MOUTH AND THROAT WITH ABUNDANT WATER AND SEEK MEDICAL ADVICE IMMEDIATELY.
CAUTION

DO NOT REMOVE THE EXPANSION TANK PLUG «1» WHEN THE ENGINE IS HOT, SINCE COOLANT IS UNDER PRESSURE AND VERY HOT. CONTACT WITH SKIN OR CLOTHES MAY CAUSE SEVERE BURNS AND/OR INJURIES.
BEVINDT.
LET OP

DE KOELVLOEISTOF IS SCHADELIJK WANNEER HET WORDT INGESLIKT; HET CONTACT MET DE HUID EN DE OGEN KAN IRRITATIES VEROORZAKEN. WANNEER DE VLOEISTOF IN CONTACT ZOU KOMEN MET DE HUID EN DE OGEN, SPOELT MEN LANG MET VEEL WATER, EN RAADPLEEGT MEN EEN ARTS. WANNEER HET WORDT INGESLIKT, MOET MEN OVERGEVEN, DE MOND EN DE KEEL SPOELEN MET VEEL WATER, EN ONMIDDELLIJK EEN ARTS RAADPLEGEN.
LET OP

VERWIJDER DOP «1» NIET VAN HET EXPANSIEVAT WANNEER DE MOTOR WARM STAAT, OMDAT DE KOELVLOEISTOF ONDER DRUK STAAT EN EEN HOGE TEMPRATUUR HEEFT. BIJ CONTACT MET DE HUID OF DE KLEDING KAN HET ERNSTIGE LETSELS/SCHADE VEROORZAKEN.
CHECKING CONTROLE
CAUTION

WAIT FOR THE ENGINE TO COOL DOWN BEFORE CHECKING OR TOPPING-UP THE COOLANT LEVEL.
- Shut off the engine and wait until it cools off.
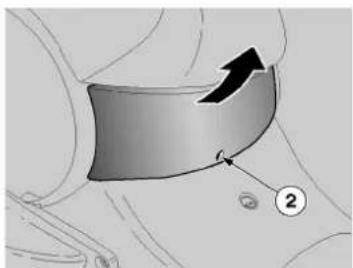
- Remove the front case.
- Make sure that the coolant level inside the expansion tank «2» reaches the «MAX» level.
MIN = minimum level.
MAX = maximum level.
- Loosen (turning it clockwise) but do not remove the filling cap «1».
- Wait for some seconds so that possible pressure may be purged.
• Unscrew and remove the tap «1».
NOTE
PARK THE SCOOTER ON SAFE AND LEVEL GROUND.
NOTE
CAP "1" IS CONNECTED TO A BREATHER PIPE "3". DO NO FORCE OR DISCONNECT THE BREATHER PIPE "3".
LET OP

VOER DE HANDELINGEN VAN DE CONTROLE EN HET BIJVULLEN VAN DE KOELVLOEISTOF UIT WANNEER DE MOTOR KOUD STAAT.
- Top up with coolant until the fluid level is near the "MAX" level.
- Refit the filling cap "1".
- Refit the front case.
CAUTION
DO NOT ADD ADDITIVES OR ANY OTHER SUBSTANCES TO THE FLUID. IF A FUNNEL IS USED, MAKE SURE IT IS PERFECTLY CLEAN.
CAUTION
IF THERE IS AN EXCESSIVE CONSUMPTION OF COOLANT OR WHEN THE EXPANSION TANK REMAINS EMPTY,
BIJVULLING
WHENTOPPING-UP,tDOtNOTtEXCEED THEt«MAX»tLEVELtORtTHEtFLUIDtWILL FLOWtOUTtWHENTHEtENGINEtIStRUN- NING.
Recommendedtproducts
AGIPtPERMANENTtSPEZIAL
Coolant Biodegradablecoolant,Ireadylforluse,Iwith "longllife"ltechnologylandcharacteristics (pink). Freezing protection up to -40° (-40°F). InIcompliancewith|theICUNAI956-16|standard.
KOELVLOEISTOFtEXCESSIEFtIS,tEN WANNEERtHETtEXPANSIEVATtLEEG BLIJFT,tCONTROLEERTtMENtOFtER GEENTLEKKENTZIJNTnTcCIRCUIT. VOORHERSTELLINGENTWENDTtMEN ZICHTTOTtEENTGEAUTORISEERDE APRILIAtDEALER.
LETtOP

BIJtHETtBIJVULLENtMAGtMENtHET «MAX»tPEILtNIETtOVERSCHRIJDEN, ANDERStZALtDEtVLOEISTOFtTIJDENS DEtWERKINGtVANtDEtMOTOR UITSTROMEN.
natural_image
Technical line drawing of mechanical components and assembly (no text or symbols)03 20
03 21
Checkingtthetbraketoiltlevel (03\_20,t03\_21)
NOTE
THISTVEHICLEtlStFITTEDtWITHtFRONT ANDtREARtDISCtBRAKEStWITHtINDEPENDENTtHYDRAULICtCIRCUITS.tTHE FOLLOWINGtINFORMATIONtREFERStTO ONEtBRAKINGtCIRCUITtBUTtlTtAPPLIES TOtBOTH.
CAUTION

UNEXPECTEDtCLEARANCEtVARIATIONS ORtELASTICtRESISTANCEtINtTHE BRAKEtLEVERTAREtDUETOtFailuretIN THEtHYDRAULICtCIRCUIT.tCONTACTtAN OFFICIALtAPRILAtDEALERtINtCASEtOF DOUBTStONtTHEtCORRECTtOPERATION OfTTHEtBRAKINGtSYSTEMtORtWHEN UNABLEtTOtCARRYtOUTtROUTINE CHECKtPROCEDURES.
CAUTION
PAYtSPECIALtATTENTIONtTOTTHE BRAKETDISCtANDtTHEtFRICTIONtGASKETStANDtCHECKtTHATtTHEYtAREtNOT OILYtORtGREASY,tSPECIALLYtAFTER MAINTENANCEtOPERATIONStOR CHECKs.tCHECKtTHATtTHEtBRAKETPIPE IStNOTtTWISTEDtORtWORN.
KEEPtOUTtOFtTHEtREACHtOFtCHILDREN
Controletvanthettoliepeil vantdetremment(03\_20, 03\_21)
N.B.
DITtVOERTUIGtlStUITGERUSTtMET SCHIJFREMMENTVOORAANTEN ACHTERAAN,tMETtGESCHEIDEN HYDRAULISCHEtCIRCUITS.tDE VOLGENDEtINFORMATIEtBETREFTtEEN ENKELEtREMINSTALLATIE,tMAARtlS GELDIGtVOORtBEIDE.
LETtOP

HETtPLOTSELINGtWIJZIGENTVANtDE SPELINGtOFtEENtELASTISCHE WEERSTANDtVANtDEtREM,tZIJNtTE WIJTENtAANTPROBLEMENtMETtDE HYDRAULISCHETINSTALLATIE.tINtGEVAL VANtTWIJFELStlNtVERBANDtMETtDE PERFECTEtWERKINGtVANtDE REMINSTALLATIeENTlNTGEVALtMEN NIETtINtSTAATlStOMtDEtNORMALE CONTROLEHANDELINGENTUITtTE VOEREN,tWENDTtMENTZICHtTOTtEEN OFFICILEtAPRILAtDEALER.
LETtOP
LETtVOORALtOPtVOORtDEtSCHIJFREM ENTtVOORtDEtWRIJVINGSPAKKINGEN, ENTCONTROLEERtOFtZEtNIET
DO NOT DISPOSE OF THE FLUID INTO THE ENVIRONMENT.
VERBONDEN ZIJN OF INGEVET ZIJN, VOORAL NA HET UITVOEREN VAN DE ONDERHOUDS- OF CONTROLEHANDELINGEN. CONTROLEER OF DE REMBUIS NIET IN ELKAAR IS GEDRAAID OF VERSLETEN IS.
BUITEN BEREIK VAN KINDEREN HOUDEN
LOOS DE VLOEISTOF NIET IN HET MILIEU.
CAUTION
BRAKES ARE THE MOST IMPORTANT COMPONENTS TO ENSURE SAFETY AND THEREFORE THEY HAVE TO BE ALWAYS IN PERFECT CONDITIONS; CHECK THEM BEFORE EVERY RIDE.
A DIRTY DISC SMEARS THE PADS RESULTING IN POOR BRAKING. REPLACE DIRTY PADS AND CLEAN THE DIRTY DISC USING A TOP-QUALITY DEGREASING PRODUCT.
LET OP
DE REMMEN ZIJN DE ONDERDELEN DIE HET MEEST DE VEILIGHEID GARANDEREN, EN MOETEN DUS STEEDS PERFECT EFFICIËNT WORDEN GEHOUDEN; CONTROLEER ZE VÓÓR ELKE REIS.
EEN VUILE SCHIJF BESMEURT DE PASTILLES, EN VERMINDERT DUS DE DOELTREFFENDHEID VAN HET REMMEN. VUILE PASTILLES MOETEN WORDEN VERVANGEN, TERWIJL DE VUILE SCHIJF MOET GEREINIGD WORDEN MET EEN ONTVETTEND PRODUCT VAN HOGE KWALITEIT.
When the friction pads wear out, the brake fluid level in the reservoir goes down to automatically compensate for that wear.
The brake fluid reservoir is located below the handlebar cover next to the brake lever attachments.
Check frequently the brake fluid level in the reservoirs and the brake pad wear.
CAUTION

DO NOT USE YOUR VEHICLE IF A FLUID LEAK IN THE BRAKING CIRCUIT IS DETECTED.
CHECKING
To check level:
• Rest the scooter on its centre stand.
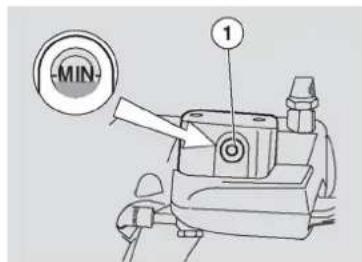
- Turn the handlebar so that the fluid in the brake fluid reservoir is parallel to the "MIN" reference mark on the sight glass "1".
- Check that the level in the reservoir is over the reference "MIN" indicated on the sight glass "1".
MIN = Minimum level.
CAUTION
If the level is too low:
- Check brake pads and disc for wear.
Iflpadsland/orltheldiscIneedInotItolbelreplaced:
• Take your scooter to an Official aprilia Dealer to carry out the replacement.
CAUTION
natural_image
Top-down view of a car battery pack with attached cables (no visible text or symbols)IF THE FLUID GETS INTO CONTACT WITH THE EYES, WASH WITH ABUNDANT WATER FOR FIFTEEN MINUTES AND CONSULT AN EYE SPECIALIST IMMEDIATELY.
IF IT IS ACCIDENTALLY SWALLOWED, DRINK A LOT OF WATER OR MILK, THEN MILK OF MAGNESIA OR VEGETAL OIL, AND SEEK MEDICAL ADVICE IMMEDIATELY.
THE BATTERY RELEASES EXPLOSIVE GASES. KEEP IT AWAY OF FLAMES, SPARKS, CIGARETTES OR ANY OTHER HEAT SOURCE.
WHEN RECHARGING OR USING THE BATTERY, BE CAREFUL TO HAVE THE ROOM ADEQUATELY AIRED. DO NOT BREATH GASES RELEASED WHEN THE BATTERY IS BEING RECHARGED.
KEEP OUT OF THE REACH OF CHILDREN
PAY ATTENTION NOT TO TILT THE VEHICLE EXCESSIVELY TO AVOID DANGEROUS SPILLS OF BATTERY FLUID.
CAUTION
DO NOT INVERT THE CONNEXIONS OF THE BATTERY LEADS.
CONNECT AND DISCONNECT THE BAT-
WANNEER HET IN CONTACT ZOU KOMEN MET DE OGEN, MOET MEN OVERVLOEDIG WASSEN MET WATER VOOR ONGEVEER VIJFTIEN MINUTEN, EN ONMIDDELLIJK EEN OOGARTS RAADPLEGEN.
WANNEER HET TOEVALLIG ZOU WORDEN INGESLIKT, MOET MEN VEEL WATER OF MELK DRINKEN, DAARNAA MAGNESIUMMELK OF VEGETALE OLIE DRINKEN, EN ONMIDDELLIK EEN ARTS RAADPLEGEN.
DE ACCU VERSPREIDT EXPLOSIEVE GASSEN, EN HET MOET DUS UIT DE BUURT WORDEN GEHOUDEN VAN VRIJE VLAMMEN, VONKEN, SIGARETTEN EN EENDER WELKE ANDERE WARMTEBRON.
TIJDENS HET LADEN OF HET GEBRUIK, VOORZIET MEN HET LOKAL VAN EEN GESCHIKTE VENTILATIE EN VERMIJDT MEN HET INADEMEN VAN DE GASSEN DIE VRIJKOMEN TIJDENS HET OPLADEN VAN DE ACCU.
BUITEN BEREIK VAN KINDEREN HOUDEN
LET OP OM HET VOERTUIG NIET TE VEEL TE HELLEN, OM GEVAARLIJKE UITSTROMINGEN VAN VLOEISTOF UIT
TERY WITH THE IGNITION SWITCH SET TO «OFF» OR THIS MAY DAMAGE SOME COMPONENTS. CONNECT THE POSITIVE LEAD (+) FIRST AND THEN THE NEGATIVE ONE (-). DISCONNECT IN THE REVERSE ORDER.
BATTERY FLUID IS CORROSIVE.
DO NOT POUR OR SPREAD IT ESPECIALLY ON PLASTIC PARTS.
WHEN RECHARGING A "MAINTENANCE FREE" BATTERY INSTALLED USE A SPECIFIC BATTERY CHARGER (VOLTAGE/CONSTANT AMPERAGE OR CONSTANT VOLTAGE TYPE).
USING A CONVENTIONAL BATTERY CHARGER MAY DAMAGE THE BATTERY.
DE ACCU TE VERMIJDEN.
LET OP
DRAAI DE VERBINDINGEN VAN DE KABELS VAN DE ACCU NOOIT OM.
VERBINDT EN MAAK DE ACCU LOS MET DE ONTSTEKINGSSCHAKELAAR IN POSITIE «OFF», ANDERS ZOUDEN SOMMIGE ONDERDELEN SCHADE KUNNEN OPLOPEN. VERBINDT EERST DE POSITIEVE KABEL (+) EN DAARNA DE NEGATIEVE (-). MAAK ZE LOS IN DE OMGEKEERDE VOLGORDE.
DE VLOEISTOF VAN DE ACCU IS CORROSIEF.
GIET ZE NIET UIT EN VERSPREIDT ZE NIET, VOORAL NIET OP DE PLASTIC DELEN.
WANNEER MEN EEN ACCU INSTALLEERT VAN HET TYPE "ZONDER ONDERHOUD", GEBRUIKT MEN VOOR HET OPLADEN EEN SPECIFIEKE ACCULADER (VAN HET TYPE MET CONSTANTE VOLTAGE/ELEKTRISCHE STROOMSTERKTE OF CONSTANTE VOLTAGE).
WANNEER MEN EEN ACCULADER VAN HET CONVENTIONELE TYPE GEBRUIKT, KAN DE ACCU BESCHADIGD WORDEN.
BATTERY COVER REMOVAL
• Make sure the ignition switch is set to "OFF"
- Lift the saddle.
- Unscrew and remove the two screws "1".
- Slide off the battery cover "2"
CAUTION

PARK THE VEHICLE ON SAFE AND LEVEL GROUND.
CHECKING AND CLEANING LEADS AND TERMINALS
- Remove the battery cover.
- Make sure the ignition switch is set to "OFF".
- Check that the leads "3" of the cables and the terminals "4" of the battery are:
in|good|conditionsl(not|corroded|or|covered by deposits);
covered by neutral grease or petroleum jelly. If necessary:
- Disconnect first the negative lead (-) and then the positive one (+).
CONTROLE EN REINIGING VAN DE TERMINALS EN VAN DE KLEMMEN
- Brush with a metal bristle brush to remove all signs of corrosion.
- Connect again first the positive lead (+) and then the negative one (-).
• Cover the leads and terminals with neutral grease or petroleum jelly.
- Remove the battery cover.
• Disconnect first the negative lead (-) and then the positive one (+). - Remove the battery "5" from its housing and place it on a level surface, in a cool and dry place.
- Refit the battery cover.
CAUTION

ONCE REMOVED THE BATTERY MUST BE PUT AWAY IN A SAFE PLACE AND OUT OF THE REACH OF CHILDREN.
CAUTION

VERWIJDERING VAN DE ACCU
- Remove the battery.
- Connect the battery to a battery charger.
- A recharge with an amperage of 1/10 of the battery capacity is recommended.
- Once the battery is recharged, control the electrolyte level and top up with distilled water if necessary.
• Refit the caps to the elements.
NOTE
REFITtTHEtBATTERYtONLYt5-10 MINUTESTAFTERtDISCONNECTINGtTHE CHARGERtASTHEtBATTERYtKEEPS PRODUCINGtGASTFORtAtSHORTtTIME.
HETtOPLADENTVANtDEtACCU
- Remove the battery cover.
- Place the battery "5" in its housing
- Connect first the positive lead (+) and then the negative one (-).
• Cover the leads and terminals with neutral grease or petroleum jelly. - Refit the battery cover.
CAUTION

ALWAYStCONNECTtTHEtBATTERY BREATHERtSotTHAttSULPHURlCTACID STEAMtFROMtTHEtBREATHERtDOES NOTtCORRODEtTHEtELECTRICALtSY-TEM,tPAINTEDtPARTS,tRUBBERtCOM-PONENTStORtGASKETS.
nieuwetaccu
Ifthelscooterlhas been linactivelforllong time, I starting l may be delayed as the fuel supply circuit may be partially empty.
Langetstilstand
Ifthelscooterlislinactivellongerlthanlfifteen days,litlislneccessaryltolrechargelthelbattery to avoid sulphation,
- Remove the battery and put it away in a cool and dry place.
In winterl or when the vehicle remains stopped, I check the chargelfrequently (about once a month) to avoid deterioration.
• Fully recharge with an ordinary charge.
IflthelbatterylisIstilllonlthelvehicle,Idisconnect the cables from the terminals.
IF A FUSE BLOWS OUT FREQUENTLY,
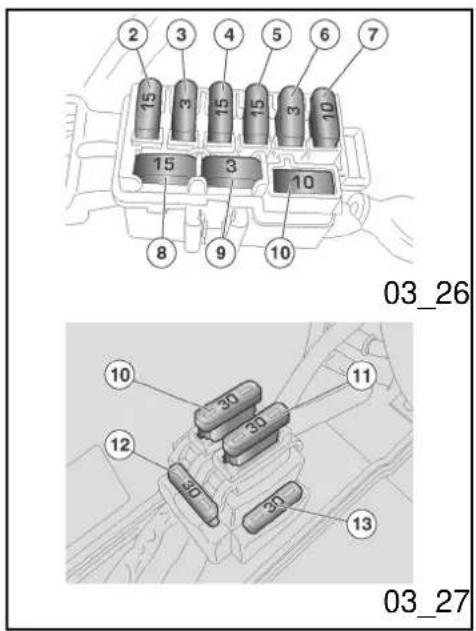
Zekeringen (03_25, 03_26, 03_27)
LET OP

HERSTEL GEEN DEFECTE ZEKERINGEN. GEBRUIK NOOIT ANDERE ZEKERINGEN DAN GESPECIFICEERD. MEN ZOU SCHADE KUNNEN VEROORZAKEN AAN HET ELEKTRISCH SYSTEEM, OF ZELFS BRAND IN GEVAL VAN KORSTSLUITING.
LET OP

THATtMAYtBEtDUEtT0tAtSHORTtCIRCUIT
ORtOVERLOAD.tINtTHISTEVENT,tCON-
TACTtANtAPRILIAtOFFICIALtDEALER.
WANNEERtEENTZEKERINGtFREQUENT
WORDTtBESCHADIGD,tISTER
WAARSCHIJNLIJKtEENTKORTSLUITING
OfTEEENTOVERBELASTING.tINtDITtGEVAL
RAADPLEEGTtMENTeENTOFFICILE
APRILIAtDEALER.
CheckIfuseslinlcaselofllailurelorirregular functioningloflanlelectricalcomponentlorengine starting failure.
Firstlcheckl3Alandl15Alfuseslandlthenl30A fuses.
Totcarrytoutthetcheck:
- Remove the battery cover.
- Extract one fuse at a time and check if the filament «1» is broken.
- Before replacing the fuse, find and solve, if possible, the problem that caused the problem.
• If the fuse is damaged, replace it with one of the same amperage. - Refit the battery cover.
NOTE
IFtTHEtSPAREtFUSEtlStUSED,tSUPPLY ANOTHERtOFtTHEtSAMEtTYPEtINtTHE CORRESPONDINGtFITTING.
| SpecificationDesc./Quantity | |
| (2) 15A Fuse | From the voltage regulator to: injection, stop/ignition light logic (Seat A on the electrical diagram). |
| (3) 15A Fuse | From the ignition switch to: engine kill logic (Seat B on the electrical diagram). |
| (4) 15A Fuse | From the ignition switch to: lights, horn, instrument panel, fan relay (Seat C on the electrical diagram). |
| (5) 15A Fuse | From the main fuse to the plug socket in the glovebox. |
| (6) 3A Fuse | From the voltage regulator to the ECU permanent power supply (Seat E on the electrical diagram). |
| (7) 15A Fuse Spare Parts. | |
| (8) 3A Fuse Spare Parts | |
| (9) Free | |
SCHIKKINGtVANtDEtSECUNDAIREtZEKERINGEN
| SpecificationDesc./Quantity | |
| (10) 30A Fuse | From the battery to: ignition switch, fuse «2», helmet compartment light, cooling fan, instrument panel permanent power supply. |
| (11) 20A Fuse | From the battery to: voltage regulator, fuse «3», fuse «5». |
| (12) 30A Fuse | Spare Parts |
| (13) 20A Fuse Spare Parts. | |
SCHIKKINGtVANtDEtHOOFDZEKERINGEN
WEARTCLEANtGLOVEStORtUSEtA CLEANtDRYtCLOTHtTOtREPLACEtTHE BULB.
DOTNOTtLEAVEtPRINTStONtTHEtBULB ASTTHISTMAYtCAUSEtITtTToOVERHEAT ORtEVENTbBLOWtOUT.tIFtYOUtTOUCH THEtBULBtWITHOUTWEARINGtGLOVES, CLEANTOFFtPRINTStWITHtALCOHOLtTO AVOIDtDAMAGINGtTHEtBULB.
DOTNOTtFORCEtELECTRICALtCABLES. NOTE
BEFOREtCHANGINGtAtBULB,tCHECK THEtFUSES.
«OFF», tENTWACHTtMENTENKELE MINUTENTZODATtDEZEtKANtAFKOELEN.
WANNEERtMENTHETtLAMPJE VERVANGT,tDRAAGTtMENTREINE HANDSCHOENENTOfTGEBRUIKTtMEN EENTREINTENTDROOGtDOEK.
LAADtGEENTAFDRUKKENTACHTERTOP HETtLAMPJE,tOMDATtHETtKAN OVERVERHITTENTENTDUSTSTUKtKAN GAAN.tWANNEERtMENTHETtLAMPJE METtDEtBLOTEtHANDENTAANRAAKT, REINIGTtMENTtDEtEVENTUELE AFDRUKKENTMETtALCOHOL,tOMtTE VERMIJDENTDATtHETtWORDT BESCHADIGD.
FORCEERtDEtELEKTRISCHEtKABELS NIET.
N.B.
VOORALEERtMENTEENTLAMPJE VERVANGT,tCONTROLEERTtMENTDE ZEKERINGEN.
BULBS/WARNINGtLIGHTS
| SpecificationDesc./Quantity | |
| High-/low-beam bulb | 12V - 55W / 12V - 55W |
LAMPEN/CONTROLELAMPEN
| KenmerktBeschrijvingt/tWaarde | |
| Lamp van het dimlicht / groot licht | 12V - 55W / 12V - 55W |
| Front parking light | 12V - 5W |
| Rear/front turn indicator bulb | 12V - 10W (rear)/ 12V - 10W (front) |
| Rear tail light /stop light bulb | 12V - 5W/21W |
| License plate light bulb | 12V - 5W |
| Instrument panel lighting bulbILED | |
| Turn indicator warning lightILED | |
| Engine oil pressure warning light | LED |
| Low-beam warning lightILED | |
| High-beam warning lightILED | |
| Low fuel warning lightILED | |
| High coolant temperature gauge warning light | LED |
03 28
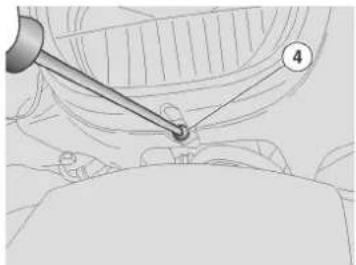
natural_image
Medical illustration showing a surgical instrument inserted into a patient's head (no text or labels)03 29
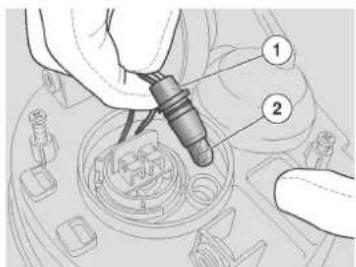
03 30
Fronttlighttgroupt(03\_28, 03\_29,t03\_30)
In the front headlight there are:
• One high-beam light bulb "1".
• One low-beam light bulb "2".
• One tail light bulb "3".
To replace low-/high-beam light bulbs:
- Unscrew and remove the lower screw "4".
- Remove the front headlight ring nut.
- Remove the headlight upper lock.
- Unscrew and remove the two head-light fixing screws.
• Take the headlight off the two lower bolts. -
Disconnect the connector and remove the headlight.
-
Slide off the rubber protection
- Turn the bulb holder clockwise and take it out of the parabole seat.
- Extract the bulb.
When refitting:
- Place the bulb holder in its parabole seat and turn it clockwise.
- Connect the bulb electrical connector.
INSERT THE BULB IN THE PARABOLE SEAT SO THAT THE TWO NOTCHES ON THE BULB COINCIDE WITH THEIR GUIDES ON THE BULB HOLDER.
- Connect the headlight connector.
- Refit the headlight
NOTE
WHEN REFITTING THE PROTECTION CAP BE CAREFUL TO PRESS ALL ALONG THE PERIMETER CORRESPONDING TO THE MARK "PUSH" TO ENSURE WATER TIGHTNESS, AND THEN CLOSE THE TABS.
To replace the tail light bulb:
• From the headlight bottom side,
hold and pull the bulb holder "1" to extract it from its seat.
- Slide off the headlight bulb "2" and replace it with another of the same type.
CAUTION

DOTNOTtPULLtTHEtELECTRICAL CABLEStWHENTAKINGtOUTtTHEtBULB HOLDER.
For a quick check of the correct direction of the front light beams, place the scooter ten metres from a vertical wall and make sure the ground is level.
Turn on the low beam light, sit on the scooter and check that the light beam projected to the wall is a little below the headlight horizontal straight line (about 9/10 of the total height).
To adjust the light beam:
- Unscrew and remove the headlight lower screw "1".
- Remove the chromium plated ring
Regelingtvantdetkoplamp (03\_31,t03\_32)
03_33
Fronttdirectiontindicators (03\_33,t03\_34,t03\_35, 03\_36)
NOTE
TOTREPLACEtTHEtTURNtINDICATOR BULBStItTlSTNOTtNECESSARYtTOTOPER- ATEtORtREMOVEtTHEtTURNtINDICATOR LENStORtPARABOLE.
To replace the bulb removal the front case as follows:
• Rest the scooter on its centre stand.
• Turn the handlebar fully to the right
03 34
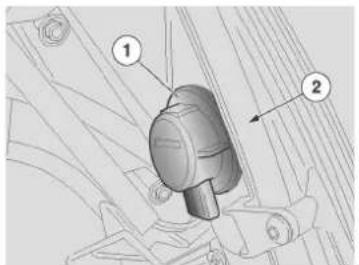
03 35
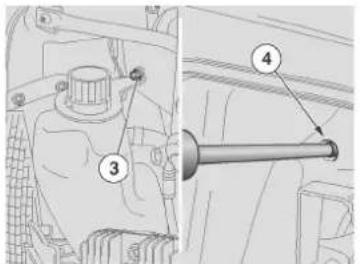
03 36
and remove the screw "1".
- Repeat the same procedure on the opposite side, turning the handlebar fully to the left.
- Turn the handlebar fully to the right and remove the screw "2".
- Repeat the same procedure on the opposite side, turning the handlebar fully to the left.
- Lift the case slightly as shown by the arrow and detach from the fittings.
CAUTION

PROCEED WITH CAUTION.
DO NOT DAMAGE THE TABS AND/OR THEIR CORRESPONDING SLOTS.
HANDLE THE PLASTIC AND PAINTED COMPONENTS WITH CARE, DO NOT SCRATCH OR SPOIL THEM.
CAUTION
WHEN REFITTING INSERT TABS IN THEIR SLOTS WITH THE CORRESPONDING CLIPS.
standaard.
- Unscrew and remove the upper screw «3» of the expansion tank.
- Open the glovebox.
- Unscrew the lower screw «4» of the expansion tank through the hole in the glovebox.
- Lift the expansion tank to reach the right bulb.
- Follow the same procedure as for left bulb.
• Install a bulb of the same type adequately.
• Reinstall in the reverse order.
CAUTION
PROCEED WITH CAUTION.
DO NOT DAMAGE THE TABS AND/OR THEIR CORRESPONDING SLOTS.
NOTE
INSERT THE BULB IN THE BULB HOLDER SO THAT THE TWO GUIDING PINS COINCIDE WITH THEIR GUIDES ON THE BULB HOLDER.
- Unscrew and remove the two screws "3".
-
Slide off the rear headlight "4".
-
Slide off the bulb holder "5" and extract the rear headlight.
• Turn the bulb "6" anticlockwise. - Remove and replace the headlight.
CAUTION
PROCEEDWITHtCAUTION.
DOTNOTtDAMAGETHEtTABSTAND/OR THEIRtCORRESPONDINGtSLOTS.
OVEREENKOMENTMETtDE RESPECTIEVELIJKEtGELEIDERStOPtDE LAMPENHOUDER.
Reartturntindicatorst(03\_39)
To replace the bulbs:
- Remove the rear headlight.
- Turn the bulb holder "1" clockwise and extract it.
- Turn the bulb "2" anticlockwise and slide it off the bulb holder.
• Unscrew and remove the screw "4".
- Remove the license plate bulb support "5".
- Slide off the bulb "6" and replace it with another of the same type.
Nummerplaatlichtt(03\_40, 03\_41)
- Hold and pull the bulb holder "3" to extract it from its seat.
- Slide off and replace the bulb with another of the same type.
DOTNOTtPULLtTHEtELECTRICAL CABLEStWHENTAKINGtOUTtTHEtBULB HOLDER.
LETtOP

TREKtNIETtAANTDEtELEKTRISCHE KABELStOMtDEtLAMPENHOUDERtTE VERWIJDEREN.
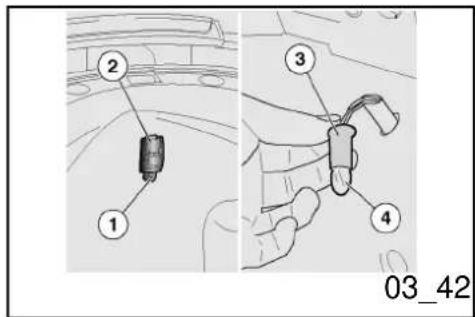
Helmetcompartment lightingtbulbt(03\_42)
For replacement:
- Lift the saddle.
- Loosen and remove the fixing screw "1" on the battery cover glass.
- Remove the glass "2" and slide it off downward.
- Hold and pull the bulb holder "3" to extract it from its seat.
- Slide off the bulb "4" and replace it with another of the same type.
CAUTION

DOtNOTtPULLtTHEtELECTRICAL CABLEStWHENtTAKINGtOUTtTHEtBULB HOLDER.
The following information refers to one rear view mirror but is valid for both.
• Rest the scooter on its centre stand.
• Unscrew the tap «3».
- Remove the rear-view mirror «4» and slide it off upward.
• Refit the cover «3».
NOTE
ASSEMBLETHEtCOMPONENTStFORTHE RIGHTtANDtTHEtLEFTtREART-VIEWtMIRRORStSEPARATELY.
CAUTION

HOLDtTHEtREAR-VIEWtMIRRORt"4"tTO AVOIDtDROPPINGtlTtBYtACCIDENT.
CAUTION

HANDLEtTHEtPLASTlCTANDtPAINTED COMPONENTStWITHtCARE,tDOtNOT SCRATCHtORtSPOILtTHEM.
natural_image
Illustration of mechanical components and tools, no visible text or symbols03_44
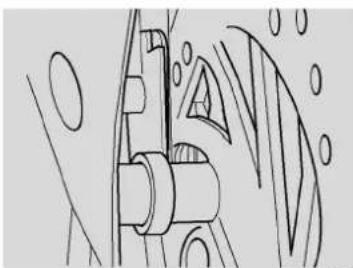
natural_image
Pure mechanical diagram showing gear and shaft components without any text or symbols03_45
Fronttandtreartdisctbrake (03_44,t03_45,t03_46, 03_47)
NOTE
THISTVEHICLEtlStFITTEDtWITHtFRONT ANDtREARtDISCtBRAKEStWITHtINDEPENDENTtHYDRAULICtCIRCUITS.tTHE FOLLOWINGtINFORMATIONtREFERStTO ONEtBRAKINGtCIRCUITtBUTtlTtAPPLIES TOtBOTH.
CAUTION

UNEXPECTEDtCLEARANCEtVARIATIONS ORtELASTICtRESISTANCEtINtTHE BRAKEtLEVERtAREtDUETOtFailuretIN THEtHYDRAULICtCIRCUIT.tCONTACTtAN OFFICIALtAPRILIAtDEALERtINtCASEtOF DOUBTStONtTHEtCORRECTtOPERATION OfTTHEtBRAKINGtSYSTEMtORTWHEN UNABLEtTOtCARRYtOUTtROUTINE CHECKtPROCEDURES.
CAUTION
PAYtSPECIALtATTENTIONtT0THE BRAKETDISCtANDtTHEtFRICTIONtGASKETStANDtCHECKtTHATtTHEYtAREtNOT OILYtORtGREASY,tSPECIALLYtAFTER
KEEP OUT OF THE REACH OF CHILDREN
DO NOT DISPOSE OF THE FLUID INTO THE ENVIRONMENT.
LET VOORAL OP VOOR DE SCHIJFREM EN VOOR DE WRIJVINGSPAKKINGEN, EN CONTROLEER OF ZE NIET VERBONDEN ZIJN OF INGEVET ZIJN, VOORAL NA HET UITVOEREN VAN DE ONDERHOUDS- OF CONTROLEHANDELINGEN. CONTROLEER OF DE REMBUIS NIET IN ELKAAR IS GEDRAAID OF VERSLETEN IS.
BUITEN BEREIK VAN KINDEREN HOUDEN
LOOS DE VLOEISTOF NIET IN HET MILIEU.
CAUTION
BRAKES ARE THE MOST IMPORTANT COMPONENTS TO ENSURE SAFETY AND THEREFORE THEY HAVE TO BE ALWAYS IN PERFECT CONDITIONS; CHECK THEM BEFORE EVERY RIDE.
A DIRTY DISC SMEARS THE PADS RESULTING IN POOR BRAKING. REPLACE DIRTY PADS AND CLEAN THE DIRTY DISC USING A TOP-QUALITY DEGREASING PRODUCT.
LET OP
DE REMMEN ZIJN DE ONDERDELEN DIE HET MEEST DE VEILIGHEID GARANDEREN, EN MOETEN DUS STEEDS PERFECT EFFICIËNT WORDEN GEHOUDEN; CONTROLEER ZE VÓÓR ELKE REIS.
EEN VUILE SCHIJF BESMEURT DE PASTILLES, EN VERMINDERT DUS DE DOELTREFFENDHEID VAN HET REMMEN. VUILE PASTILLES MOETEN WORDEN VERVANGEN, TERWIJL DE VUILE SCHIJF MOET GEREINIGD WORDEN MET EEN ONTVETTEND
PRODUCTtVANtHOGEtKWALITEIT.
Padstweartcheck
CheckIbrakelpadsIforlwearlaccordingItolthe indicationslinltheIPERIODICIMAINTENANCE CHART.
Disclbrakelpadlwearldependlonltheluse,lthe riding style and the roads.
NOTE
THE FOLLOWING INFORMATION REFERStT0tONEtBRAKINGtCIRCUITtBUT APPLIESTOtBOTH.
Controletvantdetslijtagetvantdetpastilles
ControleerIdelslijtagelvanIdelrempastilleslop basislvanIdelKAARTIVANIHETIPERIODIEK ONDERHOUD.
To carry out a quick pad check:
• Rest the scooter on its centre stand.
- Carry out a visual inspection of brake disc and pads as follows.
Fronttbraketcallipers
From the front bottom side for both callipers.
CAUTION

CHECKtBRAKEtPADStFORtWEAR MAINLYtBEFOREtEACHtRIDE.
REMPASTILLEStVOORALtVÓÓRtELKE REIS.
Reartbraketcalliper
From the back bottom side for both pads "1".
NOTE
EXCESSIVEtWEARtOfTTHEtFRICTION MATERIALtMAKEStTHEtPADtMETAL SUPPORTtGETtINTOtCONTACTtWITH THEtDISC,tWHICHTRESULTStINtAtMETAL- LICtNOISEtANDtSPARKStINtTHEtCAL- LIPER;tTHEREFORE,tBRAKINGtEFFI- CIENCYtANDtDISCtSAFETYtANDtINTEG- RITYtAREtATtRISK.
- If the friction material thickness (even in only one pad) is reduced to about 1.5 mm, replace both pads.
Front pads "2".
Rear pads "3".
CAUTION
TAKETYOURtVEHICLEtTOTANtOFFICIAL APRILIAtDEALERtTOTCARRYtOUTtTHE REPLACEMENT.
Achterstetremtang
Take some measures to avoid the side effects of not using the vehicle. Besides, it is necessary to carry out general repairs and checks before garaging the vehicle as most likely one can forget to do so afterwards.
Proceed as follows:
• Empty the fuel tank completely.
- Remove the spark plug.
• Pour a teaspoonful (5 -10 cm ^3 ) of engine oil into the cylinder.
NOTE
PLACEtAtCLEANtCLOTHtONtTHEtCYLIN-DERtNEXTtTOTHEtSPARKtPLUGtSEAT TOTPROTECTtlTtFROMtPOSSIBLEtOIL SPLASHES.
Stilstandtvanthettvoertuig (03\_48,t03\_49)
- Set the ignition switch to "ON" and press the starter button "A" for a few seconds to distribute the oil on the cylinder surfaces uniformly.
- Remove the protection cloth.
- Refit the spark plug.
- Remove the battery.
- Wash and dry the scooter.
• Polish the painted surfaces. - Inflate tyres.
- Place the scooter so that both tyres do not touch the ground using a specific support.
- Store the vehicle in a cool, dry place, away from sunlight and with steady temperature.
- Put a plastic bag on the muffler exhaust end and tie it so that humidity cannot get in.
• Cover the scooter but do not use plastic or waterproof materials.
AFTER STORAGE
• Uncover and clean the scooter.
- Check that the battery charge is OK and fit it.
- Refill the fuel tank.
- Carry out the preliminary checks.
CAUTION

AS A TEST, RIDE THE VEHICLE FOR A FEW KILOMETRES AT A MODERATE SPEED AND AWAY FROM TRAFFIC AREAS.
Cleanlthelscooterlfrequentlylwhenlridinglin the following areas or conditions:
• Air pollution (cities and industrial areas)
• Salinity and humidity in the atmosphere (sea areas, hot and wet weather).
- Special ambient/seasonal conditions (use of salt, anti-icing chemical products on the roads in winter).
- Pay special care that industrial or polluting dust deposits do not form on the bodywork and also remove tar stains, dead insects, bird droppings, etc.
- Avoid parking your scooter under trees; Resins, fruits or leaves falling from trees may contain aggressive chemical substances that may damage the paintwork.
CAUTION

Reinigentvanthettvoertuig
To remove dirt and mud deposited on the painted surfaces, use a low pressure water blast to soak all dirty parts carefully. Wipe off mud and dirt with a soft sponge for bodywork soaked in a lot of water and shampoo (2 ... 4% parts of shampoo in water). Then rinse abundantly with water and dry with a shammy cloth. To clean the engine outer parts, use degreasing detergent, brushes and cloth
CAUTION
DO NOT APPLY ANY PROTECTIVE WAX ON THE SADDLE OR IT MAY BECOME SLIPPERY.
EXCEEDING 5% (NEUTRAL SOAP, DEGREASING DETERGENTS OR ALCOHOL). DRY THE SADDLE WELL AFTER CLEANING.
NOTE
SCOOTER CLEANING TIPS
- REMOVE ALL OBJECTS FROM INSIDE THE FRONT CASE AND THE HELMET COMPARTMENT; REMOVE MOQUETTE CARPET IN THE HELMET COMPARTMENT;
- MAKE SURE ALL THE COM- PARTMENTS ALL ADEQUATELY CLOSED;
- WASH ONLY WITH NEUTRAL DE- TERGENT AND RINSE WITH WA- TER BUT NOT WITH PRESSURE.
RUBBEREN EN PLASTIC DELEN MAG MEN GEEN ALCOHOL OF BENZINE OF OPLOSMIDDELEN, MAAR ENKEL WATER EN NEUTRALE ZEEP GEBRIUKEN. VOOR DE REINIGING VAN HET ZADEL MAG MEN GEEN OPLOSMIDDELEN OF PETROLEUMDERIVATEN GEBRIUKEN (ACETON, TRICHLOORETHYLEEN, TERMENTIJN, BENZINE, OPLOSMIDDELEN). MEN MAG REINIGINGSMIDDELEN GEBRIUKEN DIE MAXIMUM 5% CAPILLAIR ACTIEVE DELEN BEVATTEN (NEUTRALE ZEEP, ONTVETTENDE REINIGINGSMIDDELEN OF ALCOHOL). DROOG HET ZADEL ZORGVULDIG NA DE REINIGING.
N.B.
NORMEN VOOR HET WASSEN VAN HET VOERTUIG
- VERWIJDER ALLE VOORWERPEN UIT DE VOORSTE RUIMTES EN UIT DE ZADELRUIMTE; VERWIJDER HET TAPIJTJE UIT DE ZADELRUIMTE;
- CONTROLEER OF DE RUIMTES CORRECT ZIJN GESLOTEN;
- WAS ENKEL MET NEUTRALE REINIGINGSMIDDELEN, EN SPOEL AF MET WATER ZONDER DRUK.
Transport
CAUTION
BEFORETRANSPORTINGTHEVEHICLE, ITIISTNECESSARYTTOEMPTYTHEITFUEL TANKTANDTTHEICARBURETTORTADEQUATELY,tCHECKINGTHATTHEYtARE DRY.
WHILEtTRANSPORTINGtTHEtVEHICLE,tIT SHOULDtBEtATtALLtTIMESTVERTICAL ANDtWELLtANCHOREDtINtORDERtTO AVOIDtFUEL,tOILtORtCOOLANTtLEAKS.
INTCASEtOFtFAILURE,tDOtNOTtHAVETHEtVEHICLEtTOWED.tASKtFORtANTADEQUATEtASSISTANCE.
Vervoer
LETtOP
VOORALEERtMENTHETtVOERTUIG VERVOERT,tMOETtMENTZORGVULDIG DEtBRANDSTOFTANKtENTDE CARBURATORtLEDIGEN,tEN CONTROLEERTtMENTOfTDEZEtGOED DROOGtZIJN.
TIJDENStDEtVERPLAATSINGtMOETtHET VOERTUIGtVERTICAALtBLIJVENTtEN GOEDtWORDENTVERANKERD,tZODAT HETtVERLIEStVANtBRANDSTOF,tOLIE ENTKOELVLOEISTOFtWORDT VERMEDEN.
INTGEVALtVANtEENtDEFECTtMAGtMEN HETtVOERTUIGtNIETtSLEPEN,tMAAR MOETtMENTeENThULPDIENST CONTACTEREN.
Emptyingtthetfuelttank
CAUTION

FIREtHAZARD.
WAITtUNTILtTHEtENGINEtANDtTHE MUFFLERtAREtCOLD.
FUELtVAPOURStAREtHARMFULtTO
Hettledigentvantdetbrandstoftank
LETtOP

BRANDGEVAAR.
WACHTtTOTtDEtMOTORtENTdEtUITLAAT VOLLEDIGtAFGEKOELDtZIJN.
DEtBRANDSTOFDAMPENTZIJN
HEALTH.
SCHADELIJK VOOR DE GEZONDHEID.
BEFORE ANY OPERATION, MAKE SURE THAT THE ROOM WHERE YOU ARE HAS ADEQUATE AIR VENTILATION.
CONTROLEER EERST OF HET LOKAL WAAR MEN HANDELT GOED VERLUCHT IS.
DO NOT INHALE FUEL VAPOURS.
ADEM DE BRANDSTOFDAMPEN NIET IN.
DO NOT SMOKE OR USE NAKED FLAMES.
ROOK NIET EN GEBRUIK GEEN VRIJE VLAMMEN.
DO NOT DISPOSE OF FUEL INTO THE ENVIRONMENT.
LOOS DE BRANDSTOF NIET IN HET MILIEU.
| SpecificationtDesc./Quantity | |
| Max. length 2263 mm | |
| Max. width 790 mm | |
| Max height (to windscreen) | 1419 mm |
| Saddle height 785 mm | |
| Centre to centre distance | 1535 mm |
| Minimum ground clearance 215 mm | |
| Kerb weight 194 kg | |
| Variator transmission Continuous, automatic | |
| Main transmission V belt | |
| Secondary transmission Gear reduction unit | |
| Engine/wheel total ratio | short 1/14.083 |
| long 1/5.406 | |
| Fuel (reserve included) 13.2 l | |
| Fuel reserve 3 l | |
| Engine oil (Engine oil change and engine oil filter replacement) | 1500 cm^3 |
| Engine oil (Change to inspect engine) | 1700 cm^3 |
| Transmission oil ~ 250 cm^3 | |
TECHNISCHETGEGEVENStVANTHETtVOERTUIG
| KenmerktBeschrijvingt/tWaarde | |
| Max lengte | 2263 mm |
| Max breedte 790 mm | |
| Max hoogte (tot de kap) | 1419 mm |
| Hoogte tot het zadel | 785 mm |
| Asafstand | 1535 mm |
| Minimum vrije hoogte vanaf de grond | 215 mm |
| Gewicht per versnellingsorde | 194 Kg |
| Variator van de transmissie | Continu en automatisch |
| Primaire transmissie | Met trapeziumvormige riem |
| Secundaire transmissie | Met raderwerk |
| Totale verhouding motor/wiel | kort 1/14,083lang 1/5,406 |
| Brandstof (inclusief de reserve) | 13,2 l |
| Brandstofreserve | 3 l |
| Motorolie (Vervanging van de motorolie en de filter van de motorolie) | 1500 cm^3 |
| Motorolie (Vervanging voor de revisie van de motor) | 1700 cm^3 |
| Coolant (50% water + 50% ethylene glycol antifreeze fluid) | 1.7 l |
| Oil for the front fork | 230 cm^3 (for each stem) |
| Seats | 2 |
| Scooter max load (rider + luggage) | 115 kg |
| Scooter max load (rider + passenger + luggage) | 190 kg |
| Chassis type | high-resistant steel tubes |
| Steering inclination angle127.5" | |
| Front stroke108 mm | |
| Front brake | ∅ 260 mm disc brake with hydraulic transmission |
| Combined rear brake | Double disc - ∅ 260 mm front disc and ∅ 240 mm rear disc |
| Front wheel rim: | 16"x3.00 light alloy rim |
| Rear wheel rim: | 14"x4.5 light alloy rim |
| Tyre type | Without inner tube (Tubeless) |
| Front tyre: | 110/70 -16" 56S tubeless |
| Rear tyre | 150 /70 -14" 66S tubeless |
| Front tyre pressure (rider only) | 2.2 bar |
| Rear tyre pressure (rider only) | 2.2 bar |
| SpecificationtDesc./Quantity | |
| Engine type | Single cylinder, 4-stroke, 4 valves, single overhead camshaft, chain driven on flywheel side |
| Valve quantity | 4 |
| Cylinder quantity 1 | |
| Overall engine capacity | 398.9 cm^3 (400 VERSION) |
| Overall engine capacity | 460 cm^3 (500 VERSION) |
| Bore/stroke | 85.8 mm / 69 mm (400 VERSION) |
| SpecificationtDesc./Quantity | |
| High-/low-beam bulb | 12V - 55W / 12V - 55W |
| Front parking light | 12V - 5W |
| Rear/front turn indicator bulb | 12V - 10W (rear)/ 12V - 10W(front) |
| Rear tail light /stop light bulb | 12V - 5W/21W |
| License plate light bulb | 12V - 5W |
| Instrument panel lighting bulbILED | |
LAMPEN/CONTROLELAMPEN
natural_image
Close-up of a mechanical component with a numbered feature (6) and no visible text or symbolsKittequipment(04\_01)
The tool kit "6" is attached under the saddle.
To reach it:
Release and lift the saddle.
The tools supplied are:
- Pouch bag.
- Twin screwdriver.
- Box spanner 16 mm.
- Shock absorber wrench.
- Allen key 4 mm.
FUELtORtANYtOTHERtFLAMMABLEtSUB-STANCEStMUSTtNOTtBEtCLOSEtTO ELECTRICALtCOMPONENTS.
BEFOREtANYtMAINTENANCEtOPERATIONtORTINSPECTIONtONtTHEtVEHICLE, SHUTtOFFtTHEtENGINEtANDtREMOVE THEtKEY.tWAITtUNTILtTHEtENGINEtAND THEtEXHAUSTtSYSTEMtAREtCOLD. WHENEVERtPOSSIBLE,tLIFTtTHE VEHICLEtWITHtAtSPECIFICtEQUIPMENT ONtAtFIRMtANDtLEVELtGROUND.
BEFOREtANYtOPERATION,tMAKEtSURE THATtTHEtROOMtWHEREtYOUtAREtHAS ADEQUATEtAIRtVENTILATION.
TOTAVOIDtBURNStBEtSPECIALLYtCAREFULtWITHtHOTtENGINEtANDtEXHAUST SYSTEMtPARTS.
DOTNOTtHOLDtANYtMECHANICALtOR OTHERtVEHICLEtPARTStWITHtYOUR MOUTH:tVEHICLEtCOMPONENTStARE NOTtEDIBLE,tONtTHEtCONTRARYtSOME OFtTHEMtAREtHARMFULtANDtEVEN
UNLESS OTHERWISE INDICATED, REFIT THE UNIT FOLLOWING THE REMOVAL STEPS BUT IN REVERSE ORDER.
WHEN CARRYING OUT MAINTENANCE OPERATIONS, IT IS ADVISABLE TO WEAR LATEX GLOVES.
VERMIJDEN.
HOU NOOIT MECHANISCHE OF ANDERE DELEN VAN HET VOERTUIG IN DE MOND: GEEN ENKEL ONDERDEEL IS EETBAAR, ENKELE DELEN ZIJN INTEGENDEEL SCHADELIJK OF ZELFS GIFTIG.
N.B.
WANNEER HET NIET UITDRUKKELIJK IS BESCHREVEN, WORDT DE HERMONTAGE VAN DE GROEPEN IN OMGEKEERDE ZIN VAN DE MONTAGEHANDELINGEN UITGEVOERD.
BIJ ONDERHOUDSHANDELINGEN RAADT MEN AAN OM LATEX HANDSCHOENEN TE GEBRUIKEN.
In general terms, routine maintenance operations can be carried out by the owner; in some cases list is necessary to thus specific tools and have some technical knowledge.
Forlservicinglorltechnicalladvice, Iconsultlan Official aprilia Dealer for prompt and accurate service.
Asklyour|Official aprilia Dealer toltest|the vehiclelonlthelroadlafterla|repairlbutlnon-etheless,IpersonallylcarryloutlthelPre-ride Checks after a maintenance operation.
Adequate maintenance is fundamental to ensuring long-lasting, optimum operation and performance of your vehicle.
For this purpose, aprilia offers a set of checks and maintenance services (at the owner's expense), which are included in the summary table shown on the following page. Any minor faults should be reported without delay to any Official aprilia Dealer without waiting until the next scheduled service to solve it.
Carrying out scheduled services on time is essential to ensure your warranty validity. For further information concerning Warranty procedures and Scheduled Maintenance, please refer to the Warranty Booklet.
KAART VAN HET PERIODIEK ONDERHOUD
| Action |
| Safety locks - check |
| Throttle lever - adjustment |
| Engine oil filter - Replace |
| Electrical system and battery - Check |
| Coolant level - check |
| Brake fluid level - check |
| Engine oil - Change |
| Brake pad wear - check |
| Tyre pressure and wear - check |
| Vehicle and brake test - test drive |
| Hub oil - Change |
| Engine revs at idle speed - Adjustment. |
| Crankcase breather - empty |
| Steering - check up |
BIJt1000tKM
| Action |
| Engine oil - Level check/topping-up |
| Brake pad wear - Check |
ELKEt5000tKM
ATt10000tKM,tATt30000tKM,tATt50000tKMtANDtAT70000tKM
| Action |
| Safety locks - check |
| Spark plug - Replace |
| Driving belt - replacement |
| Throttle lever - adjustment |
| Air filter - cleaning |
| Air filter in belt compartment - Check |
| Engine oil filter - Replace |
| Valve clearance - check |
| Electrical system and battery - Check |
| Coolant level - check |
| Brake fluid level - check |
| Engine oil - Change |
| Brake pad wear - check |
BIJt10000tKMtBIJt30000tKMtBIJt50000tKMtENtBIJ70000tKM
| Handelling |
| Veiligheidsblokkeringen - controle |
| Bougie - Vervangen |
| Transmissieriem - vervanging |
| Gascommando - registratie |
| Luchtfilter - reiniging |
| Luchtfilter van de riemruimte - Controle |
| Oliefilter van de motor - Vervangen |
| Kleppenspeling - Controle |
| Elektrische installatie en accu - Controle |
| Peil van de koelvloeistof - controle |
| Oliepeil van de remmen - controle |
| Motorolie - Vervangen |
| Slijtage van de rempastilles - controle |
| Sliding block/ variable speed rollers - Replacement |
| Tyre pressure and wear - check |
| Vehicle and brake test - test drive |
| Hub oil - Check |
| Engine revs at idle speed - Adjustment. |
| Stand control roller - Replacement |
| Suspensions - Check |
| Steering - check up |
| Crankcase breather - empty |
ATt20000tKM,tATt40000tKM,tATt60000tKMtANDtAT 80000tKM
| Action |
| Safety locks - check |
| Driven pulley bushing - check |
| Spark plug - Replace |
| Driving belt - replacement |
| Throttle lever - adjustment |
| Air filter - cleaning |
| Air filter in belt compartment - Check |
| Engine oil filter - Replace |
| ProducttDescriptionSpecifications | ||
| AGIP CITY HI TEC 4T | Engine oil | API SL, ACEA A3, JASO MA |
| AGIP GEAR SYNTH SAE 75W-90 | Gearbox oil | API GL4, GL5 |
| AGIP FORK 7.5WIFork oil- | ||
| AGIP GREASE SM2 | Lithium grease with molybdenum for bearings and other points needing lubrication | NLGI 2 |
| AGIP BRAKE 4IBrake fluid | FMVSS DOT4+ | |
| AGIP PERMANENT SPEZIAL | Coolant | Biodegradable coolant, ready for use, with "long life" technology and characteristics (pink). Freezing protection up to -40° (-40°F). In compliance with the CUNA 956-16 standard. |
TABEL VAN DE AANBEVOLEN PRODUCTEN
THEtVALUEtOFtSERVICE
Thanks to continuous technical updates and specific training programs on aprilia products, only aprilia Official Network mechanics know this vehicle fully and have the special tools necessary to carry out maintenance and repair operations correctly.
The reliability of the vehicle also depends on its mechanical conditions. Checking the vehicle before riding, its regular maintenance and the use of Original aprilia Spare Parts only are essential factors!
For information about the nearest Official Dealer and/or Service Centre, consult the Yellow Pages or search directly on the inset map in our Official Website:
www.aprilia.com
Only aprilia Original Spare Parts ensure products already studied and tested during the vehicle design stage. All aprilia Original Spare Parts undergo quality control procedures to guarantee full reliability and duration.
The descriptions and illustrations given in this publication are not binding; While the basic characteristics as described and illustrated in this manual remain unchanged, aprilia reserves the right, at any time and without being required to update this publication beforehand, to make any changes to components, parts or accessories, which it considers necessary to improve the product or which are required for manufacturing or construction reasons.
Not all models shown in this publication are available in all Countries. The availability of individual models should be confirmed with the official aprilia sales network.
© Copyright 2006- aprilia. All rights reserved. Reproduction of this publication in whole or in part is prohibited. aprilia - After sales service.
aprilia trademark is property of Piaggio & C. S.p.A.
DEtWAARDEtVANTDEtASSISTENTIE
- APRILIA WOULD LIKE TO THANK YOU
- aprilia WIL U BEDANKEN
- Beschermingtvan
- Staattvanthettvoertuig
- Arrangementtoftthetmain componentst(01\_01,t01\_02)
- Legenda (01\_03)
- High-beamtwarningtlightt"2"
- Enginetoiltpressuretwarningtlightt"1"
- CAUTION
- Electronictfueltinjectiont(EFI)twarning lightt"10"
- Controlelamptvantdetelektronische benzine-injectiet(EFI)t«10»
- Controlelamp vanthettantidiefstalsysteem (immobilizer)t«11»
- Lowtfueltwarningtlightt«9»
- Digitalclockt«6»
- Speedometert«5»
- Digitalttotaltodometert«6»
- Coolantttemperaturetgauget«4»
- Indicatortvanthettbrandstofpeilt«7»
- DigitaltIcdtdisplayt(01\_05, 01\_06)
- Settingtthettotaltandttrip odometerst(01\_07,t01\_08) DIGITALtODOMETER
- PERIODIEKtONDERHOUD.
- NOTE
- OPNULSTELLINGtVANTHETtHODOGRAM PARTIEEL
- Regelingtvantdetklok:
- Keytswitcht(01\_10)
- Inschakelingtvanthet stuurslot
- Drukknoptclaxont(01\_12)
- ACTIVATION
- DEACTIVATION
- Inschakelknoptalarmlichten (01\_14)
- Startknopt(01\_15)
- Fuelttankt(01\_17)
- Benzinetankt(01\_17)
- Powertsupplytsocket (01\_18)
- Stopcontactt(01\_18)
- Hettzadelt(01\_19)
- Chassistnumber
- Identificatiet(01\_20,t01\_21)
- Motornummer
- Rearttoptboxtopening (01\_22)
- Penentvantdetkoffertvoor (01\_22)
- PROVIDEtAtSUPPORTtWITHtAtSuitABLE HEIGHTtANDtBASEtT0tSAFELYtHOLD THEtVEHICLE.
- Controlest(02\_01,t02\_02, 02\_03)
- Controletvantdetstuurinrichting
- Enginetfulcrumtaxistcheck
- Controletvantdetdraaipuntastvantde motor
- LET OP
- Characteristic
- Bandenspanningt(02\_04)
- LETtOP
- Shocktabsorbertadjustment (02\_05,t02\_06)
- Regelingtvantde schokdemperst(02\_05, 02\_06)
- Inrijden
- Hettstilleggentvantdetmotor (02\_14,t02\_15)
- DOtNOTtLEAVEtTHEtKEYt"2"tINSERTED INtTHEtIGNITIONTSWITCH.
- Katalysator
- Standt(02\_16,t02\_17,t02\_18)
- CENTREtSTAND
- SIDEtSTAND
- Standaardt(02\_16,t02\_17, 02\_18)
- CENTRALEtSTANDAARD
- Standtchecking
- Tipsttegentdiefstal
- MAINtSAFETYtRULES
- FUNDAMENTELEtVEILIGHEIDSREGELS
- KLEDING
- ACCESSOIRES
- BELASTING
- Peiltvantdetmotorolie
- Controletvanthettpeil (03\_01,t03\_02)
- Vervangingtvantdetolie (03\_04,t03\_05,t03\_06)
- Recommended product:
- Bijvulling
- Vervangingtvantdetolietvantde transmissie
- Banden (03\_10, 03\_11)
- BANDEN
- Sparktplugtdismantlement (03\_12,t03\_13,t03\_14, 03\_15)
- Demonterentvantdetbougie (03\_12,t03\_13,t03\_14, 03\_15)
- Reinigingtvantdetluchtfilter
- Coolingtfluidtlevelt(03\_18, 03\_19)
- Peiltvantdetkoelvloeistof (03\_18,t03\_19)
- Recommendedtproducts
- AGIPtPERMANENTtSPEZIAL
- Checkingtthetbraketoiltlevel (03\_20,t03\_21)
- Controletvanthettoliepeil vantdetremment(03\_20, 03\_21)
- CHECKING
- BATTERY COVER REMOVAL
- CHECKING AND CLEANING LEADS AND TERMINALS
- CONTROLE EN REINIGING VAN DE TERMINALS EN VAN DE KLEMMEN
- VERWIJDERING VAN DE ACCU
- HETtOPLADENTVANtDEtACCU
- nieuwetaccu
- Langetstilstand
- Totcarrytoutthetcheck:
- Fronttlighttgroupt(03\_28, 03\_29,t03\_30)
- Regelingtvantdetkoplamp (03\_31,t03\_32)
- Fronttdirectiontindicators (03\_33,t03\_34,t03\_35, 03\_36)
- PROCEED WITH CAUTION.
- DO NOT DAMAGE THE TABS AND/OR THEIR CORRESPONDING SLOTS.
- PROCEEDWITHtCAUTION.
- DOTNOTtDAMAGETHEtTABSTAND/OR THEIRtCORRESPONDINGtSLOTS.
- Reartturntindicatorst(03\_39)
- Nummerplaatlichtt(03\_40, 03\_41)
- Helmetcompartment lightingtbulbt(03\_42)
- PRODUCTtVANtHOGEtKWALITEIT.
- Padstweartcheck
- THE FOLLOWING INFORMATION REFERStT0tONEtBRAKINGtCIRCUITtBUT APPLIESTOtBOTH.
- Controletvantdetslijtagetvantdetpastilles
- Fronttbraketcallipers
- CHECKtBRAKEtPADStFORtWEAR MAINLYtBEFOREtEACHtRIDE.
- Reartbraketcalliper
- Achterstetremtang
- Stilstandtvanthettvoertuig (03\_48,t03\_49)
- AFTER STORAGE
- Reinigentvanthettvoertuig
- SCOOTER CLEANING TIPS
- N.B.
- Transport
- Vervoer
- Kittequipment(04\_01)
- KAART VAN HET PERIODIEK ONDERHOUD
- THEtVALUEtOFtSERVICE
- www.aprilia.com
- DEtWAARDEtVANTDEtASSISTENTIE
Brand : APRILIA
Model : Scarabeo 400 (2006)
Category : Scooter