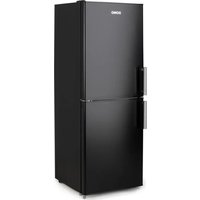
DO91201 - Fridge DOMO - Free user manual and instructions
Find the device manual for free DO91201 DOMO in PDF.


| Brand | Domo |
| Model | DO91201 |
| Product type | Refrigerator |
| Climate class | SN (10°C to 32°C), N (16°C to 32°C), ST (16°C to 38°C), T (16°C to 43°C) |
| Refrigerant | R600a (isobutane) |
| Lighting | LED (not user-replaceable) |
| Power supply | 220-240 V ~ 50/60 Hz |
| Main functions | Super Cool, Eco, Child lock, Open door alarm, Automatic defrost |
| Temperature setting | 2 °C to 8 °C (36 °F to 46 °F) |
| Display | Touch screen with backlight |
| Fresh zone | Extra fresh drawer (2 to 4 °C below the rest) |
| Accessories | Adjustable shelves, vegetable drawer, extra fresh drawer, door balconies, bottle holder |
| Door opening direction | Reversible (professional installation recommended) |
| Adjustable feet | Yes (with rollers for forward/backward movement) |
| Maintenance and cleaning | Soft cloth with warm water and mild detergent; do not use abrasive products |
| Safety | Flammable refrigerant; do not use multi-socket; ensure ventilation; child lock |
| Warranty | 2 years (accessories and wear parts: 6 months) |
| Customer service | info@linea2000.be - +32 14 21 71 91 |
| Important note | Let stand for 24 hours after installation before powering on |
Frequently Asked Questions - DO91201 DOMO
User questions about DO91201 DOMO
0 question about this device. Answer the ones you know or ask your own.
Ask a new question about this device
Download the instructions for your Fridge in PDF format for free! Find your manual DO91201 - DOMO and take your electronic device back in hand. On this page are published all the documents necessary for the use of your device. DO91201 by DOMO.
USER MANUAL DO91201 DOMO
natural_image
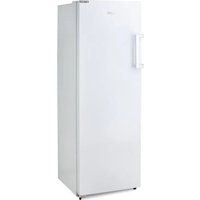
White refrigerator with handle and front panel, no visible text or symbols on bodyDO91201
| Handleiding Koelkast | |
| Mode d'emploi Réfrigérateur | |
| Gebrauchsanleitung Kühlschrank | |
| Instruction booklet Refrigerator | |
| Manual de instrucciones Frigorífico | |
| Istruzioni per l'uso Frigorifero | |
| Návod k použití Lednice | |
| Návod na použitie Chladnička | |
natural_image
Two black-and-white icons: a warning triangle with an exclamation mark and an open book with stacked books (no text or symbols)INSTALLATIE
RUBBEREN STEUNVOET
natural_image
Technical line drawing showing a mechanical assembly with an inset close-up of a component detail (no text or symbols)natural_image
Technical line drawing showing a screw fastener inserted into a base, and a separate view of a laptop with a handle (no text or symbols)natural_image
Illustration of six different screwdriver tools (no text or labels)natural_image
Line drawing of a simple desk setup with a flat surface and two small rectangular objects on the side (no text or symbols)natural_image
Simple line drawing of a rectangular frame with two small square cutouts and four corner connectors (no text or symbols)natural_image
Pure technical line drawing of a structural frame with mounting points (no text or symbols)natural_image
Illustration of two hands holding a cylindrical object with upward arrows indicating motion or force (no text or symbols)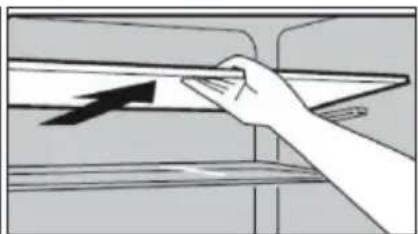
natural_image
Hand placing a rectangular object with an arrow on its surface, no text or symbols visible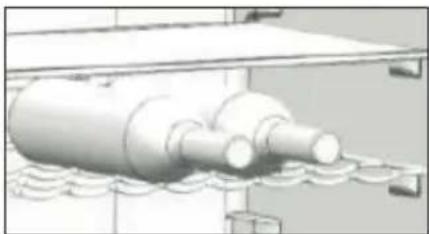
natural_image
Illustration of a cylindrical mechanical component with multiple protrusions mounted on a base, enclosed in a transparent enclosure (no text or symbols visible)VERSHOUDLADE
APPARAAT VERPLAATSEN
natural_image
Technical line drawing of a mechanical assembly with a magnified circular detail (no text or symbols)PROBLEMEN EN HUN OPLOSSINGEN
natural_image
Recycling symbol icon with three chasing arrows forming a triangle (no text or labels)PIED DE SUPPORT EN CAOUTCHOUC
natural_image
Diagram showing a mechanical assembly with an inset close-up of a component, before and after assembly (no text or symbols)natural_image
Technical line drawing showing a screw fastener inserted into a base plate and a separate view of a laptop with a handle (no text or symbols)CHANGEMENT DU SENS D'OUVERTURE DE LA PORTE
natural_image
Line drawings of five different screwdriver tools (no text or symbols)natural_image
Simple line drawing of a rectangular object with two small square components on top and a side panel attached (no text or symbols)natural_image
Simple line drawing of a rectangular frame with two small square cutouts and mounting brackets (no text or symbols)natural_image
Pure technical line drawing of a structural frame with mounting brackets (no text or symbols)natural_image
Illustration of two hands holding a cylindrical object with upward arrows indicating motion or force (no text or symbols)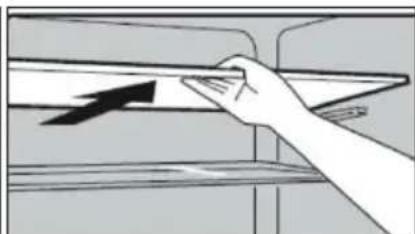
natural_image
Hand placing a black arrow on a shelf against a gray background (no text or symbols)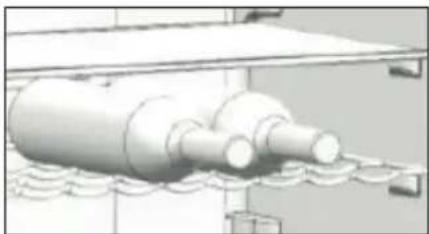
natural_image
3D rendering of a cylindrical mechanical component with multiple protrusions, mounted on a platform (no text or symbols visible)TIROIR EXTRA FRAIS
natural_image
Technical line drawing of a mechanical assembly with a magnified circular detail (no text or symbols)PROBLÈMES ET LEURS SOLUTIONS
natural_image
Recycling symbol icon with three chasing arrows forming a triangle (no text or labels)ANSCHLUSS
GUMMISTÜTZFUSS
natural_image
Diagram showing a device with a close-up view of its internal components, before and after assembly (no text or symbols present)natural_image
Technical line drawing showing a screw fastener inserted into a base plate and a separate view of a mechanical component (no text or symbols)natural_image
Line drawings of screwdrivers, wrench, and clamp tools (no text or symbols)natural_image
Line drawing of a rectangular frame with two small rectangular cutouts and a flat base, no text or symbols present.natural_image
Simple line drawing of a rectangular frame with two small square cutouts and four small protrusions at the top (no text or symbols)natural_image
Pure technical line drawing of a rectangular frame with mounting brackets and small protrusions (no text or symbols)natural_image
Illustration of two hands holding a cylindrical object with upward arrows indicating motion or force (no text or symbols)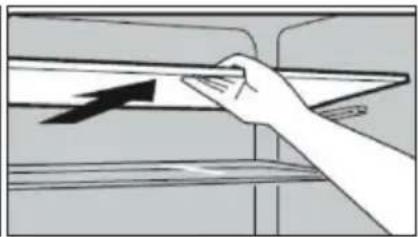
natural_image
Hand placing a white object on a surface with an arrow symbol (no text or labels)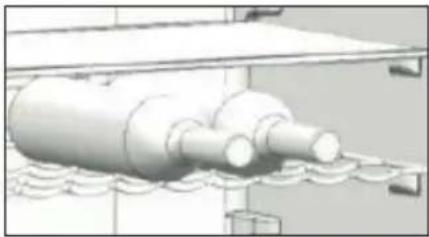
natural_image
3D rendering of a cylindrical mechanical component with multiple protrusions, mounted on a platform (no visible text or symbols)EXTRA FRESH SCHUBLADE
natural_image
Technical line drawing of a mechanical assembly with a magnified circular detail (no text or symbols)natural_image
Recycling symbol icon with three arrows forming a triangle (no text or labels)All of our products are always submitted to a strict quality control before they are sold to you.
Should you nevertheless experience problems with your device, we sincerely regret this.
In that case, we kindly request you to contact our customer service.
Our staff will gladly assist you.

+32 14 21 71 91

info@linea2000.be
Monday – Thursday: 8.30 – 12.00 and 13.00 – 17.00
Friday: 8.30 - 12.00 and 13.00 - 16.30
This appliance has a two year warranty period. During this period the manufacturer is responsible for any failures that are the direct result of construction failure. When these failures occur the appliance will be repaired or replaced if necessary. The warranty will not be valid when the damage to the appliance is caused by wrong use, not following the instructions or repairs executed by a third party. The guarantee is issued with the original till receipt. All parts, which are subject to wear, are excluded from the warranty. If your device breaks down within the 2-year warranty period, you can return the device together with your receipt to the shop where you purchased it.
The guarantee on accessories and components that are liable to wear-and-tear is only 6 months.
The guarantee and responsibility of the supplier and manufacturer lapse automatically in the following cases:
- If the instructions in this manual have not been followed.
· In case of incorrect connection, e.g. electrical voltage that is too high.
· In case of incorrect, rough or abnormal use.
· In case of insufficient or incorrect maintenance.
· In case of repairs or alterations to the device by the consumer or non-authorised third parties. - If the customer used parts or accessories that are not recommended or provided by the supplier / manufacturer.
SAFETY INSTRUCTIONS
When using electrical appliances, basic safety precautions should always be taken, including the following:
- Read all instructions carefully. Keep this manual for future reference.
• Make sure all packaging materials and promotional stickers have been removed before using the appliance for the first time. Make sure children cannot play with the packaging materials.
- This appliance is intended to be used in household and similar applications such as:
· staff kitchen areas in shops, offices and other working environments;
· farm houses;
- by clients in hotels, motels and other residential type environments;
- bed and breakfast type environments.
- Children should be supervised to ensure that they do not play with the appliance.
- This appliance can be used by children aged from 16 years and above and persons with reduced physical, sensory or mental capabilities or lack of experience and knowledge if they have been given supervision or instruction concerning use of the appliance in a safe way and understand the hazards involved.
· Children shall not play with the appliance. - Cleaning and user maintenance shall not be made by children unless they are older than 16 or supervised.
- Keep the appliance and its cord out of reach of children younger than 16 years.
- All repairs should be carried out by the manufacturer or its aftersales service.
· Make sure that children do not touch the cord or appliance.
· Your appliance uses isobutane (R600a) as a refrigerant.
Despite the fact that R600a is an environmentally friendly and natural gas, it is highly flammable. Therefore you should be careful during shipment and installation to prevent your appliance's cooler elements from being damaged. In the event of a leak caused by damage to the cooler elements, move your refrigerator from open flames or heat sources and ventilate the room where the appliance is located for a few minutes.
▲ELECTRICAL WARNINGS
- Attention: This appliance cannot be used with an external timer or a separate remote control.
- Before use, check carefully that the electric tension and frequency of the power net at your home match the indications on the rating label of the appliance.
- The appliance must be plugged into an appropriate outlet that is installed and grounded in accordance with local installation regulations.
-
Do not let the cord hang on a hot surface or on the edge of a table or counter top.
-
Never use the appliance when the cord or plug is damaged, after malfunction or when the appliance itself is damaged. In that case, take the appliance to the nearest qualified service center for check-up and repair.
- It is prohibited to alter or modify the device and its specifications.
- When disposing of the appliance, remove the plug from the power socket, cut the power cord (as closely as possible to the appliance), and remove the door to prevent playing children getting an electrical shock or shutting themselves in the appliance.
- The lamp in the appliance is intended for use in this cooling device only. Do not use the lamp as a household light.
- Unplug the appliance when it is not in use, before assembling or disassembling any parts and before cleaning the appliance. Put all buttons and knobs into the 'off' position and unplug the appliance by grasping the plug. Never unplug by pulling the cord.
⚠️INSTALLATION
- Never place this appliance near a gas stove or electrical stove or in a place where it may come into contact with a warm appliance.
· Always use the appliance on a steady, dry and level surface. - Keep the cord away from sharp edges and hot parts or other heat sources.
- Keep the ventilation openings free of obstructions.
- The appliance may not be used with an extension lead or a multiple socket.
· Avoid long exposure to direct sunlight.
· Make sure that you have access to the plug of the appliance. - Make sure the plug and cord are not crushed or damaged by the back of the appliance. This can cause short circuits and, as a result, overheating and fire.
· This is a heavy appliance. Be careful when moving it.
· This cooling unit is not intended for use as a built-in appliance. - Do not place a power strip or other portable power supply behind the appliance.
- After installation, it is advisable to wait 24 hours before connecting the appliance to allow the oil to flow back in the compressor.
⚠ USE
· Do not use the appliance outdoors.
· Only use the appliance for its intended use.
- Only use the appliance for domestic use. The manufacturer can not be held responsible for accidents that result from improper use of the appliance or not following the instructions described in this manual.
- Do not use any other electrical appliance inside the refrigerator, unless they are approved for this purpose by the manufacturer.
- Do not keep any explosive substances inside the appliance, like for instance aerosol cans with a flammable propellant.
· Do not use the appliance without a lamp.
- The use of accessories that are not recommended or sold by the manufacturer can cause fire, electrical shock or injuries.
- Ensure the food in the appliance does not touch the back wall.
- Follow the instructions below to prevent contamination of food:
- Keeping the door open for long periods may cause the temperature in the compartments of the appliance to rise considerably.
- Clean the surfaces that could come into contact with food regularly.
- If the appliance is left empty for longer periods, it should be turned off and cleaned. Allow it to dry and leave the door ajar to prevent mould from growing in the appliance.
⚠ CLEANING AND MAINTENANCE
- Never immerse the appliance, the cord or the plug in water or any other liquid.
· Do not place warm or hot objects on top of the appliance.
· Do not clean the appliance with anything made of metal. - Make sure that the refrigerant circuit does not get damaged, for instance during transportation or installation.
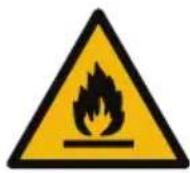
- WARNING! Never place this appliance on or in the neighbourhood of a gas or electric fire or in a place where it could come into contact with a heat source. There are flammable materials located on the back of the appliance.
· Pay attention to the symbol 'Fire risk – flammable materials' located on the back of the appliance.
SAVE THESE INSTRUCTIONS FOR FUTURE REFERENCE
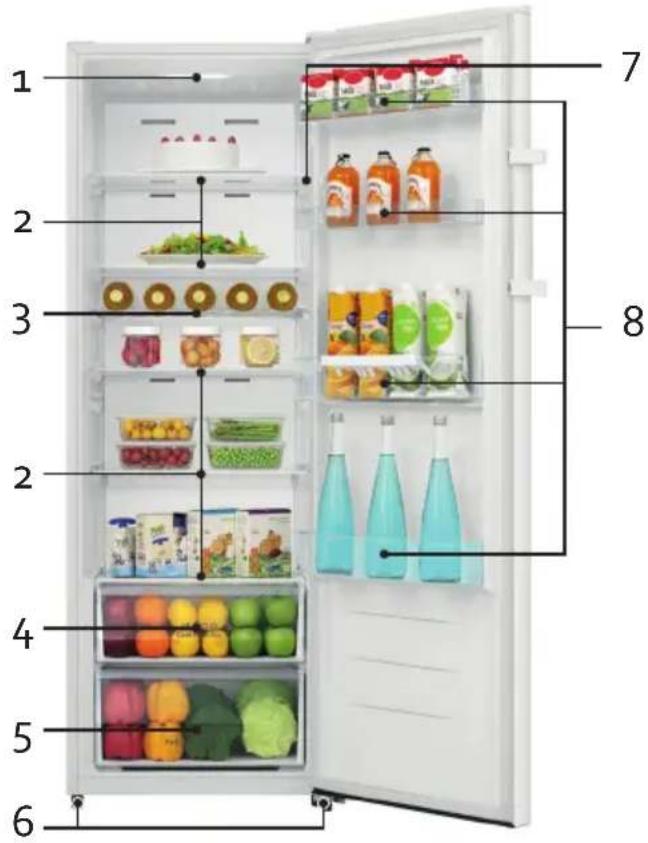
PARTS
- LED lighting
- Shelves
- Bottle rack
- Extra fresh drawer
- Vegetable container
- Levelling feet
- Display
- Door shelves
INSTALLATION
- Remove the exterior and interior packing, wipe the outside thoroughly with a soft dry cloth and the inside with a wet, lukewarm cloth. Dry the appliance off well.
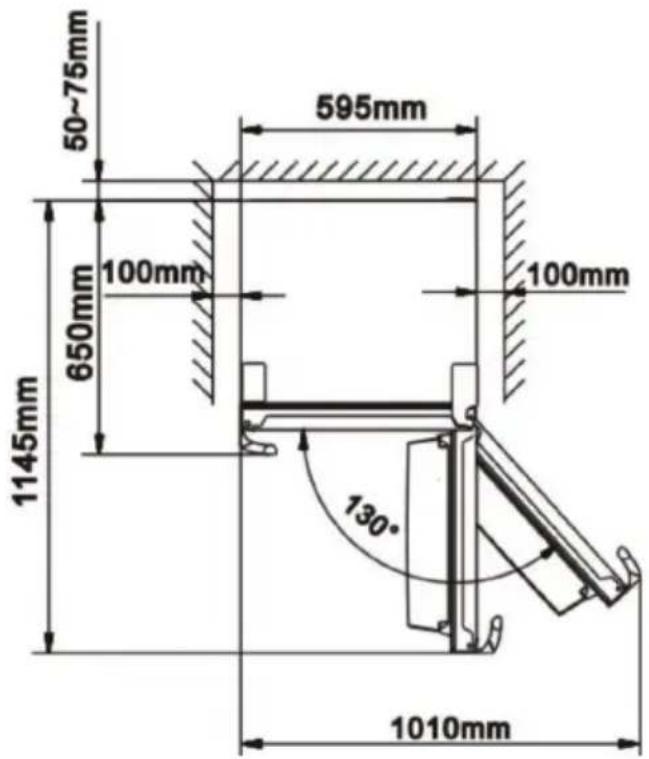
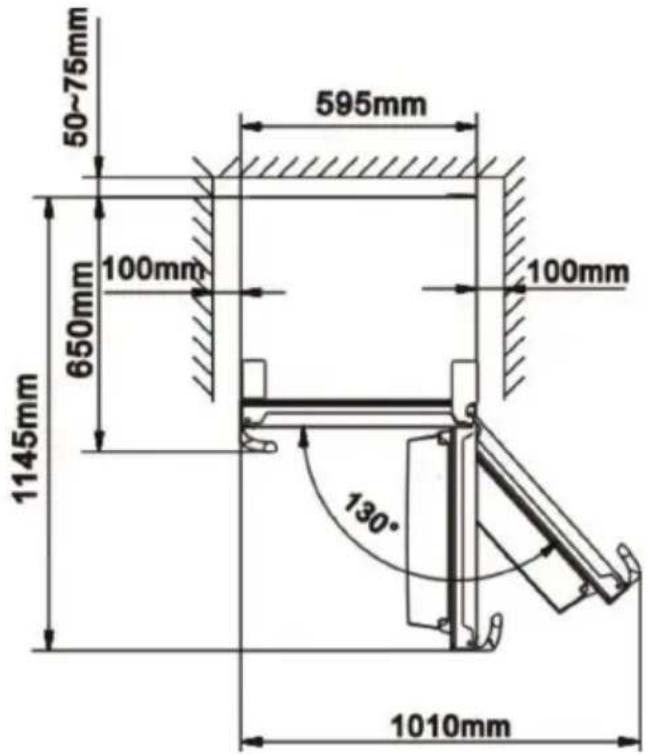
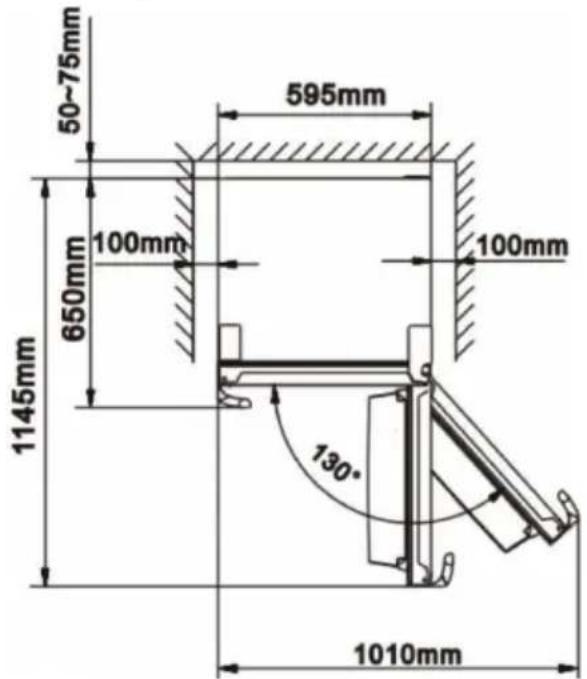
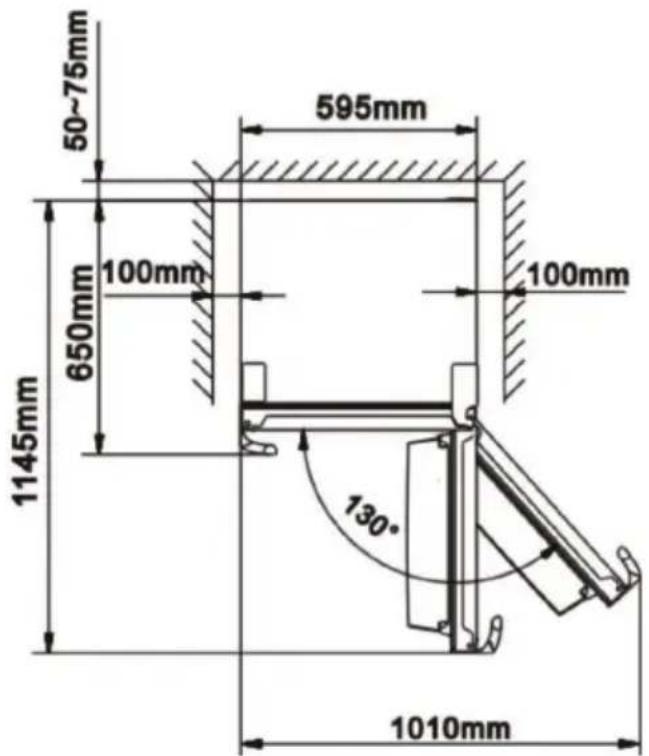
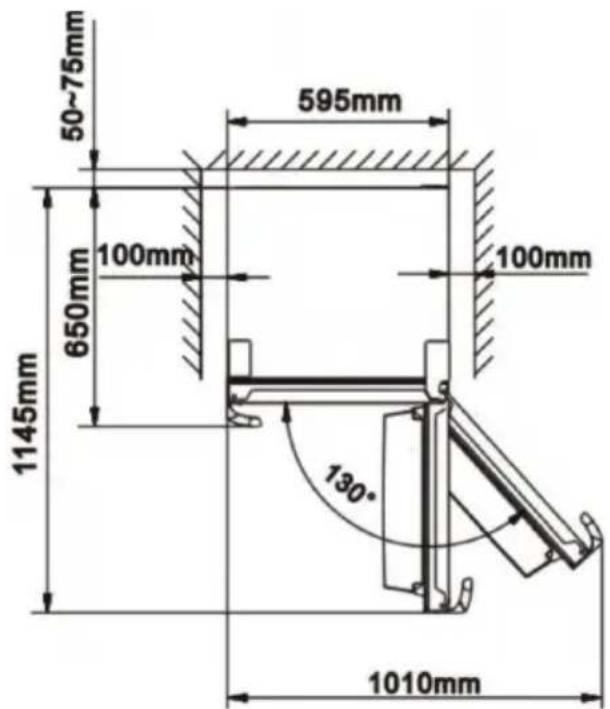
- Let air circulate freely around the cabinet.
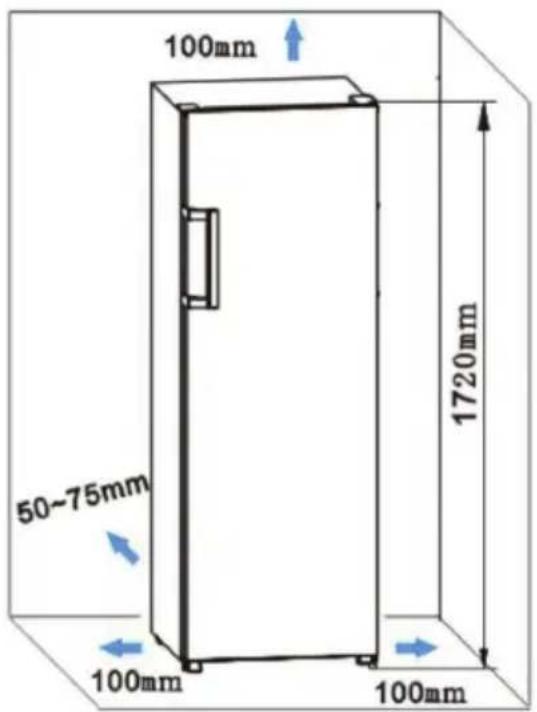
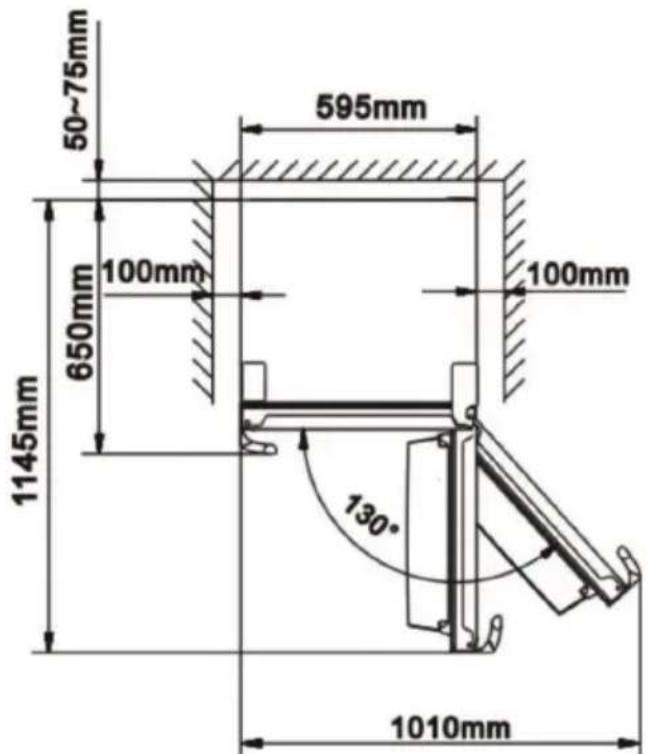
· Make sure there is sufficient space to open the door.
· This cooling unit is not intended for use as a built-in appliance.
- Select a place with a strong, level floor.
- Avoid direct sunlight and heat. Direct sunlight may affect the acrylic coating. Heat sources nearby will cause higher electricity consumption.
- Avoid very moist places. Too much moisture in the air will cause frost to form very quickly on the evaporator, and your refrigerator.
- Before connecting your refrigerator to the power supply, check that the voltage stated on the rating label of your appliance corresponds to the voltage in your home. A different voltage could damage the appliance.
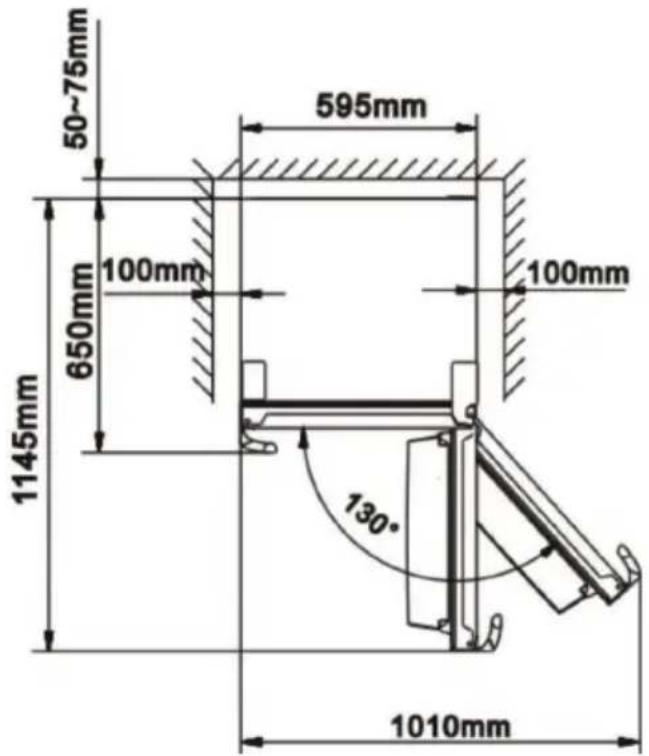
· After installation, leave the fridge for 24 hours before turning it on. This way the refrigerant can settle.
- Allow the appliance to run empty for 8 hours so the compartment can cool to the appropriate temperature.
- One can level the appliance using the adjustable legs. The adjustable legs can be adjusted by screwing them in or out of the appliance.
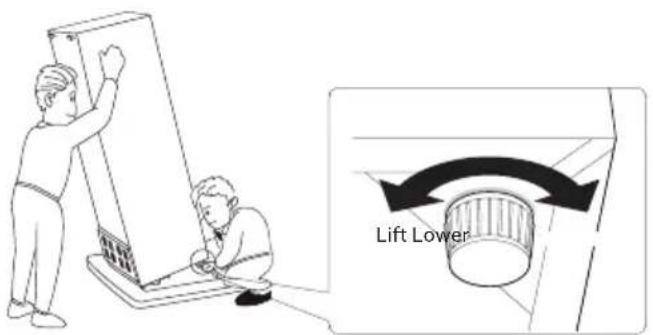
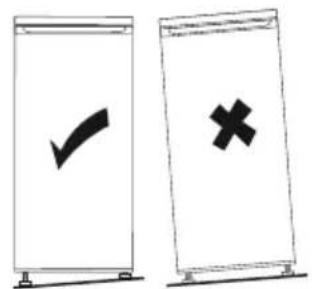
- The rollers are not wheels. They must only be used to move the appliance forwards or backwards. If the fridge is moved sideways, it could damage the floor and rollers.
The climate class indicates the minimum and maximum ambient temperature for the proper operation of an appliance. You can find the climate class on the type plate on the back of the appliance.
· SN: Subnormal: ambient temperature between 10°C and 32°C
· N: Normal: ambient temperature between 16°C and 32°C
- ST: Subtropical: ambient temperature between 16°C and 38°C
· T: Tropical: ambient temperature between 16°C and 43°C
- Install the handle.
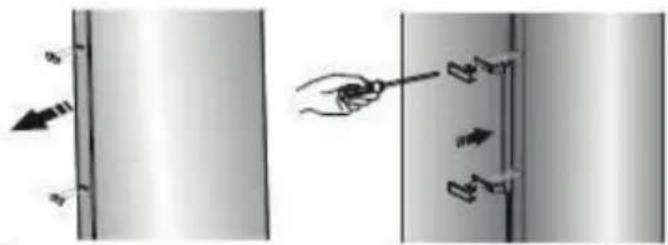
natural_image
Diagram showing a hand holding a tool interacting with a cylindrical object, with arrows indicating direction (no text or symbols present)RUBBER SUPPORT FOOT
If the refrigerator is (almost) empty and pressure is put onto the open door, the appliance may tip forward. You can fasten the rubber support foot to the bottom of the door to steady the appliance and to prevent the door from getting damaged.
- Disconnect the mains plug from the mains socket.
- Carefully tip the appliance backward so that the hole for the rubber support foot can be reached.
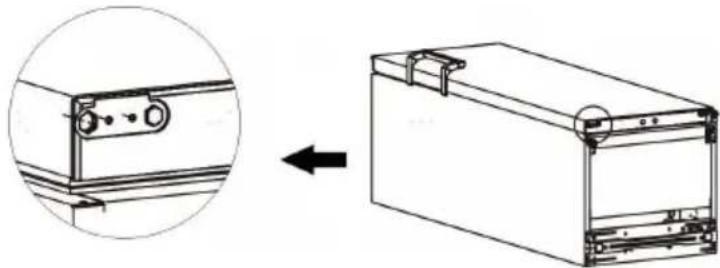
natural_image
Diagram showing a mechanical assembly with an inset close-up of a component, before and after assembly (no text or symbols)Attention: the inclination of the refrigerator must be less than 45^ so that the compressor oil does not enter the cooling circuit. If you do shut down the unit completely, wait 8 hours before turning it back on.
- Put the supplied screw into the opening of the rubber support foot and fix the rubber support foot in the hole at the bottom of the door with a cross-tip screwdriver.
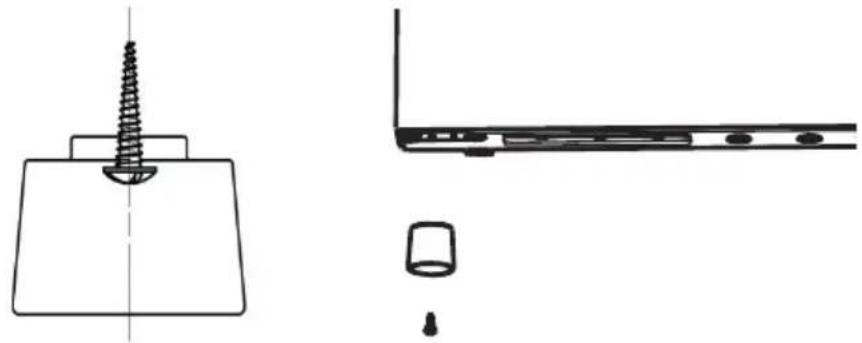
natural_image
Technical line drawing showing a screw fastener inserted into a base, and a close-up of the device's front panel with a handle (no text or symbols)DOOR CONVERSION
If you need to hinge your door on the opposite side, it is recommended that you call your local authorised service agent to make this conversion or ask a technician. Before you reverse the door, you should ensure the appliance is unplugged and empty.
It is recommended to use a crosshead screwdriver, a flathead screw-driver, a putty knife, a socket wrench (8 mm) and a wrench (8 mm) (not supplied).
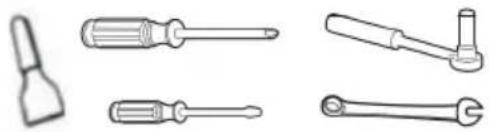
natural_image
Illustration of six different screwdriver tools (no text or labels)-
Remove the door racks to prevent damaging them.
-
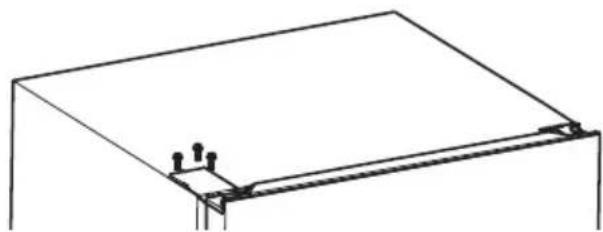
Remove the top hinge cover plates.
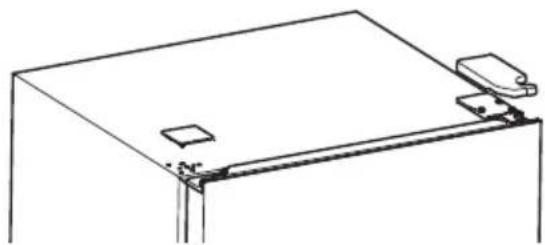
natural_image
Simple line drawing of a desk with two small objects on top (no text or symbols)- Loosen the screws of the top hinge and remove the hinge.
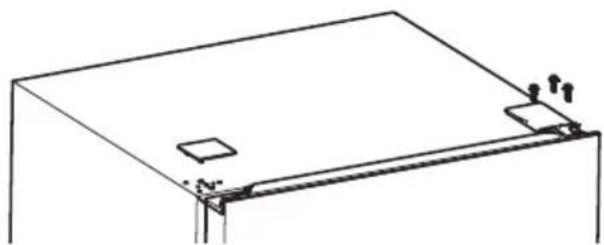
natural_image
Simple line drawing of a rectangular frame with two small square cutouts and mounting brackets (no text or symbols)-
Lift the door and place it on a padded surface to prevent it from being scratched.
-
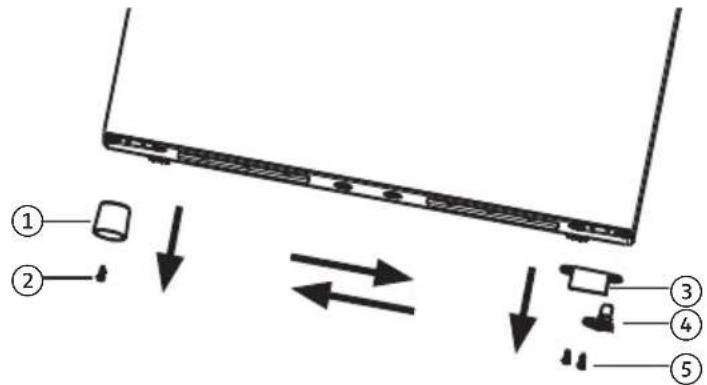
Loosen the screws ② and ⑤ at the bottom of the door, then remove the support foot ①, the stop block ④ and the door stop ③ from the bottom. Attach the support foot ① to the right side with the screw ②. Replace the door stop ③ and stop block ④ on the left side, and tighten the screws ⑤ firmly.
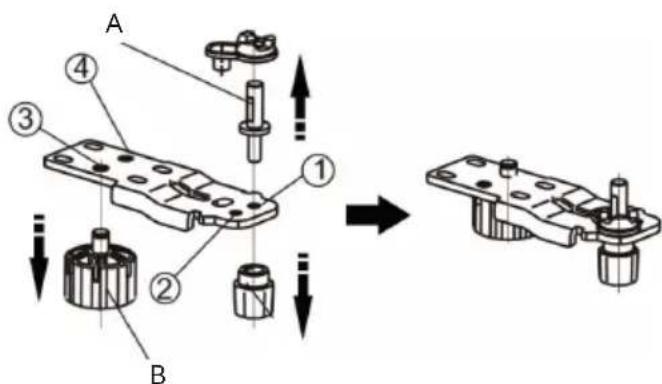
- Carefully tilt the device backwards. Loosen the bottom hinge ③ + ④. Remove the screw cover cap ① and the levelling foot ② from the left side, and attach to the right side.
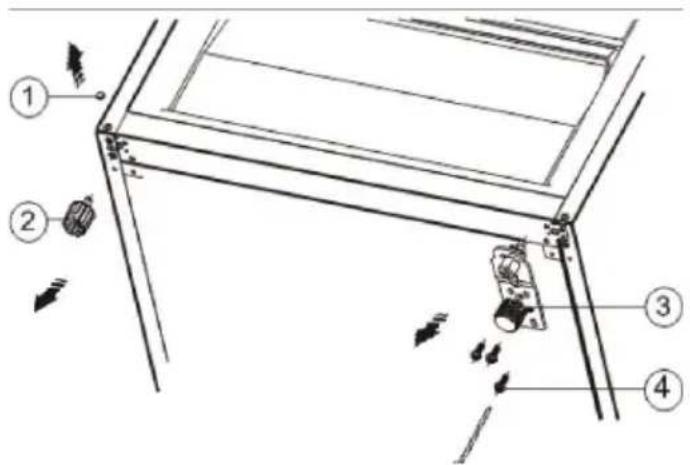
Attention: the inclination of the refrigerator must be less than 45^ so that the compressor oil does not enter the cooling circuit. If you do shut down the unit completely, wait 8 hours before turning it back on.
- Move the hinge shaft (A) from hole ① to ②. Move the levelling foot (B) from hole ③ to ④. Install the bottom hinge on the left side of the appliance.
-
Remove the rubber seal from the door, turn it over, and refit it. Refit the door.
-
Screw the top hinge back on. Ensure the door is aligned horizontally and that the door seal closes completely.
natural_image
Pure technical line drawing of a structural frame with mounting brackets and supports (no text or symbols)-
Replace the hinge cover plates.
-
Move the handle from the left side to the right side.
USE
CONTROL PANEL
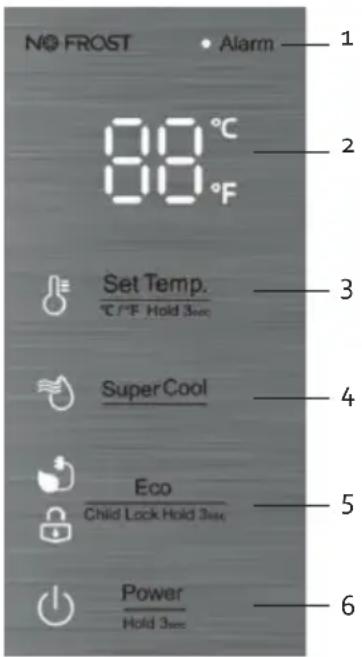
When the device is switched on for the first time, the icon backlighting on the display illuminates. If no buttons are pressed and the door is closed, the backlight is switched off.
-
Alarm warning light
-
Display: temperature
Touch screen buttons
- Set Temp.: Temperature of fridge
- Super Cool: enable or disable super mode
- Eco/Lock: enable or disable eco mode + lock/unlock child safety
- Power: on-off button
ON/OFF
Press the on-off key to switch the appliance on or off.
- Press key "Power" for 3 seconds. A buzzer sounds and the appliance is switched on.
- Press key "Power" for 3 seconds. A buzzer sounds and the appliance is switched off. The symbol lights up and - - appears on the display.
TEMPERATURE CONTROL
The temperature you set is the average temperature in the entire appliance. Temperatures in each compartment may therefore differ slightly from the temperatures displayed on the panel.
The running time and temperature are affected by where the fridge is located, how often the door is opened and the temperature of the room the fridge is located in.
- The temperature can be displayed in Celsius or Fahrenheit. To switch between these, press the "Set Temp." button for 3 seconds.
- The temperature of the fridge can be set between 2 and 8^ (36-46 °F). Under normal conditions, it is best to select 4^ . Press "Set Temp." button (temperature fridge) and continue to press until the desired temperature is displayed.
SUPER MODE
- Select this function if the standard temperature does not cool sufficiently. For example: with extremely hot weather, if the doors are opened often, with a high environmental temperature, etc.
- Selecting this function will lower the temperature to 2^ (36°F) for 6 hours.
- This function is switched off automatically after the time has elapsed. The previously set temperature will once again be maintained.
· This function can be turned on and off with the "Super Cool" button. The symbol lights up.
Note: when selecting this function, the unit will make more noise. This is normal.

ECO MODE
This function helps save energy during those periods when the appliance is used irregularly, such as, for example, during vacations.
- By selecting this function, the refrigerator temperature is set to 6^ . (43°F).
· You can turn this function on and off with the "Eco" button. The symbol lights up.

CHILD SAFETY LOCK
The child safety lock automatically blocks the buttons for safety. The control panel will automatically lock after 20 seconds.
· To unlock the panel, press the "Eco" button for 3 seconds.
· Hold down the "Eco" button for 3 seconds to lock the panel. The symbol 🔒 lights up.
ALARM
If the refrigerator door remains open for 2 minutes, you will hear a signal. "dr" appears in the display, and the alarm warning light flashes. This alarm is a warning so that you do not accidentally leave the door open and spoil your food. The alarm stops as soon as the door is closed again. If the door is still open after 10 minutes, the alarm will be deactivated.
STORAGE GUIDE
For the best storage, set up your refrigerating appliance as follows:
| Refrigerator compartment Type of food | |
| Door rack · Food with natural preservatives such as jams, juices, drinks, spices, etc. · Do not store food with a limited shelf life here | |
| Crisper drawer · Fruits, herbs, and vegetables | · Do not refrigerate bananas, onions, potatoes, or garlic |
| Middle shelf Dairy and eggs | |
| Top shelf Food that does not need to be cooked, such as ready-made meals, leftovers, spreads, etc. |
SHELVES AND DOOR RACK
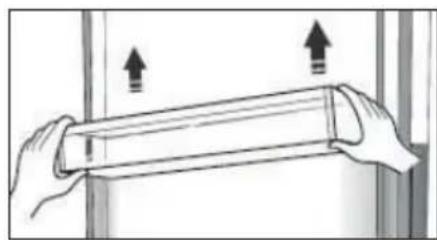
· Empty the fridge before moving the shelves or the door racks.
· To move a shelf, raise it and pull it towards you.
To remove a door rack, grip it firmly with 2 hands. Raise the door rack and pull it towards you.
natural_image
Illustration of hands holding a cylindrical object with upward arrows indicating motion or force (no text or symbols)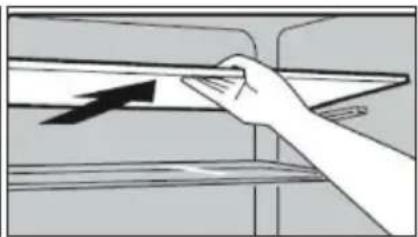
natural_image
Hand placing a black arrow on a shelf (no text or symbols visible)
natural_image
3D rendering of a cylindrical mechanical component with flanged ends and wavy base, no visible text or symbolsEXTRA FRESH DRAWER
The fridge has a zone for fresh produce, which is perfect for keeping fruit and veg and food with a limited shelf life, such as fish and meat, fresh for longer. This is a separate drawer in which the temperature is always about 2 to 4 °C lower than in the rest of the fridge.
LIGHTING
The lighting in the fridge is a LED light. LED lights are more ecological and manufactured for a long life. For this reason, these may not be replaced. If there is a problem with the lighting, contact a qualified service centre in your area.
MOVING YOUR APPLIANCE
If the appliance is turned off for any reason, wait for 10 minutes before turning it back on. This will allow the refrigeration system pressures to equalise before restarting.
- Turn off the appliance and unplug it from the mains socket. Remove all food. Also remove all mobile parts (shelves, accessories, etc.) or fix them into the fridge to avoid any shock.
- Relocate and install. If the appliance has been left on its side for any length of time, leave it standing upright for at least 10 minutes before turning on.
STORING FOOD IN THE FRIDGE
The fridge helps to extend the storage times of fresh perishable foods.
Fresh food care for best results:
- Store foods that are very fresh and of good quality.
- Ensure that food is well wrapped or covered before it is stored. This will prevent food from dehydrating, deteriorating in colour or losing taste and will help maintain freshness. It will also prevent odour transfer.
- Make sure that strong smelling foods are wrapped or covered and stored away from foods such as butter, milk and cream which can be tainted by strong odours.
- Cool hot foods down before placing them in the fridge.
VACATION TIME
For short vacation periods, leave the control knobs at their usual settings. During longer absences:
- Remove all foods.
- Disconnect from electrical outlet.
- Clean the refrigerator thoroughly, including defrost pan.
· Leave the door open to avoid possible formations of condensate, mould or odours.
POWER FAILURE
Most power failures are corrected within an hour or two and will not affect your refrigerator temperatures. However, you should minimize the number of door openings while the power is off.
During power failures of longer duration, take steps to protect your food by putting dry ice on top of packages.
SOME IMPORTANT RULES FOR THE CORRECT USE OF THE REFRIGERATOR
- Never place hot foods in the refrigerator.
-
Beverages should be stored in sealed containers.
-
Foods to be stored for a long time should be wrapped in cellophane or polyethylene foil, or kept in glass containers.
- Never place spoiled foods in the cabinet.
- Don't overload the cabinet.
- Don't open the door unless necessary.
- Caution: please keep the products away from fire or similar glowing substances before you dispose of the refrigerator.
- Caution: Not for outer camping use (e.g. in a tent).
- Caution: For indoor use only.
- Caution: The appliance can not be used in public transportation.
- Keep all accessories, such as shelves, door racks, and drawers, in the appliance to minimise energy consumption.
- Please read the storage instructions on the food packaging. Always check the storage date.
- An empty fridge consumes more energy. After all, when the door is opened, warm air enters the space and needs to be cooled. More air enters when there are fewer products, meaning that more energy needs to be consumed to cool that air. So fill your fridge properly or choose a model sized for your needs.
CLEANING AND MAINTENANCE
- Do not use abrasive cleaning agents or solvents.
- Turn the appliance off. Disconnect the mains plug from the mains socket.
· Take out the food and store in a cool location. - Clean the appliance with a soft cloth, warm water and detergent.
- Wipe the door seal with clear water only and then wipe dry thoroughly.
· After cleaning, put the plug in the socket and set the desired temperature. - Put the food back into the appliance.
DEFROSTING THE REFRIGERATOR
The refrigerator defrosts fully automatically.
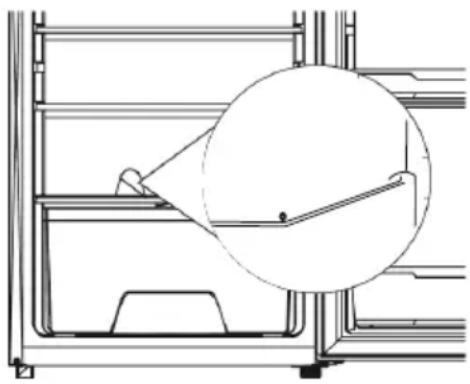
While the cooling is running, beads of condensation or hoarfrost form at the back of the refrigerator. This is normal. It is not necessary to wipe off the condensation or frost. The rear panel defrosts automatically. The condensation runs into the condensation channel and is conveyed to the compressor from where it evaporates.
Note: Keep the condensation channel and drainage hole clean, so that the condensation can run out.
natural_image
Technical line drawing of a mechanical assembly with a magnified circular detail (no text or symbols)TROUBLE SHOOTING
Frequently, a problem is minor and a service call may not be necessary, use this trouble shooting guide for a possible solution.
Does not work
- Check connection of power cord to power source.
- Check that the temperature controller is not in the o position.
- Plug in unit.
- Use proper voltage.
Cools too frequently
· The temperature setting is too cool.
- Close door securely.
- Be sure that food is cool before inserting.
- Do not keep door open for too long and minimize door openings.
- Use proper voltage.
- Do not place unit close to heat sources or direct sunlight.
Internal temperature not cold enough
- Check connection of power cord to power source.
- Plug in unit.
- Check setting and adjust as needed.
- Close door securely.
- Be sure that food is cool before inserting.
- Do not keep door open for too long and minimize door openings.
- Allow room for air to circulate around unit.
- Use proper voltage.
- Do not place unit close to heat sources or direct sunlight.
Unusual sounds
· The appliance is not level. Readjust the adjusting feet and level the unit.
· The unit is touching a wall or another object. Gently move the appliance.
There is water on the floor.
· The condensation duct is blocked. See the chapter on cleaning.
- Too much condensation has formed in the fridge, causing the reservoir to overflow. Too much condensation is caused by a heat difference. Is the door closed properly? Have you put hot food in the fridge? Does the seal still close properly?
The door does not close properly.
- The door seal is deformed. Heat it gently using a hairdryer. The rubber seal will become flexible and the magnetic strip in the rubber will automatically pull towards the appliance. After cooling, the rubber stays in that position.
ENVIRONMENTAL GUIDELINES
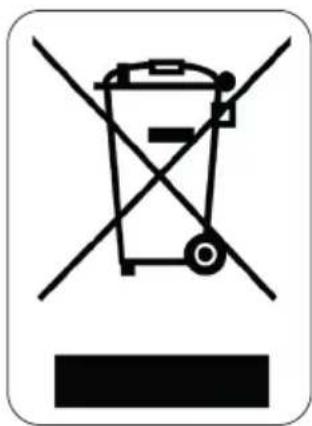
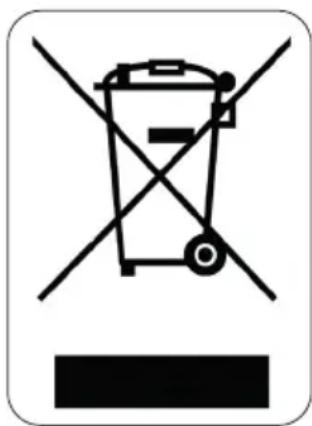
This symbol on the product or on its packaging indicates that this product may not be treated as household waste. Instead it must be brought to the applicable collection point for recycling of electrical and electronic equipment. By ensuring this product is disposed of correctly, you will help prevent potential negative consequences for the environment and human health, which could otherwise be caused by inappropriate waste handling of this product. For more detailed information about recycling of this product, please contact your local city office, your household waste disposal service or the shop where you purchased the product.
natural_image
Recycling symbol icon with three chasing arrows forming a triangle (no text or labels)The packaging is recyclable. Please treat the packaging ecologically.
GARANTIA
INSTALACIÓN
PATA DE SOPORTE DE GOMA
natural_image
Diagram showing a device with a lock and a box, connected by an arrow indicating assembly or transformation (no text or symbols present)natural_image
Simple line drawing of a screw fastener inserted into a base plate (no text or symbols)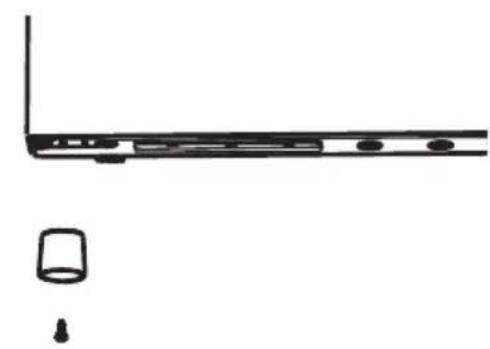
natural_image
Simple line drawing of a laptop with a small cup and a separate view of its base (no text or symbols)natural_image
Illustration of six different screwdriver tools (no text or labels)natural_image
Simple line drawing of a rectangular frame with two small square cutouts and a side clip (no text or symbols)natural_image
Simple line drawing of a rectangular frame with two small square cutouts and mounting brackets (no text or symbols)natural_image
Pure technical line drawing of a structural frame with mounting points (no text or symbols)natural_image
Illustration of two hands holding a rectangular object with upward arrows indicating motion or force (no text or symbols)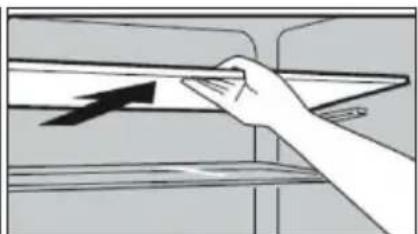
natural_image
Hand placing a black arrow on a surface next to a rectangular object (no text or symbols visible)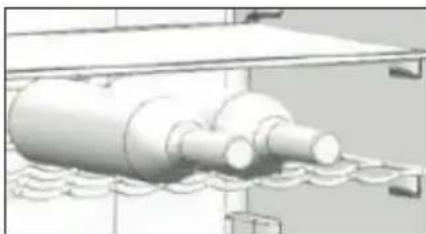
natural_image
3D rendering of a cylindrical mechanical component with multiple protrusions, mounted on a platform (no visible text or symbols)CAJÓN DE ALIMENTOS EXTRA FRESCOS
natural_image
Technical line drawing of a mechanical assembly with a magnified circular detail (no text or symbols)PROBLEMAS Y SUS SOLUCIONES
natural_image
Recycling symbol icon with three chasing arrows forming a triangle (no text or labels)INSTALLAZIONE
SOSTEGNO IN GOMMA
natural_image
Diagram showing a mechanical assembly with a close-up view of a component, no text or symbols present.natural_image
Technical line drawing showing a screw fastener inserted into a base plate and a separate view of a mechanical component (no text or symbols)INVERSIONE DELL'APERTURA DELLO SPORTELLO
natural_image
Line drawings of five different screwdriver tools (no text or symbols)natural_image
Line drawing of a simple electrical cabinet or enclosure with mounting brackets (no text or symbols)natural_image
Simple line drawing of a rectangular frame with two small square cutouts and mounting points (no text or symbols)natural_image
Pure technical line drawing of a structural bracket or frame (no text or symbols)natural_image
Illustration of two hands holding a cylindrical object with upward arrows indicating motion or force (no text or symbols)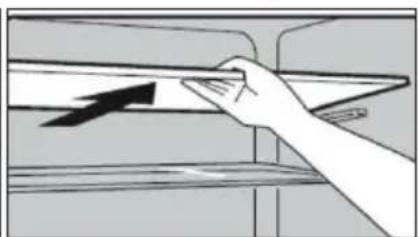
natural_image
Hand placing a directional arrow on a document or panel (no text or symbols visible)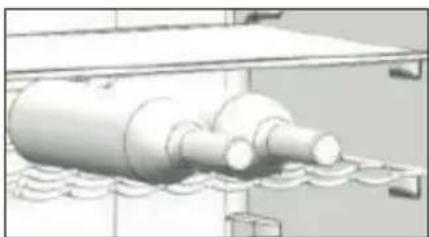
natural_image
3D rendering of a cylindrical mechanical component with flanged ends and a base, mounted on a platform (no text or symbols visible)natural_image
Technical line drawing of a mechanical assembly with a magnified circular detail (no text or symbols)natural_image
Recycling symbol icon with three chasing arrows forming a triangle (no text or labels)PŘED PRVNÍM POUŽITÍM
GUMOVÁ OPĚRNÁ NOŽIČKA
natural_image
Diagram showing a device with a close-up view of its internal components, before and after assembly (no text or symbols present)natural_image
Technical line drawing showing a screw fastener inserted into a base plate and a separate view of a laptop with a handle (no text or symbols)PŘEHOZENÍ PANTŮ DVEŘÍ
natural_image
Six different types of screwdrivers and wrenches shown in line drawings (no text or labels)natural_image
Line drawing of a simple 3D object resembling a laptop or stand with a flat top and two small rectangular components on the side (no text or symbols)natural_image
Simple line drawing of a rectangular frame with two small square cutouts and mounting brackets (no text or symbols)natural_image
Pure technical line drawing of a structural frame with mounting brackets and corner markers (no text or symbols)natural_image
Illustration of two hands holding a cylindrical object with upward arrows indicating motion or force (no text or symbols)
natural_image
Hand placing a directional arrow on a shelf (no text or symbols visible)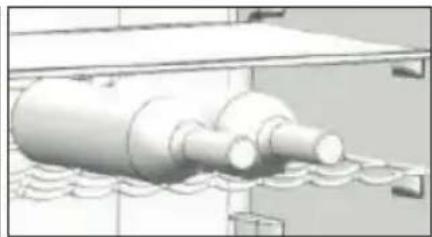
natural_image
3D rendering of a cylindrical mechanical component with multiple protrusions, mounted on a base (no text or symbols visible)FRESH ZÁSUVKU
MANIPULSCE S PŘÍSTROJEM
natural_image
Technical line drawing of a mechanical assembly with a magnified circular detail (no text or symbols)ŘEŠENÍ MOŽNÝCH PROBLÉMŮ
OHLED NA ŽÍVOTNÍ PROSTŘEDÍ
natural_image
Recycling symbol icon with three chasing arrows forming a triangle (no text or labels)PRED PRVÝM POUŽITÍM
GUMOVÁ OPORNÁ NOŽIČKA
natural_image
Diagram showing a mechanical assembly with an inset close-up of a component, before and after assembly (no text or symbols)natural_image
Technical line drawing showing a screw fastener inserted into a base plate and a separate view of a laptop with a handle (no text or symbols)PREHODENIE PÁNTOV DVERÍ
natural_image
Line drawings of six different screwdriver tools (no text or labels)natural_image
Simple line drawing of a rectangular object with two small square components on top, connected by a rod (no text or symbols)natural_image
Simple line drawing of a rectangular frame with two small square cutouts and four corner connectors (no text or symbols)natural_image
Pure technical line drawing of a structural frame with mounting brackets and corner markers (no text or symbols)natural_image
Illustration of two hands holding a cylindrical object with upward arrows indicating motion or force (no text or symbols)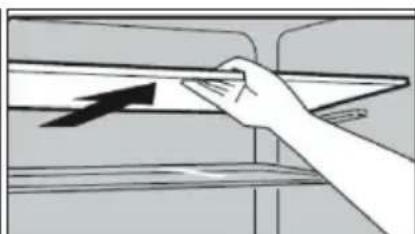
natural_image
Illustration of a hand placing an arrow on a surface with horizontal bands (no text or symbols)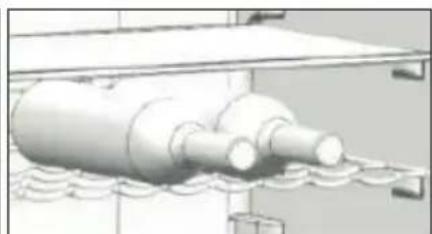
natural_image
3D rendering of a cylindrical mechanical component mounted on a platform, with no visible text or symbols.FRESH ZÁSUVKU
natural_image
Technical line drawing of a mechanical assembly with a magnified circular detail (no text or symbols)RIEŠENIE MOŽNÝCH PROBLÉMOV
natural_image
Recycling symbol icon with three chasing arrows forming a triangle (no text or labels)natural_image
Two cylindrical white objects with transparent caps, possibly milk or similar beverage (no text or symbols visible)
natural_image
Three product photos: square tiles, a clear glass coffee maker, and a rectangular container (no text or symbols visible)of scan hier:
ou scannez ici:
oder hier scannen:
or scan here:

- DO91201
- INSTALLATIE
- RUBBEREN STEUNVOET
- VERSHOUDLADE
- APPARAAT VERPLAATSEN
- PROBLEMEN EN HUN OPLOSSINGEN
- PIED DE SUPPORT EN CAOUTCHOUC
- CHANGEMENT DU SENS D'OUVERTURE DE LA PORTE
- TIROIR EXTRA FRAIS
- PROBLÈMES ET LEURS SOLUTIONS
- ANSCHLUSS
- GUMMISTÜTZFUSS
- EXTRA FRESH SCHUBLADE
- SAFETY INSTRUCTIONS
- ▲ELECTRICAL WARNINGS
- ⚠️INSTALLATION
- ⚠ USE
- ⚠ CLEANING AND MAINTENANCE
- SAVE THESE INSTRUCTIONS FOR FUTURE REFERENCE
- PARTS
- INSTALLATION
- RUBBER SUPPORT FOOT
- DOOR CONVERSION
- USE
- CONTROL PANEL
- Touch screen buttons
- ON/OFF
- TEMPERATURE CONTROL
- SUPER MODE
- ECO MODE
- CHILD SAFETY LOCK
- ALARM
- STORAGE GUIDE
- SHELVES AND DOOR RACK
- EXTRA FRESH DRAWER
- LIGHTING
- MOVING YOUR APPLIANCE
- STORING FOOD IN THE FRIDGE
- VACATION TIME
- POWER FAILURE
- SOME IMPORTANT RULES FOR THE CORRECT USE OF THE REFRIGERATOR
- CLEANING AND MAINTENANCE
- DEFROSTING THE REFRIGERATOR
- TROUBLE SHOOTING
- Does not work
- Cools too frequently
- Internal temperature not cold enough
- Unusual sounds
- There is water on the floor.
- The door does not close properly.
- ENVIRONMENTAL GUIDELINES
- GARANTIA
- INSTALACIÓN
- PATA DE SOPORTE DE GOMA
- CAJÓN DE ALIMENTOS EXTRA FRESCOS
- PROBLEMAS Y SUS SOLUCIONES
- INSTALLAZIONE
- SOSTEGNO IN GOMMA
- INVERSIONE DELL'APERTURA DELLO SPORTELLO
- PŘED PRVNÍM POUŽITÍM
- GUMOVÁ OPĚRNÁ NOŽIČKA
- PŘEHOZENÍ PANTŮ DVEŘÍ
- FRESH ZÁSUVKU
- MANIPULSCE S PŘÍSTROJEM
- ŘEŠENÍ MOŽNÝCH PROBLÉMŮ
- OHLED NA ŽÍVOTNÍ PROSTŘEDÍ
- PRED PRVÝM POUŽITÍM
- GUMOVÁ OPORNÁ NOŽIČKA
- PREHODENIE PÁNTOV DVERÍ
- RIEŠENIE MOŽNÝCH PROBLÉMOV
Brand : DOMO
Model : DO91201
Category : Fridge