USER MANUAL MDRB424FGE02 MIDEA
natural_image
Simple line drawing of a refrigerator with two doors and a side panel (no text or symbols)
Refrigerator
BOTTOM MOUNTED FREEZER SERIES
USER MANUAL
MDRB424FGE01OA
MDRB424FGE02OA
MDRB424FGD02
Warning notices: Before using this product, please read this manual carefully and keep it for future reference.
The design and specifications are subject to change without prior notice for product improvement.
Consult with your dealer or manufacturer for details.
The diagram above is just for reference. Please take the appearance of the actual product as the standard.
LANGUAGES
| ENEnglish |
| DEDeutsch |
| FRFrançais |
| ITItaliano |
| ESEspañol |
| PTPortuguês |
| PLPolski |
| CZ Čeština |
| HUMagyar |
| LVLatviešu |
| LT Lietuvių |
| SKSlovensky |
| SRSrpski |
| HRHrvatski |
| SL Slovenščina |
| RO Română |
| BGБългарски |
| ALShqip |
| GREλληνικά |
THANK YOU LETTER
Thank you for choosing Midea! Before using your new Midea product, please read this manual thoroughly to ensure that you know how to operate the features and functions that your new appliance offers in a safe way.
EN
CONTENTS
THANK YOU LETTER 01
SPECIFICATIONS 02
PRODUCT OVERVIEW 03
PRODUCT INSTALLATION 04
OPERATION INSTRUCTIONS 11
CLEANING AND MAINTENANCE 15
TROUBLESHOOTING 17
APPENDIX 19
DOC AND CERTIFICATIONS 21
SPECIFICATIONS
Product model-MDRB424FGE01OA/MDRB424FGE02OA
| Fresh Food Storage Compartment Volume 224L |
| Frozen Food Storage Volume 86L |
| Defrosting Type Auto-defrost |
| Temperature Rise Time 8h |
| Freezing Capacity 3 | 9kg/24h |
| Rated Voltage | 220-240V~ |
| Rated Current 0 | 8A |
| Overall Dimension (H x W x D) 1880x595x630mm |
Product model-MDRB424FGD02
| Fresh Food Storage Compartment Volume | 224L |
| Frozen Food Storage Volume 86L | |
| Defrosting Type Auto-defrost | |
| Temperature Rise Time 8h | |
| Freezing Capacity 3 | ,9kg/24h |
| Rated Voltage | 220-240V~ |
| Rated Current 1 | ,5A |
| Overall Dimension (H x W x D) 1880x595x630mm | |
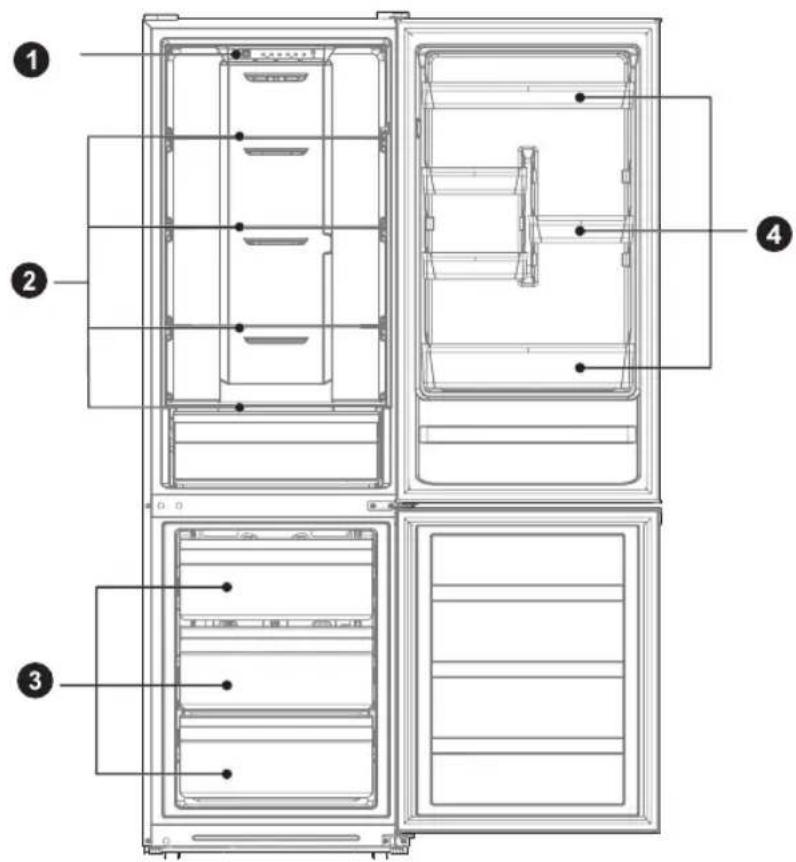
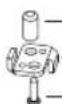
PRODUCT OVERVIEW
Names of components


1 LED lighting
3 Drawer
2 Shelf
4 Door tray
ATTENTION
The picture above is only for reference. The actual configuration will depend on the physical product or statement by the distributor.
PRODUCT INSTALLATION
Install Instruction
For refrigerating appliances with climate class
- Depending on the climate class, This refrigerating appliance is intended to be used at ambient temperatures range as specified following table.
- The climate class can be found on the rating plate. The product may not operate properly at temperatures outside of the specific range.
- You can find the climate class on the product label.
Effective temperature range
- The product is designed to operate normally in the temperature range specified by its class rating.
| Class Symbol | | Ambient temperature range °C |
| IEC 62552 (ISO 15502) ISO 8561 |
| Extended temperate SN + 10 to + 32 + 10 to + 32 | |
| Temperate N + 16 to + 32 + 16 to + 32 | |
| Subtropical ST + 16 to + 38 + 18 to + 38 | |
| Tropical T + 16 to + 43 + 18 to + 43 | |
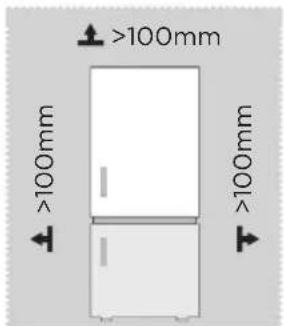
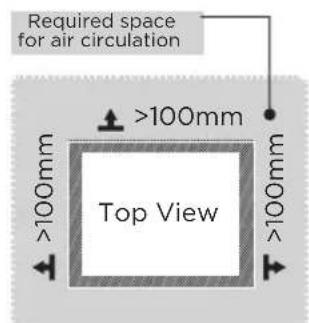
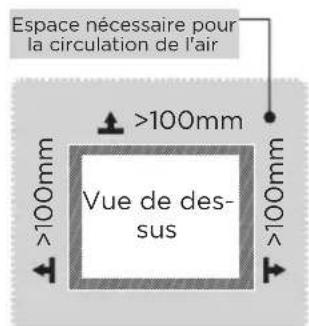
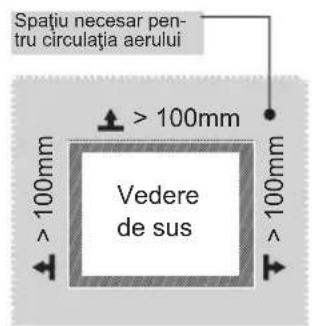
Dimensions and Clearances
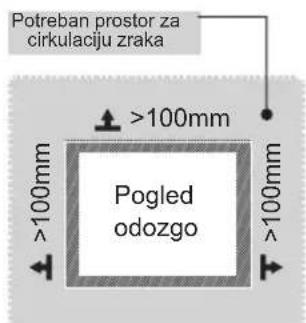
- Too small of a distance from adjacent items may result in the degradation of freezing capability and increased electricity costs. Allow over 100 mm of clearance from each adjacent wall when installing the appliance.
ATTENTION
The picture above is only for reference. The actual configuration will depend on the physical product or statement by the distributor.
Space requirement diagram (when the door is open and when the door is closed)

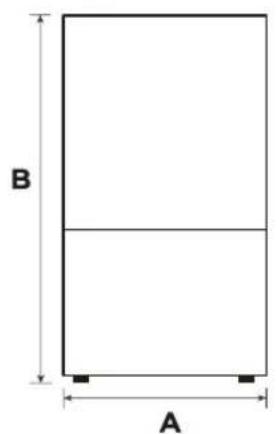
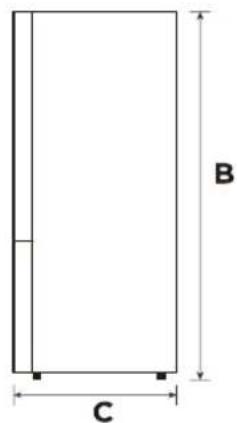
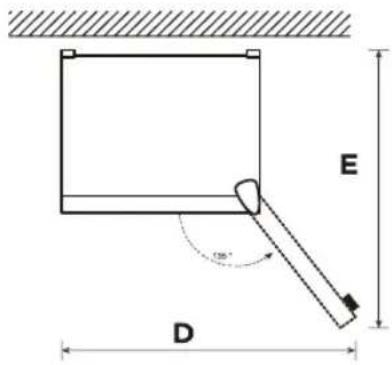
| Width Overall Height Depth | | Width doors open 135° | Depth doors open 135° |
| A B C D E | | | |
| 595 1880 630 988 1074 | | | |
Notice: All dimensions in mm
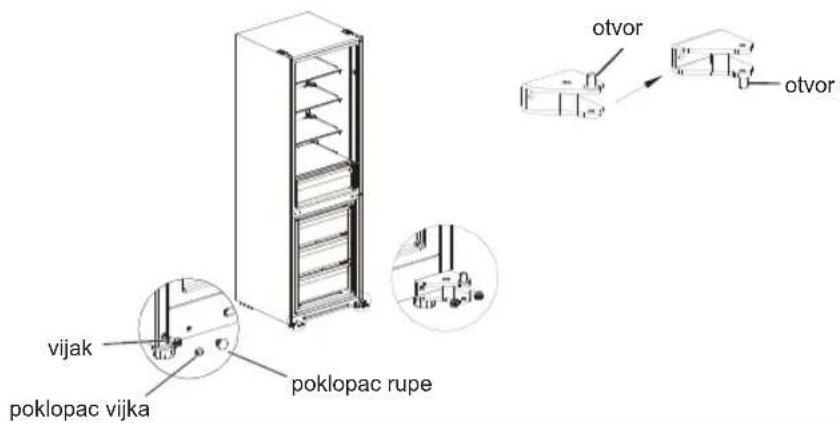
Door right-left change (optional)
Based on the location where you plan to use your refrigerator, you may find it more convenient to reverse the position of the door.

CAUTION
CAUTION: To avoid injury to yourself or your property, we recommend that someone assist you during the door reversal process.
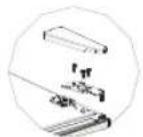
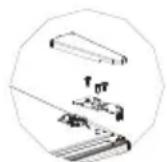
Preparing to reverse the door position
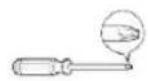
You will need: A standard screwdriver, a Phillips screwdriver, and the included Allen wrench.
- Make sure that your refrigerator is unplugged and empty.
- Have someone available to assist you in the process.
- Keep all of the parts you remove to reuse them later.
Cross screwdriver
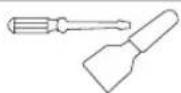
Putty knife thin-blade screwdriver
5/16" socket and ratchet
Masking tape
Step
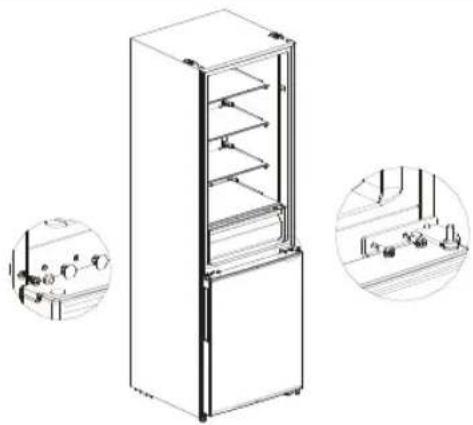
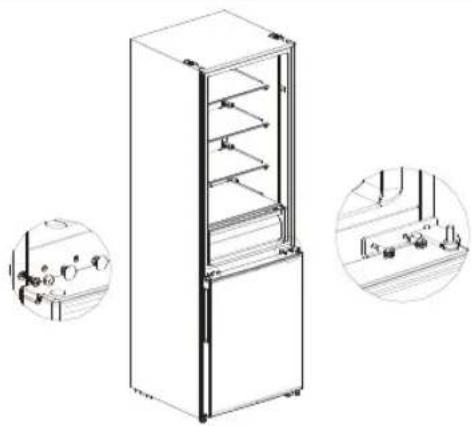
- Power off the refrigerator, and remove all objects from the door trays.
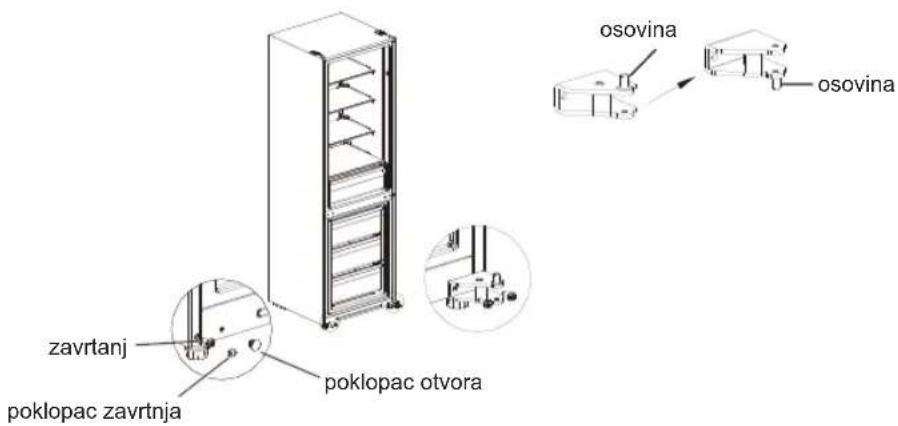
- Dismantle upper hinge cover, disconnect the signal wires, upper hinge and hole cap of the other side, remove the refrigerating door.
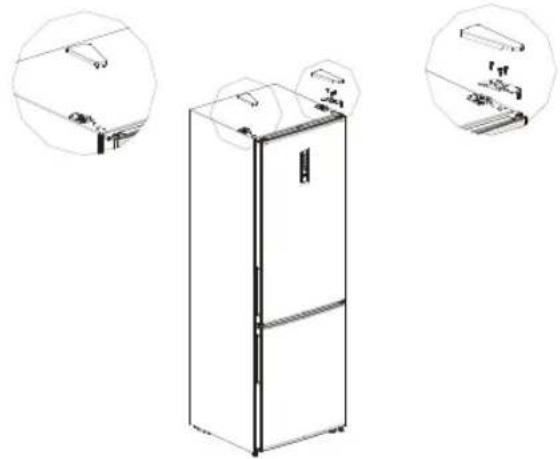
natural_image
Line drawing of a refrigerator with three inset diagrams showing exterior and front views (no text or symbols)
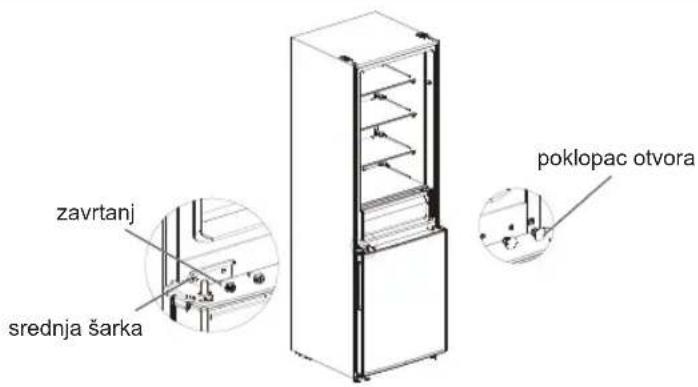
- Dismantle the middle hinge, the screws, the screws hole caps and remove the freezer door.
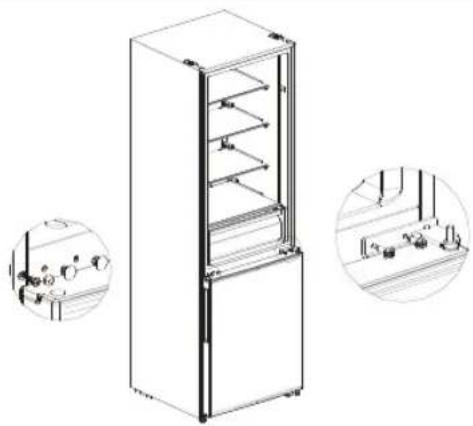
natural_image
Line drawing of a refrigerator with open doors and internal shelves, shown in two circular insets (no text or symbols)
- Dismantle the bottom hinge, hole caps and screws, Install the bottom hinge shaft on other side of the bottom hinge, then install the hinge on the other side.
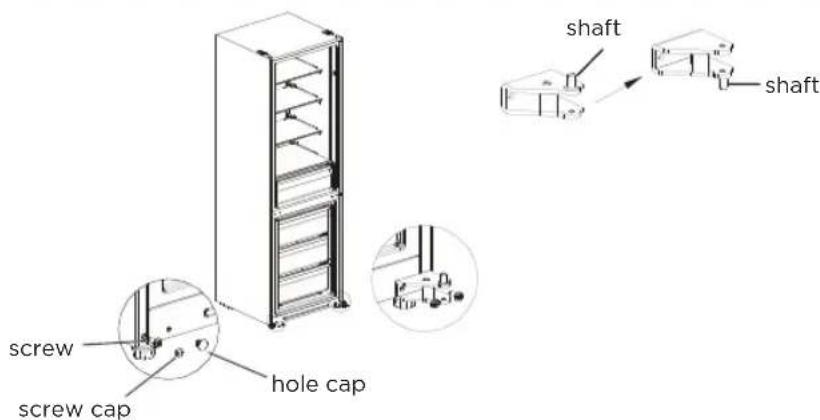
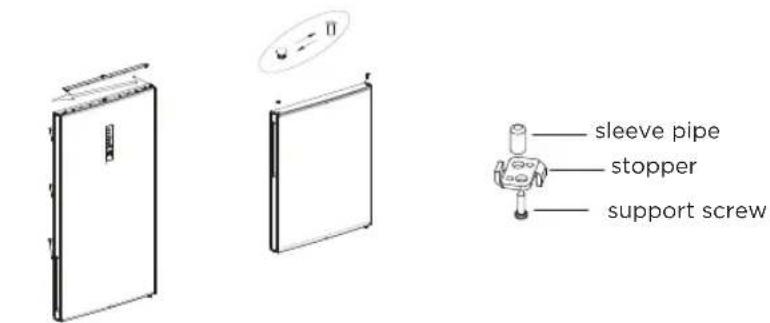
- Dismantle the screws, sleeve pipe and stopper on the lower end cover of the two door bodies, and install them successively on the other side of the door bodies. Then remove the upper end cover of the cooler door and switch the wire harness with a sleeve pipe to the other side of the door body. Finally install the sleeve pipe of the upper hinge on the cooler door in the hole on the other side of upper end cover of the cooler door.
- Put the freezer door on bottom hinge, install the middle hinge, the screws and the screw hole caps.

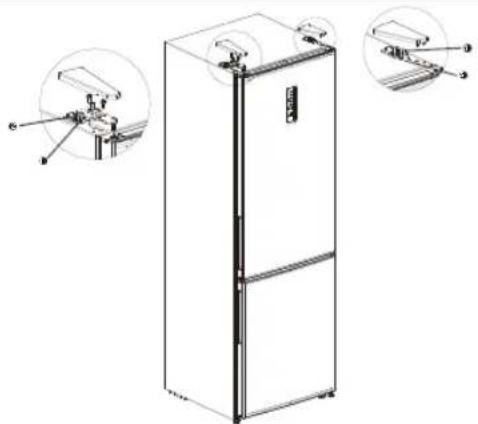
- Place the door body for the refrigerator compartment on the middle hinge, then install the upper hinge to the other side of the cabinet, finally connect the terminals 1, 2 for the signal wires at the side of the upper hinge and terminals 3, 4 on the other side and cover the hinge cover and hole cover.
natural_image
Line drawing of a refrigerator with three inset views showing internal components (no text or symbols)
ATTENTION
The picture above is only for reference. The actual configuration will depend on the physical product or statement by the distributor.
Placement
- Before use, remove all packing materials, including bottom cushions, foam pads and tapes inside of the refrigerator; tear off the protective film on the doors and the refrigerator body.
- Keep away from heat and avoid direct sunlight. Do not place the freezer in moist or watery places to prevent rust or reduction of insulating effect.
- Do not spray or wash the refrigerator; do not put the refrigerator in moist places easy to be splashed with water so as not to affect the electrical insulation properties of the refrigerator.
- The refrigerator is placed in a well-ventilated indoor place; the ground shall be flat, and sturdy (rotate left or right to adjust the wheel for leveling if unstable).
Leveling feet
To avoid vibration, the unit must be leveled.
If required, adjust the leveling screws to compensate for the uneven floor.
The front should be slightly higher than the rear to aid in door closing.
Leveling screws can be turned easily by tipping the cabinet slightly.
Turn the leveling screws counterclockwise to raise the unit, clockwise to lower it.
Moving the appliance
- Remove all food from inside the appliance.
- Pull the power plug out, insert and fix it into the power plug hook at the rear or on top of the appliance.
- Tape parts such as shelves and the door handle to prevent from falling off while moving the appliance.
- Move the appliance with more than two people carefully. When transporting the appliance over a long distance, keep the appliance upright.
- After installing the appliance, connect the power plug into a socket out to switch on the appliance.

ATTENTION
Precautions before operation:
Before making changes the refrigerator must be disconnected from power. precautions should be taken to prevent any personal injury.
Changing the light
- Any replacement or maintenance of the LED lamps is intended to be made by the manufacturer, its service agent or similar qualified person. This product contains a light source of energy efficiency class .
Step
- Please take out the plug before removal.
- Remove the lampshade with a screwdriver
1
2
- Take down the lamp panel.
- Remove the connection terminal.
3
4

Connecting the appliance
Before initial start, keep the refrigerator still for half an hour before connecting it to power supply.

ATTENTION
Before putting any fresh or frozen foods, the refrigerator shall have run for 2-3 hours, or for above 4 hours in summer when the ambient temperature is high.
Tips for energy saving
- The appliance should be located in the coolest area of the room, away from heat producing appliances or heating ducts, and out of the direct sunlight.
- Let hot foods cool to room temperature before placing in the appliance.
Overloading the appliance forces the compressor to run longer. Foods that freeze too slowly may lose quality, or spoil.
- Be sure to wrap foods properly, and wipe containers dry before placing them in the appliance. This cuts down on frost build-up inside the appliance.
- Appliance storage bin should not be lined with aluminum foil, wax paper, or paper toweling. Liners interfere with cold air circulation, making the appliance less efficient.
- Organize and label food to reduce door openings and extended searches.
Remove as many items as needed at one time, and close the door as soon as possible.
OPERATION INSTRUCTIONS
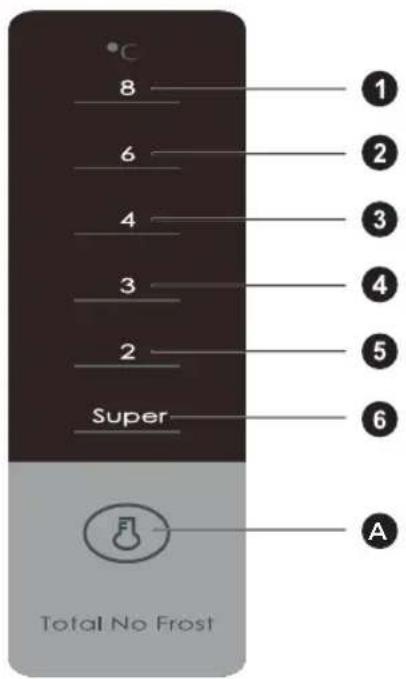
Control panel

ATTENTION
The picture above is only for reference. The actual configuration will depend on the physical product or statement by the distributor.
Key
A Temperature setting button
| Display screen |
| 1 | temperature setting 1 |
| 2 | temperature setting 2 |
| 3 | temperature setting 3 |
| 4 | temperature setting 4 |
| 5 | temperature setting 5 |
| 6 | temperature setting 6 |
Display
When power-on the refrigerator, the display screen (including the key light) will shine in full for 3s, then the refrigerator runs according to temperature setting 3.
Display of normal running
On the occurrence of a failure, the corresponding LED light will give a combined display of failure code (in recycling display);
Where there is no failure, the LED light will display the existing temperature setting.

ATTENTION
The actual control panel may di\~er from model to model.
Operating instructions
Gear setting
- The temperature setting will be changed once every time when you press the key SET. Then, the refrigerator will run under the new setting value after 15s.
Setting 1 → Setting 2 → Setting 3 → Setting 4 → Setting 5 → Setting 6 → Setting 1 → .....
Fast cool mode:
- Enter: Circulating modulation rapid cooling mode.
- Operate: Indicator of rapid cooling lights up, and the refrigerator operates at 2^ .
- Fast cool mode automatically disabled for 24H.
- Fast cool function can be used as Super freezing function.
Adjustment of manual air damper knob
- Turn the air damper slider up, the actual temperature inside the freezer room will drop, turn the air damper slider down, the actual temperature inside the freezer room will rise.
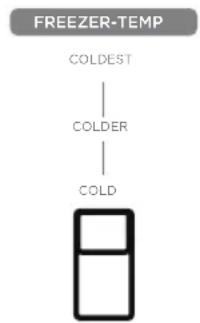
flowchart
graph TD
    A["FREEZER-TEMP"] --> B["COLDEST"]
    B --> C["COLDER"]
    C --> D["COLD"]
Error code
- The following warnings appearing on the display indicate corresponding faults of the refrigerator. Though the refrigerator may still have cooling and freezing function with the following faults, the user shall contact a maintenance specialist for maintenance, so as to ensure normal use of the refrigerator.
Fault Code Fault Description
The LED 1 and LED 2 lit Refrigerator temperature sensor circuit
The LED 1 and LED 3 lit Freezer defrost sensor
The LED 1 and LED 4 lit Ambient temperature sensor
ATTENTION
Note: The quick-freezing function is designed to maintain the nutritional value of the food in the freezer. It can freeze the food in the shortest time. If a large amount of food is frozen at one time, it is recommended that the user turn on the quick-freezing function and put the food in. At this time, the freezing speed of the freezer compartment is increased, which can quickly freeze the food, e\~ectively lock the nutrition of the food, and facilitate storage.
Refrigerating chamber
- The Refrigerating Chamber is suitable for storage of a variety of fruits, vegetables, beverages and other food consumed in the short term, suggested storage time 3 days to 5 days.
- Cooking foods shall not be put in the refrigerating chamber until cooled to room temperature.
- Foods are recommended to be sealed up before putting into the refrigerator.
- The glass shelves can be adjusted up or down for a reasonable amount of storage space and easy use.
Freezing chamber
- The low temperature freezing chamber may keep food fresh for a long time and it is mainly used to store frozen foods and making ice.
- The freezing chamber is suitable for storage of meat, fish, rice balls and other foods not to be consumed in short term.
- Chunks of meat are preferably to be divided into small pieces for quick freezing and easy access. Please be noted food shall be consumed within the shelf time.
ATTENTION
Note: Storage of too much food during operation after the initial connection to power may adversely affect the freezing effect of the refrigerator.
| Order | Compartments TYPE | Target storage temp. [°C] | Appropriate food |
| 1 Fridge | +2 ~ +8 | Eggs, cooked food, packaged food, fruits and vegetables, dairy products, cakes, drinks and other foods are not suitable for freezing. |
| 2 (***)*-Freezer | ≤-18 | Seafood (fish, shrimp, shellfish), freshwater aquatic products and meat products (recommended for 3 months, the longer the storage time, the worse the taste and nutrition), suitable for frozen fresh food. |
| 3 ***-Freezer | ≤-18 | Seafood (fish, shrimp, shellfish), freshwater aquatic products and meat products (recommended for 3 months, the longer the storage time, the worse the taste and nutrition), suitable for frozen fresh food. |
| 4 **-Freezer | ≤-12 | Seafood (fish, shrimp, shellfish), freshwater aquatic products and meat products (recommended for 3 months, the longer the storage time, the worse the taste and nutrition), suitable for frozen fresh food. |
| 5 *-Freezer | ≤-6 | Seafood (fish, shrimp, shellfish), freshwater aquatic products and meat products (recommended for 3 months, the longer the storage time, the worse the taste and nutrition), suitable for frozen fresh food. |
| 6 O-star | -6 ~ 0 | Fresh pork, beef, fish, chicken, some packaged processed foods, etc. (Recommended to eat within the same day, preferably no more than 3 days).Partially encapsulated processed foods (non-freezable foods). |
| 7 Chill | -2 ~ +3 | Fresh/ frozen pork, beef, chicken, freshwater aquatic products, etc. (7 days below 0°C and above 0°C is recommended for consumption within that day, preferably no more than 2 days). Seafood (less than 0 for 15 days, it is not recommended to store above 0°C. |
| 8 Fresh food | 0 ~ +4 | Fresh pork, beef, fish, chicken, cooked food, etc. (Recommended to eat within the same day, preferably no more than 3 days) |
| 9 Wine | +5 ~ +20 | Red wine, white wine, sparkling wine, etc. |

ATTENTION
please store different foods according to the compartments or target storage temperature of your purchased.
CLEANING AND MAINTENANCE
Overall cleaning
- Dusts behind the refrigerator and on the ground shall be timely cleaned to improve the cooling effect and energy saving.
- Check the door gasket regularly to make sure there are no debris. Clean the door gasket with a soft cloth dampened with soapy water or diluted detergent.
- The interior of the refrigerator should be cleaned regularly to avoid odor.
- Please turn off the power before cleaning interior, remove all foods, drinks, shelves, drawers, etc.
- Use a soft cloth or sponge to clean the inside of the refrigerator, with two tablespoons of baking soda and a quart of warm water. Then rinse with water and wipe clean. After cleaning, open the door and let it dry naturally before turning on the power.
- For areas that are difficult to clean in the refrigerator (such as narrow sandwiches, gaps or corners), it is recommended to wipe them regularly with a soft rag, soft brush, etc. and when necessary, combined with some auxiliary tools (such as thin sticks) to ensure no contaminants or bacterial accumulation in these areas.
- Do not use soap, detergent, scrub powder, spray cleaner, etc., as these may cause odors in the interior of the refrigerator or contaminated food.
- Clean the bottle frame, shelves and drawers with a soft cloth dampened with soapy water or diluted detergent. Dry with a soft cloth or dry naturally.
- Wipe the outer surface of the refrigerator with a soft cloth dampened with soapy water, detergent, etc., and then wipe dry.
- Do not use hard brushes, clean steel balls, wire brushes, abrasives (such as toothpastes), organic solvents (such as alcohol, acetone, banana oil, etc.), boiling water, acid or alkaline items, which may damage the fridge surface and interior. Boiling water and organic solvents such as benzene may deform or damage plastic parts.
- Do not rinse directly with water or other liquids during cleaning to avoid short circuits or affect electrical insulation after immersion.
ATTENTION
Please unplug the refrigerator for defrost and cleaning.
Defrosting
- The refrigerator is made based on the air-cooling principle and thus has automatic defrosting function. Frost formed due to change of season or temperature may also be manually removed by disconnection of the appliance from power supply or by wiping with a dry towel.
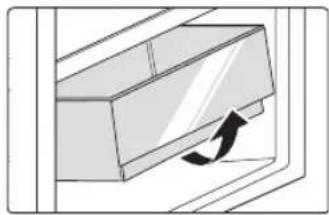
Cleaning of door tray
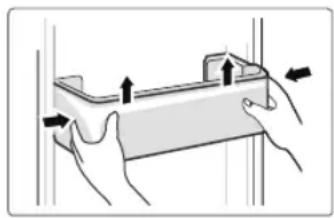
- According to the direction arrow in the figure below, use both hands to squeeze the tray, and push it upward, then you can take it out.
• After washing the tray having been taken out, you can adjust its installing height in accordance with your requirement.
natural_image
Illustration of hands holding a rectangular object with directional arrows indicating movement (no text or symbols)
Cleaning of glass shelf
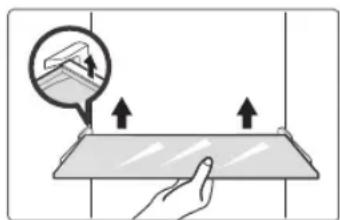
- As the innermost part of the refrigerator liner where contacting the shelves has a backstop, you shall raise the shelves upward, then you can be able to take it out.
- Adjust or clean the shelves according to your requirement.
natural_image
Illustration of a hand interacting with a laptop displaying screen data (no text or symbols present)
Cleaning the vegetable drawer
- Remove the contents of the drawer. Hold the handle of the vegetable drawer and pull it out completely until it stops.
- Lift the vegetable drawer up and remove it by pulling it out.

natural_image
Diagram of a door handle with an arrow indicating direction (no text or symbols)
Out of operation
Power failure:
In case of power failure, even if it is in summer, foods inside the appliance can be kept for several hours; during the power failure, the times of door opening shall be reduced, and no more fresh food shall be put into the appliance.
Long-time nonuse:
The appliance shall be unplugged and then cleaned; then the doors are left open to prevent odor.
Moving:
Before the refrigerator is moved, take all objects inside out, fix the glass partitions, vegetable holder, freezing chamber drawers and etc. with tape, and tighten the leveling feet; close the doors and fix them with tape. During moving, the appliance shall not be laid upside down or horizontally, or be vibrated; the inclination during movement shall be no more than 45^ .
ATTENTION
The appliance shall run continuously once it is started. Generally, the operation of the appliance shall not be interrupted; otherwise the service life may be impaired.
TROUBLESHOOTING
The following simple issues can be handled by the user. Please call the after-sale service department if the issues are not solved.
| Problem Possible reason |
| Failed operation | ·Check whether the appliance is connected to power or whether the plug is in well contact |
| ·Check whether the voltage is too low |
| ·Check whether there is a power failure or partial circuits have tripped |
| Odor | ·Odorous foods shall be tightly wrapped |
| ·Check whether there is any rotten food |
| ·Clean the inside of the refrigerator |
| Long-time operation of the compressor | ·Long operation of the refrigerator is normal in summer when the ambient temperature is high |
| ·It is not suggestible having too much food in the appliance at the same time |
| ·Food shall get cool before being put into the appliance |
| ·The doors are opened too frequently |
| Light fails to get lit | ·Check whether the refrigerator is connected to power supply and whether the illuminating light is damaged |
| ·Have the light replaced by a specialist |
| Door can not be properly closed | ·The door is stuck by food packages |
| ·The refrigerator is tiltedr. |
| Loud noises | ·Check whether the floor is level and whether the refrigerator is placed stably |
| ·Check whether accessories are placed at proper locations |
EN
| Problem Possible reason |
| Door seal fails to be tight | Remove foreign matters on the door seal |
| Heat the door seal and then cool it for restoration (or blow it with an electrical drier or use a hot towel for heating) |
| Water pan overflows | There is too much food in the chamber or food stored contains too much water, resulting in heavy defrosting |
| The doors are not closed properly, resulting in frosting due to entry of air and increased water due to defrosting |
| Hot housing | Heat dissipation of the built-in condenser via the housing, which is normal When housing becomes hot due to high ambient temperature, storage of too much food or shutdown of the compressor is shut down, provide sound ventilation to facilitate heat dissipation |
| Surface condensation | Condensation on the exterior surface and door seals of the refrigerator is normal when the ambient humidity is too high. Just wipe the condensate with a clean towel. |
| Abnormal noise | Buzz: The compressor may produce buzzes during operation, and the buzzes are loud particularly upon start or stop. This is normal. |
| Creak: Refrigerant flowing inside of the appliance may produce creak, which is normal. |
APPENDIX
Special for new European standard
The ordered parts in the following table can be acquired from Service provider channel
| Ordered part | Provided by Minimum time | required for Provision |
| Thermostats | Professional maintenance personnel | At least 7 years after the last model is launched on the market |
| Temperature sensors | Professional maintenance personnel | At least 7 years after the last model is launched on the market |
| Printed circuit boards | Professional maintenance personnel | At least 7 years after the last model is launched on the market |
| Light sources | Professional maintenance personnel | At least 7 years after the last model is launched on the market |
| Door handles | Professional repairers and final users | At least 7 years after the last model is launched on the market |
| Door hinges | Professional repairers and final users | At least 7 years after the last model is launched on the market |
| Trays | Professional repairers and final users | At least 7 years after the last model is launched on the market |
| Baskets | Professional repairers and final users | At least 7 years after the last model is launched on the market |
| Door gaskets | Professional repairers and final users | At least 10 years after the last model is launched on the market |
Dear customer
- If you want to return or replace the product, please contact the store where you buy.
(Remember to bring the purchase invoice)
- If your product breaks down which needs to repair, please contact after-sales service provider.
ATTENTION
The model information in the product database, as well as the model identifier, can be obtained througha weblink scanned by a QR code, if any, on the energy efficiency label of the product.
For more information about the energy efficiency of the appliance, visit https://ec.europa.eu and search using the model name.
The model name can be found on the rating label of the appliance.
Coldest zone in the refrigerator
OPTIONAL: OK-temperature indicator
- The OK-temperature indicator can be used to determine temperatures below +4°C. Gradually reduce the temperature if the sign does not indicate "OK".
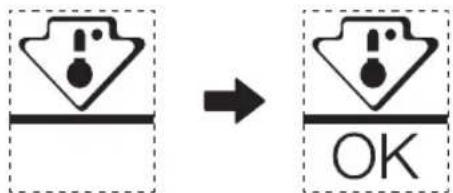
- To ensure the temperature in this area, do not change the positioning of the shelf. Inforced air refrigerators (equipped with a fan or No Frost models), the symbol of the coldest zone is not represented because the temperature inside is homogeneous.
Temperature indicator setting
• To help you set your refrigerator well, it is equipped with a temperature indicator that will monitor the average temperature in the coldest zone.
- WARNING: This indicator is intended to work only with your refrigerator, do not use it in another refrigerator (in fact, the coldest zone is not the same), or for any other use.
Checking the temperature in the coldest zone
- With the temperature indicator, you can check regularly that the temperature of the coldest zone is correct. Indeed, the internal temperature of the refrigerator depends on several factors such as the ambient temperature of the room, the amount of food stored and the frequency of door opening. Take these factors into consideration when setting the device.
- When the indicator shows « OK », this means that your thermostat is well adjusted and the internal temperature correct.
- If the indicator of temperature turns WHITE, this means that the temperature is too high; in this case, increase the refrigerator temperature control setting and wait for 12 hours before performing a new visual inspection of the indicator. When fresh food has been introduced or the door has been left open, it is possible for the indicator of temperature to turn WHITE after a while.
DOC AND CERTIFICATIONS
We hereby confirm that the following customer model names and Midea model names match each other respectively.
Brand Midea Model Marketing Model Factory Model
Midea HD-403RWENJ-W MDRB424FGE01OA CE-BCD310WE-JT
Midea HD-403RWENJ-W MDRB424FGE02OA CE-BCD310WE-JT
Midea HD-403RWENK-W MDRB424FGD02 CE-BCD310WE-KT
Manufacturer's Name: Guangzhou Midea Hualing Refrigerator Co., Ltd.
Manufacturer's Address: No. 5 Xinguangsi Road, Qianfeng Zhujiang, Nansha District, Guangzhou City, Guangdong Province, P.R.China
We, Guangzhou Midea Hualing Refrigerator Co., Ltd., hereby declare that the above-mentioned products comply with the above-mentioned currently valid regulations and standards.
DANKE
1 LED-Beleuchtung
3 Schubfach
2 Ablagefach
4 Türablage
ACHTUNG
natural_image
Line drawing of a two-tier refrigerator with front panel and side door (no text or symbols)
natural_image
Line drawing of a refrigerator with open doors and internal shelves, shown in two circular insets (no text or symbols)
natural_image
Line drawing of a refrigerator with three inset diagrams showing mechanical components (no text or symbols)
ACHTUNG
natural_image
Illustration of hands holding a rectangular object with directional arrows indicating movement (no text or symbols)
natural_image
Illustration of a hand interacting with a surface-mounted device, showing upward arrows and a magnified view of the screen (no text or symbols)
natural_image
Diagram of a mechanical component with an arrow indicating direction (no text or symbols)
INSTALLATION DU PRODUIT 04
MODE D'EMPLOI 11
NETTOYAGE ET ENTRETIEN 15
DÉPANNAGE 17
ANNEXE 19
DOCUMENTS ET CERTIFICATIONS 21
CARACTÉRISTIQUES
Dimension globale (H × L × P) 1880x595x630mm
Dimension globale (H × L × P) 1880x595x630mm
PRÉSENTATION DU PRODUIT
Noms des composants
1 Lumière LED
3 Tiroir
2 Étagère
4 Plateau de porte
ATTENTION
INSTALLATION DU PRODUIT
natural_image
Line drawing of a refrigerator with three inset views showing internal components (no text or symbols)
natural_image
Line drawing of a refrigerator with open doors and internal shelves, shown in two circular insets (no text or symbols)
natural_image
Line drawing of a refrigerator with three inset views showing internal components (no text or symbols)
ATTENTION
natural_image
Illustration of hands holding a rectangular object with directional arrows indicating movement (no text or symbols)
natural_image
Illustration of a hand interacting with a flat surface, showing upward arrows and a magnified view of the surface (no text or symbols)
natural_image
Diagram of a door handle with an arrow indicating direction (no text or symbols)
Hors service
Panne de courant :
Adresse du fabricant : No. 5 Xinguangsi Road, Qianfeng Zhujiang, Nansha District, Guangzhou City, Guangdong Province, R.P.Chine
| Dimensioni complessive (A × L × P) 1880X595x630 mm |
Modello del prodotto-MDRB424FGD02
| Dimensioni complessive (A × L × P) 1880X595x630 mm |
PANORAMICA DEL PRODOTTO
Nomi dei componenti

1 Luce LED
3 Cassetto
2 Ripiano
natural_image
Line drawing of a refrigerator with three inset views showing front, side, and top views (no text or symbols)
natural_image
Line drawing of a refrigerator with open doors and internal shelves, shown in two circular insets (no text or symbols)
natural_image
Line drawing of a refrigerator with three inset views showing internal components (no text or symbols)
ATTENZIONE
natural_image
Illustration of hands holding a rectangular object with directional arrows indicating movement (no text or symbols)
natural_image
Illustration of a hand interacting with a flat surface, showing upward arrows and a magnified view of the surface (no text or symbols)
natural_image
Diagram of a door handle with an arrow indicating direction (no text or symbols)
1 Iluminación LED
3 Cajón
2 Repisa
natural_image
Line drawing of a refrigerator with three inset views showing internal components (no text or symbols)
natural_image
Line drawing of a refrigerator with open doors and internal shelves, shown in two circular insets (no text or symbols)
natural_image
Line drawing of a refrigerator with three inset diagrams showing mechanical components (no text or symbols)
ATENCIÓN
natural_image
Illustration of hands holding a rectangular object with arrows indicating movement or force (no text or symbols)
natural_image
Illustration of a hand interacting with a flat surface, showing upward arrows and a magnified view of the surface (no text or symbols)
natural_image
Diagram of a door handle with an arrow indicating direction (no text or symbols)
Sin funcionamiento
| Dimensão Total (A × L × P) 1880x595x630 mm |
Dimensão Total (A × L × P) 1880x595x630 mm
1 Luz LED
3 Gaveta
2 Prateleira
4 Bandeja da porta
ATENÇÃO
natural_image
Line drawing of a refrigerator with three inset views showing internal components (no text or symbols)
natural_image
Line drawing of a refrigerator with open doors and internal shelves, shown in two circular insets (no text or symbols)
natural_image
Line drawing of a refrigerator with three inset diagrams showing internal components (no text or symbols)
ATENÇÃO
natural_image
Illustration of hands holding a rectangular object with directional arrows indicating movement (no text or symbols)
natural_image
Illustration of a hand interacting with a flat surface, showing upward arrows and a magnified view of the surface (no text or symbols)
natural_image
Diagram of a mechanical component with an arrow indicating direction (no text or symbols)
Fora de serviço
Falha de energia:
natural_image
Line drawing of a refrigerator with three inset diagrams showing exterior and front views (no text or symbols)
natural_image
Line drawing of a refrigerator with open doors and internal shelves, shown in two circular insets (no text or symbols)
natural_image
Line drawing of a refrigerator with three inset views showing internal components (no text or symbols)
UWAGA
natural_image
Illustration of hands holding a rectangular object with arrows indicating movement or force (no text or symbols)
natural_image
Illustration of a hand interacting with a tablet device, showing upward arrows and a magnified view of the screen (no text or symbols)
natural_image
Diagram of a mechanical component with an arrow indicating direction (no text or symbols)
District, Guangzhou City, Guangdong Province,
P.R.China
1 Osvětlení LED
3 Šuplík
2 Police
4 Police dveří
UPOZORNĚNÍ
natural_image
Line drawing of a refrigerator with three inset diagrams showing exterior and front views (no text or symbols)
natural_image
Line drawing of a refrigerator with open doors and internal shelves, shown in two circular insets (no text or symbols)
natural_image
Line drawing of a refrigerator with three inset diagrams showing internal components (no text or symbols)
UPOZORNĚNÍ
natural_image
Illustration of hands holding a rectangular object with directional arrows indicating movement (no text or symbols)
natural_image
Illustration of a hand interacting with a tablet device, showing upward arrows and a magnified view of the screen (no text or symbols)
natural_image
Diagram of a mechanical component with an arrow indicating direction (no text or symbols)
Mimo provoz
Výpadek napájení:
District, Guangzhou City, Guangdong Province, ČLR
1 LED világítás
3 Fiók
2 Polc
4 Ajtórekesz
FIGYELEM
natural_image
Line drawing of a refrigerator with three inset diagrams showing exterior and front views (no text or symbols)
natural_image
Line drawing of a refrigerator with open doors and internal shelves, shown in two circular insets (no text or symbols)
natural_image
Line drawing of a refrigerator with three inset views showing internal components (no text or symbols)
FIGYELEM
natural_image
Illustration of hands holding a rectangular object with arrows indicating movement or force (no text or symbols)
Üvegpolc tisztítása
natural_image
Illustration of a hand interacting with a flat surface, showing upward arrows and a magnified view of the surface (no text or symbols)
natural_image
Diagram of a door handle with an arrow indicating direction (no text or symbols)
PRODUKTA PÄRSKATS 03
PRODUKTA UZSTĀDĪŠANA 04
LIETOŠANAS INSTRUKCIJAS 11
TİRİŞANA UN APKOPE 15
TRAUCĒJUMMEKLĒŠANA 17
PIELIKUMS 19
DOKUMENTI UN SERTIFIKĀTI 21
SPECIFIKĀCIJAS
Produkta modelis-MDRB424FGE01OA/MDRB424FGE02OA
natural_image
Line drawing of a refrigerator with three inset diagrams showing exterior and front views (no text or symbols)
natural_image
Line drawing of a refrigerator with open doors and internal shelves, shown in two circular insets (no text or symbols)
natural_image
Line drawing of a refrigerator with three close-up insets showing internal components (no text or symbols)
UZMANIBU!
natural_image
Illustration of hands holding a rectangular object with directional arrows indicating movement (no text or symbols)
natural_image
Illustration of a hand interacting with a laptop screen, showing upward arrows and a magnified view of the screen (no text or symbols)
natural_image
Diagram of a door handle with an arrow indicating direction (no text or symbols)
Nedarbojas
District, Guangzhou City, Guangdong Province,
P.R.China
1 LED apšvietimas
3 Stalčius
2 Lentyna
4 Durelių déklas
DÈMESIO
natural_image
Line drawing of a refrigerator with three inset diagrams showing exterior and interior views (no text or symbols)
natural_image
Line drawing of a refrigerator with open doors and internal shelves, shown in two circular insets (no text or symbols)
natural_image
Line drawing of a refrigerator with three inset views showing internal components (no text or symbols)
DÈMESIO
natural_image
Illustration of hands holding a rectangular object with directional arrows indicating movement or force (no text or symbols)
natural_image
Illustration of a hand interacting with a flat surface, showing upward arrows and a magnified view of the surface (no text or symbols)
natural_image
Diagram of a mechanical component with an arrow indicating direction (no text or symbols)
Neveikimas
Maitinimo sutrikimas:
District, Guangzhou City, Guangdong Province,
P.R.China
1 LED svetlo
3 Zásuvka
2 Polica
4 Dverná zásuvka
UPOZORNENIE
natural_image
Line drawing of a refrigerator with three inset diagrams showing exterior and front views (no text or symbols)
natural_image
Line drawing of a refrigerator with open doors and internal shelves, shown in two circular insets (no text or symbols)
natural_image
Line drawing of a refrigerator with three inset views showing internal components (no text or symbols)
UPOZORNENIE
natural_image
Illustration of hands holding a rectangular object with directional arrows indicating movement or force (no text or symbols)
natural_image
Illustration of a hand interacting with a flat surface, showing upward arrows and a magnified view of the surface (no text or symbols)
Čistenie priehradky na zeleninu
natural_image
Diagram of a door handle with an arrow indicating direction (no text or symbols)
Mimo prevádzku
Výpadok energie:
District, Guangzhou City, Guangdong Province,
P.R.China
1 LED lampica
3 Fioka
2 Polica
4 Polica za vrata
PAŽNJA
Slika iznad služi samo za referencu. Stvarna konfiguracija će zavisiti od kupljenog proizvoda ili izjave distributera.
INSTALACIJA PROIZVODA
Uputstvo za instalaciju
natural_image
Line drawing of a refrigerator with three inset diagrams showing exterior and interior views (no text or symbols)
natural_image
Line drawing of a refrigerator with open doors and internal shelves, shown in two circular insets (no text or symbols)
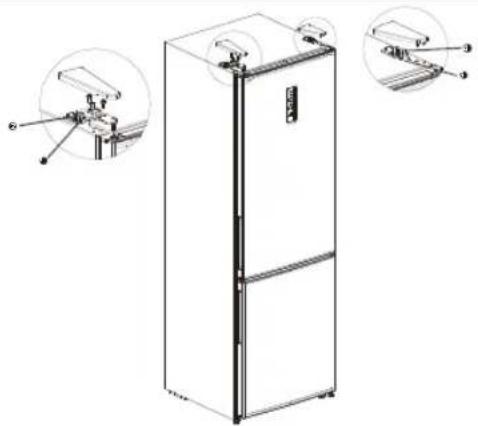
- Demontirajte donju šarku, poklopce otvora i zavrtnje, postavite osovinu donje šarke na drugu stranu donje šarke, a zatim postavite šarku na drugu stranu.
- Demontirajte zavrtnje, naglavnu cev i odbojnik na donjem delu poklopca dvokrilnih kućišta i instalirajte ih jedan za drugim na drugu stranu kućišta vrata. Zatim skinite gornji poklopac vrata frižidera i prebacite snop kablova sa naglavnom cevi na drugu stranu kućišta vrata. Na kraju postavite naglavnu cev gornje šarke na vrata frižidera u otvor na drugoj strani gornjeg poklopca vrata frižidera.

- Postavite vrata zamrzivača na donju šarku, postavite srednju šarku, zavrtnje i poklopce za rupe za zavrtnje.
- Postavite kućište vrata za odeljak frižidera na srednju šarku, zatim postavite gornju šarku na drugu stranu kućišta, a zatim povežite terminale 1, 2 za signalne kablove sa strane gornje šarke i terminale 3, 4 na drugu stranu, i postavite poklopac šarke i poklopac otvora.
natural_image
Line drawing of a refrigerator with three inset views showing internal components (no text or symbols)
PAŽNJA
Slika iznad služi samo za referencu. Stvarna konfiguracija će zavisiti od kupljenog proizvoda ili izjave distributera
Postavljanje
- Pre upotrebe uklonite sve ambalažne materijale, uključujući uloške na dnu, penaste obloge i trake u frižideru; uklonite zaštitnu foliju na vratima i kućištu frižidera.
- Držite dalje od toplote i izbegavajte direktnu sunčevu svetlost. Ne stavljate frižider na vlažna ili vodena mesta da biste sprečili rđanje ili smanjenje efekta izolacije.
- Ne prskajte po frižideru i ne perite ga; ne stavljajte frižider na vlažna mesta na kojima bi lako mogla voda da prska po njemu, jer bi to moglo da utiče na električnu izolovanost frižidera.
- Frižider treba da se postavi u dobro provetrenom zatvorenom prostoru; podloga mora biti ravna i čvrsta (okrećite levo ili desno da biste podesili točkić za nivelisanje ako je nestabilan).
Stopice za nivelisanje
natural_image
Illustration of hands holding a rectangular object with arrows indicating movement or force (no text or symbols)
Čišćenje staklene police
- Kako najdublji unutrašnji deo podloge frižidera gde kontakt sa policama ima graničnik, morate da podignite police nagore, a zatim ih možete izvaditi.
- Podesite ili očistite police prema vašim potrebama.

natural_image
Illustration of a hand pressing down on a flat surface with upward arrows, no text or symbols present
natural_image
Diagram of a mechanical component with an arrow indicating direction (no text or symbols)
Prestanak rada
Nestanak struje:
U slučaju nestanka struje, čak i ako je to leti, hrana unutar uređaja može da se sačuva nekoliko sati; tokom nestanka struje, učestalost otvaranja vrata treba smanjiti i više ne stavljati svežu hranu u uređaj.
- Da bi se održavala ujednačena temperatura u ovoj oblasti, nemojte menjati položaj police. Kod frižidera sa protokom vazduha (uređaji sa ventilatorom ili modeli „bez zaleđivanja“) simbola najhladnije zone nema jer je temperatura unutrašnjosti svuda ista.
Indikator podešavanja temperature
- Da biste dobro podesili frižider, koristite indikator temperature koji prati prosečnu temperaturu u najhladnijoj zoni.
District, Guangzhou City, Guangdong Province,
N.R. Kina
Mi, Guangzhou Midea Hualing Refrigerator Co., Ltd., ovim izjavljujemo da su gorenavedeni proizvodi u skladu sa gore navedenim važećim propisima i standardima.
PISMO ZAHVALE
1 LED svjetlo
3 Ladica
2 Polica
4 Plitica u vratima
PAŽNJA
Gornja slika služi samo kao referenca. Stvarna konfiguracija ovisit će o fizičkom proizvodu ili izjavi distributera.
UGRADNJA PROIZVODA
Upute za ugradnju
Za rashladne uređaje s klimatskim razredom
PAŽNJA
Gornja slika služi samo kao referenca. Stvarna konfiguracija ovisit će o fizičkom proizvodu ili izjavi distributera.
natural_image
Line drawing of a refrigerator with three inset diagrams showing exterior and interior views (no text or symbols)
- Rastavite srednju šarku, vijke, kapice rupa za vijke i uklonite vrata zamrzivača.
natural_image
Line drawing of a refrigerator with open doors and internal shelves, shown in two circular insets (no text or symbols)
- Rastavite donju šarku, kapice rupa i vijke, ugradite osovinu donje šarke na drugu stranu donje šarke, zatim postavite šarku na drugu stranu.
- Demontirajte vijke, manžetnu cijev i čep na donjem krajnjem poklopcu dva kućišta vrata, te ih redom montirajte na drugu stranu tijela vrata. Zatim skinite gornji krajnji poklopac vrata hladnjaka i prebacite kabelski svežanj s nastavnom cijevi na drugu stranu kućišta vrata. Na kraju postavite cijev gornje šarke na vratima hladnjaka u rupu na drugoj strani gornjeg krajnjeg poklopca vrata hladnjaka.
— cijev rukavca
zaustavljač
vijak
- Stavite vrata zamrzivača na donju šarku, postavite srednju šarku, vijke i kapice rupa za vijke.

natural_image
Line drawing of a refrigerator with three inset views showing internal components (no text or symbols)
HR
PAŽNJA
Gornja slika služi samo kao referenca. Stvarna konfiguracija ovisit će o fizičkom proizvodu ili izjavi distributera.
Postavljanje
natural_image
Illustration of hands holding a rectangular object with arrows indicating movement or force (no text or symbols)
Čišćenje staklene police
natural_image
Illustration of a hand interacting with a laptop displaying a screen, with an inset showing a magnified view of the screen (no text or symbols present)
Čišćenje ladice za povrće
- Izvadite sadržaj ladice. Držite ručku ladice za povrće i potpuno je izvucite dok se ne zaustavi.
- Podignite ladicu za povrće i izvadite je izvlačenjem.
natural_image
Diagram of a door handle with an arrow indicating direction (no text or symbols)
Van funkcije
Prekid napajanja:
- Kako biste osigurali temperaturu u tom području, nemojte mijenjati položaj police. Hladnjaci s hlađenjem pod pritiskom (opremljeni ventilatorom ili modeli bez inja), simbol najhladnije zone nije predstavljen jer je unutarnja temperatura homogena.
Postavka indikatora temperature
- Kao pomoć pri pravilnom postavljanju hladnjaka imate indikator temperature koji će pratiti prosječnu temperaturu u najhladnijoj zoni.
- UPOZORENJE: Ovaj indikator namijenjen je isključivo radu s vašim hladnjakom, nemojte ga koristiti na drugom hladnjaku (najhladnija zona nije ista) ili za drugu namjenu.
natural_image
Line drawing of a two-tier refrigerator with front door and side panels (no text or symbols)
- Razstavite srednji tečaj, vijake, pokrove za luknje vijakov in odstranite vrata zamrzovalnika.
natural_image
Line drawing of a refrigerator with open doors and internal shelves, shown in two circular insets (no text or symbols)
- Razstavite spodnji tečaj, pokrove za luknje in vijake; namestite spodnjo tečajno gred na drugi strani spodnjega tečaja in nato namestite tečaj na drugi strani.

natural_image
Line drawing of a refrigerator with three inset views showing internal components (no text or symbols)
POZOR
Lučki LED 1 in LED 4 svetita Senzor temperature okolice
POZOR
natural_image
Illustration of hands holding a rectangular object with arrows indicating movement or force (no text or symbols)
Čiščenje steklene police
natural_image
Illustration of a hand interacting with a laptop screen, showing upward arrows and a magnified view of the screen (no text or symbols)
natural_image
Diagram of a mechanical component with an arrow indicating direction (no text or symbols)
Nedelovanje
Izpad napajanja:
District, Guangzhou City, Guangdong Province,
Kitajska
Družba Guangzhou Midea Hualing Refrigerator Co., Ltd., izjavlja, da so zgoraj navedeni izdelki skladni z zgoraj navedenimi trenutno veljavnimi uredbami in standardi.
SCRISOARE DE MULTUMIRE
1 Iluminare LED
3 Sertar
2 Raft
4 Tavă uşă
ATENTIE
ATENTIE
natural_image
Line drawing of a two-tier refrigerator with front door and side panels (no text or symbols)

natural_image
Line drawing of a refrigerator with open doors and internal shelves, shown in two circular insets (no text or symbols)
natural_image
Line drawing of a refrigerator with three inset views showing internal components (no text or symbols)
ATENTIE
Compartiment frigorific
natural_image
Illustration of hands holding a rectangular object with arrows indicating movement or force (no text or symbols)
natural_image
Illustration of a hand interacting with a flat surface, showing upward arrows and a magnified view of the surface (no text or symbols)
natural_image
Diagram of a door handle with an arrow indicating direction (no text or symbols)
Scoaterea din uz
Pană de curent:
natural_image
Line drawing of a refrigerator with three inset diagrams showing exterior and front views (no text or symbols)
natural_image
Line drawing of a refrigerator with open doors and internal shelves, shown in two circular insets (no text or symbols)
natural_image
Line drawing of a modern refrigerator with three inset diagrams showing internal components (no text or symbols)
ЗАБЕЛЕЖКА
natural_image
Illustration of hands holding a rectangular object with arrows indicating movement or force (no text or symbols)
natural_image
Illustration of a hand interacting with a laptop screen, showing upward arrows and a magnified view of the screen (no text or symbols)
natural_image
Diagram of a mechanical component with an arrow indicating direction (no text or symbols)
Не работи
Спиране на тока:
1 Ndriçimi LED
3 Sirtar
2 Raft
4 Tabakaja e derës
MBANI PARASYSH
natural_image
Line drawing of a refrigerator with three inset diagrams showing exterior and interior views (no text or symbols)
AL
natural_image
Line drawing of a refrigerator with open doors and internal shelves, shown in two circular insets (no text or symbols)
natural_image
Line drawing of a refrigerator with three inset diagrams showing mechanical components (no text or symbols)
AL
MBANI PARASYSH
natural_image
Illustration of hands holding a rectangular object with arrows indicating movement or force (no text or symbols)
Pastrimi i raftit prej xhami
natural_image
Illustration of a hand interacting with a flat surface, showing upward arrows and a magnified view of the surface (no text or symbols)
natural_image
Diagram of a door handle with an arrow indicating direction (no text or symbols)
Kur nuk përdoret
Ndërprerje energjie:
District, Guangzhou City, Guangdong Province,
natural_image
Line drawing of a modern refrigerator with front panel and side door (no text or symbols)
natural_image
Line drawing of a refrigerator with open doors and internal shelves, shown in two circular insets (no text or symbols)
ΠΡΟΣΟΧΗ
natural_image
Illustration of hands holding a rectangular object with arrows indicating force or movement (no text or symbols)
natural_image
Illustration of a hand holding a flat surface with upward arrows, showing a small inset image of a roof structure (no text or symbols)
natural_image
Diagram of a mechanical component with an arrow indicating motion or force (no text or symbols present)
Διακοπή λειτουργίας
Διακοπή ρεύματος:
District, Guangzhou City, Guangdong Province, P.R.China
make yourself at home

www.midea.com
© Midea 2022 all rights reserved