
S09EH - Air conditioner LG - Free user manual and instructions
Find the device manual for free S09EH LG in PDF.
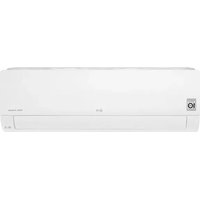


| Product type | Wall-mounted split air conditioner (wall mount) |
| Model | LG S09EH |
| Indoor unit dimensions (W x H x D) | Approx. 83.7 x 30.3 x 21.3 cm |
| Outdoor unit dimensions (W x H x D) | Approx. 71.6 x 48.5 x 27.6 cm |
| Indoor unit weight | Approx. 10.5 kg |
| Outdoor unit weight | Approx. 31.2 kg |
| Power supply | 220-240 V ~ 50 Hz |
| Refrigerant | R32 (flammable) |
| Operating modes | Cooling, heating, dehumidification, fan, auto changeover |
| Jet mode | Rapid cooling or heating (30 min) |
| Fan speed control | 5 speeds + Natural breeze |
| Timer function | On/Off timer, sleep timer (up to 7h), simple timer |
| Special functions | Ionizer, Plasma, Auto cleaning, Quiet, Energy control, Energy display, Comfort air |
| Connectivity | Built-in Wi-Fi (2.4 GHz) via LG ThinQ app |
| Self-diagnosis | Smart diagnosis via app or sound diagnosis |
| Filters | Air filter (washable every 15 days), anti-allergen filter (optional, vacuum every 6 months) |
| Maintenance and cleaning | Clean the air filter every 2 weeks; clean the indoor unit with a soft cloth; call a professional for annual cleaning of coils and condensate pan |
| Safety | Auto shut-off in case of failure, surge protection, mandatory grounding, use of flammable R32 refrigerant (safety precautions) |
| Spare parts and repairability | Filters available; repair by certified technician; open source code available for software components |
| General information | Device recyclable; take-back at delivery; collection points at www.quefairedemesdechets.fr |
Frequently Asked Questions - S09EH LG
User questions about S09EH LG
0 question about this device. Answer the ones you know or ask your own.
Ask a new question about this device
Download the instructions for your Air conditioner in PDF format for free! Find your manual S09EH - LG and take your electronic device back in hand. On this page are published all the documents necessary for the use of your device. S09EH by LG.
USER MANUAL S09EH LG
Read this owner's manual thoroughly before operating the appliance and keep it handy for reference at all times.
TYPE: WALL MOUNTED
Original instruction
EN ENGLISH
FR FRANÇAIS
EL EΛΛΗΝΙΚΑ
NL NEDERLANDS
PL POLSKI
HU MAGYAR
BG БЪЛГАРСКИ
HR HRVATSKI
CZ ČEŠTINA
ET EESTI
MT MALTI
RO ROMÂNĂ
SK SLOVENČINA
SL SLOVENŠČINA
LV LATVIEŠU
LT LIETUVIŲ
GA GAEILGE
SR SRPSKI
МК МАКЕДОНСКИ
SQ SHQIP
BS BOSANSKI
MFL69780808
Rev.09_092024
TABLE OF CONTENTS
This manual may contain images or content different from the model you purchased.
This manual is subject to revision by the manufacturer.
SAFETY INSTRUCTIONS .... 3
IMPORTANT SAFETY INSTRUCTIONS....4
OPERATION 11
Notes for Operation 11
Parts and Functions.... 11
Wireless Remote Control....12
Restarting the Air Conditioner Automatically 17
Using the Mode Function....17
Using the Jet Mode Function....20
Using the Fan Speed Function....21
Using the Air Flow Direction Function....21
Setting the On/Off Timer....22
Using the Sleep Function (Optional)....23
Using the Simple Timer Function (Optional)....23
Using the Energy Display Function (Optional)....24
Using the Light Off Function (Optional) 24
Using the Comfort Air Function (Optional)....24
Using the Energy Control Function (Optional)....25
Using Special Functions....25
SMART FUNCTIONS....27
LG ThinQ Application....27
Smart Diagnosis 29
MAINTENANCE....30
Clean the Air Filter 32
Clean the Allergy Filter (Optional)....33
TROUBLESHOOTING 34
The following safety guidelines are intended to prevent unforeseen risks or damage from unsafe or incorrect operation of the appliance.
The guidelines are separated into ‘WARNING’ and ‘CAUTION’ as described below.

This symbol is displayed to indicate matters and operations that can cause risk. Read the part with this symbol carefully and follow the instructions in order to avoid risk.

WARNING
This indicates that the failure to follow the instructions can cause serious injury or death.

CAUTION
This indicates that failure to follow the instructions can cause minor injury or damage to the product.
The following symbols are displayed on indoor and outdoor units. (for R32)

This symbol indicates that this appliance uses a flammable refrigerant. If the refrigerant leaks and is exposed to an external ignition source, there is a risk of fire.

This symbol indicates that the Operation Manual should be read carefully.

This symbol indicates that service personnel should handle this equipment with reference to the Installation Manual.

This symbol indicates that information is available, such as the Operating Manual or Installation Manual.
IMPORTANT SAFETY INSTRUCTIONS

WARNING
To reduce the risk of explosion, fire, death, electric shock, injury, or scalding to persons when using this product, follow basic precautions, including the following:
Children in the Household
This appliance is not intended for use by persons (including children) with reduced physical, sensory, or mental capabilities, or lack of experience and knowledge, unless they have been given supervision or instruction concerning use of the appliance by a person responsible for their safety. Children should be supervised to ensure that they do not play with the appliance.
For use in Europe:
This appliance can be used by children aged from 8 years and above and persons with reduced physical, sensory, or mental capabilities or lack of experience and knowledge if they have been given supervision or instruction concerning use of the appliance in a safe way and understand the hazards involved. Children shall not play with the appliance. Cleaning and user maintenance shall not be made by children without supervision.
Installation
- Do not install the air conditioner on an unstable surface or in a place where there is danger of it falling.
- Contact an authorized service center when installing or relocating the air conditioner.
- Install the panel and the cover of the control box safely.
- Do not install the air conditioner in a place where flammable liquids or gases such as gasoline, propane, paint thinner, etc., are stored.
- Make sure that the pipe and the power cable connecting the indoor and outdoor units are not pulled too tight when installing the air conditioner.
- Use standard circuit breaker and fuse that conform to the rating of the air conditioner.
- Do not input air or gas into the system except with the specific refrigerant.
- Use non-flammable gas (nitrogen) to check for leak and to purge air; using compressed air or flammable gas may cause fire or explosion.
- The indoor/outdoor wiring connections must be secured tightly, and the cable should be routed properly so that there is no force pulling the cable from the connection terminals. Improper or loose connections can cause heat generation or fire.
- Install dedicated electric outlet and circuit breaker before using the air conditioner.
- Do not connect the ground wire to a gas pipe, a lightning rod, or a telephone ground wire.
- Keep any required ventilation openings clear of obstruction. (for R32)
- Means for disconnection must be incorporated in the fixed wiring in accordance with the wiring rules.
- Do not install the unit in potentially explosive atmospheres.
Operation
Be sure to use only those parts listed in the service parts list. Never attempt to modify the equipment.
- Make sure that children do not climb on or hit the outdoor unit.
- Dispose of the batteries in a place where there is no danger of fire.
- Use only the refrigerant specified on the air conditioner label.
- Cut off the power supply if there is any noise, smell, or smoke coming from the air conditioner.
- Do not leave flammable substances such as gasoline, benzene, or thinner near the air conditioner.
- Contact an authorized service center when the air conditioner is submerged by flood waters.
- Do not use the air conditioner for an extended period of time in a small place without proper ventilation.
- In the event of a gas leak (such as Freon, propane gas, LP gas, etc.) ventilate sufficiently before using the air conditioner again.
- Be sure to ventilate sufficiently when the air conditioner and a heating appliance such as a heater are used simultaneously.
- Do not block the inlet or outlet of air flow.
- Do not insert hands or other objects through the air inlet or outlet while the air conditioner is operating.
- Make sure that the power cable is neither dirty, loose, nor broken.
- Never touch, operate, or repair the air conditioner with wet hands.
- Do not place any objects on the power cable.
- Do not place a heater or other heating appliances near the power cable.
- Do not modify or extend the power cable. Scratches or peeling insulation on the power cables may result in fire or electric shock, and should be replaced.
- Cut off the power supply immediately in the event of a blackout or a thunderstorm.
- Take care to ensure that power cable could not be pulled out or damaged during operation.
- Do not touch refrigerant pipe, water pipe and any internal parts while the unit is operating or immediately after operation.
Maintenance
- Do not clean the appliance by spraying water directly onto the product.
- Before cleaning or performing maintenance, disconnect the power supply and wait until the fan stops.
Technical Safety
- Installation or repairs made by unauthorized persons can pose hazards to you and others.
- Any person who is involved with working on or breaking into a refrigerant circuit should hold a current valid certificate from an industry-accredited assessment authority, which authorizes their competence to handle refrigerants safely in accordance with an industry recognized assessment specification. (for R32)
- Servicing shall only be performed as recommended by the equipment manufacturer. Maintenance and repair requiring the assistance of other skilled personnel shall be carried out under the supervision of the person competent in the use of flammable refrigerants. (for R32)
- The information contained in the manual is intended for use by a qualified service technician who is familiar with the safety procedures and equipped with the proper tools and test instruments.
- Failure to read and follow all instructions in this manual can result in equipment malfunction, property damage, personal injury and/or death.
- The appliance shall be installed in accordance with national wiring regulations.
- When the power cord is to be replaced, the replacement work shall be performed by authorized personnel using only genuine replacement parts.
- This appliance must be properly grounded to minimize risk of electric shock.
- Do not cut or remove the grounding prong from the power plug.
- Attaching the earth wire to the power outlet cover screw does not ground the appliance unless the cover screw is metal, uninsulated, and the power outlet is grounded through house wiring.
- If you have any doubt whether the air conditioner is properly grounded, have the power outlet and circuit checked by a qualified electrician.
- The refrigerant and insulation blowing gas used in the appliance require special disposal procedures. Consult a service agent or a similarly qualified person before disposing of them.
- If the supply cord is damaged, it must be replaced by the manufacturer, its service agent or similarly qualified person in order to avoid a hazard.
- The appliance shall be stored in a well-ventilated area where the room size corresponds to the room area as specified for operation. (for R32)
- The appliance shall be stored in a room without continuously operating open flames (for example an operating gas appliance) and ignition sources (for example an operating electric heater). (for R32)
- The appliance shall be stored so as to prevent mechanical damage from occurring. (for R32)

CAUTION
To reduce the risk of minor injury to persons, malfunction, or damage to the product or property when using this product, follow basic precautions, including the following:
Installation
- Do not install the air conditioner in an area where it is directly exposed to sea wind (salt spray). Install the drain hose properly for the smooth drainage of water condensation.
- Exercise caution when unpacking or installing the air conditioner.
- Do not touch the leaking refrigerant during installation or repair.
Transport the air conditioner with two or more people or use a forklift.
Install the outdoor unit such that it is protected from direct sunlight. Do not place the indoor unit in a place where it is directly exposed to sunlight via the windows.
- Safely dispose of packing materials such as screws, nails, plastic bags, or batteries using proper packaging after installation or repair. Install the air conditioner in a place where the noise from the outdoor unit or the exhaust fumes will not inconvenience the neighbors. Failure to do so may result in conflict with the neighbors.
Operation
Remove the batteries if the remote control is not to be used for an extended period of time.
- Make sure that the filter is installed before operating the air conditioner.
- Be sure to check if there is a refrigerant leak after installing or repairing the air conditioner.
- Do not place any object on the air conditioner.
- Never mix different types of batteries, or old and new batteries for the remote control.
- Do not let the air conditioner run for a long time when humidity is very high or when a door or a window has been left open.
- Stop using the remote control if there is a fluid leak in the battery. If your clothes or skin are exposed to the leaking battery fluid, wash off with clean water.
- Do not expose people, animals, or plants to the cold or hot wind from the air conditioner for extended periods of time.
- If the leaking battery fluid has been swallowed, rinse the inside of the mouth thoroughly and consult a doctor.
- Do not drink the water drained from the air conditioner.
- Do not use the product for special purposes, such as preserving foods, works of art, and etc. It is an air conditioner for consumer purposes, not a precision refrigeration system. There is risk of damage or loss of property.
- Do not recharge or disassemble the batteries.
Maintenance
- Never touch the metal parts of the air conditioner when removing the air filter.
- Use a sturdy stool or ladder when cleaning, maintaining, or repairing the air conditioner at a height.
- Never use strong cleaning agents or solvents when cleaning the air conditioner or spray water. Use a smooth cloth.
- To clean the interior, contact an authorized service center or dealer. Using harsh detergents may cause corrosion or damage to the unit.
Notes for Operation
Suggestion for Energy Saving
- Do not over-cool the space. This may be harmful for your health and may consume more electricity.
- Block sunlight with blinds or curtains while you are operating the air conditioner.
- Keep doors or windows closed tightly while you are operating the air conditioner.
- Adjust the direction of the air flow vertically or horizontally to circulate indoor air.
- Speed up the fan to cool or warm indoor air quickly, within a short period of time.
- Open windows regularly for ventilation. The indoor air quality may deteriorate if the air conditioner is used for long durations.
- Clean the air filter once every 2 weeks. Dust and impurities collected in the air filter may block the air flow or reduce the unit performance.
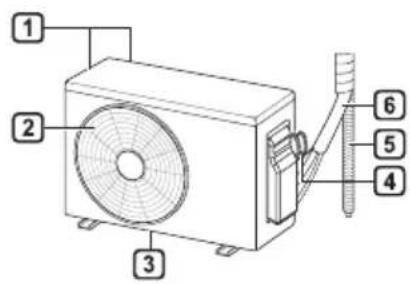
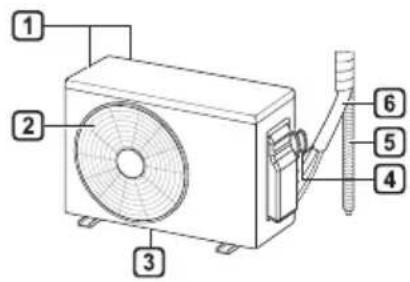
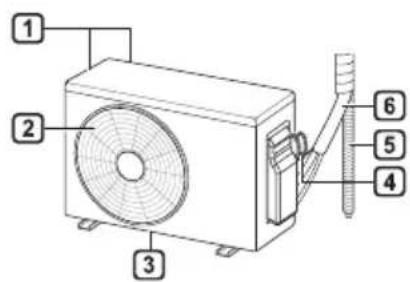
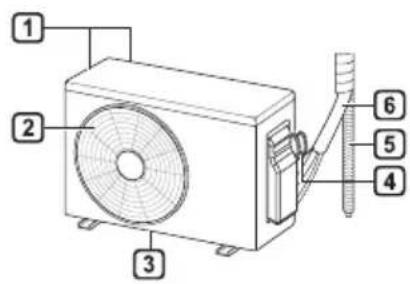
Parts and Functions
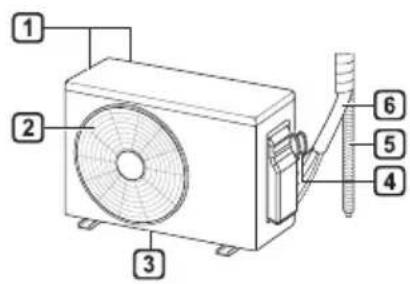
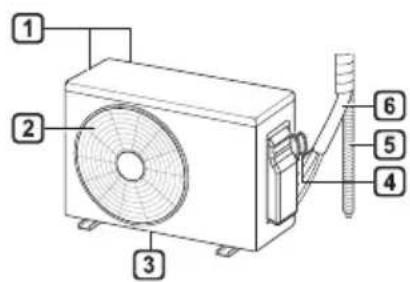
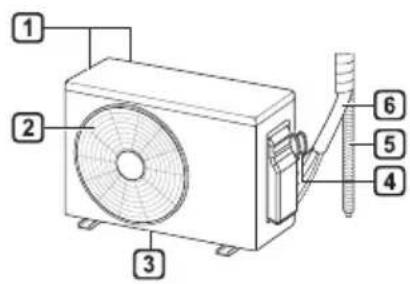
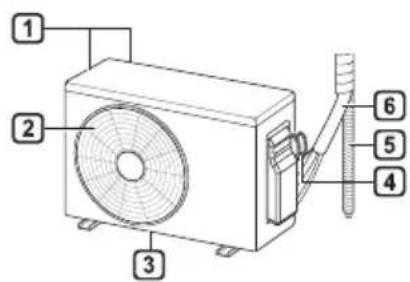
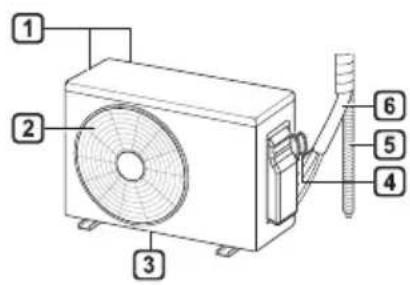
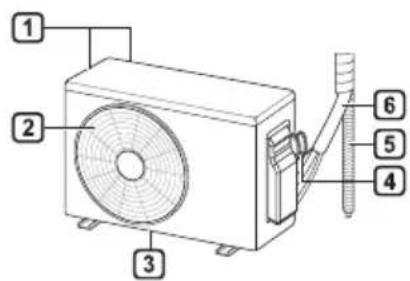
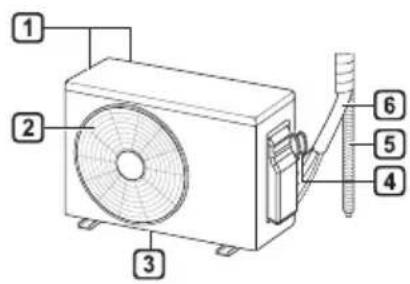
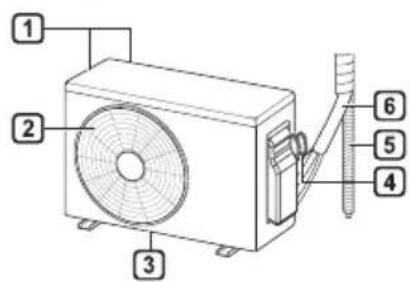
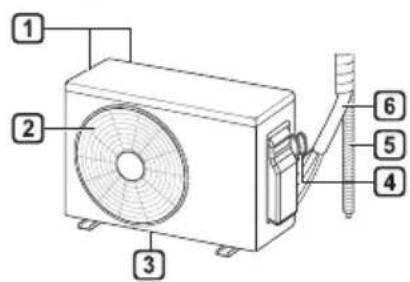
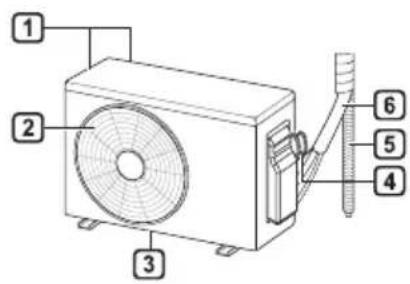
Indoor Unit Outdoor Unit
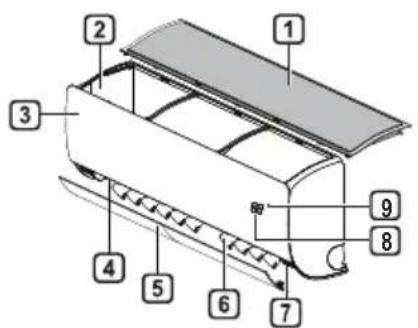
1 Air Filter 2 Air Intake 3 Front Cover 4 Air Outlet 5 Air Deflector (Horizontal Vane) 6 Air Deflector (Vertical Louver) 7 On/Off Button 8 Display 9 Signal Receiver
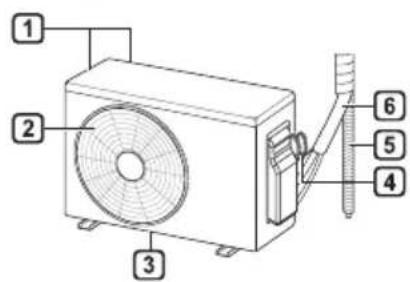
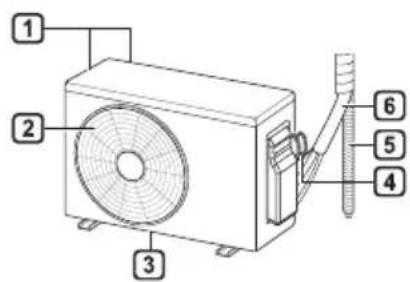
1 Air Intake Vents 2 Air Outlet Vents 3 Base Plate 4 Power Supply Cable 5 Drain Hose 6 Refrigerant Pipes
NOTE
- The number and location of operation lamps may vary according to the model of the air conditioner.
- The feature may be changed according to the type of model.
Wireless Remote Control Inserting Batteries
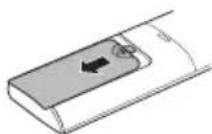
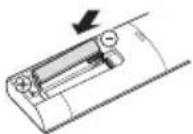
If the display screen of the remote control begins to fade, replace the batteries. Insert AAA (1.5 V) batteries before using the remote control.
1 Remove the battery cover.
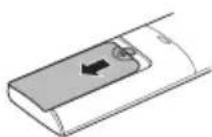
2 Insert the new batteries and make sure that the + and - terminals of the batteries are installed correctly.

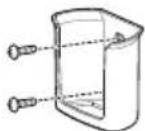
Installing the Remote Control Holder (Optional)
To protect the remote control, install the holder where there is no direct sunlight.
1 Choose a safe and easily accessible location.
2 Fix the holder by fastening 2 screws firmly with a screwdriver.
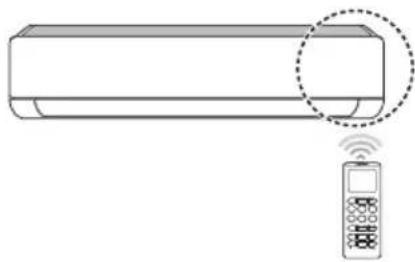
Operating Method
Point the remote control towards the signal receiver at the right side of the air conditioner to operate it.
NOTE
- The remote control may operate other electronic devices if it is directed towards them. Make sure to point the remote control towards the air conditioner signal receiver.
- For proper operation, use a soft cloth to clean the signal transmitter and receiver.
- In case of a function not provided in the product, no buzzer sound occurs from the product when a button for such function on the remote control is pressed except for Air Flow Direction (SWING), Energy Display (kw[3 s]), Air Purification function (
Setting the Current Time
1 Insert batteries.
- The icon below blinks at the bottom of the display screen.

2 Press or button to select the minutes. 3 Press SET/CANCEL button to finish.
NOTE
- The On/Off Timer is available after setting the current time.
Using the °C/°F Conversion Function (Optional)
This function changes unit between °C and °F
- Press and hold button about 5 seconds.
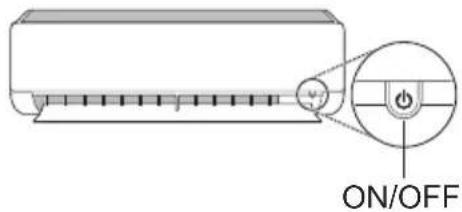
Operating the Air Conditioner without the Remote Control
You can use the ON/OFF button of the indoor unit to operate the air conditioner when the remote control is unavailable.
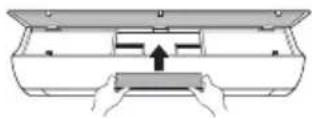
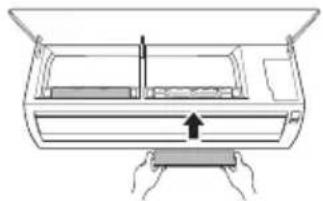
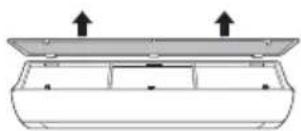
1 Open the front cover (Type2) or horizontal vane (Type1).
2 Press the ON/OFF button.
Type1
Type2
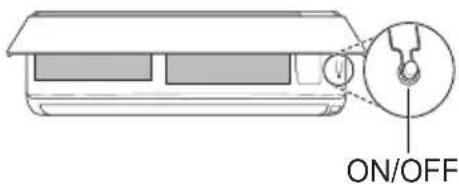
NOTE
- The stepping motor may be broken, if the horizontal vane opens rapidly. • The fan speed is set to high.
- The feature may be changed according to the type of model.
- The temperature cannot be altered when using this emergency ON/OFF button.
- For cooling & heating models, the temperature is set from 22 °C to 24 °C
Using Wireless Remote Control
You can operate the air conditioner more conveniently with the remote control.
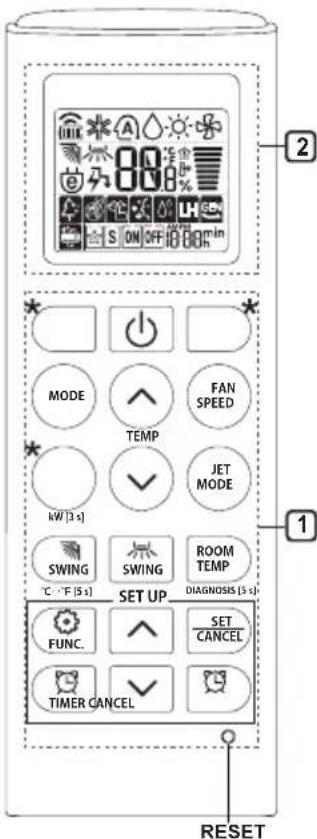
![2 * MODE FAN SPEED TEMP JET MODE kW [3 s] SWING SWING ROOM TEMP DIAGNOSIS [5 s] SET UP FUNC. SET CANCEL TIMER CANCEL RESET](/content/2026/05/747298/images/771e0c3c3682059e995049e3911dee0cd48c289c2087fdf4ea1b00c052da0f93.jpg)
| 1Button | 2DisplayScreen | Description | Available Function | |
| Single Split | Multi | |||
| - | To turn on/off the air conditioner. | ○ | ○ | |
| 88° | To adjust the desired room temperature in cooling, heating or auto changeover mode. | ○ | ○ | |
| MODE | To select the cooling mode. | ○ | ○ | |
| To select the heating mode. | ○ | ○ | ||
| To select the dehumidification mode. | ○ | ○ | ||
| To select the fan mode. | ○ | ○ | ||
| To select the auto changeover/auto operation mode. | ○ | ○ | ||
| JET MODE | Po | To change room temperature quickly. | ○ | ○ |
| FAN SPEED | To adjust the fan speed. | ○ | ○ | |
| To adjust the air flow direction vertically or horizontally. | ○ | ○ | ||
NOTE
- * buttons may be changed according to the type of model.
- When connected to the Multi Outdoor unit, the Energy Display, Energy Control, Silent and Smart Diagnosis function may not be supported.
![S ON OFF 100% * MODE FAN SPEED TEMP JET MODE kW [3 s] SWING SWING ROOM TEMP °C °F [5 s] SET UP DIAGNOSIS (5 s) FUNC. SET CANCEL TIMER CANCEL RESET](/content/2026/05/747298/images/d31502862a440b66fdca705543dee62e350f4daab8cf057c9b41b2421e54e8b8.jpg)
2
1
| [8425]Button | [3537]DisplayScreen | Description | Available Function | |
| Single Split | Multi | |||
 |   | To turn on/off air conditioner automatically at desired time. | O | O |
| SET/CANCEL | - | To set/cancel the special functions and timer. | O | O |
 | - | To cancel the timer settings. | O | O |
| [3672] | [187X] | |||
| *LIGHT OFF | - | To set the brightness of the display on the indoor unit. | O | O |
| ROOM TEMP | [YKST] | To display the room temperature. | O | O |
| °C←°F[5 s] | [7TA2] | To change unit between °C and °F | O | O |
| *COMFORT AIR | 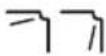 | To adjust the air flow to deflect wind. | O | O |
| kW[3 s] | - | To set whether or not to display information regarding energy. | O | X |
| *ENERGY CTRL. | 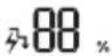 | To bring the effect of the power saving. | O | X |
| DIAGNOSIS[5 s] | - | To conveniently check maintenance information of a product. | O | X |
![2 MODE FAN SPEED TEMP JET MODE kW [3 s] SWING SWING ROOM TEMP °C / °F [5 s] SET UP DIAGNOSIS [5 s] FUNC. SET CANCEL TIMER CANCEL RESET](/content/2026/05/747298/images/9b4d4a641b1288faa91815428d569b4277bab8044f82018f9d433fec6fab06b4.jpg)
| 1Button | 2DisplayScreen | Description | Available Function | |
| Single Split | Multi | |||
| The lon generator uses millions of ions to help improve indoor air quality. | O(Optional) | O(Optional) | ||
| To reduce noise from outdoor units. | O | X | ||
| To remove moisture generated inside the indoor unit. | O | O | ||
| RESET - | To initialize the remote control settings. | O | O | |
NOTE
• Some functions may not be supported, depending on the model. - * buttons may be changed according to the type of model. - Press the SET/CANCEL button to operate the selected FUNC..
Restarting the Air Conditioner Automatically
When the air conditioner is turned on again after a power failure, this function restores the previous settings.
Disabling Auto Restart
1. Open the front cover (Type2) or horizontal vane (Type1).
2. Press and hold the ON/OFF button for 6 seconds. The unit will beep twice and the lamp will blink 4 times.
- To re-enable the function, press and hold the ON/OFF button for 6 seconds. The unit will beep twice and the lamp will blink 4 times.
Type1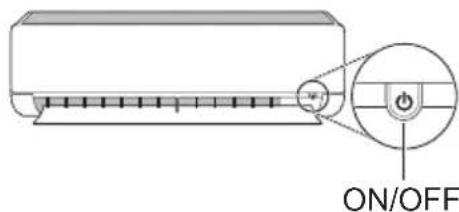
Type2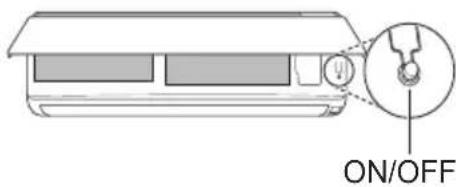
NOTE
- The feature may vary depending on the model.
- If you press and hold the ON/OFF button for 3–5 seconds instead of 6 seconds, the unit will switch to test operation. In test operation, the unit blows strong cooling air for 18 minutes and then returns to factory default settings.
Using the Mode Function
This function allows you to select the desired function.
![graph TD A[" Cooling Mode "] --> B[" Auto Changeover Mode / Auto Operation(AI) Mode "] B --> C[" Dehumidification Mode "] C --> D[" Heating Mode "] D --> E[" Fan Mode "]](/content/2026/05/747298/images/7f0e9424a3640972e58b3aa6d1efd91b9efd650c270d97fd8e703baf361e59b8.jpg)
Cooling Mode
1. Turn the appliance on.
2. Press the MODE button repeatedly to select Cooling Mode.
* is displayed on the display screen.
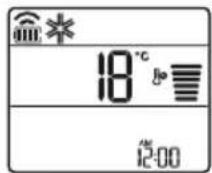
3 Press the or button to set the desired temperature.
Auto Operation (Artificial Intelligence)
Multi Model
In this operation mode, the system is automatically operated by the electronic controls.
1 Turn the appliance on.
2 Press the MODE button repeatedly to select the Auto Operation.
A is displayed on the display screen.
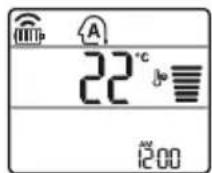
3 Press the or button to set the desired temperature.
4 Press the FAN SPEED button to adjust the fan speed.
Auto Changeover Mode
Single Split Model
This mode changes the mode automatically to maintain the set temperature at ±2°C.
1 Turn the appliance on.
2 Press the MODE button repeatedly to select the Auto Changeover Mode.
A is displayed on the display screen.
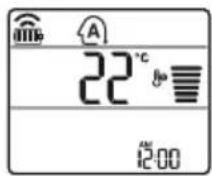
3 Press the or button to set the desired temperature.
4 Press the FAN SPEED button to adjust the fan speed.
Dehumidification Mode
This mode removes excess moisture from a highly humid environment or during the rainy season, in order to prevent mildew from setting in. This mode adjusts the room temperature and the fan speed automatically to maintain the optimal level of humidity.
1 Turn the appliance on.
2 Press the MODE button repeatedly to select the Dehumidification Mode.
is displayed on the display screen.
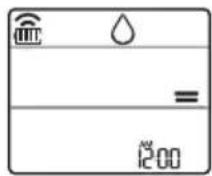
NOTE
- In this mode you cannot adjust the room temperature; it is adjusted automatically.
- The room temperature is not displayed on the display screen.
- In the dehumidification mode, the compressor and indoor fan may not operate when the room temperature is below 24 °C.
Heating Mode
1 Turn the appliance on.
2 Press the MODE button repeatedly to select the Heating Mode.
is displayed on the display screen.

3 Press the or button to set the desired temperature.
NOTE
will be displayed on the indoor unit when defrosting is operating.
• Furthermore, this indication will be displayed on the indoor unit:
- When preheating is operating.
- When the room temperature has been reached to the set temperature.
Fan Mode
This mode only circulates the indoor air without changing the room temperature.
1 Turn the appliance on.
2 Press the MODE button repeatedly to select the Fan Mode.
is displayed on the display screen.
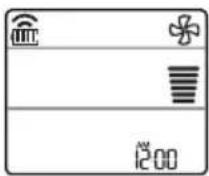
3 Press the FAN SPEED button to adjust the fan speed.
NOTE
On or will be displayed on the indoor unit when fan mode is operating.
Using the Jet Mode Function Changing Room Temperature Quickly
This function allows you to cool indoor air quickly during the summer or warm it quickly during winter.
- The Jet Mode function is available with Cooling, Heating and Dehumidification Mode.
1 Turn the appliance on.
2 Press MODE button repeatedly to select the desired mode.
3 Press JET MODE button.
Po is displayed on the display screen.
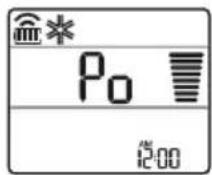
NOTE
- Jet Heating Mode is not available on some models.
- In Jet Cooling Mode, strong air blows out for 30 minutes. • After 30 minutes later, setting temperature is maintaining 18 °C If you want to change the temperature, Press ⬤ or ⬇ button to set the desired temperature.
- In Jet Heating Mode, strong air blows out for 30 minutes.
• After 30 minutes later, setting temperature is maintaining 30\ °C If you want to change the temperature, Press
or button to set the desired temperature.
- This function may operate differently from the remote control display.
Using the Fan Speed Function
Adjusting the Fan Speed
Press the FAN SPEED button repeatedly to adjust the fan speed.
| Display Screen Speed | |
| [K5xW] | High |
 | Medium - High |
 | Medium |
 | Medium - Low |
| Low | |
| - Natural Wind | |
- Natural Wind
NOTE
The fan speed of Natural Wind adjusts automatically.
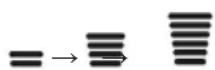
The fan speed icons are displayed on some indoor units.

On some models, the indoor unit display is shown for only 5 seconds and then returns to the set temperature.
Using the Air Flow Direction Function
This function adjusts the direction of the air flow vertically (horizontally).
Press the SWING button repeatedly and select the desired direction.
Select (SWING) to adjust the direction of the air flow automatically.
NOTE
- Adjusting the air flow direction horizontally may not be supported, depending on the model.
- Adjusting the air deflector arbitrarily may cause product failure.
- If you restart the air conditioner, it starts to operate with the previously set direction of air flow, so the air deflector may not match the icon displayed on the remote control. When this occurs, press the SWING button to adjust the direction of the air flow again.
- This function may operate differently from the remote control display.
Setting the On/Off Timer
This function sets the air conditioner to turn on/off automatically at desired time.
On/Off Timer can be set together.
Setting the On Timer
1 Press TIMER button repeatedly.
- The icon below blinks at the bottom of the display screen.
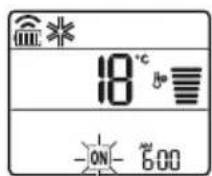
2 Press or button to select the minutes.
3 Press SET/CANCEL button to finish.
- After setting the timer, current time and ON icon are displayed on the display screen indicating that the desired time is set.
Canceling the On Timer
1 Press TIMER button repeatedly.
- The icon below blinks at the bottom of the display screen.
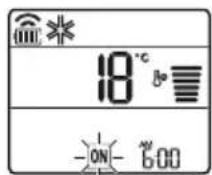
2 Press SET/CANCEL button to cancel the setting.
Setting the Off Timer
1 Press TIMER button repeatedly.
- The icon below blinks at the bottom of the display screen.
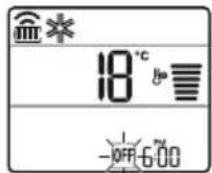
2 Press or button to select the minutes.
3 Press SET/CANCEL button to finish.
• After setting the timer, current time and OFF icon are displayed on the display screen indicating that the desired time is set.
NOTE
- This function is disabled when you set Simple Timer.
Canceling the Off Timer
1 Press TIMER button repeatedly.
- The icon below blinks at the bottom of the display screen.
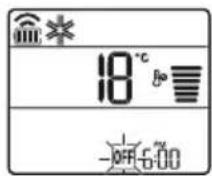
2 Press SET/CANCEL button to cancel the setting.
Canceling the Timer Setting
- Press button to cancel all timer settings.
Using the Sleep Function (Optional)
This function turns off the air conditioner automatically when you go to sleep.
1 Turn the appliance on.
2 Press the timer button repeatedly. - The icon below blinks at the bottom of the display screen.
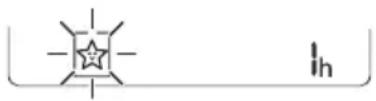
3 Press the ☑ or button to select the hour (up to 7 hours).
4 Press the SET/CANCEL button to finish. The setting is displayed on the display screen.
NOTE
This is displayed on some indoor units.
- The indoor unit display shows from 1H to 7H, which is displayed for only 5 seconds and then returns to the set temperature.
- In the Cooling and Dehumidification Mode, the temperature increases by 1 °C after 30 minutes and an additional 1 °C after another 30 minutes for a more comfortable sleep.
- The temperature increases up to 2 °C from the preset temperature.
- Although the fan speed remark on the display screen may change, the fan speed is adjusted automatically.
Using the Simple Timer Function (Optional)
This function turns off the air conditioner automatically when you go to sleep.
1 Turn the appliance on. 2 Press the TIMER button repeatedly.
- The icon below blinks at the bottom of the display screen.
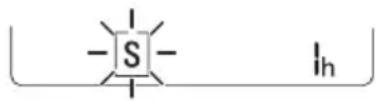
3 Press the or button to select the hour (up to 7 hours). 4 Press the SET/CANCEL button to finish. [S] is displayed on the display screen.
NOTE
- This function is disabled when you set Off Timer.
Using the Energy Display Function (Optional)
This function displays the amount of electricity generated on the indoor display as the product operates.
Display the Current Energy Usage
1. Turn the appliance on.
2. Press the ☐ button and hold it for about 3 seconds.
- The instantaneous power consumption (88) is displayed for a while on some indoor units.
NOTE
• The unit of the displayed value is kW. - It is not displayed on the wireless remote control. - If it is more than 99 kW, which is the range of expression, maintain it as 99 kW. - Display wattage under 10 kW with 0.1 kW unit, and display one over 10 kW with 1 kW unit. - The actual power may differ from the power displayed. - When connected to the Multi Outdoor unit, this function may not be supported.
Using the Light Off Function (Optional)
Display Screen Brightness
You can set the brightness of the indoor unit display screen.
- Press the LIGHT OFF button.
NOTE
- Turn on/off the display screen.
- If the brightness of an indoor appliance's display is set to OFF, pressing a button on the remote control automatically turns the display on for a while.
- This function may operate differently, depending on the model.
Using the Comfort Air Function (Optional)
Comfort Vane Operation
This function conveniently sets the vane to a preset position to deflect the supply air away from blowing directly onto the occupants in the room.
1. Turn the appliance on.
2. Press the COMFORT AIR button repeatedly and select the desired direction.
• or is displayed on the display screen.
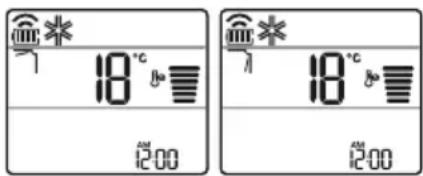
NOTE
-7 or L is displayed on some indoor units. - This function is disabled when you press the MODE or JET MODE button. - This function is disabled and auto swing of vertical direction is set up when you press the SWING button. - When this function is off, the horizontal vane operates automatically depending on the set mode.
Using the Energy Control Function (Optional)
1. Turn the appliance on.
2. Press the ENERGY CTRL. button.
- Press the ENERGY CTRL. button repeatedly to select each step.
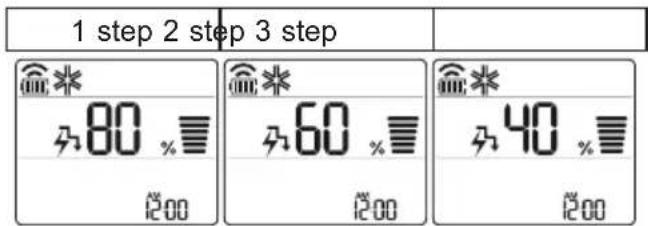
NOTE
- 1 step: The power input is decreased by 20% compared to rated power input.
80 is displayed on the display screen.
- 2 step: The power input is decreased by 40% compared to rated power input.
60 is displayed on the display screen.
- 3 step (Optional): The power input is decreased by 60% compared to rated power input.
40 is displayed on the display screen.
80 (1 step), 60 (2 step), 40 (3 step) is displayed on some indoor units.
(L(1 step), L(2 step) is displayed on some indoor units.)
- This function is available with Cooling Mode. - Capacity may decrease when Energy Control mode is selected.
- Desired temperature is displayed about 5 seconds if you press FAN SPEED, or button.
- Room temperature is displayed about 5 seconds if you press ROOM TEMP button.
- When connected to the Multi Outdoor unit, this function may not be supported.
Using Special Functions
1 Turn the appliance on.
2 Press FUNC. button repeatedly to select the desired function.
3 Press SET/CANCEL button to finish.
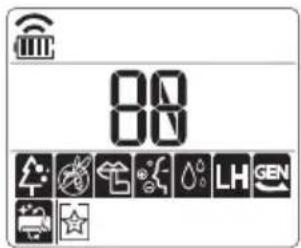
| Display Screen | Description |
 | The lon generator uses millions of ions to help improve indoor air quality. |
 | To reduce noise from outdoor units. |
 | To remove moisture generated inside the indoor unit. |
NOTE
• Some functions may not be supported, depending on the model.
- Some functions may operate differently from the remote control display.
Canceling Special Functions
1 Press FUNC. button repeatedly to select the desired function. 2 Press SET/CANCEL button to cancel the function.
Using the Air Purification Function
These functions supply clean and fresh air by ion particles and the filter.
| Function Display Description | ||
| Ionizer |  | Ion particles from lonizer reduce the surface bacteria and other harmful substances. |
| Plasma | It removes microscopic contaminants from the intake air completely to supply clean and fresh air. | |
NOTE
- You can use this function without turning the air conditioner on.
- Both the plasma lamp and the cooling lamp light up while Smoke Away/Plasma is in operation on some models.
- Do not touch ionizer during operation.
- This function may operate differently from the remote control display.
Using the Silent Function
This function prevents potential claims by neighbors, reducing noise from outdoor units.

is displayed on the display screen.
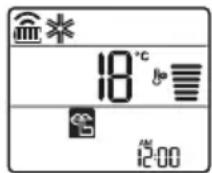
NOTE
- This function is disabled when you press MODE or ENERGY CTRL. or JET MODE button.
- This function is available with Cooling, Heating, Auto Changeover, Auto Operation Mode.
- When connected to the Multi Outdoor unit, this function may not be supported.
Using the Auto Clean Function
In the Cooling and Dehumidification Mode, moisture is generated inside the indoor unit. This function removes such moisture.

is displayed on the display screen.
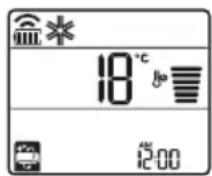
NOTE
- Some functions cannot be used while the Auto Clean function is in operation.
- If you turn off the unit, the fan continues to run for 30 minutes and cleans the inside of the indoor unit.
o is displayed on some indoor units, depending on the model.
LG ThinQ Application
This feature is only available on models with the 📄 or ThinQ logo.
The LG ThinQ application allows you to communicate with the appliance using a smartphone.
LG ThinQ Application Features
Communicate with the appliance from a smartphone using the convenient smart features.
Smart Diagnosis
If you experience a problem while using the appliance, this smart diagnosis feature will help you diagnose the problem.
Settings
Allows you to set various options on the appliance and in the application.
NOTE
- If you change your wireless router, internet service provider, or password, delete the registered appliance from the LG ThinQ application and register it again.
- The application is subject to change for appliance improvement purposes without notice to users. Functions may vary by model.
Before Using LG ThinQ Application
1. Check the distance between the appliance and the wireless router (Wi-Fi network).
- If the distance between the appliance and the wireless router is too far, the signal strength becomes weak. It may take a long time to register or installation may fail.
2. Turn off the Mobile data or Cellular Data on your smartphone.
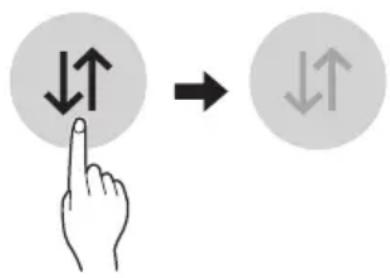
3. Connect your smartphone to the wireless router.
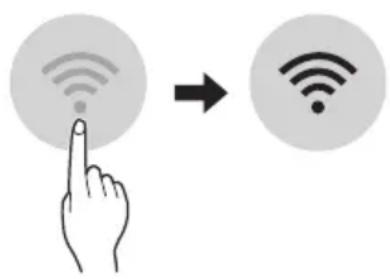
NOTE
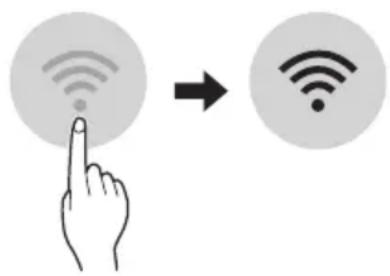
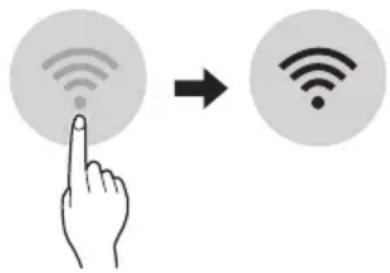
- To verify the Wi-Fi connection, check that the icon on the control panel is lit.
- The appliance supports 2.4 GHz Wi-Fi networks only. To check your network frequency, contact your Internet service provider or refer to your wireless router manual.
- LG ThinQ is not responsible for any network connection problems or any faults, malfunctions, or errors caused by network connection.
- If the appliance is having trouble connecting to the Wi-Fi network, it may be too far from the router. Purchase a Wi-Fi repeater (range extender) to improve the Wi-Fi signal strength.
- The Wi-Fi connection may not connect or may be interrupted because of the home network environment.
- The network connection may not work properly depending on the Internet service provider.
- The surrounding wireless environment can make the wireless network service run slowly.
- The appliance cannot be registered due to problems with the wireless signal transmission. Unplug the appliance and wait about a minute before trying again.
- If the firewall on your wireless router is enabled, disable the firewall or add an exception to it.
- The wireless network name (SSID) should be a combination of English letters and numbers. (Do not use special characters.)
- Smartphone user interface (UI) may vary depending on the mobile operating system (OS) and the manufacturer.
- If the security protocol of the router is set to WEP, you may fail to set up the network. Please change it to other security protocols (WPA2 is recommended) and register the product again.
Installing the LG ThinQ Application
Search for the LG ThinQ application from the Google Play Store or Apple App Store on a smartphone. Follow the instructions to download and install the application.
Open Source Software Notice Information
To obtain the source code that is contained in this product, under GPL, LGPL, MPL, and other open source licenses that have the obligation to disclose source code, and to access all referred license terms, copyright notices, and other relevant documents, please visit https://opensource.lge.com.
LG Electronics will also provide open source code to you on CD-ROM for a charge covering the cost of performing such distribution (such as the cost of media, shipping, and handling) upon email request to opensource@lge.com.
This offer is valid to anyone in receipt of this information for a period of three years after our last shipment of this product.
Smart Diagnosis
This feature is only available on models with the 🎨 or 🎨 logo.
Use this feature to help you diagnose and solve problems with your appliance.
NOTE
- For reasons not attributable to LGE's negligence, the service may not operate due to external factors such as, but not limited to, Wi-Fi unavailability, Wi-Fi disconnection, local app store policy, or app unavailability.
- The feature may be subject to change without prior notice and may have a different form depending on where you are located.
Using LG ThinQ to Diagnose Issues
If you experience a problem with your Wi-Fi equipped appliance, it can transmit troubleshooting data to a smartphone using the LG ThinQ application.
- Launch the LG ThinQ application and select the Smart Diagnosis feature in the menu. Follow the instructions provided in the LG ThinQ application.
Using Audible Diagnosis to Diagnose Issues
Follow the instructions below to use the audible diagnosis method.
- Launch the LG ThinQ application and select the Smart Diagnosis feature in the menu. Follow the instructions for audible diagnosis provided in the LG ThinQ application.
1. Plug the power plug into the outlet properly.
2. Place the mouthpiece of your smartphone close to the or logo.
3. Press and hold the DIAGNOSIS [5 s] button for 5 seconds or longer while holding the smartphone mouthpiece to the logo until the data transfer is complete.
- Keep the smartphone in place until the data transfer has finished. The time remaining for data transfer is displayed.
4. After the data transfer is complete, the diagnosis will be displayed in the application.
NOTE
- For best results, do not move the phone while the tones are being transmitted.
- Be sure to keep ambient noise to a minimum, or the phone may not correctly receive the buzzer beeps from the indoor unit.
WARNING
- Before cleaning or performing maintenance, disconnect the power supply and wait until the fan stops.
If the air conditioner will not be used for an extended period of time, dry the air conditioner to maintain it in best condition. Clean the product regularly to maintain optimal performance and to prevent possible breakdown.
- Dry the air conditioner in Fan mode for 3 to 4 hours and disconnect the power. There may be internal damage if moisture is left in its components.
- Before using the air conditioner again, dry the inner components of the air conditioner in Fan mode for 3 to 4 hours. This will help to remove the odor generated from moisture.
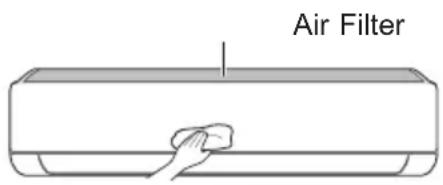
- The feature may be changed according to the type of model.
| Type Description | Interval | |
| AirFilterClean | with a vacuum or hand wash. 2 weeks | |
| Allergy Filter Clean | with a vacuum or brush. Every 6 months | |
| Ionizer (Optional) | Use dry cotton bud to remove any dust. Every 6 months | |
| IndoorUnit | Cleantheindoorunitsurfacebyusingasoft,drycloth.Regularly | |
| Have a professional clean the condensate drain pan. Once a year | ||
| Have a professional clean the condensate drain pipe. Every 4 months | ||
| Replace the remote control batteries. Once a year | ||
| OutdoorUnit | Have a professional clean the heat exchanger coils and the panel vents. (Consult with technician.) | Once a year |
| Have a professional clean the fan. Once a year | ||
| Have a professional clean the condensate drain pan. Once a year | ||
| Have a professional verify that all the fan assembly is firmly tightened. | Once a year | |
| Clean the electric components with air. Once a year |
NOTE
- Never use water that is higher than 40°C when you clean the filters. It may cause deformation or discoloration.
- Never use volatile substances when you clean the filters. They may damage the surface of the product.
- Do not wash the allergy filter with water, because the filter can be damaged (Optional).
Clean the Air Filter
Clean the air filters once every 2 weeks, or more, if necessary.
NOTE
• The air filter can be broken when it is bent. - When the air filter is not assembled correctly, dust and other substances can enter into the indoor unit.
Type1
If you look at the indoor unit from above it, can assemble the top filter easily.
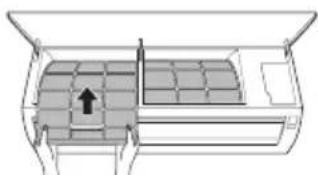
1 Turn off the power to the unit. 2 Hold the knobs of the air filter, lift it up slightly.
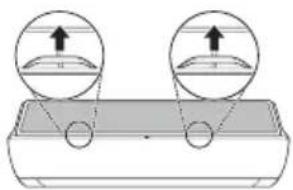
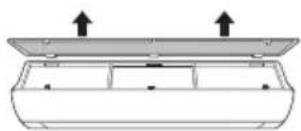
3 Remove it from the indoor unit. 4 Clean the filter with a vacuum cleaner or with lukewarm water with neutral detergent. 5 Dry the filter in the shade. 6 Insert the hooks of the air filter into the front cover.
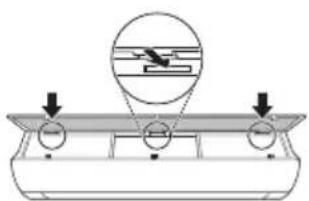
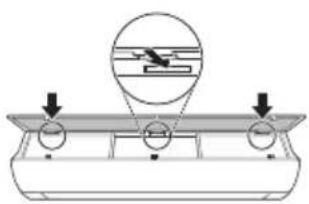
7 Push down hooks to assemble the air filter.
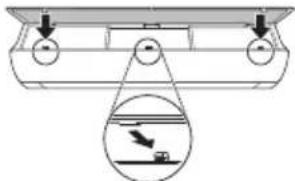
8 Check the side of the front cover for correct assembly of the air filter.
Type2
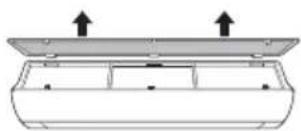
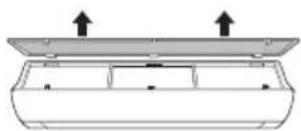
1 Turn off the power to the unit. 2 Open the front cover.
- Lift up both sides of the cover slightly.
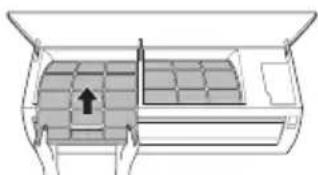
3 Hold the knobs of the air filters, pull them down slightly and remove them from the indoor unit.
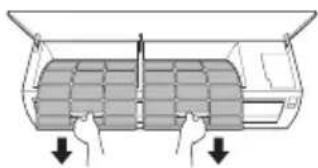
4 Clean the filters with a vacuum cleaner or with lukewarm water with neutral detergent. 5 Dry the filters in the shade. 6 Insert the hooks of the air filters into the front cover.
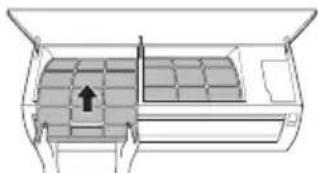
7 Check the side of the front cover for correct assembly of the air filters.
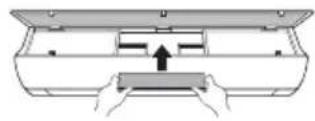
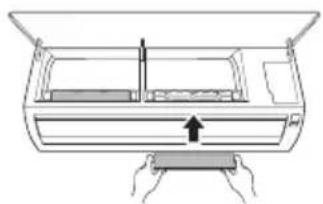
Clean the Allergy Filter (Optional)
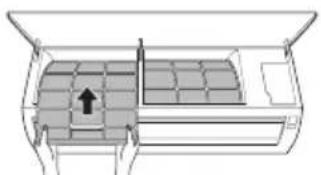
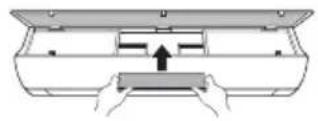
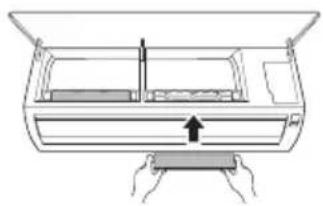
1 Turn off the power to the unit. 2 Remove the air filter from the indoor unit. 3 Remove the allergy filter from the indoor unit.
Type1
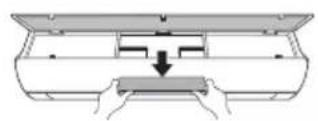
Type2
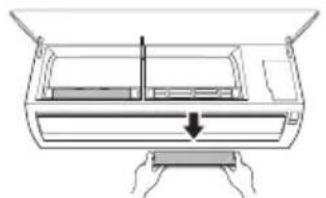
4 Clean the filter with a vacuum cleaner.
5 Insert the allergy filter.
Type1
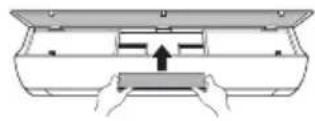
Type2
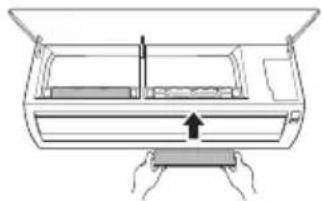
6 Assemble the air filter.
7 Check the side of the front cover for correct assembly of the air filter.
NOTE
- The feature and location of allergy filter may vary according to the type of model.
Self-diagnosis Function
This product has a built-in self-diagnosis function. If an error occurs, the lamp of the indoor unit will blink in 2 second intervals. If this occurs, contact your local dealer or service center.
Before Calling for Service
Please check the following before you contact the service center. If the problem persists, contact your local service center.
| Symptoms Possible Causes & Solution | |
| The air conditioner does not work normally. | Burning smell and strange sounds are coming from the unit.Turn off the air conditioner, switch OFF, or disconnect the power supply, and contact the service center. |
| Water leaks from the indoor unit even when the humidity level is low.Turn off the air conditioner, switch OFF, or disconnect the power supply, and contact the service center. | |
| The power cable is damaged or it is generating excessive heat.Turn off the air conditioner, switch OFF, or disconnect the power supply, and contact the service center. | |
| A switch, a circuit breaker (safety, ground), or a fuse is not operated properly.Turn off the air conditioner, switch OFF, or disconnect the power supply, and contact the service center. | |
| The unit generates an error code from its self-diagnosis.Turn off the air conditioner, switch OFF, or disconnect the power supply, and contact the service center. | |
| The air conditioner does not work. | The air conditioner is unplugged.Check whether the power cord is plugged into the outlet or the power isolators are switched on. |
| A fuse exploded, or the power supply is blocked.Replace the fuse or check if the circuit breaker has tripped. | |
| A power failure has occurred.Turn off the air conditioner when a power failure occurs.When the power is restored, wait 3 minutes, and then turn on the air conditioner. | |
| The voltage is too high or too low.Check if the circuit breaker has tripped. | |
| The air conditioner was turned off automatically at a preset time.Turn the air conditioner on. | |
| The battery setting in the remote controller is incorrect.Make sure that the batteries are inserted correctly in your remote controller.If the batteries are placed correctly, but the air conditioner still does not operate, replace the batteries and try again. | |
| The air conditioner does not emit cool air. | Air is not circulating properly.Make sure that there are no curtains, blinds, or pieces of furniture blocking the front of the air conditioner. |
| The air filter is dirty.Clean the air filter once every 2 weeks.See “Clean the Air Filter” for more information. | |
| The room temperature is too high.In summer, cooling the indoor air fully may take some time. In this case, select the Jet Mode to cool the indoor air quickly. | |
| Cold air is escaping from the room.Make sure that no cold air is escaping through the ventilation points in the room. | |
| The desired temperature is higher than the current temperature.Set the desired temperature to a level lower than the current temperature. | |
| There is a heating source nearby.Avoid using heat generators like electric ovens or gas burners while the air conditioner is in operation. | |
| Fan Mode is selected.During Fan Mode, air blows from the air conditioner without cooling or heating the indoor air.Switch the operation mode to cooling operation. | |
| Outside temperature is too high.The cooling effect may not be sufficient. | |
| The fan speed cannot be adjusted. | The Jet Mode, or Auto Operation Mode is selected.In some operation modes, you cannot adjust the fan speed. Select an operation mode in which you can adjust the fan speed. |
| The temperature cannot be adjusted. | The Fan Mode or Jet Mode is selected.In some operation modes, you cannot adjust the temperature. Select an operation mode in which you can adjust the temperature. |
| The air conditioner stops during operation. | The air conditioner is suddenly turned off.The Timer Function may have timed out, which turns the unit off. Check the timer settings. |
| A power failure has occurred during operation.Wait for the power to come back. If you have the Auto Restart function enabled, your unit will resume its last operation several minutes after power is restored. | |
| The indoor unit is still operating even when the unit has been turned off. | The Auto Clean function is being operated.Allow the Auto Clean function to continue since it removes any remaining moisture inside the indoor unit. If you do not want this feature, you can turn the unit off. |
| The air outlet on the indoor unit is discharging mist. | The cooled air from the air conditioner makes mist.When the room temperature decreases, this phenomenon will disappear. |
| Water leaks from the outdoor unit. | In the heating operations, condensed water drops from the heat exchanger.This symptom requires installing a drain hose under the base pan.Contact the installer. |
| There is noise or vibration. | A clicking sound can be heard when the unit starts or stops due to movement of the reversing valve.Creaking sound: The plastic parts of the indoor unit creak when they shrink or expand due to sudden temperature changes.Flowing or Blowing sound: This is the flow of refrigerant through the air conditioner.These are normal symptoms. The noise will stop. |
| The indoor unit gives off an odor. | Odors (such as cigarette smoke) may be absorbed into the indoor unit and discharged with airflow.If the smell does not disappear, you need to wash the filter. If this does not work, contact the service center to clean your heat exchanger. |
| The air conditioner does not emit warm air. | When Heating Mode starts, the vane is almost closed, and no air comes out, even though the outdoor unit is operating.This symptom is normal. Please wait until the unit has generated enough warm air to blow through the indoor unit. |
| The outdoor unit is in Defrosting Mode.In Heating Mode, ice/frost is built up on the coils when the outside temperature falls. This function removes a layer of frost on the coil, and it should finish in approximately 15 minutes. | |
| Outside temperature is too low.The heating effect may not be sufficient. | |
| Your home appliance and smartphone is not connected to the Wi-Fi network. | The password for the Wi-Fi that you are trying to connect to is incorrect.Find the Wi-Fi network connected to your smartphone and remove it, then register your appliance on LG ThinQ. |
| Mobile data for your smartphone is turned on.Turn off the Mobile data of your smartphone and register the appliance using the Wi-Fi network. | |
| The wireless network name (SSID) is set incorrectly.The wireless network name (SSID) should be a combination of English letters and numbers. (Do not use special characters.) | |
| The router frequency is not 2.4 GHz.Only a 2.4 GHz router frequency is supported. Set the wireless router to 2.4 GHz and connect the appliance to the wireless router. To check the router frequency, check with your Internet service provider or the router manufacturer. | |
| The distance between the appliance and the router is too far.If the distance between the appliance and the router is too far, the signal may be weak and the connection may not be configured correctly. Move the location of the router so that it is closer to the appliance. | |
NOTE
- Some functions may not be supported, depending on the model.
Memo
OWNER'S MANUAL
AIR CONDITIONER

Smart Diagnosis 29
MAINTENANCE....30
NOTE
NOTE
LG ThinQ Application
Smart Diagnosis
NOTE
Smart Diagnosis
NOTE
NOTE
NOTE
SMART FUNCTIONS....27
LG ThinQ application 27
Smart Diagnosis.... 29
MAINTENANCE....30
Clean the air filter 32
TROUBLESHOOTING....34
1 Air filter
2 Air inlet
3 Front panel
4 Air outlet
5 Air deflector (horizontal vane)
NOTE
NOTE
NOTE
6 Install the air filters.
NOTE
2
1
NOTE
NOTE
NOTE
NOTE
NOTE
Smart Diagnosis....29
SUPPORT 30
NOTE
NOTE
NOTE
IMPORTANT SAFETY INSTRUCTIONS 4
OPERATION 11
Operating notes....11
IMPORTANT SAFETY INSTRUCTIONS

WARNING
1 Air filter 2 Air inlet 3 Front cover 4 Air outlet 5 Air deflector (horizontal vane) 6 Air deflector (vertical louver) 7 Power on/off button 8 Display 9 Signal receiver
NOTE
| 1Gumb | 2Prikazzaslona | Opis | Dostupno Funkcija | |
| monosustavom | Multi | |||
| - | Za uključivanje/isključivanje klima-uređaja. | O | O | |
| 88° | Za prilagodbu željenesobne temperature unacinu hlađenja,grijanja ili automatskogprebacivanja. | O | O | |
| MODE | Za odabir načinahlađenja. | O | O | |
| Za odabir načinagrijanja. | O | O | ||
| Za odabir načinaodvlaživanja. | O | O | ||
| Za odabir načinaventilatora. | O | O | ||
| Za odabir načinaautomatskogprebacivanja /automatskog rada. | O | O | ||
| JETMODE | Po | Za brzu promjenusobne temperature. | O | O |
| FANSPEED | Za prilagodbu brzineventilatora. | O | O | |
| Za okomitu ilivodoravnu prilagodbusmjera protoka zraka. | O | O | ||
NOTE
- * The buttons may differ depending on the model type.
- When connected to an external multi unit, the energy display, energy control, quiet operation, and smart diagnosis functions may not be supported.
![S ON OFF 000 min * MODE FAN SPEED TEMP JET MODE KW [3 s] SWING SWING ROOM TEMP °C °F [5 s] SET UP DIAGNOSIS (5 s) FUNC. SET CANCEL TIMER CANCEL RESET](/content/2026/05/747298/images/e8b4055cb56d224d40855e0d57a17b246f179d6ffdacb4def2c570798931b42e.jpg)
2
1
| Gumb | Prikaz zaslona | Opis | Dostupno Funkcija | |
| mono sustavom | Multi | |||
 |  | Za uključivanje/isključivanje klima-uređaja automatski u željeno vrijeme. | O | O |
| SET/CANCEL | - | Za postavljanje/poništavanje posebnih funkcija i brojača. | O | O |
 | - | Za poništavanje postavki brojača. | O | O |
| ### | - | Za prilagodbu vremena. | O | O |
| *LIGHT OFF | - | Za postavljanje svjetline zaslona na unutarnjoj jedinici. | O | O |
| ROOM TEMP |  | Za prikaz sobne temperature. | O | O |
| °C↔°F [5 s] |  | Za promjenu jedinice između °C i °F | O | O |
| *COMFORT AIR |  | Za prilagodbu protoka zraka na skretanje strujanja zraka. | O | O |
| kW [3 s] | - | Za postavljanje želite li prikazati informacije o energiji. | O | X |
| *ENERGY CTRL. | 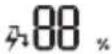 | Za pozivanje učinka uštede energije. | O | X |
| DIAGNOSIS [5 s] | - | Za jednostavno provjeravanje informacija o održavanju proizvoda. | O | X |
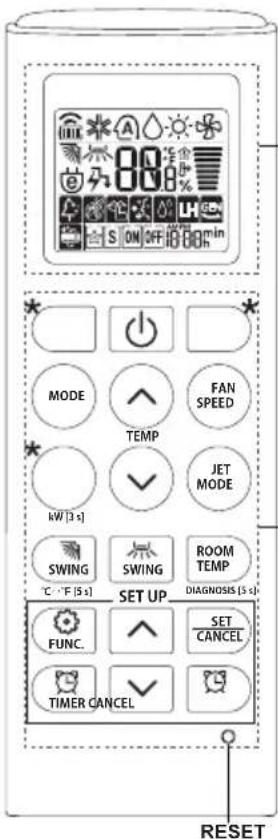
2
1
| 1Gumb | 2Prikazzaslona | Opis | Dostupno Funkcija | |
| monosustavom | Multi | |||
 |  | Generator iona koristimilijune iona kako bipomogao u poboljšanjukvalitete zraka uzatvorenom prostoru. | O(Neobavezno) | O(Neobavezno) |
 | Za smanjivanje bukevanjskih jedinica. | O | X | |
| [BOX4] | Za uklanjanje vlagekoja nastaje unutarunutarnje jedinice. | O | O | |
| RESET - | Za pokretanje postavkidaljinskog upravljača. | O | O | |
NOTE
- Some functions may not be supported depending on the model.
- * The buttons may differ depending on the model type.
- Press the SET/CANCEL button to manage the selected FUNC.
Automatic restart of the air conditioner
When the air conditioner is turned on again after a power outage, this function restores the previous settings.
Disabling automatic restart
1 Open the front panel (Type 2) or the horizontal blade (Type 1).
NOTE
• 7 ili is displayed on some indoor units. - This function is disabled when you press the MODE or JET MODE button. - This function is disabled and automatic vertical swing is set when you press the SWING button. - When this function is turned off, the horizontal louver operates automatically depending on the set operation mode.
Using the energy control function (Optional)
1 Turn on the unit.
2 Press the ENERGY CTRL. button.
- Press the ENERGY CTRL. button repeatedly to select each step.
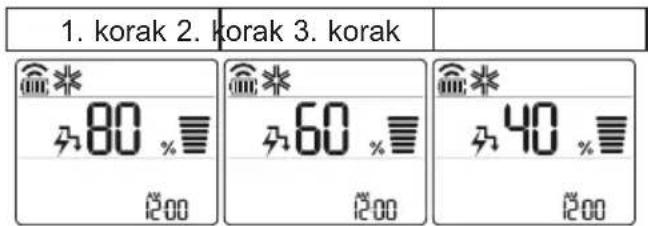
NOTE
• Step 1: Power consumption is reduced by 20% compared to rated power consumption.
480 is displayed on the display screen.
• Step 2: Power consumption is reduced by 40% compared to rated power consumption.
A60 is displayed on the display screen.
• Step 3 (Optional): Power consumption is reduced by 60% compared to rated power consumption.
40 is displayed on the display screen.
80 (Step 1), 62 (Step 2), (Step 3) is displayed on some indoor units.
(Step 1), (Step 2) is displayed on some indoor units.)
3 Connect your smartphone to the wireless router.
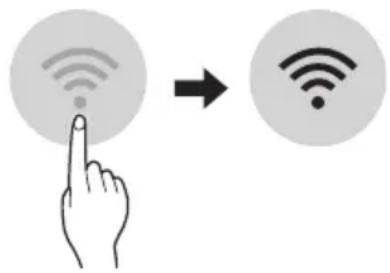
NOTE
4 Clean the filter with a vacuum cleaner or lukewarm water with neutral detergent.
5 Dry the filters in the shade.
6 Insert the air filter hooks into the front cover.
4 Clean the filters with a vacuum cleaner.
5 Insert the allergy filter.
Type 1
Type 2
6 Assemble the air filters.
NOTE
NOTE
NOTE
6 Assemble the air filters.
Important safety instructions 4
USE....11
Important safety instructions

DANGER
WARNING
WARNING
WARNING
7 To install the filter, push the hooks downward.

4 Clean the filters with a vacuum cleaner.
5 Insert the allergy filter.
Type 1
Type 2
6 Install the air filters.
Air inlet grille 11
1 Air inlet filter 2 Air outlet filter 3 Front grille 4 Air outlet 5 Air deflector (horizontal louvers) 6 Air deflector (vertical louvers) 7 On/Off button 8 Display 9 Signal receiver
1 Air inlet vents 2 Air outlet vents 3 Base plate 4 Power supply cable 5 Drain hose 6 Cooling piping
NOTE
Remote Control Battery
Battery Replacement
If the remote control display screen starts to flash, replace the batteries. Insert AAA (1.5 V) batteries before using the remote control.
1 Remove the battery cover.
2 Insert the new batteries and make sure the + and - terminals of the batteries are installed correctly.
Remote Control Holder Installation (Optional)
To protect the remote control, install the holder where there is no direct sunlight.
1 Choose a safe and easily accessible location.
NOTE
- The remote control can operate other electronic devices if pointed at them. Make sure you are pointing the remote control at the signal receiver of the air conditioner.
- For proper operation, use a soft cloth to clean the transmitter and signal receiver.
| 1Buttuna | 2Displejtal-lskrin | Deskrizzjoni | Funzjoni disponibbli | |
| maqsumsingolari | Multi | |||
| - | Biex tixghel/titfiI-kundizzjonatur tal-arja. | O | O | |
| 88° | Sabiex tagğustat-temperatura mixtieqatal-kamra fil-modalitàtat-tkessiħ, tat-tishin jewta' bidla awtomatika. | O | O | |
| MODE | Sabiex taghżelil-modalità tat-tkessiħ. | O | O | |
| Sabiex taghżelil-modalità tat-tishin. | O | O | ||
| Sabiex taghżelil-modalità tad-deumidifikazzjoni. | O | O | ||
| Sabiex taghżelil-modalità tal-fann. | O | O | ||
| Sabiex taghżelil-modalità tal-bidlaawtomatika/thaddimawtomatiku. | O | O | ||
| JETMODE | Po | Sabiex tbiddel it-temperatura tal-kamramalajr. | O | O |
| FANSPEED | Sabiex tagğustaI-velocità tal-fann. | O | O | |
| Sabiex tagğustad-direzzjoni tal-flusstal-arja vertikalment jeworizzontalment. | O | O | ||
NOTE
• * The buttons may differ depending on the model type.
- When connected to Multi Outdoor equipment, the Energy Display, Energy Control, Smart Diagnosis, and Quiet functions may not work.
![2 MODE FAN SPEED TEMP JET MODE KW [3 s] SWING SWING ROOM TEMP C °F [5 s] SET UP DIAGNOSIS (5 s) FUNC. SET CANCEL TIMER CANCEL RESET](/content/2026/05/747298/images/458c4fae3cea9a263d48d62bde41c191aa53a9afaa1e0b1355b5997fe5987328.jpg)
| 1Buttuna | 2Displejtal-Iskrin | Deskrizzjoni | Funzjoni disponibbli | |
| maqsumsingolari | Multi | |||
 |  | Sabiex tixghel/titfi l-kundizzjonatur tal-arja b'mod awtomatiku fil-hin mixtieq. | O | O |
| SET/CANCEL | - | Sabiex tikkonfigura/tikkancella l-funzjonijiet spećjali u t-timer. | O | O |
 | - | Sabiex tikkancella s-settings tat-timer. | O | O |
 | - Sabiex | tagğusta l-hin. O O | ||
| *LIGHTOFF | - | Sabiex tikkonfigura l-luminožità tal-iskrin fuq l-unità ta' ğewwa. | O | O |
| ROOMTEMP |  | Sabiex turi t-temperatura tal-kamra. | O | O |
| °C←°F[5 s] | °C°F | Sabiex tibdel il-unit bejn °C u °F | O | O |
| *COMFORTAIR |  | Sabiex tagğusta l-fluss tal-arja sabiex tibdel id-direzzjoni tar-riħ. | O | O |
| kW[3 s] | - | Sabiex tikkonfigura jekkturix jew le l-informazzjoni rigward l-energija. | O | X |
| *ENERGYCTRL. | 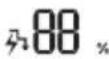 | Sabiex iğğib l-effett tal-iffrankar tal-energija. | O | X |
| DIAGNOSIS[5 s] | - | Sabiex tićčekkja l-informazzjoni tal-manutenzjoni ta' prodott b'mod konvenjenti. | O | X |
| 1Buttuna | 2Displejtal-Iskrin | Deskrizzjoni | Funzjoni disponibbli | |
| maqsumsingolari | Multi | |||
| Il-GENERatur joniku južamiljuni ta' jonji biex jghinitejjeb il-kwalità tal-arjata' gewwa. | O(Fakultattiv) | O(Fakultattiv) | ||
| Sabiex tnaqqas il-hossmill-unitajiet ta' barra. | O | X | ||
| Sabiex tneñhi l-indewwaggenerata fl-unità ta'gewwa. | O | O | ||
| RESET - | Sabiex tinizjalizzal-konfigurazzjoniettar-remote control. | O | O | |
NOTE
NOTE
NOTE
• Step 1: Energy consumption is reduced by 20% compared to the rated energy consumption.
3 Connect the smartphone to the wireless router.
NOTE
- To verify the Wi-Fi connection, check that the ⏻ icon on the control panel is lit.
- This device supports only 2.4GHz Wi-Fi networks. To check the router frequency, contact your internet service provider or refer to the wireless router manual.
- LG ThinQ is not responsible for network connection problems, damage, or malfunctions caused by the network connection.
- If the device is far from the router, it may not be able to connect to the Wi-Fi network. Purchase a Wi-Fi repeater (range extender) to improve Wi-Fi strength.
- The Wi-Fi connection may be interrupted or fail due to the home network environment.
- The network connection may not work properly due to the internet service provider.
- The surrounding wireless environment may cause the wireless network service to run slowly.
- The device cannot be registered due to problems in wireless power transmission. Disconnect the device and wait about a minute before trying again.
- If the firewall on your wireless router is enabled, disable the firewall or make an exception for this.
- The wireless network name (SSID) should be a combination of English letters and numbers. (Do not use special characters)
- The smartphone user interface (UI) may vary as it depends on the mobile operating system (OS) and the manufacturer.
- If the router's security protocol is set to WEP, you may not be able to operate the network. Please change it to other security protocols (WPA2 is recommended) and re-register the product.
How to install the LG ThinQ Application
Search for the LG ThinQ application from Google Play Store or Apple App Store on a smartphone. Follow the instructions to download and install the application.
4 Clean the filter with a vacuum cleaner or with lukewarm water mixed with a neutral detergent.
5 Dry the filters in the shade.
4 Clean the filters with a vacuum cleaner.
5 Insert the Allergy Filter.
Tip 1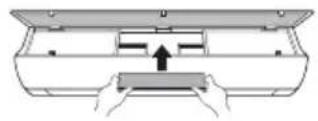
Tip 2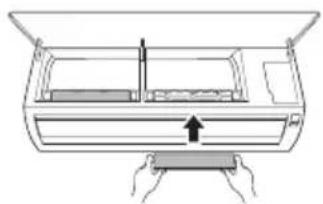
6 Assemble the air filters.
7 Check the side of the front cover for correct assembly of the air filter.
NOTE
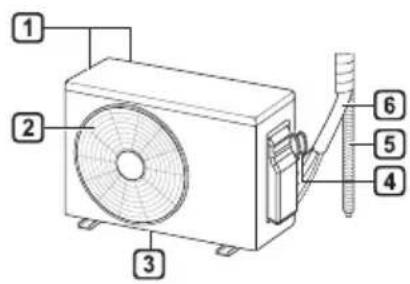
NOTE
NOTE
NOTE
IMPORTANT SAFETY INSTRUCTIONS....4
OPERATION....11
IMPORTANT SAFETY INSTRUCTIONS

WARNING
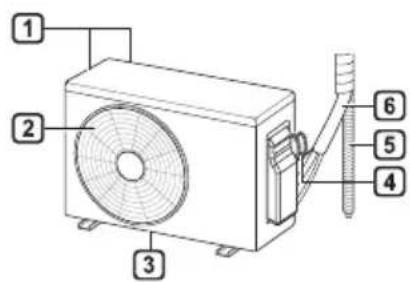
NOTE
NOTE
NOTE
4 Clean the filter with a vacuum cleaner.
NOTE
2 Press the ON/OFF button.
Tip 1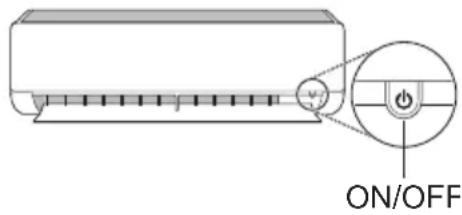
Tip 2
| 1Gumb | 2Zaslon | Opis | na voljo funkcija | |
| Enodelitvijo | Multi | |||
| - | Za vklop/izklopklimatske naprave. | O | O | |
| 88° | Za prilagoditev želenetemperature prihlajenju, ogrevanju alinačinu samodejniprehod. | O | O | |
| MODE | Za izbiro načinahlajenje. | O | O | |
| Za izbiro načinaogrevanje. | O | O | ||
| Za izbiro načinarazvlaževanje. | O | O | ||
| Za izbiro načinaventilator. | O | O | ||
| Za izbiro načinasamodejni prehod/samodejno delovanje. | O | O | ||
| JETMODE | Po | Za hitro spreminjanjetemperature v sobi. | O | O |
| FANSPEED | Za prilagajanje hitrostiventilatorja. | O | O | |
| Za prilagajanje smeripretoka zraka vnavpični ali vodoravnismeri. | O | O | ||
3 Remove the filter from the indoor unit.
4 Clean it with a vacuum cleaner or with lukewarm water mixed with a neutral detergent. 5 Dry the filters in the shade. 6 Insert the hooks of the air filters into the front panel.
7 To assemble the air filters correctly, check the side of the front panel.
Clean the allergy filter (optional)
1 Disconnect the power and unplug the power cord. 2 Remove the air filters from the indoor unit. 3 Remove the allergy filter from the indoor unit.
Tip 1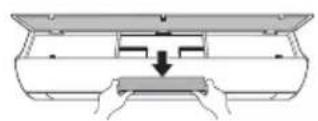
Tip 2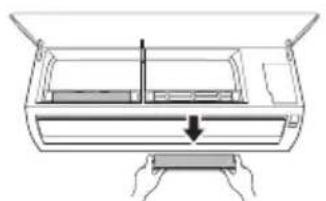
4 Clean the filters with a vacuum cleaner.
5 Insert the allergy filter.
Tip 1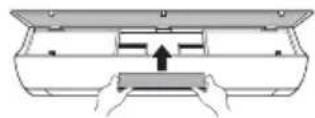
Tip 2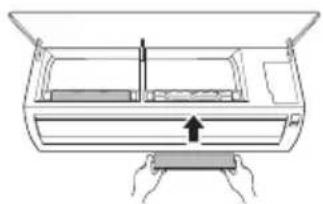
6 Assemble the air filters.
WALL-MOUNTED TYPE
Translation of the original instructions
NOTE
NOTE
NOTE
NOTE
NOTE
NOTE
6 Assemble the air filters.
OWNER'S MANUAL
AIR CONDITIONER


1 Air Filter 2 Air Intake 3 Front Cover 4 Air Outlet 5 Air Deflector (Horizontal) 6 Air Deflector (Vertical) 7 On/Off Button 8 Remote Control 9 Signal Receiver
NOTE
NOTE
3 Connect your smartphone to the wireless router.
NOTE
3 Remove it from the indoor unit.
4 Clean the filter with a vacuum cleaner or with lukewarm water and a neutral detergent.
5 Dry the filter naturally, without direct sunlight.
6 Install the air filter in the front cover.
4 Clean the filter with a vacuum cleaner or with lukewarm water and a neutral detergent.
6 Assemble the air filters together.
RAD 11
Operating instructions....11
Parts and functions....11
Wireless remote controller....12
Automatic restart of the air conditioner....17
Using the mode function....17
Using the quick mode function....20
IMPORTANT SAFETY INSTRUCTIONS

WARNING
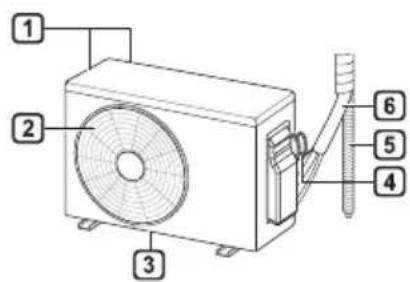
1 Air filter 2 Air inlet 3 Front panel 4 Air outlet 5 Air deflector (horizontal louver) 6 Air deflector (vertical louver) 7 On/Off button 8 Display 9 Signal receiver
1 Air inlet valves 2 Air outlet valves 3 Base plate 4 Power cord 5 Drain hose 6 Refrigerant pipes
NOTE
- The number and location of operation indicator lights may vary depending on the model of the air conditioner.
NOTE
- The remote control can operate other electronic devices if pointed at them. Make sure to point the remote control at the signal receiver on the air conditioner.
- To ensure proper operation, use a soft cloth to clean the transmitter and receiver of the signal.
- If the product does not have a certain function, no beep will sound when the corresponding button on the remote control is pressed, except for the air flow direction functions (
SWING), energy display (kw [3 s]), air purification (
| 1Dugme | 2Ekran | Opis | dostupan Funkcija | |
| Jednog deljenje | Višestruki | |||
| - | Za uključivanje/isključivanje klima uređaja. | O | O | |
| 88° | Za podešavanje željene temperature u prostoriji u režimu hlađenja, grejanja ili automatskog prebacivanja. | O | O | |
| MODE | Za izbor režima hlađenja. | O | O | |
| Za izbor režima grejanja. | O | O | ||
| Za izbor režima isušivanja vlage. | O | O | ||
| Za izbor režima ventilatora. | O | O | ||
| Za izbor režima automatskog prebacivanja / automatskog rada. | O | O | ||
| JET MODE | Po | Za brzu promenu temperature u prostoriji. | O | O |
| FAN SPEED | Za podešavanje brzine ventilatora. | O | O | |
| Za podešavanje pravca protoka vazduha vertikalno ili horizontalno. | O | O | ||
NOTE
NOTE
- On some indoor units, either L is displayed.
- This function is disabled when you press the MODE or JET MODE button.
- This function is disabled and automatic vertical direction is set when you press the SWING button.
- When this function is turned off, the horizontal louver operates automatically depending on the set mode.
NOTE
- To check the Wi-Fi connection, check whether the icon is lit on the control panel.
- The device supports only 2.4 GHz Wi-Fi networks. To check the network frequency, contact your internet service provider or refer to the wireless router manual.
- LG ThinQ is not responsible for network connection problems or for any interference, malfunctions, or errors caused by network connection.
7 Push the hooks down to install the air filter.
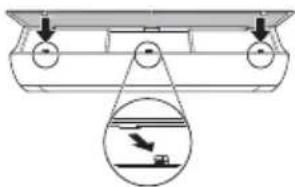
8 Check the side of the front cover to verify that the air filter is correctly installed.
Type 2
1 Turn off the power and unplug the power cord. 2 Open the front cover.
- Lift both sides of the cover slightly.
3 Hold the handles of the air filter, pull them down gently, and remove them from the indoor unit.
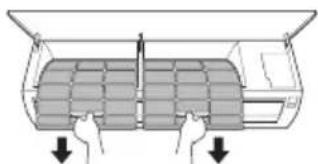
4 Clean the filter with a vacuum cleaner or lukewarm water with a neutral detergent. 5 Dry the filters in the shade. 6 Insert the hooks of the air filter into the front cover.
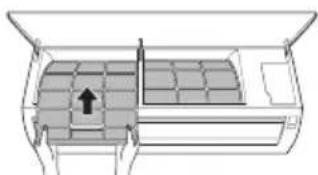
7 Check the side of the front cover to verify that the air filters are correctly installed.
Cleaning the anti-allergy filter (optional)
1 Turn off the power and unplug the unit. 2 Remove the air filters from the indoor unit. 3 Remove the anti-allergy filter from the indoor unit.
Type 1
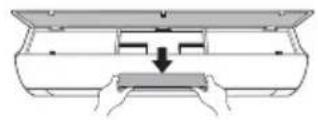
Type 2
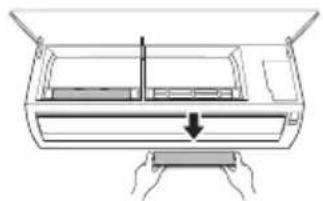
4 Clean the filters with a vacuum cleaner.
5 Insert the anti-allergy filter.
Type 1
Type 2
6 Reassemble the air filters.
7 Check the side of the front cover to verify that the air filter is correctly installed.
NOTE
- The function and location of the anti-allergy filter may vary by model.
Self-diagnosis function
1 Air filter 2 Air inlet 3 Front cover 4 Air outlet 5 Air deflector (horizontal fin) 6 Air deflector (vertical vane) 7 On/Off button 8 Display 9 Signal receiver
NOTE
NOTE
NOTE
1 Air filter 2 Air intake 3 Front cover 4 Air outlet 5 Air deflector (horizontal vane) 6 Air deflector (vertical vane) 7 On/Off button 8 Display 9 Signal receiver
NOTE
NOTE
NOTE
6 Install the air filters.
SAFETY INSTRUCTIONS....3
IMPORTANT SAFETY INSTRUCTIONS....4
OPERATION 11
Operating notes 11
IMPORTANT SAFETY INSTRUCTIONS
WARNING
To reduce the risk of explosion, fire, death, electric shock, injury, or burns to persons when using this product, follow basic precautions, including the following:
Children in the household
This appliance is not intended for use by persons (including children) with reduced physical, sensory or mental capabilities, or lack of experience and knowledge, unless they have been given supervision or instruction concerning use of the appliance by a person responsible for their safety. Children should be supervised to ensure that they do not play with the appliance.
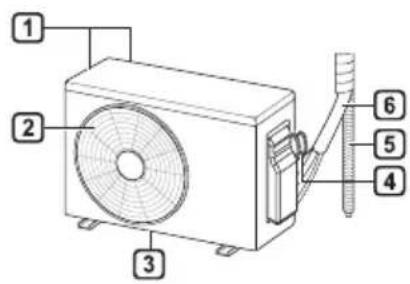
1 Air filter 2 Air inlet 3 Front panel 4 Air outlet 5 Air deflector (horizontal louvres) 6 Air deflector (vertical louvres) 7 On/Off button 8 Display 9 Signal receiver
NOTE
| Tipka1 | Displej2 | Opis | Dostupna funkcija | |
| JednostrukiRazdvojeni | Višestruki | |||
| - | Da biste uključili/isključili klima uređaj. | ○ | ○ | |
| 88° | Da biste podesiliželjenu temperaturu unacinu rada zahlađenje, grijanje ili unacinu radaautomatskogprebacivanja. | ○ | ○ | |
| MODE | Da biste odabrali načinrada za hlađenje. | ○ | ○ | |
| Da biste odabrali načinrada za grijanje. | ○ | ○ | ||
| Da biste odabrali načinrada za odvlaživanje. | ○ | ○ | ||
| Da biste odabrali načinrada ventilator. | ○ | ○ | ||
| Da biste odabraliautomatskoprebacivanje/automatski način rada. | ○ | ○ | ||
| JETMODE | Po | Da biste brzopromijenili sobnutemperaturu. | ○ | ○ |
| FANSPEED | Da podesite brzinuventilatora. | ○ | ○ | |
| Da podesite vertikalniili horizontalni smjerprotoka zraka. | ○ | ○ | ||
NOTE
NOTE
• or L_ is shown on some indoor units.
NOTE
7 Push the hooks downwards to assemble the air filter.
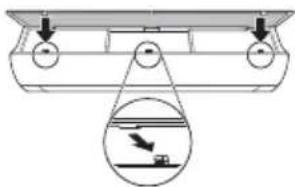
4 Clean the filters with a vacuum cleaner or lukewarm water and neutral detergent. 5 Dry the filters in the shade. 6 Insert the hooks of the air filters into the front panel.
4 Clean the filters with a vacuum cleaner.
5 Insert the anti-allergy filter.
Type 1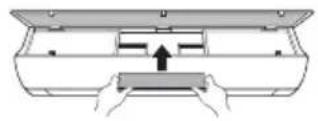
Type 2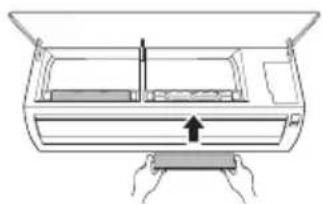
6 Assemble the air filters.
- TABLE OF CONTENTS
- SAFETY INSTRUCTIONS
- OPERATION
- SMART FUNCTIONS
- MAINTENANCE
- TROUBLESHOOTING
- WARNING
- CAUTION
- IMPORTANT SAFETY INSTRUCTIONS
- CHILDREN IN THE HOUSEHOLD
- FOR USE IN EUROPE
- INSTALLATION
- TECHNICAL SAFETY
- NOTES FOR OPERATION
- SUGGESTION FOR ENERGY SAVING
- PARTS AND FUNCTIONS
- INDOOR UNIT OUTDOOR UNIT
- NOTE
- WIRELESS REMOTE CONTROL INSERTING BATTERIES
- INSTALLING THE REMOTE CONTROL HOLDER (OPTIONAL)
- OPERATING METHOD
- SETTING THE CURRENT TIME
- INSERT BATTERIES
- USING THE °C/°F CONVERSION FUNCTION (OPTIONAL)
- OPERATING THE AIR CONDITIONER WITHOUT THE REMOTE CONTROL
- TYPE
- USING WIRELESS REMOTE CONTROL
- RESTARTING THE AIR CONDITIONER AUTOMATICALLY
- DISABLING AUTO RESTART
- USING THE MODE FUNCTION
- COOLING MODE
- AUTO OPERATION (ARTIFICIAL INTELLIGENCE)
- MULTI MODEL
- AUTO CHANGEOVER MODE
- SINGLE SPLIT MODEL
- DEHUMIDIFICATION MODE
- HEATING MODE
- FAN MODE
- USING THE JET MODE FUNCTION CHANGING ROOM TEMPERATURE QUICKLY
- USING THE FAN SPEED FUNCTION
- ADJUSTING THE FAN SPEED
- USING THE AIR FLOW DIRECTION FUNCTION
- SETTING THE ON/OFF TIMER
- SETTING THE ON TIMER
- CANCELING THE ON TIMER
- SETTING THE OFF TIMER
- CANCELING THE OFF TIMER
- CANCELING THE TIMER SETTING
- USING THE SLEEP FUNCTION (OPTIONAL)
- USING THE SIMPLE TIMER FUNCTION (OPTIONAL)
- USING THE ENERGY DISPLAY FUNCTION (OPTIONAL)
- DISPLAY THE CURRENT ENERGY USAGE
- TURN THE APPLIANCE ON
- PRESS THE ☐ BUTTON AND HOLD IT FOR ABOUT 3 SECONDS
- USING THE LIGHT OFF FUNCTION (OPTIONAL)
- DISPLAY SCREEN BRIGHTNESS
- USING THE COMFORT AIR FUNCTION (OPTIONAL)
- COMFORT VANE OPERATION
- USING THE ENERGY CONTROL FUNCTION (OPTIONAL)
- USING SPECIAL FUNCTIONS
- CANCELING SPECIAL FUNCTIONS
- USING THE AIR PURIFICATION FUNCTION
- USING THE SILENT FUNCTION
- USING THE AUTO CLEAN FUNCTION
- LG THINQ APPLICATION
- LG THINQ APPLICATION FEATURES
- SMART DIAGNOSIS
- SETTINGS
- BEFORE USING LG THINQ APPLICATION
- INSTALLING THE LG THINQ APPLICATION
- OPEN SOURCE SOFTWARE NOTICE INFORMATION
- USING LG THINQ TO DIAGNOSE ISSUES
- USING AUDIBLE DIAGNOSIS TO DIAGNOSE ISSUES
- CLEAN THE AIR FILTER
- CLEAN THE ALLERGY FILTER (OPTIONAL)
- SELF-DIAGNOSIS FUNCTION
- BEFORE CALLING FOR SERVICE
- MEMO
- OWNER'S MANUAL
- AIR CONDITIONER
- SUPPORT
- AUTOMATIC RESTART OF THE AIR CONDITIONER
- DISABLING AUTOMATIC RESTART
- TURN ON THE UNIT
- PRESS THE ENERGY CTRL. BUTTON
- USE
- DANGER
- REMOTE CONTROL BATTERY
- BATTERY REPLACEMENT
- REMOTE CONTROL HOLDER INSTALLATION (OPTIONAL)
- HOW TO INSTALL THE LG THINQ APPLICATION
- RAD
- CLEANING THE ANTI-ALLERGY FILTER (OPTIONAL)
Brand : LG
Model : S09EH
Category : Air conditioner