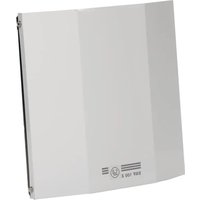
SWF-100X - Fan Soler & Palau - Free user manual and instructions
Find the device manual for free SWF-100X Soler & Palau in PDF.


| Product Type | Wall-mounted exhaust fan (sidewall) |
| Brand | Soler & Palau |
| Model | SWF-100X |
| Power Supply | 120 V AC, 60 Hz |
| Intended Use | General ventilation only |
| Max Air Temperature | 60 °C (140 °F) |
| Installation | Exterior wall, air duct and electrical passage |
| Electrical Connection | 3/8" romex cable connector |
| Motor | Pre-wired with capacitor, sealed bearings |
| Lubrication | None required (sealed bearings) |
| Maintenance | Regular inspection and cleaning of grille and wheel |
| Standard Wiring | Brown (capacitor), Black (speed), Blue (neutral), Yellow/Green (ground) |
| Speed Controller | Optional (specific wiring) |
| Warranty | 5 years (parts and labor) |
| Safety | Disconnect power before maintenance; do not use for hazardous vapors |
| Country of Manufacture | United States (Soler & Palau USA) |
Frequently Asked Questions - SWF-100X Soler & Palau
User questions about SWF-100X Soler & Palau
0 question about this device. Answer the ones you know or ask your own.
Ask a new question about this device
Download the instructions for your Fan in PDF format for free! Find your manual SWF-100X - Soler & Palau and take your electronic device back in hand. On this page are published all the documents necessary for the use of your device. SWF-100X by Soler & Palau.
USER MANUAL SWF-100X Soler & Palau
INSTALLATION AND WIRING INSTRUCTIONS
INSTRUCCIONES DE MONTAJE
INSTRUCTIONS DE MONTAGE ET DE CÂBLAGE
(English / Español / Français)
READ AND SAVE THESE INSTRUCTIONS
LEER Y GUARDAR ESTAS INSTRUCCIONES
LIRE ET CONSERVER CES INSTRUCTIONS
Dimensional Data
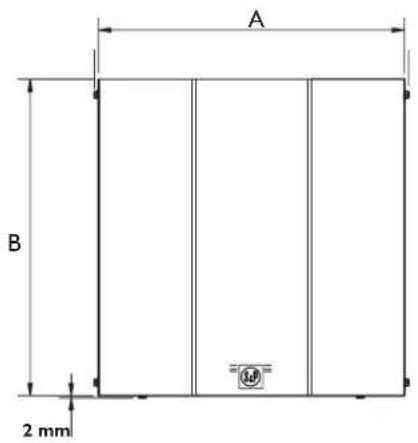
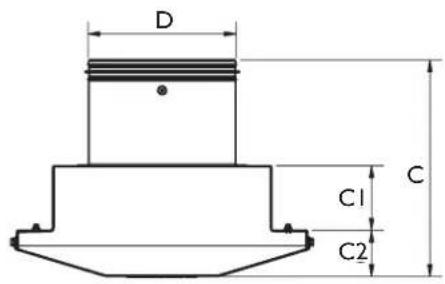
| Model A B | C CI C2 | D | ||||
| SWF-100 | 13 1/4 337 | 13 1/4 337 | 9228 | 376 | 2 7/1662 | 4100 |
| SWF-100x | 13 1/4 337 | 13 1/4 337 | 9228 | 376 | 2 7/1662 | 4100 |
| SWF-150 | 15 1/2 394 | 13 1/4 337 | 10 3/16256 | 376 | 2 7/1662 | 6150 |
| SWF-150x | 15 1/2 394 | 16 1/16408 | 10254 | 3 3/1681 | 2 7/1662 | 6150 |
| SWF-200 | 15 1/2 394 | 16 1/16408 | 11 7/16290 | 3 3/887 | 2 7/1662 | 8200 |
WARNING
Soler and Palau designs the highest quality products available in the industry and meets stringent manufacturing requirements. These units are not designed however to be utilized as the primary devices used in a life support ventilation systems where failure could result in loss or injury, the user should provide adequate backup ventilation, supplementary natural ventilation, failure alarm system, or acknowledge willingness to accept the risk of such loss or injury
ADVERTENCIA
(a) Use this unit only in the manner intended by the manufacturer. If you have any questions contact the manufacturer.
(b) Before servicing or cleaning the unit, switch the power off at the service panel and lock the service disconnecting means to prevent power from being switched on accidentally. When the service disconnecting means cannot be locked; securely fasten a prominent warning device such as a tag to the service panel.
(c) Installation work and electrical wiring must be done by qualified person(s) in accordance with all applicable codes & standards including related construction.
(d) When cutting or drilling into wall or roof, do not damage electrical wiring and other hidden utilities.
(e) CAUTION: For General Ventilating Use Only. Do Not Use To Exhaust Hazardous Or Explosive Materials And Vapors.
(f) DO NOT USE with heated air in excess 140° F ( 60° C).
Select Fan Location
When selecting a location to install the SWF fan that has been chosen, take into consideration the application of the product, the locations of fresh air intakes, and sound generated by the SWF unit.
The fan should be located a minimum of 6 feet horizontally and 8 feet vertically from any fresh air intakes for HVAC systems, heat recovery systems, etc. to prevent exhaust air streams from being re-introduced into the occupied space. Doors or windows that are frequently opened during pleasant seasons may also be considered fresh air intakes so keep this in mind when selecting the location of the SWF.
Mark and Introduce Required Holes
Once the location on the exterior wall where the fan is to be mounted has been selected, mark all screw and hole locations utilizing the included template. Cut the holes through the wall for the duct connection and for the electrical conduit. Measure the thickness of the wall and the length of the duct connection that is supplied on the SWF fan. Cut a length of duct so that once connected to the fan, will extend 2" through the wall.
If mounting the fan on a masonry wall, drill four holes and insert wall anchors. If mounting to wooden structure, you will utilize wood screws to secure the SWF to the wall.
If the fan is to be mounted on a wall surface which is not flush such as lapped siding, a mounting plate to provide for a flush fit needs to be made.
Mount the Fan
Insert electrical supply through the wall. Attach the duct extension to the SWF making sure that the connection is secure. Apply a generous amount of exterior silicone caulk to backplate of the fan to ensure an airtight/waterproof connection between the fan and the wall surface. If a mounting frame is used in conjunction with lapped siding, be certain to apply a generous amount of caulk between the frame and the wall as well as the fan backplate and the frame. Mount the fan to the wall.
Note: Be certain to make an airtight seal around all interior wall penetrations before attaching duct work.
Electrical Connection
All SWF series fans operate from a standard 120V 60Hz A.C electrical supply. All wiring must be carried out in accordance with National Electrical Code, and all applicable state and local buildings codes.
WIRING INSTRUCTIONS
WARNING! Make sure that power supply is disconnected and locked to prevent accidental activation.
I. Remove the screws securing the terminal box cover plate located on the fan motor mounting bracket. All fan motor and capacitor connections are pre-wired to the electrical terminal strip. A 3/8" romex type cable restraint connector will be needed to secure the wiring through the knockout provided on the side of the terminal box.
2. Bring incoming electrical service through the romex connector and the fan electrical service opening. Using a small regular screwdriver, tighten the neutral (white) wire of the incoming 115V power supply under the open terminal strip port opposing the motor Blue wire. Tighten the line (black) wire of the incoming supply under the open terminal opposing the motor Black wire. Now, secure the source ground to the open terminal strip opposing the Green/Yellow Wire.
3. Secure the romex connector. Secure the incoming supply with the romex connector. Replace the fan terminal box cover.
4. Apply a generous bead of silicone caulk around the electrical provision hole in the backplate of the fan to provide for a secure seal.
MAINTENANCE INSTRUCTIONS
- Since fan bearings are sealed and provided with an internal lubricating material, no additional lubrication is necessary.
- It is recommended that the cover is screen is checked on a regular basis to check for any obstructions and the cover is removed and the motor and wheel are inspected and cleaned as necessary.
No other maintenance is necessary.
WIRING DIAGRAMS
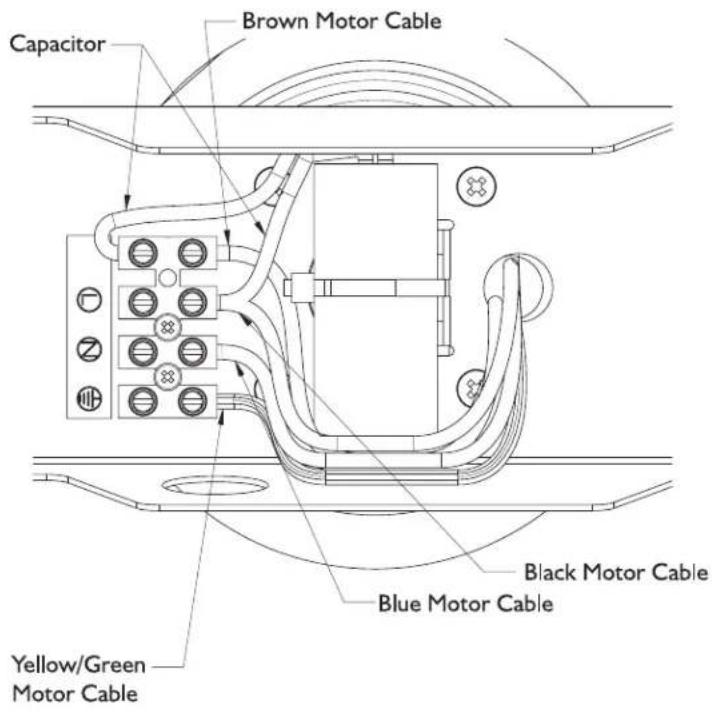
Motor without speed controller
![graph LR A["120 VAC 60Hz"] --> B["Supply"] A --> C["Ground"] A --> D["Common"] B --> E["L"] C --> F["N"] E --> G["+"] F --> H["-"] G --> I["Brown"] H --> J["Black"] I --> K["Yellow/Green"] J --> L["Blue"] K --> M["Motor"] L --> M](/content/2026/04/741300/images/4369f0ae58faa9fc9ec8201568515a8e227202f8f05fcc118388bd52edfdd728.jpg)
Motor with speed controller
![graph LR A["I20 VAC 60Hz Supply"] --> B["Motor Speed Regulator"] C["Ground"] --> B D["Common"] --> B B --> E["L"] B --> F["N"] E --> G["Brown"] E --> H["Black"] F --> I["Yellow/Green"] F --> J["Blue"] G --> K["Motor"] H --> K I --> K J --> K](/content/2026/04/741300/images/377dcdbe2fb85414e9b815faa10a53f24f130a34f4f498a697d04dba02edecba.jpg)
FIVE (5) YEAR WARRANTY
Soler & Palau warrants that the SWF - SIDEWALL series exhaust fan will be free from defective materials and workmanship for the period of (5) years from the date of original purchase. In the event that we and any part defective the product will be repaired or, in the Company's discretion, replaced without charge provided that the product has been installed in accordance with the enclosed instructions and all applicable EPA Standards and state and local building codes.
IF CLAIMING UNDER WARRANTY
Please return the complete product, freight paid, to your local authorized distributor. All returns must be accompanied by a valid Bill Of Sale. All returns must be clearly marked “Warranty Claim,” with an accompanying description stating the nature of the fault.
THE FOLLOWING WARRANTIES DO NO APPLY
Damages from shipping, either concealed or visible. Claim must be filed with the carrier. Damages resulting from improper wiring or installation
Damages caused by acts of nature, or resulting from improper consumer procedures such as: Improper Maintenance; Misuse; Negligence; Alteration; Abuse; Abnormal Use; or Accident or Incorrect Electrical Voltage and Current.
Removal or alteration to the Soler & Palau data plate label.
WARRANTY VALIDATION
The end user must keep a copy of the Bill of Sale to verify purchase date.
THE ABOVE FIVE (5) YEAR WARRANTY IS EXPRESSLY IN LIEU OF ALL OTHER WARRANTIES, EXPRESSED, WRITTEN OR IMPLIED, INCLUDING THE WARRANTIES OF MERCHANTABILITY AND FITNESS FOR USE. IN NO EVENT SHALL SOLER & PALAU BE LIABLE FOR ANY SPECIAL, CONSEQUENTIAL, OR INCIDENTAL DAMAGES, INCLUDING LOSS OF PROPERTY, REVENUES, LOST PROFITS, and COSTS OF REMOVAL, INSTALLATION OR REINSTALLATION.
ESPAÑOL
Advertencia


- DIMENSIONAL DATA
- WARNING
- ADVERTENCIA
- SELECT FAN LOCATION
- MARK AND INTRODUCE REQUIRED HOLES
- MOUNT THE FAN
- ELECTRICAL CONNECTION
- WIRING INSTRUCTIONS
- MAINTENANCE INSTRUCTIONS
- WIRING DIAGRAMS
- FIVE (5) YEAR WARRANTY
- IF CLAIMING UNDER WARRANTY
- THE FOLLOWING WARRANTIES DO NO APPLY
- WARRANTY VALIDATION
- ESPAÑOL
Brand : Soler & Palau
Model : SWF-100X
Category : Fan