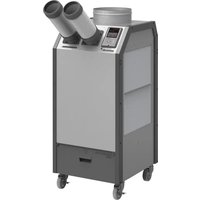
HSC-24R - Air Conditioning Airrex - Free user manual and instructions
Find the device manual for free HSC-24R Airrex in PDF.


| Product type | Portable air conditioner |
| Model | HSC-24R |
| Brand | Airrex |
| Cooling capacity | 24000 BTU/h |
| Minimum room area | 7.06 m² |
| Airflow | 92 m³/h |
| Refrigerant | R32 (A2L, flammable) |
| Power supply | 220-240 V, 50 Hz |
| Rated power | 2000 W |
| Dimensions (L x D x H) | 500 x 400 x 800 mm |
| Weight | 35 kg |
| Functions | Cooling, Dehumidification, Ventilation |
| Noise level | 65 dB(A) |
| Filter type | Washable |
| Remote control | Yes |
| Control panel | Electronic with LED display |
| Energy class | A |
| Safety | Automatic shutdown in case of refrigerant leak, Frost protection |
| Maintenance | Regular filter cleaning, Leak inspection |
| Spare parts | Filters, Remote control |
| Warranty | 2 years |
Frequently Asked Questions - HSC-24R Airrex
User questions about HSC-24R Airrex
0 question about this device. Answer the ones you know or ask your own.
Ask a new question about this device
Download the instructions for your Air Conditioning in PDF format for free! Find your manual HSC-24R - Airrex and take your electronic device back in hand. On this page are published all the documents necessary for the use of your device. HSC-24R by Airrex.
USER MANUAL HSC-24R Airrex
natural_image
Exterior view of a modern industrial air conditioning unit with coiled pipes and control panel (no visible text or symbols)Thank you for purchasing the unit. Before operation, please read this user's manual carefully.
▶ You can find the user manuals for all our products online.
TABLE OF CONTENTS
SAFETY INSTRUCTIONS 3\~4
GENERAL ADVICE BEFORE USE 4
EXTERIOR DESCRIPTION 5\~6
SPECIFICATIONS 7
CONTROL PANEL FUNCTIONS 8 \~ 9
MODE CHANGING METHOD 10
HOW TO SET THE 'OFF' TIMER 11
'ERROR' and WARNING INDICATORS 14 \~ 15
FIRE ALARM / ERROR SIGNAL CONNECTION 16 / 17
ECONOMY MODE / TROUBLE SHOOTING 18 / 19
CLEANING AND MAINTENANCE 20
WIRING DIAGRAM / HOW TO INSTALL THE CONDENSATE PUMP 21 / 22
USING MOBILE APPLICATION 23 \~ 27
THE INSTALLATION, SERVICE AND OPERATION MANUAL 28 \~ 37
This appliance is not intended for use by persons (including children) with reduced physical, sensory or mental capabilities, or lack of experience and knowledge, unless they have been given supervision or instruction concerning use of the appliance by a person responsible for their safety.
Children should be supervised to ensure that they do not play with the appliance.
It is essential that you read 'SAFETY INSTRUCTIONS' carefully before use and follow them at all times.
▶ Keep this manual on hand for reference.
▶ This unit is specified for use on the rated voltage power supply.
The warranty form is on the last page. Please complete it now and keep it in a safe place.
We have a policy of continual improving on our products. The contents (features and specifications) in this manual are therefore subject to change without notice.
● WARNING
- Keep this manual in a visible location near the unit for easy reference.
The following symbols are for your guidance :

You must NOT. You MUST.


Use a circuit breaker that fits the capacity. (It may cause fire and electric shock)

Before cleaning, disconnect the unit. (Otherwise risk of electric shock)

Do not use a damaged power cable. (Short, fire or shock hazard)

Do not use an extension lead unless of the approved type. (Risk of fire and / or electric shock)

Do not place anything on top of the machine. (This could cause electric shock, malfunction or injury)

Do not kink or sharply bend the power cable nor put any weight on it. (The insulation may be damaged causing fire or electric shock)

Check control panel after turn off circuit breaker first. (Risk of electric shock and / or malfunction)

Do not use this unit on unstable or inclined surfaces. Always use on solid flat floor. (Risk of falling causing injury, fire or malfunction)
INSTALLATION
WARNINGS REGARDING PROPER LOCATION FOR INSTALLATION

WARNING
Do not use the unit in explosive environments or in areas where flammable gas leakage may occur.
Do not use the unit in areas where it will be exposed to rain or water.
Do not use the unit in a corrosive atmosphere.
Do not install the unit on uneven or sloping surface. The unit may roll or topple over even if the casters are set to the locked position.
MOVING THE UNIT
Unlock the casters and push the unit to a flat surface and set the caster brakes to the locked position.
PLUGGING IN THE UNIT
Check the prongs and surface of the power cord plug for dust/dirt. If dust and/or dirt are present, wipe off with a clean, dry cloth.
Check the power cord, plug and prongs for damage or overload.
If any damage or overload is found, contact a qualified repair technician or a qualified electrician to perform replacement or repair of the power cord, plug or prongs.

WARNING
If the supply cord is damaged, it must be replaced by the manufacturer, its service agent or similarly qualified persons in order to avoid a hazard.

WARNING
Do not connect/disconnect the power cord or attempt to operate buttons with wet hands. This could result in electrical shock.
SAFETY INSTRUCTIONS
CAUTION

Do not place this unit on uneven, unstable or inclined surface. (This could cause malfunction)

When storing this unit, keep it in a dry, cool place. (To prevent corrosion and malfunction)

If not being used for some time or if lightening is present, always disconnect power. (To prevent risk of electric shock, short circuit or fire)

Do not spray water onto this unit nor use solvents such as benzene, thinner or alcohol for cleaning. (There is a risk of electric shock and / or short circuit)

Designed for indoor use.
GENERAL ADVICE BEFORE USE
- Ensure the safety of the location in which the unit is to be used.
- Ensure the floor or ground is smooth and flat.
- Ensure at least 20 inch space side of the unit.
- When in position, LOCK the casters to prevent rolling.
- Never use the unit at more than 2^ incline.
- If you use condensate pump, connect it to the housing in the condensate tank.
- You have to connect standard power cable.
If the power cable is damaged, it must be replaced by its service agent or qualified person in order to avoid a hazard.
● FOR MAXIMUM EFFICIENCY
- In airtight areas use vertical exhaust into ceiling.
- If possible, send exhaust out through a window or door to outside.
- Ensure rated electricity supply.
Waste electrical and electronic products must be disposed separately from normal household waste. When you dispose of such products, please recycle where facilities exist. Follow the guidance of your local authority and/or ask the shop where you purchased the product.
● FRONT VIEW
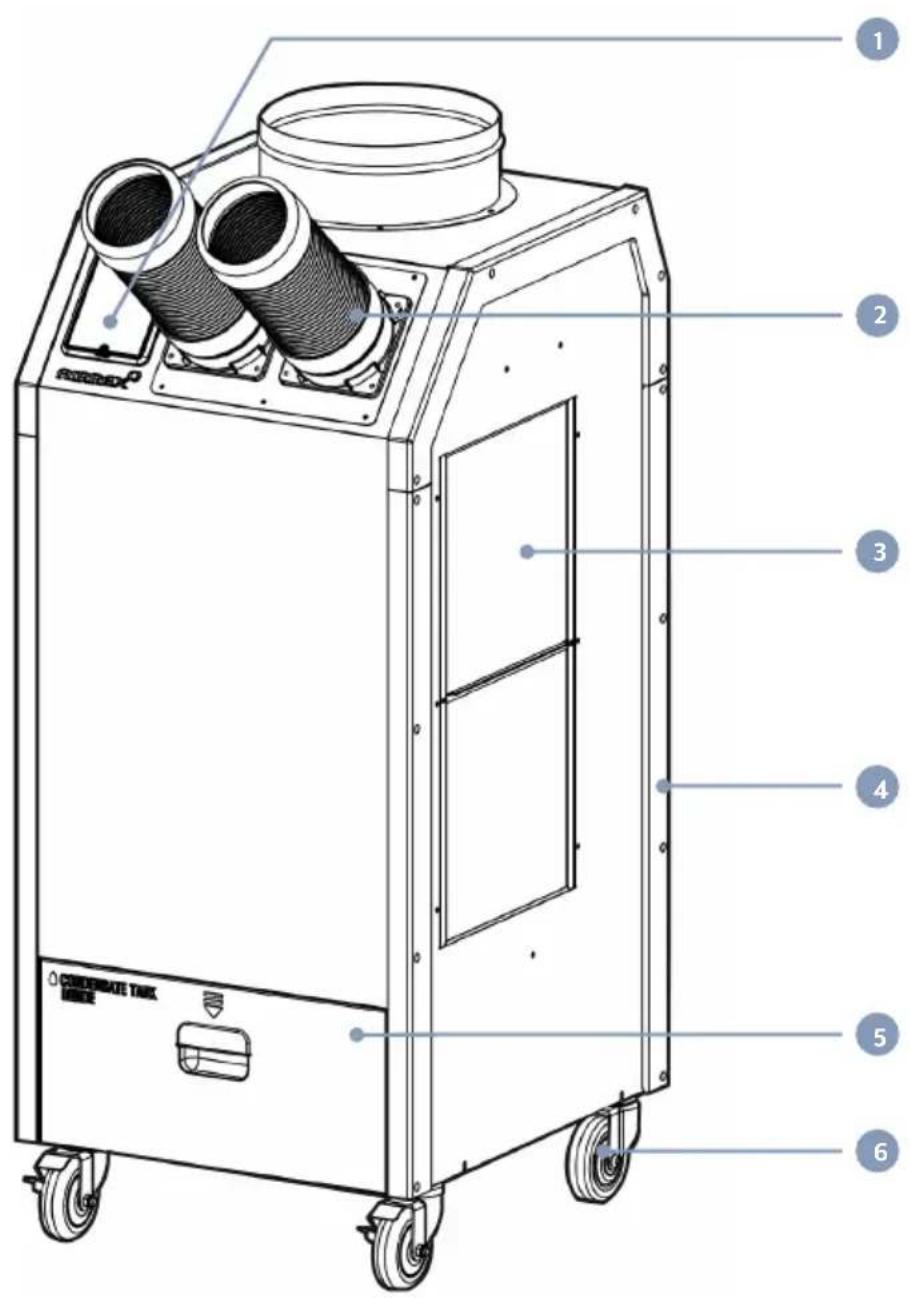
1
2 Cool Air OutletDigital Controller
3 Evaporator Filter (Ambient air inlet)
4 Protection Bumper
5 Condensate Tank Door (Condensate Tank Inside)
6 Casters (Front Lockable)
EXTERIOR DESCRIPTION
● BACK & SIDE VIEW
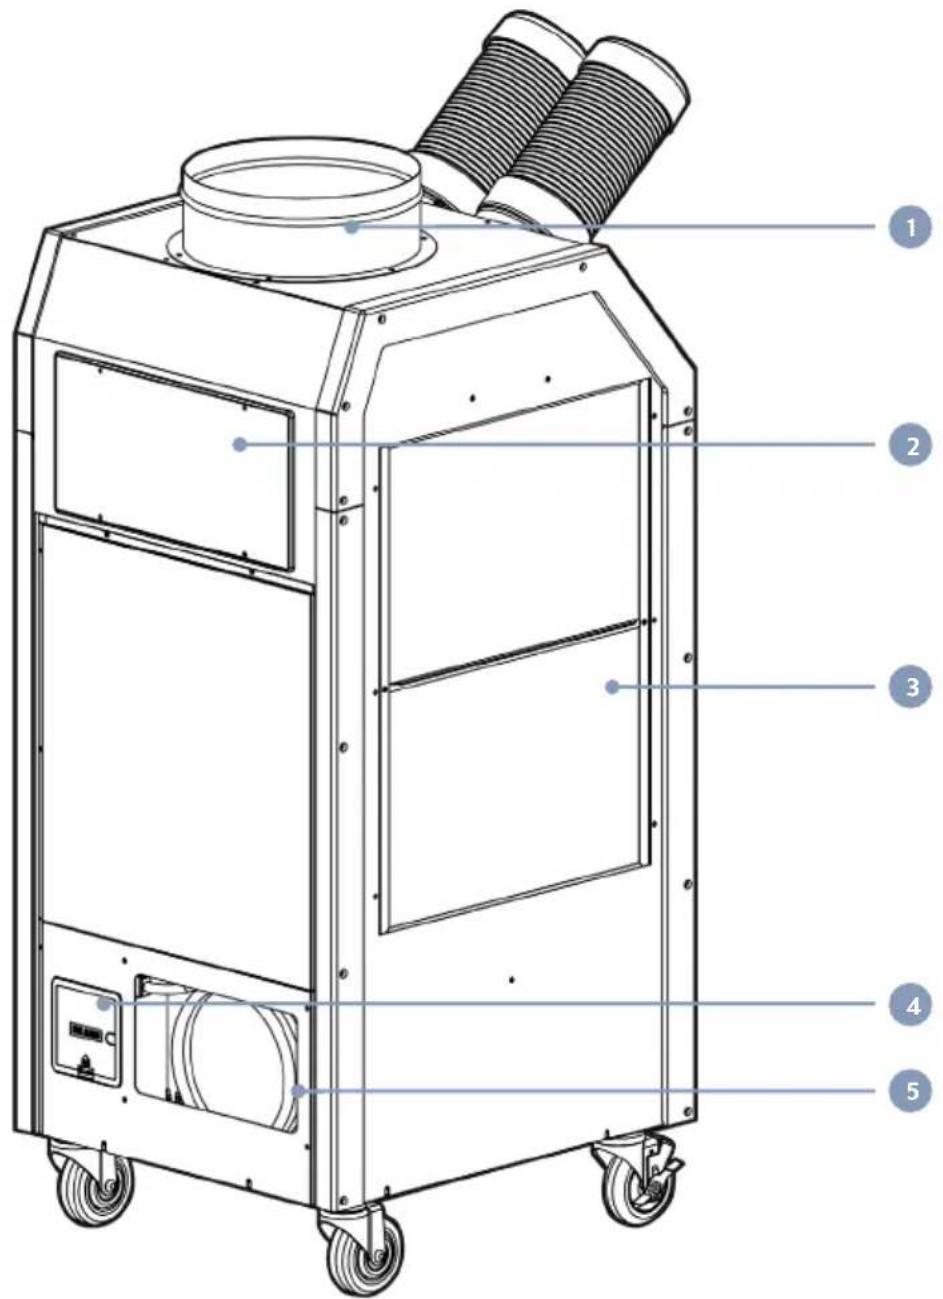
1
2 Electrical Access PanelHot Air Outlet
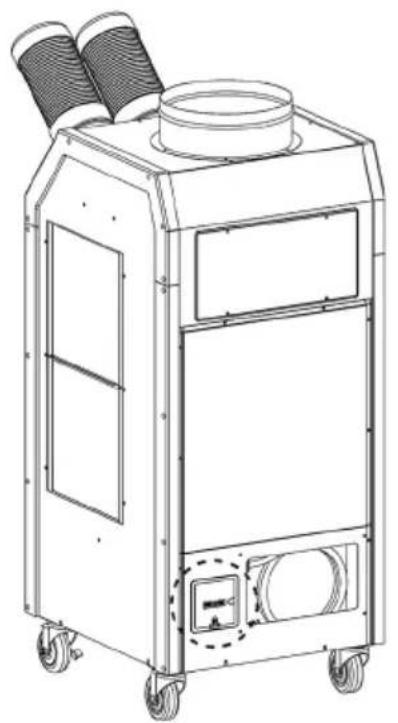
3 Condenser Filter Fire Alarm Connection Port
5 Power Cord
| MODEL HSC-14R HSC-18R HSC-24R | |||||
| Cooling capacity | Btu/h(W) | 13,600(4,000) | 16,800(4,900) | 23,500(6,900) | |
| Power Supply - 115 V~, 60 Hz, 1 Ph | 220 V~, 60 Hz, 1 Ph | ||||
| Power Consumption | kW 1.28 1.62 2.72 | ||||
| Current Consumption | A 11.8 15.0 12.8 | ||||
| Dehumidification | Max. gal/day 26 | 31.5 41.8 | |||
| Nom. | gal/day | 14.4 | 17.6 24.2 | ||
| Refrigerant(R-454B) | Ibs | 1.99 2.32 2.54 | |||
| Dimensions(W x D x H) | inch | 22 x 25 x 49 | |||
| Weight | Ibs | 172 | 175 | 187 | |
| Operating Conditions | Cooling | 55 ~ 118°F (13 ~ 48°C) | 65° ~ 118°F(18 ~ 48°C) | ||
| Dehumidification | 55 ~ 118°F (13 ~ 48°C) | ||||
| Power Cord LCDI 5-15 LCDI 5-20 LCDI 6-20 | |||||
| Fuse | 250 V~, 10 A (5 X 20 mm) | 250 V~, 5 A(5 X 20 mm) | |||
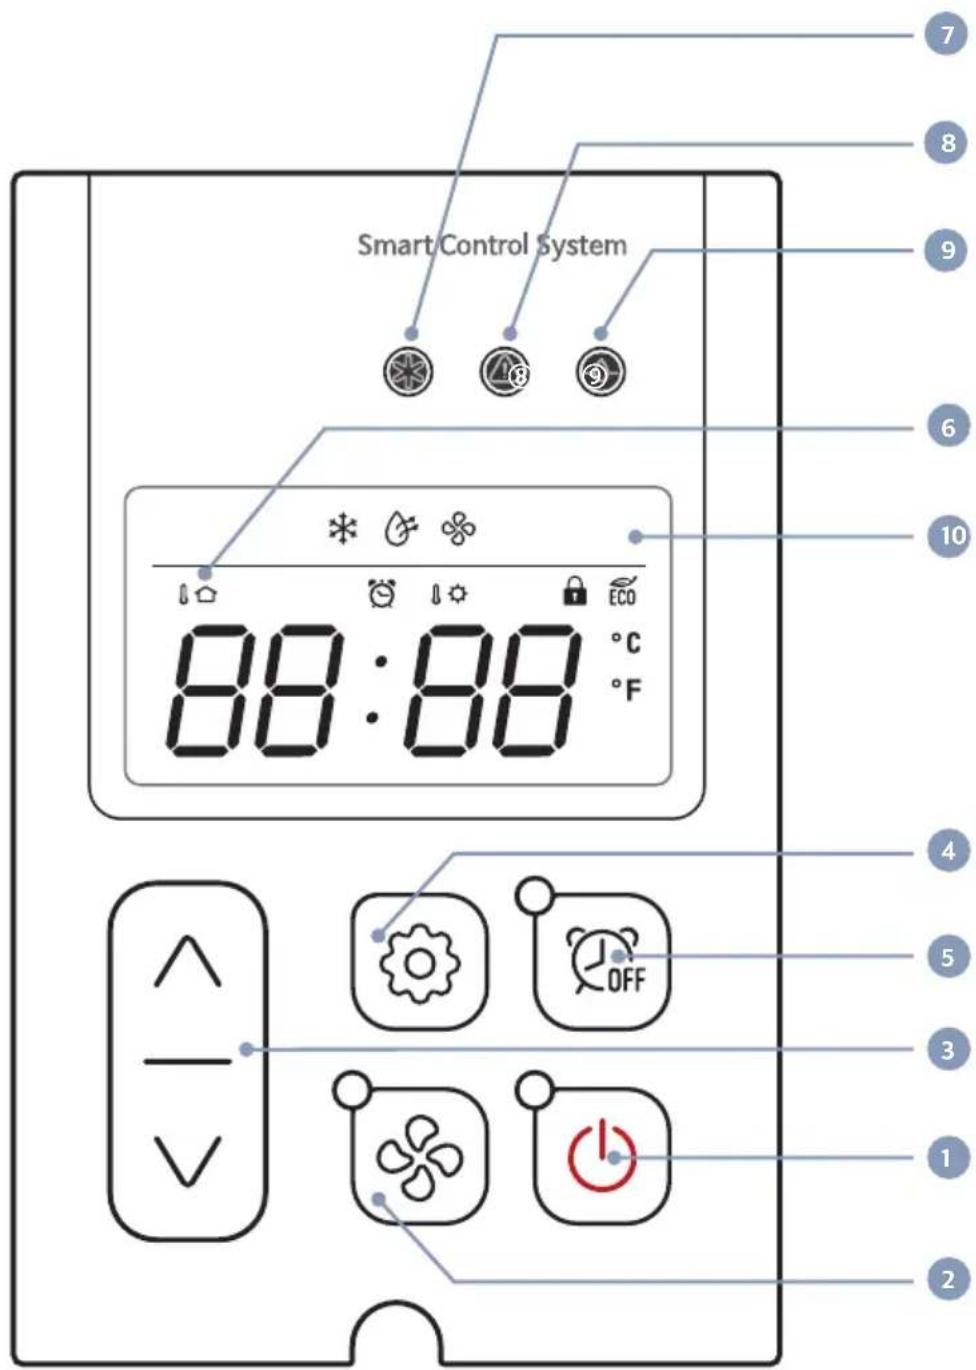
CONTROL PANEL FUNCTIONS
| NAME DESCRIPTION | ||
| 1 | Power |  Use to power on / off. Use to power on / off. |
| 2 | Fan Speed |  Controls fan low / high speed. Controls fan low / high speed. |
| 3 | V ∧ Button |  Raises or lowers the setting temperature or sleep (off) time. Raises or lowers the setting temperature or sleep (off) time. |
| 4 | Mode |  Use to select Cooling / Dehumidification / Fan mode. Use to select Cooling / Dehumidification / Fan mode. |
| 5 | Off Timer |  You can set the time to stop the unit. You can set 0~24 hours. Time intervals are 30 mins. up to 10 hours and then 1 hour between 10 and 24 hours. You can set the time to stop the unit. You can set 0~24 hours. Time intervals are 30 mins. up to 10 hours and then 1 hour between 10 and 24 hours. |
| 6 | Room |  If this icon is on, the displayed temperature is for room temp. If this icon is on, the displayed temperature is for room temp. |
| 7 | Comp |  When the compressor is operating, the LED is on. When the compressor is operating, the LED is on. |
| 8 | Error |  Error signal. Error signal. |
| 9 | Check |  If water is full or Align drain tank needs to be checked, the LED is on. If water is full or Align drain tank needs to be checked, the LED is on. |
| 10 | Display | 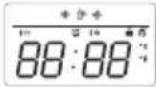 Display room temperature, and also the setting temperature and sleep time if they had been set. Display room temperature, and also the setting temperature and sleep time if they had been set. |
MODE CHANGING METHOD


COOLING MODE
If you press the 'Mode' button, 'Cooling symbol' is displayed.

● DEHUMIDIFICATION MODE
If you press the 'Mode' button when the 'cooling' is operating, 'Dehumidification symbol' is displayed.


FAN MODE
If you press the 'Mode' button when the 'dehumidification' is operating, 'Fan symbol' is displayed.
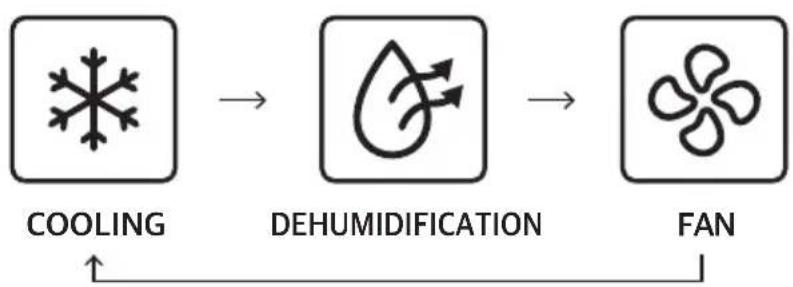
flowchart
graph LR
    A["COOLING"] --> B["DEHUMIDIFICATION"]
    B --> C["FAN"]
This function enables you to set the length of time you want the unit to operate.
STEP 1
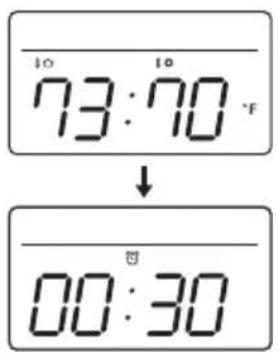
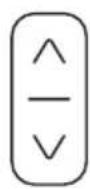

- When unit is operating, press the 'Off Timer' button and set the length of time you want by pressing ∧ or ∨. Each time you press the button you will increase the 'time to off' period by 30 mins. up to 10 hours, and 1 hour up to 24 hours. The display will show 0.5 for 30 min and 1 for an hour. One and a half hours will show 1.5.
STEP 2
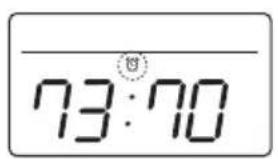

- When you have finished setting the time period, the 'Off Timer' lamp will be on which indicates the unit is in sleep (Off Timer) mode.
AFTER 1hr
- If you press the 'Off Timer' button during its operation, the remaining time will be shown.
CANCEL
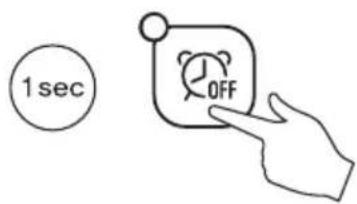
- To cancel 'Off Timer', press and hold 'Off Timer' button for 1 second. It will then switch the timer off automatically.
- When you turn ON, the setting temperature is displayed.
- You can change setting temperature.
● Display Room Temperature Range & Setting Range.
COOLING MODE
| Mode | Display range | Setting range |
| Room | 32°F ~ 99°F | 59°F ~ 86°F |
| Spot | 34°F ~ 86°F |
Cooling operates when room temperature is higher than set temperature.
Cooling stops when room temperature is lower than set temperature.
- SPOT or ROOM MODE
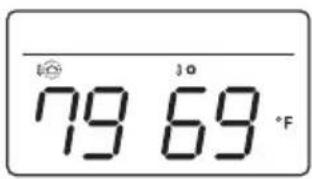


To change the temperature of the entire room, select 'Room mode'. For targeted cooling of machinery servers or people etc select
'Spot mode'. Applicable only when cooling mode.
- If you want to see room temperature, when unit is operated, push 'mode' and 'v' button simultaneously for 3 seconds.
• Light be on the 'Room LED' when room mode set.
- LOCK or UNLOCK
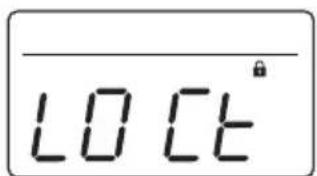


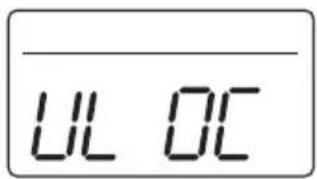

- If you press 'v' for 5 seconds when the unit is turned off, you can control 'LOCK, UNLOCK' mode.
- You can set 'UNLOCK' or 'LOCK' after pressing '^' button.
● TEMPERATURE UNIT
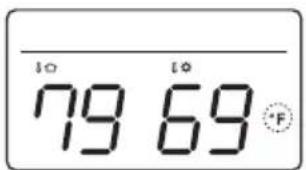


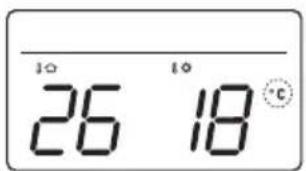
- If you want to change temperature unit °F ↔ °C, when the unit is stopped, push 'V' and '^' button simultaneously for 3 seconds.
'ERROR' and WARNING INDICATORS
| Error Code | Problem | Cause | Corrective Action |
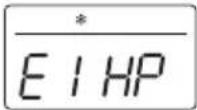 | High pressure Blocked COND filter. Blocked / kinked exhaust duct. Ambient temperature is too high. | Clean the COND filter.Ensure exhaust duct is not blocked / kinked.Do not use the air conditioner if ambient temperature is higher than 113°F. | |
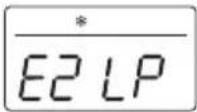 | Low pressure Verify Electrical. Refrigerant may be low or empty. | Verify Power (Voltage / Amps).Check refrigerant level and refrigerant leakage.Clean Filter and Coil.Check Evaporator Filter.Check Evaporator Coil. | |
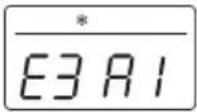 | AF1 sensor If the AF1 sensor is short circuited or cut 'E3 A1' displayed and the 'Error' LED will be on. | Exchange AF1 sensor. | |
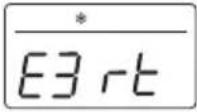 | RT sensor If the RT sensor is short circuited or cut 'E3 rt' displayed and the 'Error' LED will be on. | Exchange RT sensor in digital controller. | |
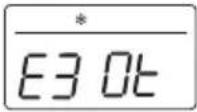 | OT sensor If the OT sensor is short circuited or cut 'E3 Ot' displayed and the 'Error' LED will be on. | Exchange OT sensor. | |
'ERROR' and WARNING INDICATORS
| Error Code | Problem | Cause | Corrective Action |
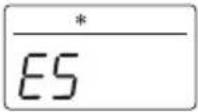 | BLDC Motor If BLDC motor is not operated, 'E5' displayed and the 'Error' LED will be on | Check or change BLDC motor | |
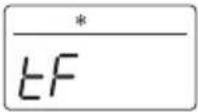 | Water full Water tank is full. Empty the water tank. | ||
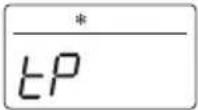 | Align water tank | Water tank is not positioned correctly. | Place the water tank in right position. |
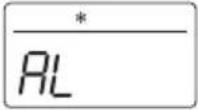 | Fire alarm signal Fire alarm signal is detected from Fire alarm system. | Reset unit by pushing and holding the "OFF TIMER" button for 5 seconds. | |
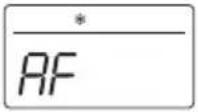 | Anti-Freezing alarm | Evaporator is below 25°F (-2°C) due to being used in a low ambient temperature area. | Do not use the unit in an ambient temperature less than 61°F (16°C). Check refrigerant level. |
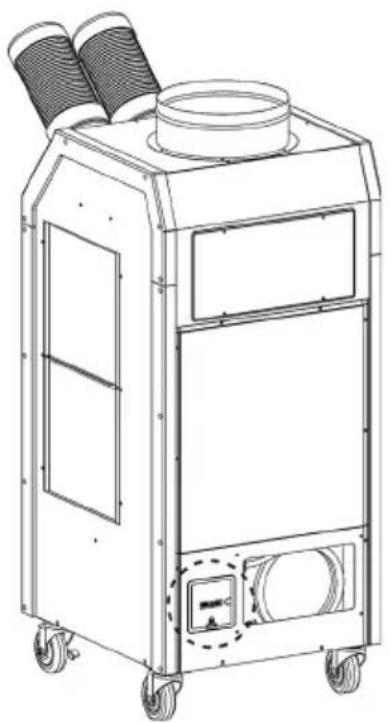
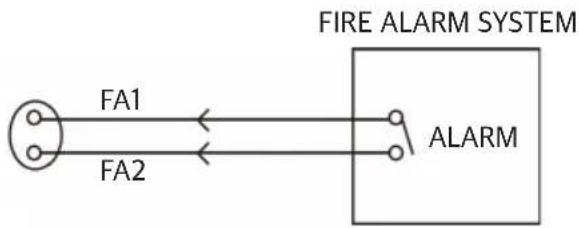
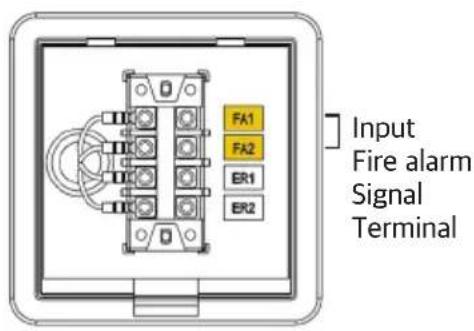
● Input terminal FA1 and FA2
When the signal from the fire alarm system is detected, the unit turns off and does not operate until the unit has been RESET.
natural_image
Line drawing of a portable industrial machine with wheels and a lid, no text or symbols present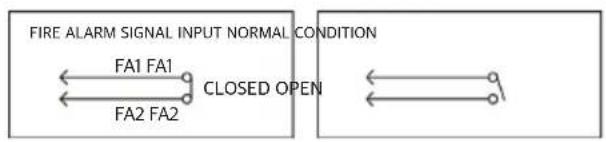
flowchart
graph LR
    A["FIRE ALARM SIGNAL INPUT NORMAL CONDITION"] --> B["FA1 FA1"]
    A --> C["FA2 FA2"]
    A --> D["CLOSED OPEN"]
    D --> E["FA1"]
    D --> F["FA2"]
    D --> G["CLOSED OPEN"]
● Connecting the fire alarm wire from fire alarm system
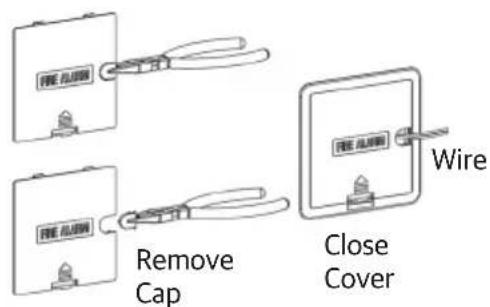
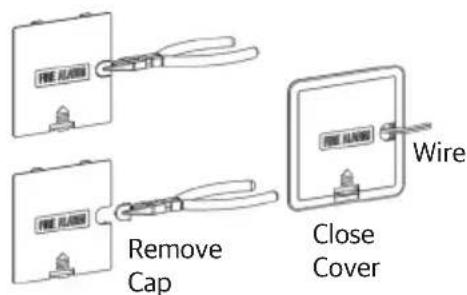
- Remove the 'Cap' on the 'Fire Alarm Cover'.
- Use recommended fire alarm wire size from 16 AWG to 26 AWG for a solid wire, or 16 AWG to 22 AWG for a stranded wire with ring terminal for #5 stud size.
- Connect fire alarm to terminal FA1 and FA2.
● Output terminal ER1 and ER2
The unit will output an Error signal (normal open dry contact) when an "Error" has occurred, to show what the failure is on the unit.
natural_image
Technical line drawing of a mechanical device with wheels and a lid (no text or symbols)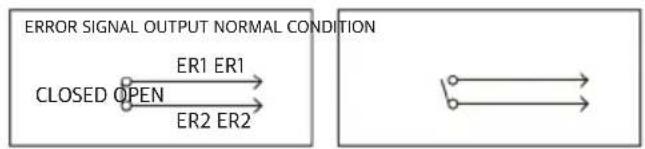
flowchart
graph LR
    A["CLOSED OPEN"] --> B["ER1 ER1"]
    A --> C["ER2 ER2"]
    D["ERROR SIGNAL OUTPUT NORMAL CONDITION"] --> E["Output Arrow 1"]
    D --> F["Output Arrow 2"]
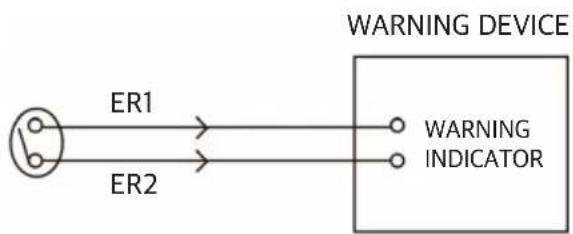
● Connecting Error Signal with warning device
- Remove the 'Cap' on the 'Fire Alarm Cover'.
- Use recommended error signal wire size from 16 AWG to 26 AWG for a solid wire, or 16 AWG to 22 AWG for a stranded wire with ring terminal for #5 stud size.
- Connect the end of the error signal wire to ER1 and ER2, and the other end to the compatible with variaus warning devices such as alarm speaker, light indicators, and etc.
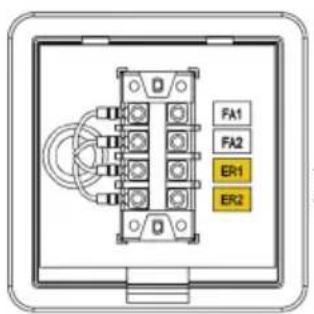
] Output Error Signal Terminal
| Model | Evap. Fan Cond. Fan | Economy mode(Push the button for 3 sec.) | Etc. | |||
| Economy Normal Economy Normal | ||||||
| HSC-12R | Stop after 30 sec. | Run -- |  | Fan integral type | ||
| HSC-14R/18R/24R | Stop after 30 sec. | Run -- |  | Fan integral type | ||
| AHSC-14R/18R | Stop after 30 sec. | Run -- |  | Fan integral type | ||
| HSC-36R | Stop after 1 min. | Run | Stop after 1 min. | Run |  | |
| HSC-60R | Stop after 1 min. | Run | Stop after 1 min. | Run |  | |
| AHSC-42R/60R | Stop after 30 sec. | Run Stop | Run |  | ||
| AHSC-140R | Stop after 1 min. | Run | Stop after 1 min. | Run |  | |
| HWC-19R | Stop after 30 sec. | Run -- |   | |||
| HWC-60R | Stop after 1 min. | Run -- |  | |||
TROUBLE SHOOTING
| TROUBLE CHECK REMEDY | ||
| NOT WORKING | Power cable correctly connected. Connect cable correctly. | |
| Power button "OFF". Press Power button to "ON". | ||
| Fuse (supply) blown. Exchange fuse in board. | ||
| Breaker on switch board tripped. Check load capacity and reset. | ||
| Ambient temperature too high. Check operating temperature range. | ||
| POOR COOLING | Filter blocked with dust. Clean Filter. | |
| Dust in heat exchanger. | Clean heat exchanger. | |
| Obstacle against inlet side. Remove and allow 20" (50 cm) clearance. | ||
CLEANING AND MAINTENANCE
● CLEANING THE AIR FILTERS
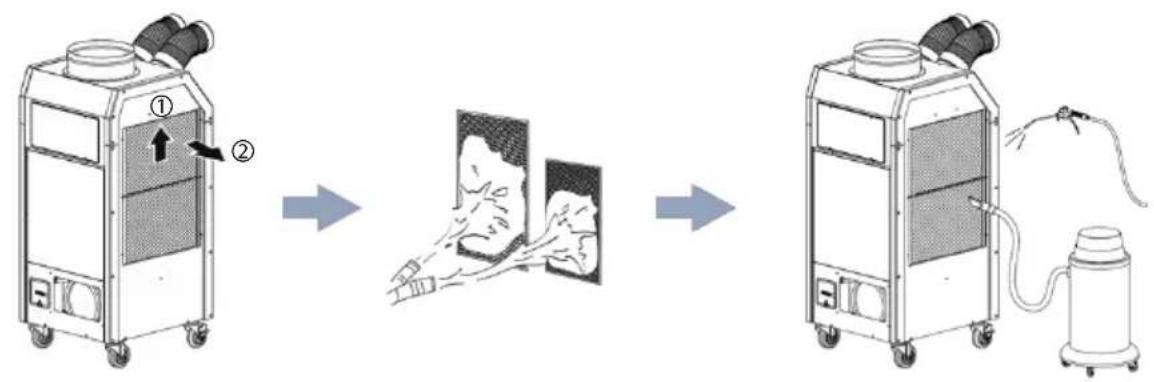
flowchart
graph LR
    A["① Air Filter"] --> B["② Dust Collection"]
    B --> C["③ Drying & Drying"]
    C --> D["Final Air Discharge"]
- To remove filters, slide up a little ① and pull towards you ②.
- Clean the filters with water or compressed air.
- Clean evaporator and condenser units with a vacuum cleaner or compressed air.
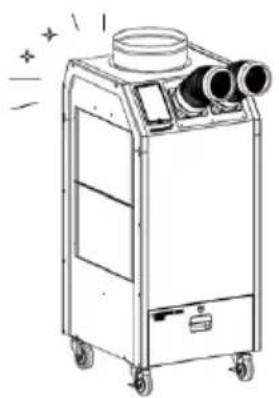
● MAINTENANCE
natural_image
Line drawing of a portable industrial machine with cylindrical ports and wheels (no text or symbols)- After cleaning, completely dry the inside of the unit by operating on 'Fan Mode'.
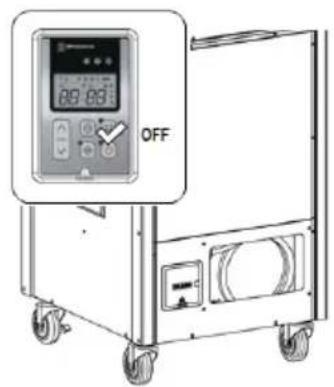
- Turn "OFF" at control panel, remove plug from socket. Coil and store cable neatly.
natural_image
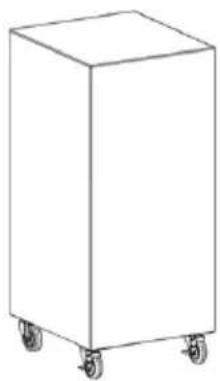
Simple line drawing of a rectangular box with wheels, no text or symbols present- Keep machine suitably covered to prevent damage by damp, humidity and dust.
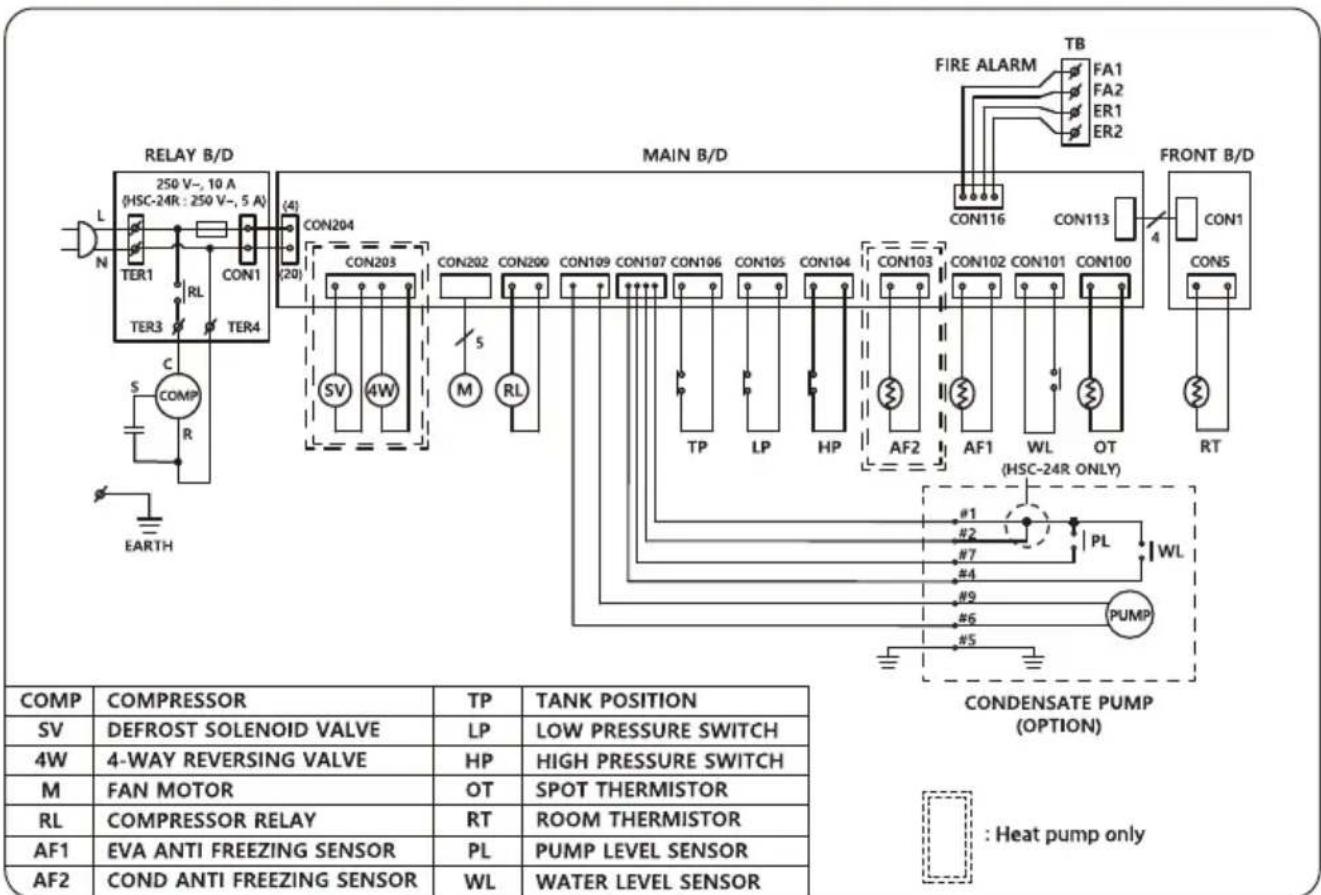
flowchart
graph TD
    subgraph MAIN B/D
        A["CON116"] --> B["CON113"]
        B --> C["CON100"]
        C --> D["CON102"]
        D --> E["CON101"]
        E --> F["CON103"]
        F --> G["CON104"]
        G --> H["CON105"]
        H --> I["CON106"]
        I --> J["CON107"]
        J --> K["CON109"]
        K --> L["CON200"]
        L --> M["CON202"]
        M --> N["CON203"]
        N --> O["CON204"]
        O --> P["CON205"]
        P --> Q["CON206"]
        Q --> R["CON207"]
        R --> S["CON208"]
        S --> T["CON209"]
        T --> U["CON210"]
        U --> V["CON211"]
        V --> W["CON212"]
        W --> X["CON213"]
        X --> Y["CON214"]
        Y --> Z["CON215"]
        Z --> AA["CON216"]
        AA --> AB["CON217"]
        AB --> AC["CON218"]
        AC --> AD["CON219"]
        AD --> AE["CON220"]
        AE --> AF["CON221"]
    end

    subgraph MAIN B/D
        AG["CON116"] --> AH["CON113"]
        AI["CON1"] --> AJ["CON5"]
        AK["S COMP"] --> AL["R"]
        AM["EARTH"] --> AN["S"]
    end

    subgraph MAIN B/D
        AO["CON204"] --> AP["CON203"]
        AQ["SV 4W"] --> AR["M RL"]
        AS["M"] --> AT["OT"]
    end

    subgraph MAIN B/D
        AU["CON202"] --> AV["CON200"]
        AW["CON109"] --> AX["CON107"]
        AY["CON106"] --> AZ["CON105"]
        BA["CON104"] --> BB["CON103"]
        BC["TP"] --> BD["LP"]
        BE["HP"] --> BF["AF2"]
        BG["AF"] --> BH["AF1 WL OT (HSC-24R ONLY)"]
    end

    subgraph MAIN B/D
        BI["CON103"] --> BJ["CON102"]
        BK["AF"] --> BL["AF1 WL OT (HSC-24R ONLY)"]
    end

    subgraph MAIN B/D
        BO["HSP"] --> BP["PUMP"]
    end

    subgraph MAIN B/D
        BQ["NP"] --> BR["PUMP"]
    end

    subgraph MAIN B/D
        BS["PUMP"] --> BT["PUMP"]
    end

    subgraph MAIN B/D
        BU["PUMP"] --> BV["PUMP"]
    end

    subgraph MAIN B/D
        BW["PUMP"] --> BX["PUMP"]
    end

    subgraph MAIN B/D
        BY["PUMP"] --> BZ["PUMP"]
    end

    subgraph MAIN B/D
        CA["PUMP"] --> CB["PUMP"]
    end

    subgraph MAIN B/D
        CC["PUMP"] --> CD["PUMP"]
    end

    subgraph MAIN B/D
        CE["PUMP"] --> CF["PUMP"]
    end

    subgraph MAIN B/D
        GD["PUMP"] --> DH["PUMP"]
    end

    subgraph MAIN B/D
        DI["PUMP"] --> DJ["PUMP"]
    end

    subgraph MAIN B/D
        DK["PUMP"] --> DL["PUMP"]
    end

    subgraph MAIN B/D
        DV["PUMP"] --> DW["PUMP"]
    end

    subgraph MAIN B/D
        DX["PUMP"] --> DX["PUMP"]
    end

    subgraph MAIN B/D
        DXP["PUMP"] --> DXP["PUMP"]
    end

    subgraph MAIN B/D
        DXR["PUMP"] --> DXR["PUMP"]
    end

    subgraph MAIN B/D
        DXS["PUMP"] --> DXS["PUMP"]
    end

    subgraph MAIN B/D
        DXT["PUMP"] --> DXT["PUMP"]
    end

    subgraph MAIN B/D
        DXU["PUMP"] --> DXU["PUMP"]
    end

    subgraph MAIN B/D
        DXV["PUMP"] --> DXV["PUMP"]
    end

    subgraph MAIN B/D
        DXW["PUMP"] --> DXW["PUMP"]
    end

    subgraph MAIN B/D
        DXX["PUMP"] --> DXX["PUMP"]
    end

    subgraph MAIN B/D
        DXY["PUMP"] --> DXY["PUMP"]
    end

    subgraph MAIN B/D
        DXZ["PUMP"] --> DXZ["PUMP"]
    end

    subgraph MAIN B/D
        DXYP["PUMP"] --> DXYP["PUMP"]
    end

    subgraph MAIN B/D
        DXYQ["PUMP"] --> DXYQ["PUMP"]
    end

    subgraph MAIN B/D
        DXYZ["PUMP"] --> DXYZ["PUMP"]
    end

    subgraph MAIN B/D
        DXYZP["PUMP"] --> DXYZP["PUMP"]
    end

    subgraph MAIN B/D
        DXYZPQ["PUMP"] --> DXYZPQ["PUMP"]
    end

    subgraph MAIN B/D
        DXYZQP["PUMP"] --> DXYZQP["PUMP"]
    end

    subgraph MAIN B/D
        DXYZQPQ["PUMP"] --> DXYZQZP["PUMP"]
    end

    subgraph MAIN B/D
        DXYZQZPQ["PUMP"] --> DXYZQZPQ["PUMP"]

    subgraph MAIN B/D
        DXYZQZPQP["PUMP"] --> DXYZQZPQP["PUMP"]

    subgraph MAIN B/D
        DXYZQZPQZP["PUMP"] --> DXYZQZPQZP["PUMP"]

    subgraph MAIN B/D
        DXYZQZPQZP["PUMP"] --> DXYZQZPQZP["PUMP"]

    subgraph MAIN B/D
        DXYZQZPQZP["PUMP"] --> DXYZQZPQZP["PUMP"]

    subgraph MAIN B/D
        DXYZQZPZPQ["PUMP"] --> DXYZQZPZPQ["PUMP"]

    subgraph MAIN B/D
        DXYZQZPZPQZP["PUMP"] --> DXYZQZPZPQZP["PUMP"]

    subgraph MAIN B/D
        DXYZQZPZPQZP["PUMP"] --> DXYZQZPZPQZP["PUMP"]

    subgraph MAIN B/D
        DXYZQZPZPQZP["PUMP"] --> DXYZQZPZPQZP["PUMP"]

    subgraph MAIN B/D
        DXYZQZPZPQZP["PUMP"] --> DXYZQZPTQZP["PUMP"]

    subgraph MAIN B/D
        DXYZQZPTQZP["PUMP"] --> DXYZQZPTQZP["PUMP"]

    subgraph MAIN B/D
        DXYZQZPTQZPQZP["PUMP"] --> DXYZQZPTQZPQZP["PUMP"]

    subgraph MAIN B/D
        DXYZQZPTQZPQZP["PUMP"] --> DXYZQZPTQZPQZP["PUMP"]

    subgraph MAIN B/D
        DXYZQZPTQZPQZP["PUMP"] --> DXYZQZPTQZPQZP["PUMP"]

    subgraph MAIN B/D
        DXYZQZPTQZPQZP,PUMP["PUMP"] --> DXYZQZPTQZPQZP,PUMP

    end
HOW TO INSTALL THE CONDENSATE PUMP
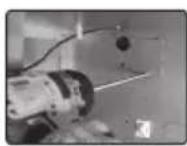
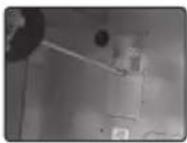
- Open the connector cover and fix the cover with a bolt under the connector box.
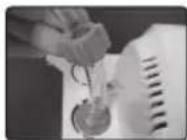
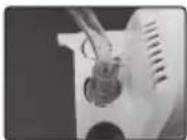
- Assemble the discharge hose with the discharge cap on the pump.
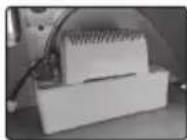
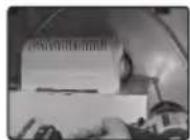
- Take out the hose through the bottom hole and fix the pump on the plate with bolts.
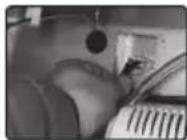
- Connect the pump plug to the receptacle on the connector box.
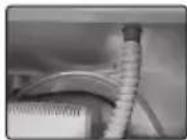
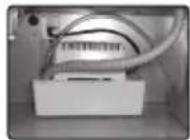
- Assemble the drain hose with drain pipe and put in the pump.
INSTALLING APPLICATION


- Start Google Play
- Find Airrex application
- Install the application
Wi-Fi module name : ESP-32-WROOM-32E
Operating frequency : Bluetooth : 2402-2480 MHz, WLAN : 2412-2472 MHz,
RF output power : Bluetooth : max. 8.23 dBm e.i.r.p
WLAN : max. 19.68 dBm e.i.r.p
REGISTER AS A USER TO APPLICATION
AIRREX ^0
Sign In
Password
φ
Forgot Password
Join
Sign In
- On the login screen, Tap JOIN button to start a new user registration. If you already have an Airrex account, sign in with your e-mail and password.

AIRREX
. Join
Password
φ
Confirm Password
φ
Password must contain
• Minimum of B characters
• At least one special character

- Enter your e-mail and desired password twice and Tap JOIN button.
AIRREX ^0
Waiting for your E-mail
Authentication.

Please check your E-mail.
Resend
Authentication Done
- Tap your e-mail inbox and verify your e-mail by clicking the button/link in your e-mail.
CONNECT YOUR PRODUCT TO YOUR APPLICATION

- Tap CONNECT PRODUCT button to start the connection process.
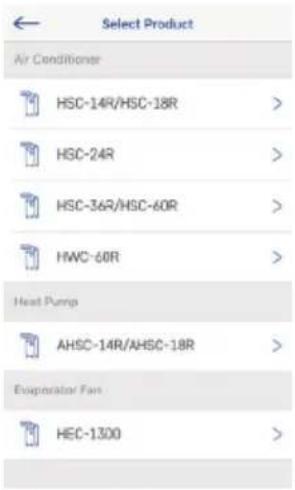
- Please select the appropriate model from the product options.
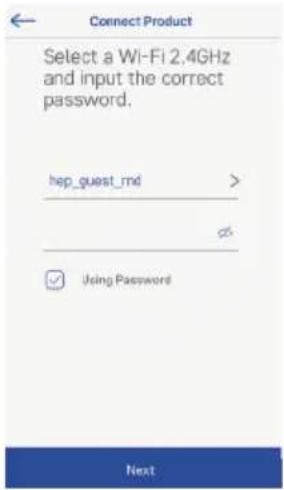
- Tap Select Wi-Fi to select a Wi-Fi network. After selecting Wi-Fi, enter the correct Wi-Fi password in the Password field. Tap Next to connect the model to your Wi-Fi.
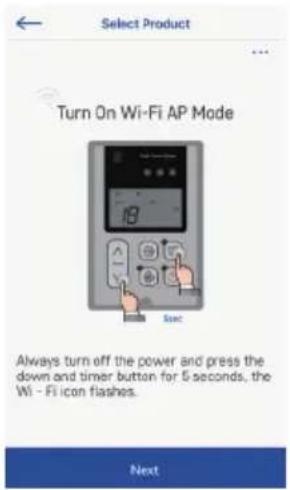
- When the product is in standby mode, press the down button + timer button for 5 seconds. Then, the Wi-Fi icon will blink. Tap the NEXT button in the app.
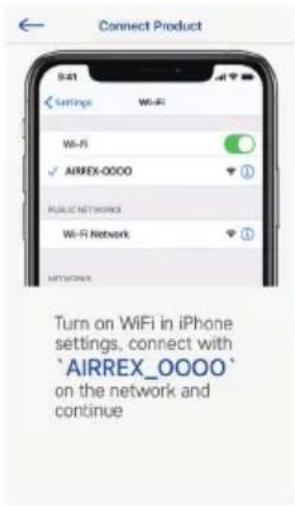
- Turn on Wi-Fi in mobile phone settings. connect with 'AIRREX_OOOO' on the network and continue.
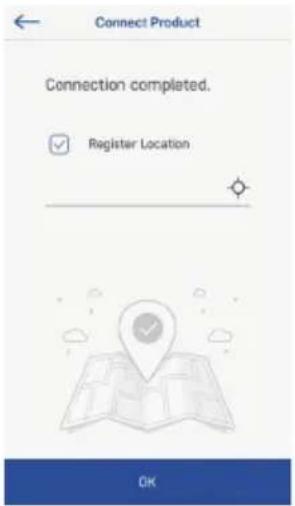
- Tap the location cursor to provide location information to the application. If you do not want to register the product location, uncheck the Register Location box.
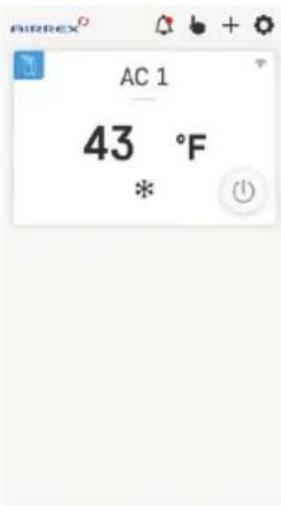
- Once registration is complete, the product will be connected as shown above.
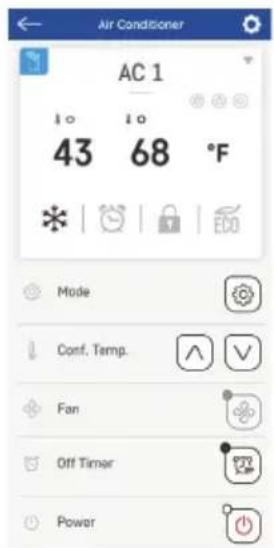
- If you select the control screen, you can see the detailed control screen.
USING THE MOBILE APPLICATION A
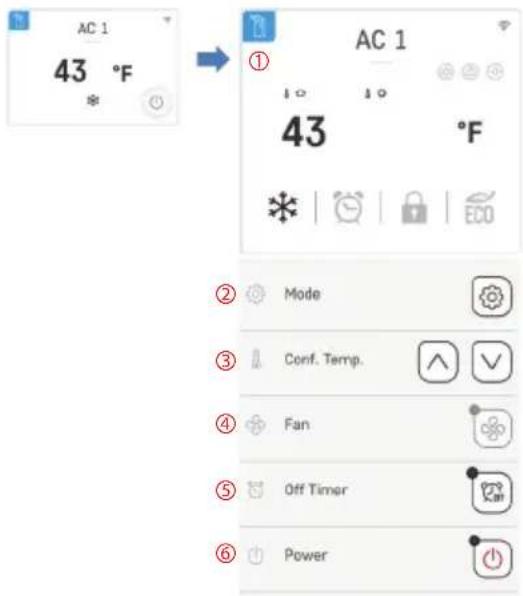
APPLICATION DETAIL DASHBOARD
If you Tap on the general dashboard screen, you can see the detailed dashboard screen (the usage method is the same as the product usage method) Display the product's operating status
- Product Operation Status.
- Use to select Cooling / Dehumidification / Fan mode.
- Raises or lowers the setting temperature.
- FAN strong/weak selection (except some models)
- Sleep (Off) time
- Use to power on/off

NOTICE

Wi-Fi light blinking twice Searching for Wi-Fi network
Wi-Fi light blinking once Connected to Wi-Fi, but not to internet
Wi-Fi light on Connected to Wi-Fi and internet.
Bluetooth blinking Searching for smartphone connection
Bluetooth light on Bluetooth connected to smartphone
TIPS FOR USING MOBILE APPLICATION
TIPS FOR USING THE MOBILE APPLICATION
• You can refresh the screen by swiping down with one finger.
- When the air conditioner is off, you can reset the wifi and bluetooth settings by pressing the OFFtimer button and the UP button for 5 seconds.
REBOOTING THE PRODUCT
- Push Power button "power off".
- Push Up and Mode button at the same time for approx. 5 sec (beeps and memory resets).
- Push Timer and Mode button at the same time for approx. 5 sec (beeps and wifi signal disappears).
NOTICE! New registration is needed, follow instructions in this manual.
USING THE MOBILE APPLICATION
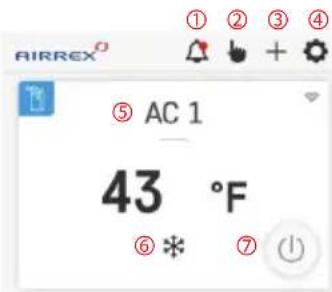
APPLICATION DASHBOARD
The mobile application works the same way as the normal control panel. Please refer to the operating instructions in this user manual to understand what each button does.
1.Push notifications
2.Total Control
3.Add new product
4.Application settings menu
5.Product name
6.Product operating status
7. Turn the product on and off
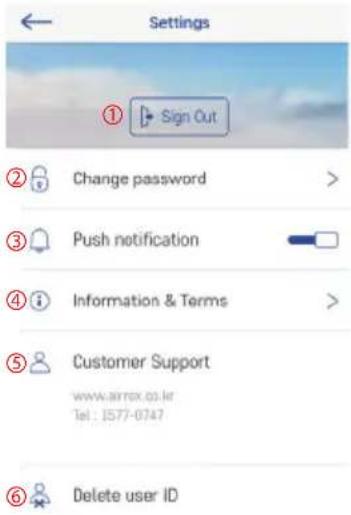
APPLICATION SETTINGS MENU
- You are automatically always logged in after signing up.
You can logout if necessary. - If you want to change your password, click this button.
You will receive an e-mail with instructions to change the password. - Select to turn push notifications on / off.
- Here you can read License information, Terms of Service and Privacy information.
- You can see the customer support website.
- To delete user ID, you need to delete all products first.
Then contact the importer to delete your user information.
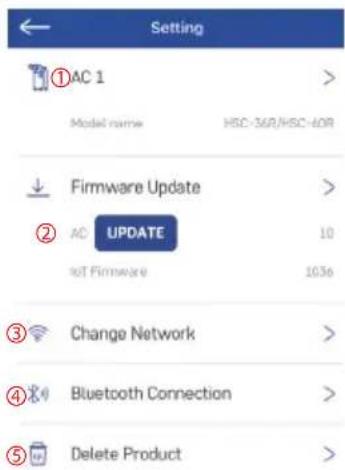
PRODUCT SETTINGS MENU
- Modify the name of the product.
- Update IoT firmware.
- Change Wi-Fi network.
- Connect to bluetooth (used only for changing the Wi-Fi information).
- Remove the product from the application.
NOTICE WHEN USING MOBILE APPLICATION
- Wireless router and LAN cable are separate purchases. Each must be installed separately.
- Airrex product uses WPA2 Security method to connect to the router.
- Airrex supports only 2,4GHz of Wi-Fi Frequency. It doesn't support 5GHz.
- Airrex uses Bluetooth v4.2 and BLE. BLE connection is used only for initial searching and connection between the smartphone and the product. The connection will be maintained by Wi-Fi network. If you want to change the network of the product, you must reconnect the BLE.
- Airrex mobile application supports Android version 5.1 and later. For iPhone the application supports iOS version 13 and later and iPhone 7 or later.
- Install a wireless router close to the product. Depending on the location or distance between the product and the wireless router, the RSSI (strength of the wireless network signal) may vary, and the transmission time and data rate in receiving may also differ.
- Check to set your SSID (wireless router ID or name) to a combination of English and numeric. If you see special characters, the information might not be properly transferred to the product modem and might not be connected.
- You might not be able to connect depending on your network settings or connection status. If you are not connected or have problems setting up your network, contact your network service provider.
- Other SSID (wireless router name) in your neighborhood can be detected when you search for a wireless network. It is illegal to use another user's network. There might be legal sanctions upon detection if you break the law. Be sure to connect to a network (router) that you have permission to use.
- Details of description can be different, depending on the version of the application. Things may be changed in part without notification to user.

natural_image
Illustration of a wireless router with three antennas emitting signal waves, accompanied by a smartphone icon (no text or symbols)
The installation, service and operation manual
natural_image
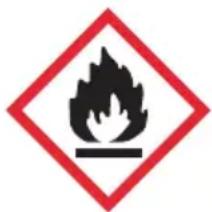
Warning symbol of a flame inside a red diamond border (no text or numbers)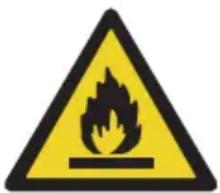
Refrigerant Safety Group A2L
WARNING
- Do not use means to accelerate the defrosting process or to clean, other than those recommended by the manufacturer.
- The appliance shall be stored in a room without continuously operating ignition sources (for example: open flames, an operating gas appliance or an operating electric heater.
- Do not pierce or burn.
- Be aware that refrigerants may not contain an odour.
- Continuous air circulation required for proper functioning. Unit must be powered except for service.
1. Installation
The appliance shall be installed in accordance with national wiring regulations.
| MODEL | HSC-14R | HSC-18R | HSC-24R |
| The minimum room area | 5.53 m^2 | 6.45 m^2 | 7.06 m^2 |
| The ventilation airflow volume (Q/min) 92 m | ^3/h | ^3/m | ^3/h |
Unventilated areas
- The non-FIXED APPLIANCE shall be stored in a room without continuously operating open flames (for example an operating gas appliance) or other POTENTIAL IGNITION SOURCES (for example an operating electric heater, hot surfaces)
- Non-duct connected appliances containing A2L refrigerants with the supply and return air openings in the conditioned space may have the body of the appliance may be installed in open areas such as false ceilings not being used as return air plenums, as long as the conditioned air does not directly communicate with the air of the false ceiling.
The installation, service and operation manual
2. Service
2.1. Competence of service personnel
• Information of procedures additional to usual information for refrigerating appliance installation, repair, maintenance and decommission procedures is required when an appliance with FLAMMABLE REFRIGERANTS is affected.
• The training of these procedures is carried out by national training organisations or manufacturers that are accredited to teach the relevant national competency standards that may be set in legislation.
- The achieved competence should be documented by a certificate.
2.2 Information and training
The training should include the substance of the following:
• Information about the explosion potential of FLAMMABLE REFRIGERANTS to show that flammables may be dangerous when handled without care.
• Information about POTENTIAL IGNITION SOURCES, especially those that are not obvious, such as lighters, light switches, vacuum cleaners, electric heaters.
• Information about the different safety concepts.
• Information about refrigerant detectors:
- Principle of function, including influences on the operation.
- Procedures, how to repair, check or replace a refrigerant detector or parts of it in a safe way.
- Procedures, how to disable a refrigerant detector in case of repair work on the refrigerant carrying parts.
• Information about the concept of sealed components and sealed enclosures.
• Information about the correct working procedures
a) Commissioning
- Ensure that the floor area is sufficient for the REFRIGERANT CHARGE or that the ventilation duct is assembled in a correct manner.
- Connect the pipes and carry out a leak test before charging with refrigerant.
- Check safety equipment before putting into service.
b) Maintenance
- Portable equipment shall be repaired outside or in a workshop specially equipped for servicing units with FLAMMABLE REFRIGERANTS.
- Ensure sufficient ventilation at the repair place.
- Be aware that malfunction of the equipment may be caused by refrigerant loss and a refrigerant leak is possible.
- Discharge capacitors in a way that won't cause any spark. The standard procedure to short circuit the capacitor terminals usually creates sparks.
- Reassemble sealed enclosures accurately. If seals are worn, replace them.
- Check safety equipment before putting into service.
The installation, service and operation manual
c) Repair
- Portable equipment shall be repaired outside or in a workshop specially equipped for servicing units with FLAMMABLE REFRIGERANTS.
- Ensure sufficient ventilation at the repair place.
- Be aware that malfunction of the equipment may be caused by refrigerant loss and a refrigerant leak is possible.
- Discharge capacitors in a way that won't cause any spark.
- When brazing is required, the following procedures shall be carried out in the following order:
- Safely remove the refrigerant following local and national regulations. If the recovery is not required by national regulations, drain the refrigerant to the outside. Take care that the drained refrigerant will not cause any danger. In doubt, one person should guard the outlet. Take special care that drained refrigerant will not float back into the building;
- Purge the refrigerant circuit with oxygen free nitrogen;
- Evacuate the refrigerant circuit;
- Remove parts to be replaced by cutting or brazing.
- Purge the braze point with nitrogen during the brazing procedure required for repair.
- Carry out a leak test before charging with refrigerant.
d) Decommissioning
- If the safety is affected when the equipment is put out of service, the REFRIGERANT CHARGE shall be removed before decommissioning.
- Ensure sufficient ventilation at the equipment location.
- Be aware that malfunction of the equipment may be caused by refrigerant loss and a refrigerant leak is possible.
- Discharge capacitors in a way that won't cause any spark.
- Remove the refrigerant. If the recovery is not required by national regulations, drain the refrigerant to the outside. Take care that the drained refrigerant will not cause any danger.
In doubt, one person should guard the outlet. Take special care that drained refrigerant will not float back into the building.
e) Disposal
- Ensure sufficient ventilation at the working place.
- Remove the refrigerant. If the recovery is not required by national regulations, drain the refrigerant to the outside. Take care that the drained refrigerant will not cause any danger. In doubt, one person should guard the outlet. Take special care that drained refrigerant will not float back into the building.
The installation, service and operation manual
- When flammable refrigerants are used,
- evacuate the refrigerant circuit.
- purge the refrigerant circuit with oxygen free nitrogen.
- cut out the compressor and drain the oil.
Ventilated enclosure
Safety of the appliance depends on ventilation of the housing.
Switching off the appliance or opening of the enclosure has a significant effect on the safety.
Care should be taken to ensure sufficient ventilation before.
Checks to the area
Prior to beginning work on systems containing FLAMMABLE REFRIGERANTS, safety checks are necessary to ensure that the risk of ignition is minimized.
For repair to the REFRIGERATING SYSTEM, 1 to 5 shall be completed prior to conducting work on the system.
- Work procedure
Work shall be undertaken under a controlled procedure so as to minimize the risk of a flammable gas or vapour being present while the work is being performed.
- General work area
All maintenance staff and others working in the local area shall be instructed on the nature of work being carried out. Work in confined spaces shall be avoided.
- Checking for presence of refrigerant
The area shall be checked with an appropriate refrigerant detector prior to and during work, to ensure the technician is aware of potentially toxic or flammable atmospheres. Ensure that the leak detection equipment being used is suitable for use with all applicable refrigerants, i.e. non-sparking, adequately sealed or intrinsically safe.
- Presence of fire extinguisher
If any hot work is to be conducted on the refrigerating equipment or any associated parts, appropriate fire extinguishing equipment shall be available to hand. Have a dry powder or CO ^2 fire extinguisher adjacent to the charging area.
The installation, service and operation manual
5. No ignition sources
No person carrying out work in relation to a REFRIGERATING SYSTEM which involves exposing any pipe work shall use any sources of ignition in such a manner that it may lead to the risk of fire or explosion.
All possible ignition sources, including cigarette smoking, should be kept sufficiently far away from the site of installation, repairing, removing and disposal, during which refrigerant can possibly be released to the surrounding space. Prior to work taking place, the area around the equipment is to be surveyed to make sure that there are no flammable hazards or ignition risks. “No Smoking” signs shall be displayed.
Checks to the refrigerating equipment
Where electrical components are being changed, they shall be fit for the purpose and to the correct specification. At all times the manufacturer's maintenance and service guidelines shall be followed. If in doubt, consult the manufacturer's technical department for assistance.
The following checks shall be applied to installations using FLAMMABLE REFRIGERANTS:
- the actual REFRIGERANT CHARGE is in accordance with the room size within which the refrigerant containing parts are installed;
- the ventilation machinery and outlets are operating adequately and are not obstructed;
- if an indirect refrigerating circuit is being used, the secondary circuit shall be checked for the presence of refrigerant;
- marking to the equipment continues to be visible and legible. Markings and signs that are illegible shall be corrected;
- refrigerating pipe or components are installed in a position where they are unlikely to be exposed to any substance which may corrode refrigerant containing components, unless the components are constructed of materials which are inherently resistant to being corroded or are suitably protected against being so corroded.
Checks to electrical devices
Repair and maintenance to electrical components shall include initial safety checks and component inspection procedures. If a fault exists that could compromise safety, then no electrical supply shall be connected to the circuit until it is satisfactorily dealt with. If the fault cannot be corrected immediately but it is necessary to continue operation, an adequate temporary solution shall be used. This shall be reported to the owner of the equipment so all parties are advised.
Initial safety checks shall include:
- that capacitors are discharged: this shall be done in a safe manner to avoid possibility of sparking;
- that no live electrical components and wiring are exposed while charging, recovering or purging the system;
• that there is continuity of earth bonding.
The installation, service and operation manual
Repairs to sealed components
- During repairs to sealed components, all electrical supplies shall be disconnected from the equipment being worked upon prior to any removal of sealed covers, etc. If it is absolutely necessary to have an electrical supply to equipment during servicing, then a permanently operating form of leak detection shall be located at the most critical point to warn of a potentially hazardous situation.
- Particular attention shall be paid to the following to ensure that by working on electrical components, the casing is not altered in such a way that the level of protection is affected. This shall include damage to cables, excessive number of connections, terminals not made to original specification, damage to seals, incorrect fitting of glands, etc.
Repair to intrinsically safe components
Do not apply any permanent inductive or capacitance loads to the circuit without ensuring that this will not exceed the permissible voltage and current permitted for the equipment in use.
Intrinsically safe components are the only types that can be worked on while live in the presence of a flammable atmosphere. The test apparatus shall be at the correct rating.
Replace components only with parts specified by the manufacturer. Other parts may result in the ignition of refrigerant in the atmosphere from a leak.
NOTE The use of silicon sealant can inhibit the effectiveness of some types of leak detection equipment. Intrinsically safe components do not have to be isolated prior to working on them.
Cabling
Check that cabling will not be subject to wear, corrosion, excessive pressure, vibration, sharp edges or any other adverse environmental effects.
The check shall also take into account the effects of aging or continual vibration from sources such as compressors or fans.
Detection of flammable refrigerants
Under no circumstances shall potential sources of ignition be used in the searching for or detection of refrigerant leaks. A halide torch (or any other detector using a naked flame) shall not be used.
The following leak detection methods are deemed acceptable for all refrigerant systems.
Electronic leak detectors may be used to detect refrigerant leaks but, in the case of FLAMMABLE REFRIGERANTS, the sensitivity may not be adequate, or may need re-calibration.
(Detection equipment shall be calibrated in a refrigerant-free area.) Ensure that the detector is not a potential source of ignition and is suitable for the refrigerant used. Leak detection equipment shall be set at a percentage of the LFL of the refrigerant and shall be calibrated to the refrigerant employed, and the appropriate percentage of gas (25 % maximum) is confirmed.
The installation, service and operation manual
NOTE Examples of leak detection fluids are
- bubble method,
- fluorescent method agents.
If a leak is suspected, all naked flames shall be removed/extinguished.
If a leakage of refrigerant is found which requires brazing, all of the refrigerant shall be recovered from the system, or isolated (by means of shut off valves) in a part of the system remote from the leak.
Removal of refrigerant shall be according to the following procedures shall be carried out in the following order:
- Safely remove the refrigerant following local and national regulations. If the recovery is not required by national regulations, drain the refrigerant to the outside. Take care that the drained refrigerant will not cause any danger. In doubt, one person should guard the outlet. Take special care that drained refrigerant will not float back into the building.
- Purge the refrigerant circuit with oxygen free nitrogen.
- Evacuate the refrigerant circuit.
- Remove parts to be replaced by cutting or brazing.
- Purge the braze point with nitrogen during the brazing procedure required for repair.
- Carry out a leak test before charging with refrigerant.
Charging procedures
In addition to conventional charging procedures, the following requirements shall be followed.
- Ensure that contamination of different refrigerants does not occur when using charging equipment. Hoses or lines shall be as short as possible to minimise the amount of refrigerant contained in them.
- Cylinders shall be kept in an appropriate position according to the instructions.
- Ensure that the REFRIGERATING SYSTEM is earthed prior to charging the system with refrigerant.
- Label the system when charging is complete (if not already).
- Extreme care shall be taken not to overfill the REFRIGERATING SYSTEM.
Decommissioning
Before carrying out this procedure, it is essential that the technician is completely familiar with the equipment and all its detail. It is recommended good practice that all refrigerants are recovered safely.
Prior to the task being carried out, an oil and refrigerant sample shall be taken in case analysis is required prior to re-use of recovered refrigerant. It is essential that electrical power is available before the task is commenced.
a) Become familiar with the equipment and its operation.
b) Isolate system electrically.
The installation, service and operation manual
c) Before attempting the procedure, ensure that:
- mechanical handling equipment is available, if required, for handling refrigerant cylinders;
- all personal protective equipment is available and being used correctly;
• the recovery process is supervised at all times by a competent person; - recovery equipment and cylinders conform to the appropriate standards.
d) Pump down refrigerant system, if possible.
e) If a vacuum is not possible, make a manifold so that refrigerant can be removed from various parts of the system.
f) Make sure that cylinder is situated on the scales before recovery takes place.
g) Start the recovery machine and operate in accordance with instructions.
h) Do not overfill cylinders (no more than 80 % volume liquid charge).
i) Do not exceed the maximum working pressure of the cylinder, even temporarily.
j) When the cylinders have been filled correctly and the process completed, make sure that the cylinders and the equipment are removed from site promptly and all isolation valves on the equipment are closed off.
k) Recovered refrigerant shall not be charged into another REFRIGERATING SYSTEM unless it has been cleaned and checked.
Labelling
Equipment shall be labelled stating that it has been de-commissioned and emptied of refrigerant. The label shall be dated and signed.
For appliances containing FLAMMABLE REFRIGERANTS, ensure that there are labels on the equipment stating the equipment contains FLAMMABLE REFRIGERANT.
Recovery
When removing refrigerant from a system, either for servicing or decommissioning, it is recommended good practice that all refrigerants are removed safely.
When transferring refrigerant into cylinders, ensure that only appropriate refrigerant recovery cylinders are employed. Ensure that the correct number of cylinders for holding the total system charge is available. All cylinders to be used are designated for the recovered refrigerant and labelled for that refrigerant (i.e. special cylinders for the recovery of refrigerant). Cylinders shall be complete with pressure-relief valve and associated shut-off valves in good working order. Empty recovery cylinders are evacuated and, if possible, cooled before recovery occurs.
The installation, service and operation manual
The recovery equipment shall be in good working order with a set of instructions concerning the equipment that is at hand and shall be suitable for the recovery of the flammable refrigerant.
If in doubt, the manufacturer should be consulted. In addition, a set of calibrated weighing scales shall be available and in good working order. Hoses shall be complete with leak-free disconnect couplings and in good condition.
The recovered refrigerant shall be processed according to local legislation in the correct recovery cylinder, and the relevant waste transfer note arranged. Do not mix refrigerants in recovery units and especially not in cylinders.
If compressors or compressor oils are to be removed, ensure that they have been evacuated to an acceptable level to make certain that flammable refrigerant does not remain within the lubricant.
The compressor body shall not be heated by an open flame or other ignition sources to accelerate this process. When oil is drained from a system, it shall be carried out safely.
3. Transportation, marking and storage
3.1. Transportation
Attention is drawn to the fact that additional transportation regulations may exist with respect to equipment containing flammable gas.
The maximum number of pieces of equipment or the configuration of the equipment permitted to be transported together will be determined by the applicable transport regulations.
3.2. Marking
Signs for similar appliances used in a work area are generally addressed by local regulations and give the minimum requirements for the provision of safety and/or health signs for a work location.
All required signs are to be maintained and employers should ensure that employees receive suitable and sufficient instruction and training on the meaning of appropriate safety signs and the actions that need to be taken in connection with these signs.
The effectiveness of signs should not be diminished by too many signs being placed together.
Any pictograms used should be as simple as possible and contain only essential details.
Disposal of equipment using flammable refrigerants
See national regulations.
The installation, service and operation manual
3.3. Storage
The storage of the appliance should be in accordance with the applicable regulations or instructions, whichever is more stringent.
Storage of packed (unsold) equipment
Storage package protection should be constructed in such a way that mechanical damage to the equipment inside the package will not cause a leak of the REFRIGERANT CHARGE.
The maximum number of pieces of equipment permitted to be stored together will be determined by local regulations.
natural_image
Red diamond-shaped warning symbol with a flame icon (no text or numbers)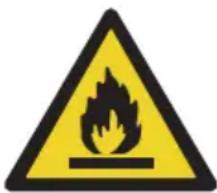
Refrigerant Safety Group A2L
ATTENTION
- agents fluorescents.
(Applicable to first retail purchaser only)
AIRREX unit gives the more reliable performance, comfort and durability the more they are used. They are built under a strict quality assurance regime which includes inspection both during and after production and exhaustive reliability testing.
In the unlikely event you have any problems, please contact your dealer or distributor. If the problem is as a result of a production fault or failure, repairs will be undertaken free of charge during the period of warranty subject to the following warranty conditions:
-
If the problem has been caused by customer error or misuse, abuse or damage, then all repairs will be charged for.
-
This warranty applies to your country.
-
Proof and date of purchase must be supplied.
-
Please complete the details below and keep this warranty in a safe place.
-
All transportation charges back to the dealer are at customer's cost. Keep all original packaging to facilitate return. Return to customer will be at dealer's cost (if genuine warranty claim).
| DESCRIPTION AIRREX | AIR CONDITIONER | ||
| MODEL HSC-14R / 18R / 24R | |||
| DATE OF PURCHASE PRODUCT SERIAL NO. | |||
| WARRANTY PERIOD ( | ) Months | ||
| DISTRIBUTOR | Name of Company | ||
| Telephone No. | |||
| CUSTOMER DETAILS | Name : | ||
| Address : | |||
| Telephone : | |||
TEMP-AIR
EQUIPMENT SALES
www.tempairsales.com

2031 Exchange Parkway, Suite A, Waco, TX 76712

888-535-8841

sales@tempairsales.com

US Electrical Standards (ETL)
- TABLE OF CONTENTS
- ● WARNING
- INSTALLATION
- WARNING
- MOVING THE UNIT
- PLUGGING IN THE UNIT
- SAFETY INSTRUCTIONS
- CAUTION
- GENERAL ADVICE BEFORE USE
- ● FOR MAXIMUM EFFICIENCY
- ● FRONT VIEW
- EXTERIOR DESCRIPTION
- ● BACK & SIDE VIEW
- CONTROL PANEL FUNCTIONS
- MODE CHANGING METHOD
- COOLING MODE
- ● DEHUMIDIFICATION MODE
- FAN MODE
- STEP 1
- STEP 2
- CANCEL
- ● Display Room Temperature Range & Setting Range.
- - SPOT or ROOM MODE
- - LOCK or UNLOCK
- ● TEMPERATURE UNIT
- 'ERROR' and WARNING INDICATORS
- ● Input terminal FA1 and FA2
- ● Connecting the fire alarm wire from fire alarm system
- ● Output terminal ER1 and ER2
- ● Connecting Error Signal with warning device
- TROUBLE SHOOTING
- CLEANING AND MAINTENANCE
- ● CLEANING THE AIR FILTERS
- ● MAINTENANCE
- HOW TO INSTALL THE CONDENSATE PUMP
- INSTALLING APPLICATION
- REGISTER AS A USER TO APPLICATION
- AIRREX 0
- Sign In
- AIRREX
- Join
- Resend
- Authentication Done
- CONNECT YOUR PRODUCT TO YOUR APPLICATION
- USING THE MOBILE APPLICATION A
- APPLICATION DETAIL DASHBOARD
- TIPS FOR USING MOBILE APPLICATION
- TIPS FOR USING THE MOBILE APPLICATION
- REBOOTING THE PRODUCT
- USING THE MOBILE APPLICATION
- APPLICATION DASHBOARD
- APPLICATION SETTINGS MENU
- PRODUCT SETTINGS MENU
- NOTICE WHEN USING MOBILE APPLICATION
- The installation, service and operation manual
- Installation
- Unventilated areas
- Service
- Competence of service personnel
- Information and training
- c) Repair
- d) Decommissioning
- e) Disposal
- No ignition sources
- Checks to the refrigerating equipment
- Checks to electrical devices
- Initial safety checks shall include:
- Repairs to sealed components
- Repair to intrinsically safe components
- Cabling
- Detection of flammable refrigerants
- Charging procedures
- Decommissioning
- Labelling
- Recovery
- Transportation, marking and storage
- Transportation
- Marking
- Storage
- ATTENTION
Brand : Airrex
Model : HSC-24R
Category : Air Conditioning