
YX-K550-200 - Safe Vevor - Free user manual and instructions
Find the device manual for free YX-K550-200 Vevor in PDF.
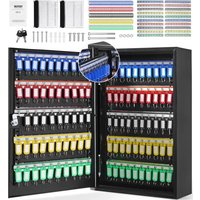


| Product Type | Key Safe |
| Brand | Vevor |
| Model | YX-K550-200 |
| Color | Black |
| Dimensions | 550 × 380 × 138 mm |
| Net weight | 9,16 kg |
| Gross weight | 10,44 kg |
| Material | Cold-rolled steel DC03, thickness 0.8 mm |
| Maximum capacity | 200 keys |
| Lock | Key lock with 2 keys provided |
| Included accessories | 20 hanger segments, 200 key rings, 2 keys, mounting hardware |
| Main functions | Secure key storage, organization with hooks and key rings |
| Intended use | Indoor, dry and clean area |
| Mounting | Wall mounting with expansion screws provided |
| Care and cleaning | Clean with a soft dry cloth. Do not use abrasive products. |
| Spare parts | Additional keys, key rings, hangers |
| Repairability | Contact the manufacturer via www.vevor.com/support. Do not repair yourself. |
| Security | Key lock, steel structure, sturdy fixings |
| Warranty | Electronic warranty certificate available on the Vevor website |
Frequently Asked Questions - YX-K550-200 Vevor
User questions about YX-K550-200 Vevor
0 question about this device. Answer the ones you know or ask your own.
Ask a new question about this device
Download the instructions for your Safe in PDF format for free! Find your manual YX-K550-200 - Vevor and take your electronic device back in hand. On this page are published all the documents necessary for the use of your device. YX-K550-200 by Vevor.
USER MANUAL YX-K550-200 Vevor
Technical Support and E-Warranty Certificate www.vevor.com/support
KEY CABINET
MODEL:YX-K550-200
We continue to be committed to provide you tools with competitive price. "Save Half", "Half Price" or any other similar expressions used by us only represents an estimate of savings you might benefit from buying certain tools with us compared to the major top brands and does not necessarily mean to cover all categories of tools offered by us. You are kindly reminded to verify carefully when you are placing an order with us if you are actually saving half in comparison with the top major brands.
VEVOR®
TOUGH TOOLS, HALF PRICE
KEY CABINET
MODEL:YX-K550-200
NEED HELP? CONTACT US!
Have product questions? Need technical support? Please feel free to contact us:
Technical Support and E-Warranty Certificate www.vevor.com/support
This is the original instruction. Please read all manual instructions carefully before operating. VEVOR reserves a clear interpretation of the user manual. The appearance of the product shall be subject to the product you received. Please forgive us that we won't inform you again if there are any technology or software updates on our product.
SAFETY INSTRUCTIONS
Thank you very much for choosing this product. Please read all of the instructions before using it. The information will help you achieve the best possible results.
1. ASSEMBLY SAFETY
PLEASE NOTE! Drawings in this manual are for illustration purposes and in some details may differ from the actual product.
Assemble only according to these instructions. Improper assembly can result in hazards. Wear ANSI-approved safety goggles and heavy-duty work gloves during assembly. Keep the assembly area clean and well-lit. Keep bystanders out of the area during assembly. Do not assemble when tired or when under the influence of alcohol or medication. The product capabilities apply to properly and completely assembled products only. Assemble on a flat, level, hard and smooth surface capable of safely supporting the key cabinet. For additional information regarding the parts listed in the following, please refer to the Assembly Diagram of this manual. Unwrap and separate all parts in a clean work area.
2. USAGE SAFETY
ATTENTION! Read all safety warnings and all instructions. Failure to follow the warnings and instructions may result in serious injury or even death. The terms "device" or "product" are used in the warnings and instructions to refer to KEY CABINET.
If you are unsure about whether the product is operating correctly or find damage, please contact the manufacturer's service centre. Only the
manufacturer's service centre may make repairs to the product. Do not attempt to make repairs yourself! Keep the device away from sources of heat.
3. USE GUIDELINES
The product is intended for storing keys out of reach of unwanted people, it has a key lock. For better organization it has key hangers and an organizer. CAUTION: Do not store a spare lock key inside the box!
SAVE THESE INSTRUCTIONS
TECHNICAL PARAMETERS
| Model | YX-K550-200 |
| Colour | Black |
| Max number of key hangers | 200 |
| Size | 550*380*138 mm |
| N.W. | 9.16 kg |
| G.W. | 10.44 kg |
| Material | Cold Rolled Steel DC03, 0.8mm |
| Lock | Key lock with 2 keys |
PARTS LIST
| English Manual*1 |  |
| Key*2 |  |
| Hangers segment*20 |  |
| Key Hanger*200 |  |
| M6*25 Screw*4 | 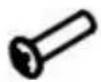 |
| M6*80 Screw*2 | 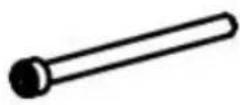 |
| M6 Nut*4 |  |
| Expansion screw set*4(M3.5*30) | 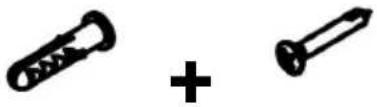 |
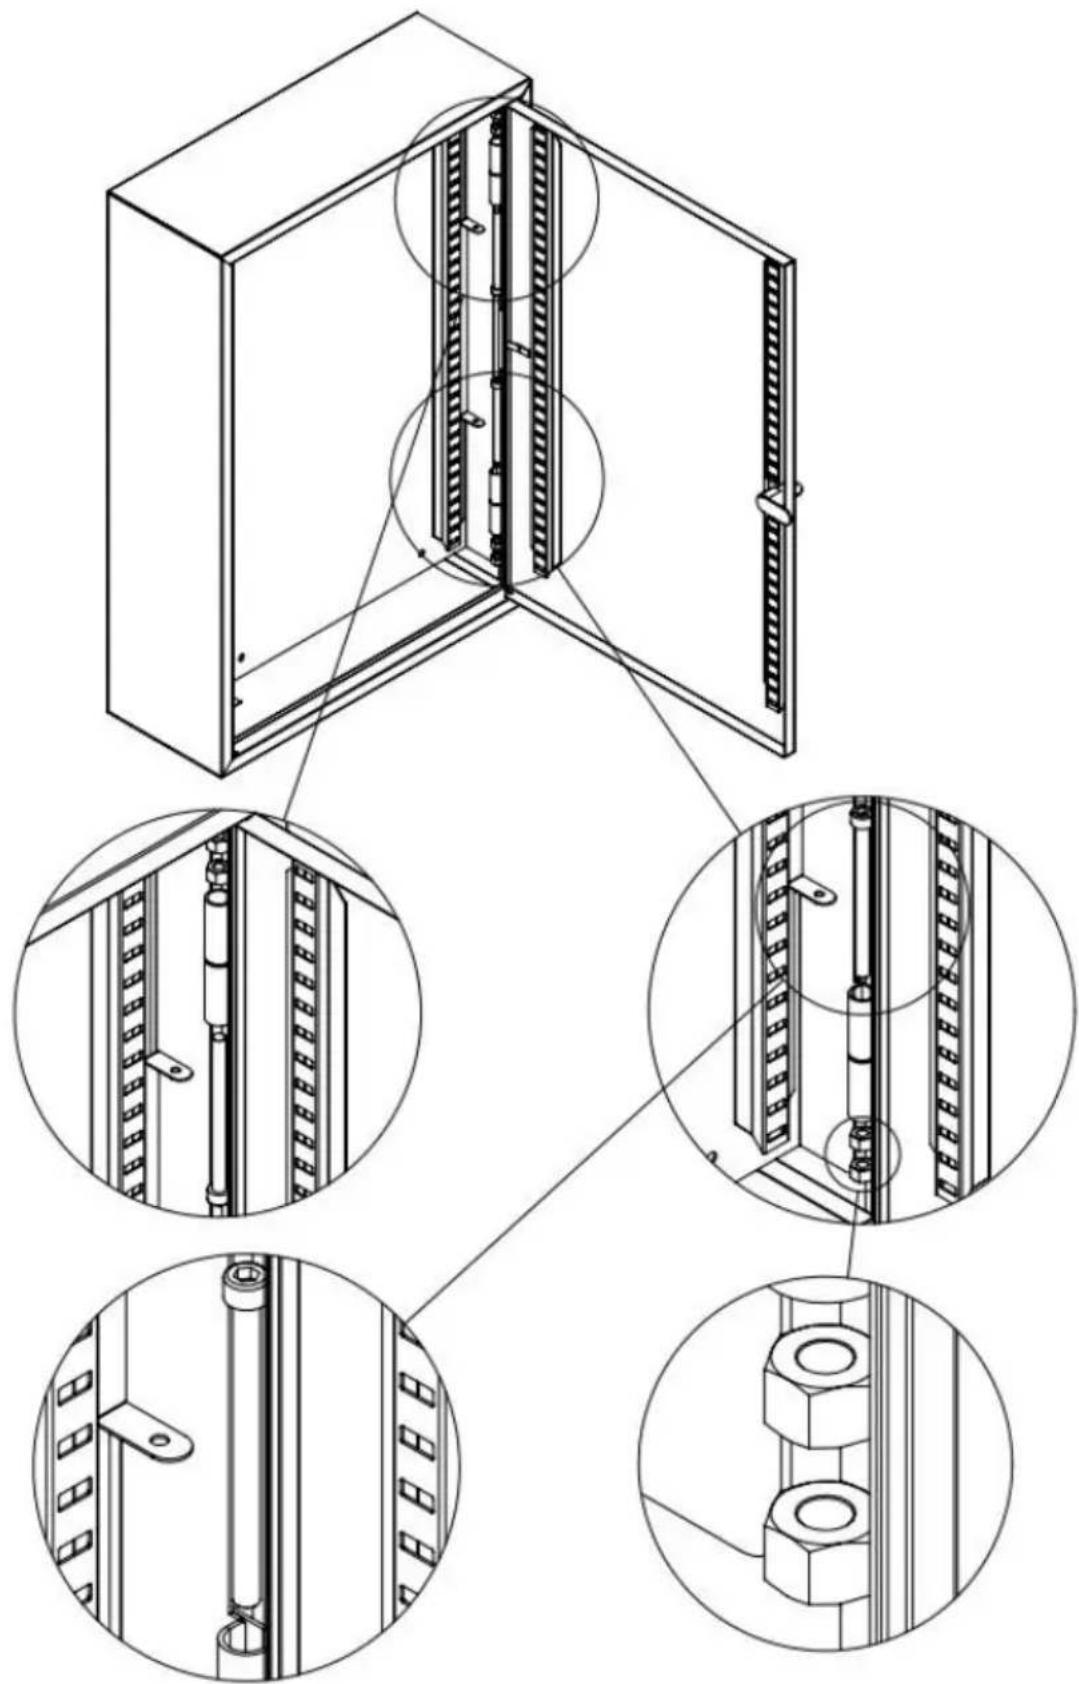
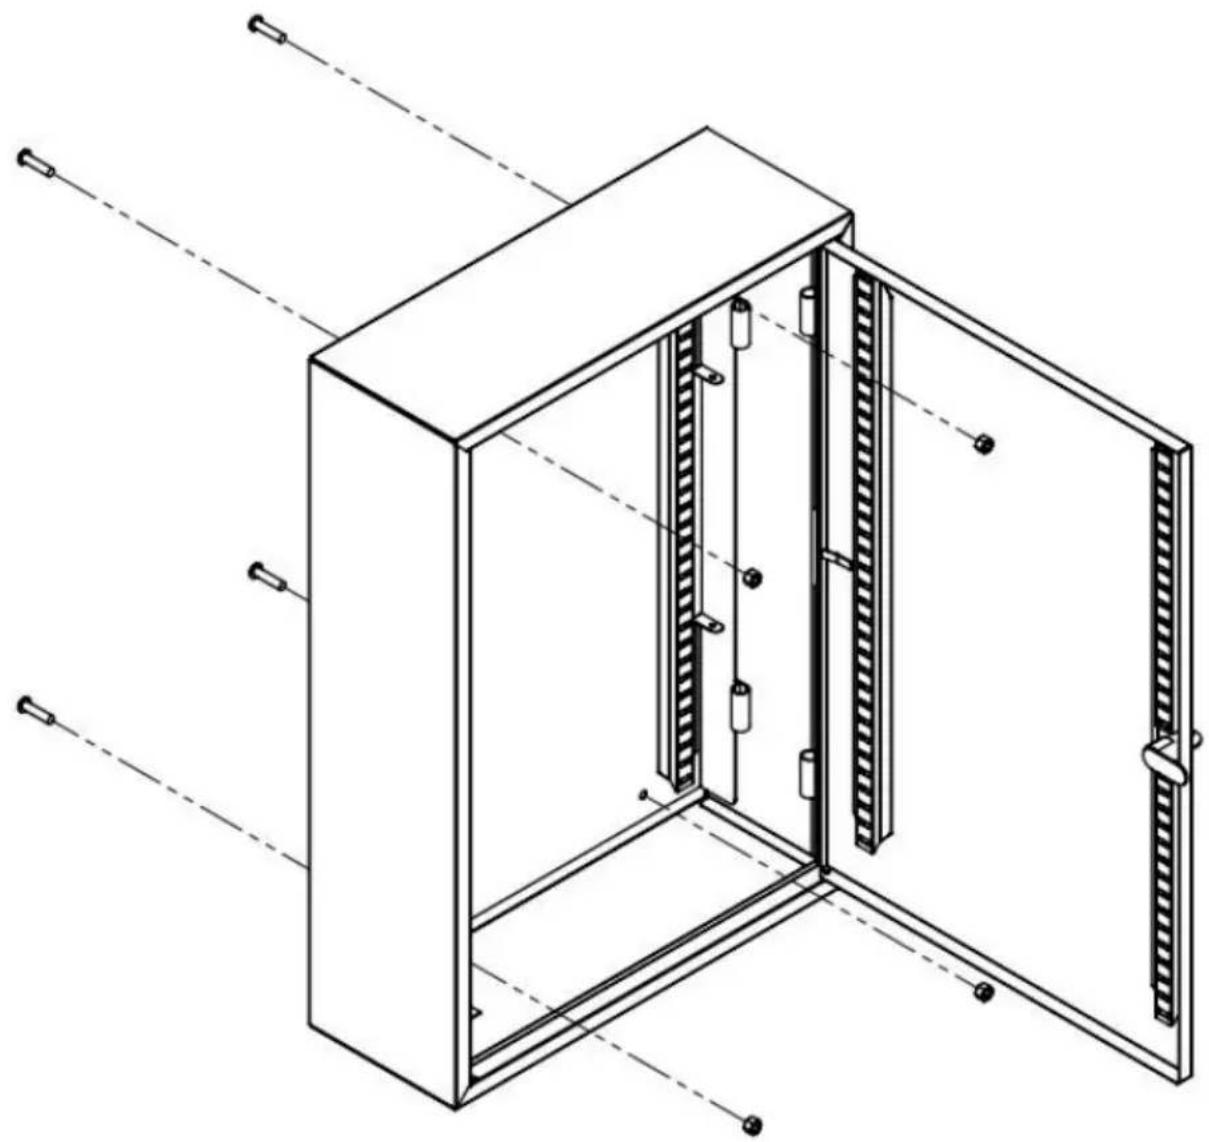
STEP 1
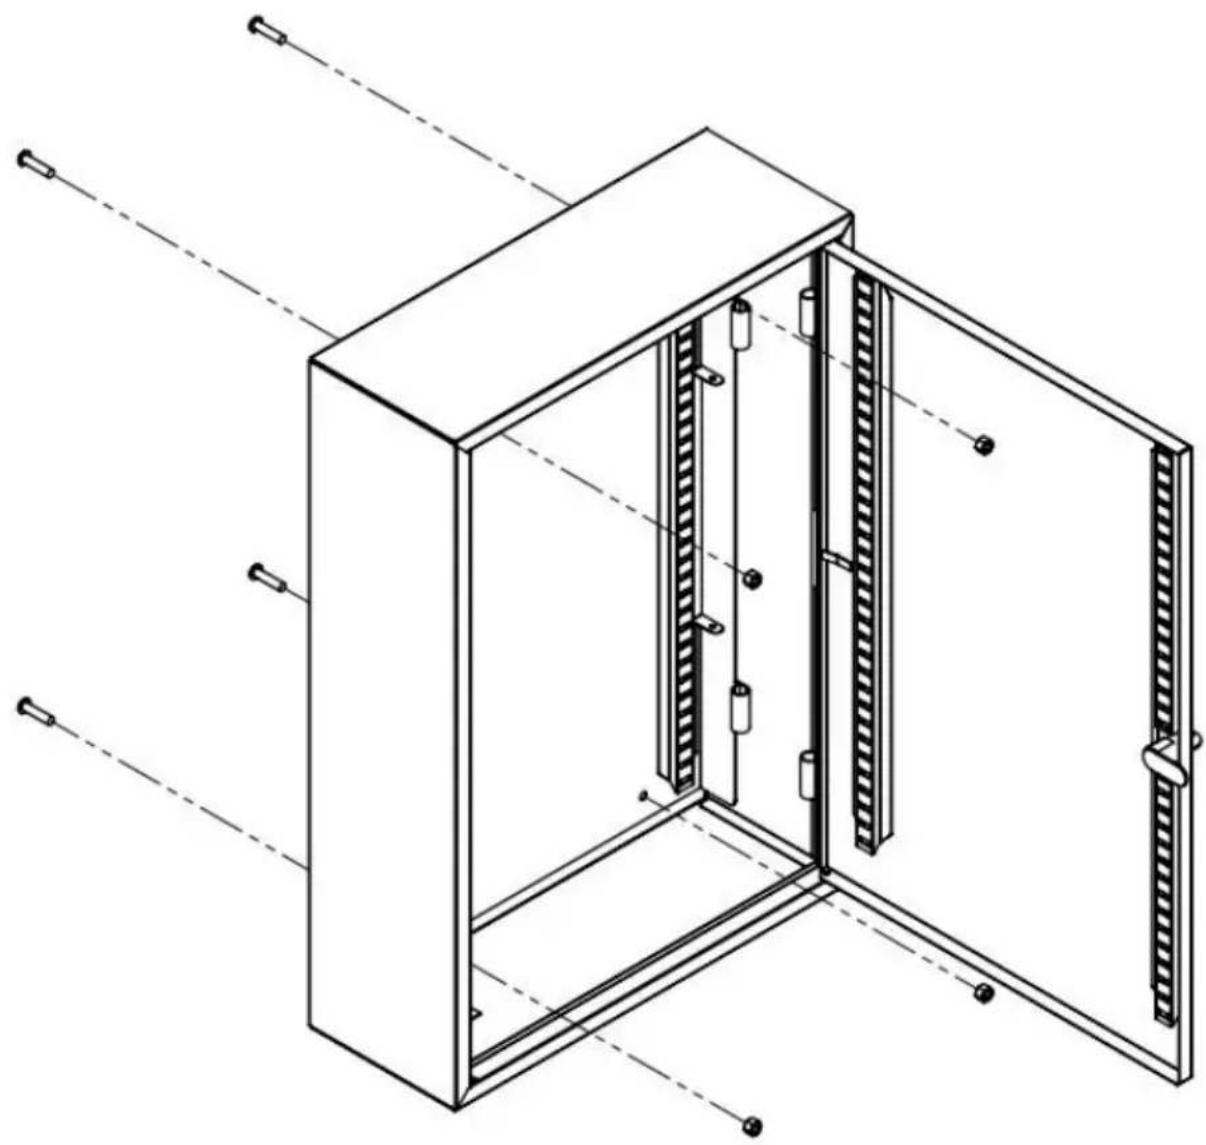
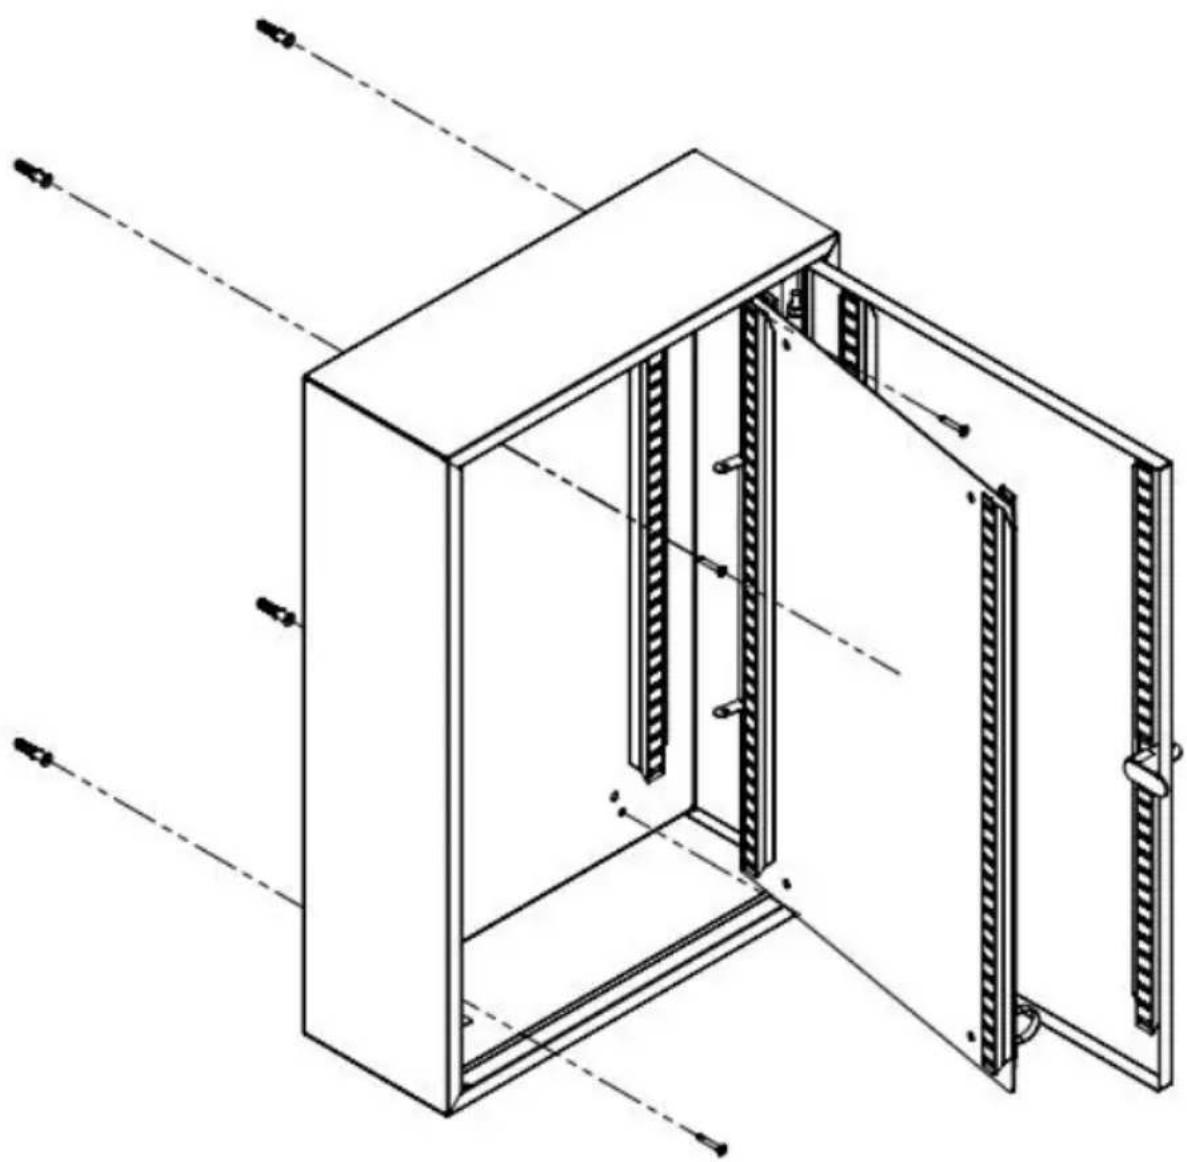
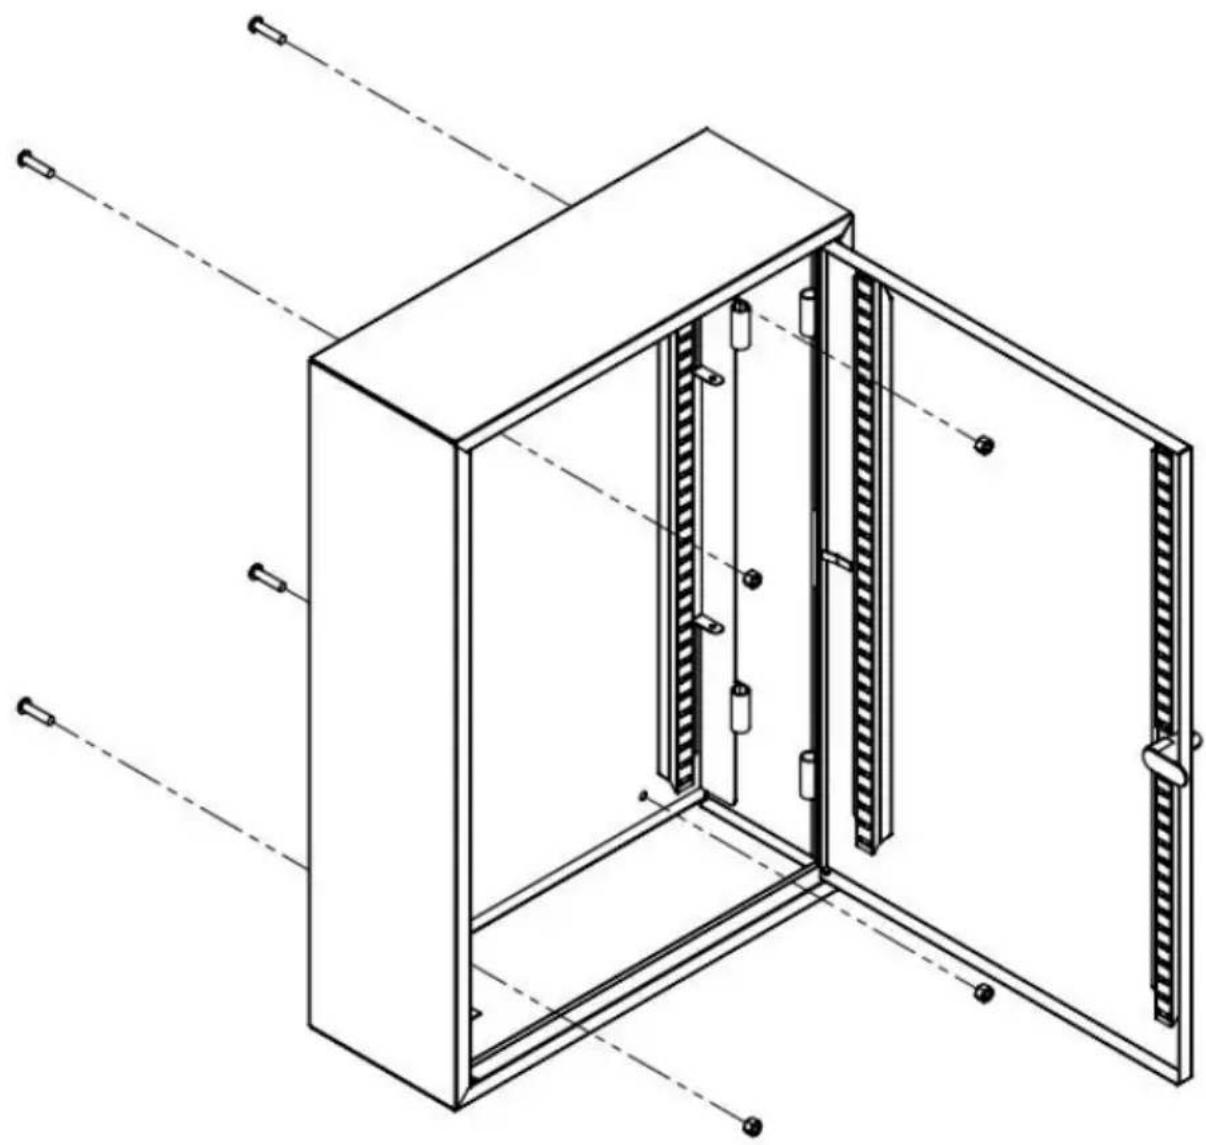
Remove the installed separator plate on the bottom of the cabinet. The nuts will be used to install the separator plate in step 2.
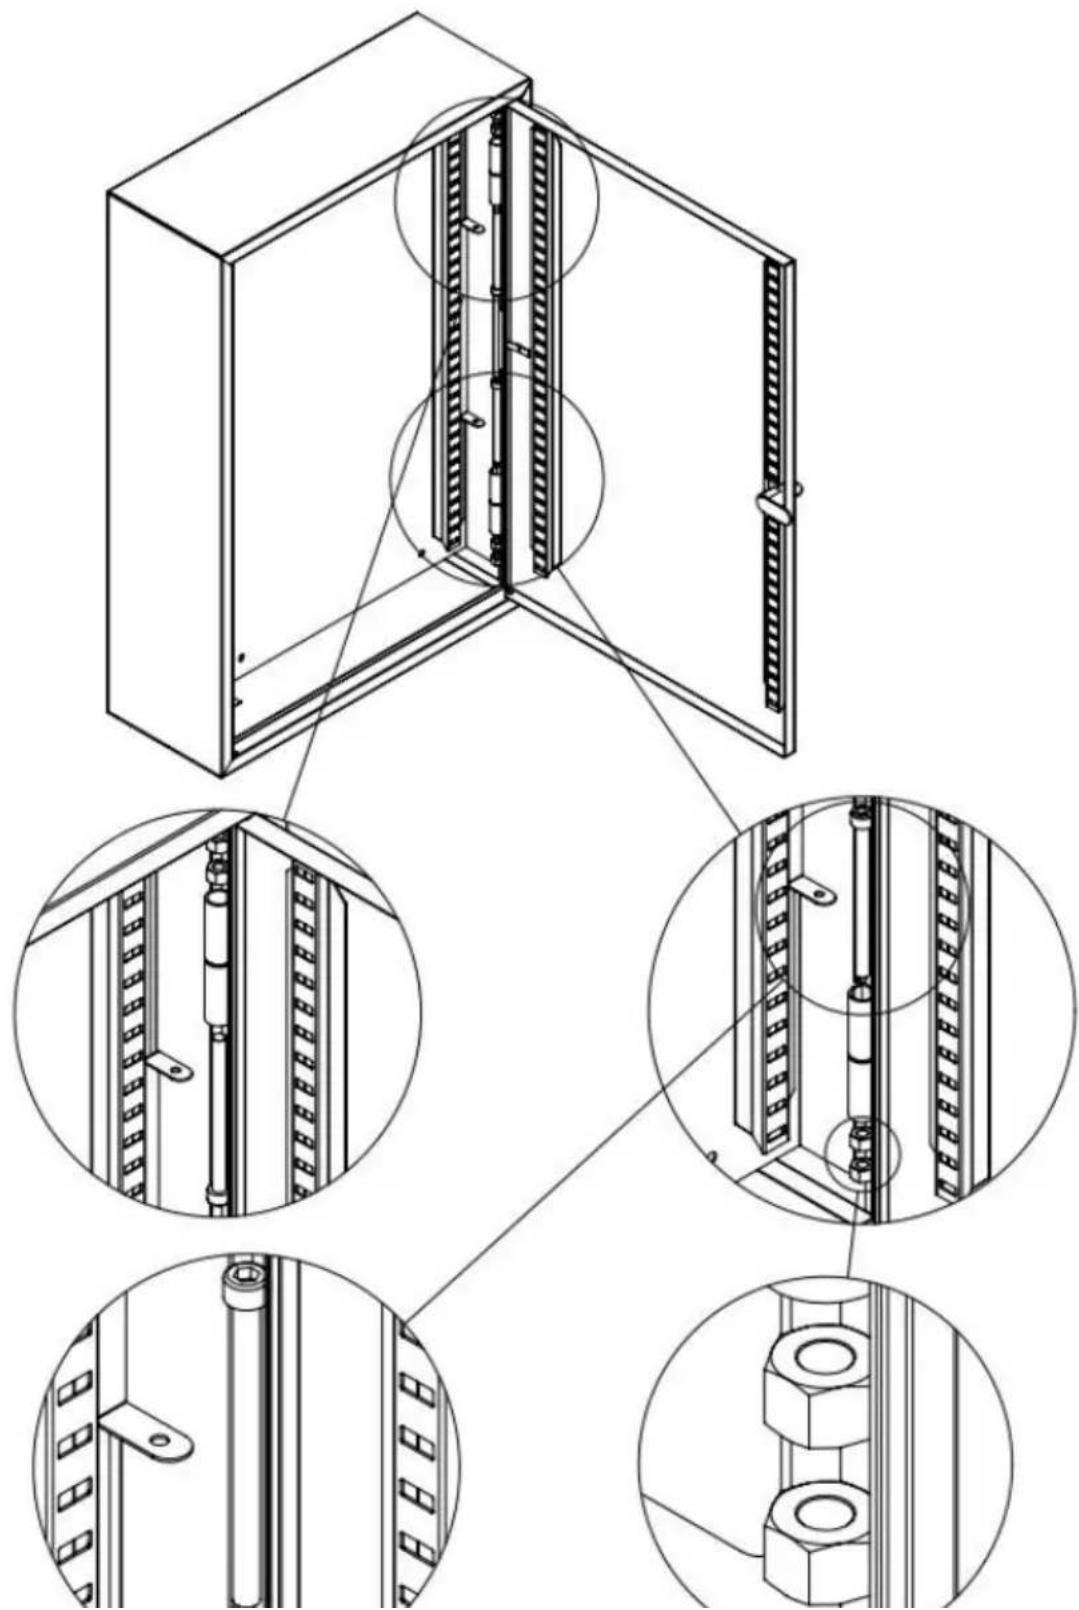
STEP 2
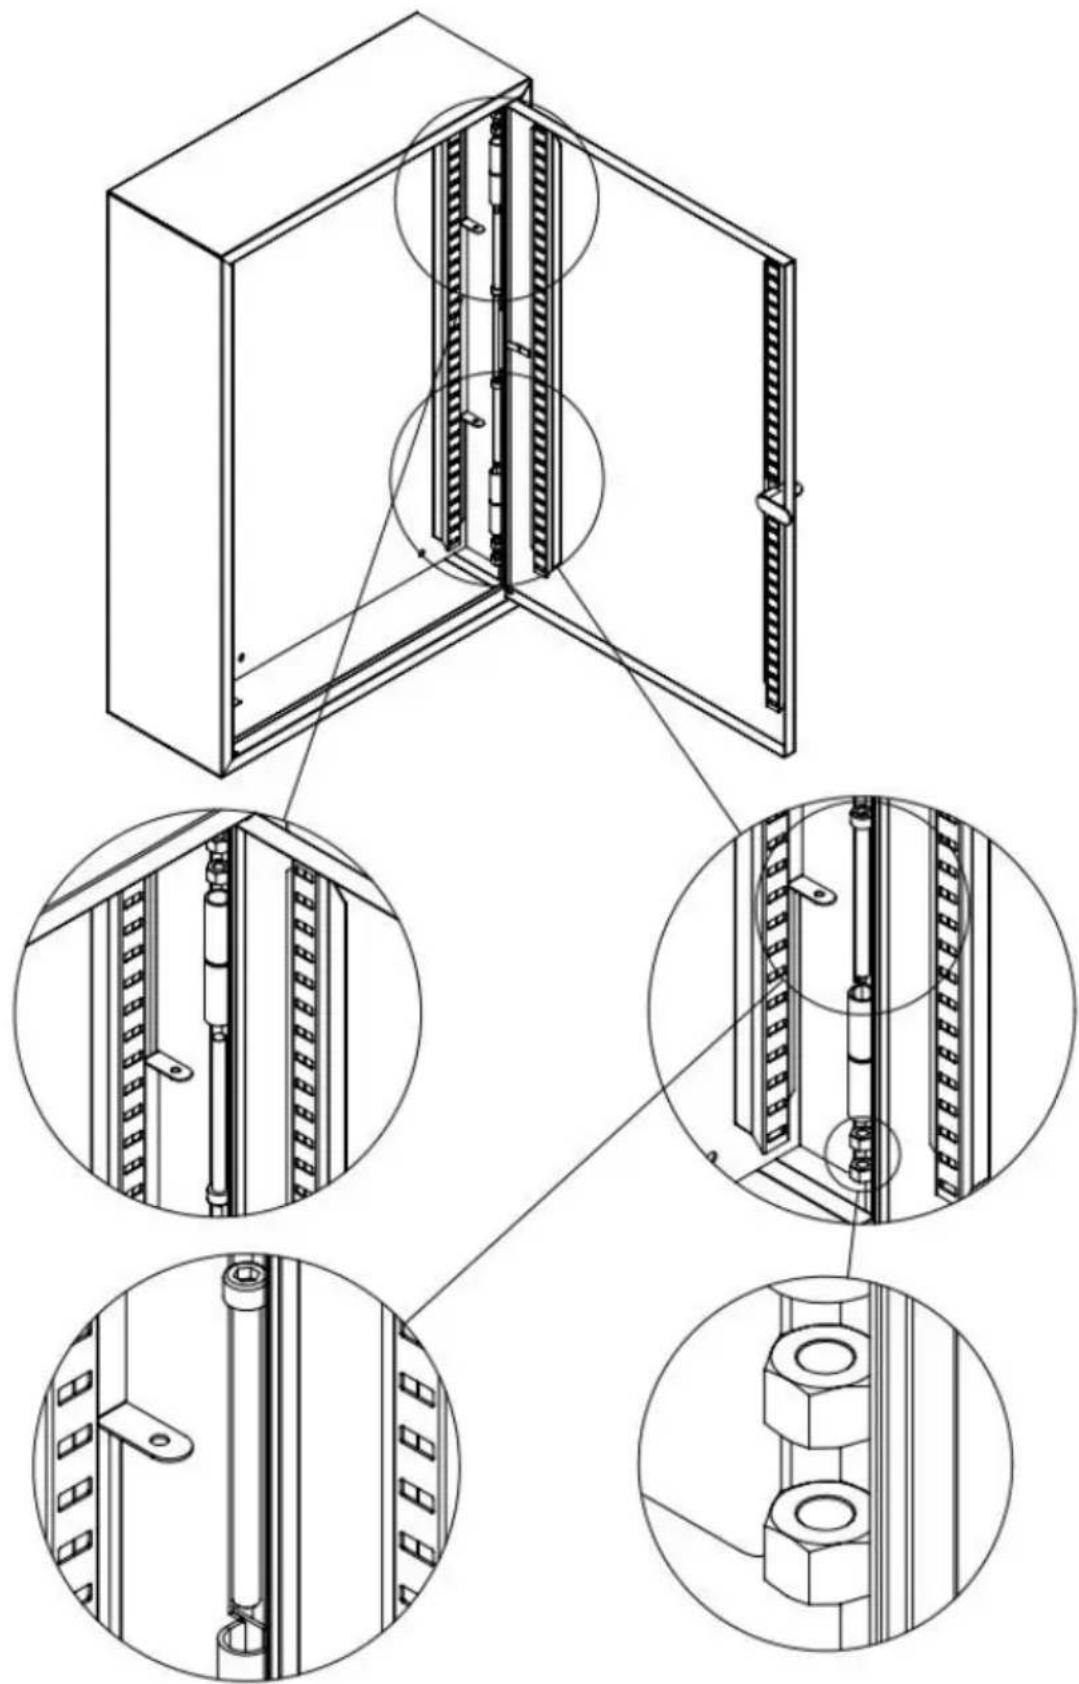
Align the hole positions of the separator plate and the cabinet. Thread the M6 bolts through the holes and screw on the nuts that were disassembled in step 1.
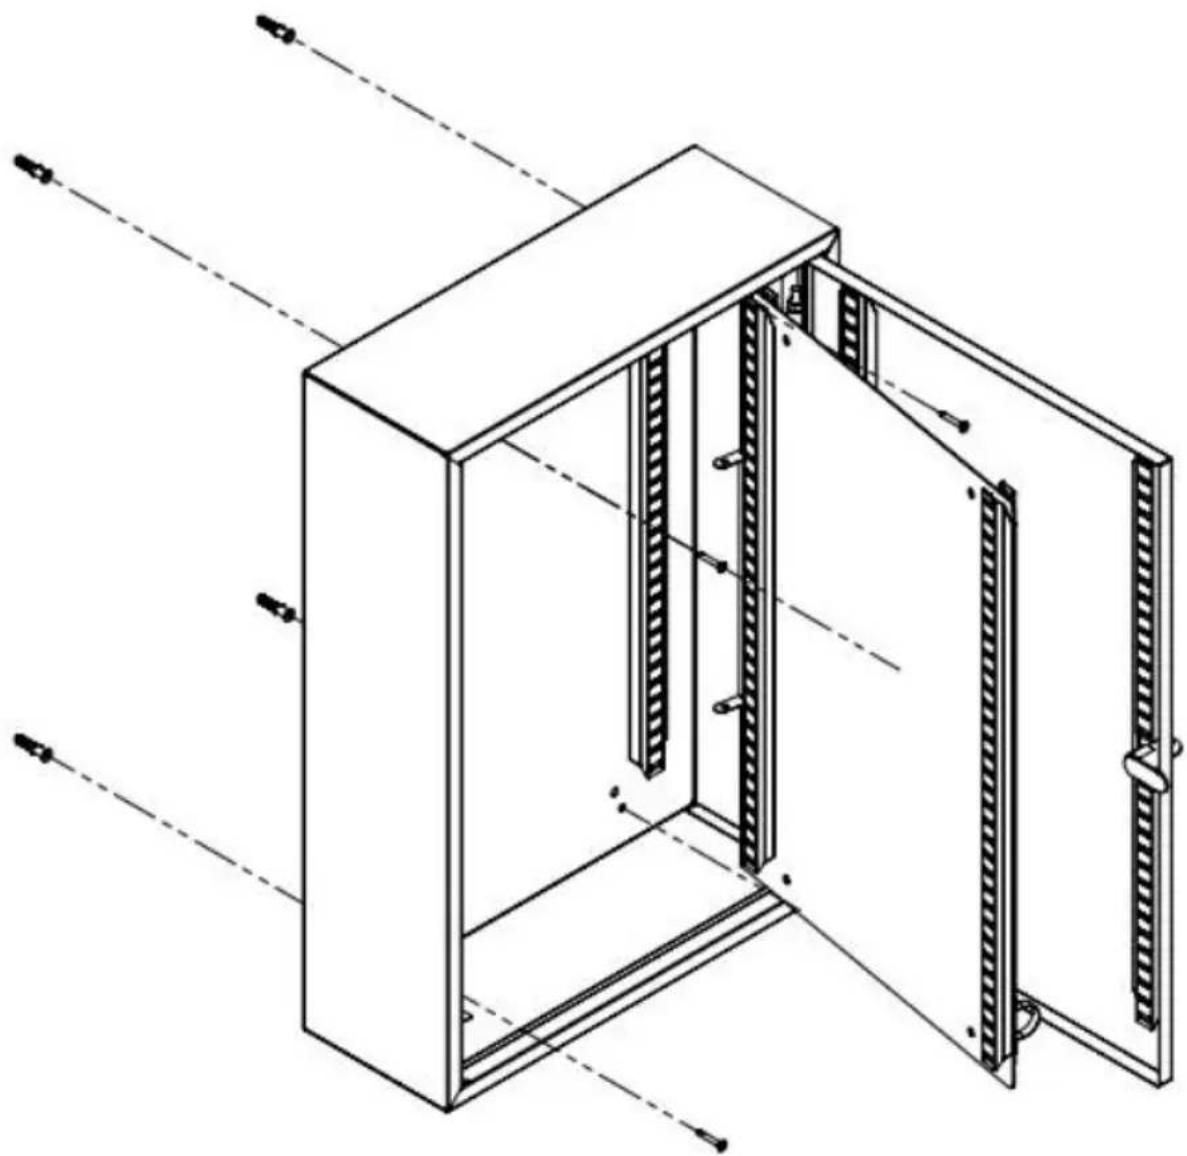
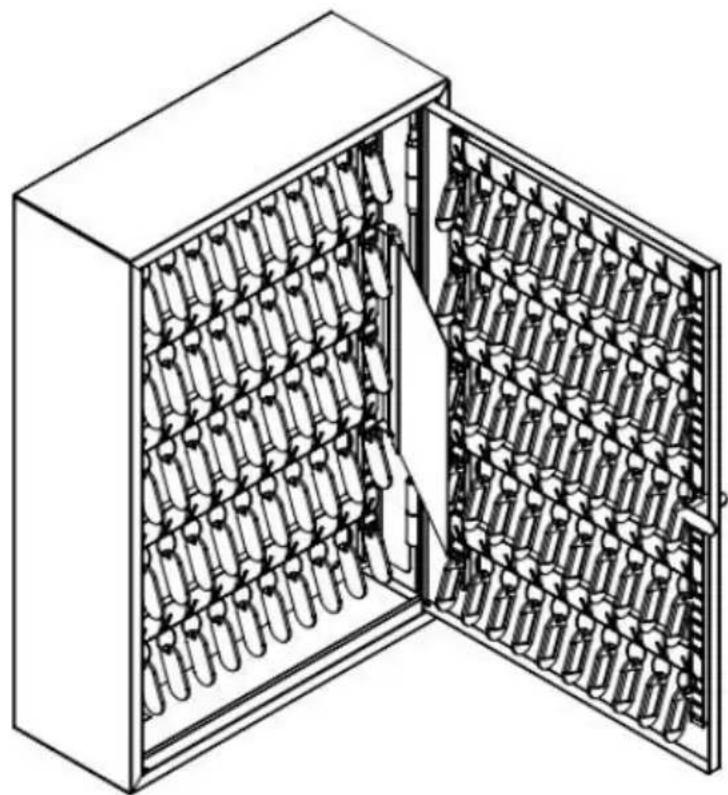
STEP 3
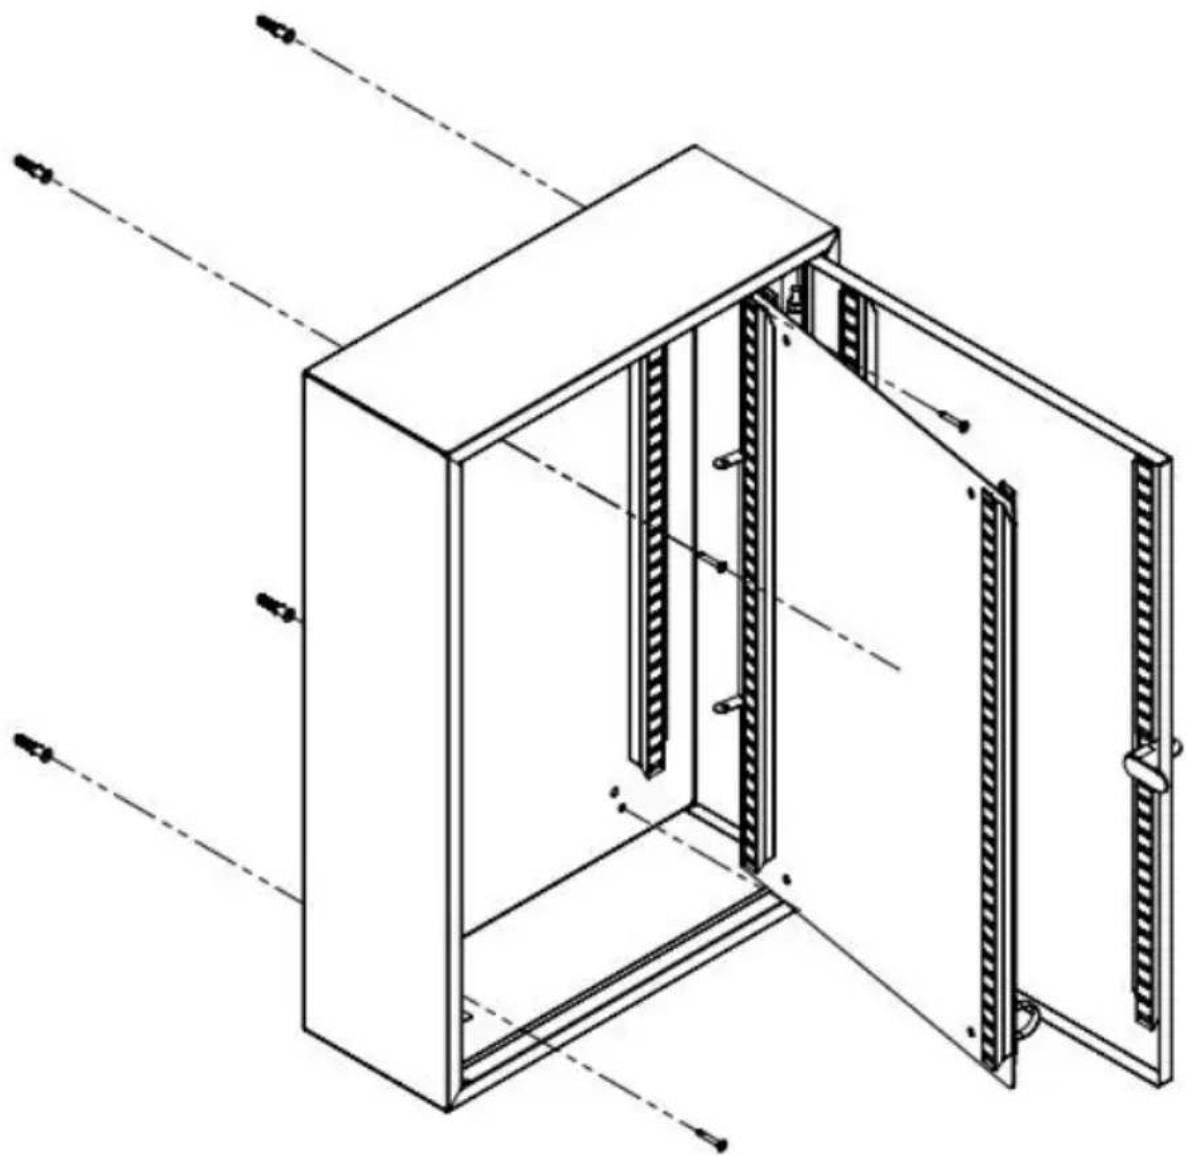
Mount the key cabinet to the wall with the expansion screws according to the holes (Φ6mm) drilled in the wall.
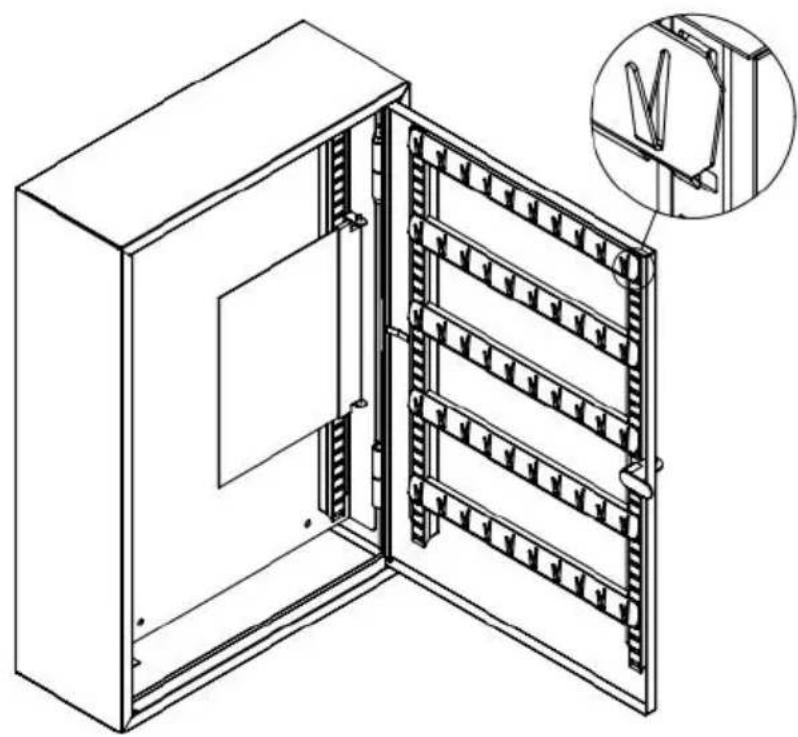
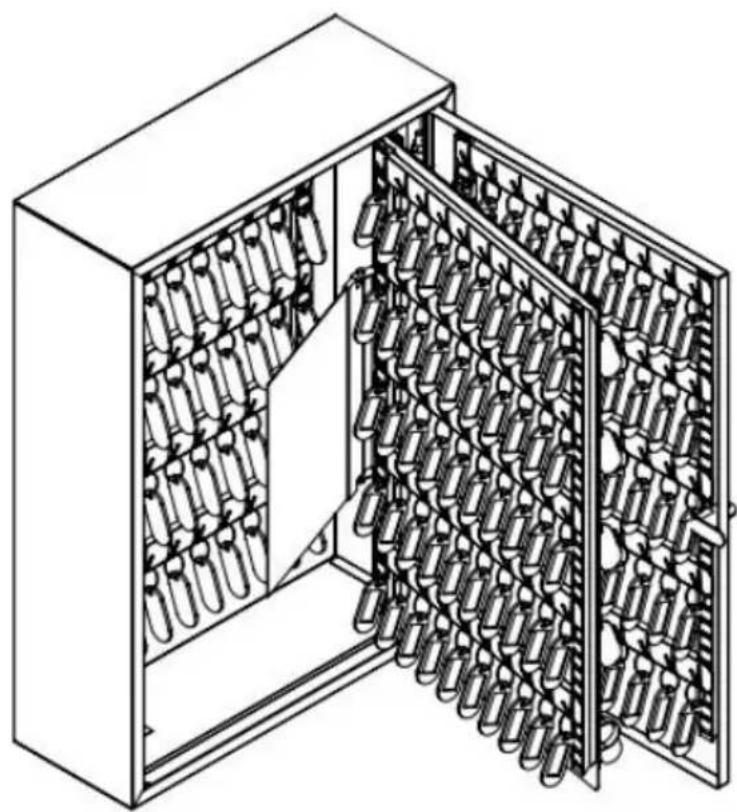
STEP 4
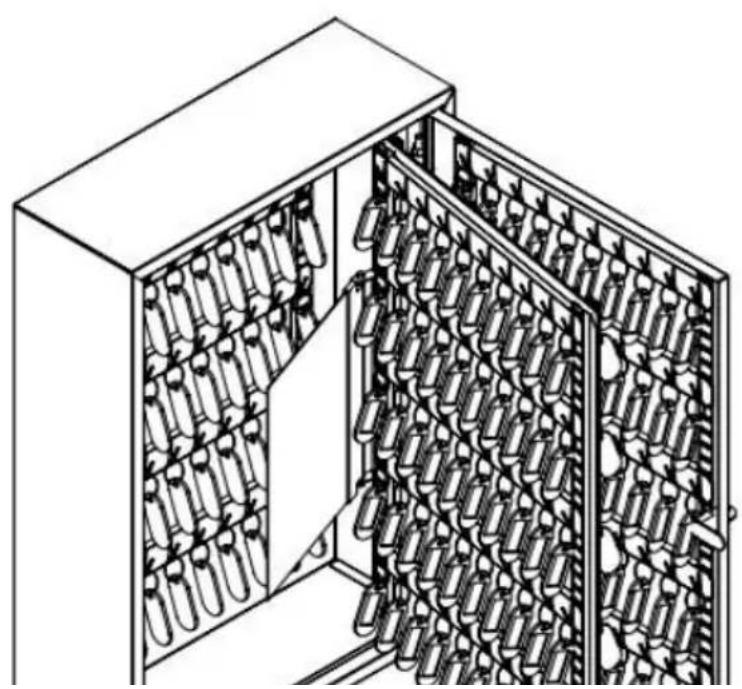
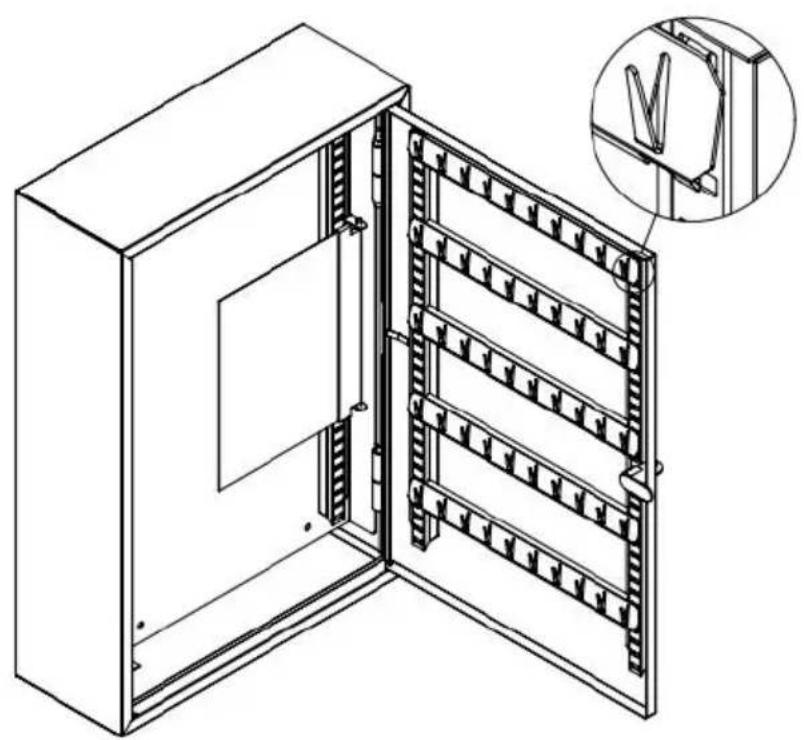
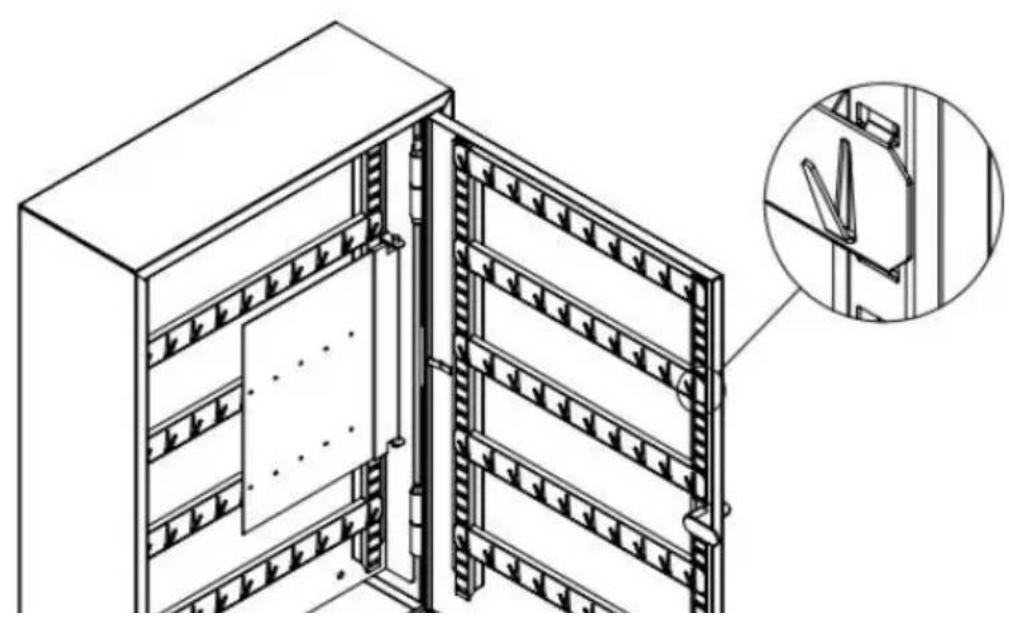
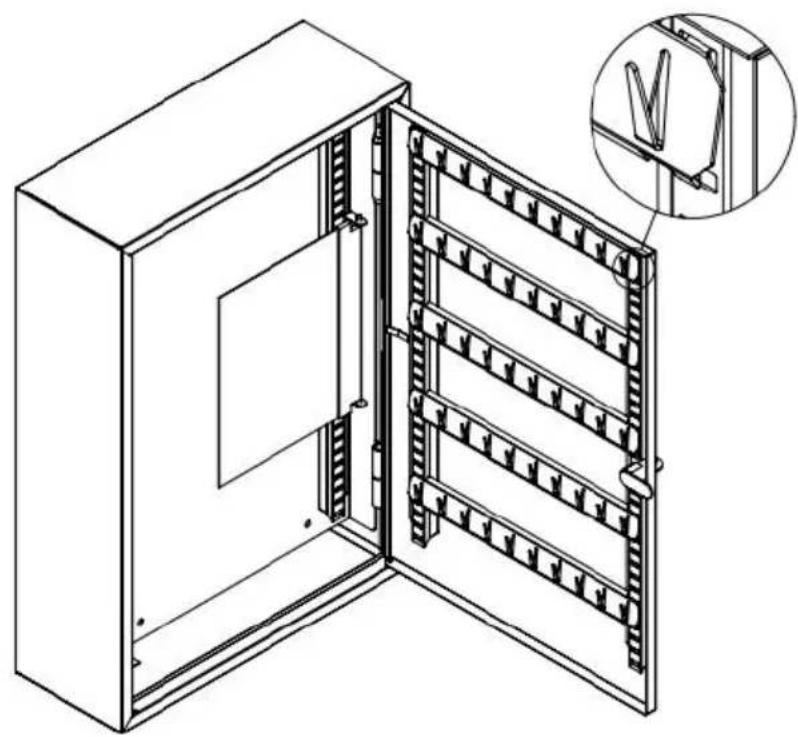
Install the hanger segments on the cabinet. First the long side, then the short side.
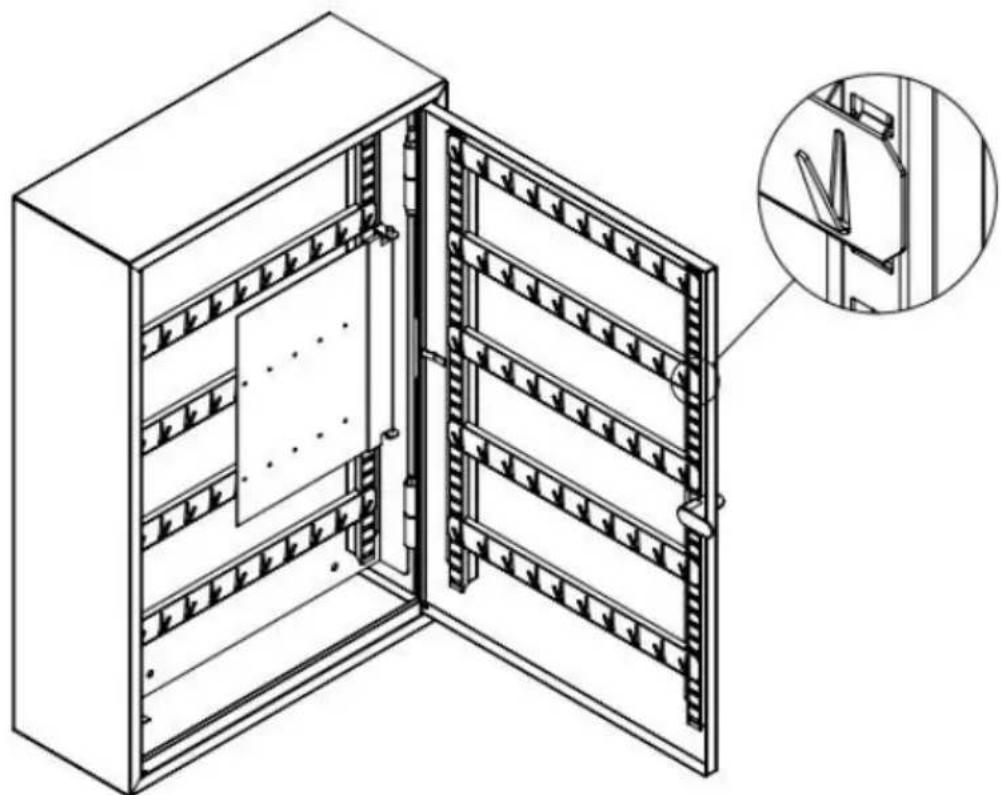
STEP 5
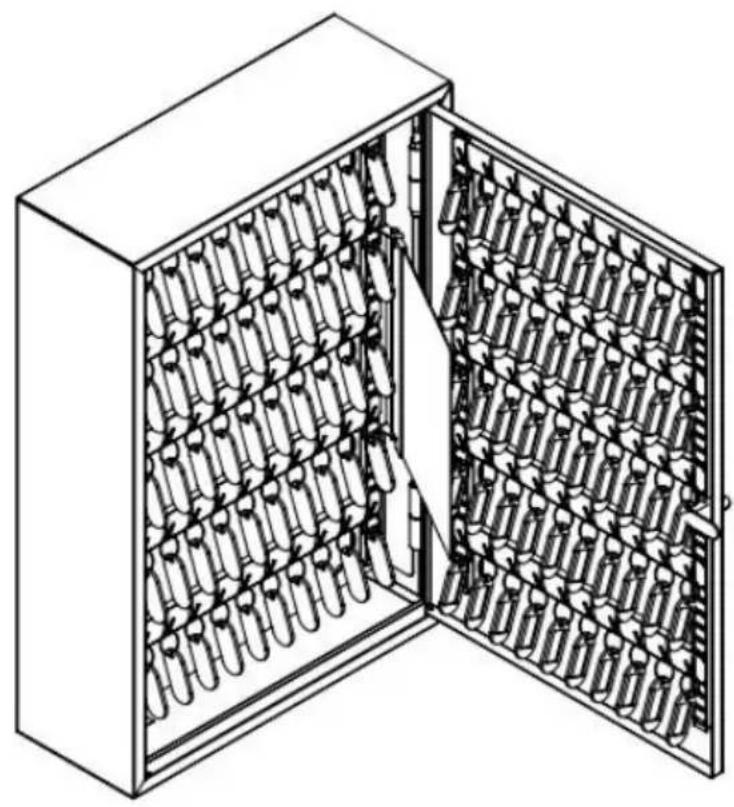
Then you can use the cabinet to hang the keys as shown below.
Imported to AUS: SIHAO PTY LTD. 1 ROKEVA STREET, EASTWOOD NSW 2122, Australia
Imported to USA: Sanven Technology Ltd. Suite 250, 9166 Anaheim Place, Rancho Cucamonga, CA 91730
| EC | REP |
E-CrossStu GmbH
Mainzer Landstr. 69, 60329 Frankfurt am Main
| UK | REP |
YH CONSULTING LIMITED.
C/O YH Consulting Limited, Office 147, Centurion House, London Road, Staines-upon-Thames, Surrey TW18 4AX
VEVOR®
TOUGH TOOLS, HALF PRICE
Technical Support and E-Warranty Certificate
www.vevor.com/support
VEVOR®
TOUGH TOOLS, HALF PRICE
BESOIN D'AIDE? CONTACTEZ-NOUS!
Remove the installed separator plate on the bottom of the cabinet. The nuts will be used to install the separator plate in step 2.
STEP 2
Align the hole positions of the separator plate and the cabinet. Thread the M6 bolts through the holes and screw on the nuts that were disassembled in step 1.
STEP 3
Mount the key cabinet to the wall with the expansion screws according to the holes (Φ6mm) drilled in the wall.
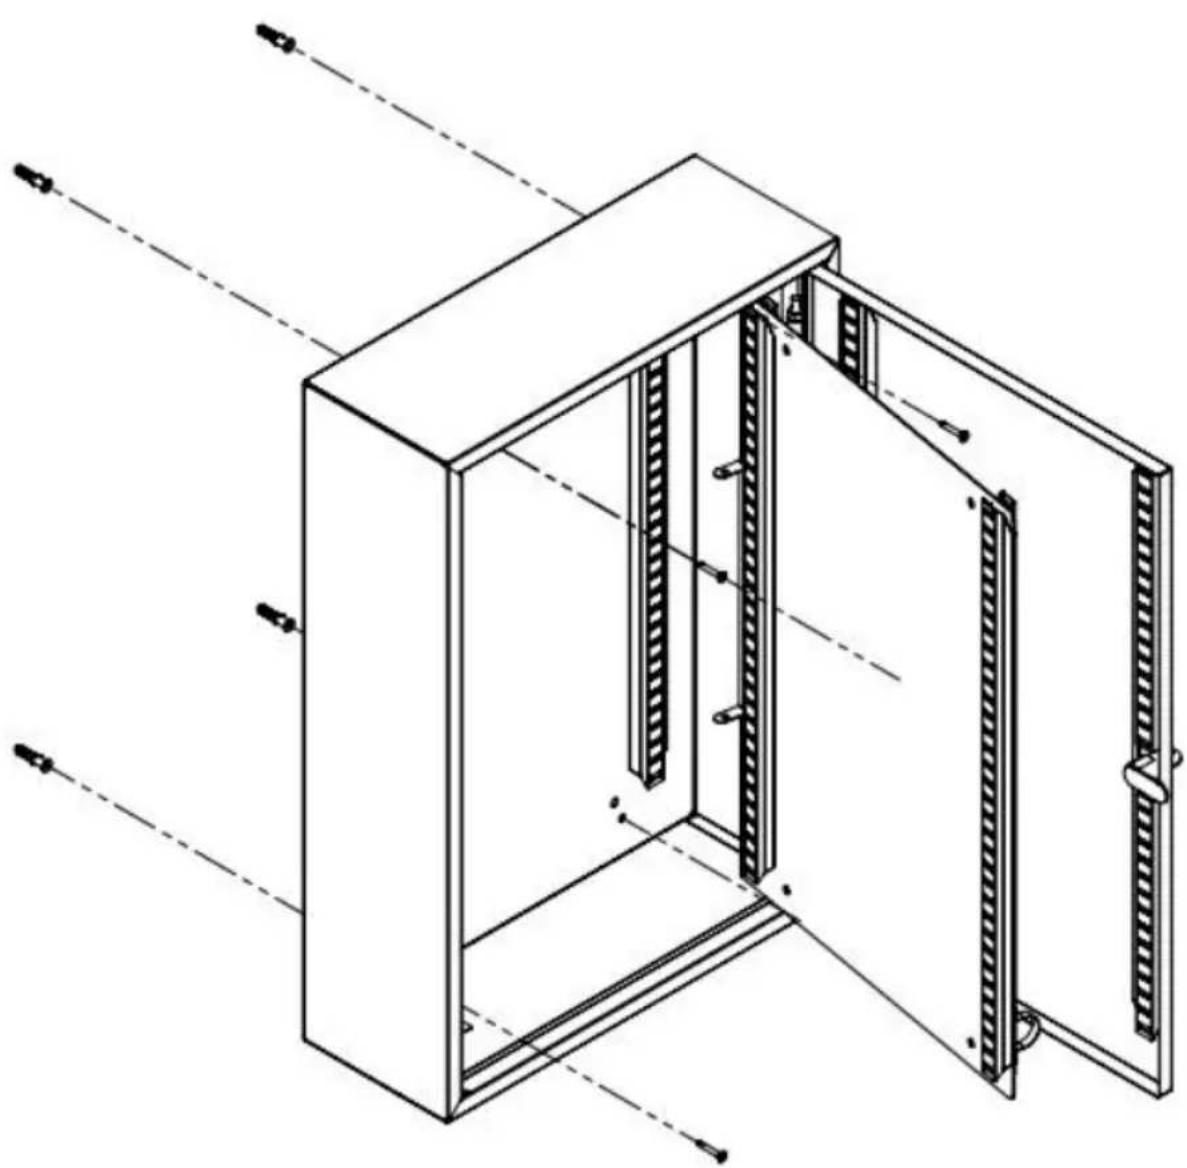
STEP 4
Install the hanger segments on the cabinet. First the long side, then the short side.
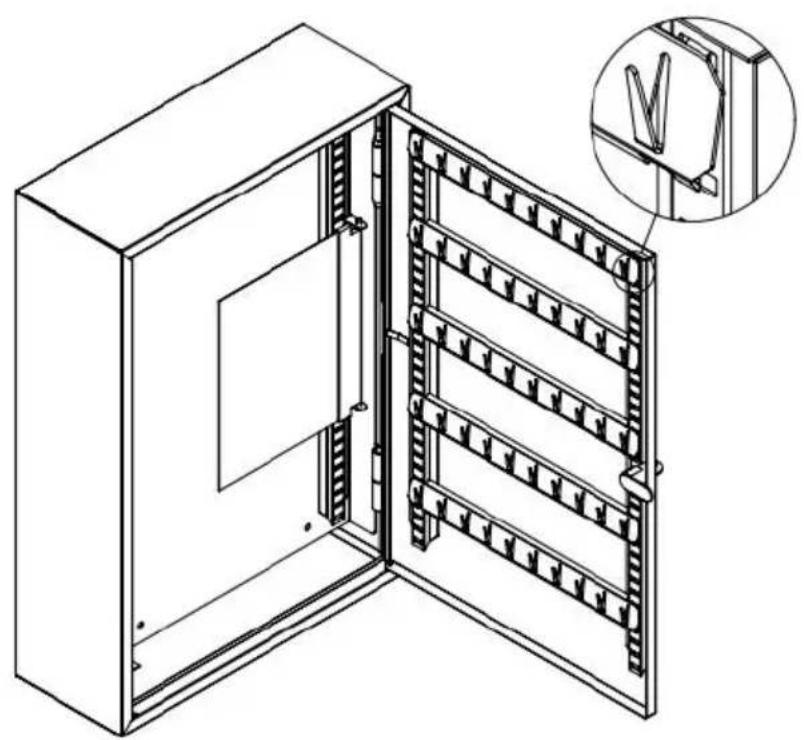
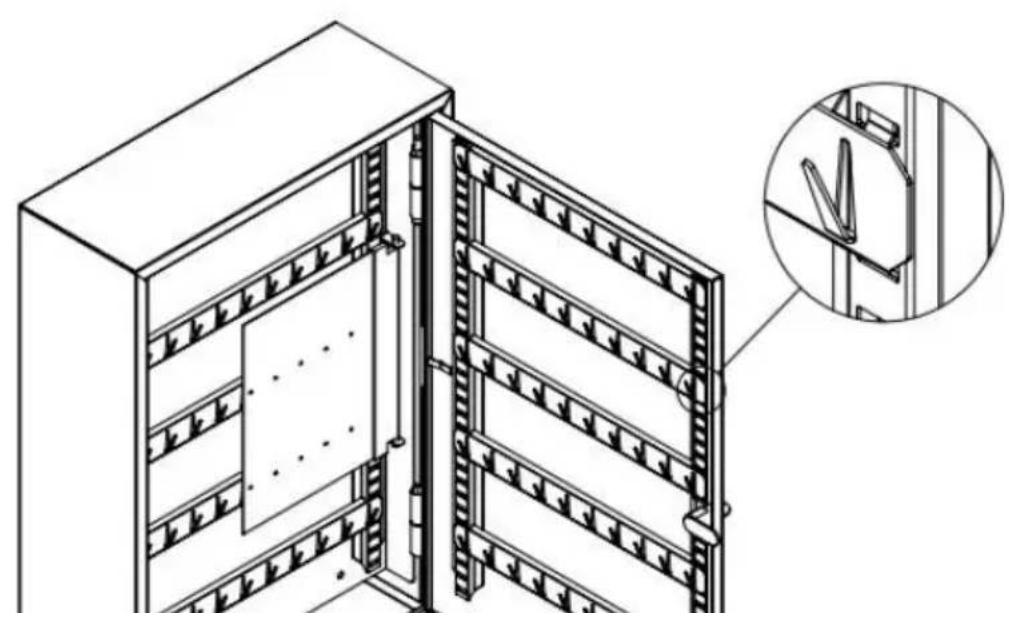
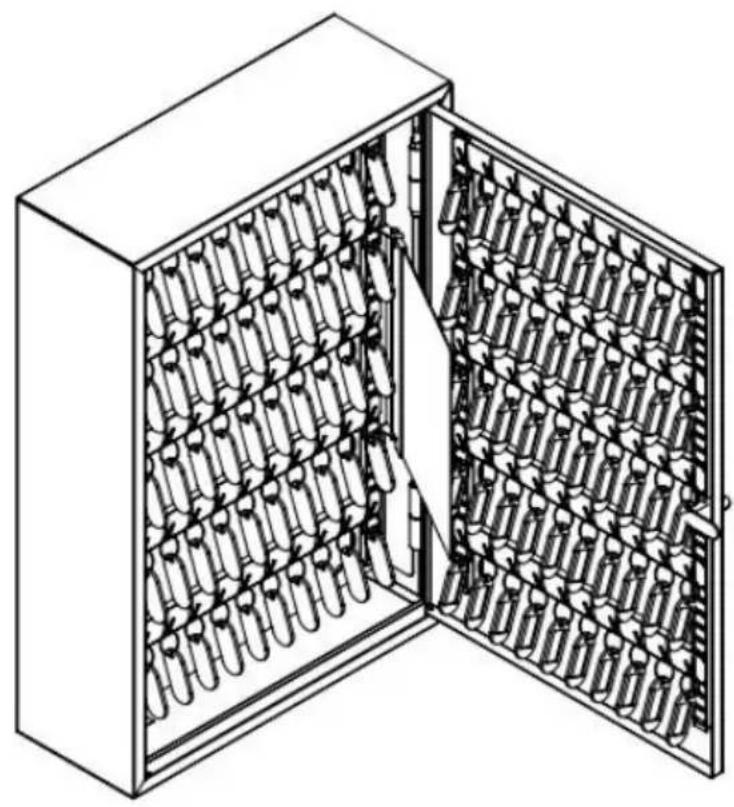
STEP 5
Then you can use the cabinet to hang the keys as shown below.
Imported into Australia: SIHAO PTY LTD. 1 ROKEVA
STREET EASTWOOD NSW 2122 Australia
Anaheim Place, Rancho Cucamonga, CA 91730
| EC | REP |
E-CrossStu GmbH
Mainzer Landstr.69, 60329 Frankfurt am Main
| UK | REP |
YH CONSULTING LIMITED.
C/O YH Consulting Limited Office 147, Centurion
House, London Road, Staines-upon-Thames, Surrey
TW18 4AX
VEVOR®
TOUGH TOOLS, HALF PRICE
Remove the installed separator plate on the bottom of the cabinet. The nuts will be used to install the separator plate in step 2.
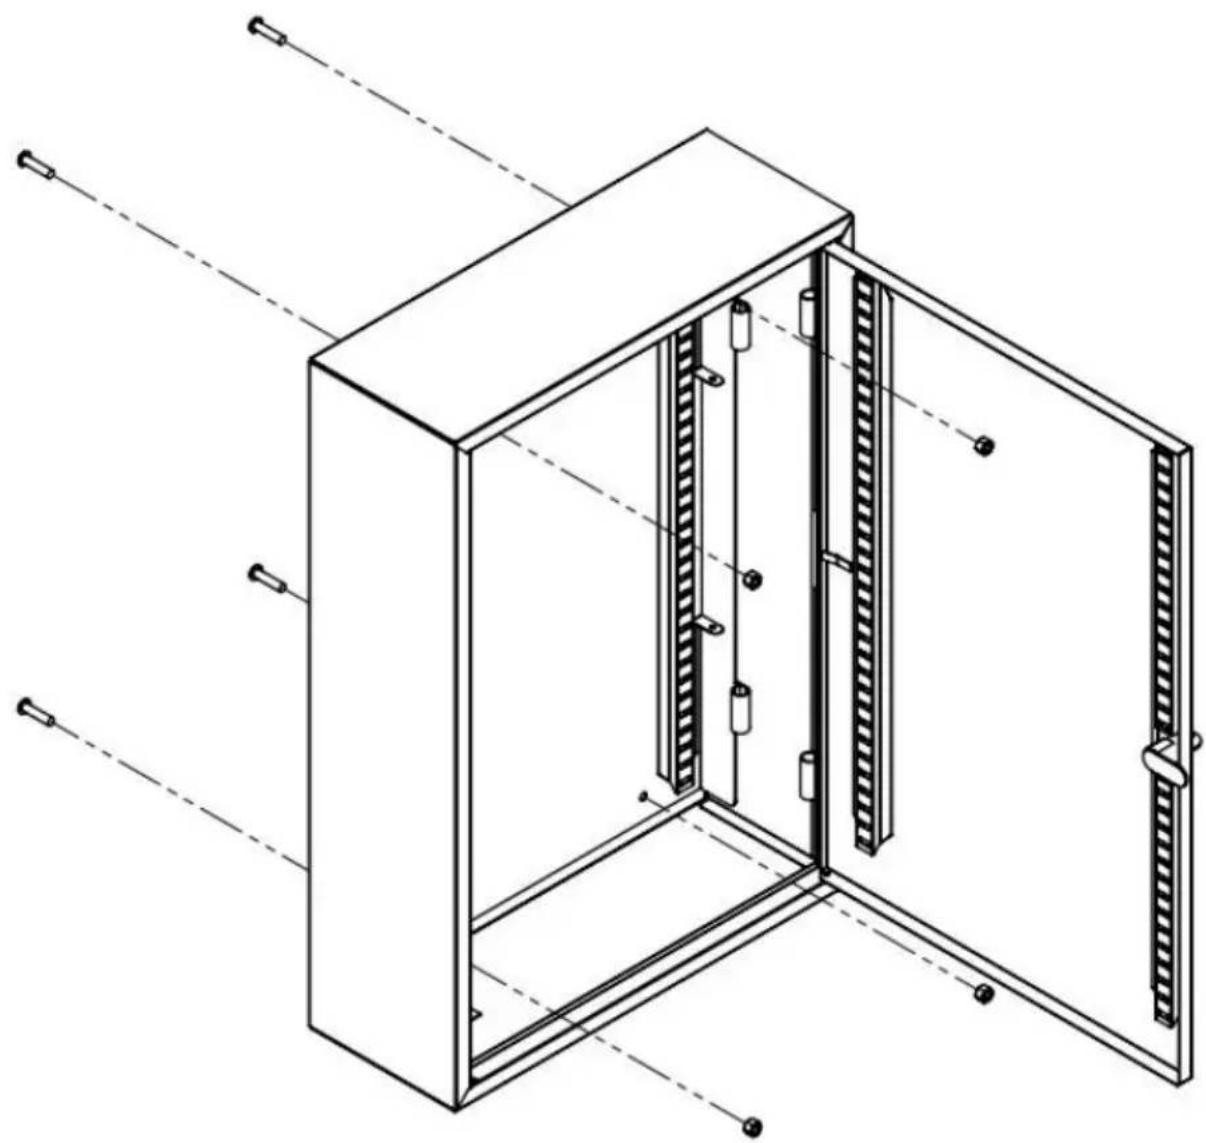
STEP 2
Align the hole positions of the separator plate and the cabinet. Thread the M6 bolts through the holes and screw on the nuts that were disassembled in step 1.
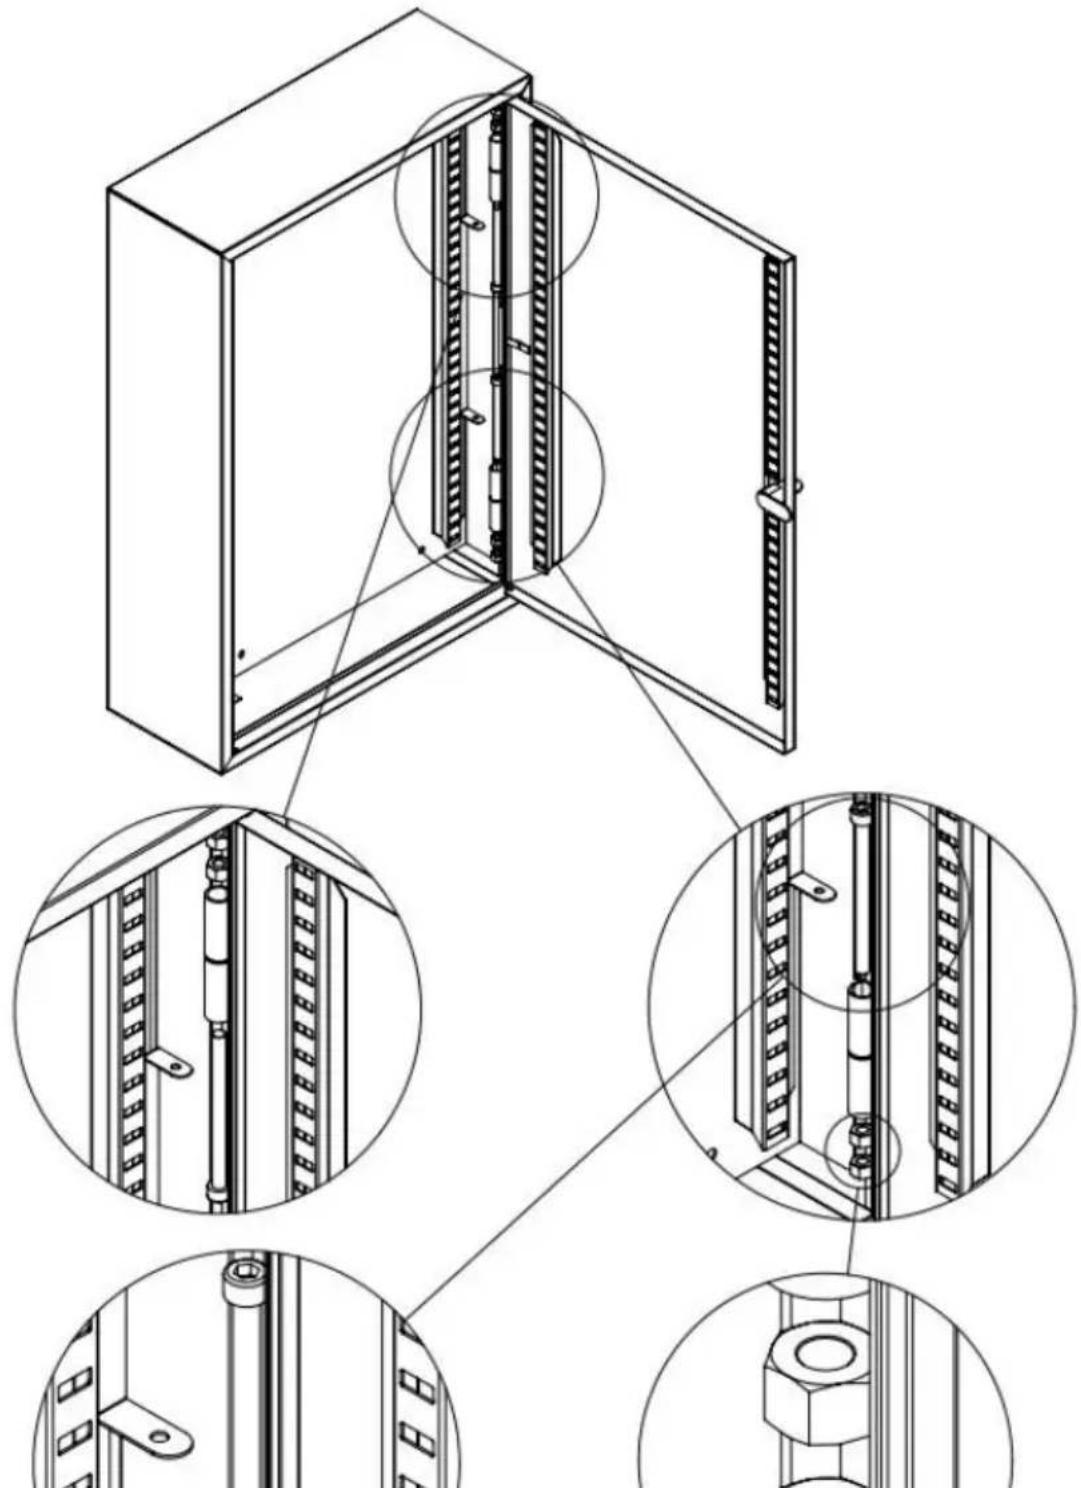
STEP 3
Mount the key cabinet to the wall with the expansion screws according to the holes (Φ6mm) drilled in the wall.
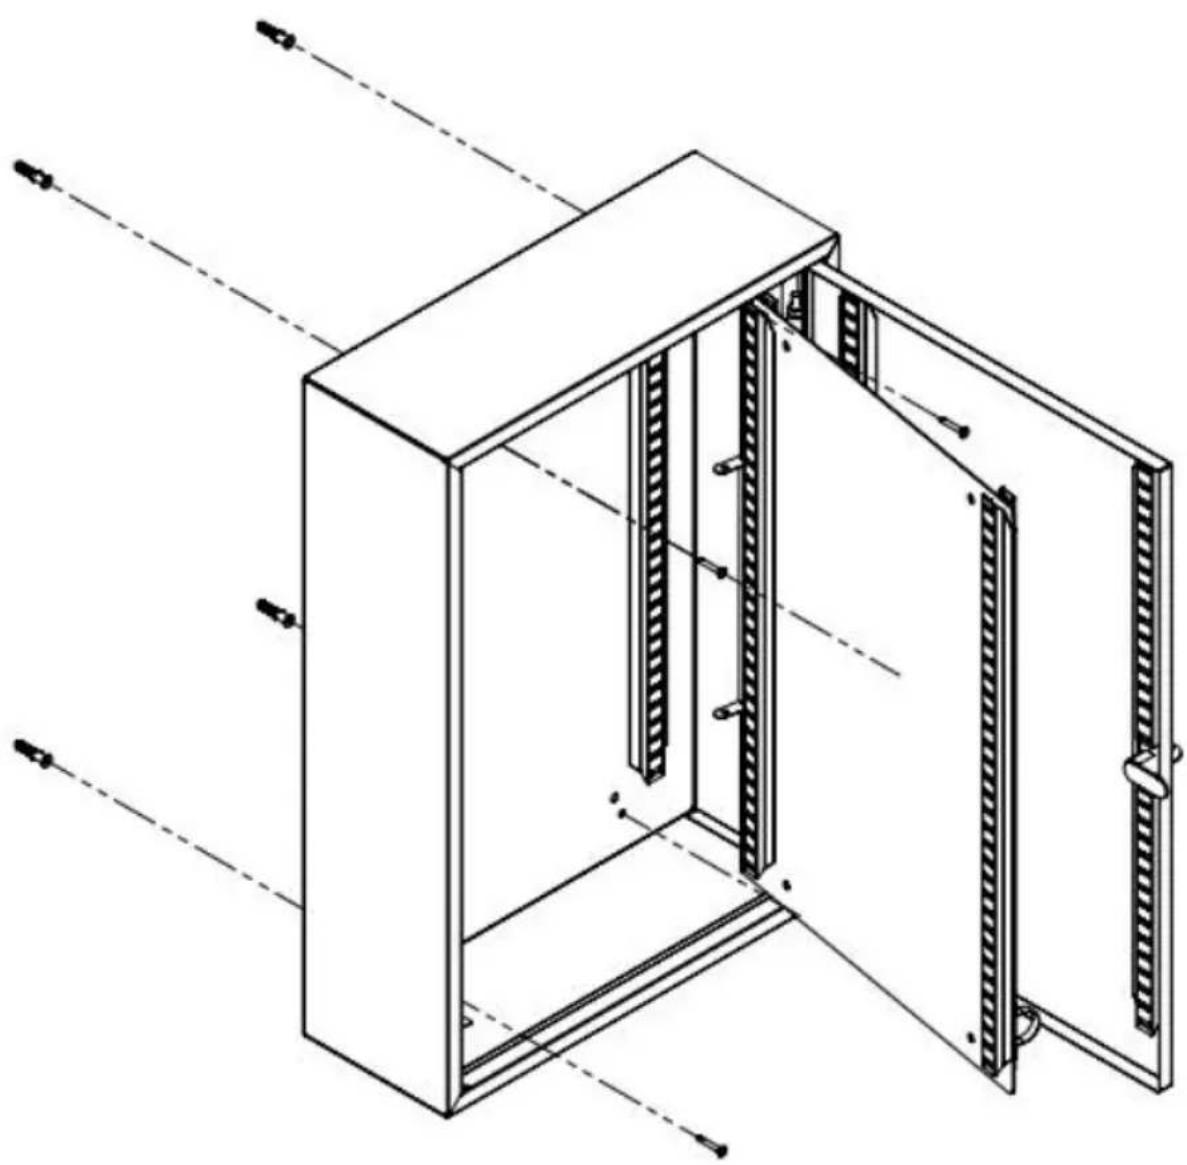
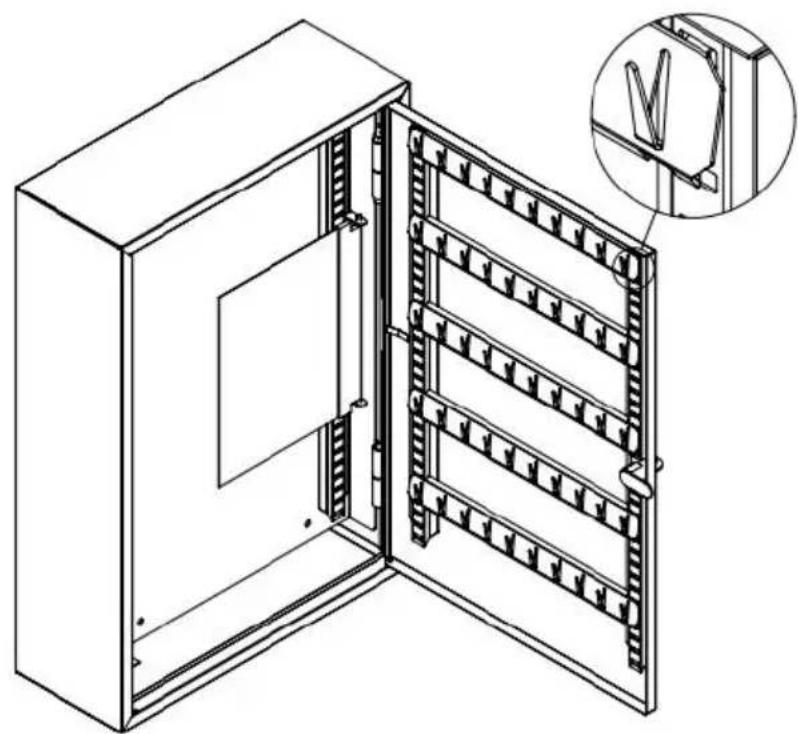
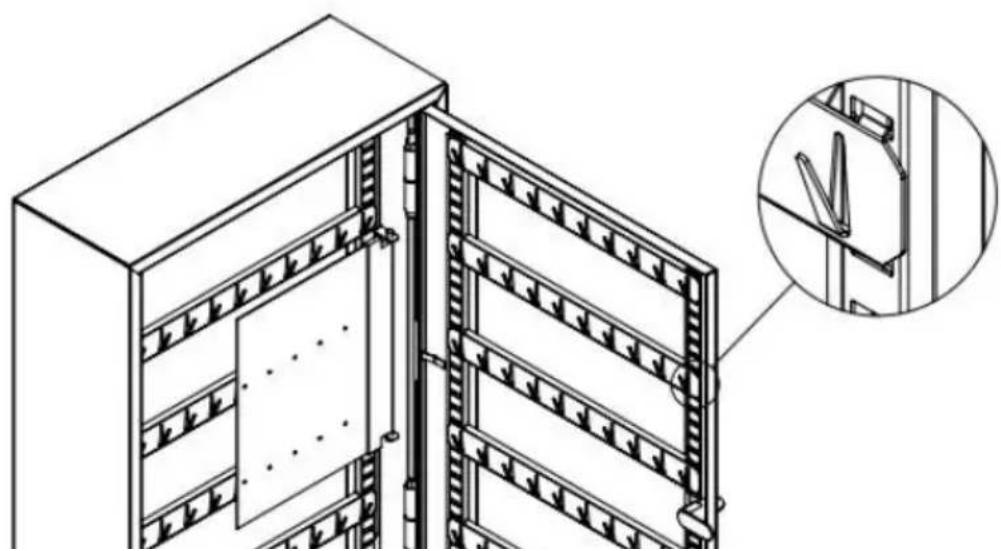
STEP 4
Install the Hangers segments on the cabinet. First the long side short.
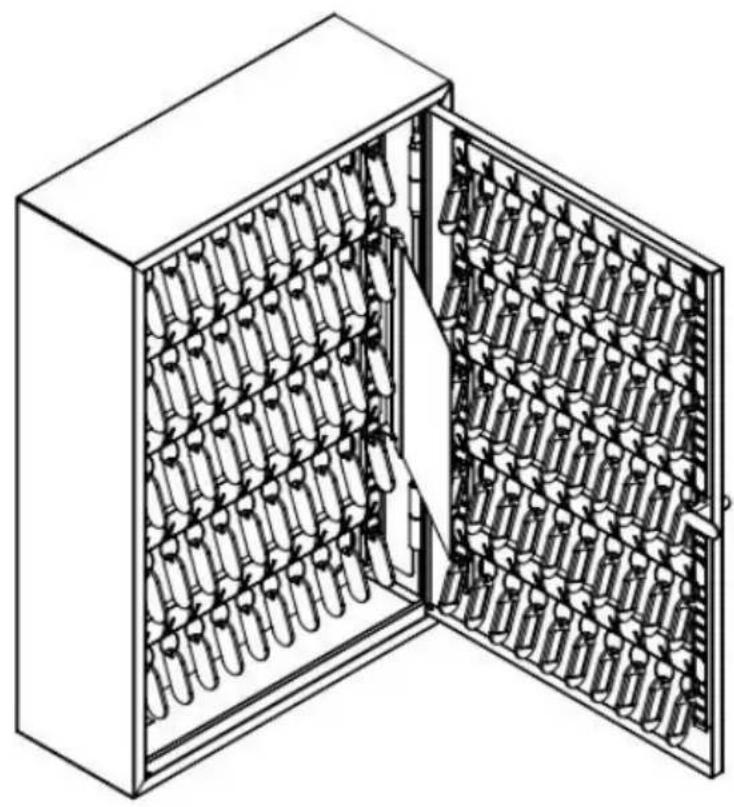
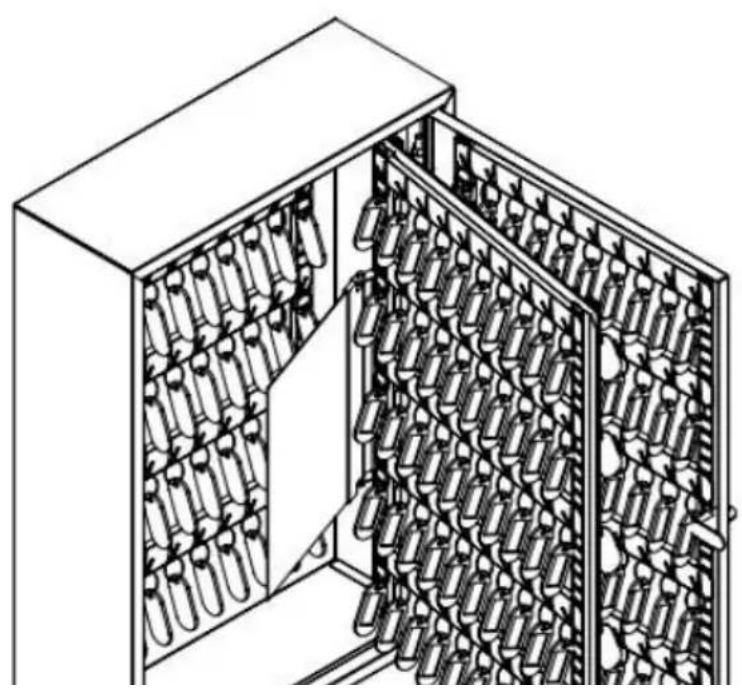
STEP5
Then you can use the cabinet to hang on the keys as below
Place, Rancho Cucamonga, CA 91730
| EC | REP |
E-CrossStu GmbH
Mainzer Landstr.69, 60329 Frankfurt am Main
| UK | REP |
YH CONSULTING LIMITED.
C/O YH Consulting Limited Office 147, Centurion
House, London Road, Staines-upon-Thames, Surrey
TW18 4AX
VEVOR®
TOUGH TOOLS, HALF PRICE
www.vevor.com/support
VEVOR®
TOUGH TOOLS, HALF PRICE
Remove the installed separator plate on the bottom of the cabinet. The nuts will be used to install the separator plate in step 2.
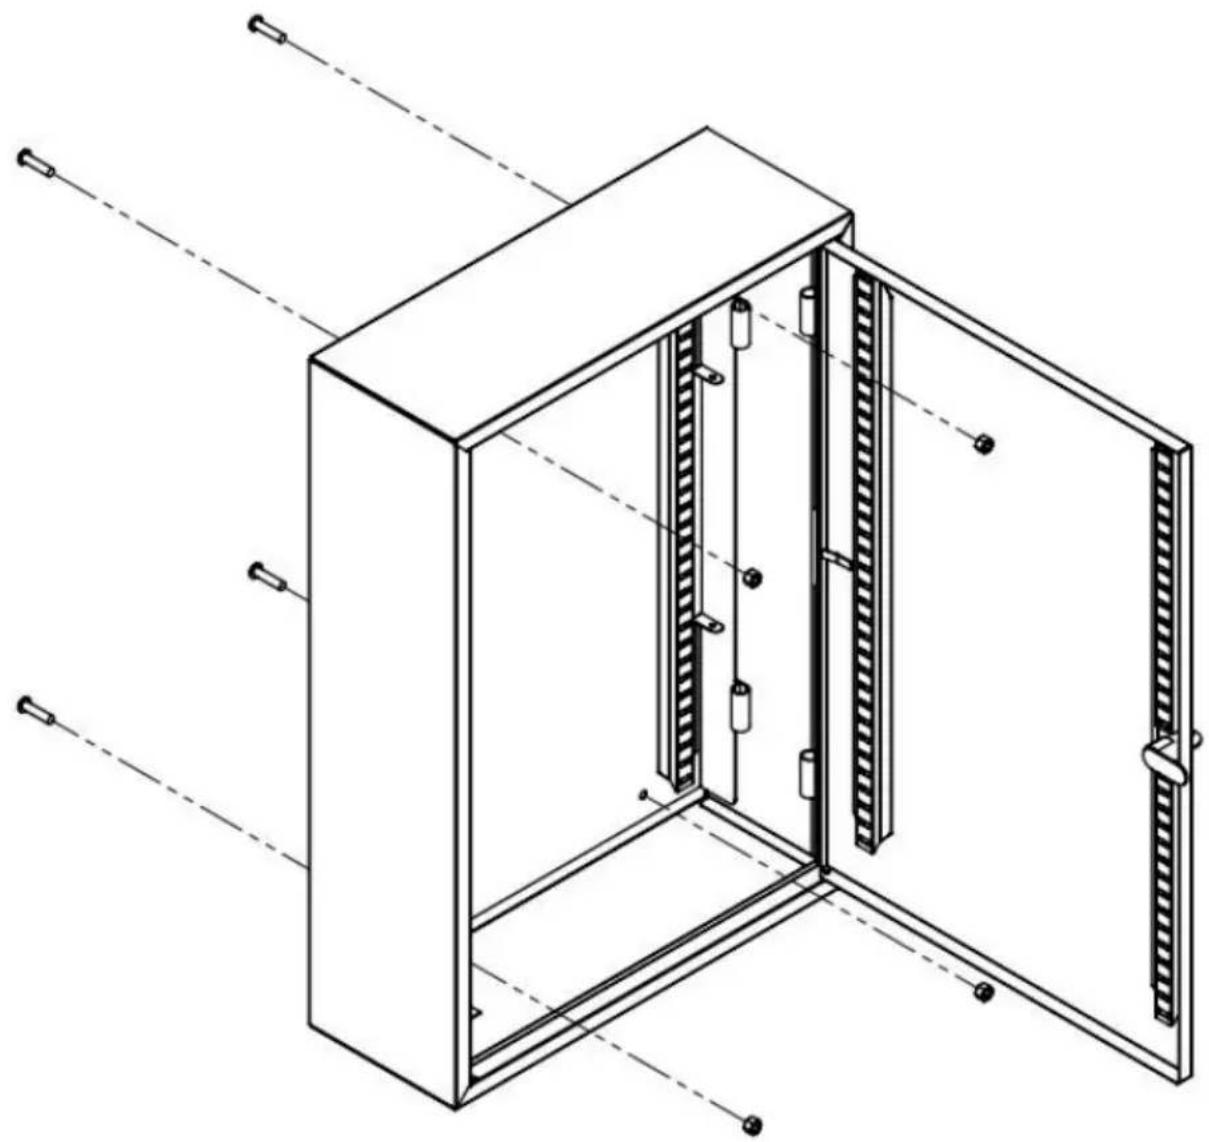
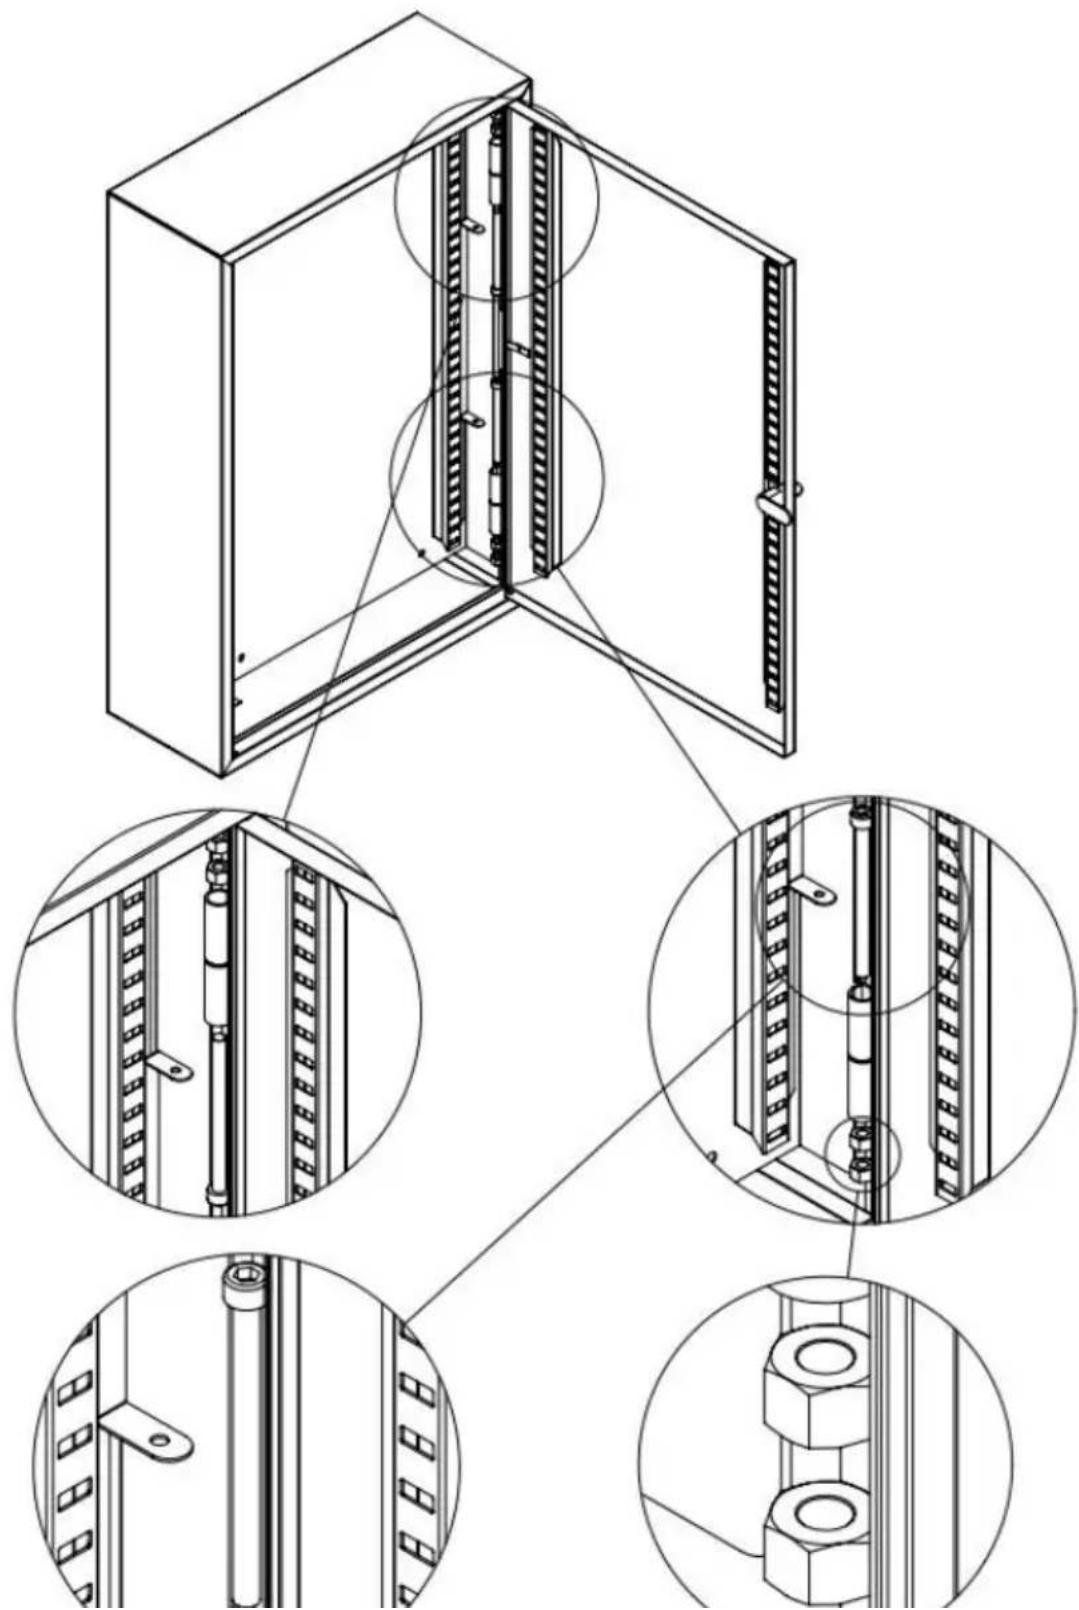
STEP 2
Align the hole positions of the separator plate and the cabinet. Thread the M6 bolts through the holes and screw on the nuts that were disassembled in step 1.
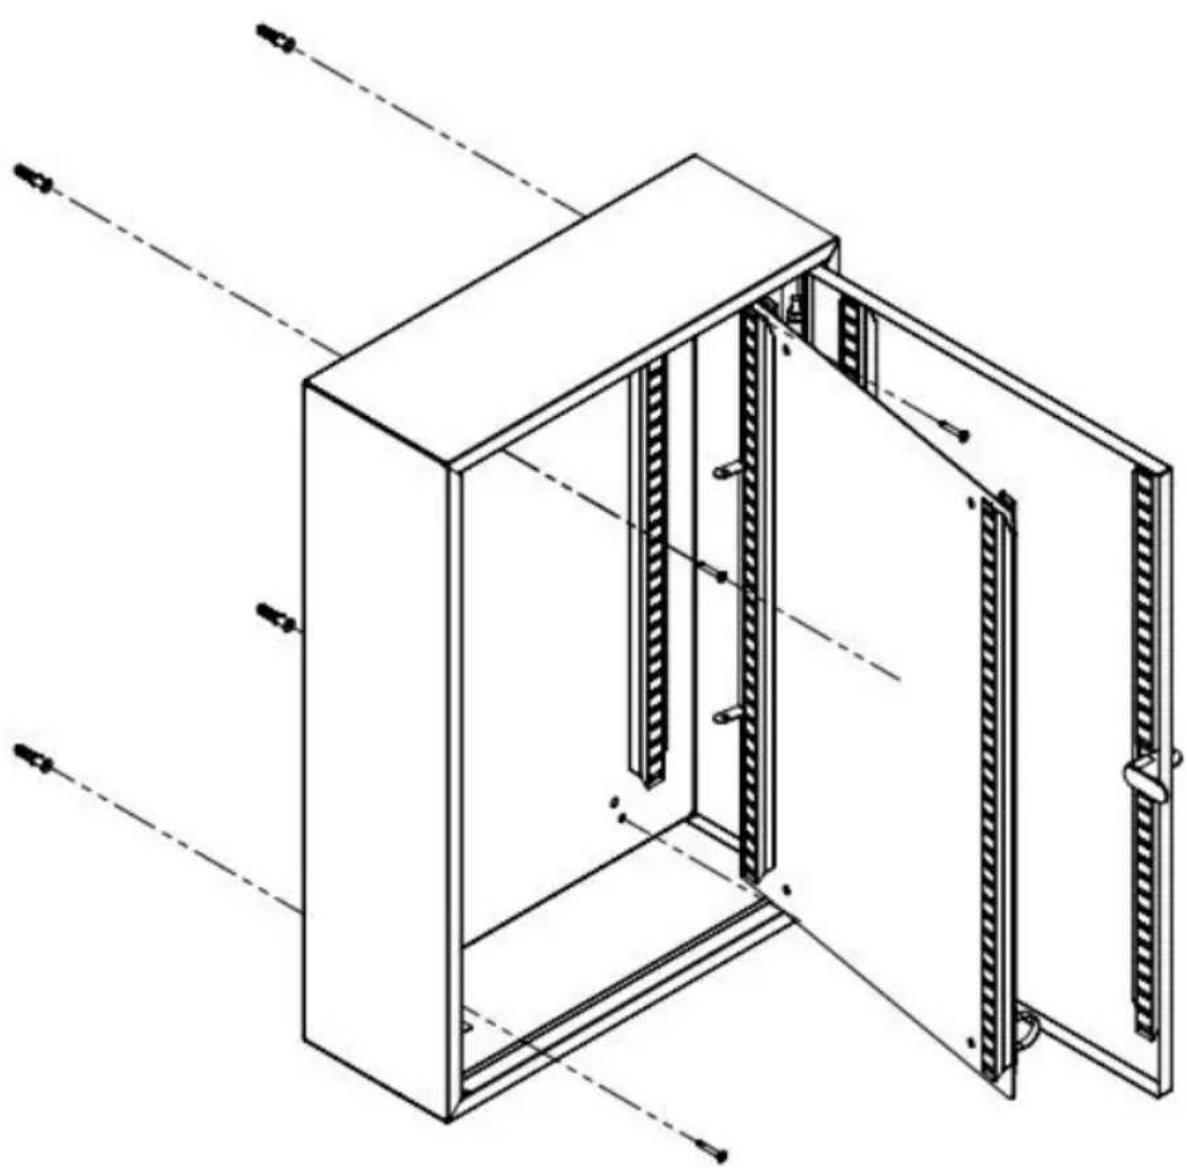
STEP 3
Mount the key cabinet to the wall with the expansion screws according to the holes (Φ6mm) drilled in the wall.
STEP 4
Install the hanger segments on the cabinet. First the long side, then the short.
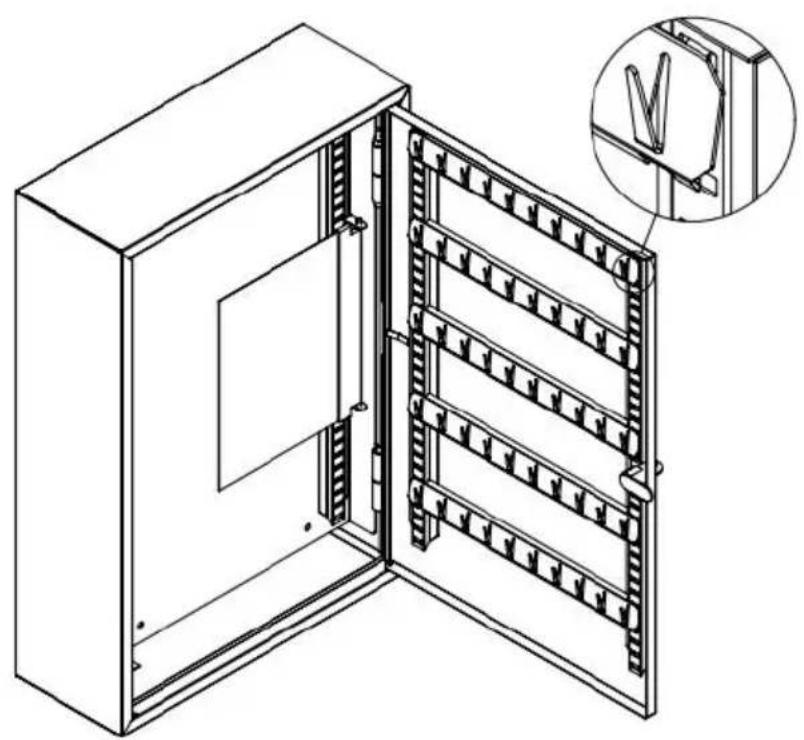
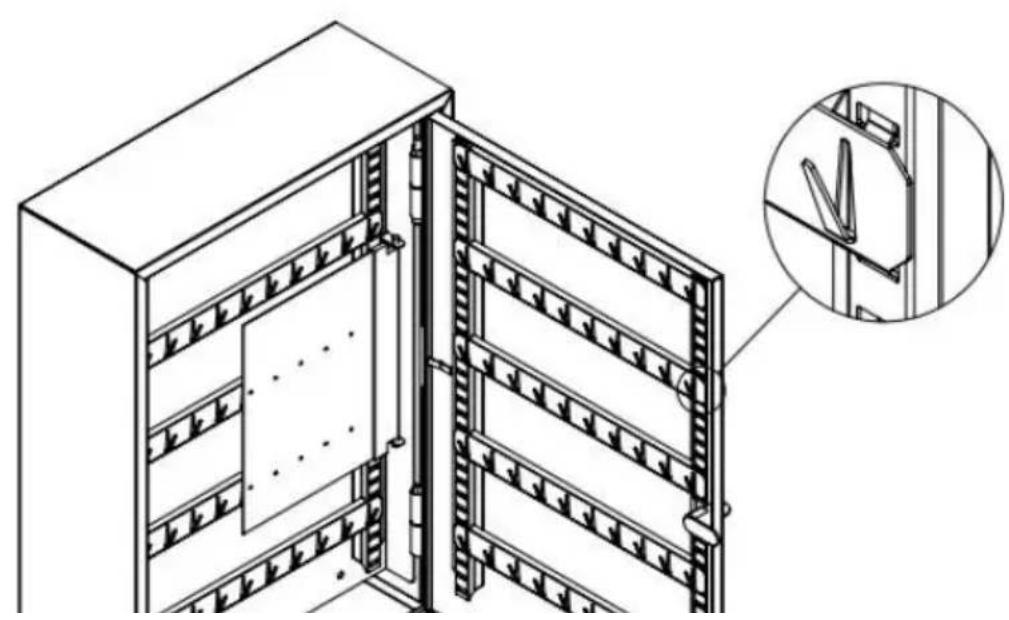
STEP 5
Then you can use the cabinet to hang the keys as below.
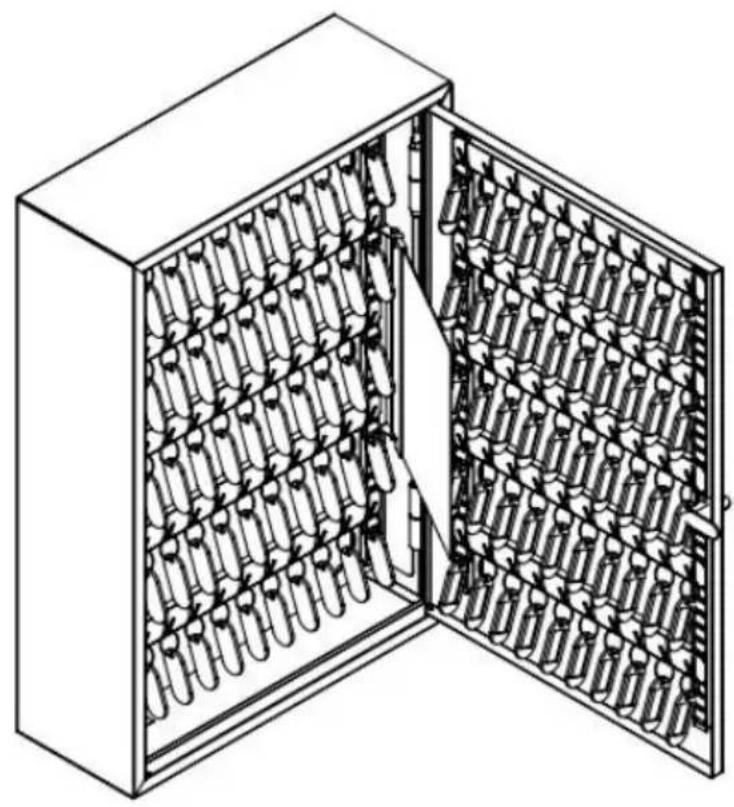
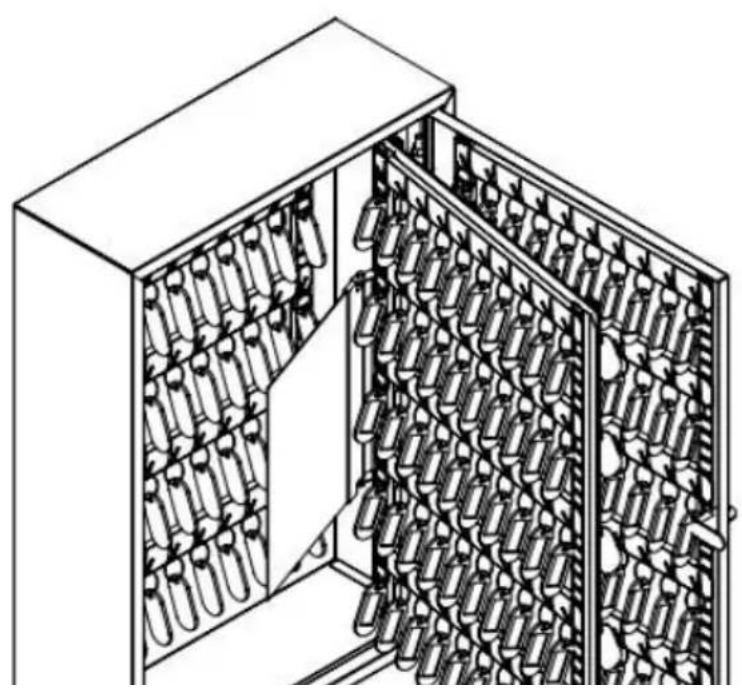
Imported in Australia: SIHAO PTY LTD. 1 ROKEVA STREET, EASTWOOD NSW 2122 Australia
Imported in the USA: Sanven Technology Ltd. Suite 250, 9166 Anaheim Place, Rancho Cucamonga, CA 91730
| EC | REP |
E-CrossStu GmbH
Mainzer Landstr. 69, 60329 Frankfurt am Main
| UK | REP |
YH CONSULTING LIMITED.
C/O YH Consulting Limited, Office 147, Centurion House, London Road, Staines-upon-Thames, Surrey TW18 4AX
VEVOR®
TOUGH TOOLS, HALF PRICE
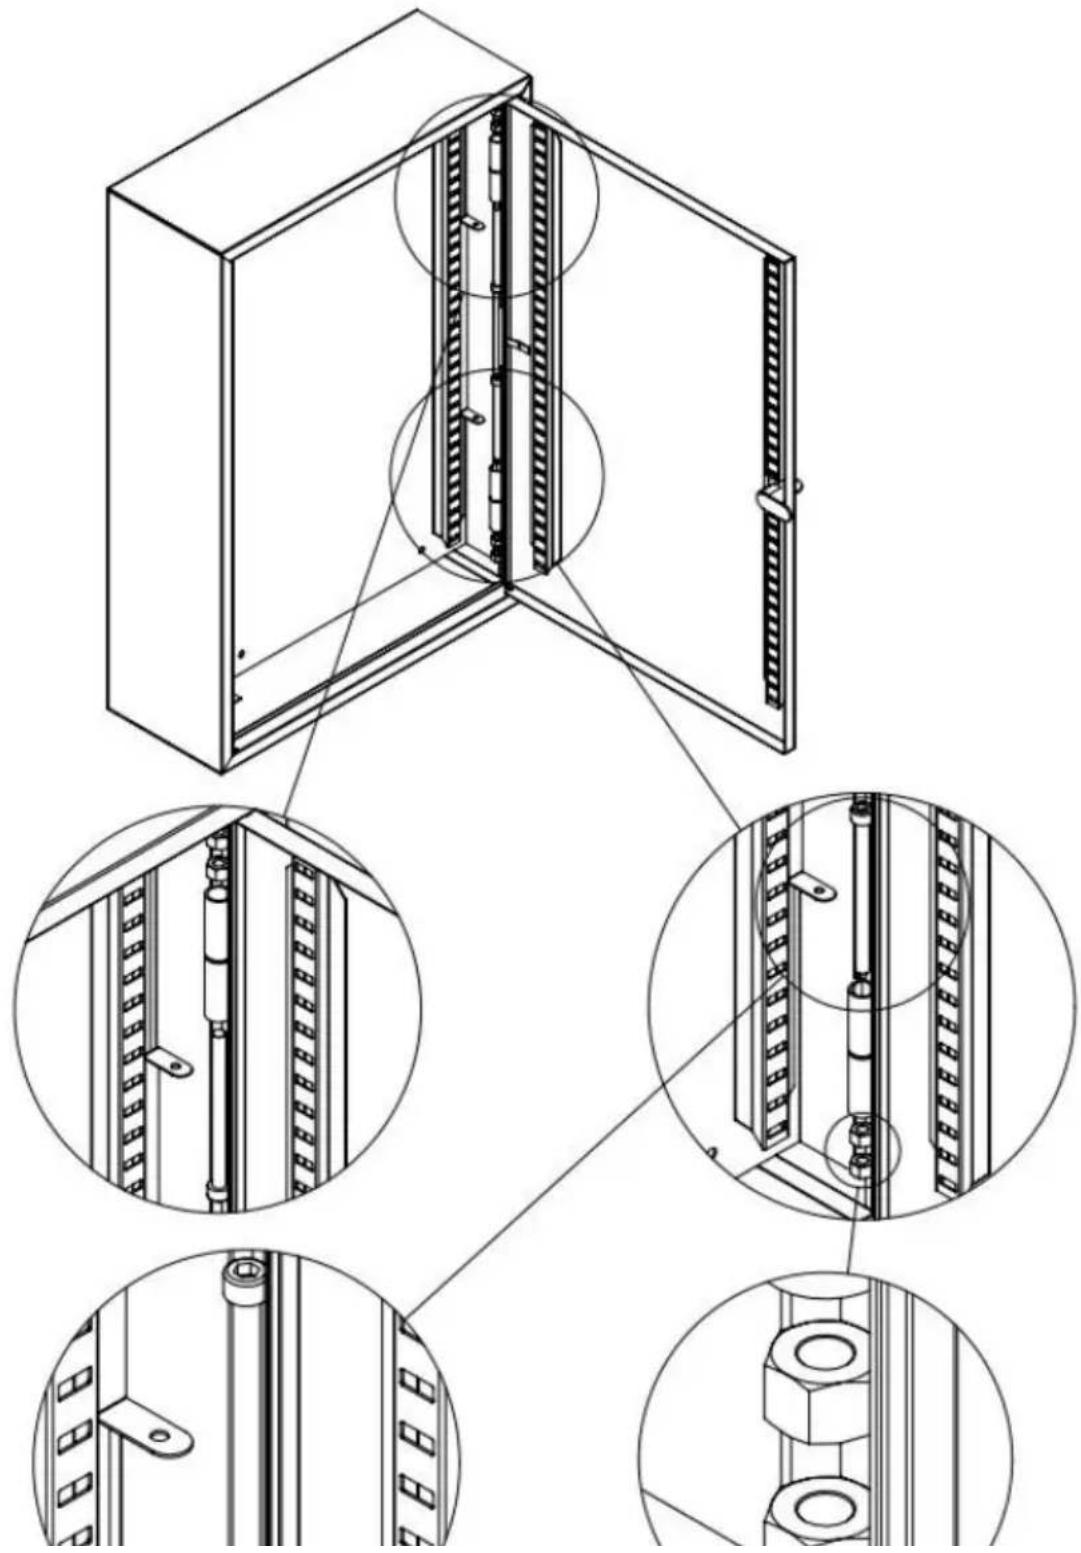
Remove the installed separator plate on the bottom of the cabinet. The nuts will be used to install the separator plate in step 2.
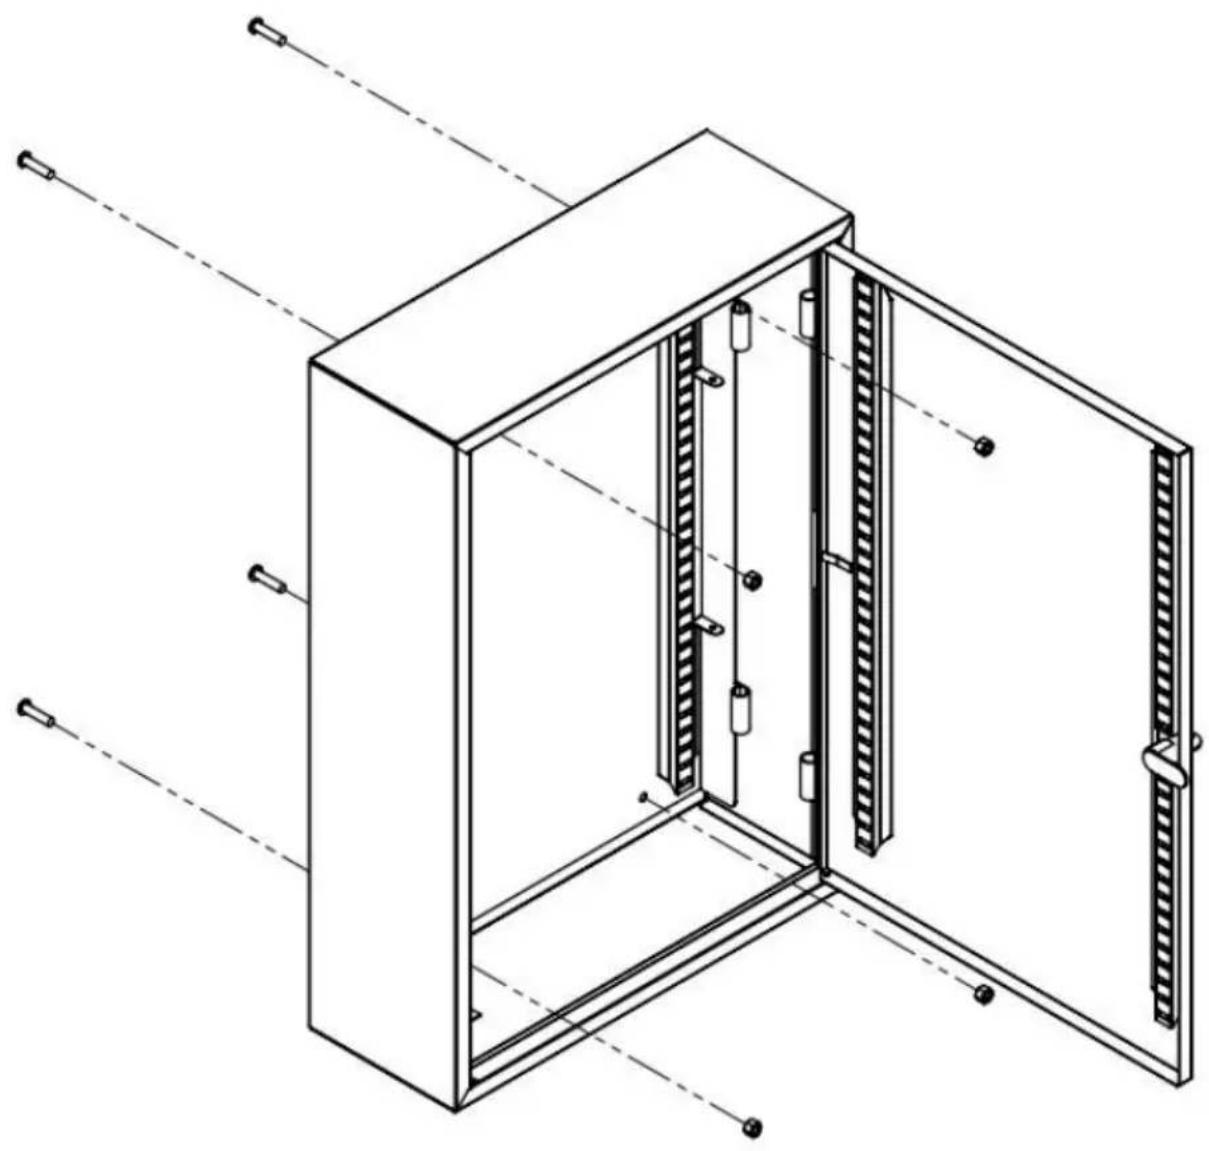
STEP 2
Align the hole positions of the separator plate and the cabinet. Thread the M6 bolts through the holes and screw on the nuts that were disassembled in step 1.
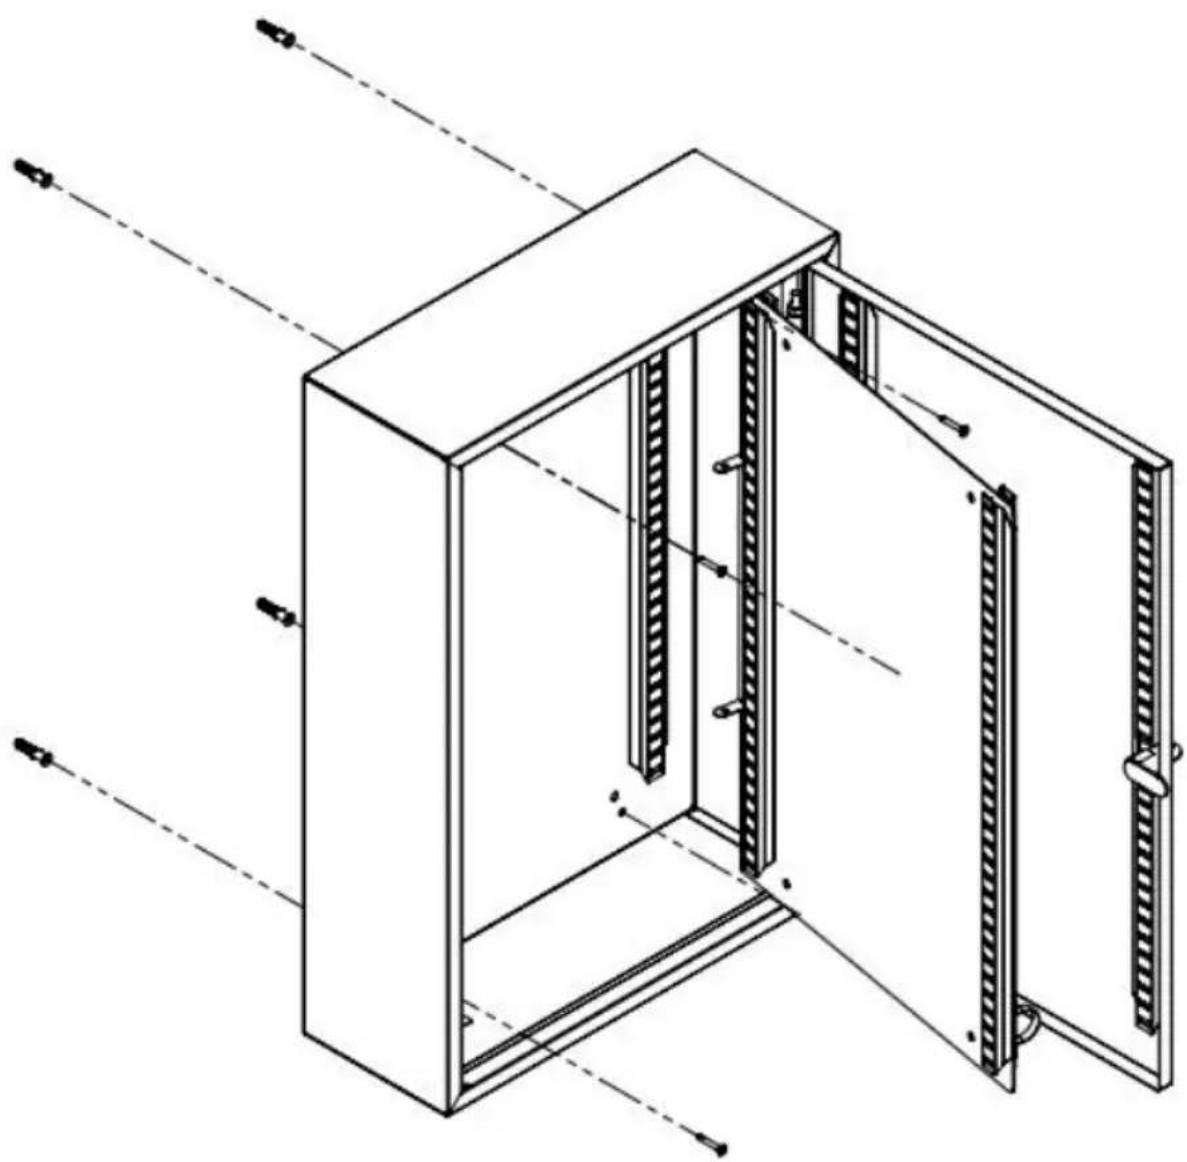
STEP 3
Mount the key cabinet to the wall with the expansion screws according to the holes (Φ6mm) drilled in the wall.
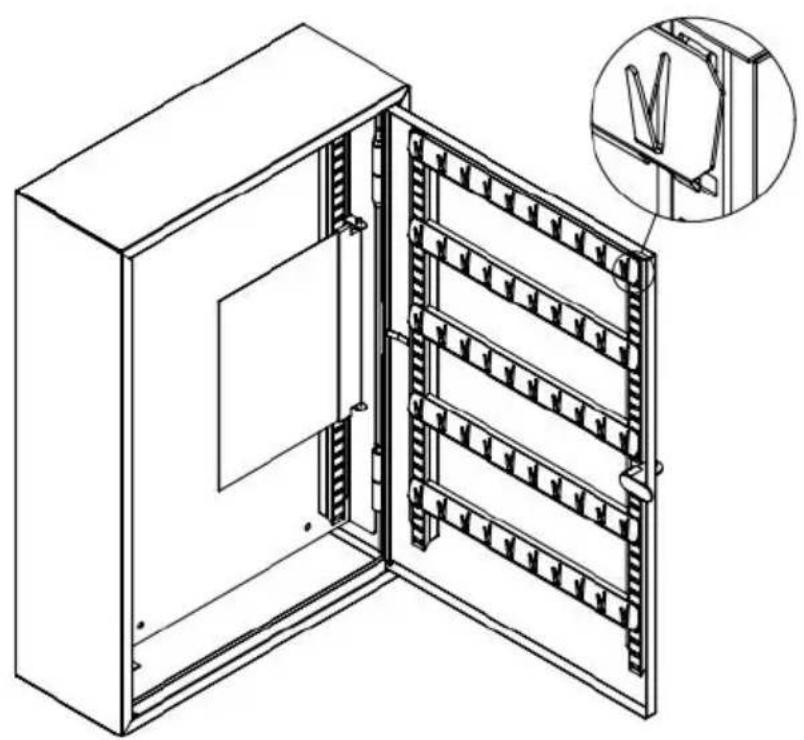
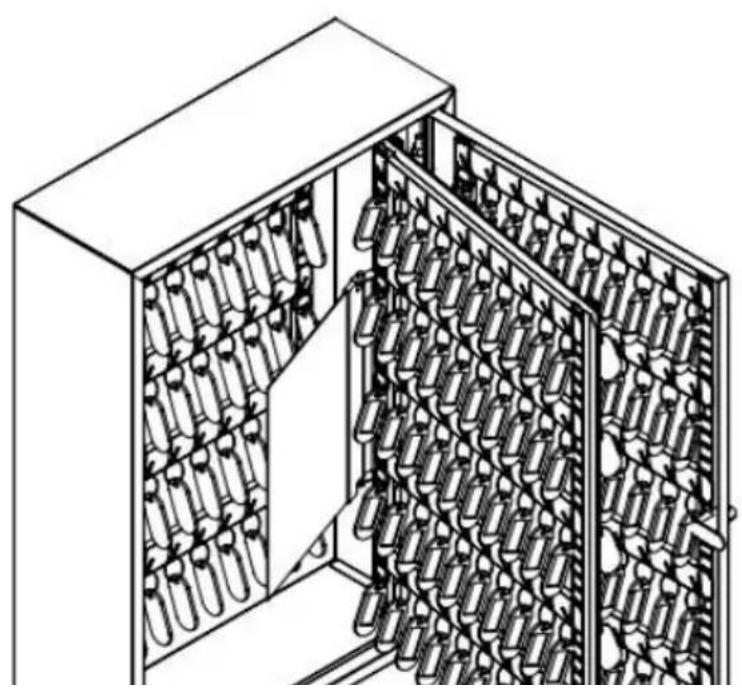
STEP 4
Install the hanger segments on the cabinet. First the long side, then the short.
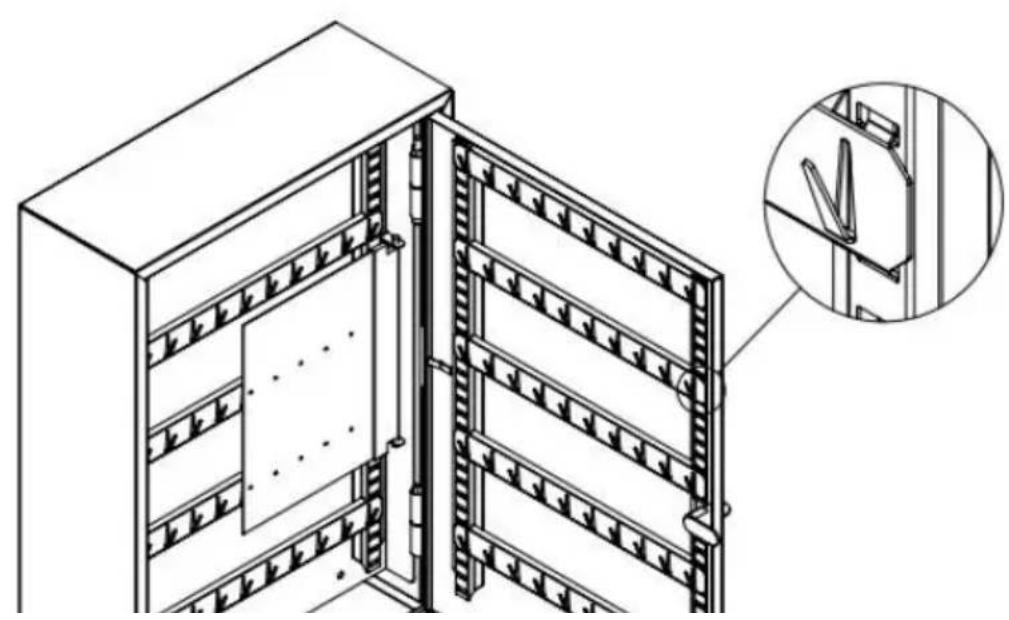
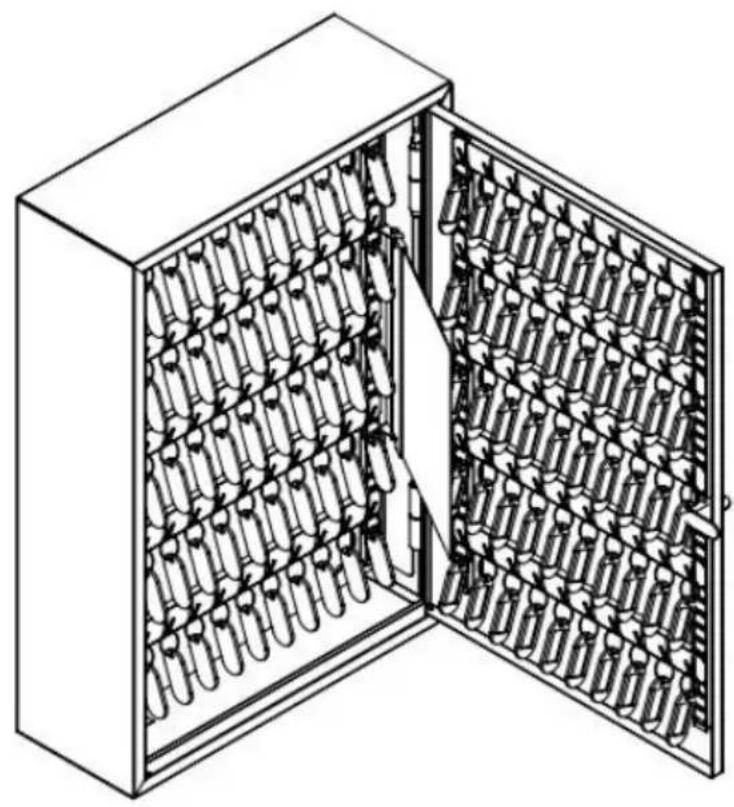
STEP 5
Then you can use the cabinet to hang the keys as shown below.
| EC | REP |
| UK | REP |
YH CONSULTING LIMITED.
C/O YH Consulting Limited Office 147, Centurion House, London Road, Staines-upon-Thames, Surrey TW18 4AX
VEVOR®
TOUGH TOOLS, HALF PRICE
NEED HELP? CONTACT US!
Remove the installed separator plate on the bottom of the cabinet. The nuts will be used to install the separator plate in step 2.
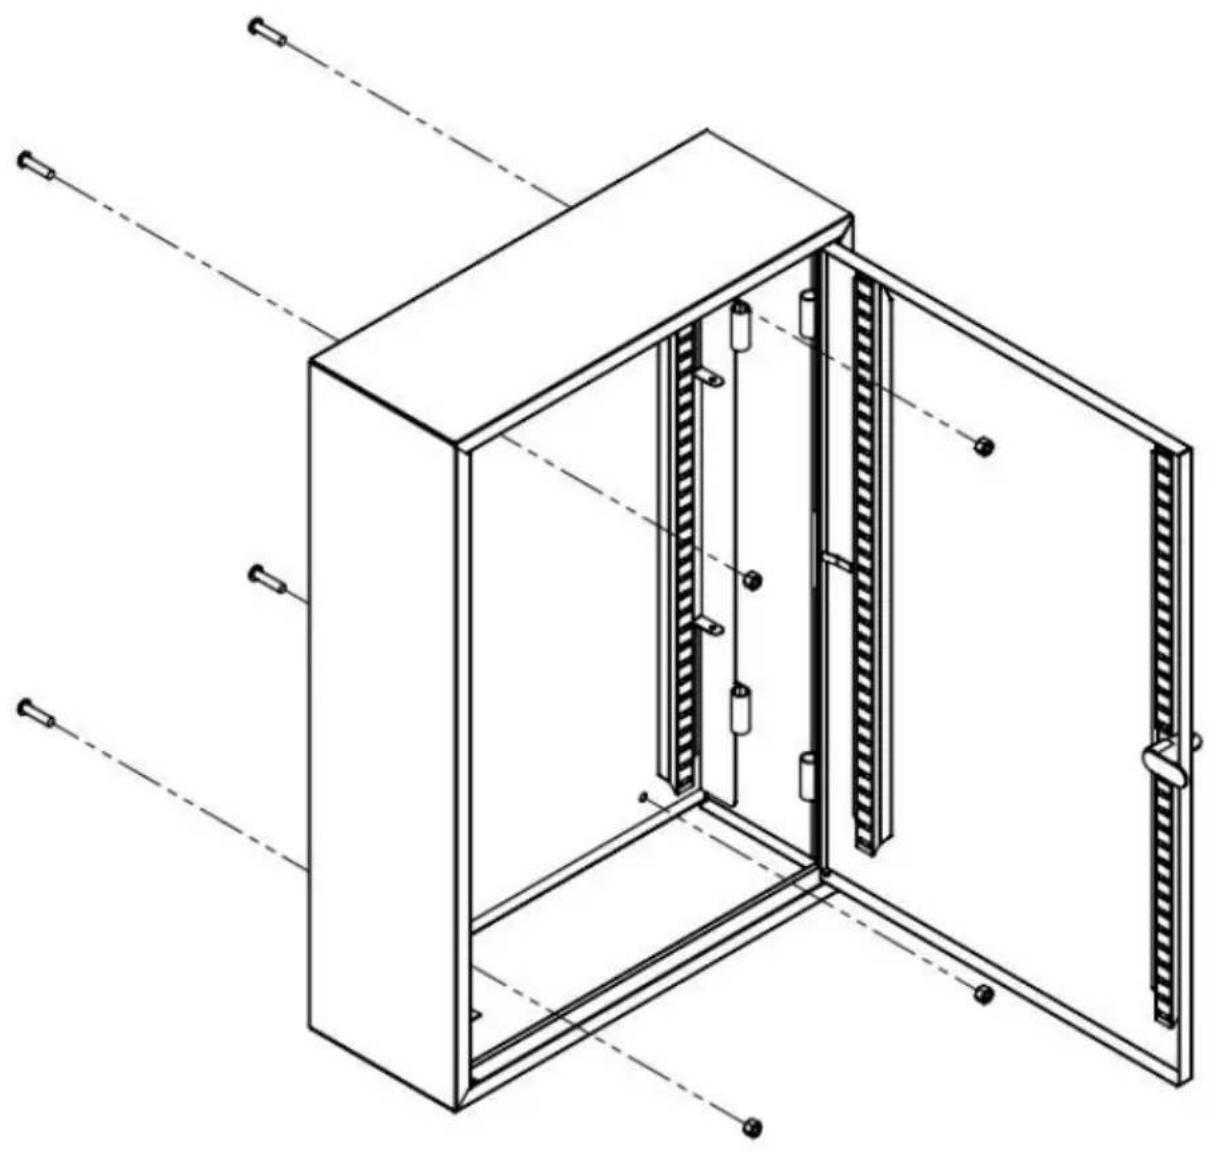
STEP 2
Align the hole positions of the separator plate and the cabinet. Thread the M6 bolts through the holes and screw on the nuts that were disassembled in step 1.
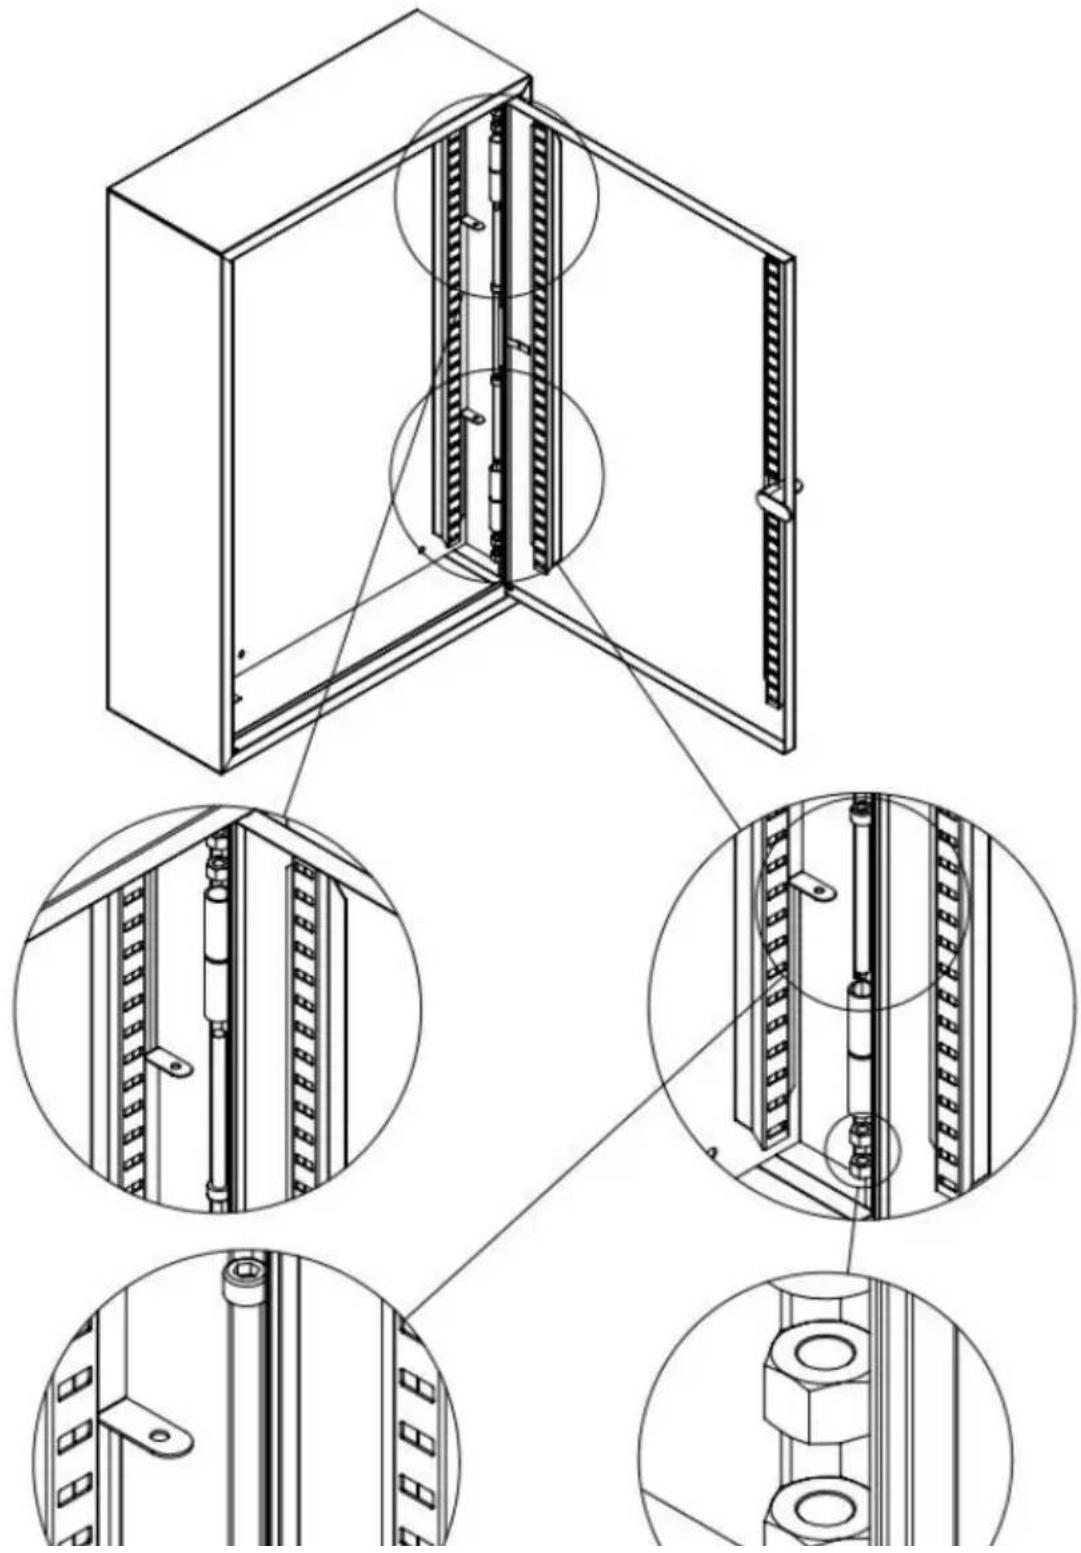
STEP 3
Mount the key cabinet to the wall with the expansion screws according to the holes (Φ6mm) drilled in the wall.
STEP 4
Install the hanger segments on the cabinet. First the long side, then the short.
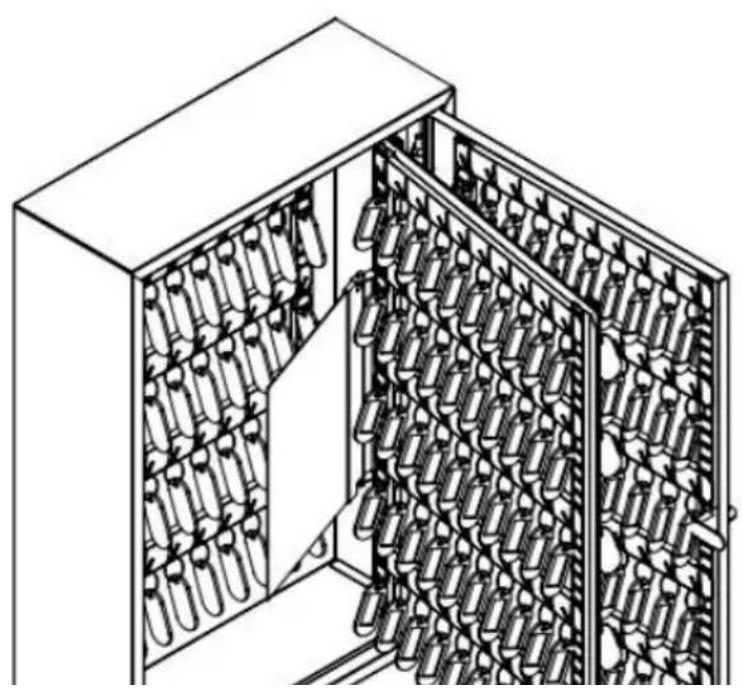
STEP 5
Then you can use the cabinet to hang the keys as shown below.
Imported to AUS: SIHAO PTY LTD. 1 ROKEVA
STREET EASTWOOD NSW 2122 Australia
Imported into the USA: Sanven Technology Ltd. Suite 250, 9166 Anar
Place, Rancho Cucamonga, CA 91730
| EC | REP |
E-CrossStu GmbH
Mainzer Landstr.69, 60329 Frankfurt am Main
| UK | REP |
YH CONSULTING LIMITED.
C/O YH Consulting Limited Office 147, Centurion
House, London Road, Staines-upon-Thames, Surrey
TW18 4AX
VEVOR®
TOUGH TOOLS, HALF PRICE
www.vevor.com/support
VEVOR®
TOUGH TOOLS, HALF PRICE
Technical Support and E-warranty Certificate www.vevor.com/support
KEY CABINET
MODEL:YX-K550-200
NEED HELP? CONTACT US!
Remove the installed separator plate on the bottom of the cabinet. The nuts will be used to install the separator plate in step 2.
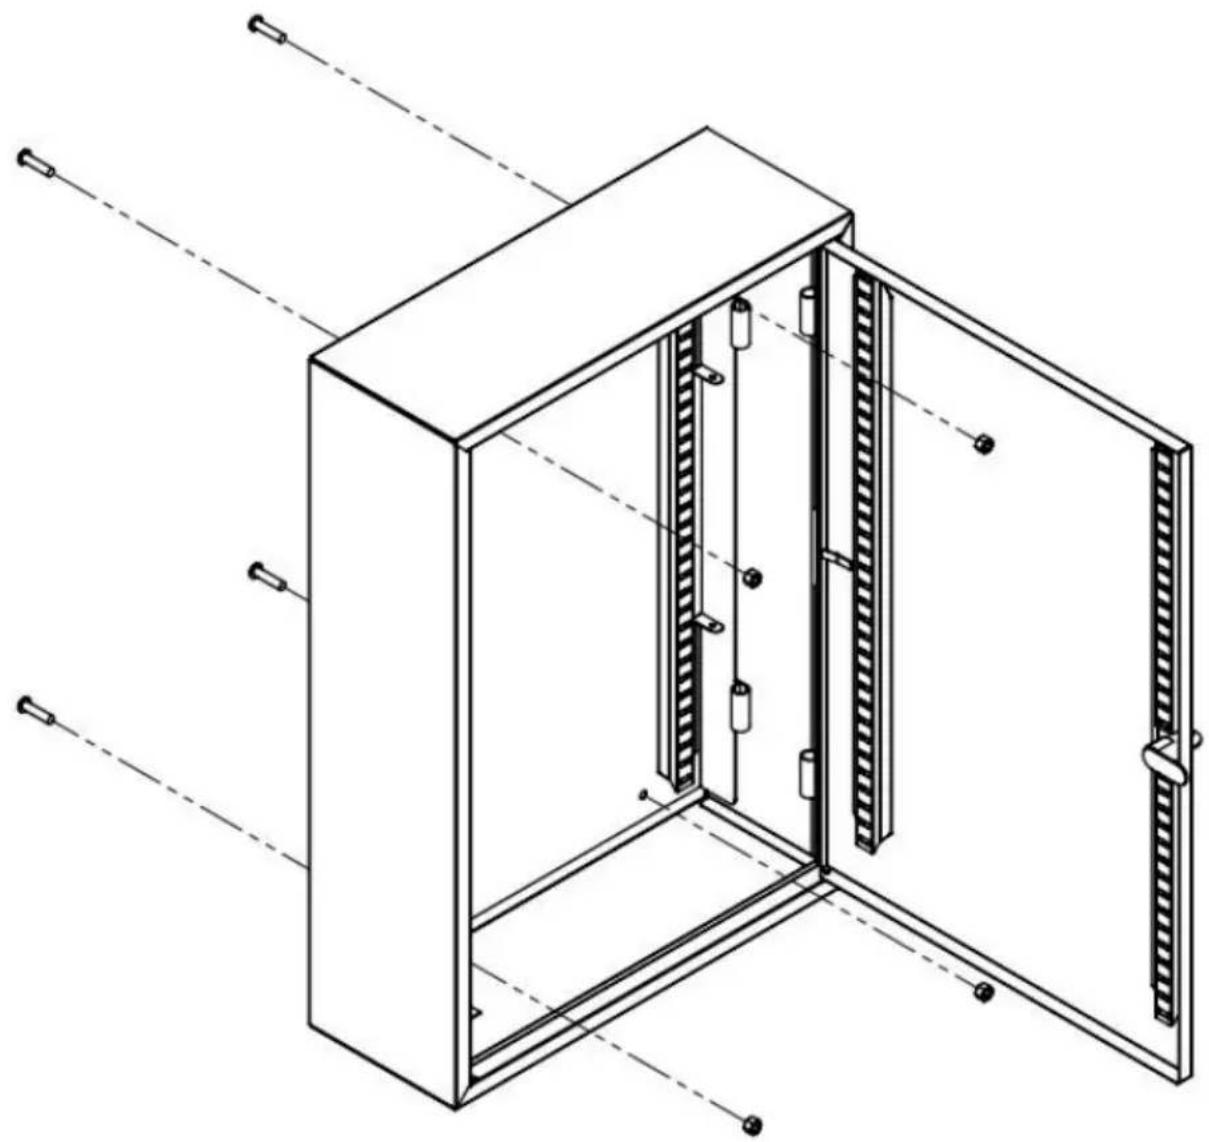
STEP 2
Align the hole positions of the separator plate and the cabinet. Thread the M6 bolts through the holes and screw on the nuts that were disassembled in step 1.
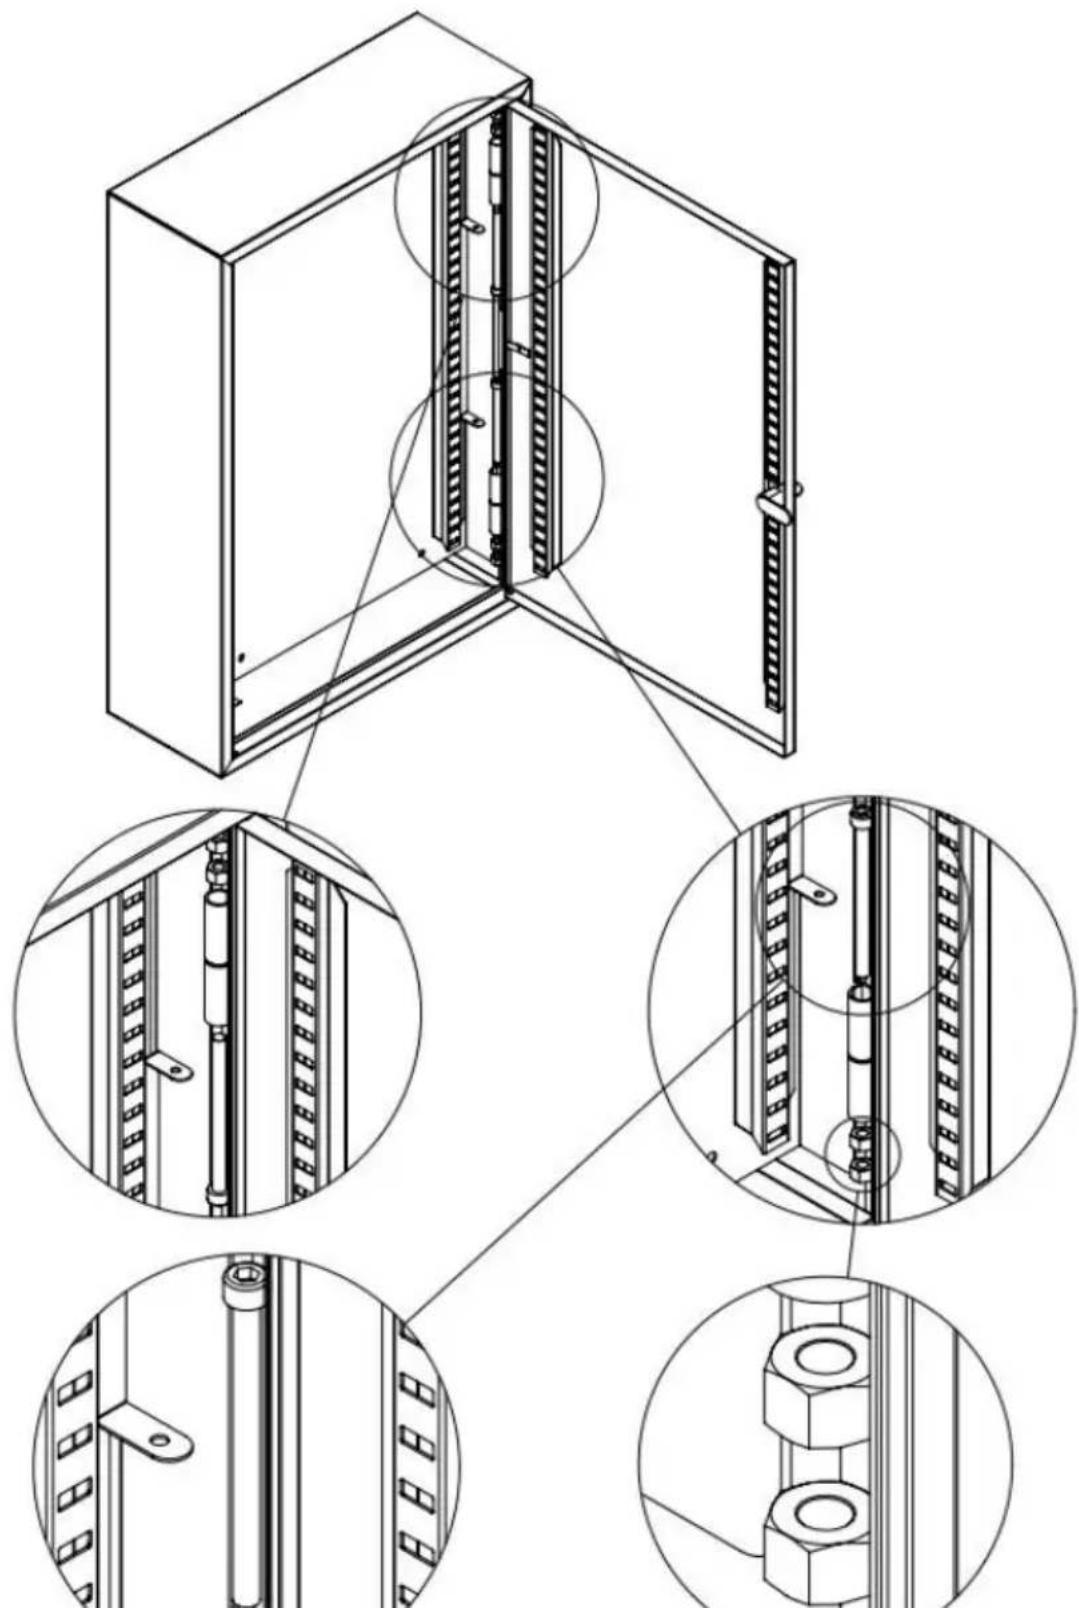
STEP 3
Mount the key cabinet to the wall with the expansion screws according to the holes (Φ6mm) drilled in the wall.
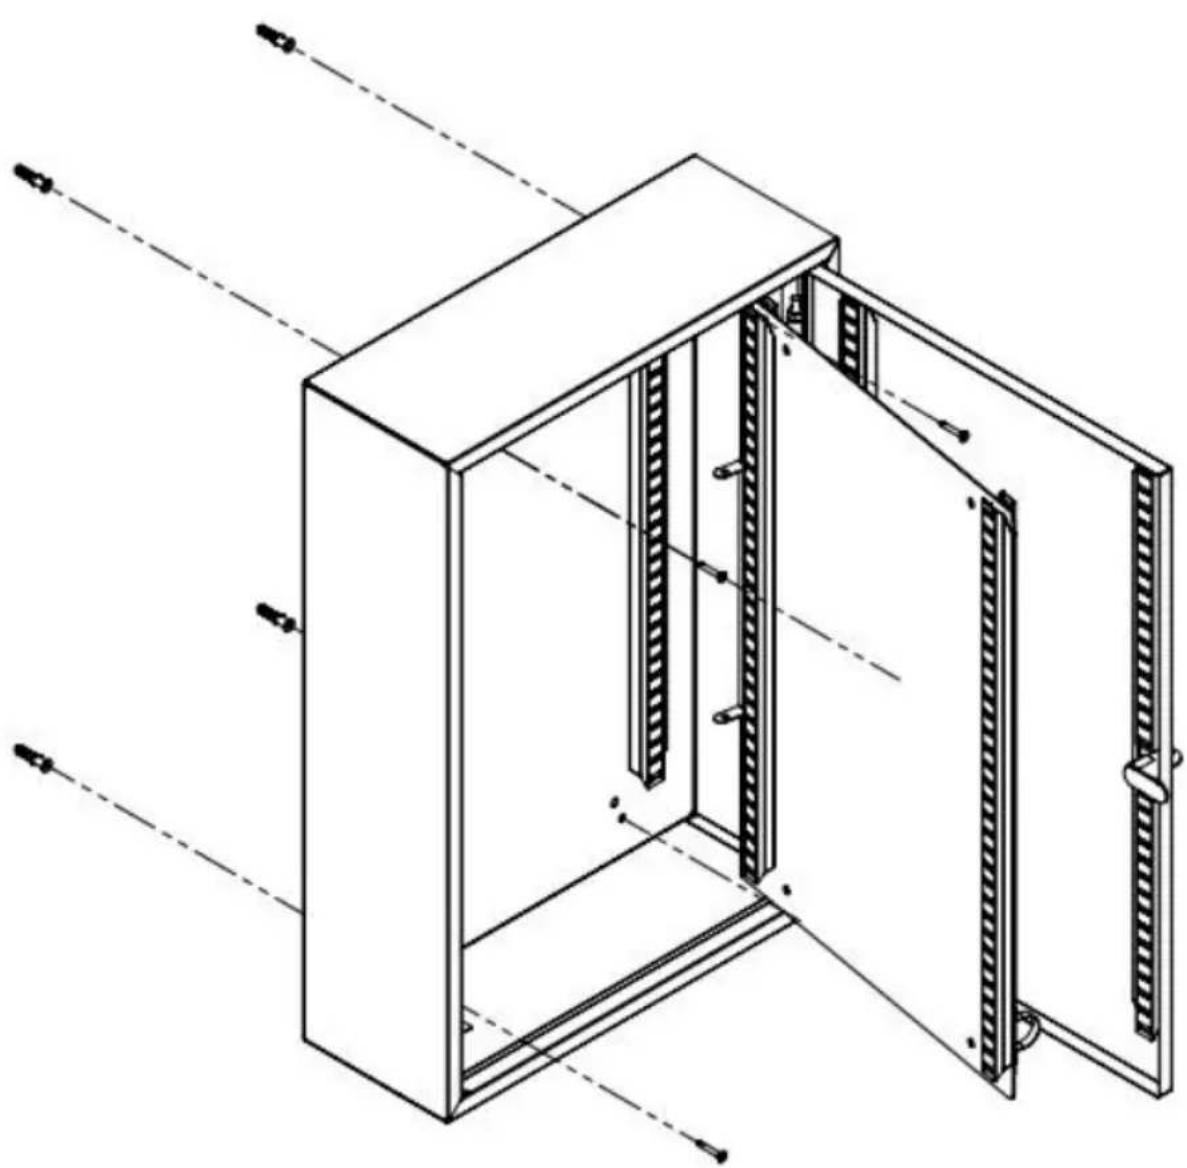
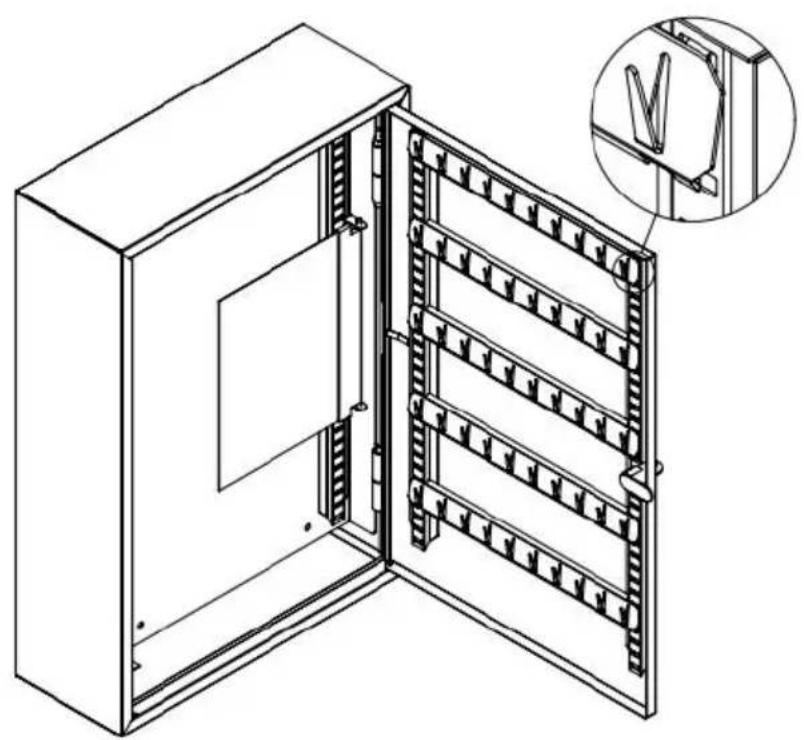
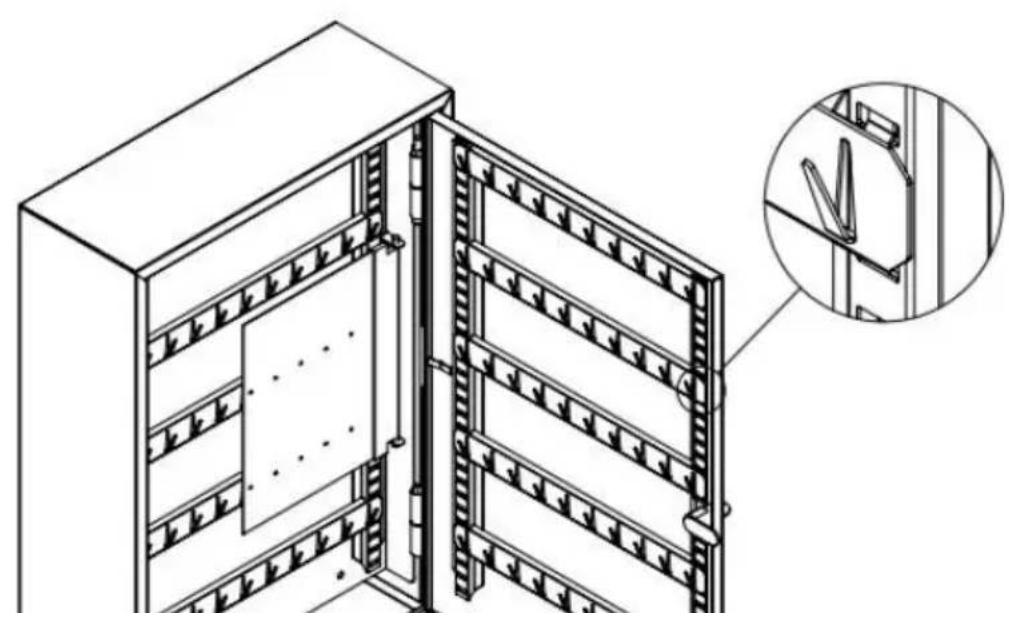
STEP 4
Install the hanger segments on the cabinet. First the long side, then the short.
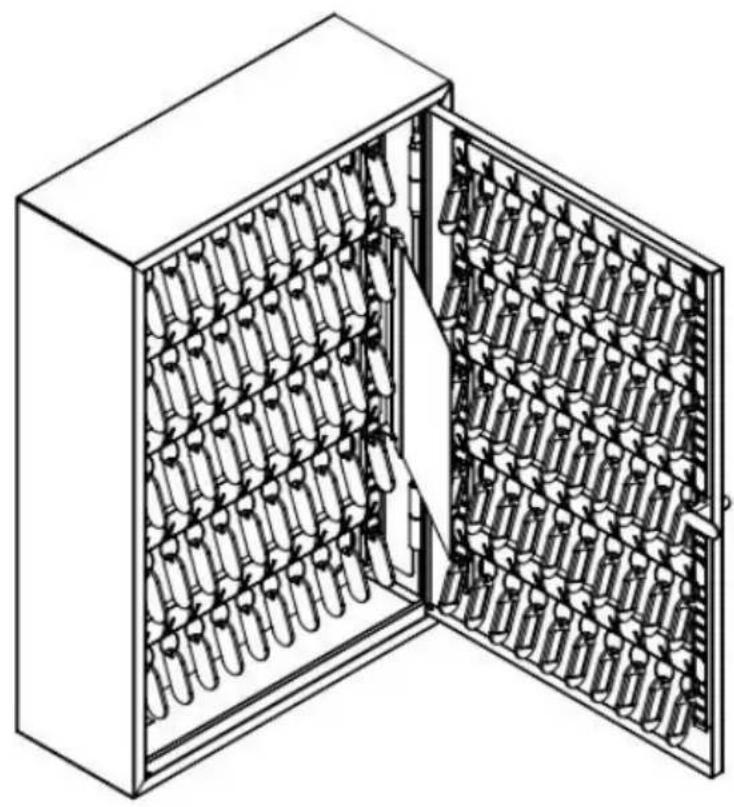
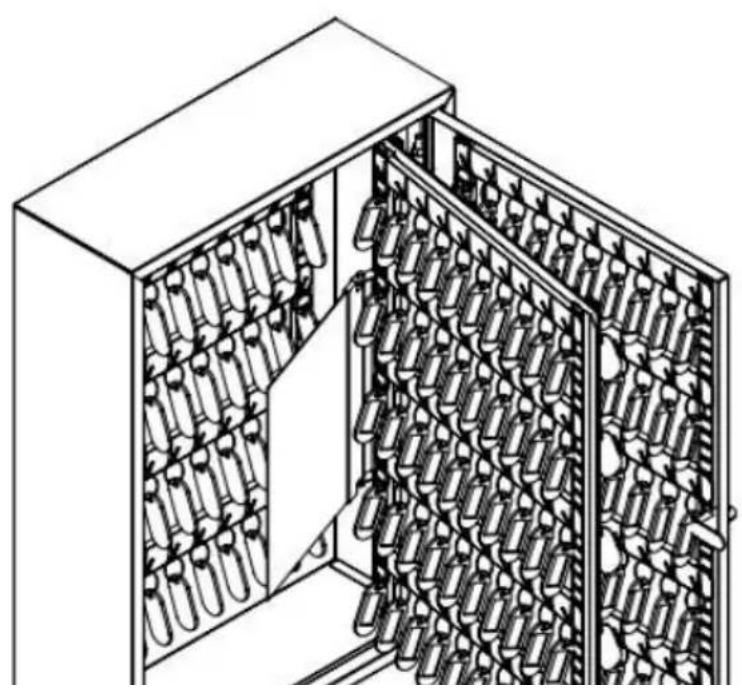
STEP 5
Then you can use the cabinet to hang the keys as shown below.
Anaheim Place, Rancho Cucamonga, CA 91730
| EC | REP |
E-CrossStu GmbH
Mainzer Landstr.69, 60329 Frankfurt am Main
| UK | REP |
YH CONSULTING LIMITED.
C/O YH Consulting Limited Office 147, Centurion
House, London Road, Staines-upon-Thames, Surrey
TW18 4AX
VEVOR®
TOUGH TOOLS, HALF PRICE
Technical Support and E-warranty Certificate www.vevor.com/support
VEVOR®
TOUGH TOOLS, HALF PRICE
NEED HELP? CONTACT US!
Remove the installed separator plate on the bottom of the cabinet. The nuts will be used to install the separator plate in step 2.
STEP 2
Align the hole positions of the separator plate and the cabinet. Thread the M6 bolts through the holes and screw on the nuts that were disassembled in step 1.
STEP 3
Mount the key cabinet to the wall with the expansion screws according to the holes (Φ6mm) drilled in the wall.
STEP 4
Install the hanger segments on the cabinet. First the long side, then the short side.
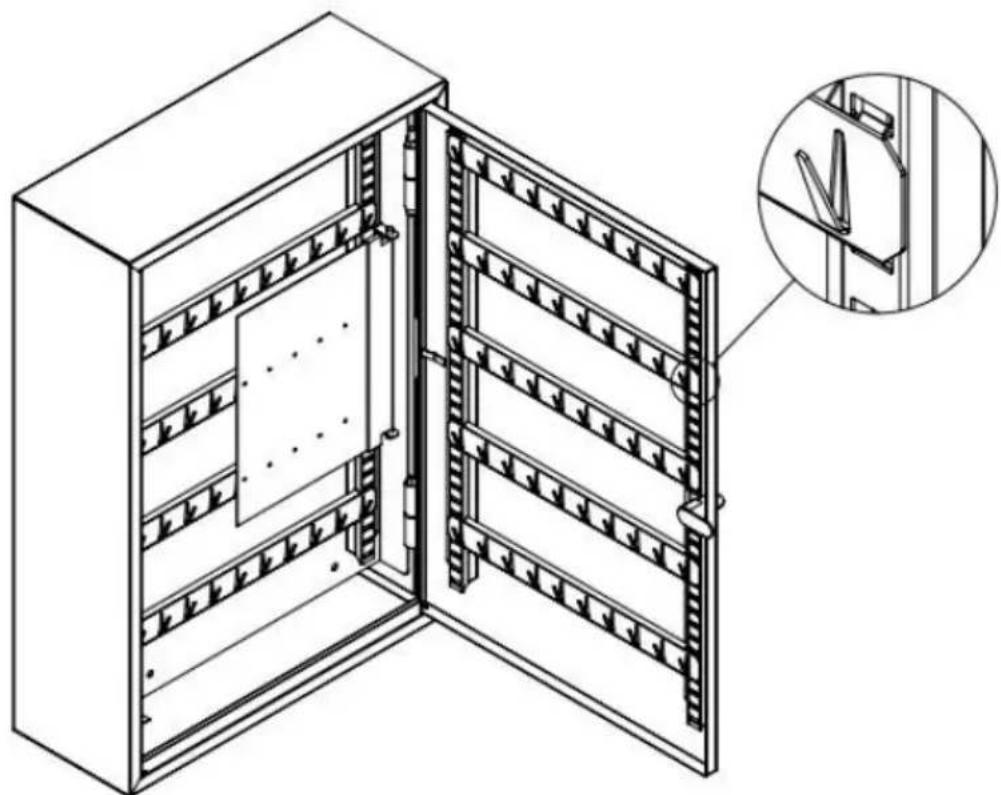
STEP 5
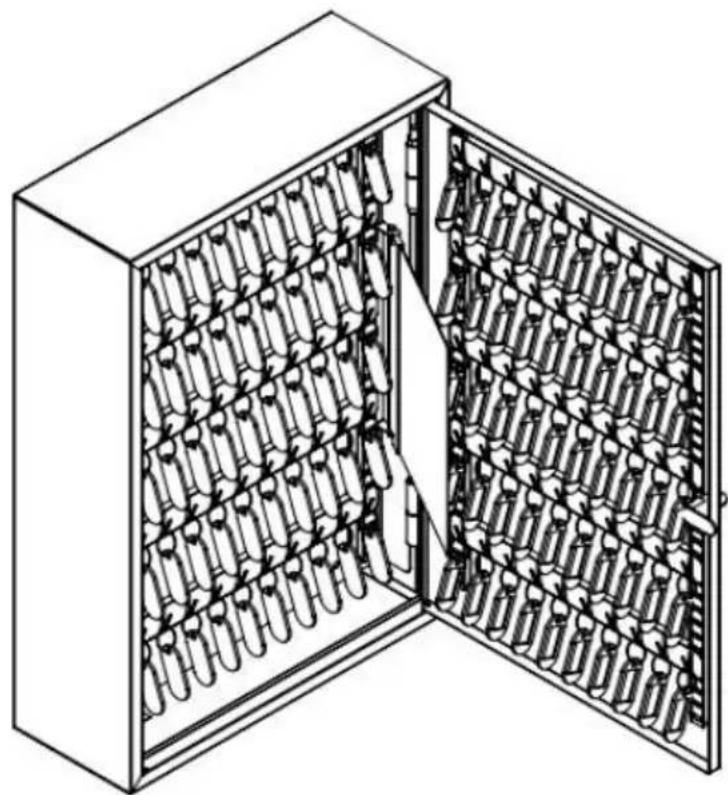
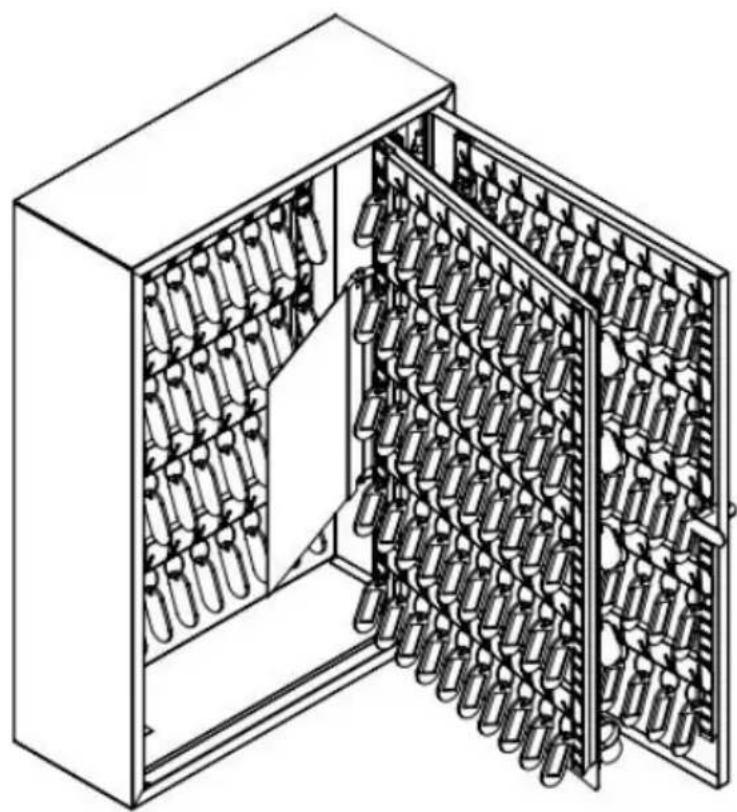
Then you can use the cabinet to hang keys as shown below.
Imported to AUS: SIHAO PTY LTD. 1 ROKEVA STREET EASTWOC NSW 2122 Australia
Imported to USA: Sanven Technology Ltd. Suite 250, 9166 Anaheim Place, Rancho Cucamonga, CA 91730
| EC | REP |
E-CrossStu GmbH
Mainzer Landstr. 69, 60329 Frankfurt am Main
| UK | REP |
YH CONSULTING LIMITED.
C/O YH Consulting Limited Office 147, Centurion House, London Road, Staines-upon-Thames, Surrey TW18 4AX
VEVOR®
TOUGH TOOLS, HALF PRICE
www.vevor.com/support
Brand : Vevor
Model : YX-K550-200
Category : Safe