
5MLTV2-12 - Heating cable Vevor - Free user manual and instructions
Find the device manual for free 5MLTV2-12 Vevor in PDF.
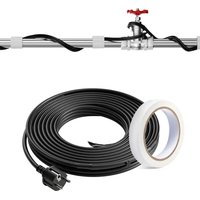


| Product Type | Self-regulating heating cable for pipe |
| Brand | Vevor |
| Model | 5MLTV2-12 |
| Supply Voltage | 230 V AC |
| Heating Cable Length | 3.7 m |
| Linear Power | 16.4 W/m at 10 °C |
| Power Cord Length | 2 m |
| Maximum Service Temperature | 65 °C |
| Thermostat Trigger Temperature | On < 6 ± 3 °C, Off > 13 ± 3 °C |
| Self-regulation | Yes |
| Pipe Compatibility | Metal and plastic (PEX, PVC) – do not use on flexible vinyl hoses |
| Recommended Insulation | At least 1/2 inch (1.27 cm) of fireproof insulation (preformed foam or fiberglass) |
| Required Electrical Protection | Residual-current circuit breaker (ground fault protection) |
| Use | Outdoor only, do not bury, do not use inside pipes |
| Certifications | CE |
| Installation | Fix with fiberglass tape, thermostat placed at the cold end, can be overlapped |
| Maintenance | Test insulation resistance (> 50 MΩ) before use and periodically |
| Spare Parts / Repairability | Not repairable; if damaged, replace the entire unit |
| Warranty | See www.vevor.com/support |
Frequently Asked Questions - 5MLTV2-12 Vevor
User questions about 5MLTV2-12 Vevor
0 question about this device. Answer the ones you know or ask your own.
Ask a new question about this device
Download the instructions for your Heating cable in PDF format for free! Find your manual 5MLTV2-12 - Vevor and take your electronic device back in hand. On this page are published all the documents necessary for the use of your device. 5MLTV2-12 by Vevor.
USER MANUAL 5MLTV2-12 Vevor
Technical Support and E-Warranty Certificate www.vevor.com/support
PIPE HEATING CABLE
MODEL:
We continue to be committed to provide you tools with competitive price.
"Save Half", "Half Price" or any other similar expressions used by us only represents an estimate of savings you might benefit from buying certain tools with us compared to the major top brands and does not necessarily mean to cover all categories of tools offered by us. You are kindly reminded to verify carefully when you are placing an order with us if you are actually saving half in comparison with the top major brands.
VEVOR®
TOUGH TOOLS, HALF PRICE
PIPE HEATING CABLE
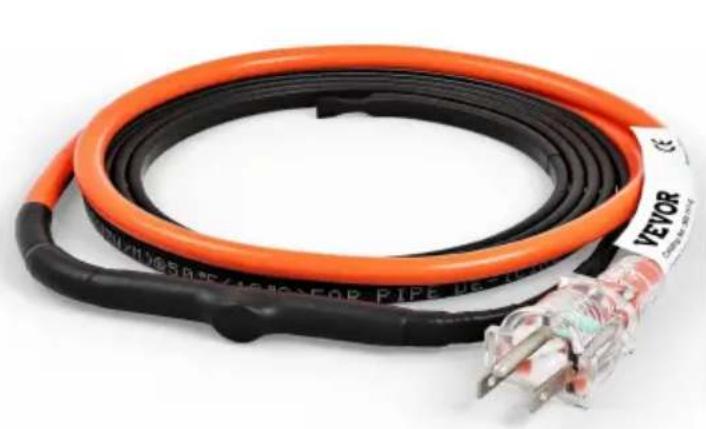
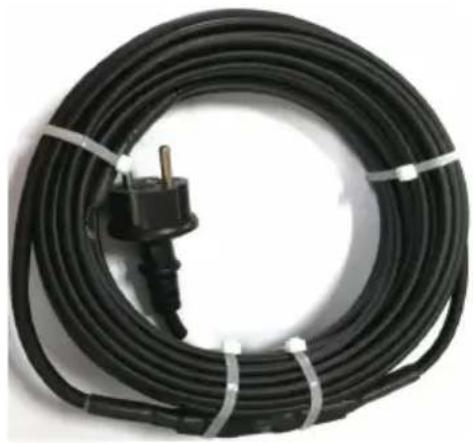
NA Version EU Version
NEED HELP? CONTACT US!
Have product questions? Need technical support? Please feel free to contact us:
Technical Support and E-Warranty Certificate www.vevor.com/support
This is the original instruction. Please read all manual instructions carefully before operating. VEVOR reserves a clear interpretation of the user manual. The appearance of the product shall be subject to the product you received. Please forgive us that we won't inform you if there are any technology or software updates on our product.
Information
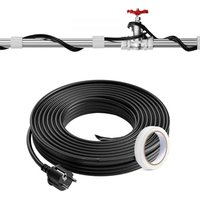
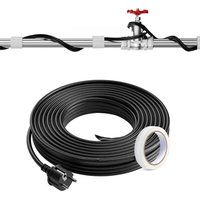
A special self-regulating core is at the center of MLTV Kit. This core is conductive and adjusts according to the surrounding temperatures. When it is cold, the cable's core has many conductive paths that generate enough heat to keep the water flowing in the pipe.
As the surrounding temperature warms, there are fewer conductive paths and heat is generated. This self-regulating technology ensures the right amount of heat is applied, when and where it's needed.
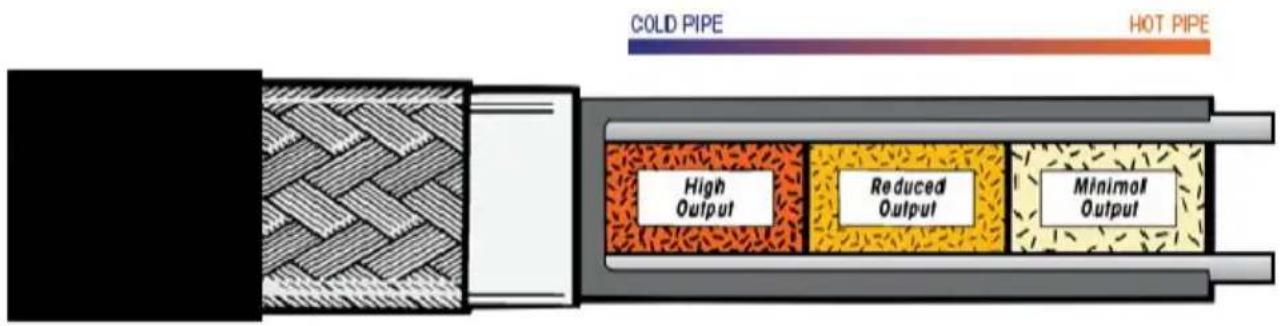
MLTV Kit
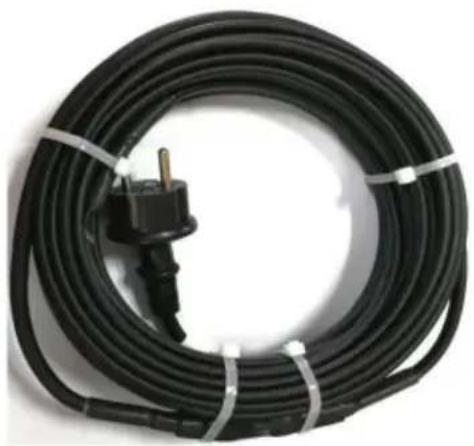
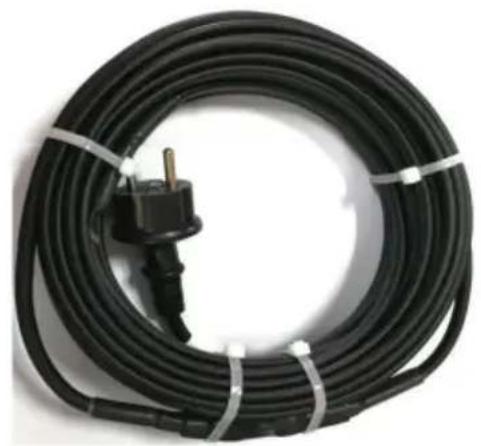
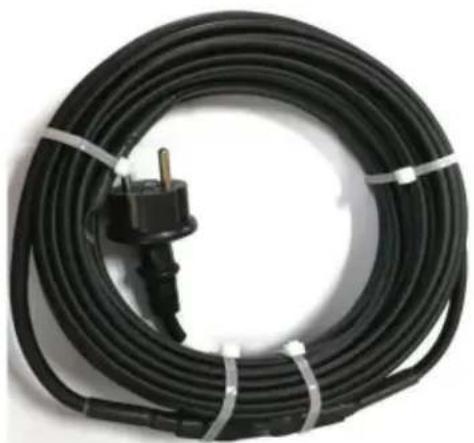
Pipe freeze prevention cable. Pre-terminated and self-regulating with plug. Nominal EU: 9.8 Watts/m at 10°C, 16.4 Watts/m at 10°C, 240 VAC. NA: 3 Watts/ft at 86°F, 5 Watts/ft at 50°F, 120 VAC.
MLTV Kit is engineered to vary its heat output with changes in surrounding temperature.
Because of the self-regulating feature of this cable, MLTV Kit can be wrapped over itself (overlapped), if necessary, when installed on pipes, valves or flanges.
Guard Against Unnecessary Frozen or Burst Water and Drain Pipes.
Automatically Regulates Heat Output To Save You Energy.
Can be Doubled & Overlapped For Easy Application.
Product operating temperature range
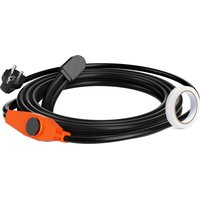
This product is controlled by a temperature sensor to detect temperature. It is working when the temperature is below 6 ± 3°C (43 ± 5°F) and stops working when the temperature is above 13 ± 3°C (55 ± 5°F). The light on when plugged in only indicates power on, and the operation is controlled by degree switch.
ACCESSORIES

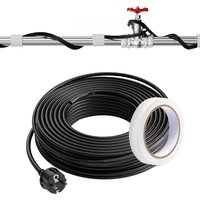
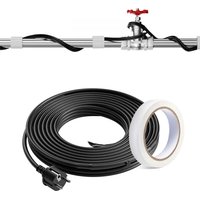
Fiberglass Tape
Assemble
Follow these 6 easy steps for a worry-free winter.
1. Collect Application Information
• Determine if your pipe is plastic or metal. • Measure the diameter of the pipe. • Measure the length of the pipe. • Count the valves and spigots.
2. Check Power Supply
- Verify that an electrical outlet is available within 2m (EU) / 3ft (NA) of the splice location on the pipe.
- It is recommended that the circuit supplying the heating cable have ground fault protection; this is mandatory by electrical code for some applications in many regions. Consult an electrical inspector to determine the specific ground fault requirements for your application prior to installation. If you are unsure that your circuit has ground fault protection, consult an electrician.
3. Review Temperature Selection Chart
- Locate the Lowest Expected Temperature
- Selection Chart you plan on using.
- Locate the pipe diameter of your plastic or metal pipe in that temperature
4. Select Your Cable Kit
• Refer to the information you collected in Step 1. • Take the measurement of the length of the pipe.
- Then add one foot (2.54 cm / 1 in) of cable for each valve or spigot you counted.
- Total this information to determine the cable length in feet of MLTV Kit cable you will need for this project.
- Select the MLTV Kit Pipe Freeze Prevention kit that most closely matches the cable length in feet per kit selection chart.
5. Additional Items Required
- Pipe/Cable must be covered with 1/2" (1.27 cm / 0.5 in) fiberglass (or equivalent non-flammable insulation).
- Use fiberglass tape to attach cable to pipe.
Product Information (NA Version)
| Catalog Number | Voltage/V | Heating Cable Length/ FT (±2%) | Watts/m @50°F | Power Cord Length/FT (±2%) | Maximum maintenance Temperature °F |
| 5MLTV1-3 | 120 | 3 | 5 | 3 | 150 |
| 5MLTV1-6 | 120 | 6 | 5 | 3 | 150 |
| 5MLTV1-9 | 120 | 9 | 5 | 3 | 150 |
| 5MLTV1-12 | 120 | 12 | 5 | 3 | 150 |
| 5MLTV1-15 | 120 | 15 | 5 | 3 | 150 |
| 5MLTV1-18 | 120 | 18 | 5 | 3 | 150 |
| 5MLTV1-24 | 120 | 24 | 5 | 3 | 150 |
| 5MLTV1-30 | 120 | 30 | 5 | 3 | 150 |
| 5MLTV1-40 | 120 | 40 | 5 | 3 | 150 |
| 5MLTV1-60 | 120 | 60 | 5 | 3 | 150 |
| 5MLTV1-80 | 120 | 80 | 5 | 3 | 150 |
| 5MLTV1-10 | 120 | 100 | 5 | 3 | 150 |
| 5MLTV1-12 | 120 | 120 | 5 | 3 | 150 |
Product Information (EU Version)
| Catalog Number | Voltage/V | Heating Cable Length/ | Watts/m @10°C | Power Cord Length/m | Maximum maintenance Temperature°C |
| 5MLTV2-6 | 230 | 1.83 | 16.4 | 2 | 65 |
| 5MLTV2-12 | 230 | 3.7 | 16.4 | 2 | 65 |
| 5MLTV2-18 | 230 | 5.5 | 16.4 | 2 | 65 |
| 5MLTV2-60 | 230 | 18.3 | 16.4 | 2 | 65 |
| 5MLTV2-80 | 230 | 24.4 | 16.4 | 2 | 65 |
| 5MLTV2-120 | 230 | 36.6 | 16.4 | 2 | 65 |
6. Thermostat Installation
- The thermostat (the splice of the heating cable) must be placed tightly against the pipe and secured with good quality fiberglass tape. The thermostat should be placed on the coldest end of the pipe and turn the cable on and off to promote economical operation.
We Make It Easy To Select Your Cable
Unshaded selections can run straight along the pipe.
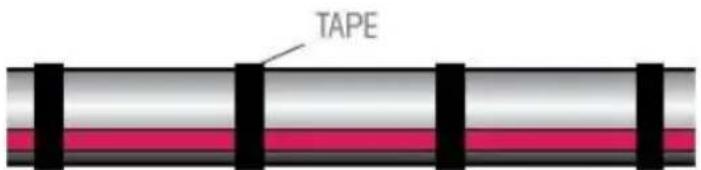
Bold shaded selections must be evenly spiraled along the pipe.
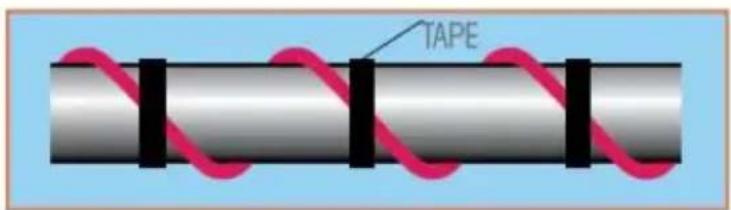
Table “A” Lowest Expected Temperature: 0 °F (NA Version)
| Plastic Pipe | Metal Pipe | |||||
| Diameter | 1/2”(0.5in) | 3/4”(0.75in) | 1”(1in) | 1/2”(0.5in) | 3/4”(0.75in) | 1”(1in) |
| Model | Plastic Pipe Length | Metal Pipe Length | ||||
| 3ft | 1.5-2.7ft | 1.5-2.4ft | 1.2-2.1ft | 1.5-2.7ft | 1.5-2.4ft | 1.2-2.1ft |
| 6ft | 3.0-5.4ft | 3.0-4.8ft | 2.4-4.2ft | 3.0-5.4ft | 3.0-5.4ft | 3.0-5.4ft |
| 9ft | 4.5-8.1ft | 4.5-7.2ft | 3.6-6.3ft | 4.5-8.1ft | 4.5-8.1ft | 4.5-8.1ft |
| 12ft | 8.1-11.4ft | 7.2-9.6ft | 6.3-8.1ft | 8.1-11.4ft | 8.1-11.4ft | 8.1-11.4ft |
| 15ft | 10.2-14.1ft | 9-12ft | 8.1-9,9ft | 10.2-14.1ft | 10.2-14.1ft | 10.2-14.1ft |
| 18ft | 13.5-17.1ft | 11.7-15.3ft | 9.9-13.5ft | 13.5-17.1ft | 13.5-17.1ft | 13.5-17.1ft |
| 24ft | 16.5-22.8ft | 15.3-20.4ft | 13.2-18ft | 16.5-22.8ft | 16.5-22.8ft | 16.5-22.8ft |
| 30ft | 20.7-28.5ft | 19.2-25.5ft | 16.5-22.5ft | 21.3-28.5ft | 21.3-28.5ft | 21.3-28.5ft |
| 40ft | 26.9-37.1ft | 25.3-37.3ft | 21.5-32.3ft | 26.9-37.1ft | 25.3-37.3ft | 21.5-32.3ft |
| 60ft | 39.9-59.1ft | 36.9-54.6ft | 31.2-47.1ft | 39.9-59.1ft | 39.9-59.1ft | 39.9-59.1ft |
| 80ft | 53.7-79.1ft | 50.6-74.5ft | 42.9-64.6ft | 53.7-79.1ft | 53.7-79.1ft | 53.7-79.1ft |
| 100ft | 66.7-99.2ft | 62.9-93.3ft | 53.0-80.6ft | 66.7-99.2ft | 66.7-99.2ft | 66.7-99.2ft |
| 120ft | 80.1-119.1ft | 75.2-112.7ft | 63.1-97.9ft | 80.1-119.1 ft | 80.1-110.1ft | 80.1-119.1ft |
Table “B” Lowest Expected Temperature: -20 °F (NA Version)
| Plastic Pipe | Metal Pipe | |||||
| Diameter | 1/2"(0.5in) | 3/4"(0.75in) | 1"(1in) | 1/2"(0.5in) | 3/4"(0.75in) | 1"(1in) |
| Model | Plastic Pipe Length | Metal Pipe Length | ||||
| 3ft | 1.5-2.7ft | 1.5-2.4ft | 1.2-2.1ft | 1.5-2.7ft | 1.5-2.4ft | 1.2-2.1ft |
| 6ft | 2.4-3.6ft | 2.4-3.3ft | 2.4-3ft | 3.0-5.4ft | 3.0-5.4ft | 3.0-5.4ft |
| 9ft | 3.6-5.4ft | 3.3-4.5ft | 3-3.6ft | 4.5-8.1ft | 4.5-7.2ft | 3.6-6.3ft |
| 12ft | 5.4-7.2ft | 4.5-6.3ft | 3.6-5.7ft | 8.1-11.4ft | 7.2-10.5ft | 6.3-9.6ft |
| 15ft | 7.2-9.0ft | 6.3-8.1ft | 5.1-7.2ft | 10.2-14.1ft | 9.3-13.2ft | 8.1-12.3ft |
| 18ft | 9.0-11.91ft | 8.1-9.9ft | 7.2-9.0ft | 13.5-17.1ft | 12.6-16.2ft | 11.7-13.5ft |
| 24ft | 11.7-15.6ft | 9.9-13.2ft | 9.0-12.0ft | 17.1-22.8ft | 16.2-21.6ft | 13.5-18ft |
| 30ft | 15.6-19.8ft | 13.2-17.4ft | 12.0-15.3ft | 22.8-29.4ft | 21.6-27.3ft | 18.0-22.8ft |
| 40ft | 26.9-37.1ft | 25.3-37.3ft | 21.5-32.3ft | 26.9-37.1ft | 25.3-37.3ft | 21.5-32.3ft |
| 60ft | 30.0-40.8ft | 26.4-35.4ft | 22.8-31.2ft | 44.7-59.4ft | 41.1-54.6ft | 34.5-46.5ft |
| 80ft | 43.5-54.7ft | 37.8-47.0ft | 33.3-41.9ft | 63.4-79.4ft | 58.2-73.0ft | 49.6-62.4ft |
| 100ft | 54.4-68.4ft | 47.1-58.8ft | 42.1ft-52.6ft | 79.9-99.4ft | 72.4-90.7ft | 62.2-77.8ft |
| 120ft | 64.8-82.1ft | 56.5-70.6ft | 50.5-63.1ft | 95.9-119.3ft | 86.9-108.8ft | 74.6-93.4ft |
Table “A” Lowest Expected Temperature: -18 °C (EU Version)
| Plastic Pipe | Metal Pipe | |||||
| Diameter | 1/2”(1.27cm) | 3/4”(1.91cm) | 1”(2.54cm) | 1/2”(1.27cm) | 3/4”(1.91cm) | 1”(2.54cm) |
| Model | Plastic Pipe Length | Metal Pipe Length | ||||
| 1.83m | 0.92-1.65m | 0.92-1.5m | 0.73-1.3m | 0.92-1.65m | 0.92-1.65m | 0.92-1.65m |
| 3.7m | 2.5-3.5m | 2.2-3m | 2m-2.5m | 2.5-3.5m | 2.5-3.5m | 2.5-3.5m |
| 5.5m | 4.2-5.3m | 11.7-15.3ft | 9.9-13.5ft | 4.2-5.3m | 4.2-5.3m | 4.2-5.3m |
| 18.3m | 12.2-18.02m | 11.25-16.64m | 9.51-14.36m | 12.2-18.02m | 12.2-18.02m | 12.2-18.02m |
| 24.4m | 53.7-79.1ft | 15.42-22.7 | 13.1-19.7m | 16.37-24.11m | 16.37-24.11m | 16.37-24.11m |
| 36.6m | 24.41-36.3m | 22.92-34.35m | 19.23-29.84m | 24.41-36.3m | 24.41-36.3m | 24.41-36.3m |
Table “B” Lowest Expected Temperature: -29 °C (EU Version)
| Plastic Pipe | Metal Pipe | |||||
| Diameter | 1/2”(1.27cm) | 3/4”(1.91cm) | 1”(2.54cm) | 1/2”(1.27cm) | 3/4”(1.91cm) | 1”(2.54cm) |
| Model | Plastic Pipe Length | Metal Pipe Length | ||||
| 1.83m | 0.73-1.1m | 0.73-1m | 0.73-0.92m | 0.92-1.65m | 0.92-1.65m | 0.92-1.65m |
| 3.7m | 1.65-2.2m | 1.37-1.92m | 1.1-1.74m | 2.5-3.5m | 7.2-10.5ft | 6.3-9.6ft |
| 5.5m | 2.74-3.63m | 2.45-3.02m | 2.2-2.74m | 4.11-5.21m | 3.84-4.94m | 3.57-4.11m |
| 18.3m | 9.1-12.4m | 8-10.8m | 6.9-9.5m | 13.6-18.1m | 12.5-16.6m | 10.5-14.2m |
| 24.4m | 13.3-16.67m | 11.5-14.32m | 10.15-12.77m | 19.32-24.2m | 17.74-22.25m | 15.12-19.02m |
| 36.6m | 20.85-25m | 17.2-21.52m | 15.4-19.23m | 29.23-36.36m | 26.5-33.2m | 22.73-28.5m |
Example:
- If lowest expected temperature: °C (29 °F), choose Table "B"
- If the material of the pipe is plastic, and the diameter of the pipe is 1/2" (1.27 cm / 0.5 in), and the length of the pipe is between 0.73-1.1 m (2.4-3.6 ft).
- Then we choose Model 1.83m (6ft).
This system can be installed with confidence that it will operate for years without requiring service. All components are made of the highest quality material and tested during critical points in the manufacturing process.
The thermostat (the splice of the heating cable) must be placed tightly against the pipe and secured with good quality fiberglass tape. The thermostat should be placed on the coldest end of the pipe and turn the cable on and off to protect economical operation.
General requirements
- MLTV heating cables may be used on metal and plastic water pipes (such as PEX pipeline, PVC pipeline), but not on flexible vinyl tubing (such as garden hoses).
- MLTV heating cables are not intended for use inside any pipes, for freeze protection of liquids other than water, or for use in classified hazardous locations.
- Install with a minimum of 1/2" fire-resistant, waterproof thermal insulation.
- Never use on any pipes that may exceed (150°F).
- You can install the product plug on the socket or regulator. But it cannot or damage the heating cable.
- Do not use inside the tube, can only be used outside the tube.
- Do not use pipe-heating cable for roof and gutter deicing application.
- Do not use by burying underground.
- Tape can be directly used on polyethylene pipes, but electrical tape cannot be used.
- Install only in accessible locations; do not install behind walls or where the cable would be hidden.
- Do not run the heating cable through walls, ceilings, or floors.
- Connect only to ground-fault protected outlets that have been installed in accordance with all prevailing national and local codes and standards and are protected from rain and other water.
Electrical codes
Articles 422 and 427 of the National Electrical Code (NEC), and Part 1, Sec of the Canadian Electrical Code (CEC), govern the installation of MLTV heating cable for pipe freeze protection and must be followed.
Important: For the Xuhui warranty to be valid, you must comply with all the requirements outlined in these guidelines.
All thermal and design information provided here is based upon a “standard” installation with heating cable fastened to an insulated pipe.
Determine which MLTV heating cable you need for pipe freeze protection:

Add 1 foot to your pipe length for each valve or spigot on your pipe. The lowest outside temperature is °C (0°F), need a minimum of 1/2" thick water
Warning: Fire and Shock Hazard. This product is an electrical device that must be installed correctly to ensure proper operation and to prevent shock or fire. Read these important warnings and carefully follow all the installation instructions.
- When used with non-metallic conduit/pipe, the softening temperature of the non-metallic conduit/pipe shall be greater than (185°F).
- To minimize the danger of fire from sustained electrical arcing if the heating cable is damaged or improperly installed, and to comply with the requirements of Xuhui agency certifications, and national electrical codes, ground fault equipment protection must be used on each heating cable branch circuit. Arcing may not be stopped by conventional circuit protection.
- For pipe freeze protection applications, use only fire-resistant insulation materials such as preformed foam or fiberglass.
- Do not damage the heating cable and power cord or plug. Remove any damaged cables from service immediately.
- Do not use any wire or metal clamps to attach the cable to the pipe. Use fiberglass tape (1/2 inch wide to 1 inch wide).
- Do not install the heating cable underneath any roof covering for roof and de-icing.
- Leave these installation instructions with the user for future reference.
Installation
1. Prepare for installation.
- Store the heating cable in a clean, dry place.
- Complete piping pressure test.
- Prior to installing the cable, remove any sharp surfaces on the pipe that could damage the heating cable.
- Review the MLTV heating cable design and compare to materials received to verify that you have the proper MLTV heating cable.
- Walk the system and plan the routing of the MLTV heating cable on the pipe.
- Heating cables can be installed in a cross overlapping manner in areas with lower temperatures, such as valves, flanges, etc. (Figure 1).
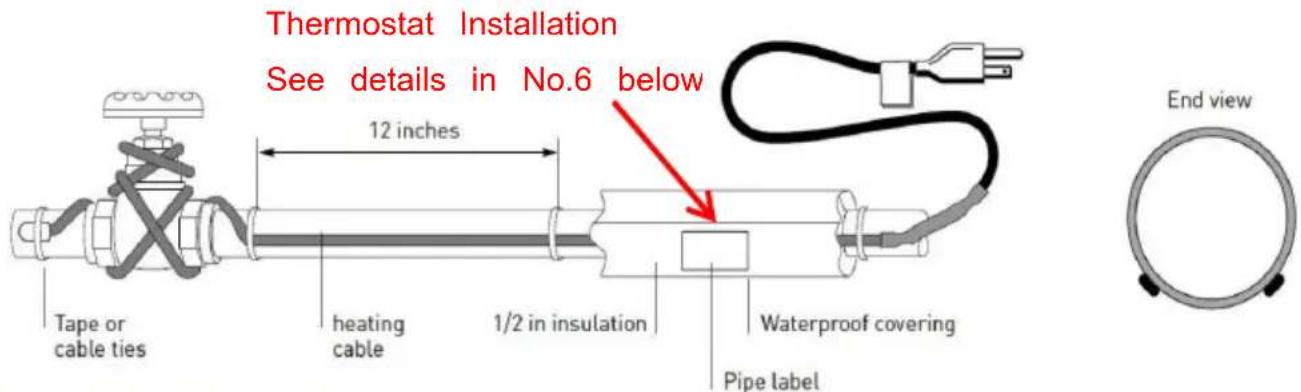
Figure 1. Straight-traced installation
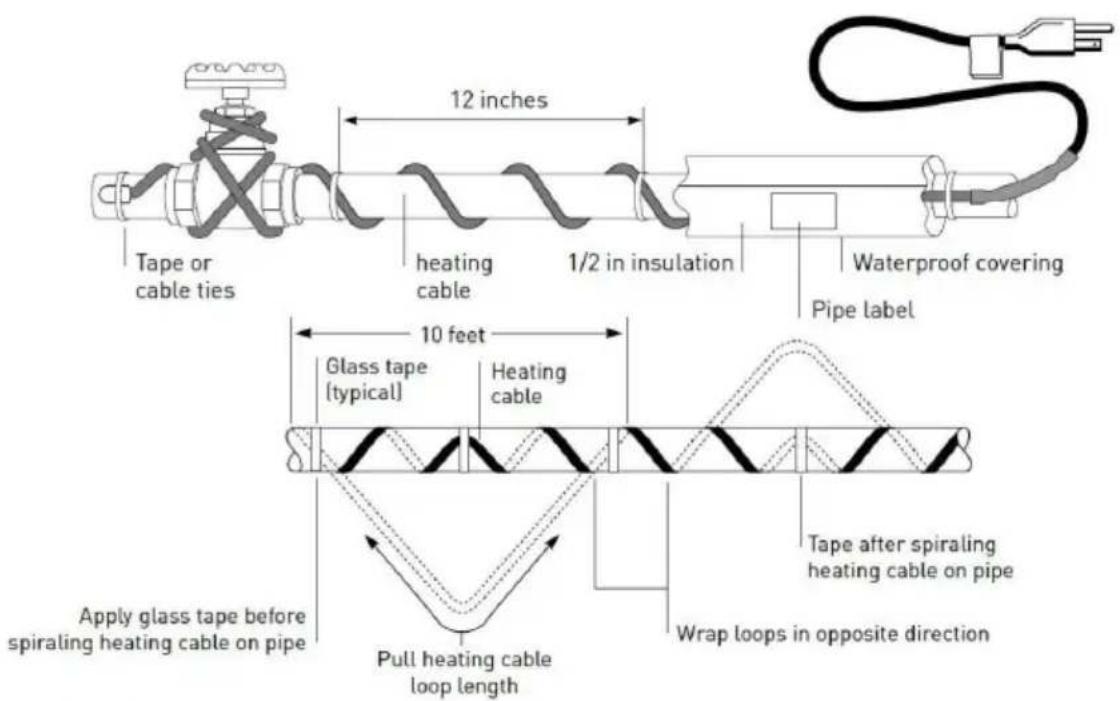
Figure 2. Spiral-traced installation
2. Position and attach heating cable to pipe.
- Be sure all piping to be traced is dry.
- Install heating cable, using straight tracing (Figure 1) or spiraling (Figure 2).
- For straight tracing, install the heating cable on a lower half of the pipe; for example, in the 4 o'clock or 8 o'clock position.
- Be sure to install the additional heating cable required for valves, flanges, as shown in Figures 1 and 2.
- When the design calls for spiraling, begin by suspending a loop every 10 feet as shown in Figure 2. To determine the loop length, divide the MLTV length by your pipe length and multiply by 10. For example, if you are using a 15.24 m (50 ft) MLTV on a 40-foot pipe, leave a 3.66 m (12 ft) loop of heating cable at every 3.1 m (10 ft) section of pipe. Grasp the loop in its center and wrap it around the pipe. Even out the distance between spirals by sliding the wraps along the pipe. Use fiberglass tape to secure the center of the loop to the pipe.
Fasten MLTV heating cable to the pipe at 1-foot intervals using fiberglass application tape or nylon cable ties. Do not use vinyl electrical tape, duct tape, metal bands, or wire.
If excess cable remains at the end of the pipe, double it back along the pipe.
3. Check the installation.
Prior to installing thermal insulation, make sure the heating cable is free of mechanical damage (from cuts, clamps, etc.) and thermal damage (from soldering, overheating, etc.).
4. Install thermal insulation.
- A reliable MLTV system depends on properly installed and dry, weatherproof thermal insulation.
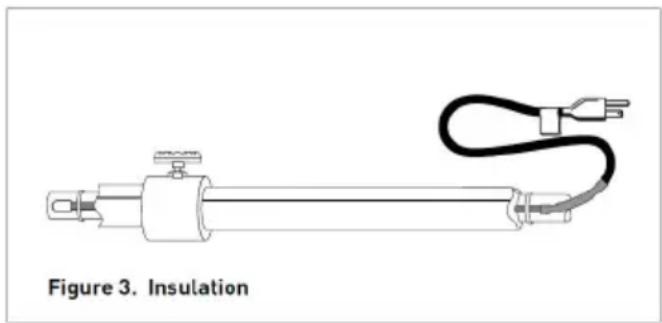
- Ensure that at least 1/2" of preformed foam or equivalent thermal insulation is used and that all piping, including valves, joints, and wall penetrations, has been fully insulated as shown in Figure 3.
- For protection to -20°F (-20°C), use 1" thick insulation.
- Install the insulation on the piping as soon as possible to minimize the potential for mechanical damage after installation.
- Be sure the MLTV label is visible on the outside of the thermal insulation.
5. Finishing the installation.
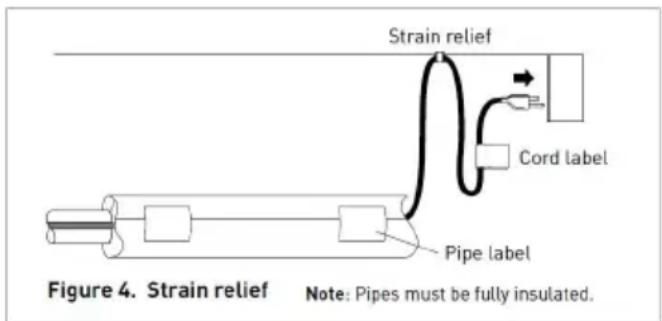
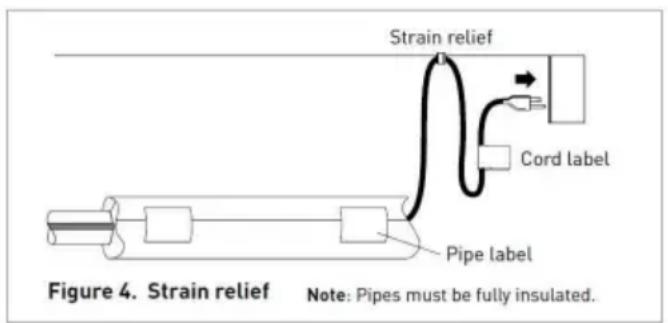
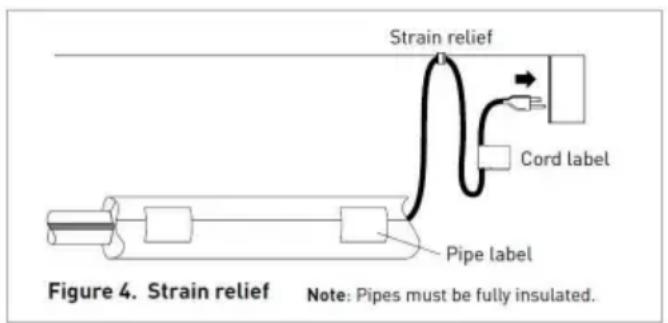
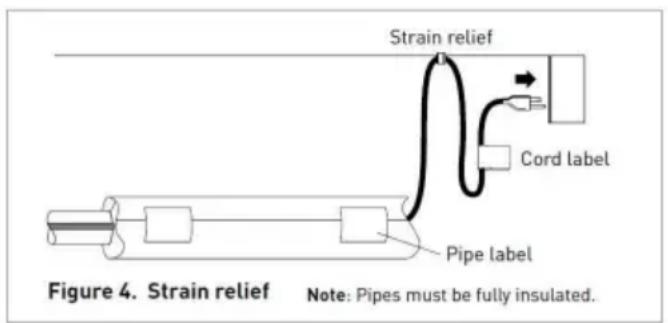
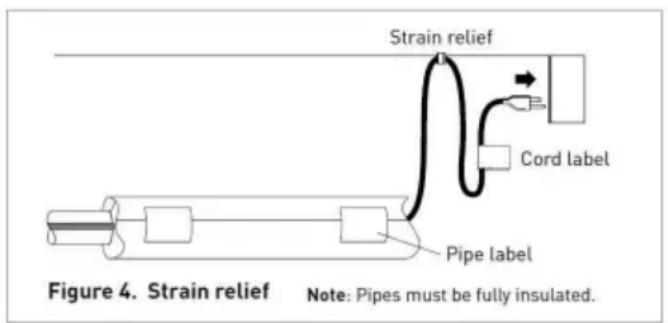
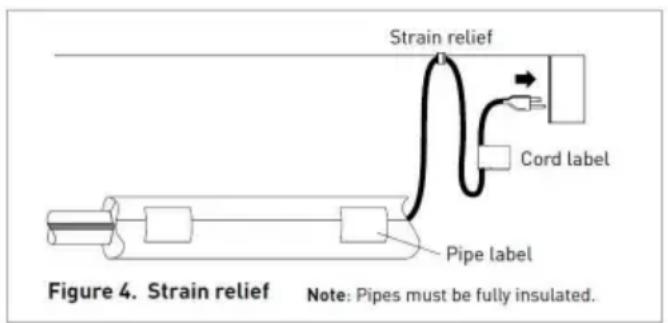
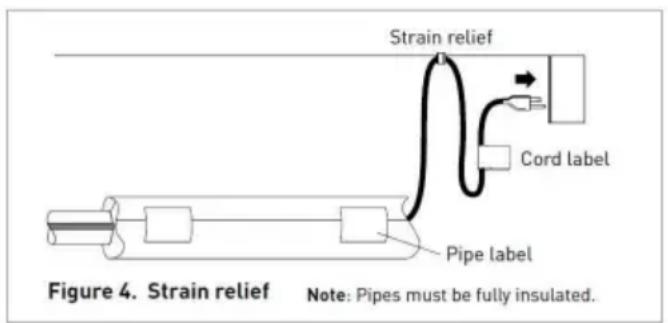
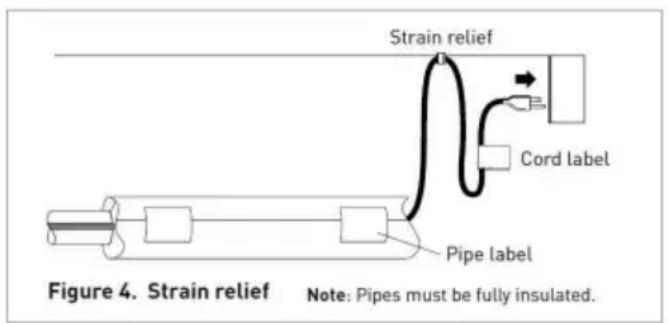
- To prevent damage to the heating cable or cord, secure the power cord (lead) with fiberglass tape as shown in Figure 4.
- Two labels indicating the presence of electric pipe heating cable are included with the heating cable. Attach the two “Electric Traced” labels on the outer section of the pipe insulation at suitable intervals to indicate the presence of MLTV heating cable.
6. Thermostat installation
The thermostat (the splice of the heating cable) must be placed tightly against the pipe and secured with good quality fiberglass tape. The thermostat should be placed on the coldest end of the pipe and turn the cable on and off to protect economical operation.
7. Starting the system.
- Xuhui recommends that the system be tested as described in the “Cable testing and maintenance” section below.
- Plug the heating cable into a ground-fault protected outlet.
- Check the circuit breaker to verify power to the cable.
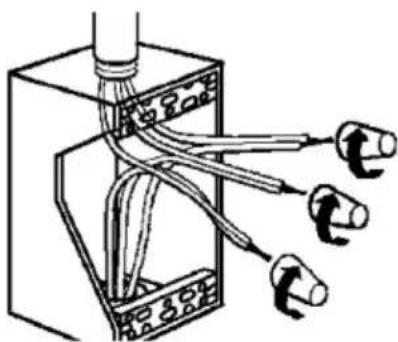
- Standing water in the pipe should feel warm within an hour. - For MLTV with power cord but without plug, using CE certified or UL Listed Type 4X junction box and outlet bushing and wire nuts (suitable for 12 to 1 wire size), connect the black and white cold leads to both phase wires and green cold lead to ground. - Check the circuit breaker to verify power to the cable.

Warning: De-energize circuit before servicing.
Cable testing and maintenance
Using a 500-Vdc megohmmeter, check the insulation resistance between both the rectangular (power, or black and white wire) prongs on the plug and the (ground, or green wire) prong after installing the heating cable. Minimum read should be 50 megohms.
Record the original values for each circuit, and compare subsequent readings taken during regular maintenance schedules to the original values.
If the readings fall below 50 megohms, replace the MLTV cable with a new one. Do not attempt to repair the unit.

Warning: Fire and Shock Hazard.
Damaged heating cable can cause electrical shock, arcing, and fire. Do not attempt to repair or energize damaged heating cable. Remove it at once and replace with a new length.
Troubleshooting
| Symptom | Probable Causes | Corrective Action |
| Heating cable doesn’t work | No voltage.Circuit breaker tripped. | Check circuit breaker.Ensure not too many cables or other appliances connected on the same circuitChange a right size of circuit break for the heating cable. |
| Pipe or roof freezed | Power on heating cable too late | Power on heating cable before temperature down to 0°C(32°F) and keep it work in low temp. |
VEVOR®
TOUGH TOOLS, HALF PRICE
Technical Support and E-Warranty Certificate
www.vevor.com/support
VEVOR®
TOUGH TOOLS, HALF PRICE
Version UEVersion NA
BESOIN D'AIDE ? CONTACTEZ-NOUS!
Kit MLTV
Figure 1. Straight-traced installation
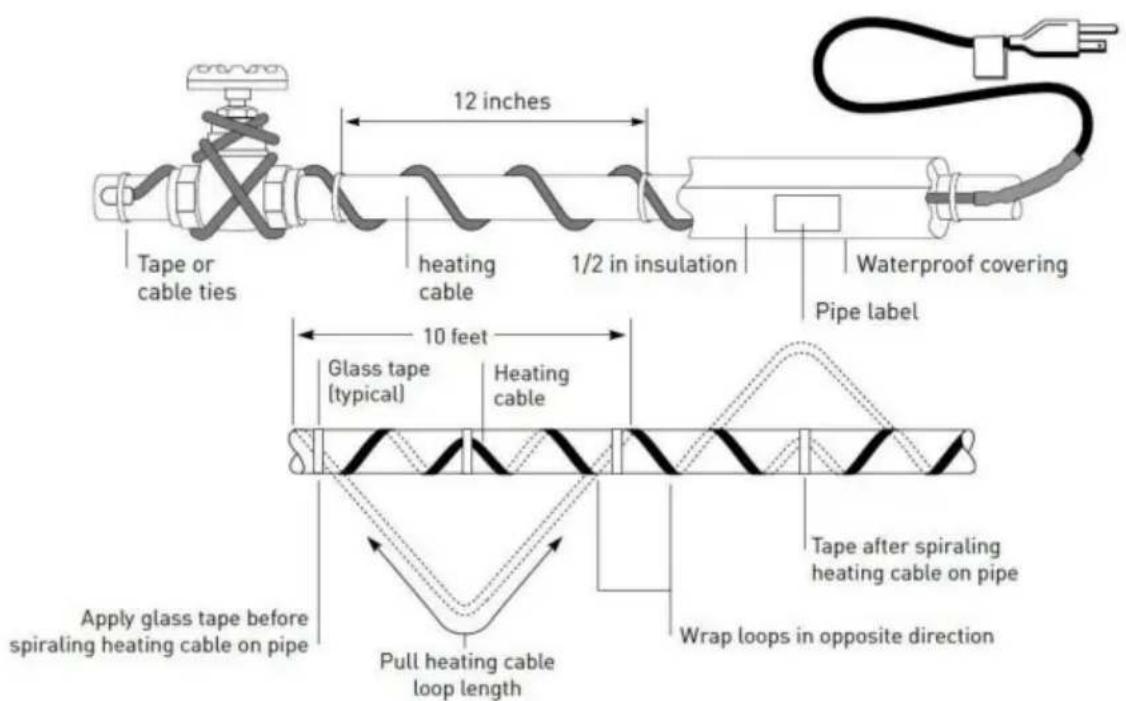
Figure 2. Spiral-traced installation
EU Version / NA Version
MLTV Kit
Fiber optic tape
Mounting
Figure 1. Straight-traced installation
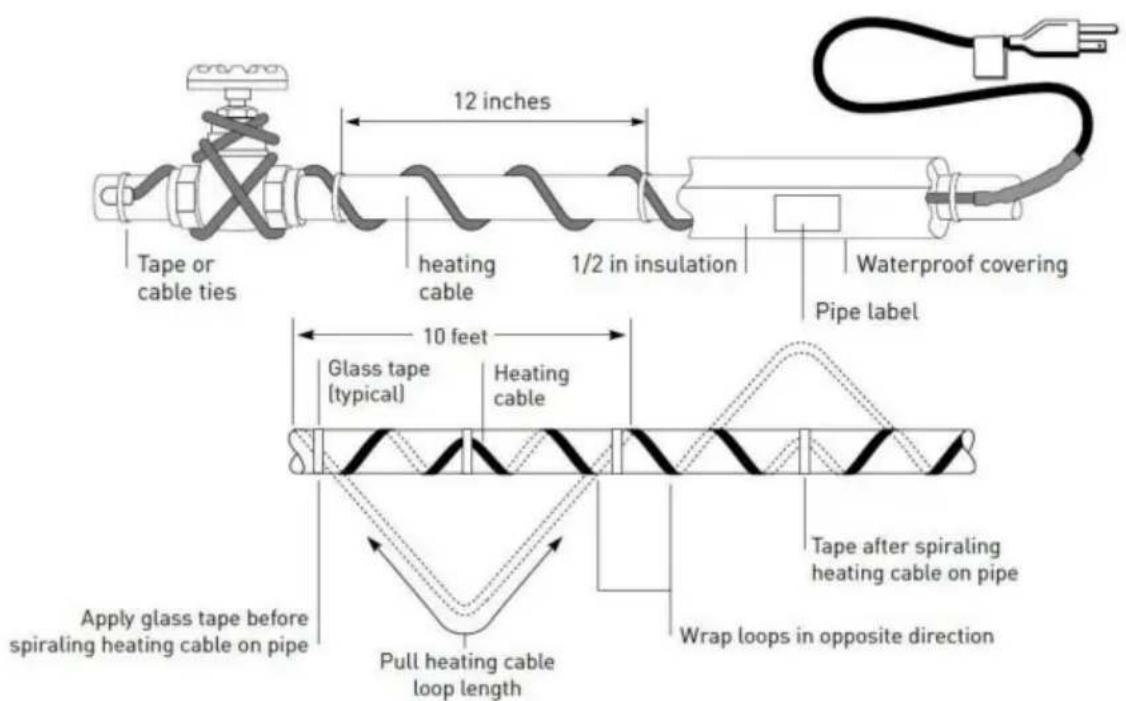
Figure 2. Spiral-traced installation
www.vevor.com/support
VEVOR®
TOUGH TOOLS, HALF PRICE
EU Version / NA Version
MLTV Kit
Figure 1. Straight-traced installation
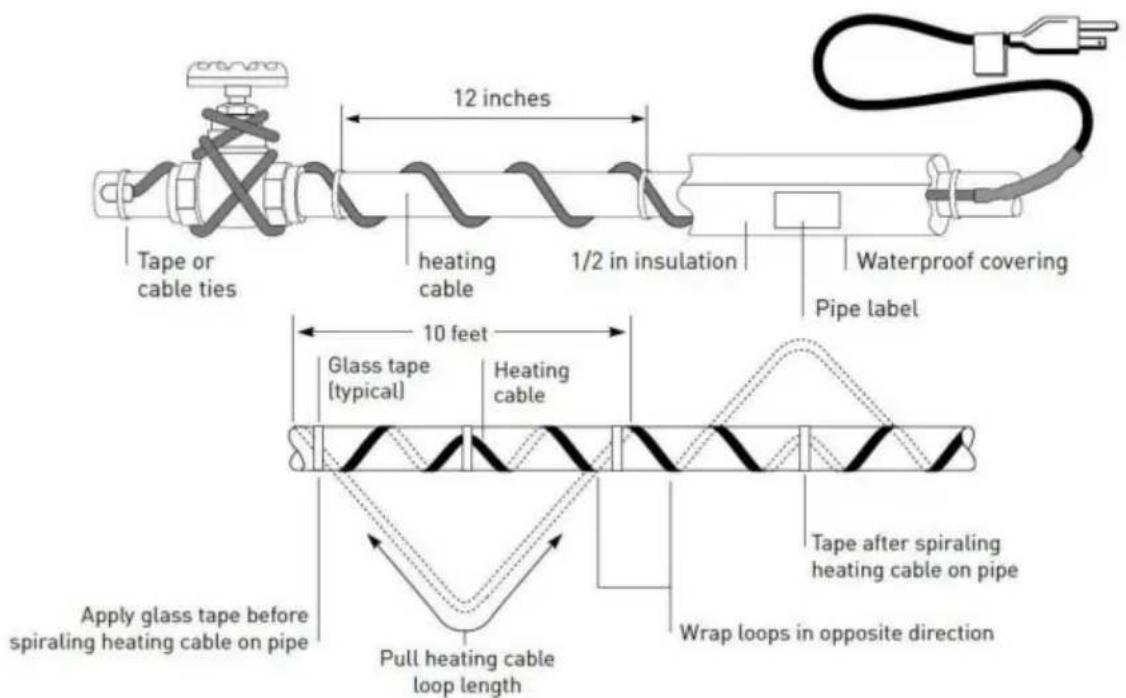
Figure 2. Spiral-traced installation
Electronics www.vevor.com/support
VEVOR®
TOUGH TOOLS, HALF PRICE
MLTV Kit
Figure 1. Straight-traced installation
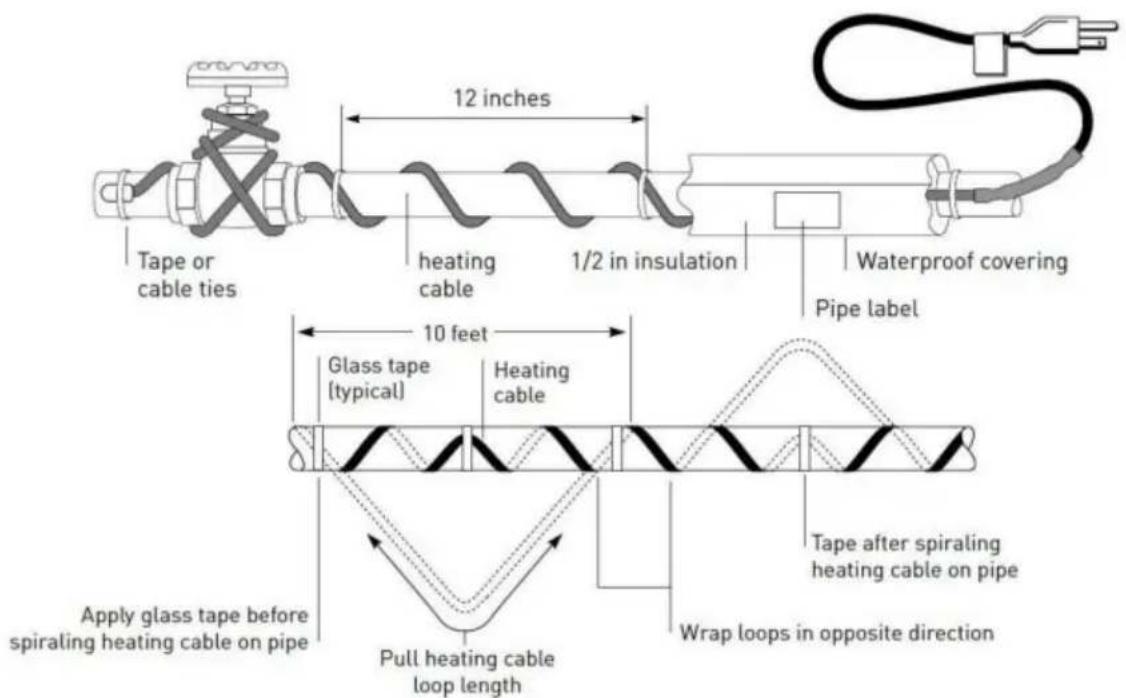
Figure 2. Spiral-traced installation
UE Version NA Version
NEED HELP? CONTACT US!
MLTV Kit
Figure 1. Straight-traced installation
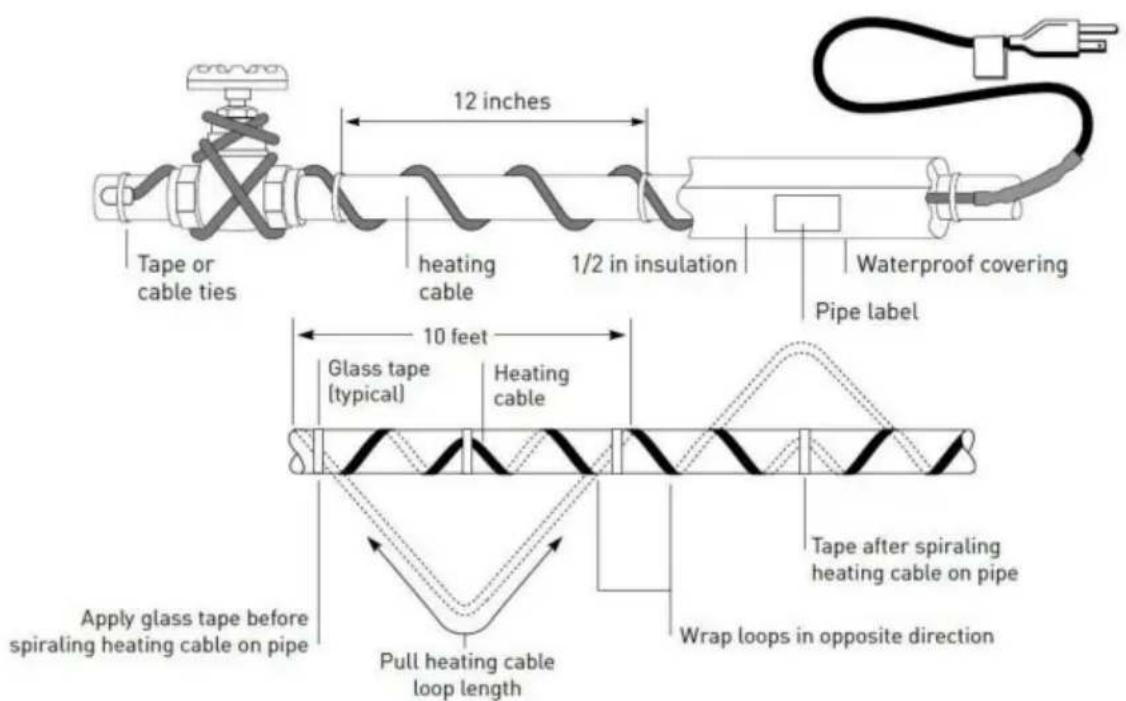
Figure 2. Spiral-traced installation
www.vevor.com/support
VEVOR®
TOUGH TOOLS, HALF PRICE
Technical support and e-warranty certificate www.vevor.com/support
PIPE HEATING CABLE
MODEL:
NA-VERSION: 5MLTV1-3, 5MLTV1-9, 5MLTV1-12, 5MLTV1-15, 5MLTV1-40, 5MLTV1-6, 5MLTV1-18, 5MLTV1-24, 5MLTV1-30, 5MLTV1-60, 5MLTV1-80, 5MLTV1-100, 5MLTV1-120
EU-VERSION: 5MLTV2-6, 5MLTV2-12, 5MLTV2-18, 5MLTV2-60, 5MLTV2-80, 5MLTV2-120
NA version
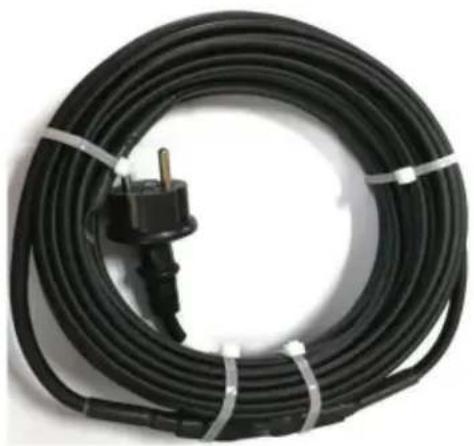
EU version
NEED HELP? CONTACT US!
MLTV kit
Fiberglass tape
Mounting
Figure 1. Straight-traced installation
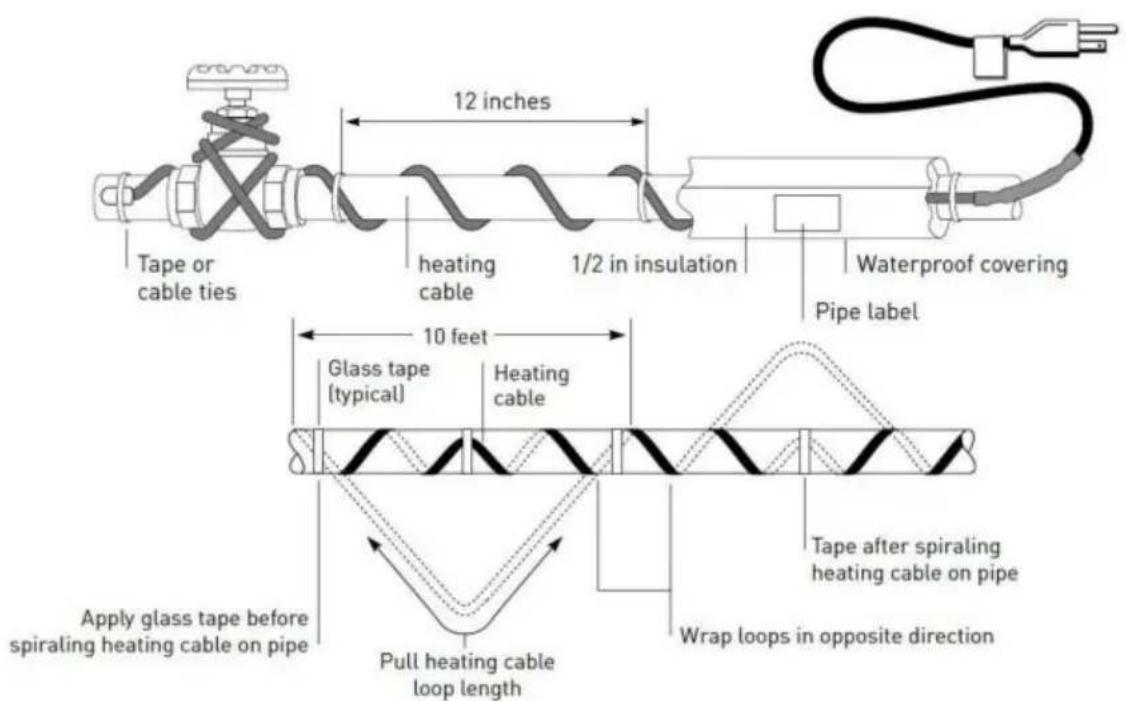
Figure 2. Spiral-traced installation
warranty certificate www.vevor.com/support
VEVOR®
TOUGH TOOLS, HALF PRICE
EU version NA version
NEED HELP? CONTACT US!
MLTV kit
Fiberglass tape
Mounting
Figure 1. Straight-traced installation
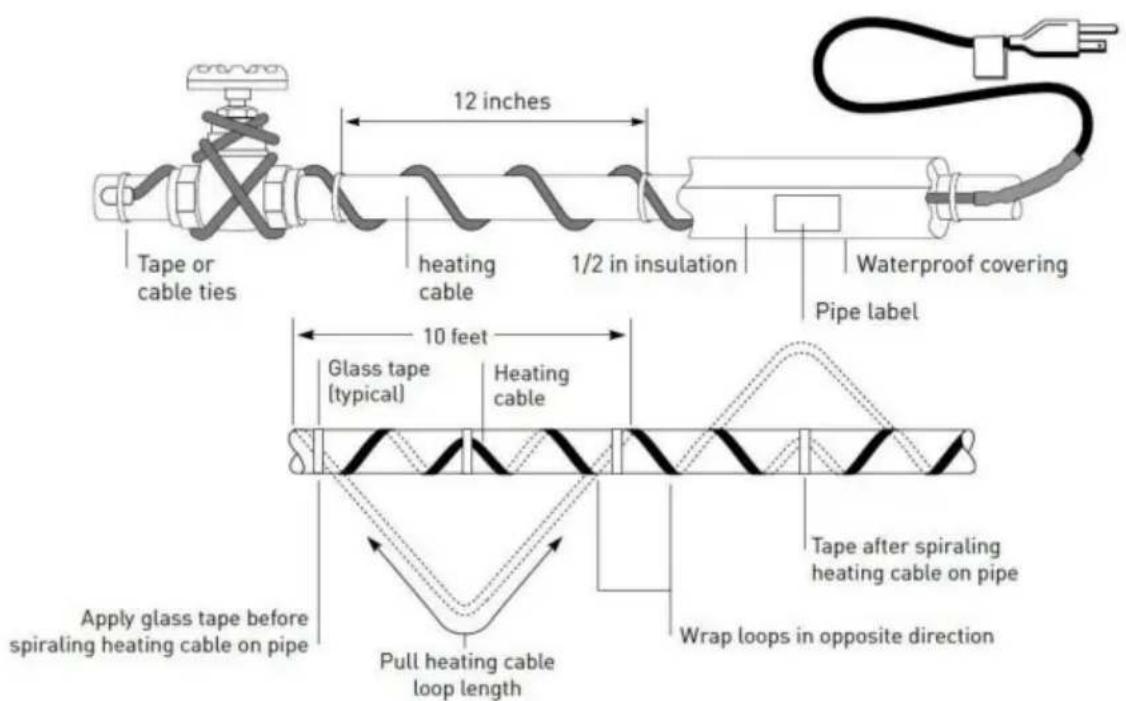
Figure 2. Spiral-traced installation
4. Install thermal insulation.
www.vevor.com/support
- PIPE HEATING CABLE
- VEVOR®
- NEED HELP? CONTACT US
- INFORMATION
- MLTV KIT
- PRODUCT OPERATING TEMPERATURE RANGE
- ACCESSORIES
- ASSEMBLE
- COLLECT APPLICATION INFORMATION
- CHECK POWER SUPPLY
- REVIEW TEMPERATURE SELECTION CHART
- SELECT YOUR CABLE KIT
- ADDITIONAL ITEMS REQUIRED
- THERMOSTAT INSTALLATION
- WE MAKE IT EASY TO SELECT YOUR CABLE
- EXAMPLE
- GENERAL REQUIREMENTS
- ELECTRICAL CODES
- DETERMINE WHICH MLTV HEATING CABLE YOU NEED FOR PIPE FREEZE PROTECTION
- INSTALLATION
- PREPARE FOR INSTALLATION
- POSITION AND ATTACH HEATING CABLE TO PIPE
- CHECK THE INSTALLATION
- INSTALL THERMAL INSULATION
- FINISHING THE INSTALLATION
- STARTING THE SYSTEM
- CABLE TESTING AND MAINTENANCE
- WARNING: FIRE AND SHOCK HAZARD
- TOUGH TOOLS, HALF PRICE
- BESOIN D'AIDE ? CONTACTEZ-NOUS
- KIT MLTV
- MOUNTING
Brand : Vevor
Model : 5MLTV2-12
Category : Heating cable