AL370 - Safe Vevor - Free user manual and instructions
Find the device manual for free AL370 Vevor in PDF.

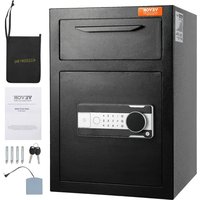
| Brand | Vevor |
| Model | AL370 |
| Product type | Handgun safe |
| Dimensions (W × H × D) | 370 × 190 × 86 mm |
| Power supply | 6 V DC (4 AA batteries) |
| Capacity | 1 handgun |
| Opening method | Numeric keypad (3-6 digit code), fingerprint reader (up to 100 fingerprints), backup key |
| Factory code | 1234 |
| Audible alarm | Triggered after 3 wrong codes or 5 wrong fingerprints, duration 30 seconds, lockout 1 minute then 5 minutes |
| Silent mode | Yes, activated by pressing "4" button for 2 seconds |
| Low battery indicator | Red LED flashes 6 times upon electronic opening |
| Material | Steel |
| Mounting | Wall mount included, fixing with thumbscrew (wood recommended) |
| Interior foam | Adjustable to fit the weapon |
| Maximum number of fingerprints | 100 |
| Battery type | 4 AA batteries (alkaline recommended) |
| Battery replacement | Remove used batteries, observe polarity (+ and -) |
| Cleaning and maintenance | Use a soft, dry cloth. Do not use chemical or abrasive products. |
| Safety | Automatic locking upon closing, backup key, alarm in case of repeated errors |
| Reset | Possibility to restore factory settings by holding the programming button |
| Compliance | FCC Part 15 |
Frequently Asked Questions - AL370 Vevor
User questions about AL370 Vevor
0 question about this device. Answer the ones you know or ask your own.
Ask a new question about this device
Download the instructions for your Safe in PDF format for free! Find your manual AL370 - Vevor and take your electronic device back in hand. On this page are published all the documents necessary for the use of your device. AL370 by Vevor.
USER MANUAL AL370 Vevor
Upgrade · The Home Creator Way
HAND GUN SAFE
USER MANUAL
MODEL:AL370
MODEL:AL370

natural_image
Line drawing of a mechanical device with no visible text or symbolsThis is the original instruction, please read all manual instructions carefully before operating. VEVOR reserves a clear interpretation of o user manual. The appearance of the product shall be subject to the product you received. Please forgive us that we won't inform you ag there are any technology or software updates on our product.
IMPORTANT SAFEGUARDS

Warning-To reduce the risk of injury, user must read instructions manual carefully. Failure to do so can result in serious injury.
Use precautions
- DO NOT SIT, STAND OR CLIMB ON THIS ITEM.
- This product is not a toy. Do not allow children to play with or item.
- Use as intended only. Keep away from sharp points, blades and ot items, so as not to scratch the product.
- Flammable: Keep away from open flame. This product will ignite and burn if brought into contact with an open flame.
- Battery Replacement: When the batteries are not high enough an must be replaced immediately. To replace the batteries, turn off the gun safe first. Replace the old batteries with new ones of the same t make sure that the polarity connections are correct (see the polarity indications at the bottom of the battery compartment). Reinstall the ba cover.
SAVE THESE INSTRUCTIONS
PRODUCT PARAMETERS
| Model | AL370 |
| Product Size | 370*190*86 mm |
| Working Power | DC 6V (4x AA batteries needed),120mA |
| Capacity | 1 piece |
FCC STATEMENT: This device complies with Part 15 of the Rules. Operation is subject to the following two conditions:(1)Th device may not cause harmful interference, and (2)this device accept any interference received, including interference that may cause undesired operation
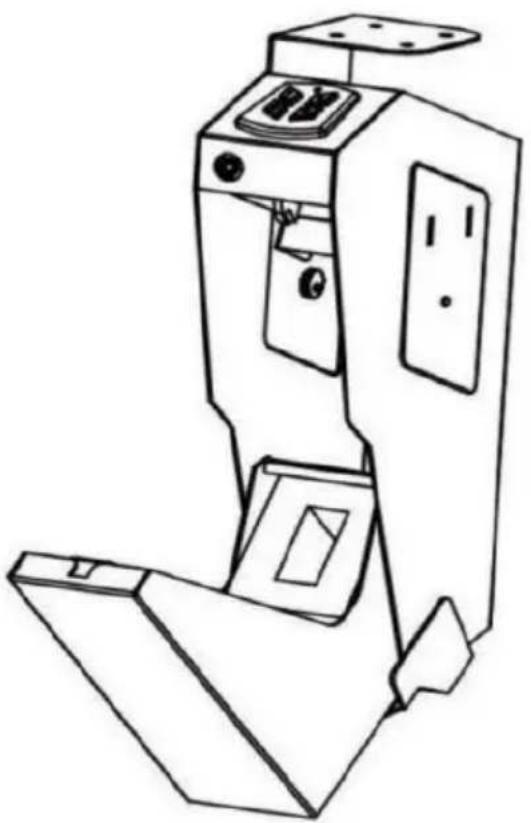
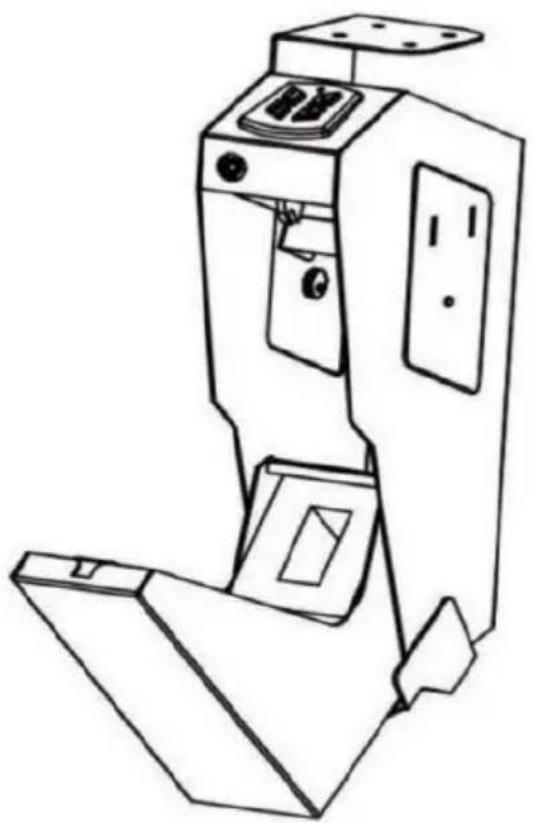
PARTS LIST
Thank you very much for choosing this Hand Gun Safe. Please read the instructions before using it. The information will help you achieve best possible results.
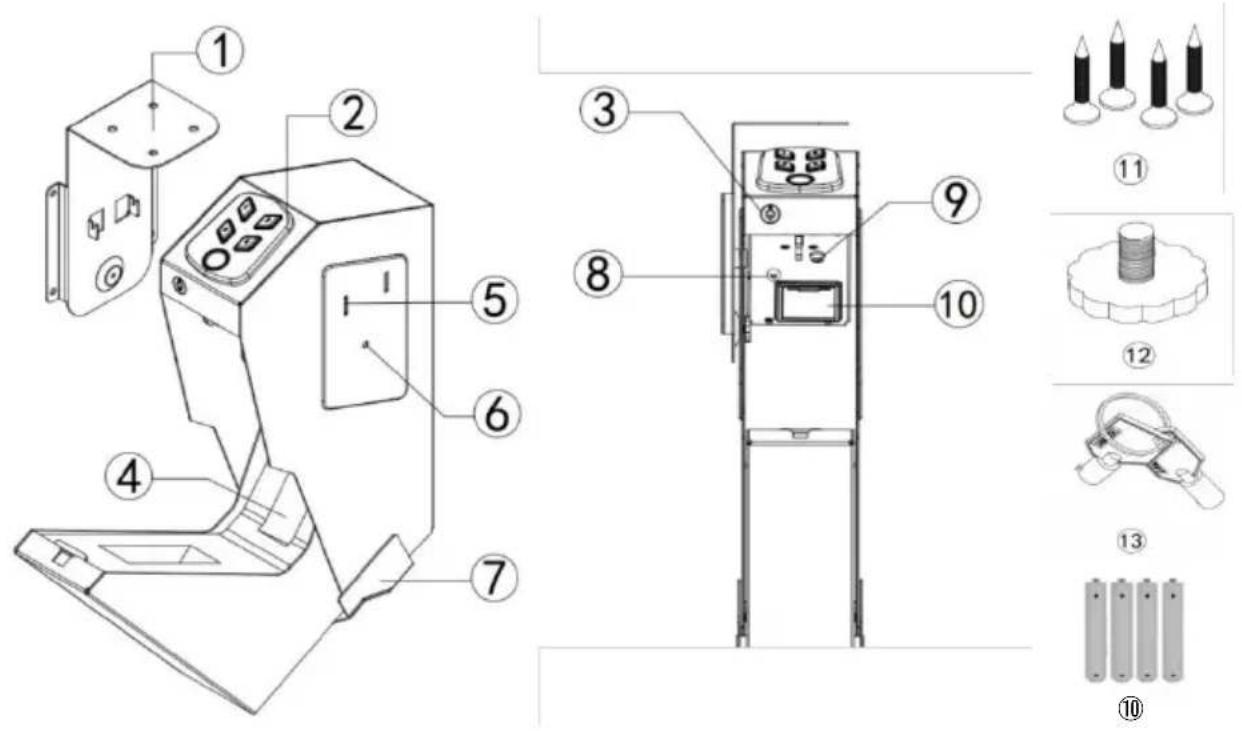
①Mounting Bracket
②Panel(Buttons&Biometric Scanner)
③Emergency Keyhole
④Anti-crash Foam
⑤Holes of Mounting Hook
⑥Plug Nut Hole
⑦Connector Protection Bracket
⑧Program Button
⑨Interior Light
⑩Battery Compartment
⑪Mounting Screws×4
⑫Thumb Screws×1
⑬Backup Keys×2
⑭AA Batteriesx4
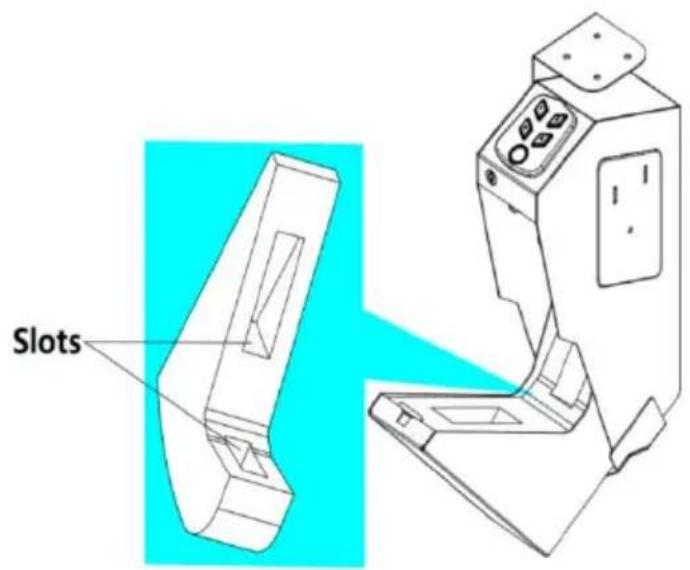
ADJUSTINGTHE FOAM
Before installing the gun safeadjust the slots on the foam to fit the your gun.
BATTERY INSTALLATION
To get started, ensure the bottom of the safe and the door are not obstructed before opening.
- Insert one of your backup keys into the keyhole at the front of the gun safe. Push the key in and tum it counterclockwise to open theg (Note: Do not lock the key inside thesafe-this is an emergency key a
will open the safe if you have lost your code.) - Locate the battery compartment inside the gun safe, and pull out the battery compartment.
- Insert 4 x AA batteries into the battery compartment goes against the spring inside of the compartment.

Pay attention to the "+" and "-" signs. The "-" end of the batteries
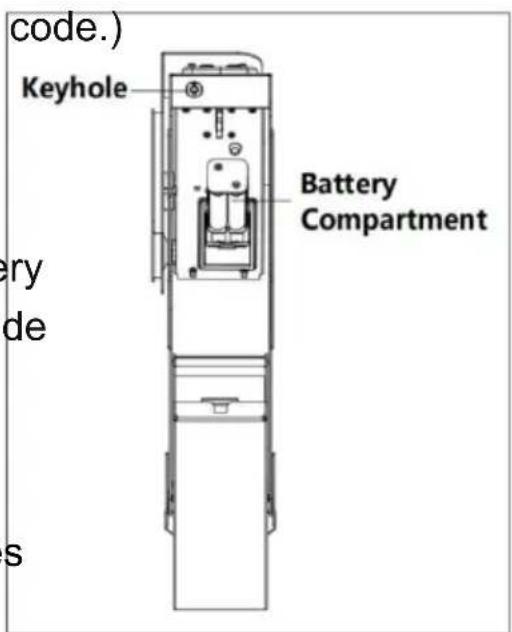
- Repeat the above steps for batteryreplacement.
BATTERY WARNINGS
- Always insert batteries correctly about polarity (+ and -) as marked on battery and the product.
- Exhausted batteries should be immediately removed from the product or properly disposed of.
- Do not mix old and new batteries.
- Do not mix alkaline, standard(carbon-zinc), or rechargeable (ni-cad, ni-mr etc) batteries.
LOW BATTERY WARNING
If the indicator light will light up red 6 times with 6 times beep opening the Gun Safe by the electronic way. your battery level low and your Gun Safe needs to be replaced the 4 new batter
FACTORYPRESETCODE
Factory preset code: 1234.
Factory preset fingerprint: blank(Unregistered fingerprints cannot be unlock)
Enter the factory code 1.2.3.4, the green led will lightup.
Important:
All safe models initially work with the safe code 1.2.3.4. It is therefore important to reset your safe with a new user code you have personal selected to provide maximum security.
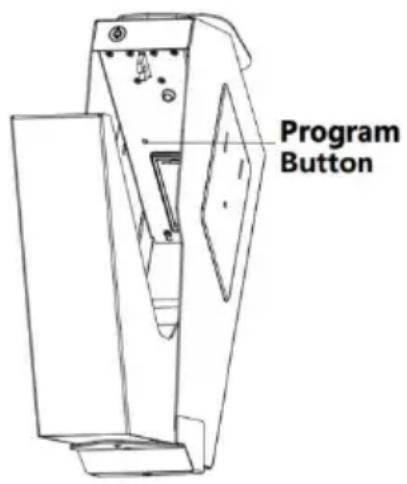
TOSET AN USER CODE
- Press the "program button" until you he beeps and the green light flashes twice, y start to set your user code with 3-6 digits
- Press the "program button" again to control the user code. When you hear 2 beeps and green light flashes twice, the new code has been set successfully.
TOSET PRIMARYUSERFINGERPRINT
- Press the "program button" until you hear 2 beeps and the flashes twice. Put one finger on the fingerprint scanner.
- Repeat 4 times. When you hear 2 beep and the green light twice, the main user fingerprint has been successfully set.(A total fingerprints are available. The setup method is the same as for primary user fingerprint.)
Note: You only have 10 seconds to set the code or fingerprint. hear 2 beeps and the red light flashes twice, the code or finger fails.
ERRORALARM
Enter the wrong password 3 times or fingerprint 5 times, the buzzer for 30 seconds, and all buttons/fingerprints invalid when the alarm so. The panel locks for one minute. Press any button or fingerprint, you hear 3 beeps and the red light flashes 3 times.
The gun safe can still be opened using the backup keys.
After one minute, the gun safe will automatically resume normal opera with one beep sound issue and the indicator light flashes green.
If the input is wrong again, the buzzer alarms for 30 seconds and tl
is locked for 5 minutes.
Note: The 30-second buzzer alarm is not affected by the mute mode
MUTE FUNCTION
Press the "4" button for more than 2 seconds, the green light f means the mute function is on/off.
RESTOREFACTORYSETTINGS
Keep pressing the set button until you hear a beep, the reset i
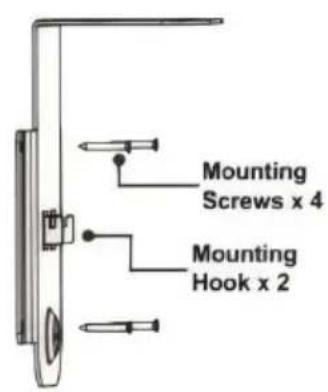
MOUNTING YOURGUN SAFE
Use proper drilling tools and mounting hardware based on the type c surface you mount the gun safely onto. Supplied screws are intended used on wooden surfaces.

Ensure you have enough clearance for the lid to open properly before mounting the gun safely.
Your Vevor gun safe will automatically lock when you fully close the lid.
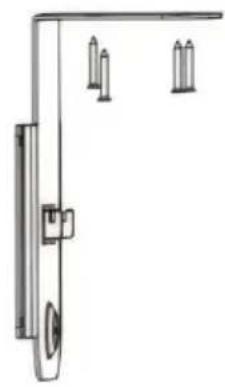
- Open the box and take out the mounting bracket and screws.
- Use the included 4x mounting screws to install the bracket onto the desired place.
- Slide the gun safe onto the bracket mounting hook, and fix the g to the bracket with a thumbscrew from inside the gun safe.
-
Close the gun safe. Now the gun safe should be ready for use.
-
The bracket is allowed to be installed on the left and right side of the safe, but the thumbscrew must be attached to the bracket.
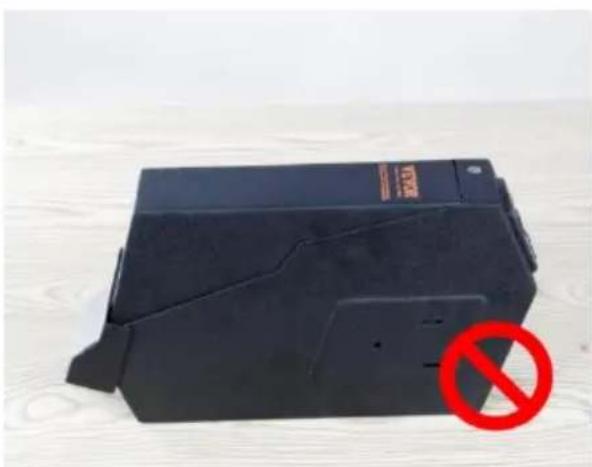
- Do not let the gun safe door face the floor when you mounting the g safe in the vertical direction to avoid your property from damage.
natural_image
Technical line drawing of a door handle with two hanging pins (no text or symbols)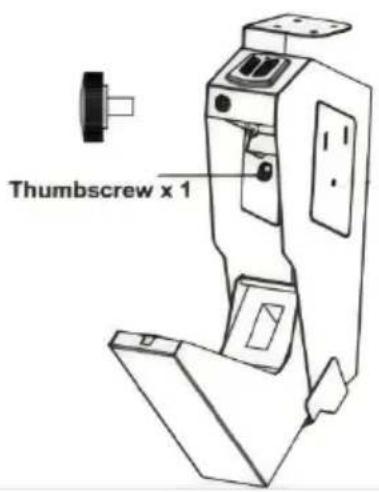
IMPORTANT INSTRUCTIONS
(1) If the password is set and the fingerprint is not entered, the empty fingerprint cannot open the door; On the contrary, if the fingerprint is entered and no password is set, the original factory password "1234" cannot open the door (of course, if the password set the user is 1234, the door can be opened normally)
(2) In the following two pictures, the drawer cannot be opened by its after unlocking, and it needs to be opened manually.
natural_image
Black plastic electronic device with a red prohibition symbol on the floor, placed on a wooden surface (no text or symbols on the device itself)
natural_image
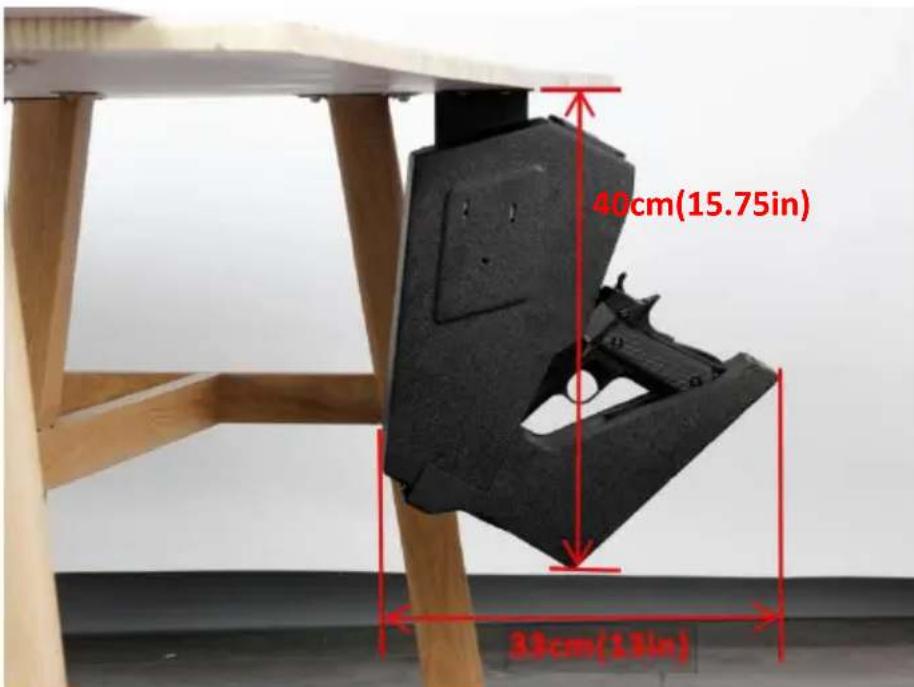
Black Veyork device with a red prohibition symbol on its side (no readable text or symbols on the device itself)(3) Installation size:
Supplementary instructions
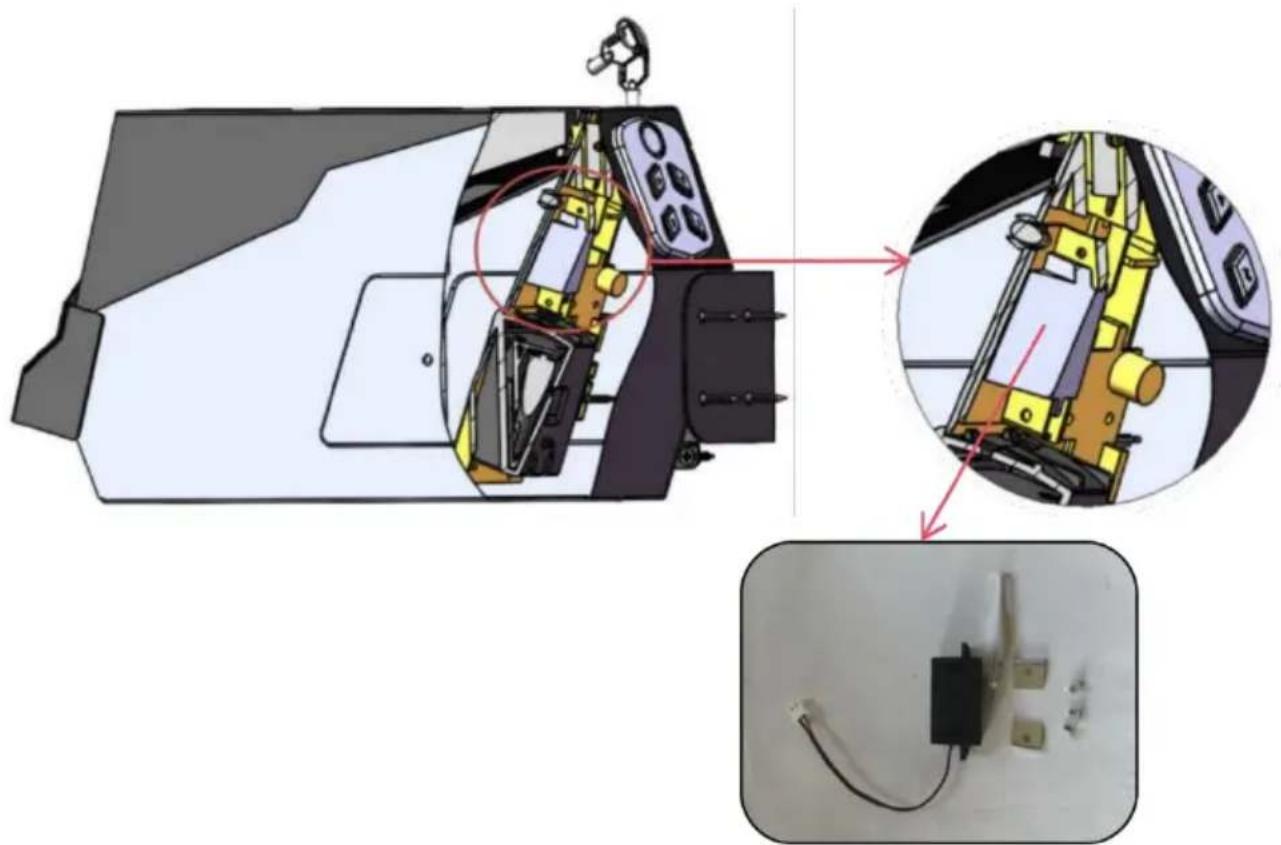
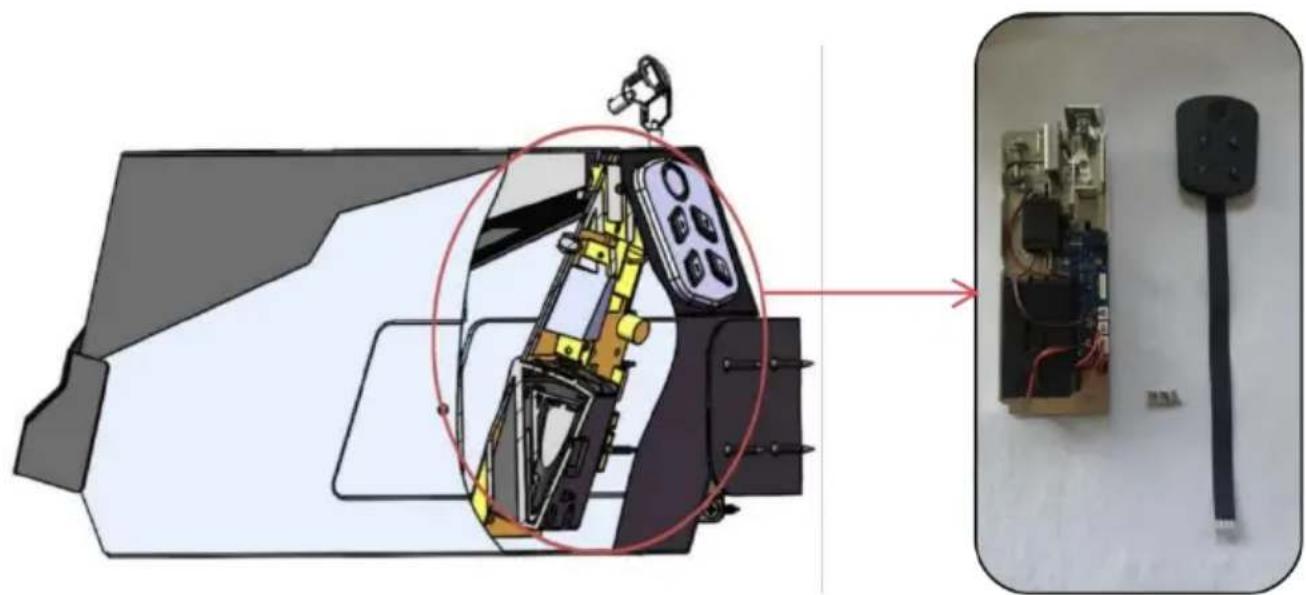
(1) AL370 Connecting rod assembly(Inside the gun safe.) [PJ-CDKDJLGZJ6TQ-001]
natural_image
Diagram of a robotic device with internal components and wiring, showing close-up views (no text or symbols)(1)AL370 Connecting rod assembly
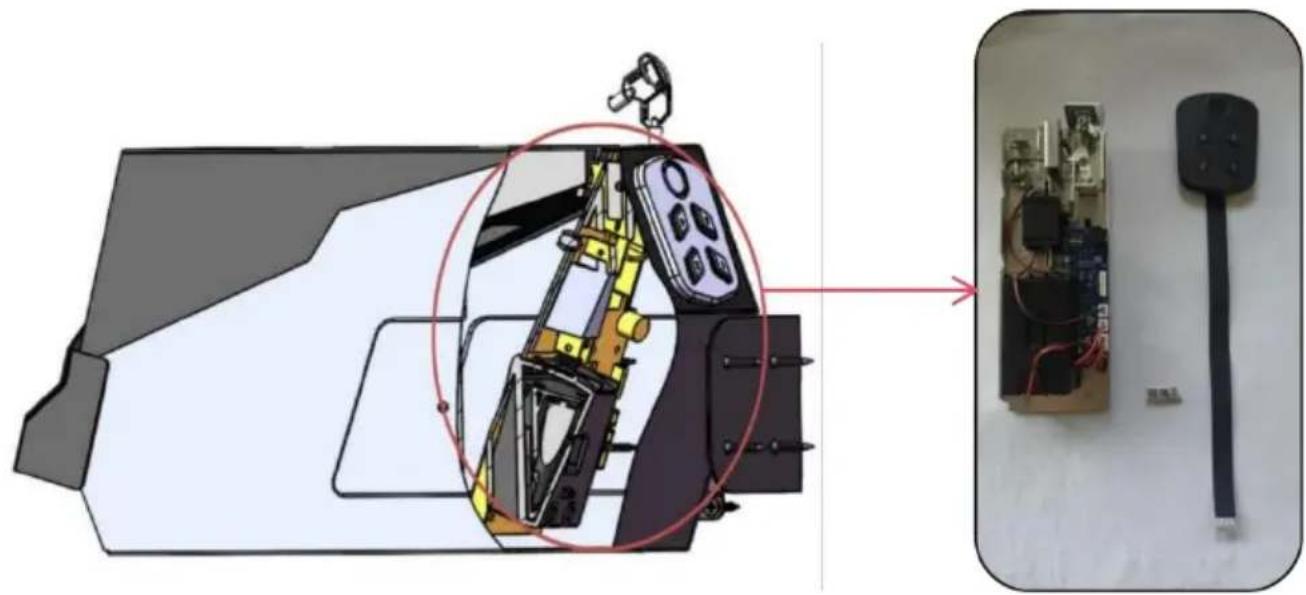
(2) AL370 Institutional components circuit board(Inside the gun safe.)[PJ-JGJHXLBTJHDW-001]
natural_image
Technical diagram showing a device interior with a close-up of its internal components, no visible text or symbols.(2)AL370 Institutional components circuit board
CORRECT DISPOSAL:
This product is subject to the provision of European Directive 2012/19/EC. The symbol showing a wheelie bin crossed through indicates that the product requires separate refuse collection in the European Union. This applies to the product and all accessories marked with this symbol. Products marked as such may not be discarded with normal domestic waste, but must be taken to a collection point for recycling electrical and electronic devices

VEVOR
Upgrade · The Home Creator Way
MAIN PISTOLET SÛR UTILISATEUR MANUEL
MODÈLE : AL370
MODÈLE : AL370

natural_image
Line drawing of a mechanical device with no visible text or symbols①Mounting Bracket
②Panel(Buttons&Biometric Scanner)
③Emergency Keyhole
④Anti-crash Foam
⑤Holes of Mounting Hook
⑥Plug Nut Hole
⑦Connector Protection Bracket
⑧Program Button
⑨Interior Light
⑩Battery Compartment
⑪Mounting Screws×4
⑫Thumb Screws×1
⑬Backup Keys×2
⑭AA Batteriesx4
ADJUSTINGTHE FOAM
POURDÉFINIR L'EMPREINTE DIGITALEDE L'UTILISATEURPRINCIPAL
IMPORTANT INSTRUCTIONS
natural_image
Black electronic device with a red prohibition symbol on a wooden surface (no text or symbols on the device itself)
natural_image
Black electronic device with a red prohibition symbol on its side (no readable text or symbols on body)natural_image
Diagram of a car interior showing internal components and wiring, with no visible text or symbols.(1)AL370 Ensemble de bielle
natural_image
Technical diagram showing a device interior with a close-up of its internal components, no visible text or symbols.Upgrade · The Home Creator Way
HAND PISTOLE SICHER
BENUTZER HANDBUCH
MODELL:AL370
MODELL:AL370
natural_image
Line drawing of a mechanical device with no visible text or symbols①Mounting Bracket
②Panel(Buttons&Biometric Scanner)
③Emergency Keyhole
④Anti-crash Foam
⑤Holes of Mounting Hook
⑥Plug Nut Hole
⑦Connector Protection Bracket
⑧Program Button
⑨Interior Light
⑩Battery Compartment
⑪Mounting Screws×4
⑫Thumb Screws×1
⑬Backup Keys×2
⑭AA Batteriesx4
ADJUSTINGTHE FOAM
FINGERABDRUCKDES PRIMÄREN BENUTZER EINSTELLEN
WICHTIG ANWEISUNGEN
natural_image
Black plastic electronic device with a red prohibition symbol on the surface (no readable text or symbols)
natural_image
Black Veyork device with a red prohibition symbol on its side (no text or symbols on the device itself)(3) Einbaumaß:
natural_image
Diagram of a car interior showing internal components and wiring, with no visible text or symbols.(1)AL370 Pleuelstange
(2) AL370 Institutionelle Komponenten Platine (Im Inneren der Pistole sicher.) [PJ-JGJHXLBTJHDW-001]
natural_image
Technical diagram showing a device interior with a close-up of its internal components, no visible text or symbols.Upgrade · The Home Creator Way
natural_image
Line drawing of a mechanical device with no visible text or symbols①Mounting Bracket
②Panel(Buttons&Biometric Scanner)
③Emergency Keyhole
④Anti-crash Foam
⑤Holes of Mounting Hook
⑥Plug Nut Hole
⑦Connector Protection Bracket
⑧Program Button
⑨Interior Light
⑩Battery Compartment
⑪Mounting Screws×4
⑫Thumb Screws×1
⑬Backup Keys×2
⑭AA Batteriesx4
ADJUSTINGTHE FOAM
PER IMPOSTAREL'IMPRONTA DIGITALE DELL'UTENTEPRIMARIA
IMPORTANTE ISTRUZIONI
natural_image
Black electronic device with a red prohibition symbol on a wooden surface (no readable text or symbols)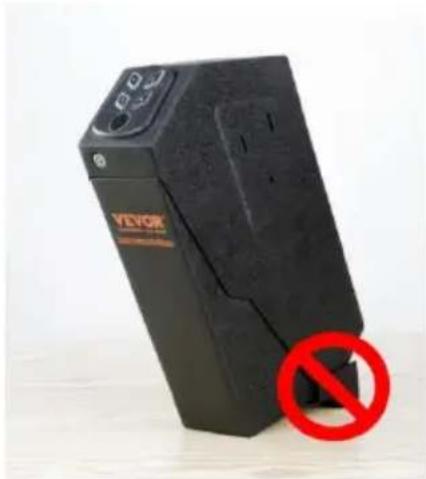
natural_image
Black electronic device with a red prohibition symbol on its side, no visible text or symbols on the device itself.natural_image
Diagram of a car interior showing internal components and wiring, with no visible text or symbols.natural_image
Technical diagram showing a device interior with a close-up of its internal components, no visible text or symbols.Upgrade · The Home Creator Way
MANO PISTOLA SEGURO USUARIO MANUAL
MODELO: AL370
MODELO: AL370
natural_image
Line drawing of a mechanical device with no visible text or symbols①Mounting Bracket
②Panel(Buttons&Biometric Scanner)
③Emergency Keyhole
④Anti-crash Foam
⑤Holes of Mounting Hook
⑥Plug Nut Hole
⑦Connector Protection Bracket
⑧Program Button
⑨Interior Light
⑩Battery Compartment
⑪Mounting Screws×4
⑫Thumb Screws×1
⑬Backup Keys×2
⑭AA Batteriesx4
ADJUSTINGTHE FOAM
ADJUSTINGTHE FOAM
PARACONFIGURARLAHUELLADACTILAR DEL USUARIOPRINCIPAL
IMPORTANTE INSTRUCCIONES
natural_image
Black plastic electronic device with a red prohibition symbol on a wooden surface (no text or symbols on the device itself)
natural_image
Black Veyoe device with a red prohibition symbol on its side (no text or symbols on the device itself)natural_image
Diagram of a robotic device with internal components and wiring, showing close-up views (no text or symbols)(1) Conjunto de biela AL370
(2) Placa de circuito de componentes institucionales AL370 (dentro de la pistola seguro.) [PJ-JGJHXLBTJHDW-001]

natural_image
Technical diagram showing a device interior with a close-up of its internal components, no visible text or symbols.(2)AL370 Institucional placa de circuito de componentes
Upgrade · The Home Creator Way
REKA PISTOLET BEZPIECZNA
UŻYTKOWNIK PODREĘCZNIK
MODEL:AL370
MODEL:AL370

natural_image
Line drawing of a mechanical device with no visible text or symbols①Mounting Bracket
②Panel(Buttons&Biometric Scanner)
③Emergency Keyhole
④Anti-crash Foam
⑤Holes of Mounting Hook
⑥Plug Nut Hole
⑦Connector Protection Bracket
⑧Program Button
⑨Interior Light
⑩Battery Compartment
⑪Mounting Screws×4
⑫Thumb Screws×1
⑬Backup Keys×2
⑭AA Batteriesx4
ADJUSTINGTHE FOAM
USTAWIANIEODCISKÓW PALCÓW GŁÓWNEG UŻYTKOWNIKA
WAŻNY INSTRUKCJE
natural_image
Black plastic electronic device with a red prohibition symbol on the surface (no text or symbols on the device itself)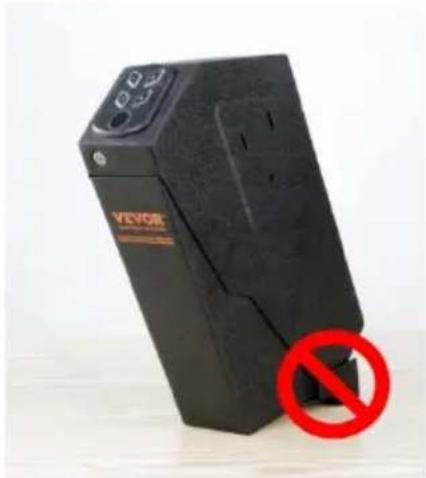
natural_image
Black VEVOR device with a red prohibition symbol on its side (no readable text or symbols on the device itself)natural_image
Diagram of a car interior showing internal components and wiring, with no visible text or symbols.natural_image
Technical diagram showing a device interior with a close-up of its internal components, no visible text or symbols.Upgrade · The Home Creator Way
HAND GEWEER VEILIG
GEBRUIKER HANDMATIG
MODEL:AL370
MODEL:AL370

natural_image
Line drawing of a mechanical device with no visible text or symbols①Mounting Bracket
②Panel(Buttons&Biometric Scanner)
③Emergency Keyhole
④Anti-crash Foam
⑤Holes of Mounting Hook
⑥Plug Nut Hole
⑦Connector Protection Bracket
⑧Program Button
⑨Interior Light
⑩Battery Compartment
⑪Mounting Screws×4
⑫Thumb Screws×1
⑬Backup Keys×2
⑭AA Batteriesx4