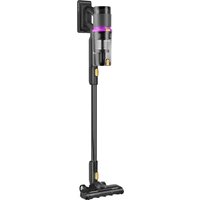
USER MANUAL ReactiClean NEC410 EUREKA
natural_image
Line drawing of a vacuum cleaner with handle and base mount (no text or symbols)
USER MANUAL
NEC410Series
VACUUM CLEANER
Please read the manual before use.
CONTENTS
English 02
SAFETY INSTRUCTIONS 03
PRODUCT OVERVIEW 06
OPERATION INSTRUCTIONS 07
CLEANING AND MAINTENANCE 10
TROUBLE SHOOTING 13
SPECIFICATIONS 15
THE EUREKA LIMITED WARRANTY 16
HOW TO ORDER REPLACEMENT PARTS 18
Canadian French 20
SAFETY INSTRUCTIONS
IMPORTANT SAFEGUARDS
When using an electrical appliance, basic precautions should always be followed, including the following: READ ALL INSTRUCTIONS BEFORE USING (THIS APPLIANCE)
WARNING
To reduce the risk of fire, electric shock, or injury:
- Use indoors only.
- Brush may start unexpectedly, disconnect battery pack before cleaning or servicing.
- Do not allow to be used as a toy. Close attention is necessary when used by or near children.
- Use only as described in this manual. Use only manufacturer's recommended attachments.
- If appliance is not working as it should, has been dropped, damaged, left outdoors, or dropped into water, return it to a service center.
- Do not run appliance over cord.
- Do not handle plug or appliance with wet hands.
- Do not put any object into openings. Do not use with any opening blocked; keep free of dust, lint, hair, and anything that may reduce air flow.
- Keep hair, loose clothing, fingers, and all parts of body away from openings and moving parts.
- Use extra care when cleaning on stairs.
- Do not use to pick up flammable or combustible liquids, such as gasoline, or use in areas where they may be present.
- Do not pick up anything that is burning or smoking, such as cigarettes, matches, or hot ashes.
- Do not use without dust bag and/or filters in place.
- Prevent unintentional starting. Ensure the switch is in the off-position before connecting to battery pack, picking up or carrying the appliance. Carrying the appliance with your finger on the switch or energizing appliance that have the switch on invites accidents.
- Disconnect the battery pack from the appliance before making any adjustments, changing accessories, or storing appliance. Such preventive safety measures reduce the risk of starting the appliance accidentally.
- Recharge only with the charger specified by the manufacturer. A charger that is suitable for one type of battery pack may create a risk of fire when used with another battery pack.
SAFETY INSTRUCTIONS
- Use appliances only with specifically designated battery packs. Use of any other battery packs may create a risk of injury and fire.
- When battery pack is not in use, keep it away from other metal objects, like paper clips, coins, keys, nails, screws or other small metal objects, that can make a connection from one terminal to another. Shorting the battery terminals together may cause burns or a fire.
- Under abusive conditions, liquid may be ejected from the battery; avoid contact.
If contact accidentally occurs, flush with water. If liquid contacts eyes, additionally seek medical help. Liquid ejected from the battery may cause irritation or burns.
- Do not use a battery pack or appliance that is damaged or modified. Damaged or modified batteries may exhibit unpredictable behavior resulting in fire, explosion or risk of injury.
- Do not expose a battery pack or appliance to fire or excessive temperature. Exposure to fire or temperature above 130^ may cause explosion.
- Follow all charging instructions and do not charge the battery pack or appliance outside of the temperature range specified in the instructions. Charging improperly or at temperatures outside of the specified range may damage the battery and increase the risk of fire.
- Have servicing performed by a qualified repair person using only identical replacement parts. This will ensure that the safety of the product is maintained.
- Do not modify or attempt to repair the appliance or the battery pack (as applicable) except as indicated in the instructions for use and care.
- Do not use outdoors or on wet surfaces.
Charging system specification:
Charger type: MC2805A
Battery pack type: BP25920C
Ambient temperature range for charging, use and storage: 5°C - 40°C
SAVE THESE INSTRUCTIONS
For Household Use Only
SAFETY INSTRUCTIONS
Tips
- Longer charging time may be needed in the following circumstances.
- When charging in a place where the indoor temperature exceeds 30°C;
- When charging immediately after stopping running.
- Please charge the vacuum cleaner after using no matter how long it is used.
- When not charging, it is recommended to unplug the power plug in time.
- If the vacuum cleaner is not in use for a long time (more than 2 months), please unplug the power plug, but in order to ensure the battery life, please fully charge it every 2 months.
- During charging, the machine may heat up, which is a normal phenomenon. Please rest assured to use it.
PRODUCT OVERVIEW
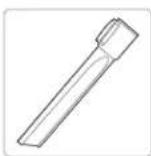
Crevice tool
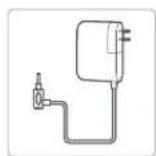
Charger
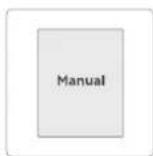
User manual
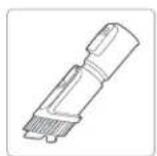
Upholstery tool
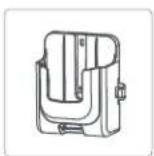
Wall mount
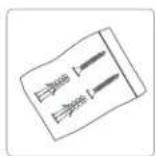
Screws
OPERATION INSTRUCTIONS
Battery Charging

ATTENTION
Fully charge the battery before first use.
01
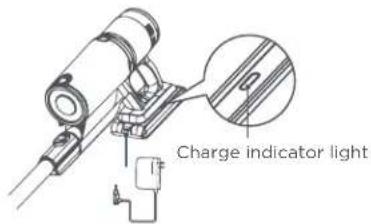
Put the body on horizontal surface. Plug charger into power outlet and then into charging port on battery pack. When charging, charge indicator will flash continuously. The indicator light turns off 1 minute after being fully charged.
02
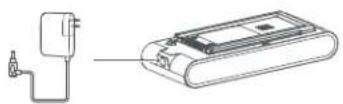
The battery pack can be charged separately.
How to Remove Battery
03
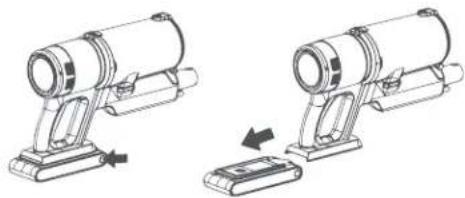
Press and hold the release button on the battery and pull the battery out toward the back of the hand vacuum.
natural_image
Two technical illustrations of a cylindrical device with base mount and clamped base, showing mechanical assembly (no text or symbols)
Charging time:
It takes approximately 3 - 5 hours to fully charge.
Runtime:
High Mode: 15mins, Medium mode: 25 mins, Low Model: 50 mins
OPERATION INSTRUCTIONS
Control Mode

ATTENTION
To avoid the air duct being blocked, please clean the big particle waste manually. (such as paper, cloth and others).
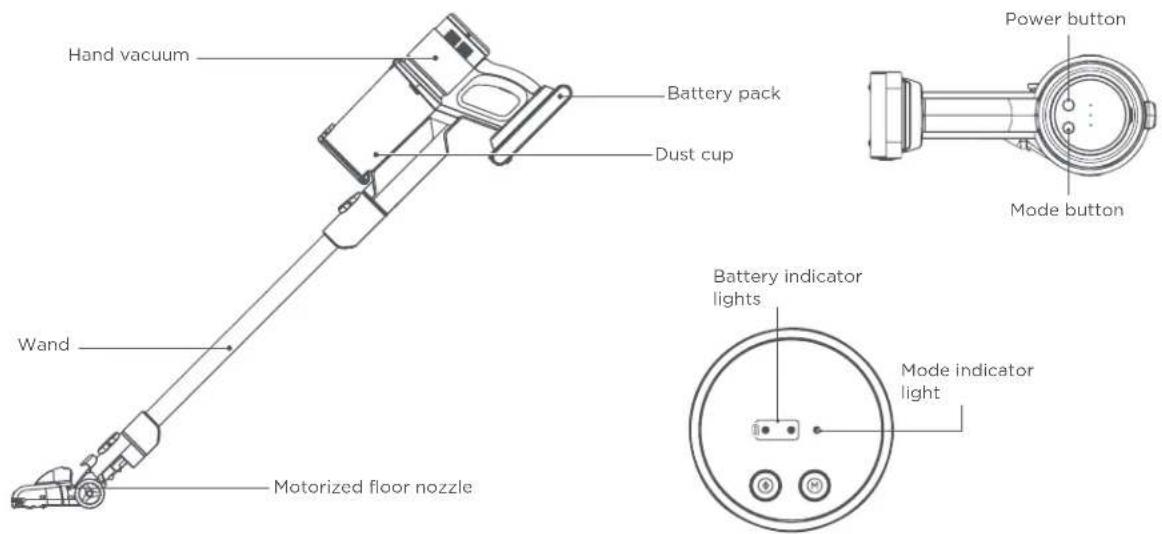
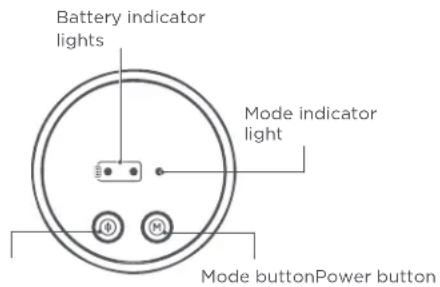
01 | Press the power button on the handle to turn on, and press again to turn off. Use the speed mode button to switch between low, medium, and high speed modes.
Indicator for Battery Level and Modes
01 | Battery level indicator lights: High battery level: the 2 lights are constantly ON; Medium battery level: one light is constantly ON; Low battery level: One light blinking.
02 | Mode Indicator lights: High mode: The mode indicator light turns blue. Medium mode: The mode indicator light turns off. Low mode: The mode indicator light turns blue and blinks slowly.
OPERATION INSTRUCTIONS
Installation and Use of Wall Mount

ATTENTION
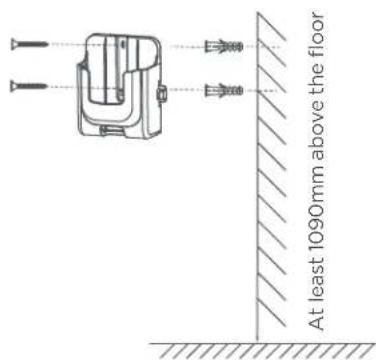
Before fixing the wall mount to the wall, please make sure the wall is solid and flat.
01
Use the included mounting hardware to fix the wall mount to a solid, flat wall to avoid falling.(At least 43in/1090mm above the ground to give the vacuum enough space.)
02
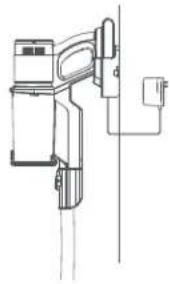
Hang the vacuum cleaner on the wall mount and connect the power supply to start charging.
natural_image
Line drawing of a refrigerator with attached electrical outlet (no text or symbols)
CLEANING AND MAINTENANCE
How to Clean Your Dust Cup

ATTENTION
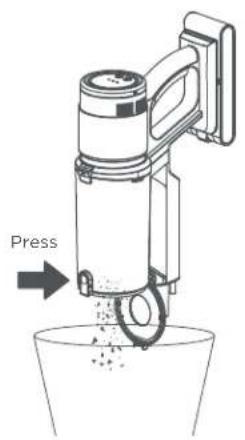
To maintain the vacuum cleaner's suction power, please clean the dust cup regularly.
01 | Press the button at the bottom of the dust cup to empty debris.
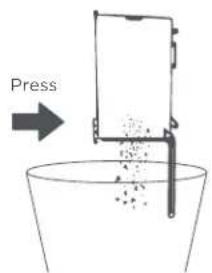
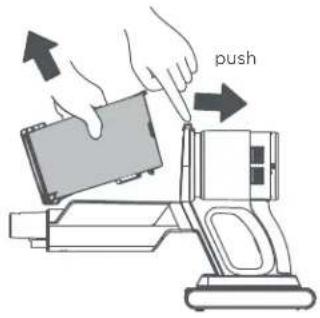
02 | Press the release button to remove the dust cup.
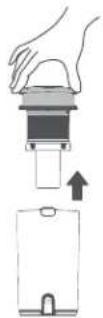
03 | Remove the cyclone from the dust cup.
11
CLEANING AND MAINTENANCE
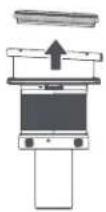
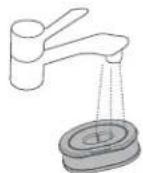
04 | Disassemble the cyclone and clean with water. All parts of the cyclone can be hand washed.
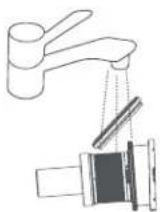
05 | Re-assemble the parts once they have fully dried.
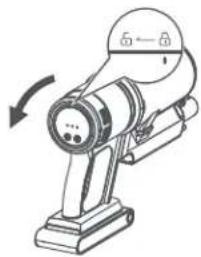
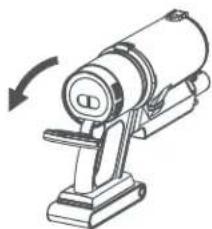
How to Clean Post-motor Filter

ATTENTION
To maintain the vacuum cleaner's suction power, please clean the post-motor filter regularly.
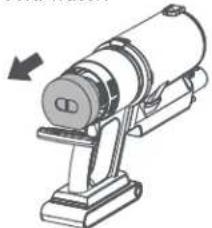
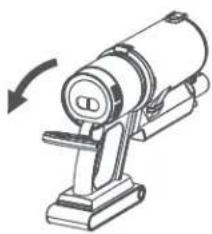
01 | Rotate the outlet cover 15 degrees counterclockwise to unlock it and pull down the outlet cover.
natural_image
Illustration of a robotic device with a rotating arm and base mount (no text or symbols)
natural_image
Illustration of a mechanical device with a rotating arrow indicating rotation (no text or symbols)
02 Remove the post-motor filter and clean it by hand with cold water.
natural_image
Mechanical device with a rotating shaft and base mount, showing no text or symbols
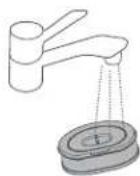
03 Install the post-motor filter back once it has full dried and lock the outlet cover once installed.
CLEANING AND MAINTENANCE
How to Maintain Floor Nozzle

WARNING
To avoid unnecessary service calls, periodically check floor nozzle for debris. Make sure vacuum cleaner is turned off before maintenance. The floor nozzle should not be cleaned with water.
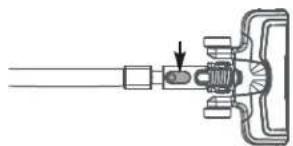
01
Press the button to remove the floor nozzle.
natural_image
Mechanical assembly diagram showing a shaft and housing with a valve mechanism (no text or labels)
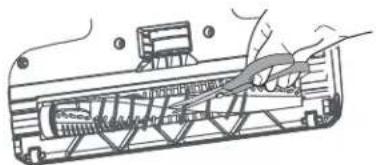
02
Turn the floor nozzle upside down to reveal the brushroll. Use scissors to cut heavy threads or strings.
natural_image
Diagram of a car interior showing internal components and hand placement (no text or labels)
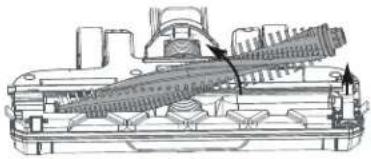
03
If debris cannot be removed easily, locate the brushroll release tab on the right side and open the brushroll cover. Remove the brushroll and clear any tangled hair or remaining debris.
natural_image
Technical line drawing of a mechanical component with internal structure and assembly (no text or symbols)
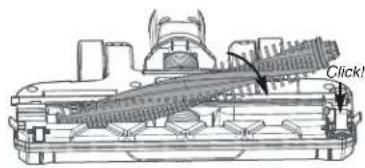
04
To reassemble:
1. Align one end of brushroll with floor nozzle gear.
2. Press other end into slot.
3. Reinstall the release tab.
TROUBLE SHOOTING

Make sure vacuum cleaner is turned off and charging plug is unplugged.
NOTICE: Thermal cut-off
This vacuum cleaner has a special thermostat that protects the vacuum cleaner in case of motor overheating. If the vacuum suddenly shuts off, proceed as follows: 1) Check the vacuum for a possible source of overheating such as a full dust cup, blocked wand or clogged filters. If these conditions are found, fix them and wait at least 30 minutes before attempting to use the vacuum. 2) After the 30 minute period, press the power button, if the vacuum still does not work, call the Eureka Customer Service HELPLINE at 1-800-282-2886(US) 1-888-365-2230 (CA).
| Problem Possible cause Solution | | |
| Motor will not start | Product has powered off or battery is low | Please charge the product before use |
| Product suction port is blocked | Cleaning product suction mouth |
| Not enough suction power | Dust cup & filter assembly is dusty/full | Empty dust cup and clean or change filters |
| Brushroll has hair or other objects wrapped around it | Clean the brushroll |
| There is a blockage in the wand | Carefully clean and check for blockage |
| Different motor operation sound | There is a blockage in the wand | Carefully clean and check for blockage |
| Filter assembly is blocked | Thoroughly clean the filters |
TROUBLE SHOOTING

Make sure vacuum cleaner is turned off and charging plug is unplugged.
| Problem | Possible cause Solution | |
| Product can not be charged | Charger not properly connected | Please check connections |
| Mains supply is not switched on | Check the mains supply is switched on |
| Situation still remains | Contact the service center |
SPECIFICATIONS
| Product Model | NEC410 Series |
| Charging rated input | 100-240V~ 50/60Hz |
| Charging output | 25-29V== 500mA |
| Charging time | 3-5 h |
| Power | 200W |
| Voltage | 25.9V --- |
| Product Size | 1260*255*257mm |
| Runtime | 15/25/50 mins |
THE EUREKA LIMITED WARRANTY
Midea America Corp. & Midea America (Canada) Corp. ("Eureka"), subject to the terms and conditions herein, warrants this vacuum cleaner and Battery Module to be free from defects in material and workmanship for a term of two years for the vacuum/one year for the Battery Module from the date of delivery when used in accordance with the Eureka operating and maintenance instructions and under normal household usage. This warranty is granted only to the original purchaser and members of immediate household, and is applicable only to original purchases from Eureka authorized resellers. The date of delivery establishes the warranty period, should service be required.
What Eureka will do:
Eureka will, at its option, repair or replace a defective vacuum/Battery Module or vacuum part that is covered by this warranty. Repairs may be performed using new or refurbished parts that meet or exceed Eureka specifications for new parts. If Eureka elects to replace it, the replacement may be a reconditioned unit. Depending on availability of products, Eureka reserves the right to provide you with a replacement product that is the same or similar, or substitute equivalent of the original product. As a matter of warranty policy, Eureka will not refund the consumer's purchase price.
This warranty does not cover:
- Normal wear and tear of the vacuum and vacuum parts that require replacement under normal use such as disposable dust bags, filters, drivebelts, light bulbs, brush-roll, bristles, impellers and cleaning.
- Damages or malfunctions resulting from: improper or unreasonable use or maintenance, abuse, negligence, failure to follow instructions contained in any written materials that accompany the product, deterioration by reason of excess moisture, corrosive atmosphere, lightning, power surges, connections to improper voltage supply, unauthorized alteration, or other external causes such as extremes in temperature or humidity, modifications, scratches or discoloration, accidents, misuse, or acts of God. This warranty also does not cover damage resulting from repair or attempted repair by anyone other than Eureka or an authorized Eureka Warranty Station. This warranty is not applicable to any product that has been altered or on which the serial number has been defaced, modified or removed. Altering, erasing, or forging any proof-of-purchase documents voids any applicable product warranty.
Obtaining warranty service:
To obtain warranty service you must contact the Eureka Service Team, toll free, at 1-800-282-2886 (US) 1-888-365-2230 (CA) or email customerservice@eureka.com (US) CanadaSupport@eureka.com (CA), to discuss the warranty claim and procedures to be followed. All warranty claims must include submission of proof-of-purchase documentation. For additional information, you may also visit visit www.eureka.com (US) www.eureka.com/ca (CA).
THE EUREKA LIMITED WARRANTY
What Eureka will do:
You will be responsible for any initial shipping and insurance charges if the defective product(s) must be shipped for warranty service or warranty evaluation; however, Eureka or a Eureka Authorized Warranty Station will pay the return shipping charges if repairs are covered by the warranty. When returning parts for repair, you must include the model, type and serial number located on the rating plate. If any product submitted for warranty service is found to be ineligible, an estimate of repair cost will be furnished and the repair performed only if requested by the owner and upon receipt of payment or acceptable arrangements for payment.
Further limitations and exclusions:
Any warranty that may be implied in connection with your purchase or use of the vacuum, including any warranty of Merchantability or any warranty of Fitness For A Particular Purpose is limited to the duration of this limited warranty. Some states do not allow limitations on how long an implied warranty lasts, so the above limitations may not apply to you. Your relief for the breach of this warranty is limited to the relief expressly provided above. In no event shall the manufacturer be liable for any consequential or incidental damages you may incur in connection with your purchase or use of the vacuum. Some states do not allow the exclusion or limitation of incidental or consequential damages, so the above limitation or exclusion may not apply to you. This warranty gives you specific legal rights. You may also have other rights, which may vary by state.
DISCARDING THEVACUUM AND BATTERY PACK

Before you discard this vacuum, dispose of battery in an environmentally safe manner. Do not discard battery with your regular household trash.

Important battery disposal information.
To find a disposal location nearest you, call 1-800-822-8837.
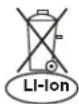
To preserve natural resources, please recycle or dispose of expired battery pack properly. This product contains a lithium-ion battery. It must be disposed of properly. Local laws may prohibit disposal of lithium-ion batteries in ordinary trash. Consult your local waste authority for information regarding available recycling and/or disposal options.
HOW TO ORDER REPLACEMENT PARTS
Order genuine Eureka accessories and replacement parts Visit www.eureka.com (US) www.eureka.com/ca (CA) or call 1-800-282-2886 (US) 1-888-365-2230 (CA).
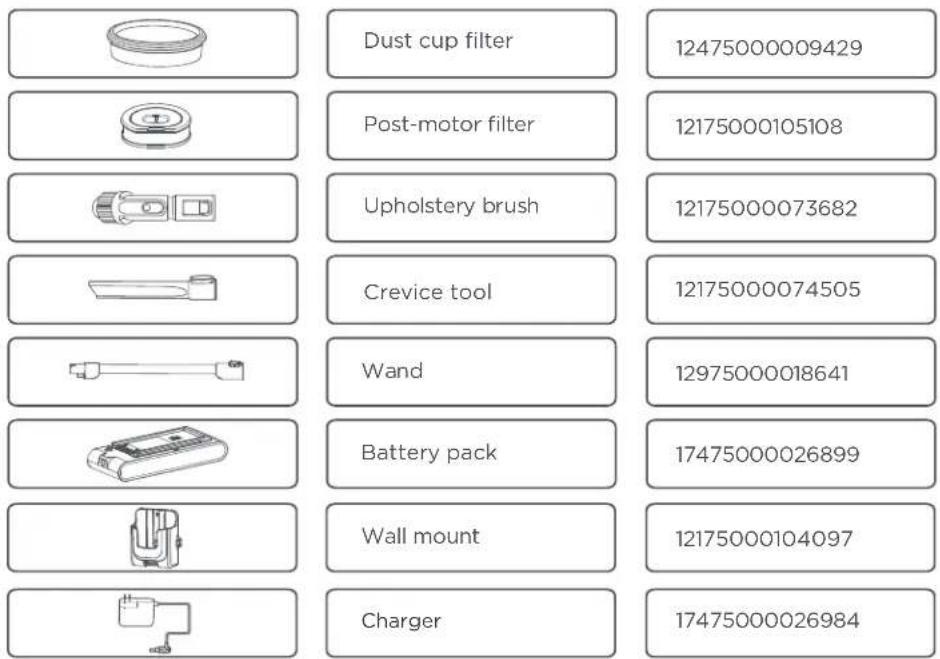
TABLE DES MATIÈRES
English 02
natural_image
Two technical illustrations of a cylindrical device with base mount and battery, showing mechanical assembly (no text or symbols)
Temps de charge :
natural_image
Technical line drawing of a mechanical device with no visible text or symbols
NETTOYAGE ET ENTRETIEN
natural_image
Illustration of a robotic device with a rotating arm and base mount (no text or symbols)
natural_image
Line drawing of a mechanical device with a rotating arrow indicating rotation (no text or symbols)
natural_image
Mechanical device with a cylindrical component mounted on a stand, showing a left-hand rule indicated by an arrow (no text or symbols present)
natural_image
Mechanical assembly diagram showing a shaft and housing with a valve mechanism (no text or labels)
02
natural_image
Diagram of a hand holding a cable inserted into a device component (no text or symbols visible)
03
natural_image
Technical line drawing of a mechanical component with no visible text or symbols
04
Pour remonter :