USER MANUAL BU3040 KENMORE
Vacuum Cleaner Help Line:
1-877-531-7321 (US) / 1-844-608-3081 (CA)
8:00am - 5:00pm EST, M-F
www.kenmorefloorcare.com

TABLE OF CONTENTS
SECTION PAGE
Before Using Your New Vacuum Cleaner .... 2
Packing List 2
Important Safety Instructions....3-4
Vacuum Cleaner Warranty 5
Parts and Features....6-7
Assembly Instructions....8-9
Operating Instructions 9-14
Performance/Safety Features 14-15
Vacuum Maintenance and Care....16-22
Troubleshooting 23-25
Requesting Assistance Or Service......Back Cover
BEFORE USING YOUR NEW VACUUM CLEANER
Read this Use & Care Guide. It will help you assemble and operate your new Kenmore vacuum cleaner in the safest and most effective way.
For more information about vacuum cleaner care and operation, call the Vacuum Cleaner Help Line at 1-877-531-7321 (US) / 1-844-608-3081 (CA). You will need the complete model and serial numbers when requesting information.
Your vacuum cleaner's model and serial numbers are located on the Model and Serial Number Plate. Use the space below to record the model number and serial number of your new Kenmore vacuum cleaner.
Model No.
Serial No.
Date of Purchase
Keep this book and your sales check (receipt) in a safe place for future reference.
PACKING LIST
Your KENMORE INTUITION® BAGGED UPRIGHT VACUUM CLEANER is packaged with the following parts and components assembled separately in the carton:
1 Upright Vacuum Cleaner
1 Handle
1 Flexible Hose
1 3-in-1 Combination Tool
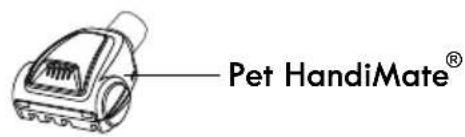
1 Pet HandiMate®
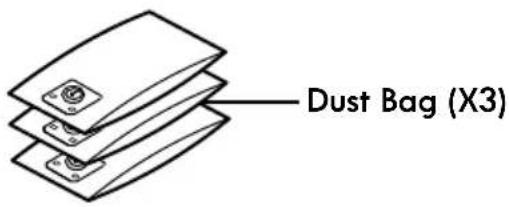
4 Dust Bags (one dust bag is pre-installed in the vacuum)
1 Use & Care Guide
IMPORTANT SAFETY INSTRUCTIONS
Read all instructions in this guide before assembling or using your vacuum cleaner.

WARNING!
Your safety is important to us. To reduce the risk of fire, electrical shock, injury to persons or damage when using your vacuum cleaner, follow basic safety precautions including the following:
- Use your vacuum cleaner only as described in this Use & Care Guide. Use only with manufacturer's recommended attachments.
- Disconnect electrical supply before servicing or cleaning out the brushroll area. Failure to do so could result in the brushroll unexpectedly starting, causing personal injury from moving parts.
- Do not leave vacuum cleaner when plugged in. Unplug from outlet when not in use and before performing maintenance.
- To reduce the risk of electrical shock - Do not use outdoors or on wet surfaces.
- Do not allow to be used as a toy. Close attention is necessary when used by or near children.
- Do not use with a damaged cord or plug. If vacuum cleaner is not working as it should, has been dropped, damaged, left outdoors, or dropped in water, immediately discontinue use and call 1-844-608-3080 (US) / 1-844-608-3081 (CA) for assistance.
- Do not pull or carry by cord, use cord as a handle, close a door on cord, or pull cord around sharp edges or corners. Do not run vacuum cleaner over cord. Keep cord away from heated surfaces.
- Do not unplug by pulling on cord. To unplug, grasp the plug, not the cord.
- Do not handle plug or vacuum cleaner with wet hands.
- Do not put any objects into openings.
- Do not use with any opening blocked;
keep free of dust, lint, hair, and anything that may reduce air flow.
- Keep hair, loose clothing, fingers, and all parts of body away from openings and moving parts.
- Turn off all controls before unplugging.
- Use extra care when cleaning on stairs.
- Do not put on chairs, tables, etc. Keep on floor.
- Do not use vacuum cleaner to pick up flammable or combustible liquids (gasoline, cleaning fluid, perfumes, etc.), or use in areas where they may be present. The fumes from these substances can create a fire hazard or explosion.
- Do not pick up anything that is burning or smoking, such as cigarettes, matches, or hot ashes.
- Do not use vacuum cleaner without dust bag and/or filters in place.
- Always replace the dust bag after vacuuming carpet cleaners or freshener, powders, and fine dust. These products clog the filters, reduce airflow and can cause damage to the vacuum cleaner. Failure to replace the dust bag could cause permanent damage to the vacuum cleaner.
- Do not use the vacuum cleaner to pick up sharp hard objects, small toys, pins, paper clips, etc. They may damage the vacuum cleaner or dust bag.
- You are responsible for making sure that your vacuum cleaner is not used by anyone unable to operate it properly.
IMPORTANT SAFETY INSTRUCTIONS
SAVE THESE INSTRUCTIONS
Proper assembly and safe use of your vacuum cleaner are your responsibilities. Your vacuum cleaner is intended for Household Use. Read this Use & Care Guide carefully for important use and safety information. This guide contains safety statements under warning and caution symbols.
AllergenSeal ^™ system lets you know that this vacuum traps 99.97% of dust and particles down to 0.3 microns inside your vacuum, keeping them out of the air you breathe.
VACUUM CLEANER WARRANTY
LIMITED WARRANTY
FOR ONE YEAR from the date of sale this product is warranted against defects in material or workmanship.
WITH PROOF OF SALE a defective product will be replaced free of charge.
The Kenmore brand is used under license. Direct all claims for warranty service to: Cleva North America, Inc., 1-877-531-7321 (US) / 1-844-608-3081 (CA).
This warranty does not cover filters or belts, which are expendable parts that can wear out from normal use within the warranty period.
This warranty is void if this product is ever used for other than private household purposes. This warranty gives you specific legal rights, and you may also have other rights which vary from state to state.
Cleva North America, Inc., Greenville SC 29607
PARTS AND FEATURES
It is important to know your vacuum cleaner's parts and features to assure its proper and safe use. Review these before using your vacuum cleaner.
REPLACEMENT PARTS
| Item Part No.(US) Part No.(CA) | | |
| Foam Filter 561060125 561060125 | | |
| HEPA Media Exhaust Filter 561055118 561055118 | | |
| 3-in-1 Combination Tool 561055134 561055134 | | |
| Pet HandiMate® | 561014106 561014106 |
| Dust Bag (6-pack) IB600 63296 | | |
| Flexible Hose 571023113 571023113 | | |
| Handle 571023101 571023101 | | |
| Filter Kit (HEPA Exhaust + Foam Filter) | 561060184 | 561060184 |
To order a replacement part, call 1-877-531-7321 (US) / 1-844-608-3081 (CA).
PARTS AND FEATURES

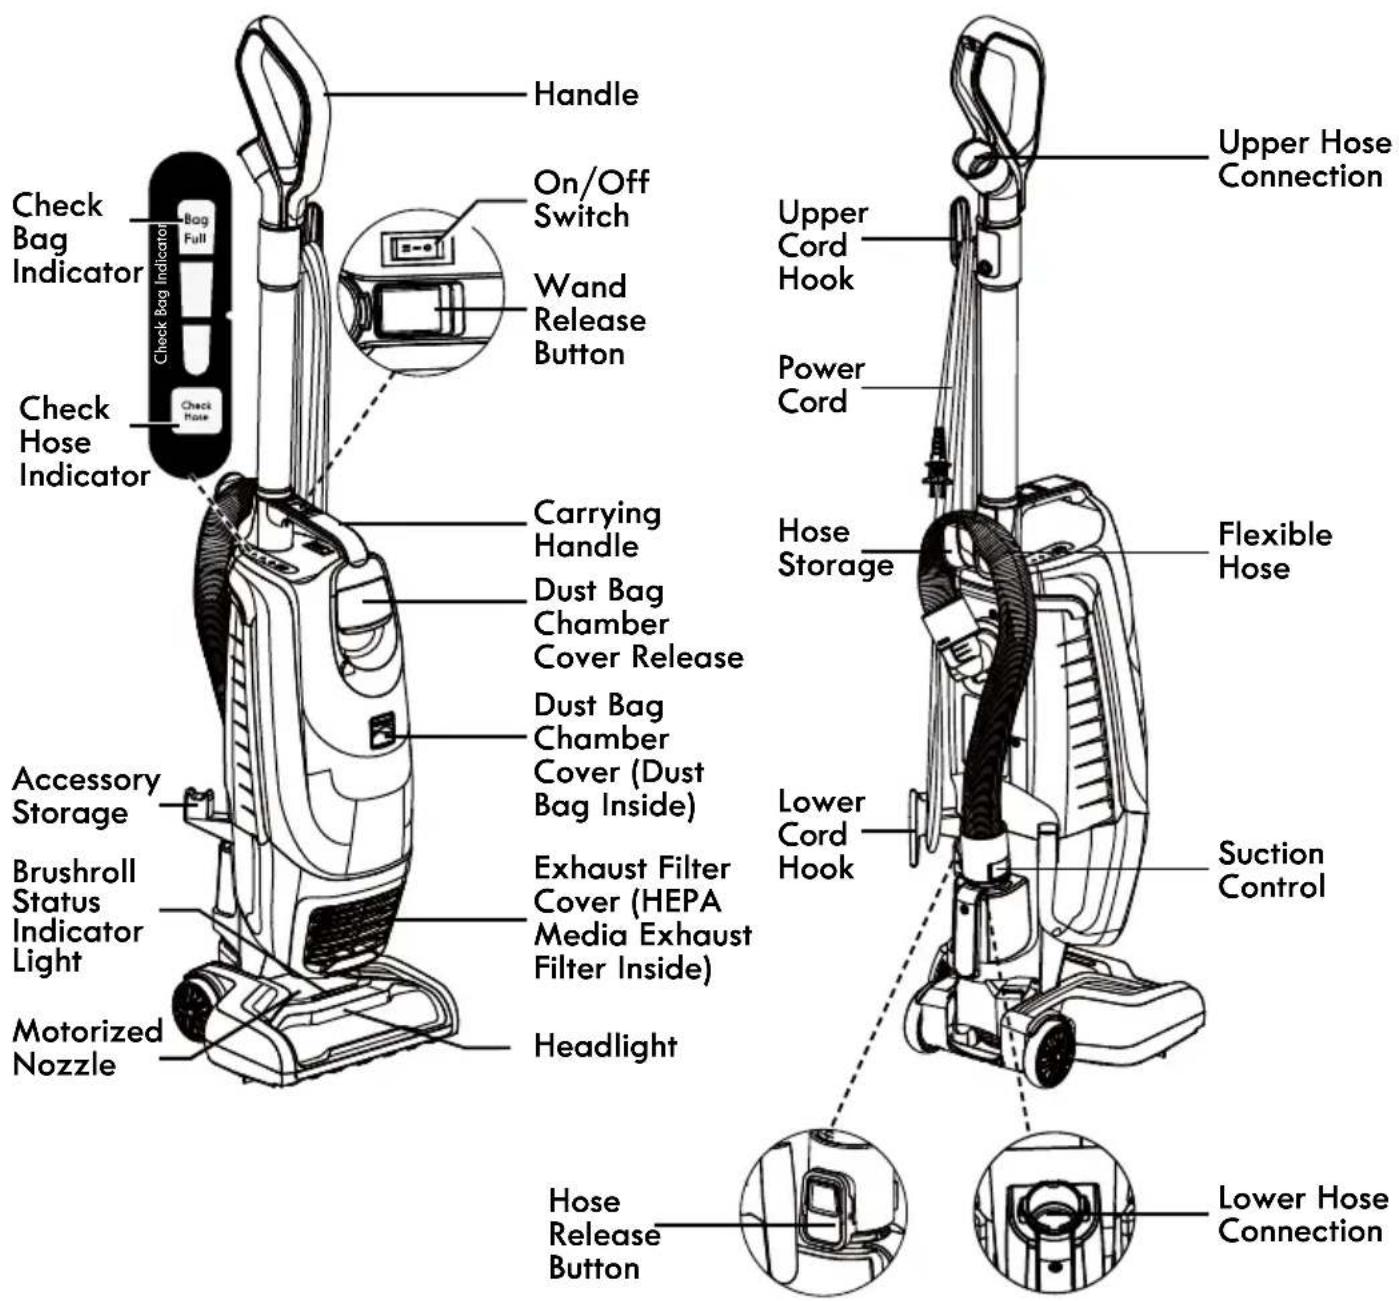

Please pay special attention to these hazard alert boxes, and follow any instructions given. WARNING statements alert you to such hazards as fire, electric shock, burns and personal injury. CAUTION statements alert you to such hazards as personal injury and/or property damage.
ASSEMBLY INSTRUCTIONS
Before assembling the vacuum cleaner, check the PACKING LIST (page 2). Use this list to verify that you have received all the components of your new Kenmore Intuition® Bagged Upright Vacuum Cleaner.
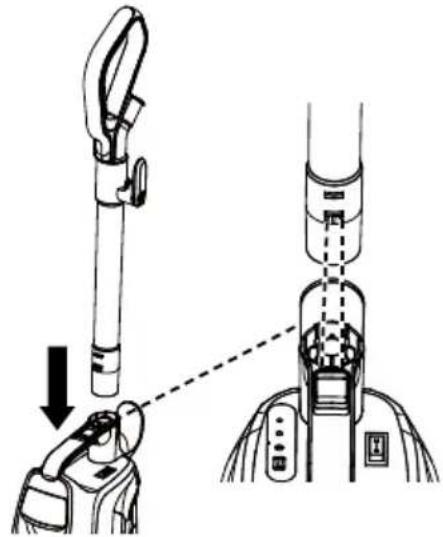
- Insert the handle into the main body until you hear a 'click'.
natural_image
Technical diagram showing a mechanical device with a lever and base, connected to a connector (no text or symbols present)
- Insert the right-angle end of the flexible hose into the main body as shown until you hear a 'click'. Then run the flexible hose over the hose storage. Insert the other end of the hose into the lower hose connection as shown until you hear a 'click'.
NOTE: It is recommended to slightly rotate the hose end when inserting the hose. Make sure both hose ends are clicked into place.

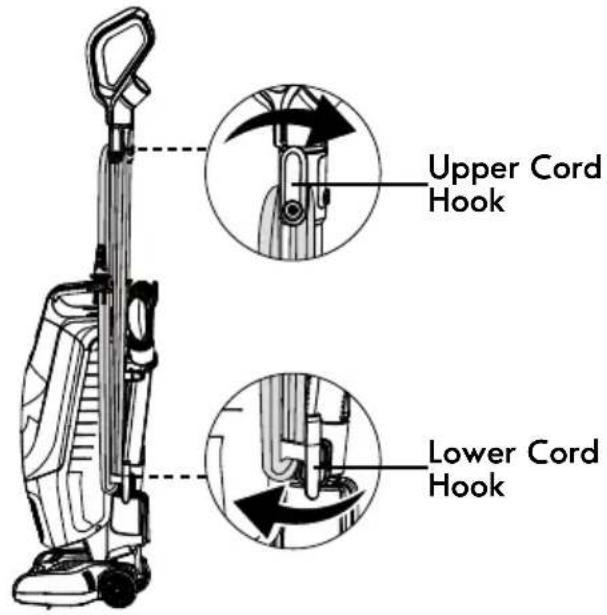
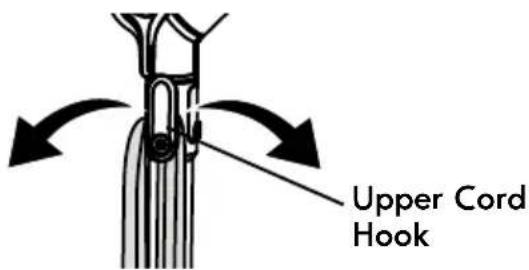
- Make sure the upper and lower cord hooks are in the proper position as shown. Wrap the power cord loosely around the upper and lower cord hooks.
NOTE: Make sure to wrap the power cord around the upper cord hook first, and then around the lower cord hook to avoid damaging the power cord.
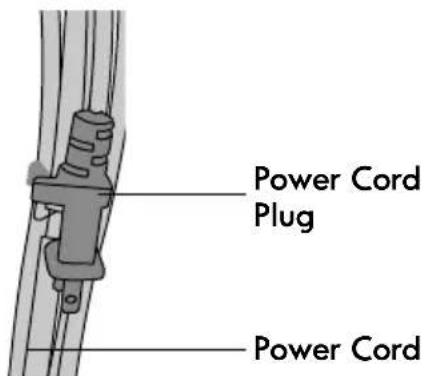
- Lock power cord plug onto the power cord.
ASSEMBLY INSTRUCTIONS

WARNING
Electrical Shock and Personal Injury Hazard
Wrapping the cord too tightly with excessive stress on the cord may cause cord damage. A damaged cord is an electrical shock hazard and could cause personal injury or damage.
OPERATING INSTRUCTIONS

CAUTION
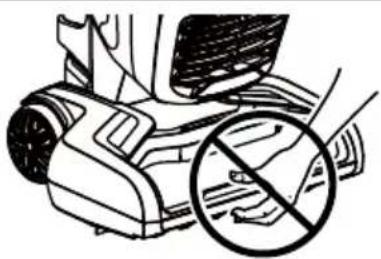
Moving parts! To reduce the risk of personal injury, DO NOT touch the brushroll when vacuum is on. Contacting the brushroll while it is rotating can cut, bruise or cause other injuries. Always turn off after operation. Use caution when operating near children or pets.
natural_image
Illustration of a hand holding a device with a prohibition symbol (no text or labels)
POWER CORD – RELEASE & USE
- Insert the handle into the main body until you hear a 'click'.

WARNING
To reduce the risk of electric shock, this appliance has a polarized plug (one blade is wider than the other). This plug will fit in a polarized outlet only one way. If the plug does not fit fully in the outlet, reverse the plug. If it still does not fit, contact a qualified electrician to install the proper outlet. Do not change the plug in any way.
- Detach the power cord plug from the power cord.
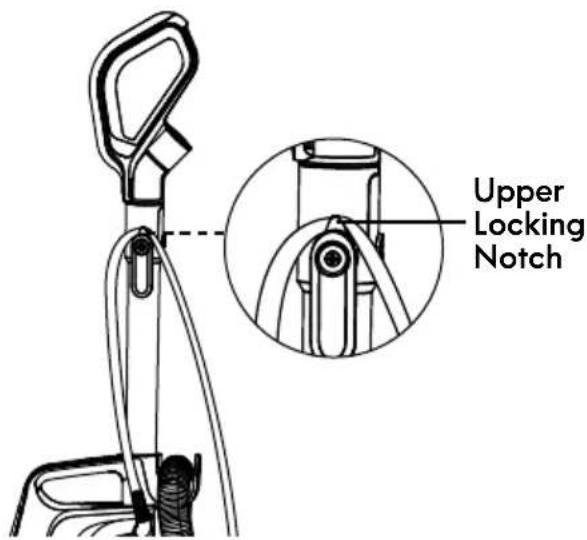
- Be sure the power cord is locked into the upper locking notch as shown. This will help manage the power cord when operating the vacuum cleaner.
POWER CORD - RELEASE & USE
- Plug the power cord plug into an outlet located near the floor.

WARNING
Personal Injury and Product Damage
Hazard
-
When any abnormality/failure occurs, stop using the product immediately and disconnect the power plug.
• DO NOT use outlets above counters. Damage from cord to items in surrounding area could occur.
-
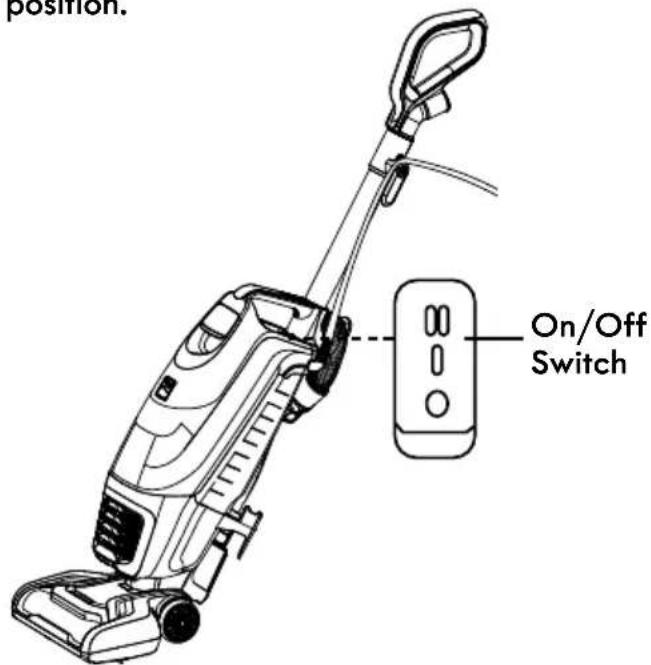
Press the On/Off switch to turn the vacuum cleaner on.
-
Once you have completed vacuuming, press the On/Off switch; unplug the power cord plug from the outlet.
-
To restore power cord after use, turn upper cord hook to the upright position. Then wrap cord loosely around cord hooks.

WARNING
Electrical Shock and Personal Injury Hazard
Wrapping the cord too tightly puts stress on the cord and can cause cord damage. A damaged cord is an electrical shock hazard and could cause personal injury or damage
OPERATION MODES
UPRIGHT MODE
NOTE: Make sure the vacuum cleaner is completely assembled. Do not operate vacuum cleaner without dust bag in place.
NOTE: Make sure the flexible hose is installed correctly into the main body (page 8).
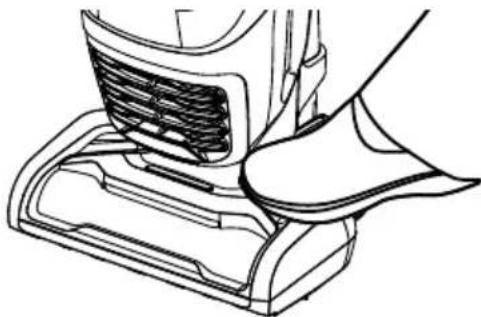
- Release the handle by placing foot on the nozzle and pull back to change handle position.
natural_image
Line drawing of a hand pressing down on a mechanical component (no text or symbols)
- Turn on the vacuum cleaner by pressing the On/Off switch to the "I" position
for cleaning bare floors and small area rugs.
NOTE: The brushroll does not rotate when the vacuum cleaner is in the "l" position.
OPERATION MODES
- Press the switch to the "II" position for cleaning carpets or rugs.
NOTE: The brushroll rotates when the vacuum cleaner is in the "II" position.

CAUTION
Do not allow the vacuum cleaner to remain in one spot for any length of time when the brushroll is turning. Damage to carpet may occur.
- Once you have completed vacuuming, switch to the "O" position and unplug the power cord from the power outlet.
NOTE: Select the right mode when using this vacuum cleaner. Do not press the switch to the "II" position when cleaning the bare floor, otherwise it could potentially damage the floor.
CHECK HOSE INDICATOR & CHECK BAG INDICATOR
When there is a jam in the hose, the check hose indicator will flash red.
As the dust bag fills with dirt and debris, the check bag indicator can be used to estimate the level of bag fill. Once all three LEDs are illuminated red, the bag should be replaced. See page 17 for the dust bag replacement instructions.
| Indicators | Status |
| Check Hose Indicator | Red flashing | There is a jam in the hose. Turn off and unplug the vacuum, and remove any blockages in the hose. |
| Check Bag Indicator | One LED light (furthest left), green continuous | Lights progressively illuminate to show the bag is filling.Replace the bag when all three LED lights begin to illuminate red continuously. |
| Two LED lights, orange continuous |
| Three LED lights, red continuous |

CAUTION
Make sure the dust bag is replaced when all LED lights begin to illuminate red continuously. If not, the LED lights will flash red. If the red flashing remains after replacing the dust bag, check and clean the air path as it is blocked.
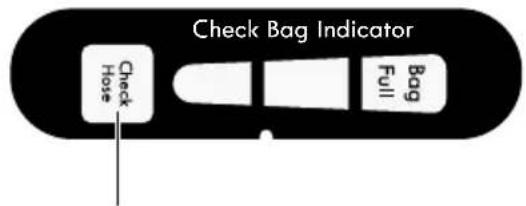
Check Hose Indicator
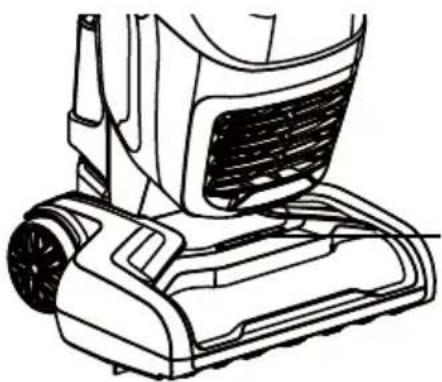
BRUSHROLL STATUS INDICATOR LIGHT
| Brushroll Status Indicator Light | Status |
| Green, Continuous | The brushroll is spinning and working as it should. |
| Red, Continuous | There is a jam in the brushroll area. Turn off and unplug the vacuum, and remove any blockages in the nozzle. |
| No Light The brushroll is off. |
natural_image
Line drawing of a vacuum cleaner's base with visible blades and mounting bracket (no text or symbols)
Brushroll
Status
Indicator
Light
OPERATION MODES
ABOVE FLOOR MODE
- Place the vacuum cleaner in the upright locked position.
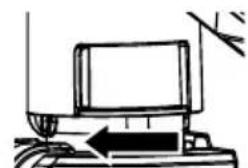
- Press the hose release button and pull up to release the lower hose end from the lower hose connection.
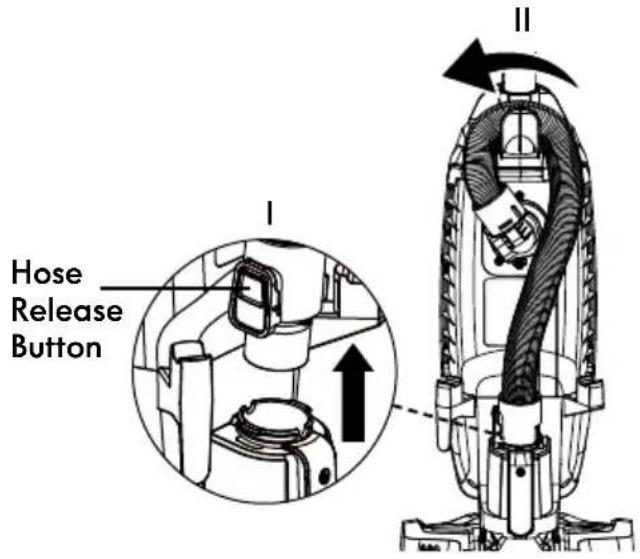
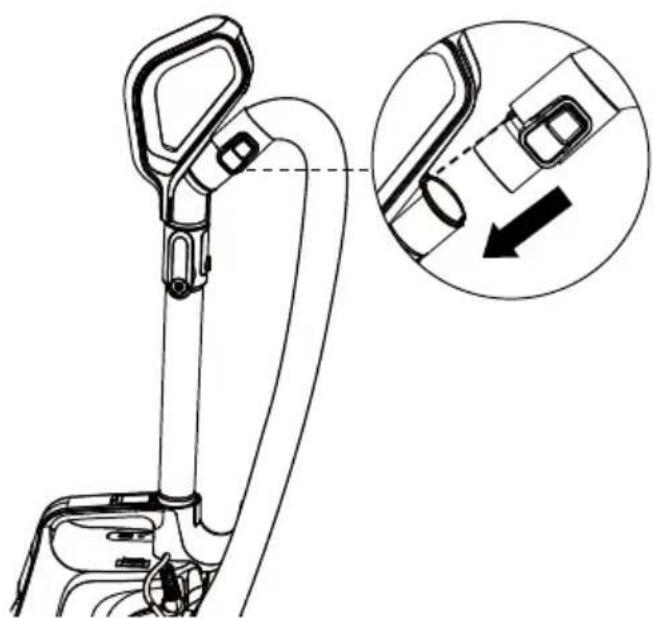
- Insert the hose end into the upper hose connection as shown until you hear a 'click'.
natural_image
Technical line drawing of a mechanical device with a close-up inset showing a component detail (no text or symbols)
- Slide the wand release button and lift up the handle for above floor cleaning.
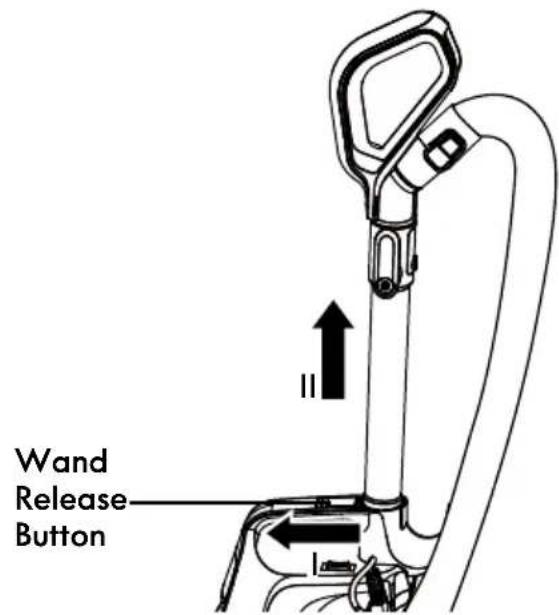
- Choose the desired attachments and insert it into the handle.
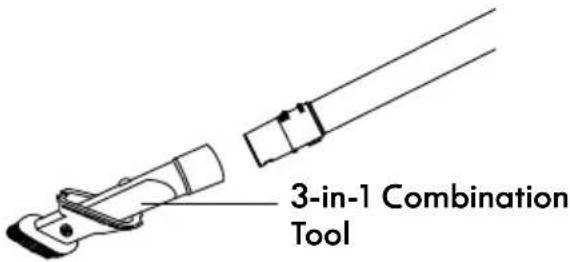
-
Turn on the vacuum cleaner by pressing the switch to the "I" position.
-
Once you have completed vacuuming, switch to the "O" position and unplug the power cord from the power outlet.
IMPORTANT: Remember to re-insert the hose end into the lower hose connection before using the vacuum in upright mode.

CAUTION
When using attachments, be careful not to over extend the stretch hose when reaching. Trying to reach beyond the hose stretch capability could cause the vacuum cleaner to tip over.
OPERATION MODES

CAUTION
DO NOT pull the vacuum cleaner around the room by the hose. Property damage or personal injury could result.
ATTACHMENTS
The 3-in-1 combination tool can be attached to the handle. Slide the collar of the tool over the open end of the handle.
Use the 3-in-1 combination tool in crevice tool mode for cleaning in tight spaces such as furniture, between cushions, and stairs. See ATTACHMENT USE TABLE (page 14).
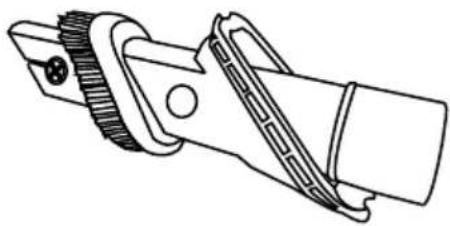
natural_image
Technical line drawing of a mechanical clamp or connector (no text or symbols)
Set the combination tool in dusting brush mode by pressing the release button and sliding the dusting brush side of the brush tool to the end of the combination tool. Use in dusting brush mode for cleaning loose surfaces such as drapes. See ATTACHMENT USE TABLE (page 14).
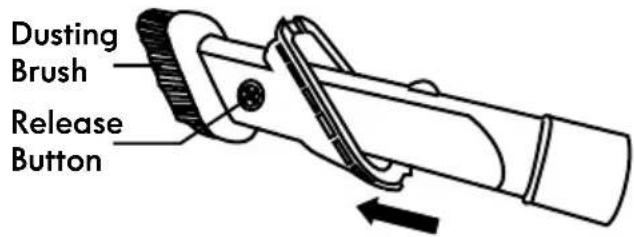
Press the release button to remove the brush tool. Set the combination tool in upholstery brush mode as shown. Use in upholstery brush mode for cleaning fabric surfaces such as fabric sofa. See
ATTACHMENT USE TABLE (page 14).
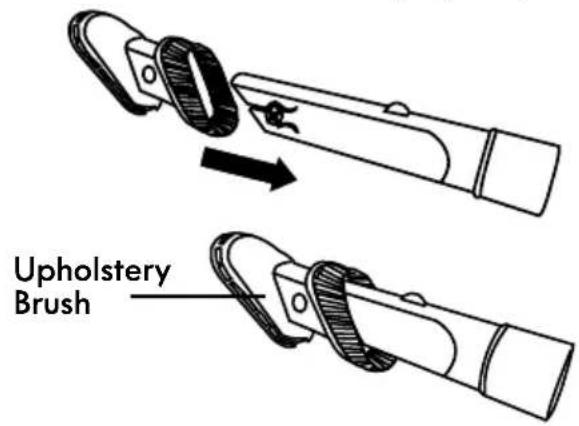
To return the combination tool to crevice tool mode, press the release button and slide the brush tool down the combination tool.
PET HANDIMATE®
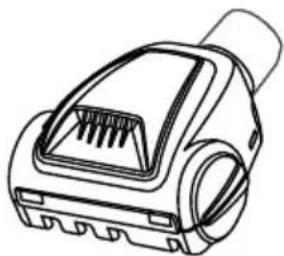
The Pet HandiMate ^® can be attached to the end of the handle.
Pet HandiMate ^® pivots for more convenient cleaning.
Use Pet HandiMate ^® for cleaning fabric surfaces such as furniture and carpet. See ATTACHMENT USE TABLE (page 14).
natural_image
Line drawing of a handheld electric shaver device (no text or symbols)

CAUTION
Use attachments when the vacuum cleaner is upright.
ATTACHMENT USE TABLE
| CLEANING AREA √ = Applicable |
| ATTACHMENT | | Between Cushions* | Drapes* | Stairs | Baseboards Furnit |
| Carpet | Bare |
| CREVICE TOOL |  | √ | √ | | √ | √ | √ |
| DUSTING BRUSH |  | √ | | √ | √ | √ | √ |
| UPHOLSTERY BRUSH |  | √ | | √ | | | |
| PET HANDIMATE® |  | √ | | √ | | | |
*Always clean attachments before using on fabrics.
THERMAL PROTECTOR
This vacuum cleaner has a thermal protector which automatically trips to protect the vacuum cleaner suction motor. If a clog prevents the normal flow of air to the motor, the thermal protector turns the motor off automatically. This allows the motor to cool in order to prevent possible damage to the vacuum cleaner.
To reset thermal protector: Turn the vacuum cleaner off and unplug the power cord from the outlet to allow the vacuum cleaner to cool and the thermal protectors to reset.

CAUTION
Always return the vacuum cleaner to the upright position before using the hose and attachments. Failure to do so may result in overheating of the brushroll motor and can cause the thermal protectors to trip.
Check for and remove clogs, and replace dust bag if necessary. Also check and clean any clogged filters. Wait approximately 50 minutes before restarting vacuum cleaner.
BY-PASS VALVE
This vacuum cleaner has a By-Pass Valve which prevents motor overheating and damage. The valve opens to provide cooling air when a clog prevents normal air flow to the vacuum cleaner suction motor. You will notice a change of sound as air rushes through the valve opening.
To correct the problem: remove any clogs, check and replace filters if needed, check and install new dust bag if needed.
NOTE: The By-Pass Valve may open when using attachments or when cleaning new carpet due to reduced airflow or air path is blocked, caused by the attachments themselves or by new carpet lint filling the dust bag quickly.
BRUSHROLL RESET
The brushroll has built-in protection against motor damage should the brushroll jam. If the brushroll slows down or stops, the brushroll overload protector shuts off the brushroll motor and the brushroll status indicator light emits red light. The vacuum cleaner suction motor will continue to run.
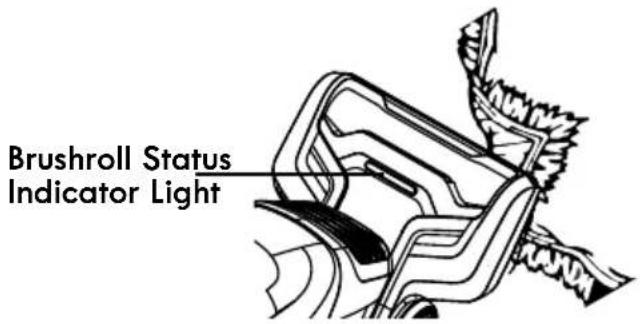
To solve the problem: Turn off and unplug vacuum cleaner, remove obstruction, then turn on the vacuum cleaner.
NOTE: Once the brushroll motor shuts down, clear jam from brushroll and then restart the vacuum cleaner. If the problem persists, contact the vacuum cleaner help line for assistance.
SUCTION CONTROL
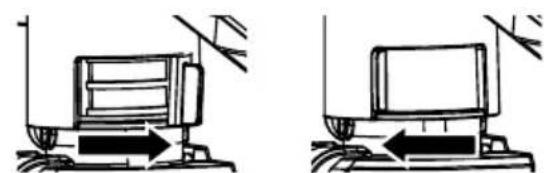
To assist with push/pull force of the vacuum on surfaces like thick carpet, the suction control valve can be opened to help reduce suction. Note that for best cleaning results, the suction control valve must be fully closed.
- Slide to right to open the suction control and decrease suction. Opening control decreases suction for draperies and lightweight rugs.
- Slide to left to close the suction control and increase suction. Closing control increases suction for upholstery and carpets.
natural_image
Two technical line drawings of a computer monitor setup with no visible text or symbols
Decrease Suction Increase Suction
VACUUM MAINTENANCE AND CARE
Always follow all safety precautions when performing maintenance to the vacuum cleaner.

WARNING
Electrical Shock and Personal Injury Hazard
Disconnect electrical supply before servicing or cleaning the vacuum cleaner. Failure to do so could result in electrical shock or personal injury from vacuum cleaner suddenly starting.
CLEANING EXTERIOR AND ATTACHMENTS
- Turn off and unplug vacuum cleaner. DO NOT drip water on vacuum cleaner.
- To clean exterior, or to reduce static electricity and dust build-up, wipe outer surface with a clean, soft cloth that has been dipped in a solution of mild liquid detergent and water, then wrung dry. Wipe dry after cleaning.
NOTE: Wash attachments in warm soapy water, rinse and air dry. Do not clean in dishwasher.

CAUTION
Do not use attachments if they are wet. Attachments used in dirty areas, such as under a refrigerator, should not be used on other surfaces until they are washed. They could leave marks.
VACUUM CLEANER STORAGE

WARNING
Electrical Shock and Personal Injury Hazard
Wrapping the cord too tightly puts stress on the cord and can cause cord damage. A damaged cord is an electrical shock hazard and could cause personal injury or damage.
- Place the flexible hose and attachments in storage position if necessary (see page 8).
- Gather the cord and wrap it loosely around the upper and lower cord hooks. Lock plug retainer onto the power cord. See page 8.
- Store the vacuum cleaner in a dry, indoor area, on the floor with the handle locked in the upright position.
DUST BAG REPLACEMENT
WARNING
Always unplug power cord from electrical outlet before performing any service on vacuum cleaner.
- Pull bag chamber cover release handle out and up, hold the cover using the handle.
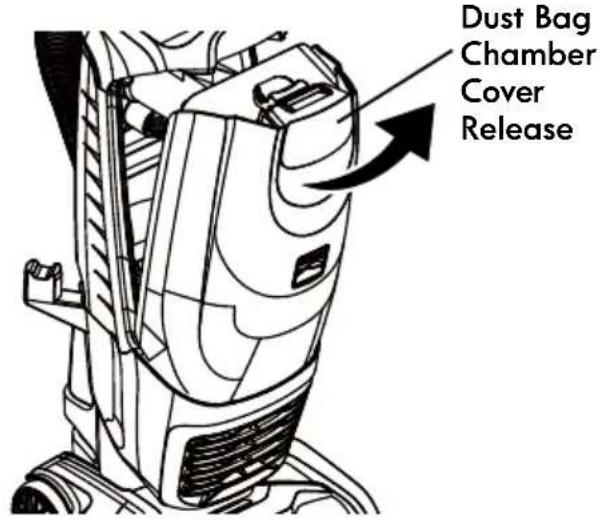
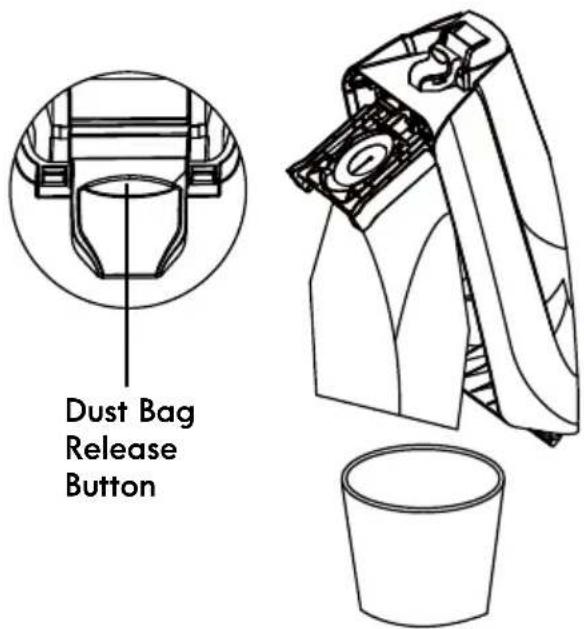
NOTE: Do not press the dust bag release button when release bag chamber cover, or the dust bag will drop down automatically.
- Tilt the bag chamber as shown. Press dust bag release button and the dust bag drops down automatically.
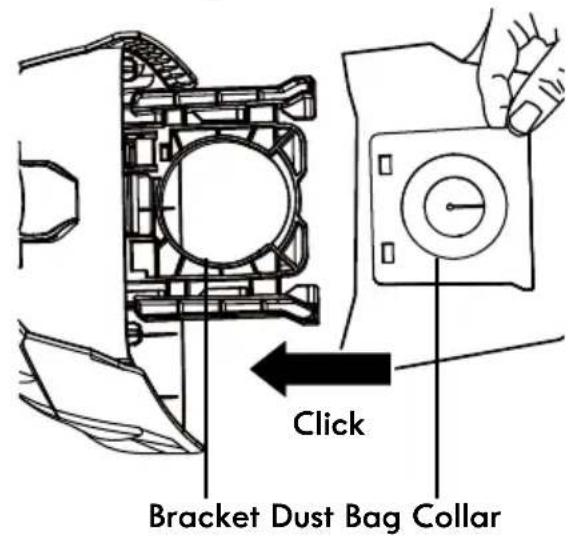
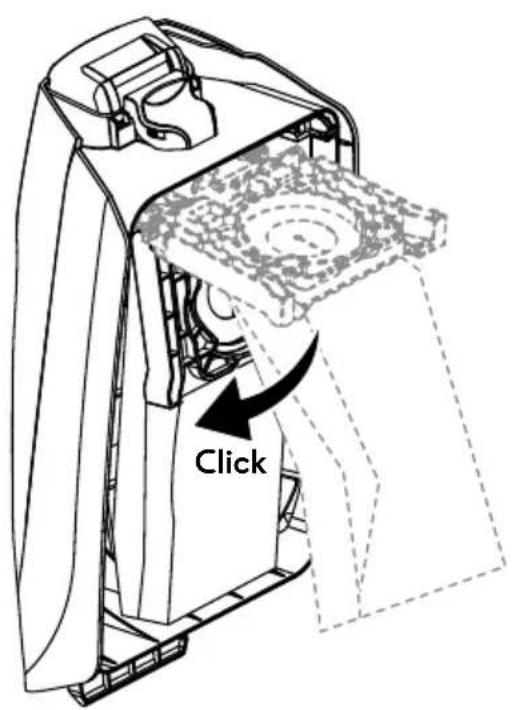
- To install a new dust bag, insert the dust bag collar into bracket until you hear a 'click', and then rotate bracket down until another 'click' can be heard. Tuck the bag into the dust bag chamber. Be sure all sides of the dust bag are flat within the bag chamber.
DUST BAG REPLACEMENT
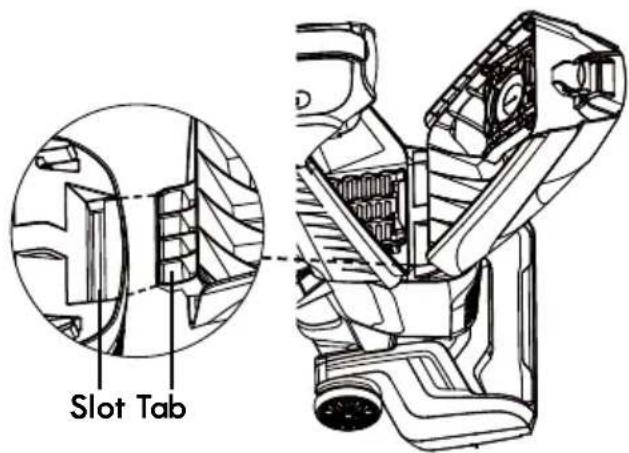
- Place the tab on the dust bag chamber cover in the slot on the vacuum cleaner. Push the dust bag chamber cover into place until a 'click' is heard.
NOTE: Make sure the dust bag is locked into place before pushing the dust bag chamber cover. The dust bag chamber cover can't be assembled successfully if dust bag is missing or not installed into place.
FOAM FILTER CLEANING

WARNING
Electrical Shock Hazard
Unplug power cord from electrical outlet. Do not operate the vacuum cleaner without the foam filter. Be sure the filter is dry and properly installed to prevent motor failure and/or electrical shock.
Clean the foam filter with cold water as needed.
NOTE: When the cleaning of filters no longer restores vacuum cleaner suction to full power, or the filters are worn or broken, replace the filters. To purchase filters, call 1-844-608-3080 (US) / 1-844-608-3081 (CA).
Regularly clean and replace the filters to keep the vacuum's suction power optimal.
- Remove the dust bag as outlined in the DUST BAG REPLACEMENT section (page 17).
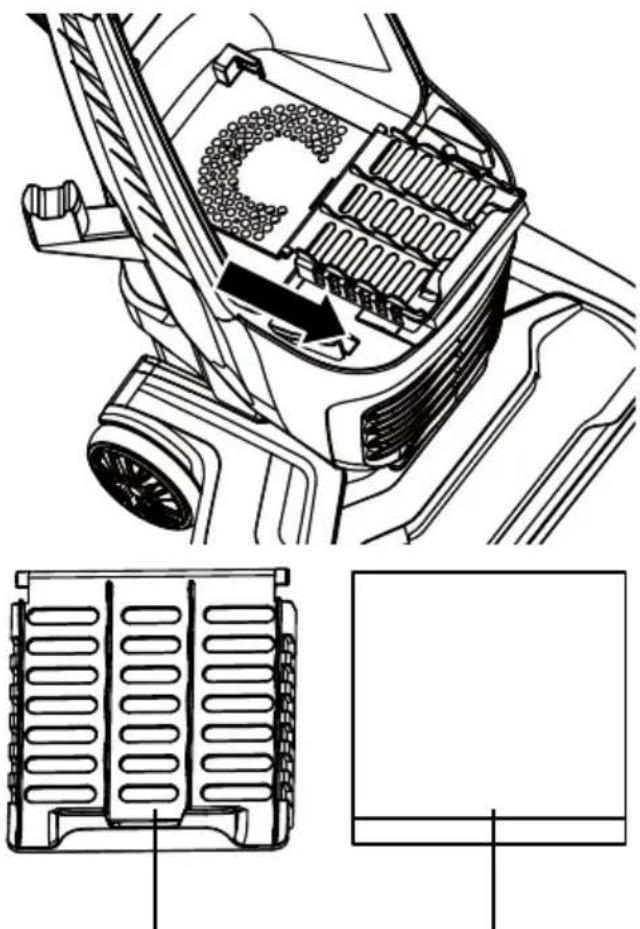
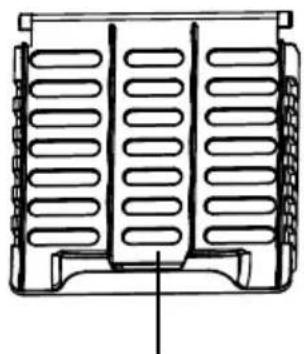
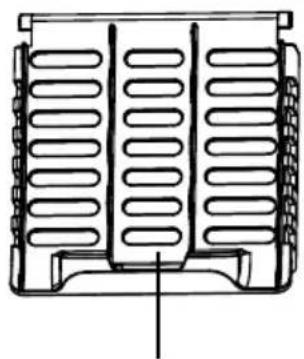
- Remove the foam filter cover and the foam filter.
natural_image
Technical line drawing of a mechanical component with internal structure and two views (top: top-down view, bottom: front view), no text or symbols present.
Foam Filter Cover Foam Filter
FOAM FILTER CLEANING
- Wash the filter in warm soapy water, rinse and dry thoroughly by squeezing the excess water out of the filter and allowing to air dry for 24 hours.
NOTE: DO NOT operate without foam filter installed.
DO NOT wash in the dishwasher.
DO NOT install foam filter if damp.
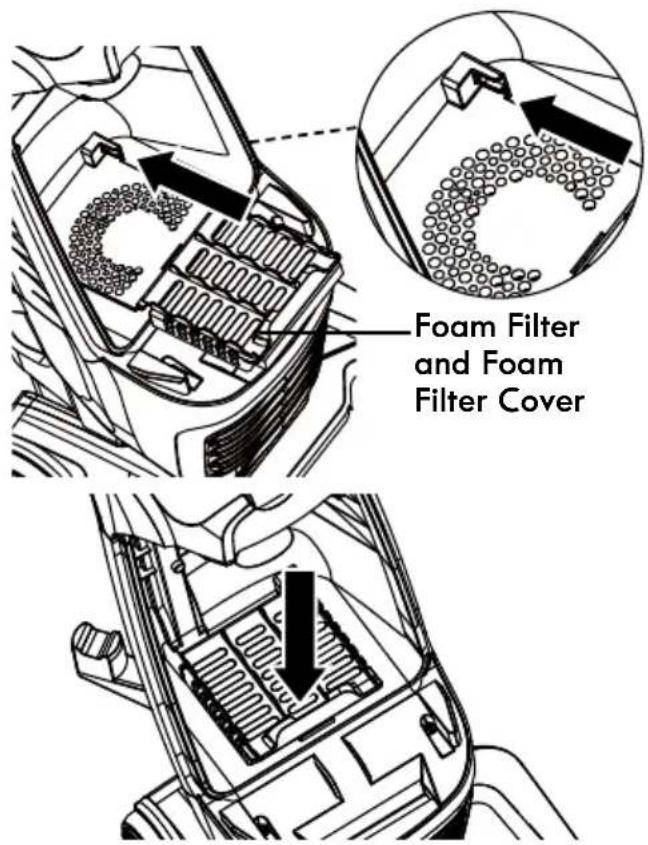
- Reinstall the foam filter into the foam filter cover and slide it to the slots until it is in place. Press the cover to lock it into place until a 'click' can be heard.
NOTE: Replace the foam filter if it is worn or broken.
- Reinstall the dust bag as outlined in the DUST BAG REPLACEMENT section (page 17).
It is recommended to clean the HEPA media exhaust filter with cold water every year.
NOTE: When the cleaning of the filter no longer restores vacuum cleaner suction to full power, or the filter is worn or broken, replace the exhaust filter. To purchase the exhaust filter, call 1-844-608-3080 (US) / 1-844-608-3081 (CA).
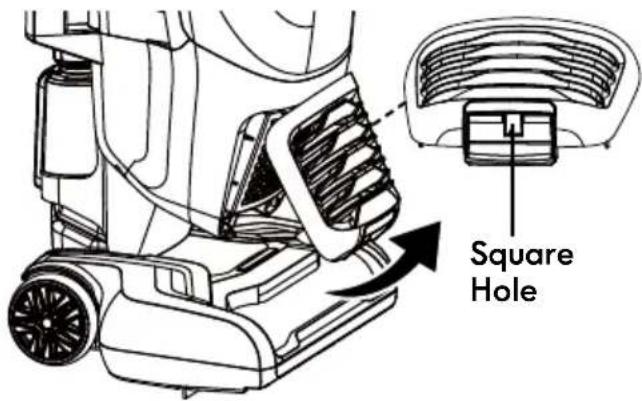
- Remove exhaust filter cover by pulling the square hole outward at the bottom of the cover.
- Remove the HEPA media exhaust filter from vacuum cleaner.

- Wash with cold water only, DO NOT use detergent or soap. Allow to air dry. Allow parts to dry 24 hours before putting back into vacuum cleaner.
NOTE: DO NOT operate without HEPA media exhaust filter installed.
DO NOT wash in the dishwasher.
DO NOT install the filter if damp.
- Reinstall the HEPA media exhaust filter into the vacuum cleaner.
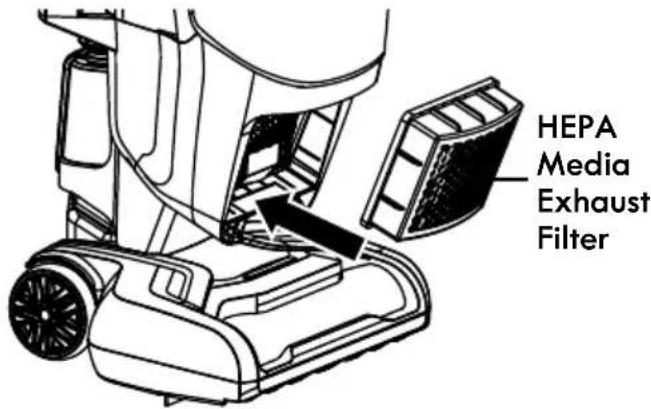
- Insert the exhaust filter cover tabs into the upper slots and lock the exhaust filter cover into place by pressing the bottom of the cover until a click is heard.
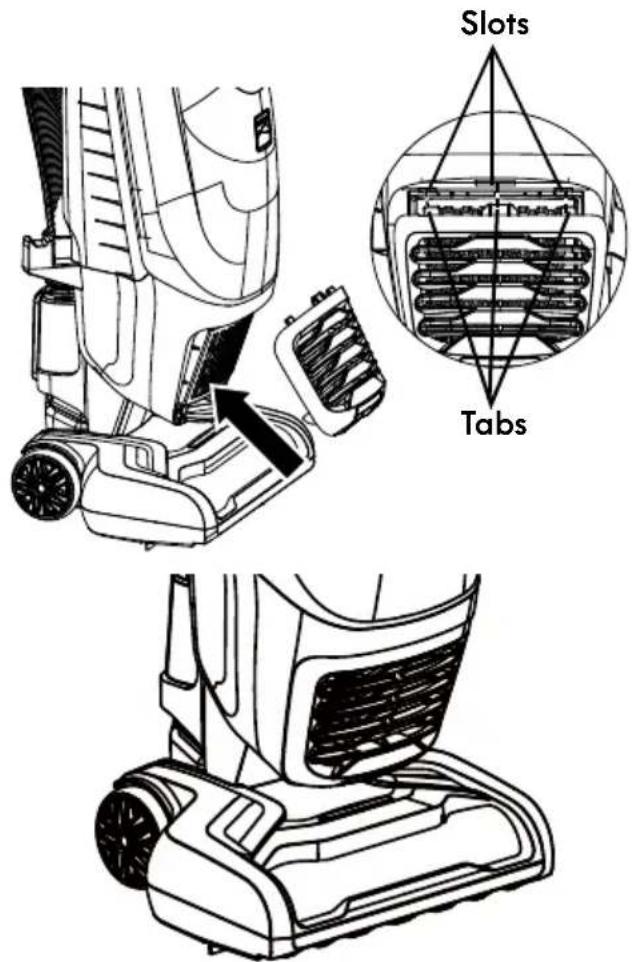
NOTE: Make sure the exhaust filter cover is properly installed.
BRUSHROLL CLEANING
WARNING
Always unplug the power cord from an electrical outlet before performing maintenance to the vacuum cleaner.
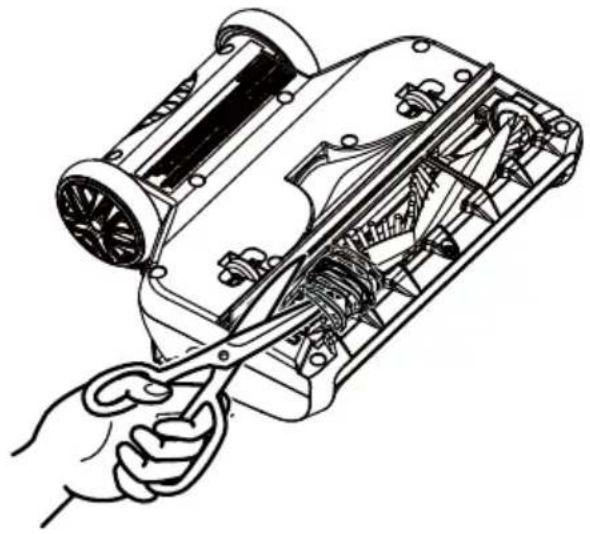
To maintain efficient cleaning, the brushroll must be kept free of carpet fiber, string, or hair build-up. If the brushroll is jammed, unplug and turn vacuum cleaner over and check brushroll for fiber and hair build-up. Use scissors to remove any build-up entangled around the brushroll. Cleaning the brushroll periodically is recommended for best performance.
natural_image
Line drawing of a hand using a tool to adjust internal components of an electric motor (no text or symbols present)
PET HANDIMATE® CLEANING
WARNING
Always unplug the power cord from an electrical outlet before performing maintenance to the vacuum cleaner.
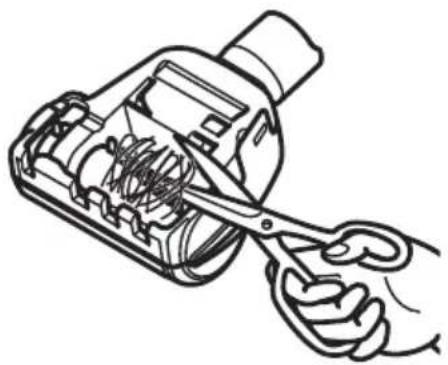
Cut off any carpet pile and lint entangled around brushroll with a pair of scissors.
CAUTION
To reduce the risk of injury from moving parts, remove Pet HandiMate ^® from the handle before servicing.
natural_image
Line drawing of a hand using scissors to cut internal components of a device (no text or symbols)
REMOVING CLOGS

WARNING
Disconnect electrical supply before removing clogs. Failure to do so could result in electrical shock or personal injury.
CHECKING FLEXIBLE HOSE FOR CLOGS
If there is noticeable abnormal noise when using the vacuum or the suction power suddenly drops, it is necessary to check the air path for clogs.
Frequently check air path to make sure it is free of obstructions.
NOTE: The four LED lights of bag fill level indicator flash red when the air path is blocked.
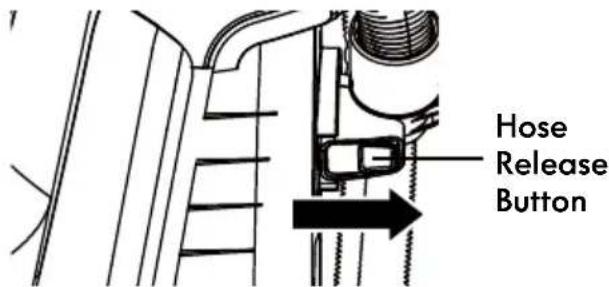
- Press the hose release button and remove the hose from the main body. Release the other end of the hose from the lower hose connection.
-
Check and remove any clogs in the flexible hose.
-
Reinstall the flexible hose to the vacuum cleaner. See ASSEMBLY (page 8).
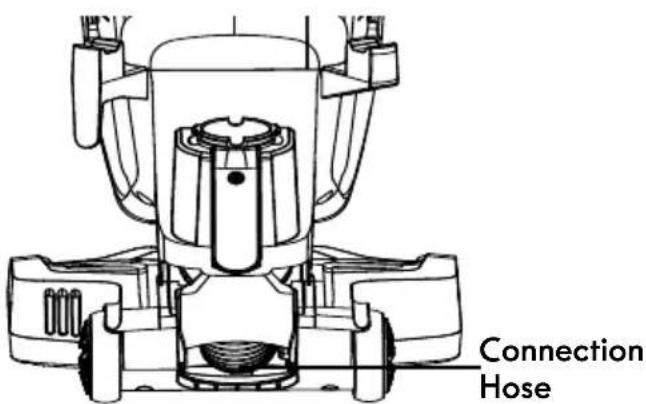
CHECKING CONNECTION HOSE FOR CLOGS
- Release the hose end from the lower hose connection.
- Check and remove any clogs in the connection hose.
- Reattach the flexible hose onto the lower hose connection.
TROUBLESHOOTING
Review this table to find do-it-yourself solutions for minor performance problems. Any service needed, other than maintenance described in this Use & Care Guide, should be performed by a qualified service agent.

WARNING
Disconnect electrical supply before performing maintenance to the vacuum cleaner. Failure to do so could result in electrical shock or personal injury.
| PROBLEM POSSIBLE CAUSE SOLUTION | |
| Vacuum cleaner won't run. | Unplugged at wall outlet. | Plug in firmly, press the On/Off switch to “I” or “II” position. |
| The On/Off switch is not pressed to start the vacuum cleaner. | Press the On/Off switch to “I” or “II” position. |
| Defective wall outlet. | Check with a good appliance or lamp. Have outlet properly serviced. |
| The vacuum body is overheated. | Unplug the power cord and let the vacuum cool down for 50 minutes. |
| The motor is damaged. | Call 1-877-531-7321 (US) / 1-844-608-3081 (CA) for assistance. |
| Poor job of dirt pick-up. | The hose and attachments are not installed correctly. | Check the hose and attachments for correct installation and ensure they are snapped firmly in place. |
| The hose is not installed in correct place when using the upright mode. | Check and ensure the hose is installed correctly into the main body (page 8). |
| Dust bag is not installed correctly. | Check dust bag for correct installation and ensure it is snapped firmly in place. |
| Full or clogged dust bag. Change the dust bag (page 17). |
| There is a clog in the air path. | Check and remove all clogs. Follow instructions on page 21-22. |
| Suction control is in open position. | Adjust the suction control to increase suction. Follow instructions on page 15. |
| The foam filter or HEPA media exhaust filter needs to be cleaned or replaced. | Clean or replace the foam filter or HEPA media exhaust filter. Follow the foam filter cleaning or HEPA media exhaust filter cleaning instructions on page 18-19 or 19-20. |
| The hose is worn. | Replace the hose assembly. To purchase parts, call 1-877-531-7321 (US) / 1-844-608-3081 (CA). |
TROUBLESHOOTING
| The connection hose is worn. | Call 1-877-531-7321 (US) / 1-844-608-3081 (CA) for assistance. |
| The brushroll is worn. | Call 1-877-531-7321 (US) / 1-844-608-3081 (CA) for assistance. |
| The belt is worn or broken. | Call 1-877-531-7321 (US) / 1-844-608-3081 (CA) for assistance. |
| Dust escapes from vacuum. | Dust bag or dust bag chamber cover is not installed correctly. | Check the dust bag or dust bag chamber cover for correct installation and ensure they are snapped firmly in place. Follow instructions on page 17. |
| HEPA media exhaust filter is installed incorrectly. | Check exhaust filter for correct installation. Follow instructions on page 19-20. |
| The dust bag is worn or broken. Check and replace the dust bag. |
| Foam filter or HEPA media exhaust filter is worn or broken. | Check and replace the foam filter or the HEPA media exhaust filter. |
| Brushroll does not turn. | Handle is in fully upright position. Move handle from the fully upright position. |
| Select the wrong mode. | Press the switch to the “II” position to start the brushroll. |
| Brushroll is jammed. | Remove obstruction. Follow instructions on page 21. |
| Brushroll is not installed correctly. | Call 1-877-531-7321 (US) / 1-844-608-3081 (CA) for assistance. |
| The belt is not routed correctly. | Call 1-877-531-7321 (US) / 1-844-608-3081 (CA) for assistance. |
| Fault in PCB section of the motorized nozzle. | Call 1-877-531-7321 (US) / 1-844-608-3081 (CA) for assistance. |
| Sound changes. | Exhaust filter cover is installed incorrectly. | Position exhaust filter cover correctly and snap firmly into place. Follow instructions on page 20. |
| Air path is blocked. | Check for and remove any clogs and clean the air path. Follow instructions on page 21-22. |
| Attachments in use restrict air flow. | Check attachments for fuzz, lint, pet hair or other debris. |
| Vacuum turns off on its own. | The power cord plug is loose from the outlet when using the vacuum. | Reinsert the power cord plug fully into the outlet. Avoid pulling or dragging the power cord when using the vacuum. |
| Thermal protector is activated. | Turn the vacuum cleaner off and unplug it. Check the air path and dust bag. Allow the vacuum cleaner to cool for a minimum of 50 minutes. Plug in vacuum and turn it on. |
| The motor is damaged. | Call 1-877-531-7321 (US) / 1-844-608-3081 (CA) for assistance. |
TROUBLESHOOTING
| Brushroll status indicator light emits red. | There is a jam in the brushroll area. | Turn off and unplug the vacuum. Remove any blockages in the brushroll. See page 15. |
| The brushroll is worn or broken. | Call 1-877-531-7321 (US) / 1-844-608-3081 (CA) for assistance. |
| Faulty brushroll motor or PCB section of the motorized nozzle. | Call 1-877-531-7321 (US) / 1-844-608-3081 (CA) for assistance. |
| The brushroll motor is overheated. | Turn off and unplug the vacuum. Allow the vacuum to cool for a moment. Plug in vacuum and turn it on. |
| Dust bag chamber cover can’t be installed. | Dust bag is missing. Install the dust bag. | |
| Dust bag collar is not installed into bracket correctly or the bracket is not rotated down into place. | Insert the dust bag collar into bracket until you hear a ‘click’. Rotate bracket down until another ‘click’ can be heard. Follow instructions on page 17. |
| The bracket is broken. | Call 1-877-531-7321 (US) / 1-844-608-3081 (CA) for assistance. |
TABLA DE CONTENIDOS
SECCIÓN PÁGINA
Cleva North America, Inc., Greenville SC 29607
PIEZAS Y CARACTERÍSTICAS
natural_image
Technical diagram showing a mechanical device with a lever and base, connected to a connector (no text or symbols present)
natural_image
Illustration of a hand holding a device with a prohibition symbol (no text or labels present)
natural_image
Line drawing of a hand pressing down on a mechanical component (no text or symbols)
natural_image
Line drawing of a vacuum cleaner with visible blades and housing (no text or symbols)
natural_image
Technical illustration of a carabiner handle with magnified detail showing internal components (no text or symbols)
natural_image
Technical line drawing of a mechanical clamp or connector assembly (no text or symbols)
natural_image
Line drawing of a mechanical component with no visible text or symbols

PRECAUCIÓN
natural_image
Technical line drawing of a mechanical component with no visible text or symbols
natural_image
Simple line drawing of a computer monitor with an arrow pointing to it, no text or symbols present.
Reducir la succión
natural_image
Simple line drawing of a computer monitor on a keyboard with an arrow indicating leftward movement (no text or symbols)
Aumentar la succión
MANTENIMIENTO Y CUIDADO DE LA ASPIRADORA
natural_image
Technical line drawing of a mechanical device with internal components and a directional arrow (no text or symbols)
natural_image
Technical line drawing of a mechanical component with internal channels and mounting base (no text or symbols)
natural_image
Simple geometric diagram with a rectangle and a vertical line intersecting at the bottom (no text or symbols)
Filtro de espuma
LIMPIEZA DEL FILTRO DE ESPUMA
natural_image
Line drawing of a hand using a tool to cut or inspect internal components of an electric motor (no text or symbols present)
LIMPIEZA CON EL PET HANDIMATE®

ADVERTENCIA
natural_image
Line drawing of a hand using scissors to cut internal components of a device (no text or symbols)
CÓMO QUITAR OBSTRUCCIONES

ADVERTENCIA
Cleva North America, Inc., Greenville SC 29607
PIÈCES ET FONCTIONNALITÉS
natural_image
Stack of three overlapping sheets with circular buttons, no text or symbols present
natural_image
Technical diagram showing a mechanical device with a lever and base, connected to a connector (no text or symbols present)
natural_image
Illustration of a hand holding a device with a prohibition symbol (no text or labels present)
CORDON D'ALIMENTATION: DÉGAGEMENT ET UTILISATION
natural_image
Diagram of a mechanical linkage or cable assembly with directional arrows indicating motion (no text or symbols)
natural_image
Line drawing of a mechanical component with a handle and meshing (no text or symbols)
natural_image
Line drawing of a vacuum cleaner with mesh chamber and wheels (no text or symbols)
natural_image
Technical line drawing of a car seatbelt buckle with an inset showing the detail of the buckle (no text or symbols present)
natural_image
Technical line drawing of a mechanical clamp or connector (no text or symbols)
natural_image
Mechanical assembly diagram showing a lever mechanism with no visible text or symbols
ACCESSOIRE PET HANDIMATE
natural_image
Line drawing of a mechanical component with no visible text or symbols
ATTENTION
natural_image
Technical line drawing of a mechanical assembly with no visible text or symbols
natural_image
Simple line drawing of a mechanical device with an arrow indicating direction (no text or symbols)
natural_image
Simple line drawing of a desktop computer with monitor and keyboard (no text or symbols)
NETTOYAGE DU FILTRE EN MOUSSE

AVERTISSEMENT
natural_image
Technical line drawing of a mechanical device with internal components and a circular component (no text or symbols)
natural_image
Technical line drawing of a heat exchanger or cooling unit with no visible text or symbols
natural_image
Simple geometric diagram with a rectangle and a vertical line intersecting it (no text or symbols)
Filtre en mousse
NETTOYAGE DU FILTRE EN MOUSSE
natural_image
Line drawing of a hand using scissors to cut the internal structure of an electric fan (no text or symbols present)
NETTOYAGE DE L'ACCESSOIRE PET HANDIMATE®

AVERTISSEMENT
natural_image
Line drawing of a hand using scissors to cut the internal structure of a device (no text or symbols present)
ÉLIMINATION DES OBSTRUCTIONS
AVERTISSEMENT
Vacuum Cleaner Help Line