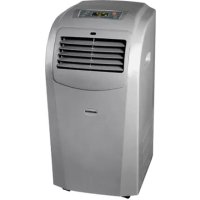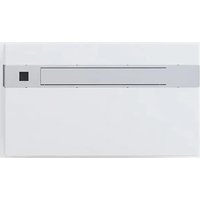
KLIMA KING+ - Air Conditioning Sonnenkönig - Free user manual and instructions
Find the device manual for free KLIMA KING+ Sonnenkönig in PDF.


User questions about KLIMA KING+ Sonnenkönig
0 question about this device. Answer the ones you know or ask your own.
Ask a new question about this device
Download the instructions for your Air Conditioning in PDF format for free! Find your manual KLIMA KING+ - Sonnenkönig and take your electronic device back in hand. On this page are published all the documents necessary for the use of your device. KLIMA KING+ by Sonnenkönig.
USER MANUAL KLIMA KING+ Sonnenkönig
Festnetz 14 Cent/Minute
ICONS LCD Description

Auto
Refroidissement
Sechant
Ported vanne
Chauffage
Modifications techniques
Festnetz 14 Cent/Minute
Festnetz 14 Cent/Minute
1 Safty instructions. 57
2 Technical details 59
3 Pars description 60
4 Accessories. 60
5 Installation 61
6 Operation. 65
7 Cleaning. 67
8 Troubleshooting 68
9 Warranty / Disposal / Technical modifications 69
1. SAFETY INSTRUCTIONS
Please read before first commissioning the safety instructions carefully and observe the safety instructions to prevent damage due to misuse, improper operation, and improper environmental conditions to be avoided. Keep these for later reference.
Check the device after removing the packaging for damage. Do not put the unit in case of suspected corruption in operation and consult a specialist. The recyclable packaging material must not be stored or disposed accessible for young children, but must be disposed of properly. This appliance is only for the purpose for which it was explicitly developed. Any other use is regarded as improper and therefore dangerous. The supplier is not liable for damage to persons and / or property damage due to an improper or incorrect use.
This appliance can be used by children aged from 8 years and above and persons with reduced physical, sensory or mental capabilities or lack of experience and knowledge if they have been given supervision or instruction concerning use of the appliance in a safe way and understand the hazards involved. Children shall not play with the appliance. Cleaning and user maintenance shall not be made by children without supervision. Please make sure to place the device on a suitable and waterproof surfaces, so that spilled liquids can not cause harm.
Repairs to electrical appliances must only be carried out by trained personnel only. Improperly performed repairs and alterations to the equipment can have dangerous consequences for the user according to what the warranty will be rejected.
VERY IMPORTANT! Wait at least 12 hours after unpacking the device before using it! Please do not install or use your lokale air conditioner before you have carefully read this manual. Please keep this instruction manual for possible warranty claims and for future reference.
WARNING
- The device shall be stored in a room without continuously operating ignition sources (for example: open flames, an operating gas appliance or an operating electric heater).
- Do not pierce or burn the device.
- Be aware that refrigerants may be odourless.
Specific information regarding appliances with R290 refrigerant gas:
- Thoroughly read all the warnings.
- When defrosting and cleaning the device, do not use any tools other than those recommended by the manufacturing company.
- The device must be placed in an area without any continuously operating sources of ignition (for example: open flames, gas or electrical appliances in operation).
- Do not pierce or burn the device.
- R290 is a refrigerant gas that complies with the European directives on the environment. Do not puncture any part of the refrigerant circuit.
- If the device is installed, operated or stored in a non-ventilated area, the room must be designed to prevent the accumulation of leaking refrigerant as it poses a risk of fire or explosion if the refrigerant is ignited by electric heaters, stoves or other sources of ignition.
-
The device must be stored in such a way as to prevent mechanical failure.
-
Individuals who operate or work on the refrigerant circuit must have the appropriate certification issued by an accredited organisation that ensures competence in handling refrigerants according to a specific evaluation recognised by the associations in the industry.
-
Repairs must be performed based on the recommendation from the manufacturing company. Maintenance and repairs that require the assistance of other qualified personnel must be performed under the supervision of an individual specified in the use of flammable refrigerants.
EN
Safety Awareness
Do not use the device on a socket which is under repair or not installed properly.
Do not use the device in the following situations:
A: Near sources of fire.
B: In an area where oil is likely to splash.
C: In an area exposed to direct sunlight.
D: In an area where water is likely to splash.
E: Near a bath, a shower or a swimming pool.
- Never insert your fingers, sticks or similar objects into the air outlet. Take special care with and warn children of these dangers.
- Keep the unit upright during transport and storage so the compressor remains properly positioned.
- Before cleaning the air conditioner, always turn off or disconnect the power supply.
- When moving the air conditioner, always turn it off first, disconnect the power supply and move it slowly.
- To avoid a fire hazard, do not cover the air conditioner.
- All the sockets for the air conditioner must comply with the local electric safety requirements. If necessary, please check the requirements.
- Young children should be supervised to ensure that they do not play with the device.
- If the power cord is damaged, it must be replaced by the manufacturer, its service agent or similarly qualified persons in order to avoid a hazard.
- This appliance can be used by children aged 8 years and above and persons with reduced physical, sensory or mental capabilities or lack of experience and knowledge if they have been given supervision or instruction concerning use of the appliance in a safe way and understand the hazards involved. Children shall not play with the appliance. Cleaning and user maintenance shall not be made by children without supervision.
- The appliance shall be installed in accordance with national wiring regulations.
- Details of type and rating of fuses: T, 250V AC, 2A.
- To prevent possible harm to the environment or human health from uncontrolled waste disposal, recycle it responsibly to promote the sustainable reuse of material resources. To return your used device, please use the return and collection systems or contact the retailer where the product was purchased. They can take this product for environmental safe recycling.
- GWP: R290: 3
- Contact an authorised service technician for repair or maintenance of this device.
- Do not pull, deform or modify the power cord or immerse it in water. Pulling or misuse of the power cord can result in damage to the device and cause electrical shock.
- Compliance with national gas regulations shall be observed.
- Keep ventilation openings clear of any obstruction.
- Any person involved in working on or accessing a refrigerant circuit should hold a current valid certificate from an industry-accredited assessment authority, which authorises their competence to handle refrigerants safely in accordance with an assessment specification recognised by the industry.
-
Servicing shall only be performed as recommended by the manufacturer of the device. Maintenance and repair requiring the assistance of other skilled personnel shall be carried out under the supervision of the person competent in the use of flammable refrigerants.
-
Do not operate or stop the device by inserting or pulling out the power plug, as it may cause electric shock or fire due to heat generation.
- Unplug the device if strange sounds, smell, or smoke come from it.
Notes
- If any parts are damaged, please contact the dealer or a designated repair shop.
- In case of any damage, please turn off the air switch, disconnect the power supply and contact the dealer or a designated repair shop.
- The power cord must always be firmly grounded.
- To avoid any hazard resulting from a damaged power cord, please turn off the air switch and disconnect the power supply. It must be replaced by the dealer or a designated repair shop.
DO NOT place the unit on water sensitive surfaces to prevent damage from leaking liquids.
2. TECHNICAL DETAILS
Model KLIMA KING+
Leistung 1200 W
| accessories name | |
| fastening brtacket | |
| external grating | |
| 160 / 150 mm ring | |
| 2 x plastic sheet air pipe | |
| drainage pipe | |
| paper template for wall drilling | |
| kit of screws | |
| remote control and holder |
5. INSTALLATION
POSITIONING THE AIR CONDITIONER
To maintain the best performance from your air conditioner, prevent breakdowns or hazards, you must position it correctly. Please fol low the guidelines and instruction below in full, as failure to do so could cause potential installation problems.
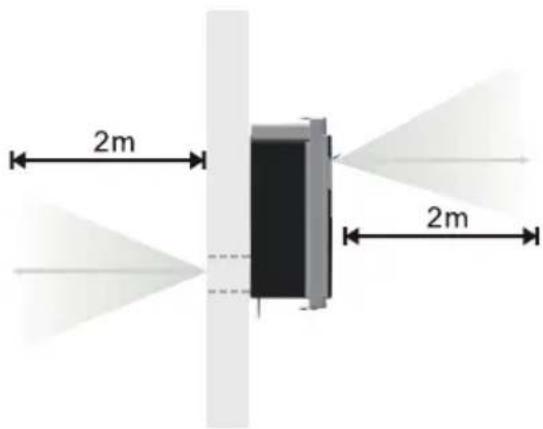
- The air conditioner must be installed on an exterior wall that has access to the outside with a minimum of 2 meters clearance to the outside.
- The air conditioner must be fitted leaving room all around as illustrated in the paper tem plate
- The wall on which the air conditioner is installed must be sturdy and able to withstand the weight of the air conditioner.
After determining the best place for installation as described above, please check to ensure that the wall can be drilled in the chosen area without interfering with other structures or installations (beams, piers, pipes, wires, etc.).
Please also ensure that there are no obstacles on the outside of the wall, which may obstruct air circulation through the drilled holes, for example: plants and their leaves, slats or panelling, drain pipes, overflows and gratings, etc.). Any obstruction could interfere with the correct performances of the air conditioner.
PAPER TEMPLATE
Fasten the template to the wall once the following guidelines have been thoroughly checked.
Do not drill any holes until you are completely confident that there are no obstacles in the area you wish to drill and there are no obstructions, which could be hidden by the construction of the wall, for example: Electrical wiring water & gas pipes or supporting lintels or beams.
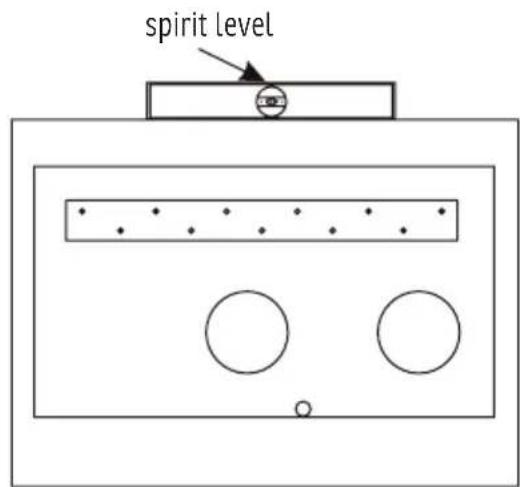
Ensure that a spirit level is used, as the air conditioner must be level.
Follow the installation instructions in full.
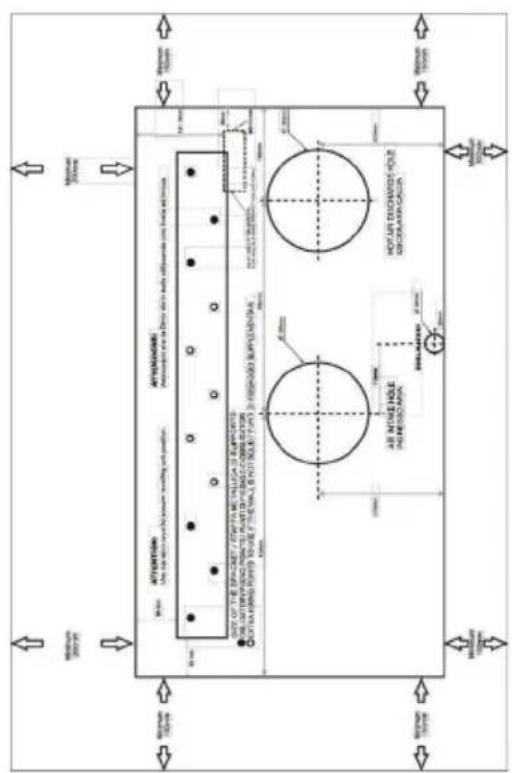
Wall Drilling
Please note: If you are drilling the hole above ground level, please ensure that one area is secured and the outside area is monitored during drilling until the hole is completed.
EN
Inlet and outlet holes
This operation should be carried out with the following tools suitable tool (diamond drill or core drill with high torque and adjustable speed).
Fix the template to the wall, making sure that the distance to the floor or ceiling is maintained.
Mark the centre of each core hole to be drilled with a pilot drill.
Use a 162mm diameter core drill to drill the two holes for the air inlet and outlet.
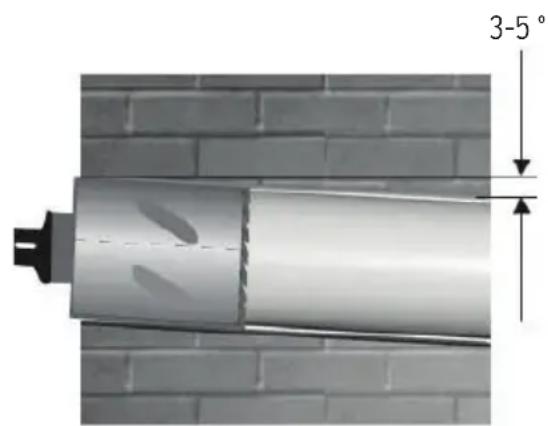
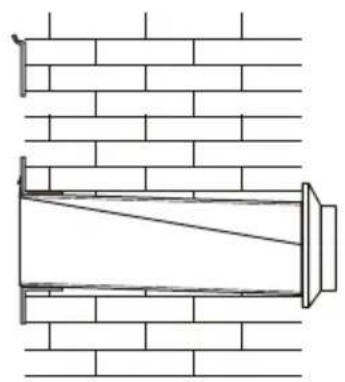
It is recommended that the holes demonstrate a slight downward slope of 3-5 degrees to prevent backflow of water from the two pipes.
Drain pipe
This air conditioner has a double system for automatic condensate moisture drainage. Before installing the air conditioner, select the system that is suitable for you. Please read the following instructions carefully.
System «A»: Drill a 30~mm diameter hole in the wall at the location indicated in the paper template. Drainage is by gravity. For this reason, it is important that the drain pipe has a downward slope of at least 3 degrees along its entire length: Connect the drain pipe (from the rubber clamp) to the air conditioner (back) after removing the black rubber shell. This solution allows you to drain the condensation moisture to a suitable place so as not to cause problems for your neighbours.
If you use system «A», please do not pull the black rubber cup from system «B».
Innen Aussen
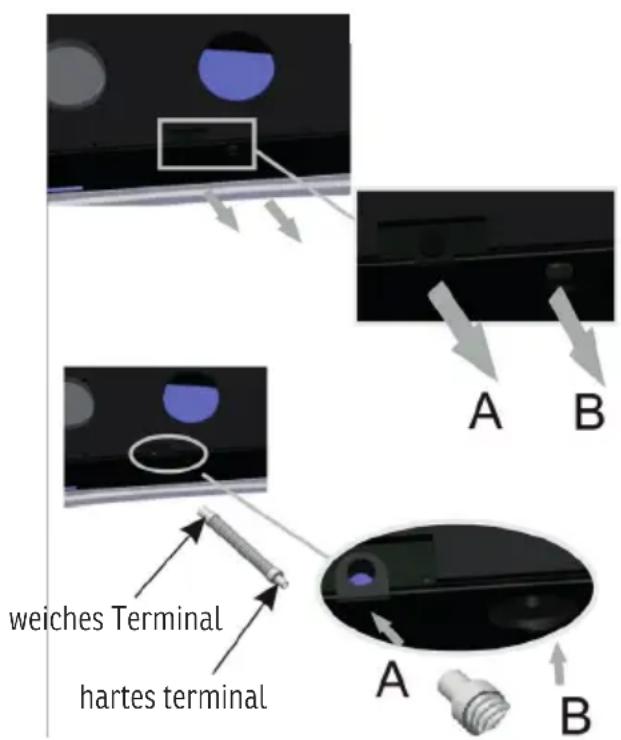
System «A» is more commonly used and the drain pipe goes outside where there is no problem to connect or drain it, this solution is OK for hot countries and normal cold temperatures outside.
System «B»: If it is not possible to install the drain pipe as in system «A», please use system «B» to drain the condensate moisture to a suitable place. If you use system «B», please do not remove the black rubber cup from system «A».
Normally the «B» opening is used for installation when the outside temperature is very low, this prevents ice from forming in the water drainage pipe. This solution is also used to make it easier for the installer to connect the internal drain pipe when he does not want to see the pipe from the outside.
Fixing the bracket
Drill the holes for anchoring the mounting bracket to the wall preferably in the 6 holes shown in black on the paper template. If the wall is not stable enough, it is advisable to use additional anchor bolts by using the holes marked in grey on the paper template.
The anchor bolts supplied require 8mm holes: The wall should be inspected to determine if the supplied bolts are useful or if another anchorage must be used. The manufacturer is not liable if the structural consistency of the anchorage is underestimated during installation.
Installing the pipes
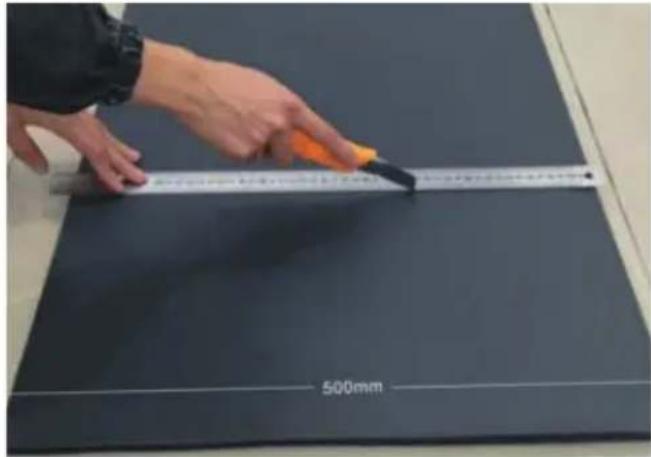
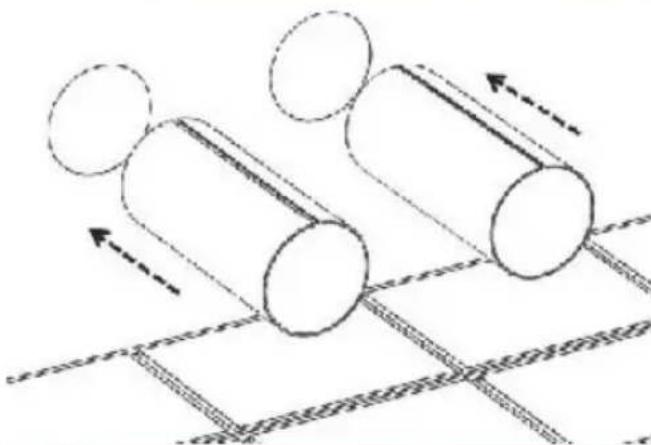
After you have drilled the holes, you must put the plastic sheet supplied with the air conditioner through the holes.
Measure the depth of the wall and cut the plastic sheet provided. Roll up the sheet and insert it into the hole, paying attention to the joining line, which must always be at the top. Remember that the panel must have the same inclination as the holes (at least 3^ ). Insert the rings into the holes.
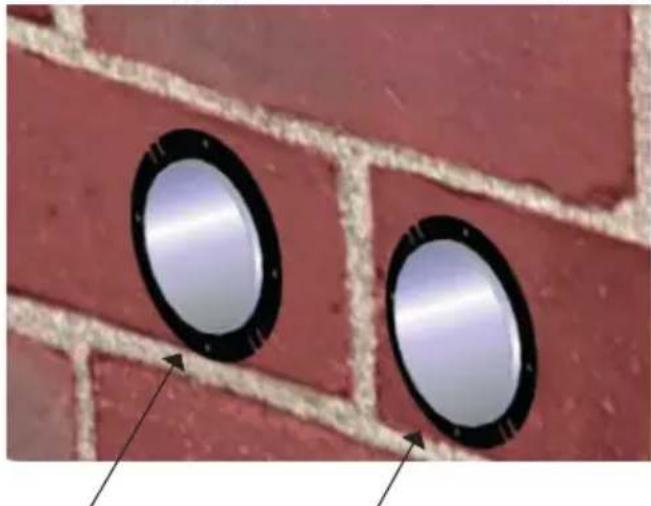
160 mm Ring150 mm Ring
Fitting the gratings
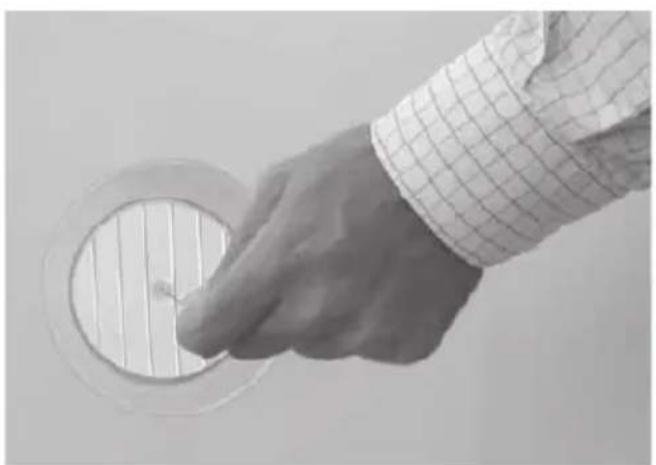
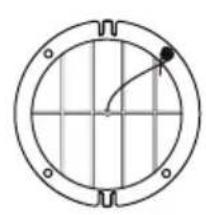
To install the two outer gratings, please proceed as follows: Before installation, familiarise yourself with how to mount the grating on the pipe. Pass the cords through the centre of the gratings. One grille fits on the outside of the pipe, the other on the inside. The air outlet is the larger hole and the grille therefore fits on the outside of the air outlet pipe. Insert the supplied cord into the hole. Fold the outer grille in half and hold the cord with your free hand. Insert your arm into the tube with the grille and push it all the way out. Let the grille unfold and pull the string towards you. One grille fits on the outside of the tube and the other on the inside. With a little patience and dexterity, the two grids will fit on the end of the tubes. Grasp the string, put your fingers between the ribs and pull the grille towards you until it sits properly in the tube, keeping the ribs vertical.
If the outer grille is accessible so that it cannot be removed, it is advisable to fix it to the wall with 6mm diameter dowels and screws. Tighten the cord and attach it to the bump on the inner flanges.
Mount the air conditioner on the bracket
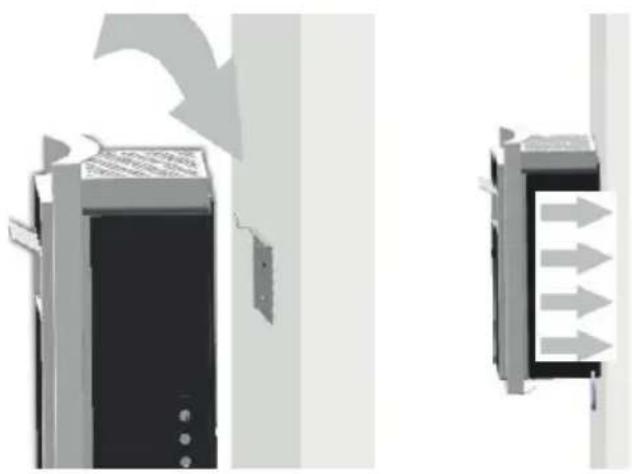
After checking again that the mounting bracket is securely fastened to the wall and all necessary preparations for electrical connection and condensate drainage (if required) have been made, attach the air conditioner to its mounting bracket. Lift the unit by holding it by the sides at the bottom. Tilt the air conditioner slightly towards you to facilitate attachment to the bracket. The air conditioner can now be pressed firmly against the wall. Check the installation carefully to ensure that the insulating back panel is firmly against the wall and that there are no cracks on the back of the air conditioner and that the two plastic semicircles on the back of the air conditioner are placed inside the two plastic hoses fixed in the wall. The hoses are fixed in the wall.
ATTENTION: The unit must not be installed in the laundry.
ATTENTION: The appliance must be placed so that the plug is accessible.
ATTENTION: The appliance must be installed according to the national regulations for wiring
6. OPERATION
Remote control function
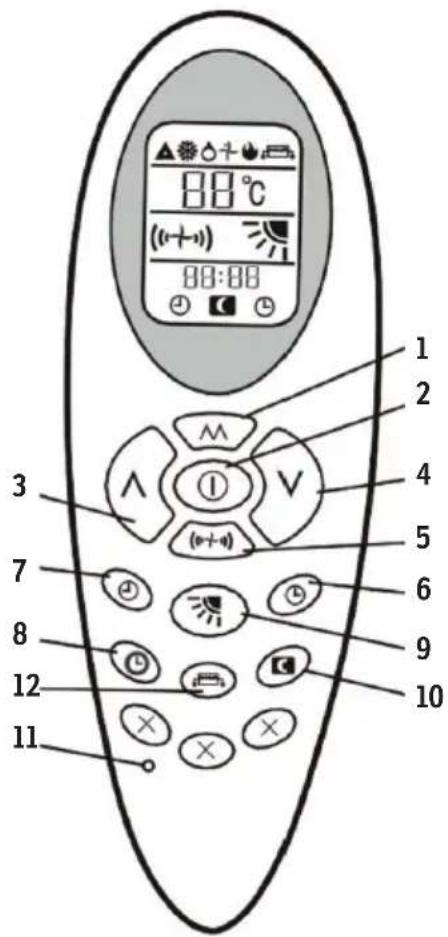
1: MODE BUTTON: Setting the operating mode
2:ON/OFF BUTTON
3: Increasing the temperature and time
4: Decrease temperature and time
5: FAN SPEED: Setting the fan speed
6: Setting the start time/timer of the air conditioner
7: TIMER OFF: Setting the time, where the air conditioner stops
8: Setting the clock
9: SWING BUTTON: Setting the airflow direction
10: SLEEP BUTTON: Automatic adjustment of the set temperature. set temperature.
11: RESET BUTTON
12: ELECTRICAL HEAT BUTTON: Turns on the electric heater to provide sufficient heat output in the cold winter.
LCD ICONS Description
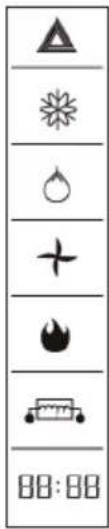
Car
Cooling
Drying
Valve gate
Heating
Electric heating
Clock
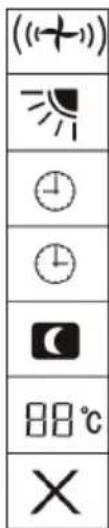
Fan speed
Air direction
Timer off
Timer On
Sleep mode
Temperature
No use
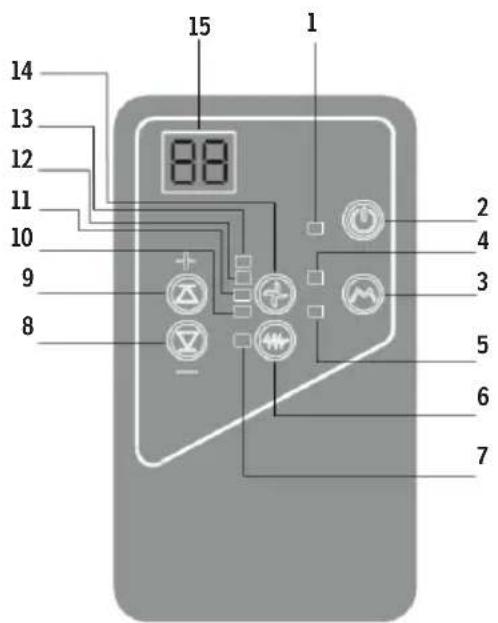
Operation on the unit
1: LED Indicates the operating status of the unit.
2: ON/OFF button for operating the unit.
3: Mode Button for operating mode of the unit
4: Cooling LED Signals the cooling status
5: Heating LED Signals the heating status
6: Electrical heating ON/OFF
7: Heating LED Signals the heating status
8: Decreases the temperature and time
9: Increases temperature and time
10: Signals the high speed state
11: Signals the medium state
12: Signals the low speed state
13: Signals the automatic state
If you select the Auto speed, the fan speed is
If you select the Auto speed, the fan speed depends on the room temperature and the set temperature.
14: Button for setting the fan speed
15: Temperature display window
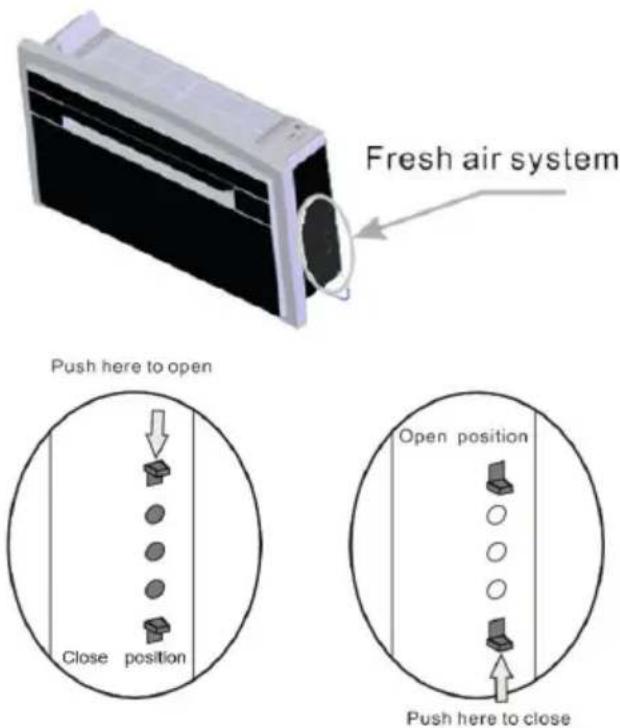
Fresh air system
When the fresh air system is open, the air conditioner automatically exchanges the room air: in this way, new, clean and fresh air is introduced into the room. You can open or close the fresh air system at any moment. When the fresh air system is closed, the performance of the air conditioner is higher, so we recommend keeping the fresh air system closed and only opening it for a few minutes per day.
Displays
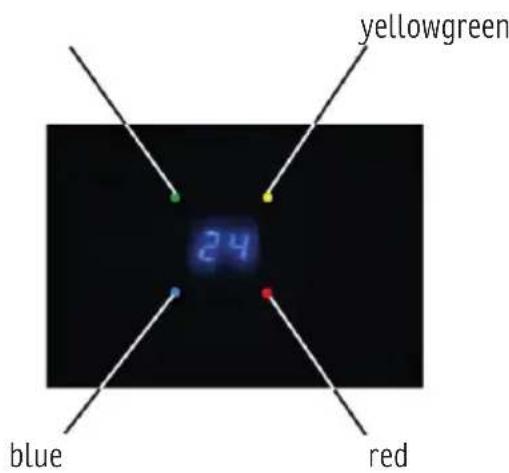
The display shows the set temperature as well as the ambient temperature. The set temperature flashes for 15 minutes after setting, then the display shows the ambient temperature for 70 seconds. Then the display is switched off until the next setting.
- RED LED Power supply is connected;
GREEN LED Compressor is on;
YELLOW LED Timer is on; - BLUE LED Night mode is on;
7. CLEANING
Cleaning the filters
The filters should be cleaned regularly to keep the air conditioner working efficiently. Clean the filters every fortnight.
How to proceed:
- Disconnect the air conditioner from the power supply.
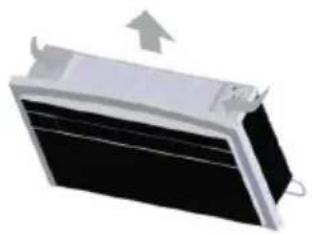
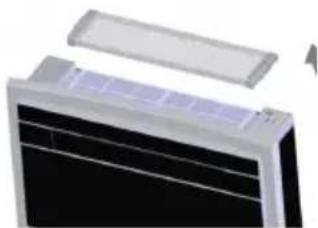
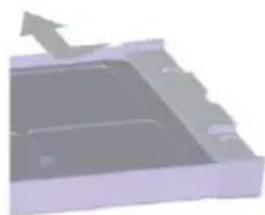
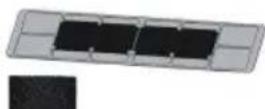
- Pull out the filter grille in the direction of the arrow. Remove the filter as shown. Wash it out (do not use hot water) and replace it only when it is dry.
ATTENTION: Do not use the air conditioner without the filter as this could seriously damage the air conditioner.
External cleaning
- Disconnect the air conditioner from the power supply.
- Wipe the external surfaces with a damp cloth only.
- Do not use abrasive cloths and/or solvents as they may damage the surfaces.
- Do not use excessively wet cloths or sponges as waterlogging could damage the air conditioner and affect safety.
Activated carbon filter
The unit has an activated carbon filter that not only has the function of removing suspended particles that a conventional mechanical filter has, but can also remove foreign substances such as free chlorine, odours, colours and toxic substances that are difficult to filter out by conventional methods.
With an activated carbon filter, the indoor air is fresh and healthy.
It is advisable to replace it every three months, as you cannot wash or clean it.
EN
7. TROUBLESHOOTING
Possible causes
The air conditioner does not work.
- The air conditioner does not cool the room.
Strange smell in the room.
Water is dripping from the air conditioner.
- The remote control does not work.
- The air conditioner does not work for 3 minutes after switching on.
Possible solutions
Incorrect timer setting / Check it.
- Problems with the power supply / Call the service centre.
- The filter may be dirty/ Clean it.
- The room temperature is too high/ Wait until the temperature has dropped.
- The temperature is not set correctly/ Check it.
- The grilles might be blocked/ Check and remove any obstructions.
- Moisture in the room coming from walls, pets, furnishings or the like.
- Faulty installation of the air conditioner.
- Faulty connection of the drain pipe.
- Discharged batteries.
Incorrect insertion of batteries in the remote control.
- Protection of the air conditioner. Wait 3 minutes and the air conditioner will work again.

If the cable is damaged, it must be replaced by the manufacturer or its after-sales service or a similarly qualified person to avoid a hazard.
The maximum operating temperature for the air conditioner (maximum cooling: outside DB43°C/ WB26°C, inside DB32°C/ WB23°C; min heating: outside DB-S°C/ WB-6°C, inside DB20°C).
This appliance is not intended for use by persons (including children) with reduced physical, sensory or mental capabilities, or lack of experience and knowledge, unless they have been given supervision or instruction concerning use of the appliance by a person responsible for their safety.
Children should be supervised to ensure that they do not play with the appliance.
VERY IMPORTANT! Please do not install or use your locale air conditioner until you have carefully read this manual. Please keep these operating instructions for possible product warranty and later reference.
WARNING! Do not use any means other than those recommended by the manufacturer to speed up the defrosting process or to clean the appliance. The appliance must be stored in a room without regularly operated ignition sources (e.g. naked flames, a gas appliance or an electric heater). Do not puncture or burn. Note that the refrigerants must not contain any odours.
8. WARRANTY / DISPOSAL / TECHNICAL MODIFICATIONS
Warranty
The Products are controlled just before delivery. If despite a lack of your product, try trustfully your seller. Please bring your receipt, as this is to be submitted for each warranty. The guarantee period is 24 months from date of purchase.
Disposal
The device must be disposed of properly. The device can be distributed free of charge for disposal at each dealer.
Technical changes
We reserve the right to modify the price, the design and the technical features.
Please save the packaging materials of the unit.
CE declaration of conformity
This device complies with the following standards
EMC EN 55014-1:2017
EN 55014-2:2015
EN IEC 61000-3-2:2019
EN 61000-3-3:2013+A1:2019
EN 61000-3-11:2000
LVD EN 60335-1:2012 + AC:2014 + A11:2014 + A13:2017 + A1:2019 + A2:2019 + A14:2019
EN 60335-2-40:2003 + A11:2004 + A12:2005 + A1:2006 + Cor.:2006 + A2:2009
- Cor.:2010 + A13:2012 + A13:2012/AC:2013
EN 62233:2008
LVD 2014/35/EU
EMC 2014/30/EU
RoHS 2015/863/EU
DISPOSAL INSTRUCTIONS FOR THE ELECTRICAL PART OF THE PRODUCT
In accordance with Article 26 of the Decree-Law of 14 March 2014 implementing Directive 2012/19/EC, and the Law of 31 March 2015 implementing Directive 2015/863/EU on the reduction of the use of hazardous substances in electrical and electronic equipment and on waste management.
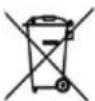
The crossed-out dustbin symbol on the machine or packaging indicates that the waste generated at the end of its useful life must be collected separately from other waste. The user must therefore take the device to the appropriate collection points at the end of its service life. Sort electronic and electrical waste or send back to the retailer when purchasing new, equivalent devices in a one-to-one process. Appropriate separate collection for subsequent commissioning of the equipment to be recycled, treatment and environmentally sound disposal helps to avoid possible adverse effects on the environment and health, and promote the reuse and/or recycling of the materials to which they belong. Misuse of this product by the user will result in the application of the administrative penalties provided for in the applicable legislation. Batteries contained in the device must be disposed of separately in the appropriate containers for the collection of used batteries.
DISPOSAL OF BATTERIES AND ACCUMULATORS
In accordance with Legislative Decree 188 of 20 November 2008 implementing Directive 2006/66/EC on batteries, accumulators and related waste, the symbol of the crossed-out waste bin on the battery indicates that the disposal of used batteries is prohibited in household waste.
Single-use and rechargeable batteries contain substances that are highly polluting for the environment. The user is obliged to dispose of used batteries at collection points in the municipality or in appropriate containers. This service is free. In this way, legal requirements are adhered to and the environment protected. The symbols identifying hazardous materials that may be present in single-use and rechargeable batteries are as follows: Hg = Mercury , Cd = Cadmium , Pb = Lead .
Company
Armin Schmid
Olensbachstrasse 9-15
CH-9631 Ulisbach
Tel. Int. +41 (0) 586116000
Tel.Nat.0848870850
Festnetz 14 Cent/Minute