
UBX-110H - Compact computer Advantech - Free user manual and instructions
Find the device manual for free UBX-110H Advantech in PDF.

| Product type | Compact computer |
| Brand | Advantech |
| Model | UBX-110H |
| Power supply | 12 V DC, 5 A min, UL certified adapter FSP060-DAAN2 |
| Storage temperature | -20 °C to 60 °C |
| Noise level | ≤ 70 dB(A) according to IEC 704-1 |
| Maintenance | Disconnect before cleaning; use a damp cloth without detergent |
| Safety | Do not open; entrust all repairs to qualified personnel |
| Ventilation | Do not cover openings; avoid liquids in vents |
| Installation | Reliable surface, away from moisture, restricted access |
| Battery | RTC battery; replace only with equivalent type |
| Supplied components | Use screws and accessories provided for installation |
| Power cord | Do not step on; do not place anything on it |
| Power outage | Disconnect the device if unused for an extended period |
| Humidity | Do not expose to moisture; prevent any liquid from entering |
| Electric hazard | Never open while energized; use the device only with the supplied adapter |
| Safety instructions | Read and keep the manual; follow all warnings |
| Intended use | Computing and data processing in a controlled environment |
| Compliance | IEC 704-1 for safety; UL certified adapter |
| Repairability | Spare parts available via Advantech; intervention by qualified personnel |
Frequently Asked Questions - UBX-110H Advantech
User questions about UBX-110H Advantech
0 question about this device. Answer the ones you know or ask your own.
Ask a new question about this device
Download the instructions for your Compact computer in PDF format for free! Find your manual UBX-110H - Advantech and take your electronic device back in hand. On this page are published all the documents necessary for the use of your device. UBX-110H by Advantech.
USER MANUAL UBX-110H Advantech
The documentation and the software included with this product are copyrighted 2025 by Advantech Co., Ltd. All rights are reserved. Advantech Co., Ltd. reserves the right to make improvements in the products described in this manual at any time without notice. No part of this manual may be reproduced, copied, translated, or transmitted in any form or by any means without the prior written permission of Advantech Co., Ltd. The information provided in this manual is intended to be accurate and reliable. However, Advantech Co., Ltd. assumes no responsibility for its use, nor for any infringements of the rights of third parties that may result from its use.
Acknowledgments
Intel ^® and Pentium ^® are trademarks of Intel ^® Corporation.
Microsoft Windows ^® is a registered trademark of Microsoft Corp.
RTL is a trademark of Realtek Semiconductor Co., Ltd.
ESS is a trademark of ESS Technology, Inc.
UMC is a trademark of United Microelectronics Corporation
SMI is a trademark of Silicon Motion, Inc.
Creative is a trademark of Creative Technology, Ltd.
CHRONTEL is a trademark of Chrontel, Inc.
All other product names or trademarks are properties of their respective owners.
For more information about this or other Advantech products, visit our website at http://www.advantech.com
https://www.advantech.com/products/fanless-embedded-computers/sub_1-2jkeuf
For technical support and customer service, visit our support website at http://support.advantech.com.tw/support
Part No. 2008110H01
Edition 2
Printed in Taiwan July 2025
Product Warranty (2 years)
Advantech warrants the original purchaser that each of its products will be free from defects in materials and workmanship for two years from the date of purchase.
This warranty does not apply to any products that have been repaired or altered by persons other than repair personnel authorized by Advantech, or products that have been subject to misuse, abuse, accident, or improper installation. Advantech assumes no liability under the terms of this warranty as a consequence of such events.
Because of Advantech's high quality-control standards and rigorous testing, most customers never need to use our repair service. If an Advantech product is defective, it will be repaired or replaced free of charge during the warranty period. For out-of-warranty repairs, customers will be billed according to the cost of replacement materials, service time, and freight. Please consult your dealer for more details.
If you believe your product to be defective, follow the steps outlined below.
- Collect all the information about the problem encountered. (For example, CPU speed, Advantech products used, other hardware and software used, etc.) Note anything abnormal and list any onscreen messages displayed when the problem occurs.
- Call your dealer and describe the problem. Please have your manual, product, and any helpful information readily available.
- If your product is diagnosed as defective, obtain a return merchandise authorization (RMA) number from your dealer. This allows us to process your return more quickly.
- Carefully pack the defective product, a completed Repair and Replacement Order Card, and a proof of purchase date (such as a photocopy of your sales receipt) into a shippable container. Products returned without a proof of purchase date are not eligible for warranty service.
- Write the RMA number clearly on the outside of the package and ship the package prepaid to your dealer.
Declaration of Conformity
FCC Class B
This equipment has been tested and found to comply with the limits for a Class B digital device, pursuant to part 15 of the FCC Rules. These limits are designed to provide reasonable protection against harmful interference in a residential installation. This equipment generates, uses, and can radiate radio frequency energy and, if not installed and used in accordance with the instruction manual, may cause harmful interference to radio communications. However, there is no guarantee that interference will not occur in a particular installation. If this equipment does cause harmful interference to radio or television reception, which can be determined by turning the equipment off and on, the user is encouraged to try to correct the interference by one or more of the following measures:
■ Reorient or relocate the receiving antenna.
■ Increase the separation between the equipment and receiver.
■ Connect the equipment into an outlet on a circuit different from that to which the receiver is connected.
- Consult the dealer or an experienced radio/TV technician for assistance.
Technical Support and Assistance
- Visit the Advantech website at www.advantech.com/support to obtain the latest product information.
- Contact your distributor, sales representative, or Advantech's customer service center for technical support if you need additional assistance. Please have the following information ready before calling:
– Product name and serial number
– Description of your peripheral attachments
– Description of your software (operating system, version, application software, etc.)
– A complete description of the problem
– The exact wording of any error messages
Warnings, Cautions, and Notes
Warning! Warnings indicate conditions that if not observed can cause personal injury!

Caution! Cautions are included to help prevent hardware damage and data loss. For example,

"Batteries are at risk of exploding if incorrectly installed. Do not attempt to recharge, force open, or heat the battery. Replace the battery only with the same or equivalent type as recommended by the manufacturer. Discard used batteries according to the manufacturer's instructions."
Note! Notes provide additional information.

Packing List
Before system installation, check that the items listed below are included and in good condition. If any item does not accord with the list, contact your dealer immediately.
1 x UBX-110H unit
■ 1 x Power adapter (DC 12V, 60W)
■ 1 x China RoHS declaration sheet
■ 1 x SSD thermal pad and 1 x SSD shielding case
■ 2 x Memory thermal pads and 1 x Memory shielding case
Ordering Information
Part Number Description
| UBX-110H-BCL01 UBX-110, Celeron® 6305E, barebone |
| UBX-110H-BI301 UBX-110, i3 1115G4E, barebone |
| UBX-110H-BI501 UBX-110, i5 1145G7E, barebone |
| UBX-110H-BI701 UBX-110, i7 1185G7E, barebone |
| UBX-110H-UCL01 UBX-110, Celeron® 6305E, barebone, MIT |
| UBX-110H-UI301 UBX-110, i3 1115G4E, barebone, MIT |
| UBX-110H-UI501 UBX-110, i5 1145G7E, barebone, MIT |
| UBX-110H-UI701 UBX-110, i7 1185G7E, barebone, MIT |
| UBX-100P-V00E UBX-110 VESA mounting kit |
| UBX-100P-WM0E UBX-110 Wall Mount Kit |
Safety Instructions
- Read these safety instructions carefully.
- Retain this user manual for future reference.
- Disconnect the equipment from all AC outlets before cleaning. Use only a damp cloth for cleaning. Do not use liquid or spray detergents.
-
For pluggable equipment, the power outlet socket must be located near the equipment and easily accessible.
-
Protect the equipment from humidity.
-
Place the equipment on a reliable surface during installation. Dropping or letting the equipment fall may cause damage.
-
The openings of the enclosure are for air convection. Protect the equipment from overheating. Do not cover the openings.
-
Ensure that the voltage is correct before connecting the equipment to a power outlet.
-
Position the power cord away from high-traffic areas. Do not place anything over the power cord.
-
All cautions and warnings on the equipment should be noted.
-
If unused for a long time, disconnect the equipment from the power source to avoid damage from transient overvoltage.
-
Never pour liquid into an opening. This may cause fire or electrical shock.
-
Never open the equipment. For safety reasons, the equipment should be opened only by qualified service personnel.
-
If one of the following occurs, have the equipment checked by authorized service personnel:
The power cord or plug is damaged.
Liquid has penetrated the equipment.
The equipment has been exposed to moisture.
The equipment is malfunctioning or does not operate according to the user manual.
The equipment has been dropped and damaged.
The equipment shows obvious signs of breakage.
-
Do not store the equipment in an environment with a room temperature of below -20 ^ ( -4 ^ ) or above 60 ^ ( 140 ^ ) as this may cause damage. The equipment should be stored in a controlled environment.
-
Any unverified components may cause unexpected damage. To ensure correct installation, always use the components (e.g., screws) provided in the accessory box.
-
Batteries are at risk of exploding if incorrectly installed. Replace only with the same or equivalent type as recommended by the manufacturer. Discard used batteries according to the manufacturer's instructions.
-
Always disconnect the power cord from the chassis before manually handling the hardware. Do not implement connections or configuration changes while the device is powered on. Sudden power surges may damage sensitive electronic components.
-
In accordance with the IEC 704-1:1982 specifications, the sound pressure level at the operator position should not exceed 70 dB (A).
-
The equipment should only be installed in a restricted access area.
-
DISCLAIMER: These instructions are provided according to IEC 704-1 standards. Advantech disclaims all responsibility for the accuracy of any statements contained herein.
-
This model is intended to be supplied by a UL-certified power supply (Adapter: FSP/ FSP060-DAAN2) suitable for use at TMA 60 °C (140 °F) min., and the output is rated 12 V _DC , 5.0A min., ES1. If you need further assistance, contact Advantech for additional information.
Chapter 1 General Information ....1
1.1 Introduction ...... 2
1.2 Product Features.... 2
1.2.1 General 2
1.3 Mechanical Specifications.... 3
1.3.1 System Dimensions .... 3
1.3.2 Weight.... 3
1.4 Power Requirements.... 4
1.4.1 System Power.... 4
1.4.2 RTC Battery 4
1.5 Environmental Specifications 4
1.5.1 Temperature 4
1.5.2 Relative Humidity 4
1.5.3 Vibration Tolerance.... 4
1.5.4 Shock Tolerance 4
1.5.5 Safety Certification.... 4
1.5.6 EMC Certification 4
Chapter 2 Hardware Installation ....5
2.1 Introduction ...... 6
2.2 UBX-110H I/O Connectors....6
Figure 2.1 UBX-110H Front View 6
Figure 2.2 UBX-110H Rear View....6
2.3 Hardware Installation 7
2.3.1 Memory, M.2 SSD, and Wi-Fi Module Installation 7
2.4 VESA Mounting Kit Installation 9
Figure 2.3 UBX-110H VESA Installation....9
Chapter 1
General Information
1.1 Introduction
The Advantech UBX-110H is an ultra-compact box PC that is used for offices, retail applications, etc. It features an 11th Gen Intel® processor to boost system performance and efficiency. The UBX-110H enables 8K video resolution via USB-C output that delivers vivid and high-quality A/V experiences. It also supports TPM 2.0 and RAID 0/1 to offer complete system security and data protection. It is an ideal mini PC for retail applications.
11th Gen Intel® High Performance Processors
The UBX-110H has an 11th Gen Intel® Celeron Core™ i3/i5/i7 processor and a built-in Intel® Iris® graphics chip. It provides powerful computing performance and superior video quality for retail applications.
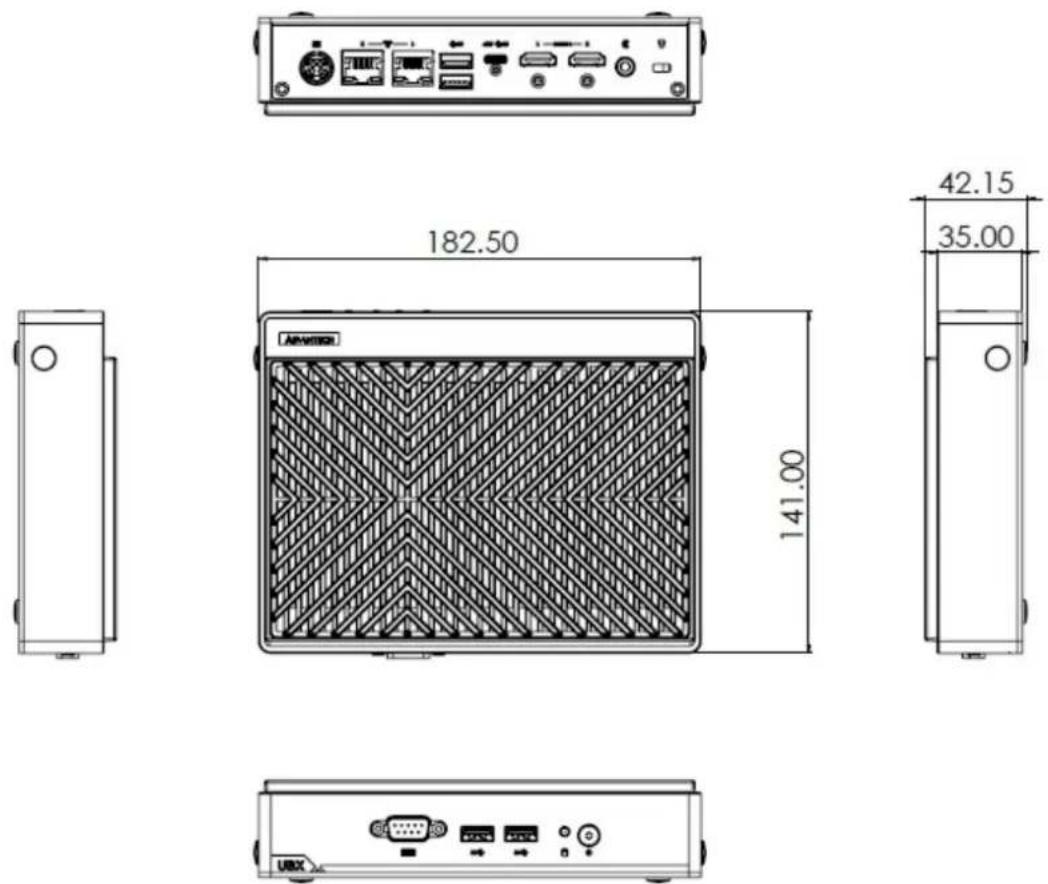
Triple Displays & Compact Size with Multiple I/Os
The UBX-110H is fanless and supports DDR4 memory and M.2 2280 SATA SSD. It has a 0 \~ 40°C operating temperature. The UBX-110 dimensions (W x D x H) are 182.5 x 141 x 42.15 mm. It has a compact body with multiple I/Os including 1 x RS232, 2 x LAN, 6 x USB 3.0 ports, and it supports 2 x M.2 2280 and 1 x M.2 2230 expansion slot.
1.2 Product Features
1.2.1 General
CPU:
- Intel® Celeron® 6305E
- Intel® Core™ i3 - 1115G4E
- Intel® Core™ i5 - 1145G7E
- Intel® Core™ i7 - 1185G7E
BIOS: AMI 256 Mbit Flash BIOS
Video:
- 1 x USB-C (compliant with DP 1.4a), supports up to 7680 x 4320 @60Hz
- 2 x HDMI 2.0b, supports 4096 x 2160 @60Hz
■ Triple Display: USB-C + 2 x HDMI
■ Memory (Optional): 1 x DDR4 260-pin SODIMM, supports up to 64 GB (non-ECC)
■ Storage (Optional): 2 x M.2 2280 SATA SSD
USB: 4 x USB 3.0
■ Audio: HD audio (via USB-C, HDMI), 1 x Line-out
Serial: 1 x RS232/422/485 (via BIOS setting)
LAN: 2 x RJ-45
- LAN1: Intel® i219; 10/100/1000 Mbps
- LAN2: Intel® i225: up to 2.5 Gbps
■ Expansion: 1 x M.2 2230 for Wi-Fi and Bluetooth combo module
1.3 Mechanical Specifications
1.3.1 System Dimensions
1.3.2 Weight
0.94 kg
1.4 Power Requirements
1.4.1 System Power
■ Power Input: DC in 12V
1.4.2 RTC Battery
Lithium: 3V/220 mAh
1.5 Environmental Specifications
1.5.1 Temperature
Operating Temperature: 0 \~ 40°C (If the UBX-110H operating temperature is up to 45°C, please use a power adapter with a temperature spec that is compliant.)
■ Storage Temperature: -20 \~ 60°C
1.5.2 Relative Humidity
■ 95% @40°C (104°F) (non-condensing)
1.5.3 Vibration Tolerance
The system is equipped with a memory and 2 x M.2 SSD: 3.5 g
■ Reference IEC60068-2-6:2007, random, 5 \~ 500 Hz, 1 hr/axis, (x, y, z) 3 axes
1.5.4 Shock Tolerance
The system is equipped with a memory and two M.2 SSD: 30G acceleration
■ Reference IEC60068-2-27:2008, half sine, 11 ms pulse duration
1.5.5 Safety Certification
UL, CB, CCC, BSMI
1.5.6 EMC Certification
CE, FCC, CCC, BSMI, RED
Chapter 2
Hardware Installation
2.1 Introduction
The following sections introduce the I/Os on the UBX-110H and demonstrate the memory, storage, and Wi-Fi module installation.
2.2 UBX-110H I/O Connectors
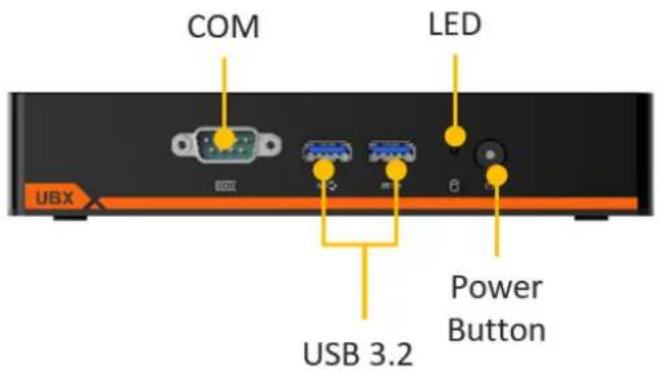
Figure 2.1 UBX-110H Front View
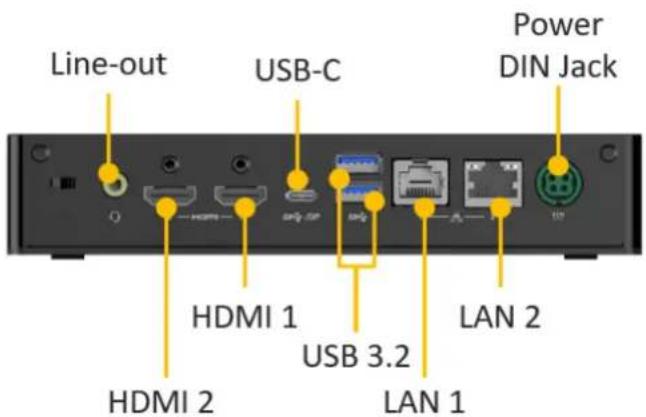
Figure 2.2 UBX-110H Rear View
2.3 Hardware Installation
2.3.1 Memory, M.2 SSD, and Wi-Fi Module Installation
Please follow these steps to install the memory and M.2 SSD for the UBX-110H.
- Remove the specified 6 screws.
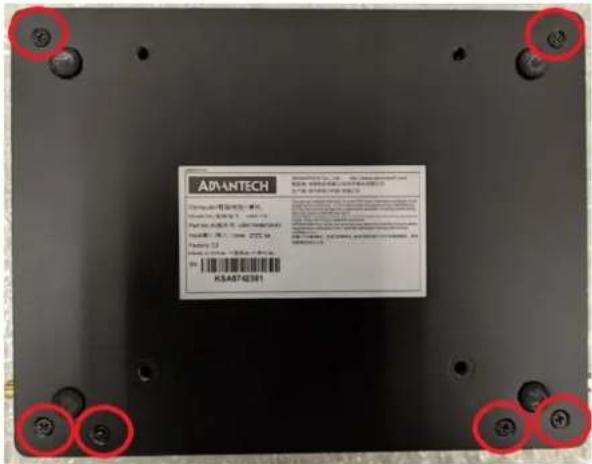
- After removing the 6 screws, remove the bottom cover. You will see one DDR4 memory slot, two SSD slots, and one Wi-Fi module slot under the shielding cases, respectively.
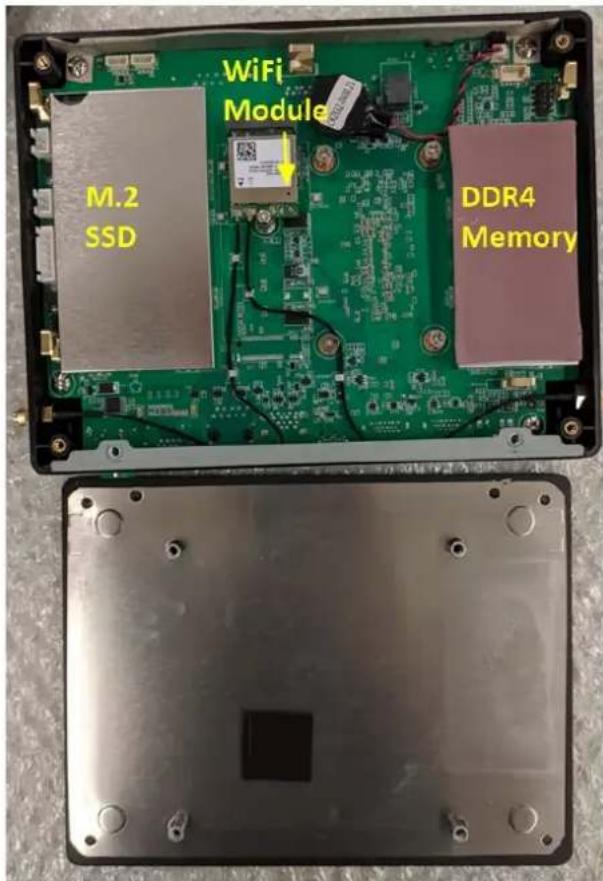
- Please use a tool to help remove the shielding case without breaking it.
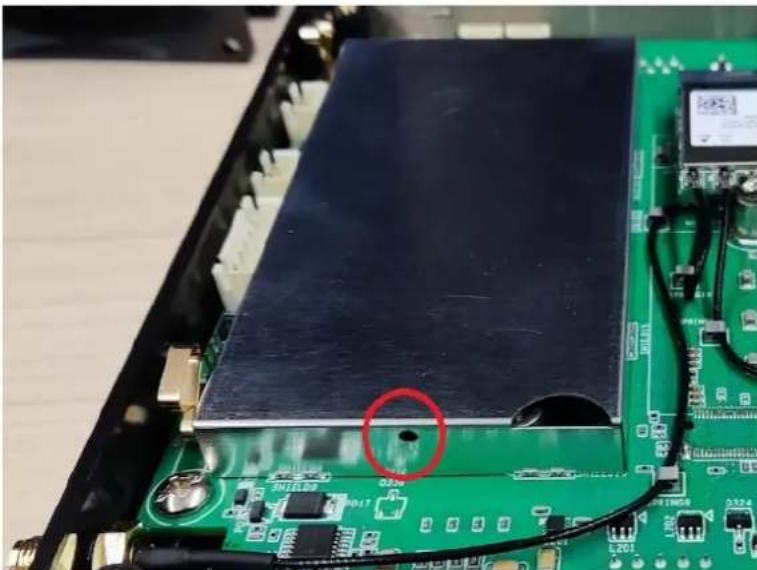
natural_image
Close-up of an electronic circuit board with a black electronic component and a red circle highlighting a defect or feature (no readable text or symbols)a) In the memory slot, please add the DDR4 memory and stick the thermal pads inside and on top of the shielding case.
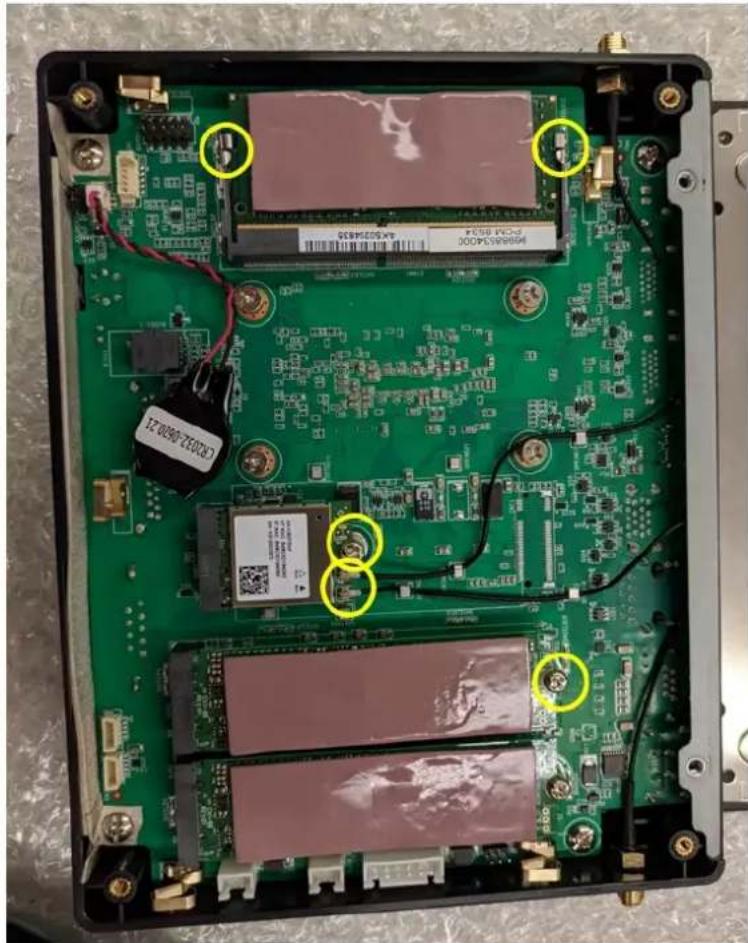
natural_image
Interior view of an electronic device with green circuit board and multiple display screens (no readable text or symbols)b) Regarding the M.2 SSD slots, please remove the screws and insert the SSD into an M.2 2280 slot.
c) For the Wi-Fi module, attach it using the two antenna cables. Users need to screw in the connector screws to fix the cable connection.
2.4 VESA Mounting Kit Installation
The UBX-110H VESA mounting kit is compatible with horizontal installation and vertical installation. Users can select an appropriate installation.
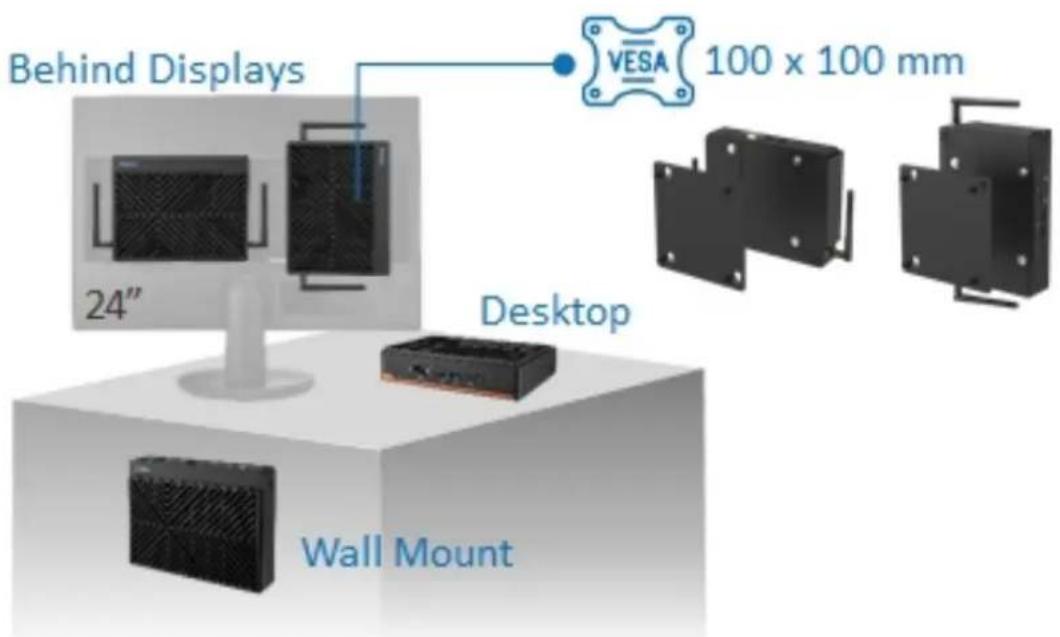
Figure 2.3 UBX-110H VESA Installation
Please follow these steps to install the UBX-110H VESA mounting kit with thermal isolation.
- Please remove the four footpads from the bottom cover of the UBX-110H. After removing the foot pads, go on to the next step.
- Use 4 x M4*8L screws (P/N: 1930004646) to attach the UBX-110H VESA mount kit (P/N: 1960109660N001) behind a display. Finally, attach the UBX-110H to the mount to finish the setup.
ADVANTECH
Enabling an Intelligent Planet
www.advantech.com
Please verify specifications before quoting. This guide is intended for reference purposes only.
All product specifications are subject to change without notice.
No part of this publication may be reproduced in any form or by any means, such as electronically, by photocopying, recording, or otherwise, without prior written permission from the publisher.
All brand and product names are trademarks or registered trademarks of their respective companies.
©Advantech Co., Ltd. 2025
- Acknowledgments
- Product Warranty (2 years)
- Declaration of Conformity
- FCC Class B
- Technical Support and Assistance
- Warnings, Cautions, and Notes
- Packing List
- Ordering Information
- Safety Instructions
- Chapter 1 General Information ....1
- Chapter 2 Hardware Installation ....5
- Chapter 1
- Introduction
- 11th Gen Intel® High Performance Processors
- Triple Displays & Compact Size with Multiple I/Os
- Product Features
- General
- CPU:
- BIOS: AMI 256 Mbit Flash BIOS
- Video:
- ■ Triple Display: USB-C + 2 x HDMI
- Mechanical Specifications
- System Dimensions
- Weight
- Power Requirements
- System Power
- RTC Battery
- Environmental Specifications
- Temperature
- Relative Humidity
- Vibration Tolerance
- Shock Tolerance
- Safety Certification
- EMC Certification
- Chapter 2
- Introduction
- UBX-110H I/O Connectors
- Hardware Installation
- Memory, M.2 SSD, and Wi-Fi Module Installation
- VESA Mounting Kit Installation
- ADVANTECH
- www.advantech.com
Brand : Advantech
Model : UBX-110H
Category : Compact computer