
BMN14 - Microwave Oven BAUKNECHT - Free user manual and instructions
Find the device manual for free BMN14 BAUKNECHT in PDF.

| Product type | Microwave oven |
| Brand | Bauknecht |
| Model | BMN14 |
| Maximum microwave power | 750 W |
| Microwave power levels | 750, 500, 350, 160, 0 W |
| Functions | Microwave, Grill, Crisp Plate, Jet Defrost, Timer |
| Control type | Touch electronic |
| Display | Digital screen |
| Turntable | Yes, glass |
| Grill | Yes, built-in |
| Crisp Plate | Yes, included |
| Quick defrost | Jet Defrost, by weight |
| Child safety | Yes, automatic activation |
| Cleaning | Microfiber cloth, mild detergent; dishwasher-safe accessories |
| Reference | BMN14 |
Frequently Asked Questions - BMN14 BAUKNECHT
User questions about BMN14 BAUKNECHT
0 question about this device. Answer the ones you know or ask your own.
Ask a new question about this device
Download the instructions for your Microwave Oven in PDF format for free! Find your manual BMN14 - BAUKNECHT and take your electronic device back in hand. On this page are published all the documents necessary for the use of your device. BMN14 by BAUKNECHT.
USER MANUAL BMN14 BAUKNECHT
THANK YOU FOR BUYING A BAUKNECHT PRODUCT In order to receive a more complete assistance, please register your product on www.bauknecht.eu/register

Before using the appliance carefully read the Safety Instruction.
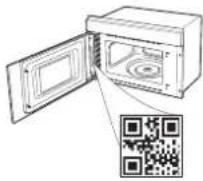
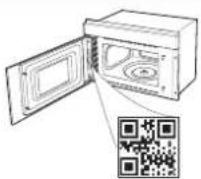
PLEASE SCAN THE QR CODE ON YOUR APPLIANCE IN ORDER TO REACH MORE INFORMATION
PRODUCT DESCRIPTION
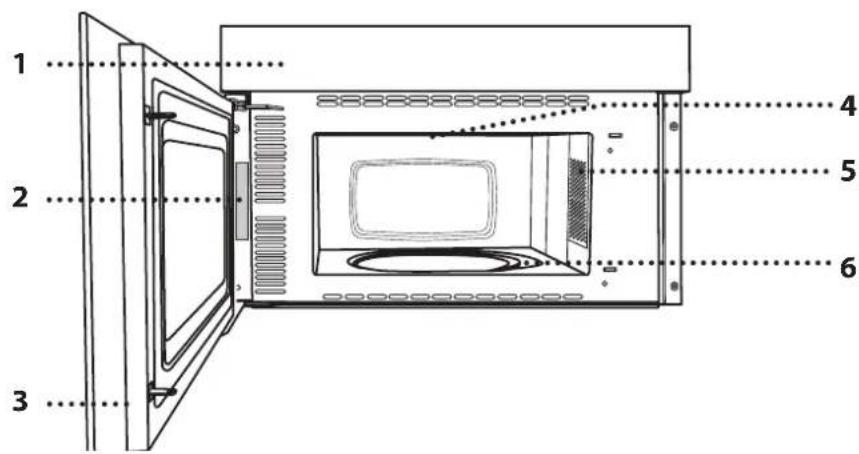
- Control panel
- Identification plate (do not remove)
- Door
- Grill
- Light
- Turntable
CONTROL PANEL DESCRIPTION

flowchart
graph TD
    A["1"] --> B["2"]
    B --> C["3"]
    C --> D["4"]
    D --> E["5"]
    E --> F["6"]
    F --> G["7"]
    G --> H["8"]
    H --> I["9"]
1. STOP
For stopping a function or an audible signal, cancelling the settings and switching off the oven.
2. MICROWAVE FUNCTION/POWER
For selecting the microwave function and setting the required power level.
3. GRILL FUNCTION
-
CRISP FUNCTION
-
DISPLAY
-
- / - BUTTONS
For adjusting the settings of a function (e.g. length, weight).
7. JET DEFROST FUNCTION
- START
For starting a function.
- DOOR OPENING BUTTON
ACCESSORIES
TURNTABLE
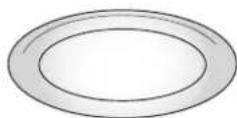
Placed on its support, the glass turntable can be used with all cooking methods.
The turntable must always be used
as a base for other containers or accessories.
TURNTABLE SUPPORT
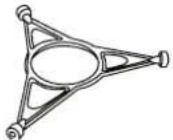
Only use the support for the glass turntable.
Do not rest other accessories on the support.
The number and the type of accessories may vary depending on which model is purchased.
There are a number of accessories available on the market. Before you buy, ensure they are suitable for microwave use and resistant to oven temperatures.
Metallic containers for food or drink should never be used during microwave cooking.
FUNCTIONS

MICROWAVE
For quickly cooking and reheating food or drinks.
| 750 W | Quickly reheating drinks or other foods with a high water content or meat and vegetables. |
| 500 W | Cooking fish, meaty sauces, or sauces containing cheese or egg. Finishing off meat pies or pasta bakes. |
| 350 W | Slow, gently cooking. Perfect for melting butter or chocolate. |
| 160 W | Defrosting frozen food or softening butter and cheese. |
0 W When using the minuteminder only.

GRILL
For browning, grilling and gratins when used alone. We recommend turning the food during cooking. For best results, preheat the grill for 3-5 minutes. For quickly cooking and gratinating dishes, combines with microwaves.
Only for use with the designated functions.
The Crisp plate must always be placed in the centre of the glass turntable and can be pre-heated
when empty, using the special function for this purpose only. Place the food directly on the Crisp plate.
HANDLE FOR CRISP PLATE
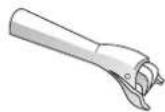
Useful for removing the hot Crisp plate from the oven.
Other accessories that are not supplied can be purchased separately from the After-sales Service.
Always ensure that foods and accessories do not come into contact with the inside walls of the oven.
Always ensure that the turntable is able to turn freely before starting the oven. Take care not to unseat the turntable whilst inserting or removing other accessories.

JET DEFROST
For quickly defrosting various different types of food simply by specifying their weight. Food should be placed directly onto the glass turntable. Turn the food when prompted. Food should be placed directly onto the glass turntable. Turn the food when prompted. A standing time after defrosting always improves the result.

CRISP
For perfectly browning a dish, both on the top and bottom of the food. This function must only be used with the special crisp plate. This function must only be used with the special Crisp-plate provided, which must be placed at the centre of the glass turntable. It is recommended to preheat the plate for 2-3 minutes before cooking any food items that do not require long cooking times, like pizza or desserts.
DURATION (min) RECOMMENDED FOR
| 3 - 4 | Cookies (8- 10 pieces) |
| 7 - 8 | Frozen pizza (350 g) |
| 7 - 9 | Sponge cake (500 g) |
| 8 - 10 | Fish fingers (8 pieces) |
| 9 - 10 | Pizza (350 g) |
| 10 - 14 | French fries (200 - 300g) |
| 13 - 15 | Quiche Lorraine (500 g) |
Simply press the button for the function you require to
select it.
2. SET THE LENGTH
After selecting the function you require, use △ or ☑ set the length for it to run.
The time can be changed during cooking by pressing △ or ▽ by increasing the length for 30 seconds each time by pressing ▶.
Press as many times as required to select the power level for the microwave.
To use the microwave in combination with the grill, select the "Grill" function by pressing ☐ and then use ☑ to set the microwave power.
Please note: You can also change this setting during cooking by pressing ☐.
4. JET DEFROST
Press, then use or to set the weight of the food. During defrosting, the function will pause briefly to allow
you to turn the food. Once the operation is complete, close the door and press ▶.
5. ACTIVATE THE FUNCTION
Once you have applied the settings you require, press ▶ to activate the function.
Every time the ▶ button is pressed again, the cooking time will be increased by a further 30 seconds.
You can press at any time to stop the function that is currently active.
6. JET START
When the oven is switched off, press to activate cooking with the microwave function set at full power (750 W) for 30 seconds.
7. PAUSE
To pause an active function, for example to stir or turn the food, simply open the door.
The setting will be maintained for 10 minutes.
To start it up again, close the door and press ▶.
A beep will signal once of twice a minute for 10 minutes when the cooking is finished. Press the STOP button or open the door to cancel the signal.
Please note: The oven will only hold the setting for 60 seconds if the door is opened and then closed after the cooking is finished.
8. COOLING DOWN
When a function is finished, the oven may carry out a cooling procedure the oven switches off automatically.
9. SAFETY LOCK

This function is automatically activated to prevent the oven from being switched on accidentally. Open and
close the door, then press ▶ to start the function.
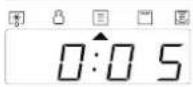
10. SET THE TIME OF THE DAY

Press until the two digits for the hour (on the left) starting flashing.
Use △ or to set the correct hour and
press ▶ to confirm: The minutes will flash on the display. Use △ or ▽ set the minutes and press to confirm
Please note: You may need to set the time again following lengthy power outages.
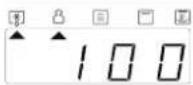
11. MINUTEMINDER
The display can be used as a timer. To activate the function and set the length of time you require, use △ or ▽Press to set the power to 0 W, then press to ▶ activate the countdown.
Please note: The timer does not activate any of the cooking cycles. To stop the timer at any time, press ☐.
CLEANING
Make sure that the appliance has cooled down before carrying out any maintenance or cleaning.
Never use steam cleaning equipment. Do not use wire wool, abrasive scourers or abrasive/corrosive cleaning agents, as these could damage the surfaces of the appliance.
INTERIOR AND EXTERIOR SURFACES
- Clean the surfaces with a damp microfibre cloth. If they are very dirty, add a few drops of pH-neutral detergent. Finish off with a dry cloth.
- Clean the glass in the door with a suitable liquid detergent.
- At regular intervals, or in case of spills, remove the turntable and its support to clean the bottom of the oven, removing all food residue.
- The grill does not need to be cleaned as the intense heat burns away any dirt. Use this function on a regular basis.
ACCESSORIES
All accessories are dishwasher safe.
The crisp plate should be cleaned using water and a mild detergent. For stubborn dirt, rub gently with a cloth. Always leave the crisp plate to cool down before cleaning.
TROUBLESHOOTING
| Problem Possible cause Solution | ||
| The oven is not working. | Power cut.Disconnection from the mains. | Check for the presence of mains electrical power and whether the oven is connected to the electricity supply.Turn off the oven and restart it to see if the fault persists. |
| The display is showing “Err”. Software fault. | Contact you nearest After-sales Service Centre and state the letter or number that follows “Err”. | |
| The display shows unclear text and appears to be broken. | Another language set. Contact you nearest Client After-sales Service Centre. | |
Policies, standard documentation and additional product information can be found by:
• Using the QR on your product
- Visiting our website docs.bauknecht.eu
• Alternatively, contact our After-sales Service (See phone number in the warranty booklet). When contacting our After-sales Service, please state the codes provided on your product's identification plate.

MERCI D'AVOIR ACHETÉ UN PRODUIT BAUKNECHT
- KNAPP FÖR ATT ÖPPNA LUCKAN
TILLBEHÖR
ROTERANDE GLASPLATTA
