
A-16 - Heating XPower - Free user manual and instructions
Find the device manual for free A-16 XPower in PDF.

| Product Type | Versatile Motorized Duster/Dryer |
| Brand | XPower |
| Model | A-16 |
| Power Supply Voltage | 115 V~ |
| Frequency | 60 Hz |
| Rated Amperage | 8 to 17 A |
| Double Insulation | Yes |
| Use | Indoor Only |
| Main Functions | Dusting, drying, pet drying |
| Included Accessories | Nozzle connector, nozzles (flat, conical, standard), brushes, straw adapter, extra filter |
| Speed Variator | Yes, via a knob |
| Built-in Heating | No (A-16 model does not have heating element) |
| Plug Type | Polarized (wide blade and narrow blade) |
| Filter Maintenance | Clean or replace the intake, motor, and housing filters frequently |
| Warranty | 1 year limited (USA) |
| Support | Contact XPOWER by phone (855-855-8868) or email (info@xpower.com) |
Frequently Asked Questions - A-16 XPower
User questions about A-16 XPower
0 question about this device. Answer the ones you know or ask your own.
Ask a new question about this device
Download the instructions for your Heating in PDF format for free! Find your manual A-16 - XPower and take your electronic device back in hand. On this page are published all the documents necessary for the use of your device. A-16 by XPower.
USER MANUAL A-16 XPower
natural_image
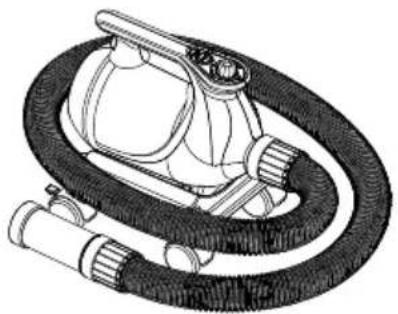
Technical line drawing of a vacuum cleaner with coiled tubing and housing (no text or symbols)Multipurpose Powered Duster/Dryer Owner's Manual
Read and save these instructions
WARNING: READ AND SAVE THESE INSTRUCTIONS BEFORE USING THIS PRODUCT.
When using electrical appliances, especially when children or animals are present, basic safety precautions should always be followed to reduce the risk of fire, electric shock, and personal injury, including, but not limited to the following:
- DO NOT use attachments not intended for use with the machine. Only use attachments recommended or sold by the manufacturer.
- DO NOT attempt to perform any service or maintenance not outlined in instruction manual.
- WARNING: To reduce the risk of electric shock – Use indoors only. DO NOT use outdoors.
- WARNING: This machine is not intended for use by children. Adult assembly and operation required. To reduce the risk of injury, close supervision is necessary when an appliance is used near children.
• DO NOT use as a toy. - DO NOT leave appliance when plugged in. Unplug from outlet when not in use and before servicing.
- DO NOT use extension cords with machine.
- DO NOT unplug unit by pulling on cord, to unplug, grasp the plug, not the cord.
- WARNING: Never use machine with a damaged cord or plug, or after the appliance malfunctions or is dropped, damaged. Return to an authorized service center for service, examination, repair, or electrical or mechanical adjustment.
- To disconnect, turn all controls to the off ("O") position, then remove plug from outlet.
- DO NOT pull or carry by cord, use cord as a handle, close a door on cord, or pull cord around sharp edges or corners. DO NOT run appliance over cord. Keep cord away from heated surfaces.
- DO NOT handle plug or appliance with wet hands.
- Use extra care when cleaning on stairs.
- DANGER: DO NOT expose machine to rain or water.
- DO NOT use or store machine where it can fall or be pulled into tub or sink or standing water. If machine falls into water, unplug it, DO NOT reach into the water. Keep units out of baths and DO NOT operate on a wet floor, or wet surface.
- DO NOT use to pick up flammable or combustible liquids, such as gasoline, or use in areas where they may be present. DO NOT pick up anything that is burning or smoking, such as cigarettes, matches, or hot ashes.
- Unplug before connecting nozzles and hose.
- WARNING: DO NOT put any object into machine openings. Keep loose clothing, jewelry and hair away from machine openings. DO NOT use with any opening blocked; keep free of dust, lint, hair, and anything that may reduce air flow.
Safety Instructions (Continued)
- WARNING: DO NOT allow any material to clog or block air intakes as this may cause units to overheat and result in a fire or electrical hazard. Regularly clear hair or other substances from air intakes. DO NOT contact moving parts.
Servicing of Double-Insulated Appliances
A double-insulated appliances is marked with one or more of the following: The words “DOUBLE INSULATION” or “DOUBLE INSULATED” or the double insulation symbol (square within a square).
In a double-insulated appliance, two systems of insulation are provided instead of grounging. No grounding means is provided on a double-insulated appliance. Nor should a means for grounding be added to the appliance. Servicing a double-insulated appliance requires extreme care and knowledge of the system, and should be done only by qualified service personnel. Replacement parts for a double-insulated appliance must be identical to the parts they replace.
To reduce the risk of electric shock, this appliance has a polarized plug (one blade is wider than the other). This plug will fit in a polarized outlet only one way. If the plug does not fit fully in the outlet, reverse the plug. If it still does not fit, contact a qualified electrician to install the proper outlet. Do not change the plug in any way.
Double Insulation Symbol

natural_image
Simple geometric diagram of two concentric squares (no text or symbols)Multipurpose Powered Duster/Dryer Introduction
- The XPOWER Multipurpose Powered Duster/Dryer produces a powerful airflow for endless applications with various nozzle attachments.
- It's ideal to dust, pump air, and dry a variety of surfaces with its power and flexibility.
- With a high pressure airflow, it's also designed to help dry a bathed pet in your home.
natural_image
Technical line drawing of a medical or laboratory device with tubing and connectors (no text or symbols)Items Included

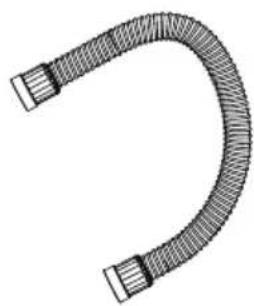
natural_image
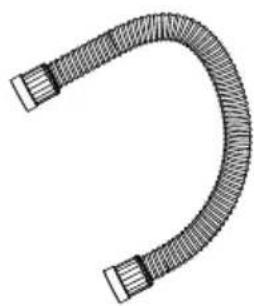
Technical line drawing of a mechanical device with no visible text or symbols- Duster/Dryer x 1 • Hose x 1
natural_image
Illustration of a U-shaped pipe with two connectors (no text or symbols)
- Nozzles
natural_image
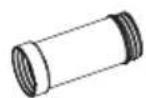
Line drawing of a wheeled vehicle chassis with wheels and mounting feet (no text or symbols)- Extra Filter Set x 1 • Nozzle ConnDdtyxx1**
- Owner's Manual x 1
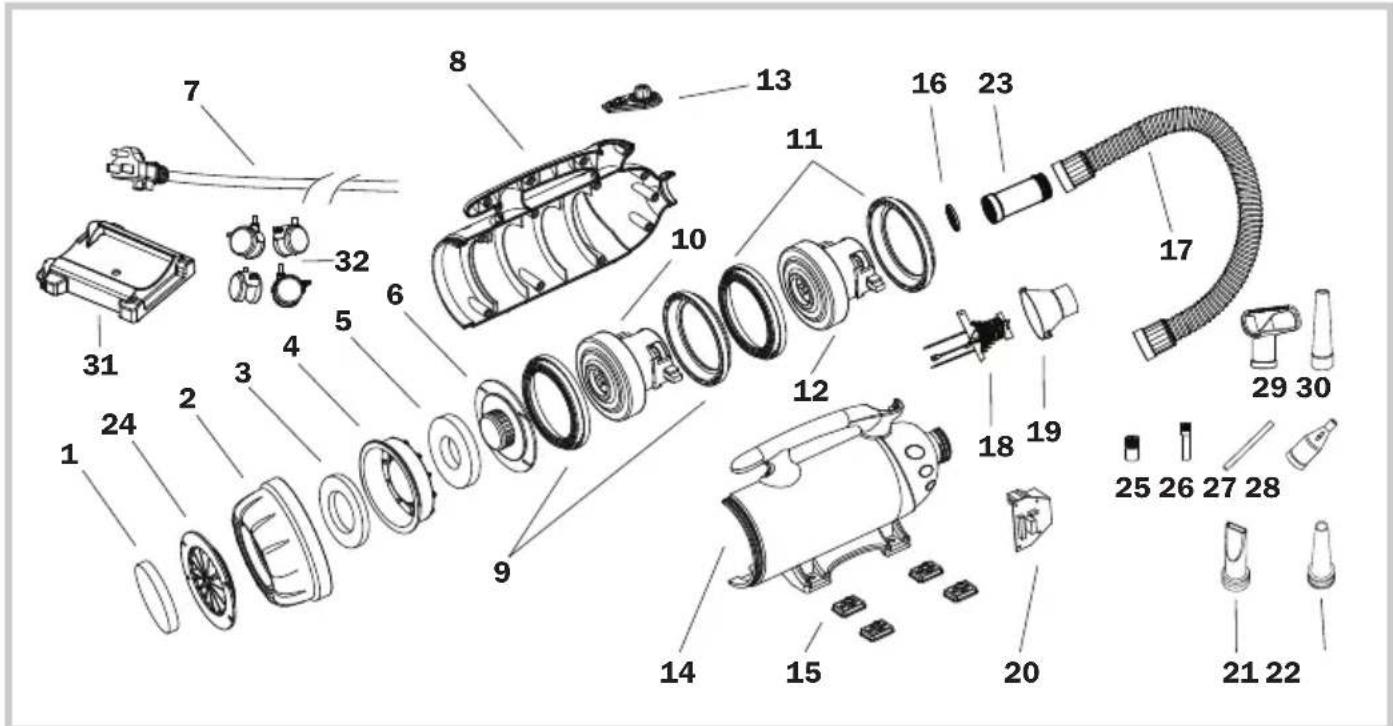
(1) Inlet Filter
(2) Rear Cover***
(3) Case Filter***
(4) Dust Case***
(5) Motor Filter
(6) Dustproof Cover
(7) Power Cord
(8) Right Housing
(9) Motor Sleeves
(10) Motor
(11) Motor Sleeves*
(12) Motor*
(13) Switch Plate
(14) Left Housing
(15) Rubber Feet
(16) Outlet Grille Cover
(17) Hose
(18) Heating Element**
(19) Heating Element Tunnel**
(20) PCB Board
(21) Flat Nozzle
(22) Cone Nozzle
(23) Nozzle Connector****
(24) Inlet Grille Cover****
(25) Standard Brush***
(26) Detail Brush***
(27) Straw Adapter***
(28) Tapered Flow Nozzle***
(29) Square Nozzle***
(30) Standard Nozzle***
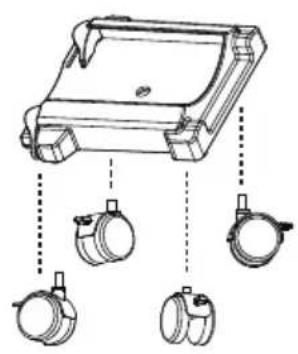
(31) Dolly Body****
(32) Wheels****
* For model A-16 only.
** For model A-12 only.
*** For model A-5 only.
**** For model A-12 and A-16 only.
Installation and Operation Guide
Power Supply
Amperage Rating
This appliance consumes high amperage electricity from 8 A to 17 A (See Page 14: Technical Specifications). You should also check if the power circuit of your building can support the total power consumption of all the devices including this appliance.
Power Outlets Selection
Make sure you have a power socket with a compatible amperage rating and fuse setting.
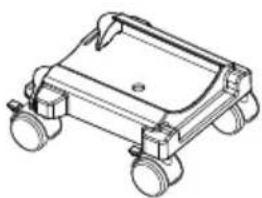
Dolly Installation (For Model A-12 / A-16)
natural_image
Technical line drawing of a mechanical device with three hanging components (no text or symbols)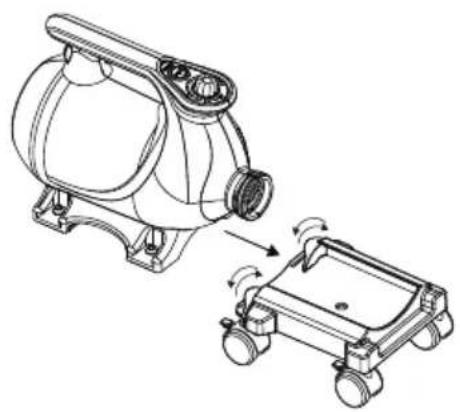
natural_image
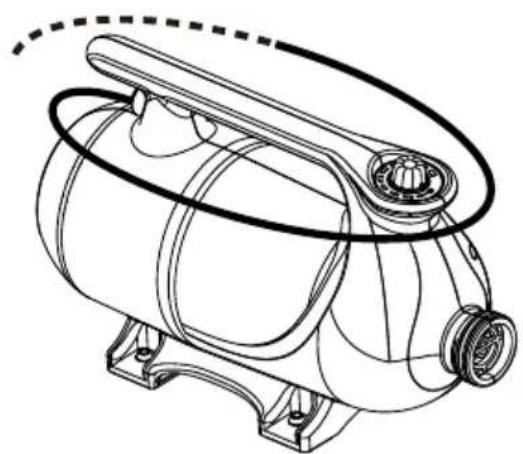
Technical line drawing of a mechanical device with a separate view showing rotational motion (no text or symbols)- You can equip the dryer to the dolly for convenient use.
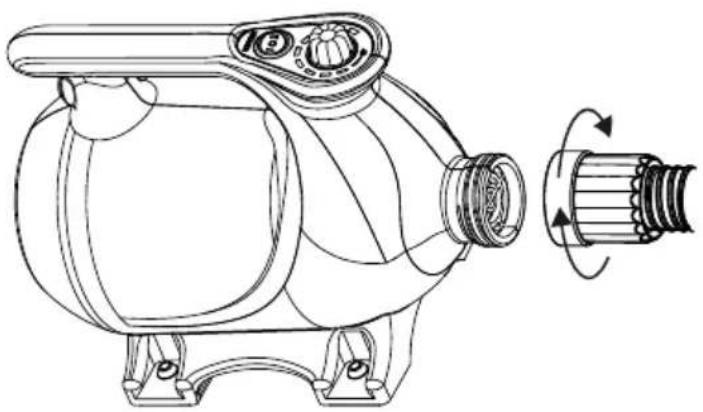
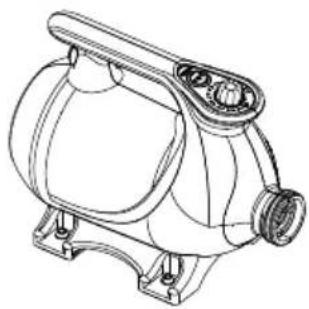
Hose Installation
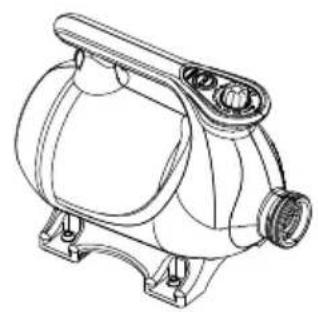
natural_image
Technical line drawing of a pump or motor assembly with a side view showing rotational motion (no text or symbols)- Screw the hose into the air outlet of the machine. Fasten the connection.
Installation and Operation Guide (Continued)
Nozzle Installation
For model A-5:
Attach the nozzle onto the air outlet of the hose.

natural_image
Diagram of a cylindrical object with threaded ends and a conical tip, showing an arrow indicating direction (no text or symbols)The standard brush must be attached onto the standard nozzle.

natural_image
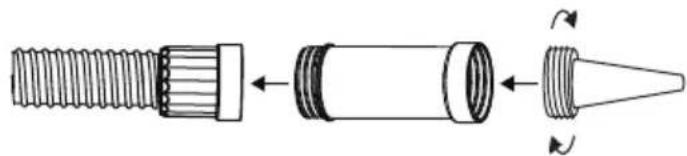
Diagram showing three types of mechanical components: threaded cylindrical body, conical tip, and flanged cylindrical body (no text or symbols)The tapered flow nozzle, straw adapter and the detail brush should be used together.
- Attach the straw adapter onto the tapered flow nozzle.
- Insert the detail brush inside the other end of the straw adapter.
- Attach the whole set of the nozzles onto the hose.

natural_image
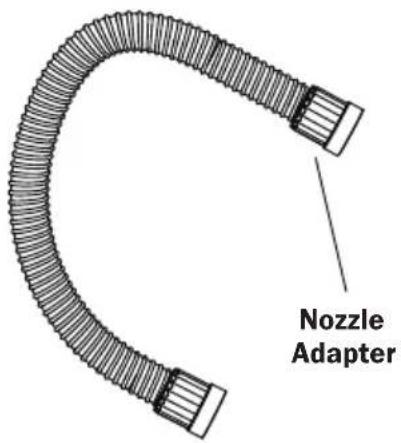
Diagram of a mechanical component with multiple parts, no text or symbols presentFor model A-12 and A-16:
Connect the nozzle connector in between the nozzle adapter and the nozzle.
natural_image
Diagram of a mechanical component with threaded shaft, internal cylindrical housing, and conical tip (no text or symbols)Installation and Operation Guide (Continued)
Extension Setup
natural_image
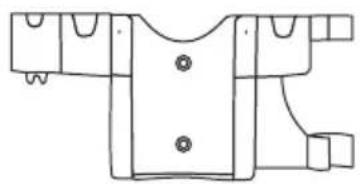
Line drawing of a garment pattern piece with buttons and side connectors (no text or symbols)Wall Mount Kit* (B-WMK-2)
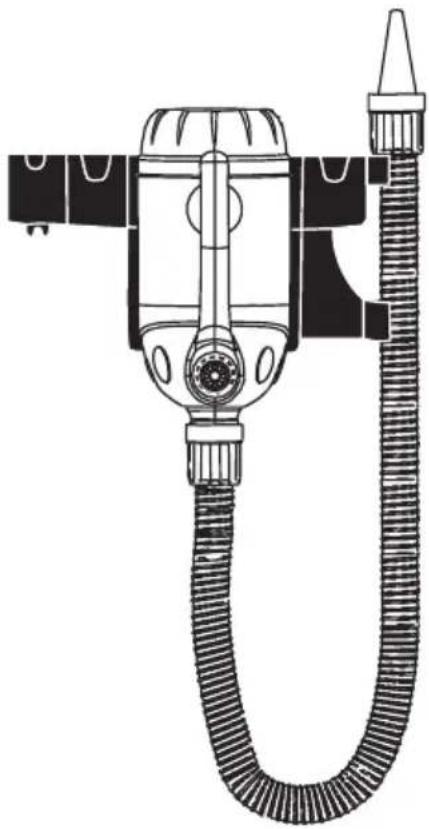
Wall Mounted
- You can mount the dryer to the wall with a Wall Mount Kit for space-saving and convenient use.
* The Wall Mount Kit (B-WMK-2) is sold separately.
natural_image
Technical line drawing of a vacuum cleaner with coiled hose and valve (no text or symbols)Switch Plate
natural_image
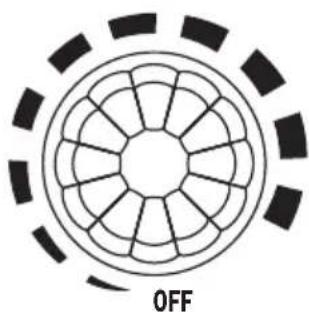
Circular diagram with radial segments and a dashed outer ring, labeled 'OFF' at the bottom (no other text or symbols)Speed Switch
- Turn to "OFF" position to switch the machine off. Turn to any speed position to switch the machine ON.
- Turn clockwise to set the desired speed.

natural_image
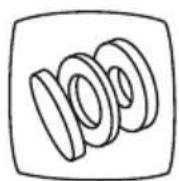
Concentric circles with internal symbols (no text or labels)Heater Switch
- Switch to "O" setting to turn the heating element OFF.
- Switch to other settings to turn the heating element on. "I"/"II" means the lower/higher heat setting.
Installation and Operation Guide (Continued)
Start Your Job
Before Turning on the Machine:
Please hold the hose tightly and point the nozzle outlet to a safe area.
Dusting a Computer or Other Devices (See Page 5: Parts Description)
Recommended nozzles: standard nozzle or cone nozzle, standard brush, tapered flow nozzle, straw adapter and detail brush.
- Disassemble the computer (or other desired devices) and put the computer (or other desired devices) in a outdoor place (recommended).
- Install the standard nozzle or cone nozzle and turn on the machine with the higher speed setting. Roughly dust the surface of the computer (or other desired devices).
- For model A-5, install the standard brush onto the standard nozzle to remove difficult dirt. Switch to tapered flow nozzle with straw adapter and detail brush installed to clean crawl places. Switch to standard nozzle again to dust out the whole surface.
Used As a Dryer after Car Washing (See Page 5: Parts Description)
Recommended Nozzles: standard nozzle or cone nozzle, and flat nozzle.
- Install the standard nozzle or cone nozzle and turn on the machine with the higher speed setting. Remove the water from the blind angles and gaps of car windows, door frames, lamps, grilles, outer mirrors, rims and etc.
- Switch to flat nozzle to remove the water from the outer surface of the car.
Used As a Hair Dryer for Pet (See Page 5: Parts Description)
Recommended nozzles: standard nozzle or cone nozzle, and flat nozzle.
- Force Drying Stage: In this stage, pets have been bathed and are saturated with heavy water. High-pressure airflow can remove the heavy water efficiently. You can achieve high-pressure air by installing the standard nozzle or air blade nozzle and dry at the higher speed setting of the machine.
- Finish Stage: In this stage, most of the heavy water on the pets have been removed in the force drying stage, but there is still some moisture. Heated-temperature and high-volume soft airflow can help to vaporize the rest of the moisture or to fluff and style.
- For model A-12, you can achieve high temperature airflow by using the heating element. For model A-5 and A-16, turn to the highest speed setting for around 10 minutes for motor-heated airflow.
- To achieve high-volume soft airflow, switch to round nozzle or reduce the speed of the machine.
Installation and Operation Guide (Continued)
Start Your Job (Continued)
Tips
- Hold the nozzle adapter or nozzle connector to avoid the hot areas of the hose.
User Maintenance and Servicing Instructions
Frequent maintenance is recommended on this appliance. Failure to follow the maintenance instructions may cause failure of the appliance and void the warranty.
- When not in use, unplug and store the appliance in a dry and cool indoor place. Make sure it's out of reach of children.
- Before performing any maintenance or cleaning, always disconnect the machine from its power source.
- Use a damp cloth to wipe the surface of the housing. Do not clean the unit with water directly.
- Check if the grille covers are clean. Remove dirt or any other objects that could block the air inlet and air outlet.
Organize the Cord
natural_image
Technical line drawing of a mechanical device with no visible text or symbols- Wrap the power cord around the handle on top of the housing for storage after use.
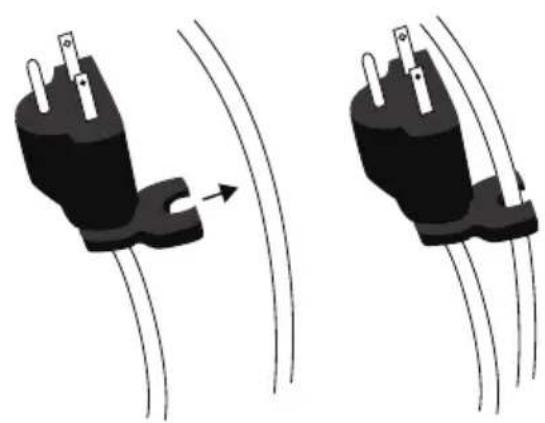
natural_image
Two identical black electrical plug diagrams with wires, showing a curved arrow indicating motion (no text or symbols)- Use convenient clip at end of cord to secure in place.
Nozzle Maintenance
- Check if the nozzles are clean. Remove dirt or any other objects that could block the nozzle.
- Store the nozzle in a sealed container and put the container in a dry and cool indoor place. Make sure it's out of reach of children.
User Maintenance and Servicing Instructions (Continued)
Filter Maintenance
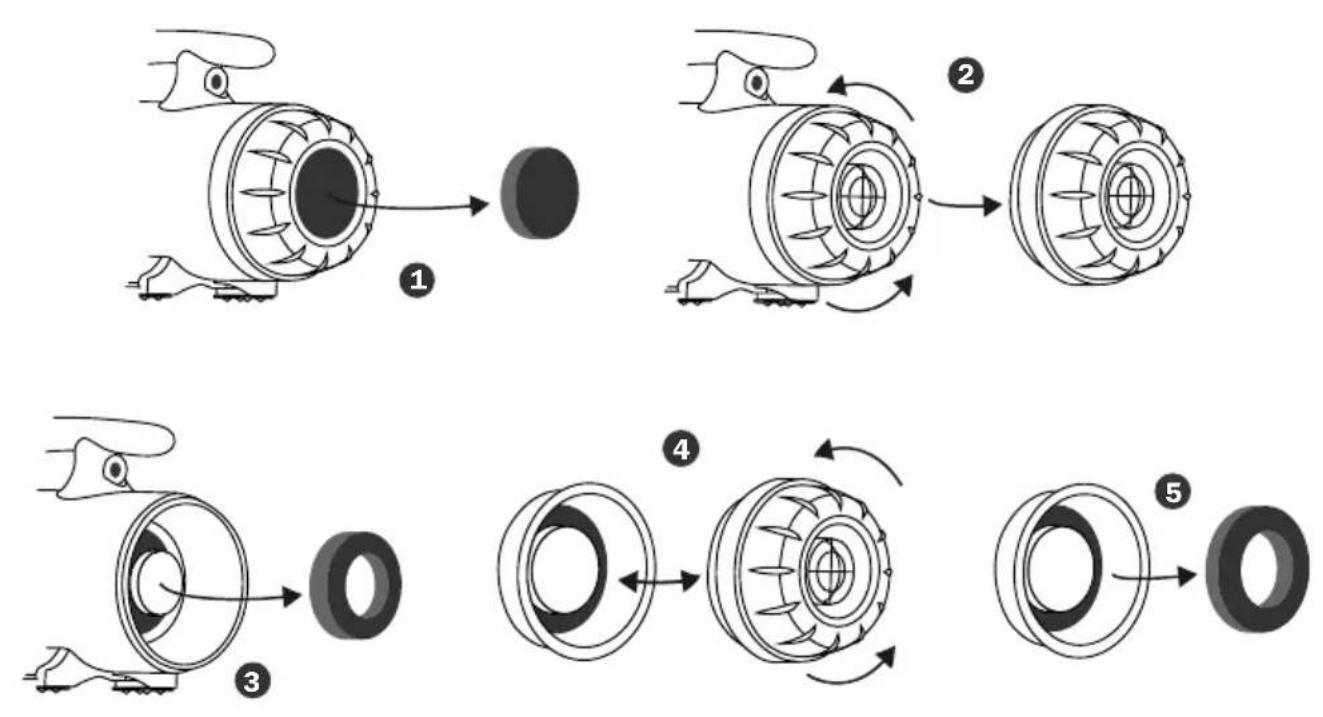
Three filters are on rear (intake) of the machine. To ensure the best performance, you should clean or replace the filters frequently. (See Also Page 5: Parts Description). Follow the below instructions to take out the filters:
For model A-12 and A-16:
① Take out the intake filter right from the end of the machine.
For all other models:
① Take out the intake filter right from the end of the machine.
② Screw off the rear cover.
③ Take out the motor filter from the machine.
④ Screw off the dust proof cover from the rear cover.
⑤ Take out the case filter from the dust case.
User Maintenance and Servicing Instructions (Continued)
Hose Maintenance (For model A-12/A-16)
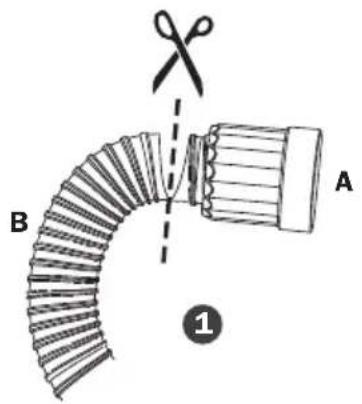
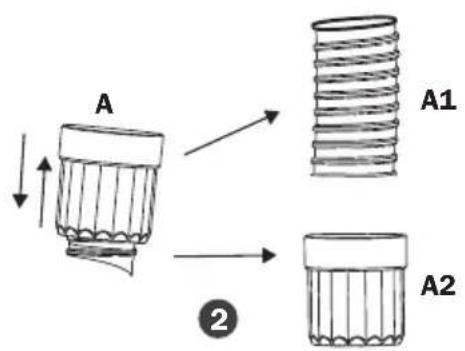
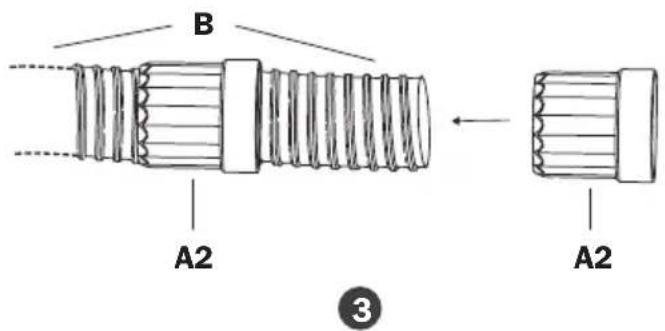
Always keep the hose away from chemicals, sunlight, ultraviolet ray, extreme temperature and sharp edges.
If your hose breaks, it could be fixed by the following methods:
① Cut out the broken hose into two ends, A and B.
② Take out A1 from A2.
③ Insert B into A2.
Troubleshooting Guide
PROBLEM POSSIBLE CAUSE SOLUTION
| Duster/Dryer does not start | No electricity. Check for power supply. | |
| The power cord is not properly plugged in. | Remove and reconnect the power cord. | |
| The circuit breaker of the power socket or power circuit jumps. | Disconnect the machine to the power socket. Reset the circuit breaker and reconnect. | |
| The thermal switch is triggered. | Turn off and unplug the machine. Clean or replace the filters. Plug and use again after the machine totally cools down. | |
| Unit runs but the speed / noise is abnormal | Air inlet or air outlet is blocked. | Remove blockage, clean or replace the filters. |
| Carbon brushes of the motor are worn out. | Contact XPOWER for more assistance. | |
| Leakage on the hose. Try to fix the leakage or replace the hose. (See Page 13: Hose Maintenance) | ||
| Unit runs but the machine gets very hot | The motor produces heat and heats up the machine after a long time use. | Turn off the machine. Use again after the machine totally cools down. |
If troubleshooting does not resolve your problem, please contact XPOWER or other parties authorized by XPOWER for further instructions.
Technical Specification
| MODEL NUMBER A-5 A-12 A-16 | |||
| Voltage/Frequency 115 V~ 60Hz | |||
| Amperage 8.0 A 12.0 A 19.0 A | |||
| Motor Power 2 HP 4.5 HP 6 HP | |||
| Rated Airflow 100 CFM 220 CFM 320 CFM | |||
| Speed Control 2 Speeds Variable Speed | |||
| Heating Element N/A | 2 Settings | N/A | |
| Hose Length | 5 ft. / 1.5 m | 16 ft. / 5.0 m | 30 ft. / 9.1 m |
| Cord Length 5 ft. / 1.5 m | 10 ft. / 3.0 m | 15 ft. / 4.5 m | |
| Housing | ABS | ABS + PC | |
| Unit Dimension (L) x (W) x (H) | 10.3 x 5.2 x 8.0 in. / 26.2 x 13.2 x 20.3 cm | 11.9 x 9.2 x 11.8 in. / 30.1 x 23.3 x 29.9 cm | 15.6 x 9.2 x 11.8 in. /39.6 x 23.3 x 30.0 cm |
| Unit Weight | 4.8 lbs. / 2.2 kg | 11.7 lbs. / 5.3 kg | 18.5 lbs. / 8.4 kg |
| Safety Certification | ETL/C-ETL | N/A | |
If your product(s) is not listed above, please visit www.xpower.com for more information.
XPOWER Limited Warranty (USA)
1 YEAR LIMITED WARRANTY
XPOWER-branded products purchased in the U.S. from authorized distributors include a 1-year limited warranty. Contact XPOWER to confirm warranty information about your product(s).
This limited warranty covers defects in materials and workmanship in your XPOWER-branded products, purchased in the U.S. ONLY. Local warranty policy (if any) in your country will cover products purchased outside the U.S.

IMPORTANT:
(1) Please finish the online warranty registration before usage. Visit www.xpower.com/service-support/warranty-registration.
(2) This Limited Warranty applies with its own timeliness. Contact XPOWER or visit www.xpower.com for more information.
Items mentioned but not limited to below are not covered by warranty:
(1) Power cord, filters or any other components considered as a “consumable parts” by XPOWER.
(2) Normal wear and tear.
(3) Problems that result, directly or indirectly, at XPOWER's sole discretion, from:
(3.1) External causes such as accident, abuse, misuse or problems with electrical power supply.
(3.2) Disassembling, servicing or modification not authorized by XPOWER.
(3.3) Usage that is not accordant with product instructions stated in Owner's Manual.
(3.4) Failure to follow the product instructions or lack of necessary maintenance stated in Owner's Manual.
Before contacting XPOWER, please try one or more of the following:
(1) Consult this Owner's Manual and follow the instructions of troubleshooting guide.
(2) Access www.xpower.com for more advice and information that could be helpful to address your problems.
If you need additional assistance from XPOWER, please:
(1) Email info@xpower.com.
(2) Call XPOWER U.S. Customer Service Department at 855-855-8868 or other numbers provided on www.xpower.com.
(3) Visit XPOWER U.S. Head Office at 240 Clary Ave., San Gabriel, CA 91776 or the most current address provided on www.xpower.com.
Please also have your original proof of purchase and the serial number(s) of your product(s) ready when you contact XPOWER.
XPOWER Limited Warranty (USA) (Continued)
If you are instructed to return the unit for service or replacement, please:
(1) Request a RMA (Return-Merchandise-Authorization) number.
(2) Use the original or an equivalent packaging, prepay shipping charges at your own expense to the address provided by XPOWER, with the RMA number on the shipping label or the packaging.
(3) Include all the original parts and components.
XPOWER will inspect, assess and advise the repairs needed and applicable cost, if any. For products under warranty, we will pay to ship the repaired or replaced product(s) to you if you use an address within the Contiguous United States. Otherwise, we will ship the product(s) to you at your own expense.

ADVERTENCIA: LEA Y GUARDE ESTE MANUAL ANTES DE USAR ESTE PRODUCTO.
natural_image
Simple geometric diagram of two concentric squares (no text or symbols)natural_image
Technical line drawing of a mechanical device with coiled tubing and connectors (no text or symbols)Artículos incluidos
natural_image
Technical line drawing of a mechanical pump or valve assembly (no text or symbols)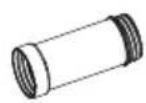
- Conector de boquilla x 1*
natural_image
Illustration of a flexible hose with threaded ends and flanges (no text or symbols)
natural_image
Line drawing of a four-wheeled vehicle chassis (no text or symbols)- Carro x 1*
(1) Filtro de entrada
(2) Cubierta trasera***
(3) Filtro de caja***
(4) Caja de polvo***
(5) Filtro de motor
(6) Cubierta anti-polvo
(7) Cable de alimentación
(8) Carcasa derecha
(9) Fundas de motor
(10) Motor
(11) Fundas de motor*
(12) Motor*
(13) Placa de interruptor
natural_image
Technical line drawing of a mechanical device with three circular components and dashed alignment lines (no text or symbols)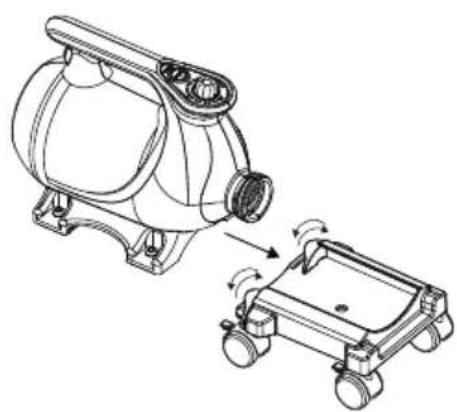
natural_image
Technical line drawing of a mechanical device with a separate view showing internal components and motion arrows (no text or symbols)natural_image
Technical line drawing of a pump or motor assembly with a side view showing rotational motion (no text or symbols)natural_image
Diagram of a cylindrical object with threaded ends and an arrow pointing to its tip (no text or symbols)natural_image
Diagram showing three types of mechanical components: threaded cylindrical body, conical tip, and flanged cylindrical body (no text or symbols)natural_image
Diagram of a mechanical component with threaded body, tapered tip, and shaft (no text or symbols)natural_image
Diagram of a mechanical component with threaded shaft, internal cylindrical housing, and conical tip (no text or symbols)natural_image
Technical line drawing of a garment pattern piece with buttons and connectors (no text or symbols)natural_image
Technical line drawing of a vacuum cleaner with coiled hose and valve (no text or symbols)Montado en la Pared
natural_image
Circular diagram with radial segments and a dashed outer ring, labeled 'OFF' at the bottom (no other text or symbols)natural_image
Technical line drawing of a mechanical device with no visible text or symbolsnatural_image
Two identical diagrams showing a plug with pins and wires, one increasing and the other decreasing (no text or symbols)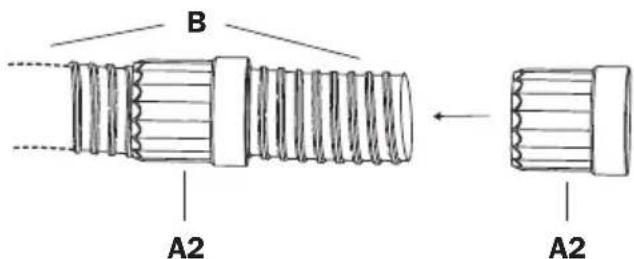
3
natural_image
Simple geometric diagram of two concentric squares (no text or symbols)natural_image
Technical line drawing of a portable air purifier with coiled tubing and handle (no text or symbols)Éléments inclus
natural_image
Technical line drawing of a mechanical pump or motor component (no text or symbols)natural_image
Illustration of a U-shaped pipe with two flanged ends and textured fill (no text or symbols)- Tuyau x 1
natural_image
Line drawing of a four-wheeled vehicle chassis (no text or symbols)- Chariot x 1*
natural_image
Technical line drawing of a mechanical device with three circular components and connecting rods (no text or symbols)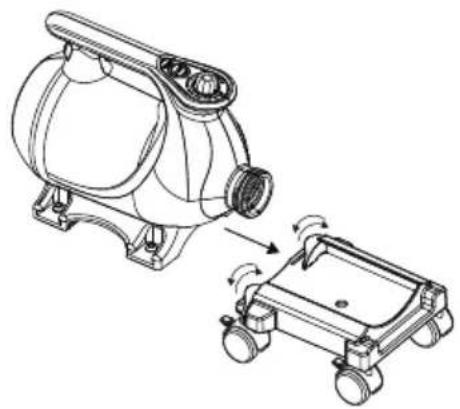
natural_image
Technical line drawing of a mechanical device with a separate view showing a motor and wheels (no text or symbols)natural_image
Technical line drawing of a pump or motor assembly with a side view showing rotational motion (no text or symbols)natural_image
Diagram of a cylindrical object with threaded ends and an arrow pointing to its tip (no text or symbols)natural_image
Diagram showing three types of mechanical components: threaded cylindrical body, conical tip, and flanged cylindrical body (no text or symbols)natural_image
Diagram of a mechanical component with threaded body, tapered tip, and shaft (no text or symbols)natural_image
Diagram of a mechanical component with threaded shaft, cylindrical body, and conical tip (no text or symbols)natural_image
Line drawing of a garment pattern piece with buttons and side connectors (no text or symbols)Fixation Murale* (B-WMK-2)
Fixé au Mur
natural_image
Technical line drawing of a vacuum cleaner with coiled tubing (no text or symbols)natural_image
Circular diagram with radial segments and a dashed border, labeled 'OFF' at the bottom (no other text or symbols)
natural_image
Concentric circles with internal symbols (no text or labels)natural_image
Technical line drawing of a mechanical device with no visible text or symbolsnatural_image
Two identical black electrical plug connectors with wires, shown in side-by-side motion (no text or symbols)PROBLÈME CAUSE POSSIBLE SOLUTION
Technical Specification
| NUMÉRO DEMODÈLE | A-5 A-12 A-16 | ||
| Tension / Fréquence | 115 V~ 60Hz | ||
| Ampérage 8.0 A 12.0 A 19.0 A | |||
| Puissance u moteur | 2 HP 4.5 HP 6 HP | ||
| Débit d'air nominal | 100 CFM* 220 CFM* 320 CFM* | ||
| Contrôle de vitesse | 2 Vitesses Vitesse variable | ||
| Élément chauffant N/A 2 Configurations N/A | |||
| Longueur du tuyau | 5 pieds / 1.5 m | 16 pieds / 5.0 m | 30 pieds / 9.1 m |
| Longueur du cordon | 5 pieds / 1.5 m | 10 pieds / 3.0 m | 15 pieds / 4.5 m |
| Boîtier | ABS | ABS + PC | |
| Dimension unitaire (L) x (W) x (H) | 10.3 x 5.2 x 8.0 ponces. / 26.2 x 13.2 x 20.3 cm | 11.9 x 9.2 x 11.8 ponces. / 30.1 x 23.3 x 29.9 cm | 15.6 x 9.2 x 11.8 ponces. /39.6 x 23.3 x 30.0 cm |
| Poids de l'unité | 4.8 lbs. / 2.2 kg | 11.7 lbs. / 5.3 kg | 18.5 lbs. / 8.4 kg |
| Certification de sécurité | ETL/C-ETL | N/A | |
XPOWER Manufacture, INC.
668 S. 6th Ave., City of Industry,
San Gabriel, CA 91776 USA
www.xpower.com | 1-(855)-855-8868 | info@xpower.com
Read and save these instructions

- Multipurpose Powered Duster/Dryer Owner's Manual
- WARNING: READ AND SAVE THESE INSTRUCTIONS BEFORE USING THIS PRODUCT.
- Safety Instructions (Continued)
- Servicing of Double-Insulated Appliances
- Double Insulation Symbol
- Multipurpose Powered Duster/Dryer Introduction
- Items Included
- Installation and Operation Guide
- Power Supply
- Amperage Rating
- Power Outlets Selection
- Dolly Installation (For Model A-12 / A-16)
- Hose Installation
- Installation and Operation Guide (Continued)
- Nozzle Installation
- For model A-5:
- For model A-12 and A-16:
- Extension Setup
- Wall Mounted
- Switch Plate
- Speed Switch
- Heater Switch
- Start Your Job
- Before Turning on the Machine:
- Dusting a Computer or Other Devices (See Page 5: Parts Description)
- Used As a Dryer after Car Washing (See Page 5: Parts Description)
- Used As a Hair Dryer for Pet (See Page 5: Parts Description)
- Start Your Job (Continued)
- Tips
- User Maintenance and Servicing Instructions
- Organize the Cord
- Nozzle Maintenance
- User Maintenance and Servicing Instructions (Continued)
- Filter Maintenance
- Hose Maintenance (For model A-12/A-16)
- Troubleshooting Guide
- Technical Specification
- XPOWER Limited Warranty (USA)
- YEAR LIMITED WARRANTY
- IMPORTANT:
- Items mentioned but not limited to below are not covered by warranty:
- Before contacting XPOWER, please try one or more of the following:
- If you need additional assistance from XPOWER, please:
- XPOWER Limited Warranty (USA) (Continued)
- If you are instructed to return the unit for service or replacement, please:
- ADVERTENCIA: LEA Y GUARDE ESTE MANUAL ANTES DE USAR ESTE PRODUCTO.
- Artículos incluidos
- Montado en la Pared
- Éléments inclus
- Fixé au Mur
- XPOWER Manufacture, INC.
Brand : XPower
Model : A-16
Category : Heating