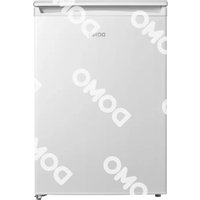
DO91138 - Refrigerator DOMO - Free user manual and instructions
Find the device manual for free DO91138 DOMO in PDF.


| Product type | Refrigerator |
| Brand | DOMO |
| Model | DO91138 |
| Refrigerant | Isobutane (R600a) – flammable gas, eco-friendly |
| Climate class | SN, N, ST, T (according to rating plate) |
| Interior lighting | LED (non-user replaceable) |
| Adjustable temperature | Yes, by SETTING button from COLD to COLDEST + Super Cool |
| Super Cool function | Yes, active for 6 hours |
| Defrosting | Automatic (drainage through condensation channel) |
| Door opening direction | Reversible (door reversal possible) |
| Adjustable feet | Yes, for leveling |
| Compartments | Door bins, shelves, vegetable drawer |
| Capacity | Not specified (estimate: approx 100-150 L) |
| Supply voltage | 230 V ~ 50 Hz (according to European standard) |
| Energy consumption | Not specified (estimate: energy class F or G) |
| Dimensions (approx.) | Height ~ 85 cm, Width ~ 55 cm, Depth ~ 55 cm (estimate) |
| Weight (approx.) | Approximately 30 kg (estimate) |
| Intended use | Domestic and similar (offices, farms, hotels) |
| Warranty | 2 years |
| After-sales service | Linea 2000 (info@linea2000.be, +32 14 21 71 91) |
Frequently Asked Questions - DO91138 DOMO
User questions about DO91138 DOMO
0 question about this device. Answer the ones you know or ask your own.
Ask a new question about this device
Download the instructions for your Refrigerator in PDF format for free! Find your manual DO91138 - DOMO and take your electronic device back in hand. On this page are published all the documents necessary for the use of your device. DO91138 by DOMO.
USER MANUAL DO91138 DOMO
natural_image
White rectangular appliance with 'DOMO' branding on top, no visible text or symbols on bodyEN Instruction booklet Refrigerator
Read all instructions carefully.
Save this instruction manual for future reference.
natural_image
Line drawings of two rectangular refrigerators with directional arrows indicating motion (no text or symbols)natural_image
Line drawing of a refrigerator with an inset close-up showing internal components (no text or symbols)natural_image
Line drawing of a refrigerator interior showing front, side, and side views with arrows indicating transformation (no text or symbols)natural_image
Technical line drawings of a mechanical device with three views: front, top, and side (no text or symbols)natural_image
Line drawings of a refrigerator interior with mechanical components and a close-up view of the handle (no text or symbols)natural_image
Technical line drawing of a refrigerator with three orthographic views (no text or symbols)natural_image
Diagram showing a 3D model of a refrigerator with an arrow indicating transformation from top to front view (no text or symbols present)GEBRUIK
TEMPERATUURREGELING
natural_image
Line drawing of a hand holding a shelf with a ruler, no text or symbols present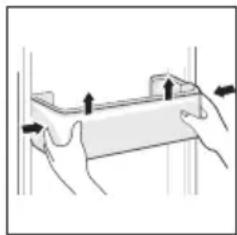
natural_image
Illustration of two hands holding a rectangular object with arrows indicating direction (no text or symbols)VERLICHTING
natural_image
Technical line drawing of a refrigerator interior with a magnified circular detail showing internal structure (no text or symbols)PROBLEMEN EN OPLOSSINGEN
natural_image
Symbol of a trash bin with crossed lines indicating no waste or discharge (no text or numbers present)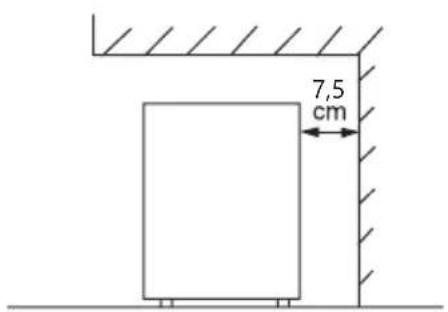
natural_image
Line drawing of a rectangular refrigerator with a small inset showing a screwdriver (no text or symbols)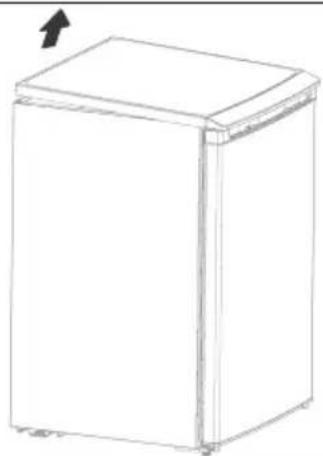
natural_image
Line drawing of a simple refrigerator with a lid and front panel, no text or symbols presentnatural_image
Line drawing of a refrigerator with an inset close-up showing internal components (no text or symbols)natural_image
Line drawing of a refrigerator interior showing front, side, and side views (no text or symbols)natural_image
Technical line drawings of a mechanical device with three views: front, top, and side (no text or symbols)natural_image
Line drawings of a refrigerator interior with three views showing different mechanical components (no text or symbols)natural_image
Technical line drawing of a refrigerator with three orthographic views (no text or symbols)natural_image
Diagram showing the assembly of a refrigerator from front to side, with no text or symbols present.UTILISATION
RÉGLAGE DE LA TEMPÉRATURE
natural_image
Illustration of a hand holding a shelf with a pointer, no text or symbols present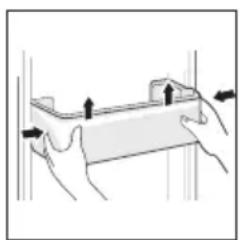
natural_image
Illustration of two hands holding a rectangular object with arrows indicating direction (no text or symbols)ÉCLAIRAGE
natural_image
Technical line drawing of a mechanical assembly with a magnified circular detail (no text or symbols)natural_image
Symbol of a trash bin crossed with no text or numbers, representing waste sorting or disposal (no text present)natural_image
Recycling symbol with three chasing arrows forming a triangle (no text or labels)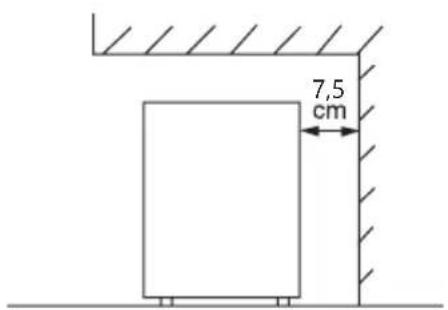
natural_image
Line drawing of two rectangular refrigerators with directional arrows indicating motion (no text or symbols)natural_image
Technical line drawing of a rectangular refrigerator with mounting feet and a close-up inset showing internal components (no text or symbols)natural_image
Line drawing of a refrigerator interior showing front, side, and side views (no text or symbols)natural_image
Technical line drawings of a mechanical device with exploded and assembled views (no text or symbols)natural_image
Line drawings of a refrigerator interior with mechanical components and a close-up view of the handle (no text or symbols)natural_image
Technical line drawing of a refrigerator with mounting brackets and internal components, shown in two orthographic views (no text or symbols present)natural_image
Diagram showing the assembly of a refrigerator from front to side, with no text or symbols present.GEBRAUCH
TEMPERATURREGELUNG
natural_image
Line drawing of a hand holding a shelf with a ruler, no text or symbols present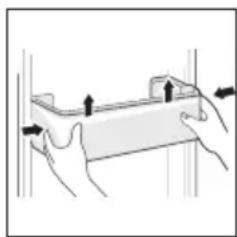
natural_image
Illustration of two hands holding a rectangular object with arrows indicating direction (no text or symbols)BELEUCHTUNG
natural_image
Technical line drawing of a mechanical component with a magnified circular detail (no text or symbols)natural_image
Symbol of a trash bin crossed with two crossed lines and a solid black rectangle below (no text or labels)Thank you for your confidence in DOMO. We do hope you enjoy your new purchase. Before reaching you, all our products undergo a strict quality inspection. Should you still encounter problems with your appliance, then we are truly sorry and will do everything possible to resolve the situation quickly. Do not hesitate to contact our customer service. Our staff will do all they can to help you!
+32 14 21 71 91 info@linea2000.be

Monday - Thursday: 8.30 - 12.00 and 13.00 - 17.00
Friday: 8.30 - 12.00 and 13.00 - 16.30
This device has a warranty period of 2 years from the date of purchase. During this warranty period, the distributor will assume responsibility for any defects that can be shown to be the result of material, construction or manufacturing errors. Such defects will be remedied by repair or replacement of the device. The 2-year warranty period will be suspended during the repair period and will continue after the repair has taken place for the remaining duration of the warranty period. The warranty will be honoured if proof of purchase clearly showing the date of purchase is provided. If your device becomes defective within the 2-year warranty period, please return it with your proof of purchase to the store you purchased it from or follow the procedure of the relevant webshop if you bought it online.
The warranty does not cover damage to the device, accessories or parts caused by:
• normal wear and tear from use;
• non-compliance with the instructions for use, maintenance and cleaning in the manual;
- incorrect connection, e.g. electrical voltage too high;
- incorrect, heavy-handed or abnormal use;
• repairs or alterations carried out by the consumer or unauthorised third parties;
- use of parts or accessories not recommended nor supplied by the distributor.
SAFETY INSTRUCTIONS
When using electrical appliances, basic safety precautions should always be taken, including the following. Any injury or damage caused by failure to comply with these rules are at your own risk. Neither the manufacturer, importer, or the supplier may be held liable.
- Read all instructions carefully.
• Make sure all packaging materials and promotional stickers have been removed before using the appliance for the first time. Make sure children cannot play with the packaging materials. -
This appliance is only suitable for use in domestic and similar environments, such as:
-
staff kitchen areas in shops, offices and other working environments;
- farm houses;
- by clients in hotels, motels and other residential type environments;
• bed and breakfast type environments.
• Children should be supervised to ensure that they do not play with the appliance.
- This appliance can be used by children aged from 16 years and above and persons with reduced physical, sensory or mental capabilities or lack of experience and knowledge if they have been given supervision or instruction concerning use of the appliance in a safe way and understand the hazards involved.
• Children shall not play with the appliance.
- Cleaning and user maintenance shall not be made by children unless they are older than 16 or supervised.
- Keep the appliance and its cord out of reach of children younger than 16 years.
- All repairs should be carried out by the manufacturer or its aftersales service.
- Make sure that children do not touch the cord or appliance.
- Your appliance uses isobutane (R600a) as a refrigerant. Despite the fact that R600a is an environmentally friendly and natural gas, it is highly flammable. Therefore you should be careful
during shipment and installation to prevent your appliance's cooler elements from being damaged. In the event of a leak caused by damage to the cooler elements, move your refrigerator from open flames or heat sources and ventilate the room where the appliance is located for a few minutes.
- Using the appliance incorrectly may cause an injury. Any injury or damage caused by failure to comply with these rules are at your own risk. Neither the manufacturer, importer, or the supplier may be held liable.
▲ELECTRICAL WARNINGS
- In order to avoid a hazard this appliance must not be supplied through an external switching device, such as a timer or a separate remote control, or connected to a circuit that is regularly switched on and off by the utility.
- Before use, check carefully that the electric tension and frequency of the power net at your home match the indications on the rating label of the appliance.
- The appliance must be plugged into an appropriate outlet that is installed and grounded in accordance with local installation regulations.
- The appliance must be disconnected from its power source when not in use, during service and when replacing parts. If present, first turn all the buttons to the 'off' position, then pull the plug out of the socket by grasping the plug itself. Never pull the cord or appliance to remove the plug from the socket.
- Do not let the power supply cord hang over the edge of a counter, or touch hot surfaces.
- Keep the power cord away from hot parts and don't cover the appliance.
- Unwrap the cord completely to prevent overheating of the cord. Do not allow the power cord supply to run underneath or around the unit.
- For safety reasons, never use the appliance if the cord, plug, or appliance itself is damaged, or after a malfunction of the appliance. Return the appliance to the DOMO Service Department or its service agent for examination, repair, or
electrical or mechanical adjustment. Do not try to repair the appliance yourself.
- It is prohibited to alter or modify the device and its specifications.
- When disposing of the appliance, remove the plug from the power socket, cut the power cord (as closely as possible to the appliance), and remove the door to prevent playing children getting an electrical shock or shutting themselves in the appliance.
- Unplug the appliance when it is not in use, before assembling or disassembling any parts and before cleaning the appliance. Put all buttons and knobs into the 'off' position and unplug the appliance by grasping the plug. Never unplug by pulling the cord.
- The lamp in the appliance is intended for use in this cooling device only. Do not use the lamp as a household light.
⚠️INSTALLATION
- Do not place near flammable materials, gases or explosives.
• Always use the appliance on a steady, level and dry surface.
- Never place this appliance near a gas stove or electrical stove or in a place where it may come into contact with a warm appliance.
- Keep the ventilation openings free of obstructions.
- Avoid long exposure to direct sunlight.
- Make sure that you have access to the plug of the appliance.
- Make sure the plug and cord are not crushed or damaged by the back of the appliance. This can cause short circuits and, as a result, overheating and fire.
- This is a heavy appliance. Be careful when moving it.
- This cooling unit is not intended for use as a built-in appliance.
- Do not place a power strip or other portable power supply behind the appliance.
• After installation, it is advisable to wait 6 hours before connecting the appliance to allow the oil to flow back in the compressor.
⚠ USE
- Do not use or store this appliance outdoors.
- Do not use this appliance for other than intended use.
- Do not use any other electrical appliance inside the refrigerator, unless they are approved for this purpose by the manufacturer.
- Do not keep any explosive substances inside the appliance, like for instance aerosol cans with a flammable propellant.
- Do not use the appliance without a lamp.
- The use of accessories that are not recommended or sold by the manufacturer can cause fire, electrical shock or injuries. Only use the utensils delivered with the appliance.
- Ensure the food in the appliance does not touch the back wall.
- Follow the instructions below to prevent contamination of food:
- Keeping the door open for long periods may cause the temperature in the compartments of the appliance to rise considerably.
- Clean the surfaces that could come into contact with food regularly.
- If the appliance is left empty for longer periods, it should be turned off, defrosted and cleaned. Allow it to dry and leave the door ajar to prevent mould from growing in the appliance.
⚠ CLEANING AND MAINTENANCE
- To protect against electrical shock or burns, do not immerse unit, cord, or plug in water or other liquid.
- Do not place warm or hot objects on top of the appliance.
- Do not clean the appliance with anything made of metal.
- Make sure that the refrigerant circuit does not get damaged, for instance during transportation or installation.
- Do not use mechanical appliances or other means to speed up the defrosting process, unless approved by the manufacturer.
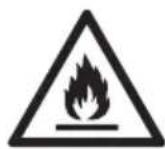
WARNING: Never place this appliance on or in the neighbourhood of a gas or electric fire or in a place where it could come into contact with a heat source. There are flammable materials located on the back of the appliance.
Pay attention to the symbol 'Fire risk – flammable materials' located on the back of the appliance.
SAVE THESE INSTRUCTIONS FOR FUTURE REFERENCE
All images and descriptions in this manual are purely indicative and may differ slightly from the actual device.
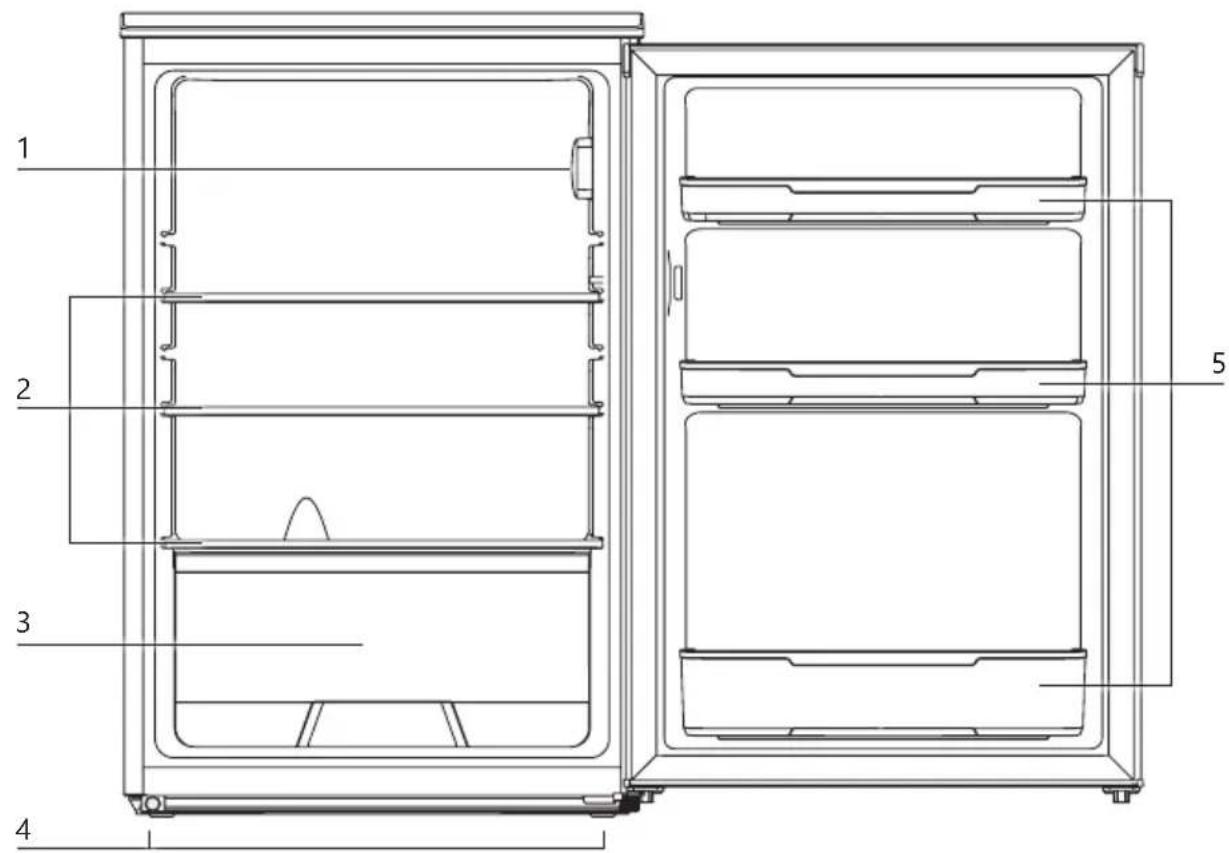
PARTS
- LED lighting + temperature control knob
- Shelves
- Vegetable container
- Levelling feet
- Door shelves
INSTALLATION
- Remove the exterior and interior packing, wipe the outside thoroughly with a soft dry cloth and the inside with a wet, lukewarm cloth. Dry the appliance off well.
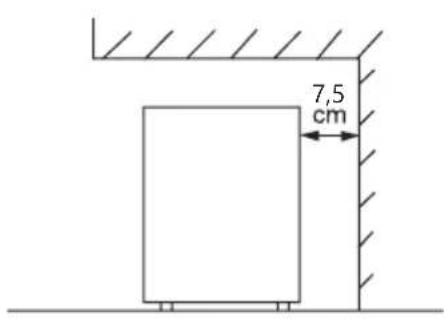
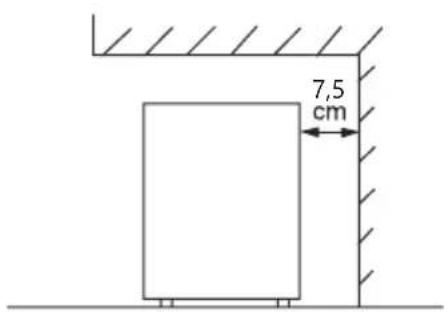
- Let air circulate freely around the cabinet.
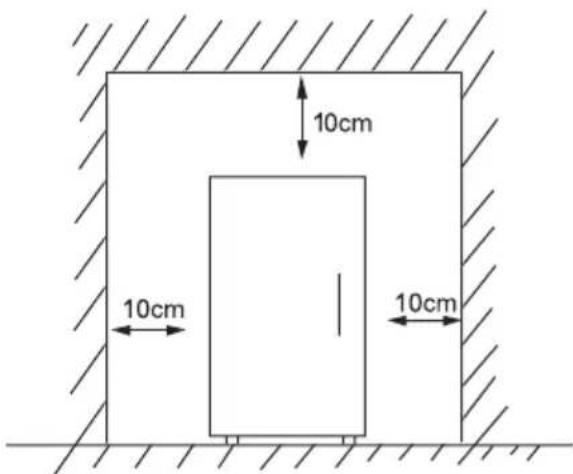
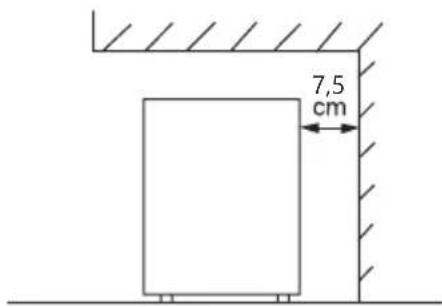
- Make sure there is sufficient space to open the door.
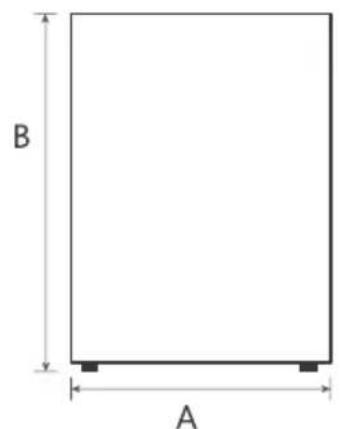
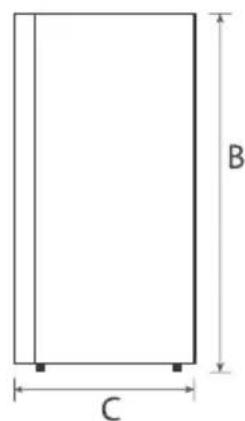
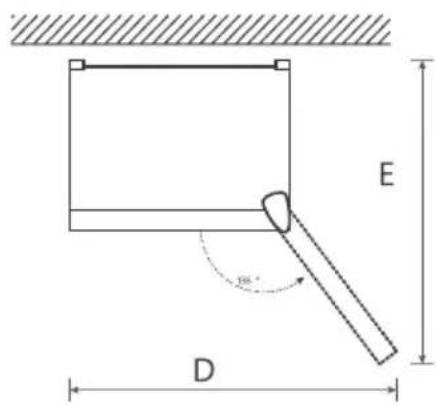

- This cooling unit is not intended for use as a built-in appliance.
- Select a place with a strong, level floor.
- Avoid direct sunlight and heat. Direct sunlight may affect the acrylic coating. Heat sources nearby will cause higher electricity consumption.
- Avoid very moist places. Too much moisture in the air will cause frost to form very quickly on the evaporator, and your refrigerator.
- Before connecting your refrigerator to the power supply, check that the voltage stated on the rating label of your appliance corresponds to the voltage in your home. A different voltage could damage the appliance.
-
The plug is the only way to disconnect the device from the power supply, make sure it is always easily accessible. To disconnect power to the device, turn off the device and then unplug it.
• After installation, leave the fridge for 6 hours before turning it on. This way the refrigerant can settle. -
Allow the appliance to run empty for 8 hours so the compartment can cool to the appropriate temperature.
- You can level the appliance using the adjustable legs. The adjustable legs can be adjusted by screwing them in or out of the appliance.
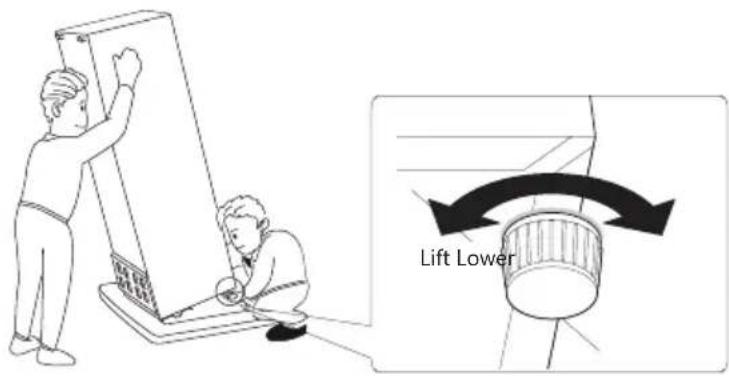
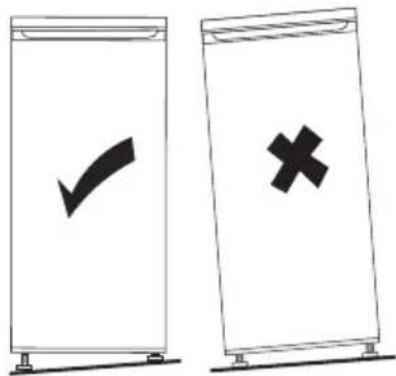
- The climate class indicates the minimum and maximum ambient temperature for the proper operation of an appliance. You can find the climate class on the type plate on the inside or back of the appliance.
• SN: Subnormal: ambient temperature between 10°C and 32°C
• N: Normal: ambient temperature between 16°C and 32°C
• ST: Subtropical: ambient temperature between 16°C and 38°C
• T: Tropical: ambient temperature between 16°C and 43°C
DOOR CONVERSION
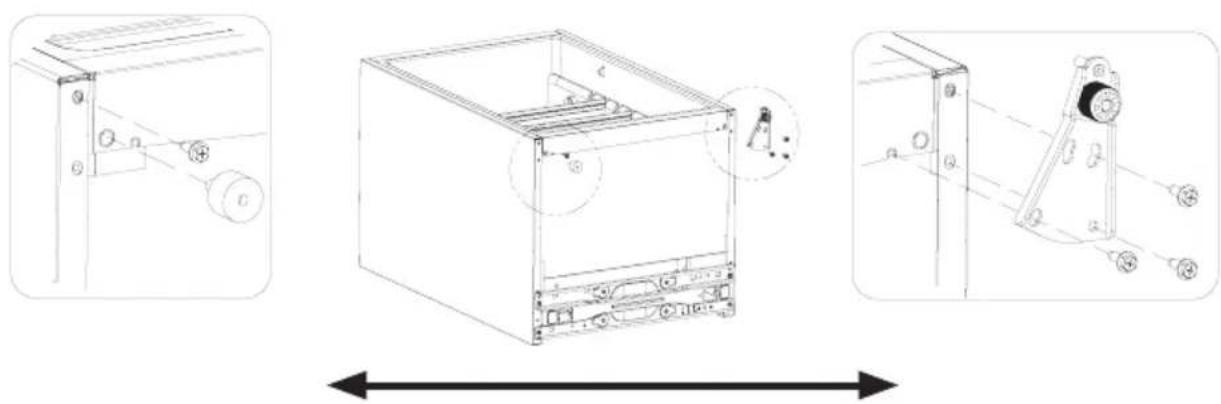
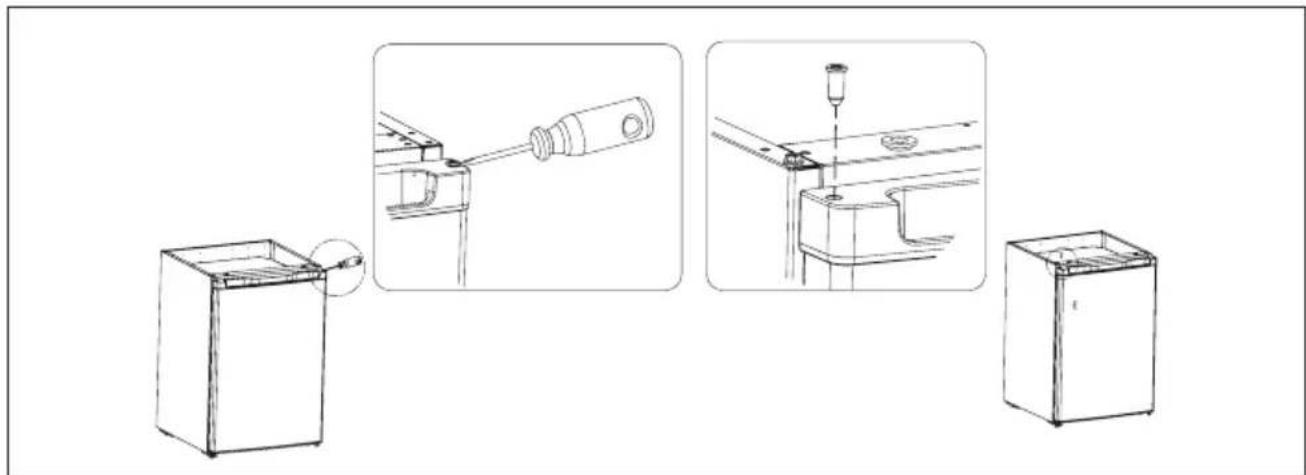
If you need to hinge your door on the opposite side, it is recommended that you call your local authorised service agent to make this conversion or ask a technician. Before you reverse the door, you should ensure the appliance is unplugged and empty. After reversing the door, leave the appliance alone for at least 2 hours before switching it on. This allows the coolant to set.
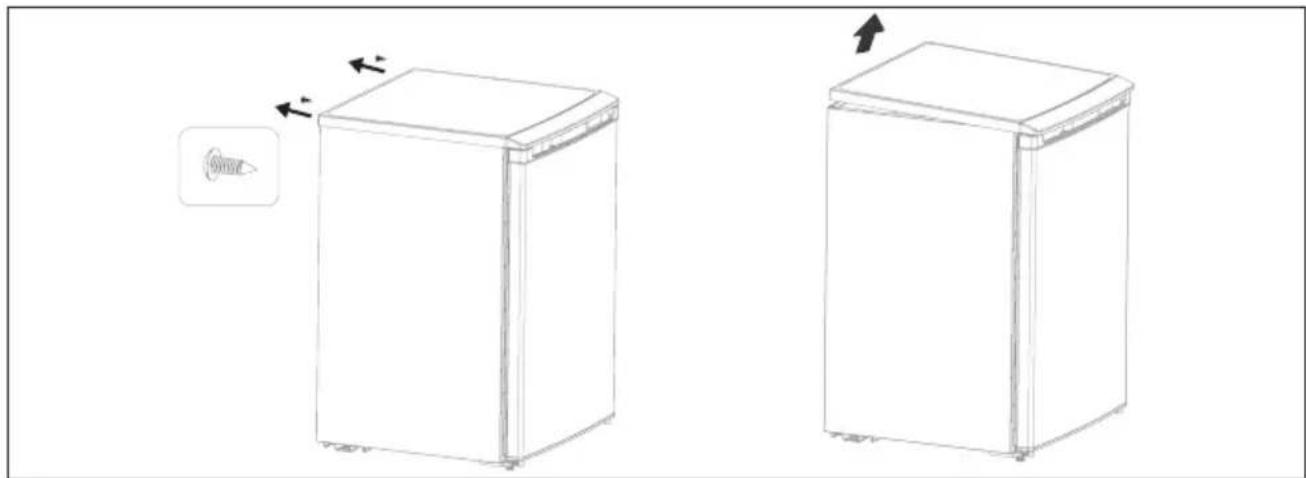
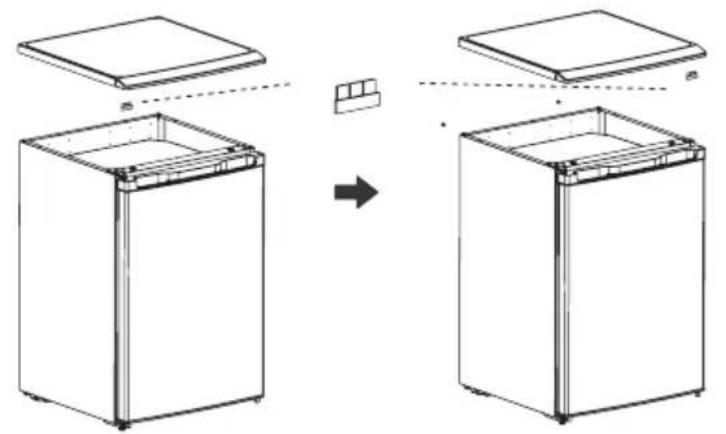
- Unscrew and remove the top cover of the refrigerator, then place it on a soft surface to avoid scratches.
natural_image
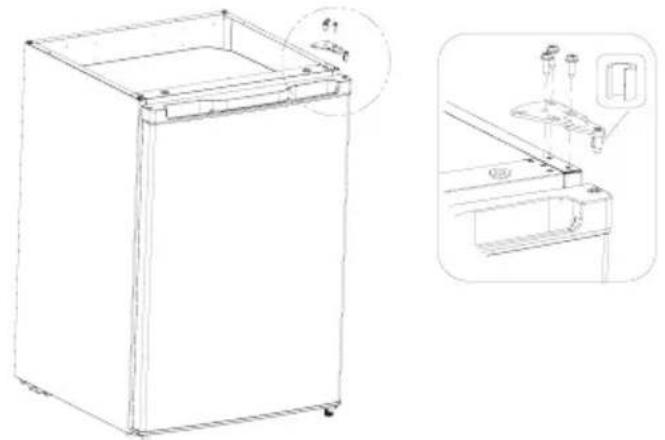
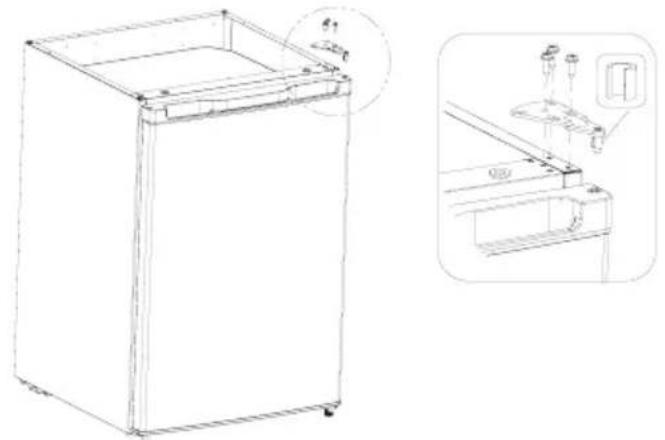
Line drawing of two rectangular kitchen cabinets with directional arrows indicating movement (no text or symbols)- Unscrew the upper hinge and remove it together with the sleeve on the shaft.
natural_image
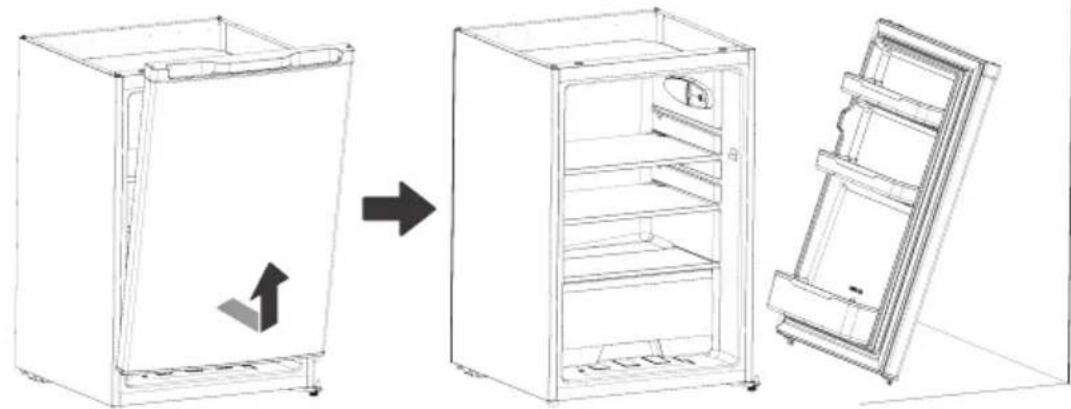
Line drawing of a refrigerator with an inset close-up showing internal components (no text or symbols)- Lift the door and place it on a padded surface to prevent it from being scratched.
natural_image
Line drawing of a refrigerator interior showing front, side, and side views (no text or symbols)- Carefully tip the appliance backward. Unscrew and remove the bottom hinge with adjustable foot. Also remove the levelling foot and the screw on the left side.
Attention: the inclination of the refrigerator must be less than 45^ so that the compressor oil does not enter the cooling circuit. If you do shut down the unit completely, wait 8 hours before turning it back on.
- Swap the lower hinge with adjustable foot and the other adjustable feet and the screw from one side to the other side and screw them back in place.
natural_image
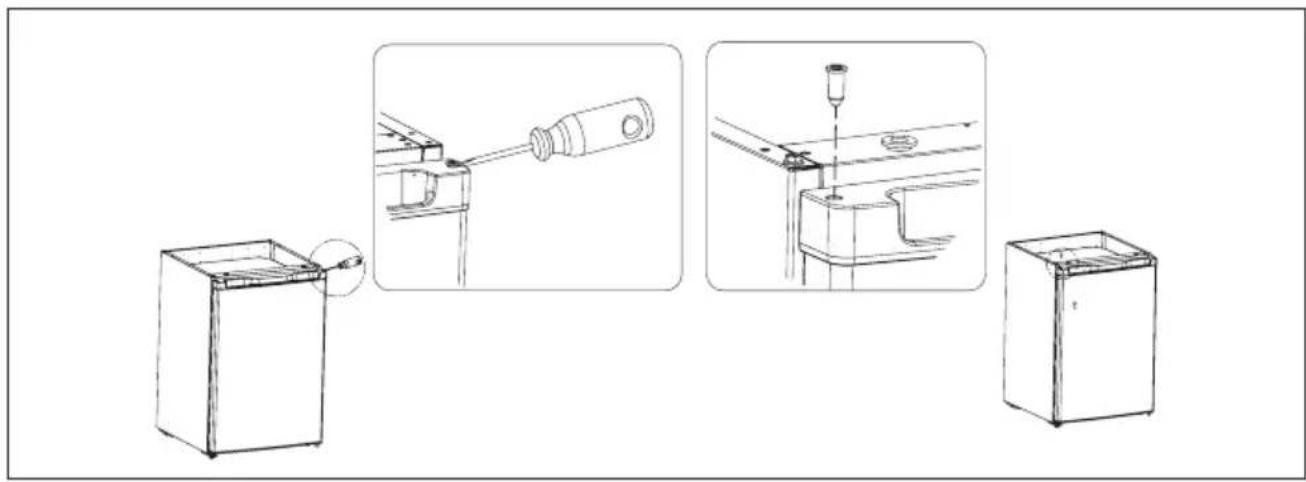
Technical line drawings of a mechanical device with exploded and assembled views (no text or symbols)- Remove the shaft sleeve from the top right corner of the door with a flathead screwdriver. Insert the shaft sleeve into the opening in the top left corner.
natural_image
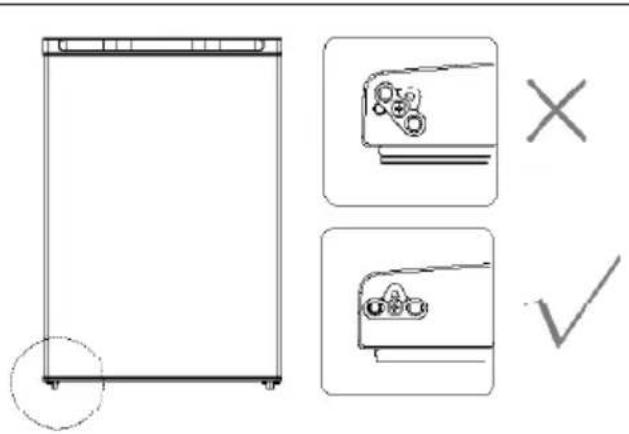
Line drawings of a refrigerator interior with mechanical components and a close-up view of the handle (no text or symbols)- Check that the hole at the bottom left corner of the door is aligned.
- Remove the screw on the left side of the fridge and attach it to the right side.
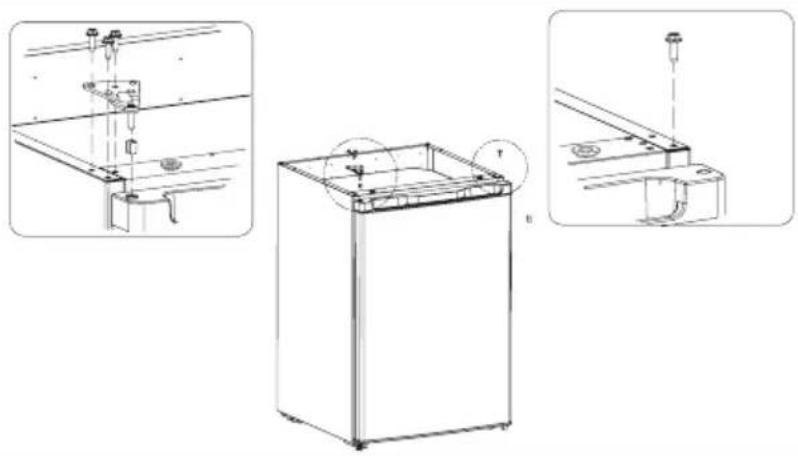
- Place the door on the bottom hinge and fit the top hinge. Screw this tightly on.
natural_image
Technical line drawing of a refrigerator with three orthographic views (no text or symbols)- Move the plate for sealing the hinge opening of the upper lid from left to right.
natural_image
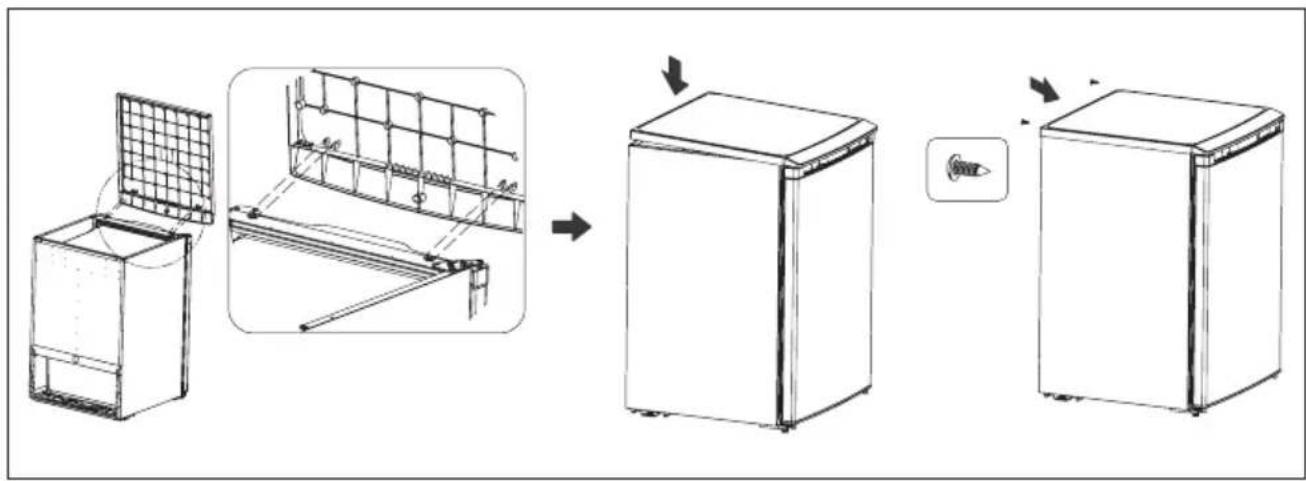
Line drawing of a refrigerator interior showing the change from top to front view, with no text or symbols present.- Return the top cover of the refrigerator back into position. First make sure the front is positioned correctly, then slide the lid back and screw it into place.
USE
TEMPERATURE CONTROL
The fridge is controlled with a temperature control knob located inside the appliance.
Adjust the control knob as desired to suit your individual preference. Position ■ is the recommended position for normal use.
TEMP ZONE
- The running time and temperature are affected by where the fridge is located, how often the door is opened and the temperature of the room the fridge is located in.
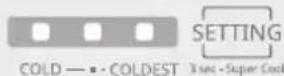
- Press the "SETTING" button to set the temperature. Pressing this button will raise the temperature by one on the scale. The scale goes from "COLD" to "COLDEST", with "■ + COLDEST" being the coldest setting (both indicator lights will come on). This scale works in a cycle.

flowchart
graph LR
    A["COLD"] --> B["COLDEST"]
    B --> C["+ COLDEST"]
    C --> D["OFF"]
- In the OFF position the appliance does not operate (the cooling system is switched off), but power supply is not interrupted. None of the indicator lights will come on.
SUPERCOOLING
- You can turn this function on by pressing and holding the 'SETTING' button down for 3 seconds. The COLD and ■ indicator lights will illuminate.
- Select this function if the standard temperature does not cool sufficiently. For example: with extremely hot weather, if the doors are opened often, with a high environmental temperature, etc. Or if you want to cool food quickly.
- This function is switched off automatically after 6 hours. If you want to turn off the function earlier, press the "SETTING" button.
STORAGE GUIDE
The higher up in your appliance, the warmer. So whatever spoils fastest (fish, meat, etc.) is best put at the bottom. The door is the least cold because it opens regularly. For the best storage, set up your refrigerating appliance as follows:
| Refrigerator compartment Type of food | |
| Door rack • Food with natural preservatives such as jams, juices, drinks, spices, etc. • Do not store food with a limited shelf life here | |
| Top shelf • Food that does not need to be cooked, such as ready-made meals, leftovers, spreads, etc. | |
| Middle shelf • Dairy and eggs | |
| Bottom shelf • Raw meat, poultry, fish | |
| Crisper drawer • Fruits, herbs, and vegetables • Do not refrigerate bananas, onions, potatoes, or garlic |
MOVING THE SHELVES AND DOOR RACK
- Empty the fridge before moving the shelves or the door racks.
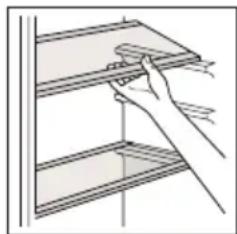
• To move a shelf, raise it and pull it towards you.
- To move a door rack, take hold of it with both hands and push the rack inwards a bit. Lift it up and remove the rack from the door.
natural_image
Line drawing of a hand holding a shelf with a magnifying glass (no text or symbols)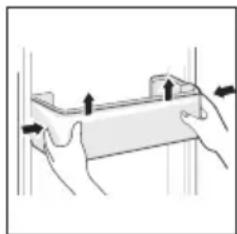
natural_image
Illustration of two hands holding a rectangular object with arrows indicating direction (no text or symbols)LIGHTING
The lighting in the fridge is a LED light. LED lights are more ecological and manufactured for a long life. For this reason, these may not be replaced. If there is a problem with the lighting, contact a qualified service centre in your area.
MOVING YOUR APPLIANCE
If the appliance is turned off for any reason, wait for 10 minutes before turning it back on. This will allow the refrigeration system pressures to equalise before restarting.
- Turn off the appliance and unplug it from the mains socket. Remove all food. Also remove all mobile parts (shelves, accessories, etc.) or fix them into the fridge to avoid any shock.
- Relocate and install. If the appliance has been left on its side for any length of time, leave it standing upright for at least 2 hours before turning on.
STORING FOOD IN THE FRIDGE
The fridge helps to extend the storage times of fresh perishable foods.
Fresh food care for best results:
- Store foods that are very fresh and of good quality.
- Ensure that food is well wrapped or covered before it is stored. This will prevent food from dehydrating, deteriorating in colour or losing taste and will help maintain freshness. It will also prevent odour transfer.
- Make sure that strong smelling foods are wrapped or covered and stored away from foods such as butter, milk and cream which can be tainted by strong odours.
- Cool hot foods down before placing them in the fridge.
VACATION
For short vacation periods, leave the control knobs at their usual settings. During longer absences:
- Remove all foods.
- Disconnect from electrical outlet.
- Clean the refrigerator thoroughly, including defrost pan.
- Leave the door open to avoid possible formations of condensate, mould or odours.
POWER FAILURE
- Most power failures are corrected within an hour or two and will not affect your refrigerator temperatures. However, you should minimize the number of door openings while the power is off.
- During power failures of longer duration, take steps to protect your food by putting dry ice on top of packages.
SOME IMPORTANT RULES FOR THE CORRECT USE OF THE REFRIGERATOR
- Never place hot foods in the refrigerator.
- Beverages should be stored in sealed containers.
- Foods to be stored for a long time should be wrapped in cellophane or polyethylene foil, or kept in glass containers.
- Never place spoiled foods in the cabinet.
- Don't overload the cabinet.
- Don't open the door unless necessary.
- Keep all accessories, such as shelves, door racks, and drawers, in the appliance to minimise energy consumption.
- Please read the storage instructions on the food packaging. Always check the storage date.
- An empty fridge consumes more energy. After all, when the door is opened, warm air enters the space and needs to be cooled. More air enters when there are fewer products, meaning that more energy needs to be consumed to cool that air. So fill your fridge properly or choose a model sized for your needs.
⚠️Not for outer camping use (e.g. in a tent).
⚠️ For indoor use only.

The appliance can not be used in public transportation.
CLEANING AND MAINTENANCE
- Do not use abrasive cleaning agents or solvents.
- Turn the appliance off. Disconnect the mains plug from the mains socket.
• Take out the food and store in a cool location. - Clean the appliance with a soft cloth, warm water and detergent.
- Wipe the door seal with clear water only and then wipe dry thoroughly.
• After cleaning, put the plug in the socket and set the desired temperature. - Put the food back into the appliance.
DEFROSTING THE REFRIGERATOR
The refrigerator defrosts fully automatically.
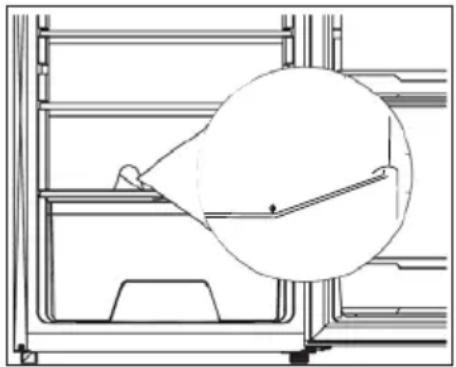
While the cooling is running, beads of condensation or hoarfrost form at the back of the refrigerator. This is normal. It is not necessary to wipe off the condensation or frost. The rear panel defrosts automatically. The condensation runs into the condensation channel and is conveyed to the compressor from where it evaporates.
Note: Keep the condensation channel and drainage hole clean, so that the condensation can run out.
natural_image
Technical line drawing of a refrigerator interior with a magnified circular detail showing internal structure (no text or symbols)PROBLEMS AND SOLUTIONS
| PROBLEMS SOLUTIONS | |
| The ■ indicator light flashes. • The defrosting sensor is not working. If you see this error message, please contact our after-sales service. | |
| The housing gets hot. • This is normal. When the appliance is in operation, heat is dissipated to the outside. Always ensure adequate ventilation around the appliance. | |
| The refrigerator does not work. • Check connection of power cord to power source.• Check that the temperature controller is not in the OFF position.• Plug in unit.• Use proper voltage. | |
| The refrigerator cools too frequently. | • The temperature setting is too cool.• Close door securely.• Be sure that food is cool before inserting.• Do not keep door open for too long and minimize door openings.• Use proper voltage.• Do not place unit close to heat sources or direct sunlight. |
| The internal temperature is not cold enough. | Check connection of power cord to power source.Plug in unit.Check setting and adjust as needed.Close door securely.Be sure that food is cool before inserting.Do not keep door open for too long and minimize door openings.Allow room for air to circulate around unit.Use proper voltage.Do not place unit close to heat sources or direct sunlight. |
| Unusual sounds. • The appliance is not level. Readjust the adjusting feet and level the unit.The unit is touching a wall or another object. Gently move the appliance. | |
| There is water on the floor. • The condensation duct is blocked. See the chapter on cleaning.Too much condensation has formed in the fridge, causing the reservoir to overflow. Too much condensation is caused by a heat difference. Is the door closed properly? Have you put hot food in the fridge? Does the seal still close properly? | |
| The door does not close properly. | The door seal is deformed. Heat it gently using a hairdryer. The rubber seal will become flexible and the magnetic strip in the rubber will automatically pull towards the appliance. After cooling, the rubber stays in that position. |
GUIDELINES
natural_image
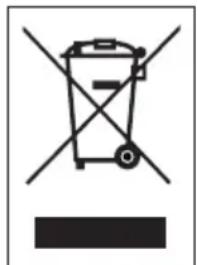
Symbol of a trash bin with crossed lines indicating no waste or discharge, and a solid black rectangle below (no text or labels)This symbol on the product or on its packaging indicates that this product may not be treated as household waste. Instead it must be brought to the applicable collection point for recycling of electrical and electronic equipment. By ensuring this product is disposed of correctly, you will help prevent potential negative consequences for the environment and human health, which could otherwise be caused by inappropriate waste handling of this product. For more detailed information about recycling of this product, please contact your local city office, your household waste disposal service or the shop where you purchased the product.
The packaging is recyclable. Please treat the packaging ecologically.

This appliance conforms to all European requirements in the areas of safety, health, and environmental protection. The EU declaration concerning this appliance can be requested at any time from info@linea2000.be
GARANTIA
Estimado cliente,
natural_image
Line drawing of a single refrigerator with side panels and a small inset showing a fish icon (no text or symbols)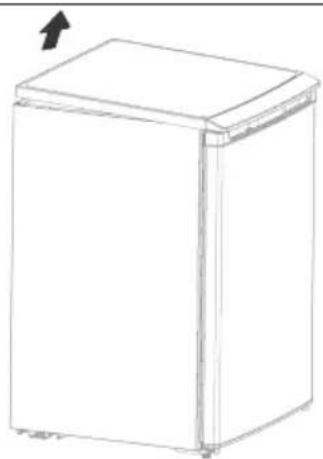
natural_image
Line drawing of a simple refrigerator with lid and side panel (no text or symbols)natural_image
Line drawing of a refrigerator with an inset close-up showing internal components (no text or symbols)natural_image
Line drawing of a refrigerator interior showing front, side, and side views (no text or symbols)natural_image
Technical line drawings of a mechanical device with three views: front, top, and side (no text or symbols)natural_image
Line drawings of a refrigerator interior with mechanical components and a close-up view of the handle (no text or symbols)natural_image
Technical line drawing of a refrigerator with three orthographic views showing internal components and mounting points (no text or symbols)natural_image
Diagram showing a 3D model of a refrigerator being placed into a larger refrigerator, with no text or symbols present.USO
natural_image
Line drawing of a hand holding a shelf with a ruler, no text or symbols present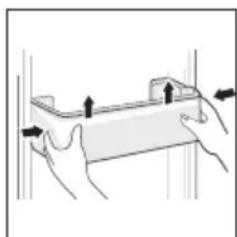
natural_image
Illustration of two hands holding a rectangular object with arrows indicating direction (no text or symbols)ILUMINACIÓN
natural_image
Technical line drawing of a mechanical component with a magnified circular detail (no text or symbols)PROBLEMAS Y SOLUCIONES
natural_image
Symbol of a trash bin crossed with two crossed lines and a black rectangular base (no text or numbers present)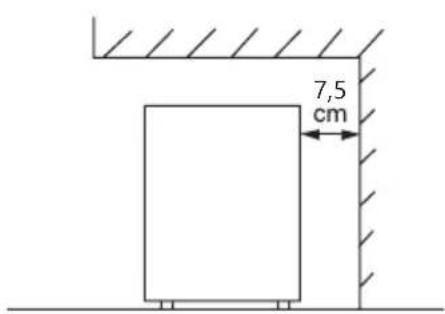
natural_image
Line drawing of two rectangular kitchen cabinets with directional arrows indicating movement (no text or symbols)natural_image
Technical line drawing of a rectangular refrigerator with an inset close-up showing internal components (no text or symbols)natural_image
Line drawing of a refrigerator interior showing front, side, and side views (no text or symbols)natural_image
Technical line drawings of a mechanical device with three views: front, top, and side (no text or symbols)natural_image
Line drawings of a refrigerator interior with mechanical components and a close-up view of the device (no text or symbols)natural_image
Technical line drawing of a refrigerator with three orthographic views (no text or symbols)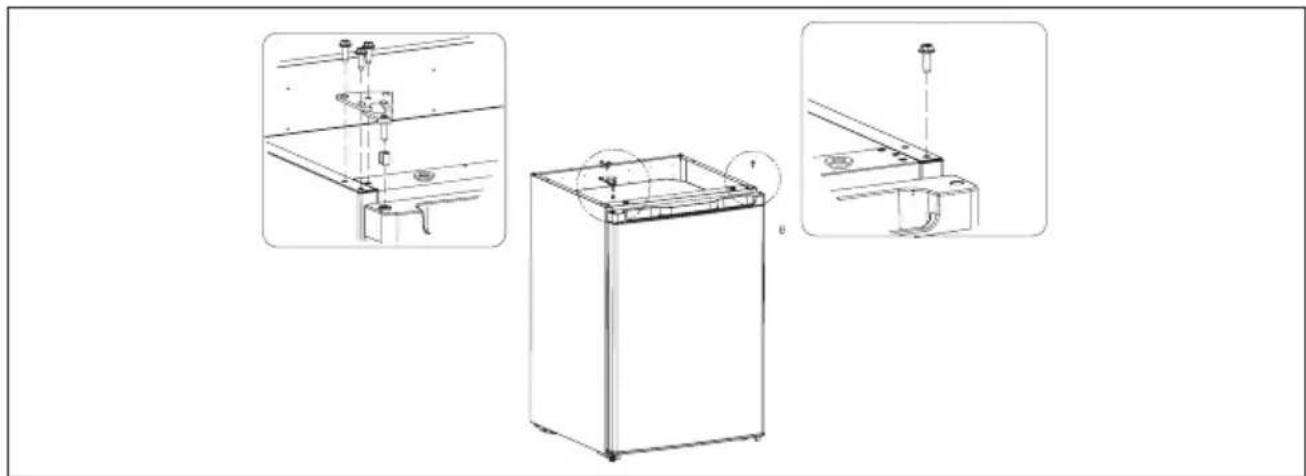
natural_image
Technical line drawing of a refrigerator with mounting brackets and internal components, shown in two orthographic views (no text or symbols present)natural_image
Diagram showing the assembly of a refrigerator from front to side, with no text or symbols present.UTILIZZO
CONTROLLO DELLA TEMPERATURA
natural_image
Illustration of a hand using a tool to lift or adjust a shelf (no text or symbols visible)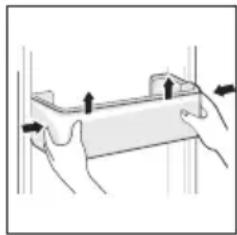
natural_image
Illustration of two hands holding a rectangular object with arrows indicating direction (no text or symbols)ILLUMINAZIONE
natural_image
Technical line drawing of a mechanical component with a magnified circular detail (no text or symbols)natural_image
Symbol of a trash bin crossed with no text or numbers, accompanied by a black rectangular block below (no text or symbols present)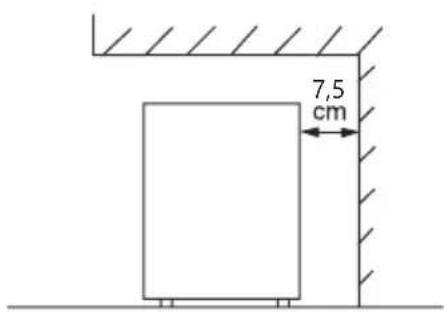
natural_image
Line drawing of a refrigerator with a small inset showing a 6-inch speed indicator (no text or symbols on the device itself)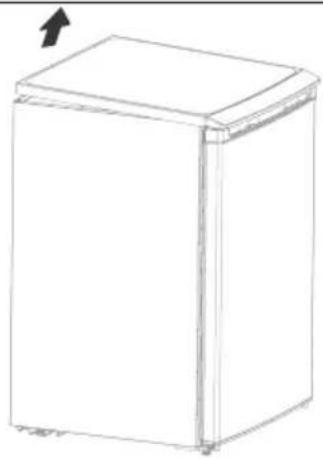
natural_image
Line drawing of a simple refrigerator with a lid and front panel, no text or symbols presentnatural_image
Line drawing of a refrigerator with an inset close-up showing internal components (no text or symbols)natural_image
Line drawing of a refrigerator interior showing exterior, front, and side views (no text or symbols)natural_image
Technical line drawings of a mechanical device with exploded and assembled views (no text or symbols)natural_image
Line drawings of a refrigerator interior with mechanical components and a close-up view of the device (no text or symbols)natural_image
Technical line drawing of a refrigerator with mounting fixtures and internal components, shown in two orthographic views (no text or symbols present)natural_image
Diagram showing the assembly of a refrigerator from top to side, with no text or symbols present.POUŽITÍ
NASTAVENÍ TEPLOTY
natural_image
Illustration of a hand holding a shelf with a ruler, no text or symbols present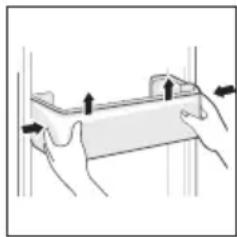
natural_image
Illustration of two hands holding a rectangular object with arrows indicating direction (no text or symbols)OSVĚTLENÍ
MANIPULACE S PŘÍSTROJEM
natural_image
Technical line drawing of a mechanical component with a magnified circular detail (no text or symbols)PROBLÉMY A ŘEŠENÍ
natural_image
Symbol of a trash bin crossed with two crossed lines and a solid black rectangle below (no text or labels)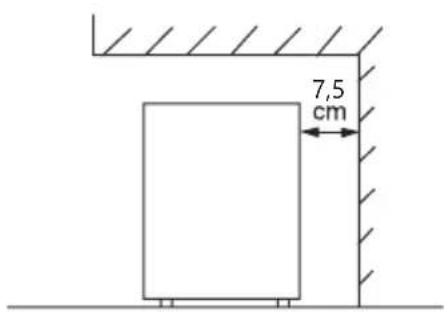
natural_image
Line drawing of a white refrigerator with a side panel and a small inset showing a fan icon (no text or symbols)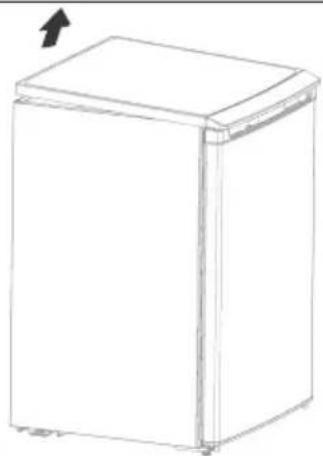
natural_image
Line drawing of a simple refrigerator with a lid and side panel, no text or symbols present- Odskrutkujte horný záves a vyberte ho spolu s objímkou na hriadeli.
natural_image
Technical line drawing of a refrigerator with an inset close-up showing internal components (no text or symbols)natural_image
Line drawing of a refrigerator interior showing front, side, and side views (no text or symbols)natural_image
Technical line drawings of a mechanical device with mounting brackets and a right-hand assembly (no text or symbols)- Odstráňte puzdro hriadel'a z pravého horného rohu dverí pomocou plochého skrutkovača. Vložte puzdro hriadel'a do otvoru v l'avom hornom rohu.
natural_image
Line drawings of a refrigerator interior with mechanical components and a close-up view of the handle (no text or symbols)natural_image
Technical line drawing of a refrigerator with three orthographic views (no text or symbols)natural_image
Diagram showing the assembly of a refrigerator from front to side, with no text or symbols present.POUŽITIE
NASTAVENIE TEPLOTY
natural_image
Line drawing of a hand holding a shelf with a tool, no text or symbols present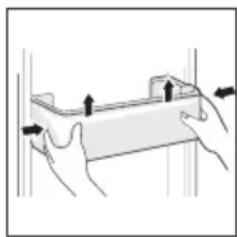
natural_image
Illustration of two hands holding a rectangular object with arrows indicating direction (no text or symbols)OSVETLENIE
natural_image
Technical line drawing of a mechanical assembly with a magnified circular detail (no text or symbols)PROBLÉMY A RIEŠENIA
natural_image
Symbol of a trash bin crossed with two crossed lines, no text or numbers presentLooking for extra accessories or you have a broken piece?
ORDER the original DOMO accessories and parts on our webshop.
Webshop

natural_image
Stack of sheets of paper with a circular inset showing a small object, no visible text or symbols
natural_image
Two white plastic electrical connectors with mounting holes (no text or symbols visible)
natural_image
White rectangular container with black interior, no visible text or symbols
natural_image
Clear glass coffee maker with black handle and lid (no text or symbols visible)
- GEBRUIK
- TEMPERATUURREGELING
- VERLICHTING
- UTILISATION
- RÉGLAGE DE LA TEMPÉRATURE
- ÉCLAIRAGE
- GEBRAUCH
- TEMPERATURREGELUNG
- BELEUCHTUNG
- SAFETY INSTRUCTIONS
- ▲ELECTRICAL WARNINGS
- ⚠️INSTALLATION
- ⚠ USE
- ⚠ CLEANING AND MAINTENANCE
- SAVE THESE INSTRUCTIONS FOR FUTURE REFERENCE
- PARTS
- INSTALLATION
- DOOR CONVERSION
- USE
- TEMPERATURE CONTROL
- SUPERCOOLING
- STORAGE GUIDE
- MOVING THE SHELVES AND DOOR RACK
- LIGHTING
- MOVING YOUR APPLIANCE
- STORING FOOD IN THE FRIDGE
- VACATION
- POWER FAILURE
- SOME IMPORTANT RULES FOR THE CORRECT USE OF THE REFRIGERATOR
- CLEANING AND MAINTENANCE
- DEFROSTING THE REFRIGERATOR
- GUIDELINES
- GARANTIA
- USO
- ILUMINACIÓN
- UTILIZZO
- CONTROLLO DELLA TEMPERATURA
- ILLUMINAZIONE
- POUŽITÍ
- NASTAVENÍ TEPLOTY
- OSVĚTLENÍ
- MANIPULACE S PŘÍSTROJEM
- POUŽITIE
- NASTAVENIE TEPLOTY
- OSVETLENIE
Brand : DOMO
Model : DO91138
Category : Refrigerator