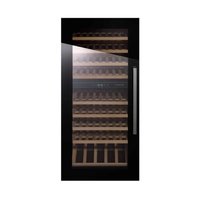
FWK4800.0S - Beverage fridge Küppersbusch - Free user manual and instructions
Find the device manual for free FWK4800.0S Küppersbusch in PDF.


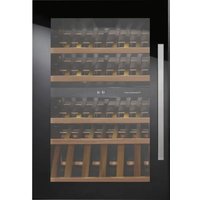
| Product type | Beverage refrigerator (service wine cellar) |
| Brand | Küppersbusch |
| Model | FWK4800.0S |
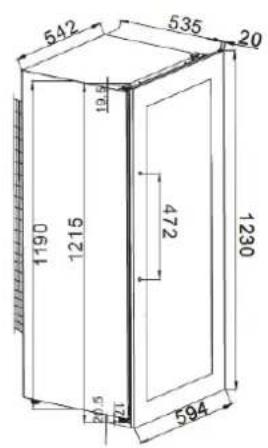
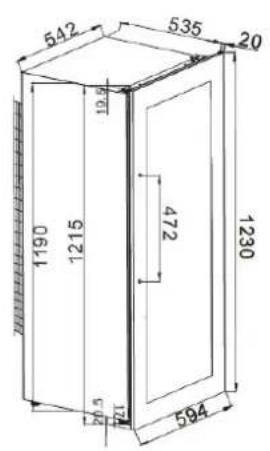
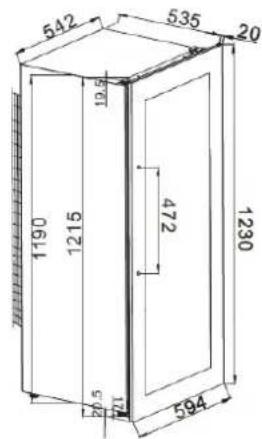
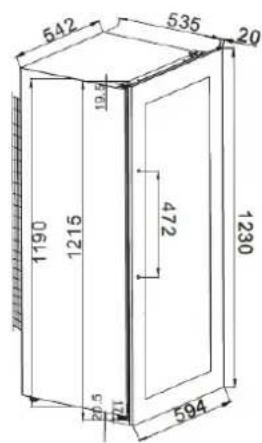
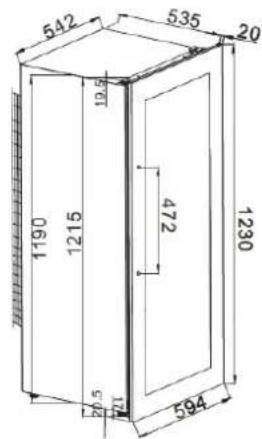
| Dimensions (W x D x H) | 594 x 555 x 1230 mm |
| Net weight | 56 kg |
| Total net volume | 205 L |
| Adjustable temperature range | 5 °C to 18 °C |
| Climate class | N/SN (10 °C to 32 °C) |
| Annual energy consumption | 150 kWh/year (0.41 kWh/24h) |
| Power supply | 220-240 V / 50 Hz |
| Energy class | A |
| Noise level | 40 dB(A) |
| Refrigerant | R600a (isobutane, 53 g) |
| Defrosting | Automatic |
| Installation type | Integrable in column |
| Interior lighting | LED (0.5 W) |
| Door | Glazed with UV filter |
| Shelves | Included (removable, with stop) |
| Anti-vibration system | Compressor on silent blocks, polyurethane insulation |
| Door reversibility | Yes (left to right) |
| Child safety | Control lock (simultaneous press) |
| Maintenance and cleaning | Warm water and mild detergent; do not use solvents or abrasives |
| Spare parts and repairability | Contact authorized after-sales service; genuine parts mandatory |
| General information | Domestic use only; beverage storage |
Frequently Asked Questions - FWK4800.0S Küppersbusch
User questions about FWK4800.0S Küppersbusch
0 question about this device. Answer the ones you know or ask your own.
Ask a new question about this device
Download the instructions for your Beverage fridge in PDF format for free! Find your manual FWK4800.0S - Küppersbusch and take your electronic device back in hand. On this page are published all the documents necessary for the use of your device. FWK4800.0S by Küppersbusch.
USER MANUAL FWK4800.0S Küppersbusch
natural_image
Simple line drawing of a vertical rectangle divided by a horizontal line, no text or symbols present.FWK4800.0S
Please read the users and installation instructions carefully before installation of the appliance and before starting to use it.
natural_image
Empty rectangular frame with black border (no text or symbols)natural_image
Isometric line drawing of a multi-tiered storage unit with internal flow arrows (no text or symbols)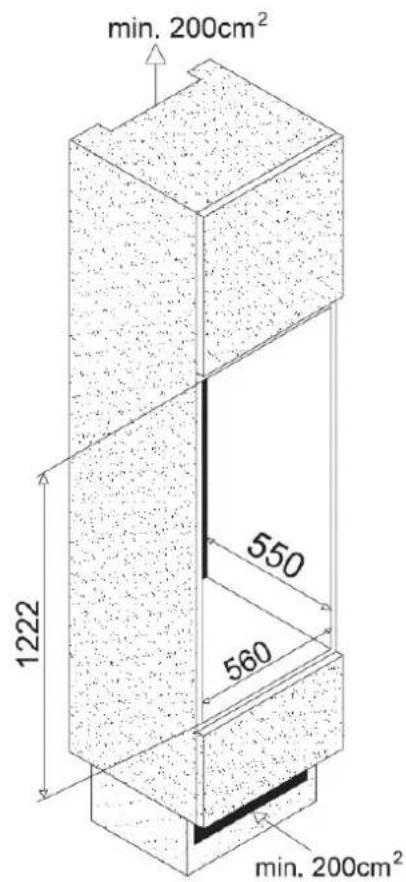
natural_image
Technical line drawing of two mechanical components with flanges and mounting holes (no text or symbols)7. BEFÜLLUNG
natural_image
Illustration of various wine bottles with green and blue colors, some labeled with white and red text (no readable labels or symbols)natural_image
Two green plastic bottles with red caps, connected by a white plastic bag (no text or symbols visible)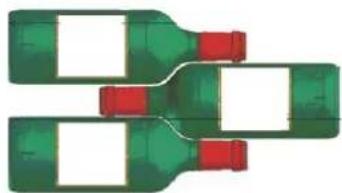
natural_image
Three green wine bottles with red caps, arranged in a staggered layout (no text or symbols visible)Service Ref: FWK4800.0S/1
S/N :CL18CJ00001
natural_image
Empty rectangular frame with black border (no text or symbols)natural_image
Isometric line drawing of a multi-tiered storage unit with internal structure and directional arrows (no text or symbols)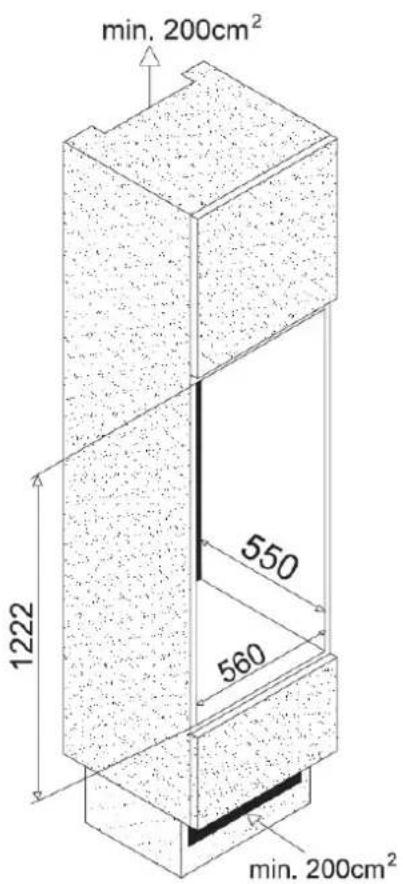
natural_image
Technical line drawing of two mechanical components with mounting holes (no text or symbols)7. CHARGEMENT
natural_image
Illustration of multiple wine bottles with green and blue labels, no text or symbols presentnatural_image
Two green plastic bottles with red caps, connected by a white gap (no text or symbols visible)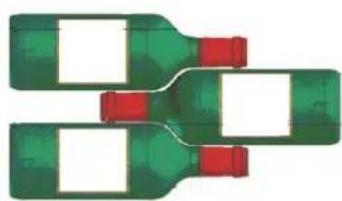
natural_image
Three green wine bottles with red caps, arranged in a zigzag pattern (no text or symbols)Before use, please read and follow the safety rules and operating instructions in this manual.
Firstly, we would like to thank you for purchasing a KÜPPERSBUSCH product and hope that this appliance fully lives up to your expectations.
This appliance enables you to bring your bottles at room temperature or bring them to service temperature (depending on the bottles) thanks to its wide adjustment range.
1. GENERAL SAFETY INSTRUCTIONS
Before you use your appliance for the first time, please read this user manual carefully. Store it carefully so that you can refer to it in the future, if necessary. To reduce the risk of fire, electrical shock, or injury when using your appliance, follow these basic precautions.
Generally speaking, your appliance must be maintained by a qualified professional.
For your safety and correct usage, before installing and first using the appliance, read this user manual carefully, including its hints and warnings. To avoid unnecessary mistakes and accidents or to avoid damage to the appliance, it is important to make sure that all people using the appliance are thoroughly familiar with its operation and safety features. Save these instructions and be sure that they remain with the appliance if it is moved or sold, so that anyone using it throughout its life will be properly informed on its usage and safety notices. This will ensure optimum operation of the appliance.
For the safety of life and property and to avoid any risk of injury, keep the precautions of these user's instructions as the manufacturer is not responsible for damages caused by omission.
This appliance is intended exclusively for domestic use and is intended for the storage of special drink products at a storage
temperature higher than that of a storage compartment for fresh products. Under no circumstances is it intended to keep food products fresh.
Make sure that your electrical installation's voltage corresponds to that on the appliance's nameplate; the appliance must be connected to an approved, earthed system. Incorrect repairs or connections can cause safety hazards. Have your electrical installation checked by a professional, if you are in any doubt.
This unit must be correctly connected to an earthed socket for your protection. Do not cut off or remove the earth wire on the mains cable supplied.
For safety reasons, do not use an electrical extension cable.
If your appliance is damaged (e.g. a major impact) or suffers harm (power surge due to lightning, flood, fire), it may be dangerous to use. Disconnect the mains plug and have the appliance checked by an approved professional repairer.
To prevent any danger, do not replace a damaged mains cable yourself. Contact your retailer, an approved service center or professional repairer.
This appliance must be positioned such that the mains socket is accessible. Do not move the appliance once it is full: you might distort its body beyond repair. The electrical parts must not be directly accessible.
√ Keep children away from the appliance
√ Do not use this appliance outdoors
In the event that liquid is accidentally spilled (broken bottle,
etc.) on electrical components (motor, etc.), disconnect the mains plug immediately.
To prevent any risk of fire, electrocution or injury, do not immerse the mains cable, plug or the appliance itself in water or any other liquid. Do not handle the appliance with wet hands.
Keep the appliance away from any source of heat and out of direct sunlight.
Do not allow the mains cable to hang from a table or be in contact with sharp edges or hot surfaces.
Do not pull on the mains cable - take hold of the plug to disconnect the appliance.
Ensure that the area where your appliance is positioned can support its weight when loaded (a 75 cl bottle weighs approximately 1.3 kg). Your cellar must be placed on a flat surface. If you have to position it on a rug or carpet, place a support underneath.
To prevent damaging the door gasket, make sure the door is fully open when pulling shelves out of the rail compartment.
Safety of children and other vulnerable persons
- This appliance can be used by children aged from 8 years and above, and by persons with reduced physical, sensory or mental capabilities or lack of experience and knowledge if they have been given supervision or instruction concerning use of the appliance in a safe way and understand the hazards involved.
- User cleaning and servicing operations should not be carried
out by children, unless they are more than 8 years old and are supervised.
- Keep all packaging away from children as there is risk of suffocation.
- Risk of child entrapment. Child entrapment and suffocation are not problems of the past. Junked or abandoned appliances are still dangerous, even if they will “just sit in the garage a few days”.
- If you are discarding the appliance, pull the plug out of the socket, cut the connection cable (as close to the appliance as you can) and remove the door to prevent children playing from suffering an electric shock or from closing themselves inside it.
- If this appliance, featuring a magnetic door seals, is to replace an older appliance having a spring lock (latch) on the door or lid, be sure to make the spring lock unusable before you discard the old appliance. This will prevent it from becoming a death trap for a child.
- Keep the appliance and its power cable out of reach of children less than 8 years old.
- Before you throw away your old wine cooler: take off the door. Leave the shelves in place so that children may not easily climb inside.
General safety
WARNING — This appliance is intended to be used in household and similar applications such as:
√ Staff kitchen areas in shops, offices and other working environments,
√ Farm houses and by clients in hotels, motels and other residential type environments,
√ Bed and breakfast type environments,
√ Catering and similar non-retail applications.
WARNING — To avoid a hazard due to instability of the appliance, it must be fixed in accordance with the instructions.
WARNING — Do not store explosive substances such as aerosol cans with a flammable propellant in this appliance, as they could leak or release fluids.
WARNING — If the supply cord is damaged, it must be replaced by the manufacturer, its service agent or similarly qualified persons in order to avoid a hazard.
WARNING — Keep ventilation openings, in the appliance enclosure or in the built-in structure, clear of obstruction and ensure that air can circulate, especially if the appliance is dedicated for a built-under or built-in installation.
WARNING — Do not use mechanical devices or other means to accelerate the defrosting process, other than those recommended by the manufacturer.
WARNING — Do not damage the refrigerant circuit.
WARNING — Do not use electrical appliances inside the storage compartments of the appliance, unless they are of the type recommended by the manufacturer.
WARNING — The refrigerant and insulation blowing gas are flammable. When disposing of the appliance, do so only at an authorized waste disposal center. Do not expose to flame.
WARNING — The refrigerant of these appliances is R600a,
flammable and explosive articles should not be put in or near the cabinet, to avoid the fire or explode caused.
Refrigerating fluid
The refrigerating circuit in the appliance uses refrigerating isobutene (R600a), which is a highly inflammable natural gas and is therefore dangerous for the environment. When transporting or installing the appliance, ensure that no element of the refrigerating circuit is damaged. The refrigerating fluid (R600a) is inflammable.
Caution: risk of fire
If the refrigerant circuit should be damaged:
√ Avoid opening flames and sources of ignition.
√ Thoroughly ventilate the room in which the appliance is situated.
It is dangerous to alter the specifications or modify this product in any way. Any damage to the cord may cause a short circuit, fire, and/or electric shock.
Electrical safety
- We decline any liability in respect of incidents caused by poor electrical installation.
- The power cord must not be lengthened. Do not use an extension cable, or adapter, or multi-way socket.
- Make sure that the power plug is not crushed or damaged. A crushed or damaged power plug may overheat and cause a fire.
-
Make sure that you can access the main plug of the appliance.
-
Do not pull the main cable.
- Ensure that the appliance is always electrically earthed.
- If the power plug socket is loose, do not insert the power plug. There is a risk of electric shock or fire.
- You must not operate the appliance without the interior lighting lamp cover.
- Disconnect the appliance before replacing the lighting bulb.
- The cellar is only applied with power supply of single phase alternating current of 220\~240V/50Hz.
- Do not attempt to replace a damaged power cable, contact your after-sales service.
- The power socket must be easily accessible but out of reach of children. In case of doubt, contact your installation technician.
Daily use
- This appliance is intended to be used exclusively for the storage of wine.
- Do not store flammable gas or liquids in the appliance. There is a risk of an explosion.
- Do not operate any electrical appliances in the appliance (electric ice cream makers, mixers etc.).
- When unplugging always pull the plug from the mains socket and do not pull on the cable.
- Do not place hot items near the plastic components of this appliance.
-
The appliance manufactures storage recommendations should be strictly adhered to. Refer to relevant instructions for storage.
-
Keep burning candles lamps and other items with naked flames away from the appliance so that do not set the appliance on fire.
- The appliance is intended for keeping beverages in normal household as explained in this instruction booklet.
- The appliance is heavy. Care should be taken when moving it. If your appliance is equipped with castors, remember that these are only designed to facilitate minor movements. Do not move the appliance over long distances.
- Never use the base, drawers, doors etc. to stand on or as supports.
- To avoid items falling and causing injury or damage to the appliance, do not overload the door racks or put food into the appliance.
Caution: cleaning and servicing
- Before carrying out servicing, switch off the power supply and disconnect the appliance.
- When cleaning the appliance, do not use metal objects, steam systems, volatile fluids, organic solvents or abrasive substances.
- Never clean appliance parts with flammable fluids. The fumes can create a fire hazard or explosion.
- Do not use sharp or pointed objects to remove ice. Use a plastic scraper.
Important information concerning installation
- Avoid locating the unit in moist areas.
- Keep the appliance away from direct sunlight and sources of heat (stove, heater, radiator, etc.). Direct sunlight may affect the acrylic coating and heat sources may increase electrical
consumption. Extreme cold or hot ambient temperatures may also cause the appliances not to perform properly.
- Plug the wine cooler into an exclusive, properly installed-grounded wall outlet. Do not under any circumstances cut or remove the third (ground) prong from the power cord. Any questions concerning power and/or grounding should be directed toward a certified electrician or an authorized products service center.
- To ensure proper electrical connection, follow the recommendations given in the present manual.
- Unpack the appliance and visually check that it is not damaged. Do not connect a damaged appliance. Inform your retailer or point of sale of any damage. In such a case, keep the packaging.
- It is recommended that the appliance be allowed to settle for at least 24 hours before connecting the electrical power supply, so that the compressor fluid feed is correct.
- Proper air circulation is necessary to avoid overheating. To ensure sufficient ventilation, observe the installation recommendations provided.
- In order to avoid fire risk, wherever possible, ensure that the appliance is not in contact with walls or with any hot element (compressor, condenser). Observe the installation recommendations.
- The appliance should not be placed close to radiators or cooking hot plates or gas rings.
- Check that electrical sockets remain accessible when the appliance is installed.
Power saving
To limit the electricity consumption of your appliance:
√ Install it in an appropriate place (see “Installation instructions”).
√ Leave the doors open as little time as possible.
√ To ensure that the appliance operates properly, clean the condenser regularly (see “Maintenance”).
√ Regularly inspect the door seals and ensure that they are still closing properly. If this is not the case, contact your after-sales service.
Trouble shooting
- Any electrical work should be carried out by a qualified and skilled technician.
- The appliance should be repaired by an accredited repair centre, using only manufacturer's original spare parts.
The appliance is designed for home use only. The manufacturer declines any liability whatsoever in the case of other use.
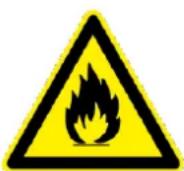
R600a
Safety instructions
- Caution — Do not obstruct the ventilation grills on the appliance. Keep ventilation openings in the appliance enclosure or in the structure for building-in clear of obstruction.
- Caution — Do not store explosive substances, such as aerosol cans containing an inflammable propellant, in the appliance.
-
Caution — Do not damage the refrigerating circuit in the appliance.
-
Caution — The refrigerating units use isobutane (R600a), and should not be placed close to ignition sources (for example, electrical contacts that are exposed or open contacts that could be closed by the refrigerating fluid in the event of a leak). The refrigerating fluid type is specified on the power cabinet identification plate.
- Caution — Do not use electrical equipment in the compartments of the appliance, unless they are of the type recommended by the manufacturer.
This appliance meets the requirements of all applicable European directives and their amendments, and notably complies with the following standards:
• 2011/65/EU (ROHS)
• 2014/35/EU on electrical safety
• 2014/30/EU on electromagnetic compatibility
• 643/2009/CE relating to energy labels

CE
2. DESCRIPTION OF THE APPLIANCE
Below is an example of the nameplate:
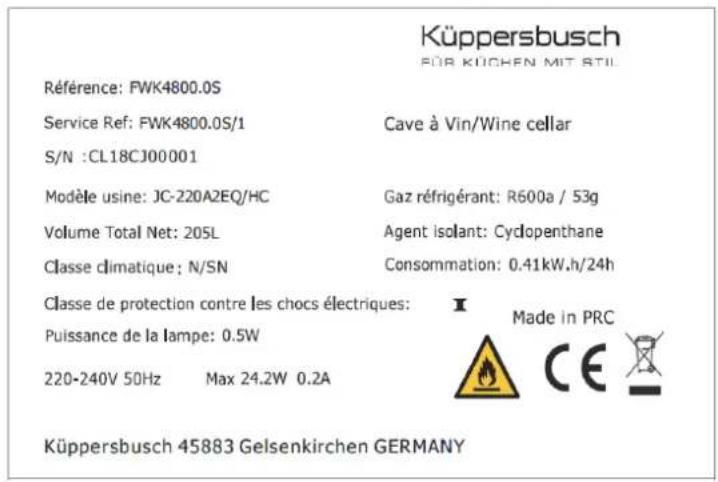
The nameplate attached to the inside or rear of the appliance (depending on the model) includes the entire information specific to your appliance.
We recommend that you make a note of its serial number in this booklet prior to installation, so that you can refer to it later (technical work, request for assistance, etc.).

natural_image
Empty rectangular frame with black border (no text or symbols)Once the appliance is installed and loaded, access to it is not so easy.
CAUTION: no assistance can be provided without this information.
4. INSTALLATION INSTRUCTIONS
Before using this appliance
- Remove the exterior and interior packing.
- Before connecting the appliance to the power source, let it stand upright for approximately 24 hours. This will reduce the possibility of a malfunction in the cooling system from handling during transportation.
- Clean the interior surface with lukewarm water using a soft cloth.
- When disposing your appliance, please choose an authorized disposal site.
- Use two or more suitably qualified people to move and install the appliance. Failure to do so can result in back or other injury.
- Place your wine cooler on a position that is strong enough to support it when it is fully loaded. To level your wine cooler, adjust the front leveling leg at the bottom of the wine cooler.
- Adequate ventilation is required, do not block the front air outlet.
• Not designed for placement in adage or basement.
• The appliance is for indoor use only. -
This device is only designed to be incorporated into fitted kitchen units.
-
Connect the cellar to a single socket and be careful to support it, so that your wine cellar is perfectly level (use of a spirit level is recommended). This will prevent any movement due to instability, causing noise and vibration, and will ensure that the door seals perfectly.
- This appliance is intended to be used exclusively for the storage of wine.
- This appliance is using flammability refrigerant. So never damage the cooling pipe work during the transportation.
Attention
- Store wine in sealed bottles.
- Do not overload the cabinet.
- Do not open the door unless necessary.
- Do not cover shelves with aluminum foil or any other shelf material which may prevent air circulation.
- Should the wine cooler be left empty for long periods it is suggested that the appliance is unplugged, and after careful cleaning, leave the door ajar to allow air to circulate inside the cabinet in order to avoid possible condensation, mold or odors forming.
CAUTION: please keep the appliance away from substance, which can cause ignition.
Ambient room temperature limits
This appliance is designed to operate in ambient temperatures specified by its temperature class marked on the rating plate.
| CLASS | SYMBOL | AMBIENT TEMPERATURES RANGE (°C) |
| Extended temperate | SN | From +10 to +32 |
| Temperate | N | From +16 to +32 |
| Subtropical | ST | From +16 to +38 |
| Tropical | T | From +16 to +43 |
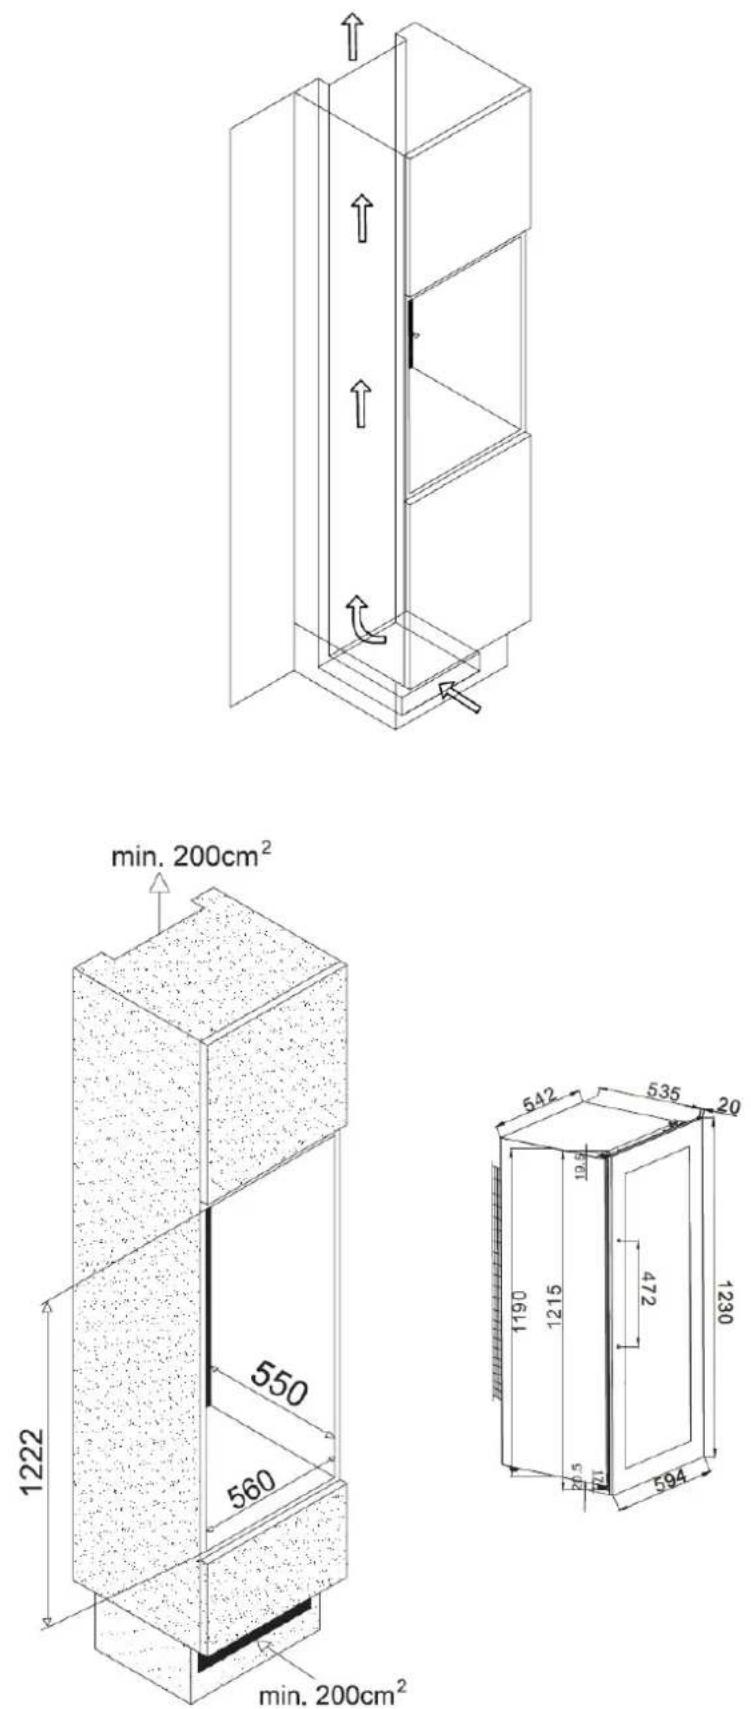
Built-in installation drawings
The wine cooler door seals the installed unit almost completely.
CAUTION: for all of these models, please take into consideration the clearances required for air intake and exhaust.
Hot air must be driven by the ventilation to the rear wall of the cellar and then expelled upwards. The ventilation channels shall be at least 200 square centimeters in cross-section.
Warning: to ensure proper operation, the ventilation grilles must never be obstructed or covered.
Reversing the door
The door can be changed from left and right side. No special requirement, all the door is opened from left side. If required to open from right side please refer to the following direction.
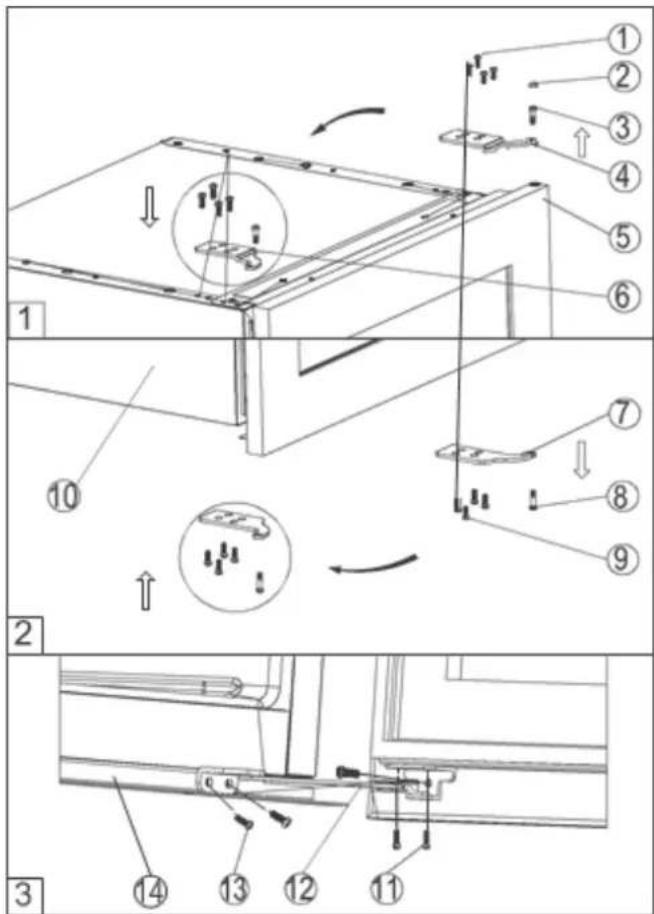
1) Screws
2) Decoration plug
3) Top hinge pin
4) Right top hinge plate
5) Glass door
6) Left top hinge plate
7) Lower hinge plate
8) Lower hinge pin
9) Screws
10) Cabinet
11) Screws
12) Lower hinge plate
13) Screws
14) Lower part of the cabinet
IMPORTANT: all parts removed must be saved to do the reinstallation of door.
- Close the glass door, and remove the decoration plug n°2. Unscrew the top hinge pin n°3 and lower hinge pin n°8. Be careful to support the glass door with hands to prevent it dropping after removing the pins (fig. 1 & 2).
- Pull down to remove the glass door and place it on a padded surface to prevent scratching it.
- Remove the right top hinge plate n°4 by unscrewing the four screws n°1 and get the left top hinge plate n°6 from the plastic bag that includes the instruction manual then install it at the designated position on the opposite side (fig. 1).
- Remove the lower plate n°7 by unscrewing the four screws n°9. Then turn it around and refit it on the opposite side (fig. 2).
- Turn around the glass 180^ and refit the hinge pin n°3 and 8 through the top hinge plate n°6 and lower hinge plate n°7 into the door. Make sure that the spacers which the hinge pins sit on are correctly positioned.
- Leveling the door by adjusting the screws that are used to fix the top hinge plate and lower hinge plate.
5. OPERATING INSTRUCTIONS
It is recommended that you installed your appliance in a place where the ambient temperature is between 10-32°C. If the ambient temperature is above or below recommended temperatures, the performance of the unit may be affected and it may not be possible to obtain temperature between 5-18°C.
Küppersbusch
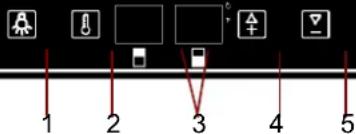
1) Light button
2) Compartment selection button
3) Temperature displays
4) Button to increase temperature
5) Button to decrease temperature
To switch the wine cellar on or off, press buttons 1 and 2 simultaneously. To change the temperature reading unit, press the light button (1) for 5 seconds. The display will show the selected temperature unit (°C or °F).
It is possible to adjust the temperature degree by degree; the temperature can be adjusted with the keys d to the t of the temperature display. In first, the desired compartment must be selected by pressing button 2. The temperature range of this cellar is between 5°C and 18°C in each zone.
To turn on or off the indoor light, press button 1. 📄 light (LED) is suitable for storing wine. However, it is advisable to turn off the light in normal use.
IMPORTANT: the temperature selected for the upper compartment must always be lower than the temperature selected for lower compartment (2-compartment model).
Temperature display
In normal operation, the display shows the temperature inside the cellar. When you increase or decrease this temperature, the display will show the desired temperature. After a few moments, the display will again show the temperature measured in the cellar. The temperature display will flash if:
- A different temperature is being set,
- The temperature in the zone deviates by more than 5^ C from the set temperature. The temperature display flashing ensures that the temperature cannot rise or fall un-noticed and impair the wine.
NOTE: when first used or after operating the wine cellar after a long period of inactivity, the inner temperature will not immediately be the temperature shows on the display. Indeed, it is necessary to wait a few hours for a temperature adjustment of the wine cellar in order to have a homogeneous temperature. To avoid excessive condensation when the ambient temperature is above 28^ C, do not lower the temperature to below 7^ C.
IMPORTANT: after unplugging, turning off the power or after a power failure, it is imperative to wait 5 minutes before turning it on again. Otherwise, the wine cellar will not turn on.
6. EQUIPMENT
The climate control system
According to advice from specialists, the ideal temperature for storing wine is around 12^ C, within a bracket of 10 to 14^ C. Do not confuse this with service temperature, which varies between 5 and 18^ C, depending on the specific nature of the wine.
It is especially important to avoid sudden changes in temperature. Designed by specialists for oenophiles, this appliance, unlike a simple refrigerator, takes into account the sensitivity of grand cru wines to sudden variations in temperature by ensuring the close control of a constant average temperature.
The anti-vibration system
The refrigeration compressor is equipped with special dampers (silent-blocks) and the inner space is insulated from the body by a thick layer of polyurethane foam. These characteristics prevent the transmission of vibration to your wines.
The anti-UV system
Light accelerates the ageing of wine. In our solid door cellars, your wines are naturally protected, on condition, of course, that the door is not opened too often. This glass-door model has been specially treated and filters out harmful ultraviolet rays, thus ensuring your wines are perfectly shielded.
Defrosting
Your appliance is equipped with an automatic defrost cycle. When a cooling cycle finishes, the appliance's refrigerated surfaces are defrosted automatically. The defrost water is channeled into a condensates evaporation tray which is located in the back of the appliance near the compressor. The heat produced by the compressor then evaporates the condensates collected in the tray.
Shelves
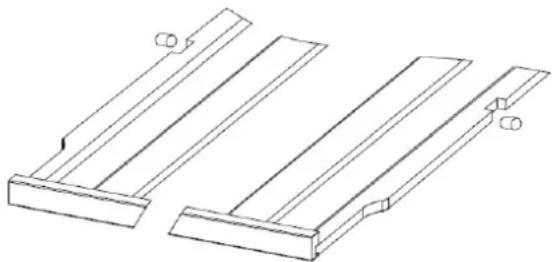
- To prevent damage to the door seal, ensure that the door is fully open before pulling out the shelves to add or remove bottles.
- For easier access to the contents of the shelves, slide the shelf out approximately one third of the way. The shelves are, however, fitted with a stop to prevent the bottles falling out.
- To remove or reposition the shelves, move the shelf to the position where the notch of wooden shelf is exactly under the plastic post and lift the wooden shelf. Please ensure these are replaced when the shelf is put back.
natural_image
Technical line drawing of two L-shaped metal structural components with mounting holes (no text or symbols)7. LOADING
The maximum recommended loading quantities for bottles are given as guidelines and are indicative only; they provide a quick estimate of the size of the appliance (similar to the capacity of a refrigerator expressed in liters).
They correspond to tests conducted with a standard bottle: the standard "75 cl light Bordeaux" bottle - standards apply the geographical origin of each bottle shape (Bordeaux, Burgundy, Provence, etc.) and a type (traditional, heavy, light, flute, etc.), each with its own diameter and height.
In reality and in extreme cases, you could store more bottles by stacking the same type of bottle without using shelves, but a varied cellar comprises a wide variety of bottles and the practical aspect of everyday cellar management limits its capacity. You will therefore probably load the appliance a little less than the recommended maximum.
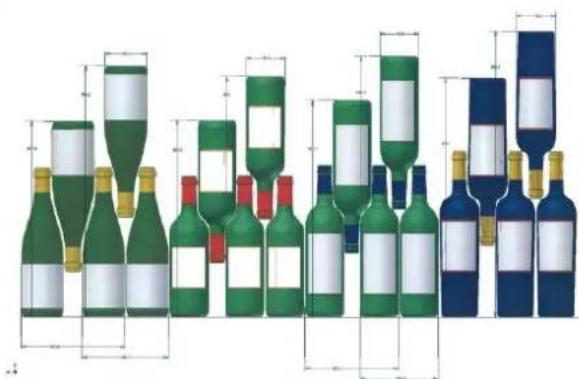
Types of bottle:
natural_image
Illustration of various wine bottles with green and blue colors, some outlined for scale (no text or symbols)We see here 4 kinds of 75 cl wine bottles: Burgundy and Bordeaux wine bottles of different dimensions. There are many others of all shapes and sizes. You will note the storage differences depending on bottle heights, diameters and alternating position method.
For example, if a wine cellar is loaded only with Burgundy wine bottles, there will be approximately 30% fewer bottles than the initial quantity calculated for Bordeaux bottles.
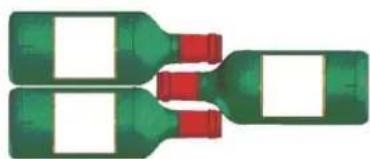
Criss-crossing types
Top-to-bottom neck-to-neck:
Note the difference in depth!
Top-to-bottom neck between bottle bodies:
Increased loading.
natural_image
Two green plastic bottles with red caps, connected by a white gap (no text or symbols visible)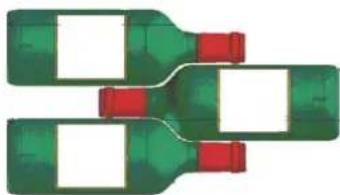
natural_image
Three green wine bottles with red caps, arranged in a staggered pattern (no text or symbols visible)- Verify that you can shut the door without touching a bottle before closing.
- When loading several bottles at once, it will take more time for the unit to reach the desired temperature.
Examples of serving temperatures
| Opinions vary, and the ambient temperature too, but many people agree on the following: | |
| Prestigious Bordeaux wines – Reds | 16 – 17°C |
| Prestigious Burgundy wines – Reds | 15 – 16°C |
| Prestigious dry white vintages | 14 – 16°C |
| Light, young, fruity reds | 11 – 12°C |
| Provence rosés, primeur wines | 10 – 12°C |
| Dry whites and vin de pays reds | 10 – 12°C |
| Vin de pays whites | 8 – 10°C |
| Champagnes | 7 – 8°C |
| Sweet wines | 6°C |
8. CARE AND MAINTENANCE
Before cleaning your appliance (something that should be done regularly), disconnect it by removing the plug or by pulling the fuse on the circuit.
Before using your appliance for the first time and regularly after that, we recommend that you clean the inside and outside (front, side and top) with warm mixed with a gentle cleaning product. Rinse with clean water and allow drying before reconnecting. Do not use solvents or abrasives.
When the appliance is switched on for the first time, there may be a residual odor. In that case, runt the appliance empty for a few hours at the coldest possible temperature. The cold will kill any odors.
In case of a power cut
Most power cuts are resolved within a short time. A power cut of 1 or 2 hours will not affect the temperature in your cabinet. To protect your wines during a power cut, avoid opening the door as much as possible. During very long power cuts, take the necessary measures to protect your wine.
- If the appliance is disconnected or if there is a power cut, you must wait three to five minutes before re-starting. If you try to re-start before this time, the compressor will only re-start after 3 to 5 minutes (if the temperature requires).
- When switching on for the first time or following a prolonged shutdown, it is possible that when restarting, the temperatures selected and those displayed are not the same. This is normal. It will take a few hours before they stabilize.
Vacation time
- Short vacations: leave the wine cooler operating during vacations of less than three weeks.
- Long vacations: if the appliance will not be used for several months, remove all items and turn off the appliance. Clean and dry the interior thoroughly. To prevent odor and mold growth, leave the door open slightly: blocking it open if necessary.
Moving your wine cooler
- Remove all items.
- Securely tape down all loose items (shelves) inside your appliance.
- Turn the adjustable leg up to the base to avoid damage.
- Tape the door shut.
- Be sure the appliance stays secure in the upright position during transportation. Also protect outside of appliance with a blanket, or similar item.
9. IN THE EVENT OF A BREAKDOWN
Despite the care we take during production, a breakdown can never be totally ruled out. Before contacting your retailer's after-sales department, please check that:
- The appliance is properly plugged in
- There is not a power cut in progress
- The breakdown is not one of those described in the table at the end of this manual
IMPORTANT: if the power cable supplied is damaged, it must be replaced by the manufacturer, a service centre approved by the brand or the retailer. In all events, it must be replaced by qualified personnel in order to avoid any risk of injury.
IF THESE CHECKS REVEAL NOTHING, THEN CONTACT YOUR RETAILER'S AFTER-SALES DEPARTMENT.
CAUTION!
Unplug the appliance before carrying out any maintenance or repair work.
10. TROUBLE SHOOTING
You can solve many common wine cooler problems easily, saving you the cost of a possible service call. Try the suggestions below to see if you can solve the problem before calling the servicer.
| PROBLEM | POSSIBLE CAUSE |
| Wine cooler does not operate | Not plugged inThe circuit breaker tripped or a blown fuse |
| Wine cooler is not cold enough | Check the temperature control settingExternal environment may require a higher settingThe door is opened too oftenThe door is not closed completelyThe door gasket does not seal properly |
| Turns on and off frequently | The room temperature is hotter than normalA large amount of contents has been added to the wine cooler.The door is open too oftenThe door is not closed completelyThe temperature control is not set correctlyThe door gasket does not seal properly |
| The light does not work | Not plugged inThe circuit breaker tripped or a blown fuseThe bulb has burned out, contact your after-sales serviceThe light switch is “OFF” |
| Vibrations | Check to assure that the wine cooler is level |
| The wine cooler seems to make too much noise | The rattling noise may come from the flow of the refrigerant, which is normalAs each cycle ends, you may hear gurgling sounds caused by the flow of refrigerant in your wine coolerContraction and expansion of the inside walls may cause popping and crackling noisesThe wine cooler is not level |
| The door will not close properly | The wine cooler is not levelThe door was reversed and not properly installedThe gasket is dirtyThe shelves are out of position |
| Failure LED display | Poor display qualityTemperature value does not appearContact your after-sales service |
| Fans do not work anymore | Contact your after-sales service |
| « EL » or « EH » error code | Temperature probe is failingContact your after-sales service |
Replacing light
This appliance consists of light-emitting diodes (LEDs). This type of diode cannot be changed by the consumer. The lifetime of these LEDs is normally sufficient for no change to be made. If however, and despite all the care taken during the manufacture of your wine cellar, the LEDs were defective, please contact your after-sales service for any intervention.
11. ENVIRONMENT
This appliance is marked according to the European directive 2012/19/CE on Waste Electrical and Electronic Equipment (WEEE). By ensuring this product is disposed of correctly, you will help prevent potential negative consequences for the environment and human health, which could otherwise be caused by inappropriate waste handling of this product.
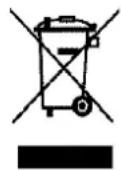
The symbol on the product, or on the documents accompanying the product, the Crossed Out Wheelie Bin, indicates that this appliance may not be treated as household waste. Instead it shall be handed over to the applicable collection point for the recycling of electrical and electronic equipment, or, if you are buying an equivalent product, to the retailer of the new product.
The user is responsible for taking the appliance to the appropriate collection center at the end of its useful life. Selective and appropriate collection for the recycling of no longer used appliances and their disposal and destruction in an environmentally friendly manner, helps to prevent potential negative effects on the environment and health, and encourages the recycling of materials used to make the product.
For more detailed information about treatment, recovery and recycling of this product, please contact your local authority, your household waste disposal service or the retailer where you purchased the product.
12. WARNING
As we continuously improve our products for the benefit of our customers, we reserve the right to modify technical characteristics without notice.
Warranties for KÜPPERSBUSCH brand products are offered exclusively by selected retailers. No part of these instructions may be considered as a supplementary guarantee.
KÜPPERSBUSCH cannot be held liable for errors or technical or editorial omissions in this document.
Non-binding document.
EUROPEAN DATA SHEET
according to the regulations (UE) N°1060/2010
SERVICE WINE CABINET
| BRAND | KÜPPERSBUSCH |
| COMMERCIAL REFERENCE | FWK4800.0S |
| POWER SUPPLY | 220-240 V / 50 Hz |
| PRODUCT DIMENSIONS (W x D x H) | 594 x 555 x 1230 mm |
| NET WEIGHT | 56 kg |
| APPLIANCE CATEGORY | 2 |
| ENERGY EFFICIENCY CLASS | A |
| ENERGY CONSUMPTION | Energy consumption 150 kWh per year calculated on the basis of results obtained over 24 hours in standardized test conditions. Actual energy consumption depends on conditions of use and the location of the appliance. |
| NET VOLUME | 205 L |
| ADJUSTABLE TEMPERATURES | 5 – 18°C / 5 – 18°C |
| NO FROST | Automatic defrost |
| CLIMATE CLASS | Climate class: N/SNThis appliance is designed to be used at an ambient temperature of between 10°C (lowest) and 32°C (highest). |
| ACOUSTIC EMISSIONS IN AIR IN dB(A) RE 1 pW | 40 dB(A) |
| INSTALLATION TYPE | Built-in column installation |
This appliance is intended exclusively for the storage of wine.
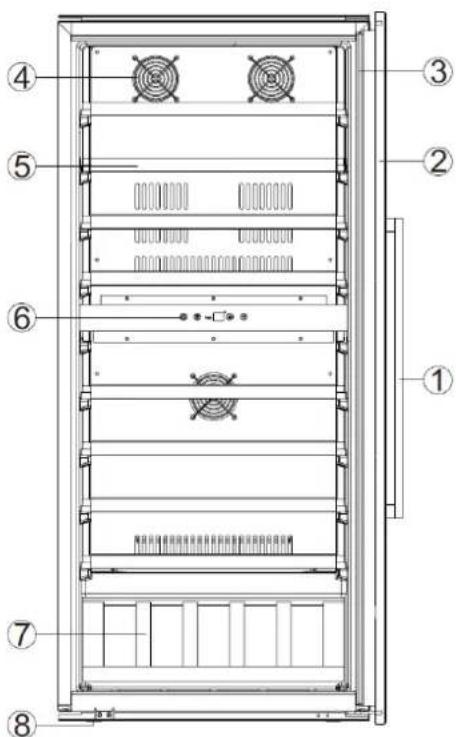
2. BESCHRIJVING VAN HET APPARAAT
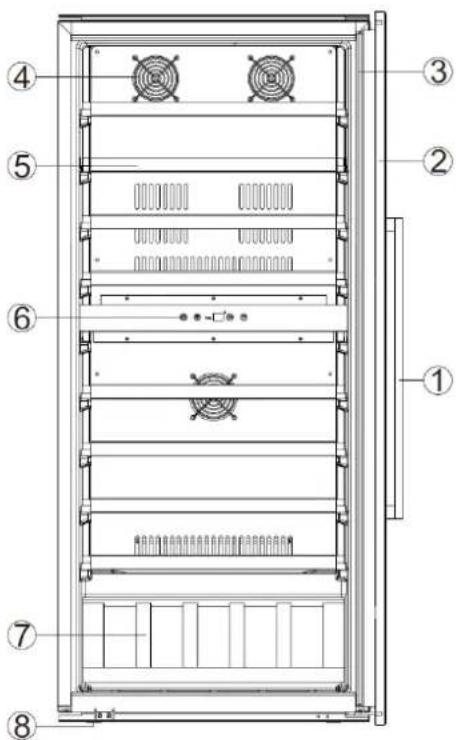
1) Handgreep
2) Glazen deur
3) Pakking
4) Kap van de ventilator
5) Oplegplank
6) Display
7) Presentatieoplegplank
8) Voeten
natural_image
Empty rectangular frame with black border (no text or symbols)natural_image
Isometric line drawing of a vertical shelf or storage unit with directional arrows indicating flow or movement (no text or symbols)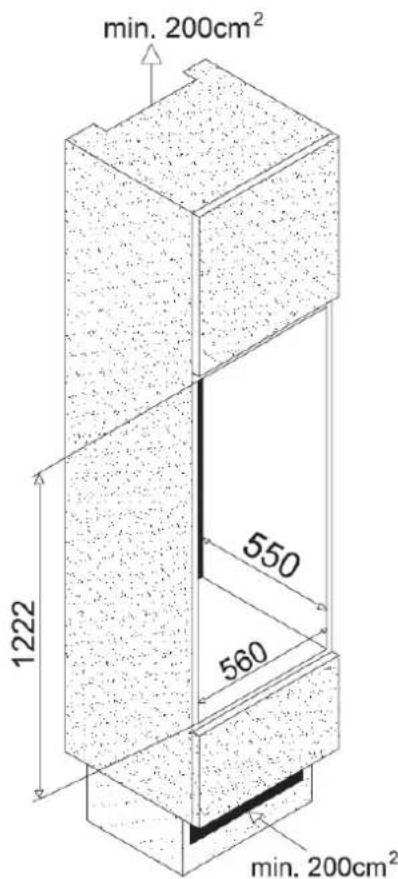
natural_image
Technical line drawing of two mechanical components with flanges and mounting holes (no text or symbols)7. LADEN
natural_image
Illustration of multiple wine bottles with colored labels and dimension lines (no text or symbols)natural_image
Illustration of two green bottles with red caps, connected by a line (no text or symbols)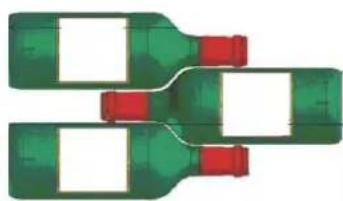
natural_image
Three green wine bottles with red caps, arranged in a staggered pattern (no text or symbols visible)natural_image
Empty rectangular frame with black border (no text or symbols)natural_image
Isometric line drawing of a vertical shelf with directional arrows indicating flow or movement (no text or symbols)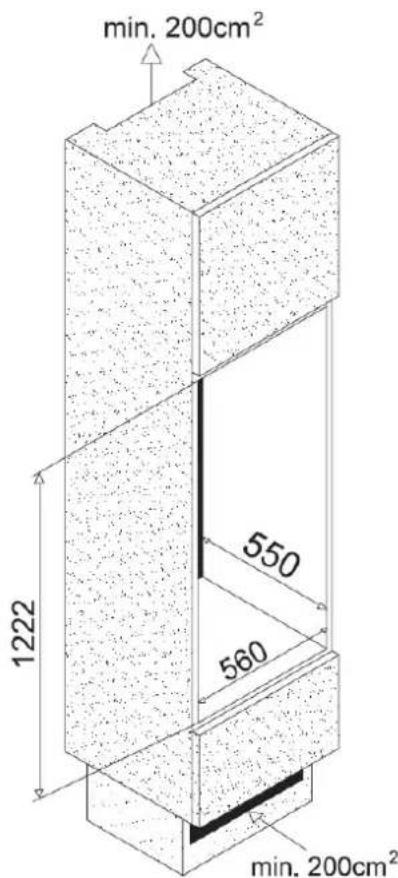
natural_image
Technical line drawing of two L-shaped metal brackets with mounting holes (no text or symbols)7. CARGA
natural_image
Illustration of multiple wine bottles with green and blue labels, shown in a grid layout (no text or symbols)natural_image
Two green plastic bottles with red caps, connected by a double-headed arrow (no text or symbols)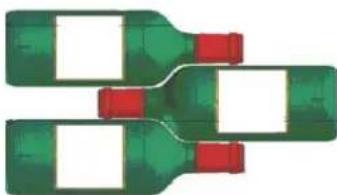
natural_image
Three identical green wine bottles with red caps, arranged in a zigzag pattern (no text or symbols visible)natural_image
Empty rectangular frame with black border (no text or symbols)natural_image
Isometric line drawing of a vertical shelf or storage unit with directional arrows indicating flow or movement (no text or symbols)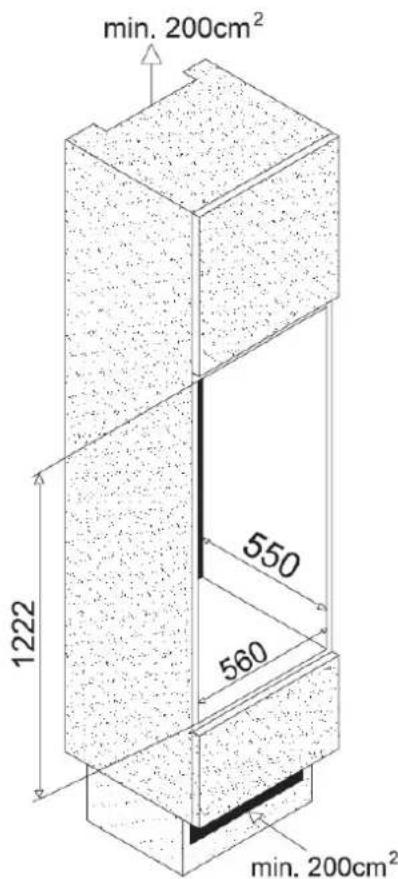
natural_image
Technical line drawing of two L-shaped metal brackets with mounting holes (no text or symbols)7. CARICO
natural_image
Illustration of multiple wine bottles with green and white labels, arranged in rows (no text or symbols)natural_image
Two green plastic bottles with red caps, connected by a coiled cord (no text or symbols visible)
natural_image
Diagram of three identical bottles with red connectors, arranged in a zigzag pattern (no text or symbols)Küppersbusch
- BEFÜLLUNG
- CHARGEMENT
- GENERAL SAFETY INSTRUCTIONS
- Safety of children and other vulnerable persons
- General safety
- Refrigerating fluid
- Caution: risk of fire
- Electrical safety
- Daily use
- Caution: cleaning and servicing
- Important information concerning installation
- Power saving
- Trouble shooting
- Safety instructions
- DESCRIPTION OF THE APPLIANCE
- INSTALLATION INSTRUCTIONS
- Before using this appliance
- Attention
- Ambient room temperature limits
- Built-in installation drawings
- Reversing the door
- IMPORTANT: all parts removed must be saved to do the reinstallation of door.
- OPERATING INSTRUCTIONS
- Temperature display
- EQUIPMENT
- The climate control system
- The anti-vibration system
- The anti-UV system
- Defrosting
- Shelves
- LOADING
- Types of bottle:
- Criss-crossing types
- Examples of serving temperatures
- CARE AND MAINTENANCE
- In case of a power cut
- Vacation time
- Moving your wine cooler
- IN THE EVENT OF A BREAKDOWN
- CAUTION!
- Unplug the appliance before carrying out any maintenance or repair work.
- TROUBLE SHOOTING
- Replacing light
- ENVIRONMENT
- WARNING
- EUROPEAN DATA SHEET
- according to the regulations (UE) N°1060/2010
- SERVICE WINE CABINET
- BESCHRIJVING VAN HET APPARAAT
- LADEN
- CARGA
- CARICO
Brand : Küppersbusch
Model : FWK4800.0S
Category : Beverage fridge