
TT601S - Turntable AMAZON - Free user manual and instructions
Find the device manual for free TT601S AMAZON in PDF.

| Product Type | Vinyl Record Player with Built-in Speakers |
| Brand | Amazon |
| Model | TT601S |
| Dimensions (L × W × H) | 37.4 × 30 × 13.3 cm |
| Weight | 3.15 kg |
| Power Supply | DC 5 V, 1.5 A power adapter |
| Playback Speeds | 33 1/3, 45 and 78 rpm |
| Compatible Disc Size | 17.8 cm (7 inches), 25.4 cm (10 inches), 30.5 cm (12 inches) |
| Drive System | Belt drive with automatic calibration |
| Stylus | Diamond (plastic and metal), replaceable |
| Built-in Speakers | 2 × 3 W, 4 ohms impedance |
| Bluetooth | Version 5.0, device name: AB Turntable 601 |
| Audio Inputs | Auxiliary input (AUX IN) 3.5 mm, Bluetooth |
| Audio Outputs | 3.5 mm headphone jack, RCA output (for active speakers) |
| Special Features | Auto stop, mode selector (phono, Bluetooth, line input) |
| Cleaning and Maintenance | Wipe with a soft cloth; clean the stylus with a soft brush; replace the stylus if damaged |
| Safety | Double insulation, do not expose to water, do not open, refer repairs to a professional |
| Spare Parts and Repairability | Replaceable stylus and power adapter; no other user-serviceable parts |
| Included Accessories | Power adapter, 3.5 mm audio cable, RCA/3.5 mm cable, 2 styli (1 pre-installed), user guide |
| Housing Material | Fabric |
| Color | Black |
Frequently Asked Questions - TT601S AMAZON
User questions about TT601S AMAZON
0 question about this device. Answer the ones you know or ask your own.
Ask a new question about this device
Download the instructions for your Turntable in PDF format for free! Find your manual TT601S - AMAZON and take your electronic device back in hand. On this page are published all the documents necessary for the use of your device. TT601S by AMAZON.
USER MANUAL TT601S AMAZON
natural_image
Line drawing of a portable electronic device with open lid and internal components (no text or symbols)User Manual
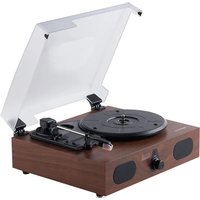
Turntable Record Player with Built-In Speakers and Bluetooth, Suitcase, Black
Safety Instructions....3
Package Contents....4
Parts Overview....5
Setting Up the Turntable 7
Using the Turntable 7
Cleaning and Maintenance 11
Troubleshooting....12
Specifications 14
Legal Notices....15
Feedback and Help....16
Safety Instructions
Important – Please read these instructions fully before installing or operating.
CAUTION
TO REDUCE THE RISK OF ELECTRIC SHOCK, DO NOT REMOVE ANY COVER. THERE ARE NO USER-SERVICEABLE PARTS INSIDE. REFER ANY SERVICING TO QUALIFIED PERSONNEL.
▶ Please read this user manual.
Please take the time to follow the instructions in this user manual carefully. It will help you set up and operate your system properly and enjoy all of its advanced features.
Please save this user manual for future reference.
The product label is located on the back of the product.
- Heed all warnings on the product and in the user manual.
Do not use this product near a bathtub, washbowl, kitchen sink, laundry tub, in a wet basement, near a swimming pool, or anywhere else that water or moisture is present.
▶ Only use attachments/accessories specified by the manufacturer.
- Unplug this apparatus during lightning storms or when unused for long periods of time to prevent damage to this product.
▶ Refer all servicing to qualified service personnel.
Servicing is required when the apparatus has been damaged in any way (for example, liquid has been spilled or objects have fallen into the apparatus, the apparatus has been exposed to rain or moisture, does not operate normally, or has been dropped.
Do not attempt to service this product yourself.
Opening or removing covers may expose you to dangerous voltages or other hazards.
To prevent risk of fire or electric shock, avoid overloading wall outlets, or extension cords.
Use the power adapter. Plug the product into a suitable power source, as described in the operating instructions or as marked on the product.


This symbol means that this unit is double insulated. An earth connection is not required.
-
No naked flame sources, such as lighted candles, should be placed on or near this equipment.
-
Do not place the product in enclosed bookcases or racks without proper ventilation.
-
The power adapter is used to disconnect the device and must be easily reached to unplug.
-
Always use the power adapter supplied. If it needs to be replaced, make sure the replacement has the same rating.
EN
- Do not cover the ventilation openings with items, such as newspapers, table-clothes, curtains, etc.
- Do not expose to dripping or splashed fluids. Objects filled with liquids, such as vases, must not be placed on or near this equipment.
- Do not expose the record player to direct sunlight, very high or low temperature, moisture, vibrations, or place in a dusty environment.
- Do not use abrasives, benzene, thinner, or other solvents to clean the surface of the unit. To clean, wipe with a clean soft cloth and a mild detergent solution.
- Never attempt to insert wires, pins, or other such objects into the vents or opening of the unit.
- Do not disassemble or modify the turntable. Apart from the stylus, which can be replaced, there are no other user serviceable parts.
- Do not use if the turntable is damaged in any way or malfunctions. Consult a qualified service engineer.
- Unplug the power adapter when the turntable is not in use.
- Do not dispose of this product with household waste at the end of its life cycle. Hand it over to a collection center for the recycling of electrical and electronic appliances. By recycling, some of the materials can be reused. You are making an important contribution to protect our environment. Please check with your local authority or recycling service.
Package Contents
▶ Turntable record player
Power adapter
3.5 mm audio cable
▶ RCA to 3.5 mm audio cable
▶ 2 styluses (1 pre-installed)
User Manual
Please contact Amazon customer service if there is any accessory missing from the package. Retain the original packaging materials for exchange or return purposes.
Parts Overview
Back
Top
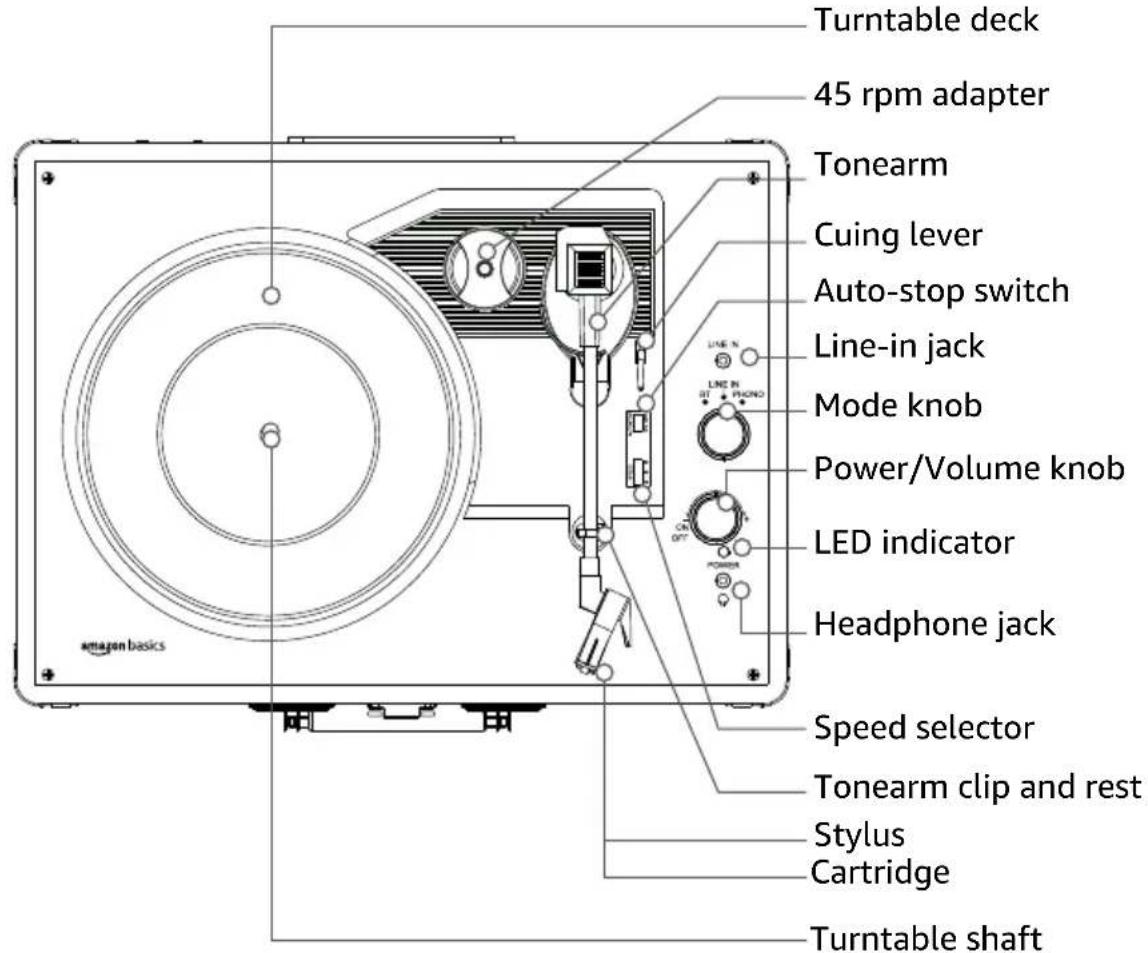
Front

Understanding the Status Indicator

Indicator Color Description
| Red (solid) Standby | |
| Green (solid) Phono mode | |
| Blue (blinking) Bluetooth mode (unpaired and searching for devices) | |
| Blue (solid) Bluetooth mode (paired) | |
| Amber (solid) LINE IN mode | |
| Off No power |
Setting Up the Turntable
Before First Use
-
Place the turntable on a flat and level surface. The selected location should be stable and free from vibration.
-
Remove the tie-wrap that is holding the tonearm.
-
Remove the stylus cover and keep for future use.
CAUTION To avoid stylus damage, make sure that the stylus cover is in place when the turntable is moved or cleaned.

- Connect the AC adapter to the DC IN jack on the turntable.
Using the Turntable
-
Turn the power/volume knob clockwise to turn on the turntable.
-
Adjust the speed selector to 33, 45, or 78 rpm, based on the label on your record.
Note: Set your turntable to 33 if the record indicates a speed of 33 1/3 rpm.
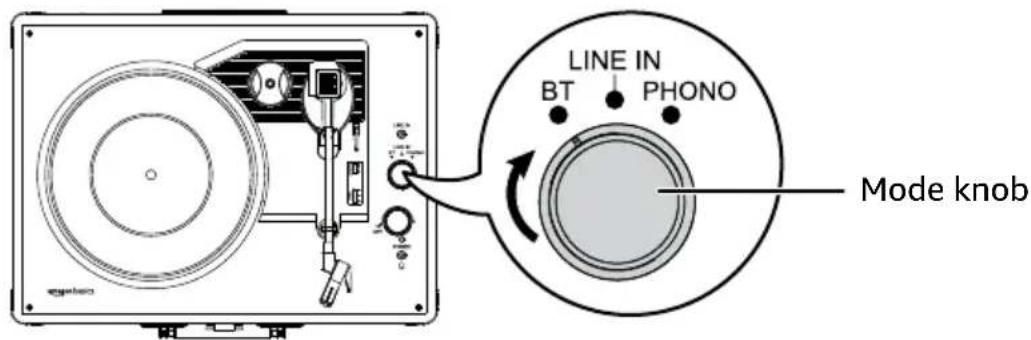
- Turn the mode knob to choose your audio output:
In Phono mode the status indicator is green. If you connect an amp (between the turnable and speaker), use Phono mode. The Phono signal is weaker than a LINE signal and needs the help of a preamp to properly amplify the sound.
In Bluetooth mode the status indicator is blue. See "Connecting to a Bluetooth Device" for pairing instructions.
In LINE IN mode the status indicator is amber. If you connect speakers directly to the turntable, use LINE IN mode. See "Connecting an Auxiliary Device" for instructions.
-
Place a record on the turntable. If needed, place the 45 rpm adapter over the turntable shaft.
-
Release the tonearm from its clip.

Note: When the turntable is not in use, lock the tonearm with the clip.
- Use the cuing lever to gently lift the tonearm onto the record. Set the stylus just inside the edge of the record to start at the beginning, or align it with the start of the track you want to play.
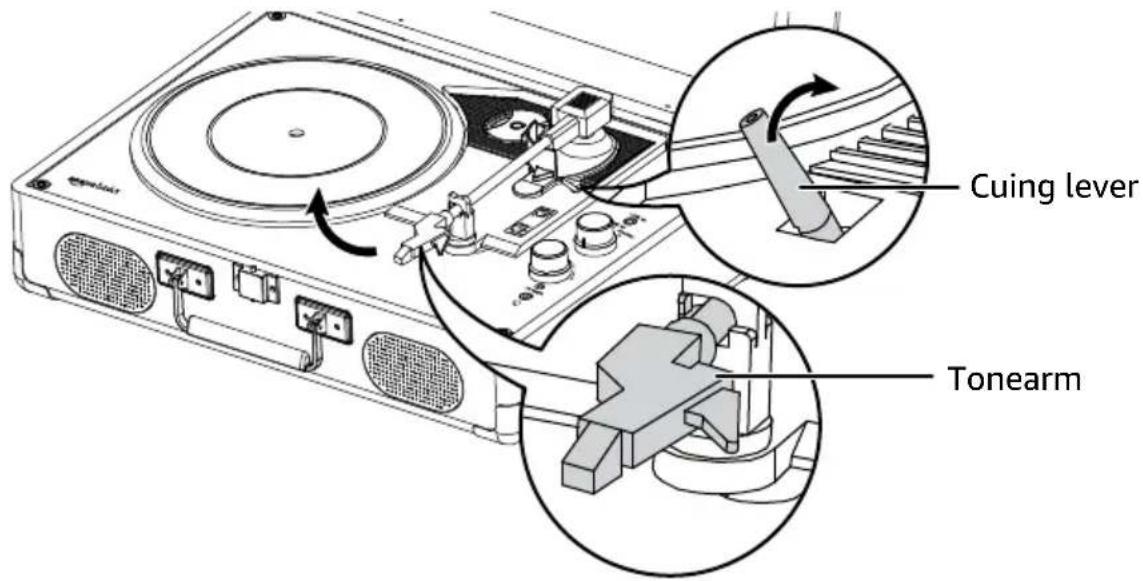
- When the record has finished playing, the tonearm will stop at the center of the record. Use the cuing lever to return the tonearm to the tonearm rest.
- Lock the tonearm clip to secure the tonearm.
- Turn the power/volume knob counterclockwise to turn off the turntable.
Connecting to a Bluetooth Device
- To enter Bluetooth mode, turn the mode knob to BT. The LED indicator lights blue.
-
Turn on Bluetooth on your audio device, then select AB Turntable 601 from the device list to pair. When paired, the status indicator is solid blue.
-
Play audio from your device to listen through the turntable using the turntable's volume control.
Note: After pairing, the turntable stays paired to your device until it is manually unpaired or your Bluetooth device is reset.
Connecting an Auxiliary Audio Device
Connect an audio device to play music through your turntable.
- Connect the 3.5 mm cable from the AUX IN jack to your audio device.
- To enter LINE IN mode, turn the mode knob to LINE IN. The LED indicator is amber.
- Use the playback controls on the connected device, and the volume controls on either the turntable or connected device.
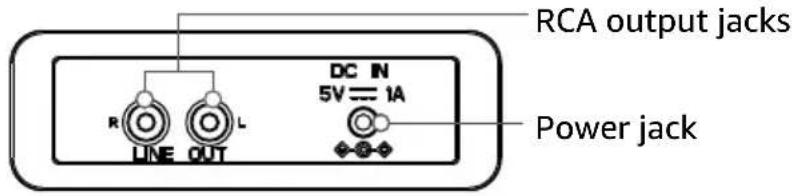
Connecting to RCA Speakers
The RCA jacks output analog line-level signals and can be connected to a pair of active/ powered speakers or your stereo system.
Note: The RCA jacks are not designed to connect directly to passive/unpowered speakers. If connected to passive speakers, the volume level will be very low.
- Connect an RCA cable (not included) from the turntable to your speakers. The red RCA plug connects to the R (right channel) jack and the white plug connects to the L (left channel) jack.
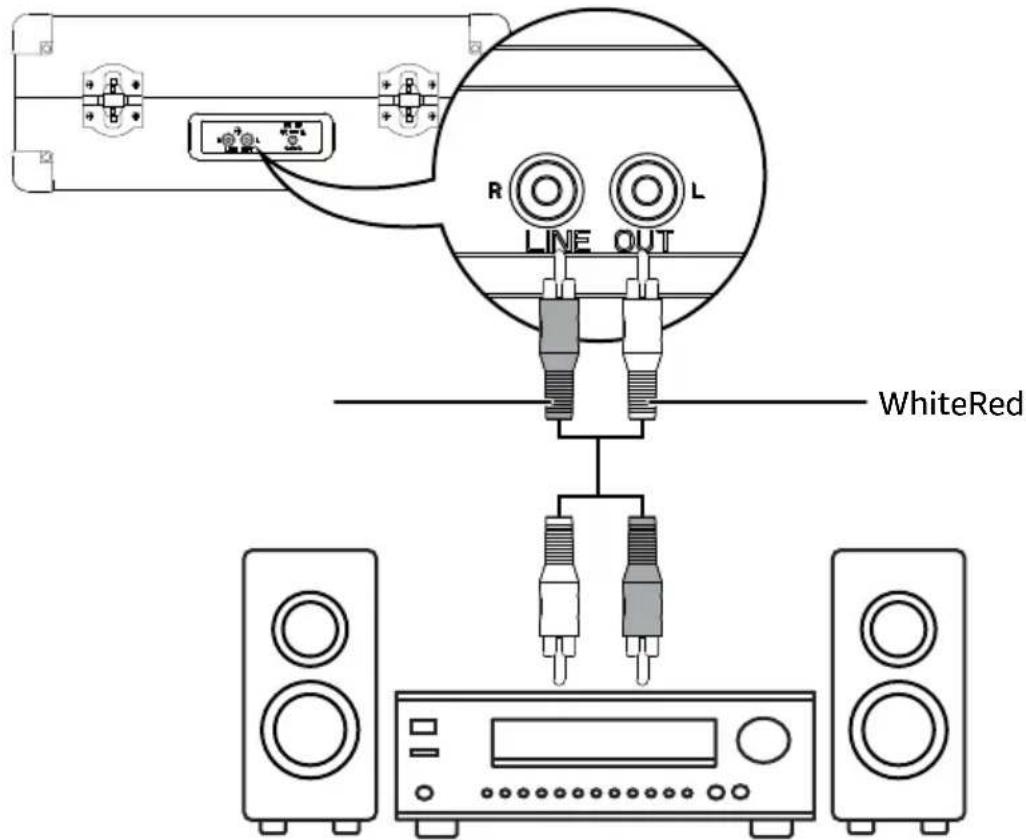
- Use the playback controls on the connected device, and the volume controls on either the turntable or connected device.
Listening Through Headphones

CAUTION
Excessive sound pressure from headphones can cause hearing loss. Do not listen to audio at a high volume.
-
Connect your headphones (not included) to the 🎨 (headphone) jack.
-
Use the turntable to adjust the volume level. The turntable speakers do not play audio when headphones are connected.
Using the Auto-Stop Function
Choose what the turntable does at the end of a record:
Slide the auto-stop switch to the OFF position. The turntable keeps spinning when the record reaches the end.
▶ Slide the auto-stop switch to the ON position. The turntable stops spinning when the record reaches the end.
Cleaning and Maintenance
Cleaning the Turntable
Wipe external surfaces with a soft cloth. If the case is very dirty, unplug your turntable and use a damp cloth soaked in a weak dish soap and water solution. Allow the turntable to dry thoroughly before using.
Clean the stylus using a soft brush with back and forth movement in the same direction. Do not touch the stylus with your fingers.
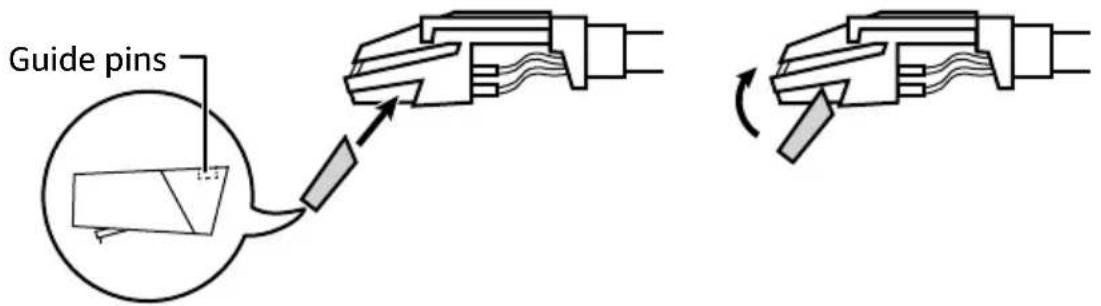
Replacing the Stylus
- Make sure that the tone arm is secured with the clip.
- Push down on the front edge of the stylus with the tip of a small screwdriver, then remove.
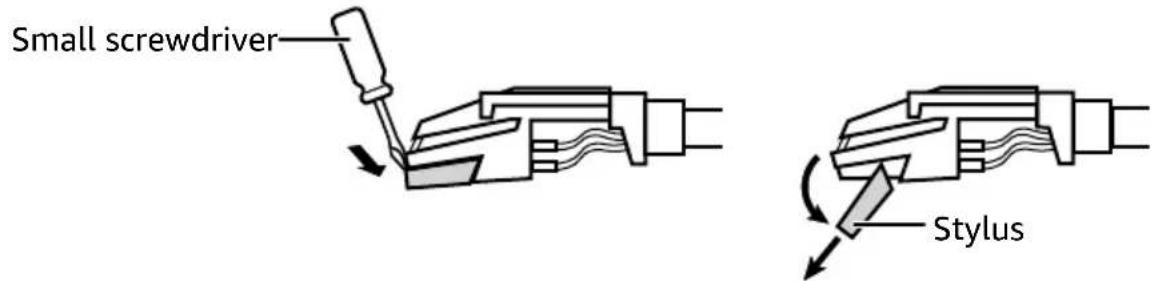
- With the front end of the stylus at a downward angle, align the guide pins with the cartridge and gently lift the front of the stylus until it snaps into place.
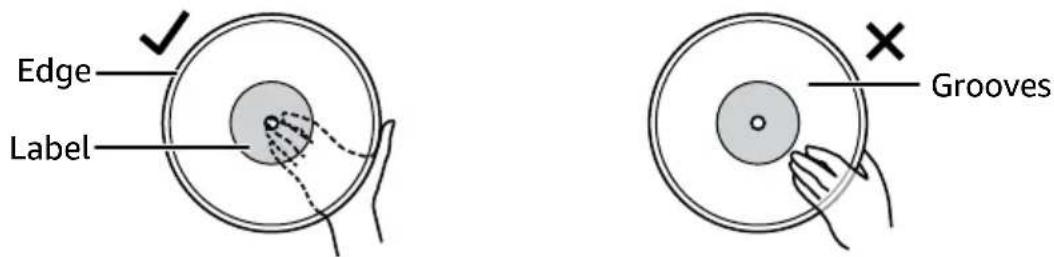
Caring for Records
Hold records by the label or edges. Oil from clean hands can leave residue on the record surface that gradually deteriorates the quality of your record.
Store records in a cool, dry place inside their sleeves and jackets when not in use.
EN
- Store records upright (on their edges). Records stored horizontally will eventually bend and warp.
Do not expose records to direct sunlight, high humidity, or high temperatures. Long exposure to high temperatures will warp the record.
If a record becomes dirty, gently wipe the surface in a circular motion using a soft anti-static cloth.

natural_image
Illustration of a hand holding a small object over an oval frame (no text or symbols)Troubleshooting
Problem
There is no power.
Solutions
Power adaptor is not connected correctly.
▶ No power at the power outlet.
To help save power consumption, some models will comply with the ERP energy-saving standard. When there is no audio input for 20 minutes, they will automatically turn off. To turn power back on and resume playing, turn off the power and turn it on again.
Problem
Power is on, but the platter does not turn.
Solutions
Turntable's drive belt has slipped off. Fix the drive belt.
A cable is plugged into the AUX IN jack. Unplug the cable.
Make sure the power cord is securely connected to the turntable and a working power outlet.
Problem
Turntable is spinning, but there is no sound, or sound not loud enough.
Solutions
Make sure the stylus protector is removed.
▶ Tone arm is raised.
Make sure there are no headphones connected to the headphone jack.
- Raise the volume with the power/volume knob.
Check the stylus for damage and replace it, if needed.
Make sure the stylus is correctly installed on the cartridge.
Try switching between LINE IN and Phono modes.
The RCA jacks are not designed to connect directly to passive/unpowered speakers. Connect to active/powered speakers or your stereo system.
Problem
The turntable won't connect to Bluetooth.
Solutions
- Bring your turntable and Bluetooth device closer to each other.
Make sure that you selected AB Turntable 601 on your Bluetooth device.
Make sure your turntable is not paired to another Bluetooth device. Unpair manually using the Bluetooth device list on your device.
Make sure your Bluetooth device is not connected to any other device.
Make sure your turntable and Bluetooth device are in pairing mode.
Problem
My turntable does not appear in my Bluetooth device's pairing list.
Solutions
▶ Bring your turntable and Bluetooth device closer to each other.
Put your turntable into Bluetooth mode, then refresh your list of Bluetooth devices.
Problem
The audio is skipping.
Solutions
Check the record for scratches, warping, or other damage.
▶ Check the stylus for damage and replace, if needed.
Problem
The audio is playing too slowly or too quickly.
Solutions
Adjust the turntable speed selector to match the speed on your record's label.
Specifications
Housing Style Fabrics style
Motor Power Type DC Motor
Stylus/Needle Diamond stylus needles (plastic & metal)
Drive System Belt driven with automatic calibration
Speed 33-1/3 rpm, 45 rpm, or 78 rpm
Record Size Vinyl LP (Long-Playing): 7", 10", or 12"
Source Input 3.5 mm AUX IN
Audio Output Built-In Speaker: 3W x 2
Built-In Speaker Impedance 4 Ohm
Headphone Output 3.5 mm jack RCA output jack (for active speaker)
Power Adapter DC 5V, 1.5A
Dimensions (L × W × H) 14.7 × 11.8 × 5.2 in. (37.4 × 30 × 13.3 cm)
Weight 6.95 lbs. (3.15 kg)
Power Adapter Length 59 in. (1.5 m)
3.5 mm Audio Cable Length 39 in. (1 m)
RCA to 3.5 mm Audio Cable Length 59 in. (1.5 m)
Bluetooth Version 5.0
Legal Notices
Disposal
WEEE marking "Information for the consumer"
Disposal of your old product. Your product is designed and manufactured with high quality materials and components, which can be recycled and reused. When this crossed out wheeled bin symbol is attached to a product it means the product is covered by the European Directive 2002/96/EC.
Please make yourself aware of local collection system for electrical and electronic products. Please act according to your local rules and do not dispose of your old products with your normal household waste. The correct disposal of your old product will help prevent potential negative consequences for the environment and human health.
FCC Statements
This equipment has been tested and found to comply with the limits for a Class B digital device, pursuant to Part 15 of the FCC Rules. These limits are designed to provide reasonable protection against harmful interference in a residential installation. This equipment generates, uses, and can radiate radio frequency energy and, if not installed and used in accordance with the instructions, may cause harmful interference to radio communications. However, there is no guarantee that interference will not occur in a particular installation. If this equipment does cause harmful interference to radio or television reception, which can be determined by turning the equipment off and on, the user is encouraged to try to correct the interference by one or more of the following measures:
▶ Reorient or relocate the receiving antenna.
- Increase the separation between the equipment and receiver.
Connect the equipment into a circuit different from that to which the receiver is connected.
Consult the dealer or an experienced radio TV technician for help.
FCC Compliance Statement
- This device complies with Part 15 of the FCC Rules. Operation is subject to the following two conditions:
i. this device may not cause harmful interference, and
ii. this device must accept any interference received, including interference that may cause undesired operation.
- Changes or modifications not expressly approved by the party responsible for compliance could void the user's authority to operate the equipment.
FCC Interference Statement
This equipment has been tested and found to comply with the limits for a Class B digital device, pursuant to part 15 of the FCC Rules. These limits are designed to provide reasonable protection against harmful interference in a residential installation. This equipment generates, uses and can radiate radio frequency energy and, if not installed and used in accordance with the instructions, may cause harmful interference to radio communications. However, there is no guarantee that interference will not occur in a particular installation. If this equipment does cause harmful interference to radio or television reception, which can be determined by turning the equipment off and on, the user is encouraged to try to correct the interference by one or more of the following measures:
▶ Reorient or relocate the receiving antenna.
▶ Increase the separation between the equipment and receiver.
Connect the equipment into an outlet on a circuit different from that to which the receiver is connected.
Consult the dealer or an experienced radio /TV technician for help.
RF Warning Statement: The device has been evaluated to meet general RF exposure requirements. This device should be installed and operated with minimum distance of 8" (20 cm) between the radiator and your body.
Canada IC Notice
This Class B digital apparatus complies with Canadian CAN ICES-003(B) / NMB-003(B) standard.
This device contains licence-exempt transmitter(s)/receiver(s) that comply with Innovation, Science and Economic Development Canada's licence-exempt RSS(s). Operation is subject to the following two conditions:
This device may not cause interference.
This device must accept any interference, including interference that may cause undesired operation of the device.
Feedback and Help
We would love to hear your feedback. To ensure we are providing the best customer experience possible, please consider writing a customer review.
Scan QR Code below with your phone camera or QR reader:

If you need help with your Amazon Basics product, please use the website or number below.

amazon.com/gp/help/customer/contact-us

+1 877-485-0385
Contents
natural_image
Illustration of a hand holding a small object over an oval frame (no text or symbols)CA: amazon.com/review/review-your-purchases#
CA: amazon.ca/gp/help/customer/contact-us
Contenido
natural_image
Illustration of a hand holding a small object over an oval frame (no text or symbols)amazon.com.mx/review/review-your-purchases#
amazon.com.mx/gp/help/customer/contact-us
amazon basics
amazon.com/AmazonBasics
MADE IN CHINA
FABRIQUÉ EN CHINE
HECHO EN CHINA
V01-12/22

- User Manual
- Safety Instructions
- CAUTION
- EN
- Package Contents
- Parts Overview
- Back
- Top
- Front
- Understanding the Status Indicator
- Setting Up the Turntable
- Before First Use
- Using the Turntable
- Connecting to a Bluetooth Device
- Connecting an Auxiliary Audio Device
- Connecting to RCA Speakers
- Listening Through Headphones
- Using the Auto-Stop Function
- Cleaning and Maintenance
- Cleaning the Turntable
- Replacing the Stylus
- Caring for Records
- Troubleshooting
- Problem
- Solutions
- Specifications
- Legal Notices
- Disposal
- FCC Statements
- FCC Compliance Statement
- FCC Interference Statement
- Canada IC Notice
- Feedback and Help
- Contents
- Contenido
- amazon basics
Brand : AMAZON
Model : TT601S
Category : Turntable