
Timix S.U. - Wheelchair Vermeiren - Free user manual and instructions
Find the device manual for free Timix S.U. Vermeiren in PDF.

| Product type | Electric wheelchair with chin control |
| Brand | Vermeiren |
| Model | Timix S.U. |
| Dimensions (L × W × H) | Approximately 110 × 65 × 95 cm (depending on configuration) |
| Total weight | Approximately 80 kg (depending on equipment) |
| Maximum user weight | 130 kg |
| Maximum speed | 6 km/h (adjustable in 3 levels D1, D2, D3) |
| Range | Approximately 20 km (depending on weight, terrain, settings) |
| Battery | Lithium or lead-acid, 2 × 12 V / 50 Ah |
| Charging time | Approximately 8 hours |
| Motors | 2 geared electric motors |
| Brakes | Automatic electromagnetic brakes |
| Control | Chin joystick with LiNX 400 touch screen |
| Electric adjustments | Seat height, backrest tilt, footrests |
| Screen | Color touch screen, displays speed, battery, errors |
| Protection | IP rating? (indoor/outdoor use) |
| Operating temperature | -10 °C to +40 °C |
| Warranty | 2 years (subject to general terms and conditions) |
Frequently Asked Questions - Timix S.U. Vermeiren
User questions about Timix S.U. Vermeiren
0 question about this device. Answer the ones you know or ask your own.
Ask a new question about this device
Download the instructions for your Wheelchair in PDF format for free! Find your manual Timix S.U. - Vermeiren and take your electronic device back in hand. On this page are published all the documents necessary for the use of your device. Timix S.U. by Vermeiren.
USER MANUAL Timix S.U. Vermeiren
MANUEL D'UTILISATION
GEBRUIKSAANWIJZING
GEBRAUCHSANWEISUNG
natural_image
Close-up of a black automotive seat with attached mechanical arms and a spherical head (no visible text or symbols)EN
Instructions for specialist dealer
This instruction manual is part and parcel of the product and must accompany every product sold.
Version: B, 2021-11
FR
Multi version: B, 2021-11
All rights reserved, including translation.
This page is intentionally left blank
Content
Content....1
Preface....2
1 Description ....3
2 Before use ....5
2.1 General safety instructions ....5
3 Driving 6
4 Operating console functions ....7
4.1 Switching ON / OFF 7
4.2 Failures and blocks....8
4.3 Battery status and charging 8
4.4 Navigation....9
4.5 Settings button....9
4.6 Joystick operation (driving and braking)....12
4.7 Operating console lock 12
4.8 Adjusting your body position 12
4.9 Changing drive function 13
4.10 Adjusting the chin controller....14
5 Troubleshooting....16
Preface
Important note
This manual reflects the latest product developments. Vermeiren has the right to implement changes to this type of product without being imposed to any obligation to adapt or replace similar products previously delivered.
Pictures are used to clarify the instructions in this manual. Details of the depicted product may deviate from your product.
Information available
On our website http://www.vermeiren.com/ you will always find the most recent version of the information in this manual. Please consult this website regularly for possible updates.
Visually impaired people can download the electronic version of this manual and have it read out by means of a text-to-speech software application.

This user manual of applied operating console For user and specialist dealer

User manual of wheelchair For user and specialist dealer

Installation manual of wheelchair For specialist dealer

User manual of battery and charger For user and specialist dealer
1 Description
The operating console built into your electric wheelchair enables you to control all the driving, steering, braking and operating processes, as well as other adjusting motors (lifting column, seat and back adjuster). The wheelchair's electrical unit and electronics are constantly being monitored internally.
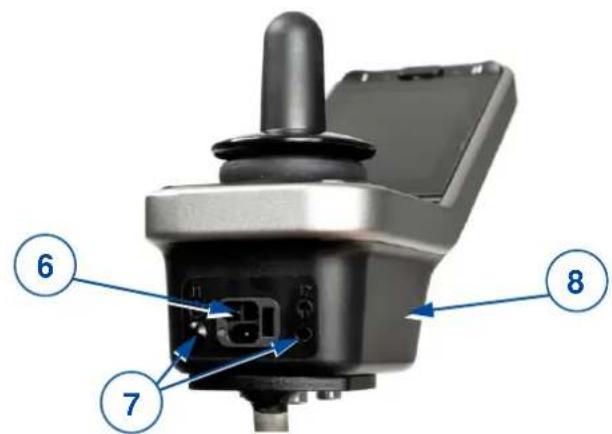
The following pictures show all parts that are relevant to the user.
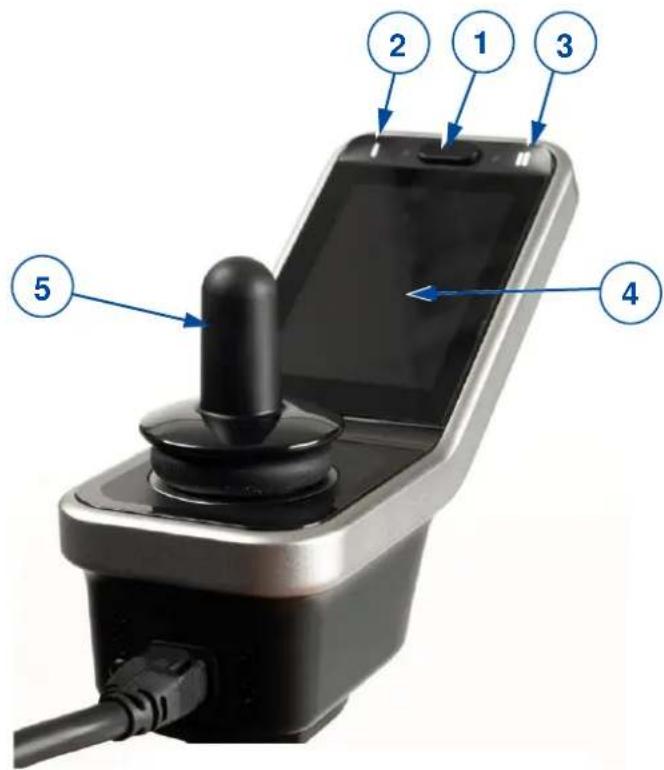
- ON / OFF button with status indicator
- Navigation button main menu
- Navigation button submenu
- Touch screen
- Joystick
- Connection point of power cable
- Connection point for service purposes
- Console base
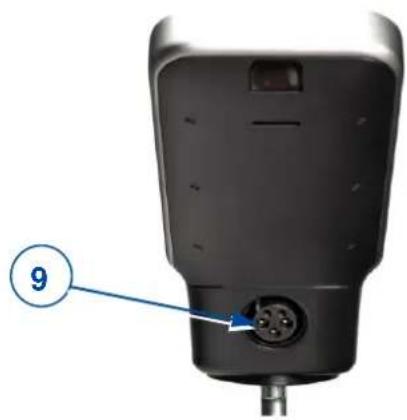
- Connection point of power charger
natural_image
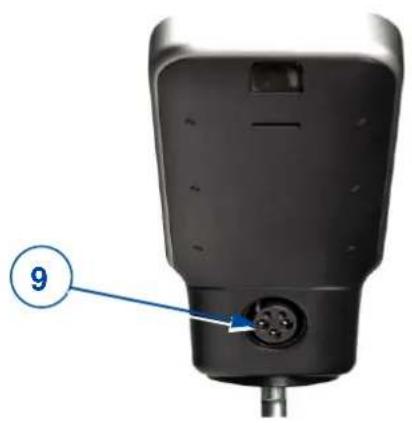
Close-up of a black electronic device with a 9-pin connector and labeled point (no text or symbols beyond the number)Figure 1 Important parts (LiNX 400 screen)
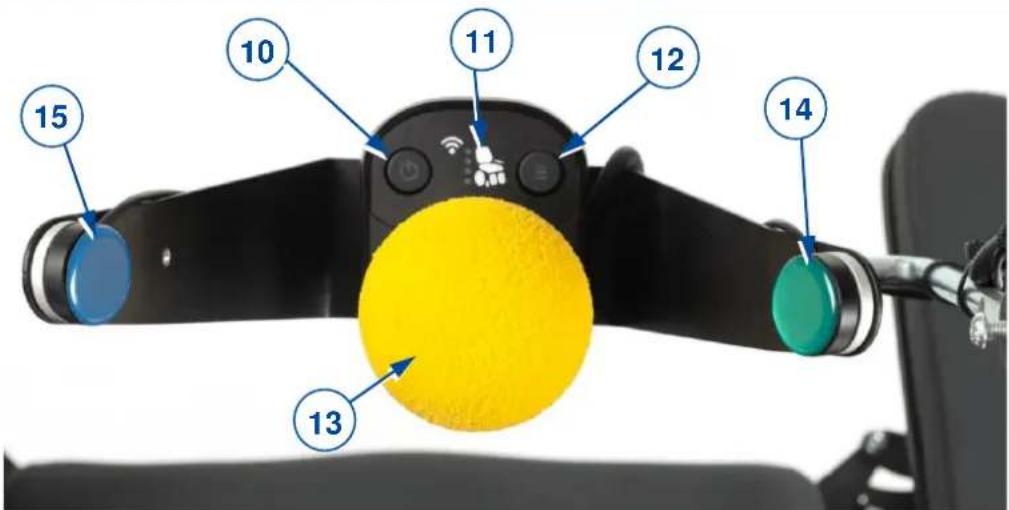
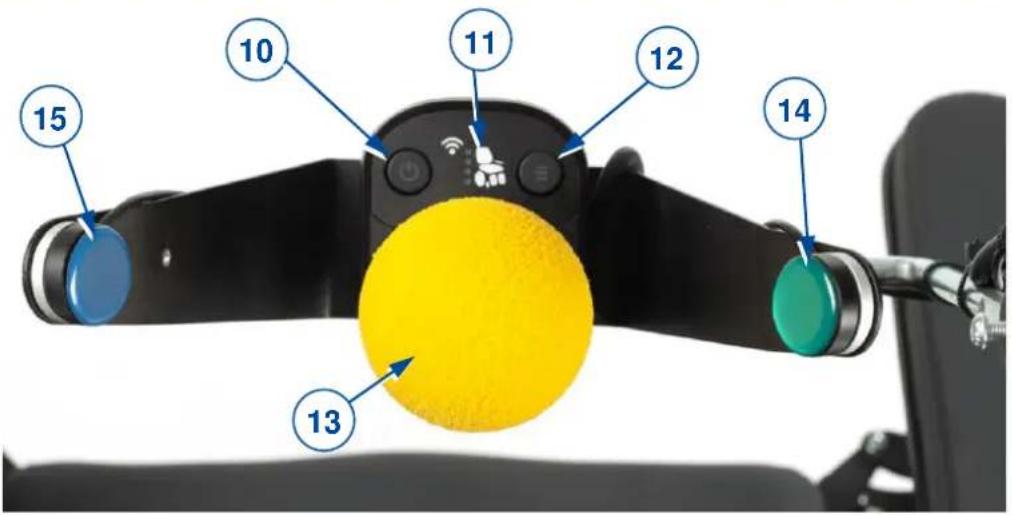
Figure 2 Important parts (chin controller)
- ON / OFF button with status indicator
- Functions indicator
- Menu navigation button
- Joystick
- ON / OFF button (green, right) *
- Navigation button (blue, left) *
* Upon request, these buttons can be installed to switch sides.
2 Before use

WARNING
Risk of injuries and damage
- Do NOT install, maintain or use this product unless you have read and fully understood all instructions in this manual and all relevant manuals regarding the wheelchair equipped with this product.
- Do not try to open or disassemble the console in any case - there are no user-serviceable parts inside.
- In case of doubts or questions, do not hesitate to contact your local specialist dealer, your care provider, or your technical adviser to help you with this.
i Vermeiren is responsible for software updates/repairs. For adaptations in the software, contact Vermeiren, see our website http://www.vermeiren.com/
2.1 General safety instructions
Keep the following general warnings in mind during use:
- The operating consoles have been tested for electromagnetic compatibility on typical, representative vehicles and comply with the appropriate EMC standards: EN 12184: 2014, ISO7176-21: 2009.
- Nevertheless, sources of electromagnetic field may influence the driving performance of your wheelchair, like the fields of mobile phones, power generators or high-power energy sources. On the other hand, the electronics of your wheelchair can affect other electronic appliances too, like alarm systems of shops and automatic doors. We therefore advise you to check your operating console / wheelchair regularly for damage and wear, since these may enlarge the interference.
- Be aware that the surface of the operating console may get very hot due to solar radiation or heating devices. Be careful when touching.
- Make sure that the controller does not become colder or hotter than the allowed minimum and maximum temperature, see the wheelchair user manual.
- Before switching the wheelchair on, be aware of your environment/situation. Adjust your speed accordingly before driving off. We advise you to use the slowest speed setting to drive indoors. For outdoor driving you can adjust the speed to a suitable speed at which you feel comfortable and safe.
- Do not touch the connector pins. If you touch the pins, they can become dirty, or they can be damaged by electrostatic discharge.
- If the wheelchair has not been fitted with a hand guard for the operating console, be aware that your hand will not be protected from crushing, for example while manoeuvring towards a table.
- The XLR connector on the controller is to be used exclusively for the intended purpose of charging the battery. The warranty will lapse if any unauthorized device is connected to this port.
- Make sure that the battery charger that is used with the vehicle has a drive-inhibited function that is correctly connected for use with the controller. This drive-inhibited feature is intended to prevent the chair from driving while the battery is being charged. If you are not sure, ask your dealer.
- Immediately turn the controller off and consult your service agent if the vehicle:
o is damaged; - does not behave the same every time;
- does not respond normally, the way you expect it to;
-
becomes hotter than normal;
o smokes; -
does not change its speed when you adjust the speed dial;
o displays a fault on its fault indicator and the controller does not perform normally.
- Turn the controller off:
o when you do not use it;
o before you get in or out of the wheelchair;
o if your vehicle drives by itself or against your will. When you turn the controller off, the vehicle will halt.
3 Driving
- Press the ON/OFF button on the chin controller or screen.
- If the LED on the ON/OFF screen button and chin controller button is green, the wheelchair is powered and ready to go.
- Check the battery status indicator. Charge the battery if necessary (see § 4.3).
- Select the driving program and set the speed range, see driving functions in § 4.9.
- Start moving the wheelchair by operating the joystick on the chin controller slowly forwards/backwards.
- The speed will increase when you push the joystick further out of the centre.
- To turn left or right, push the joystick to the left or right.
- To brake, move the joystick to neutral position.
- After arrival, check the battery status and press the ON/OFF button.
- Charge the battery if necessary.
4 Operating console functions
The operating console with chin controller enables you to control all driving components as well as the motors to adjust your body position. For your own safety, and to prevent that the wheelchair gets damaged, movements are monitored by the electronics. This may result in block of movement, speed decrease or complete stop.
4.1 Switching ON / OFF
Put the joystick in the neutral (central) position before pressing the ON/OFF button.
If the console is switched on with the joystick out of the neutral position, the wheelchair will not drive. Release the joystick (return to neutral) within 5 seconds to unlock the drive. If the joystick is not released within 5 seconds, the fault turns into a module fault which is indicated by the red blinking LED in the ON/OFF buttons. The wheelchair will not drive. To clear the module fault, release the joystick and switch the operating console OFF and then ON again.
- To switch the operating console ON: either press the green ON/OFF button (1) on the chin controller, or press the ON/OFF screen button (2) or chin controller button (3).
The start screen is displayed for a few seconds, after which the operating screen appears. The LED (status indicator) in the ON/OFF buttons goes on. When it turns green, the operating console is ready for operation. When the LED starts blinking in red, there is a failure, see §4.2 and §5.
- To switch the operating console OFF when it is ON: either press the ON/OFF button (1) on the chin controller, or press the ON/OFF screen button (2) or chin controller button (3).
The operating console will power down and the status indicator goes out.
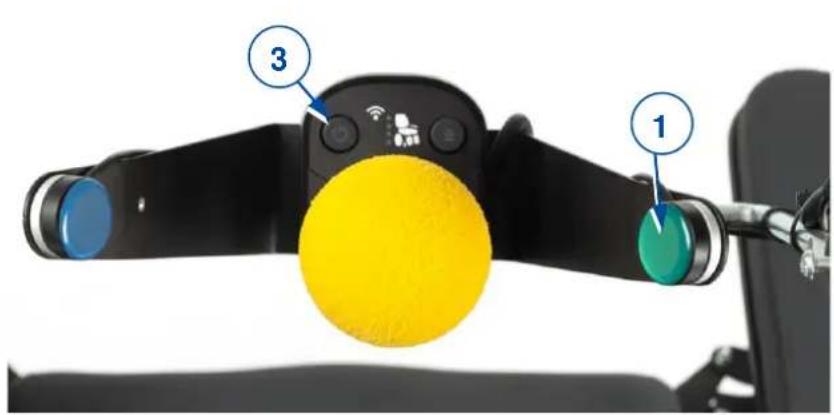
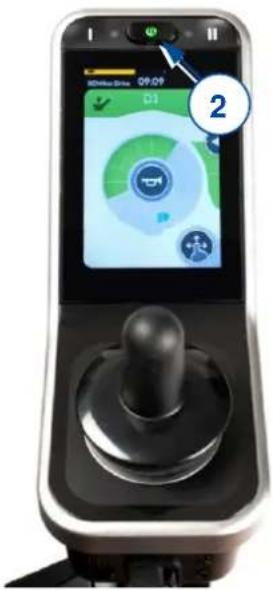
Figure 3 Switching ON/OFF
4.1.1 Emergency stop
If you need to stop a driving or body-positioning movement quickly, press the ON/OFF button to perform an EMERGENCY STOP. The wheelchair will come to a halt quickly.
4.1.2 Sleep mode
The operating console will go into sleep mode after a period of inactivity (default 5 minutes). When the system sleeps, it is partially turned off to reduce energy consumption.
To reactivate the operating console, press a button or move the joystick.
4.2 Failures and blocks
When the operating console is powered and a failure appears, the indicator of the ON/OFF buttons starts blinking in red, see picture. The number of blinks indicates the fault code. For a few seconds, a triangle with fault code (A) is displayed. The ON/OFF buttons will keep blinking.
Figure 4 Failure indication and drive inhibited
In case of a failure, one or all functions of the operating console are blocked. This is indicated by the "forbidden"-symbol and the yellow warning bars (B).
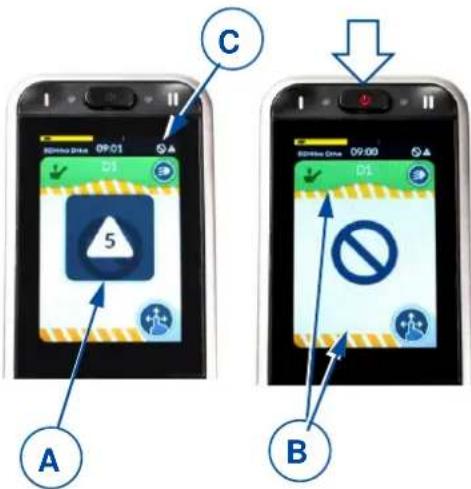
i The status is indicated by a small symbol (C) in the top corner of each screen.
For more information, see §5.
4.3 Battery status and charging

WARNING
Risk of injuries and damage
- Follow the charging instructions in the wheelchair instruction manual and the supplier's manual of the battery charger.
The battery charge indicator (located at the top of the touchscreen) provides an estimation of the remaining battery capacity.
In the following table all battery indications and their meanings are collected.
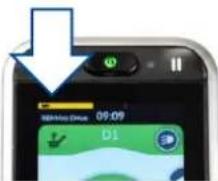
Figure 5 Battery status indication
Table 1: Battery status description
| Display | Description | Meaning | Remarks |
 | Most blocks are green | Battery capacity: more than 50% of full capacity. | |
 | Blocks turn yellow | Battery capacity level is decreasing: less than 50% of full capacity | Consider recharging the battery soon. |
| Blocks turn red | Battery almost empty | Stop and recharge now. | |
 | Yellow or green blocks with charging symbol | Battery is charging.Battery capacity level is indicated by colour. | Wait until battery is completely charged. |
4.3.1 Charging
i
- Driving is prevented (inhibited) while the system is being charged.
- Charging is possible without switching the operating console ON. To see the battery status indicator, switch it ON.
Plug the battery charger into the remote's XLR socket (9), see Figure 1.
The battery status indication now turns into a charge indication, see figure 5. The battery charging state is shown by the yellow or green blocks.
After a few seconds, the operating console turns to power-save mode and the screen illumination decreases. Touching a button or the joystick on the chin controller turns normal illumination on.

Figure 6 Battery-charging indication
4.4 Navigation
There are 2 main menus to view on the touchscreen:
- S-menu for adjusting the body position, see §4.8.
• D-menu for changing the drive functions, see §4.9.
Each main menu has separate submenus.
Once the operating console has been switched ON, you can navigate through the screens/menus.
- To navigate between the S and D menus, press the blue chin controller button (15, see Figure 2) for 2-3 seconds. Repeat until the desired menu is shown on the screen.
- To select a specific submenu, shortly press the blue chin controller button until the desired submenu is shown on the screen.
Navigation between and within the menus is also possible by swiping and tapping the touch screen.
Navigating and altering the settings on the operator console is only possible by swiping and tapping the screen. The chin controller can not be used for this.
i
Use the set key on the screen to get an overview of the navigation structure.
4.5 Settings button
The settings button (K) is displayed in each menu screen. With this button, the screen view can be changed, a popup screen can be opened, and settings can be changed.
- To toggle between full screen view and menu-scroll view, tap the settings button shortly.
• To open the pop-up screen, hold your finger on the settings button for 4 seconds.
i
This pop-up screen can also be opened/closed by pressing menu button I (4) for 4 seconds.
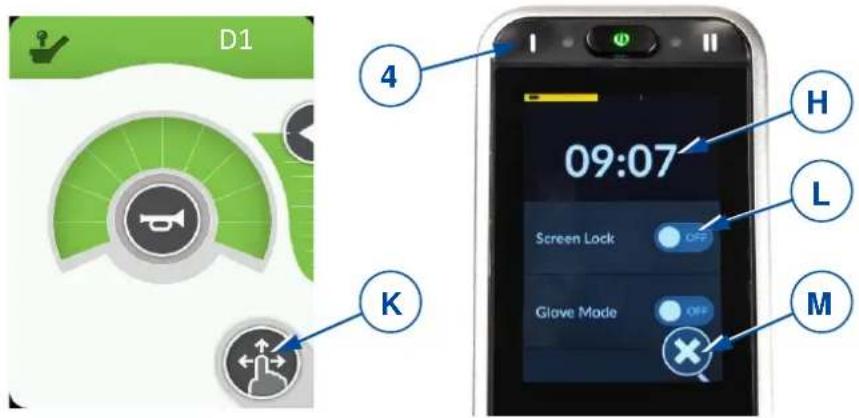
Figure 7 Settings button and pop-up screen
- To navigate to one of the items in the pop-up screen, tap on the item.
• To navigate to the previous screen, tap the return arrow.
- To close the pop-up screen, tap on the cross key (M) at the bottom of the screen.
- When a selection key is active, the indicator of the key turns green.

4.5.1 Time setting
- Tap on the time indication (H in previous figure) and set hour and minutes by tapping the arrows (I).
- To switch from 12-hour dial to 24-hour dial, tap in the area of the 12/24-hour button (J).
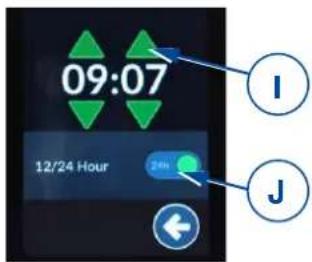
Figure 8 Time setting
4.5.2 Screen lock
The Screen lock key (L) (see Figure 7) is primarily intended to restrict the authorisation of the screen operation to the occupant, but also prevents unintentional use of screen controls.
i The screen lock does not influence the driving functions or body-positioning functions. When the screen is locked, the maximum drive speed is set according to submenu D1. This pop-up screen can also be opened/closed by pressing submenu button II (3) for 2 seconds.
• To lock the screen:
- Tap and hold your finger on the settings button (K) for 7 seconds (see Figure 7). - To switch the lock ON, tap the selection key of the “screen lock” section. The indicator turns green.
When the screen is locked, all operating keys are greyed out and become inoperable.
The symbol of the settings button (K) turns into a padlock.
• To unlock the screen:
- Switch off the operating console with the ON/OFF button to lift the lock.
The keys on the screen become operable again.
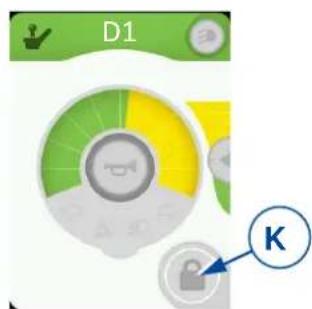
Figure 9 Screen locked
4.5.3 Glove mode
The touchscreen is programmed to a particular degree of touch sensitivity. For this reason, the screen does not respond when you wear gloves. With this function, you can increase the touch sensitivity so you can operate the console while wearing gloves.
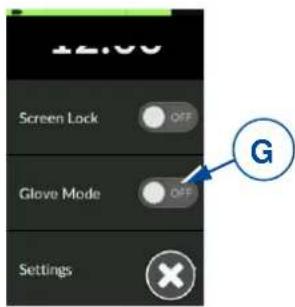
- To switch the glove mode ON, tap the selection key (G). The indicator turns green.
- To switch this mode off, tap the selection key again. It is now greyed out.
Figure 10 Glove mode key
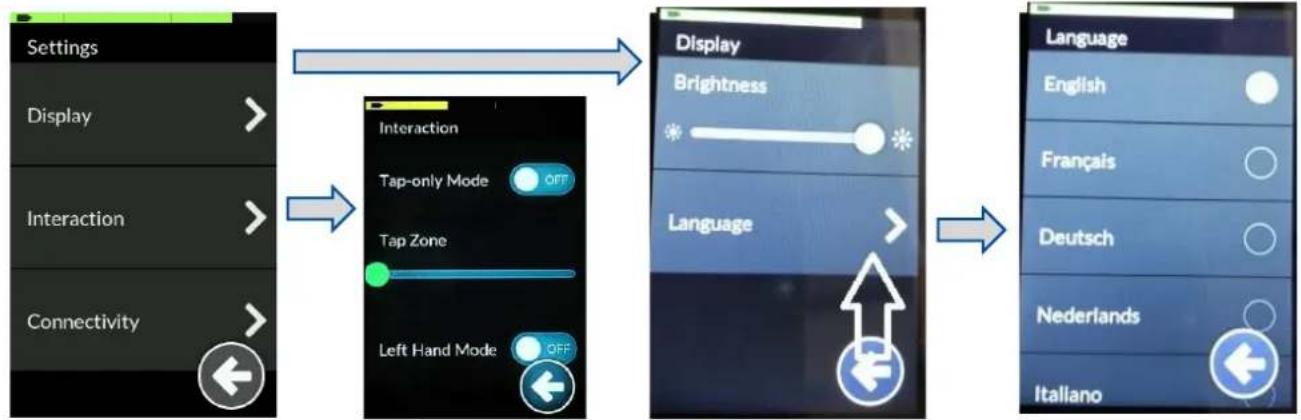
4.5.4 Settings
- Tap on your chosen setting to enter the setting menu and submenus.
flowchart
graph LR
    A["Settings"] --> B["Display"]
    B --> C["Interaction"]
    C --> D["Connectivity"]
    D --> E["Interaction"]
    E --> F["Tap-only Mode OFF"]
    F --> G["Tap Zone"]
    G --> H["Left Hand Mode OFF"]
    H --> I["Display Brightness"]
    I --> J["Language"]
    J --> K["Language English"]
    J --> L["Language Français"]
    J --> M["Language Deutsch"]
    J --> N["Language Nederlands"]
    J --> O["Language Italiano"]
Figure 11 Settings menu
Display
- Brightness
- Move the green slider to the left/right to decrease/increase the brightness of the screen.
- Language
- Your operating console is set to English by default. your preferred language can be selected from the list under the "Language" setting.
Interaction
- Tap only mode
- Tap this selection key to switch this mode OFF or ON. After switching on this function, sliding and wiping do not operate. The screen can only be operated by tapping the arrow keys and +/- keys that replace these functions.
- Tap zone
o Move the slider to the left/right to decrease/increase the sensitivity zone of the tap field.
- Left hand mode
o Tap this selection key to switch this mode OFF or ON. By switching on, the location of the operating keys switches from the right to the left side of the screen.
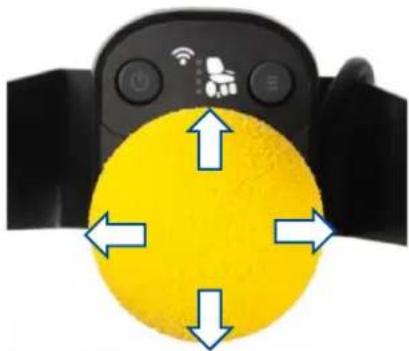
4.6 Joystick operation (driving and braking)
Operating the joystick in a specific direction will move the electric wheelchair in that direction. The speed of movement depends on the displacement of the joystick. If the joystick is pushed/pulled to maximum displacement, the speed will be maximal (within the selected drive mode).
By moving the joystick to its central position (neutral) during driving, the brakes will start working until the wheelchair stops:
- For gradual braking, move the joystick slowly
- For a quick stop, release the joystick; the wheelchair will stop as quickly as possible.
Figure 12 Joystick movements
natural_image
Close-up of a black remote control with white icons and directional arrows pointing to a yellow circular interface (no text or symbols)i Make sure that the joystick is in neutral (central) position when pressing the on/off button, otherwise the electronics will be locked.
After switching the operating console ON by the ON/OFF button, the joystick stays in the central position for at least five seconds. The console has been programmed this way for technical and safety reasons. If joystick and ON/OFF button are activated at the same time the steering unit is locked and will only unlock after switching completely OFF.
i Make sure that the free-wheel lever is in braking position BEFORE switching the wheelchair ON. Electromagnetic brakes do NOT function if the wheelchair is in free-wheel mode. This is indicated on the operating console. Driving is not possible.
i To prevent unintended changes of the settings, the operating keys disappear during operation of the joystick. As soon as the joystick is in neutral position, the keys appear again.
4.7 Operating console lock
It is possible to lock the operating console, to prevent unauthorized use of the wheelchair.
- To lock the console: Press the ON/OFF button until the lock symbol appears and the screen goes black.
- To unlock the console: hold your finger on the screen. The lock symbol appears again, together with a white loading bar around the screen. Wait until the bar is fully loaded, the console now becomes operable again.
4.8 Adjusting your body position

CAUTION
Risk of injuries or damage
- Be aware that the stability decreases when the wheelchair is moved from sitting straight to inclined position.
- Make sure there is enough space around the wheelchair to operate the backrest and seat.
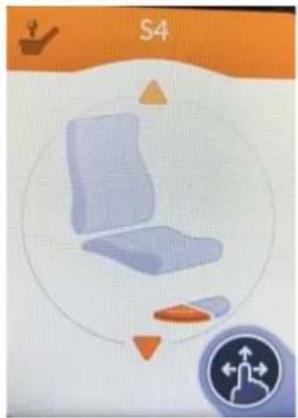
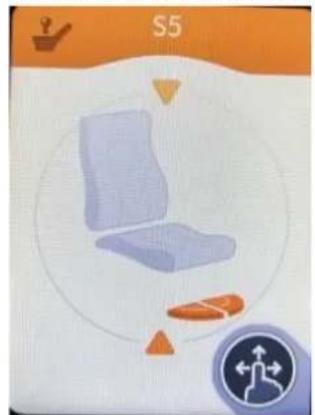
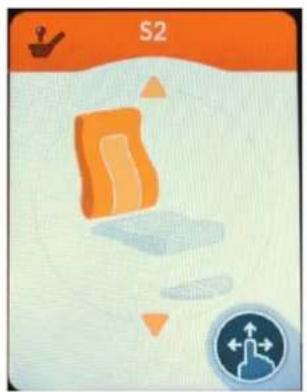
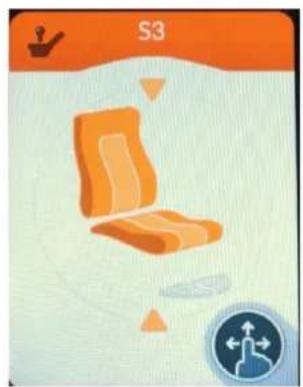
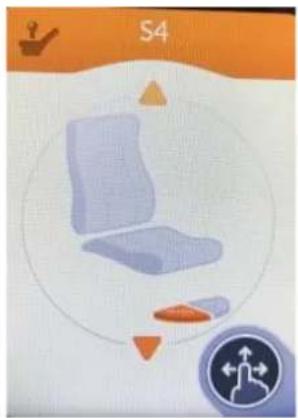
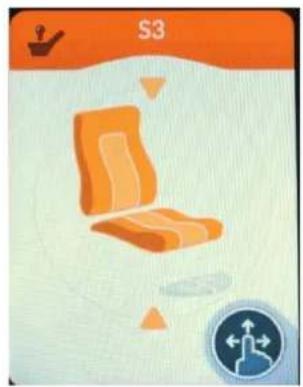
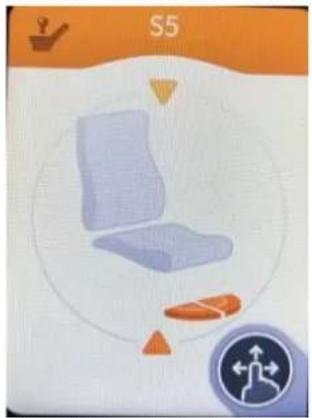
The wheelchair's adjusting functions can be operated from the S-menu. Depending on your type of wheelchair, there can be up to 6 submenus.
- To adjust your body position, move the joystick to the front or back, according to the arrows on the screen.
- To return to the basic sitting position, move the joystick to the back for each adjusting movement.
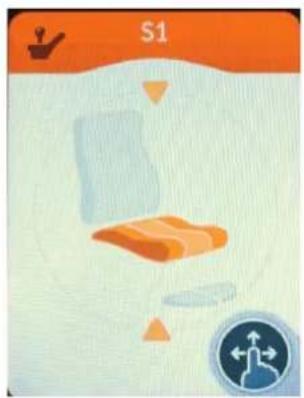
natural_image
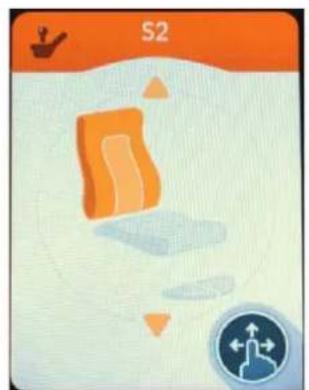
Illustration of a stylized object with orange and gray tones, no visible text or symbolsSeat height (lift)

natural_image
Illustration of a stylized orange and blue object with directional arrows, set against a light background (no text or symbols)Backrest inclination

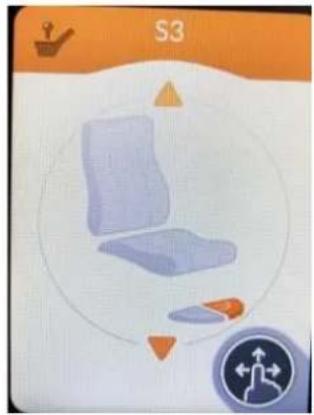
natural_image
Illustration of an orange chair with a blue circular icon showing a walking figure (no text or symbols)Seat & backrest inclination
natural_image
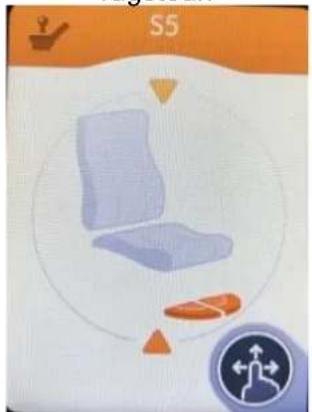
Illustration of a chair inside a circular frame with directional arrows, no text or symbols present.Left foot support
natural_image
Illustration of a blue chair with orange accents and a circular design, no text or symbols present.Right foot support
natural_image
Illustration of a chair with seatbelt and foot icons, no readable text or symbolsBoth foot supports/central footplate
Figure 13 Possible submenus
4.9 Changing drive function
The wheelchair's speed functions can be operated from the D1, D2, or D3 submenu. The maximum driving speed by maximal deflection of the joystick depends on the selected drive submenu (D1, D2 or D3).
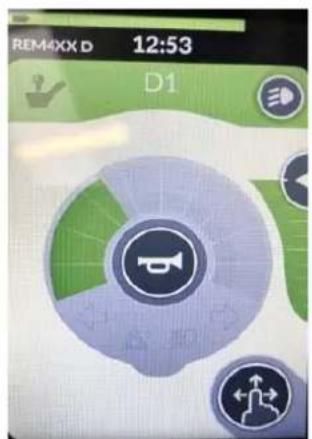
Low speed setting (indoor driving)

Medium speed setting (indoor-outdoor driving)

High speed setting (outdoor driving)
Figure 14 Submenu D1, D2, D3
4.9.1 Limited driving speed
For your safety, the driving speed of your wheelchair will be automatically reduced when certain body position alterations have been made. The drive of the wheelchair is then limited to the lowest speed setting D1, or even becomes completely blocked.
Driving and speed limitations occur when:
- the lift has been adjusted to a higher position. Only speed setting D1 is available.
-
the backrest inclination exceeds a certain angle (see figure 15):
-
All functions of your wheelchair are available.
- Only speed setting D1 is available.
- Driving your wheelchair is no longer possible. Raise the backrest until the block is lifted.

Figure 15 Backrest inclination
To lift the speed/driving limitations, lower the lift to standard (lowest) position, and adjust your seat and backrest to upright sitting position.
4.10 Adjusting the chin controller
The chin controller can be adjusted in several directions to make the driving experience as comfortable as possible for the user.
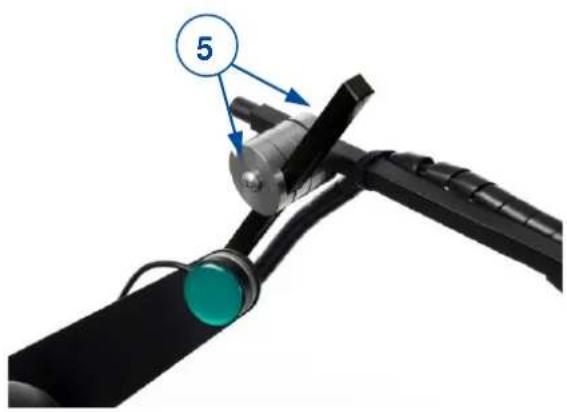
4.10.1 Adjusting the vertical position
The height of the chin controller can be altered in two ways.
- At the back of the wheelchair: Loosen the star knob to move the controller support up/down until the desired height.
- On the controller support: Loosen the screws (5) to adjust the position of the controller support arm.
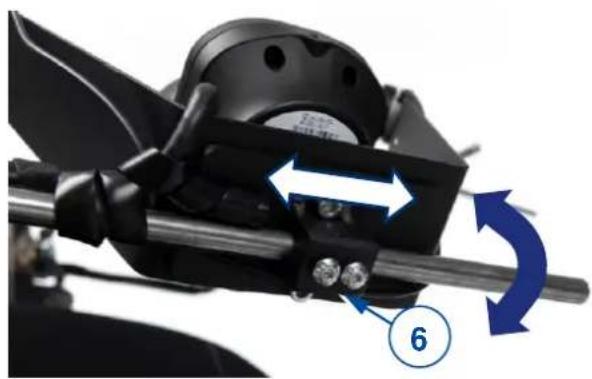
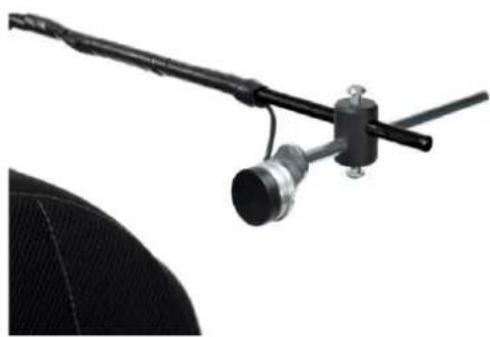
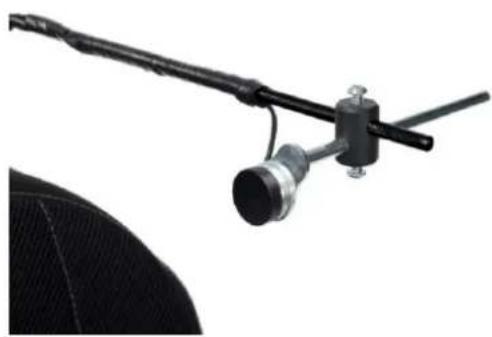
4.10.2 Adjusting the horizontal position
The horizontal position of the chin controller can be altered in two ways.
The chin controller itself:
- Loosen both screws (6) on the bottom of the chin controller.
- Move the chin controller sideways on the support arm until the desired position is reached.
- Turn the chin controller forwards/backwards until the desired position is reached.
natural_image
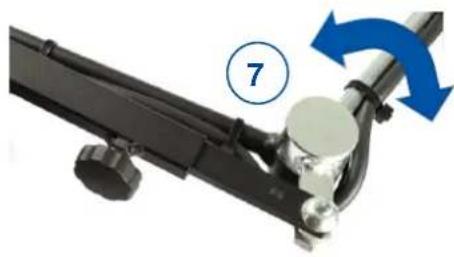
Mechanical assembly diagram showing a rotating component with blue directional arrows and numbered label (6), no readable text or symbols present.The complete chin controller:
- Manually: Turn the complete chin controller support inward/outward by means of the hinge (7).
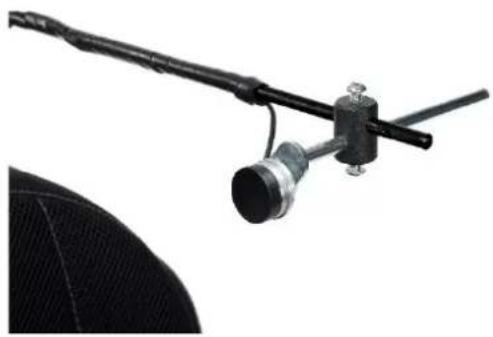
natural_image
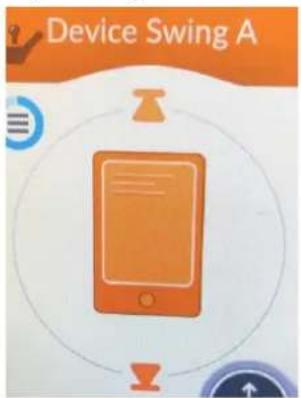
Mechanical component with numbered callout (7) and blue directional arrow, no readable text or symbols- Electrically: Push the separate controller button to activate the motor and move the chin controller support inward/outward. The LCD display shows that the controller support is being moved.

natural_image
Close-up of a black mechanical device with a cylindrical component and attached rod, against a white background (no text or symbols visible)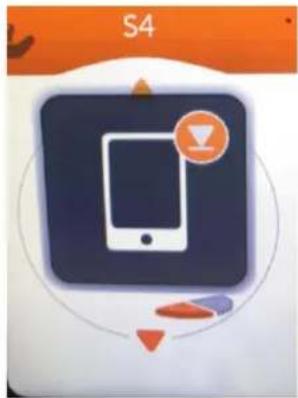
natural_image
Icon of a smartphone with a notification badge and surrounding abstract shapes (no text or symbols)
5 Troubleshooting

WARNING
Risk of injuries and damage to the operating console or wheelchair
- NEVER attempt to repair the operating console yourself.
- For failures of the operating console, you need to contact your specialist dealer.
He/She decides if the console needs to be reprogrammed.
In case of failure, a fault code is displayed by the blinking LED in the ON-OFF button or by a triangle on the touch screen, see Figure 4.
The following table summarises the possible fault codes. Some problems can be solved by yourself. For all problems marked in grey, consult your specialist dealer.
Table 2: Troubleshooting
| Code | Problem | Meaning |
| 1 | Remote / joystick failure | Verify that the joystick is in the neutral position when switching ON the operating console.Check the joystick: not damaged and working properly. |
| 2 | Network or configuration failure | 1. Check all connection points and cables.2. Verify the correct working of the software.If you cannot find any fault, contact your specialist dealer. |
| 3 | Left motor (or its connection) is defective. | 1. Verify whether the plugs of both motors have been inserted properly.2. Check the plug contacts of both motors for corrosion or damage.This fault also appears when the motors are disconnected. Connect again and restart the system. |
| 4 | Right motor (or its connection) is defective. | As described above. |
| 5 | Left parking brake (or its connection) is defective or neutral active. | 1. Verify whether the motors' plugs have been inserted properly.2. Check the plugs for corrosion or damage. |
| 6 | Right parking brake (or its connection) Is defective. | As described above. |
| 7 | Module failure (other than Remote) | One of the wheelchair parts may be damaged except the operator control. |
Table des matières
natural_image
Close-up of a black electronic device with a 3-pin connector and numbered label (9), no visible text or symbols beyond the number.natural_image
Close-up of a black remote control with white icons and directional arrows, overlaid on a yellow circular background (no text or symbols)natural_image
Illustration of a bed with orange bedding and a blue circular icon showing a person walking (no text or symbols)natural_image
Illustration of a stylized orange and gray object with directional arrows, set against a light background (no text or symbols)natural_image
Illustration of an orange chair with a blue circular icon showing a finger pointing at it (no text or symbols)natural_image
Illustration of a chair inside a circular frame with directional arrows and a compass icon (no text or symbols)natural_image
Illustration of a chair inside a circle with directional arrows and a small icon (no text or symbols)natural_image
Illustration of a chair with seat, legs, and footprints (no text or symbols)natural_image
Close-up of a black cable connector with a green circular component labeled '5' pointing to a metallic connector (no text or symbols beyond the label)4.10.2 Ajuster la position horizontale
natural_image
Mechanical assembly with rotating components and blue directional arrows indicating motion (no text or symbols)natural_image
Mechanical assembly with numbered component and blue directional arrow (no text or symbols)natural_image
Close-up of a black mechanical device with a cylindrical component and attached rod, against a white background (no text or symbols visible)
natural_image
Icon of a smartphone with a notification badge, surrounded by abstract shapes (no text or symbols)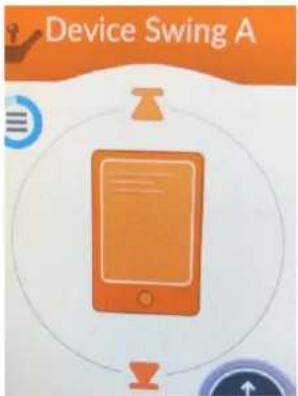
natural_image
Close-up of a black electronic device with a 9-pin connector and labeled pin (no text or symbols beyond the number)Figuur 7 Instellingsknop en pop-upscherm
4.5.2 Schermvergrendeling
natural_image
Close-up of a black remote control with white icons and directional arrows pointing to a yellow circular object (no text or symbols)natural_image
Illustration of a medical or anatomical structure with orange and blue gradient fill, no visible text or symbolsZithoogte (lift)
natural_image
Illustration of a stylized orange and gray object with directional arrows, set against a light background (no text or symbols)natural_image
Illustration of an orange chair with a blue directional arrow icon, no text or symbols presentnatural_image
Illustration of a chair with seatbelt and seat, set within a circular frame (no text or symbols)Beensteun links

natural_image
Illustration of a chair inside a circular frame with directional arrows and a small icon (no text or symbols)Beensteun rechts
natural_image
Illustration of a chair inside a circular frame with directional arrows and a small icon (no text or symbols)natural_image
Mechanical assembly diagram showing a rotating motor with blue directional arrows indicating rotational motion (no text or symbols)natural_image
Mechanical component with blue directional arrow and number 7 label (no readable text or symbols)
natural_image
Icon of a smartphone with a speech bubble and download symbol, no readable text or symbols present
natural_image
Close-up of a black mechanical device with a cylindrical sensor and attached rod, mounted on a flat surface (no visible text or symbols)5 Probleemoplossing

WAARSCHUWING
4.5.4 Einstellungen
natural_image
Close-up of a black remote control with white icons and directional arrows pointing to a yellow circular object (no text or symbols)natural_image
Illustration of a kitchen utensil with a blue tray and orange fill, no text or symbols presentSitzhöhe (Lift)
Rückenlehnenneigung
natural_image
Illustration of an orange chair with a blue circular icon showing a walking figure (no text or symbols)natural_image
Illustration of a chair inside a circular frame with directional arrows and a small icon (no text or symbols)Linke Fußablage
natural_image
Illustration of a chair with seat design and directional arrows, no text or symbols presentRechte Fußablage

natural_image
Illustration of a chair inside a circle with icons for cleaning, walking, and running (no text or symbols)natural_image
Close-up of a black handheld device with a green circular component and blue arrows pointing to a numbered label '5' (no text or symbols on the device itself)natural_image
Close-up of a mechanical device with blue directional arrows indicating motion or rotation, no visible text or symbolsnatural_image
Mechanical assembly with numbered component and blue directional arrow (no text or symbols)natural_image
Close-up of a black cable with a metallic connector and attached rod, against a white background (no text or symbols visible)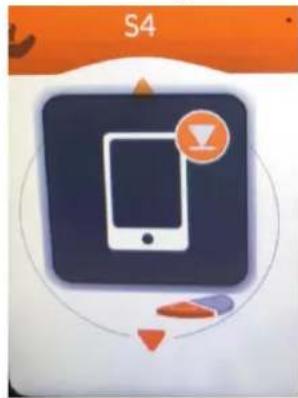
DE
natural_image
Close-up of a black electronic device with a labeled pin (9) pointing to its internal port (no text or symbols beyond the number)Figura 1 Componenti importanti (LiNX 400 touchscreen)


natural_image
Close-up of a black remote control with white signal icons and directional arrows pointing to a yellow circular interface (no text or symbols)natural_image
Illustration of a bed with orange bedding and a blue circular icon showing motion (no text or symbols)natural_image
Illustration of a water feature with orange blocks and directional arrows, no text or symbols presentnatural_image
Illustration of an orange chair with a blue circular icon below (no text or symbols)natural_image
Illustration of a chair with directional arrows and a small icon, no readable text or symbols present.natural_image
Illustration of a chair inside a circular frame with orange and purple accents, no text or symbols present.natural_image
Close-up of a mechanical assembly with blue directional arrows indicating motion or force, no visible text or symbolsnatural_image
Mechanical assembly diagram showing a lever mechanism with a numbered component (7) and blue directional arrow indicating motion (no text or symbols present)
natural_image
Close-up of a black mechanical device with a cylindrical component and attached rod, against a white background (no text or symbols visible)
natural_image
Illustration of a smartphone with a notification badge and circular loading control arrows (no text or symbols)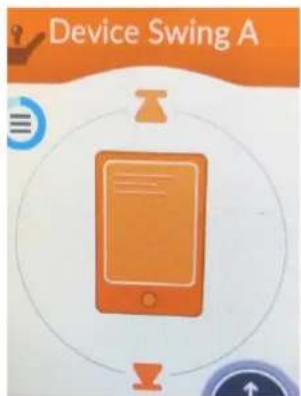
natural_image
Close-up of a black electronic device with a numbered component (9) pointing to a pinout on the surface (no text or symbols beyond label)Figura 1 Piezas importantes (pantalla Linx 400)

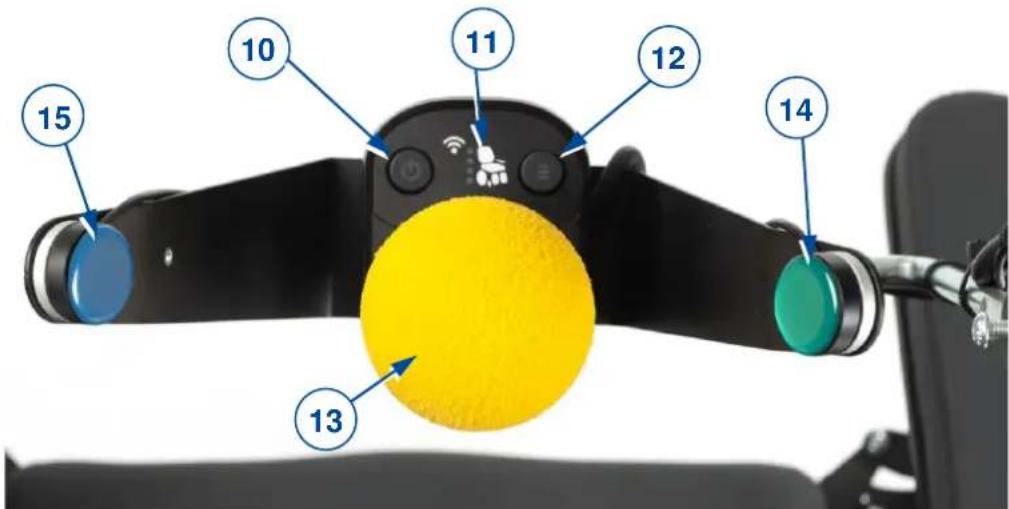
Figura 8 Ajustes de hora
Figura 10 Teclo del modo guante
4.5.4 Configuración
natural_image
Close-up of a black remote control with white icons and directional arrows, overlaid on a yellow circular background (no text or symbols)natural_image
Illustration of a medical or surgical device with orange and blue gradient sections, no visible text or symbolsnatural_image
Illustration of an orange chair with a blue circular icon showing a walking figure (no text or symbols)natural_image
Illustration of a chair inside a circular frame with directional arrows and a small icon (no text or symbols)natural_image
Illustration of a chair with seat, legs, and feet (no text or symbols)natural_image
Illustration of a chair inside a circular frame with directional arrows and a walking figure icon (no text or symbols)natural_image
Close-up of a black handheld device with a green circular component labeled '5' pointing to a connector (no text or symbols beyond the label)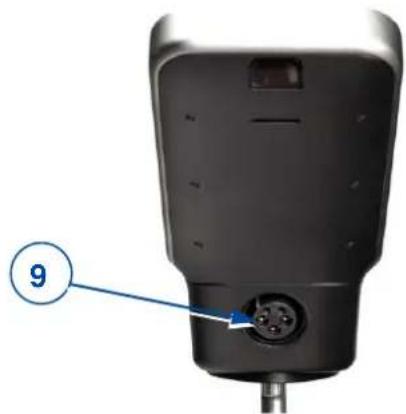
natural_image
Close-up of a black electronic device with a labeled pin (9) pointing to its internal port (no text or symbols beyond the label)natural_image
Close-up of a black remote control with a yellow circular interface and directional arrows (no text or symbols)natural_image
Illustration of a food item labeled S1 with a circular icon showing a person and a walking figure (no text or symbols on the food itself)natural_image
Illustration of a stylized orange book with geometric shapes and a circular icon (no text or symbols)Pochylenie oparcia

natural_image
Illustration of an orange chair with a blue circular icon below (no text or symbols)natural_image
Illustration of a chair inside a circular frame with directional arrows, no text or symbols present.natural_image
Illustration of a chair with seat and legs, no text or symbols presentnatural_image
Illustration of a chair with seat design and motion icons (no text or symbols)natural_image
Close-up of a mechanical device with blue directional arrows indicating motion or rotation, no visible text or symbolsKompletny kontroler podbródka:
natural_image
Mechanical assembly with numbered component and blue directional arrow (no text or symbols)
natural_image
Illustration of a smartphone with a circular icon and directional arrows, no readable text or symbols present.
natural_image
Close-up of a black cable with a metallic connector and attached cable, against a white background (no text or symbols visible)natural_image
Close-up of a black electronic device with a labeled port (9), no visible text or symbols beyond the number and arrow.natural_image
Close-up of a black remote control with white arrows pointing to a yellow circular interface (no text or symbols visible)natural_image
Illustration of a medical or surgical device with orange and blue gradient shading, no visible text or symbolsnatural_image
Illustration of a stylized orange book with geometric shapes and a circular icon (no text or symbols)Sklon opěradla
natural_image
Illustration of an orange chair with a blue circular icon below (no text or symbols)natural_image
Illustration of a chair with seat, legs, and a play button (no text or symbols)Pravá nožní opěrka
natural_image
Illustration of a chair with seatbelt and foot, set within a circular frame (no text or symbols)natural_image
Close-up of a mechanical device with a numbered component (5) and green circular badge, no visible text or symbols.natural_image
Mechanical assembly with rotating components and directional arrows (no text or symbols)
natural_image
Mechanical assembly with numbered component and blue directional arrow (no text or symbols)
natural_image
Icon of a smartphone with a notification badge, surrounded by abstract shapes (no text or symbols)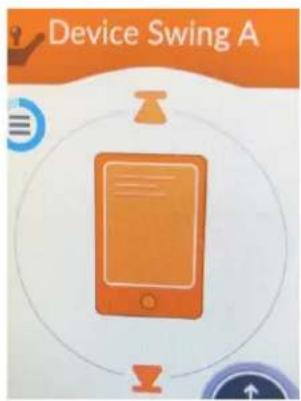
natural_image
Close-up of a black mechanical device with a cylindrical sensor and attached rod, mounted on a flat surface (no visible text or symbols)- EN
- Instructions for specialist dealer
- FR
- Content
- Content....1
- Preface....2
- Preface
- Important note
- Information available
- Description
- Before use
- WARNING
- Risk of injuries and damage
- General safety instructions
- Driving
- Operating console functions
- Switching ON / OFF
- Emergency stop
- Sleep mode
- Failures and blocks
- Battery status and charging
- Charging
- Navigation
- Settings button
- Time setting
- Screen lock
- Glove mode
- Settings
- Display
- Interaction
- Joystick operation (driving and braking)
- Operating console lock
- Adjusting your body position
- CAUTION
- Risk of injuries or damage
- Changing drive function
- Limited driving speed
- Adjusting the chin controller
- Adjusting the vertical position
- Adjusting the horizontal position
- The chin controller itself:
- The complete chin controller:
- Troubleshooting
- Table des matières
- Ajuster la position horizontale
- Schermvergrendeling
- Probleemoplossing
- WAARSCHUWING
- Einstellungen
- DE
- Configuración
- Kompletny kontroler podbródka:
Brand : Vermeiren
Model : Timix S.U.
Category : Wheelchair