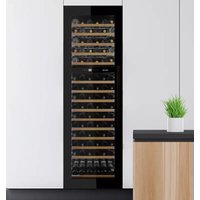
PVMAV 178-101 - Wine cellar Pando - Free user manual and instructions
Find the device manual for free PVMAV 178-101 Pando in PDF.


| Product Type | Built-in Wine Cellar |
| Brand | Pando |
| Model | PVMAV 178-101 |
| Bottle Capacity | 101 bottles (Bordeaux 0.75L, ∅76mm) |
| Number of Temperature Zones | 2 independent zones |
| Temperature Range | 5°C to 20°C (41°F to 68°F) |
| Dimensions (H x W x D) | 1784 x 595 x 559 mm (without handle) |
| Depth with handle | 599 mm |
| Built-in dimensions (H x W x D) | 1773 x 556 x 545 mm |
| Total storage volume | 285 L |
| Net weight | Not specified (estimated: approx 80 kg) |
| Power supply | 220-240 V~ / 50 Hz |
| Rated power | 160 W |
| Rated current | 1.4 A |
| Energy class (2021) | G |
| Annual energy consumption | 185 kWh/year |
| Refrigerant type | R600a (isobutane) |
| Noise level | 36 dB(A) |
| Number of removable beechwood shelves | 15 sliding shelves + 1 fixed |
| Door type | Tempered smoked triple-glazed glass, anti-UV |
| Door reversibility | Yes |
| Interior lighting | LED, white or blue, on/off switch |
| Special functions | DynaClima, silent mode, dimmable display, temperature and door alarm, memory function, automatic defrost |
| Active charcoal filter | Yes (annual replacement recommended) |
| Climate class | ST (16°C to 38°C) |
| Warranty | 3 years (parts and labor) |
Frequently Asked Questions - PVMAV 178-101 Pando
User questions about PVMAV 178-101 Pando
0 question about this device. Answer the ones you know or ask your own.
Ask a new question about this device
Download the instructions for your Wine cellar in PDF format for free! Find your manual PVMAV 178-101 - Pando and take your electronic device back in hand. On this page are published all the documents necessary for the use of your device. PVMAV 178-101 by Pando.
USER MANUAL PVMAV 178-101 Pando
natural_image
Modern kitchen interior with wooden cabinets, glass shelves, and a large window overlooking trees (no visible text or symbols)Integral WineCellar
Pando integralcooking
Español Português Français English Italiano Русский

Quality Management System Certification

ISO 14001:2015 - ES20/208675
Environmental Management System Certification
integralkitchensolutions
Images and content in this catalogue is of exclusive property of Pando- INOXPAN S.L, for which it is completely forbidden the use of images as well as total or partial reproduction without previous authorisation in written.
LAS IMÁGENES MOSTRADAS EN ESTE CATÁLOGO NO SON CONTRACTUALES.
THE IMAGES SHOWN IN THIS CATALOGUE ARE NOT CONTRACTUAL
Pando Technical Management reserves the right to modify, alter or improve any technical drawings exposed in this Catalogue with previous warning.
natural_image
Simple line drawing of a trash bin with no text or symbolsnatural_image
Interior view of a refrigerator with shelves stocked with wine bottles, showing internal wiring and ventilation system (no text or symbols visible)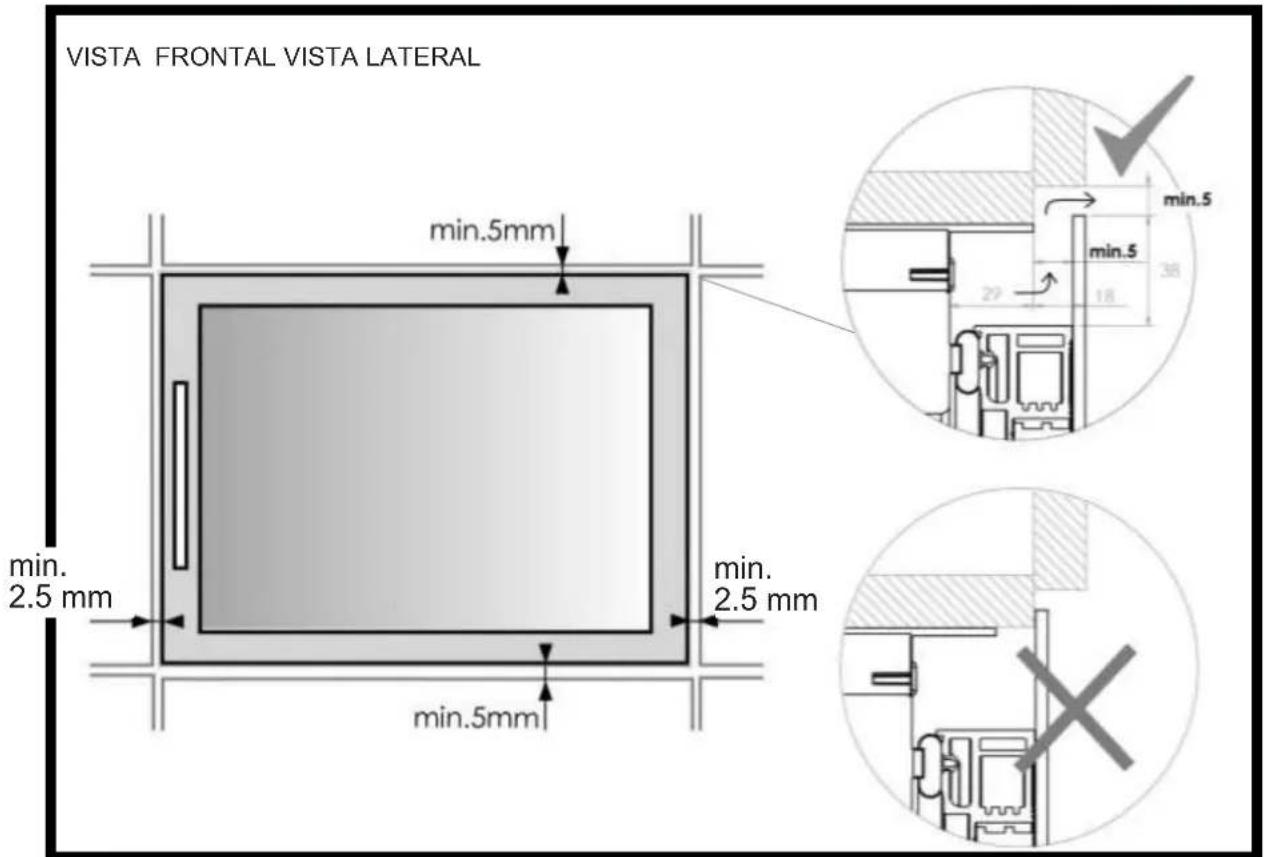

AVISO
natural_image
Technical line drawing showing two mechanical assembly steps with mounting holes and fasteners (no text or symbols)- PVMB 30-16
- PVMB 40-28
- PVMB 60-46CRR
- PVMBP 60-44
- PVMBP HD 40-25
• PVMBP HD 60-52
natural_image
Diagram of a cabinet with open door and shelf, showing internal components and arrows indicating movement (no text or symbols)• PVMAV 60-23 • PVMAVP 45-16
• PVMAV 88-45 • PVMAVP 60-23
• PVMAV 124-65 • PVMAVP 88-45
• PVMAV 178-101 • PVMAVP 124-65
• PVMAVP 178-101

natural_image
Shelves with glass domes and dark liquid, no visible text or symbols on the shelves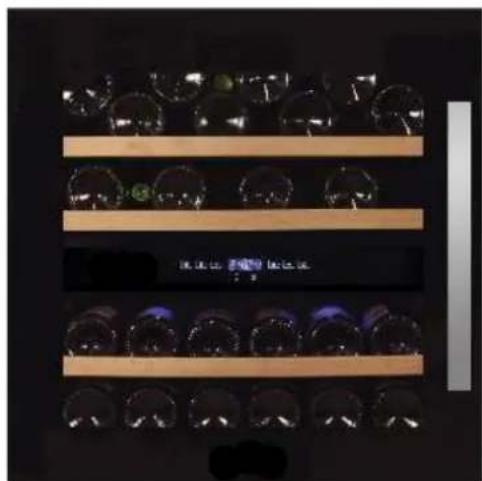
natural_image
Display shelf with glass domes and dark liquid, no visible text or symbolsAngulos Embellecedores

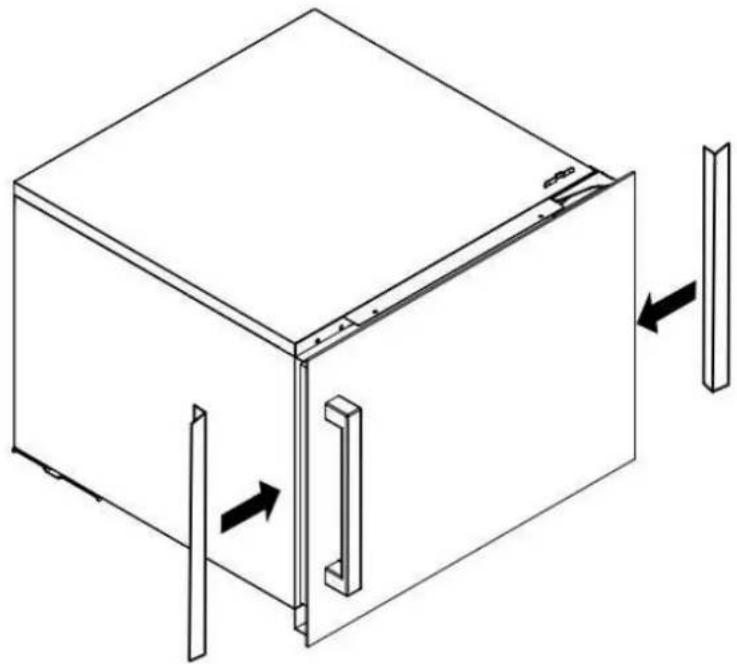
1
natural_image
Simple line drawing of a Y-shaped structure with a folded paper clip and a circular outline (no text or symbols)2
natural_image
Isometric line drawing of a 3D cube with internal structural components and directional arrows indicating movement (no text or symbols)natural_image
Hand pointing at a shelf with circular objects, no visible text or symbolsnatural_image
Simple line drawing of a rectangular frame with a circular hole and curved arrow inside (no text or symbols)Luz interior
natural_image
Technical line drawing of a mechanical device with an inset showing a close-up of the component (no text or symbols present)natural_image
Technical line drawing of a rack with a hand inserting a component, showing internal structure and directional arrows (no text or symbols)natural_image
Line drawing of a rectangular container placed on a wooden platform (no text or symbols)natural_image
Diagram of a circular grid pattern with bidirectional arrows on both sides (no text or symbols)https://www.pando.es/en/after-sales-services/
FR
natural_image
Simple line drawing of a trash bin with no text or symbolsnatural_image
Interior view of a dual-chamber refrigerator with shelves stocked with bottles, showing internal wiring and ventilation system (no text or symbols visible)VISTA FRONTAL
FRONTALVISTA LATERAL

AVISO
natural_image
Technical line drawing showing two mechanical assembly steps with mounting holes and fasteners (no text or symbols)- PVMB 30-16
- PVMB 40-28
- PVMB 60-46CRR
- PVMBP 60-44
- PVMBP HD 40-25
- PVMBP HD 60-52
natural_image
Diagram of a cabinet with open door and shelf, showing internal components and arrows indicating movement (no text or symbols)• PVMAV 60-23 • PVMAVP 45-16
• PVMAV 88-45 • PVMAVP 60-23
• PVMAV 124-65 • PVMAVP 88-45
• PVMAV 178-101 • PVMAVP 124-65
• PVMAVP 178-101

natural_image
Interior view of a multi-tiered storage unit with glass domes and wooden shelves (no visible text or symbols)
natural_image
Display shelf with multiple glass dominoes and dark liquid, no visible text or symbolsÂngulos de corte

1
natural_image
Simple line drawing of a Y-shaped structure with a folded paper clip and a circular outline (no text or symbols)2
natural_image
Isometric line drawing of a 3D rectangular box with internal vertical supports and directional arrows indicating movement (no text or symbols)natural_image
Hand pointing at a rack of circular objects, possibly cameras or storage units (no visible text or symbols)natural_image
Simple line drawing of a rectangular block with a circular hole and an arrow indicating rotation (no text or symbols)Luz interior
INTERIOR
natural_image
Technical line drawing of a server rack with an inset showing the internal structure (no text or symbols)natural_image
Technical line drawing of a rack-mounted device with a hand operating the rack and an inset showing a mechanical component (no text or symbols)natural_image
Line drawing of a rectangular basin placed on a wooden platform (no text or symbols)Limpeza da unidade
natural_image
Diagram of a circular grid pattern with directional arrows on both sides (no text or symbols)Falhas de energia
https://www.pando.es/en/after-sales-services/
FR
natural_image
Simple line drawing of a trash bin with crossed lines indicating no waste or restriction (no text or symbols)FICHES DE DONNÉES ....145
GARATIE....150
DIAGRAMMES D'INSTALLATION ET DIMENSIONS....296
DISTRIBUTION DE BOUTEILLES....312
MESURES DE SÉCURITÉ
CARACTÉRISTIQUES DU PRODUIT
natural_image
Technical line drawing showing two mechanical assembly steps with mounting holes and fasteners (no text or symbols)- PVMB 30-16
- PVMB 40-28
- PVMB 60-46CRR
- PVMBP 60-44
- PVMBP HD 40-25
- PVMBP HD 60-52
natural_image
Line drawing of a cabinet with open door and shelf, showing internal shelves and arrows indicating movement (no text or symbols)• PVMAV 60-23 • PVMAVP 45-16
• PVMAV 88-45 • PVMAVP 60-23
• PVMAV 124-65 • PVMAVP 88-45
• PVMAV 178-101 • PVMAVP 124-65
- PVMAVP 178-101

natural_image
Display shelf with multiple glass dominoes and a dark screen showing Chinese text (no readable document content)
natural_image
Display shelf with dark glass domes and a central display showing Chinese text (no readable document text in image)Angles de garniture

natural_image
Diagram of a Y-shaped structure with a label '1' and an arrow indicating rotation, enclosed in a circle (no text or symbols on the diagram itself)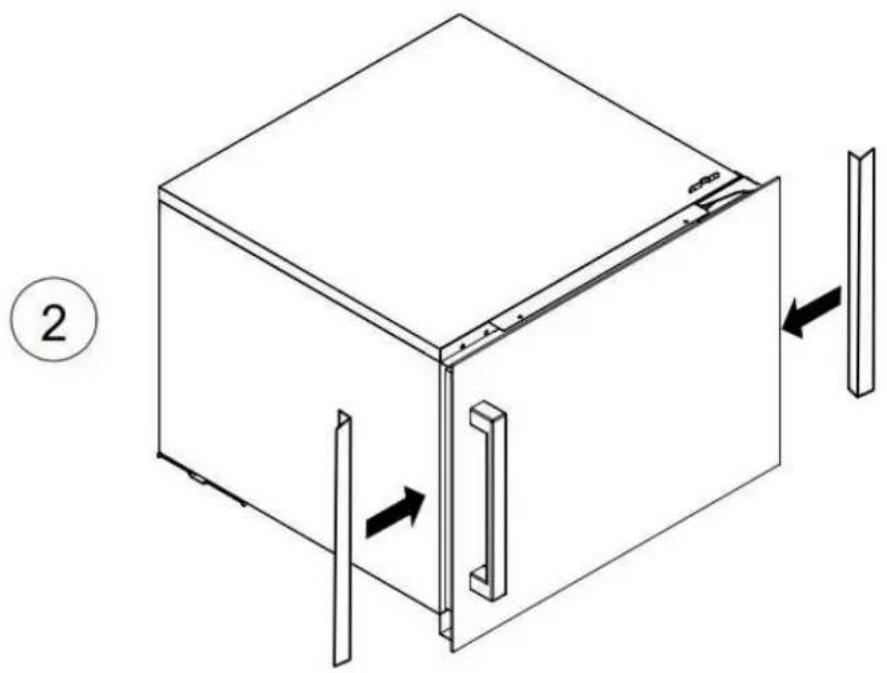
natural_image
Isometric line drawing of a 3D cube with internal components and directional arrows indicating movement (no text or symbols)MODE D'EMPLOI
Mode anti-condensation
natural_image
Hand pointing at a rack of circular objects, possibly bottles or containers, with no visible text or symbols on the objects themselves.natural_image
Simple line drawing of a rectangular frame with a circular hole and curved arrow indicating rotation (no text or symbols)Eclairage intérieur
INTÉRIEUR
natural_image
Technical line drawing of a metal shelving unit with an arrow indicating direction (no text or symbols)VOIR DÉTAIL IMAGE B
natural_image
Technical line drawing of a server rack with an inset showing the internal structure (no text or symbols)Image de détail - B
natural_image
Technical line drawing of a rack-mounted device with a hand operating the frame, showing internal structure and a magnified inset (no text or symbols)natural_image
Line drawing of a rectangular container placed on a wooden platform (no text or symbols)Nettoyage appareli
natural_image
Diagram of a circular grid pattern with bidirectional arrows on both sides (no text or symbols)QUESTIONS QUESTIONS FRÉQUEMMENT POSÉES
https://www.pando.es/en/after-sales-services/
FR
Pando reserves the right to change or cancel any measures of the articles in the manual without prior notice, without affecting the essential characteristics of functionality and safety, and is not responsible for any errors or omissions that may occur in the manual.
Technical specifications valid except for typographical errors, omission, or printing. The images and content of this manual are the exclusive property of Pando - INOXPAN S.L., and any appropriation of images and total or partial reproduction without prior written authorization is strictly prohibited.
THE IMAGES SHOWN IN THIS MANUAL ARE NOT CONTRACTUAL.
Pando's Technical Management reserves the right to modify, alter, or improve the technical drawings displayed in this manual without prior notice.
The paper version of this manual cannot be updated in real-time, to ensure the latest version of your product's instructions, we recommend consulting the digital version at www.pando.es
First of all, we would like to thank you for the trust you have placed in our company by purchasing one of our products.
For purchasing one of our products. We are sure that you have made the right decision.
At Pando, not only do we offer top quality products, but we also have a large team of professionals who will help you and advise you on any queries you may have during installation or operation.
To get to know us better, we invite you to visit our website (www.pando.es) where you can see our full range of products with the most up to date commercial and technical information.
Here you will find a wide selection of Decorative Hoods; wall-mounted, ceiling-mounted, island, integrated into furniture and integrated into the hob.
This variety allows us to adapt to any style of kitchen.
We also show you our collection of essential appliances in any home.
Appliances such as our collection of high-performance Ovens and Microwaves with high performance, Induction and Gas Hobs that will help you to make the best recipes, Wine Cellars and Ageing Cellars to maintain and preserve your wines in the best conditions, Dishwashers with the most modern technology and our with the most up-to-date technology and our range of Refrigerators and Freezers with Freezers and Refrigerators for panel integration together with those for free installation.
All this under a brand with a very long trajectory of more than 40 years in the sector, which manufactures its products as a sector, which manufactures its products like a true craftsman. Bringing the best of our experience to everything we do.
We sincerely hope you have fun, experience and enjoy the comfort and capabilities of what is already your new capabilities of what is already your new kitchen ally.
Muchas gracias
El equipo de Pando
ENVIRONMENTAL PROTECTION
The symbol on the product or its packaging indicates that this product cannot be disposed of like normal domestic waste. The product must be handed over at a collection point for recycling electrical and electronic equipment. If you ensure that this product is correctly disposed of, you will help to avoid the possible negative environmental and public health effects that could arise from incorrect disposal. For more detailed information about recycling this product, please contact your city authorities, the domestic waste service or the establishment where you purchased it. This electrical appliance is marked in compliance with European Directive 2012/19/EU on electrical and electronic appliance waste (WEEE).
COLLECTION OF
HOUSEHOLD APPLIANCES
natural_image
Simple line drawing of a trash bin with no text or symbols
ENVIRONMENTAL PROTECTION AND WASTE TREATMENT
DISPOSAL OF THE PACKAGING. The packaging is marked with in Green Dot.
In its commitment to the protection of the environment and in compliance with the provisions of the European Directive 94/62 / EC on packaging and packaging waste and the derived Law 22/2011 on Contaminated Residues and Soils, Pando entrusts entities of social economy an Integrated Management System, responsible for the periodic collection at the consumer's home or in its vicinity of used packaging and packaging waste for subsequent treatment.
To remove all packaging materials such as cardboard, expanded polyurethane, and film, use the appropriate containers.
This ensures the correct treatment and reuse of packaging materials.
INDEX
SECURITY MEASURES....155
PRODUCT FEATURES....160
INSTALLATION....161
BEFORE USING THE APPLIANCE 161
INSTALLATION 161
UNDER-WORKTOP MOUNTING INSTRUCTIONS 163
INTEGRATED ASSEMBLY INSTRUCTIONS....164
ELECTRICAL CONNECTION....165
HANDLE INSTALLATION....165
FIXING AND SECURING THE UNIT TO THE FURNITURE....166
REVERSIBLE DOOR....167
OPERATING INSTRUCTIONS....169
USE AND OPERATION OF THE CONTROL PANEL/....170
DISPLAY....170
DISPLAY AN AREA....170
DUAL ZONE DISPLAY....171
CONFIGURATION MODE 174
Screen Brightness....174
Indoor Lighting 174
Fan mode....174
Audible Tones....175
Temperature Display....175
Temperature Memory Function 175
Temperature Alarm 175
Door Alarm....176
Dynclima / Silent Mode ....176
Display Off Mode 177
Eco Demo Mode....177
AUTOMATIC PUSH-TO-OPEN FUNCTION....178
CARE AND MAINTENANCE....184
PROBLEM SOLVING....189
FREQUENTLY ASKED QUESTIONS ....192
DATA SHEETS....194
GUARANTEE....199
INSTALLATION DIAGRAMS AND DIMENSIONS....296
BOTTLE DISTRIBUTION 312
SECURITYMEASURES
When using an electrical appliance, there are certain precautions that must be followed to reduce the risk of fire, electric shock and injury to persons, including the following:
FOR YOUR SAFETY
Read the instructions carefully, even if you are very familiar with the appliance.
- The appliance is intended to be used for the storage of wine. Use this appliance only as described in this manual. Other non-recommended uses may cause fire, electric shock or personal injury.
- This appliance can be used by children aged from 8 years and above and persons with reduced physical, sensory or mental capabilities or lack of experience and knowledge if they have been given supervision or instruction concerning use of the appliance in a understand the hazards involved. Children should not play with the appliance. Cleaning and maintenance shall not be made by children without supervision.
- In accordance with IEC standards: This appliance is not intended for use by persons (including children) with reduced physical, sensory or mental capabilities, or lack of experience and knowledge, unless they have been given supervision or instruction concerning use of the appliance by a person responsible for their safety. Children should be supervised to ensure that they do not play with the appliance.
- lectrical appliances are not toys. Always keep the device out of the reach of children. Keep the mains cord out of the reach of children. Do not let the mains cord hang over the edge of the table or worktop where the appliance is placed.
- Children between the ages of 3 to 8 years are allowed to carry and unload refrigeration equipment.
- To protect against the risk of electric shock, DO NOT PLUNK unit, cord or plug in water or spray any other liquid.
- Unplug appliances from the wall socket when not in use, when moving from one place to another and before cleaning.
- To disconnect the appliance, grasp the plug and pull it out of the wall socket. Never pull on the cord.

WARNING: Please keep the appliance away from substances, which may cause ignition. Do not operate the appliance in the presence of explosive and/or flammable gases.

- Do not place the appliance or any of its parts near a naked flame. open fireplace, cooker or other heating appliance
- Do not operate the appliance with a damaged cord or plug, if the product is not working, or if it has been dropped or damaged in any way. If the power supply cord is damaged, it must be replaced by the manufacturer or its service agent or similarly qualified persons in order to avoid a hazard.
- The use of accessories not recommended by the manufacturer can be dangerous.
- Place the unit on a dry, level surface.
- Do not operate if the housing is removed or damaged.
- A poor connection between the AC mains (wall) socket and the plug may cause overheating and deformation of the plug. Contact a qualified electrician to replace the wall socket if it is loose or damaged.
- Place the unit away from direct sunlight and heat sources (stove, heater, radiator, etc.).
- WARNING: This appliance is free of CFC and HFC gases and contains small amounts of isobutane (R600a), which is environmentally friendly but flammable. It does not damage the ozone layer, nor will it cause damage to the ozone layer. increase the greenhouse effect. Care must be taken during transport and commissioning of the machine to ensure that no parts of the cooling system are damaged. Leaking coolant can ignite and can damage the eyes.
In the event of damage:
- Avoid open flames and anything that creates a spark.
- Disconnect from the mains
- Air the room in which the appliance is located for several minutes and contact the Technical Support Service for advice.
In the event of refrigerant leakage, if the appliance is located in a small room, there is a danger that combustible gases will spread through the room. For every 8 g of refrigerant, at least 1 cubic metre of room space is required. The amount of refrigerant in the appliance is indicated on the rating plate inside the appliance. It is dangerous for anyone other than an authorised service technician to service or repair this appliance.
WARNING: Keep the ventilation openings, on the appliance or of the integrated structure, free of obstructions. No liability will be accepted for any damage incurred as a result of misuse of the appliance or as a result of repairs carried out by unqualified personnel. In this case neither the warranty nor any other liability claims will be valid.
WARNING: Do not use mechanical devices or other means to accelerate the defrosting process other than those recommended by the manufacturer. WARNING: Do not damage the refrigerant circuit. Never use an appliance with a damaged circuit.
WARNING: Do not use any electrical appliances inside the food compartment of the appliance unless they are of a type recommended by the manufacturer.
WARNING: In order to avoid danger due to the instability of the apparatus, it is imperative that you do not use any of the following The vehicle must be fixed in accordance with the instructions.
CAUTION: Please keep the products away from fire or abrasive substances before installing the cooler.
WARNING: DO NOT store explosive substances such as aerobic cans.
The flammable propellant used in this appliance must not be used with a flammable propellant in this appliance.
WARNING: When installing the appliance, make sure that the power cord is not trapped or damaged.
WARNING: Do not locate portable outlets, extension cords or portable power sources on the back of the unit.
To avoid contamination of stored products, observe the following instructions:
- Opening the door for prolonged periods of time can lead to an increase in The temperature in the compartments of the appliance shall be significantly reduced.
- Regularly clean surfaces which may come into contact with accidental spillage of liquids.
- If the refrigeration appliance is left empty for extended periods of time, turn off, defrost, clean, dry and leave the door open to prevent mould and mildew from forming in the appliance.
- The wine cooler is not intended for food storage. The recommended use is for the preservation of bottled liquids.
- This appliance is intended for DOMESTIC use and is NOT recommended for INDUSTRIAL use.
- Do not attempt to repair or replace any part of this product unless specifically recommended in this manual. Any other service should be performed by a qualified technician.
- Replace all panels after servicing before commissioning.
- Use two or more people to move and install the appliance. Failure to do so may damage your back and/or cause other injuries.
- Never clean parts of this appliance with flammable liquids. Their fumes may cause a risk of fire or explosion. And do not store or use gasoline or other flammable liquids in the vicinity. Their fumes may cause fire or accidental explosion.
- Do not connect or disconnect the electrical plug with wet hands.
- A separate circuit, serving your appliance only, is recommended. Use mains sockets that cannot be switched off with a switch.
- If you have a locking device, do not keep the key near the appliance or within reach of children.
WARNING: To reduce the risk of fire, electric shock or personal injury, unplug or disconnect the appliance from the power supply before servicing.
KEEP THESE INSTRUCTIONS
If you are experiencing problems, refer to the Troubleshooting Guide at the back of this manual. It lists the causes of minor operating problems, which are self-correctable.
PACKAGING AND END-OF-LIFE
The packaging of the appliance must be disposed of properly. Make sure that plastic wrappings, bags, etc. are disposed of in a safe manner and kept out of the reach of babies and small children.
Choking hazard!
Refrigeration equipment must be disposed of properly in a professional and appropriate manner, in accordance with current local regulations and laws protecting the environment. This applies to unserviceable devices and also for your new unit once it has reached the end of its service life.
WARNING: Ensure that old used appliances cannot be used after disposal by removing the doors, removing the plug, cutting the mains cable, and disposing of the appliance.
or destruction of any spring-loaded fasteners or screws. This will prevent children from being trapped in the appliance during play (risk of suffocation) or otherwise endangering their lives. DO NOT dispose of the appliance in landfills with the insulation (cyclopentene) and refrigerant gas (R600a) contained in these appliances, as they are flammable.
DISPOSAL INSTRUCTIONS:
- The appliance must not be disposed of with normal household waste or rubbish.
- The cooling circuit, in particular the heat exchanger at the rear / bottom of the unit, must not be damaged.
CHARACTERISTICS OF THE PRODUCT
- Equipped with separate shelf installation with one, two or three temperature zones, depending on the model.
- Electronic variable temperature control with digital display and touch input.
- The temperature can be set from 5^ to 20^ (41°F to 68°F) in either compartment and can be displayed in degrees Fahrenheit or degrees Celsius.
- It can be set for long term storage temperature of or at specific serving temperature for red / white / sparkling wines.
- Cooling and heating to maintain perfect storage and / or on condition of service.
- Dynamic cooling compressor to ensure indoor air circulation with uniform temperature and humidity distribution.
- Blue LED light inside with ON/OFF switch. Operating mode and mode shop window.
- Malfunction alarm system for open door.
- The "DISPLAY OFF" sleep mode will allow the indicator lights (dis-plays), interior light and audible alarms to be switched off. Pre-existing cooling operations will continue to function normally.
- Temperature memory function - If the power supply is interrupted (power surge, switch off, etc.) and then switched on again, the unit will operate at the last selected temperature.
• Automatic defrosting with evaporation of defrost water. - Reversible, triple-pane, smoked, tempered glass door protects the wine from UV light and creates an attractive presentation with low condensation and low noise level.
- The matt black coated steel outer frame with a black inner lining offers high performance, durability and stability. This black coating prevents excessive light from damaging the maturation process.
- Glass door with optional stainless steel frame and stainless steel knob.
- Optional outward sliding shelves made of varnished, adjustable solid beech for maximum convenience and flexibility to accommodate different bottle sizes.
- Environmentally friendly refrigerant with foam insulation.
- Optional Humidity Control System (Water Tank)
NOTE: Features and specifications are subject to change without notice.
INSTALLATION
BEFORE USING THE DEVICE
- Remove all outer and inner packaging. Clean the inside surface with warm water and a soft cloth. The unit may have residual odours at first, these will disappear as the unit cools down.
- Before connecting the appliance to the mains, allow it to stand upright for at least 24 hours. This will reduce the possibility of a malfunction in the cooling system caused by handling during transport. During this time, it is recommended that you leave the door open to eliminate any residual odours.
- The door of this appliance can be opened from either the left or the right. The unit is delivered with the door opening on the left side. If you wish to open the door from the right, follow the instructions "Reverse door hinge".
- Modify the door handle if necessary.
INSTALLATION
INSTALLATION DRAWINGS AND DIMENSIONS, SEE END PAGES OF THE MANUAL.
- The devices are designed to be built-in, flush-mounted or free-standing.
- WARNING: Do not store or install the appliance outdoors. The unit is for indoor use.
- WARNING: Do not install the appliance in the laundry room. Avoid locating the unit in damp areas.
- Place the unit on a floor that is strong enough to support its weight when fully loaded. To level the unit, adjust the front leveling foot on the bottom of the unit.
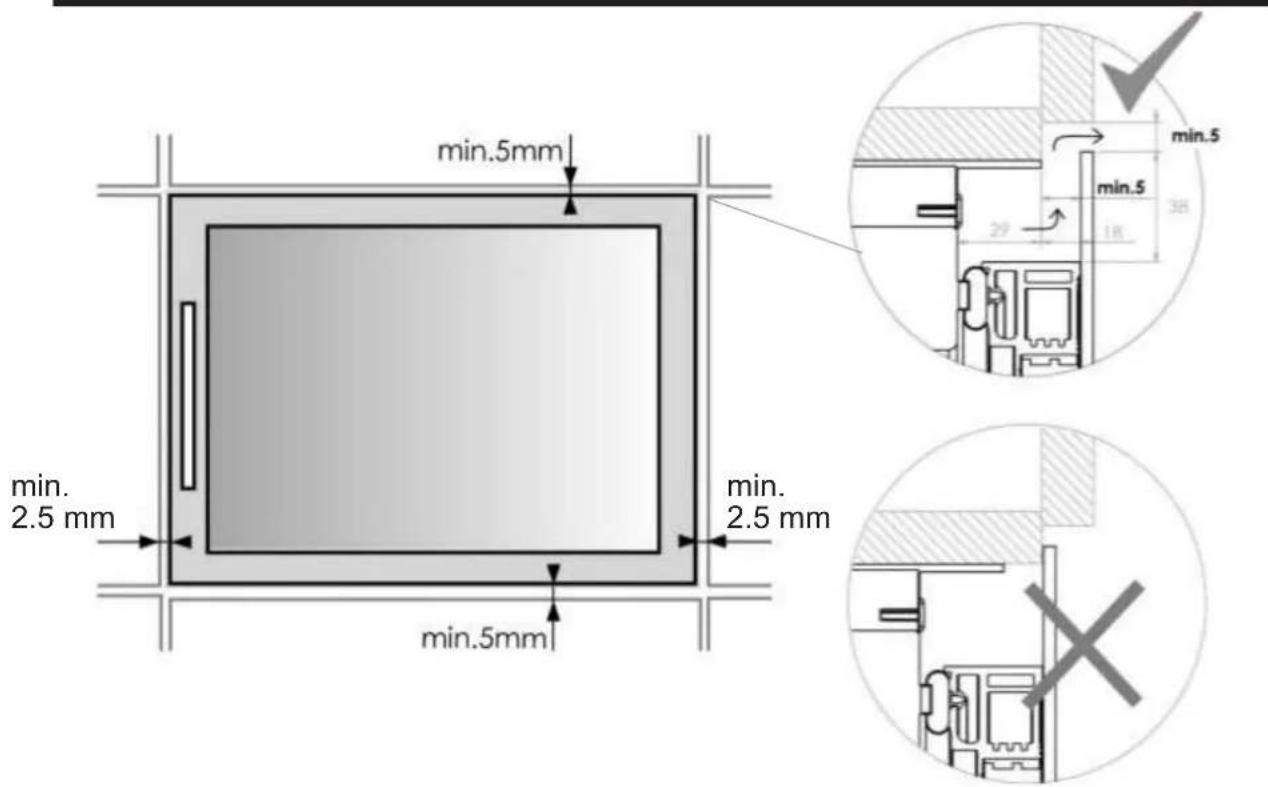
- For free-standing installation, 100 mm of space is required between the back and sides of the unit to allow for the air circulation necessary to cool the compressor and condenser, thus saving energy. Even for built-in installation, it is necessary to maintain a 5 mm space on each side and at the top to ensure proper access and ventilation. Take care that the air outlet at the front of the unit is not covered or blocked in any way.
- Place the unit out of direct sunlight and away from heat sources (cooker, heater, radiator, etc.). Direct sunlight can affect the acrylic coating and its heating can increase power consumption. Extremely cold ambient temperatures may also cause the unit to malfunction.
- Connect the appliance to a dedicated, easily accessible outlet. Any questions regarding power and/or grounding should be directed to a qualified electrician or an authorized service centre.
- The appliance must be installed with all electrical, plumbing, water and drain connections in accordance with state and local codes.
IMPORTANT: HIGH HUMIDITY CLIMATE
During periods of high humidity, some condensation may appear on the outer surfaces of the glass door. This condensation will disappear when the humidity levels drop. For prevention, it is advisable to install the appliance with sufficient ventilation in a place with dry air and/or air conditioning.
NOTE: The appliance must be positioned so that the plug is accessible.
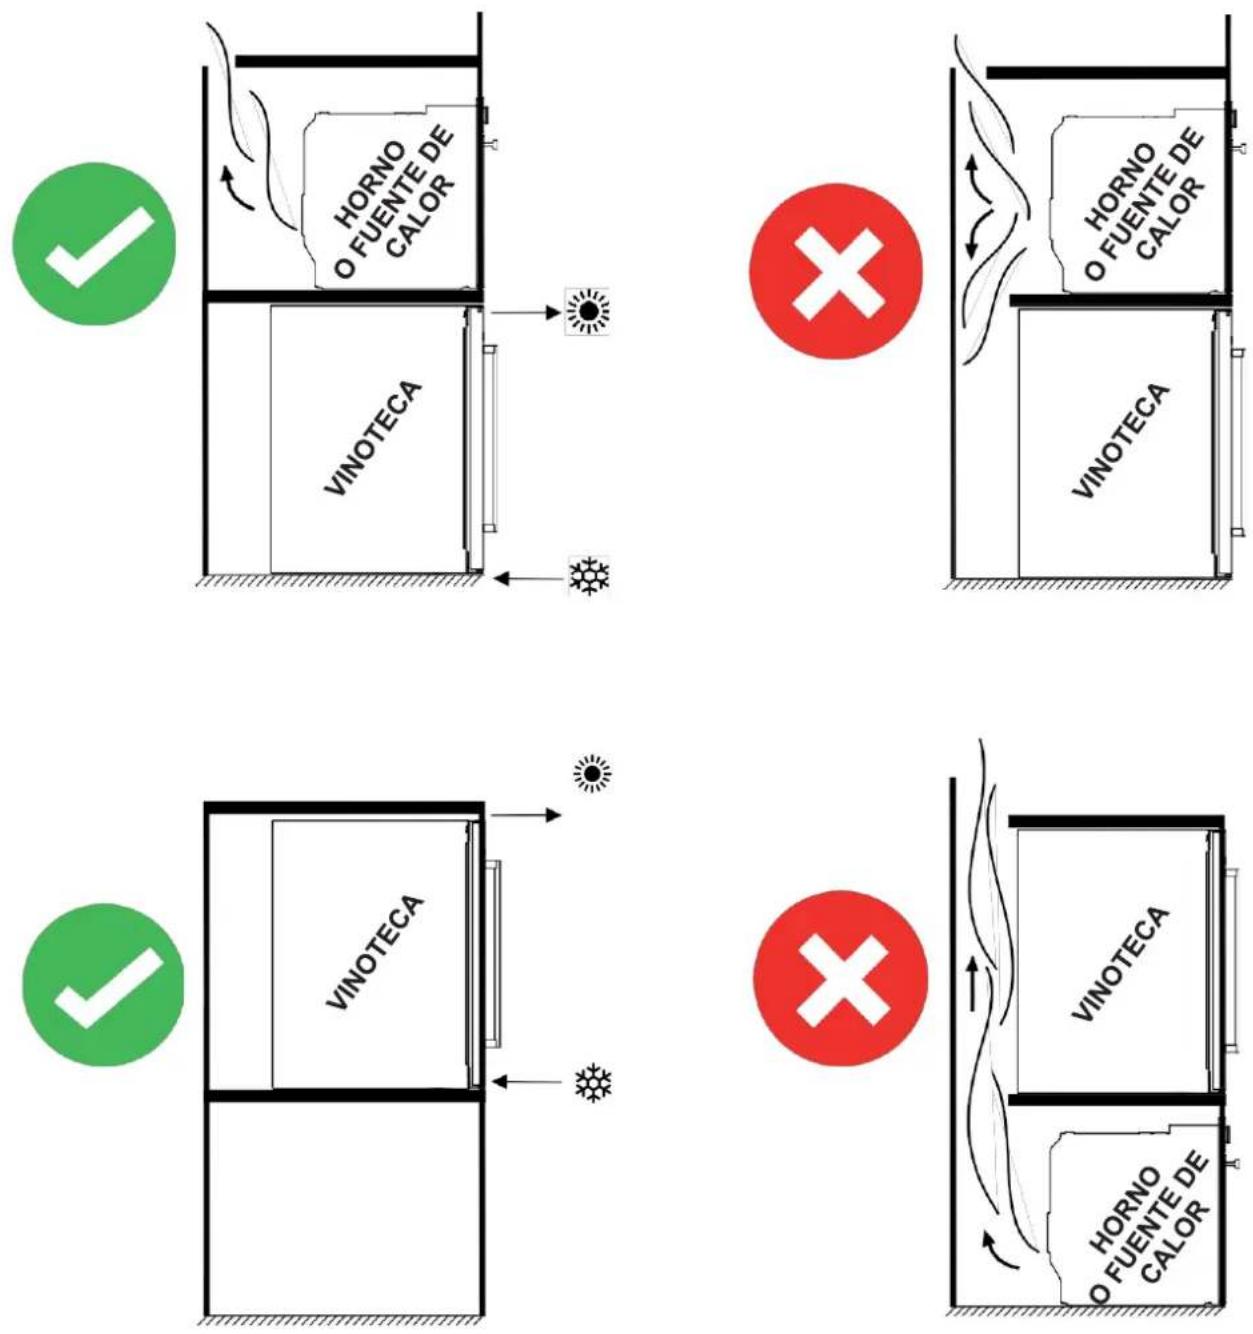
Installation Of Various Household Appliances
ATTENTION: INSTALLATION OF SEVERAL APPLIANCES WITH SHARED VENTILATION:
Please note that if the wine cooler is installed in furniture where there are other heat emitting appliances, the necessary ventilation and insulation measures must be taken so that the heat from these other appliances does not communicate with or directly affect any part of the wine cooler. Inappropriate insulation and ventilation could cause malfunction or breakdown of the wine cooler, or damage to the furniture, which would NOT be covered by the manufacturer's warranty.
ASSEMBLY INSTRUCTIONS UNDER WORKTOP
For models only:
- PVMB 30-16
- PVMB 40-28
- PVMB 60-46CRR
- PVMBP 60-44
- PVMBP HD 40-25
- PVMBP HD 60-52
Ensure that your installation does not block the front ventilation grille. The unit is designed to fit under worktops between 820 and 890mm high, using the adjustable vent to ensure that the feet are hidden from front view. Remove the screws from the adjustable ventilation grille and slide it to the required height. Tighten the screws to secure the grille in position.
If the unit is installed fully integrated, for kitchen plinth mounting, make sure that the ventilation grilles in the plinth can dissipate at least 300 square centimetres so that the hot air can disperse unhindered. Otherwise, the appliance has to work harder, which leads to an increase in electricity consumption.
And also make sure that the door will open and close correctly at the chosen location.
NOTE: When pushing the appliance into the socket, make sure that the power cord is not trapped.
ASSEMBLY INSTRUCTIONS INTEGRATED
For models only:
• PVMAV 60-23 • PVMAVP 45-16
• PVMAV 88-45 • PVMAVP 60-23
• PVMAV 124-65 • PVMAVP 88-45
• PVMAV 178-101 • PVMAVP 124-65
• PVMAVP 178-101
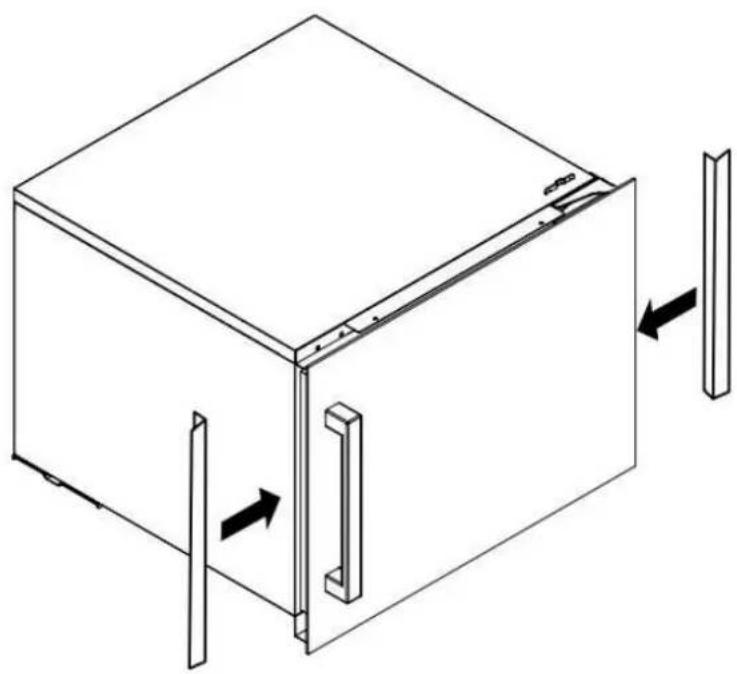
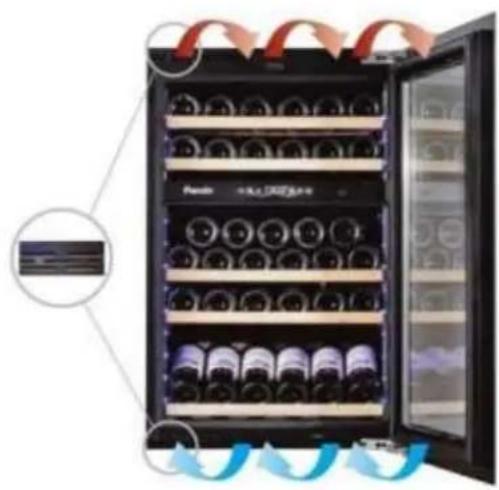
These models are equipped with an exclusive Pando integrated ventilation system, see picture.
They incorporate a ventilation system at the top and bottom front, invisible when the door of the unit is closed.
Do not cover or obstruct the grilles, keep them clean for the free passage of air.
They can be mounted directly in the niche of the cabinet/column, without the need for vents in the cabinet.
natural_image
Interior view of a refrigerator with rows of wine bottles and blue airflow indicators (no text or symbols)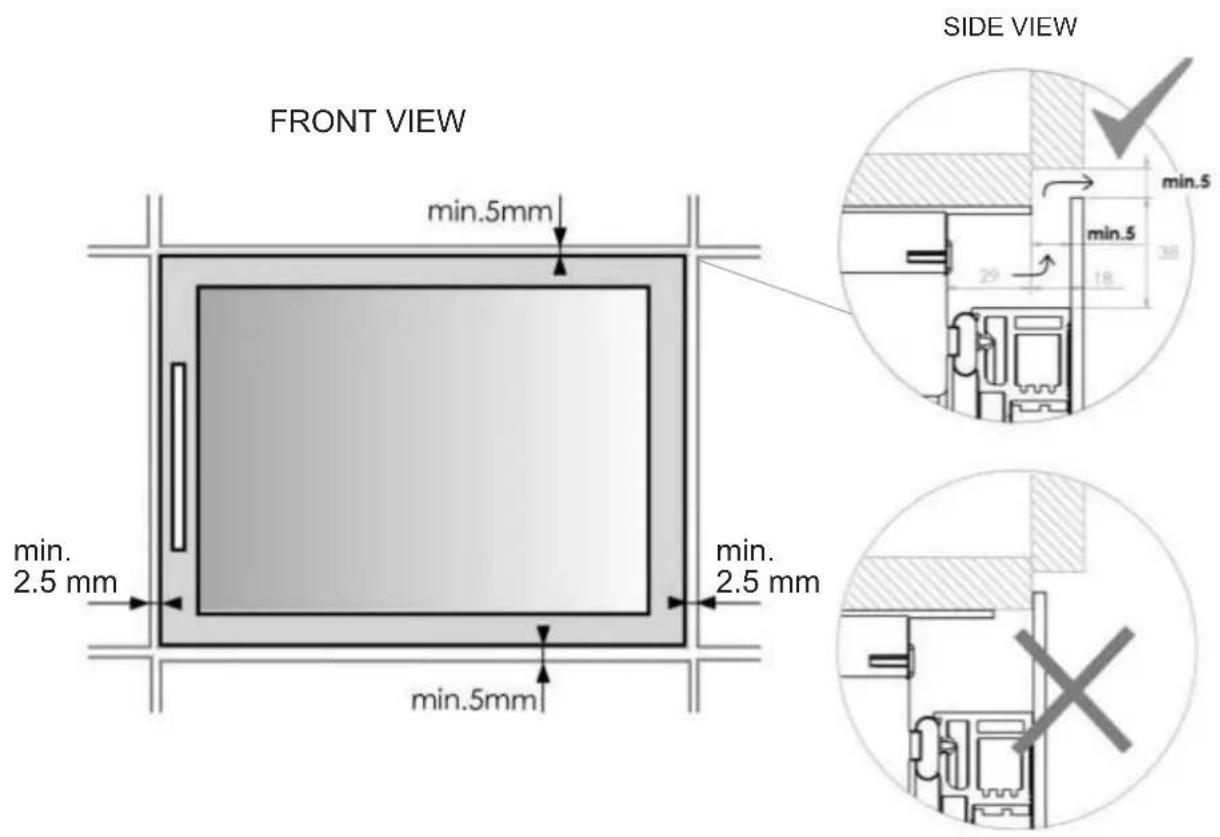

NOTICE
Respect the minimum measures of front ventilation in perimeter and bottom (5mm), to avoid malfunctions or breakdowns in the product that would NOT be covered by the warranty.
FOR INSTALLATION, PLEASE REFER TO THE DETAILED DRAWINGS AT THE END OF THE MANUAL.
CONNECTION ELECTRICA
WARNING: Incorrect use of the earth connection may result in a risk of electric shock. If the mains cable is damaged, it must be replaced by a qualified electrician or an authorised service centre.
All electrical work must be carried out by a qualified professional in accordance with local and national safety regulations.
Check that the voltage indicated on the product corresponds to the supply voltage of your installation.
Connect the device separately to a mains socket that can withstand 13A.
The connection must be made via a suitable, easily accessible socket outlet. For safety reasons it is advisable to install a residual current device (RCD) with a tripping current of 30 mA.
Have the appliance and circuit checked by a qualified electrician to ensure that the outlet is properly grounded.
Note: In places where there is frequent lightning, it is advisable to use surge protectors.
Do not connect the appliance to the mains with an extension / long cable. Extension cables do not guarantee the necessary safety of the appliance (e.g. danger of overheating).
The device must not be connected to an inverter and must not be used with a plug adapter as these may cause damage to the electronic unit.
The cable must be secure behind the appliance and prevent it from becoming entangled or dangling unprotected.
WARNING: THIS APPLIANCE MUST BE EARTHED.
INSTALLATION OF THE HANDLE
IMPORTANT: Do not overtighten the screws and do not use power tools to install the handle.
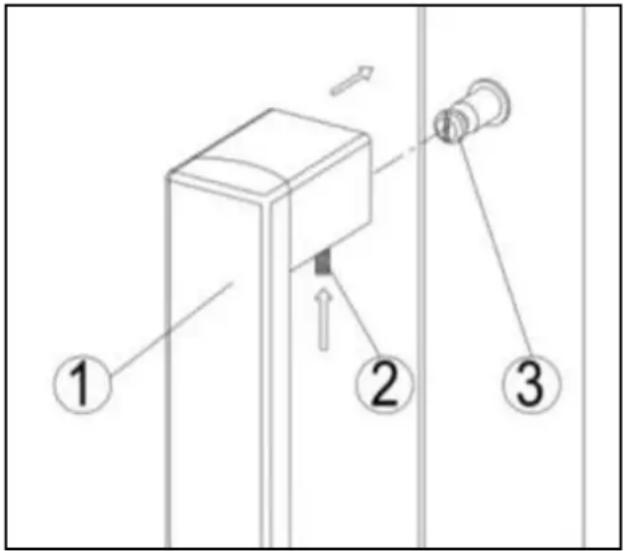
Place the handle (1) on the fastening pins.
(3) of the door and using the Allen key provided, tighten the retaining grub screws (2) to secure the door handle (3).
NOTE:
All replaced parts should be saved for re-installation of the door to its initial state, if required.
FIX AND SECURE THE UNIT TO FURNITURE
Under-counter models
natural_image
Technical line drawing showing two mechanical assembly steps with mounting holes and fasteners (no text or symbols)Column/Integration Models
natural_image
Diagram of a cabinet with open door and shelf, showing internal components and arrows indicating movement (no text or symbols)- PVMB 30-16
- PVMB 40-28
- PVMB 60-46CRR
- PVMBP 60-44
- PVMBP HD 40-25
- PVMBP HD 60-52
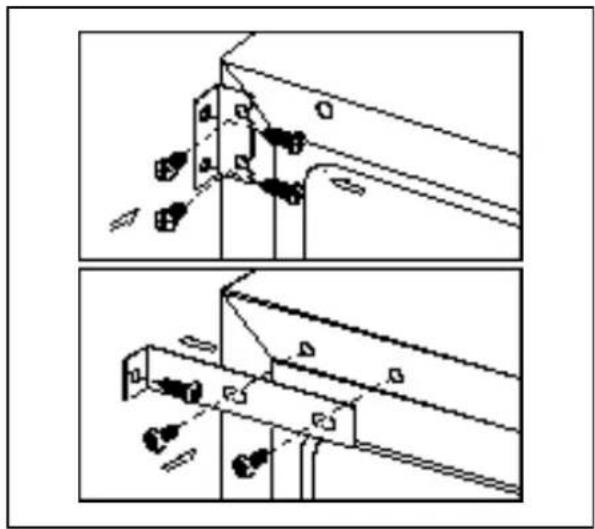
Remove the two protective caps on the opposite side of the hinge and fix the appliance in the niche by tightening the screws through the fixing bracket.
• PVMAV 60-23 • PVMAVP 45-16
• PVMAV 88-45 • PVMAVP 60-23
• PVMAV 124-65 • PVMAVP 88-45
• PVMAV 178-101 • PVMAVP 124-65
• PVMAVP 178-101
Open the door and secure the unit in the niche. Fit the screws into the top and bottom brackets of the unit, tightening them into the cabinet mounting bracket.
REVERSIBLE DOOR Hinge With "Soft" Lock
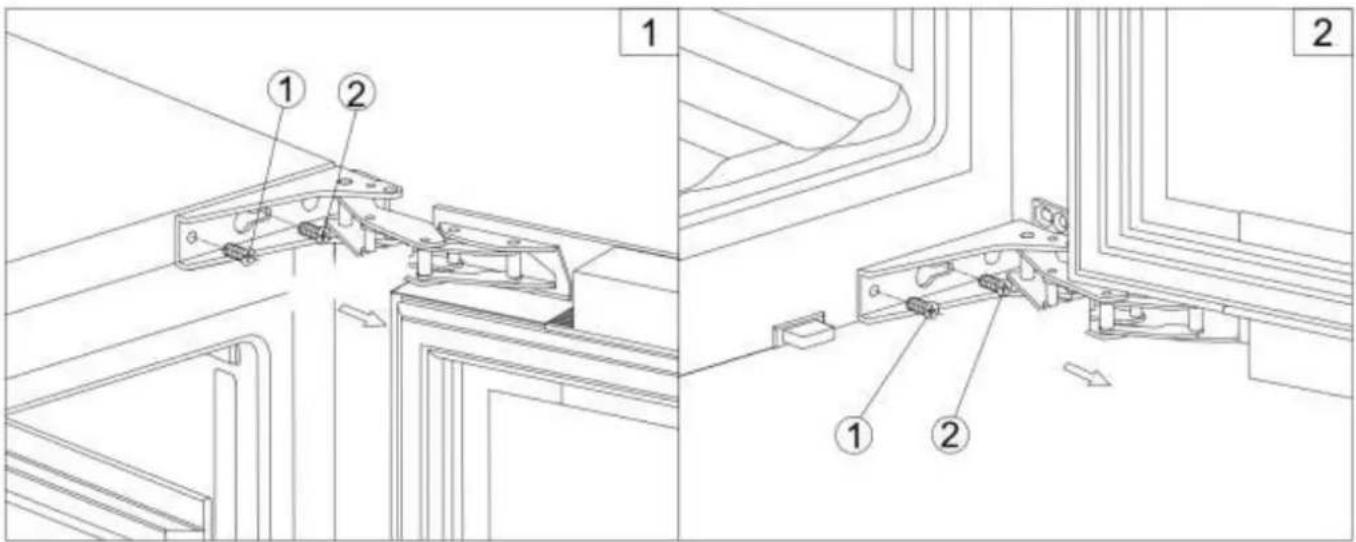

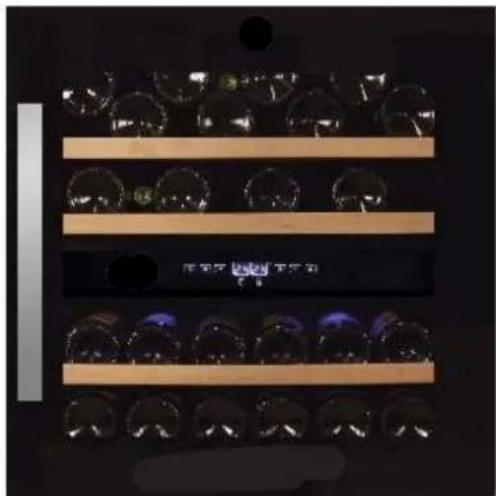
CAUTION - Be very careful with hinged hinges. The hinge closes automatically and there are many pinch points before / during installation.
- Unscrew and remove the two screws (1) and loosen the two screws (2). Slide the door through the slotted hole and remove it. Take care to hold the door firmly and place it on a cushioned surface to avoid damage.
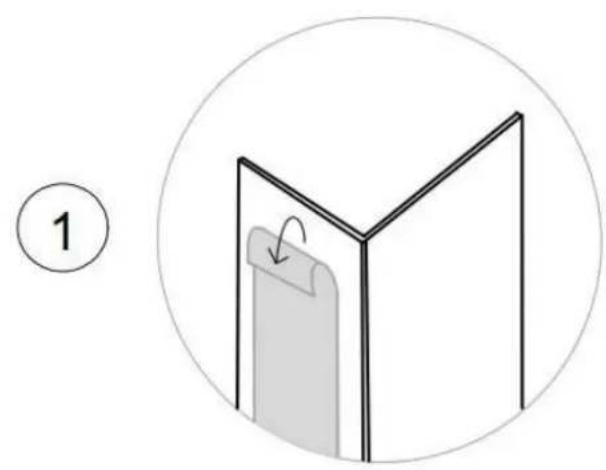
- Remove the screws (2). Remove the covers on the opposite side of the cabinet and use them to cover the holes for these screws.
- On the opposite side, screw in the screws (2) halfway.
- Position the new door on the opposite side, offsetting the hinge's coloured hole by the screws (2). Level and tighten both screws firmly.
- Finally, tighten the screws (1) firmly.
natural_image
Interior view of a multi-tiered storage unit with glass domes and dark liquid, no visible text or symbols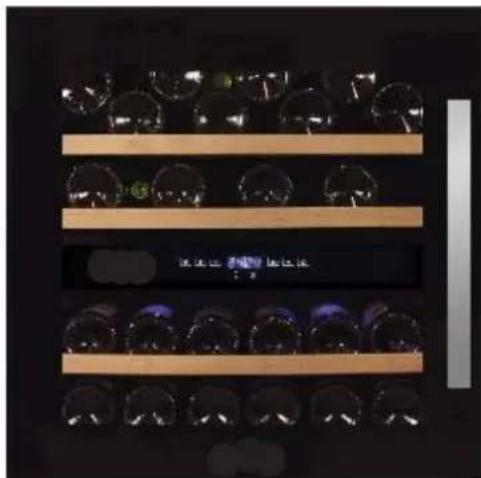
natural_image
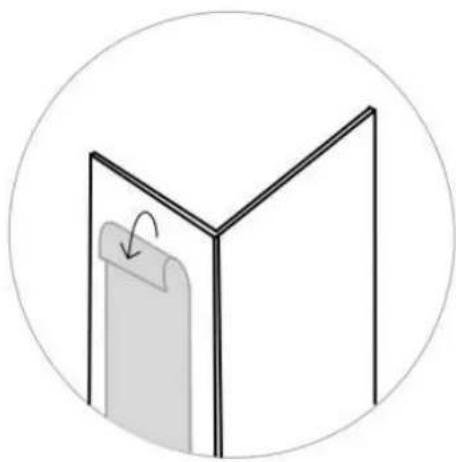
Display of glass dominoes arranged on wooden shelves against a dark background (no visible text or symbols)Trim Angles

natural_image
Diagram of a Y-shaped structure with a folded paper or sheet inside, enclosed in a circle (no text or symbols)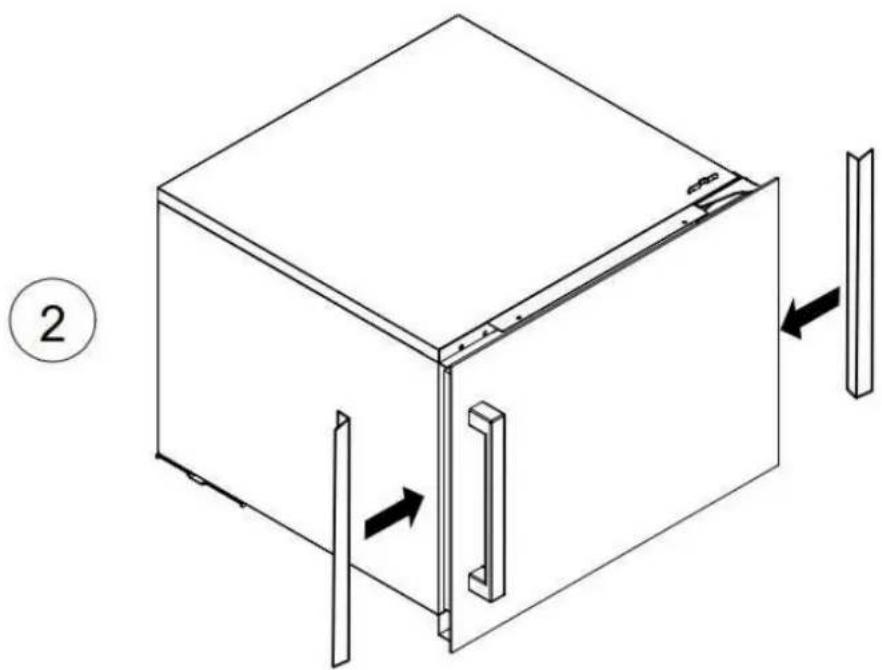
natural_image
Isometric line drawing of a 3D cube with internal vertical supports and directional arrows indicating movement (no text or symbols)OPERATING INSTRUCTIONS
This appliance is designed to operate at certain ambient temperatures. The climate class is specified on the rating plate.
The appliance may malfunction if left for a long period of time at a temperature outside the specified range. For example, placing the unit in extremely hot or cold conditions may cause fluctuations in internal temperatures. The range between 5^ C and 20^ C ( 41^ F and 68^ F) may not be reached.
| Climate class Ambient temperature | |
| SN | +10°C to +32°C |
| N | +16°C to +32°C |
| ST | +16°C to +38°C |
| T +16°C to +43°C | |
NOTE: Units without a heater will not raise their internal temperature if the ambient temperature where the unit is located is below the set temperature.

WARNING: When using the appliance for the first time or after restarting it because it has been switched off for a long time, there may be a variation of a few degrees between the selected temperature and that indicated on the display panel.
LED. This is normal and is due to the activation time. Once the unit is in operation for a few hours everything will return to normal.
If the unit is disconnected, there is a power failure or the unit is switched off, you will have to wait 3 to 5 minutes before restarting the unit.
If you try to reboot before this time, the unit will not start.
USE AND OPERATION OF THE CONTROL PANEL/DISPLAY
DISPLAY A AREA
Pando


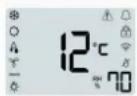


ON - To turn the wine cooler off, gently touch the key and hold it down for 5 seconds until it turns off. To turn the wine cooler on, gently touch and hold the key for 1 second until the temperature indicator lights up.

SELECTOR - Set the temperature to be displayed in degrees Fahrenheit or degrees Celsius.

LIGHT - Used to turn on/off the internal light.

RISE - Used to increase the programmed temperature by 1^ C/ 1^ F.

LOWER - Used to lower the set temperature by 1^ C/ 1^ F.

SET SELECTOR - Selects the temperature and humidity to be set.
Symbols on the screen
12 Temperature or error code display Compressor is on.

The heater is switched on.

Defrost mode.

DynaClima mode.

Eco Demo Mode.
DEMO The interior light is in display mode. Warning

Audible tone signal

Child lock is activated Signal of wifi

connection

Anti-condensation mode Relative

humidity indication


First ignition
When the unit is first plugged in, it will automatically turn on at the default settings. The factory preset temperature is 12^ C ( 54^ F).
- Touch the setting dial until the temperature you want to set flashes. You can then use the UP and DOWN keys to set the desired indoor temperature. When you touch either key for the first time, the display will show the last previously set temperature.
- The temperature will increase by 1^ C/ 1^ F if you touch the UP key once, or the temperature will decrease by 1^ C/ 1^ F if you touch the DOWN key once. The display flashes while making the adjustment.
- The set temperature will temporarily flash on the display for 5 seconds after the temperature has been set. The display will then return to the current indoor temperature.
- To view the set temperature at any time, touch the setting selector key, the set temperature will temporarily flash on the display for 5 seconds. The display will then return to the current indoor temperature.
DOUBLE DISPLAY ZONE
Pando
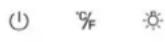
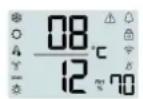
① TURNING ON To turn the wine cooler off, gently touch and hold the key for 5 seconds until it turns off. To turn the wine cooler on, gently touch and hold the key for 1 second until it turns on. el indicador temperature.

LIGHTUsed to switch the internal light on/off.

RISEUsed to increase the temperature by Canada /1°F

LOWERUsed to lower the temperature set at 1^ / 1^
Symbols on the screen
| 08 | Display of the temperature or error code of the upper/left area |
| 12 | Display of the temperature or error code |
| Compressor is switched on | |
| Heating is on | |
| Defrost mode | |
| Dynaclima mode | |
| DEMO | Eco Demos mode |
| The interior light is in display mode. | |
| Warning | |
| Acoustic signal | |
| Child lock is activated |
Multi-key function
To perform the multi-key function, lightly touch and hold the first key, then touch the remaining key for at least 5 seconds, then release all keys. Temperature control setting
- The unit has two independent temperature zones. The temperature of both zones can be adjusted between 5^ and 20^ (41°F and 68°F). For serving wine, the recommended temperature of the UPPER zone should be between 5^ and 10^ (41°F and 50°F), ideal for serving champagne and white wine, and the recommended temperature of the LOWER zone should be between 15^ and 20^ (58°F and 68°F), ideal for serving red wine.
- When the unit is plugged in for the first time, it will automatically turn on with the default settings. The factory preset temperature for the UPPER temperature zone is 8^ (46°F) and for the LOWER temperature zone is 12^ (54°F).
- Touch the setting dial until the temperature you want to set flashes. You can then use the UP and DOWN keys to set the desired indoor temperature. When you touch either key for the first time, the display will show the last previously set temperature.
IMPORTANT! ONLY FOR DUAL DISPLAY MODELS
WITHOUT Twin Wine conditioning systems, the temperature of the LOWER zone must always be equal to or higher than that of the UPPER zone.
With Twin Wine conditioning systems, the temperature of the LOWER zone has a completely independent temperature setting from the temperature setting of the UPPER zone, each zone can be adjusted between 5°C - 20°C.
** The models WITH Twin Wine conditioning system:
PVMAV 60-23 PVMAV 88-45 PVMAV 124-65 PVMAV 178-101 PVMAVP 60-23 PVMAVP 88-45 PVMAVP 124-65 PVMAVP 178-101
- The temperature will increase by 1^ / 1^ if you touch the UP key once, or the temperature will decrease by 1^ / 1^ if you touch the DOWN key once. The display flashes while making the adjustment.
- The set temperature will temporarily flash on the display for 5 seconds after the temperature has been set. The display will then return to the current indoor temperature.
- To view the set temperature at any time, touch the setting selector key, the set temperature will temporarily flash on the display for 5 seconds. The display will then return to
CONFIGURATION MODE
Some wine cooler settings can only be selected in the Settings mode.
Touch and hold the UP key for 5 seconds to enter and exit the Settings mode. The device will automatically exit Settings mode after approximately one minute.
°F/°C Selection
- Lightly touch and hold the UP key for 5 seconds to enter Setup mode.
- Use the UP and DOWN keys to select the temperature display setting in Fahrenheit or Celsius.
- Press and hold the UP key for 5 seconds to confirm the selection.
Brightness Display
- Lightly touch and hold the UP key for 5 seconds to enter Setup mode, then touch the ON key once.
- Use the UP and DOWN keys to select the brightness of the display when the door is closed. When the door is open, the display brightness returns to its normal level.
d0: off
d3: brighter setting
- Press and hold the UP key for 5 seconds to confirm the selection.
Lighting Indoor
- Lightly touch and hold the UP key for 5 seconds to enter Setup mode, then double-tap the ON key.
- Use the UP and DOWN keys to select the brightness of the interior lighting when the door is closed. When the door is open, the interior lighting returns to its normal level.
L0: off when door is closed or open L1: dimmer setting
L2: medium setting
L3: brightest setting (default)
- Press and hold the UP key for 5 seconds to confirm the selection.
Mode Fan
- Lightly touch and hold the UP key for 5 seconds to enter Setup mode, then touch the ON key three (3) times.
- Use the UP and DOWN keys to select the fan mode.
F0: Silent mode - energy saving mode (default) F1: DynaClima
mode - half time
F2: DynaClima mode - full time
- Press and hold the UP key for 5 seconds to confirm the selection.
Tones Audible
- Lightly touch and hold the UP key for 5 seconds to enter Setup mode, then touch the ON key four (4) times.
- Use the UP and DOWN keys to select the audible tones. S0: sensor tone ON, alarm tone OFF
S1: Sensor tone ON, Alarm tone ON (default) S2: Sensor
tone OFF, Alarm tone OFF S3: Sensor tone OFF, Alarm
tone ON
- Press and hold the UP key for 5 seconds to confirm the selection.
Display of the Temperature
During normal operation, the temperature indicator on the control panel shows the temperature inside the appliance. The temperature indicator will flash if
-A different temperature is being set,
-Zone temperature deviates more than 5^ C ( 9^ F) from the set temperature.
The intermittent temperature display ensures that the temperature cannot inadvertently rise or fall and damage the wine.
Memory Function From Temperature
In the event of a power failure (power surge, circuit breaker, etc.), the unit remembers the previous temperature settings. When the power is restored, the cabinet temperature will return to the same temperature setting as before the power interruption.
Temperature Alarm
An acoustic alarm will sound if the temperature of one of the zones rises or falls outside the temperature range. The corresponding temperature indicator shall flash at the same time and the symbols and shall light up.
The temperature at which the appliance is set determines the temperature that the appliance recognises as too hot or too cold.
The audible alarm will sound and the temperature display will flash:
- When switching on the appliance, if the temperature inside the appliance is very different from the set temperature.
- When there has been a prolonged power failure.
- When too many items have been put into the unit at the same time. Or too much ambient air has entered when rearranging and removing stored items.
- When the door is not properly closed.
- The device is faulty.
The audible alarm will be automatically silenced, the temperature display will stop flashing and the warning symbols and audible signal tones (bell) will be switched off when the set temperature is reached again. However, if the noise bothers you, you can deactivate the audible alarm beforehand by touching any key once and the alarm will stop. The corresponding temperature indicator will continue to flash and the warning symbols and audible tone signal (bell) will remain lit until the set temperature is reached. The display will then be steadily illuminated, the warning symbols and audible signal tones (bell) and the alarm system will be fully active again.
Door Alarm
If the door has been open for more than 60 seconds, the audible alarm will sound and the audible tone signal symbol (bell) will light up. By closing the door or touching any key once you can turn off the audible alarm.
Dynclima / Silent Mode
The appliance has two different operating modes: DynaClima and Silent modes.
The DYNACLIMA (Dynamic Climate) mode allows the relative humidity inside the unit and the temperature to be evenly distributed throughout the interior so that you can store all your wine in exactly the same excellent conditions. If you want to use the unit for long-term wine storage, the DYNACLIMA mode is a must. This will create a continuous climate in the cabinet that mimics that of a wine cellar.
In DYNACLIMA mode, the indoor fan circulates the indoor air evenly even when the set temperature is reached. Using the DYNACLIMA mode increases the noise level during operation. The symbol will light up. In SILENT mode (also known as energy saving mode), the appliance will operate without the fan once the set temperature is reached. The symbol will go out.
Display Mode Off
This mode turns off the displays, interior light, sensor tones and audible alarms and prevents them from being turned on again. Normal cooling operations will continue to take place.
To initiate Display off mode, touch the POWER and LIGHT keys simultaneously for at least 5 seconds. The displays and interior lights will turn off to confirm that the mode is activated.
The Display off mode can be cancelled by repeating the above process. It will automatically deactivate after 96 hours.
Eco Mode Demo
The Eco Demo mode can be activated by presenting the unit at exhibitions or sales rooms. In Eco Demo mode, the compressor and all fan motors are switched off. It is also perfect as a cleaning mode. The refrigeration is switched off while the lights remain on.
By touching and holding the "UP"&"DOWN" and "LIGHT" keys simultaneously for at least 5 seconds, the symbol will light up to confirm the input and the unit will operate in Eco Demo mode. The Eco Demo mode can be cancelled by repeating the above process and the symbol will turn off.
AUTOMATIC OPENING PUSH FUNCTION
For models only:
- PVMAVP 45-16
. PVMAVP 60-23
. PVMAVP 88-45 - PVMAVP 124-65
- PVMAVP 178-101
natural_image
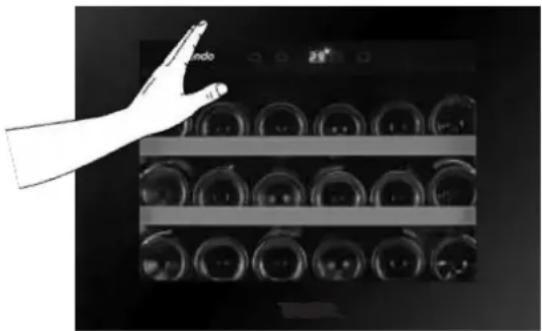
Hand pointing at a display of circular objects on shelves (no text or symbols visible)The PushOpen door function (if your model has one) is activated when the unit is switched on. To open the door, push it inwards slightly to the top left position for the right hinged model (top right position for the left hinged model) and then release it. The push piston will open the door slightly. The push piston opens the door slightly. The door can then be fully opened manually. The push piston automatically returns to its initial position after 2 seconds.
NOTE:
- To prevent unintentional opening, the door will close again after about 2 seconds if you do not pull it manually on hinged models.
- Do not block the door or hold it while opening. If you block the door or hold it while opening, the automatic door opening device and the door will be damaged. Loud and repeated clicking sounds will be heard.
- Do not push the push piston or hold it during closing. If the push piston is blocked during closing, it will no longer be able to reach its initial position. In the initial position, the push piston is flush with the front of the enclosure. To return the push piston to its initial position, disconnect the appliance from the mains, wait approximately 10 seconds and then switch it on again. The impulse piston returns to its initial position. The impulse piston returns to its initial position.
- The system does not activate immediately after closing the door. Wait 3 seconds and try again. This is not a system malfunction.
The door of the unit is pressure sensitive. The pressure sensitivity to open the door can be adjusted as indicated below:
- Open the door.
- Turn the screw in the top centre of the door anti-clockwise to increase the sensitivity and clockwise to decrease it.
- Close the door and check that the setting is correct. Turning the screw too far anti-clockwise may cause the door to open automatically even without pushing or simply closing the door forcefully. Conversely, turning the screw too far clockwise may cause the door not to open even with a strong push.

natural_image
Simple line drawing of a rectangular frame with a circular hole and an arrow indicating rotation (no text or symbols)Interior light
The interior lighting makes it easier to see your wine labels and enhances the display of your collection. If you press and hold the LIGHT key for 5 seconds, you will switch between 2 modes of operation of the interior lights: functional mode (default) and showcase mode. If you are in functional mode (default), the lights will be switched on only when the door is open. The interior light will turn off about 5 seconds after the door is closed. If in showcase mode, the lights will come on whether the door is open or not and the light bulb symbol will be illuminated.
The unit is equipped with LED lights and is designed for an extremely long service life. Thanks to the LED lighting, the wine will not be adversely affected by heat or ultraviolet light. However, they are not user serviceable. To replace them, please contact our service department.
NOTE: Use only original LED lighting fixtures supplied by the manufacturer.
Trays and storage
WARNING: Do not pull with more than one loaded shelf at a time as this may cause the unit to tip forward. Some shelves are designed to hold more than 1 layer of bottles. Such shelves should not slide if there is more than 1 layer of bottles loaded on them.
WARNING: Do not attempt to slide the shelves out beyond the stop to prevent the bottles from falling.
WARNING: To avoid damaging the door seal, make sure that the door is fully open when pulling the shelves out of their compartment.
All wine shelves slide out for easy access, with the exception of the bottom shelf. For easy access to stored bottles, pull the shelf out gently until it stops. The shelves are designed with an emergency stop to prevent them from overextending while loading bottles.
IMPORTANT: Do not cover any part of the shelves with aluminium foil or any other material that prevents proper air circulation inside the cabinet.
WARNING: Bottles may vary in size and dimensions. Different formats in size and diameter may be available on the market. For this reason, the actual number of bottles to be stored may vary. The maximum capacity of the bottle rack is produced with traditional Bordeaux bottles of 750 ml. with a bottle height of up to 30cm.
- You can load your wine bottles in a single row or stacked, keeping in mind the following: if you do not have enough bottles to fill your wine cooler, it is better to distribute the load along the wine cooler in order to avoid loading "all up" or "all down".
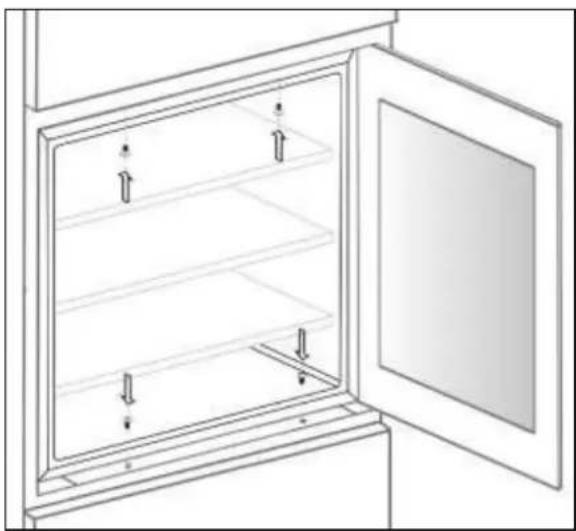
- Do not remove or change the adjustable wooden shelves to accommodate more bottles or increase the capacity of the wine cellar by stacking the bottles if necessary (see removal of shelves).
- Maintain small spaces between walls and bottles to allow air circulation. Like an underground cellar, air circulation is important to avoid mould and to generate a more homogeneous temperature.
- Do not overload your cellar to facilitate air circulation.
- Lay the bottles flat.
- Prevent obstruction of the internal fans (located inside the rear panel of the unit).
- Do not introduce contaminants. Store only wine in your unit to ensure that the environment is odour free.
- Only store wine with unopened bottles. Storing opened bottles can lead to spillage.
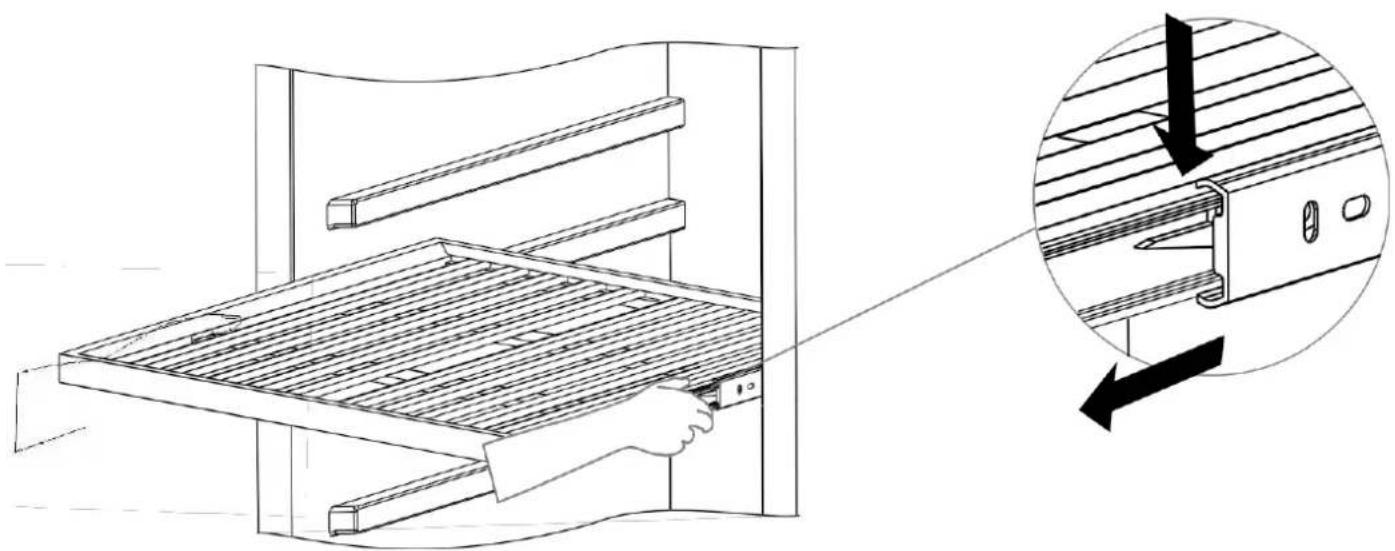
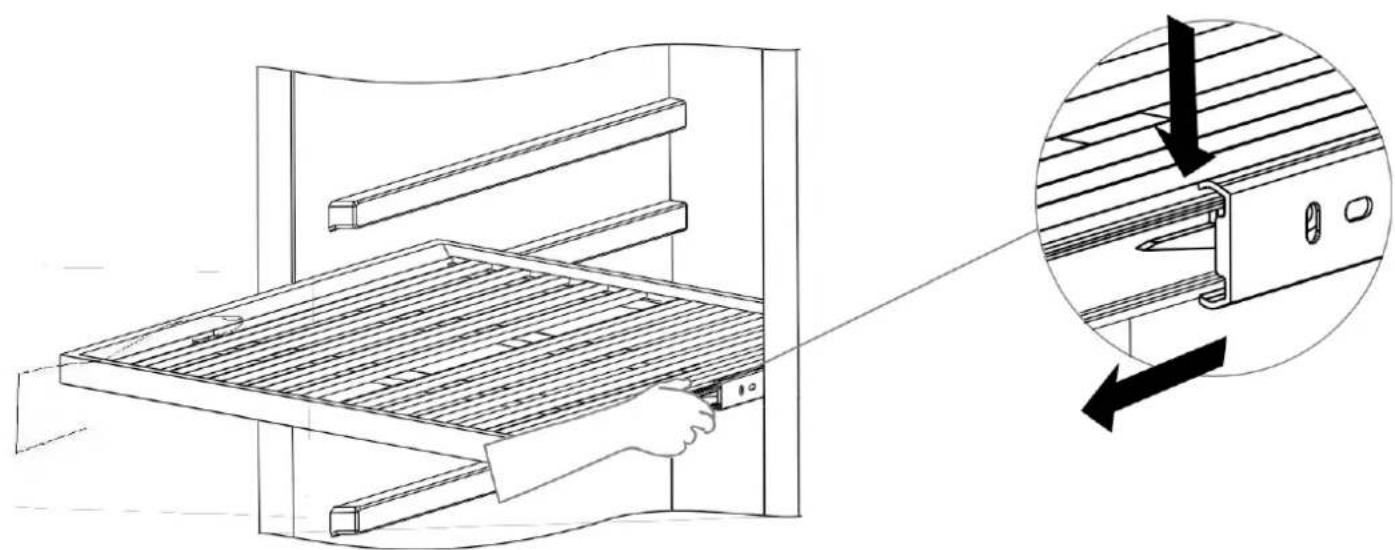
Shelves with top-hat rails
To avoid damaging the door seal, be sure to have the door fully open when removing the shelves from the rail compartment.
To facilitate access to the bottles, the shelves should be pulled out about 1/3 of the rail compartment.
• To remove the shelves from the rails, pull out each shelf as far as it will go.
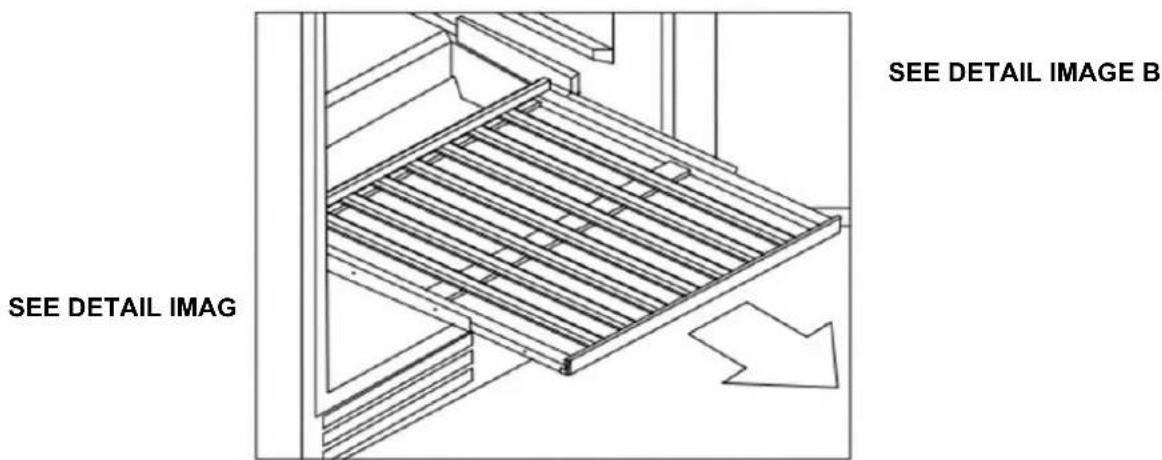
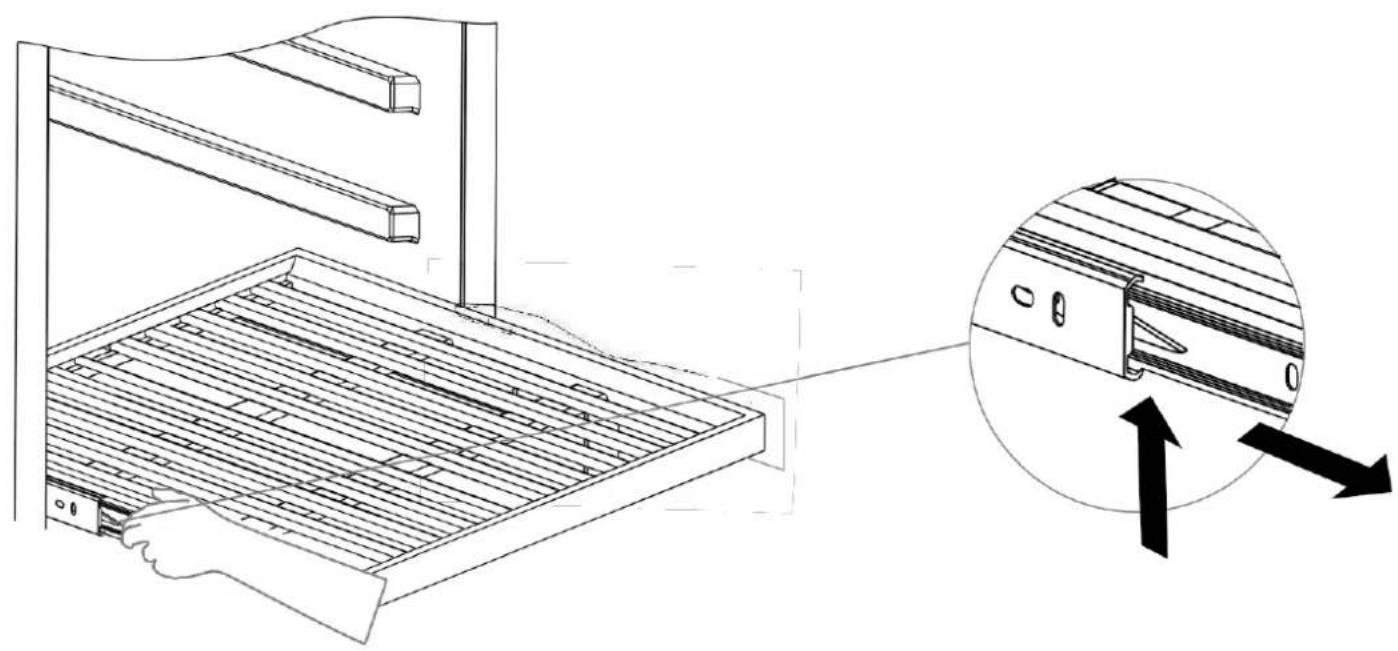
With both hands, press both levers at the same time with your fingers, downwards on the right plastic lever as shown in Image A and upwards on the left plastic lever as shown in Image B. Then slowly pull out the shelf.
Detail image - A
natural_image
Technical line drawing of a server rack with an inset showing internal components (no text or symbols)Detail image - B
natural_image
Technical illustration of a rack-mounted shelf with a hand inserting a component, showing internal structure and directional arrows (no text or symbols)Defrosting / Hygrometry / Ventilation
The unit is designed with an automatic defrost system. During the "off cycle" the evaporator at the back, on the rear wall of the unit, defrosts automatically.
Condensation collects in the drain pan behind the rear wall of the unit, and some of it flows through the drain hole in the drip pan above the compressor.
Heat is transferred from the discharge pipe or compressor evaporating any condensation that accumulates in the tray. Some of the remaining water is collected inside the unit for humidity issues.
This system allows the creation of the correct humidity level inside your unit, required by the natural cork, to maintain a long lasting seal.
The appliance is not completely sealed: The fresh air intake is via the drain pipe. The air is circulated through the unit by means of a fan / fans through the shelf openings.
NOTE: Frost may accumulate on the evaporator if the unit is opened in frequent high ambient heat or is located in a place with high humidity. If the frost does not disappear within 24 hours, your unit will require manual defrosting.
IMPORTANT: Do not install the wine cooler, especially the built-in models, in such a way that in adjacent areas there are sources of heat, such as freez,ersovens, cookers, etc.... This may cause the compressor unit to never stop working and the unit to produce excess ice, affecting the correct operation of the internal fans and the compressor unit itself.
IMPORTANT INFORMATION ABOUT TEMPERATURE
Your unit has been designed to ensure optimal conditions for storing and/or serving your wines.
Fine wines require a long and gentle evolution and need specific conditions to reach their full potential.
All wines mature at the same temperature, which is a constant temperature set at between 11^ C and 14^ C. Only the temperature of "dégustation" (wine appreciation) varies according to the type of wines (see the table of wine serving temperatures above). That said, and as in the natural cellars used by wine producers for long storage periods, it is not the exact temperature that is important, but its constancy. In other words, as long as the temperature of your cellar is constant (between 11^ C and 14^ C, or 52^ F and 57^ F) your wines will be kept in perfect condition.
Not all wines improve with age. Some should be consumed at an early stage (2 to 3 years) while others have an enormous ageing capacity (50 years or more). All wines have a peak of maturity. Consult your wine merchant for relevant information.
At too high a temperature (over 20^ C) the wine ripens too quickly, which prevents the aromas from developing further. The wine cannot fully mature at too low a temperature (below 5^ C).
Fluctuations in temperature stress the wine and disrupt the maturation process. It is therefore very important to maintain a constant temperature.
Tip: Store the wine 1 or 2°C cooler than the recommended drinking temperature, as it warms up a little when poured into the glass.
Tip: Full-bodied reds should be opened for 2-3 hours before drinking to allow the wine to breathe and develop its aroma.
CARE AND MAINTENANCE
WARNING: Failure to unplug the appliance during servicing or cleaning may result in electric shock or personal injury.
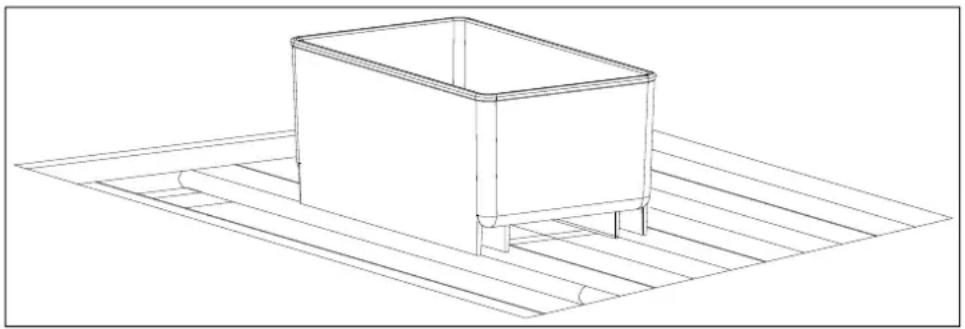
Humidity Control
The appliance is equipped with a system to maintain the correct humidity level. In extremely dry ambient conditions, you may need to add a little water in the humidity box provided.
Fill the small plastic tank (humidity box) to 34 of its capacity with water, and insert it into the guides on the top shelf of the appliance. Check the water level regularly and top up as necessary.
Make sure that the tank is correctly positioned on the top shelf guides to avoid the possibility of water spillage.
natural_image
Line drawing of a rectangular basin placed on a wooden platform (no text or symbols)Cleaning the unit
Switch off the appliance, unplug it and remove all objects, including the shelves and rack.
Wash interior surfaces with a solution of warm water and baking soda. The solution should be about 2 tablespoons of baking soda per litre of water.
Wash the shelves with a mild detergent solution.
Wring excess water from the sponge or cloth when cleaning any area of the controls.
The sealing gasket around the door must be cleaned regularly to prevent discolouration and prolong the service life. Use clean water. After cleaning the sealing gasket, check that it still provides a tight seal.
Wash the outdoor furniture with warm water and mild liquid detergent. Rinse thoroughly and dry with a soft, clean cloth.
Do not clean stainless steel with steel wool. We suggest that you use an all-in-one stainless steel cleaner to clean stainless steel. Always clean in the direction of the grain.
Power Failure
In the event of a power failure, all previous temperature settings are automatically memorised. If the power supply is interrupted (power surge, circuit breaker, etc.) and switched on again, the unit will operate with the last temperature setpoint.
Most power outages are corrected within a few hours and should not affect the temperature of your appliance if you minimise the number of times you open the door. If the power is going to be off for a longer period of time, you should take appropriate measures to protect its contents.
NOTE: Regardless of the cause, if you observe abnormal levels of temperature
or humidity inside your unit, rest assured that only prolonged and frequent exposure to these abnormal conditions can cause a detrimental effect on your wines.
Holidays
Short holidays: Leave the unit in operation during holidays of less than three weeks.
Prolonged absences: If the appliance is not to be used for several months, remove all objects, switch it off and unplug it. Clean and dry the interior thoroughly. To prevent the formation of odours and mould, leave the door slightly open, locking it if necessary.
Moving Your Device
Disconnect the plug from the socket.
Remove the contents of the grilles and all moving parts inside. Lift the
adjustable feet up to the base to prevent damage.
Tape the door shut and lock it if it is fitted with a locking system. Transport the appliance in an upright position only. Also protect the outside of the appliance with
a blanket or similar item.
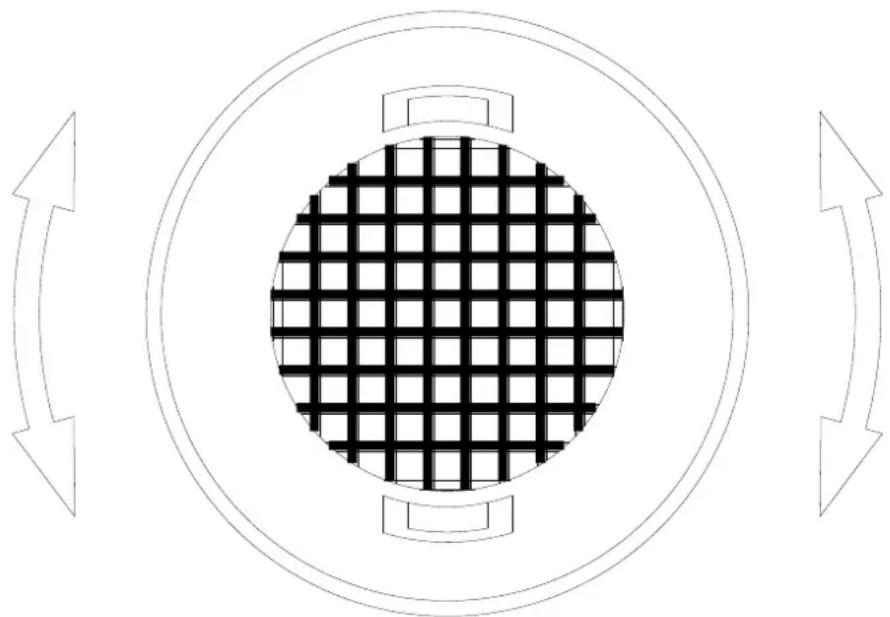
Activated Carbon Air Filters
The active carbon air filter (if your model is equipped with one) is located at the rear of the compartment. The activated carbon filter achieves optimum air quality by filtering the incoming air and absorbing unwanted odours. Replace it with a new one once a year. You can purchase it from our After-Sales department.
- Remove the shelf in front of the filter.
- Hold the filter and turn it 90^ clockwise or counterclockwise to remove it.
- Insert the new filter vertically and rotate it 90^ clockwise or counterclockwise until it clicks into position
natural_image
Diagram of a circular grid pattern with directional arrows on both sides (no text or symbols)Power Outages
In the event of a power interruption, all existing temperature settings are automatically memorised. If the power supply is interrupted (power surge, switch failure, etc.) and then switched on again, the unit will operate at the last selected temperature.
Most power outages are rectified within a few hours and should not affect the temperature of your appliance if the number of times the door is opened is minimised. If the power is to be cut off for a longer period of time, it is necessary to take appropriate measures to protect the contents.
NOTE: Regardless of the cause, if you notice any abnormal temperature or variation in humidity levels inside the unit, please be assured that only frequent long term exposure to these abnormal conditions can cause a detrimental effect on your wines.
Energy Saving Tips
In case the appliance remains empty for long periods of time, it is suggested to unplug it and, after careful cleaning, leave the door ajar to allow air to circulate inside the cabinet to avoid possible formation of condensation, mould or odours.
The appliance should be installed in the coolest part of the room, away from heat-producing appliances and direct sunlight.
Ensure that the unit is adequately ventilated. Never cover the ventilation openings. Clean dust and dirt from the condenser at regular intervals.
Open the door only as much as necessary and for as little time as
possible. Store contents in an organised manner.
To allow air circulation, do not overfill the appliance.
Operating Noises
The unit is cooled by a compressor (cooling aggregate). The compressor pumps refrigerant through the cooling system, producing operating noise. Even when the compressor is switched off, noises caused by temperature and pressure changes are unavoidable. The operating noise will be most audible immediately after the compressor is switched on. It becomes quieter as the period of operation continues.
The following noises are normal and occur from time to time:
- Gurgling sound, caused by coolant flowing through the coils of the appliance.
- Buzzing noise produced by the engine compressor. This noise may become louder for short periods when the engine is started.
- Cracking and popping sounds, resulting from the contraction and expansion of materials due to temperature variations.
- Fan operation sound, to circulate the air inside the wine cooler.
- Unusual noises are usually the result of incorrect installation. Under no circumstances should the pipes come into contact with a wall, other furniture or other pipes.
- If the unit is installed in an open plan kitchen or in partition walls, the operating noise level will be louder. However, this is due to the surrounding architecture and not the unit.
- Individual noise perception is directly related to the environment in which the device is located, as well as to the specific type of model. Our appliances comply with international standards for this type of appliance and the latest technical developments. But remember that noise from the compressor and the refrigerant flowing through the system is unavoidable.
SOLUTION OF PROBLEMS
Many common problems can be easily solved, saving you the cost of service support Try the following suggestions to see if you can solve the problem before calling customer service / after sales.
| PROBLEM | POSSIBLE CAUSE | REMEDY |
| Nothing works.The device does not work. | The device is not connected to a power supply.The device is switched off.The circuit breaker has tripped or has been tripped.blown fuse. | Switch on the device.Switch on the device.Turn on the circuit breaker or replace the fuse. |
| The appliance does not cool sufficiently. | Temperature is not set correctly.The ambient temperature may require a different temperature setting.The door opened with too much frequency.The door was not completely closed.The door is not hermetically sealed closed.The condenser is too dirty.The ventilation opening is blocked or too dusty. | Check the temperature programmed.Set another temperature.Do not open the door wider than necessary.Close the door tightly.Check the door seal and clean or replace it.Clean the condenser when as necessary.Clear obstacles and clean up the dust. |
| The appliance switches on and off frequently. | The ambient temperature is higher than media.A large number of bottles have been added to the unit.The door opens with too much frequency.The door does not close completely.Door seal does not seal correctly. | Place the device in a location cooler.Let the appliance operate for a while until it reaches the set temperature.Do not open the door wider than necessary.Close the door tightly.Check the door seal and clean or replace it. |
| The light does not come on. | The device is not connected to a power supply.The circuit breaker has tripped or has been tripped blown fuse.The light went out on the control panel.Faulty light. | Switch on the device.Turn on the circuit breaker or replace the fuseTurn on the light.Call a service technician for replacement. |
| Vibrations. | The appliance is not properly levelled. | Level the device with the feet adjustable. |
| The device seems to make too much noise. | The rattling noise may come from the refrigerant flow, which is normal. At the end of each cycle, you may hear gurgling noises caused by the flow of refrigerant in your appliance.If temperature fluctuations occur, the contraction and expansion of the interior walls can cause popping and creaking noises. | |
| The appliance is not properly levelled. | Level the device with the feet adjustable. | |
| The door does not close properly. | The appliance is not properly levelled.The door was reversed and not reinstalled correctly.The gasket is dirty.The shelves are out of position. | Level the device with the feet adjustable.Check the door hinge and reassemble it.correctly.Clean the door seal.Check the shelves and replace them correctly. |
| The display shows E0, E1, E2, E3, E4, E5, E6, E7, E8, E9, Ec or Et. | Error code. | Try resetting the controls by disconnecting power to the unit. for 5 minutes and switch it on again. If the error code reappears, the problem cannot be solved by the user. Call for service. |
| The alarm sounds and the temperature indicator is NOT flashing (alarm door). | The door has been left open for more than 60 seconds. | Close the door or touch any key to deactivate the door. the alarm. The alarm is will reset when the door is closed. |
| The alarm sounds AND the temperature display flashes (temperature alarm). | Has the appliance door been open for more than 60 seconds? If not, then the temperature has risen or fallen above the temperature that has been set. This could be due to:- The appliance door opens too often.- The ventilation opening is clogged or too dusty.- A prolonged power outage.- A large amount of bottles to the unit. | If the answer is yes, close the door.- Do not open the door wider than necessary.- Clear obstacles and dust- Let the appliance run for a while to reach the set temperature. |
| The dashed icon "--" lights up and flashes on the temperature display. | Temperature indication is off of rank. | If the temperature does not fall within this range that the device is capable of displaying, the dashed "--" icon will appear instead. This is normal. Keep the door closed and let the appliance cool down to the set temperature. |
| Condensation on the outer surfaces of the glass door | High humidity climate. | During periods of high humidity, some of the following may occur condensation on the outer surfaces of the glass door. It will disappear when humidity levels drop. It is advisable to install the appliance with sufficient ventilation in a dry and/or air-conditioned location. |
| The wooden shelves are warping. | Volume change due to moisture absorption or drying out is a typical characteristic of wood. An increase in humidity will cause wood components to warp, which can lead to cracks. Knots and the patina of the grain is part of the natural character of the wood. | Replace shelves if necessary necessary. |
QUESTIONS FREQUENTLY ASKED
QUESTIONS
- What are the storage conditions that concern collectors and consumers of good wine?
Light, humidity, temperature and vibration.
- What is the ideal temperature for wine?
The ideal temperature for storing wine is between 52°F and 57°F (11°C\~14°C). However, any temperature between 41°\~68°F (5°\~20°C) will suffice as long as it is constant.
- What is the ideal humidity for wine?
A humidity of between 60%-70% is an excellent range in which to store wine. High humidity levels keep moisture inside the bottle and prevent evaporation through the cork. Humidity levels that are too high often cause the creation of micro-organisms that can prematurely age your wine and even spoil it.
- The storage temperature seems to vary from 2 to 4 degrees frequently.
This is normal: small temperature differences are necessary for the appliance to work properly. When the wine cellar starts the defrost cycle, the temperature rises slightly. When the refrigeration system starts working again, the temperature drops again.
Such changes occur in a short period of time and their effect is minimal to affect the conservation of the wine. The liquid tends to maintain a medium temperature with a range of 2^ . For example, if the temperature of a swimming pool is 25^ and, one night, the outside temperature drops to 18^ , the water temperature will not drop that much. In the morning it may only is at 22^ .
- Water has accumulated on the floor or has appeared on the back of the appliance.
Make sure that the drain hose inside the appliance is properly positioned over the water collection tray at the back of the appliance. If it is, in times of high humidity you should collect the excess water with a sponge.
- Water has appeared on the inside wall of the appliance.
During very wet seasons, it can happen when the door is opened too many times.
- It seems that the device is never switched off: it is always on.
Make sure that the door is closed properly. Add another thermometer inside the cellar to see if the thermostat in the cellar is at the same temperature.
- Steam/condensation has appeared on the glass door.
It can occur during very wet seasons, especially in summer.
Certify that the installation has been carried out in accordance with the manual, in particular the vents, which are very important for optimum operation and to avoid serious malfunctions.
As for condensation on the outside of the wine cooler door, it is a normal and natural effect that occurs in atypical circumstances, where high outside temperature, high relative humidity, room or kitchen without adequate ventilation, room closed for a long time and the cold glass door of the wine cooler are all factors that certainly cause condensation.
It is advisable to install the unit in a well ventilated, dry and/or air-conditioned location.
- The indoor fan motors are switched on and off even when the set temperature is reached.
To circulate the air and maintain the set temperature inside the cabinet, the indoor fans must run ON and OFF when the compressor is off in Dynamic Climate mode. The fans will cycle on and off approximately every 20 seconds. This cycle is normal and is done both to circulate the air and to ensure the continuous running status of the fans. If the fan stops completely and does not complete the cycle, the fan will not operate. The Dynamic Climate mode is the factory preset mode. If the user finds it noisy, the SILENT mode can be selected by pressing and holding the UP key for at least 5 seconds until hearing "B B B" three sounds confirming that the silent mode is activated.
- High and low temperatures cannot be set separately - both are set at the same time (if one is raised, the other is raised, etc.).
This is normal. The set temperature of the LOWER ZONE should always be the same or higher than that of the UPPER ZONE. Thus, when the user adjusts the temperature of one of the zones, if the above condition cannot be met, the set temperature of the second zone will be automatically changed to meet the above condition.
- The control panel does not seem to be working.
The control panel of this equipment has an auto-lock feature that prevents tampering with the temperature or power settings. This feature is automatically activated 2 minutes after the last touch of a control panel key. To unlock the control panel, press and hold the UP and DOWN keys for 5 seconds.
- The fans run constantly, is this normal?
To circulate the air and maintain the set temperature inside the cabinet, the indoor fans must run ON and OFF when the compressor is off in Dynamic Climate mode. The fans will cycle on and off approximately every 20 seconds. This cycle is normal and is done both to circulate the air and to ensure the continuous running status of the fans. If the fan stops completely and does not complete the cycle, the fan will not operate.
- The digital display works. But the appliance does not cool.
Check if the appliance is in "Eco Demo Mode". Press and hold the "UP", "DOWN" and "LIGHT" buttons at the same time for at least 5 seconds to exit the Eco Demo Mode.
-
The digital display, light and sound do not work, but the appliance cools well. You can that the device is in "display OFF" mode
-
Ice accumulates on the lower rear side (compressor area) and may rub against the fan, causing the unit to malfunction.
Check if there is any other appliance that produces or is a source of heat, such as a freezer, oven etc., at the bottom or adjacent to it, especially in integration models, THE VINOTECA MUST NOT BE INSTALLED UNDER THESE CIRCUMSTANCES.
TECHNICAL SPECIFICATIONS
| MODEL | PVMB30-16 | PVMB40-28 | PVMBPHD 40-25 | PVMB60-46 | PVMBP60-44 | PVMBPHD 60-52 | PVMAV45-16 | PVMAVP45-16 | PVMAV60-23 | PVMAVP60-23 | |
| Specification (EN) Especificaciones (ES) | |||||||||||
| Number of Sections Secciones de frio | 2 2 2 2 2 | 1 1 2 2 | |||||||||
| Cold sections insulation Aislamiento secciones frio | SI SI SI SI | SI SI SI SI SI SI | |||||||||
| Wine Storage Bottles with Full Sliding Shelves - Total | N° botellas Total(Burdeos 0,75 / ∅76mm) | 16 28 25 | 46 44 52 16 16 | 23 23 | |||||||
| Bottle height (mm) Altura botella (mm) | 300 300 | 300 | 300 | 300 300 | 300 300 300 300 | 300 | |||||
| Wine Bottles - Zone One(Upper or Left) | N° botellas Zona 1 | 5 9 9 16 | 9 22 | N.A.N.A 12 12 | |||||||
| Wine Bottles - Zone Two(Lower or Right) | N° botellas Zona 2 | 11 19 16 30 | 28 30 N.A | N.A 11 11 | |||||||
| No. Trays removable wood Haya | N° Bandejas madera Haya | 5 | 4 | 5 | 5 | 4 | 5 | 2 | 2 | 3 | 3 |
| No. Trays fixed department | N° Bandejas departamento fijo | 1 | 1 | 1 | 1 | 1 | 1 | 1 | 1 | 1 | 1 |
| Cabinet Shelf (Q'ty)(Sliding Wooden Shelves) | N° bandejas o guías fijas | 5 | 4 | 5 | 5 | 4 | 5 | 2 | 2 | 3 | 3 |
| Trays with sliding guides Bandejas con guías correderas | 0 | 0 | 5 | 5 | 4 | 5 | 2 | 2 | 3 | 3 | |
| Light | Luz interior | Si SI SI SI SI | Si SI SI SI SI | ||||||||
| Temp. Control (Electronic-Digital/Mechanical) | Control temperatura | Electrónico-Digital | Electrónico-Digital | Electrónico-Digital | Electrónico-Digital | Electrónico-Digital | Electrónico-Digital | Electrónico-Digital | Electrónico-Digital | Electrónico-Digital | Electrónico-Digital |
| Temp. Range (°C/F) | Temperatura operativa | 5-20°C | 5-20°C | 5-20°C | 5-20°C | 5-20°C | 5-20°C | 5-20°C | 5-20°C | 5-20°C | 5-20°C |
| Temp. Range - Zone One (Upper or Left) (°C/F) | Temperatura Zona 1 | 5-20°C | 5-20°C | 5-20°C | 5-20°C | 5-20°C | 5-20°C | - | - | 5-20°C | 5-20°C |
| Temp. Range - Zona Two (Lower or Right) (°C/F) | Temperatura Zona 2 | 5-20°C | 5-20°C | 5-20°C | 5-20°C | 5-20°C | 5-20°C | - | - | 5-20°C | 5-20°C |
| Defrosting (Automatic/Semi Automatic/Manual/Frost Free) | Defrost (Desccongelado) | Automático | Automático | Automático | Automático | Automático | Automático | Automático | Automático | Automático | Automático |
| Humidity Control (Humidity Box) | Control de humedad (Caja humedad) | Si SI SI SI SI | Si SI SI SI SI | ||||||||
| Heating | Calefactor | Si SI SI SI SI | Si SI SI SI SI | ||||||||
| Temperature Alarm System | Alarma temperatura | Si SI SI SI SI | Si SI SI SI SI | ||||||||
| Door Alarm System | Alarma puerta | Si SI SI SI SI | Si SI SI SI SI | ||||||||
| Deodorizer - Active Charcoal Filter | Filtro olores | Si SI SI SI SI | Si SI SI SI SI | ||||||||
| Wine Storage Compartment Humidity | Depósito control humedad interior. | Si SI SI SI SI | Si SI SI SI SI | ||||||||
| Control System Humidity Pump for humidity control | Sistema automático con bomba de control de humedad. | No | No | No | No | No | No | No | No | No | No |
| °C/F Temperature Display | Indicador temperatura display on °C/F | Si SI SI SI SI | Si SI SI SI SI | ||||||||
| Display Color (Blue/Red) Color display | White or Blue Azul o Blanco | White or Blue Azul o Blanco | White or Blue Azul o Blanco | White or Blue Azul o Blanco | White or Blue Azul o Blanco | White or Blue Azul o Blanco | White or Blue Azul o Blanco | White or Blue Azul o Blanco | White or Blue Azul o Blanco | White or Blue Azul o Blanco | |
| Interior Light Type (LED/Built) | Luz interior | LED | LED | LED | LED | LED | LED | LED | LED | LED | LED |
| Interior Light Color (White/Blue) | Color iluminación interior | White or Blue Azul o Blanco | White or Blue Azul o Blanco | White or Blue Azul o Blanco | White or Blue Azul o Blanco | White or Blue Azul o Blanco | White or Blue Azul o Blanco | White or Blue Azul o Blanco | White or Blue Azul o Blanco | White or Blue Azul o Blanco | White or Blue Azul o Blanco |
| Flush Back Design | Disseño posterior (liso o radiador) | Liso | Liso | Liso | Liso | Liso | Liso | Liso | Liso | Liso | Liso |
| Light Switch | Interruptor luz | Si SI SI SI SI | Si SI SI SI SI | ||||||||
| Profesional Fully-integrated HINDGE | BISAGRA profesional completamente integrada | No | No | Si | No | Si | Si | Si | Si | Si | Si |
| Door reversibility | Puerta reversible | Si SI SI SI SI | Si SI SI SI SI | ||||||||
| Door Opening Angle | Ángulo apertura | 115° | 115° | 95-115° | 115° | 95-115° | 95-115° | 95-115° | 95-115° | 95-115° | 95-115° |
| Anti UV Glass | Cristal puerta Filtro UV | Si SI SI SI SI | Si SI SI SI SI | ||||||||
| Number of Layers for Glass Door | N° cristales puerta | 3 3 3 3 3 3 | 3 3 3 3 | ||||||||
| Tempered Glass | Cristal templado | Si SI SI SI SI | Si SI SI SI SI | ||||||||
| Free Standing | Formato libre instalación. | Si | Si | Si | Si | Si | Si | No | No | No | No |
| Built-in | Formato integración en mueble. | No | No | No | No | No | No | Si | Si | Si | Si |
| Built-under Formato integración bajo nueble. | Si Si Si Si | Si Si No No No | No | ||||||||
| Power Cord Length (m) - Cabinet to Wall | Largo cable red (m) | 1,8 1,8 1,8 | 1,8 1,8 1,8 1,8 | 1,8 1,8 1,8 | |||||||
| Integrated ventilation system Sistema | ventilación integrado | No No No | No No No Si Si | Si | |||||||
| Air Ventilation (Kitchen Unit Ventilation/Front Plinth Ventilation) | Ventilación, zócalo o trasera | Ventilación frontal zócalo | Ventilación frontal zócalo | Ventilación frontal zócalo | Ventilación frontal zócalo | Ventilación frontal zócalo | Ventilación libre integrada | Ventilación libre integrada | Ventilación libre integrada | Ventilación libre integrada | |
| Height (mm/Inches) | Alto_H (mm) | 820 | 820 | 880 | 820 | 820 | 880 | 455 | 455 | 595 | 595 |
| Width (mm/Inches) | Ancho_W (mm) | 295 | 395 | 395 | 595 | 595 | 595 | 595 | 595 | 595 | 595 |
| Depth without handle (mm/Inches) | Profundidad sin tirador_D (mm) | 575 575 575 | 575 | 555 555 559 559 | 559 559 | ||||||
| Depth with handle (mm/Inches) | Profundidad con tirador (mm) | 615 | 615 | - | 615 | - | - | 599 | - | 599 | - |
| Body depth without door (mm) | Profundidad cuerpo sin puerta (mm) | 530 | 530 | 510 | 530 | 510 | 510 | 512 | 512 | 512 | 512 |
| Depth and height base_DxH (mm) | Profundidad y allura zócalo_DxH (mm) | 72x95 | 72x95 | 72x95 | 72x95 | 72x95 | 72x95 | - | - | - | - |
| Handle Dimensions_HxWxD (mm) | Dimensiones Tirador_HxWxD (mm) | 510x25x40 | 510x25x40 | - | 510x25x40 | - | - | 285x25x40 | - | 340x25x40 | - |
| product size (HxWxD) | Dimensiones_HxWxD (mm) SIN tirador | 820x295x575 | 820x395x575 | 880x395x555 | 820x595x575 | 820x595x555 | 880x595x555 | 455x595x559 | 455x595x559 | 595x595x559 | 595x595x559 |
| Adjustment measures_HxWxD (mm) | Encastre_HxWxD (mm) | 822x300x ≥575 | 822x400x ≥575 | 882x400x ≥555 | 822x600x ≥575 | 822x600x ≥555 | 882x600x ≥555 | 450x556x545 | 450x556x545 | 589x556x545 | 589x556x545 |
| Total Storage Volume (l) | Capacidad, Volumen almacenamiento (l) | 52 75 80 | 125 | 116 | 130 | 46 46 63 63 | |||||
| Energy Efficiency Class / 2021 | Clase energética / 2021 | F | F | F | F | F | F | E | E | F | F |
| Climate Class (Temp. Range) | Clase climática | ST | ST | ST | ST | ST | ST | ST | ST | ST | ST |
| Rated Power Supply | Alimentación red | 220-240V~/50Hz | 220-240V~/50Hz | 220-240V~/50Hz | 220-240V~/50Hz | 220-240V~/50Hz | 220-240V~/50Hz | 220-240V~/50Hz | 220-240V~/50Hz | 220 - 240 V - /50Hz | 220 - 240 V - /50Hz |
| Interior Light Number Qty | N° Unidades de lampara led interior | 4 | 4 | 4 | 4 | 4 | 4 | 2 | 2 | 4 | 4 |
| Consumption for indoor led unit (W) | Consumo por unidad led interior (W) | - | - | - | - | - | - | - | - | - | - |
| Consumption Total indoor led light (W) | Consumo Total luz led interior (W) | 2,4 | 2,2 | 2,8 | 2,4 | 2,2 | 2,8 | 1,2 | 1,2 | 1,6 | 1,4 |
| Power Input (W) | Potencia (W) | 100 | 100 | 100 | 100 | 100 | 100 | 100 | 100 | 100 | 100 |
| Current (A) | Corriente (A) | 1,2 | 1,2 | 1,2 | 1,2 | 1,2 | 1,2 | 1,2 | 1,2 | 1,2 | 1,2 |
| Energy Consumption (kWh/y.r) / 2021 | Consumo (Kwh/ año) / 2021 | 96 | 100 | 100 | 104 | 104 | 105 | 77 | 77 | 99 | 99 |
| INVERTER (Yes / No) | INVERTER (SI / NO) | Si Si Si | Si Si Si Si Si | Si | Si | ||||||
| Refrigerant Type | Refrigerante | R600a | R600a | R600a | R600a | R600a | R600a | R600a | R600a | R600a | R600a |
| Sound LwA (dB(A) re 1 pW) / 2021 | Potencia sonora LwA (dBA) / 2021 | 35 | 35 | 35 | 35 | 35 | 35 | 35 | 35 | 35 | 35 |
| CE Approval | Aprobación CE | Si Si Si Si | Si | Si | Si Si Si Si | ||||||
INOXPAN S.L., thanks you for choosing and placing your trust in a product of our brand Pando, which is distinguished by its Quality, Design and Innovation, being faithful to its origins and commitments.
PANDO WARRANTY CONDITIONS:
This appliance is guaranteed for 3 years from the date of purchase. This warranty exclusively covers the Pando product against any manufacturing defect that aff ects its proper functioning. In order for the warranty to be valid, it is essential to present the invoice or purchase receipt together with a photo of the label or registration number of the product to the Pando Authorised Service technician.
During this period, the Company undertakes to replace or repair free of charge any defective part due to a defect or manufacturing defect in the appliance, until it is in proper working order, as well as the necessary labour and expenses incurred as a result of such repair or replacement.
EXCLUSIONS FROM THE PANDO WARRANTY:
The following cases will not be covered by the guarantee of the product or wine cooler, or could be cause for cancellation of the same, in which case the user will be responsible for the cost of materials, labour and travel expenses of the technical service:
- The installation, servicing, cleaning or maintenance of the appliance.
- Any breakdown, malfunction or malfunction caused by incorrect installation or use.
- Breakdowns or damage caused by failure to observe or follow the safety instructions, recommendations for use and maintenance in the appliance's manuals.
- When the product is intended for commercial or non-residential use, for which it is not intended.
- Malfunctions or damage to the appliance due to non-compliance with the instructions described in the user manual, installation and ventilation instructions for the appliance.
- Breakdowns or damage caused by transport or transfer, and handling of the device by unauthorised personnel not belonging to this company or to the Pando brand.
- Bumps, dents, scratches or scrapes, broken glass.
- Presence of foreign bodies foreign to the device, inside or outside the product.
- The product is not accessible because there are elements that prevent easy and safe access. The means required for the authorised Pando technician to access the device shall be at the user's expense and responsibility.
- Improper handling of product wiring and connections.
- Faults or damage to the product caused by incorrect power supply or electrical connection.
- Aesthetic, wear and tear components, such as light screens, filters, lamps (LED), shelves, drawers, lids, gaskets, etc.
- Rust, stains, discolouration caused by improper application or unprotected exposure to corrosive elements such as cleaning products not recommended by the manufacturer and unsuitable cleaning agents, such as those containing corrosive chemicals, and exposure to sea breeze (saltpetre).
• Any damage to the wines or any other contents due to possible incidents or malfunctions of the appliance.
- Breakdowns or damage caused by variations in the electricity supply or fortuitous and natural causes of atmospheric or geological origin such as storms, lightning, earthquakes, floods, etc.
- Appliances from resale, second hand, trade-in or exhibitions that are more than three years old from the date of manufacture
INOXPAN, S.L., is expressly excluded from any liability for any direct or indirect damage to persons or things caused by a product installed, manipulated, used and/or maintained improperly.
Contact details Offi cial Authorised Pando Service Centre
ESPAÑA, PORTUGAL Y ANDORRA OTHER COUNTRIES:
https://www.pando.es/asistencia-tecnica/

EN
https://www.pando.es/en/after-sales-services/

natural_image
Simple line drawing of a trash bin with no text or symbolsnatural_image
Interior view of a refrigerator with multiple wine bottles on shelves and a door open, showing internal wiring (no text or symbols visible)natural_image
Technical line drawing showing two mechanical assembly steps with mounting holes and fasteners (no text or symbols)- PVMB 30-16
- PVMB 40-28
- PVMB 60-46CRR
- PVMBP 60-44
- PVMBP HD 40-25
• PVMBP HD 60-52
natural_image
Diagram of a cabinet with open door and internal shelves, showing structural components (no text or symbols)• PVMAV 60-23 • PVMAVP 45-16
• PVMAV 88-45 • PVMAVP 60-23
• PVMAV 124-65 • PVMAVP 88-45
• PVMAV 178-101 • PVMAVP 124-65
- PVMAVP 178-101

natural_image
Display shelf with glass domes and dark liquid, no visible text or symbols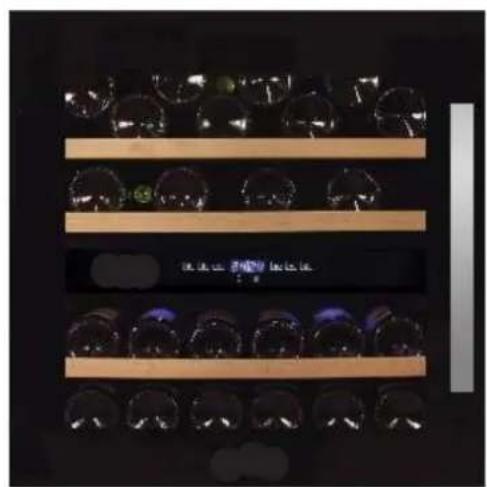
natural_image
Display of glass bowls arranged in three rows on wooden shelves, no visible text or symbolsAngoli di taglio

1
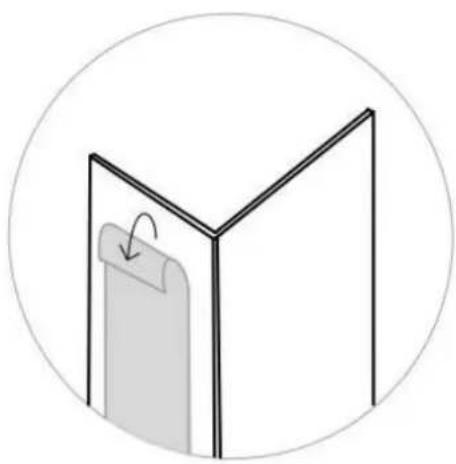
natural_image
Simple line drawing of a Y-shaped structure with a folded paper or clip, no text or symbols present.2

natural_image
Isometric line drawing of a 3D cube with internal structural components and directional arrows indicating movement (no text or symbols)ISTRUZIONI PER L'USO
- PVMAVP 45-16
- PVMAVP 60-23
- PVMAVP 88-45
- PVMAVP 124-65
PVMAVP 178-101
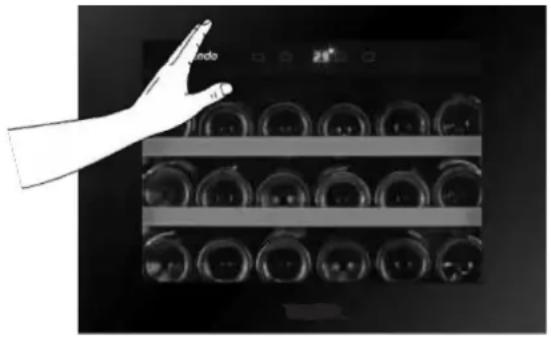
natural_image
Hand pointing at a wall-mounted device with multiple circular components (no visible text or symbols)natural_image
Simple line drawing of a circular object on a horizontal surface with an arrow indicating rotation (no text or symbols)Luce interna
NE INTERNA
natural_image
Technical line drawing of a mechanical device with internal components and an inset showing a close-up view of the component (no text or symbols present)natural_image
Technical line drawing of a rack-mounted device with a hand operating the tray, showing internal structure and a magnified inset (no text or symbols)natural_image
Line drawing of a rectangular container placed on a wooden platform (no text or symbols)Pulizia dell'unità
natural_image
Diagram of a circular grid pattern with bidirectional arrows on both sides (no text or symbols)https://www.pando.es/en/after-sales-services/
FR
natural_image
Interior view of a refrigerator with multiple bottles on shelves and a door open, showing wiring connections (no text or symbols visible)natural_image
Technical line drawing of mechanical components with no visible text or symbols- PVMB 30-16
- PVMB 40-28
• PVMB 60-46 CRR - PVMBP 60-44
• PVMBP HD 40-25
• PVMBP HD 60-52
natural_image
Diagram of a cabinet with shelves and doors open, showing internal components and directional arrows (no text or symbols)- PVMAV 60-23
- PVMAV 88-45
- PVMAV 124-65
- PVMAV 178-101
- PVMAVP 45-16
- PVMAVP 60-23
- PVMAVP 88-45
- PVMAVP 124-65
• PVMAVP 178-101

ВНИМАНИЕ!
natural_image
Diagram of a Y-shaped structure with a folded paper clip and a circular outline, no text or symbols present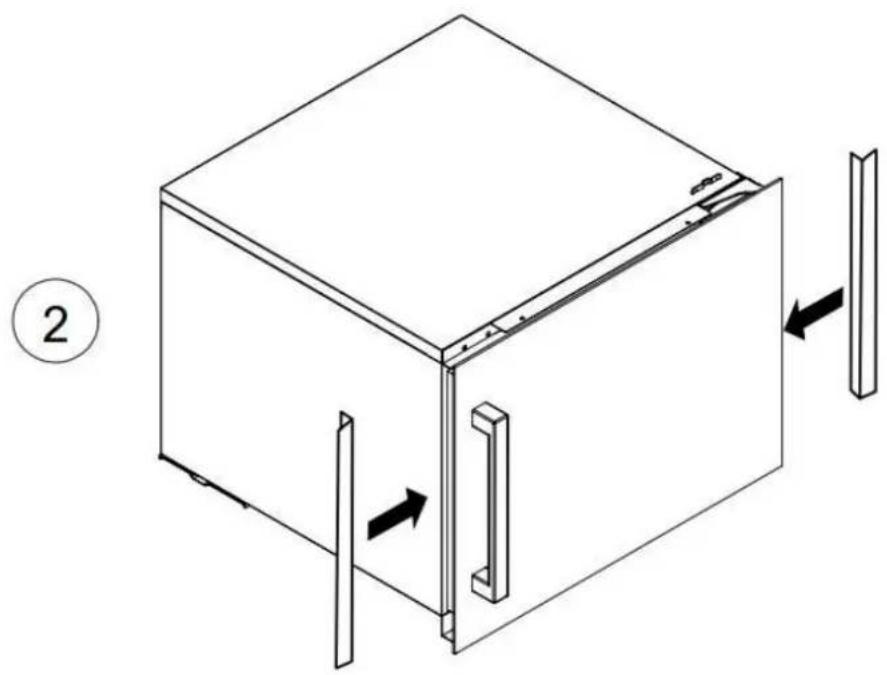
natural_image
Isometric line drawing of a 3D cube with internal vertical supports and directional arrows indicating movement (no text or symbols)natural_image
Simple line drawing of a rectangular frame with a circular hole and curved arrow, no text or symbols present.natural_image
Technical line drawing of a metal shelving unit with an arrow indicating direction (no text or symbols)natural_image
Technical line drawing of a server rack with an inset showing the internal structure (no text or symbols)natural_image
Technical line drawing of a rack-mounted device with a hand inserting a component, showing internal structure and assembly (no text or symbols)natural_image
Line drawing of a rectangular container placed on a wooden platform (no text or symbols)Очистка прибора
natural_image
Diagram of a circular grid pattern with directional arrows on both sides (no text or symbols)PVAMAV 88-45 / PVMAVP 88-45
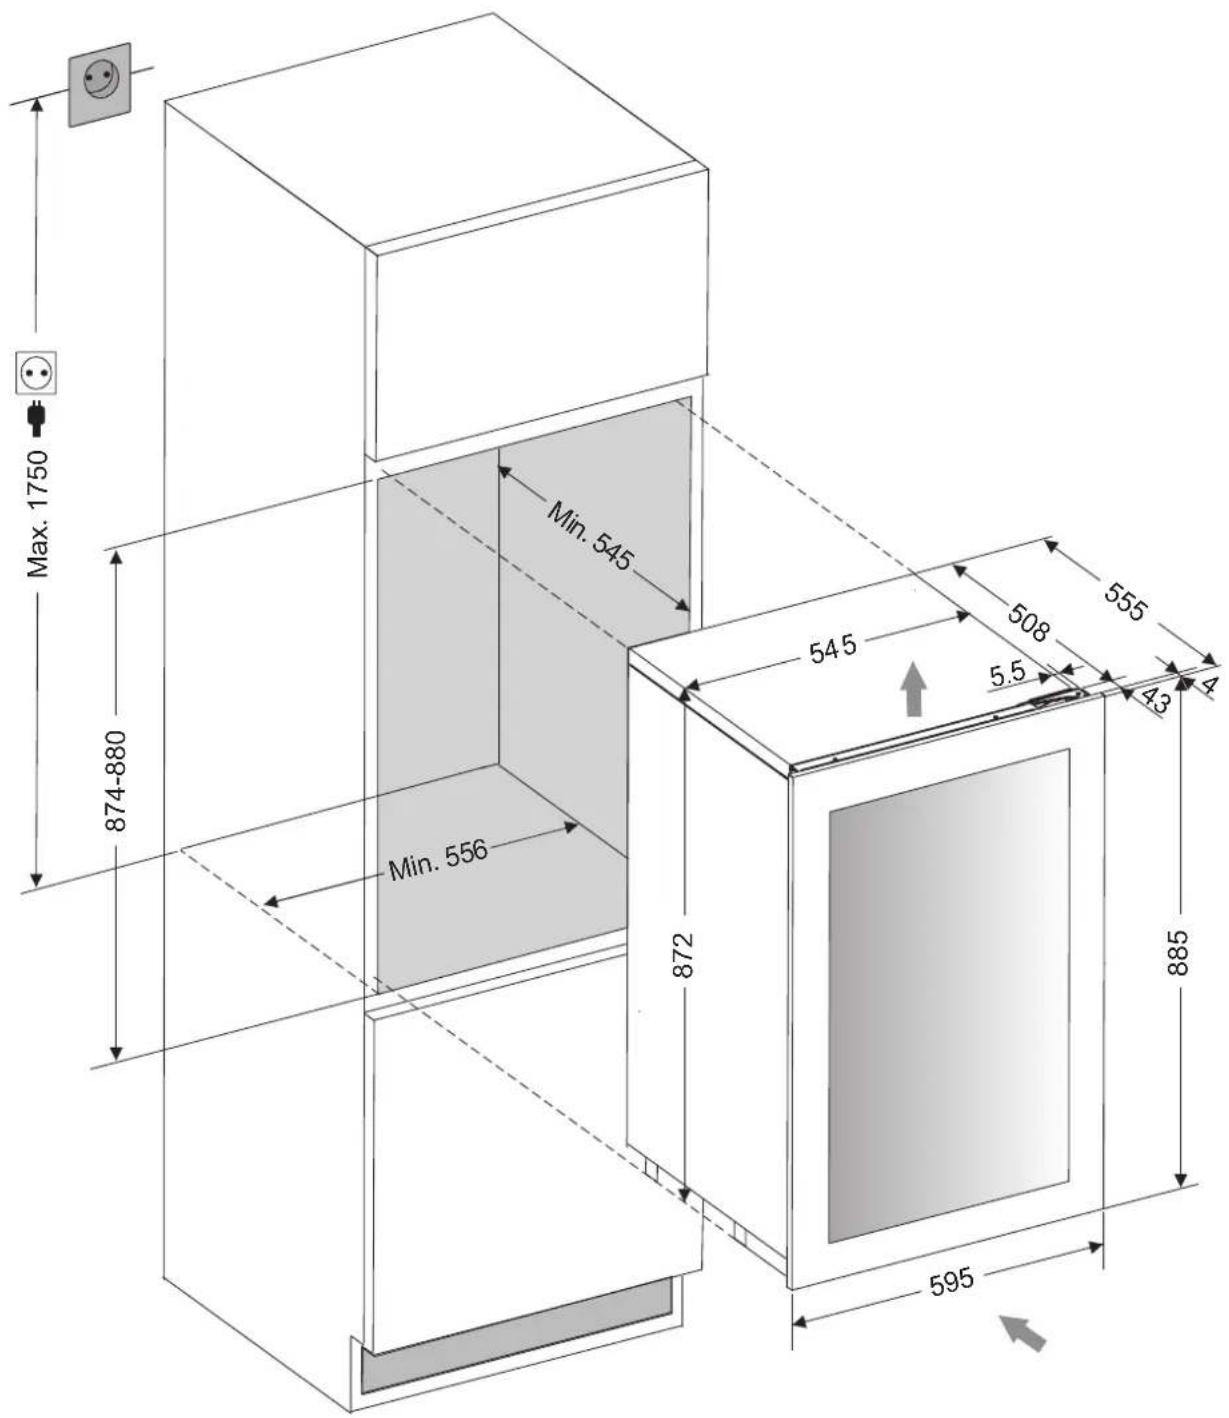
PVAMAV 88-45 / PVMAVP 88-45
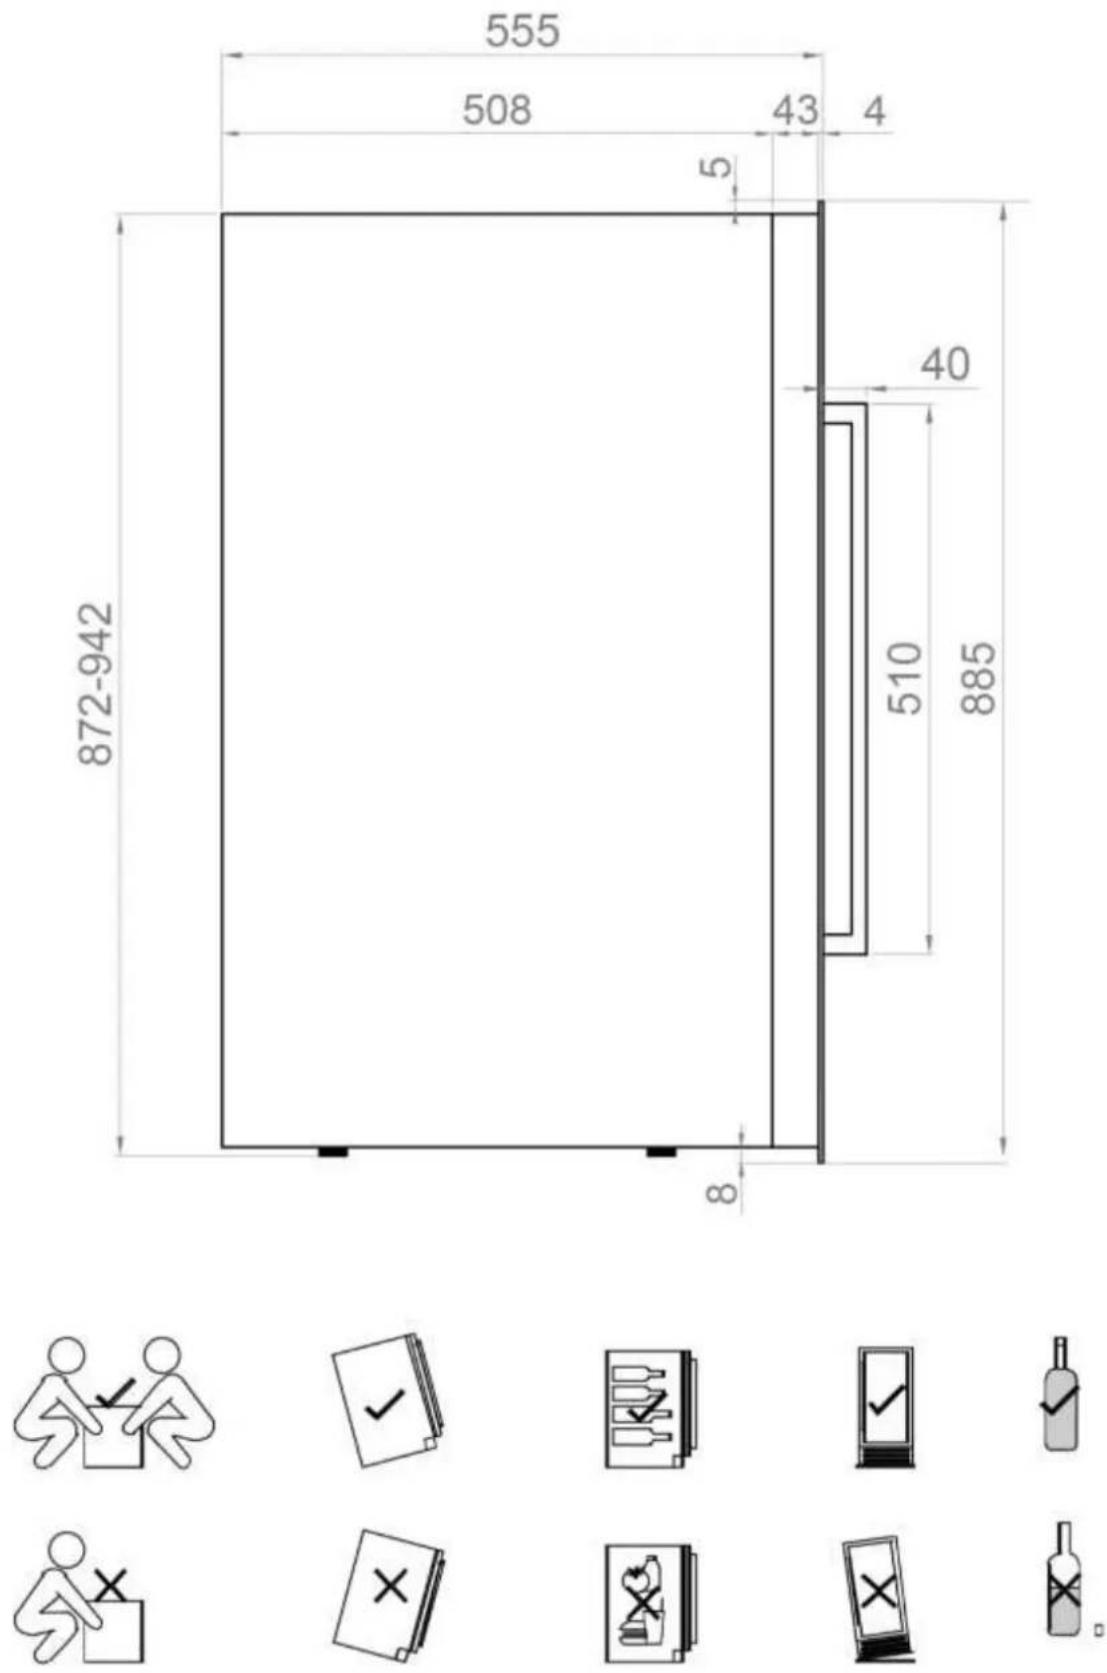
PVAMAV 124-65 / PVMAVP 124-65
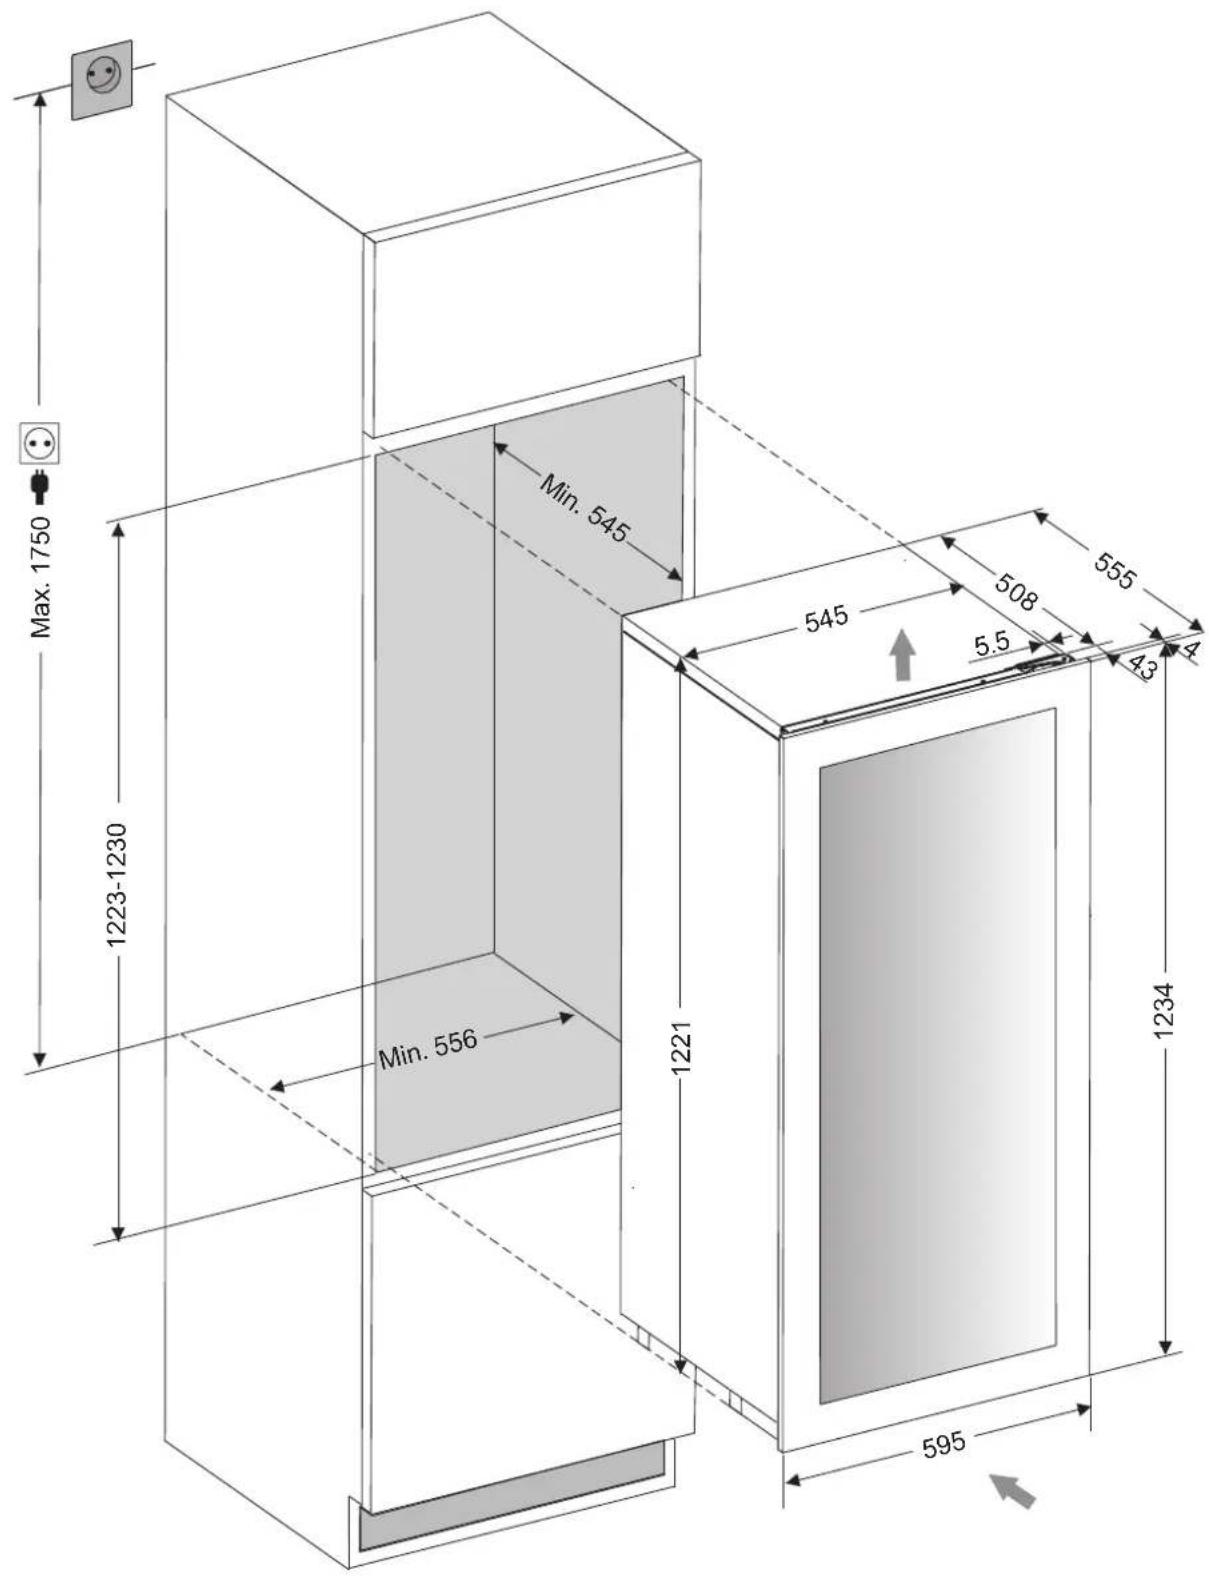
PVMB 30-16
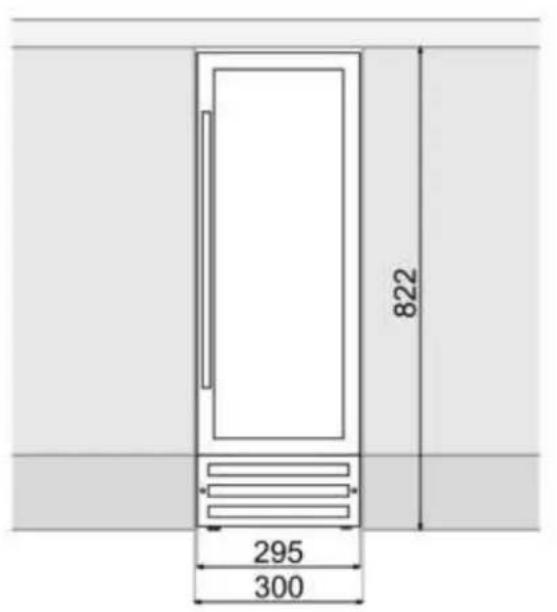
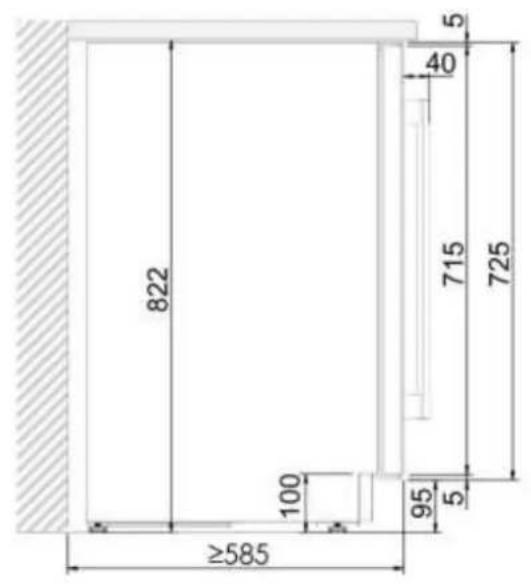
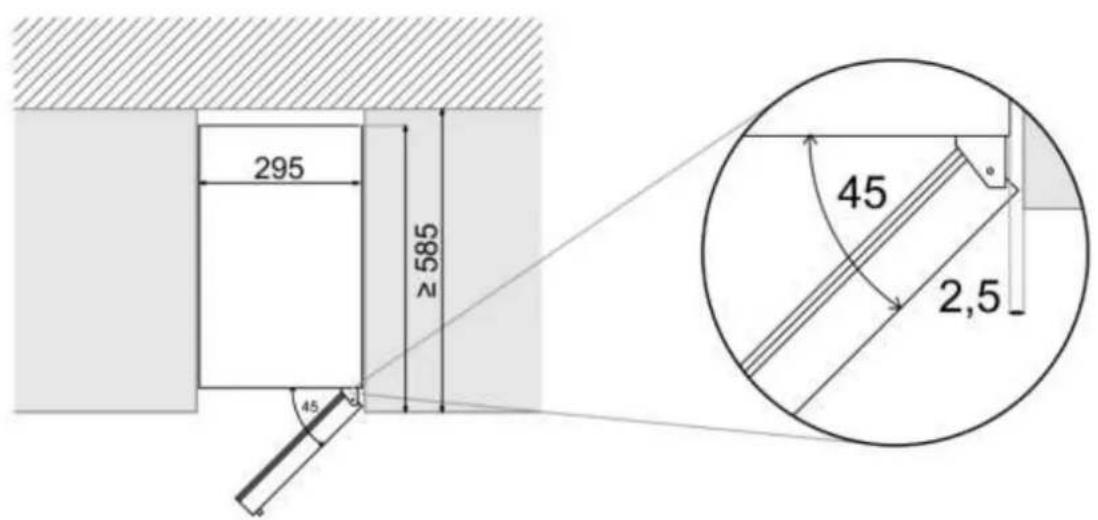

PVAMAV 124-65 / PVMAVP 124-65
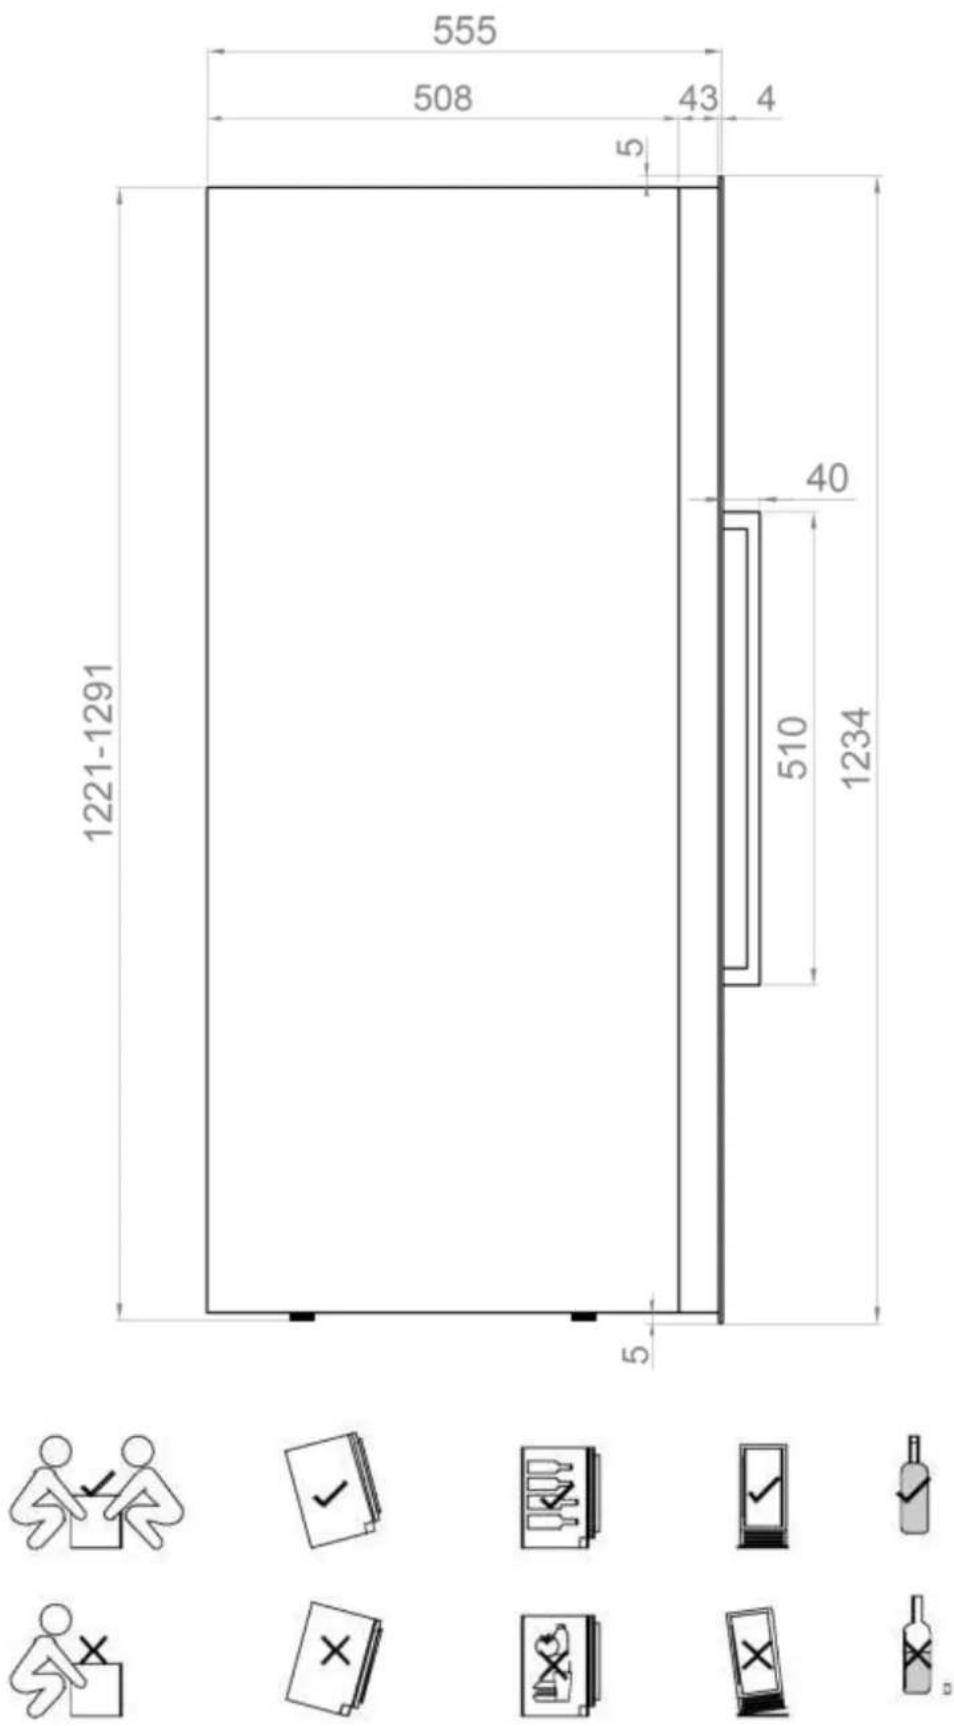
PVAMAV 178-101 / PVMAVP 178-101
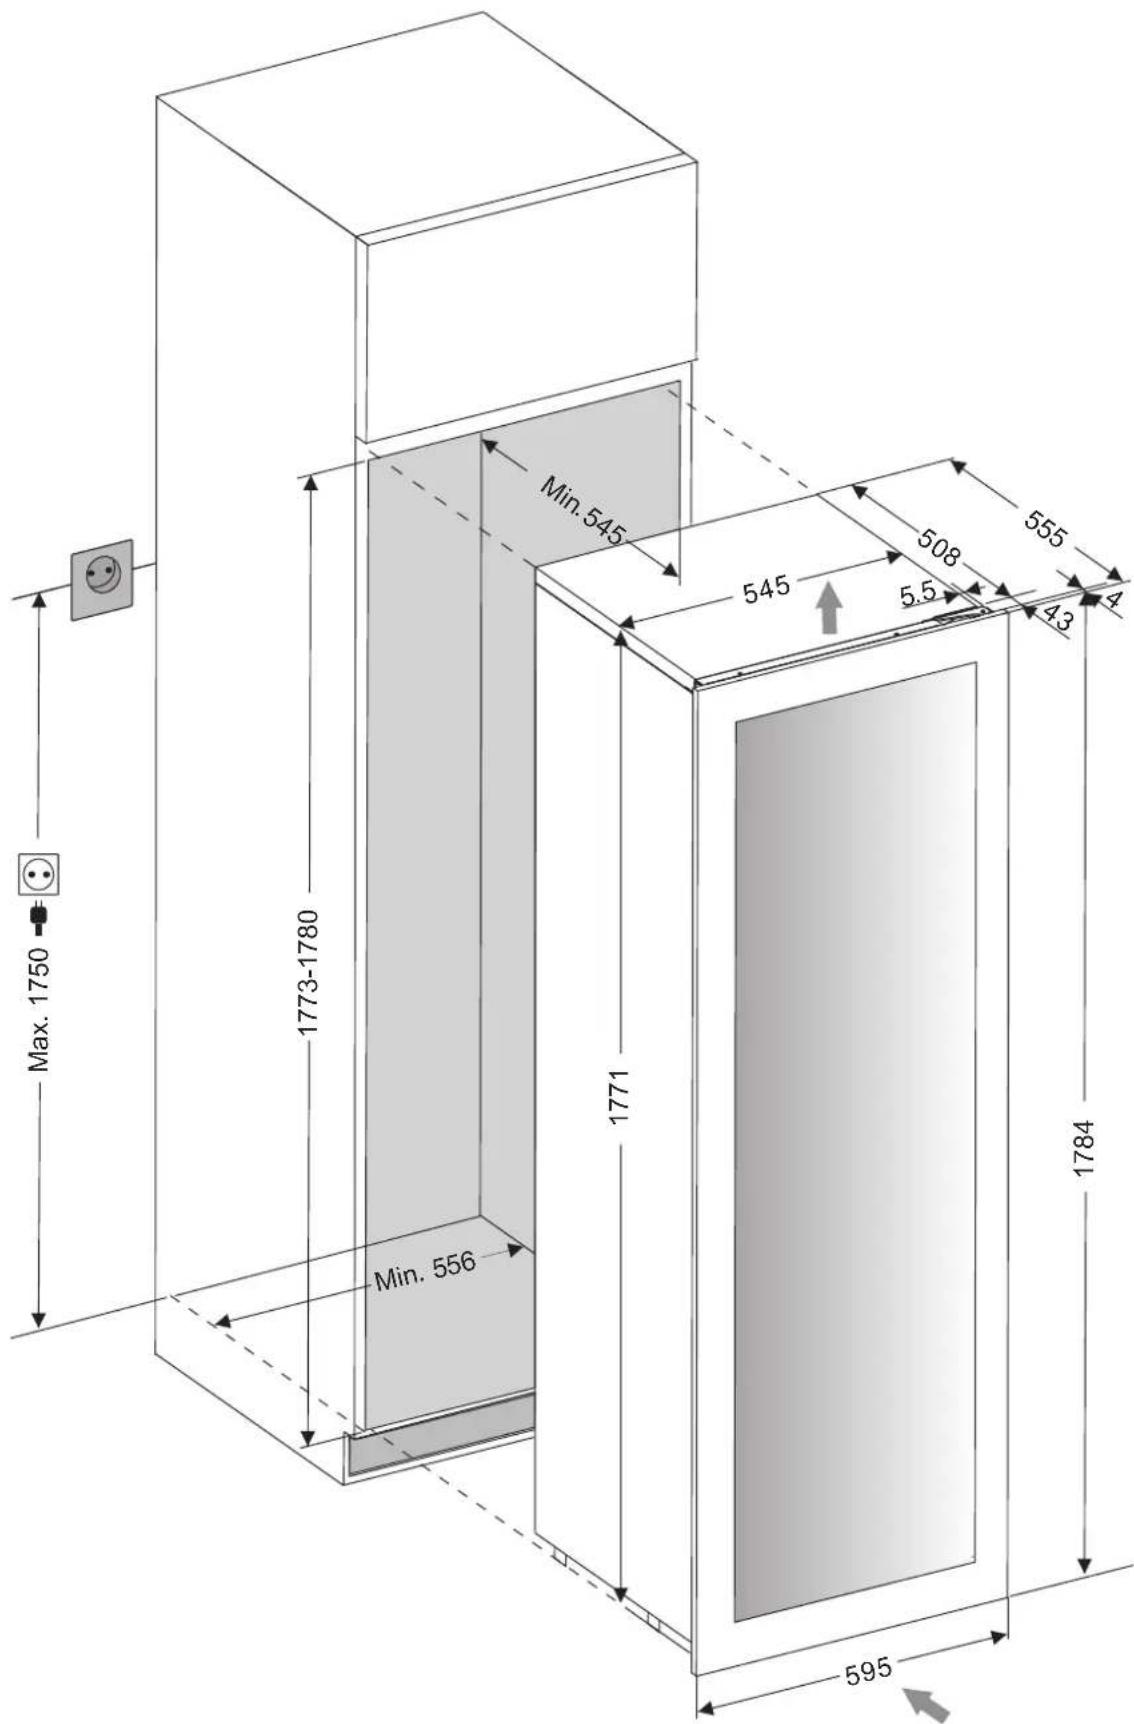
PVAMAV 178-101 / PVMAVP 178-101
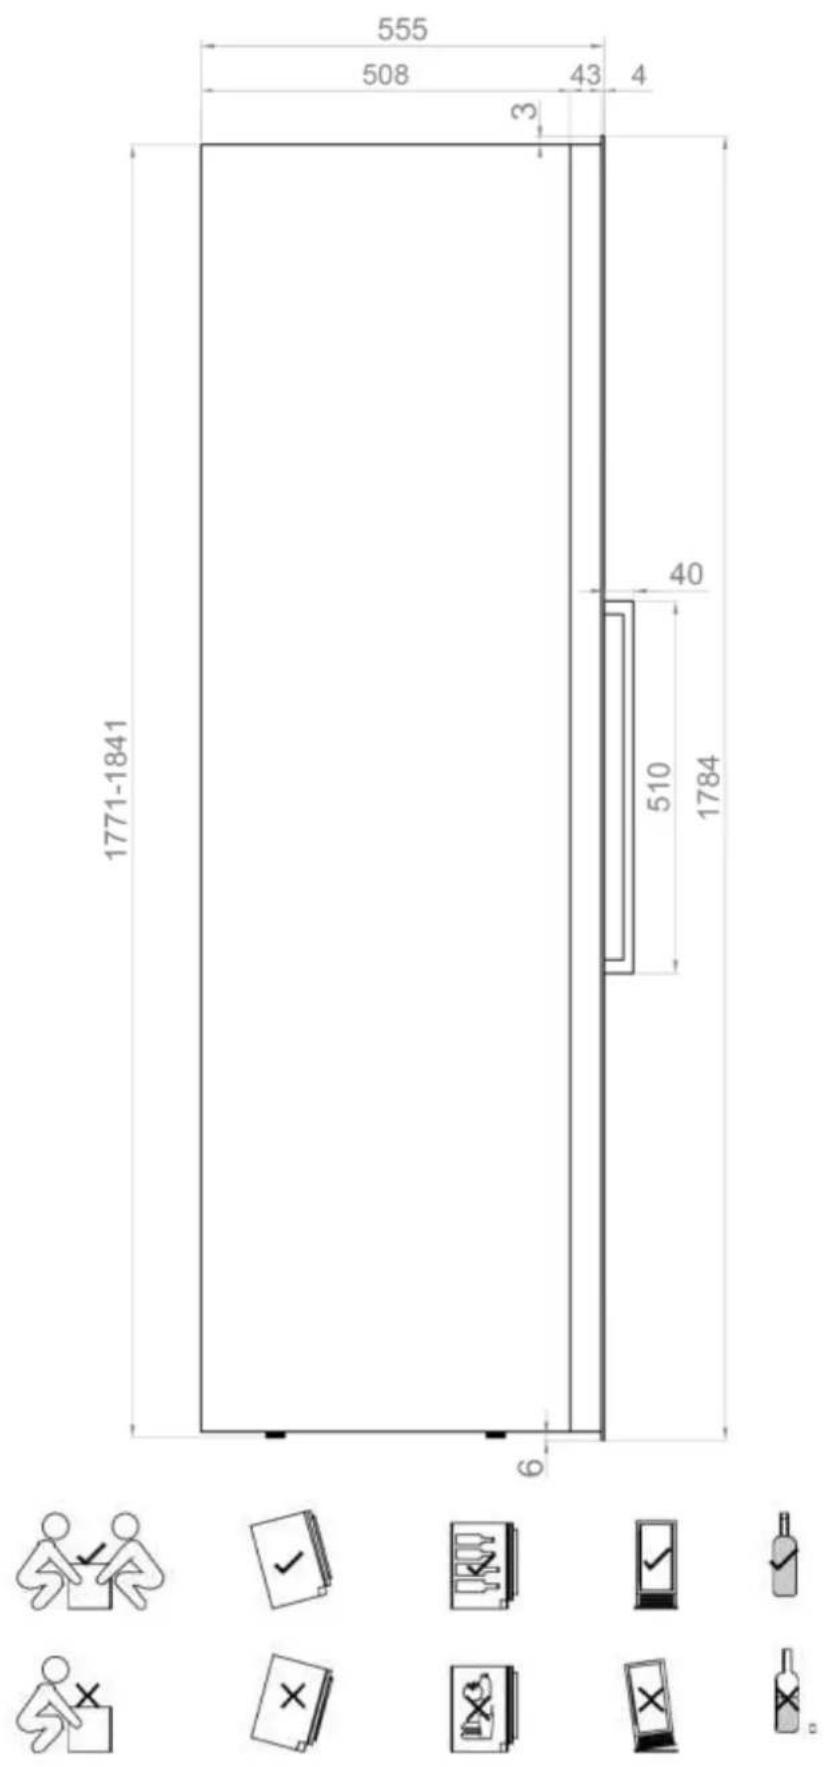
DISTRIBUCIÓN DE BOTELLAS DISTRIBUIÇÃO DE GARRAFAS DISTRIBUTION DE BOUTEILLES BOTTLE DISTRIBUTION DISTRIBUZIONE DELLE BOTTIGLIE РАЗДАЧА БУТЫЛОК
PVMB 30-16
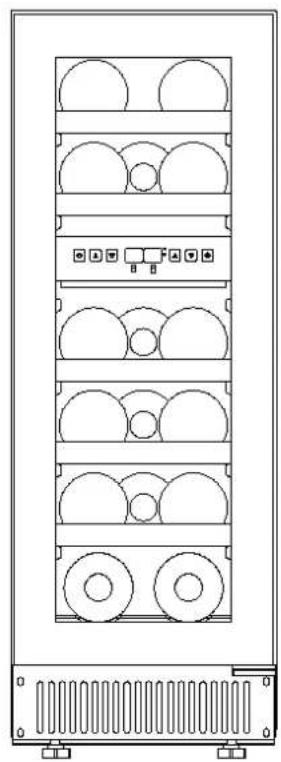
natural_image
Technical line drawing of a multi-chamber rack-mounted server unit with circular components and control buttons (no text or labels)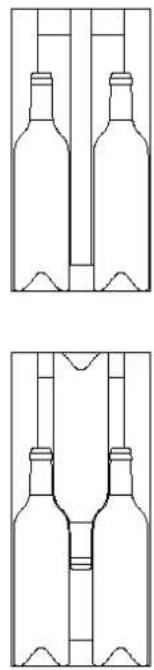
natural_image
Two identical line drawings of wine bottles with no text, numbers, or symbols present.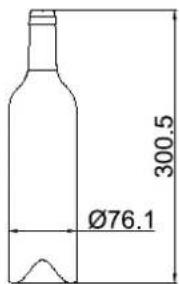
PVMB 40-28 / PVMBP-HD 40-28
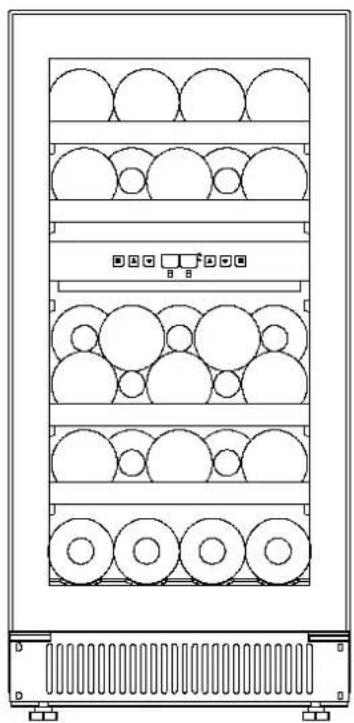
natural_image
Technical line drawing of a multi-tiered rack-mounted device with circular components and control panel (no text or symbols)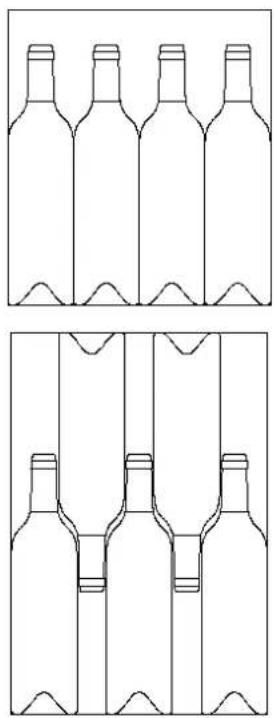
natural_image
Line drawings of five wine bottles arranged in two rows (no text or symbols)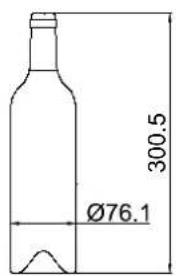
PVMBP HD 40-25
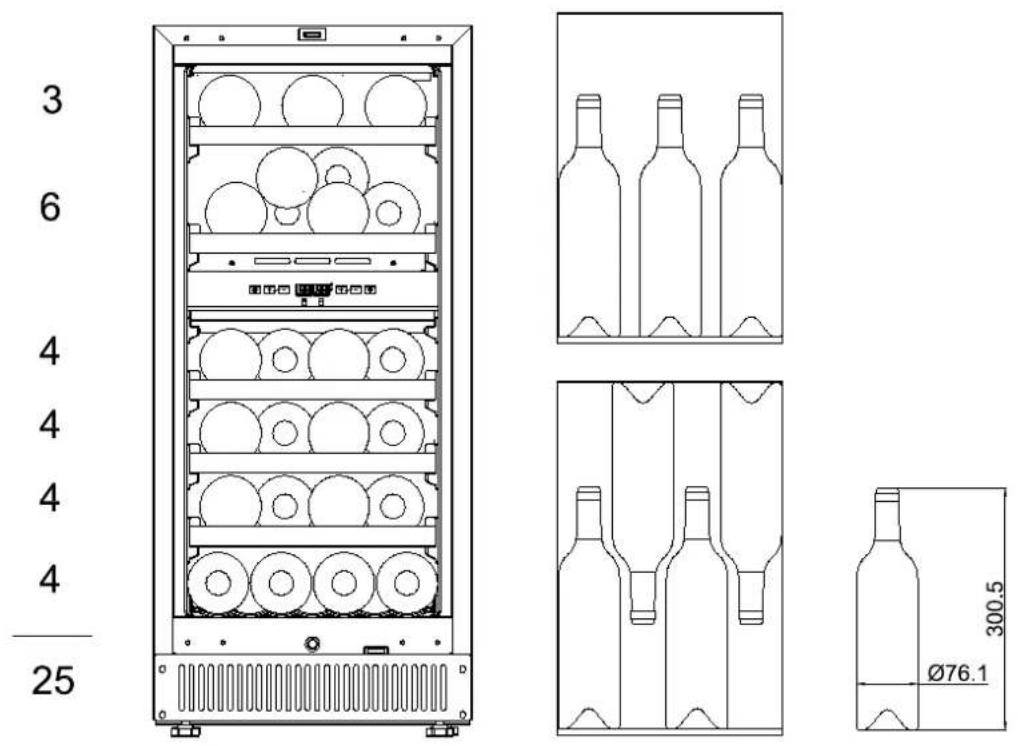
PVMB 60-46
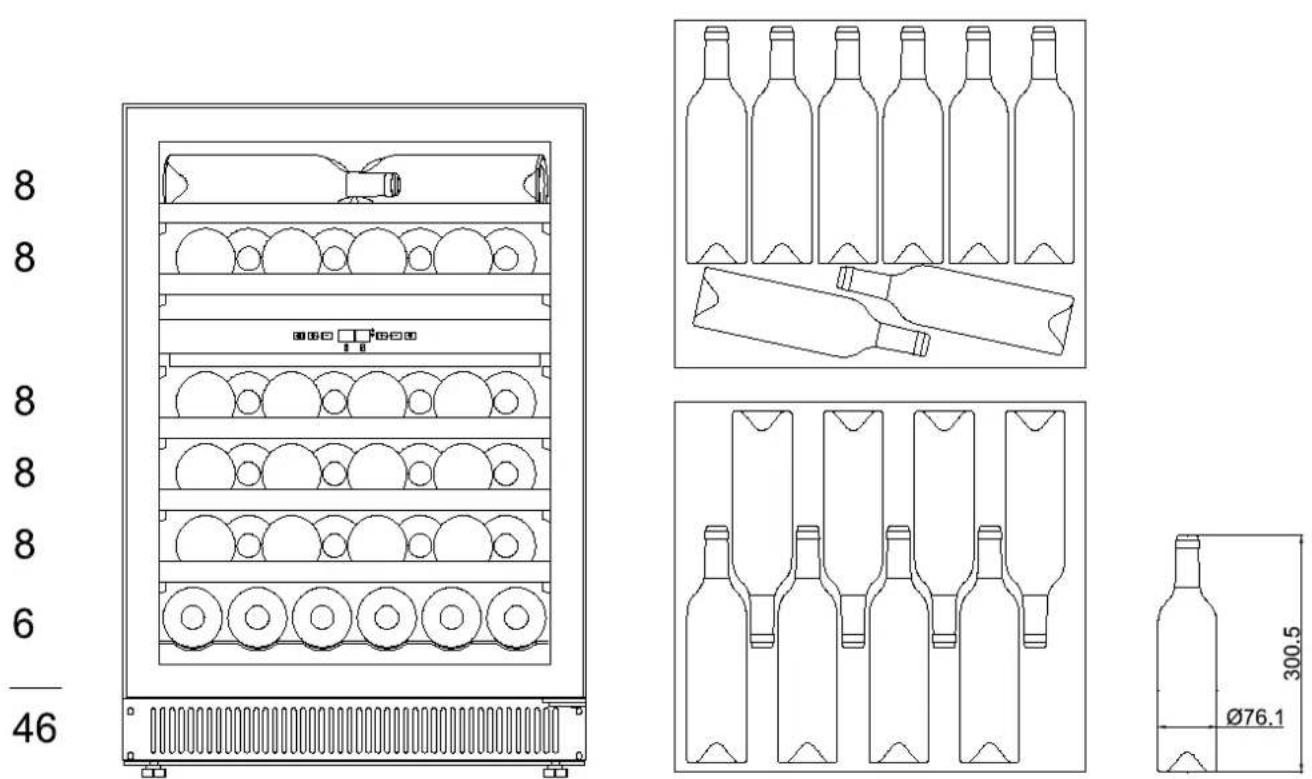
PVMBP 60-44
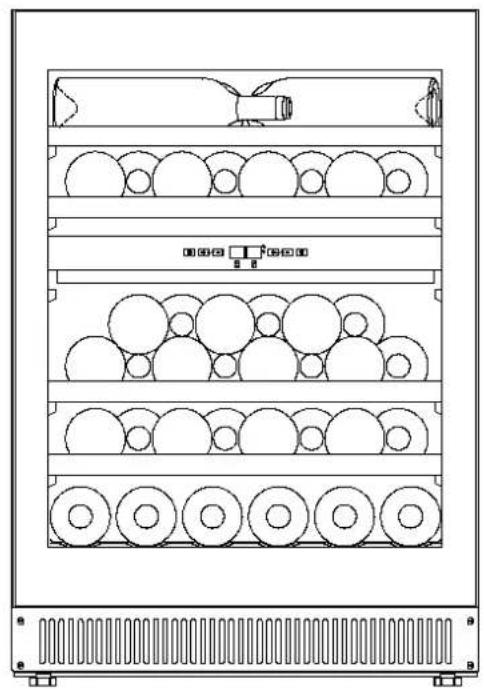
natural_image
Technical line drawing of a multi-tiered rack-mounted device with circular components and mounting brackets (no text or symbols)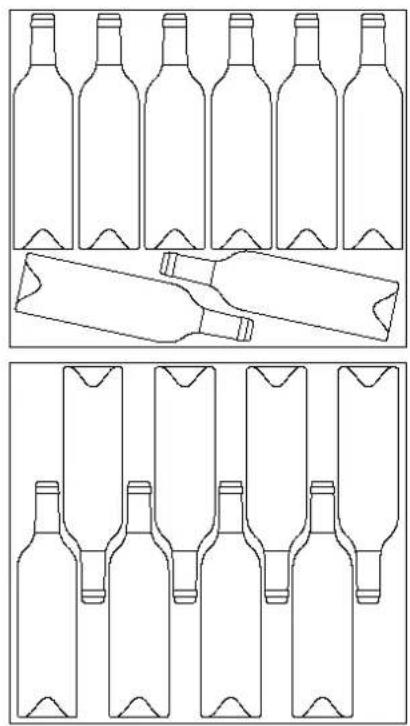
natural_image
Line drawings of wine bottles arranged in two rows, showing different shapes and packaging designs (no text or symbols)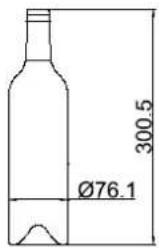
PVMBP 60-52 / PVMBP HB 60-52
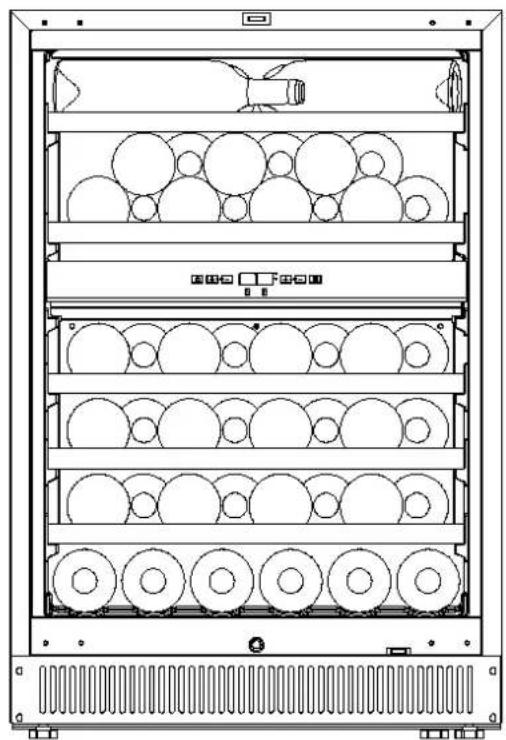
natural_image
Technical line drawing of a multi-level rack-mounted server unit with circular components and ventilation grilles (no text or symbols)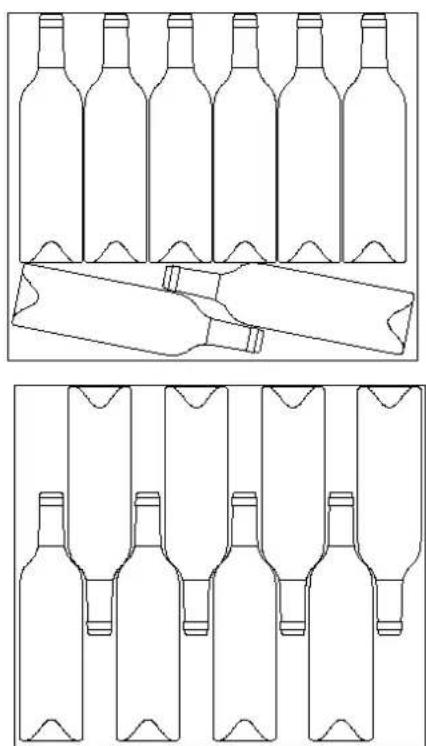
natural_image
Line drawings of multiple bottles arranged in rows, with one bottle partially visible below (no text or symbols)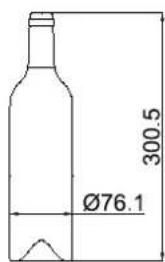
PVMAV 45-16 PVMAVP 45-16
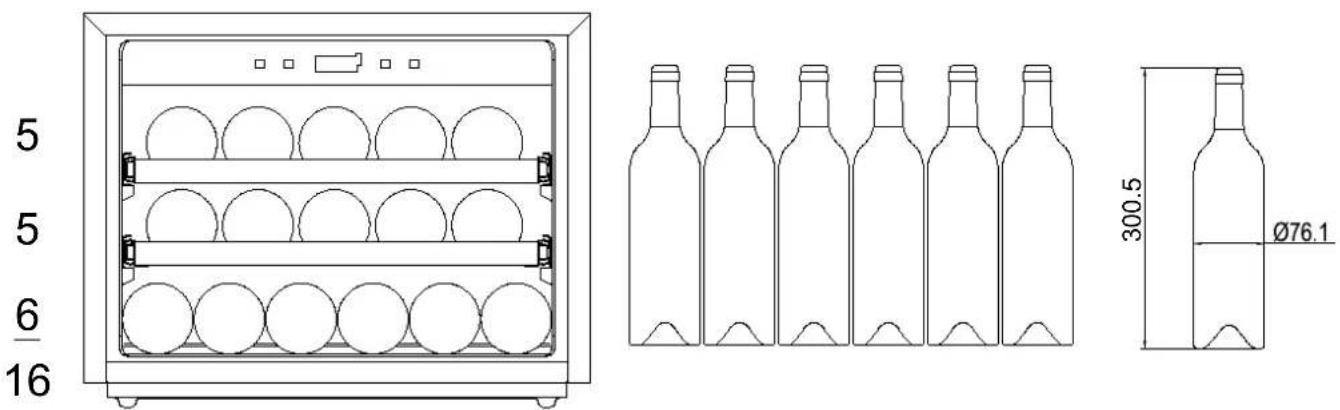
PVMAV 60-23 / PVMAVP 60-23
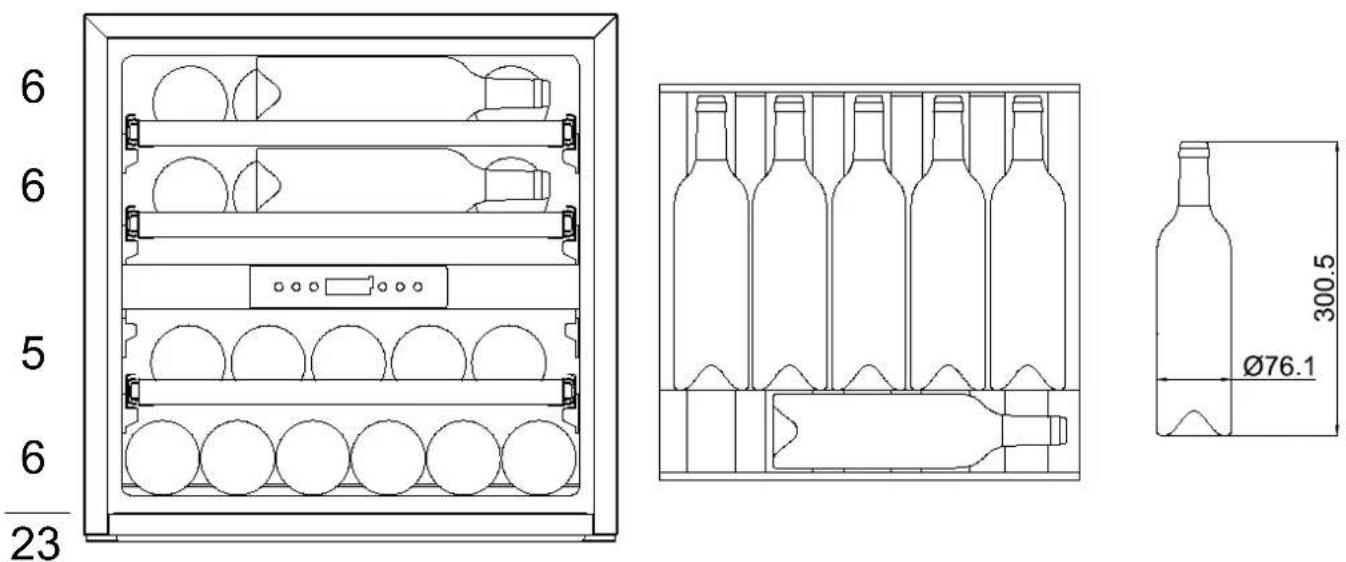
PVMAV 88-45 / PVMAVP 88-45
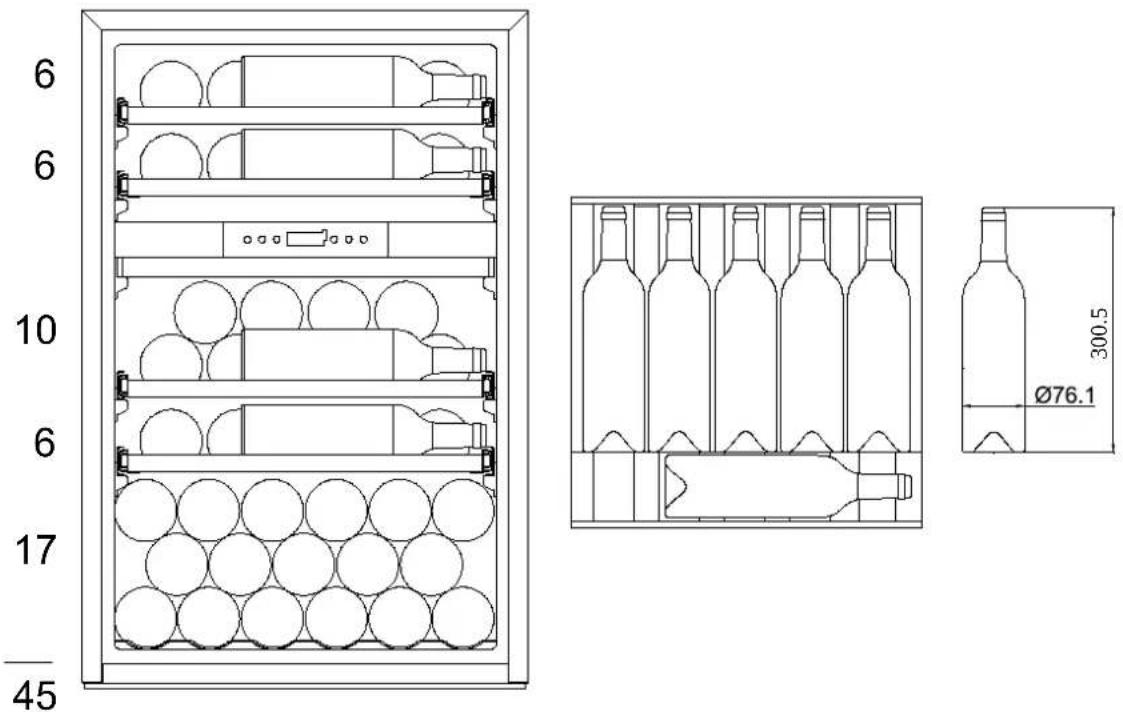
PVMAV 124-65 / PVMAVP 124-65
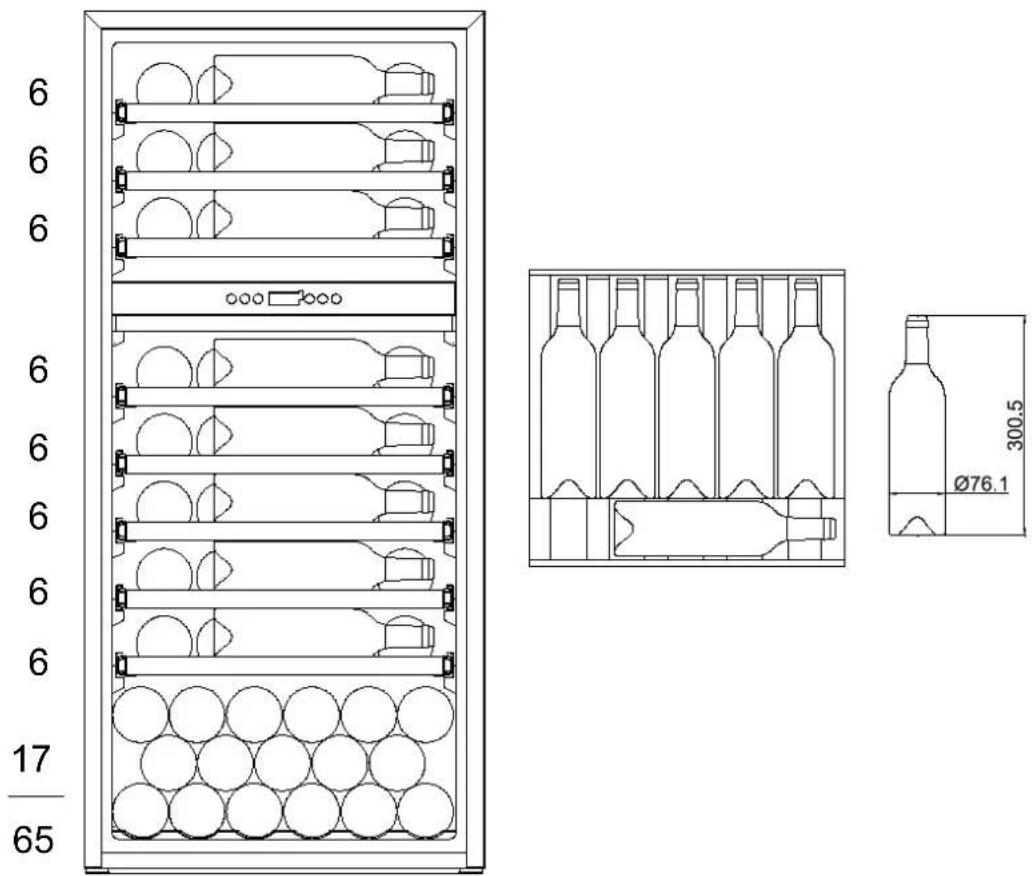
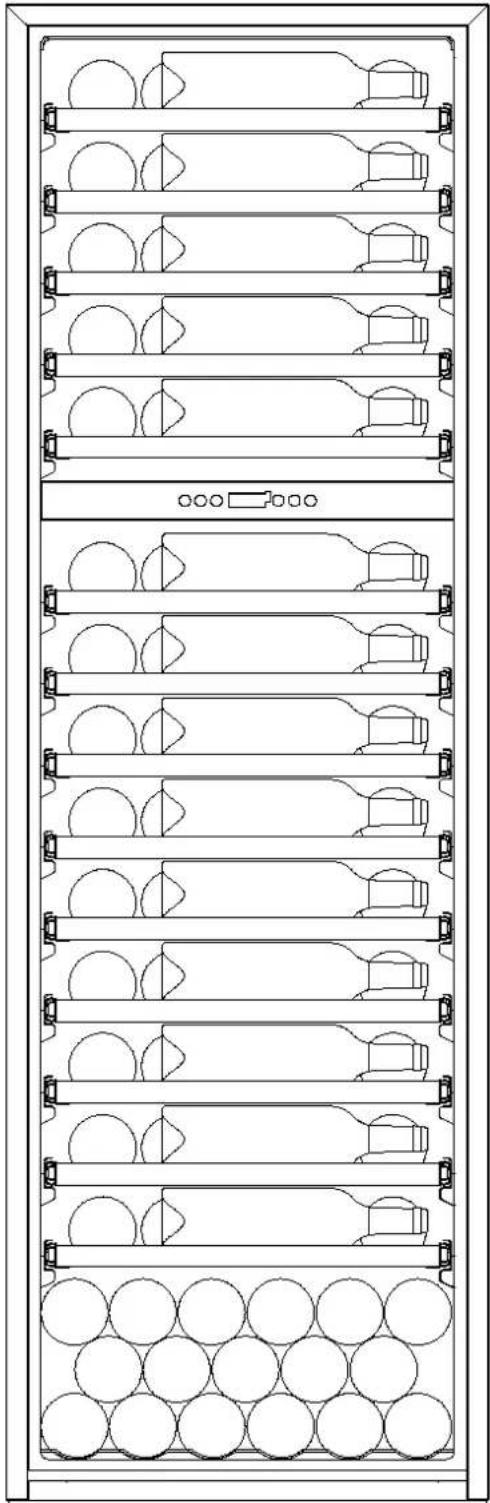
natural_image
Technical line drawing of a multi-tiered rack cabinet with circular components and mounting brackets (no text or symbols)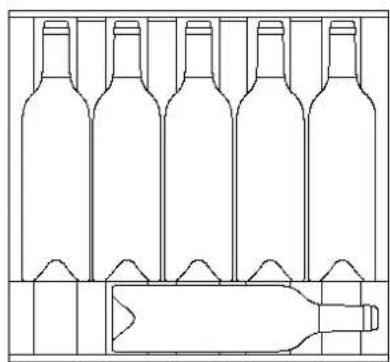
natural_image
Line drawing of a wine bottle arrangement with a separate empty bottle (no text or symbols)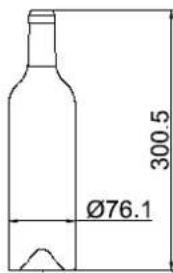
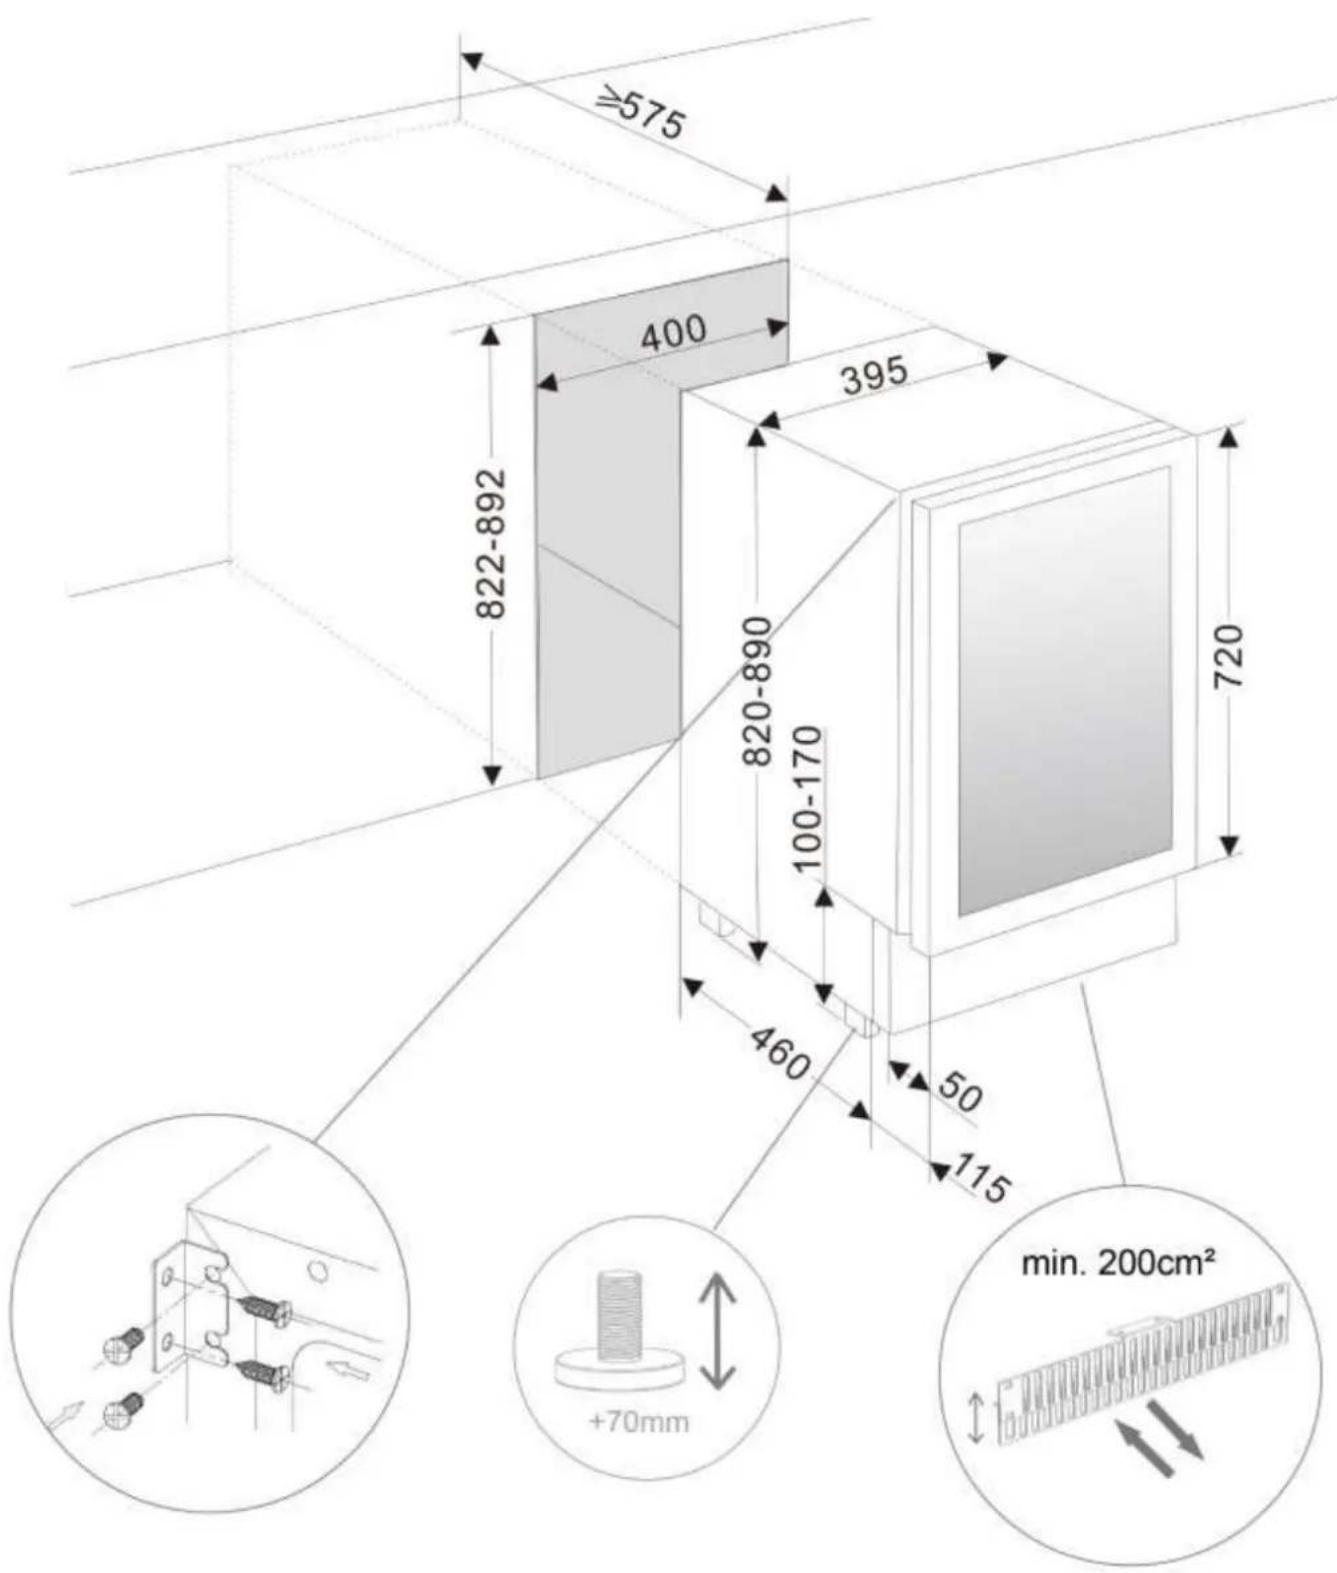
PVMB 30-16
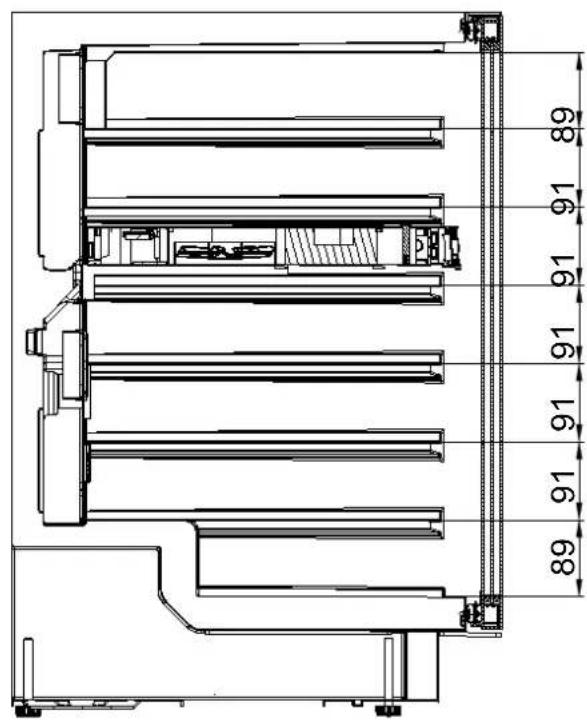
PVMB 40-28
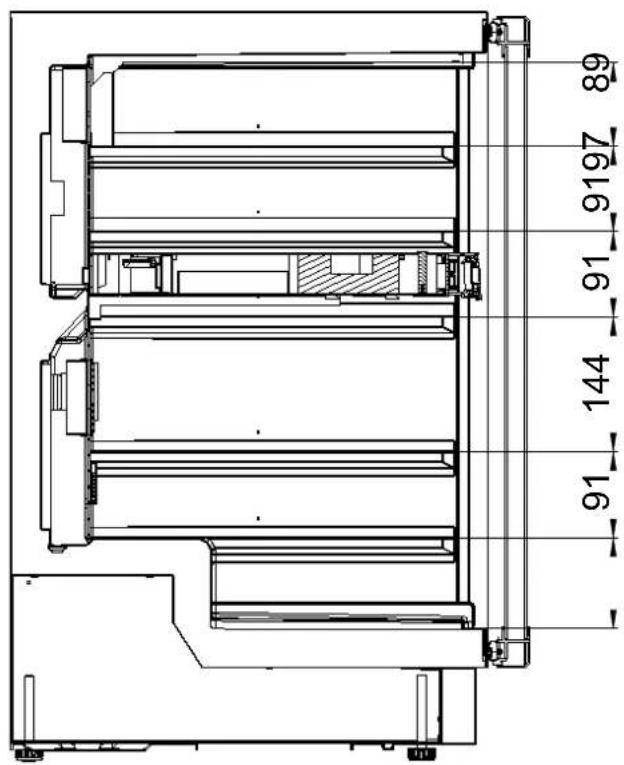
PVMBP HD 40-25
PVMB 60-46
PVMBP 60-44
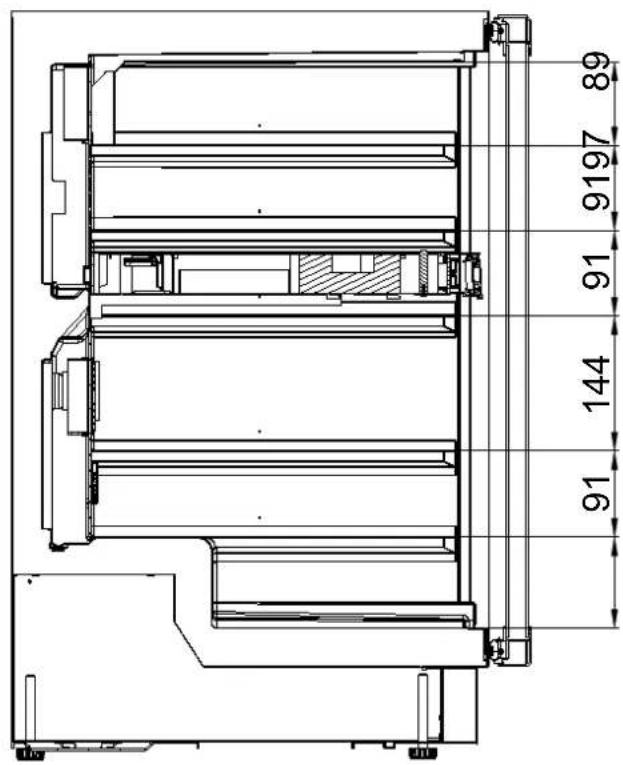
PVMBP HB 60-52
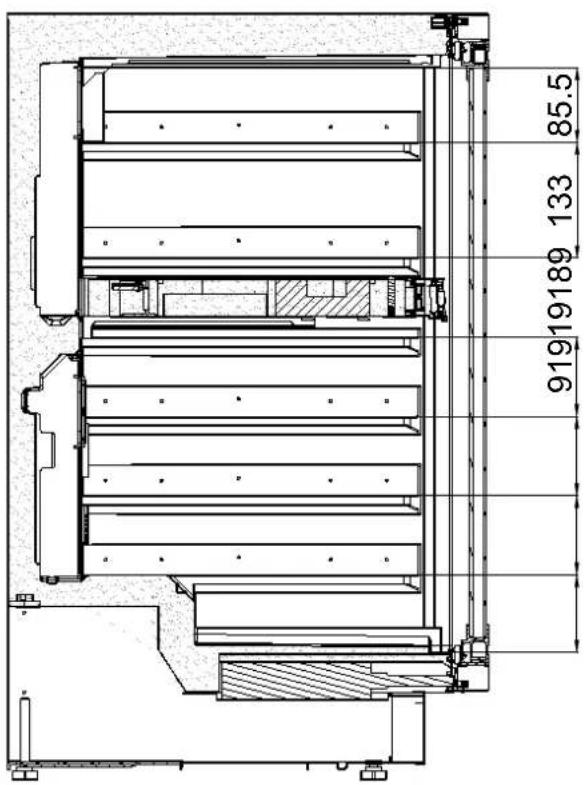
PVMAV 45-16 / PVMAVP 45-16
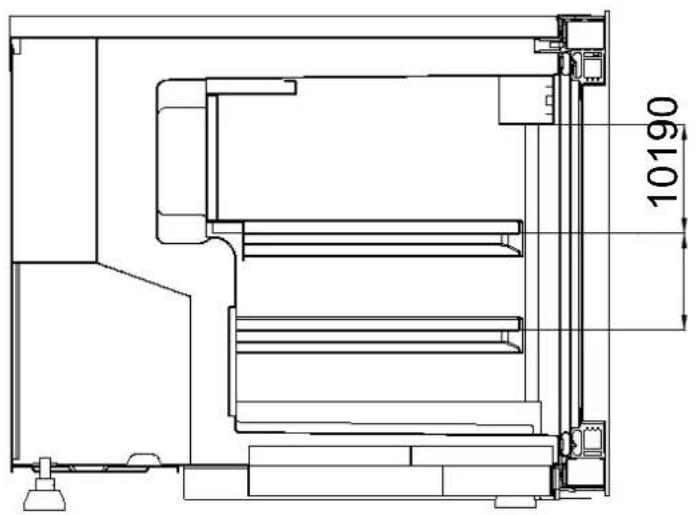
PVMAV 60-23 / PVMAVP 60-23
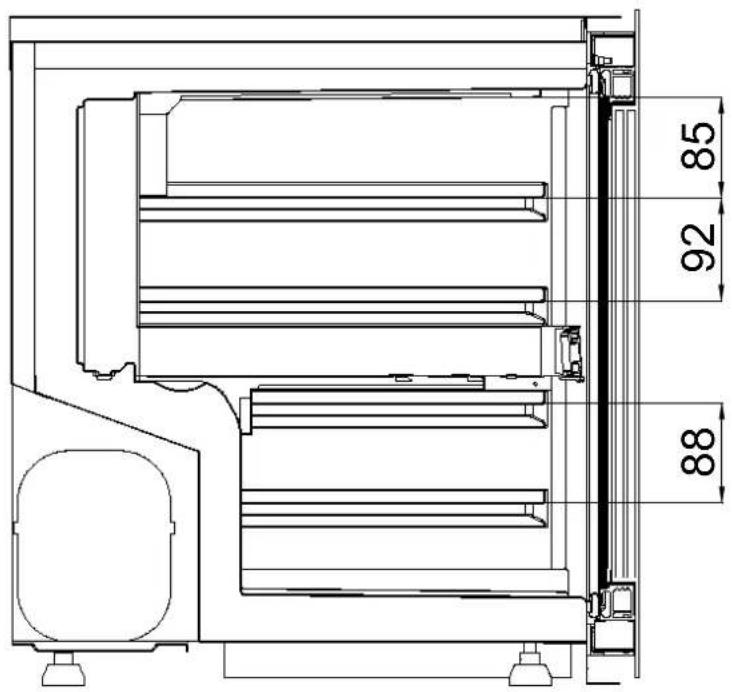
PVMAV 88-45 / PVMAVP 88-45
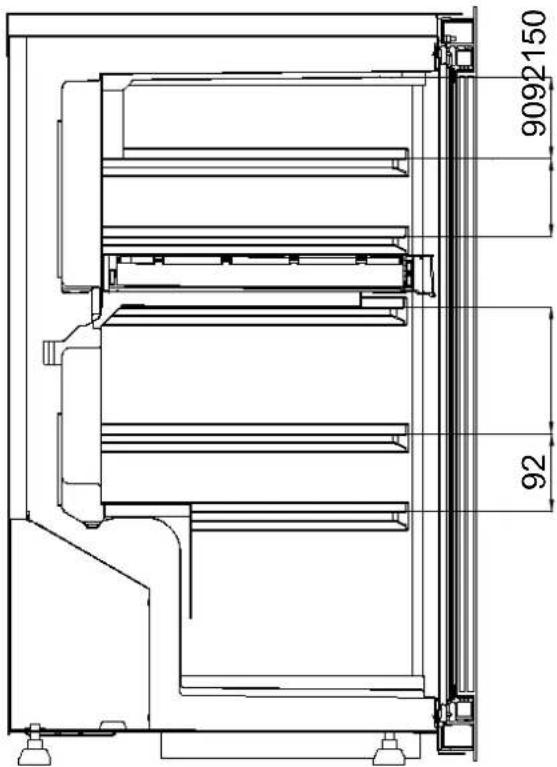
PVMAV 124-65 / PVMAVP 124-65
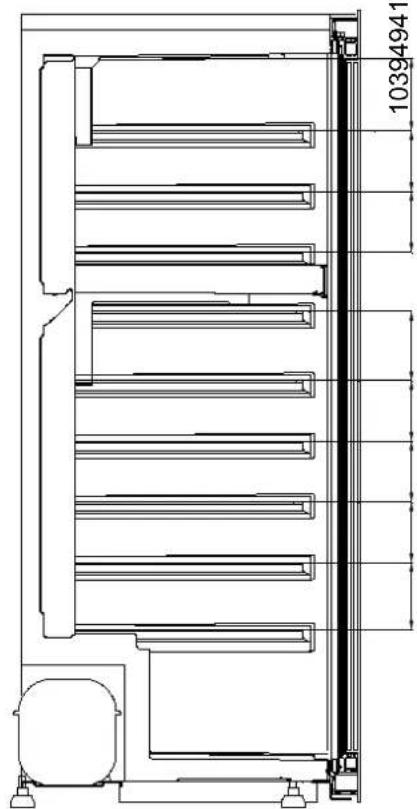
PVMAV 178-101 / PVMAVP 178-101
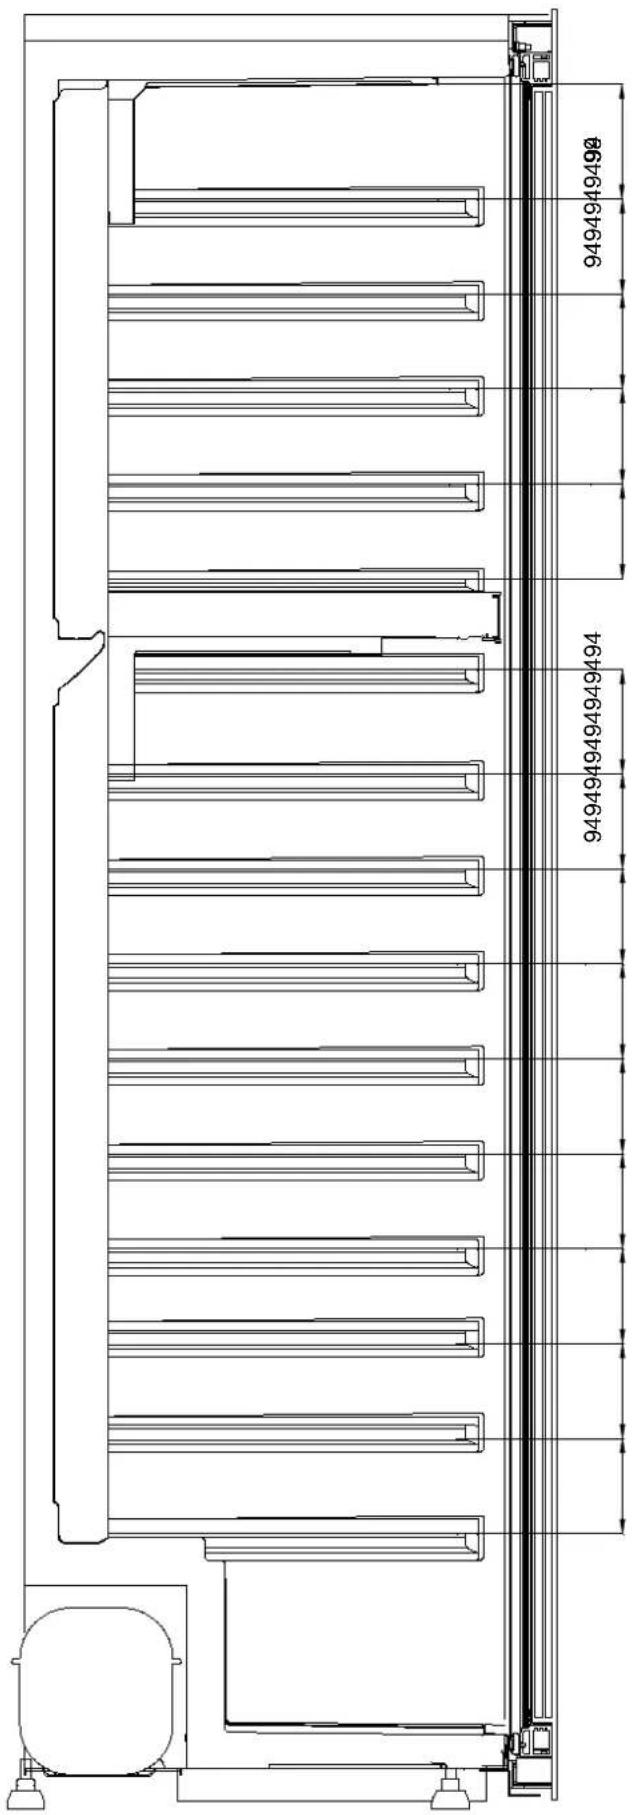
PVMB 40-28
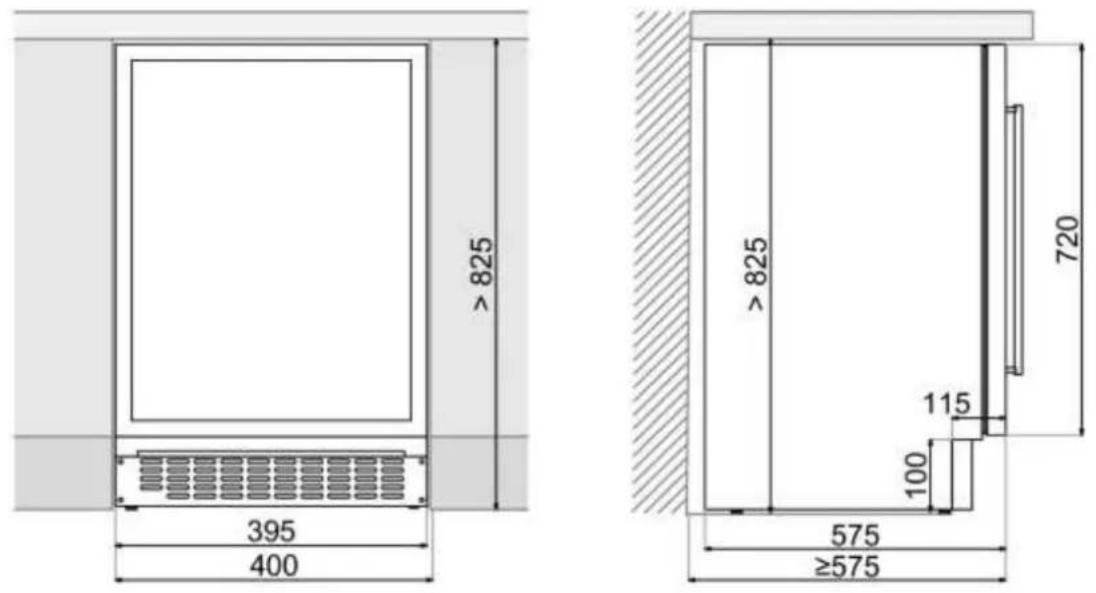
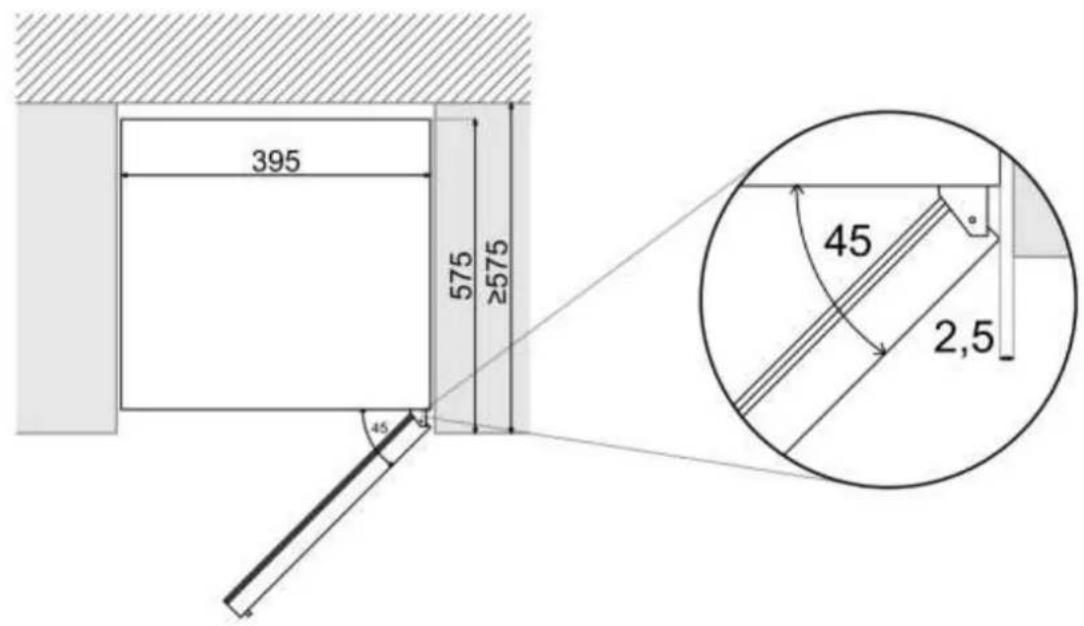

PVMBP-HD 40-25
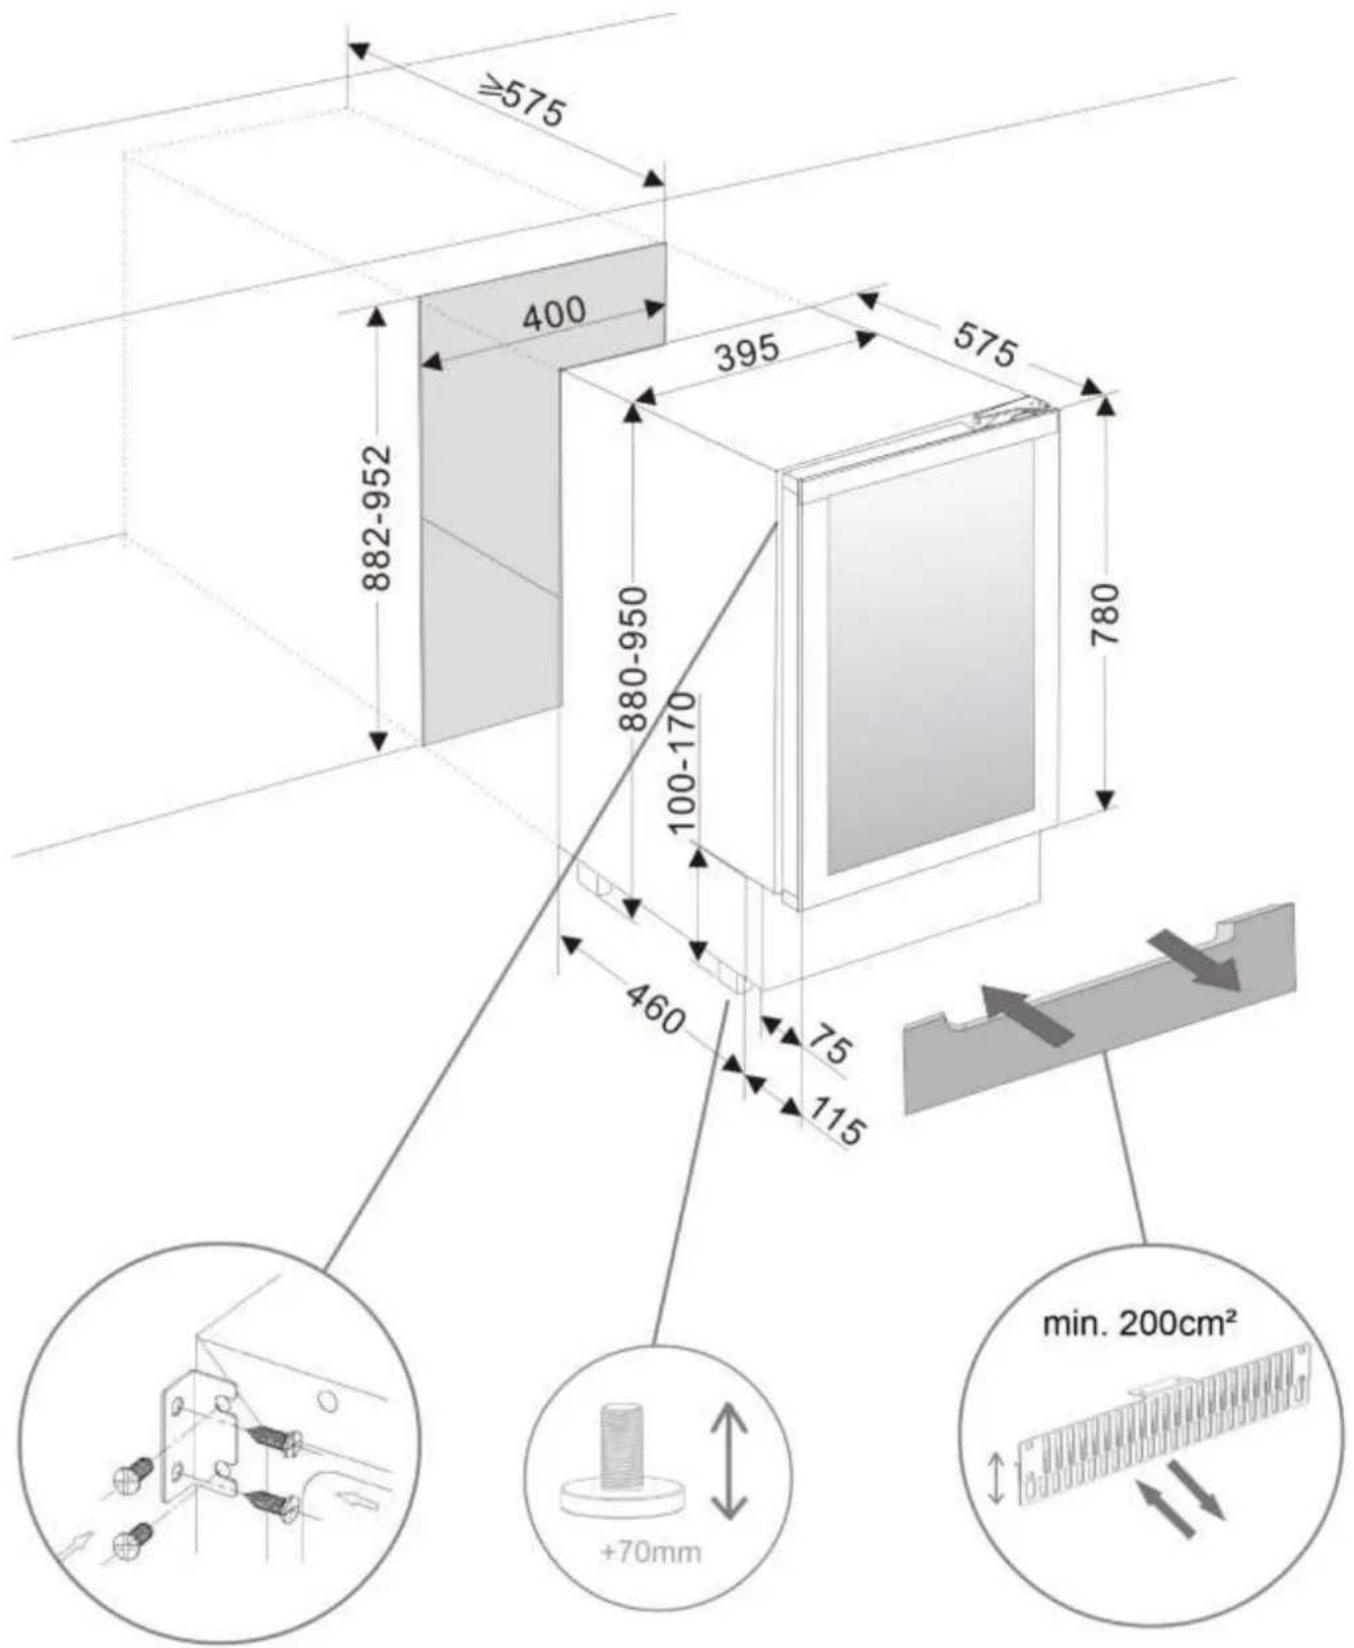
PVMBP-HD 40-25
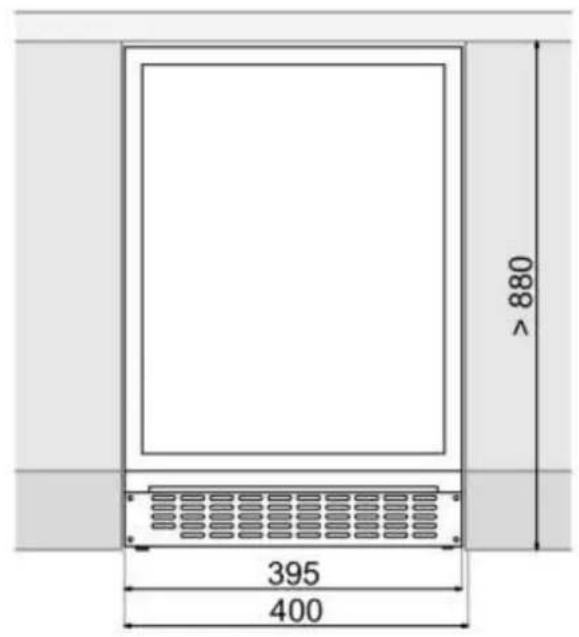
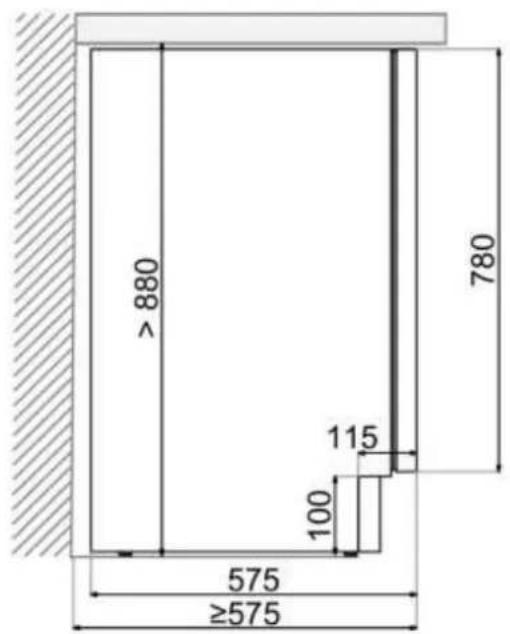
Top View
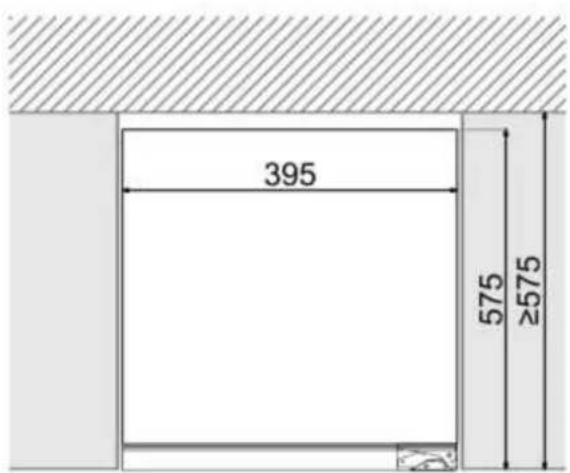
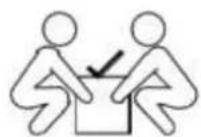

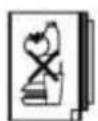
PVMB HD 60-46
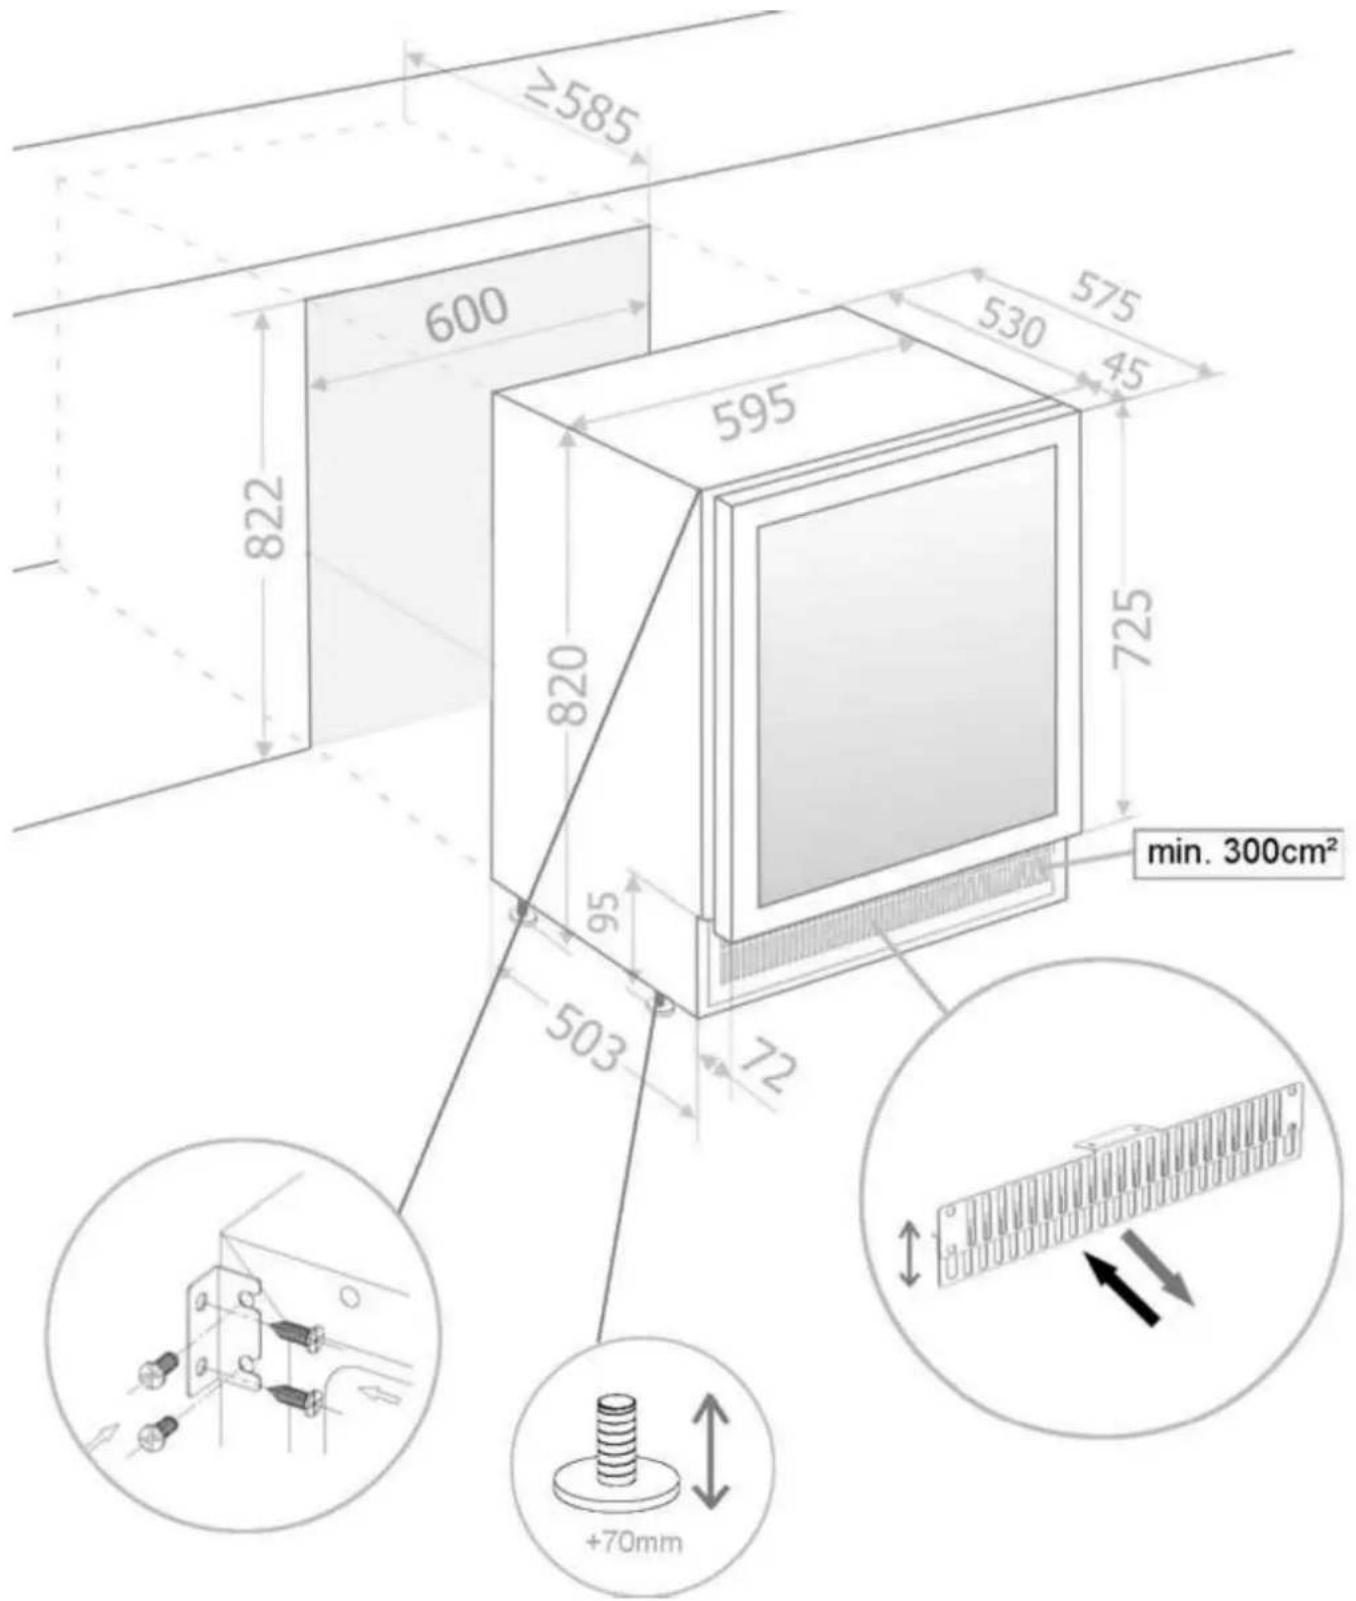
PVMB 60-46
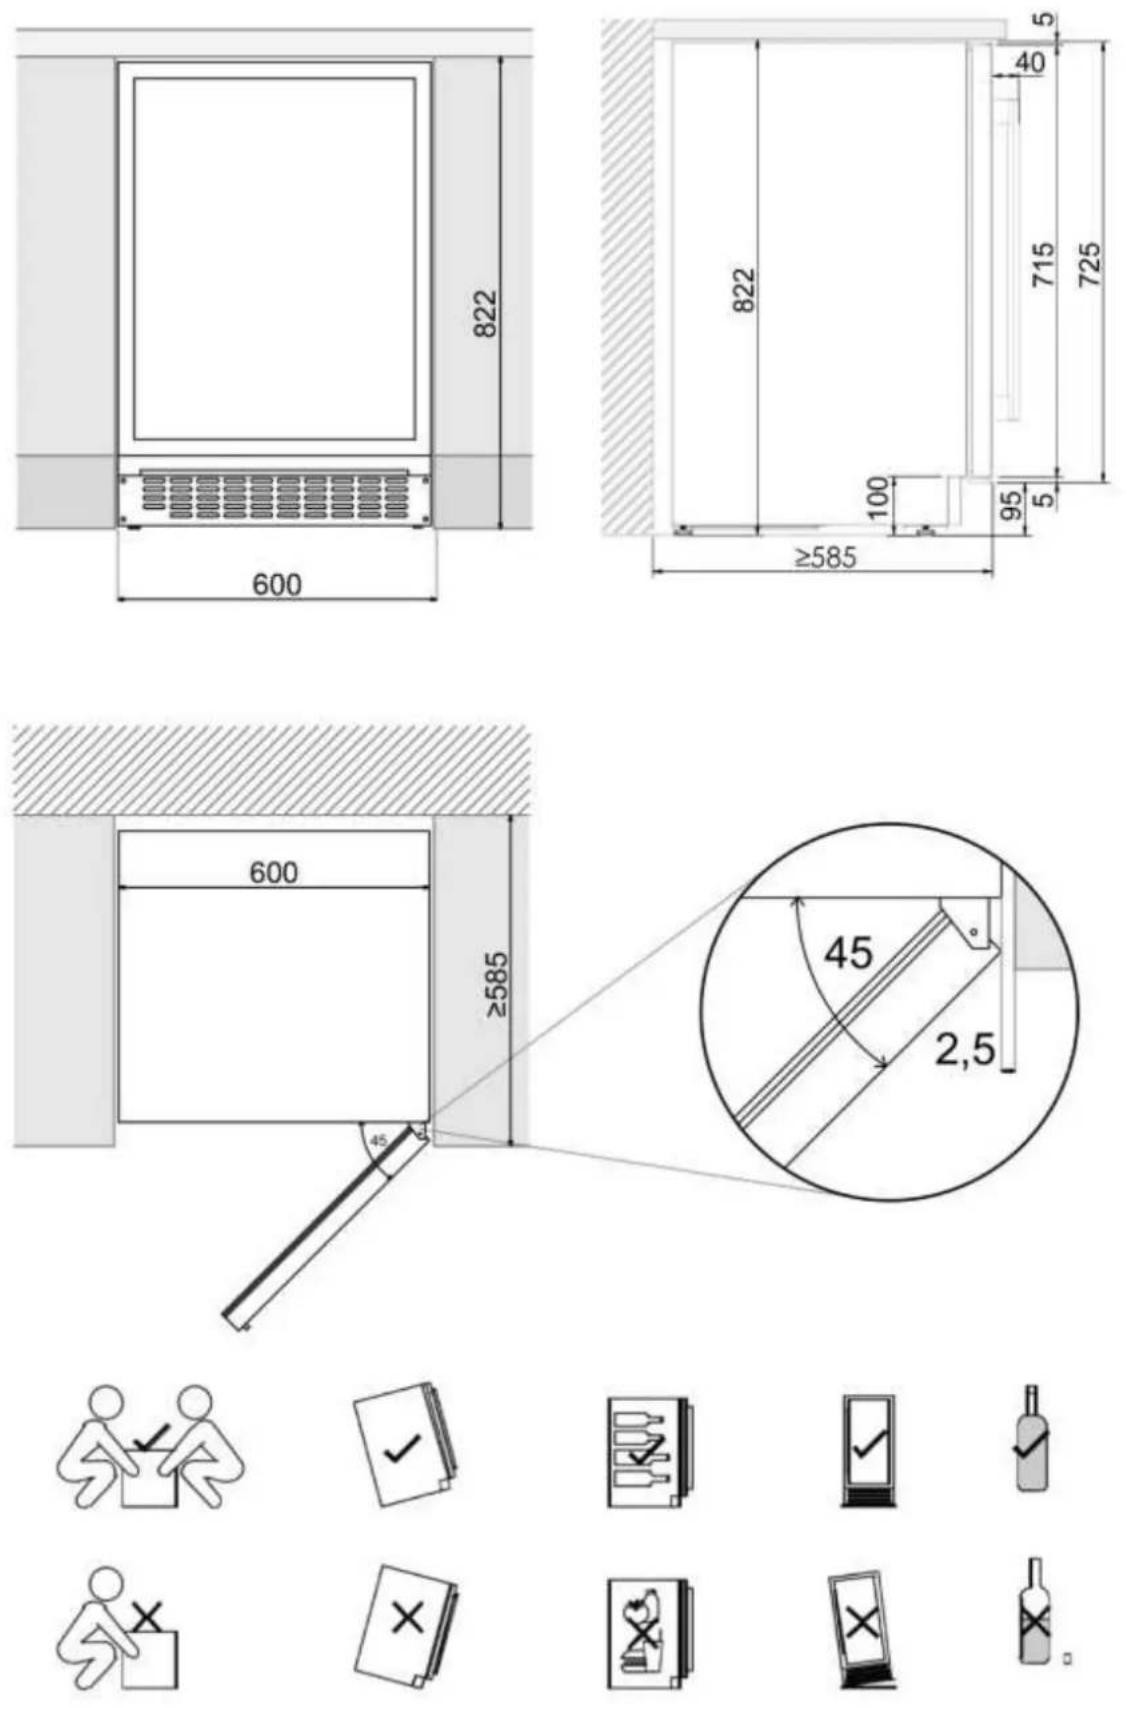
PVMB 60-44
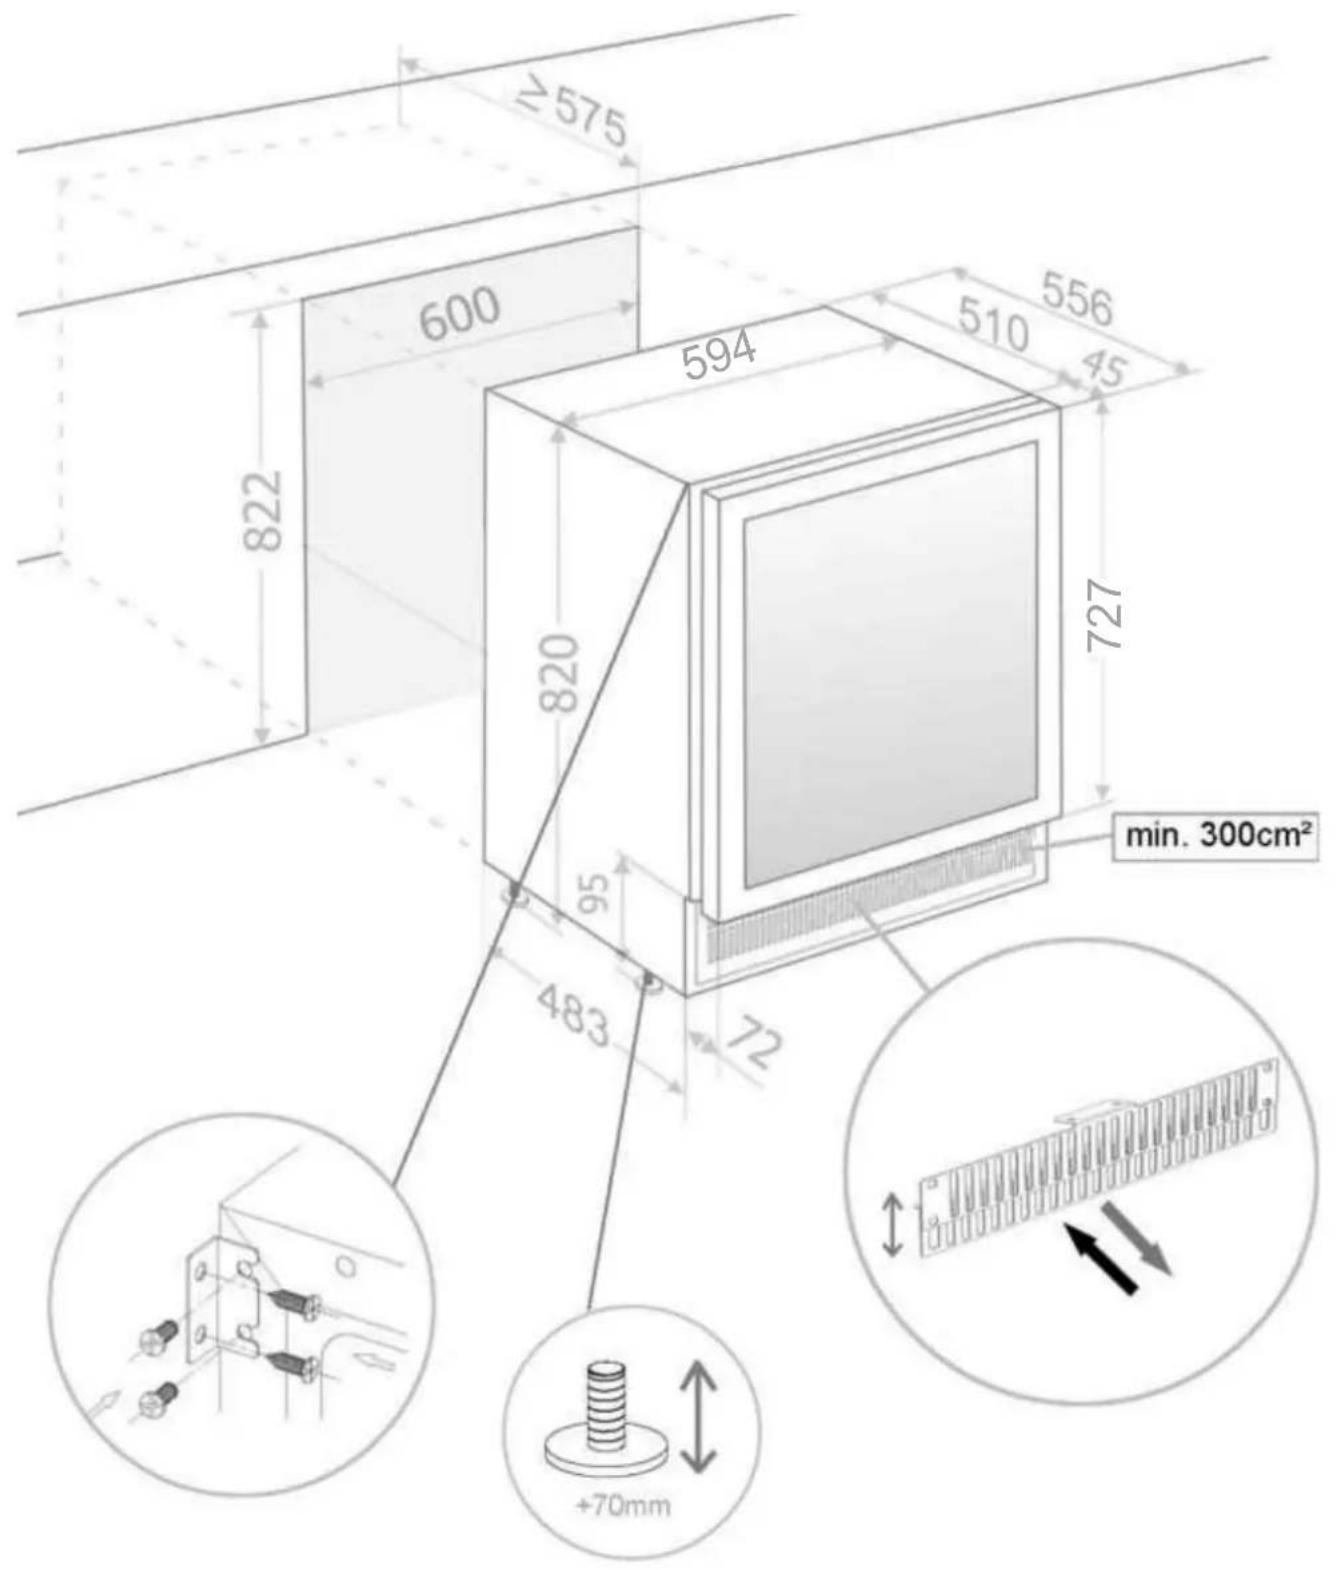
Pol. Ind. El Cros
Environmental Management System Certification
UNE-EN ISO 14001:2015
ES20/208675
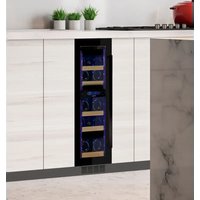

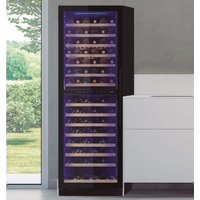
- Integral WineCellar
- Pando integralcooking
- integralkitchensolutions
- AVISO
- Angulos Embellecedores
- Luz interior
- Ângulos de corte
- INTERIOR
- Limpeza da unidade
- Falhas de energia
- FICHES DE DONNÉES ....145
- GARATIE....150
- DIAGRAMMES D'INSTALLATION ET DIMENSIONS....296
- DISTRIBUTION DE BOUTEILLES....312
- MESURES DE SÉCURITÉ
- CARACTÉRISTIQUES DU PRODUIT
- Angles de garniture
- MODE D'EMPLOI
- Eclairage intérieur
- INTÉRIEUR
- Nettoyage appareli
- QUESTIONS QUESTIONS FRÉQUEMMENT POSÉES
- FR
- ENVIRONMENTAL PROTECTION
- ENVIRONMENTAL PROTECTION AND WASTE TREATMENT
- INDEX
- SECURITY MEASURES....155
- PRODUCT FEATURES....160
- INSTALLATION....161
- OPERATING INSTRUCTIONS....169
- AUTOMATIC PUSH-TO-OPEN FUNCTION....178
- CARE AND MAINTENANCE....184
- PROBLEM SOLVING....189
- FREQUENTLY ASKED QUESTIONS ....192
- DATA SHEETS....194
- GUARANTEE....199
- INSTALLATION DIAGRAMS AND DIMENSIONS....296
- BOTTLE DISTRIBUTION 312
- SECURITYMEASURES
- FOR YOUR SAFETY
- In the event of damage:
- To avoid contamination of stored products, observe the following instructions:
- KEEP THESE INSTRUCTIONS
- PACKAGING AND END-OF-LIFE
- DISPOSAL INSTRUCTIONS:
- CHARACTERISTICS OF THE PRODUCT
- NOTE: Features and specifications are subject to change without notice.
- INSTALLATION
- BEFORE USING THE DEVICE
- IMPORTANT: HIGH HUMIDITY CLIMATE
- Installation Of Various Household Appliances
- ATTENTION: INSTALLATION OF SEVERAL APPLIANCES WITH SHARED VENTILATION:
- ASSEMBLY INSTRUCTIONS UNDER WORKTOP
- For models only:
- ASSEMBLY INSTRUCTIONS INTEGRATED
- These models are equipped with an exclusive Pando integrated ventilation system, see picture.
- Do not cover or obstruct the grilles, keep them clean for the free passage of air.
- NOTICE
- CONNECTION ELECTRICA
- INSTALLATION OF THE HANDLE
- NOTE:
- FIX AND SECURE THE UNIT TO FURNITURE
- Under-counter models
- Column/Integration Models
- REVERSIBLE DOOR Hinge With "Soft" Lock
- Trim Angles
- OPERATING INSTRUCTIONS
- USE AND OPERATION OF THE CONTROL PANEL/DISPLAY
- DISPLAY A AREA
- Pando
- Symbols on the screen
- First ignition
- DOUBLE DISPLAY ZONE
- Multi-key function
- IMPORTANT! ONLY FOR DUAL DISPLAY MODELS
- CONFIGURATION MODE
- °F/°C Selection
- Brightness Display
- Lighting Indoor
- Mode Fan
- Tones Audible
- Display of the Temperature
- Memory Function From Temperature
- Temperature Alarm
- Door Alarm
- Dynclima / Silent Mode
- Display Mode Off
- Eco Mode Demo
- AUTOMATIC OPENING PUSH FUNCTION
- Interior light
- Trays and storage
- Shelves with top-hat rails
- Defrosting / Hygrometry / Ventilation
- IMPORTANT INFORMATION ABOUT TEMPERATURE
- CARE AND MAINTENANCE
- Humidity Control
- Cleaning the unit
- Power Failure
- Holidays
- Moving Your Device
- Activated Carbon Air Filters
- Power Outages
- Energy Saving Tips
- Operating Noises
- SOLUTION OF PROBLEMS
- QUESTIONS FREQUENTLY ASKED
- QUESTIONS
- TECHNICAL SPECIFICATIONS
- PANDO WARRANTY CONDITIONS:
- EXCLUSIONS FROM THE PANDO WARRANTY:
- Contact details Offi cial Authorised Pando Service Centre
- ESPAÑA, PORTUGAL Y ANDORRA OTHER COUNTRIES:
- Angoli di taglio
- ISTRUZIONI PER L'USO
- Luce interna
- NE INTERNA
- Pulizia dell'unità
- ВНИМАНИЕ!
- Очистка прибора
- PVAMAV 88-45 / PVMAVP 88-45
- PVAMAV 124-65 / PVMAVP 124-65
- PVAMAV 178-101 / PVMAVP 178-101
- DISTRIBUCIÓN DE BOTELLAS DISTRIBUIÇÃO DE GARRAFAS DISTRIBUTION DE BOUTEILLES BOTTLE DISTRIBUTION DISTRIBUZIONE DELLE BOTTIGLIE РАЗДАЧА БУТЫЛОК
- PVMB 30-16
- PVMB 40-28 / PVMBP-HD 40-28
- PVMBP HD 40-25
- PVMB 60-46
- PVMBP 60-44
- PVMBP 60-52 / PVMBP HB 60-52
- PVMAV 45-16 PVMAVP 45-16
- PVMAV 60-23 / PVMAVP 60-23
- PVMAV 45-16 / PVMAVP 45-16
- PVMAV 88-45 / PVMAVP 88-45
Brand : Pando
Model : PVMAV 178-101
Category : Wine cellar