
DV8900C - DVD player LG - Free user manual and instructions
Find the device manual for free DV8900C LG in PDF.

| Product type | DVD Player |
| Brand | LG |
| Model | DV8900C |
| Region code | 2 (Europe) |
| Power supply | AC 110-240 V, 50/60 Hz |
| Power consumption | 12 W |
| Dimensions (approx.) | 430 x 250 x 40 mm |
| Weight | Approx. 2 kg |
| Compatible disc types | DVD, VCD, Audio CD, MP3, WMA, JPEG, DVD±R/RW, CD-R/RW, Kodak Photo CD |
| Video output | 1.0 V (p-p), 75 Ω, RCA jack x 1 / SCART (for TV) |
| Digital audio output | Coaxial: 0.5 V (p-p), 75 Ω, RCA jack x 1 |
| Supported audio formats | Dolby Digital, DTS, MPEG, PCM |
| Signal system | PAL / NTSC |
| Laser | Semiconductor, wavelength 650 nm |
| Frequency response | DVD (PCM 96 kHz): 8 Hz to 44 kHz CD: 8 Hz to 20 kHz |
| Signal-to-noise ratio | More than 100 dB |
| Harmonic distortion | Less than 0.008% |
| Special functions | Zoom, marker search, programmed playback, repeat (A-B, title, chapter), random playback, 3D Surround, parental control, last scene memory, screen saver |
| Included accessories | Remote control, video cable, audio cable, batteries |
| Cleaning | Use a dry cloth; do not use solvents |
| Safety | Do not open the casing (laser radiation); do not expose to moisture |
| Maintenance | Recommended check every 1,000 hours of playback |
Frequently Asked Questions - DV8900C LG
User questions about DV8900C LG
0 question about this device. Answer the ones you know or ask your own.
Ask a new question about this device
Download the instructions for your DVD player in PDF format for free! Find your manual DV8900C - LG and take your electronic device back in hand. On this page are published all the documents necessary for the use of your device. DV8900C by LG.
USER MANUAL DV8900C LG
Before connecting, operating or adjusting this product, please read this instruction booklet carefully and completely.
CAUTION
RISK OF ELECTRIC SHOCK DO NOT OPEN

Warning: To reduce the risk of electric shock, do not remove the cover or back of this product. There are no user-serviceable parts inside. Refer servicing to qualified service personnel.

Warning: To reduce the risk of fire or electric shock, do not expose this product to dripping or splashing water, rain, or moisture. Do not place objects filled with water such as vases, on the product.
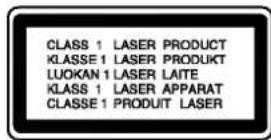

Warning: This digital video disc player employs a laser system. Use of controls, adjustments, or the performance of procedures other than those specified herein may result in hazardous radiation exposure.

Warning: To prevent direct exposure to laser beam, do not open the enclosure. Visible laser radiation when open.

Warning: Never stare directly into the laser beam.

Caution: Do not install this product in a confined space such as a book case or similar unit.
CE This product is manufactured to comply with the radio interference requirements of EEC DIRECTIVE 89/336/EEC, 93/68/EEC and 73/23/EEC.
SERIAL NUMBER:
You can find the serial number on the back of the unit. This number is unique to this unit and not available to others. You should record requested information here and retain this guide as a permanent record of your purchase.
Model No. ____
Serial No. ____
Date of Purchase
Contents
Introduction 4
Symbol used in this Manual 4
About the ⊙ Symbol Display ....4
Notes on Discs 4
Handling Discs 4
Storing Discs 4
Cleaning Discs 4
Types of Playable Discs ....5
Regional code 5
Disc-related terms 6
Front Panel 7
Display Window 7
Remote Control ....8
Remote Control Operation 8
Remote Control Battery Installation .....8
Installation and Setup 9
Setting up the Player 9
DVD Player Connections 9
Video and Audio Connections to Your TV . . .9
Audio Connection to Your TV 9
Audio Connection to Optional Equipment ..10
On-Screen Display 11
Playback Status/Restrictions .....11
Initial Settings 12
General Operation 12
LANGUAGE 12
- Menu Language 12
• Disc Audio / Subtitle / Menu .....12
DISPLAY 12
• TV Aspect 12
- Display Mode 12
AUDIO 13
• Dolby Digital / DTS / MPEG .....13
• Sample Freq. (Frequency) .....13
• Dynamic Range Control (DRC) .....13
• Vocal 13
OTHERS 13
• PBC 13
• Auto Play 13
• B.L.E. 13
LOCK (Parental Control) 14
• Rating 14
- Password (Security Code) 14
• Country Code 14
Operation 15
Playing a DVD or Video CD .....15
Playback Setup 15
General Features 15
Moving to another TITLE 15
Moving to another CHAPTER/TRACK ....15
Search 15
Changing the Audio Channel .....15
Still Picture and Frame-by-Frame Playback . . .16
Slow Motion 16
Random 16
Repeat A-B 16
Repeat 16
3D Surround 16
Time Search 16
Zoom 17
Marker Search 17
Special DVD Features 17
Checking the contents of DVD discs: Menus .17
Title Menu 17
Disc Menu 17
Camera Angle 17
Changing the Audio Language .....17
Subtitles 17
Playing an Audio CD or MP3/WMA Disc ...18
Audio CD and MP3 / WMA Disc Features ...19
Pause 19
Moving to another Track 19
Repeat Track/All/Off 19
Search 19
Random 19
Repeat A-B 19
3D Surround 19
Programmed Playback 20
Repeat Programmed Tracks 20
Erasing a Track from Program List .....20
Erasing the Complete Program List .....20
Viewing a JPEG Disc 21
Slide Show 21
Still Picture 21
Moving to another File .....21
Zoom 21
To rotate picture .....21
To listen to music watching picture .....21
Playing a DVD VR format Disc .....22
Maintenance and Service .....22
Additional Features 23
Last Scene Memory 23
Screen Saver 23
System Select 23
Controlling other TVs with the remote control . . .23
Reference .....24
Language Codes 24
Country Codes 24
Troubleshooting 25
Specifications 25
Front Panel
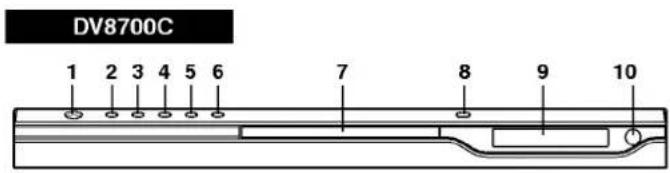
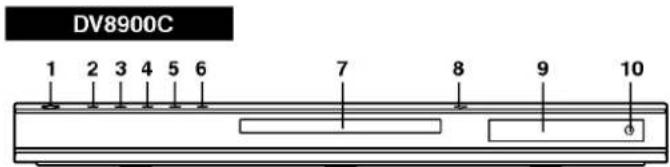
- POWER Switches the player ON and OFF.
- PLAY (▶) Starts playback.
- PAUSE (II) Pause playback temporarily/press repeatedly for frame-by-frame playback.
- STOP ( ■ ) Stops playback.
- Reverse Scan/Skip ( ◀◀ / ◀◀◀ ) Go to previous chapter / track or to the beginning. Press and hold for two seconds for fast reverse search.
- Forward Skip/Scan (▶▶I / ▶▶) Go to the next chapter / track. Press and hold for two seconds for fast forward search.
- Disc Tray Insert a disc here.
- OPEN / CLOSE ( ▲ ) Opens or closes the disc tray.
- Display window Shows the current status of the player,
- Remote Sensor Point the DVD Player remote control here.
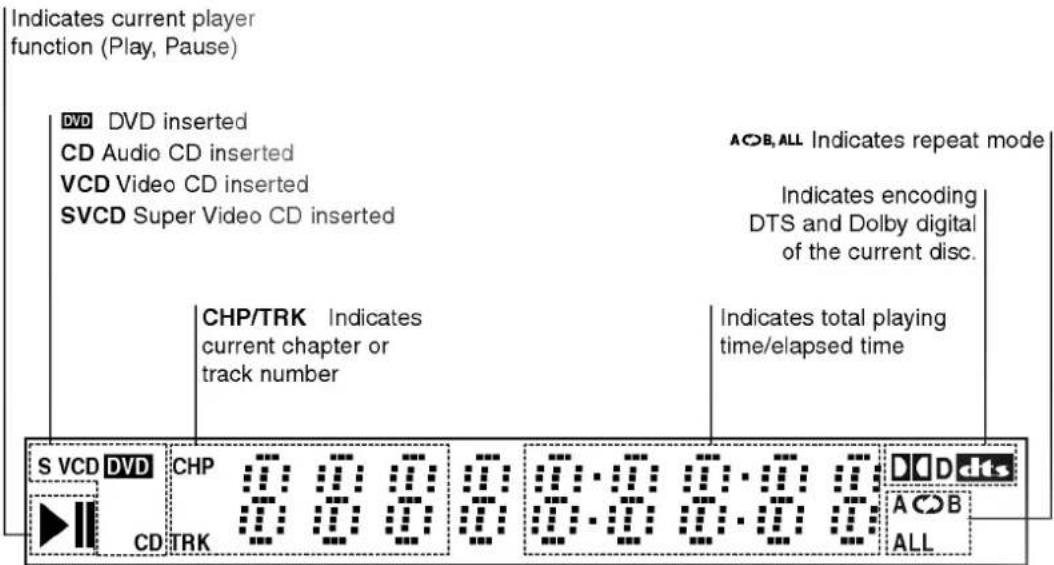
Display Window
Installation and Setup
Setting up the Player
The picture and sound of a nearby TV, VCR, or radio may be distorted during playback. If this occurs, position the player away from the TV, VCR, or radio, or turn off the unit after removing the disc.
DVD Player Connections
Depending on your TV and other equipment there are various ways you can connect the player. Please refer to the manuals of your TV, stereo system or other devices as necessary for additional connection information.
Rear of TV
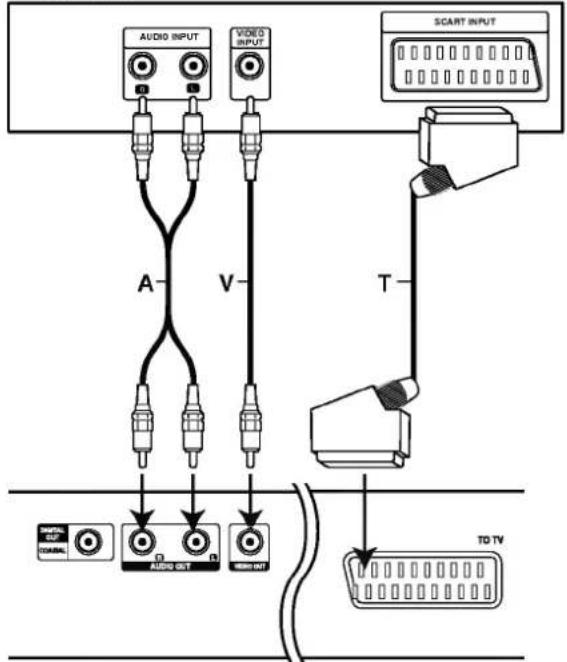
Rear of DVD player
Video and Audio Connections to Your TV
Make sure the DVD player is connected directly to the TV and not to a VCR, otherwise the DVD image could be distorted by the copy protection system.
Video: Connect the VIDEO OUT jack on the DVD player to the video in jack on the TV using the video cable (V).
SCART connection: Connect the TO TV scart jack on the DVD Player to the corresponding in jacks on the TV using the scart cable (T).
Audio Connection to Your TV:
Connect the left and right AUDIO OUT jacks of the DVD Player to the audio left and right IN jacks on the TV (A) using the audio cables. Do not connect the DVD Player's AUDIO OUT jack to the phono in jack (record deck) of your audio system.
Audio Connection to Optional Equipment
Connect the DVD player to your optional equipment for audio output.

flowchart
graph TD
    A["TO TV"] --> B["Central Cable"]
    A --> C["Vertical Cable"]
    A --> D["Vertical Cable"]
    B --> E["Cordial Digital Input"]
    C --> F["Audio Input"]
    D --> G["Audio Input"]
    H["Central Cable"] --> I["X"]
    J["Vertical Cable"] --> K["A"]
    L["Vertical Cable"] --> M["A"]
    N["Vertical Cable"] --> O["A"]
Amplifier (Receiver)
Amplifier equipped with 2-channel analog stereo or Dolby Pro Logic II / Pro Logic: Connect the left and right AUDIO OUT jacks on the DVD player to the audio left and right IN jacks on your amplifier, receiver, or stereo system, using the audio cables (A).
Amplifier equipped with 2-channel digital stereo (PCM) or audio / video receiver equipped with a multi-channel decoder (Dolby Digital™, MPEG 2, or DTS): Connect one of the DVD Player's DIGITAL AUDIO OUT jacks (COAXIAL X) to the corresponding in jack on your amplifier. Use an optional digital (coaxial X) audio cable.
Digital Multi-channel sound
A digital multi-channel connection provides the best sound quality. For this you need a multi-channel audio / video receiver that supports one or more of the audio formats supported by your DVD player such as MPEG 2, Dolby Digital and DTS. Check the receiver manual and the logos on the front of the receiver.
Notes:
- If the audio format of the digital output does not match the capabilities of your receiver, the receiver produces a strong, distorted sound or no sound at all.
- Six Channel Digital Surround Sound via a digital connection can only be obtained if your receiver is equipped with a Digital Multi-channel decoder.
- To see the audio format of the current DVD in the on-screen display, press AUDIO.
On-Screen Display
You can display the general playback status on the TV screen. Some items can be changed using the menu. To use the on-screen display:
- Press DISPLAY during playback.
- Press ▲ / ▼ to select an item. The selected item is highlighted.
- Press ◀ / ▶ to change the setting. You can also use the number buttons if appropriate (e.g. inputting the title number). For some functions, press ENTER to execute the setting.
Notes:
- Some discs may not provide all of the features shown below.
- If no button is pressed for 10 seconds, the on-screen display disappears.
Playback Status/Restrictions

Repeat title

Repeat sequence

Enter a Marker

Marker Search menu

Resume play from this point

Action prohibited or not available
Example: On-Screen Display during playing DVD Video
| Items | Selection Method | |
| Title Number | 1/3 | < / >, Numbers ENTER |
| Chapter Number | 1/12 | < / >, Numbers ENTER |
| Time search | 0:20:09 | Numbers, ENTER |
| Audio language and Digital Audio Output mode | 1 ENGODD>3/2.1 | < / > or AUDIO |
| Subtitle language | 1 ENG | < / > or SUBTITLE |
| Angle | 1/3 | < / > or ANGLE |
| Sound | 3D SUR | < / > |
Example: On-Screen Display during playing VCD
| Items | Selection Method | |
| Track Number(or PBC mode) | 1/3 | ◄/►, Numbers ENTER |
| Time search | 0:20:09 | Numbers ENTER |
| Audio Channel | Stereo | ◄/► or AUDIO |
| Sound | 3D SUR | ◄/► |
Initial Settings
By using the Setup menu, you can make various adjustments to items such as picture and sound. You can also set a language for the subtitles and the Setup menu, among other things. For details on each Setup menu item, see pages 12 to 14.
To display and exit the Menu:
Press SETUP to display the menu. A second press of SETUP will take you back to initial screen.
To go to the next level:
Press ▶ on the remote control.
To go back to the previous level:
Press ◀ on the remote control.
General Operation
- Press SETUP. The Setup menu appears.
- Use ▲ / ▼ to select the desired option then press ▶ to move to the second level. The screen shows the current setting for the selected item, as well as alternate setting(s).
- Use ▲ / ▼ to select the second desired option then press ▶ to move to the third level.
- Use ▲ / ▼ to select the desired setting then press ENTER to confirm your selection. Some items require additional steps.
- Press SETUP, RETURN, or PLAY to exit the Setup menu.
LANGUAGE

Menu Language
Select a language for the Setup menu and on-screen display.
Disc Audio / Subtitle / Menu
Select the language you prefer for the audio track (disc audio), subtitles, and the disc menu.
Original: Refers to the original language in which the disc was recorded.
Other: To select another language, press number buttons then ENTER to enter the corresponding 4-digit number according to the language code list in the reference chapter. If you enter the wrong language code, press CLEAR.
DISPLAY
natural_image
Pure graphical element with no text, numbers, or symbols visibleTV Aspect
4:3: Select when a standard 4:3 TV is connected.
16:9: Select when a 16:9 wide TV is connected.
Display Mode

Display Mode setting works only when the TV Aspect mode is set to "4:3".
Letterbox: Displays a wide picture with bands on the upper and lower portions of the screen.
Panscan: Automatically displays the wide picture on the entire screen and cuts off the portions that do not fit.
AUDIO
Each DVD disc has a variety of audio output options. Set the player's AUDIO options according to the type of audio system you use.
Dolby Digital / DTS / MPEG
Bitstream: Select "Bitstream" if you connect the DVD Player's DIGITAL OUT jack to an amplifier or other equipment with a Dolby Digital, DTS or MPEG decoder.
PCM (for Dolby Digital / MPEG): Select when connected to a two-channel digital stereo amplifier. DVDs encoded in Dolby Digital or MPEG will be automatically downmixed to two-channel PCM audio.
Off (for DTS): If you select "Off", the DTS signal is not output through the DIGITAL OUT jack.
Sample Freq. (Frequency)
If your receiver or amplifier is NOT capable of handling 96 kHz signals, select 48 kHz. When this choice is made, this unit automatically converts any 96 kHz signals to 48 kHz so your system can decode them.
If your receiver or amplifier is capable of handling 96 kHz signals, select 96 kHz. When this choice is made, this unit passes each type of signal through without any further processing.
Check the documentation for your amplifier to verify its capabilities.
Dynamic Range Control (DRC)
With the DVD format, you can hear a program's soundtrack in the most accurate and realistic presentation possible, thanks to digital audio technology. However, you may wish to compress the dynamic range of the audio output (the difference between the loudest sounds and the quietest ones). This allows you to listen to a movie at a lower volume without losing clarity of sound. Set DRC to On for this effect.
Vocal

Set to On only when a multi-channel karaoke DVD is playing. The karaoke channels on the disc mix into normal stereo sound.
OTHERS
The PBC, Auto Play and B.L.E. settings can be changed.
PBC

Set Playback Control (PBC) to On or Off.
On: Video CDs with PBC are played according to the PBC.
Off: Video CDs with PBC are played the same way as Audio CDs.
Auto Play

You can set up the DVD Player so a DVD disc automatically starts playing whenever the DVD is inserted.
If Auto Play mode is set to On, this DVD player will search for title that has the longest playback time and then play back the title automatically.
On: Auto Play function is active.
Off: Auto Play function is not active.
Note:
The Auto Play function may not work for some DVDs.
B.L.E. (Black Level Expansion)

To select the black level of playback pictures. Set your preference and monitor's ability.
On: Expanded grey scale. (0 IRE cut off)
Off: Standard grey scale. (7.5 IRE cut off)
Note:
The B.L.E. function works NTSC system only.
LOCK (Parental Control)
Rating

Some movies contain scenes that may not be suitable for children to view. Many of these discs contain parental control information that applies to the complete disc or to certain scenes on the disc. Movies and scenes are rated from 1 to 8, depending on the country. Some discs offer more suitable scenes as an alternative.
The parental control feature allows you to block access to scenes below the rating you input, thereby preventing your children from being able to view material you believe is unsuitable.
- Select "Rating" on the LOCK menu then press ▶.
- To access the Rating, Password and Country Code features, you must input the 4-digit security code you created. If you have not yet entered a security code you are prompted to do so.
Input a 4-digit code and press ENTER. Enter it again and press ENTER to verify. If you make a mistake before pressing ENTER, press CLEAR. - Select a rating from 1 to 8 using the ▲ / ▼ buttons.
Rating 1-8: Rating one (1) has the most restrictions and rating eight (8) is the least restrictive.
Unlock
If you select unlock, parental control is not active and the disc plays in full.
Notes:
If you set a rating for the player, all disc scenes with the same rating or lower are played. Higher rated scenes are not played unless an alternate scene is available on the disc. The alternative must have the same rating or a lower one. If no suitable alternative is found, playback stops. You must enter the 4-digit password or change the rating level in order to play the disc.
- Press ENTER to confirm your rating selection, then press SETUP to exit the menu.
Password (Security Code)
You can enter or change password.
- Select Password on the LOCK menu then press ▶.
- Follow step 2 as shown left (Rating). "Change" or "New" is highlighted.
- Enter the new 4-digit code, then press ENTER. Input it again to verify.
- Press SETUP to exit the menu.
If you forget your Security Code
If you forget your security code you can clear it using the following steps:
- Press SETUP to display the Setup menu.
- Input the 6-digit number "210499" and the security code is cleared.
- Enter a new code as described above.
Country Code

Enter the code of the country/area whose standards were used to rate the DVD video disc, based on the list in the reference chapter.
- Select "Country Code" on the LOCK menu then press ▶.
- Follow step 2 as shown left (Rating).
- Select the first character using ▲ / ▼ buttons.
- Shift the cursor using ▶ button and select the second character using ▲ / ▼ buttons.
- Press ENTER to confirm your country code selection.
Operation
Playing a DVD or Video CD
Playback Setup
- Turn on the TV and select the video input source connected to the DVD player.
- Turn on the audio system (if applicable) and select the input source connected to the DVD player.
- Press OPEN/CLOSE to open the disc tray and load your chosen disc in the tray, with the playback side down.
- Press OPEN/CLOSE to close the tray. Playback starts automatically. If playback does not start, press PLAY.
In some cases, the disc menu might appear instead:
DVD
Use the ◀▶▲▼ buttons to select the title/chapter you want to view, then press ENTER to start. Press TITLE or DVD MENU to return to the menu screen.
VCD
Use the number buttons to select the track you want to view and press RETURN to return to the menu screen. Menu settings and operating procedures may differ. Follow the instructions on the each menu screen. You also may set PBC to Off (See "PBC" on page 13).
Notes:
- If parental control is set and the disc is not within the rating settings you must input the password. (See "Lock Menu" on page 14.)
- DVDs may have a region code. Your player does not play discs that have a region code different from your player. The region code for this player is 2 (two).
General Features
Note:
Unless stated otherwise, all operations described use the remote control. Some features may also be available on the Setup menu.
Moving to another TITLE DVD
When a disc has more than one title, you can move to another title. Press DISPLAY while playback is stopped then the appropriate number (0-9) or use ◀/▶ to move to another title.
You can play any title by inputting its number while playback is stopped.
Moving to another CHAPTER/TRACK
DVD VCD
When a title on a disc has more than one chapter or a disc has more than one track, you can move to another chapter/track as follows:
- Press SKIP ◀◀◀ or ▶▶◀ briefly during playback to select the next chapter/track or to return to the beginning of the current chapter/track.
- Press SKIP ◀◀ twice briefly to step back to the previous chapter/track.
- To go directly to any chapter during DVD playback, press DISPLAY and press ▲ / ▼ to select the chapter/track icon. Then, input the chapter/track number or use ◀ / ▶.
Search DVD VCD
- Press SCAN (◀◀ or ▶▶) during playback.
- Press SCAN (◀◀ or ▶▶) repeatedly to select the required speed.
DVD; X2, X4, X16 or X100
Video CD; X2, X4 or X8 - To exit SEARCH mode, press PLAY.
Changing the Audio Channel VCD
Press AUDIO repeatedly during playback to hear a different audio channel (Stereo, Left, or Right).
Still Picture and Frame-by-Frame Playback
DVD VCD
- Press PAUSE/STEP on the remote control during playback. Advance the picture frame-by-frame by pressing PAUSE/STEP repeatedly.
- To exit still motion mode, press PLAY.
Slow Motion DVD VCD
- Press PAUSE/STEP (Ⅲ) during playback. The DVD player will now go into PAUSE mode.
- Use the SCAN (◀◀ or ▶▶) to select the required speed: ◀ 1/16, ◀ 1/8, ◀ 1/4, or ◀ 1/2 (backward), or ▶ 1/16, ▶ 1/8, ▶ 1/4, or ▶ 1/2 (forward).
With a Video CD, the Slow speed changes: 1/16, 1/8, 1/4 or 1/2 (forward).
- To exit Slow Motion mode, press PLAY (▶).
Note:
Slow motion playback in reverse is not possible with Video CDs.
Random VCD
- Press RANDOM during playback. The unit automatically begins random playback and RANDOM appears on the menu screen.
- Press RANDOM again to normal.
Tip:
By pressing SKIP ▶▶ during random playback, the unit selects another title (track) and resumes random playback.
Note:
On a Video CD with PBC, You must set PBC to Off on the setup menu to use the repeat function (See "PBC" on page 13).
Repeat A-B DVD VCD
To repeat a sequence.
- Press A-B at your chosen starting point. "A-" appears briefly on the TV screen.
- Press A-B again at your chosen end point. "A - B" appears briefly on the TV screen and the repeat sequence begins.
- Press A-B again to cancel.
Repeat DVD VCD
You can play a title/chapter/all/track on a disc.
Press REPEAT during playback to select a desired repeat mode.
DVD Video Discs - Repeat Chapter/Title/Off
• Chapter: repeats the current chapter.
• Title: repeats the current title.
- Off: does not play repeatedly.
Video CDs - Repeat Track/All/Off
- Track : repeats the current track
- All : repeats all the tracks on a disc.
- Off: does not play repeatedly.
Notes:
- On a Video CD with PBC, you must set PBC to Off on the setup menu to use the repeat function (See "PBC" on page 13).
- If you press SKIP (▶▶▶) once during Repeat Chapter (Track) playback, the repeat playback cancels.
3D Surround DVD VCD
To produce a 3D surround effect that simulates multi-channel audio from two stereo speakers (instead of the five+ speakers normally required for multi-channel audio from a home theater system).
- Press DISPLAY during playback.
- Use ▲ or ▼ to select the sound option. The sound option will be highlighted.
- Use ◀ or ▶ to select "3D SUR". To turn off the 3D Surround effect, select "Normal".
Time Search DVD VCD
To start playing at any chosen time on the disc:
- Press DISPLAY during playback. The time search box shows the elapsed playing time.
- Press ▲ / ▼ to select the time clock icon and "--:-" appears.
- Input the required start time in hours, minutes, and seconds from left to right. If you enter the wrong numbers, press CLEAR to remove the numbers you entered. Then input the correct numbers.
- Press ENTER to confirm. Playback starts from the selected time.
Zoom DVD VCD
Use zoom to enlarge the video image.
- Press ZOOM during playback or still playback to activate the Zoom function. The square frame appears briefly in the right bottom of the picture.
- Each press of the ZOOM button changes the TV screen in the sequence: 400% size → 1600% size → normal size
- Use the ◀▶▲▼ buttons to move through the zoomed picture.
- To resume normal playback, press ZOOM or CLEAR button repeatedly.
Note:
Zoom may not work on some DVDs.
Marker Search DVD VCD
To enter a Marker
You can start playback from up to nine memorized points. To enter a marker, press MARKER at the desired point on the disc. The Marker icon appears on the TV screen briefly. Repeat to enter up to nine markers.
To Recall or Clear a Marked Scene
- During disc playback, press SEARCH. The marker search menu appears on the screen.
- Within 10 seconds, press ◀ / ▶ to select a marker number that you want to recall or clear.
- Press ENTER and playback starts from the marked scene. Or, Press CLEAR and the marker number is erased from the list.
- You can play any marker by inputting its number on the marker search menu.
Special DVD Features
Checking the contents of DVD discs: Menus
DVDs may offer menus that allow you to access special features. To use the disc menu, press DVD MENU. Input the corresponding number or use the ▶▲▼ buttons to highlight your selection. Then press ENTER.
Title Menu DVD
- Press TITLE. If the current title has a menu, the menu appears on the screen. Otherwise, the disc menu may appear.
- The menu offers features such as camera angles, spoken language and subtitle options, and chapters for the title.
- Press TITLE to exit.
Disc Menu DVD
Press DVD MENU and the disc menu is displayed. Press DVD MENU again to exit.
Camera Angle DVD
If the disc contains scenes recorded at different camera angles, you can change to a different camera angle during playback. Press ANGLE repeatedly during playback to select a desired angle. Note that the number of the current angle appears on the display.
Tip:
The angle indicator will blink on the display window during scenes recorded at different angles as an indication that angle switching is possible.
Changing the Audio Language DVD
Press AUDIO repeatedly during playback to hear a different audio language or audio track.
With DVD-RW discs recorded in VR mode that have both a main and a Bilingual audio channel, you can switch between Main (L), Bilingual (R), or a mix of both (Main + Bilingual) by pressing AUDIO.
Subtitles DVD
Press SUBTITLE repeatedly during playback to see the different subtitle languages.
Playing an Audio CD or MP3/WMA Disc
The DVD player can play MP3/WMA formatted recordings on CD-ROM, CD-R, or CD-RW discs.
Audio CD
Once you insert an audio CD a menu appears on the TV screen. Press ▲ / ▼ to select a track then press PLAY or ENTER and playback starts.

natural_image
Grayscale abstract image with no discernible text, symbols, or identifiable objectsMP3 / WMA
- Press ▲ / ▼ to select a folder, and press ENTER to see the folder contents.
- Press ▲ / ▼ to select a track then press PLAY or ENTER. Playback starts.
natural_image
Plain gray gradient background with no visible text, symbols, or objectsNote:
Displays path of track from the disc on the TV screen.
Tip:
- If you are in a file list on the MP3/WMA menu and want to return to the Folder list, use the ▲ / ▼ to highlight 🔒. and press ENTER.
- Press and hold ▼ / ▲ to go to the next / previous page.
- On a CD with MP3/WMA and JPEG you can switch MP3/WMA and JPEG. Press TITLE and MP3/WMA or JPEG word on top of the menu is highlighted.
MP3 / WMA disc compatibility with this player is limited as follows:
- Sampling frequency: within 8 - 48 kHz (MP3), within 22 - 48kHz (WMA)
- Bit rate: within 32 - 320kbps (MP3), 40 - 192kbps (WMA)
- The player cannot read an MP3/WMA file that has a file extension other than ".mp3" / ".wma".
• CD-R physical format should be ISO 9660 - If you record MP3 / WMA files using software that cannot create a file system (eg. Direct-CD) it is impossible to playback MP3 / WMA files. We recommend that you use Easy-CD Creator, which creates an ISO 9660 file system.
- File names should have a maximum of 8 letters and must incorporate an .mp3 or .wma extension.
- They should not contain special letters such as / ? * : "< > I etc.
- The total number of files on the disc should be less than 999.
This DVD player requires discs and recordings to meet certain technical standards in order to achieve optimal playback quality. Pre-recorded DVDs are automatically set to these standards. There are many different types of recordable disc formats (including CD-R containing MP3 or WMA files) and these require certain pre-existing conditions (see above) to ensure compatible playback.
Customers should note that permission is required in order to download MP3 / WMA files and music from the Internet. Our company has no right to grant such permission. Permission should always be sought from the copyright owner.
Audio CD and MP3 / WMA Disc Features
Pause CD MP3 WMA
- Press PAUSE/STEP during playback.
- To return to playback, press PLAY, ENTER or press PAUSE/STEP again.
Moving to another Track CD MP3 WMA
- Press SKIP (I◄◄ or ►►I) briefly during playback to go to the next track or to return to the beginning of the current track.
- Press SKIP ◀◀ twice briefly to go back to the previous track.
- You can play any track by inputting its number.
Repeat Track/All/Off CD MP3 WMA
You can play a track/all on a disc.
- Press REPEAT when playing a disc. The repeat icon appears.
-
Press REPEAT to select a desired repeat mode.
-
Track: repeats the current track
- All: repeats all the tracks on a disc.
- Off(No display): does not play repeatedly.
Note:
If you press SKIP (▶▶▶) once during Repeat Track playback, the repeat playback cancels.
Search CD MP3 WMA
- Press SCAN (◀◀ or ▶▶) during playback.
- Press SCAN (◀◀ or ▶▶) repeatedly to select the required speed: X2, X4, X8 backward or forward.
- To exit SEARCH mode, press PLAY.
Random CD
- Press RANDOM during playback. Random Playback begins immediately and RANDOM appears on the menu screen.
- To return to normal playback, press RANDOM repeatedly until RANDOM disappears from the menu screen.
Tip:
By pressing SKIP ▶▶I during random playback, the unit selects another track and resumes random playback.
Repeat A-B CD
- To repeat a sequence during disc playback press A-B at your chosen starting point. The Repeat icon and "A" appear on the menu screen.
- Press A-B again at your chosen end point. The Repeat icon and "A-B" appear on the menu screen, and the sequence begins to play repeatedly.
- To exit the sequence and return to normal play, press A-B again. The Repeat icon disappears from the menu screen.
3D Surround CD
To produce a 3D surround effect that simulates multi-channel audio from two stereo speakers (instead of the five+ speakers normally required for multi-channel audio from a home theater system).
- Press AUDIO during playback. "3D SUR" appears on the menu screen.
- To return to normal playback, press AUDIO repeatedly until "3D SUR" disappears from the menu screen.
Programmed Playback
The program function enables you to store your favorite tracks from any disc in the player memory. A program can contain 99 tracks (Audio CD) or 999 tracks (MP3/WMA).
- Insert a disc.
Audio CD and MP3/WMA Discs:
Audio CD or MP3/WMA menu appears as below.
natural_image
Blurred grayscale image with no discernible text, symbols, or identifiable objectsAudio CD Menu
natural_image
Blank grayscale image with no visible text, symbols, or discernible featuresMP3/WMA Menu
Video CD: Press PROGRAM while playback is stopped. The program menu appears. Press RETURN to exit the menu.
Note:
On a Video CD with PBC, you must set PBC to Off on the setup menu to use the programmed playback (See "PBC" on page 13).
natural_image
Blank grayscale image with no visible text, symbols, or discernible featuresVideo CD Menu
- Select a track on the List.
- Press PROGRAM. Or, select "→" icon then ENTER to place the selected track on the Program list. Repeat to place additional tracks on the list.
You can add all tracks in the disc. Select
" s_2 → " icon then press ENTER.
-
Select the track you want to start playing on the Program list. Press and hold ▲ / ▼ to move to the next / previous page.
-
Press PLAY or ENTER to start. Playback begins in the order in which you programmed the tracks and "PROG." appears on the display window. Playback stops after all of the tracks on the Program list have played once.
Repeat Programmed Tracks
You can play a title/chapter/all/track on a disc.
- Press REPEAT when playing a disc. The repeat icon appears.
-
Press REPEAT to select a desired repeat mode.
-
Track: repeats the current track
- All: repeats all the tracks on programmed list.
- Off(No display): does not play repeatedly.
Note:
If you press SKIP (▶▶▶) once during Repeat Track playback, the repeat playback cancels.
Erasing a Track from Program List
- Use ▲▼◀▶ to select the track that you wish to erase from the Program list.
- Press CLEAR. Or, select "☐" icon then Press ENTER to place the selected track on the Program list. Repeat to erase additional tracks on the list.
Erasing the Complete Program List
Select " ☐", then press ENTER. The complete Program for the disc is erased.
Note:
The programs are also cleared when the disc is removed.
Viewing a JPEG Disc
Using this DVD Player you can view Kodak PICTURE CDs and discs with JPEG files.
- Insert a disc and close the tray. The PHOTO menu appears on the TV screen.
natural_image
Blurred grayscale image with no discernible text, symbols, or identifiable objects-
Press ▲ / ▼ to select a folder, and press ENTER. A list of files in the folder appears. If you are in a file list and want to return to the previous Folder list, use the ▲ / ▼ buttons on the remote to highlight 📄 and press ENTER.
-
If you want to view a particular file, press ▲ / ▼ to highlight a file and press ENTER or PLAY. Slide Show starts from the selected file if Speed option is not Off. While viewing a file, you can press STOP to move to the previous menu (PHOTO menu).
Tip:
- Press and hold ▼ / ▲ to go to the next / previous page.
- There are four Slide Speed options ▶ : >>> (Fast), >> (Normal), > (Slow) and II (Off). Use ▲ ▼ ◀ to highlight the Speed. Then, use ◀ / ▶ to select the option you want to use then press ENTER.
- On a disc with MP3/WMA and JPEG you can switch MP3/WMA and JPEG. Press TITLE and MP3/WMA or JPEG word on top of the menu is highlighted.
- Press RETURN, information of file is hidden.
Slide Show
Use ▲▼◀▶ to highlight the ■ (Slide Show) then press ENTER.
Still Picture
-
Press PAUSE/STEP during slide show. The player will now go into PAUSE mode.
-
To return to the slide show, press PLAY or press PAUSE/STEP again.
Moving to another File

Press SKIP (I◄◄ or ►►) or cursor (▲ or ▼) once while viewing a picture to advance to the next or previous file.
Zoom

Use zoom to enlarge the photo image. (see 17 page)
To rotate picture
Press ◀ / ▶ during showing a picture to rotate the picture clockwise or counter clockwise.
To listen to MP3 music watching picture

You can display files while listening to MP3 music files recorded on the same disc.
- Insert the disc containing the two types of file in the player.
- Press TITLE to display PHOTO menu.
- Press ▲ / ▼ to select a photo file.
- Use ▶ to select 📋 icon then press ENTER. Playback starts. The playback will continue until STOP is pressed.
Tip:
When MP3 and picture are included in the same disc, you can listen only MP3 music during watching picture.
JPEG disc compatibility with this player is limited as follows:
- Depending upon the size and number of JPEG files, it could take a long time for the DVD player to read the disc's contents. If you don't see an on-screen display after several minutes, some of the files may be too large — reduce the resolution of the JPEG files to less than 5M pixels as 2760 x 2048 pixels and burn another disc.
- The total number of files and folders on the disc should be less than 999.
- Some discs may be incompatible due to a different recording format or the condition of disc.
- Ensure that all the selected files have the ".jpg" extensions when copying into the CD layout.
- If the files have ".jpe" or ".jpeg" extensions, please rename them as ".jpg" file.
- File names without ".jpg" extension will not be able to be read by this DVD player. Even though the files are shown as JPEG image files in Windows Explorer.
Playing a DVD VR format Disc
This unit will play DVD-R/RW discs recorded using the DVD-Video format that have been finalized using a DVD-recorder.
- This unit will play DVD-RW discs recorded using the Video Recording (VR) format.
- Insert a disc and close the tray. The TITLE LIST menu appears on the TV screen.

natural_image
Grayscale gradient image with no visible text, symbols, or identifiable objects- Press ▲ / ▼ to select a track then press PLAY or ENTER and playback starts.
Note:
- Unfinalized DVD-R/RW discs cannot be played in this player.
- Some DVD-VR disc are made with CPRM data by DVD RECORDER. Player does not support these kinds of discs and display the "CHECK DISC".
What is 'CPRM'?
CPRM is a copy protection system (with scramble system) only allowing the recording of 'copy once' broadcast programs. CPRM stands for Content Protection for Recordable Media.
This play is CPRM compatible, which means that you can record copy-once broadcast programs, but you cannot then make a copy of those recordings. CPRM recordings can only be made on DVD-RW discs formatted in VR mode, and CPRM recordings can only be played on players that are specifically compatible with CPRM.
Maintenance and Service
Refer to the information in this chapter before contacting a service technician.
Handling the Unit
When shipping the unit
Please save the original shipping carton and packing materials. If you need to ship the unit, for maximum protection, re-pack the unit as it was originally packed at the factory.
Keeping the exterior surfaces clean
- Do not use volatile liquids such as insecticide spray near the unit.
- Do not leave rubber or plastic products in contact with the unit for a long period of time, since they leave marks on the surface.
Cleaning the unit
To clean the player, use a soft, dry cloth. If the surfaces are extremely dirty, use a soft cloth lightly moistened with a mild detergent solution.
Do not use strong solvents such as alcohol, benzine, or thinner, as these might damage the surface of the unit.
Maintaining the Unit
The DVD player is a high-tech, precision device. If the optical pick-up lens and disc drive parts are dirty or worn, the picture quality could be diminished.
Depending on the operating environment, regular inspection and maintenance are recommended after every 1,000 hours of use.
For details, please contact your nearest authorized service center.
Additional Features
Last Scene Memory
DVD CD VCD
This player memorizes last scene from the last disc that is viewed. The last scene remains in memory even if you remove the disc from the player or switch off the player. If you load a disc that has the scene memorized, the scene is automatically recalled.
Note:
This player does not memorize the scene of a disc if you switch off the player before commencing to play the disc.
Screen Saver
The screen saver appears when you leave the DVD player in Stop mode for about five minutes. If the Screen Saver is displayed for five minutes, the DVD Player automatically turns itself off.
System Select
You must select the appropriate system mode for your TV system. If NO DISC appears in the display window, press and hold PAUSE on the front panel for more than 5 seconds to be able to select a system (PAL, NTSC, or AUTO).
Controlling other TVs with the remote control
You can control the sound level, input source, and power switch of your LG TV with the supplied remote control.
You can control the sound level, input source, and power switch of non-LG TVs as well. If your TV is listed in the table below, set the appropriate manufacturer code.
- While holding down TV POWER button, press the number buttons to select the manufacturer code for your TV (see the table below).
- Release TV POWER button.
Code numbers of controllable TVs
If more than one code number is listed, try entering them one at a time until you find the one that works with your TV.
| Manufacturer | Code Number |
| LG / GoldStar | 1 (Default), 2 |
| Zenith | 1, 3, 4 |
| Samsung | 6, 7 |
| Sony | 8, 9 |
| Hitachi | 4 |
Note:
- Depending on your TV, some or all buttons may not function on the TV, even after entering the correct manufacturer code.
- If you enter a new code number, the code number previously entered will be erased.
- When you replace the batteries of the remote, the code number you have set may be reset to the default setting. Set the appropriate code number again.
Reference
Language Codes
Use this list to input your desired language for the following initial settings: Disc Audio, Disc Subtitle, Disc Menu.
| Language | Code | Language | Code | Language | Code | Language | Code |
| Abkhazian | 6566 | Fiji | 7074 | Lingala | 7678 | Singhalese | 8373 |
| Afar | 6565 | Finnish | 7073 | Lithuanian | 7684 | Slovak | 8375 |
| Afrikaans | 6570 | French | 7082 | Macedonian | 7775 | Slovenian | 8376 |
| Albanian | 8381 | Frisian | 7089 | Malagasy | 7771 | Somali | 8379 |
| Ameharic | 6577 | Galician | 7176 | Malay | 7783 | Spanish | 6983 |
| Arabic | 6582 | Georgian | 7565 | Malayalam | 7776 | Sudanese | 8385 |
| Armenian | 7289 | German | 6869 | Maltese | 7784 | Swahili | 8387 |
| Assamese | 6583 | Greek | 6976 | Maori | 7773 | Swedish | 8386 |
| Aymara | 6588 | Greenlandic | 7576 | Marathi | 7782 | Tagalog | 8476 |
| Azerbaijani | 6590 | Guarani | 7178 | Moldavian | 7779 | Tajik | 8471 |
| Bashkir | 6665 | Gujarati | 7185 | Mongolian | 7778 | Tamil | 8465 |
| Basque | 6985 | Hausa | 7265 | Nauru | 7865 | Tatar | 8484 |
| Bengali; Bangla | 6678 | Hebrew | 7387 | Nepali | 7869 | Telugu | 8469 |
| Bhutani | 6890 | Hindi | 7273 | Norwegian | 7879 | Thai | 8472 |
| Bihari | 6672 | Hungarian | 7285 | Oriya | 7982 | Tibetan | 6679 |
| Breton | 6682 | Icelandic | 7383 | Panjabi | 8065 | Tigrinya | 8473 |
| Bulgarian | 6671 | Indonesian | 7378 | Pashto, Pushto | 8083 | Tonga | 8479 |
| Burmese | 7789 | Interlingua | 7365 | Persian | 7065 | Turkish | 8482 |
| Byelorussian | 6669 | Irish | 7165 | Polish | 8076 | Turkmen | 8475 |
| Cambodian | 7577 | Italian | 7384 | Portuguese | 8084 | Twi | 8487 |
| Catalan | 6765 | Japanese | 7465 | Quechua | 8185 | Ukrainian | 8575 |
| Chinese | 9072 | Javanese | 7487 | Rhaeto-Romance | 8277 | Urdu | 8582 |
| Corsican | 6779 | Kannada | 7578 | Rumanian | 8279 | Uzbek | 8590 |
| Croatian | 7282 | Kashmiri | 7583 | Russian | 8285 | Vietnamese | 8673 |
| Czech | 6783 | Kazakh | 7575 | Samoan | 8377 | Volapük | 8679 |
| Danish | 6865 | Kirghiz | 7589 | Sanskrit | 8365 | Welsh | 6789 |
| Dutch | 7876 | Korean | 7579 | Scots Gaelic | 7168 | Wolof | 8779 |
| English | 6978 | Kurdish | 7585 | Serbian | 8382 | Xhosa | 8872 |
| Esperanto | 6979 | Laothian | 7679 | Serbo-Croatian | 8372 | Yiddish | 7473 |
| Estonian | 6984 | Latin | 7665 | Shona | 8378 | Yoruba | 8979 |
| Faroese | 7079 | Latvian, Lettish | 7686 | Sindhi | 8368 | Zulu | 9085 |
Country Codes
Choose a country code from this list.
| Country | Code | Country | Code | Country | Code | Country | Code |
| Afghanistan | AF | Ethiopia | ET | Malaysia | MY | Saudi Arabia | SA |
| Argentina | AR | Fiji | FJ | Maldives | MV | Senegal | SN |
| Australia | AU | Finland | FI | Mexico | MX | Singapore | SG |
| Austria | AT | France | FR | Monaco | MC | Slovak Republic | SK |
| Belgium | BE | Germany | DE | Mongolia | MN | Slovenia | SI |
| Bhutan | BT | Great Britain | GB | Morocco | MA | South Africa | ZA |
| Bolivia | BO | Greece | GR | Nepal | NP | South Korea | KR |
| Brazil | BR | Greenland | GL | Netherlands | NL | Spain | ES |
| Cambodia | KH | Islands | HM | Netherlands Antilles | AN | Sri Lanka | LK |
| Canada | CA | Hong Kong | HK | New Zealand | NZ | Sweden | SE |
| Chile | CL | Hungary | HU | Nigeria | NG | Switzerland | CH |
| China | CN | India | IN | Norway | NO | Taiwan | TW |
| Colombia | CO | Indonesia | ID | Oman | OM | Thailand | TH |
| Congo | CG | Israel | IL | Pakistan | PK | Turkey | TR |
| Costa Rica | CR | Italy | IT | Panama | PA | Uganda | UG |
| Croatia | HR | Jamaica | JM | Paraguay | PY | Ukraine | UA |
| Czech Republic | CZ | Japan | JP | Philippines | PH | United States | US |
| Denmark | DK | Kenya | KE | Poland | PL | Uruguay | UY |
| Ecuador | EC | Kuwait | KW | Portugal | PT | Uzbekistan | UZ |
| Egypt | EG | Libya | LY | Romania | RO | Vietnam | VN |
| El Salvador | SV | Luxembourg | LU | Russian Federation | RU | Zimbabwe | ZW |
Troubleshooting
| Symptom | Possible Cause | Correction |
| No power. | The power cord is disconnected. | Plug the power cord into the wall outlet securely. |
| The power is on, but the DVD player does not work. | No disc is inserted. | Insert a disc. (Check that the DVD or audio CD indicator in the display window is lit.) |
| No picture. | The TV is not set to receive DVD signal output. | Select the appropriate video input mode on the TV. |
| The video cable is not connected securely. | Connect the video cable securely. | |
| No sound. | The equipment connected with the audio cable is not set to receive DVD signal output. | Select the correct input mode of the audio receiver so you can listen to the sound from the DVD player. |
| The power of the equipment connected with the audio cable is turned off. | Turn on the equipment connected with the audio cable. | |
| The AUDIO options are set to the wrong position. | Set the Digital Audio Output to the correct position, then turn on the DVD player again by pressing POWER. | |
| The DVD player does not start playback. | An unplayable disc is inserted. | Insert a playable disc. (Check the disc type, color system, and regional code.) |
| The rating level is set. | Cancel the rating function or change the rating level. | |
| The remote control does not work properly. | The remote control is not pointed at the remote sensor on the DVD player. | Point the remote control at the remote sensor of the DVD player. |
| The remote control is too far from the DVD player. | Operate the remote control closer to the DVD player. |
Specifications
General
Power requirements: AC 110-240 V, 50/60 Hz
Power consumption: 12W
Dimensions (Approx.):
430 x 39 x 242 mm (W x H x D) without foot
Weight (Approx.): 2.2 kg
Operating temperature:
5 °C to 35 °C (41 °F to 95 °F)
Operating humidity: 5 % to 90 %
Outputs
VIDEO OUT:
1 Vp-p 75 Ω, sync negative, RCA jack x 1/ SCART (TO TV)
AUDIO OUT:
2.0 Vrms (1 KHz, 0 dB), 600 Ω, RCA jack (L, R) x 1/SCART (TO TV)
DIGITAL OUT (COAXIAL):
0.5 V (p-p), 75 Ω, RCA jack x 1
System
Laser:
Semiconductor laser, wavelength 650 nm
Signal system: PAL / NTSC
Frequency response:
DVD (PCM 96 kHz): 8 Hz to 44 kHz DVD (PCM 48 kHz): 8 Hz to 22 kHz
CD: 8 Hz to 20 kHz
Signal-to-noise ratio:
More than 100 dB (ANALOG OUT connectors only)
Harmonic distortion: Less than 0.008%
Dynamic range:
More than 90 dB (DVD/CD)
Accessories
Video cable (1), Audio cable (1), Remote control (1), Batteries (2)
Note:
Design and specifications are subject to change prior notice.

LG
DVD PLAYER
Gebrauchsanleitung
MODELL : DV8700C/DV8900C


• Dynamic Range Control (DRC) .....13
• Vocal 13
ANDERE 13
• PBC 13
• Autom. Wiedergabe .....13
• B.L.E. (Black Level Expansion). .....13
LOCK (KINDERSICHERUNG) .....14
• Einstufung 14
• Kennwort (Sicherheitscode) .....14
• Ländercode 14
Betrieb ....15
natural_image
Two hand diagrams showing a ring and a cross, no text or symbols presentDolby Digital / DTS / MPEG
Dynamic Range Control (DRC)
B.L.E. (Black Level Expansion)

natural_image
Plain gray surface with a small rectangular dark square at the top (no text or symbols)Hinweis
natural_image
Plain gray surface with no visible text, symbols, or distinct featuresMenü Audio-CD
natural_image
Grayscale abstract image with no discernible text, symbols, or identifiable objectsMenü MP3/WMA
natural_image
Pure electrical circuit lines without any symbolsMenü Video-CD
natural_image
Grayscale abstract image with a bright central region and faint gradient edges (no text or symbols)RISQUE D'ÉLECTROCUTION NE PAS OUVRIR

natural_image
Illustration of two hands holding a circular object, one with a cross symbol (no text or symbols present)natural_image
Dark gradient background with faint diagonal lines and a small arrow symbol (no text or symbols)Classement

natural_image
Plain gray surface with a small rectangular object in the top-left corner (no text or symbols)MP3 / WMA
natural_image
Plain gray surface with a small rectangular object on top (no text or symbols visible)Remarque:
natural_image
Interior view of a room with a ceiling light and a wall-mounted door (no visible text or symbols)Menu de CD Audio

natural_image
Blurred grayscale image with no discernible text, symbols, or identifiable objectsMenu MP3/WMA
natural_image
Blurred grayscale image with no discernible text, symbols, or identifiable objectsMenu CD Vidéo
| Pays | Code | Pays | Code | Pays | Code | Pays | Code |
| Afghanistan | AF | Ethiopia | ET | Malaysia | MY | Saudi Arabia | SA |
| Argentina | AR | Fiji | FJ | Maldives | MV | Senegal | SN |
| Australia | AU | Finland | FI | Mexico | MX | Singapore | SG |
| Austria | AT | France | FR | Monaco | MC | Slovak Republic | SK |
| Belgium | BE | Germany | DE | Mongolia | MN | Slovenia | SI |
| Bhutan | BT | Great Britain | GB | Morocco | MA | South Africa | ZA |
| Bolivia | BO | Greece | GR | Nepal | NP | South Korea | KR |
| Brazil | BR | Greenland | GL | Netherlands | NL | Spain | ES |
| Cambodia6 | KH | Heard and McDonald IslandsHM | Netherlands Antilles | AN | Sri Lanka | LK | |
| Canada | CA | Hong Kong | HK | New Zealand | NZ | Sweden | SE |
| Chile | CL | Hungary | HU | Nigeria | NG | Switzerland | CH |
| China | CN | India | IN | Norway | NO | Taiwan | TW |
| Colombia | CO | Indonesia | ID | Oman | OM | Thailand | TH |
| Congo | CG | Israel | IL | Pakistan | PK | Turkey | TR |
| Costa Rica | CR | Italy | IT | Panama | PA | Uganda | UG |
| Croatia | HR | Jamaica | JM | Paraguay | PY | Ukraine | UA |
| Czech Republic | CZ | Japan | JP | Philippines | PH | United States | US |
| Denmark | DK | Kenya | KE | Poland | PL | Uruguay | UY |
| Ecuador | EC | Kuwait | KW | Portugal | PT | Uzbekistan | UZ |
| Egypt | EG | Libya | LY | Romania | RO | Vietnam | VN |
| El Salvador | SV | Luxembourg | LU | Russian Federation | RU | Zimbabwe | ZW |
430 x 39 x 242 mm (A x A x P) sans pied.
Poids (Env.): 2.2 kg
2.0 Vrms (1 kHz, 0 dB), 600 Ω, RCA jack (L, R) x 1 SCART (POUR TV)
CLASS 1 LASER PRODUCT
KLASSE 1 LASER PRODUKT
LUOKAN 1 LASER LAITE
KLASS 1 LASER APPARAT
CLASSE 1 PRODUIT LASER

OSD (On-Screen Display)
B.L.E. (Black Level Expansion)

natural_image
Dark image with faint geometric shapes and no discernible text or symbolsBeveiligingsniveau

natural_image
Blurred grayscale image with no discernible text, symbols, or identifiable objectsMP3 / WMA
natural_image
Plain gray surface with no visible text, symbols, or markingsOpmerking:
natural_image
Grayscale abstract image with no discernible text, symbols, or identifiable objectsVideo-cd-Menu
natural_image
Dark, grainy image with no discernible text, symbols, or identifiable objects.- CAUTION
- SERIAL NUMBER:
- Contents
- Introduction 4
- Installation and Setup 9
- Operation 15
- Reference .....24
- Installation and Setup
- Setting up the Player
- DVD Player Connections
- Video and Audio Connections to Your TV
- Audio Connection to Your TV:
- Audio Connection to Optional Equipment
- Digital Multi-channel sound
- Notes:
- On-Screen Display
- Playback Status/Restrictions
- Initial Settings
- To display and exit the Menu:
- To go to the next level:
- To go back to the previous level:
- General Operation
- Menu Language
- Disc Audio / Subtitle / Menu
- TV Aspect
- Display Mode
- AUDIO
- Dolby Digital / DTS / MPEG
- Sample Freq. (Frequency)
- Dynamic Range Control (DRC)
- Vocal
- OTHERS
- PBC
- Auto Play
- Note:
- B.L.E. (Black Level Expansion)
- LOCK (Parental Control)
- Rating
- Unlock
- Password (Security Code)
- Country Code
- Operation
- Playing a DVD or Video CD
- Playback Setup
- DVD
- VCD
- General Features
- Moving to another TITLE DVD
- Moving to another CHAPTER/TRACK
- DVD VCD
- Search DVD VCD
- Changing the Audio Channel VCD
- Still Picture and Frame-by-Frame Playback
- Slow Motion DVD VCD
- Random VCD
- Tip:
- Repeat A-B DVD VCD
- Repeat DVD VCD
- DVD Video Discs - Repeat Chapter/Title/Off
- Video CDs - Repeat Track/All/Off
- 3D Surround DVD VCD
- Time Search DVD VCD
- Zoom DVD VCD
- Marker Search DVD VCD
- To enter a Marker
- To Recall or Clear a Marked Scene
- Special DVD Features
- Checking the contents of DVD discs: Menus
- Title Menu DVD
- Disc Menu DVD
- Camera Angle DVD
- Changing the Audio Language DVD
- Subtitles DVD
- Playing an Audio CD or MP3/WMA Disc
- Audio CD
- MP3 / WMA
- MP3 / WMA disc compatibility with this player is limited as follows:
- Audio CD and MP3 / WMA Disc Features
- Pause CD MP3 WMA
- Moving to another Track CD MP3 WMA
- Repeat Track/All/Off CD MP3 WMA
- Search CD MP3 WMA
- Random CD
- Repeat A-B CD
- 3D Surround CD
- Programmed Playback
- Audio CD and MP3/WMA Discs:
- Repeat Programmed Tracks
- Erasing a Track from Program List
- Erasing the Complete Program List
- Viewing a JPEG Disc
- Slide Show
- Still Picture
- Moving to another File
- Zoom
- To rotate picture
- To listen to MP3 music watching picture
- JPEG disc compatibility with this player is limited as follows:
- Playing a DVD VR format Disc
- What is 'CPRM'?
- Maintenance and Service
- Handling the Unit
- When shipping the unit
- Keeping the exterior surfaces clean
- Cleaning the unit
- Maintaining the Unit
- Additional Features
- Last Scene Memory
- DVD CD VCD
- Screen Saver
- System Select
- Controlling other TVs with the remote control
- Code numbers of controllable TVs
- Reference
- Language Codes
- Country Codes
- Specifications
- General
- Outputs
- VIDEO OUT:
- AUDIO OUT:
- DIGITAL OUT (COAXIAL):
- System
- Laser:
- Frequency response:
- Signal-to-noise ratio:
- Dynamic range:
- Accessories
- DVD PLAYER
- Gebrauchsanleitung
- MODELL : DV8700C/DV8900C
- Betrieb ....15
- Hinweis
- Remarque:
- OSD (On-Screen Display)
- Beveiligingsniveau
- Opmerking:
Brand : LG
Model : DV8900C
Category : DVD player