
CCP06DP4PW2 - Wine cellar Café - Free user manual and instructions
Find the device manual for free CCP06DP4PW2 Café in PDF.

| Product Type | Built-in or freestanding wine cellar |
| Brand | Café |
| Model | CCP06DP4PW2 |
| Capacity (bottles) | 46 bottles (standard configuration) |
| Dimensions (H x W x D) | 86.6-89.1 cm x 60.3 cm x (depth unspecified, approx. 60 cm) |
| Weight | Approximately 45 kg (empty, estimated) |
| Electrical supply | 115 V AC, 60 Hz, 15-20 A, grounded outlet |
| Temperature range | 5 °C to 16 °C (41 °F to 61 °F) |
| Temperature zones | Single zone (display for upper or lower zone) |
| Refrigerant | R600a (isobutane), flammable |
| Door type | Solid, reversible (with Café handle) |
| Interior lighting | LED with proximity sensor and presentation mode |
| Special features | Built-in WiFi (SmartHQ), child lock, Sabbath mode, door and temperature alarm, door lock |
| Interior storage | Full-extension removable drawers (5 drawers of 8 bottles + 1 drawer of 6 bottles) |
| Exterior material | Fingerprint-resistant stainless steel |
| Installation | Built-in under counter or freestanding (with anti-tip kit) |
| Cleaning | Warm water and mild detergent; do not use abrasive or stainless steel cleaners |
| Safety | Grounding required; do not use extension cord; manual defrost with plastic scraper |
| Warranty | 1 year parts and labor, 5 years on sealed system (compressor, condenser, evaporator) |
Frequently Asked Questions - CCP06DP4PW2 Café
User questions about CCP06DP4PW2 Café
0 question about this device. Answer the ones you know or ask your own.
Ask a new question about this device
Download the instructions for your Wine cellar in PDF format for free! Find your manual CCP06DP4PW2 - Café and take your electronic device back in hand. On this page are published all the documents necessary for the use of your device. CCP06DP4PW2 by Café.
USER MANUAL CCP06DP4PW2 Café
natural_image
Top-down view of a festive dining table setup with plates, cutlery, and decorative floral arrangements (no text or symbols visible)
natural_image
Solid dark green rectangle with no visible text, symbols, or features.CAFE
DISTINCT BY DESIGN
Owner's Manual

natural_image
Solid red rectangular background with no text, symbols, or discernible features.
natural_image
Fresh mushrooms on a wooden cutting board with herbs and garlic, no visible text or symbolsCAFE
DISTINCT BY DESIGN™
Owner's Manual and Installation Instructions
Undercounter Wine Center
CCP06DP*****
CCR06DM*****
Contents
Safety Information....3
Using the Wine Center
Controls 6
WiFi 7
Full Extension Drawers 8
Insert Wine Bottles 8
Care And Cleaning 9
Cleaning the Outside 9
Cleaning the Inside 9
Vacation and Moving 9
Installation Instructions
Wine Center Dimensions 1 1
The Installation Space 11
Product Clearances .... 1 1
Removing Packaging 11
Reversing the Door Swing 12
Door Adjustment 14
Handle Installation 14
Method 1 - Undercounter Installation ..... 1 5
Method 2 - Freestanding Installation ..... 1 6
Connect to Power 16
Complete Installation 16
Troubleshooting Tips 17
Limited Warranty 19
Consumer Support 20
Write the model and serial numbers here:
Model # ____
Serial # ____
Find these numbers on a label inside of your wine center on the left side near the top.
ENGLISH/FRANÇAIS/ESPAÑOL
THANK YOU FOR MAKING CAFÉ A PART OF YOUR HOME.
We take pride in the craftsmanship, innovation and design that goes into every Café product, and we think you will too. Among other things, registration of your appliance ensures that we can deliver important product information and warranty details when you need them.
Register your Café appliance now online. Helpful websites are available in the Consumer Support section of this Owner's Manual. You may also mail in the pre-printed registration card included in the packing material.
CAFE
DISTINCT BY DESIGN™
IMPORTANT SAFETY INFORMATION READ ALL INSTRUCTIONS BEFORE USING THE APPLIANCE
WARNING
To reduce the risk of fire, explosion, electric shock, or injury when using your refrigerator, follow these basic safety precautions:
- Use this appliance only for its intended purpose as described in this Owner's Manual.
■ This appliance must be properly installed and located in accordance with the Installation Instructions before it is used.
■ Unplug the appliance before making repairs, replacing a light bulb, or cleaning.
NOTE: Power to the appliance cannot be disconnected by any setting on the control panel.
NOTE: Repairs must be performed by a qualified Service Professional.
■ Replace all parts and panels before operating.
■ Do not use an extension cord. - Keep flammable materials and vapors away from the refrigerator.
■ Do not store explosive substances such as aerosol cans with a flammable propellant in this appliance.
■ To prevent suffocation and entrapment hazards to children, remove the doors from any appliance before disposing of it or discontinuing its use.
■ To avoid serious injury or death, children should not stand on, or play in or with the appliance.
■ Children and persons with reduced physical, sensory or mental capabilities or lack of experience and knowledge can use this appliance only if they are supervised or have been given instructions on safe use and understand the hazards involved.
This appliance is intended to be used in household and similar applications such as: staff kitchen areas in shops, offices and other working environments; farm houses; by clients in hotels, motels, bed & breakfast and other residential environments; catering and similar non-retail applications.
- Do not apply harsh cleaners to the appliance. Certain cleaners will damage plastic which may cause parts such as the door or door handles to detach unexpectedly. See the Care and Cleaning section for detailed instructions.
CAUTION
To reduce the risk of injury when using your refrigerator, follow these basic safety precautions.
- Keep fingers out of the “pinch point” areas; clearances between the doors and cabinet are necessarily small. Be careful closing doors when children are in the area.
WARNING

or Explosion Hazard
Keep flammable materials and vapors away from appliance. Failure to do so can result in fire, explosion, or death.
WARNING
To reduce the risk associated with choking, do not allow children under 3 years of age to have parts during the installation of this product.
WARNING
EXCESS WEIGHT HAZARD
Use two or more people to move and install wine center.
Failure to do so can result in back or other injury.
READ AND SAVE THESE INSTRUCTIONS
IMPORTANT SAFETY INFORMATION READ ALL INSTRUCTIONS BEFORE USING THE APPLIANCE
CONNECTING ELECTRICITY
WARNING

LECTRICAL SHOCK HAZARD
Plug into a grounded 3-prong outlet
Do not remove the ground prong
Do not use an adapter
Do not use an extension cord.
Failure to follow these instructions can result in death, fire, or electrical shock.
Do not, under any circumstances, cut or remove the third (ground) prong from the power cord. For personal safety, this appliance must be properly grounded.
The power cord of this appliance is equipped with a 3-prong (grounding) plug which mates with a standard 3-prong (grounding) wall outlet to minimize the possibility of electric shock hazard from this appliance. Have the wall outlet and circuit checked by a qualified electrician to make sure the outlet is properly grounded.
Where a standard 2-prong wall outlet is encountered, it is your personal responsibility and obligation to have it replaced with a properly grounded 3-prong wall outlet. Do not use an adapter.
The refrigerator should always be plugged into its own individual electrical outlet which has a voltage rating that matches the rating plate.
A 115 Volt AC, 60 Hz, 15- or 20-amp fused, grounded electrical supply is required. This provides the best performance and also prevents overloading house wiring circuits which could cause a fire hazard from overheated wires.
Never unplug your wine center by pulling on the power cord. Always grip plug firmly and pull straight out from the outlet.
Immediately discontinue use of a damaged supply cord. If the supply cord is damaged, it must be replaced by a qualified service professional with an authorized service part from the manufacturer.
When moving the wine center away from the wall, be careful not to roll over or damage the power cord.
PROPER DISPOSAL OF YOUR OLD APPLIANCE
WARNING
SUFFOCATION AND ENTRAPMENT HAZARD
Failure to follow these disposal instructions can result in death or serious injury
IMPORTANT: Child entrapment and suffocation are not problems of the past. Junked or abandoned appliances are still dangerous even if they will sit for “just a few days.” If you are getting rid of your old refrigerator, please follow the instructions below to help prevent accidents.
Before You Throw Away Your Old Appliance
■ Take off the doors.
■ Leave the drawers in place so that children may not easily climb inside.
Refrigerant and Foam Disposal:
Dispose of appliance in accordance with Federal and Local Regulations. Flammable refrigerant and insulation material used requires special disposal procedures. Contact your local authorities for the environmentally safe disposal of your appliance.
READ AND SAVE THESE INSTRUCTIONS
IMPORTANT SAFETY INFORMATION READ ALL INSTRUCTIONS BEFORE USING THE APPLIANCE
WARNING

E OR EXPLOSION HAZARD
Flammable Refrigerant
This appliance contains isobutane refrigerant, also known as R600a, a natural gas with high environmental compatibility. However, it is also combustible. Adhere to the warnings below to reduce the risk of injury or property damage.
- When handling, installing and operating the appliance, care should be taken to avoid damage to the refrigerant tubing.
- Service shall only be performed by authorized service personnel. Use only manufacturer-authorized service parts.
-
Dispose of appliance in accordance with Federal and Local Regulations. Flammable refrigerant and insulation material used require special disposal procedures. Contact your local authorities for the environmentally safe disposal of your refrigerator.
-
Keep ventilation openings in the appliance enclosures or in the built-in structure clear of obstruction.
- To remove frost, scrape with a plastic or wood spatula or scraper. Do not use an ice pick, metal, or sharp-edged instrument as it may puncture the wine center liner and then the flammable refrigerant tubing behind it.
- Do not use electrical appliances inside the food storage compartment of the appliance.
- Do not use any electrical device in defrosting your wine center.
READ AND SAVE THESE INSTRUCTIONS
CONTROLS

Temperature Setting
The temperature range of both wine center zones is 41^ F ( 5^ C) to 61^ F ( 16^ C).
The temperature display can show only one zone temperature at a time. "Upper" or "Lower" is displayed to the right of the temperature to indicate the selected zone. Use the Zone Select button to select the zone that you want to view or change.
Use the + and - buttons to increase or decrease the temperature settings.
°C and °F Conversion
Press and hold + and Display for 3 seconds. The temperature display will change from degrees Fahrenheit to degrees Celsius. Press and hold + and Display for 3 seconds again to switch back to Fahrenheit.
Turn On/Off Cooling
Press and hold Power for 3 seconds to turn off cooling and lighting. This does not disconnect power to the wine center.
Door Alarm
Sounds an alert when the door has been left open. The alert stops when the door is closed. Snooze the alert by pressing the Alarm button. Disable the door alarm by pressing and holding - and Alarm for 3 seconds. Press and hold - and Alarm for 3 seconds, to reactivate the feature.
High Temperature Alert
Sounds an alert when the temperature is outside of the normal range. Snooze the alert by pressing the Alarm button. Disable the High Temperature Alert by pressing and holding Display and Alarm for 3 seconds. Press and hold Display and Alarm for 3 seconds, to reactivate the feature.
Child Control Lockout
This child control lockout feature prevents unwanted changes to the settings of your wine center.
To lock, press and hold Control Lock for 3 seconds. To unlock, press and hold Control Lock for 3 seconds.
Proximity Lighting
The interior lighting is activated when someone approaches the wine center. To turn off this feature, press and hold Alarm, Display and Control Lock for 3 seconds. Press and hold Alarm, Display and Control Lock for 3 seconds again to reactivate the feature.
Display Mode
The interior light enhances the display of your collection. Press the Display button to activate display mode. In display mode the interior lighting will remain on even when the door is closed and proximity lighting is off. Press the Display button again to exit display mode.
Sabbath Mode
The Sabbath Mode was designed for use on the Jewish Sabbath and Holidays. The Sabbath Mode feature makes it possible for observant Jews to use the wine center during the duration of the holiday.
The Sabbath Mode feature can be set to override typical reactions caused by your interaction with the wine center. While in the Sabbath Mode, your appliance will still operate. However, it will not respond to your actions.
While in the Sabbath Mode, you may notice the fan running when the door is opened, however, this is not a result of your actions. The compressor and fan will operate at predetermined times.
ON/OFF - To activate the Sabbath Mode, press and hold down the - and DISPLAY for 5 seconds. SA will be displayed on the control. SA will remain in the display and all the control settings will be frozen and stay on
the last mode before entering Sabbath Mode. Controls and lights will not work until the - and DISPLAY are held again for 5 seconds to exit Sabbath Mode.

Lockout Mode
For when you are away and don't want others opening your wine center. As soon as the door is opened the door alarm will sound. The interior lighting will remain off. If the wine center is connected to wifi, a notification can be received through the app that the door has been opened.
This feature can be enabled / disabled using the app. If your connected device is not available the feature can be enabled with a press and hold of + and Control Lock for 3 seconds. Press and hold + and Control Lock again for 3 seconds to disable the feature.
APPLIANCE COMMUNICATION
WiFi (for customers in the United States, its territories, and Canada)
■ Download the SmartHQ app.
• Available for iPhone from the Apple Store or from link at GEAppliances.com.
• Available for Android from Google Play or from link at GEAppliances.com.
■ Select Create Account on app.
- Enter information, and select Register. An e-mail will be generated.
- When you receive the e-mail, select Verify Account.
- Sign in with your credentials and select Authorize to allow the app to communicate with your wine center.
■ Set up the app.
- Press the at the top of the screen.
- Choose Cafe > Refrigeration > Wine Center.
- The info button will show a picture of the touch display on the appliance. Select OK.
- Select Next.
■ Press WiFi Connect on the control. The WiFi symbol will start flashing on the display.
- Select Next in the app.
■ Find the password inside the refrigerator door on the "Connected Appliance Information" label.
- Enter the password into the app.
- Connect to the refrigerator's WiFi Module in the phone's WiFi settings, then return back to the SmartHQ app and select Next.
- The WiFi will have the format "GE_MODULE_XXXX". The module number can also be found on the Connected Appliance Information label inside the fridge door.
- Connect to the home WiFi network and type in the home WiFi password.
- If all check marks appear and the user gets a screen that says the device is connected, the device has been successfully connected.
- If the app fails to connect, the app will display the "Oops! Something Went Wrong" screen. The user will be given possible reasons why connection failed and the option to retry.
REGULATORY INFORMATION
FCC/IC Compliance Statement:
This device complies with Part 15 of the FCC Rules. Operation is subject to the following two conditions:
- This device may not cause harmful interference, and
- This device must accept any interference received, including interference that may cause undesired operation.
This equipment has been tested and found to comply with the limits for a Class B digital device, pursuant to Part 15 of the FCC Rules. These limits are designed to provide reasonable protection against harmful interference in a residential installation. This equipment generates uses and can radiate radio frequency energy and, if not installed and used in accordance with the instructions, may cause harmful interference to radio communications. However, there is no guarantee that interference will not occur in a particular installation. If this equipment does cause harmful interference to radio or television reception, which can be determined by turning the equipment off and on, the user is encouraged to try to correct the interference by one or more of the following measures:
- Reorient or relocate the receiving antenna.
- Increase the separation between the equipment and receiver.
- Connect the equipment into an outlet on a circuit different from that to which the receiver is connected.
- Consult the dealer or an experienced radio/television technician for help.
Labelling: Changes or modifications to this unit not expressly approved by the manufacturer could void the user's authority to operate the equipment.
Using the Wine Center
FULL EXTENSION DRAWERS
All of the full extension drawers pull out so bottles can be conveniently added or removed.
Any of the full extension drawers can be removed to store larger bottles.
To remove:
- Pull the full extension drawer out to the STOP position.
- Push the tab on right drawer guide down while pulling the tab on left guide up, and pull the drawer out.
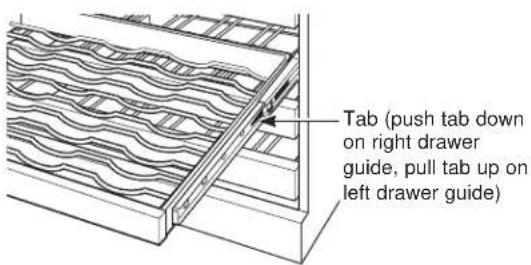
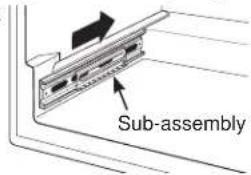
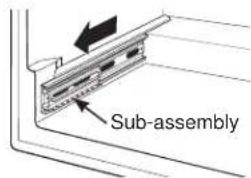
To replace:
- Push the drawer slide arm back into the unit.
- Pull the small slide sub-assembly completely forward.
- Insert the sides of the drawer back into the guides.
- Push until the tabs lock into place.
NOTE: Make sure the tabs on the full extension drawer guides are fully engaged before loading any bottles. Pull the drawers out all the way to the STOP position and push back in several times to make sure locking tabs are properly engaged.
Appearance may vary
To replace, push drawer slide arm back into unit
Pull small slide sub- assembly completely forward
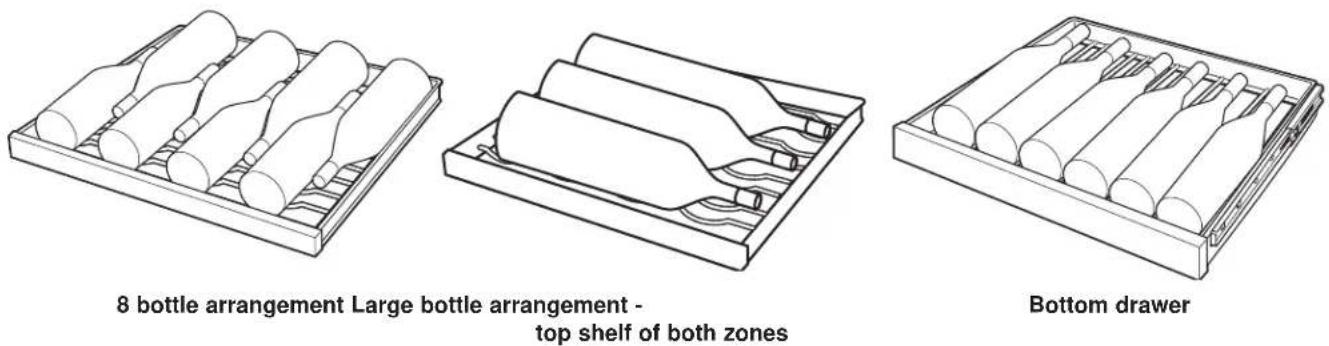
INSERT WINE BOTTLES
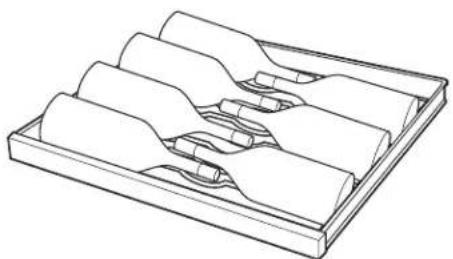
The top five full extension drawers each hold eight bottles, two deep with the necks alternating front to back.
The top shelf in each zone can store larger bottles by orienting them sideways. The other full depth shelves can hold 7 bottles in the sideways orientation. This orientation provides additional length that may be needed for some bottle shapes.
The bottom full extension drawer holds six bottles and is loaded with necks facing the rear.
natural_image
Technical line drawing of a multi-layered mechanical component or tray (no text or symbols)7 bottle arrangement
CLEANING THE OUTSIDE
Fingerprint Resistant Stainless Steel\*
⚠️ DO NOT use Stainless Steel cleaners on the door surfaces. ⚠️
IMPORTANT: The use of incorrect products may damage the outer finish of Fingerprint Resistant Stainless. Please follow these instructions and use only the appropriate items below to clean your appliance surfaces.
- Clean interior/exterior surfaces with warm water, mild soap or detergent, and a soft or microfiber cloth to avoid damage.
- Wipe the appliance surface dry with a soft clean cloth or microfiber towel to avoid streaking or water spotting.
| DO USE DO NOT USE | |
| Soft, clean cloth or sponge Microfiber cloth | Abrasive cloths, paper towels, scrubbing sponges (with or without soap), scouring or steel wool pads |
| Mild detergent mixed with warm water | Abrasive powders, liquids, or sprays Oven cleanersWindow sprays, ammonia, or bleach Alkaline cleanersCitrus or plant oil-based cleaners Stainless steel cleanersAcidic or vinegar-based cleaners |
*Easily wipe away smudges and fingerprints.
CLEANING THE INSIDE
WARNING

electrical Shock Hazard
Unplug the appliance before cleaning. If the unit is in a built-in location, remove power at the circuit breaker.
WARNING

sk of Fire or Explosion.
Flammable Refrigerant
To remove frost, scrape with a plastic or wood spatula or scraper. Do not use an ice pick or a metal or sharp-edged instrument as it may puncture the appliance liner and then the refrigerator tubing behind it.
Do not use any electrical device to defrost your appliance.
If this is not practical, wring excess moisture out of sponge or cloth when cleaning around switches, lights or controls.
Use warm water and baking soda solution—about a tablespoon (15 ml) of baking soda to a quart (1 liter) of water. This both cleans and neutralizes odors. Rinse and wipe dry.
CAUTION
Do not clean glass shelves or
covers with warm water when they are cold. Glass shelves and covers may break if exposed to sudden temperature changes or impact such as bumping or dropping. Tempered glass is designed to shatter into many small pieces if it breaks.
Do not wash any plastic wine center parts in the dishwasher.
VACATION AND MOVING
Vacation
If you will be away for an extended period of time and do not want to leave the appliance on while you are gone, prepare it for your absence.
- Remove all items.
- Press and hold POWER on the control panel for 3 seconds to turn off cooling.
- Unplug or disconnect power.
- Clean the interior. See "Cleaning."
- Prop door open, so air can circulate inside.
Preparing to Move
Secure all loose items such as shelves and drawers by taping them securely in place to prevent damage. Be sure the wine center stays in an upright position during moving.
Installation Instructions
Wine Center
Questions? Visit our Website at: cafeappliances.com In Canada, visit cafeappliances.ca
BEFORE YOU BEGIN
Read these instructions completely and carefully.
- IMPORTANT — Observe all governing codes and ordinances. Save these instructions for local inspector's use.
- Note to Installer – Be sure to leave these instructions with the Consumer.
- Note to Consumer – Keep these instructions for future reference.
- Skill level – Installation of this appliance requires basic mechanical skills.
- Completion time – Wine center Installation can vary
- Proper installation is the responsibility of the installer.
- Product failure due to improper installation is not covered under the Warranty.
WARNING EXCESS WEIGHT HAZARD
Use two or more people to move and install wine center. Failure to do so can result in back or other injury.
IMPORTANT: Handle with care when moving wine center to avoid either damaging the refrigerant tubing or increasing the risk of a leak.
IMPORTANT: If the wine center has been placed in a horizontal position for any period of time, wait one hour before plugging in to allow the refrigerant to settle.
LOCATION REQUIREMENTS
IMPORTANT: Before use, this wine center must be installed properly.
NOTE: Allow the wine center to sit upright on its base for at least one hour before installation.
- Do not install the wine center where the temperature will go below 55°F (13°C) because it will not run often enough to maintain proper temperatures.
- Do not install the wine center where the temperature will go above 110°F (43°C) because it will not perform properly.
• Install it on a floor strong enough to support it fully loaded. - Do not install the wine center in a location exposed to water (rain, etc.) or direct sunlight.
TOOLS NEEDED
• Phillips Screwdriver
- Measuring Tape
- Carpenter's Level
- Flathead screwdriver
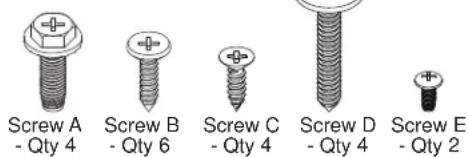
PARTS SUPPLIED
Anti-tip Brackets (Qty 4)
Toe Kick Brackets (Qty 2)
Protective Guard (Qty 1)
Toe Kick (Qty 1)
Handle (Qty 1)
1/8" Allen Wrench (Qty 1)
Screws
WINE CENTER DIMENSIONS
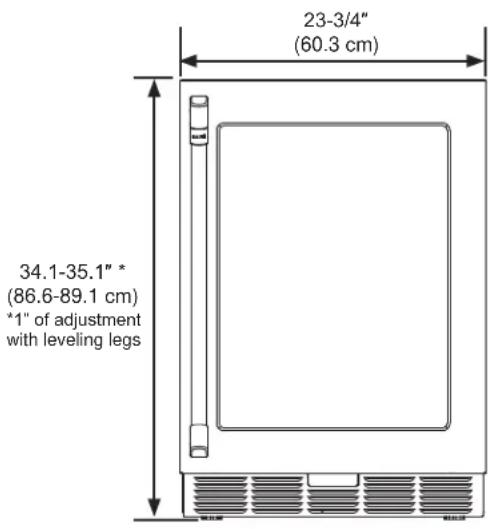
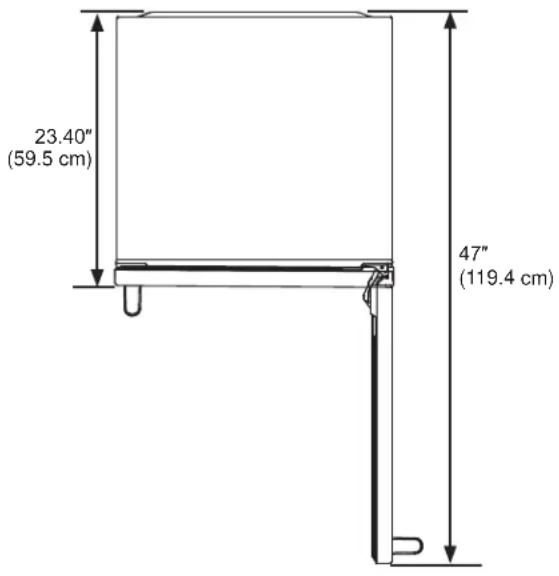
THE INSTALLATION SPACE
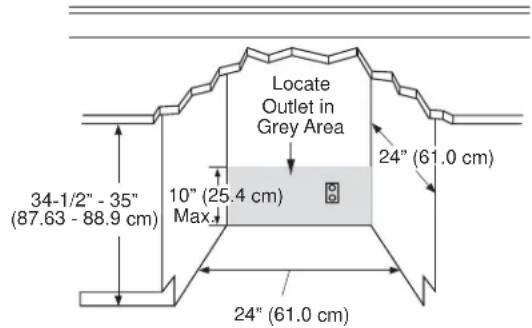
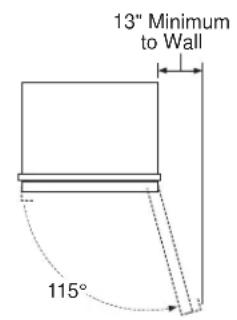
PRODUCT CLEARANCES
When installed in a corner:
- Allow 4" (10 cm) min. clearance on the hinge side for the 90° door swing and to allow racks to slide out.
- Allow 13" (33 cm) minimum clearance on the hinge side for a full 115° door swing.

REMOVE PACKAGING
NOTE: The toekick and door handle (some models) are included in the packaging which covers the top of the unit. A wrench for the handle installation is included in the accessory bag located inside the wine center.
- Remove tape and glue residue from surfaces before turning on the wine center. Rub a small amount of liquid dish soap over the adhesive with your fingers. Wipe with warm water and dry.
NOTE: Do not use sharp instruments, rubbing alcohol, flammable fluids, or abrasive cleaners to remove tape or glue. These products can damage the surface of your wine center. For more information, see “Wine Center Safety.”
- Dispose of/recycle all packaging materials.
WARNING
Small objects are a choke hazard
for children. Remove and discard any parts not used.
CLEAN BEFORE USING
After you remove all of the packaging materials, clean the inside of the wine center before using it. See the cleaning instructions in "Wine Center Care."
Installation Instructions
INSTALLING THE WINE CENTER
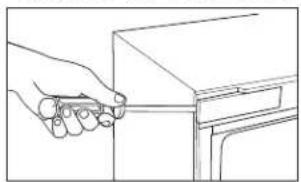
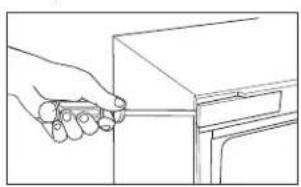
REVERSING THE DOOR SWING - MODELS WITH CAFE HANDLE - CCP06DP\*\*\*\*
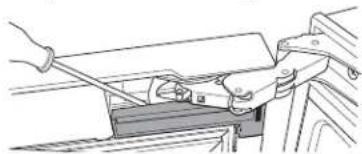
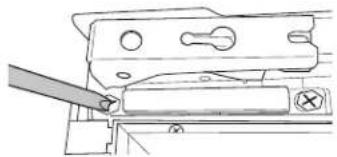
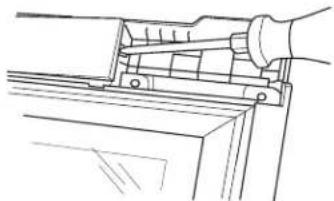
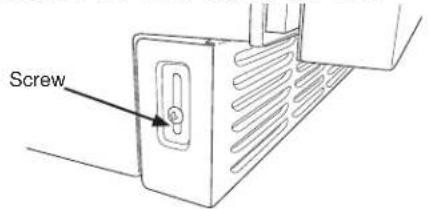
- Open the door and use a flat head screw driver to remove the top and bottom covers from the cabinet opposite the hinge side.
natural_image
Line drawing of a hand holding a pen or ruler above a cabinet (no text or symbols)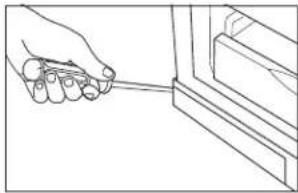
natural_image
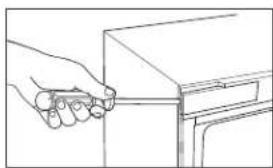
Line drawing of a hand holding a tool near a window frame (no text or symbols)Remove the top and bottom hinge covers to gain access to the screws. Push in on the tab while disengaging the cover with a flat head screw driver
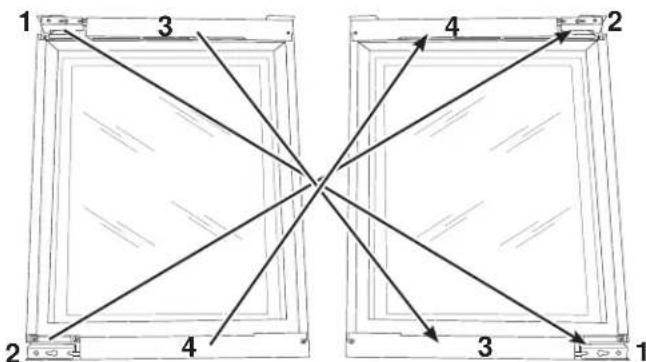
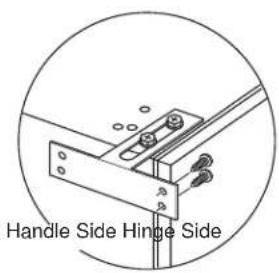
- Loosen the screws that hold the top and bottom hinges to cabinet.
- Remove the door and leave the hinges open.
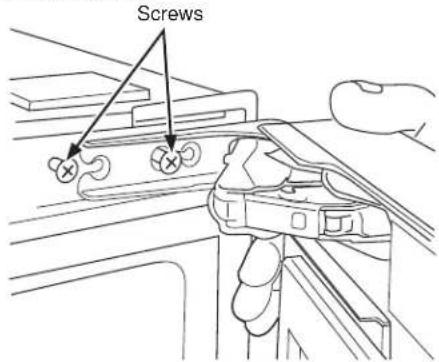
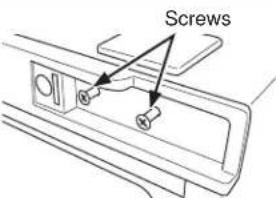
- Remove the hinge screws and install them on the other side. Install screws only part of the way so that hinges can slide behind the screw heads.
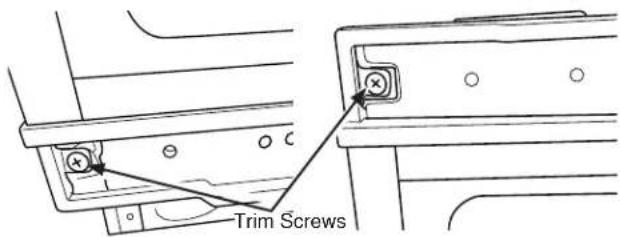
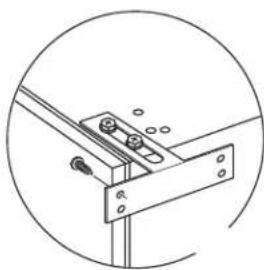
- Remove trim screws and install in opposite corners.
- Flip the door and slide the hinges behind the screw heads.
- Tighten hinges screws.
- Install covers to cabinet on the other side.
REVERSING THE DOOR SWING - MODELS WITH POCKET HANDLE - CCR06DM\*\*\*\*
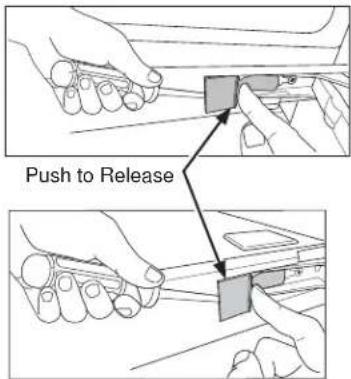
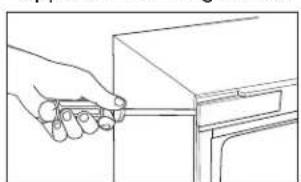
- Open the door and use a flat head screw driver to remove the top and bottom covers from the cabinet opposite the hinge side.
natural_image
Line drawing of a hand holding a tool near a cabinet (no text or symbols)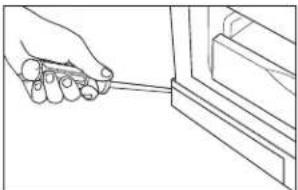
natural_image
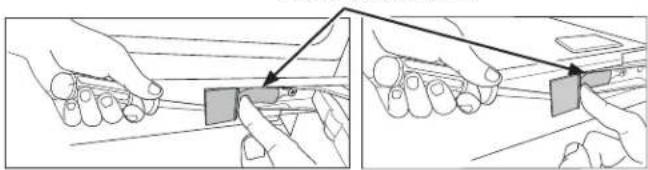
Line drawing of a hand holding a tool near a window frame (no text or symbols)Remove the top and bottom hinge covers to gain access to the screws. Push in on the tab while disengaging the cover with a flat head screw driver Push to Release
natural_image
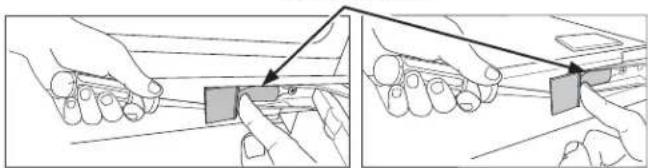
Illustration of two hands holding rectangular blocks with arrows indicating alignment or adjustment (no text or symbols)INSTALLING THE WINE CENTER (Cont.)
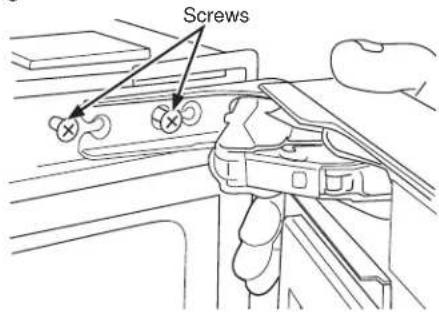
REVERSING THE DOOR SWING - MODELS WITH POCKET HANDLE - CCR06DM\*\*\*\* (Cont.)
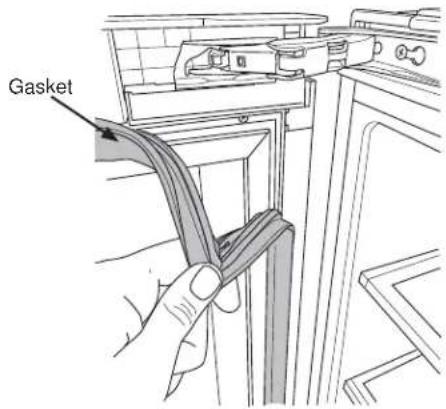
- Peel back the gasket and remove it from the door.
- Use a flat screwdriver to remove the plastic covers near the top and bottom hinge.
natural_image
Line drawing of a mechanical assembly with hands operating a tool (no text or symbols)- Loosen the screws that hold the top and bottom hinges to cabinet.
- Remove the door and close the hinges.
WARNING
Door Hinge Pinch Point Hazard
While closing the hinge, keep fingers away from the internal moving parts of the hinge.
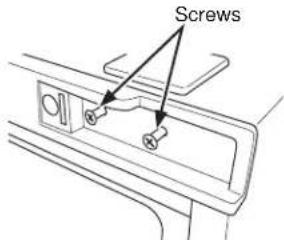
- Remove the hinge screws and install them on the other side. Install screws only part of the way so that hinges can slide behind the screw heads.
- Remove trim screws and install in opposite corners.
- Remove the hinges by fully loosening (2) screws.
natural_image
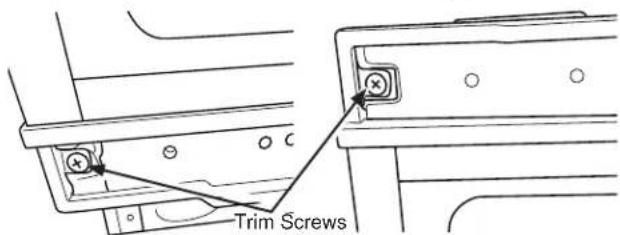
Technical line drawing of a mechanical assembly with a tool inserted (no text or symbols)- Use a flat screw driver to remove the top and bottom door trim.
natural_image
Line drawing of a hand using a tool to adjust or install a component (no text or symbols present)- Re-install hinges and door trim in opposite locations as shown in the images below.
-
Open the hinges. Install door by sliding the hinges behind the screw heads. Tighten screws.
-
Re-install all remaining cabinet and door trims. Re-install the gasket. Make sure that the gasket is fully seated in the pocket.
Installation Instructions
INSTALLING THE WINE CENTER (Cont.)
DOOR ADJUSTMENT
- Peel back the gasket near the hinge
Gasket
Remove all protective film from the door before installing the handle.
HANDLE INSTALLATION
- Remove the handle allen wrench from the accessory bag located inside the wine center.
- Remove the handles from the top piece of the packaging material.
- Loosen the set screw using the allen wrench.
set screw
set screw
-
Use a flat screwdriver to remove the plastic cover.
-
Loosen the screws to make the adjustment and the tighten the screw. NOTE: Push door in direction of arrow to raise handle side of door.r
-
Re-install the plastic cover and gasket. Make sure that gasket is fully seated in the pocket.
Place the handle caps over the fasteners of the door, so that the Cafe badge is at the top of the handle. Take care to support the handle so it doesn't fall and scratch the appliance finish. Make sure both handle caps are resting on the face of the door.
handle cap
fastener
- Lock one end of the handle into position by tightening the set screw in the handle cap with the allen wrench provided. DO NOT over-tighten.
set screw
set screw
- Keep supporting the handle as you lock the other end of the handle into position by tightening the set screw in the handle cap. DO NOT over-tighten.
INSTALLING THE WINE CENTER (Cont.)
METHOD 1
UNDERCOUNTER INSTALLATION
Level the Wine Center
Adjustment of the leveling legs under the wine center may be necessary for a proper fit in the cabinet opening. Tilt the unit to adjust the height of the four leveling legs.
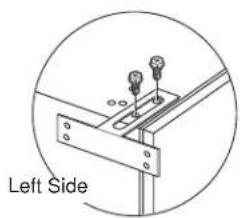
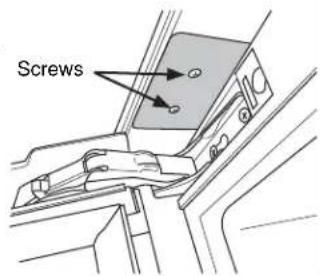
Attach the Anti-tip Brackets
- Pry hole covers from the top of the wine center to reveal the holes used to install the anti-tip brackets.
- Remove the anti-tip brackets and screws from the accessory bag.
- If installing to adjacent cabinets, use Screw A (Qty 4), fasten an anti-tip bracket to each side of the top of the cabinet.
natural_image
Technical diagram of a right-side bracket with mounting holes and a labeled 'Left Side' (no other text or symbols)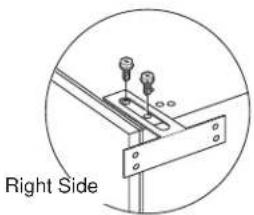
natural_image
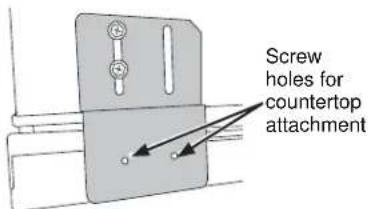
Technical diagram showing a right side view of a mechanical bracket with bolts and fasteners (no text or symbols)- If installing to countertop, use Screw A (Qty 2), to attach bracket on hinge side.
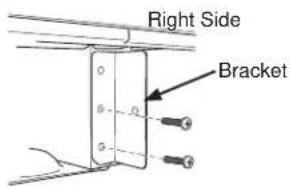
Install Toe Kick
- Using Screw B (Qty 4), attach the toe kick brackets to each side of the bottom of the cabinet as shown in the picture.
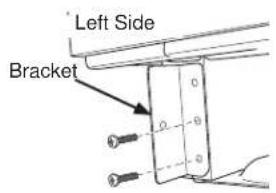
- Install the toe kick. Use Screw B or Screw E depending on the color of your toe kick.
CONNECT TO POWER
WARNING
ELECTRICAL SHOCK HAZARD
Plug into a grounded 3 prong outlet.
Do not remove the ground prong from the power cord plug.
Do not use an adapter.
Do not use an extension cord.
Failure to do so can result in death, fire or electrical shock.
■ Plug into a grounded 3 prong outlet.
COMPLETE INSTALLATION - Installing to Adjacent Cabinets
- Remove cover.
natural_image
Line drawing of a hand holding a rectangular object with a handle, no text or symbols present-
Slide the wine center under the counter.
-
Install wine center to cabinetry using Screw C (Qty 3).
natural_image
Technical line drawing of a mechanical bracket or mounting bracket with bolts and a circular outline (no text or symbols)- Reinstall cover.
COMPLETE INSTALLATION - Installing to Countertop
-
Slide the wine center under the counter.
-
Install wine center to countertop using Screw C (Qty 2).
INSTALLING THE WINE CENTER (Cont.)
METHOD 2
FREESTANDING INSTALLATION
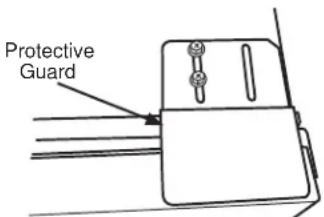
Attach the protective guard over the hinge
- Pry hole cover from the top of the wine center cabinet on the hinge side to reveal the holes used to install the protective guard.
2 Remove the protective guard and screws from the accessory bag.
WARNING

or Hinge Pinch Point Hazard
Improper installation can lead to a finger pinch point hazard near the hinge when operating the door. For installations that are not under a counter, follow the installation instructions. A protective guard is provided for limiting access to the door hinge.
- Using Screw A (Qty 2), install the protective guard onto the hinge side of the cabinet as shown.
Level the Wine Center
Adjust the height of the leveling legs so that the product is level and so that the left rear leveling leg will slide into the anti-tip bracket. Tilt the unit to adjust the height of the Loc B four leveling legs.
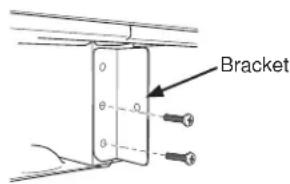
1/4" (6 mm) Distance between the edge of bracket and the side of the cabinet in its final location

Anti-tip Bracket
- Determine the final location of the cabinet before attempting to install the bracket. The bracket will capture the left rear leveling leg.
- The bracket must be secured to either the FLOOR or REAR WALL. 2 screws must enter the floor or wall at Loc A, B, or C.

Screw must enter wood
FREESTANDING INSTALLATION
FLOOR Installation:
WOOD FLOOR: Use Screw D (qty 2) to secure the bracket using the pair of marked holes (either Loc A or B).
CONCRETE FLOOR: Use a screw that is appropriate for concrete applications and secure the bracket to the floor using the pair of marked holes (either Loc A or B). Screws for concrete application are not provided with the unit.
REAR WALL Installation:
Use screw D (qty 2) to secure the bracket using the pair of marked holes at Loc C. The screws MUST enter into a wood sill plate. If the wall contains any metal studs or similar materials, then the floor must be used.
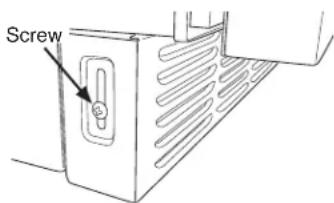
Install Toe Kick
- Using Screw B (qty 4), attach the toe kick brackets to each side of the bottom of the cabinet as shown in the picture.

- Install the toe kick. Use Screw B or Screw E depending on the color of your toe kick.
CONNECT TO POWER
WARNING

LECTRICAL SHOCK HAZARD
Plug into a grounded 3 prong outlet.
Do not remove the ground prong from the power cord plug.
Do not use an adapter.
Do not use an extension cord.
Failure to do so can result in death, fire or electrical shock.
■ Plug into a grounded 3 prong outlet.
COMPLETE INSTALLATION
Slide the wine center into its final location. The rear leveling leg must be fully inserted into the anti-tip bracket.
Troubleshooting Tips... Before you schedule service
Save time and money! Review the charts on the following pages first and you may not need to schedule service.
Problem Possible Causes What to Do
Wine center does not run Wine center is unplugged. Plug power cord into power source.
| Breaker is tripped or turned off/Fuse is blown. | Reset/Turn on breaker or replace fuse. | |
| Wine center compressor runs frequently or for long periods of time | Normal when first plugged in Allow 24 hours for the wine center to cool completely | |
| Warm or large amounts of bottles added | This is normal | |
| Door is left ajar Ensure that door is not being held open by an item | ||
| Hot weather or frequent openings This is normal to maintain constant temperature during hot and humid days | ||
| Gasket is not sealing properly Clean the gasket | ||
| Wine center has an odor | Interior needs to be cleaned | Clean the interior. See “Cleaning.” |
| Light does not come on Wine center is unplugged. Plug into power source. | ||
| LED light is burned out. Contact a qualified technician to replace the burned out LED. | ||
| Vibration or rattling Wine center is not resting firmly on floor | See “Leveling.” | |
| Normal Sounds It sounds like water is flowing from the Wine center | Refrigerant flowing in the lines will make this sound when the compressor starts and stops. | |
| Humming or buzzing sounds The compressor and fans can make this sound. If the wine center is not level, the sound will be louder. | ||
| Cracking or clicking sounds The interior parts will make this sound as they contract and expand in response to temperature changes. | ||
| TEMPERATURE AND MOISTURE | ||
| Wine center is too warm | Temperature control is not set low enough | Adjust the temperature to a colder setting; allow 24 hours for the temperature to adjust |
| Doors opened frequently or left open | Keep door closed / Check that a package is not preventing door from closing | |
| Warm bottles added recently Allow time for bottles and wine center to cool | ||
| Gasket is not sealing properly. | Clean the gasket | |
| Wine center is too cold | Temperature control is set too low | Adjust temperature in the compartment to the next warmer setting; allow 24 hours to adjust |
| Moisture on exterior/interior of the wine center | High humidity | This is normal. Dry surface and adjust temperature to slightly colder setting |
| Doors opened frequently or left open | Keep door closed. Check that a package is not preventing door from closing | |
| Gasket is not sealing properly Clean the gasket | ||
Café Refrigerator Limited Warranty
cafeappliances.com
All warranty service is provided by our Factory Service Centers, or an authorized service technician. To schedule service online, visit us at cafeappliances.com/service. Please have your serial number and your model number available when scheduling service. In Canada, visit cafeappliances.ca/service.
Servicing your refrigerator may require the use of the onboard data port for diagnostics. This gives a Café Factory Service technician the ability to quickly diagnose any issues with your appliance and helps Café improve its products by providing Café with information on your appliance. If you do not want your appliance data to be sent to Café, please advise your technician NOT to submit the data to Café at the time of service.
| For the Period of: Café | Will Replace |
| One YearFrom the date of the original purchase | Any part of the wine center which fails due to a defect in materials or workmanship.During the limited one-year warranty, Café will also provide, free of charge, all labor and related service to replace the defective part. |
| Five YearsFrom the date of the purchase | Any part of the sealed refrigerating system (the compressor, condenser, evaporator and all connecting tubing) which fails due to a defect in materials or workmanship.During this limited five-year sealed refrigerating system warranty, Café will also provide, free of charge, all labor and related service to replace the defective part in the sealed refrigerating system. |
What Café Will Not Cover:
■ Service trips to your home to teach you how to use the product.
■ Improper installation, delivery or maintenance.
■ Failure of the product if it is abused, misused, or used for other than the intended purpose or used commercially.
■ Loss of food due to spoilage.
■ Replacement of house fuses or resetting of circuit breakers.
■ Damage to finish, such as surface rust, tarnish, or small blemishes not reported within 48 hours of delivery.
■ Replacement of the light bulbs, if included, or water filter cartridge, if included, other than as noted above.
■ Damage to the product caused by accident, fire, floods or acts of God.
■ Incidental or consequential damage caused by possible defects with this appliance.
■ Product not accessible to provide required service.
EXCLUSION OF IMPLIED WARRANTIES
Your sole and exclusive remedy is product repair as provided in this Limited Warranty. Any implied warranties, including the implied warranties of merchantability or fitness for a particular purpose, are limited to one year or the shortest period allowed by law.
For US Customers: This limited warranty is extended to the original purchaser and any succeeding owner for products purchased for home use within the USA. If the product is located in an area where service by a Café Authorized Servicer is not available, you may be responsible for a trip charge or you may be required to bring the product to an Authorized Café Service location for service. In Alaska, the limited warranty excludes the cost of shipping or service calls to your home.
Some states do not allow the exclusion or limitation of incidental or consequential damages. This limited warranty gives you specific legal rights, and you may also have other rights which vary from state to state. To know what your legal rights are, consult your local or state consumer affairs office or your state's Attorney General.
Warrantor: GE Appliances, a Haier company
Louisville, KY 40225
For Customers in Canada: This limited warranty is extended to the original purchaser and any succeeding owner for products purchased in Canada for home use within Canada. In-home warrant service will be provided in areas where it is available and deemed reasonable by Mabe to provide.
Warrantor Canada: MC Commercial, Inc., Burlington, Ontario, L7R 5B6
Consumer Support
Café Website
Have a question or need assistance with your appliance? Try the Café website 24 hours a day, any day of the year! You can also shop for more great Café products and take advantage of all our on-line support services designed for your convenience. In the US: cafeappliances.com
Register Your Appliance
Register your new appliance on-line at your convenience! Timely product registration will allow for enhanced communication and prompt service under the terms of your warranty, should the need arise. You may also mail in the pre-printed registration card included in the packing material. In the US: cafeappliances.com/register
Schedule Service
Expert Café repair service is only one step away from your door. Get on-line and schedule your service at your convenience any day of the year. In the US: cafeappliances.com/service
Extended Warranties
Purchase a Café extended warranty and learn about special discounts that are available while your warranty is still in effect. You can purchase it on-line anytime. Café Service will still be there after your warranty expires. In the US: cafeappliances.com/extended-warranty
Parts and Accessories
Individuals qualified to service their own appliances can have parts or accessories sent directly to their homes (VISA, MasterCard and Discover cards are accepted). Order on-line today 24 hours every day. In the US: cafeappliances.com/parts
Instructions contained in this manual cover procedures to be performed by any user. Other servicing generally should be referred to qualified service personnel. Caution must be exercised, since improper servicing may cause unsafe operation.
Contact Us
If you are not satisfied with the service you receive from Café, contact us on our website with all the details including your phone number, or write to:
In the US: General Manager, Customer Relations | Café Appliances, Appliance Park | Louisville, KY 40225 cafeappliances.com/contact
CAFE
DISTINCT BY DESIGN™
natural_image
Technical line drawing of a multi-layered mechanical component or tray with internal channels (no text or symbols)ESPACE D'INSTALLATION
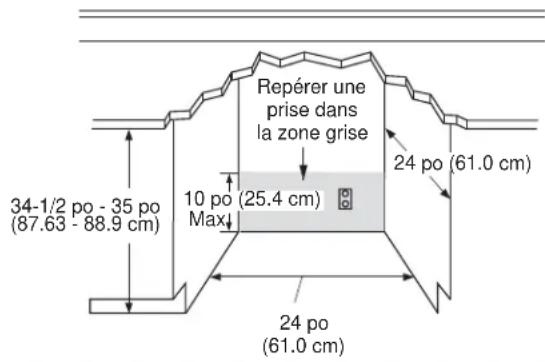
DÉGAGEMENTS DU PRODUIT
natural_image
Line drawing of a hand holding a tool near a cabinet (no text or symbols)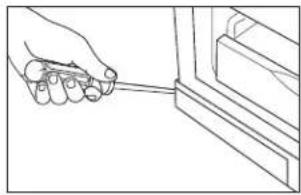
natural_image
Line drawing of a hand holding a tool near a window (no text or symbols)natural_image
Line drawing of a hand holding a small object near a window (no text or symbols)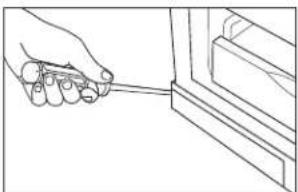
natural_image
Line drawing of a hand holding a tool near a bracket (no text or symbols)natural_image
Illustration of hands using a tool to adjust or install a component, showing two sequential steps (no text or symbols present)INSTALLATION DU REFROIDISSEUR DE VIN (suite)
INVERSION DU SENS D'OUVERTURE DE PORTE - MODÈLES AVEC POIGNÉE ESCAMOTÉE - CCR06DM\*\*\*\* (suite)
natural_image
Line drawing of a hand using a tool to adjust or install a mechanical component (no text or symbols present)natural_image
Technical line drawing of a mechanical clamp or bracket assembly with a tool inserted (no text or symbols)natural_image
Line drawing of a hand using a tool to adjust or install a mechanical component (no text or symbols present)natural_image
Line drawing of a hand using a tool to lift a wooden plank (no text or symbols)natural_image
Technical line drawing of a mechanical assembly with a tool and directional arrow (no text or symbols)natural_image
Line drawing of a hand holding a small object near a cabinet (no text or symbols)natural_image
Pure mechanical assembly diagram showing bracket and mounting plate without any text or symbolsGarant Canada: MC Commercial, Inc., Burlington, Ontario, L7R 5B6
Au Canada : cafeappliances.ca
Au Canada : cafeappliances.ca/register
Au Canada : cafeappliances.ca/service
Prolongation de garantie
Au Canada : cafeappliances.ca/service
Au Canada : cafeappliances.ca
cafeappliances.com/contact
Au Canada : Director, Consumer Relations, Mabe Canada Inc. | Suite 310, 1 Factory Lane | Moncton, N.B. E1C 9M3 cafeappliances.ca/contact
CAFE
DISTINCT BY DESIGN™
natural_image
Technical line drawing of a structural panel with wavy internal layers and a diagonal guide (no text or symbols)natural_image
Line drawing of a wooden tray with five cylindrical objects arranged in a row (no text or symbols)
natural_image
Technical line drawing of a mechanical component with layered sections and internal channels (no text or symbols)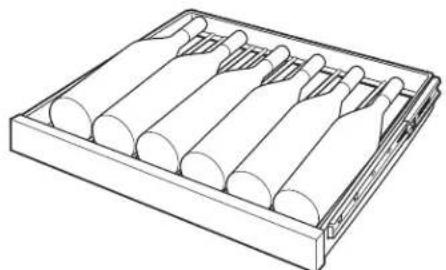
natural_image
Line drawing of a wooden abacus with five cylindrical rods arranged in a tray (no text or symbols)Cajón inferior
natural_image
Technical line drawing of a multi-layered mechanical component with no visible text or symbolsnatural_image
Line drawing of a hand holding a tool near a cabinet (no text or symbols)
natural_image
Line drawing of a hand holding a tool near a window frame (no text or symbols)- Open the door and use a flat head screw driver to remove the top and bottom covers from the cabinet opposite the hinge side.
natural_image
Line drawing of a hand holding a tool near a cabinet (no text or symbols)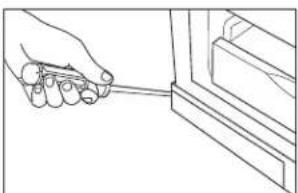
natural_image
Line drawing of a hand holding a tool near a bracket (no text or symbols)Remove the top and bottom hinge covers to gain access to the screws. Push in on the tab while disengaging the cover with a flat head screw driver
Presione para Liberar
natural_image
Illustration showing two-step hand-drawn instructions for using a tool or device (no text or symbols present)INSTALAR EL CENTRO DE VINOS (Cont.)
INVERSION DE LA APERTURA DE LA PUERTA - MODELOS CON MANIJA DE BOLSILLO - CCR06DM\*\*\*\* (Cont.)
natural_image
Line drawing of a mechanical assembly with a tool and bracket (no text or symbols)natural_image
Technical line drawing of a mechanical component with a tool inserted (no text or symbols)natural_image
Line drawing of a hand operating a mechanical clamp or bracket (no text or symbols)natural_image
Line drawing of a hand operating a mechanical clamp or fixture with wooden supports (no text or symbols)natural_image
Technical line drawing of a mechanical assembly with a tool inserted, showing no text or symbolsnatural_image
Pure mechanical component diagram without any text, numbers, or symbolsnatural_image
Line drawing of a hand holding a tool near a cabinet (no text or symbols)Warrantor: GE Appliances, a Haier company
Louisville, KY 40225
- CAFE
- Owner's Manual
- Owner's Manual and Installation Instructions
- Undercounter Wine Center
- Contents
- ENGLISH/FRANÇAIS/ESPAÑOL
- THANK YOU FOR MAKING CAFÉ A PART OF YOUR HOME.
- IMPORTANT SAFETY INFORMATION READ ALL INSTRUCTIONS BEFORE USING THE APPLIANCE
- WARNING
- CAUTION
- or Explosion Hazard
- EXCESS WEIGHT HAZARD
- READ AND SAVE THESE INSTRUCTIONS
- CONNECTING ELECTRICITY
- LECTRICAL SHOCK HAZARD
- Do not, under any circumstances, cut or remove the third (ground) prong from the power cord. For personal safety, this appliance must be properly grounded.
- PROPER DISPOSAL OF YOUR OLD APPLIANCE
- SUFFOCATION AND ENTRAPMENT HAZARD
- Before You Throw Away Your Old Appliance
- Refrigerant and Foam Disposal:
- E OR EXPLOSION HAZARD
- Flammable Refrigerant
- CONTROLS
- Temperature Setting
- Turn On/Off Cooling
- Door Alarm
- High Temperature Alert
- Child Control Lockout
- Proximity Lighting
- Display Mode
- Sabbath Mode
- Lockout Mode
- APPLIANCE COMMUNICATION
- WiFi (for customers in the United States, its territories, and Canada)
- REGULATORY INFORMATION
- FCC/IC Compliance Statement:
- Using the Wine Center
- FULL EXTENSION DRAWERS
- To remove:
- To replace:
- INSERT WINE BOTTLES
- CLEANING THE OUTSIDE
- Fingerprint Resistant Stainless Steel\*
- ⚠️ DO NOT use Stainless Steel cleaners on the door surfaces. ⚠️
- CLEANING THE INSIDE
- electrical Shock Hazard
- sk of Fire or Explosion.
- Do not clean glass shelves or
- VACATION AND MOVING
- Vacation
- Preparing to Move
- Installation Instructions
- Wine Center
- BEFORE YOU BEGIN
- WARNING EXCESS WEIGHT HAZARD
- LOCATION REQUIREMENTS
- TOOLS NEEDED
- PARTS SUPPLIED
- PRODUCT CLEARANCES
- When installed in a corner:
- REMOVE PACKAGING
- CLEAN BEFORE USING
- INSTALLING THE WINE CENTER
- REVERSING THE DOOR SWING - MODELS WITH CAFE HANDLE - CCP06DP\*\*\*\*
- REVERSING THE DOOR SWING - MODELS WITH POCKET HANDLE - CCR06DM\*\*\*\*
- INSTALLING THE WINE CENTER (Cont.)
- REVERSING THE DOOR SWING - MODELS WITH POCKET HANDLE - CCR06DM\*\*\*\* (Cont.)
- Door Hinge Pinch Point Hazard
- DOOR ADJUSTMENT
- HANDLE INSTALLATION
- METHOD 1
- UNDERCOUNTER INSTALLATION
- Level the Wine Center
- Attach the Anti-tip Brackets
- Install Toe Kick
- CONNECT TO POWER
- COMPLETE INSTALLATION - Installing to Adjacent Cabinets
- COMPLETE INSTALLATION - Installing to Countertop
- METHOD 2
- FREESTANDING INSTALLATION
- Attach the protective guard over the hinge
- or Hinge Pinch Point Hazard
- Anti-tip Bracket
- FLOOR Installation:
- REAR WALL Installation:
- COMPLETE INSTALLATION
- Troubleshooting Tips... Before you schedule service
- Problem Possible Causes What to Do
- Café Refrigerator Limited Warranty
- cafeappliances.com
- What Café Will Not Cover:
- EXCLUSION OF IMPLIED WARRANTIES
- Consumer Support
- Café Website
- Register Your Appliance
- Schedule Service
- Extended Warranties
- Parts and Accessories
- Contact Us
- DÉGAGEMENTS DU PRODUIT
- INSTALLATION DU REFROIDISSEUR DE VIN (suite)
- INVERSION DU SENS D'OUVERTURE DE PORTE - MODÈLES AVEC POIGNÉE ESCAMOTÉE - CCR06DM\*\*\*\* (suite)
- Prolongation de garantie
- INSTALAR EL CENTRO DE VINOS (Cont.)
- INVERSION DE LA APERTURA DE LA PUERTA - MODELOS CON MANIJA DE BOLSILLO - CCR06DM\*\*\*\* (Cont.)
Brand : Café
Model : CCP06DP4PW2
Category : Wine cellar