NBC096BS00 - Fridge NewAir - Free user manual and instructions
Find the device manual for free NBC096BS00 NewAir in PDF.

| Product Type | Cooler for 96 cans |
| Brand | NewAir |
| Model | NBC096BS00 |
| Power Supply Voltage | 110-120 V ~ 60 Hz |
| Rated Power | 90 W |
| Storage Capacity | 3.2 cu ft (approx. 90.6 L) |
| Adjustable Temperature Range | 3 °C to 19 °C (37 °F – 66 °F) |
| Dimensions (W x D x H) | 37.6 x 57.4 x 85.7 cm |
| Net Weight | 32.7 kg |
| Interior Lighting | With switch |
| Cooling System | Compressor with internal ventilation |
| Charcoal Filter | Yes, for air purification |
| Shelves | Included, adjustable |
| Door Lock | Yes, with key |
| Adjustable Legs | Yes, for leveling |
| Door Seal | Magnetic, removable |
| Interior Maintenance | Warm water and baking soda |
| Condenser Cleaning Frequency | Every 6 months |
| Electrical Safety | Grounding required, do not use extension cord |
| Warranty | 1 year limited (parts and labor) |
| Replacement Parts | Available through manufacturer |
Frequently Asked Questions - NBC096BS00 NewAir
User questions about NBC096BS00 NewAir
0 question about this device. Answer the ones you know or ask your own.
Ask a new question about this device
Download the instructions for your Fridge in PDF format for free! Find your manual NBC096BS00 - NewAir and take your electronic device back in hand. On this page are published all the documents necessary for the use of your device. NBC096BS00 by NewAir.
USER MANUAL NBC096BS00 NewAir
96-Can Beverage Fridge
natural_image
Exterior view of a modern stainless steel beer refrigerator with multiple Coca-Cola cans on the glass (no visible text or symbols)OWNER'S MANUAL
A Name You Can Trust
Trust should be earned and we will earn yours. Customer happiness is the focus of our business.
From the factory to the warehouse, from the sales floor to your home, the whole Newair family promises to provide you with innovative products, exceptional service, and support when you need it the most.
Count on Newair
As a proud Newair owner, welcome to our family. There are no robots here, real people shipped your product and real people are here to help you.
Contact Us
Please reach out to our customer service team before making a return to your store of purchase. We are happy to help with any questions or concerns!
Mon-Fri from 8-4 PST at:
Call: 1-855-963-9247
Email: support@newair.com
Online: www.newair.com
A team member will respond to you within 24 hours.
Follow Us

Facebook.com/newairusa

Instagram.com/newairusa

YouTube.com/newairusa

Twitter.com/newairusa
READ AND SAVE THESE INSTRUCTIONS
TABLE OF CONTENTS
Specifications 5
Register Your Product Online....6
Safety Information & Warnings 7
Parts List....8
Electrical Circuit Diagram....9
Assembly & Installation 10
Operating Instructions....11
How to Use The Buttons on the Display Panel 11
Additional Notes 11
Cleaning & Maintenance....12
Cleaning Your Cooler....12
Moving Your Cooler 12
Troubleshooting....13
Limited Manufacturer's Warranty 15
SPECIFICATIONS
| MODEL NO. | NBC096BS00 |
| VOLTAGE: | 110-120V |
| CURRENT: | 1.2A |
| FREQUENCY: | 60Hz |
| POWER CONSUMPTION: | 90W |
| STORAGE CAPACITY: | 3.2 cubic feet |
| TEMPERATURE RANGE: | 37°F - 66°F |
| PRODUCT WEIGHT: | 72 lbs |
| UNIT DIMENSIONS (W X D X H) : | 14.8" x 22.6" x 33.75" |
REGISTER YOUR PRODUCT ONLINE
Register Your Newair Product Online Today!
Take advantage of all the benefits product registration has to offer:

Service and Support
Diagnose troubleshooting and service issues faster and more accurately

Recall Notifications
Stay up to date for safety, system updates and recall notifications

Special Promotions
Opt-in for Newair promotions and offers
Registering your product information online is safe & secure and takes less than 2 minutes to complete:
newair.com/register
Alternatively, we recommend you attach a copy of your sales receipt below and record the following information, located on the manufacturer's nameplate on the rear of the unit. You will need this information if it becomes necessary to contact the manufacturer for service inquiries.
Date of Purchase: ____
Serial Number: ____
Model Number: ____
SAFETY INFORMATION & WARNINGS

When using any electrical appliance, basic safety precautions must be followed in order to reduce the risk of fire, electrical shock and/or injury to persons or property. Be sure to read all instructions before using this appliance and observe the following safety tips:

Shock Hazard – Electrical Grounding Required
- Never attempt to repair or perform maintenance on the unit until the electricity has been disconnected.
- Never remove the round grounding prong from the plug and never use a two-prong grounding adaptor.
- Altering or cutting of power cord, removal of power cord, removal of power plug, or direct wiring can cause serious injury, fire, loss of property and/or life, and will void the warranty.
- Never use an extension cord to connect power to the unit.
- Avoid operating this beverage cooler in excessively moist or humid environments.

Important Precautions:
- Do not lift unit by door handle.
- Never install or operate the unit behind closed doors.
- Be sure the kick-plate on the front bottom is free of obstruction. Obstructing airflow can cause the unit to malfunction and will void the warranty.
- Failure to clean the condenser every six months can cause the unit to malfunction.
- Allow unit temperature to stabilize for 24 hours before use.
- Do not block any internal fans.
- Keep the cooler away from hazardous materials or combustible/flammable substances.
- Use only genuine supplier's replacement parts. Imitation parts can damage the unit, affect its operation or performance, and may void the warranty.
Attention: Child Entrapment Risk!
To prevent the risk of child entrapment, do not allow children to operate, play with, or crawl inside the unit. If the unit will not be used for an extended period of time, remove the door and leave the shelves in place so that children cannot crawl inside. Also remove the door when disposing of the unit.
PARTS LIST
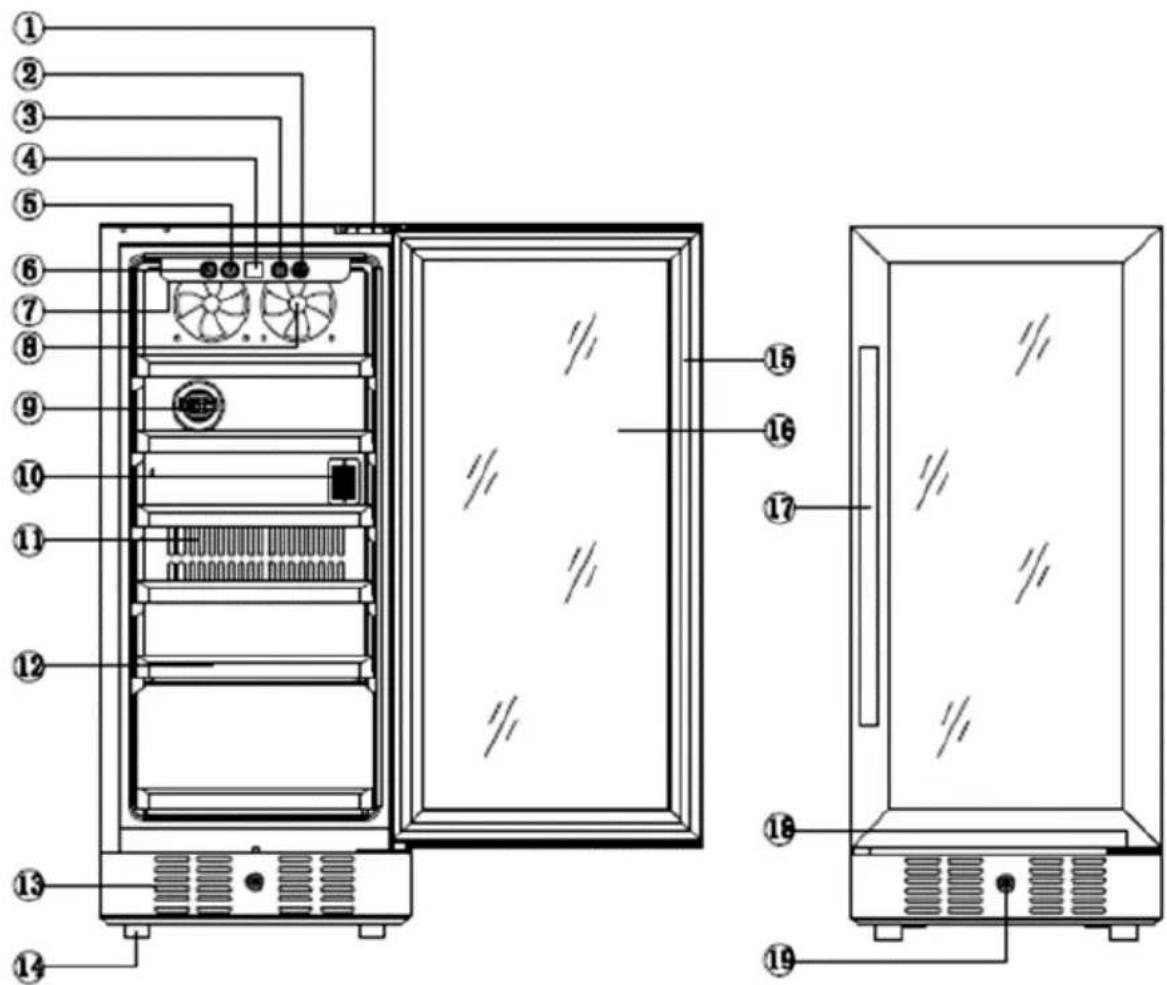
text_image
Technical diagram of a refrigerator internal structure with numbered labels pointing to each panel.1、Right upper Hingo
2、Light switch
3、Temperature setting
4、Temperature display
5、Temperature setting
6、Temperature switch
7、Light
8、Fan
9、Carbon filter
10、NTC point
11、Exhaust window
12、Shelf
13、Exhaust window
14、Foot
15、Door seal
16、Class
17、Handle
18、Lover Hinge
19、Lock
ELECTRICAL CIRCUIT DIAGRAM
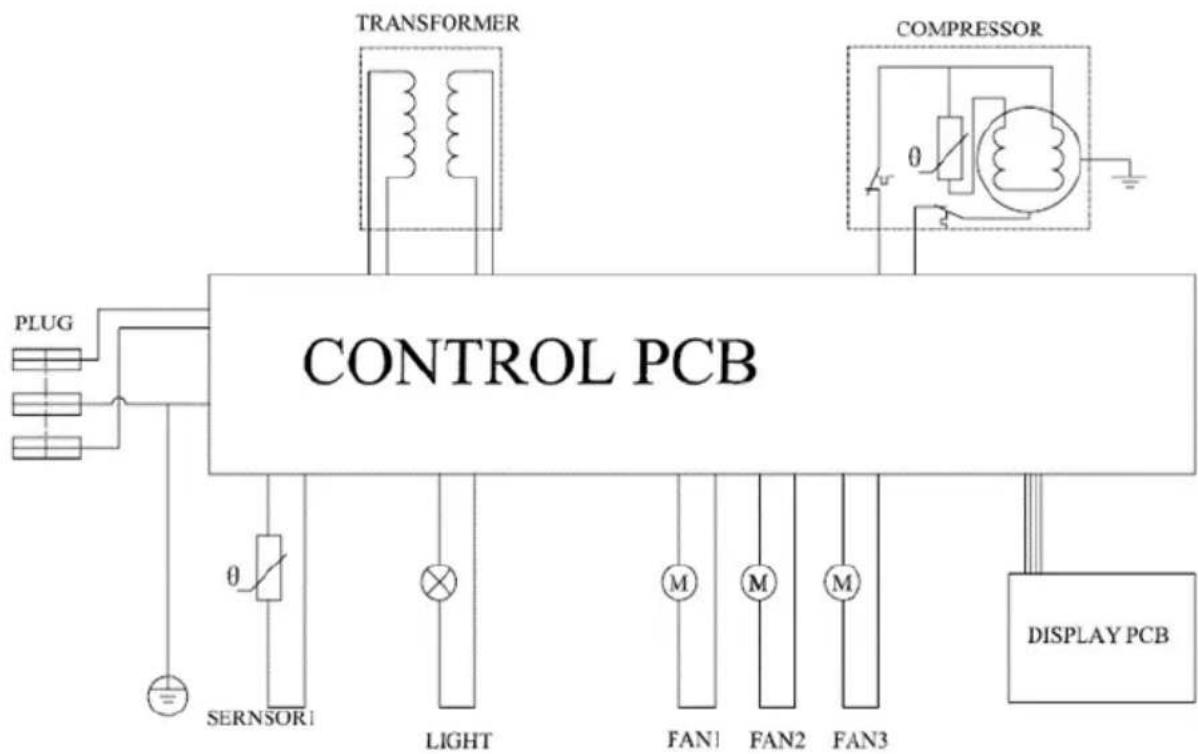
flowchart
graph TD
    A["PLUG"] --> B["CONTROL PCB"]
    B --> C["TRANSFORMER"]
    B --> D["COMPRESSOR"]
    B --> E["SENSOR1"]
    B --> F["LIGHT"]
    B --> G["FAN1"]
    B --> H["FAN2"]
    B --> I["FAN3"]
    B --> J["DISPLAY PCB"]
ASSEMBLY & INSTALLATION

Before connecting the appliance to a power source, let it stand upright for approximately 2 hours. This will reduce the possibility of a malfunction in the cooling system from handling during transportation.
Before operating your cooler for the first time, follow these steps:
- Remove the exterior and interior packing.
- Clean the interior surface of the unit with lukewarm water and a soft cloth.
- Place the cooler on a level surface that will be strong enough to support the unit when it is fully loaded. To level your cooler, adjust the front feet located at the bottom of the unit.
OPERATING INSTRUCTIONS
HOW TO USE THE BUTTONS ON THE DISPLAY PANEL

Raise the desired temperature. *

Lower the desired temperature. *
* To set the temperature, press the UP or DOWN button on the control panel. The interior temperature can be adjusted in increments of 1 degree between 37 and 66^ (3 - 18°C).
The interior light can be turned on or off by pressing the "Light" button.
ADDITIONAL NOTES
- The appliance should not be used by children or persons with reduced physical, sensory or mental capabilities, or lack of experience.
- Children should not play with the appliance. Cleaning and user maintenance should be performed under adult supervision.
- If the supply cord is damaged, it must be replaced by the manufacturer, its service agent, or similarly qualified persons in order to avoid a safety hazard.
- Keep ventilation openings, in the appliance enclosure or in the built-in structure, clear of obstruction.
- Do not use mechanical devices or means other than those recommended by the manufacturer to accelerate the defrosting process.
- Do not damage the refrigerant circuit.
- Do not use electrical appliances other than those recommended by the manufacturer inside the storage compartments of the appliance.
- Do not store explosive substances such as aerosol cans with a flammable propellant in the appliance.
- This appliance is intended for use only in the household, office and similar environments.
CLEANING & MAINTENANCE
CLEANING YOUR FRIDGE
To clean your cooler:
- Unplug the cooler and remove anything inside.
- Wash the inside of the unit with a solution made of warm water and baking soda solution (2 tablespoons of baking soda to one quart of water).
- Unscrew the water reservoir at the bottom of the unit and rinse with water.
- To clean the outside of the unit, use a mild detergent and warm water.
MOVING YOUR FRIDGE
To move your cooler:
- Remove anything stored inside.
- Securely tape down all loose parts located inside the unit.
- Turn the leveling feet up to the base in order to avoid damage.
- Tape the door shut.
- Be sure the cooler stays in an upright position during transportation.
TROUBLESHOOTING
| Problem | Possible Causes | Solution |
| Unite does not operate. | The unit may be plugged in using a different voltage. | Check if using the wrong voltage. |
| The circuit breaker may be tripped or there is a blown fuse. | Reset the circuit breaker or check for a broken fuse | |
| Unit is not cold enough. | The external environment may require a higher setting. | Lower the temperature of the cooler. |
| The door may be opened too frequently. | Open the door less frequently. | |
| The door is not closed completely. | Make sure the door is closed securely. | |
| The door seal does not seal properly. | Replace the seal on the door. Replacements can be acquired from the manufacturer. | |
| The front grille is obstructed. | Make sure nothing is blocking the front grille. | |
| The light does not work. | There may be a problem with the display board. | Contact the manufacturer. |
| The unit vibrates while operating. | The unit is not sitting on a level floor, or the unit's feet are not correctly installed. | Make sure the unit's feet are in the proper position and tightened securely. |
| The unit produces a lot of noise. | The unit is not levelled. | See above. |
| The fan may be obstructed | Check the fan to make sure there is no debris or obstruction. If not, contact the manufacturer. | |
| The door will not close properly. | The unit is not levelled. | See above. |
| The door is not properly installed. | Check the door hinges to make sure they are properly installed. | |
| The seal is weak. | Replace the seal on the door. Replacements can be acquired from the manufacturer. | |
| The shelves are out of position. | Make sure the shelves slide all the way into the unit. | |
| The LED display does not work. | There may be a problem with the main control board. | Contact the manufacturer. |
| There is a problem with the plug. | Contact the manufacturer. | |
| There is an LED display error, or the LED displays “LO”. | The cooling kit is no longer working properly. | Contact the manufacturer. |
| The PC Board is faulty. | Contact the manufacturer. | |
| The buttons do not function. | The temperature control panel may be damaged. | Contact the manufacturer. |
LIMITED MANUFACTURER'S WARRANTY
This appliance is covered by a limited manufacturer's warranty. For one year from the original date of purchase, the manufacturer will repair or replace any parts of this appliance that prove to be defective in materials and workmanship, provided the appliance has been used under normal operating conditions as intended by the manufacturer.
Warranty Terms:
During the first year, any components of this appliance found to be defective due to materials or workmanship will be repaired or replaced, at the manufacturer's discretion, at no charge to the original purchaser. The purchaser will be responsible for any removal or transportation costs.
Warranty Exclusions:
The warranty will not apply if damage is caused by any of the following:
- Power failure
- Damage in transit or when moving the appliance
- Improper power supply such as low voltage, defective household wiring or inadequate fuses
- Accident, alteration, misuse or abuse of the appliance such as using non-approved accessories, inadequate air circulation in the room or abnormal operating conditions (extreme temperatures)
- Use in commercial or industrial applications
- Fire, water damage, theft, war, riot, hostility or acts of God such as hurricanes, floods, etc.
- Use of force or damage caused by external influences
- Partially or completely dismantled appliances
- Excess wear and tear by the user
Obtaining Service:
When making a warranty claim, please have the original bill of purchase with the purchase date available. Once confirmed that your appliance is eligible for warranty service, all repairs will be performed by a Newair™ authorized repair facility. The purchaser will be responsible for any removal or transportation costs. Replacement parts and/or units will be new, re-manufactured or refurbished and is subject to the manufacturer's discretion. For technical support and warranty service, please email support@newairusa.com.
Un nom de confiance
Instagram.com/newairusa
Twitter.com/newairusa
LISEZ ET CONSERVEZ CES INSTRUCTIONS
TABLE DES MATIÈRES
text_image
Technical diagram of a refrigerator with numbered components for identification and assembly reference.Email: support@newair.com
Instagram.com/newairusa

YouTube.com/newairusa

Twitter.com/newairusa
LEA Y GUARDE ESTAS INSTRUCCIONES
INDICE
text_image
Technical diagram of a refrigerator internal structure with numbered labels pointing to each panel1、Right upper Hinge
2、Light switch
3、Temperature setting
4、Temperature display
5、Temperature setting
6、Temperature switch
7、Light
8、Fan
9、Carbon filter
10、NTC point
11、Exhaust window
12、Shelf
13、Exhaust window
14、Foot
15、Door seal
16、Glass
17、Handle
18、Lover Hinge
19、Lock
DIAGRAMA DE CIRCUITO ELÉCTRICO
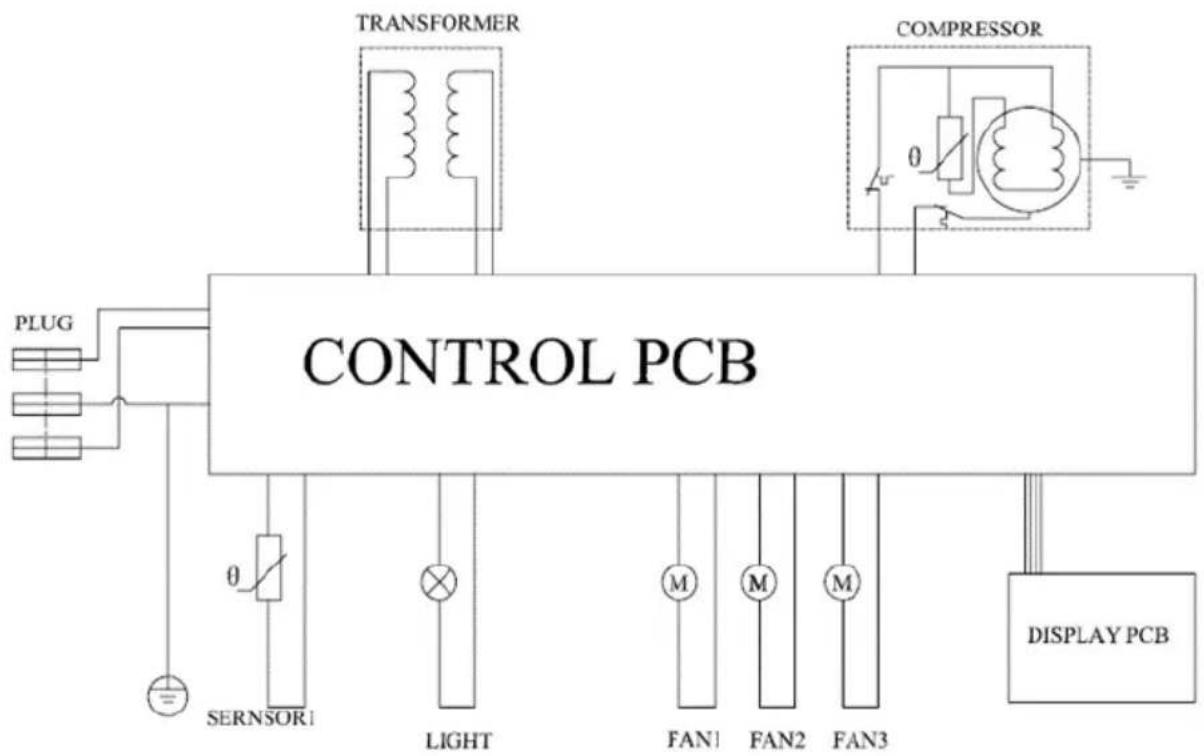
flowchart
graph TD
    A["PLUG"] --> B["CONTROL PCB"]
    B --> C["TRANSFORMER"]
    B --> D["COMPRESSOR"]
    B --> E["SERNSOR1"]
    B --> F["LIGHT"]
    B --> G["FAN1"]
    B --> H["FAN2"]
    B --> I["FAN3"]
    B --> J["DISPLAY PCB"]