
CSD4B24 - Cooker Summit - Free user manual and instructions
Find the device manual for free CSD4B24 Summit in PDF.

| Product Type | Built-in Cooktop (Ceramic Glass Cooktop) |
| Brand | Summit |
| Model | CSD4B24 |
| Number of Burners | 4 |
| Surface Type | Ceramic Glass |
| Total Power | 5500 W (estimated) |
| Burners (diameter / power) | 2 x 1000 W (6 inches), 1 x 1500 W (8 inches), 1 x 2000 W (8 inches) |
| Dimensions (W x D) | 29.5 x 20.5 inches (approx. 750 x 520 mm) |
| Electrical Supply | 240 V / 60 Hz, 20 A (recommended breaker) |
| Connection Type | Hardwiring or power cord kit (3 or 4 conductors) |
| Controls | Rotary knobs with push-to-turn feature |
| Operation Indicators | Indicator lights for each burner |
| Installation | Flush mount in countertop, cutout required (see dimensions) |
| Materials | Ceramic surface, metal frame |
| Care and Cleaning | Ceramic glass cleaner, razor blade scraper, soft cloth |
| Safety | Grounding required, hot surfaces, do not use water on grease fires |
| Warranty | 1 year limited (parts and labor, contiguous USA) |
| Included Accessories | 4 mounting brackets, screws, sealant recommended |
| Country of Origin | China |
| Certifications | UL, ANSI/NFPA |
Frequently Asked Questions - CSD4B24 Summit
User questions about CSD4B24 Summit
0 question about this device. Answer the ones you know or ask your own.
Ask a new question about this device
Download the instructions for your Cooker in PDF format for free! Find your manual CSD4B24 - Summit and take your electronic device back in hand. On this page are published all the documents necessary for the use of your device. CSD4B24 by Summit.
USER MANUAL CSD4B24 Summit
natural_image
Line drawing of a two-c� electric stove with two circular top ovens and three side switches (no text or symbols)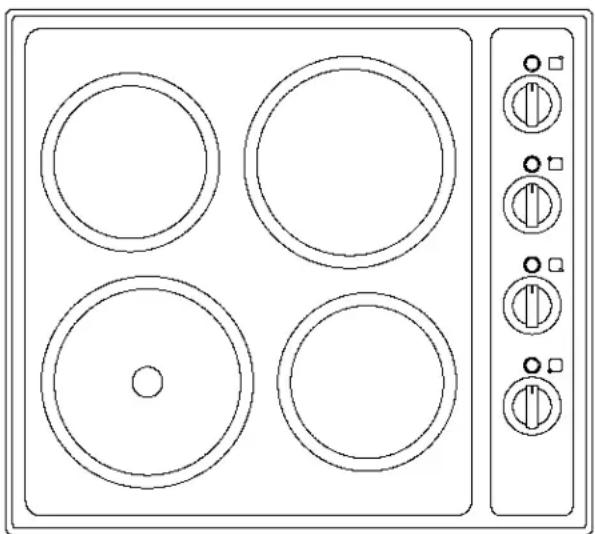
natural_image
Line drawing of a four-c� electric stove with four circular ovens and a control panel (no text or symbols)BEFORE USE, PLEASE READ AND FOLLOW ALL SAFETY RULES AND OPERATING INSTRUCTIONS.
AVANT UTILISATION, VEUILLEZ LIRE ET SUIVRE TOUTES LES RÈGLES DE SÉCURITÉ ET LES INSTRUCTIONS D'UTILISATION.
An ISO 9001:2015 registered company
770 Garrison Avenue
Bronx, NY10474
www.summitappliance.com
TABLE OF CONTENTS
Appliance Safety 2
Important Safeguards 2 - 4
Location of Parts 5 - 6
Installation Instructions 7 - 11
Before Using Your Appliance 7
Installation of Your Appliance 7 - 9
Electrical Connection 10 - 11
Operating Your Appliance 12 - 12
Operating Your Cooktop 12
Operating Indicators 12
Cookware Selection 12
Care and Maintenance 13
Cleaning Your Appliance 13
Troubleshooting 14
Limited Warranty 15
French version of this manual 16 - 29
APPLIANCE SAFETY
Your safety and the safety of others are very important.
We have provided many important safety messages in this manual and on your appliance. Always read and obey all safety messages.

This is the Safety Alert Symbol. The symbol alerts you to potential hazards that can kill or injure you and others. All safety messages will follow the Safety Alert Symbol and either the words DANGER or WARNING.
! DANGER !
DANGER means that failure to heed this safety statement may result in severe personal injury or death.
! WARNING
WARNING means that failure to heed this safety statement may result in extensive product damage, serious personal injury, or death.
All safety messages will alert you about the potential hazard, tell you how to reduce the chance of injury, and let you know what can happen if the instructions are not followed.
IMPORTANT SAFEGUARDS

Before the appliance is used, it must be properly positioned and installed as described in this manual, so read the manual carefully. To reduce the risk of fire, electrical shock or injury when using the appliance, follow basic precautions, including the following:
! DANGER !
It is recommended that a separate circuit serving only your appliance be provided. Use receptacles that cannot be turned off by a switch or pull chain.
Never clean appliance parts with flammable fluids. These fumes can create a fire hazard or explosion. And do not store or use gasoline or other flammable vapors and liquids in the vicinity of this or any other appliance. The fumes can create a fire hazard or explosion.
Before proceeding with cleaning and maintenance operations, make sure the power line of the unit is disconnected.
Unplug the appliance or disconnect power before cleaning or servicing. Failure to do so can result in electrical shock or death.
User Servicing - Do not attempt to repair or replace any part of your appliance unless it is specifically recommended in this manual. All other servicing should be referred to a qualified technician.

WARNING
FOLLOW WARNING CALLOUTS BELOW ONLY WHEN APPLICABLE TO YOUR MODEL
This appliance is only intended for residential cooking. The manufacturer cannot be held responsible for damage or injury caused by improper use or for uses other than those for which this appliance is intended.
Do not touch hot surfaces. Use handles or knobs.
To protect against electrical shock, do not immerse cord or body of unit in water or other liquid.
Close supervision is necessary when any appliance is used by or near children.
Do not operate any appliance with a damaged cord or after the appliance malfunctions or has been damaged in any manner. Return appliance to the nearest authorized service facility for examination, repair, or adjustment.
The use of accessory attachments not recommended by the appliance manufacturer may cause injuries. Do not use outdoors.
Do not let cord hang over edge of table or counter, or touch hot surfaces.
Extreme caution must be used when moving an appliance containing hot oil or other hot liquids.
To disconnect power, turn any control to "OFF".
CAUTION - Do not store items of interest to children in cabinets above a range or on the backguard of a range – children climbing on the range to reach items could be seriously injured.
Do Not Cook on a Broken Cooktop - If cooktop should break, cleaning solutions and spillovers may penetrate the broken cooktop and create a risk of electric shock.
Clean Cooktop with Caution - If a wet sponge or cloth is used to wipe spills on a hot cooking area, be careful to avoid steam burns. Some cleaners can produce noxious fumes if applied to a hot surface.
The appliance must be installed with all electrical, water and drain connections in accordance with state and local codes. A standard electrical supply (120V AC or 240 V AC only, 60 Hz), properly grounded in accordance with the National Electrical Code and local codes and ordinances, is required.
Electrical Grounding Instructions - The appliance must be installed and grounded by a qualified technician in accordance with the National Electrical Code ANSI/NFPA No. 70 (Latest Edition) and local electrical code requirements.
Do not kink or pinch the power supply cord of the appliance.
The size of the fuse (or circuit breaker) should be 20 amperes.
Proper Installation - Be sure your appliance is properly installed, per the manufacturer instructions.
Never use your appliance for warming or heating the room.
Do Not Leave Children Alone - Children should not be left alone or unattended in area where the appliance is in use. They should never be allowed to sit or stand on any part of the appliance.
Use Proper Pan Size - This appliance is equipped with one or more surface units of different size. Select utensils having flat bottoms large enough to cover the surface unit heating element. The use of undersized utensils will expose a portion of the heating element to direct contact and may result in ignition of clothing. Proper relationship of utensil to burner will also improve efficiency.
Never Leave Surface Units Unattended at High Heat Settings – Boil-over causes smoking and greasy spillovers that may ignite and can create a Fire Hazard.
Do Not Touch Heating Elements or Areas Near Heating Elements - Heating elements may be hot even though they are dark in color. Areas near heating elements may become hot enough to cause burns.
During and after use, do not touch or let clothing or other flammable materials contact heating elements or areas near heating elements until they have had sufficient time to cool. Among these areas are the cooktop and surfaces facing the cooktop.
Wear Proper Apparel – Loose-fitting or hanging garments should never be worn while using the appliance.
Storage in or on Appliance – Flammable materials should not be stored in an oven or near surface units.
Do Not Use Water on Grease Fires – Smother fire or flame or use dry chemical or foam-type extinguisher.
Use Only Dry Potholders – Moist or damp potholders on hot surfaces may result in burns from steam.
Do not let potholder touch hot heating elements. Do not use a towel or other bulky cloth.
Make Sure Reflector Pans or Drip Bowls Are in Place – Absence of these pans or bowls during cooking may subject wiring or components underneath to damage.
Protective Liners – Do not use aluminum foil to line surface unit drip bowls or oven bottoms, except as suggested in the manual. Improper installation of these liners may result in a risk of electric shock, or fire.
Glazed Cooking Utensils – Only certain types of glass, glass/ceramic, ceramic, earthenware, or other glazed utensils are suitable for range-top service without breaking due to the sudden change in temperature.
Utensil Handles Should Be Turned Inward and Not Extend Over Adjacent Surface Units – To reduce the risk of burns, ignition of flammable materials, and spillage due to unintentional contact with the utensil, the handle of a utensil should be positioned so that it is turned inward, and does not extend over adjacent surface units.
Do Not Soak Removable Heating Elements – Heating elements should never be immersed in water.
Use this appliance only for its intended purpose as described in this Owner's Manual.
- SAVE THESE INSTRUCTIONS -
LOCATION OF PARTS
MODEL CSD2B230
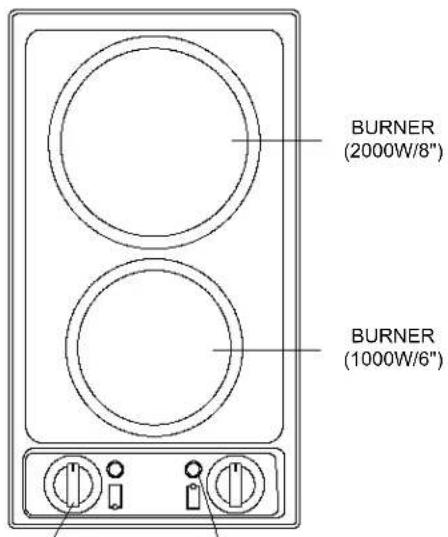
CONTROL KNOB OPERATING INDICATOR
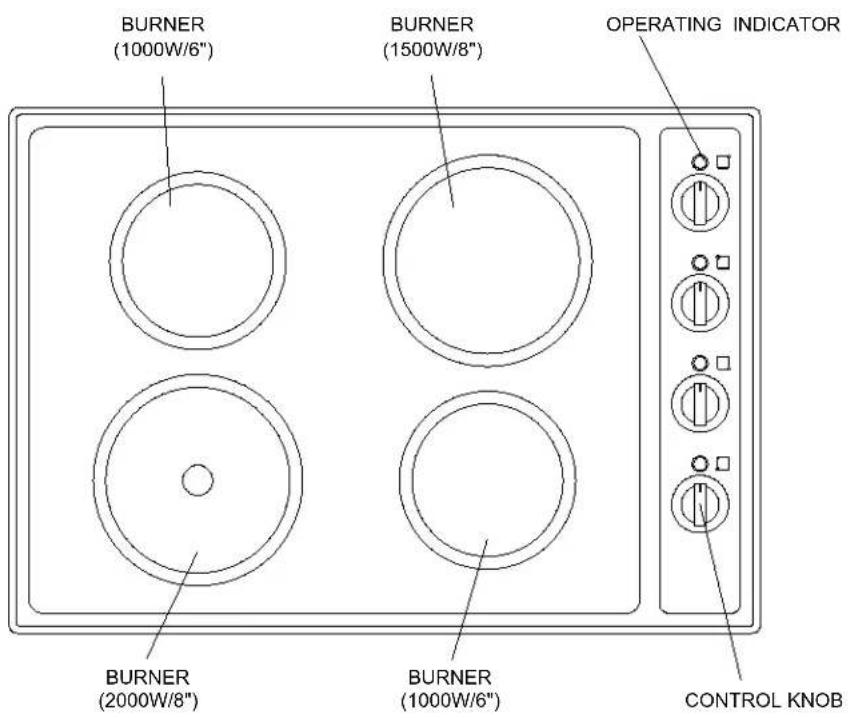
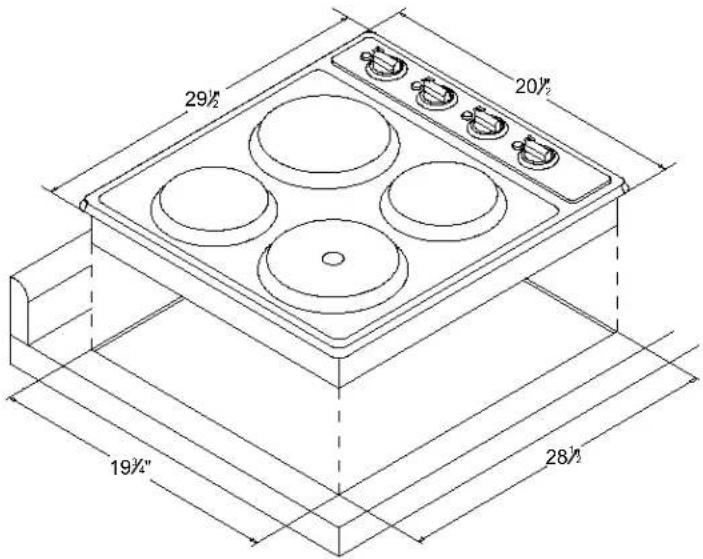
MODEL CSD4B24
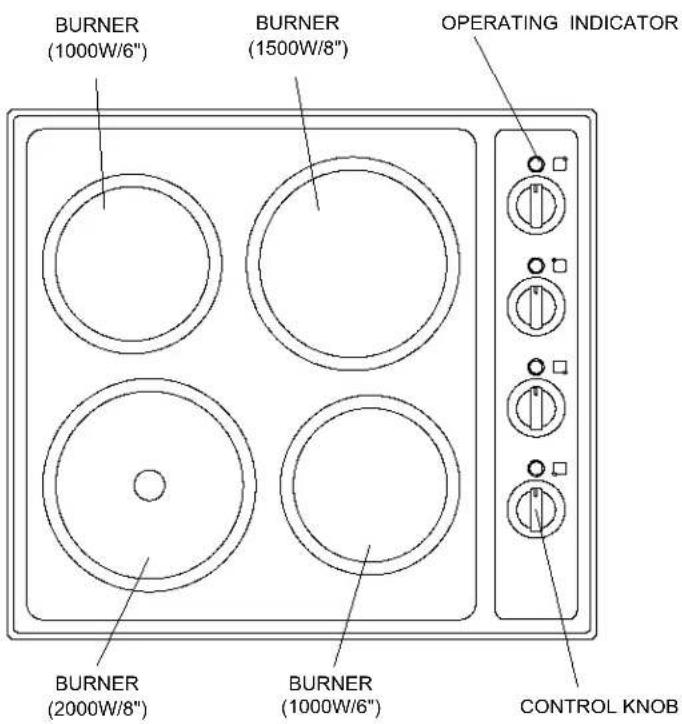
CONTROL KNOB OPERATING INDICATOR
MODEL CSD4B300 / CSD4B301E / LCSD302
INSTALLATION INSTRUCTIONS
BEFORE USING YOUR APPLIANCE
Remove the exterior packing.
Check if there is any damage to the unit.
Clean the unit. A thorough cleaning with a recommended cooktop cleaner will provide a clean, shiny coating on the cooktop surface.
INSTALLATION OF YOUR APPLIANCE
Follow these directions to prepare the countertop cutout and install your cooktop:
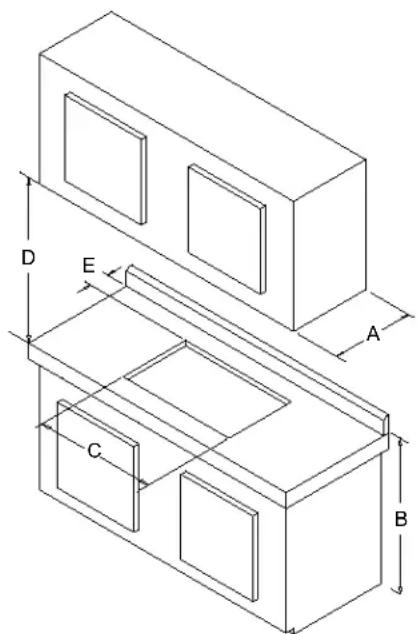
1. Countertop Preparation
NOTE: Please read this section prior to making cutout for cooktop. It is important to plan ahead for installation of the cooktop, keeping the following dimensions in mind.
A — 13 inches maximum depth of overhead cabinets
B — 34 inches is the minimum height of the countertop above the floor
NOTE: Some building codes may vary.
C — The minimum flat countertop surface that the cooktop will rest upon must be equal to or greater than the overall cooktop dimensions (refer to the following page for overall cooktop dimensions).
D — 30 inches minimum clearance between the top of the cooking surface and the bottom of an unprotected wood or metal cabinet or 24 inches minimum clearance when the bottom of wood or metal cabinet is protected by not less than 1/4 - inch thick flame retardant millboard covered with not less than No. 28 MSG sheet steel, 0.015-inch-thick stainless steel, 0.024-inch-thick aluminum or 0.020-inch-thick copper.
E — 1-inch minimum from backsplash of countertop to edge of glass (refer to the following page for overall cooktop dimensions).
NOTE: Do not install closer than 1/2 inch (12 mm) from any adjacent surface.
WARNING
To eliminate the risk of burns by reaching over heated surface units, avoid having cabinet storage space located above surface units. If cabinet storage is to be provided, the risk can be reduced by installing a range hood that projects horizontally a minimum of 5" beyond the bottom of the cabinets.
Before making the countertop cutout, check for clearance. Check to see if the cooktop will clear the front and side walls of the base cabinet. It is also important to provide enough ventilation.
natural_image
Isometric line drawing of a two-tiered rectangular box or enclosure with labeled dimensions (A, B, C, D, E), no text or symbols present.Adequate ventilation of the space below the countertop must be provided to ensure proper operation of the cooktop. Heat transferred from the cooktop bottom pan during operation will overheat an improperly ventilated area.
Allow a 2" minimum clearance between the bottom of the metal pan of the cooktop and any combustible surface located below, i.e.: the upper edge of a drawer installed below the cooktop. Failure to provide proper clearances and ventilation may result in a fire hazard. If the cooktop is installed above an oven, keep the cooktop's power cord from contacting the oven.
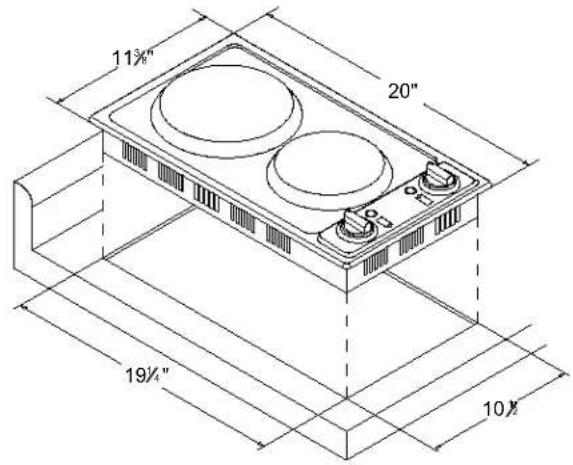
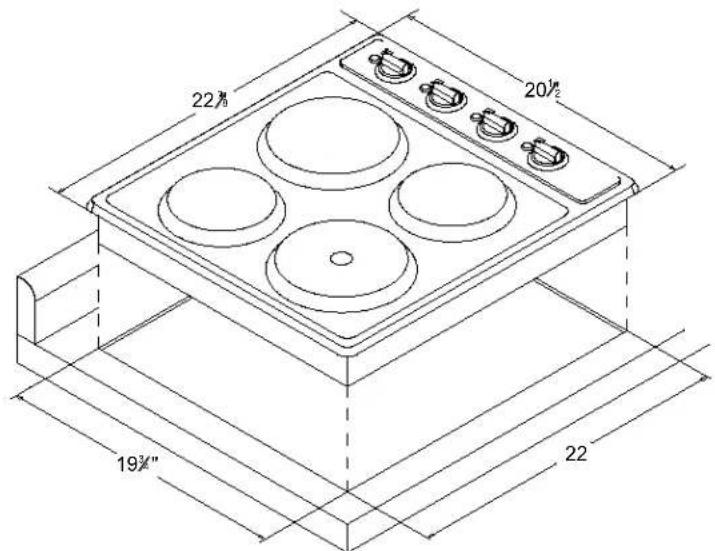
Cooktop dimensions and countertop cutout dimensions are shown below:
NOTE: When making the countertop, radius the corners of the cutout (1/4" radius is typical). This will prevent cracking of the countertop. Follow the countertop manufacturer's instructions regarding the minimum corner radius and reinforcement of corners.
Model CSD2B230 / CSD2B115 / CSD2B115E / LCSD1152B
Model CSD4B24
Model CSD4B300 / CSD4B301E / LCSD302
2. Installing the Cooktop
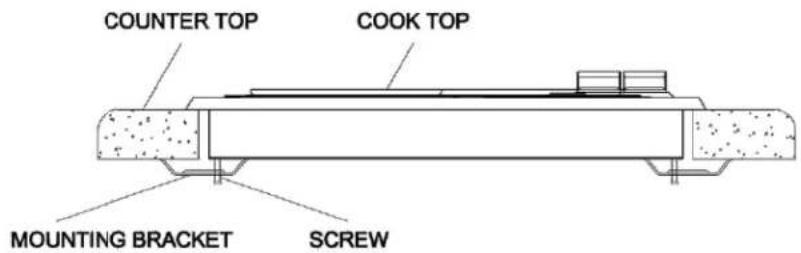
There are four mounting brackets supplied with the electric cooktop. These brackets are designed to hold the cooktop firmly in place. The cooktop should be bedded to the countertop using a soft bedding compound that will prevent damage if later removal for service is necessary. We recommend a very small bead of silicone sealant.
Position the cooktop in the cutout opening and press firmly on all sides to seal the frame into the bedding compound. Secure the mounting brackets to the cooktop from underneath with the screws that are supplied as shown below.
WARNING
Improper connection of the equipment-grounding can result in the risk of electrical shock. If the power cord of the unit is damaged, have it replaced by an authorized service center.
For personal safety, the appliance must be properly grounded.
Remove house fuse or open circuit breaker before beginning installation.
Do not attempt to repair or replace any part of the appliance unless it is specifically recommended in this manual. All other servicing should be referred to a qualified technician.
To minimize the possibility of electric shock, disconnect this appliance from the A/C power supply before attempting any maintenance.
Before installing this appliance, please check the rating on the rating label located on the rear cover of this appliance. The unit must be connected to the proper electrical voltage and frequency as specified on the rating label.
Do not use an extension cord.
NOTE: Turning the appliance off does not disconnect the appliance from the power supply. We recommend having a qualified technician service your appliance.
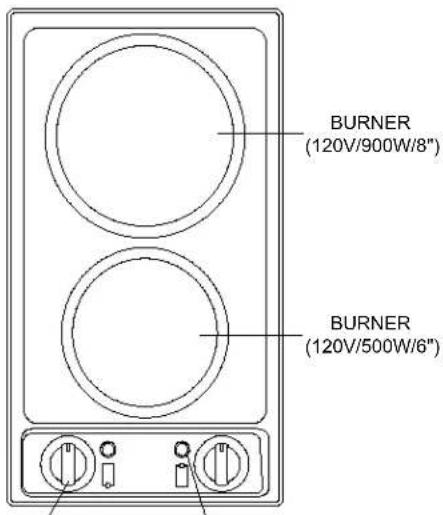
MODELS: CSD2B115 / CSD2B115E / LCSD1152B
This appliance should be properly grounded for your safety. The power cord of the appliance is equipped with a grounded plug that mates with standard three prong wall outlets to minimize the possibility of electrical shock.
Do not under any circumstances cut or remove the third ground prong from the power cord supplied. For personal safety, this appliance must be properly grounded.
This appliance requires a standard 115/120 Volt AC \~/60Hz electrical ground outlet with three-prong socket. Have the wall outlet and circuit checked by a qualified electrician to make sure the outlet is properly grounded. When a standard 2-prong wall outlet is encountered, it is your responsibility and obligation to have it replaced with a properly grounded 3-prong wall outlet.
The appliance should always be plugged into its own individual electrical outlet that has a voltage rating that matches the rating label on the appliance. This provides the best performance and also prevents overloading house wiring circuits that could cause a fire hazard from overheating. Never unplug the appliance by pulling the power cord. Always grip the plug firmly and pull straight out from the receptacle.
Repair or replace immediately all power cords that have become frayed or otherwise damaged. Do not use a cord that shows cracks or abrasion damage along its length or at either end. When moving the appliance, be careful not to damage the power cord.
MODELS: CSD2B230 / CSD4B24 / CSD4B300 / CSD4B301E / LCSD302
The appliance must be properly installed and grounded by a qualified technician in accordance with the National Electrical Code ANSI/NFPA No. 70 (Latest Edition) and local electrical code requirements. Installation should be made by a licensed electrician.
The unit may be connected by means of permanent Hard Wiring or Power Supply Cord Kit. The power supply cord is not supplied but is available through your local electrical supplies supplier.
Use only a 3-conductor or 4-conductor UL-listed cord rated at 20 amps with a 250V minimum voltage range. These cords may be provided with strain relief or a conduit connector.
The unit should be connected directly to the junction box through flexible, armored or nonmetallic sheathed, copper cable. The flexible, armored cable extending from the fuse box or circuit breaker box should be connected directly to the junction box. Locate the junction box to allow as much slack as
possible between the junction box and the unit so that the unit can be moved if servicing becomes necessary in the future.
Do not cut the conduit. Use the length of the conduit provided.
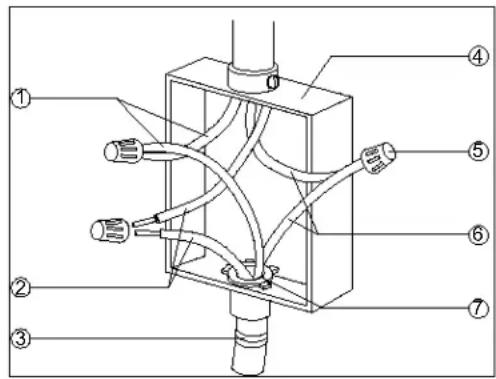
1. 3-Wire Power Cord Installation
IMPORTANT: Use the 3-wire cable from power supply where local codes permit connecting the frame-ground conductor to the neutral (white) junction box wire.
- Disconnect power
- Remove junction box cover, if present.
- Connect the flexible cable conduit (3) from the cooktop to the junction box (4) using a UL listed or CSA approved conduit connector (7).
- Tighten screws on conduit connector if present.
- Connect the two black wires (1) together using the UL listed wire nut (5).
- Connect the two red wires (2) together using the UL listed wire nut.
- Connect the green wire (6) to the white (neutral) wire (6) in the junction box using the UL listed wire nut.
- Install junction box cover.
- Reconnect power.
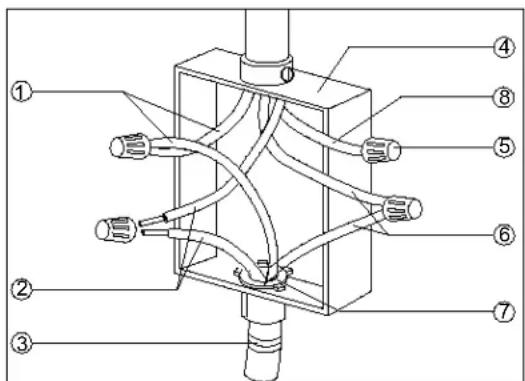
2. 4-Wire Power Cord Installation
IMPORTANT: Use the 4-wire cable from power supply where local codes do not permit connecting the frame-ground conductor to the neutral (white) junction box wire.
- Disconnect power
- Remove junction box cover if present.
- Connect the flexible cable conduit (3) from the cooktop to the junction box (4) using a UL listed or CSA approved conduit connector (7).
- Tighten screws on conduit connector, if present.
- Connect the two black wires (1) together using the UL listed wire nut (5).
-
Connect the two red wires (2) together using the UL listed wire nut.
-
Connect the green wire (6) from the cooktop cable to the green wire (6) (in the junction box) using the UL listed wire nut.
-
Put a UL listed wire nut on the end of the white wire (8).
NOTE: Do not connect the bare ground wire to the neutral (white) wire in the junction box.
-
Install junction box cover.
-
Reconnect power.
OPERATING YOUR APPLIANCE
Any burner can be turned on by pushing the control knob down and turning it clockwise or counter-clockwise to the desired setting. To adjust the setting, turn the knob without pressing down. The burner is turned off by turning the control knob clockwise or counter-clockwise to "OFF".
OPERATING INDICATORS
When the burner is turned on, the corresponding operating indicator will light up regardless of the setting.
WARNING
Do not touch or lay any heat-sensitive objects on the cooktop while the operating indicator is still on. Danger of burns and fire hazard!
COOKWARE SELECTION
Pots and pans
Special cookware is not required, but as is true with all types of cooking appliances, the better the cookware, the better the performance.
Following these tips will allow you to make the most of your ceramic cooktop.
For the most even and energy-efficient cooking, the diameter of the pots should match the diameter of the burners as closely as possible.
Use cookware with thick, flat, smooth bottoms. Slightly concave bottoms will also work adequately. Pans with convex bottoms will not cook well.
Using a lid while cooking will minimize the loss of heat and decrease the cooking time.
Copper-bottom and aluminum pans may leave a residue on the cooktop in the form of metallic lines. This is normal. These lines can be removed using a non-abrasive ceramic cooktop cleaner or a shielded scraper blade.
Cast iron, glass or stoneware should not be used because they have poor heat transfer and may scratch the surface.
CAUTION: Be sure to clean the cooktop after each use. Each time the residue is allowed to melt it becomes harder to remove and may mar the appearance of the cooktop. Let the cooktop cool before cleaning.
CARE AND MAINTENANCE
CLEANING YOUR APPLIANCE
Do not use a steam cleaner to clean this appliance. Steam could penetrate electrical components and cause a short circuit. Pressurized steam could cause permanent damage to the surface and to components for which the manufacturer cannot accept responsibility.
Do not use any sharp pointed objects which could damage the seal between the burners, the surrounding frame and the countertop.
Never use abrasive or caustic (oven) cleaners, dishwasher detergent, scouring pads, steel wool or hard brushes. They will damage the surface.
The burners can be cleaned by the damp cloth with mild detergent and warm water. Do not immerse in Water! Occasionally wiping the surface of the burners with a trace of clean cooking oil will help to maintain their appearance.
Make sure that no cleaner residue remains on the cooking surface by carefully wiping the cooktop with a damp cloth. The residue could damage the cooktop or produce toxic fumes when heated.
Be sure that pot and pan bases are clean and dry. After cleaning, dry the cooking surface with a soft cloth to prevent a buildup of lime scale deposits.
Clean any spills immediately before they become difficult to remove.
Clean the appliance regularly, preferably after each use. Allow the appliance to cool before cleaning.
Wipe off any soiling using a damp cloth. Stubborn soiling is best removed with a shielded scraper blade.
A pply a mild cleaner using a soft cloth or paper towel. To remove any lime scale deposits or metallic residue, apply a mild cleaner using a soft cloth and a shielded scraper blade if necessary.
After cleaning, wipe the cooking surface with a damp cloth and dry.
A cleaner with a special additive to prevent water marks and smears on the cooking surface may be used.
Any melted solids like sugar, plastic or aluminum foil should be removed as soon as possible, while the burner is still warm. If they are allowed to harden, the cooktop may become pitted.
TROUBLESHOOTING
You can solve many common problems easily, saving you the cost of a possible service call. Try the suggestions below to see if you can solve the problem before calling a service technician.
Troubleshooting Guide
| PROBLEM | POSSIBLE CAUSE |
| The appliance does not operate. | Not connected to power supply.Circuit breaker has tripped or fuse is blown. |
| The heating element cycles on and off frequently. | The power setting is too low. |
| Burners will not maintain a rolling boil or frying rate is not fast enough. | You must use pans that are absolutely flat.Pan bottom should closely match the diameter of the burner selected. |
| Foods cook slowly | Improper cookware being used. |
| Burners' control knobs will not turn. | You are not pushing in before turning. |
LIMITED WARRANTY
ONE-YEAR LIMITED WARRANTY
Within the 48 contiguous United States, for one year from the date of purchase, when this appliance is operated and maintained according to instructions attached to or furnished with the product, warrantor will pay for factory-specified parts and repair labor to correct defects in materials or workmanship. Service must be provided by a designated service company. Outside the 48 states, all parts are warranted for one year from manufacturing defects. Plastic parts, shelves and cabinets are warranted to be manufactured to commercially acceptable standards, and are not covered from damage during handling or breakage.
ITEMS WARRANTOR WILL NOT PAY FOR:
- Service calls to correct the installation of your appliance, to instruct you how to use your appliance, to replace or repair fuses or to correct wiring or plumbing.
- Service calls to repair or replace appliance light bulbs or broken shelves. Consumable parts (such as filters) are excluded from warranty coverage.
- Damage resulting from accident, alteration, misuse, abuse, fire, flood, acts of God, improper installation, installation not in accordance with electrical or plumbing codes, or use of products not approved by warrantor.
- Replacement parts or repair labor costs for units operated outside the United States.
- Repairs to parts or systems resulting from unauthorized modifications made to the appliance.
- The removal and reinstallation of your appliance if it is installed in an inaccessible location or is not installed in accordance with published installation instructions.
DISCLAIMER OF IMPLIED WARRANTIES; LIMITATION OF REMEDIES
CUSTOMER'S SOLE AND EXCLUSIVE REMEDY UNDER THIS LIMITED WARRANTY SHALL BE PRODUCT REPAIRS PROVIDED HEREIN. IMPLIED WARRANTIES, INCLUDING WARRANTIES OF MERCHANTABILITY OR FITNESS FOR A PARTICULAR PURPOSE, ARE LIMITED TO ONE YEAR. WARRANTOR SHALL NOT BE LIABLE FOR INCIDENTAL OR CONSEQUENTIAL DAMAGES. SOME STATES DO NOT ALLOW THE EXCLUSION OR LIMITATION OF INCIDENTAL OR CONSEQUENTIAL DAMAGES, OR LIMITATIONS ON THE DURATION OF IMPLIED WARRANTIES OF MERCHANTABILITY OR FITNESS, SO THESE EXCLUSIONS OR LIMITATIONS MAY NOT APPLY TO YOU. THIS WARRANTY GIVES YOU SPECIFIC LEGAL RIGHTS AND YOU MAY ALSO HAVE OTHER RIGHTS, WHICH VARY FROM STATE TO STATE.

WARNING: This product can expose you to chemicals including Nickel (Metallic) which is known to the State of California to cause cancer, birth defects or other reproductive harm.
For more information go to www.P65Warnings.ca.gov
Note: Nickel is a component in all stainless steel and some other metallic compositions.
FELIX STORCH, INC.
770 Garrison Avenue
Bronx, NY10474
Phone: (718) 893-3900
Fax: (844) 478-8799
www.summitappliance.com

For parts and accessory ordering, troubleshooting and helpful hints, visit: www.summitappliance.com/support
Printed in China
TABLE DES MATIÈRES
- TABLE OF CONTENTS
- APPLIANCE SAFETY
- ! DANGER !
- ! WARNING
- IMPORTANT SAFEGUARDS
- WARNING
- FOLLOW WARNING CALLOUTS BELOW ONLY WHEN APPLICABLE TO YOUR MODEL
- - SAVE THESE INSTRUCTIONS -
- LOCATION OF PARTS
- INSTALLATION INSTRUCTIONS
- BEFORE USING YOUR APPLIANCE
- INSTALLATION OF YOUR APPLIANCE
- Countertop Preparation
- Installing the Cooktop
- For personal safety, the appliance must be properly grounded.
- 3-Wire Power Cord Installation
- 4-Wire Power Cord Installation
- OPERATING YOUR APPLIANCE
- OPERATING INDICATORS
- COOKWARE SELECTION
- Pots and pans
- CARE AND MAINTENANCE
- CLEANING YOUR APPLIANCE
- TROUBLESHOOTING
- LIMITED WARRANTY
- ONE-YEAR LIMITED WARRANTY
- ITEMS WARRANTOR WILL NOT PAY FOR:
- DISCLAIMER OF IMPLIED WARRANTIES; LIMITATION OF REMEDIES
- TABLE DES MATIÈRES
Brand : Summit
Model : CSD4B24
Category : Cooker