
RBF 73380 FI EU - Fridge TEKA - Free user manual and instructions
Find the device manual for free RBF 73380 FI EU TEKA in PDF.

| Product type | Built-in refrigerator-freezer |
| Brand | Teka |
| Model | RBF 73380 FI EU |
| Dimensions (H x W x D) | 1771-1774 x 540 x 550 mm |
| Net weight (approx.) | Approximately 65 kg |
| Power supply | 220-240 V / 50 Hz, 10 A fuse |
| Climate class | SN, N, ST, T (10 °C to 43 °C) |
| Freezer star rating | 4 stars (≤ -18 °C) |
| Freezing capacity (approx.) | Approximately 10 kg/24h |
| Refrigerator volume (approx.) | Approximately 200 L |
| Freezer volume (approx.) | Approximately 100 L |
| Defrost technology | Refrigerator: automatic (cyclic defrost); Freezer: No Frost |
| Main functions | VitaCare, Super Cooling, Holidays, Eco, Super Freezer, My Zone (adjustable drawer -3°C to +3°C) |
| Display and controls | Touch panel with digital display |
| Interior lighting | LED |
| Shelf material | Tempered glass |
| Refrigerant type | R600a (isobutane) |
| Noise level (approx.) | Approximately 38 dB(A) |
| Energy class (approx.) | E (according to EPREL energy label) |
| Installation | Built-in, sliding or fixed hinges depending on model |
| Included accessories | Door bins, My Zone drawer, vegetable crisper, ice cube tray |
| Maintenance and cleaning | Manual defrost of freezer if necessary; interior cleaning with mild detergent |
| Spare parts and repairability | Availability of parts for at least 7 to 10 years (according to EU regulations) |
| Safety | Child lock not specified; emergency stop via button ⑧ (3 seconds) |
| General information | Manual available in multiple languages; energy label available on EPREL |
Frequently Asked Questions - RBF 73380 FI EU TEKA
User questions about RBF 73380 FI EU TEKA
0 question about this device. Answer the ones you know or ask your own.
Ask a new question about this device
Download the instructions for your Fridge in PDF format for free! Find your manual RBF 73380 FI EU - TEKA and take your electronic device back in hand. On this page are published all the documents necessary for the use of your device. RBF 73380 FI EU by TEKA.
USER MANUAL RBF 73380 FI EU TEKA
natural_image
Modern kitchen interior with minimalist design, featuring dark wood cabinets, oven, and stainless steel appliances (no visible text or symbols)User Manual
RBF 73380 FI EU
EN DE FR ES PT IL TR CZ SK
EN
Content
GUIDELINES CONCERNING THE SAFETY OF USE 2
INSTALLATION AND OPERATING CONDITIONS OF THE APPLIANCE … 6
UNPACKING 8
DISPOSAL OF OLD APPLIANCE 8
CONTROLS 9
OPERATION AND FUNCTIONS 11
USING THE REFRIGERATOR EFFICIENTLY 13
DEFROSTING, WASHING AND MAINTENANCE 15
TROUBLE-SHOOTING 17
INSTALLATION INSTRUCTION.... 19
GUIDELINES CONCERNING THE SAFETY OF USE
- The appliance is intended for household use only.
- The manufacturer reserves the right to introduce changes which do not affect the operation of the appliance.
- Some provisions in this user manual are unified for re-frigerating products of different types (for a refrigerator, refrigerator-freezer or freezer)
- The Manufacturer shall not be held liable for damage arising from the failure to observe the instructions contained in this manual.
- Keep this manual for future reference, or to pass it over to the next user.
- This appliance is not intended for use by persons (including children) with limited physical or mental capabilities and persons who lack experience or familiarity with the appliance.
- Do not allow children to use the appliance. Do not allow them to play with the appliance. They must not climb in-side the drawers and swing on the doors.
- The appliance operates properly at the ambient temper-ature (see product fiche). Do not use it in the cellar, un-heated summer cottage during autumn and winter.
- When placing, moving, lifting the appliance, do not hold the door handles, do not pull the condenser at the rear part of the refrigerator and do not touch the compressor unit.
- When transporting, moving or positioning the fridge-freezer do not tilt it by more than 40^ from the vertical position. Should such a situation occur, the appliance should be switched on after minimum 2 hours from its replacement in the right position.
- Pull the plug out from the mains socket before each main-tenance activity. Do not pull on the cord, but hold the body of the plug instead.
- The “cracking” sound, which the appliance may emit is caused by the expansion and contraction of parts as a result of temperature variations.
- For safety reasons do not repair the appliance yourself. Repairs carried out by persons who do not have the required qualifications may result in serious danger for the user of the appliance.
- Air the room in which the appliance is placed for a few minutes (the size of the room for a product containing isobuthane/R600a must be at least 4m^3 ) to avoid dam-age to the cooling system.
- Do not refreeze partly thawed products.
- Do not store beverages in bottles and cans, especially carbonated beverages, in the freezer chamber. The cans and the bottles may explode.
- Do not put frozen products, taken out directly from the freezer (lollies, ice cubes, etc.) into your mouth, their low temperature may cause severe frostbite.
- Make sure you do not damage the cooling system, by puncturing the refrigerant pipes in the evaporator or breaking the pipes. The refrigerant is flammable. If the refrigerant makes contact with the eyes, rinse them with clean water and call for medical assistance immediately.
- If the power wire gets broken, it should be replaced with a new one in a specialist repair shop.
- This appliance is intended for food storage, do not use it for other purposes.
- When performing activities, such as cleaning, maintenance or moving, the appliance must be completely dis-connected from power supply (by pulling the plug out from the socket)
- This appliance can be used by children aged 8 years and older or by persons with physical, mental or sensory handicaps, or by those who are inexperienced or unfa-miliar with the appliance, provided they are supervised or have been instructed how to safely use the appliance and are familiar with risks associated with the use of the appliance. Ensure that children do not play with the appliance. Cleaning and maintenance of the appliance should not be performed by children unless they are 8 years or older and are supervised by a competent person.
- In order to obtain more space in the freezer, you can remove the drawers and place the food directly on the shelves. This has no effect on the product mechanical properties and cooling performance. Declared freezer capacity was calculated with the drawers removed.
- This product contains a light source, replaceable (LED only) light source by a professional.
flowchart
graph LR
    A["LED"] <--> B["LED"]
WARNING: Risk of fire / flammable materials
- Children aged from 3 to 8 years are allowed to load and unload refrigerating appliances.
To avoid contamination of food, please respect the following instructions:
- Opening the door for long periods can cause a significant increase of the temperature in the compartments of the appliance.
- Clean regularly surfaces that can come in contact with food and accessible drainage systems.
- Store raw meat and fish in suitable containers in the re-frigerator, so that it is not in contact with or drip onto other food.
- Two-star frozen-food compartments are suitable for storing pre-frozen food, storing or making ice-cream and making ice cubes.
- One-, two- and three-star compartments are not suitable for the freezing of fresh food.
| Compartments TYPE | Target storage temp.[°C] | Appropriate food | |
| 1 | Fridge +2≤+8 | Eggs, cooked food, packaged food, fruits and vegetables, dairy products, cakes, drinks and other foods are not suitable for freezing. | |
| 2 | Freezer *** | ≤-18 | Seafood (fish, shrimp, shellfish), freshwater aquatic products and meat products (recommended for 3 months, the longer the storage time, the worse the taste and nutrition), suitable for frozen fresh food. |
| 3 | Freezer *** | ≤-18 | Seafood (fish, shrimp, shellfish), freshwater aquatic products and meat products (recommended for 3 months, the longer the storage time, the worse the taste and nutrition), are not suitable for frozen fresh food. |
| 4 | Freezer ** | ≤-12 | Seafood (fish, shrimp, shellfish), freshwater aquatic products and meat products (recommended for 2 months, the longer the storage time, the worse the taste and nutrition), are not suitable for frozen fresh food |
| 5 | Freezer * | ≤-6 | Seafood (fish, shrimp, shellfish), freshwater aquatic products and meat products (recommended for 1 months, the longer the storage time, the worse the taste and nutrition), are not suitable for frozen fresh food. |
| 6 | 0-star compartment | -6≤0 | Fresh pork, beef, fish, chicken, some packaged processed foods, etc. (Recommended to eat within the same day, preferably no more than 3 days). Partially encapsulated processed foods (non-freezable foods) |
| 7 Chill 2≤+3 | Fresh/frozen pork, beef, chicken, freshwater aquatic products, etc.(7 days below 0 °C and above 0 °C is recommended for consumption within that day, preferably no more than 2 days). Seafood (less than 0 for 15 days, it is not recommended to store above 0°C) | ||
| 8 Fresh Food 0≤+4 | Fresh pork, beef, fish, chicken, cooked food, etc. (Recommended to eat within the same day, preferably no more than 3 days) | ||
| 9 Wine +5≤+20 red wine,white wine,sparkling wine etc. | |||
- Note: please store different foods according to the com-partments or target storage temperature of your pur-chased products.
- If the refrigerating appliance is left empty for long periods, switch off, defrost, clean, dry, and leave the door open to prevent mould developing within the appliance.
- Water dispenser cleaning (special for water dispenser products): Clean water tanks if they have not been used for 48 h; flush the water system connected to a water sup-ply if water has not been drawn for 5 days.
- Pursuant to Commission Regulation (EU) 2019/2019, the minimum availability period for spare parts necessary to repair the appliance is 7 or 10 years depending on the type and purpose of the spare part.
- The list of spare parts and the ordering procedure are available on the websites of the manufacturer, importer or an authorized representative.
- For more information about the product, please refer to the EU EPREL Product Database at https://eprel.ec.eu-ropa.eu. For more information, please use your mobile device to scan the QR code on the energy label or en-ter the product model listed on the energy label in the EPREL search engine https://eprel.ec.europa.eu/
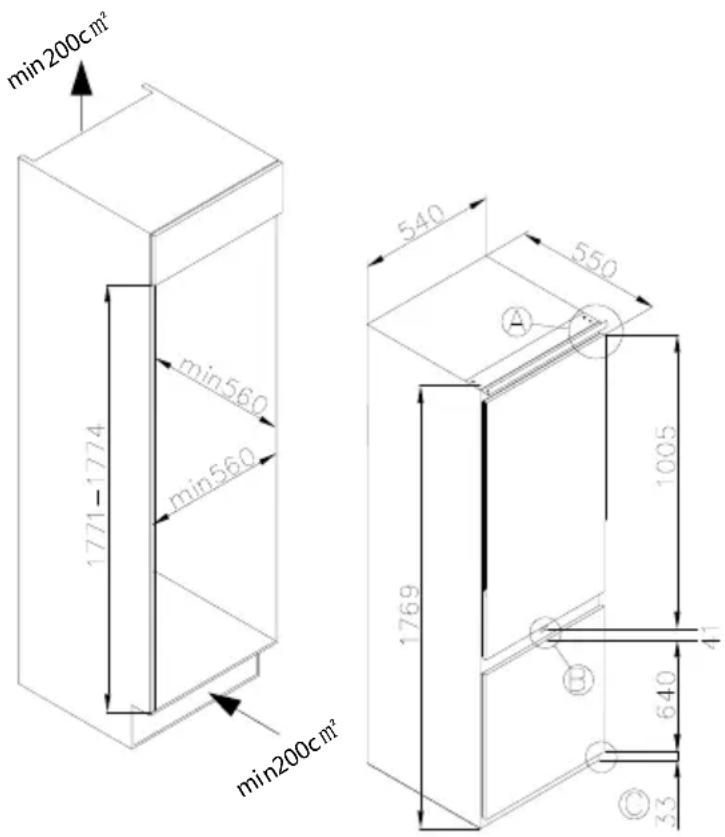
INSTALLATION AND OPERATING CONDITIONS OF THE APPLIANCE
This refrigeration appliance is intended for use as a built-in appliance.
Installation before using the appliance for the first time
• Take the product out of the package, remove the scotch tape protecting the door and the equipment. Any remaining adhesive stains may be removed with a mild washing agent.
- Do not throw away the polystyrene elements of the packaging. If it is necessary to transport the fridge-freezer, pack it in the polystyrene elements and film as well as protecting it with scotch tape
- Clean the interior surface of the fridge- freezer and the elements of the equipment with a washing agent dissolved in lukewarm water, then wipe it dry.
- Place the fridge-freezer on an even, flat and stable surface, in dry, aired and shaded room, far from the heat sources such as: oven, hob, central heating radiators, central heating pipes, hot water installation, etc.
- On the exterior surface of the product may be a protective foil, this foils should be removed.
- Make sure the appliance is placed in a horizontal position by screwing in the 2 adjustable front legs.
• Make sure the distance between the side of the appliance (on door hinges side) and the wall is enough, to ensure that the door opens freely.
- Ensure adequate ventilation of the room and free air circulation from all sides of the appliance.
Minimum distances from the heat sources
• from the electric gas and other ovens - 30 mm,
• from oil or coal fired ovens - 300 mm,
• from built-in ovens - 50 mm
If there is no possibility of ensuring the above-mentioned distances, provide an ap-propriate insulation board.
Warning:
- The rear wall of the refrigerator, in particular, the condenser and other elements of the cooling system must not contact other elements, which may damage them, (e.g. central heating pipes and the water supply pipes).
- It is forbidden to readjust or modify any parts of the unit. It is crucial not to damage the capillary tube visible in the compressor recess. The tube may not be bent, straightened or wound.
- If the capillary tube is damaged by the user the guarantee will be void.
- In some models the handle is put into the appliance, You should screw it with Your own screwdriver,
Mains connection
- Prior to connection, it is recommended to set the temperature control knob to an "OFF" or other position that disconnects the appliance from the power supply (See page with the control description).
-
This appliance should be connected to AC 220-240V 50Hz supply socket. The socket must be fitted properly, and must be supplied with an earthing conduit and a 10A fuse.
-
It is a legal requirement that the appliance is properly earthed. The manufacturer will not be held liable for any damage or injury which may result from the failure to fulfil this requirement.
- Do not use adapters, multiple sockets and two-wire extension leads. If it is necessary to use the extension lead, it must be equipped with a protection ring and a single socket and must have a VDE/GS safety certificate.
- If an extension lead is used (with a protection ring and safety certificate), its socket must be located at a safe distance, away from the sinks, and must not be in a place where it could be flooded by water or waste water.
- See the type plate at the lower part of the internal wall of the appliance for de-tailed specifications**.
Disconnecting the mains
Make sure the appliance can be easily disconnected from the mains, either by pulling the plug out of the mains socket, or by switching the two-pole switch off.
Climate range
The information about the climate range of the appliance is provided on the rated plate or carton board.
Climate class
Allowable ambient temperature
| SN Extended Temperate | This refrigeration appliance is intended for use at an ambient temperature ranging between 10°C and 32°C |
| N Temperate | This refrigeration appliance is intended for use at an ambient temperature ranging between 16 °C and 32°C |
| ST Subtropical | This refrigeration appliance is intended for use at an ambient temperature ranging between 16 °C and 38 °C |
| T Tropical | This refrigeration appliance is intended for use at an ambient temperature ranging between 16 °C and 43 °C |
UNPACKING

natural_image
Recycling symbol composed of three chasing arrows forming a triangle (no text or labels)During transportation, protective packaging was used to protect the appliance against any damage. After unpacking, please dispose of all elements of packaging in a way that will not cause damage to the environment.
All materials used for packaging the appli- ance are environmentally friendly; they are 100% recyclable and are marked with the appropriate symbol.
Important! Packaging materials (bags, polyethylene, polystyrene, etc.) should be kept away from children during unpacking.
DISPOSAL OF OLD APPLIANCE
natural_image
Symbol of a trash bin crossed with diagonal lines, no text or numbers presentIn accordance with European Directive 2012/19/EU and local legislation regarding used electrical and electronic goods, this appliance is marked with the symbol of the crossed-out waste container. This marking indicates that the appliance must not be disposed of together with other household waste after it has been used.
The user is obliged to hand it over to waste collection centre collecting used electrical and electronic goods. The collectors, including local collection points, shops and local authority departments provide recycling schemes.
Proper handling of used electrical and electronic goods helps avoid environmental and health hazards resulting from the presence of dangerous components and the inappropriate storage and processing of such goods.
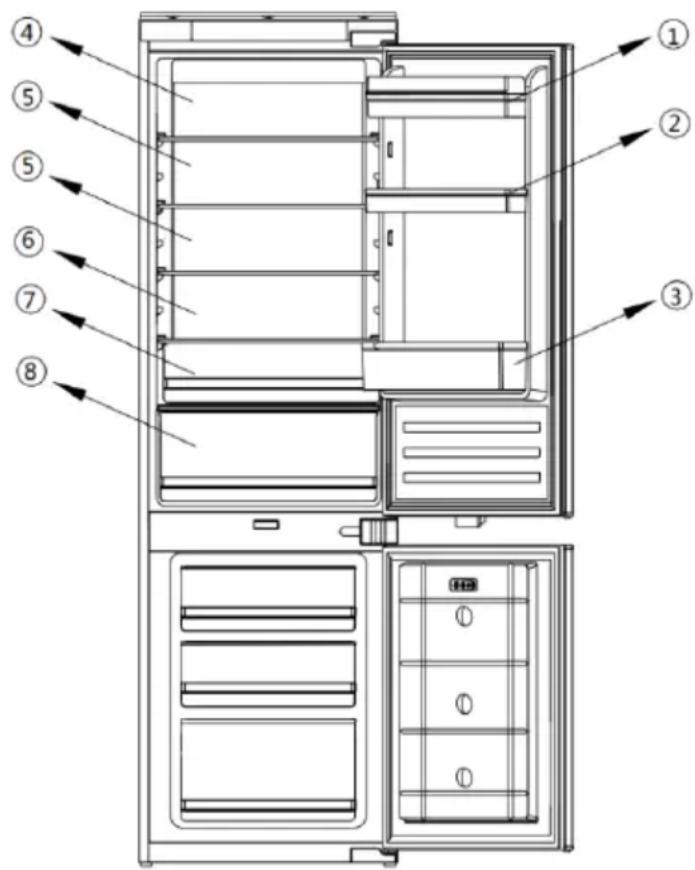
CONTROLS

- First time of switching on the appliance, this appliance always works at settings: 5°C for fridge, 0°C for My Zone and -18°C for freezer. If you want to adjust the temperature or functions manually, press the button to conduct the operations. Temperature ranges of adapt zone from -3°C to 3°C.
- Fridge temperature adjustment – press button ④ on left part of control panel to achieve different temperatures from 2^ C to 8^ C.
- Freezer temperature adjustment –press button ⑤ on right part of control panel to achieve different temperatures from -15°C to -25°C.
- My Zone drawer adjustment function: this button ① controls temperature. By pressing on this button, the digit will go from -3^ to +3^ . This function can be on/off by continuously pressing for three seconds.
- Fast cooling function –Press button ②, light of button illumines and fast cooling function is turned on, fridge starts to work automatically at temperature setting 2^ C and quits after 24 hours, light of symbol eliminates.
- Holiday function—Press button ③, light of button illumines, holiday function is turned on and whole appliance starts to work automatically at settings: fridge at 17^ C and freezer at -18^ C.
- Eco function – Press button ⑥ on control panel, eco function is turned on and button illuminates, fridge compartment works at setting 5°C and freezer compartment works at setting of -18°C. The adapt zone works at setting of 3°C.
- Fast freezing function – Press button ⑦, light of button illumines and freezer start to work at fast freezing function, temperature setting -25°C. After 24 hours, fast freezing function quits automatically.
- Press button ⑧ for 3 seconds to switch off your appliance and the button illumines, power is cut off. Internal lamps eliminate, compressor stops working. Press the button ⑧ for 3 seconds to switch on your appliance, the symbol illumined and power is connected again.
Additional information on the temperature
- The temperature inside the appliance is influenced by many factors. How you set the temperature control dial depends on the ambient temperature, sun exposure, how often you open the door and the amount of food stored. The middle setting of the dial is most optimal in most cases.
- Do not put food into the fridge freezer before it has reached its operating temperature, which takes minimum 4 hours.
- Do not change the temperature settings due to the change in the season of the year. The ambient temperature increase will be detected by the sensor and the compressor will be switched on automatically for a longer period of time in order to maintain the temperature set inside the chambers.
- The slight changes in temperature are perfectly normal and may occur, for instance during the storage of great quantities of fresh products in the fridge, or when the door is open for a longer period of time. This will not affect the condition of the stored foodstuff, and the temperature will quickly return to its set value.
Error code
This appliance has ‘fault display & alarm’ function. Once the sensors got fault, there are alarms displayed on the temperature displaying, the appliance still cools but professional service engineer should be called and check the appliance.
F2 – Sensor of adapt zone
F3 – Sensor of fridge apartment
F4 – Sensor of freezer
compartment
F5 – Sensor of defrosting
2E – Fault of fan/motor in freezer
CE- Communication fault between main panel and display panel.
The above Errors only show on display, no voice
Over temperature alarm in freezer: after freezer temperature arrives at the set temperature, after that, if the temperature rises to >-1 ^ , the alarm will start, accompany with flash of freezer temperature digit. Press any button to cancel the voice alarm. The flash will remain until the temperature is <-1 ^ .
PS: Main board locates in compressor compartment compartment
OPERATION AND FUNCTIONS
Storage of food in the fridge-freezer
- The products should be placed on plates, in containers or packed in food wrap. Distribute them evenly over the shelves.
• If the food contacts the rear wall, it may cause frosting or wetting of the products. - Do not put dishes with hot food into the fridge
- Products which absorb flavours easily such as butter, milk, white cheese and products with intense flavour, such as fish, smoked meat, hard cheese must be placed on shelves, packed in food wrap or in tightly sealed containers.
- The storage of vegetables containing significant quantities of water will cause the deposition of condensation on the vegetable containers, it does not impact on the proper functioning of the fridge.
- Before putting the vegetables into the fridge, dry them well.
- Excessive moisture shortens the shelf life of vegetables, especially the leafed vegetables.
- Do not wash the vegetables before storing in the refrigerator. Washing removes the natural protection, therefore it is better to wash the vegetables directly before consumption.
-
It is recommended to place the products in freezer drawers 1, 2, 3* up to natural loading capacity.**
-
Packed products
- Shelf
-
Natural loading capacity
4. -
Stacking of products on the freezer shelves is acceptable.*
- It is acceptable to place products beyond the natural loading capacity by 20-30 mm.**
- In order to increase the loading capacity of the freezer chamber and allow the stacking of products on the freezer evaporator wire shelves up to maximum height it is possible to remove drawers 1 and 2.*
Freezing food\*\*
- Practically all the food products, except for vegetables consumed raw, such as lettuce can be frozen.
- Only food products of the highest quality, divided into small portions for single use, should be frozen.
- Products should be packed in materials that are odourless, resistant to air and moisture penetration, and not susceptible to fat. Plastic bags, polyethylene and aluminium sheets are the best wrapping materials.
- The packaging should be tight and should stick to the frozen products. Do not use glass containers.
- Keep fresh and warm foodstuff at ambient temperature away from the products, which have already been frozen.
- We advise you not to place more of fresh food at a time to the freezer per day (see table witch technical specification).
- In order to maintain optimum quality of the frozen food, reorganise the food that is in the middle of the freezer, so that it does not touch the products that are not yet frozen.
-
It is recommended that you move the already frozen products to one side and place the fresh products that are to be frozen on the opposite side, as close to the rear and side walls as possible.
-
To freezing products, use space marked
- Bear in mind that the temperature in the freezer is affected by several factors, including the ambient temperature and the quantity of food products in the chamber, the frequency of opening the door, the amount of frost in the freezer, and the thermostat setting.
- If you cannot open the freezer door immediately after closing it, allow 1-2 minutes for the negative pressure to compensate, and try again to open the door.
The storage time for frozen products depends on their quality before freezing when fresh, and on the storage temperature. The following storage periods are recommended when the temperature of -18^ or lower is maintained:
| Products Months | |
| Beef 6-8 | |
| Veal 3-6 | |
| Giblets 1-2 | |
| Pork 3-6 | |
| Poultry 6-8 | |
| Eggs 3-6 | |
| Fish 3-6 | |
| Vegetables | 10-12 |
| Fruit 10-12 | |
Do not store frozen food in rapid cooling chamber. Ice cubes can be prepared and stored in this chamber.
Note: If the appliance does not have a freezer compartment ( ^ ^** ), it is not suitable for freezing foodstuffs.
USING THE REFRIGERATOR EFFICIENTLY
Practical everyday tips
- Do not place fridges or freezers next to radiators, heaters, stoves or in direct sunlight.
- Make sure that air vents are not covered up and clean the dust off them once or twice a year.
- Select the right temperature: 6 to 8°C in your refrigerator and -18°C in your freezer is sufficient.
- When on holiday, turn up the temperature in your fridge.
- Only open your fridge or freezer when necessary. It helps if you know what food each contains and where it is located. Return food to the fridge or freezer as soon as possible after you have used it so that it does not warm up too much.
- Wipe the inside of your fridge regularly with a cloth soaked in a mild detergent. Appliances which are not self-defrosting will require regular defrosting. Do not allow frost layers thicker than 10 mm to form.
- Keep the seal around the door clean, otherwise it will not shut properly. Always replace broken seals.
Understanding the stars

Temperature is at least -6°C; sufficient to store frozen food for about a week. Drawers or compartments marked with one star used to be a feature of (mostly) cheaper fridges.

Food can be stored at -12°C or below for 1-2 weeks without losing its taste. Not suitable for freezing food.
This rating is mainly used to store foods at -18°C or below. Can also be used to freeze up to 1 kilogram of fresh food.

This appliance is suitable for storing foods at -18^ C or below and freezing larger quantities of fresh foods.
Practical tips
Due to the natural circulation of the air in the appliance, there are different temperature zones in the refrigerator chamber.
- The coldest area is directly above the vegetables drawers. Use this area for all delicate and highly perishable food e.g.:
- Fish, meat, poultry
- Sausage products, ready meals
- Dishes or baked goods containing eggs or cream
- Fresh dough, cake mixtures
- Pre-packed vegetable and other fresh food with a label stating it should be kept at a temperature of approx 4^ C.
- The warmest area is in the top section of the door. Use this for storing butter and cheese.
Food that should not be stored in a refrigerator
- Not all food is suitable for storing in the refrigerator, particularly:
- Fruit and vegetables which are sensitive to cold, such as bananaas, avocado, papaya, passion fruit, aubergines, peppers, tomatoes and cucumbers.
- Fruit which is not yet ripe
- Potatoes
Warning:
Example of storing the food - see below
To achieve the most effective food preservation for the longest possible time and to avoid wasting any food, position the products as shown in Figure 12. In addition, this figure illustrates the layout of drawers, baskets and shelves, which allows the most efficient use of energy.
Optimal temperature and storage conditions will extend product shelf life and optimize electricity consumption. Optimal storage temperature range should be stated on the food product packaging.
The fridge section is for short term food storage. Although low temperatures can be maintained, extended periods of food storage is not recommended. As the cold air circulates within the fridge, the temperature can vary between the different sections. As such, foods should be stored in different sections according to type.
- Butter, cheeses etc.
- Food in jars and bottles
- Drinks, e.g. milk
- Cooked food
- Yogurts, preserves etc.
- 75cl bottles or ready meals etc.
- Fruit and vegetables
- Fresh meat and fish/fruit and vegetables
The fridge shelves can be moved according to the storage requirements within the fridge section. To move the shelf, lift up the rear section and then pull it outwards.
The most energy-saving configuration requires drawers, food box and shelves to be positioned in the product, please refer to the above pictures.
DEFROSTING, WASHING AND MAINTENANCE
Never clean the product's casing or plastic parts using solvents or strong, abrasive detergents (e.g. washing powders or creams)! Use mild liquid detergents and soft cloths only. Do not use sponges.
Defrosting the fridge\*\*\*
- Frost settles on the rear wall of the fridge chamber. It is removed automatically. During the defrosting, the condensate, which contains contaminants may clog the opening in the through. Should it occur, carefully unclog the opening with the cleaning plug.
- The appliance operates in cycles: it refrigerates (then the frost settles on the rear wall), and defrosts (water flows down the rear wall)
- Disconnect the appliance from the mains before cleaning by removing the plug from the mains socket or switching off the fuse. Prevent water from penetrating the control panel or the light.
- Do not use defrosting aerosols. They may cause the formation of an explosive mixture, or contain solvents which may damage the plastic components of the appliance and even be harmful to health.
- Make sure the water used for cleaning does not flow into the evaporation container through the discharge opening.
- The whole appliance, except for the door gasket must be cleaned with a mild cleaning detergent. The door gasket should be cleaned with water and wiped dry.
- Wash all the accessories (vegetable containers, door shelves, glass shelves, etc.).
Defrosting the freezer\*\*
- It is recommended to combine defrosting the appliance with washing it.
- Excessive accumulation of ice on the freezing areas impairs the appliance's freezing capacity and increases the energy consumption.
- Defrost the appliance at least once or twice a year. In case of a higher ice build-up, defrosting must be carried out more frequently.
- If there is food in the freezer, set the knob to the max. position about 4 hours before the planned defrosting. This will ensure the possibility of storing the food at the ambient temperature for a longer time.
• After taking the food out of the freezer, put it in a container, wrap it with several layers of paper, a blanket and store it at a cool place. - The defrosting operation should last as short as possible. Long storage of food at the ambient temperature shortens their shelf life.
Defrost the freezer chamber following steps:\*\*
- Switch of the appliance using the control panel and pull the plug out from the socket..
- Open the door and remove the food from the freezer.
- Depending on the model, pull out the drainage tube located in the bottom of the freezer compartment and place a suitable vessel underneath.
- Leave the door open, this will speed up the defrost process. Additionally, a pot with hot water (not boiling) may be placed inside the freezer compartment.
- Wash the interior of the freezer and wipe it dry.
- Switch on the appliance as per the relevant point in the manual.
Automatic fridge defrosting\*\*\*\*
The fridge chamber has been equipped with an automatic defrosting function. However, frost may settle on the rear wall of the fridge chamber. This happens usually, when large quantities of fresh food products are stored in the fridge.
Automatic freezer defrosting\*\*\*\*
The freezer chamber has been equipped with an automatic defrosting function (no frost). The food is frozen in the cooled circulation air, and the moisture from the freezer chamber is discharged outside. As a result, no ice and frost is produced in the freezer and the products do not freeze on each other.
Washing the fridge and freezer chambers manually\*\*\*\*
It is recommended to wash the fridge and freezer chambers at least once a year. This prevents the formation of bacteria and bad odour. Switch off the appliance, remove the food from the chambers and wash them using water with a mild detergent. Then, wipe the chambers dry with a cloth.
Taking out and putting in the shelves\*\*\*\*\*
Slide the shelf out, then slide it in as much as possible so that its clamp could fit the guide groove.
Taking out and putting in the door shelf\*\*\*\*\*
Lift the door shelf, remove it and put it back from the top into its required position.
WARNING! You must not put an electric heater, a heating fan or a hair dryer into the freezer by any means.

TROUBLE-SHOOTING
Problems Possible causes Remedies
| The appliance does not work The electric circuit is disrupted | - check whether the plug is properly inserted into the socket- check whether the power cable of the appliance is not damaged- check whether there is voltage in the socket, by plugging another appliance, e.g. a night lamp- check whether the appliance is switched on by setting the thermostat to a position above 0. | |
| The lighting inside the chamber does not work | The bulb is loose or fused (only appliances with bulb lightning type) | - fit the bulb correctly or replace it (see section above “Replacing the interior light bulb) |
| The appliance works continuously | Incorrect setting of the adjustment knob | - reset the knob to a lower position |
| See. "Temperature inside the appliance is not low enough for description of other possible causes | See. "Temperature inside the appliance is not low enough for description of other possible remedies | |
| Water collects in the lower part of the appliance | The water discharge opening is clogged (depending on the model) | - clean the discharge opening (see the operating manual – chapter entitled "Defrosting the fridge") |
| Internal air circulation obstructed | - place the food and containers in such a way as that they do not touch the rear wall of the fridge | |
| The appliance generates unusual noise | Incorrect levelling of the appliance | - level the appliance properly |
| The appliance is touching furniture and/or other objects | - place the appliance at a location that ensures proper clearances around it | |
Problems Possible causes Remedies
| Temperature inside the appli-ance is not low enough or too high | Incorrect setting of the adjust-ment knob | - reset the knob to a higher position |
| The ambient temperature is higher or lower than the climate range from table with technical specification | - the appliance is adapted to op-eration in the climate range from table with technical specification. | |
| The appliance is located in a sunlit place or near heat sources | - move the appliance to another place. Observe the guidelines contained in the manual | |
| Too much warm food loaded at a time | - wait 72 hours until the food becomes cool (freezes) and the required temperature is reached inside the chamber | |
| Internal air circulation obstructed | - place the food and containers in such a way that they do not touch the rear wall of the fridge | |
| The air circulation at the back of the appliance is obstructed | - move the appliance min. 30 mm away from the wall | |
| The door of the fridge/freezer is opened too often and/or remains open for too long | - reduce the frequency of open-ing the door and/or shorten the time when door remains open | |
| The door does not close com-pletely | - place the food and containers so that they would not interfere with door closed | |
| The compressor is switched on too rarely | - check whether the ambient temperature is not lower than climate class | |
| Door gasket inserted incorrectly - press the gasket in | ||
Certain sounds can be heard during normal use of the refrigerator, which do not affect its correct operation.
Sounds, which can be easily prevented:
- noise caused by the appliance which is not level - adjust the position with the adjustable turn-in front feet. Alternatively, place pads made of soft material under the rear rollers, especially when the appliance is placed on tiles.
- touching the adjacent piece of furniture - move the refrigerator away.
- creaking of the drawers or shelves - take out and put back the drawer or shelf.
- sounds of clinking bottles - move bottles apart.
Sounds heard during normal use are mainly due to operation of the thermostat, compressor (switching on) and cooling system (thermal expansion and contraction of the radiator caused by flow of the cooling agent).
INSTALLATION INSTRUCTION
Installation preparation
This appliance must never be installed close to heat sources, e.g. heating elements or cookers, nor in damp places.
Seek the help of another individual, or two, when installing this appliance. This appliance may have sharp edges. Wear adequate PPE for the task and environment.
- To ensure the appliance is level, you should use the height adjustable feet at the front of the appliance.
- The cooling system at the rear of the appliance must not touch the rear wall. The greater the gap, the better.
- The appliance must be installed with adequate ventilation. Ensure that there is clearance above the appliance to allow air to escape and that there is space between the rear of the appliance and the wall.
Installation drawing
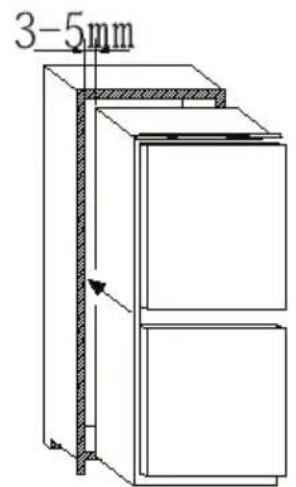
Installation instruction (sliding hinge)
1) Insert the appliance into the wooden furniture, placing it on the opposite site of the hinges, and make sure 3-5 mm distance gap.
2) After ensuring the match between appliance door and column door, then screw the appliance upper part to the cabinet.
3) Screw the appliance lower part.
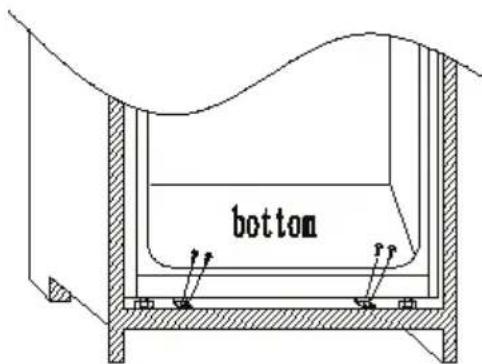
4) Fit the seal to the appliance, cut off the excessive part if necessary. Fit the bottom parts with plastic covers.
natural_image
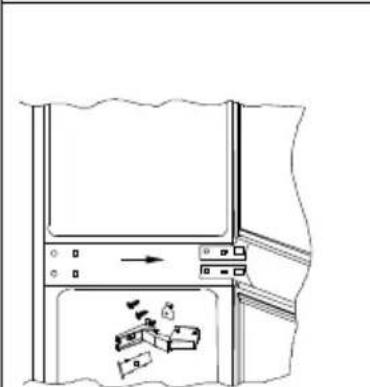
Technical line drawing of a cabinet or enclosure with directional arrows indicating flow or movement (no text or symbols present)5) Use a cross-screwdriver to loosen the connecting pin underneath the right middle hinge, and adjust to screw onto the right cabinet wall.

6) Fix the slider and slider base onto wooden door and appliance door
Installation instruction(FIX hinge)
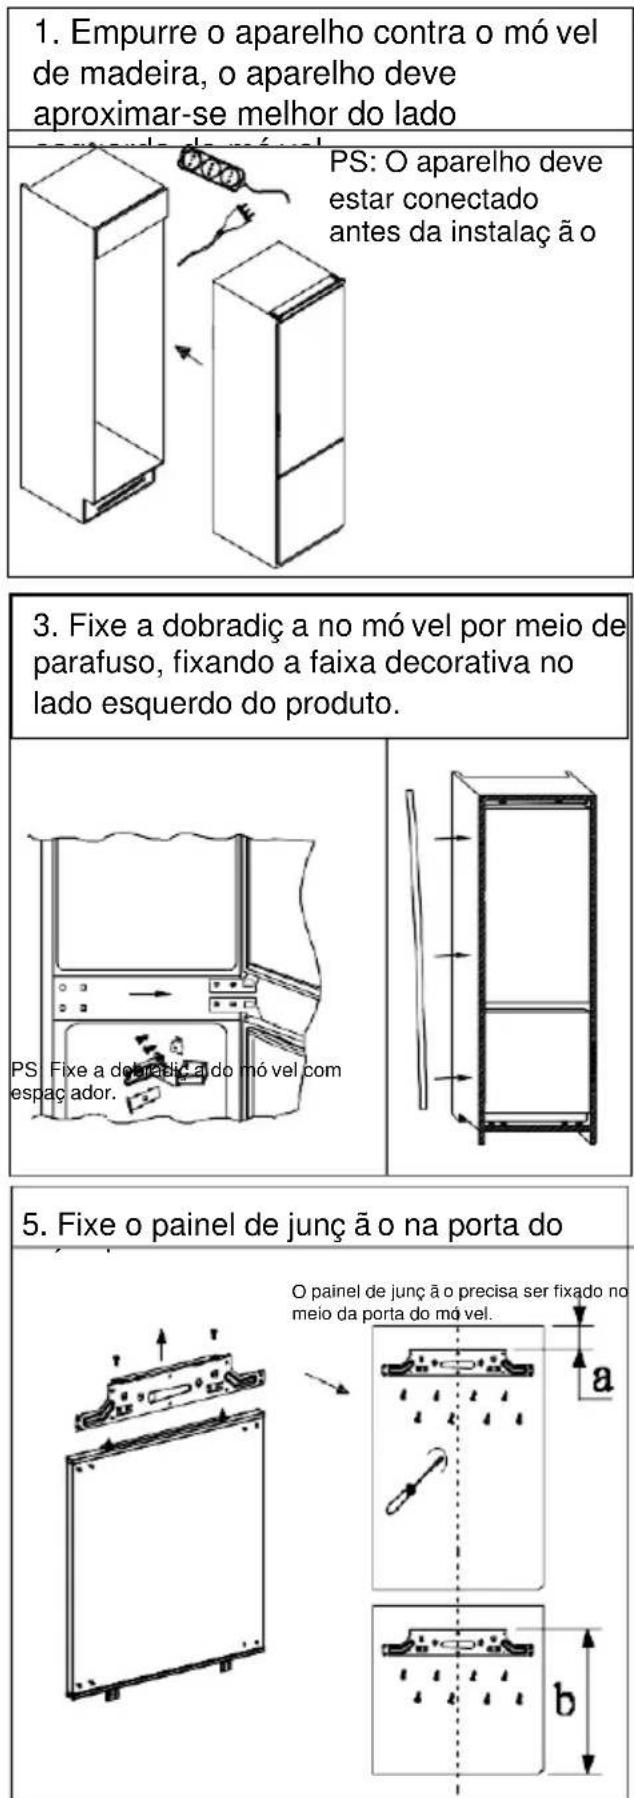
1.. Push the appliance into the wood furniture, the appliance should be better approach furniture left side.
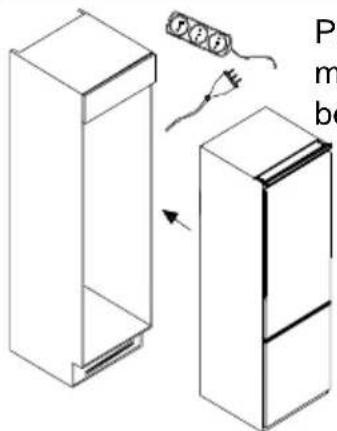
PS: The appliance must be plugged in before installation
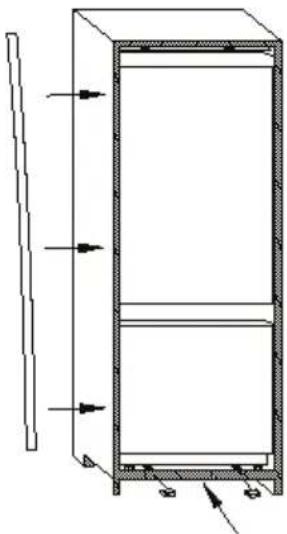
3.. Fix the hinge on furniture by screw, attached the decoration stripe on the product left side.
natural_image
Diagram of a refrigerator with an arrow indicating direction and a small box inside, no text or symbols present
natural_image
Diagram of a vertical structure with horizontal arrows indicating direction, no text or symbols presentPS: Fix the hinge on furniture with spacer
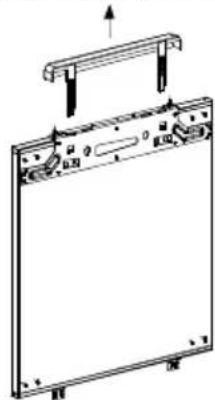
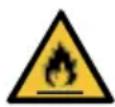
5.. Fix the junction panel on furniture door
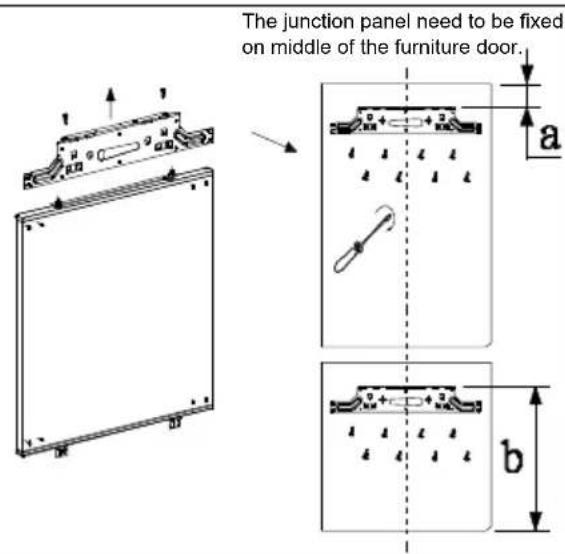
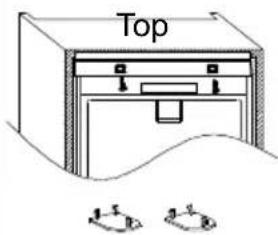
- Adjust the position of appliance, screw product top and bottom part on the furniture
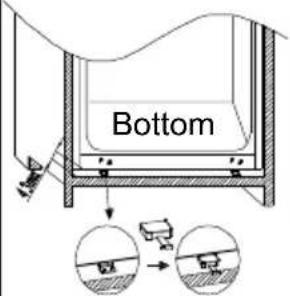
PS: Please remove the tail after fixing the bottom part cover.
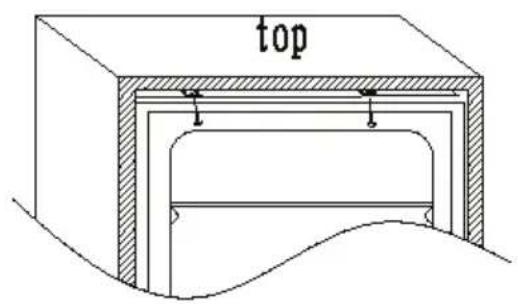
Upper hinge cover
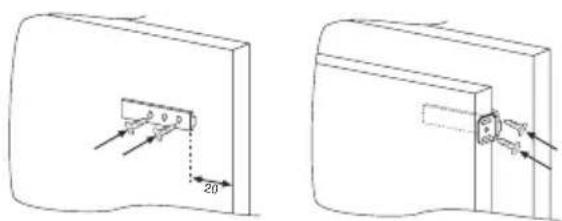
- Measure the dimension on a and b.
Disassemble the junction panel before measuring.
natural_image
Technical line drawing of a mechanical assembly with mounting brackets and a handle (no text or symbols)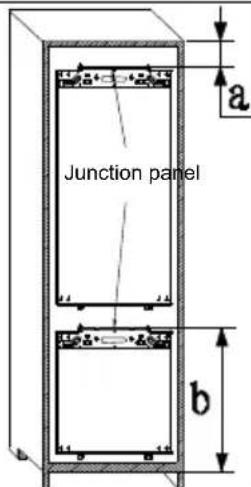
- Fix the appliance door on furniture door.
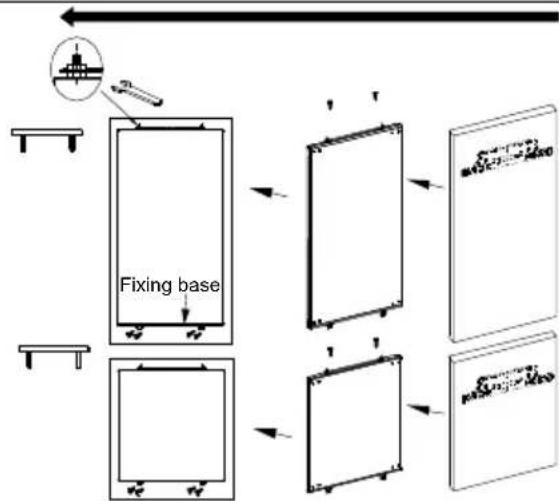
flowchart
graph TD
    A["Tool Insert"] --> B["Fixing base"]
    B --> C["Step 1: Tool Insert"]
    B --> D["Step 2: Tool Insert"]
    B --> E["Step 3: Tool Insert"]
    B --> F["Step 4: Tool Insert"]
    C --> G["Assembly Step 1"]
    D --> H["Assembly Step 2"]
    E --> I["Assembly Step 3"]
    F --> J["Assembly Step 4"]
DE
Inhaltsverzeichnis
AUFTAUEN, WASCHEN UND PFLEGEN
natural_image
Technical line drawing of a two-story cabinet with directional arrows indicating movement or force (no text or symbols)
natural_image
Pure technical line drawing of a mechanical component with no text or symbolsflowchart
graph TD
    A["Initial Setup"] --> B["Befestigungs basis"]
    B --> C["Panel 1: Screen with 'B' label"]
    B --> D["Panel 2: Screen with 'D' label"]
    B --> E["Panel 3: Screen with 'D' label"]
    C --> F["Final Display with 'D' label"]
    D --> G["Final Display with 'D' label"]
FR
Table des matières
INSTRUCTIONS GENERALES CONCERNANT LA SECURITE D'UTILISATION......46
CONDITIONS D'INSTALLATION ET DE FONCTIONNEMENT DE L'APPAREIL.....50
DEBALLAGE....52
ÉLIMINATION DE L'ÉQUIPEMENT USAGÉ....52
CONTRÔLE....53
FONCTIONNEMENT ET FONCTIONS.... 55
UTILISATION EFFICACE DU RÉFRIGÉRATEUR....57
DÉCONGÉLATION, LAVAGE ET ENTRETIEN....59
DÉPANNAGE....61
INSTALLATION....63
LIGNES DIRECTRICES SUR LA SÉCURITÉ D'UTILISATION
natural_image
Technical line drawing of a vertical cabinet with directional arrows indicating movement or force (no text or symbols)natural_image
Technical line drawing of a mechanical assembly with no visible text or symbols
natural_image
Pure technical line drawing of a mechanical component with no text or symbolsnatural_image
Simple line drawing of a two-story cabinet with a vertical rod on the left side (no text or symbols)natural_image
Technical line drawing of a cabinet with directional arrows indicating movement or force (no text or symbols)natural_image
Diagram showing two 3D rectangular containers with internal compartments and a separate container with a cable (no text or symbols)natural_image
Diagram of a refrigerator with an arrow pointing to the door, showing a person inside (no text or symbols present)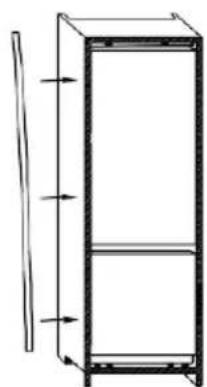
natural_image
Technical line drawing of a vertical cabinet or enclosure with directional arrows indicating flow or movement (no text or symbols)natural_image
Technical line drawing of a rectangular electronic component with mounting brackets and a handle (no text or symbols)
Entendendo as estrelas

DESCONGELAMENTO, LAVAGEM E CUIDADOS
natural_image
Technical line drawing of a cabinet or enclosure with directional arrows indicating flow or movement (no text or symbols present)Instruç õ es de instalaç ã o (dobradiç a FIX)
natural_image
Technical line drawing of a rectangular electronic component with mounting brackets and a handle (no text or symbols)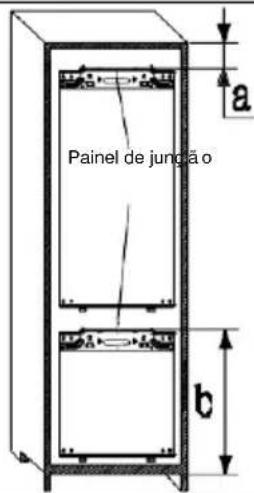
| 5 | א' אַרְה | ≤ -6 | א' אַרְה אַרְה אַרְה אַרְה אַרְה אַרְה אַרְה אַרְה אַרְה אַרְה אַרְה אַרְה אַרְה אַרְה אַרְה א' (בְרָבִי, כְרָבִי, כְרָבִי) א' (בְרָבִי, כְרָבִי, כְרָבִי, כְרָבִי, כְרָבִי, כְרָבִי, כְרָבִי, כְרָבִי, כְרָבִי, כְרָבִי, כ' (בְרָבִי, כ' (בְרָבִי, כ' (בְרָבִי, כ' (בְרָבִי, כ' (בְרָבִי, כ' (בְרָבִי, כ' (בְרָבִי, כ' (בֱרְה, כ' (בְרָבִי, כ' (בְרָבִי, כ' (בְרָבִי, כ' (בְרָבִי, כ' (בְרָבִי, כ' (בְרָבִי, כ' (בְרָבִי, dom' (בְרָבִי, dom' (בְרָבִי, dom' (בְרָבִי, dom' (בְרָבִי, dom' (בְרָבִי, dom' (בְרָבִי, dom' (בְרָבִי, dom' |
| 6 | א' ( | -6 ≤ 0 | א' (בְרָבִי, dom' (ב' (ב' (ב' (ב' (ב' (ב' (ב' (ב' (ב' (ב' (ב' (ב' (ב' (ב' (ב' (ב' (ב' (ב' (ב' (ב' (ב' (ב' (ב' (ב' (ב' (ב' (ב' (ב' (ב' (ב' (ב' (ב' (ב' (ב 3-ה' (ב' (ב' (ב' (ב' (ב' (ב' (ב' (ב' (ב' (ב' (ב' (ב' (ב' (ב' (ב' (ב' (ב' (ב' (ב' (ב' (ב' (ב' (ב' (ב' (ב' (ב' (ב' (ב' (ב' (ב' (ב' (ב' (ב', (ב' (ב' (ב' (ב' (ב' (ב' (ב' (ב' (ב' (ב' (ב' (ב' (ב' (ב' (ב' (ב' (ב' (ב' (ב' (ב' (ב' (ב' (ב' (ב' (ב' (ב' (ב' (ב' (ב' (ב' (ב' (ב' (ב' |
| 7 | א' ( | 2 ≤ +3 | א' (ב' (ב' (ב' (ב' (ב' (ב' (ב' (ב' (ב' (ב' (ב' (ב' (ב' (ב' (ב' (ב' (ב' (ב' (ב' (ב' (ב' (ב' (ב' (ב' (ב' (ב' (ב' (ב' (ב' (ב' (ב' (ב' (ב'), 15 (ב' (ב' (ב' (ב' (ב' (ב' (ב' (ב' (ב' (ב' (ב' (ב' (ב' (ב' (ב' (ב' (ב' (ב' (ב' (ב' (ב' (ב' (ב' (ב' (ב' (ב' (ב' (ב' (ב' (ב' (ב' (ב' (ב' ) 0-ה' (ב' (ב' (ב' (ב' (ב' (ב' (ב' (ב' (ב' (ב' (ב' (ב' (ב' (ב' (ב' (ב' (ב' (ב' (ב' (ב' (ב' (ב' (ב' (ב' (ב' (ב' (ב' (ב' (ב' (ב' (ב' (ב' |
The image contains no legible text or symbols.
"OFF"
natural_image
Symbol of a trash bin crossed with diagonal lines, no text or labels present.הכלההוּרָהוּרָהוּרָהוּרָהוּרָהוּרָהוּרָהוּרָהוּרָהוּרָהוּרָהוּרָהוּרָהוּרָהוּרָה
**n" n 20-30-הַרְבָרִיֹתָהַעֲשֵׁוֹם הַלְאָהַעֲשֵׁוֹם הַלְאָהַעֲשֵׁוֹם הַלְאָהַעֲשֵׁוֹם הַלְאָהַעֲשֵׁוֹם
.הכלההוּרָהוּרָהוּרָהוּרָהוּרָהוּרָהוּרָהוּרָהוּרָהוּרָהוּרָהוּרָהוּרָהוּרָהוּרָה
הַרְשָׁ
אַלְרָה:
natural_image
Technical line drawing of a two-story cabinet with directional arrows indicating force or movement (no text or symbols)natural_image
Simple line drawing of a cabinet with two switches below (no text or symbols)natural_image
Diagram of a refrigerator with an arrow indicating direction and a small box inside (no text or symbols)natural_image
Technical line drawing of a vertical shelf or cabinet with directional arrows indicating movement (no text or symbols)natural_image
Technical line drawing of a rectangular frame with mounting holes and a top panel, showing no text or symbols.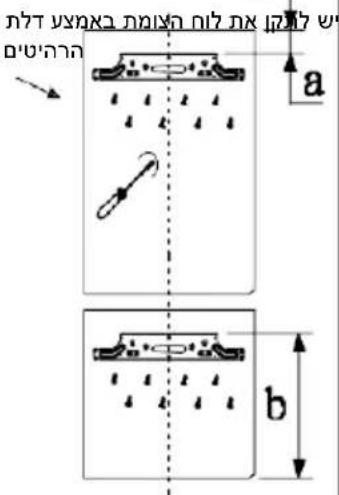
natural_image
Technical line drawing of a rectangular frame with mounting brackets and a support bracket (no text or symbols)
TR
İçindekiler
flowchart
graph LR
    A["User Icon"] --> B["LED"]
    B <--> C["LED"]
natural_image
Recycling symbol composed of three arrows forming a triangle (no text or labels)natural_image
Symbol of a trash bin crossed with two crossed lines, representing waste sorting or restriction (no text present)BUZ ÇÖZME, YIKAMA VE BAKIM
natural_image
Technical line drawing showing two mechanical components with angular dimensions (20° and 30°), no text or symbols present.natural_image
Technical line drawing of a rectangular cabinet with directional arrows indicating flow or movement (no text or symbols)natural_image
Diagram of a refrigerator interior with doors, seats, and a door, showing no text or symbols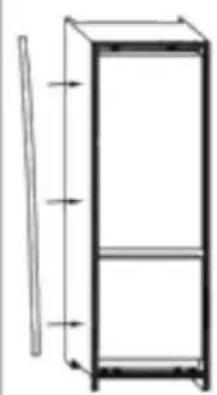
natural_image
Simple line drawing of a rectangular cabinet with a vertical rod and horizontal arrows indicating direction (no text or symbols)natural_image
Pure technical diagram of a rectangular panel with mounting holes and a horizontal support bar (no text or symbols)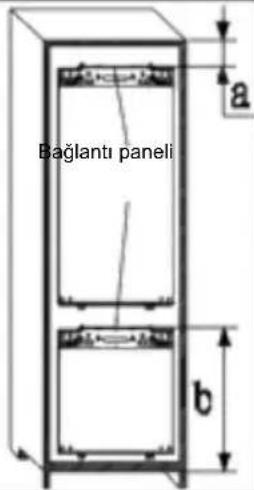
natural_image
Recycling symbol composed of three chasing arrows forming a triangle (no text or labels)natural_image
Symbol of a trash bin crossed with a diagonal line, no text or numbers presentODMRAZOVÁNÍ, MYTÍ A ÚDRŽBA
natural_image
Technical line drawing of a two-tiered rectangular cabinet with directional arrows indicating force or movement (no text or symbols)
natural_image
Simple line drawing of a vertical panel with arrows indicating direction, no text or symbols presentnatural_image
Technical line drawing of a rectangular panel with mounting brackets and a support bracket (no text or symbols)
flowchart
graph TD
    A["Initial setup"] --> B["Upevnění základny"]
    B --> C["Arrow to next step"]
    C --> D["Arrow to next step"]
    D --> E["Arrow to next step"]
    E --> F["Arrow to next step"]
Obsah
BEZPEČNOSTNÉ POKYNY PRE POUŽÍVANIE. 178
INŠTALÁCIA A PREVÁDZKOVÉ PODMIENKY ZARIADENIA ..... 182
ROZBAL'OVANIE 184
LIKVIDÁCIA POUŽITÝCH ZARIADENÍ. 184
OVLÁDANIE....185
PREVÁDZKA A FUNKCIE 187
EFEKTÍVNE VYUŽÍVANIE CHLADNIČKY 189
ODMRAZOVANIE, UMÝVANIE A ÚDRŽBA 191
ODSTRÁNENIE PORÚCH....193
NÁVOD NA INŠTALÁCIU. 195
BEZPEČNOSTNÉ POKYNY
natural_image
Recycling symbol composed of three chasing arrows forming a triangle (no text or labels)natural_image
Symbol of a trash bin crossed with a diagonal line, no text or numbers presentODMRAZOVANIE, UMÝVANIE A ÚDRŽBA
natural_image
Technical line drawing of a two-story cabinet with directional arrows indicating force or movement (no text or symbols)natural_image
Simple line drawing of a refrigerator with an open door and a person inside, no text or symbols present.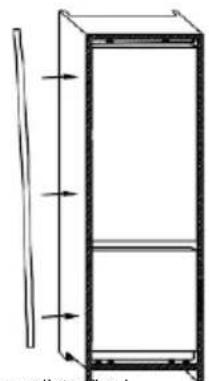
natural_image
Diagram of a vertical panel with arrows indicating direction, no text or symbols presentnatural_image
Pure technical line drawing of a rectangular panel with mounting brackets and a handle, no text or symbols present