
iRV42H3 - Television RCA - Free user manual and instructions
Find the device manual for free iRV42H3 RCA in PDF.

| Product type | LED TV |
| Brand | RCA |
| Model | iRV42H3 |
| Screen size | 42 inches (approx. 107 cm) |
| Resolution | Full HD 1920 x 1080 pixels |
| Display technology | LED |
| Operating system | VIDAA |
| Connectivity | 3x HDMI, 2x USB, AV, RF, LNB, Ethernet RJ45, coaxial output, headphone jack |
| Smart TV functions | Netflix, Prime Video, YouTube, Plex, Deezer, Disney+, web browser |
| Power consumption (home mode) | Less than 35 W |
| Standby consumption | Less than 0.49 W |
| Power supply | 100-240 V AC, 50/60 Hz |
| Insulation class | Class II (double insulation) |
| Weight (approx.) | Approximately 10 kg |
| Dimensions without stand (approx.) | 95 x 55 x 8 cm |
| Included accessories | Remote control, batteries, user manual |
| Safety | Auto off, timer, parental control, child lock |
| Maintenance | Clean with a dry cloth; do not use liquids |
Frequently Asked Questions - iRV42H3 RCA
User questions about iRV42H3 RCA
0 question about this device. Answer the ones you know or ask your own.
Ask a new question about this device
Download the instructions for your Television in PDF format for free! Find your manual iRV42H3 - RCA and take your electronic device back in hand. On this page are published all the documents necessary for the use of your device. iRV42H3 by RCA.
USER MANUAL iRV42H3 RCA
natural_image
Illustration of a laptop computer with blank screen and glossy base (no text or symbols)iRV24H3
iRV32H3
iRV42H3


USER'S MANUAL LED TV SET

natural_image
Illustration of a laptop computer with a blank screen and glossy surface (no text or symbols)ESPAÑOL
CONTENIDO
Precaución
natural_image
Simple line drawing of a computer monitor with a blue X mark and a hanging paper tied with a string (no text or symbols)Precaución
natural_image
Illustration of a computer monitor with a 'X' symbol and a small icon above it, no text or symbols present.Precaución
natural_image
Simple line drawing of a box with steam rising, marked with a 'X' symbol (no text or labels)Precaución
natural_image
Cartoon illustration of a person using a computer with a 'X' symbol (no text or symbols present)Precaución
natural_image
Illustration of a computer monitor with a blue X mark and a lightning bolt, resting on a table (no text or symbols)Precaución
natural_image
Illustration of a person standing next to a computer monitor and a small globe (no text or symbols)Precaución
natural_image
Simple line drawing of a computer monitor with a lamp on top (no text or symbols)Precaución
- RJ45
- COAXIAL.
- Entrada AV.
- LNB IN.
- Antena RF.
- Entrada HDMI3.
- Entrada HDMI2.
- Entrada HDMI1.
- USB 1 & 2 media player:
natural_image
User interface toolbar with five function icons (no text or symbols)IMAGEN
ES
Ajuste de Color
ES
SONIDO
SONIDO
Salida de Audio
Balanced left and right channels.
Recepción
ES
Ajuste de Modo
Escaneo Automático
CANAL
Editar canal
Ajustes avanzados
CANAL
Escaneo manual
Escaneo manual de ATV
ACCESIBILIDAD
Esquema de menú
SISTEMA
Formato de Hora
Temporizador
ES
SISTEMA
Ubicación
Compartir contenido
Nombre del TV
ES
SISTEMA
Subtítulos
Información
USER'S MANUAL LED TV SET

natural_image
Illustration of a laptop computer with a blank screen and glossy surface (no text or symbols)FRANÇAIS
CONTENU
natural_image
Illustration of a computer monitor with a broken screw and lightning bolts, no text or symbols present.Précaution
natural_image
Simple line drawing of a computer monitor with a blue X mark and a hanging paper curtain beside it (no text or symbols)Précaution
natural_image
Illustration of a computer monitor with a 'X' symbol and a hand holding a starburst above it (no text or symbols present)Précaution
natural_image
Simple line drawing of a box with steam rising, no text or symbols presentPrécaution
natural_image
Cartoon illustration of a person holding a computer monitor with an 'X' symbol, surrounded by floating bubbles (no text or symbols present)Précaution
natural_image
Simple line drawing of a computer monitor with an X mark and a lightning bolt, resting on a table (no text or symbols)Précaution
natural_image
Simple line drawing of a computer monitor and a cartoon chef holding a phone (no text or symbols)Précaution
natural_image
Simple line drawing of a computer monitor with a lit screen and pointer, emitting light rays (no text or symbols)Précaution
natural_image
User interface toolbar with five function icons (no text or symbols)IMAGE
Mode image
FR
FR
SON

SON
Sortie audio
Réception
FR
Réglage du mode
CHAÎNE
Modifier la chaîne
Réglages avancés
CHAÎNE
Recherche manuelle
FR
Recherche ATV manuelle
ACCESSIBILITÉ

Schéma de menus
Minuteur
FR
SYSTÈME
Emplacement
Partager du contenu
Nom du téléviseur
Information
flowchart
graph TD
    A["Red Block"] --> C["Bottom"]
    B["Green Block"] --> C["Bottom"]
    D["Blue Block"] --> C["Bottom"]
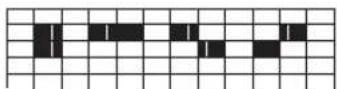
Pixel noir
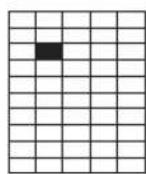

Sous-pixels
Deux pixels brillants adjacents
Deux pixels noirs adjacents
USER'S MANUAL LED TV SET

natural_image
Illustration of a laptop computer with a blank screen and glossy surface (no text or symbols)ENGLISH
CONTENS
- Warning....64
- Important Safety Information 65
- Safety Precautions....66
- Remote Control 67
• TV Terminal Connections 68
• Home 68 - Input....69
- Setting 69
• Picture....70 - Sound....73
- Network....75
- Channel....76
- Accessibility....80
- System 81
WARNING

CAUTION
RISK OF ELECTRIC SHOCK, DO NOT OPEN

CAUTION: TO AVOID THE RISK OF ELECTRIC SHOCK.
DO NOT REMOVE COVER (OR BACK).
NO USER- SERVICEABLE PARTS INSIDE.
REFER SERVICING TO QUALIFIED SERVICE PERSONNEL.

This symbol is intended to alert the user to avoid the risk of electric shock, do not disassemble this equipment by anyone except a qualified service personnel.

This symbol is intended to alert the user to the presence of important operating and maintenance instructions in the literature accompanying the equipment.

This equipment is a Class II or double insulated electrical appliance. It has been designed in such a way that it does not require a safety connection to electrical earth.
IMPORTANT SAFETY INFORMATION
- Read these instructions.
- Keep these instructions.
- Heed all warnings.
- Follow all instructions.
- Do not use near water.
- Clear only with dry cloth.
- Do not block any ventilation openings. Install in accordance with the manufacturer's instructions.
- Do not install near any heat sources such as radiators, heat registers, stoves, or other apparatus (including amplifiers) that produce heat.
- Do not defeat the safety purpose of the polarized or grounding-type plug. A polarized plug has two blades with one wider than the other. A grounding type plug has two blades and a third grounding prong. The wide blade or the third prong are provided for your safety. If the provided plug does not fit into your outlet, consult an electrician for replacement of the obsolete outlet.
- Protect the power cord from being walked on or pinched particularly at plugs, convenience receptacles, and the point where they exit from the apparatus.
- Only use attachments/ accessories specified by the manufacturer.
- Use only with the cart, stand, tripod, bracket, or table specified by the manufacturer, or sold with the apparatus. When a cart is used, use caution when moving the cart/ apparatus combination to avoid injury from tip-over.
- Unplug this apparatus during lightning storms or when unused for long periods of time.
- Refer all servicing to qualified service personnel. Servicing is required when the apparatus has been damaged in any way, such as power supply cord or plug is damaged, liquid has been spilled or objects have fallen into the apparatus, the apparatus has been exposed to rain or moisture, does not operate normally, or has been dropped.
- Apparatus shall not be exposed to dripping or splashing and that no objects filled with liquids, such as vases, shall be placed on the apparatus.
- WARNING: To reduce the risk of fire or electric shock, do not expose this apparatus to rain or moisture.
- Mains plug or appliance coupler is used as the disconnect device, shall be readily operable.
- The apparatus shall be connected to a MAINS socket outlet with a protective earthing connection.
- WARNING: The batteries shall not be exposed to excessive heat such as sunshine, fire or the like.
- The ON-MODE Power under Home Mode should be less than 35W.
- The Sleep Mode power should be less than 0.49W.
- This equipment is a Class II or double insulated electrical appliance. It has been designed in such a way that it does not require a safety connection to electrical earth.

HIGH-DEFINITION MULTIMEDIA INTERFACE
"HDMI, the HDMI logo and High-Definition Multimedia Interface are trademarks or registered trademarks of HDMI Licensing LLC."
Thank you for buying this TV! Please read this manual thoroughly before operating the TV. Make sure the TV was not damaged in transit. Should the TV be damaged, do not install it and contact your dealer. Check that you have all the accessories according to the model.
SAFETY PRECAUTIONS
natural_image
Illustration of a computer monitor with a crossed-out screwdriver and lightning bolts (no text or symbols)Caution
High voltages are used in the operation of this product. Do not open the product's casing. Refer servicing to qualified service personnel.
natural_image
Simple line drawing of a computer monitor with a blue X mark and a hanging ribbon, no text or symbols present.Caution
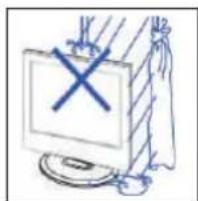
To prevent fire or electrical shock hazard, do not expose the main unit to rain or moisture, do not place objects filled with liquids, such as vases, on the apparatus.
natural_image
Illustration of a computer monitor with a 'X' symbol and a flower emerging from it (no text or symbols present)Caution
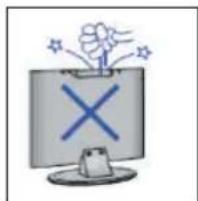
Do not drop or push objects into the television cabinet slots or openings. Never spill any kind of liquid on the television receiver.
natural_image
Simple line drawing of a computer monitor with a 'X' mark on the screen and smoke rising (no text or symbols)Caution
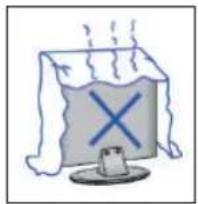
Avoid exposing the main unit to direct sunlight and other sources of heat. Do not stand the television receiver directly on other producis which give off heat. E. g. video cassette players, Audio amplifiers. Do not block the ventilation boles in the back cover. Ventilation is essential to prevent failure of electrical component!. Do not squash power supply cord under the main unit or other heavy objects.
natural_image
Illustration of a person holding a computer monitor with a 'X' symbol, surrounded by floating bubbles (no text or symbols on the monitor)Caution
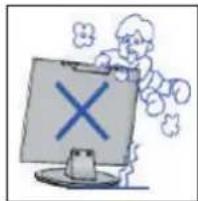
Never stand on, lean on, push suddenly the product or its stand. You should Pay special attention to children.

natural_image
Illustration of a computer monitor with a blue X mark and a lightning bolt, resting on a table (no text or symbols)Caution
Do not place the main unit on an unstable cart stand, shelf or table. Serious injury to an individual, and damage to the television, may result if it should fall.

natural_image
Simple line drawing of a computer monitor and a cartoon character holding a phone (no text or symbols)Caution
When the product is not used for an extended period of time, it is advisable to disconnect the AC power cord from the AC outlet.
natural_image
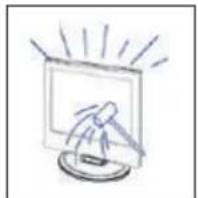
Simple line drawing of a computer monitor with rays indicating light (no text or symbols)Caution
The LED panel used in this product is made of glass. Therefore, it can break when the product is dropped or applied with impact. Be careful not to be injured by broken glass pieces in case the LED panel breaks.
REMOTE CONTROL

: Power on/off button, press once to turn the TV on and press again to turn the TV off.
INPUT: Press to change signal source.
0-9: Select and switch to a channel using 0 - 9.
GUIDE: Launches the EPG (Electronic Program Guide)
CH.LIST: Display program list.
COLOR BUTTONS (RED, GREEN, YELLOW, BLUE):
Execute corresponding function at that time.
: Displays the main TV menu.
▶: Press to start playing/pause playing the MEDIA. (In USB models)
OK : Enter the selected option or execute the selected operation.
5: Switch back and front between the current and previous channels.
EXIT: Exit the main TV menu.
VOL-/VOL+: Adjust the volume.
CH /CH : Change the channel up and down.
: This button takes you to the HOME screen.
: Press this button to mute or restore sound.
TXT: Press to enter the Teletext mode.
SUBTITLE: Open or close subtitle.
INFO: Display the present screen information such as the current channel and input source.
FREE: Press to enter VIDA Free APP.
: Press to EDIT shortcut keys.
DEEZER: Press to enter deezer APP
NETFLIX: Press to enter Netflix APP.
PRIME VIDEO: Press to enter prime video APP.
YOUTUBE: Press to enter YouTube APP.
PLEX: Press to enter PLEX APP.
BROWSER: Press to enter Browser APP.
You may have either Disney or MEDIA on the remote controller.
Disney+: Press to enter the Disney+ APP.
MEDIA: USB multimedia player, to play from a USB memory.
TV TERMINAL CONNECTIONS
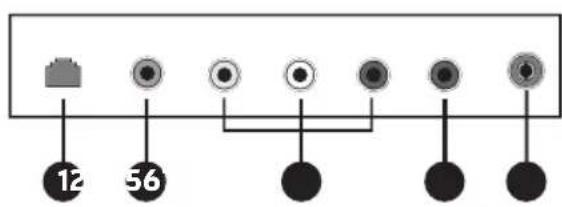
- RJ45
- COAXIAL output terminal.
- AV input terminal.
- LNB IN.
- RF antenna.
- HDMI3 input terminal.
- HDMI2 input terminal.
- HDMI1 input terminal.
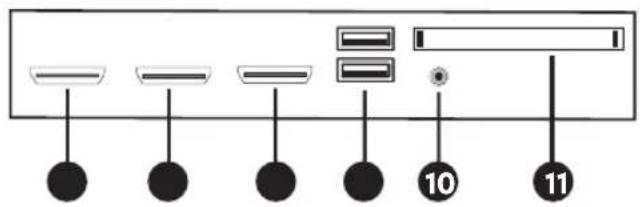
- USB 1 & 2 media player: connect the USB device, such as flash disk to access media function of TV.
- Earphone terminal.
- Cl slot.
HOME
When finish First Time setup, you can enter HOME screen.

Press


button to select.

natural_image
User interface toolbar with five function icons (no text or symbols)
Inputs: Icon to select an input source.

Setting: Various settings can be configured here.

Notifications

VIDAA account
INPUT
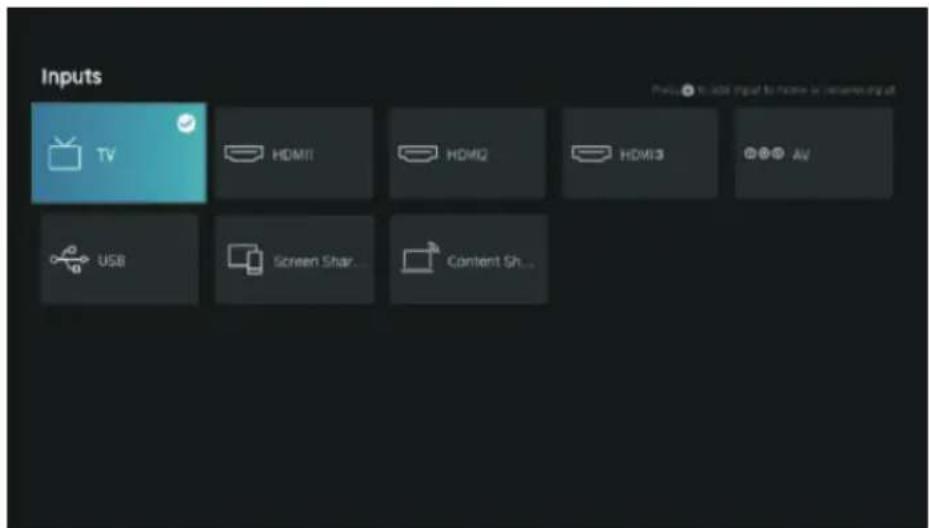
Press ▼ / ▲ button to select Inputs menu.
Press ▼ / ▲ / ◀ ▶ button to select.
Press OK to select input.
SETTING
PICTURE
- Press ▼ PICTURE men select the option that you want to adjust in the
- Press OK button to adjust.
- After finishing your adjustment, press BACK button to save and return to the previous menu.
Picture Mode
Press ▼ Piktura Mode, Silentpress OK
button to select.
(Optional: Standard/Cinema day/Cinema night/Dynamic/Sports).
Standard The default mode, to make users experience high-quality images under normal light.
Cinema day Enhance the contrast, color and clarity of the screen to make the color more vivid.
Cinema night Reduce the screen contrast, color and clarity to make the screen looks soft.
Dynamic Enhance the contrast, color and clarity of the screen, so that the picture in the dynamic will balance the color.
Sports This mode is more suitable for watching sport video.
Aspect Ratio
Adjust the Aspect Ratio to stretch or zoom in on your picture.
Press ▼ / ▲ button to select Aspect Ratio.
Press ▼ / ▲ button to select Automatic/16:9/4:3/Panoramic/Movie Zoom/Direct.
Game Mode
Press ▼ /▲ to select, and press ◀ ▶ to select On/Off.
Picture Mode Settings
Press ▼ to select, and press to enter.
PICTURE
E
Apply Picture Settings
In this menu, you can adjust current picture mode to apply to all sources or just current source.
Press ▼ / ▲o select, and press ▶OK to enter.
(Optional: All Sources/Current Source)
Backlight/Brightness/Contrast/Colour Saturation/Sharpness
Press ▼ /▲toadjustt, and press ◀ ▶
Backlight Adjust image backlight. (Optional:Off/On)
Brightness Adjust image brightness.
Contrast Adjust image contrast.
Colour Saturation Adjust image color density.
Sharpness Adjust the image edge sharpness.
Adaptive Contrast
In this menu, you can automatically darken dark areas and lighten light areas of images to see more details. Press ▼ / ▲ to select Adaptive Contrast. press ◀ ▶ to select Off/Low/Medium/High.
Noise Reduction
Set up options to eliminate the image noise intensity.
Press ▼ / ▲ button to select Noise Reduction.
Press ◀/▶ button to select Off/Low/Medium/High.
MPEG Noise Reduction
Set up options to eliminate the MPEG noise intensity.
Press ▼ / ▲ button to select Noise Reduction.
Press ◀/▶ button to select Off/Low/Medium/High.
Color Temperature
Adjust the overall color of the image.
Press ▼ / ▲ button to select Color Temperature.
Press ◀/▶ button to select Warm1/Warm2/Standard/Cool.
Expert Settings
Adjust the color space and Gamma to best suit the content you're viewing.
Press ▼ / ▲ button to select Expert Settings. Press ◀ ▶ button to enter sub-menu.
PICTURE
Colour Tuner
Adjust the Hue, saturation and Brightness of color settings.
Press ▼ / ▲ button to select Colour Tuner.
Press OK /▶ button to enter sub-menu and adjust.
White Balance
Adjust the intensity of red, green and bule lights to view the true colors of all images in the picture.
Press ▼ / ▲ button to select White Balance.
Press OK /▶ button to enter and adjust.
Black Level (Only available on HDMI source)
In this menu, you can adjust the HDMI signal range to be more suitable for content.
Press ▼ / ▲ to select Black Level. Press ◀ ▶
Gamma Adjustment
Press ▼ to select Gamma Adjustment. Press / to select 1.8/2.0/2.2/2.4/2.6.
Gamma Calibration
In this menu, you can adjust the Gamma curve which one you selected.
Press ▼ / ▲ to select Gamma Calibration.
Press OK /▶ button to enter sub-menu to adjust.
RGB Only Mode
Press ▼ / ▲ to select RGB Only Mode. Press ◀ ▶ to select Off/Red/Green/Blue.
Overscan
Press ▼ ON button to select Overscan. Press button to select On/Off.
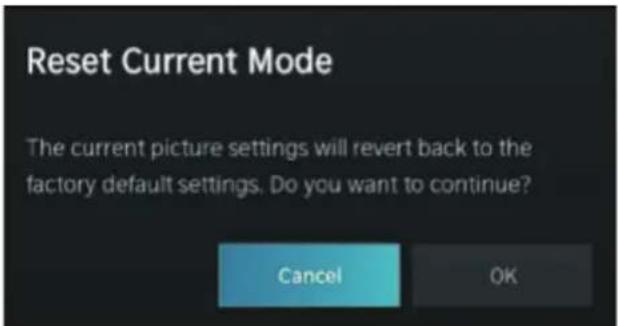
Reset Current Mode
Press ▼ OK/button to select Reset Current Mode. Press ▶ button to enter sub-menu.
PICTURE
SOUND

- Press ▼ SOUND theme, select the option that you want to adjust in the
- Press Enter button to adjust.
- After finishing your adjustment, press BACK button to save and return to the previous menu.
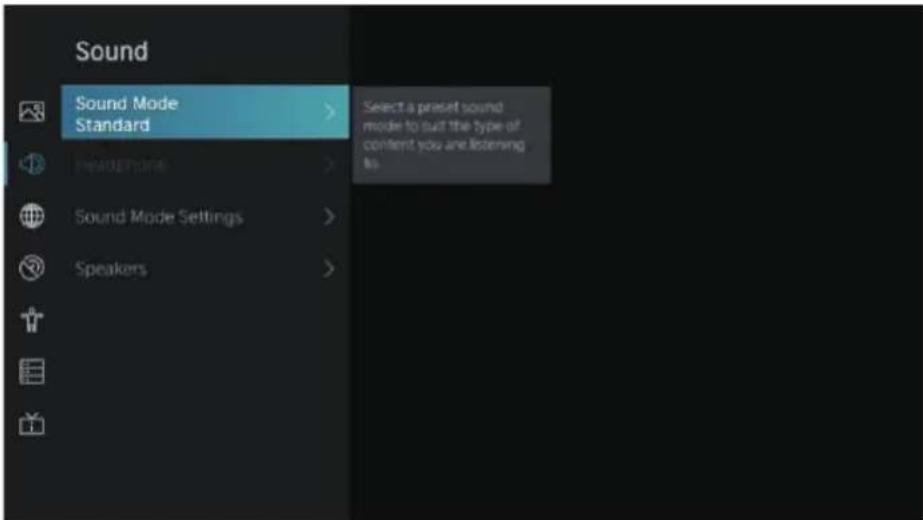
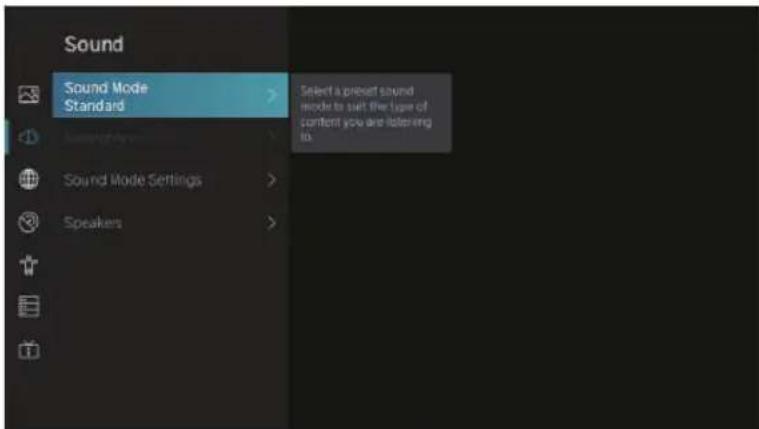
Sound Mode
Press ▼ ▲ button to select your favorite Sound Mode.
(Optional: Standard/Theatre/Music/Speech/Late Night/Sports.)
Standard Produces a balanced sound in all environments.
Theatre Theatre mode increases the surround sound effect and provides a more prominent subwofer response.
Music Preserves the original sound. Good for musical programs.
Speech Low and high frequencies are attenuated to improve the reproduction and clarity of the human voice.
Late Night Improve the reproduction and clarity of the human voice with a low volume level.
Sports Optimized sound for watching football game.
Headphone
Press ▼ button to select Headphone. It only available on headphone is inserted. It can set the sound output mode through headphones.
SOUND
Sound Mode Settings
Press ▼ OK/button to select Sound Mode Settings. Press
▶ button to enter sub-menu.

Apply Audio Settings
Adjust the Current sound mode to apply to all source or just current source.
Press ▼ / ▲ button to select, then press ▶ button to select Current Source/All Sources.
Equalizer
Press ▼ /▲to adjust Equalize details ◀ ▶
(Optional: 100Hz/500Hz/1.5KHz/5KHz/10KHz)
Bass Boost / Surround Sound / Dialog Clarity / TruVolume / Wall Mount Setup / Auto Volume Control
Press ▼ OK button to select, and press button to select On/Off.
Reset Current Mode
Press ▼ /▲ button to select, and press ◀ ▶ button to choose restore or not.
Speakers
Press ▼ OK/button to select Speakers. Press ▶ button to enter sub-menu.

SOUND
Audio Output
Press ▼ /▲ button to select Audio Output and enter, then press ▼ ▲ button to select ARC/TV Speaker/SPDIF Only.
Digital Audio Output
Press ▼ /▲ button to select Digital Audio Out, then press ▼ ▲ button to select.
Digital Audio Delay
Press ▼ /▲ button to select Digital Audio Delay, then press ▼ ▲ button to adjust.
Lip Sync
Press ▼ / ▲ button to select, then press ◀ ▶ button to adjust.
Balance
Balanced left and right channels.
Press ▼ / ▲ button to select Balance. Press ◀ ▶ button to adjust.
NETWORK
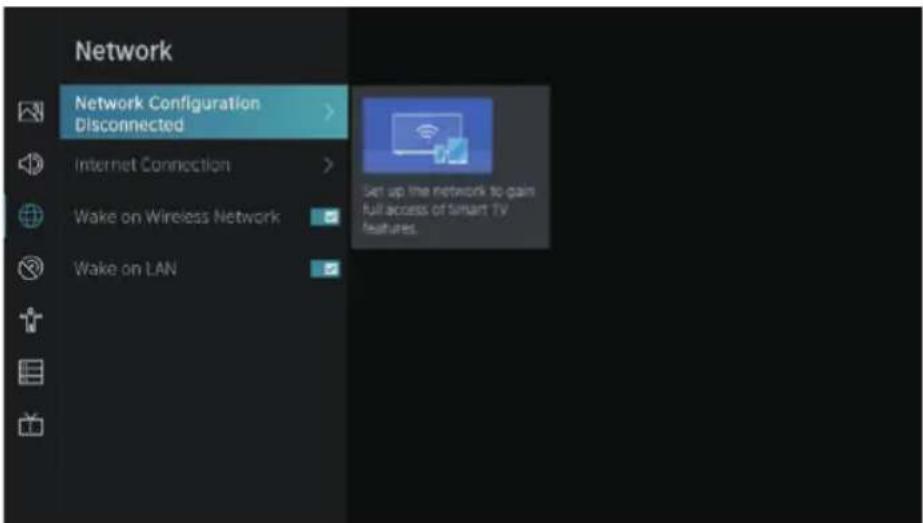
Press ▼ / ▲ button to select: Network Configuration/Internet Connection/ Wake on Wireless Network/Wake on LAN.
Network Cofiguration
Press ▼ ▲ button to select Network Configuration to set up the network.
Internet Connection
Press ▼ ▲ button to select Internet Connection to check Internet Connection.
Wake on Wireless Network
Press ▼ OK button to select Wake on Wireless Network, then press button to selece On/Off.
Wake on LAN
Press ▼ OK button to select Wake on LAN. Press button to select On/Off.
CHANNEL
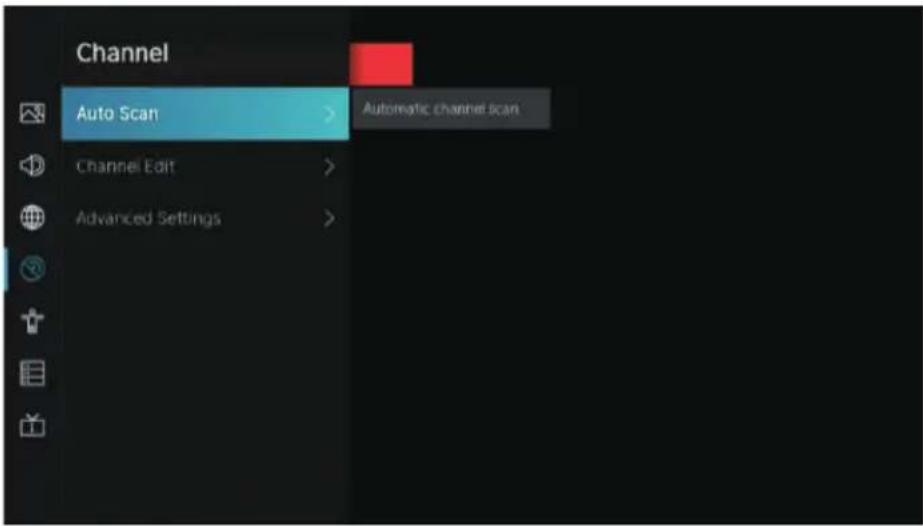
- Press ▼ Channel menu select the option that you want to adjust in the
- Press Enter button to adjust.
- After finishing your adjustment, press BACK button to save and return to the previous menu.
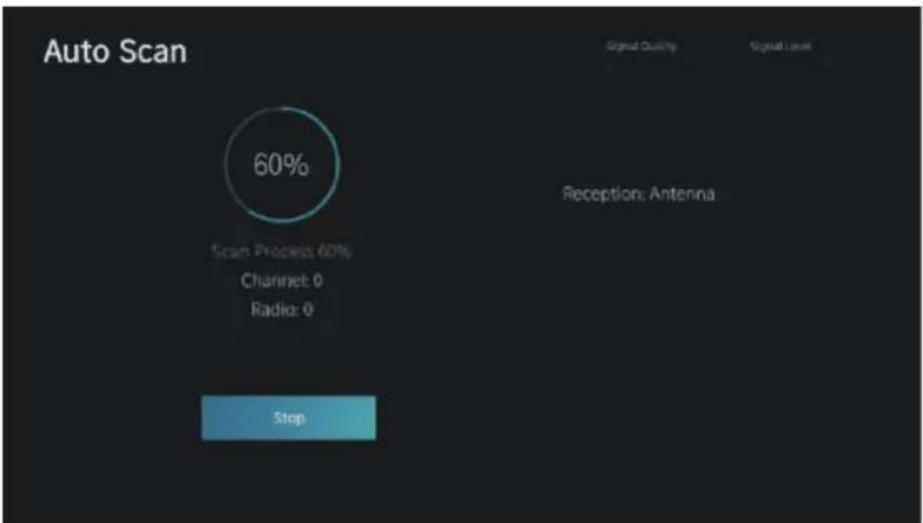
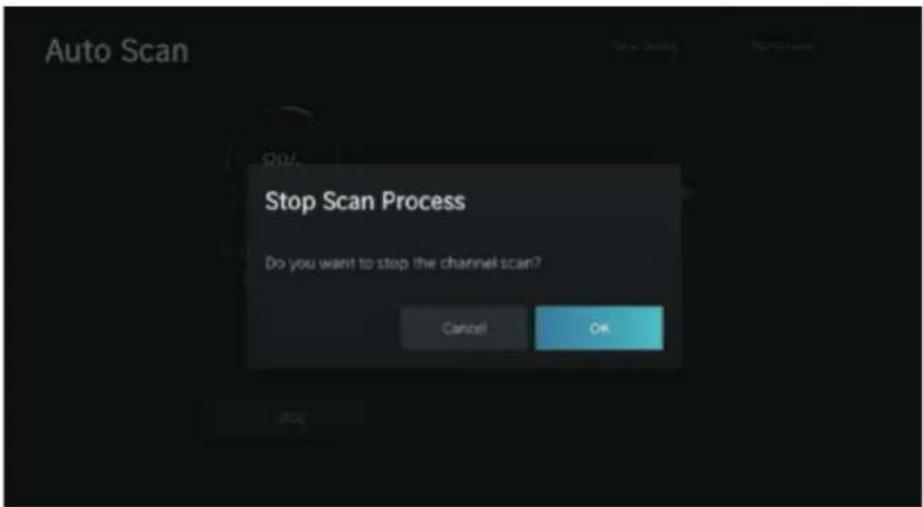
Auto Scan
Automatic search can search for effective program channel automatically.
Press ▼ / ▲Kutton to select Auto Scan, then press button to setup.
Rescan
In this page, you can choose rescan channel or change setup.
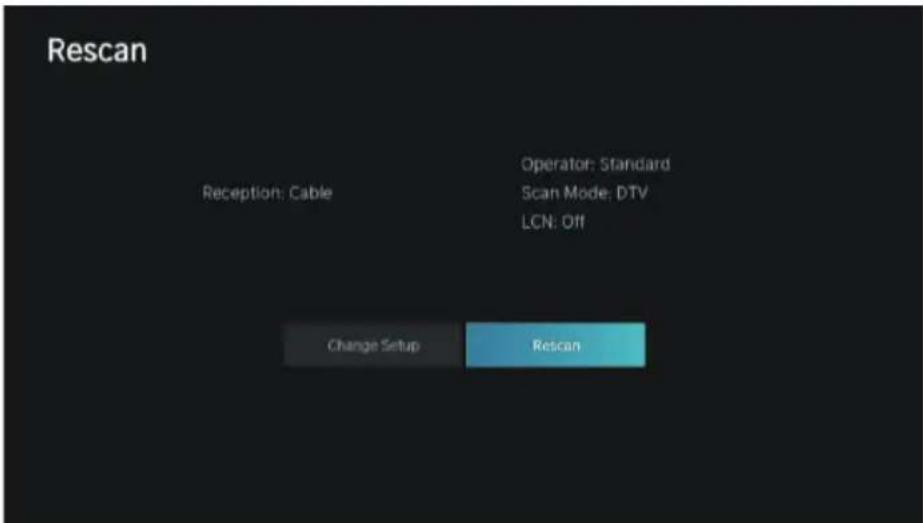
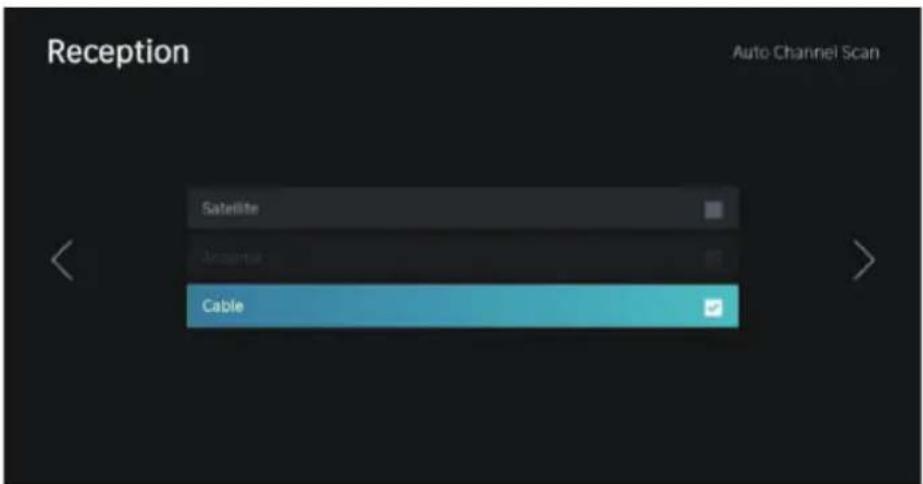
Reception
Press ◀ button to select Reception, and press ▼ ▲ button to select Antenna/Cable.
CHANNEL
Z
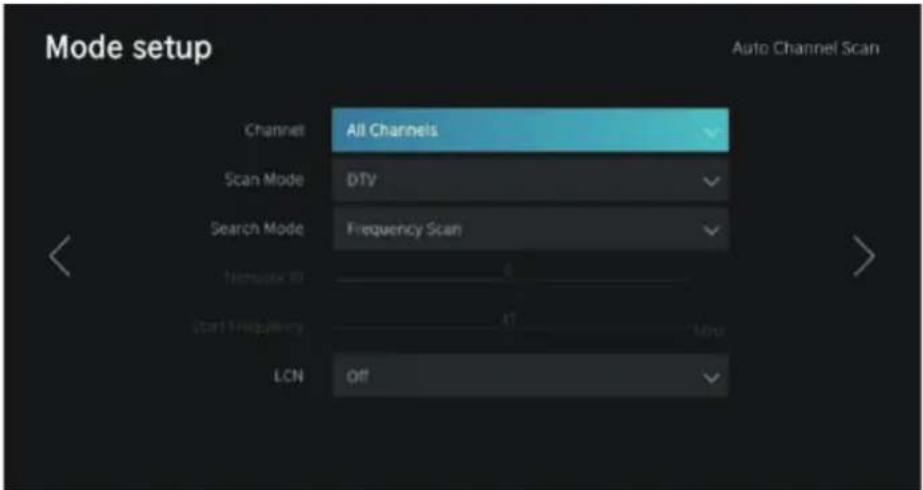
Mode setup
Press ◀ button to select Mode setup, and press ▼ ▲ button to select Channel/Scan Mode/LCN.
Auto Scan

CHANNEL
If you want to stop searching, press Stop or Exitbutton to stop searching.
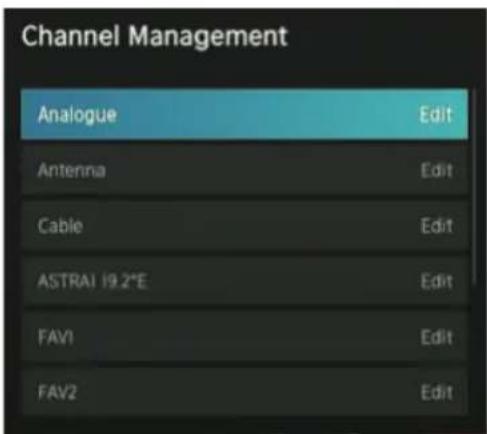
Channel Edit
Press ▼ ▲ button to select Channel Edit.
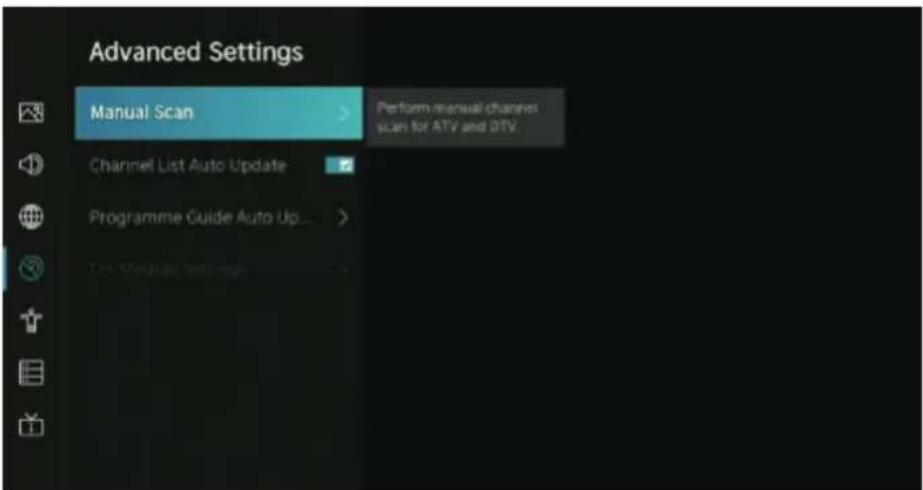
Advanced Settings
Press ▼ OK button to select Advanced Settings, then press ▶ button to enter.
CHANNEL
Manual Scan
Press ▼ OK button to select Manual Scan, then press button to enter.
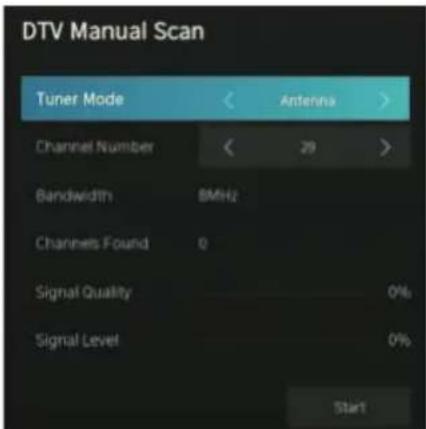
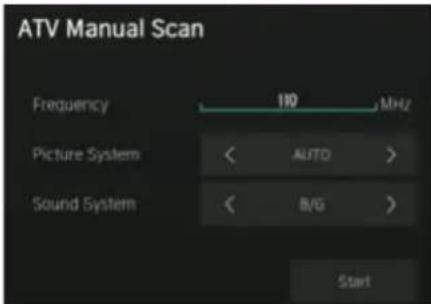
Press ▼ / ▲ button to select DTV Manual Scan/ATV Manual Scan.
DTV Manual Scan
Press ▼ Enter button to select DTV Manual Scan, then press button to enter.
Z
ATV Manual Scan
Press ▼ Enter button to select ATV Manual Scan, then press button to enter.
Channel List Auto-Update
Press ▼ OK button to select Channel List Auto-Update, then press button to select On/Off.
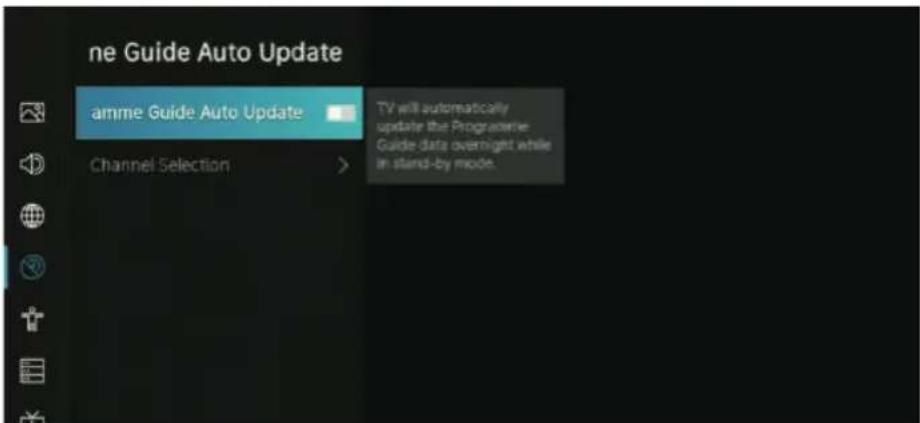
Programme Guide Auto Update
Press ▼ ▲ button to select Programme Auto Update.
CHANNEL
Programme Auto Update
Press ▼ OK button to select Channel List Auto-Update, then press button to select On/Off.
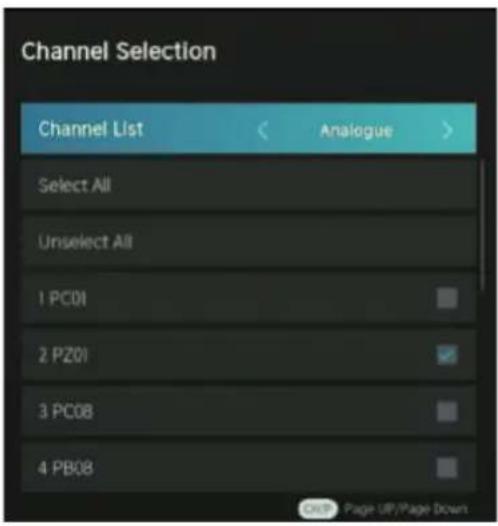
Channel Selection
Press ▼ ▲ button to select Channel Selection.
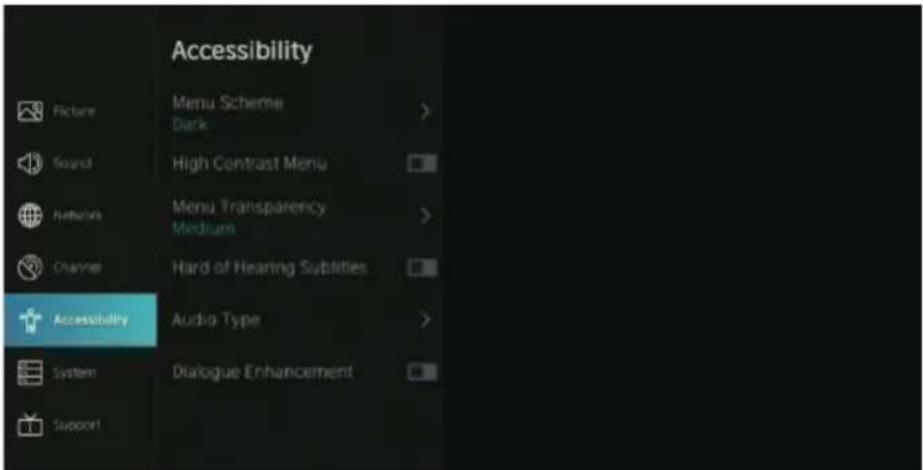
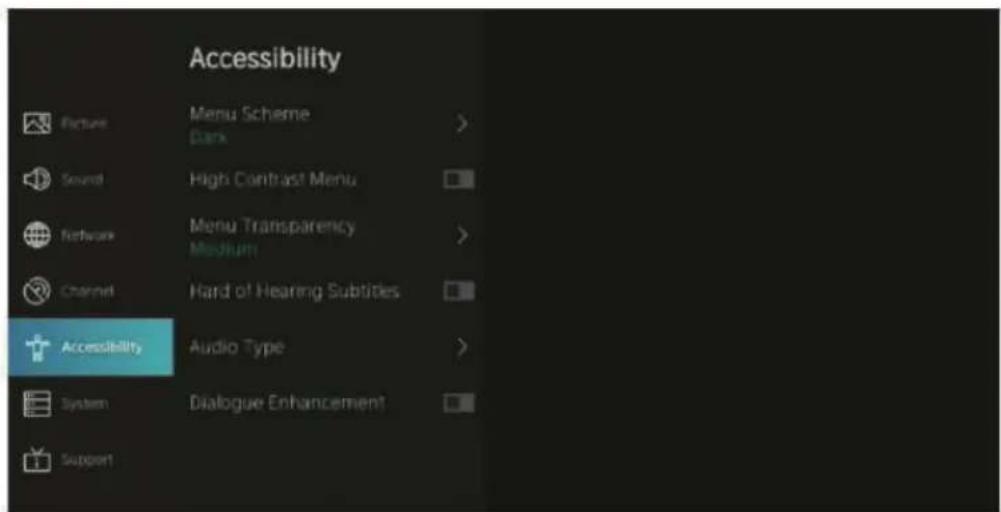
ACCESSIBILITY
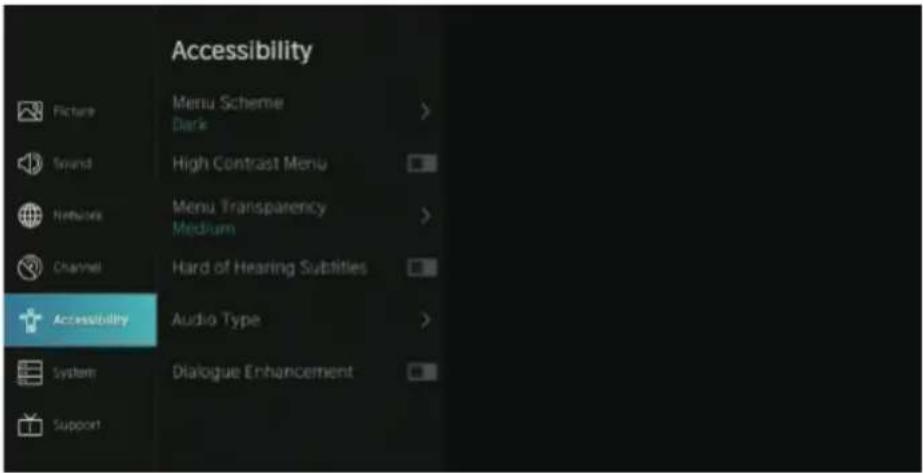
Menu Scheme
Press ▼ OK/button to select Menu Scheme, then press ▶ button to choose Dark/Light.
High Contrast Menu
Press ▼ OK button to select High Contrast Menu, then press button to select On/Off.
Menu Transparency
Press ▼ Off/button to select Menu Transparency, then press ▶ button to choose Off/Medium/High.
ACCESSIBILITY
Hard of Hearing Subtitles
Press ▼ OK button to select Hard of Hearing Subtitles, then press button to select On/Off.
Audio Type
Press ▼ OK/button to select Audio Type, then press Enter button to enter sub-menu. Then press
▶ button to select Normal / Audio Description / Spoken Subtitles / All Supplementary Audio.
Voiceover Volume
Press ▼ OK/button to select Voiceover Volume, then press ▶ button to select On/Off.
- Press ▼ / ▲ system to enter select the option that you want to adjust in the
- Press Enter button to adjust.
- After finishing your adjustment, press BACK button to save and return to the previous menu.
Time
Press ▼ ▲ button to select Time.
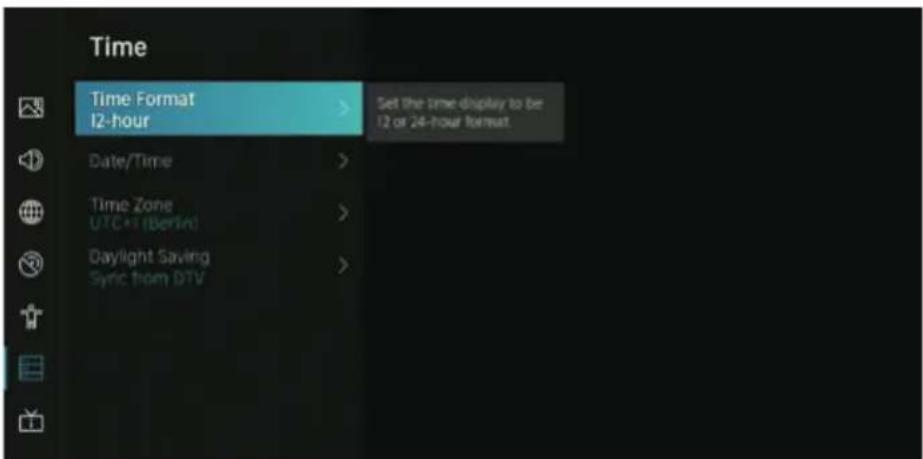
SYSTEM
Time Format
Press ▼ ▲ button to select Time Format. (Optional: 12-hour/24-hour)
Date/Time
Set the Date and Time
Press ▼ / ▲Kouttorsetuplect, then press ▶
Time Zone
Select your time zone
Press ▼ / ▲Koytttenerkter ksub-Timeau torsettopen press
Daylight Savings
Press ▼ ▲ button to select Daylight Savings. (Optional: Off/On/Sync from DTV)
TIMER SETTINGS
Press ▼ ▲ button to select Timer Settings.
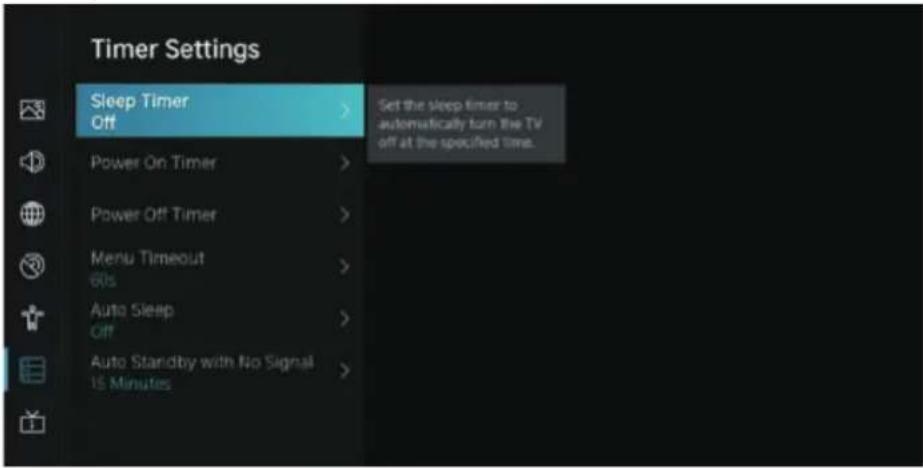
Sleep Timer
Press ▼ ▲ button to select Sleep Timer. (Optional: Off/15/30/60/90/120 Minutes/User Defined)
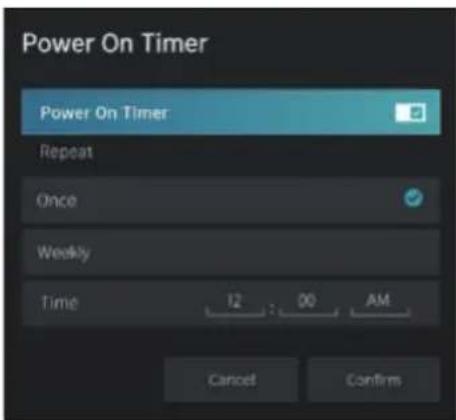
Power On Timer
Press ▼ ▲ button to select Power On Timer.
SYSTEM
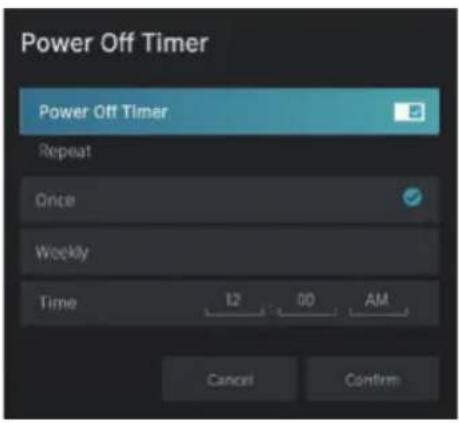
Power Off Timer
Press ▼ ▲ button to select Power Off Timer.
Z
Menu Timeout
Press ▼ ▲ button to select Menu Timeout. (Optional: Off/10s/20s/30s/60s/5 min)
Auto Sleep
Press ▼ ▲ button to select Auto Sleep. (Optional: Off/3H/4H)
Auto Standby with No Signal
Press ▼ ▲ button to select Auto Standby with No Signal. (Optional:Off/15 Minutes)
System PIN
Press ▼ button to select System PIN. Change your PIN that you use to access Parental Controls, Auto Channel Scan and Reset To Factory Defaults.
Parental Control
Press ▼ ▲ button to select Parental Control.
Turn on Parental Controls to block children from being able to view certain programmes.
LANGUAGE AND LOCATION
Press ▼ ▲ button to select Language and Location.
Turn on Parental Controls to block children from being able to view certain programmes.
SYSTEM
Location
Press ▼ OK/buto select,select Location, and press ▶
Menu Language
Press ▼ OK/butselectselect Menu Language, and press
Primary Audio
Press ▼ OK/buto select. Select Primary Audio, and press
Secondary Audio
Press ▼ OK/uto select Select Secondary Audio, and press
Primary Subtitle
Press ▼ Off/put to select. Select Primary Subtitle, and press
Secondary Subtitle
Press ▼ OK/buto select. Select Secondary Subtitle, and press
Digital Teletext
Press ▼ ▲ button to select Digital Teletext.
(Optional: WEST EUR / EAST EUR / Russian / Aarabic / Persian / Greek)
APPLICATION SETTINGS
Press ▼ ▲ button to select Application Settings.
Content Sharing
Press ▼ OK button to select Content Sharing, then press button to select On/Off.
Hbb TV
Press ▼ OK button to select Hbb TV, then press button to select On/Off.
Clear Cache
Press ▼ OK/button to select Clear Cache, then press ▶ button to enter sub-menu.
Delete Cookie
Press ▼ OK/button to select Delete Cookies, then press ▶ button to enter sub-menu.
SYSTEM
Do Not Track
Press ▼ OK/button to select Do Not Track, then press ▶ button to enter sub-menu
Prime Video
Press ▼ OK/uto select Select Prime Video, and press
Netflix
Press ▼ OK/buto select select Netflix, and press
HDMI&CEC
Press ▼ OK button to select HDMI&CEC, then press button to enter sub-menu to select.
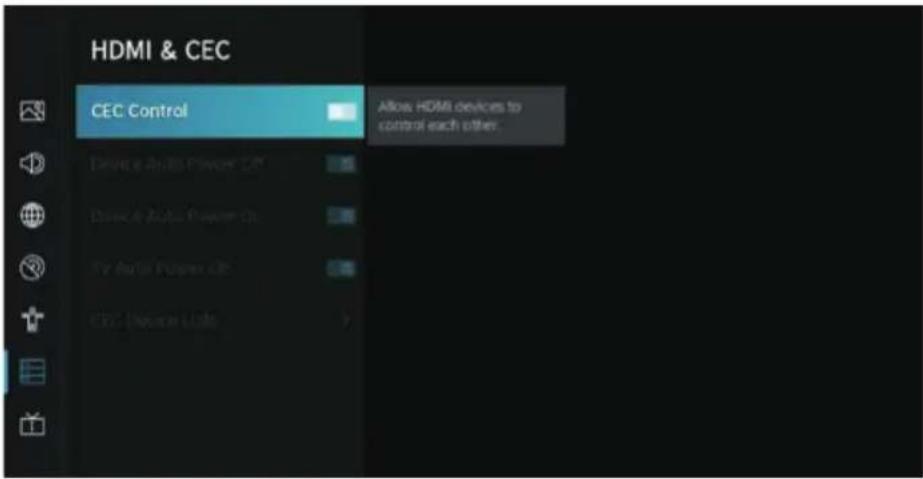
Press ▼ ▲ button to select CEC Control/Device Auto Power Off/Device Auto Power On/ TV Auto Power On/CEC Device Lists.
Note: All the Options are available only when the CEC Control select On.
CEC Control
Press ▼ OK button to select CEC Control, and press button to select On/Off. The following terms are available only when "On" is selected in CEC Control.
Device Auto Power Off
Press ▼ OK button to select Device Power Off, and press to select On/Off.
Device Auto Power On
Press ▼ OK button to select DeviceAuto Power On, and press button to select On/Off.
Tv Auto Power On
Press ▼ OK button to select TV Auto Power On, and press button to select On/Off.
CEC Device Lists
Press ▼ OK button to select CEC Device Lists, and press button to enter.
Usage Mode
Press ▼ OK/button to select Usage Mode, then press ▶ button to select Home Mode/Store Mode.
SYSTEM
ADVANCED SETTINGS
Press ▼ OK/button to select Advanced Settings, then press
▶ button to enter
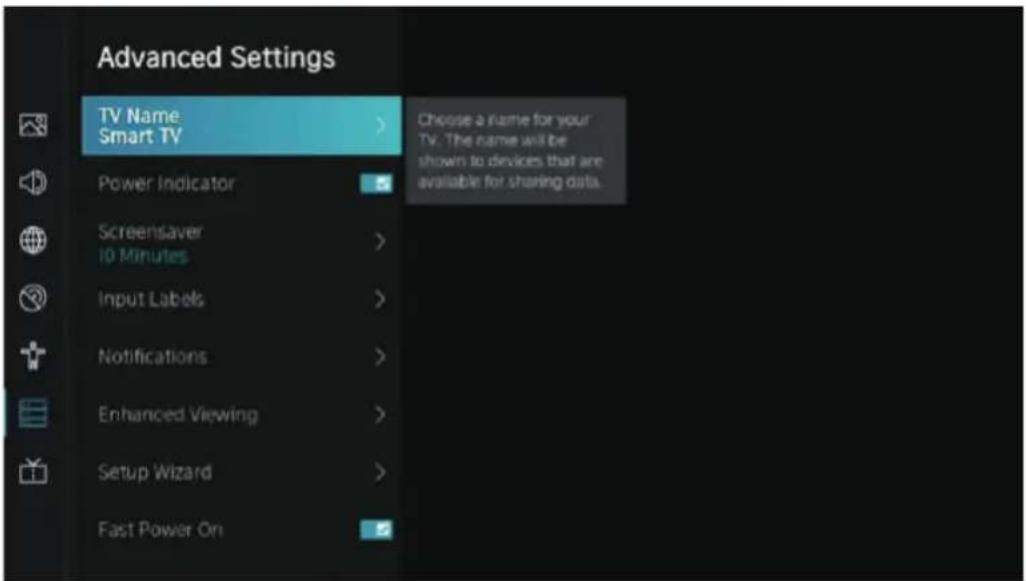
TV Name
Press ▼ OK/button to select TV Name, then press
▶ button to setup your TV name.
Screen saver
Press ▼ OK/button to select Screen saver, then press (Optional: None/5 Minutes/10 Minutes/20 Minutes)
▶ button to enter.
Input Labels
Press ▼ OK/button to select Input Labels, then press (Optional: TV/AV/HDMI1/HDMI2/HDMI3)
▶ button to enter.
Notifications
Press ▼ OK/button to select Notifications, then press
▶ button to enter sub-menu and select.
Enhanced Viewing
Press ▼ OK/button to select Enhanced Viewing, then press select.
▶ button to enter sub-menu and
Setup Wizard
Press ▼ OK button to select Setup Wizard, then press
▶ button to select.
Fast Power On
Press ▼ OK button to select Fast Power On, then press
button to select On/Off.
Power On Mode
Press ▼ On button to select Power On Mode, then press
▶ button to select.
SYSTEM
SUPPORT
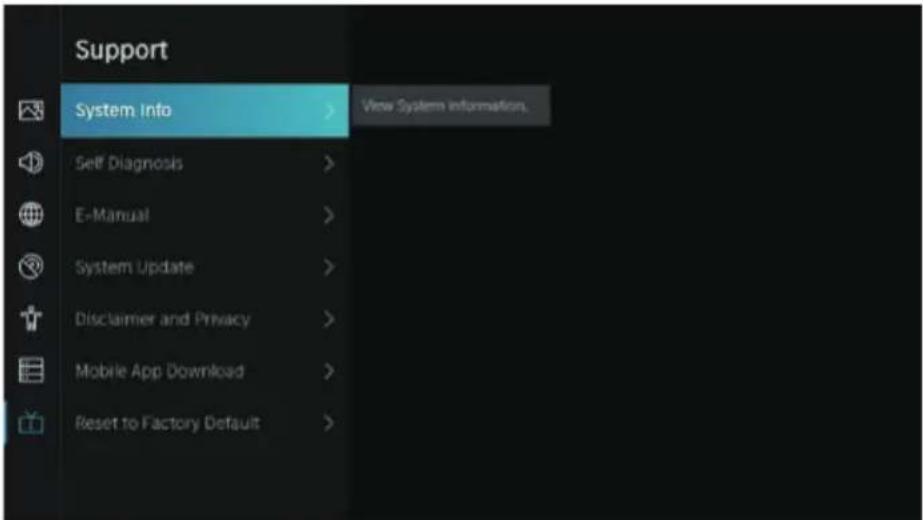
System Info
View System information
Press ▼ / ▲Kbutton to select System Info, then press
▶ button to enter sub-menu.
Self Diagnosis
Perform self diagnosis to test sound, picture and connections.
Press ▼ / ▲Kutton to select Self Diagnosis, then press
▶ button to enter sub-menu.
E-Manual
Press ▼ OK/button to select E-Manual, then press
▶ button to enter sub-menu.
System Update
Set your TV to receive the latest firmware.
Press ▼ / ▲Kutton to select System Update, then press
▶ button to enter sub-menu.
Disclaimer and Privacy
Click to read the Disclaimer details.
Press ▼ / 🔊 Kutton to select Disclaimer and Privacy, then press
▶ button to enter sub-menu.
Mobile App Download
Press ▼ OK/button to select Mobile App Download, then press
▶ button to enter sub-menu.
Press ▼ OK按钮 to select Restore To Factory Default, then press and select.
▶ button to enter sub-menu
Press MENU button to wakeup Menu, then press ▼ / ▲ button to select.
SYSTEM
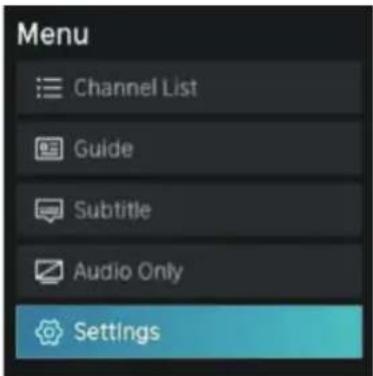
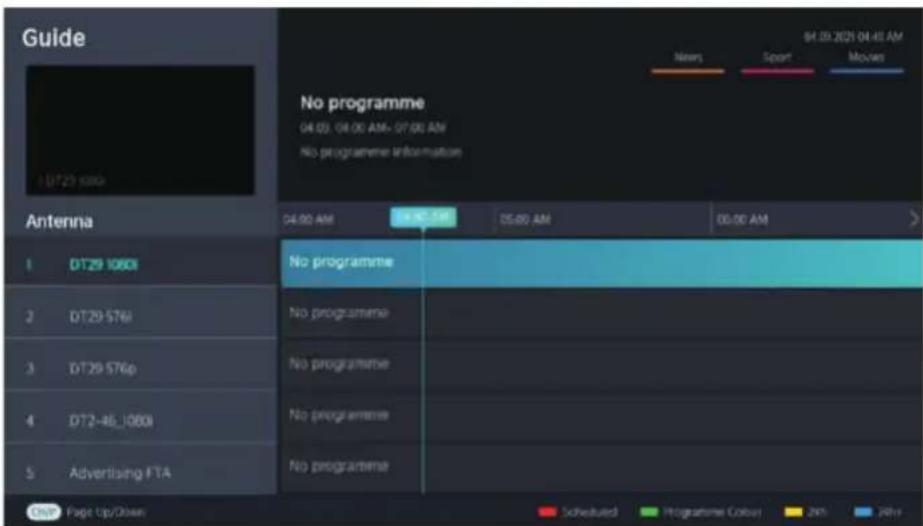
Channel List
Press ▼ OK button to select Channel List, then press button to enter sub-menu.

Guide
Press ▼ OK button to select Guide, then press button to enter sub-menu.
SYSTEM
Subtitle
Press ▼ /▲ button to select Subtitle, then press ▼ ▲ button to select Off/On.
Audio Only
Press ▼ OK button to select Audio Only. Press button enter the sub-menu.
Settings
Press ▼ OK button to select Settings. Press button enter the sub-menu. Please refer to the home page--Setting part.
MEDIA
Press ▼ /▲/ MEDIA button to select Media on the Home page or press button on the remote, and press OK button to enter the Media Center.
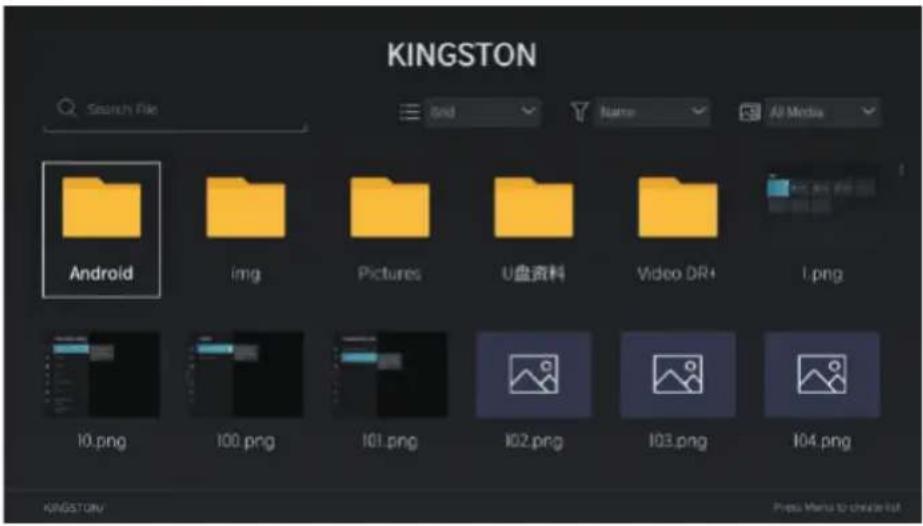
Video
Press ▼ /▲/button to select Video or All, and press ▼ ▲ ◀ button to select Movies. Press Menu button to display the setting options on the left side.

SYSTEM
Zoom Mode
Press ▼ OK button to select Zoom Mode, and press button to select.
(Optional: Fit/Full/Original Size)
Rotate
Press ▼ OK button to select Rotate, and press button to select. (Options: Right 90°/Left 90°)
Audio Only
Press ▼ OK button to select Audio Only, and press button to select.
Repeat Mode
Press ▼ OK button to select Repeat Mode, and press button to select.
(Optional: No Repeat / Repeat Current / Repeat All)
Playback start position
Press ▼ OK button to select Playback start position, and press button to select.
Information
Press ▼ OK button to select Information, and press button to view.
Play List
Press ▼ OK button to select Play List, and press button to display all available videos.
Audio Only
Press ▼ OK button to select Audio Only, and press button to select.
Audio
Press ▼ /▲/button to select Audio or All, and press ▼ ▲ ◀ button to select Music.
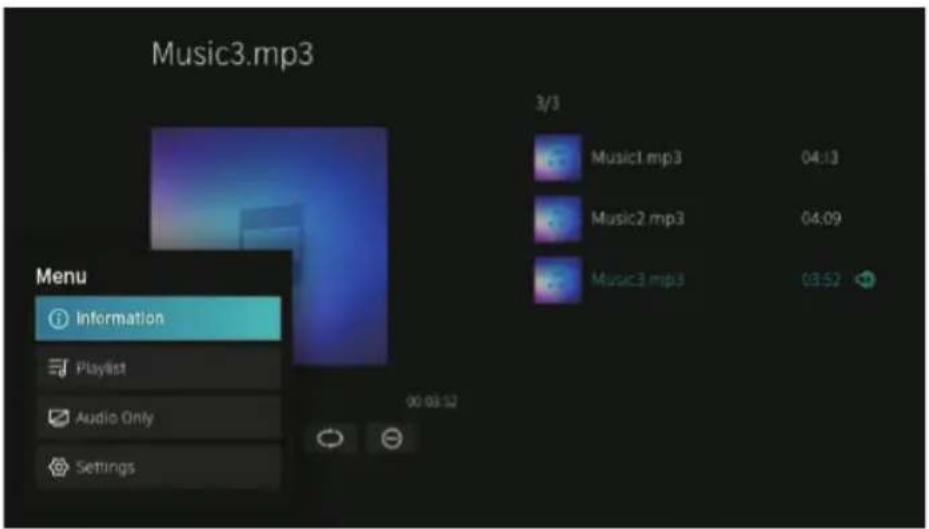
Information
Press ▼ OK button to select Information, and press button to view.
Play List
Press ▼ OKbutton to select Play List, and press button to display all available videos.
(Optional: Pause/Repeat All/Edit)
SYSTEM
Audio Only
Press ▼ OK button to select Audio Only, and press button to select.
Image
Press ▼ /▲/button to select Image or All, and press ▼ ▲ ◀ button to select Picture.

Zoom Mode
Press ▼ OK button to select Zoom Mode, and press button to select. (Optional: Fit/Original Size)
Repeat Mode
Press ▼ OK button to select Repeat Mode, and press button to select. (Optional: No Repeat/Repeat All)
Interval
Press ▼ OK button to select Ineterval, and press button to select. (Optional: 5S/10S/20S)
Information
Press ▼ OK button to select Information, and press button to view.
Play List
Press ▼ OK button to select Play List, and press button to display all available Picture.
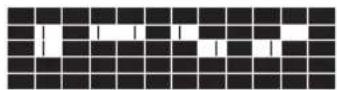
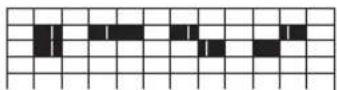
Policy on defective pixels
Due to the complexity of the technology used in the manufacture of LCD, TFT and LED screens, it is possible that some of the pixels that make up the screen may be defective. While it is desirable for all the pixels to function correctly, this is not always possible from a production perspective. For this reason, HKC certi es that its LED TV products meet the criteria of admissible defect described herein and certi es that its LED TV screens are class A.
| Defective pixels | 19"-20"-22"-24" 29 | "-32" 39"-40" 46"-50" | |
| Bright pixel (max.) 4 4 4 4 | |||
| Dark pixel (max.) 8 9 14 16 | |||
| Maximum permitted sum of pixels | 5 7 12 12 | ||
| Double adjacent pixels (max.) 1 1 1 1 |
If an LED TV screen has dark or bright pixels, this is only considered to be a fault by HKC when the ranges established herein for an LED panel to be considered defective are exceeded, thereby allowing HKC to manage the replacement or warranty of the panel due to a product non-conformance. As a rule and except for limited exceptions, HKC considered an LED TV product to be faulty when it has a considerable number of permanently bright or dark pixels. As a reference, an LCD/LED panel has more than 1 million pixels and a single defective pixel is therefore not considered to constitute a lack of conformance and cannot be catalogued as a fault, as this circumstance will not a ect the correct functioning of the product.
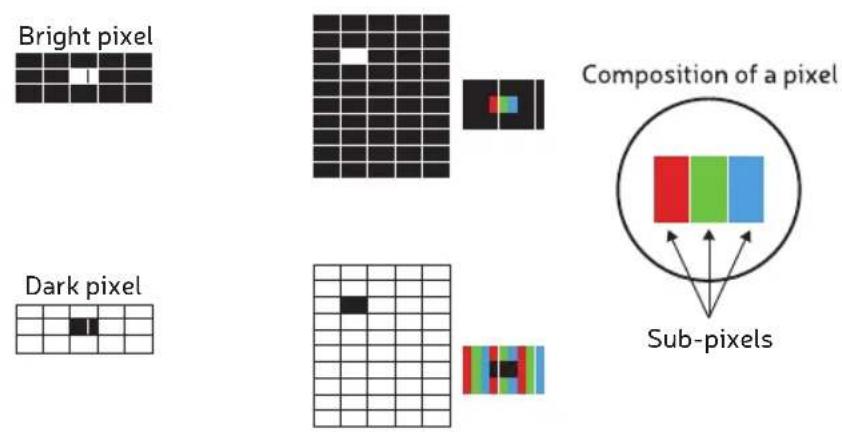
Double adjacent bright pixels

Double adjacent dark pixels
Therefore, if an LED screen meets the above criteria, it cannot be changed or repaired as this is not considered to be a lack of product conformance and cannot be catalogues as a defect or fault.

USER'S MANUAL LED TV SET

natural_image
Illustration of a laptop computer with a blank screen and glossy surface (no text or symbols)PORTUGUÊS
CONTENIDO
natural_image
Illustration of a computer monitor with blue lightning bolts and a crossed-out screwdriver (no text or symbols)Precaução
natural_image
Simple line drawing of a computer monitor with a blue X mark and a hanging ribbon, next to a rope (no text or symbols)Precaução
natural_image
Illustration of a computer monitor with a 'X' symbol and a hand holding a starburst above it (no text or symbols present)Precaução
natural_image
Simple line drawing of a computer monitor with a 'X' symbol on its screen (no text or labels)Precaução
natural_image
Illustration of a person holding a computer monitor with a 'X' symbol, surrounded by floating bubbles (no text or symbols present)Precaução
natural_image
Illustration of a computer monitor with a blue X symbol and a lightning bolt, resting on a table (no text or symbols present)Precaução
natural_image
Simple line drawing of a computer monitor and a cartoon chef with a skull (no text or symbols)Precaução
natural_image
Simple line drawing of a computer monitor with rays, no text or symbols presentPrecaução
- RJ45
- COAXIAL.
- Entrada AV.
- LNB IN.
- Antena RF.
- Entrada HDMI3.
- Entrada HDMI2.
- Entrada HDMI1.
- USB 1 & 2 media player:
natural_image
User interface icons including search, refresh, gear, alarm, and user profile (no text or symbols)IMAGEM
PT
Ajuste de cor
SOM

SOM
Saída de áudio
Recepção
Pesquisa automática

CANAL
Editar canal
CANAL
Pesquisa manual
Pesquisa manual de ATV
ACESSIBILIDADE

Esquema de menu
Temporizador
SISTEMA
Localização
Nome da TV
(Opções: TV/AV/HDMI1/HDMI2/HDMI3)
Notificações
PT
Informações
natural_image
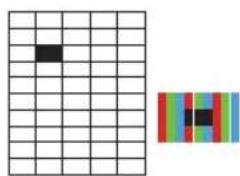
Grid of black squares with a white square in the top-left corner and a small inset showing a color-coded square (red, green, blue) on the right side.flowchart
graph TD
    A["Red Block"] --> C["Bottom"]
    B["Green Block"] --> C["Bottom"]
    D["Blue Block"] --> C["Bottom"]
Subpíxeles
natural_image
Simple line drawing of a laptop on a stand (no text or symbols)DEUTSCH
INHALT
natural_image
Illustration of a computer monitor with a broken tool and lightning bolts, no text or symbols present.
Vorsicht
natural_image
Simple line drawing of a computer monitor with a blue X mark and a hanging screen (no text or symbols)
Vorsicht
natural_image
Simple cartoon illustration of a box with a cross symbol inside, placed on a platform (no text or symbols)
Vorsicht
natural_image
Cartoon illustration of a person using a computer with a 'X' symbol (no text or symbols present)
Vorsicht
natural_image
User interface icons including search, refresh, gear, alarm, and user group (no text or symbols)BILD
Colour Tuner (Farbtuner)
DE
TON
TON
Wake on LAN (Wake-on LAN)
Reception (Empfang)
Mode setup (Moduseinstellung)

SENDER
SENDER
Manual Scan (Manuelle Suche)

BARRIEREFREIHEIT

Menu Scheme (Menüschema)
Time Zone (Zeitzone)
Zeitzone wählen
Sleep Timer (Sleeptimer)
SYSTEM
Power Off Timer (Ausschalt-Timer)
Menu Timeout (Menü-Timeout)

SYSTEM
Location (Standort)
TV Name (TV-Name)
Information (Informationen)
natural_image
Illustration of a laptop computer with blank screen and stand (no text or symbols)ITALIANO
INDICE
natural_image
Illustration of a computer monitor with a broken tool and lightning bolts, no text or symbols present.
Cautela
natural_image
Simple line drawing of a computer monitor with a blue X mark and a hanging sheet, no text or symbols present.
Cautela
natural_image
Simple cartoon illustration of a roof with a cross symbol inside, no text or symbols present
Cautela
natural_image
Cartoon illustration of a person using a computer with a 'X' symbol (no text or symbols present)
Cautela
natural_image
User interface toolbar with search, document, gear, bell icon, and user group (no text or symbols)
IMMAGINE

SUONI
SUONI
Audio Output (Uscita audio)

CANALE
CANALE

ATV Manual Scan (Scansione manuale ATV)
ACCESSIBILITÀ
Menu Scheme (Schema menù)
SISTEMA
Power Off Timer (Spegnimento del timer)

SISTEMA
Digital Teletext (Teletext digitale)
APPLICATION SETTINGS (IMPOSTAZIONI APPLICAZIONE)
Delete Cookie (Elimina i cookie)
CEC Control (Controllo CEC)
ADVANCED SETTINGS (IMPOSTAZIONI AVANZATE)
Mobile App Download (Scaricare App mobili)
SISTEMA

- USER'S MANUAL LED TV SET
- CONTENIDO
- Precaución
- IMAGEN
- Ajuste de Color
- SONIDO
- Salida de Audio
- Recepción
- Ajuste de Modo
- Escaneo Automático
- CANAL
- Editar canal
- Ajustes avanzados
- Escaneo manual
- Escaneo manual de ATV
- ACCESIBILIDAD
- Esquema de menú
- SISTEMA
- Formato de Hora
- Temporizador
- Ubicación
- Compartir contenido
- Nombre del TV
- Subtítulos
- Información
- CONTENU
- Précaution
- IMAGE
- Mode image
- SON
- Sortie audio
- Réception
- Réglage du mode
- CHAÎNE
- Modifier la chaîne
- Réglages avancés
- Recherche manuelle
- Recherche ATV manuelle
- ACCESSIBILITÉ
- Schéma de menus
- Minuteur
- SYSTÈME
- Emplacement
- Partager du contenu
- Nom du téléviseur
- Information
- CONTENS
- WARNING
- CAUTION
- IMPORTANT SAFETY INFORMATION
- SAFETY PRECAUTIONS
- REMOTE CONTROL
- HOME
- INPUT
- SETTING
- PICTURE
- Picture Mode
- Aspect Ratio
- Game Mode
- Picture Mode Settings
- Apply Picture Settings
- Backlight/Brightness/Contrast/Colour Saturation/Sharpness
- Adaptive Contrast
- Noise Reduction
- MPEG Noise Reduction
- Color Temperature
- Expert Settings
- Colour Tuner
- White Balance
- Black Level (Only available on HDMI source)
- Gamma Adjustment
- Gamma Calibration
- RGB Only Mode
- Overscan
- Reset Current Mode
- SOUND
- Sound Mode
- Headphone
- Sound Mode Settings
- Apply Audio Settings
- Equalizer
- Bass Boost / Surround Sound / Dialog Clarity / TruVolume / Wall Mount Setup / Auto Volume Control
- Speakers
- Audio Output
- Digital Audio Output
- Digital Audio Delay
- Lip Sync
- Balance
- NETWORK
- Network Cofiguration
- Internet Connection
- Wake on Wireless Network
- Wake on LAN
- CHANNEL
- Auto Scan
- Rescan
- Reception
- Mode setup
- Channel Edit
- Advanced Settings
- Manual Scan
- DTV Manual Scan
- ATV Manual Scan
- Channel List Auto-Update
- Programme Guide Auto Update
- Programme Auto Update
- Channel Selection
- ACCESSIBILITY
- Menu Scheme
- High Contrast Menu
- Menu Transparency
- Hard of Hearing Subtitles
- Audio Type
- Voiceover Volume
- Time
- SYSTEM
- Time Format
- Date/Time
- Time Zone
- Daylight Savings
- TIMER SETTINGS
- Sleep Timer
- Power On Timer
- Power Off Timer
- Menu Timeout
- Auto Sleep
- Auto Standby with No Signal
- System PIN
- Parental Control
- LANGUAGE AND LOCATION
- Location
- Menu Language
- Primary Audio
- Secondary Audio
- Primary Subtitle
- Secondary Subtitle
- Digital Teletext
- APPLICATION SETTINGS
- Content Sharing
- Hbb TV
- Clear Cache
- Delete Cookie
- Do Not Track
- Prime Video
- Netflix
- HDMI&CEC
- CEC Control
- Device Auto Power Off
- Device Auto Power On
- Tv Auto Power On
- CEC Device Lists
- Usage Mode
- TV Name
- Screen saver
- Input Labels
- Notifications
- Enhanced Viewing
- Setup Wizard
- Fast Power On
- Power On Mode
- SUPPORT
- System Info
- Self Diagnosis
- E-Manual
- System Update
- Disclaimer and Privacy
- Mobile App Download
- Channel List
- Guide
- Subtitle
- Audio Only
- Settings
- MEDIA
- Video
- Zoom Mode
- Rotate
- Repeat Mode
- Playback start position
- Play List
- Audio
- Interval
- Policy on defective pixels
- Precaução
- IMAGEM
- Ajuste de cor
- SOM
- Saída de áudio
- Recepção
- Pesquisa automática
- Pesquisa manual
- Pesquisa manual de ATV
- ACESSIBILIDADE
- Esquema de menu
- Localização
- Nome da TV
- Notificações
- Informações
- INHALT
- Vorsicht
- BILD
- Colour Tuner (Farbtuner)
- TON
- Wake on LAN (Wake-on LAN)
- Reception (Empfang)
- Mode setup (Moduseinstellung)
- SENDER
- Manual Scan (Manuelle Suche)
- BARRIEREFREIHEIT
- Menu Scheme (Menüschema)
- Time Zone (Zeitzone)
- Sleep Timer (Sleeptimer)
- Power Off Timer (Ausschalt-Timer)
- Menu Timeout (Menü-Timeout)
- Location (Standort)
- TV Name (TV-Name)
- Information (Informationen)
- INDICE
- Cautela
- IMMAGINE
- SUONI
- Audio Output (Uscita audio)
- CANALE
- ATV Manual Scan (Scansione manuale ATV)
- ACCESSIBILITÀ
- Menu Scheme (Schema menù)
- Power Off Timer (Spegnimento del timer)
- Digital Teletext (Teletext digitale)
- APPLICATION SETTINGS (IMPOSTAZIONI APPLICAZIONE)
- Delete Cookie (Elimina i cookie)
- CEC Control (Controllo CEC)
- ADVANCED SETTINGS (IMPOSTAZIONI AVANZATE)
- Mobile App Download (Scaricare App mobili)
Brand : RCA
Model : iRV42H3
Category : Television