
100LF-WF - Faucet DELTA - Free user manual and instructions
Find the device manual for free 100LF-WF DELTA in PDF.

| Brand | Delta |
| Model | 100LF-WF |
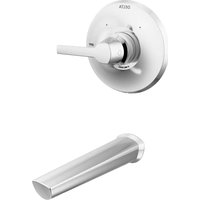
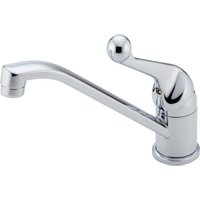
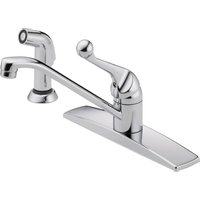
| Product Type | Kitchen faucet with pull-down spray head |
| Mounting | Deck mount (two or three holes) |
| Material | Chrome-plated brass |
| Spout Reach | 20.3 cm (8 inches) |
| Flow Rate | 6.8 L/min (1.8 GPM) with aerator |
| Control Mechanism | Ball cartridge (single handle) |
| Spray Head | Pull-down with flexible hose and holder |
| Power Source | None (mechanical faucet) |
| Warranty | Limited lifetime warranty on parts and finish (residential) |
| Maintenance and Cleaning | Clean with damp cloth and dry gently; avoid abrasive cleaners |
| Replacement Parts | Available: ball (RP70), seats and springs (RP4993), diverter (RP63136), O-rings (RP25), etc. |
| Repairability | Repairable with Delta repair kits |
| Maximum Water Temperature | 82°C (180°F) recommended |
| Minimum Recommended Pressure | 0.3 bar (5 psi) |
| Certifications | Complies with ASME A112.18.1 |
Frequently Asked Questions - 100LF-WF DELTA
User questions about 100LF-WF DELTA
0 question about this device. Answer the ones you know or ask your own.
Ask a new question about this device
Download the instructions for your Faucet in PDF format for free! Find your manual 100LF-WF - DELTA and take your electronic device back in hand. On this page are published all the documents necessary for the use of your device. 100LF-WF by DELTA.
USER MANUAL 100LF-WF DELTA
Models 100LF-WF, 101LF-WF, 120LF, 175LF-WF, 300LF-WF, 400LF-WF, 420LF & 570LF-WF Series
Write purchased model number here.
SINGLE HANDLE KITCHEN / LAVATORY FAUCETS
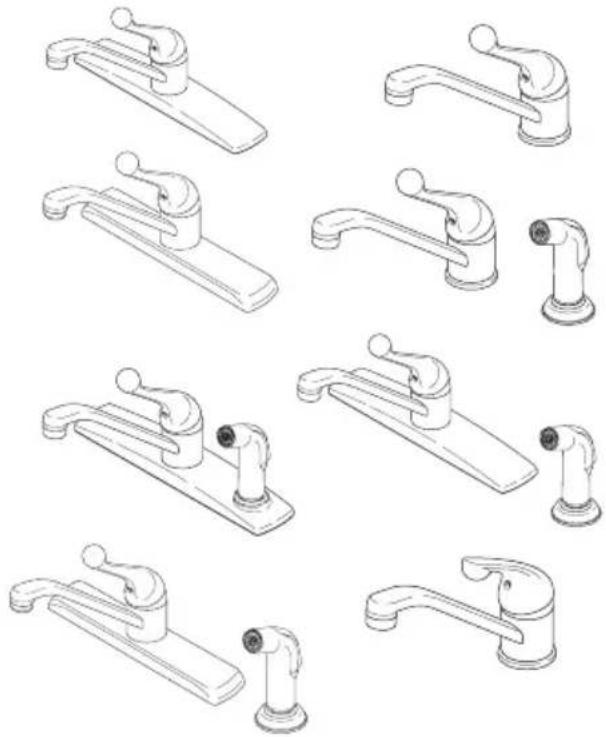
natural_image
Line drawings of various bathroom fixtures including a faucet, showerhead, and sink (no text or symbols)You may need the following tools:

natural_image
Illustration of five different personal protective and safety tools: wrench, eyeglasses, pliers, and a silicone tool (no text or symbols present)For easy installation of your faucet you will need:
• To READ ALL the instructions completely before beginning.
• To READ ALL warnings, care, and maintenance information.
• To purchase the correct water supply hook-up.
www.deltafaucet.com
TABLE OF CONTENTS:
Warranty Page 2
Installation Instructions ---- Pages 3-7
Maintenance Page 8
Replacement Parts --Pages 9-12
Limited Warranty on Delta® Faucets
Parts and Finish. All parts (other than electronic parts and batteries) and finishes of Delta® faucets purchased from authorized Delta sellers are warranted to the original consumer purchaser to be free from defects in material and workmanship for as long as the original consumer purchaser owns the home in which the faucet was first installed. For commercial purchasers, (a) the warranty period is ten (10) years for multi-family residential applications and (b) five (5) years for all other commercial applications, in each case from the date of original purchase. For purposes of this warranty, the term "multi-family residential application" refers to the purchase of the faucet from an authorized Delta seller by a purchaser who owns but does not live in the residential dwelling in which the faucet is initially installed, such as in a rented or leased single unit or multi-unit detached home (duplex or townhome), or a condominium, apartment building or community living center. The following installations are not considered multi-family residential applications, are excluded from the 10-year warranty and are subject to the 5-year warranty: industrial, institutional or other business premises, such as a dormitory, hospitality premises (hotel, motel or extended stay location), airport, educational facility, long- or short-term healthcare facility (hospital, rehabilitation center, nursing, assisted or staged-care living unit), public space or common area.
Parts and Finish for Delta® Recertified Faucets. Delta Faucet Company offers for sale on deltafaucet.com Delta® Recertified faucets. All parts (other than electronic parts and batteries) and finishes of these Delta® Recertified faucets are warranted to the original consumer purchaser to be free from defects in material and workmanship for ten (10) years from the date of original purchase. For commercial purchasers, the warranty period is one (1) year from the date of original purchase.
Electronic Parts. Electronic parts (other than batteries), if any, of Delta® faucets purchased from deltafaucet.com or authorized Delta sellers are warranted to the original consumer purchaser to be free from defects in material and workmanship for five (5) years from the date of original purchase or, for commercial purchasers, for one (1) year from the date of original purchase. No warranty is provided on batteries.
What We Will Do. Delta Faucet Company will repair or replace, free of charge, during the applicable warranty period (as described above), any part or finish that proves defective in material and/or workmanship under normal installation, use and service. If repair or replacement is not practical, Delta Faucet Company may elect to refund the purchase price in exchange for the return of the product. These are your exclusive remedies.
What Is Not Covered. Because Delta Faucet Company is unable to control the quality of Delta products sold by unauthorized sellers, unless otherwise prohibited by law, this warranty does not cover Delta products purchased from unauthorized sellers.
Any labor charges incurred by the purchaser to repair, replace, install or remove this product are not covered by this warranty. Delta Faucet Company shall not be liable for any damage to the faucet resulting from reasonable wear and tear, outdoor use, misuse (including use of the product for an unintended application), freezing water, abuse, neglect or improper or incorrectly performed installation, maintenance or repair, including failure to follow the applicable care and cleaning instructions. Delta Faucet Company recommends using a professional plumber for all installation and repair of faucets. We also recommend that you use only genuine Delta® replacement parts.
What You Must Do To Obtain Warranty Service or Replacement Parts. A warranty claim may be made and replacement parts may be obtained by calling 1 800 345 DELTA (3358) or by contacting us by mail or online as follows (please include your model number and date of original purchase):
In the United States and Mexico: In Canada:
Delta Faucet Company Masco Canada Limited, Plumbing Group
Product Service Technical Service Centre
55 E. 111th Street 350 South Edgeware Road
Indianapolis, IN 46280 St. Thomas, Ontario, Canada N5P 4L1
Attention: Customer Solutions Attention: Customer Serv
www.deltafaucet.com/service-parts/contact-us http://www.deltafaucet.ca/customersupport/assistance.html
Proof of purchase (original sales receipt) from the original purchaser must be made available to Delta Faucet Company for all warranty claims unless the purchaser has registered the product with Delta Faucet Company or the product is a Delta® Recertified product purchased from deltafaucet.com. This warranty applies only to Delta® faucets manufactured after January 1, 2019 and installed in the United States of America, Canada and Mexico.
Limitation on Duration of Implied Warranties. Please note that some states/provinces (including Quebec) do not allow limitations on how long an implied warranty lasts, so the below limitations may not apply to you. TO THE MAXIMUM EXTENT PERMITTED BY APPLICABLE LAW, ANY IMPLIED WARRANTY, INCLUDING THE IMPLIED WARRANTIES OF MERCHANTABILITY AND OF FITNESS FOR A PARTICULAR PURPOSE, IS LIMITED TO THE STATUTORY PERIOD OR THE DURATION OF THIS WARRANTY, WHICHEVER IS SHORTER.
Limitation of Special, Incidental or Consequential Damages. Please note that some states/provinces (including Quebec) do not allow the exclusion or limitation of special, incidental or consequential damages, so the below limitations and exclusions may not apply to you. TO THE MAXIMUM EXTENT PERMITTED BY APPLICABLE LAW, THIS WARRANTY DOES NOT COVER, AND DELTA FAUCET COMPANY SHALL NOT BE LIABLE FOR, ANY SPECIAL, INCIDENTAL OR CONSEQUENTIAL DAMAGES (INCLUDING LABOR CHARGES TO REPAIR, REPLACE, INSTALL OR REMOVE THIS PRODUCT), WHETHER ARISING OUT OF BREACH OF ANY EXPRESS OR IMPLIED WARRANTY, BREACH OF CONTRACT, TORT, OR OTHERWISE. DELTA FAUCET COMPANY SHALL NOT BE LIABLE FOR ANY DAMAGE TO THE FAUCET RESULTING FROM REASONABLE WEAR AND TEAR, OUTDOOR USE, MISUSE (INCLUDING USE OF THE PRODUCT FOR AN UNINTENDED APPLICATION), FREEZING WATER, ABUSE, NEGLECT OR IMPROPER OR INCORRECTLY PERFORMED INSTALLATION, MAINTENANCE OR REPAIR, INCLUDING FAILURE TO FOLLOW THE APPLICABLE INSTALLATION, CARE AND CLEANING INSTRUCTIONS. Notice to residents of the State of New Jersey: The provisions of this warranty, including its limitations, are intended to apply to the fullest extent permitted by the laws of the State of New Jersey.
Additional Rights. This warranty gives you specific legal rights, and you may also have other rights which vary from state/province to state/province.
This is Delta Faucet Company's exclusive written warranty and the warranty is not transferable.
If you have any questions or concerns regarding our warranty, please contact us as provided above or view our Warranty FAQs at www.deltafaucet.com.
© 2020 Delta Faucet Company
1
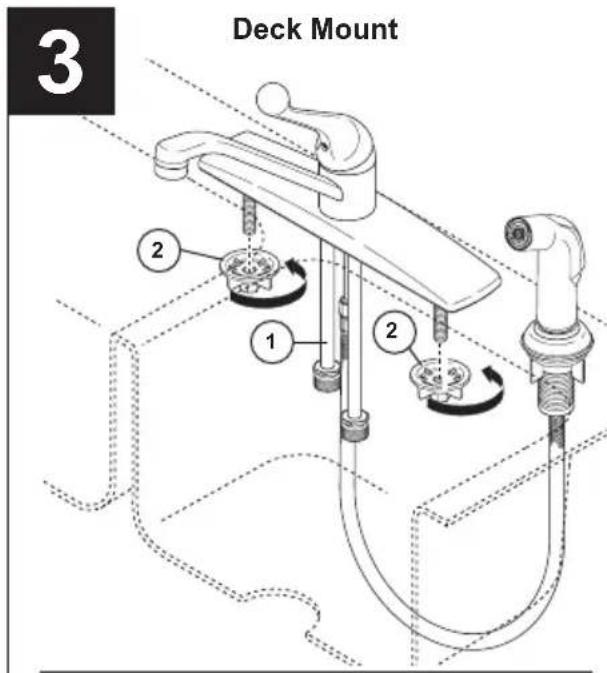
Deck Mount
100LF-WF & 400LF-WF
natural_image
Technical diagram of a mechanical switch assembly with labeled parts (no text or symbols present)Deck Mount 300LF-WF
natural_image
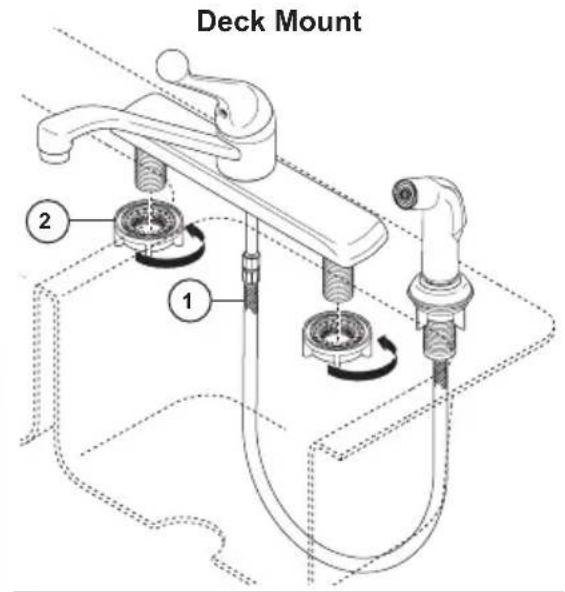
Technical diagram of a mechanical switch assembly with labeled parts (no text or symbols present)Deck Mount
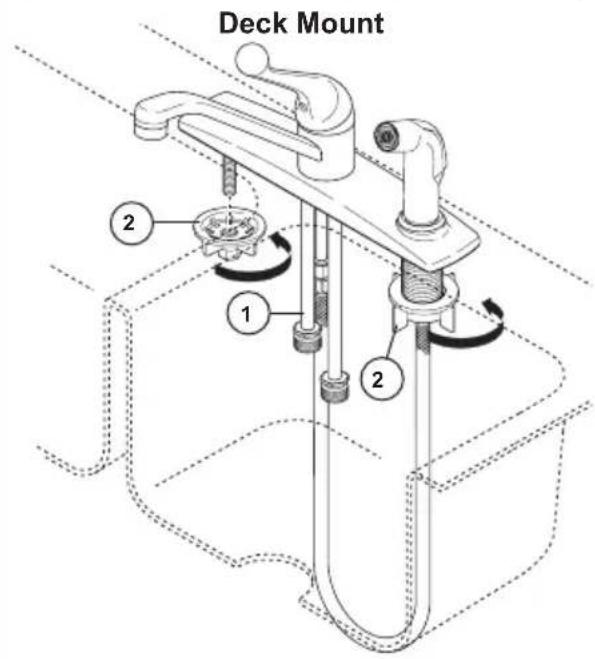
120LF & 420LF
natural_image
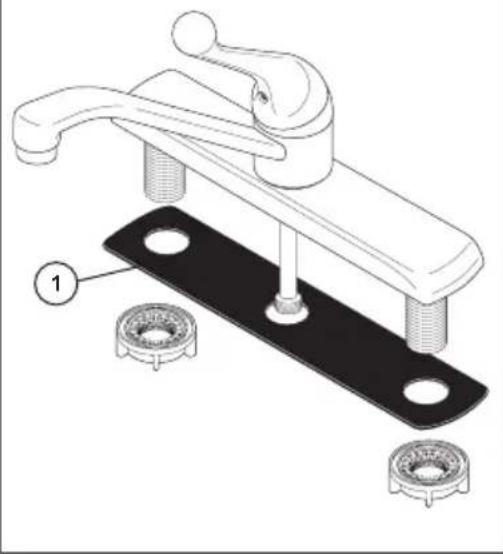
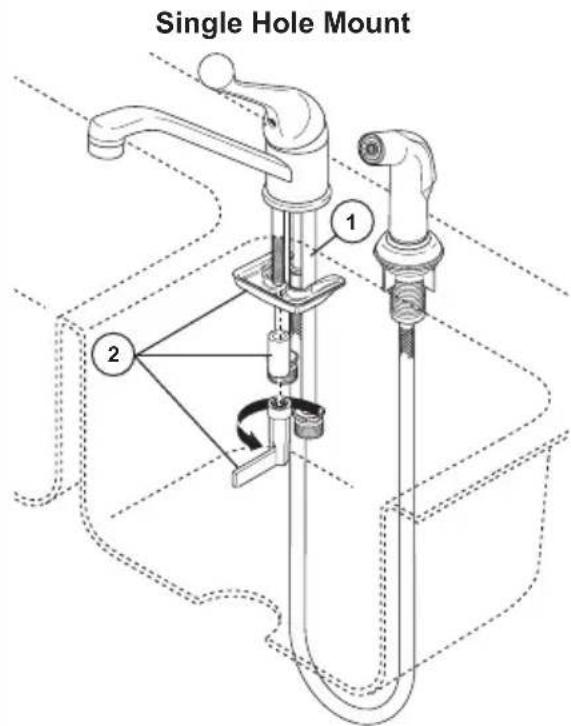
Technical illustration of a hand switch mechanism with two base plates and a ball bearing (no text or symbols)Single Hole Mount
101LF-WF, 175LF-WF & 570LF-WF
Preparing for Installation
SHUT OFF WATER SUPPLIES
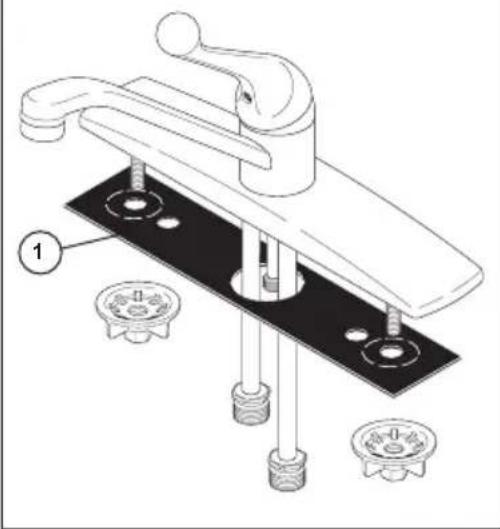
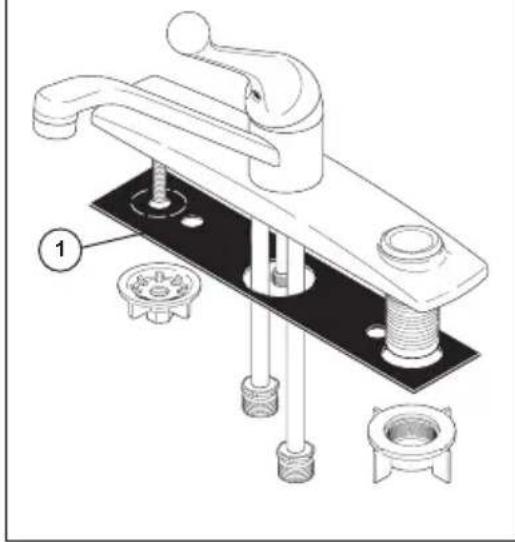
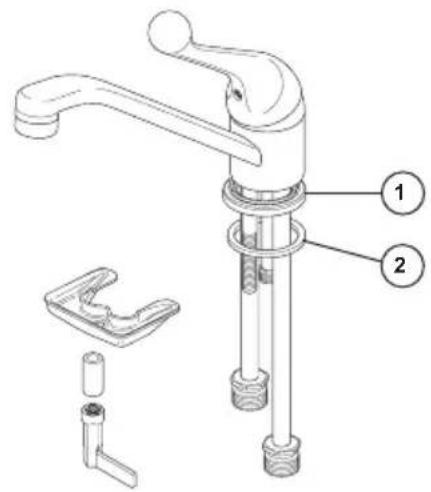
Remove old faucet. For deck mount models place gasket (1) on faucet. For single hole mount models, place base (1) then gasket (2) on faucet.
For models without spray, go to Step 3. For models with spray, go to Step 2.
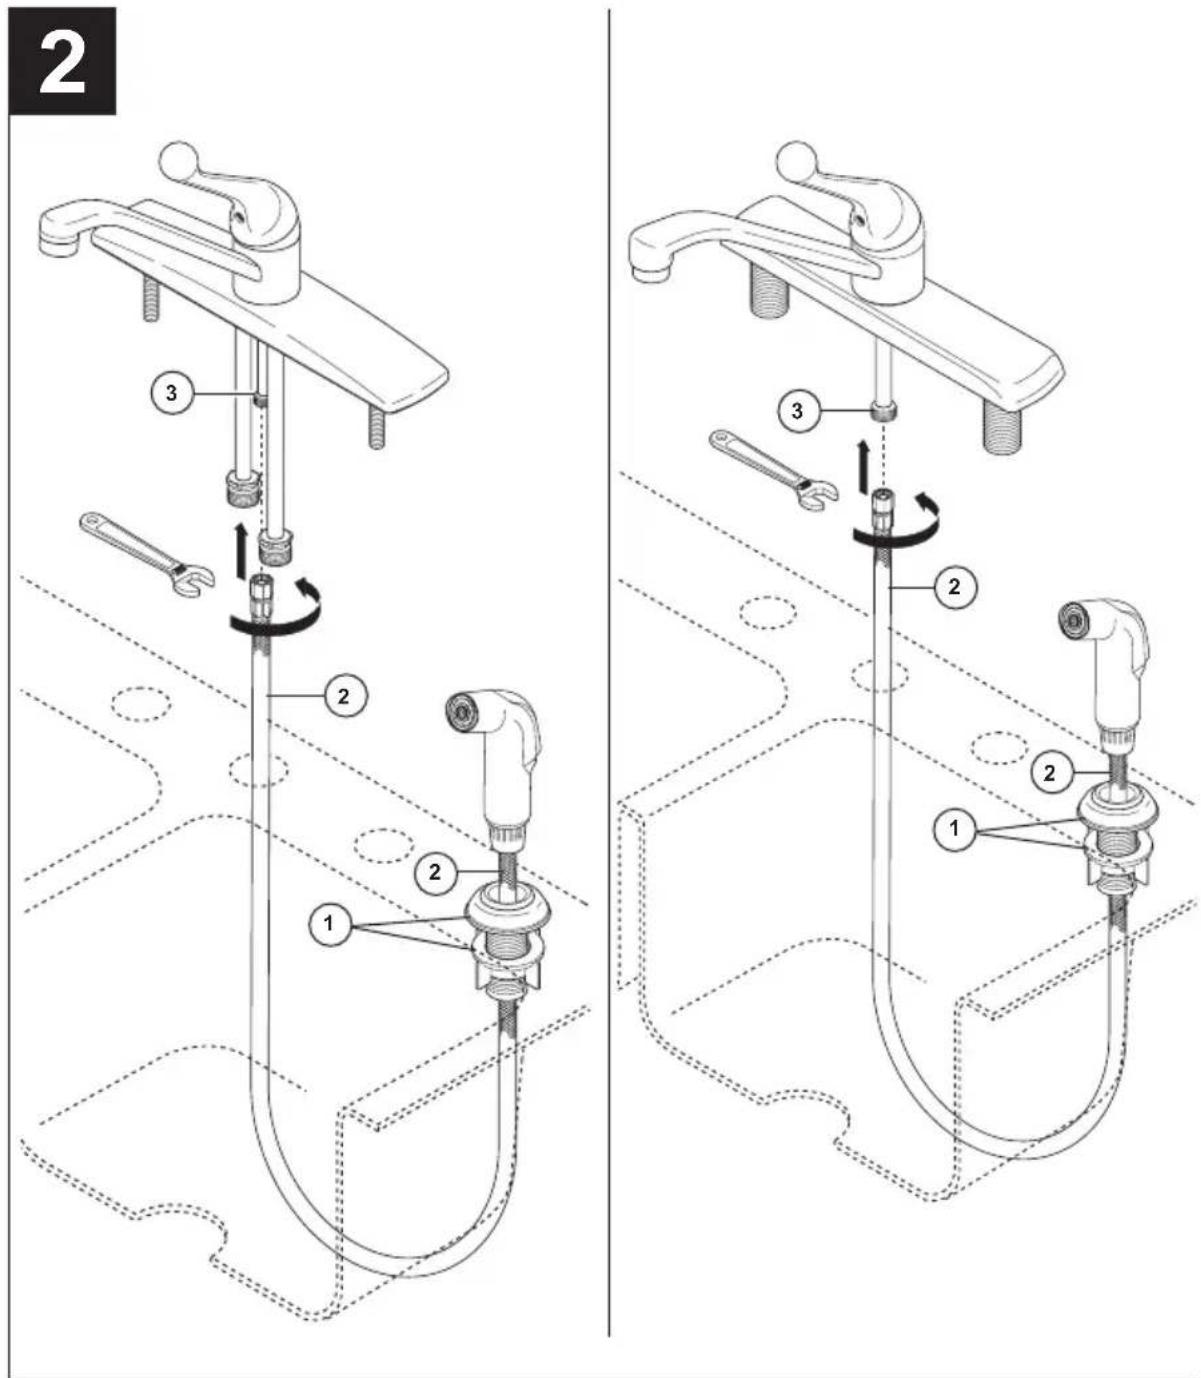
Sprayer Installation
For models with spray and spray support.
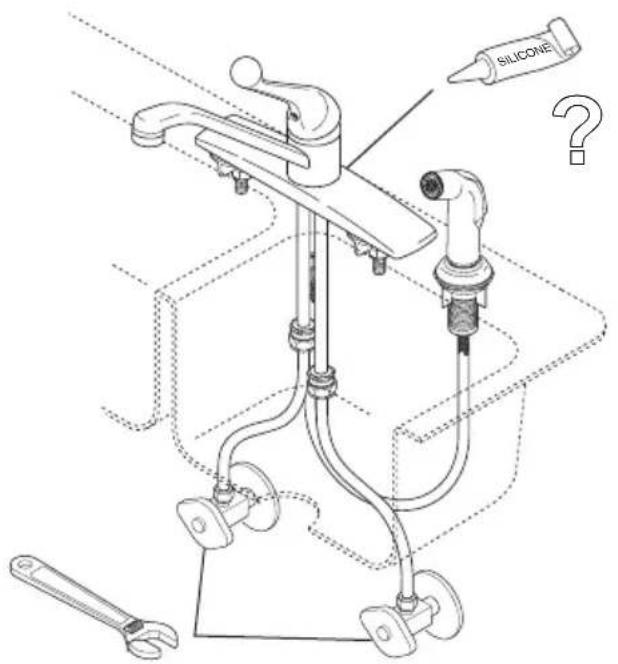
Mount the spray support assembly (1) in far right hole in sink. Hand tighten nut. Insert spray hose (2) down through support assembly and up through center hole on sink. From above the sink,
thread hose (2) onto spray hose nipple (3). Tighten securely with wrench. Do not over tighten. Go on to Step 3.
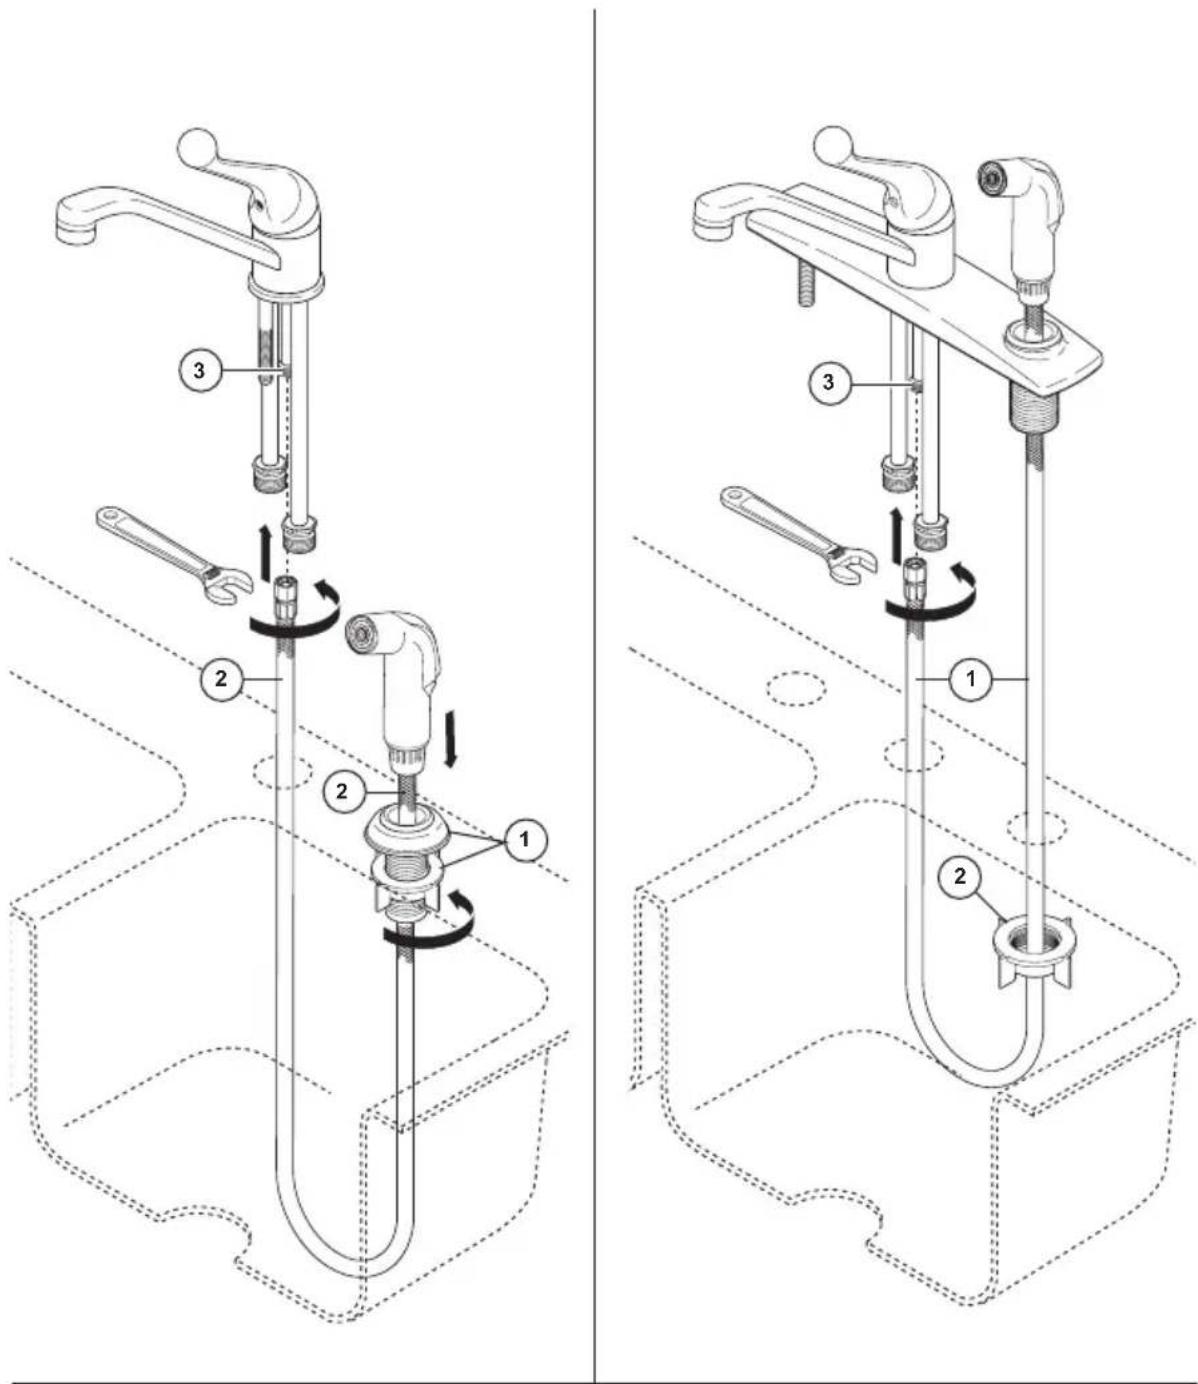
Sprayer Installation
For single hole models with spray and spray support.
Mount the spray support assembly (1) in far right hole in sink. Hand tighten nut. Insert spray hose (2) down through support assembly and up through center hole on sink. From above the sink, thread hose (2) onto spray hose nipple (3). Tighten securely with wrench. Do not over tighten. Go on to Step 3.
For models with integrated spray.
Insert spray hose (1) down through support assembly on escutcheon and hole in sink. From underneath the sink place the mounting nut (2) over spray hose and insert the hose up through the middle hole in sink. From above the sink, thread hose (1) onto spray hose nipple (3). Tighten securely with wrench. Do not over tighten. Go on to Step 3.
Faucet Installation
For deck mount models.
Feed tube(s) (1) down through center hole in sink. OPTION: If sink is uneven, use silicone sealant under the gasket. Secure faucet to sink with mounting nuts (2) supplied with your faucet.
For single hole mount models.
Feed tubes (1) down through remaining hole in sink. OPTION: If sink is uneven, use silicone sealant under the gasket. Secure faucet to sink with mounting bracket, spacer (for thin mount only) and nut (2) supplied with your faucet.
Important: Use two wrenches when tightening. Do not over tighten.
5

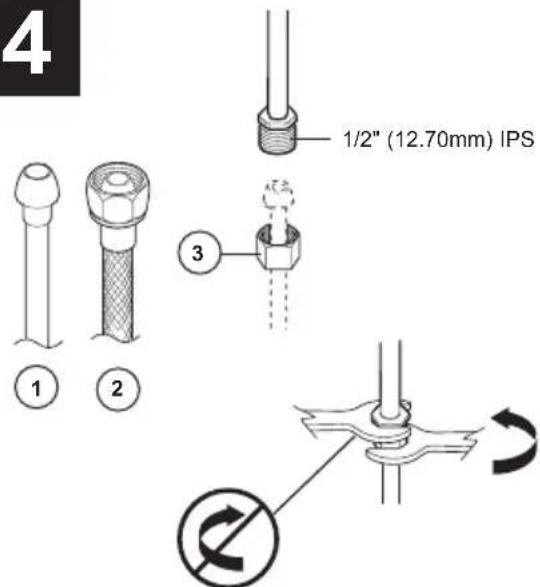
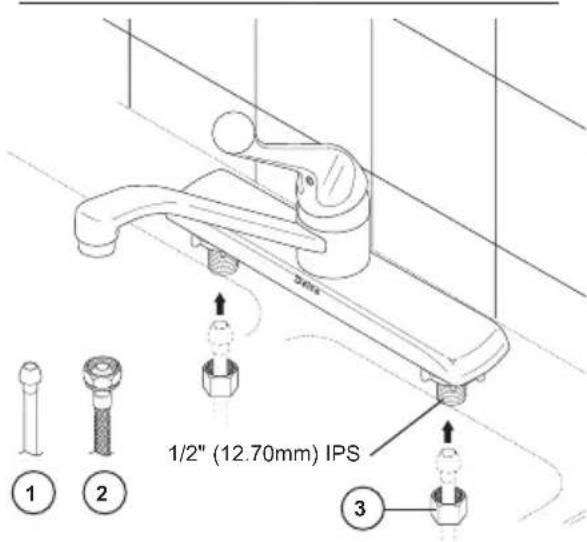
Supply Line Connections
For models with fittings.
Note: Be careful when bending the copper tubing. Kinked tubes will void the warranty. Choose hook-ups for 1/2" I.P.S. connections: (1) Ball nose riser (3/8" O.D. copper tubing), or (2) 1/2" I.P.S. faucet connector. Use the enclosed coupling nuts (3) with the ball nose risers (1).
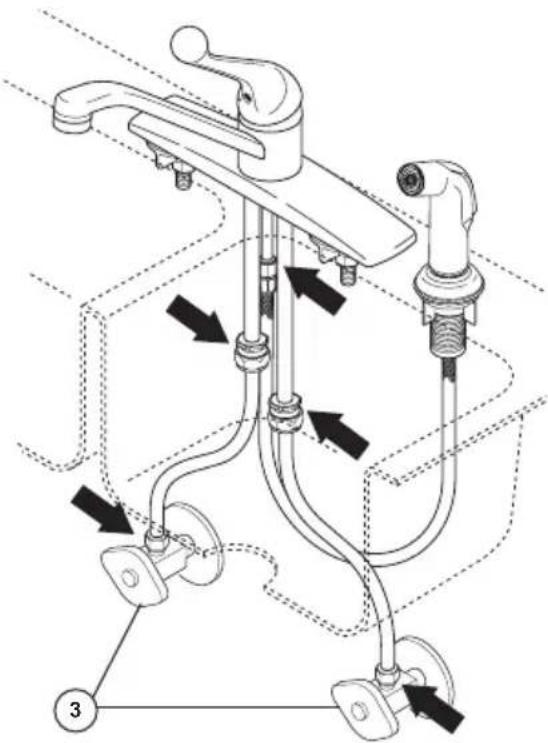
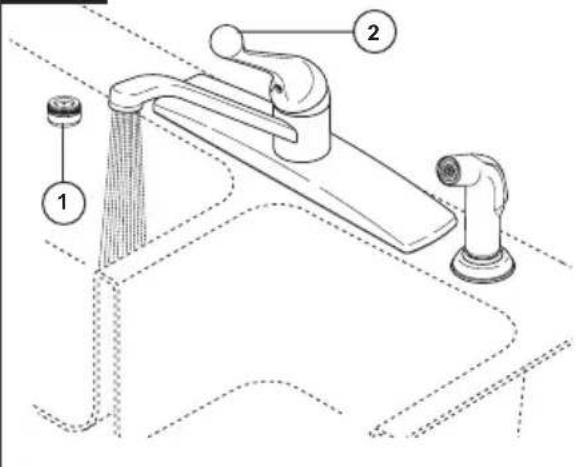
Flush the System and Check for Leaks
Remove aerator (1) and turn faucet handle (2) to the full on mixed position. Turn on hot and cold water supplies (3) and flush water lines for one minute. Important: This flushes away any debris that could cause damage to internal parts.
Check all connections at arrows for leaks. Re-tighten if necessary, but do not overtighten.
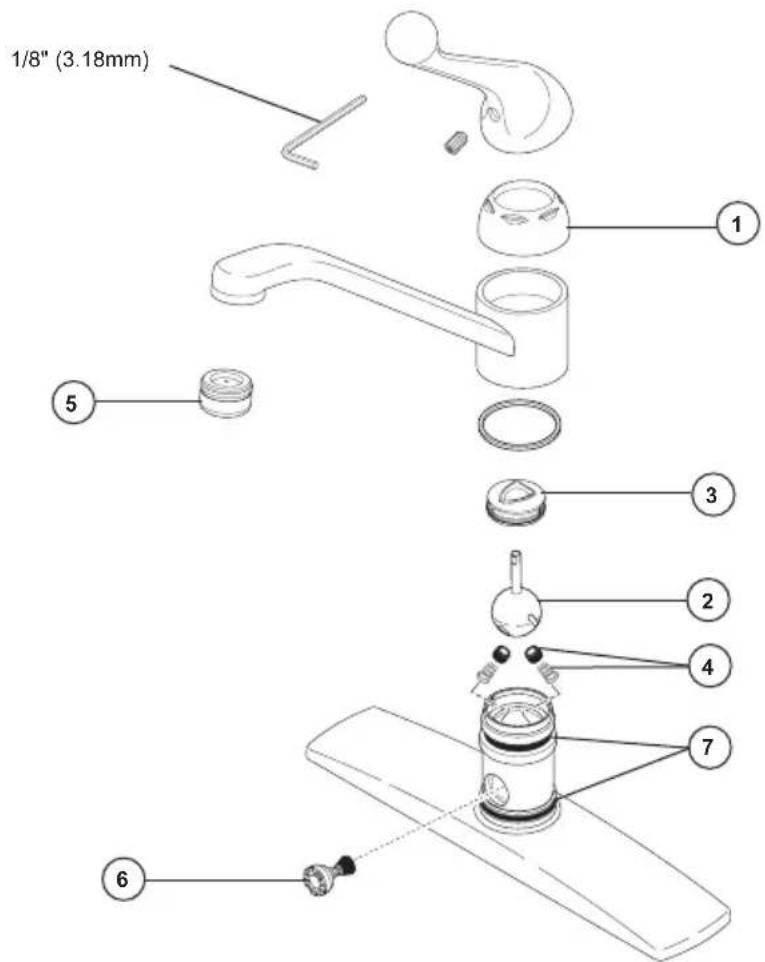
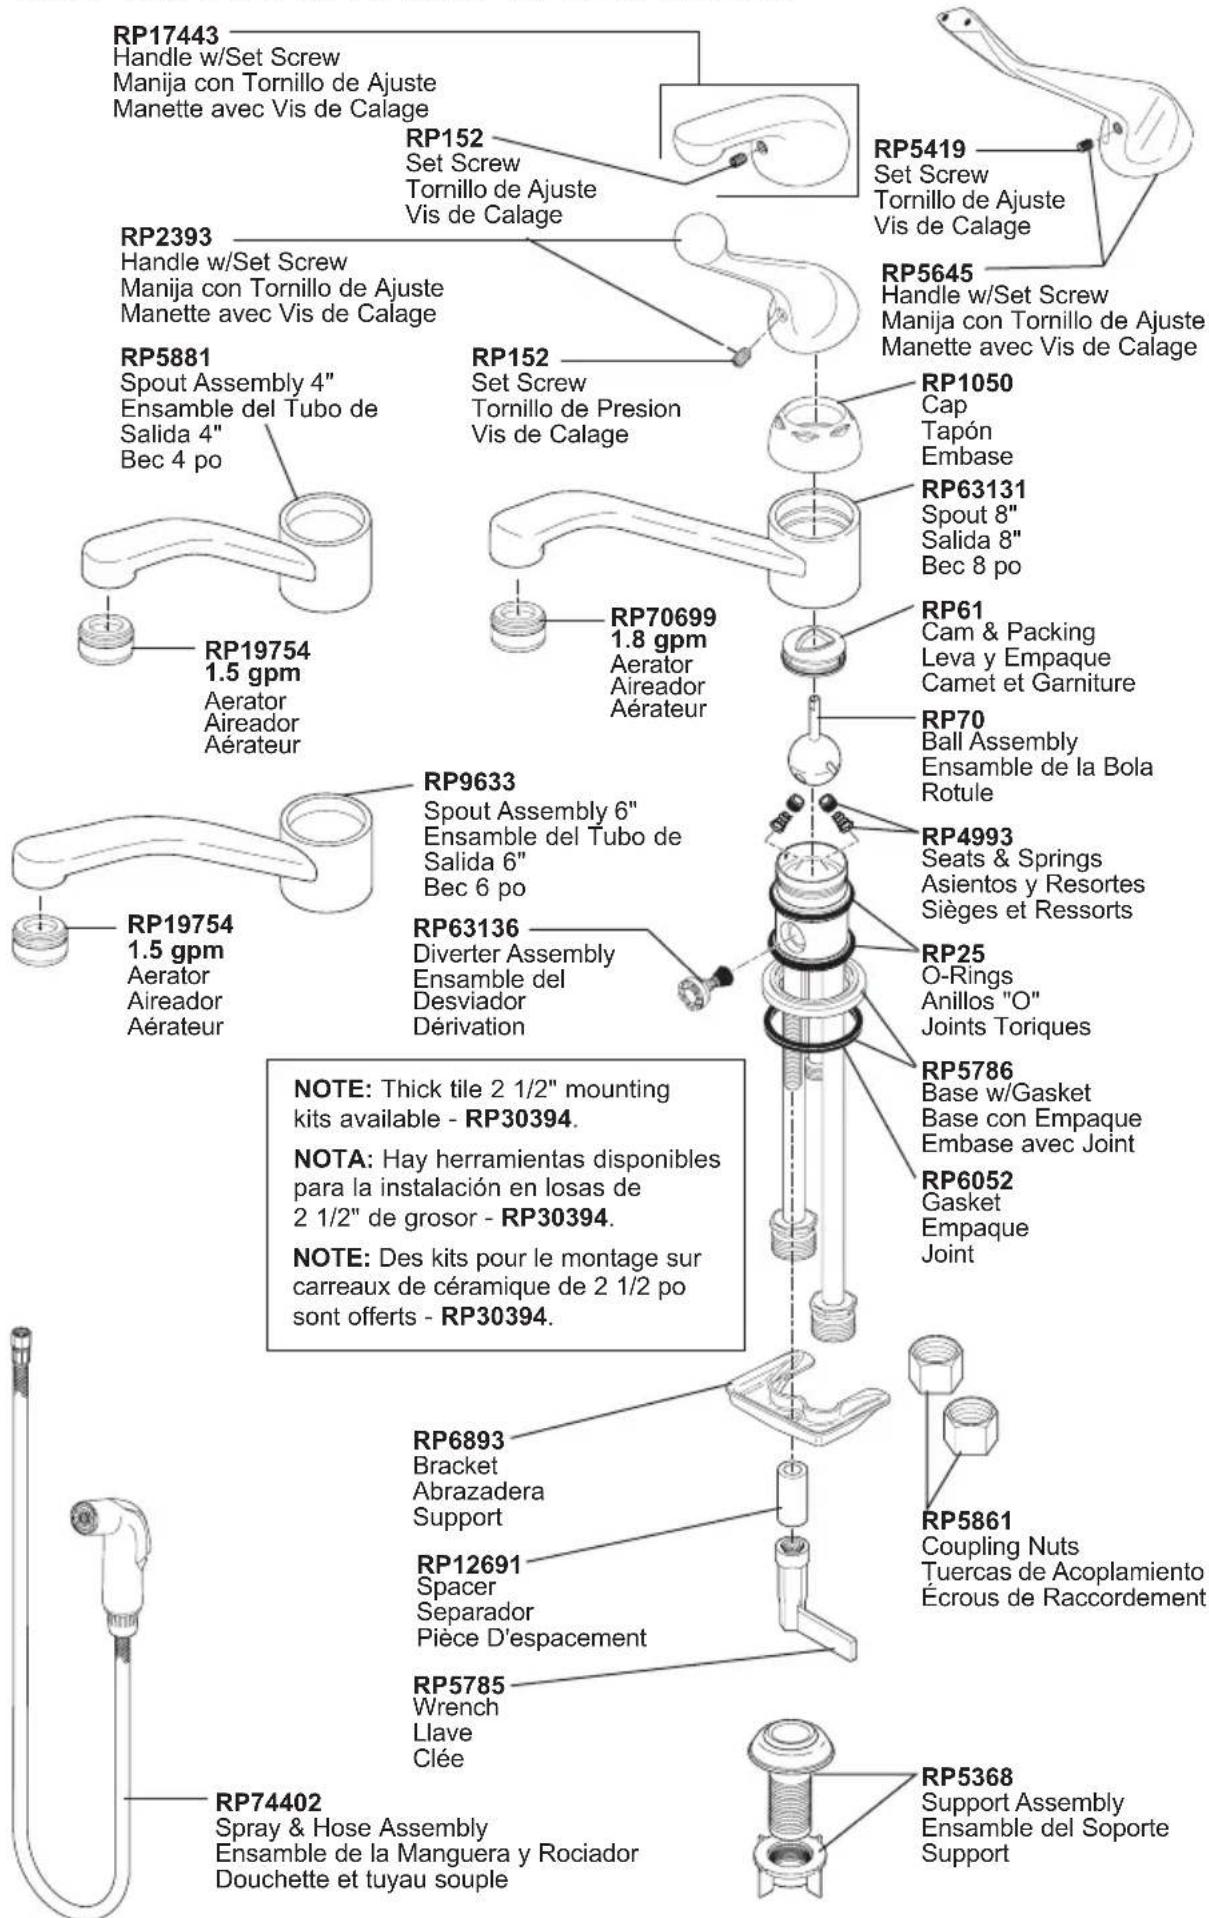
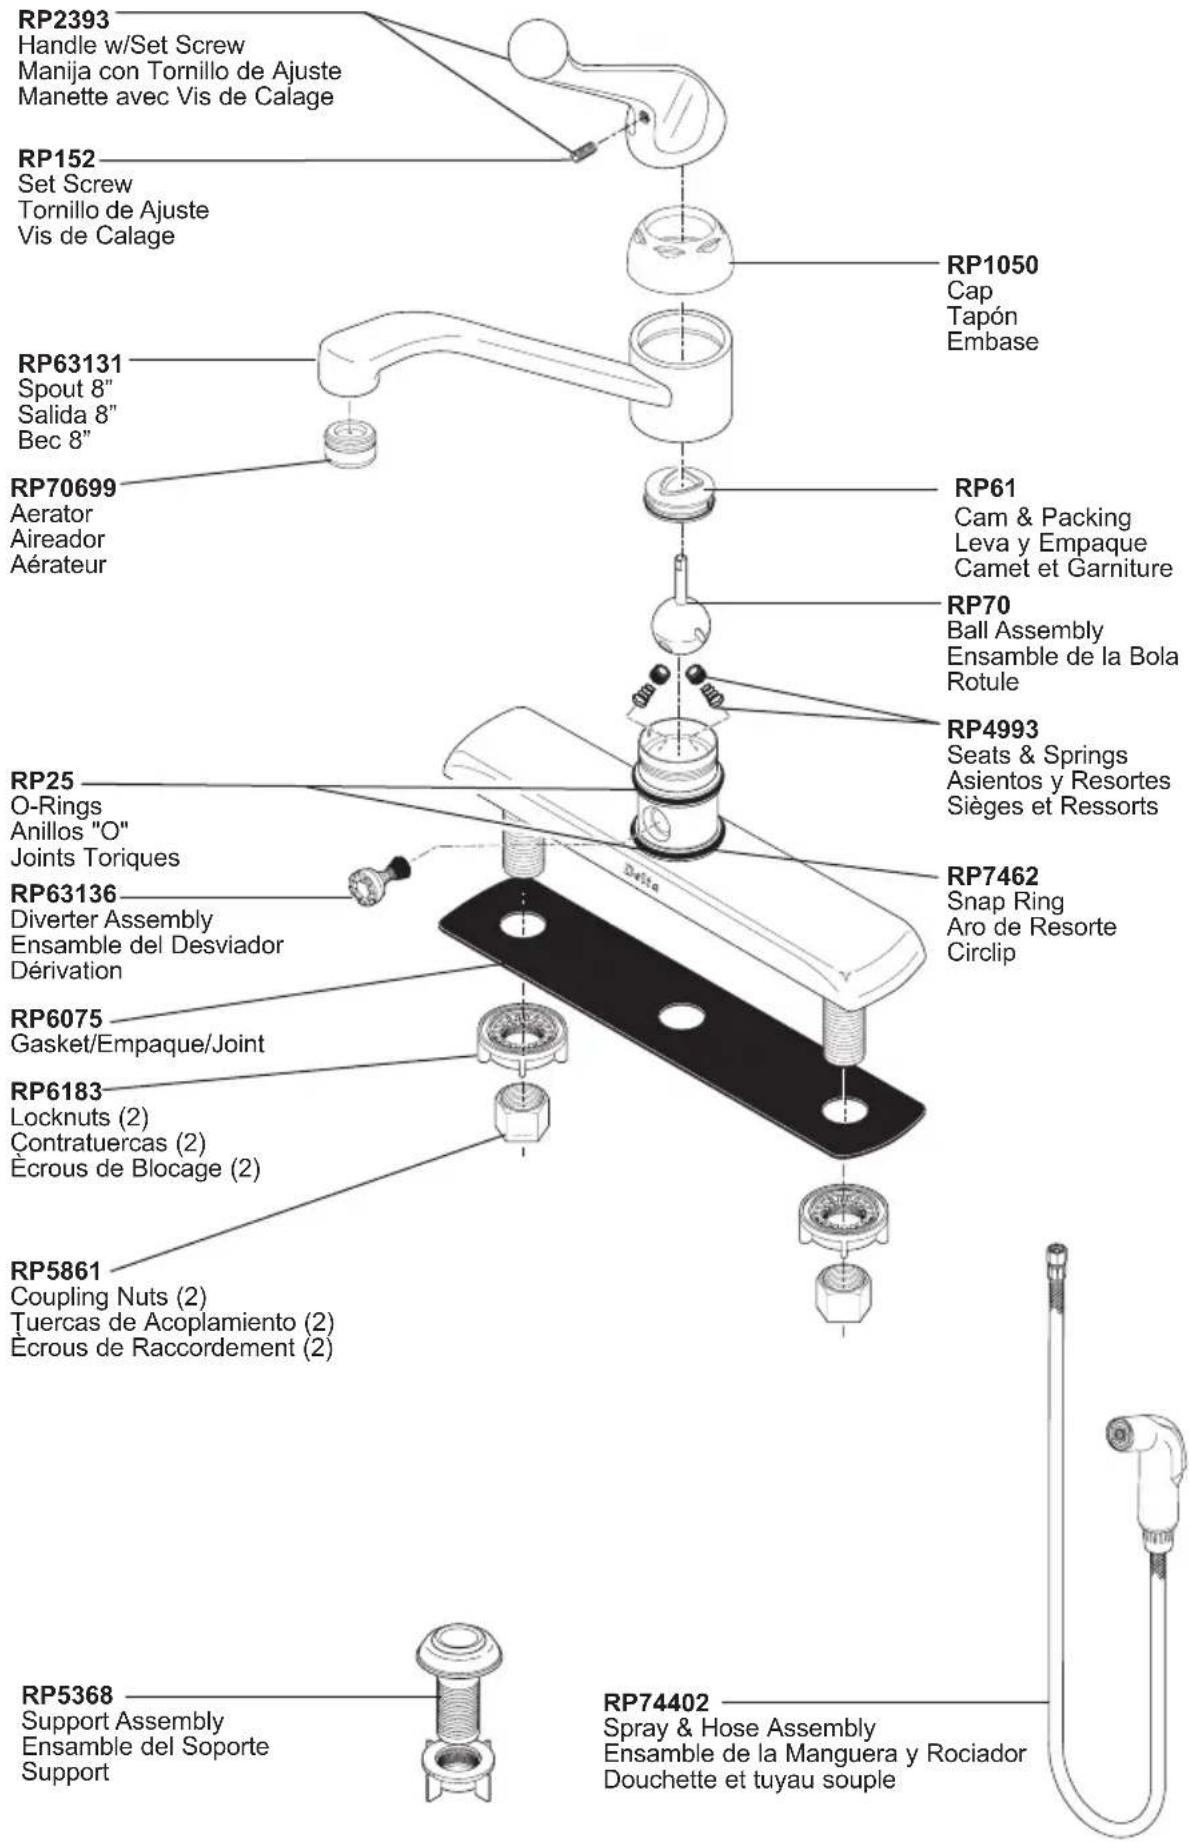
Maintenance Cleaning and Care
If faucet leaks from under handle:
Remove handle and ensure cap (1) is tight.
If leak persists—SHUT OFF WATER SUPPLIES. Replace Ball Assembly (2)—Repair Kit RP70 and Cam & Packing (3)—Repair Kit RP61.
If faucet leaks from spout outlet:
SHUT OFF WATER SUPPLIES. Replace Ball Assembly (2)-Repair Kit RP70 and Seats & Springs (4)-Repair Kit RP4993.
If faucet exhibits very low flow
A. Remove and clean Aerator (5), or B. SHUT OFF WATER SUPPLIES. Clean Seats and Springs (4) of any debris.
If spray attachment does not function properly:
SHUT OFF WATER SUPPLIES. Remove Diverter Assembly (6) and clean.
If condition persists—SHUT OFF WATER SUPPLIES. Replace Diverter Assembly (6)—Repair Kit RP63136.
If faucet leaks from base of spout:
SHUT OFF WATER SUPPLIES. Remove spout and replace Spout O-Rings (7)-Repair Kit RP25.
Care should be given to the cleaning of this product. Although its finish is extremely durable, it can be damaged by harsh abrasives or polish. To clean, simply wipe gently with a damp cloth and blot dry with a soft towel.
Modelos 100LF-WF, 101LF-WF, 120LF, 175LF-WF, 300LF-WF, 400LF-WF, 420LF Y 570LF-WF Series
natural_image
Line drawings of various bathroom fixtures including faucet, showerhead, and sink (no text or symbols)natural_image
Line drawings of five different eyewear and accessories: wrench, safety goggles, pliers, silicone tool, and lamp (no text or symbols)Delta Faucet Company Masco Canada Limited, Plumbing Group
Product Service Technical Service Centre
55 E. 111th Street 350 South Edgeware Road
Indianapolis, IN 46280 St. Thomas, Ontario, Canada N5P 4L1
Attention: Customer Solutions Attention: Customer Service
www.deltafaucet.com/service-parts/contact-us http://www.deltafaucet.ca/customersupport/assistance.html
© 2020 Delta Faucet Company
1
natural_image
Technical diagram of a mechanical assembly with labeled parts (no text or symbols present)natural_image
Technical diagram of a mechanical latch assembly with two base plates and a handle (no text or symbols)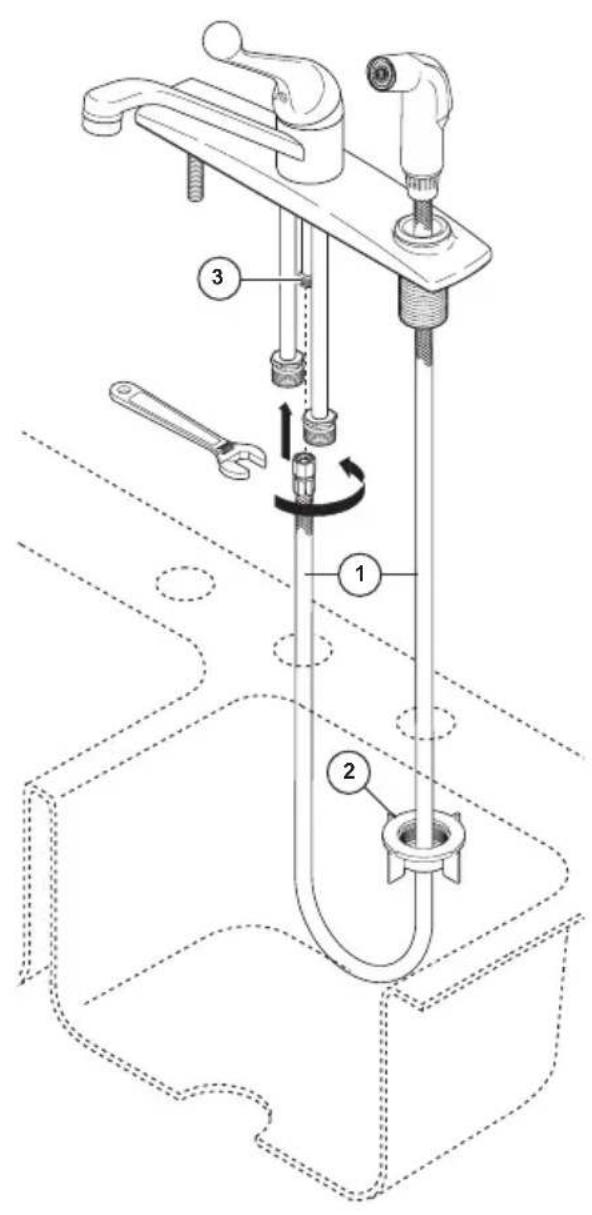
5


Maintenance
Modèles 100LF-WF, 101LF-WF, 120LF, 175LF-WF, 300LF-WF, 400LF-WF, 420LF & 570LF-WF Seria
natural_image
Line drawings of various bathroom fixtures including faucet, showerhead, and sink (no text or symbols)natural_image
Line drawings of five different eyewear and accessories: wrench, safety goggles, pliers, silicone tool, and flashbox (no text or symbols)Product Service Centre de services techniques
55 E. 111th Street 350, chemin South Edgeware
Indianapolis, IN 46280 St. Thomas (Ontario) Canada N5P 4L1
www.deltafaucet.com/service-parts/contact-us http://www.deltafaucet.ca/customersupport/assistance.html
© 2020 Delta Faucet Company
1
natural_image
Technical diagram of a mechanical switch assembly with labeled parts (no text or symbols present)natural_image
Technical diagram of a mechanical switch assembly with labeled parts (no text or symbols present)natural_image
Technical illustration of a hand switch mechanism with two base plates and a ball bearing (no text or symbols)5

Maintenance Instructions de nettoyage
101LF-WF, 175LF-WF, & 570LF-WF SERIES/SERIA
120LF & 420LF SERIES/SERIA

- SINGLE HANDLE KITCHEN / LAVATORY FAUCETS
- For easy installation of your faucet you will need:
- TABLE OF CONTENTS:
- Limited Warranty on Delta® Faucets
- 1
- Preparing for Installation
- SHUT OFF WATER SUPPLIES
- Sprayer Installation
- For single hole models with spray and spray support.
- For models with integrated spray.
- Faucet Installation
- For deck mount models.
- For single hole mount models.
- Supply Line Connections
- Flush the System and Check for Leaks
- Maintenance Cleaning and Care
- Maintenance
- Maintenance Instructions de nettoyage
- 120LF & 420LF SERIES/SERIA
Brand : DELTA
Model : 100LF-WF
Category : Faucet