
RACE8002E - Air Conditioning RCA - Free user manual and instructions
Find the device manual for free RACE8002E RCA in PDF.

| Product Type | Window Air Conditioner |
| Brand | RCA |
| Model | RACE8002E |
| Power Supply Voltage | 115 V (103.5-126.5 V) |
| Rated Current | 12 A max |
| Recommended Fuse | 15 A time-delay |
| Plug Type | 3-prong grounding plug |
| Power Cord Length | 183 cm max to outlet |
| Required Window Opening Dimensions | Width 38 in (96.5 cm), Height 13 1/4 in (33.7 cm) |
| Main Functions | Cooling, ventilation, temperature adjustment, timer |
| Air Filter | Removable, washable with warm water and mild soap |
| Filter Maintenance | Every 2 weeks |
| Front Panel Cleaning | Soft damp cloth, air dry |
| Safety | GFCI cord with Test and Reset buttons, grounding required |
| Installation | Double-hung window, requires 2 persons |
| Warranty | Warranty void if unauthorized disassembly |
Frequently Asked Questions - RACE8002E RCA
User questions about RACE8002E RCA
0 question about this device. Answer the ones you know or ask your own.
Ask a new question about this device
Download the instructions for your Air Conditioning in PDF format for free! Find your manual RACE8002E - RCA and take your electronic device back in hand. On this page are published all the documents necessary for the use of your device. RACE8002E by RCA.
USER MANUAL RACE8002E RCA
natural_image
Line drawing of a portable air conditioner unit with ventilation grilles and control panel (no text or symbols)Please read this owner's manual carefully and thoroughly before installing and operating your room air conditioner.
Please retain this owner's manual for future reference after reading it thoroughly.
CONTENTS
Contents....1
Safety Precautions....2
Before Operation 5
Introduction 6
Installation....8
Window Requirements 8
Preparation of Chassis....9
Unit Installation....10
Removal from Window....11
Operating Instructions....12
Operation Panel....12
Function Specifications ....13
Remote Controller 15
Maintenance 16
Troubleshooting....17
French Manual 19

WARNING
Installation
Don't use a power cord, a plug or a loose socket which is damaged.
- Otherwise, it may cause a fire or electrical shock.
Do not disassemble or modify products.
- It may cause failure and electric shock.
Always ground the product.
• There is risk of fire or electric shock.
Always install the expansion panel(s).
- Improper assembly or installation may cause incorrect operation, including injury, fire, and poor performance, electric shock hazards.
Do not modify or extend the power cable.
- There is risk of fire or electric shock.
Do not use the power cord near flammable gas or combustibles such as gaso-line, benzene, thinner, etc.
- It may cause explosion or fire.
Operation
Do not place heavy object on the power cord and take care so that the cord should not be pressed.
- There is danger of fire or electric shock.
Always install a dedicated circuit and breaker.
- Improper wiring or installation may cause fire or electric shock
Do not touch(operate) the product with wet hands.
- There is risk of fire or electrical shock.
Do not place the power cord near a heater.
- It may cause fire and electric shock.
Do not allow water to run into electric parts.
- It will cause failure of machine or electric shock.
Use a soft cloth to clean. Do not use wax, thinner, or a strong detergent.
- The appearance of the air conditioner may deteriorate, change color, or develop surface flaws.
If strange sounds, or small or smoke comes from product. Turn the breaker off or disconnect the power supply cable.
- There is risk of electric shock or fire.
Do not open the suction inlet grill of the product during operation.
- Otherwise, it may electrical shock and failure.
If water enters the product, turn off the power switch of the main body of appliance. Contact service center after taking the power-plug out from the socket.
Ventilate the room well when using this appliance together with a stove, etc.
- An oxygen shortage may occur.
Do not plug or unplug the power supply plug during operation.
- There is risk of fire or electric shock.
Take care to ensure that power cable could not be pulled out or damaged during operation.
- There is risk of fire or electric shock.
Turn off the power and breaker firstly when cleaning the unit.
- Since the fan rotates at high speed during operation, it may cause injury.
Do not damage or use an unspecified power cord.
- It will cause electric shock or fire.
When gas leaks, open the window for ventilation before operating the unit.
- Otherwise, it may cause explosion, and a fire.
Turn off the main power switch when not using it for a long time.
- Prevent accidental startup and the possibility of injury.
Do not operate with wet hands or in damp environment.
- It will cause electric shock.
Never touch the metal parts of the unit when removing the filter.
• They are sharp and may cause injury.

CAUTION
■ Installation
Install the product so that the noise or hot wind from the outdoor unit may not cause any damage to the neighbors.
- Otherwise, it may cause dispute with the neighbors.
Keep level parallel in installing the product.
- Otherwise, it may cause vibration or water leakage.
Operation
Do not put a pet or house plant where it will be exposed to direct air flow.
- It may cause injury.
Do not block the inlet or outlet of air flow.
- It may cause product failure.
Use a soft cloth to clean. Do not use wax, thinner, or a strong detergent.
- The appearance of the air conditioner may deteriorate, change color, or develop surface flaws.
Do not step on the indoor/outdoor unit and do not put anything on it.
- It may cause an injury through dropping of the unit or falling down.
Be cautious not to touch the sharp edges when installing.
- It may cause injury.
Always insert the filter securely. Clean it every two weeks.
- Operation without filters will cause failure.
Avoid excessive cooling and perform ventilation sometimes.
- Otherwise, it may do harm to your health.
Do not drink water drained from air conditioner.
• It contains containment and will make you sick.
Do not insert the hands or bars through the air inlet or outlet during operation.
- Otherwise, it may cause personal injury.
If the liquid from the batteries gets onto your skinor clothes, wash it well with clean water. Do not use the remote if the batteries have leaked.
If you eat the liquid from the batteries, brush your teeth and see doctor. Do not use the remote if the batteries have leaked.
- The chemicals in batteries could cause burns or other health hazards.
- The chemicals in batteries could cause burns or other health hazards.
Preparation for Operation
- Contact an installation specialist for installation.
- Plug in the power cord properly.
- Use a dedicated circuit. Overloading the line could create a fire hazard.
- Do not use an extension cord.
- Do not start/stop operation by plugging/unplugging the power cord.
- If the cord/plug is damaged, have an authorized Servicer install an exact replacement part.
Usage
- Being exposed to direct airflow for an extended period of time could be hazardous to your health. Do not expose occupants, pets, or plants to direct airflow for extended periods of time.
- Due to the possibility of oxygen deficiency, ventilate the room when used together with stoves or other heating devices.
- Do not use this air conditioner for non-specified special purposes (e.g. Preserving precision devices, food, pets, plants, and art objects). Such usage could damage the items.
- The air conditioner is a consumer comfort appliance, not a precision climate control system.
Cleaning and Maintenance
- Do not touch the metal parts of the unit when removing the filter. Injuries can occur when handling sharp metal edges.
- Do not use water to clean inside the air conditioner. Exposure to water can destroy the insulation, leading to possible electric shock.
- When cleaning the unit, first make sure that the power and breaker are turned off. The fan rotates at a very high speed during operation. There is a possibility of injury if the unit's power is accidentally triggered on while cleaning inner parts of the unit.
Service
For repair and maintenance, contact your authorized service dealer.
How and Why
Your room air conditioner provides the following functions to make hot weather living more comfortable:
- Cools and circulates the room air.
- Lowers humidity by removing excess moisture.
- Filters out summertime dust, dirt, and some airborne impurities.
The air conditioner performs these functions by drawing the room air through a filter which traps dust and dirt particles. The air then passes over a cooling coil which refrigerates the air and removes excess moisture. The same air is then returned to the room-cooler, drier, and cleaner. Moisture removed from the room air is carried to the outside and evaporated.
Your air conditioner is designed to be easy to operate and to provide plenty of cooling power.
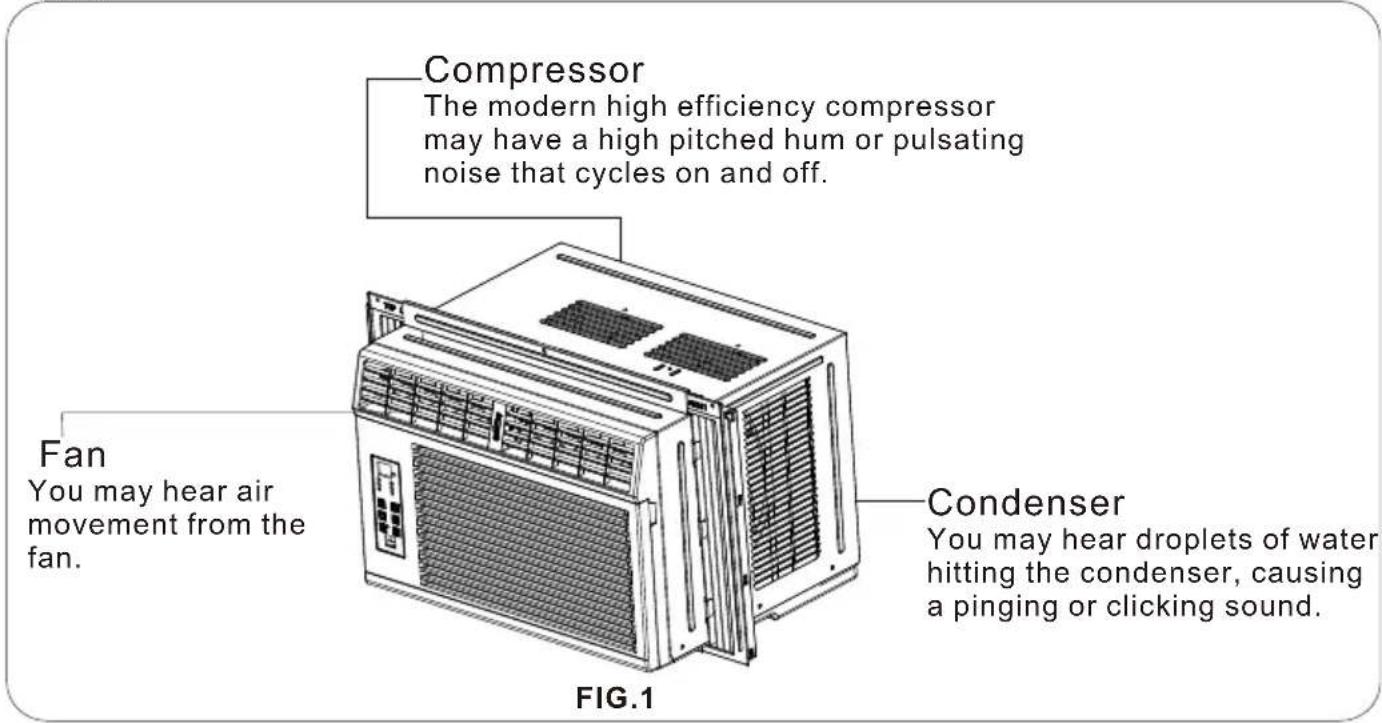
Normal Sounds
Aside from the regular fan motor and compressor sounds coming from your air conditioner, you will once in a while hear a pinging sound. This is the result of moisture inside the room air being thrown against the running fan. This is normal and should not be caused for concern. Also, do not be alarmed if you hear a slight hissing or gurgling sound coming from your air conditioner after it is off. These are normal coolant noises.
Capacitance and Running Time
Proper unit size is important in deciding the desired comfort for the area you want to cool. The proper size is determined by the number of square feet in the area to be cooled.
Whenever the heat or humidity load is above normal, the air conditioner must run longer and more often to keep the desired temperature you have selected. Under heavy heat load conditions, the air conditioner may need to run constantly to keep the temperature you want.
At times using the high fan setting to circulate the room air may make it comfortable even though you do not set the air conditioner to cool the air. This will save your cost of use.
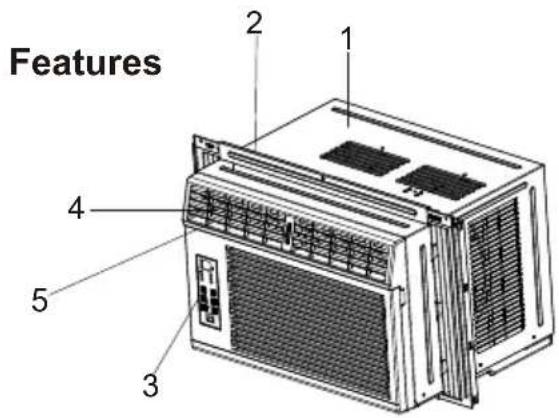
- Cabinet
- Upper guide
- Operation panel
- Horizontal louver blades
- Vertical louver blades
- Guide panel
- Front grille
- Air filter
- Inlet grille
10.Wheel
FIG.2
Using the Air Conditioner
WARNING
To reduce the risk of fire, electric shock, or injury to persons, read the section of important safety instructions before operating the appliance.
To begin operating the air conditioner after installation, follow these steps:
- Plug in the air conditioner. (To prevent electrical hazards, do not use an extension cord or an adapter plug.)
- Turn on the power switch.
- Select the cool mode.
- Set the fan speed at the high level.
- Adjust the air direction control tabs for comfortable airflow.
- Once the room has cooled, adjust the set temperature and fan speed to the setting you find most comfortable.
Note:
If the air conditioner is turned off, a “compressor protection circuit” is automatically self-activated. The compressor cannot operate during a “compressor protection” condition. (This is normal) it may take 3 minutes before the “protection circuit” self-deactivates.
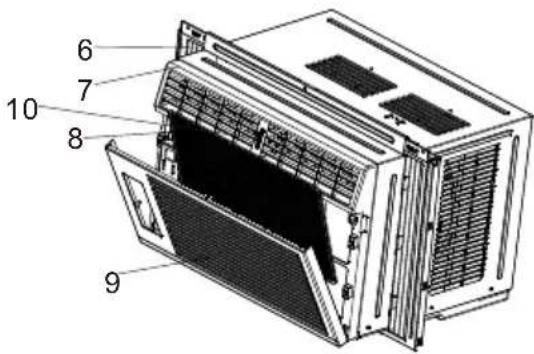
| ITEM | NAME OF PARTS | Q'TY |
| A | SCREW(ST4X10FT) | 4 |
| B | FOAM STRIP(Adhesive backed) | 1 |
| C | FOAM STRIP(Not adhesive backed) | 1 |
| D | CURTAIN | 2 |
| E | UPPER GUIDE | 1 |
| F | CURTAIN FIXER | 2 |
| G | SCREW(ST4X16FT) | 5 |
| H | CURTAIN SASH | 2 |
| I | CURTAIN CLIP | 2 |
Attention: For detailed content of accessories, please take our package as major reference.
REQUIRED TOOLS:
- Tight fitting gloves Standard screwdriver
- Pliers
- Sharp knife
• 3/8-inch open end wrench or adjustable wrench
• 1/4-inch hex socket and racher - Tape measure Electric drill
- 1/4-inch drill bit
WINDOW REQUIREMENTS
Your air conditioner will install into standard double hung windows with actual clear opening widths of about 24" to 39" (610 to 991mm)(FIG.4).
Lower sash must open sufficiently to allow a clear vertical opening of about 15.4" (392mm). Side louvers and the rear of the air conditioner must have clear air space to allow enough airflow through the condenser for heat removal. The rear of the unit must be outdoors, not inside a building or garage.
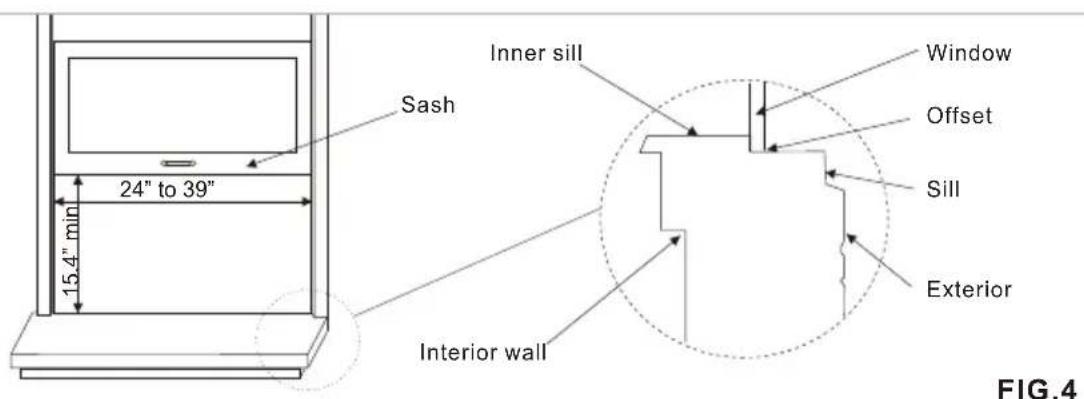
FIG.4
PREPARATION OF CHASSIS
1 GUIDE PANEL
Install the curtain (ITEM D) into the curtain sash(ITEM H), please note that the side with middle clip should be put inside the curtain sash, after that insert the curtain clip (ITEM H) into the curtain sash, as shown in FIG.5. Therefore after the two guide panels are assembled, keep them for later use.

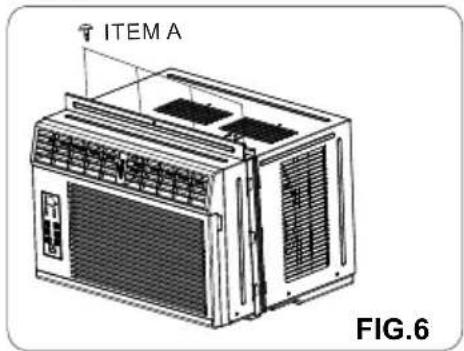
2 UPPER GUIDE
Fasten the upper guide(ITEM E) on the top of the air conditioner with 4 screws (ITEM A) as shown in FIG.6.
natural_image
Line drawing of an air conditioning unit (ITEM A) with ventilation grilles and fan array, labeled FIG.6 (no text or symbols on the device itself)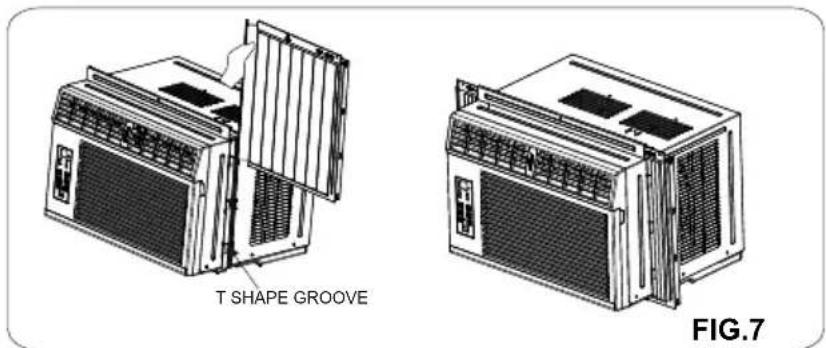
3 GUIDE PANEL
Pull the guide panels and make them fit into the T shape groove from the top down, then insert and push the frame into the guides of the air conditioner, as shown in FIG.7.
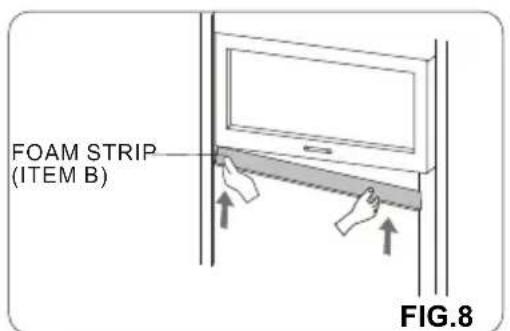
4 FOAM STRIP
Cut the adhesive-backed foam strip(ITEM B) to the window width. Remove the backing from the foam strip and attach the foam strip to the underside of the bottom window. (FIG.8)

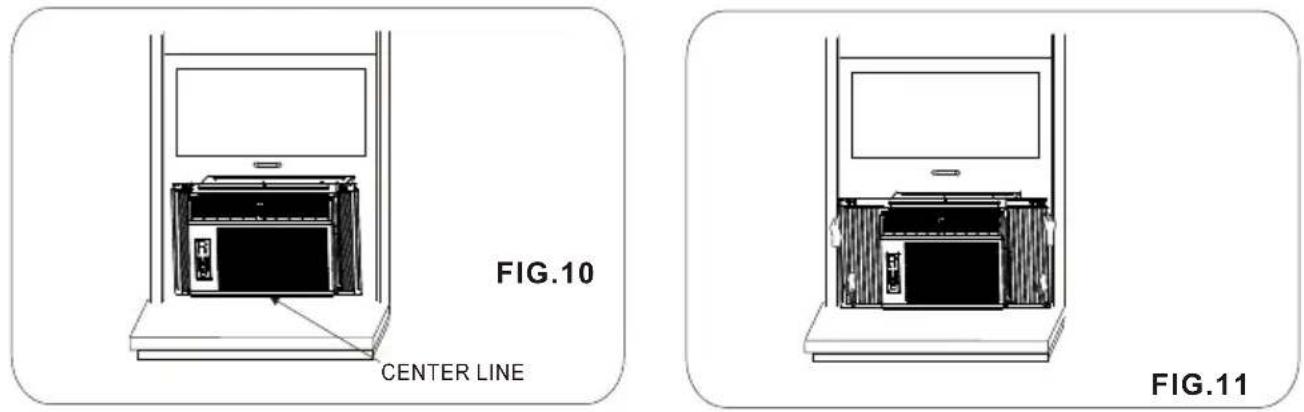
5 LOCATE THE UNIT IN WINDOW
Open the window and mark center line with pencil on the center of the inner sill, as shown in FIG.9.
UNIT INSTALLATION

Caution: During the following step, hold unit firmly until window sash is lowered to top channel behind side panel frames. Personal injury or property damage may result if unit falls from window.
INSTALL THE AIR CONDITIONER ON THE WINDOW
Carefully lift the air conditioner and slide it into the open window. Make sure it is put in the center of the window as shown in FIG.10.
While steadying the air conditioner, carefully bring the window sash down behind the upper guide of the air conditioner. Extend the guide panels to fill the window opening, drive Slovenia (THEM G) curtain clips (IATM the sill, as shown in FIG.11.
When the air conditioner is properly installed, it should tilt slightly down at the back. If it is set correctly in the window, it will hang lower in the back automatically. If it does not, there is a problem with the installation.
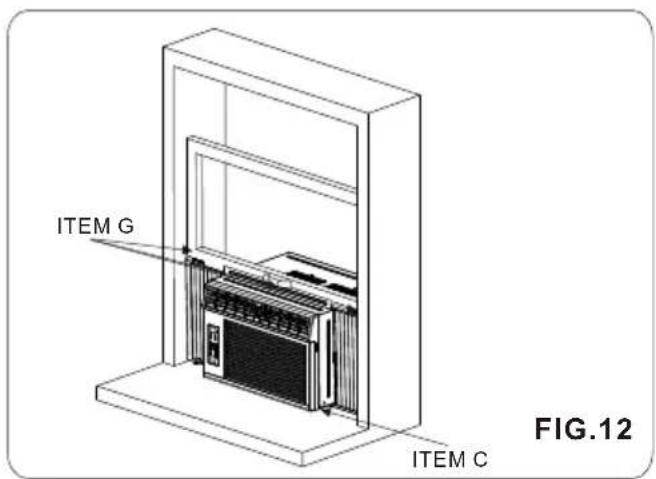
2 SECURE THE GUIDE PANELS
Fasten the top of the and the sash with 3 screwsguide panels (ITEM G), as shown in FIG.12.
Finally, inset the foam seal (ITEM C) in the space between the window sill and the bottom of the air conditioner. As shown in FIG.12.
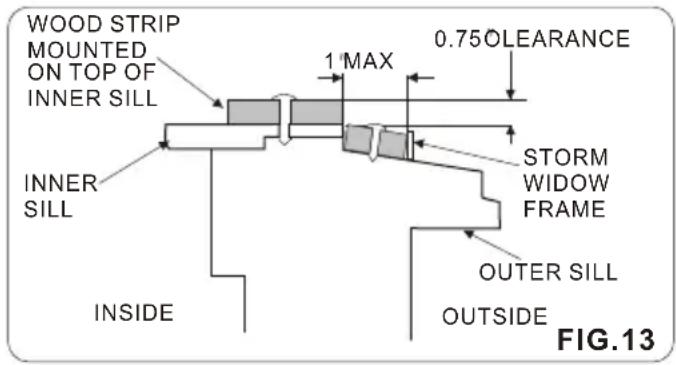
3 IF AIR CONDITIONER IS BLOCKED BY STORM WINDOW FRAME
Proper clearance enhances the cooling efficiency of the unit and prevents heat radiation of the condenser. If storm window presents interference, fasten a 2^ wide wood strip to the inner window sill across the full width of the sill. The wood strip should be thick enough to raise the height of the window sill so that the unit can be installed without interference from the storm window frame. See FIG.13.
The top of the wood strip should be approximately 0.75"higher than the storm window frame or wood strip to help condensation to drain properly to the outside.
Install a second wood strip (approximately 6'long by 1.5 wide and same thickness as first strip) in the center of the outer sill flush against the back of the inner sill, as shown in FIG.13.
If the distance between storm window frame and wood strip mounted on top of inner sill is more than 1" two of wood strips are not necessary.
REMOVAL FROM WINDOW
Turn off the air conditioner and disconnect the power cord. Remove the 5 screws installed through the window and the air conditioner, and save for reinstallation later. Close the guide panels. Keeping a firm grip on the air conditioner, raise the sash, and carefully tilt the air conditioner away from you to drain any condensate water. Remove the air conditioner from the window.

CAUTION
Air conditioners covered in this manual pose an excessive weight hazard. Two or more people are needed to move and install the unit.
To prevent injury or stain, use proper lifting and carrying techniques when moving unit.
When handling the air conditioner, be careful to avoid cuts from sharp metal fins on front and rear coils.
Make sure air conditioner does not fall during removal.
OPERATION PANEL
The control featured in this manual are representative of the many models available. Your model may look slightly different.
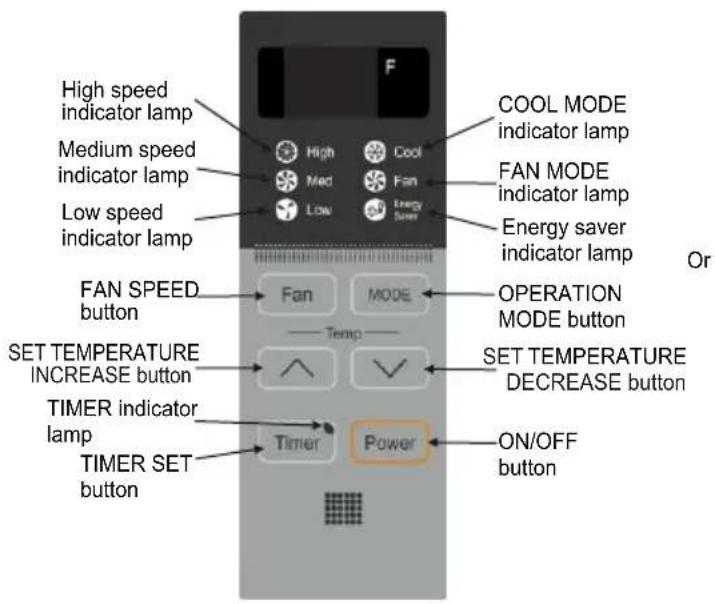
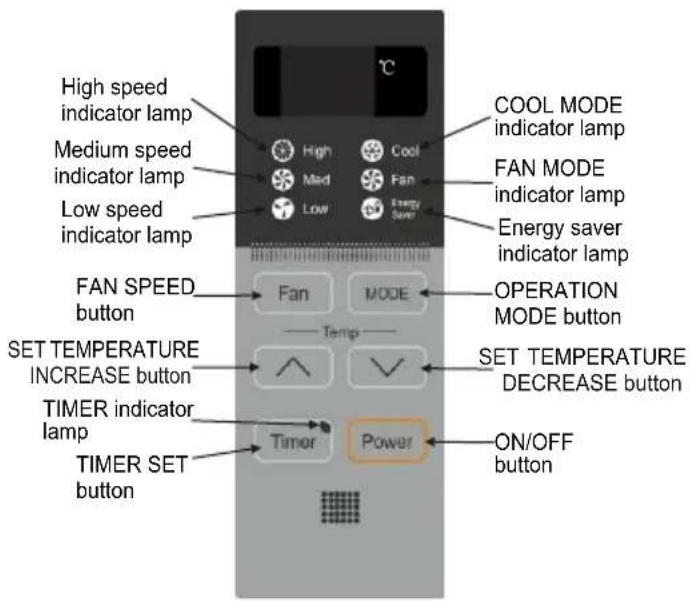
1.ON/OFF button Power
Turns on/off the air conditioner.

Caution: If you turn off the air conditioner or switch from cooling to the fan, wait at least 3 minutes before setting to cooling again.
2. FAN SPEED button Fan
Use to set the fan speed in the order of: low→medium→high→low.
3. OPERATION MODE button MODE
Use to select the operation mode in the order of: COOL mode FAN mode COOL mode and relative indicator lamps will illuminate.
4. TIMER SET button Timer (Timer range: 1-24 hours)
1) When the unit is on, press this button once to start timer off function and "01" will be shown on the display, every press of this button increases the AUTO-OFF time by 1 hour(24 hours at most), when the time accumulates to 24, press this button again the air conditioner will quit timer function. You can refer to the following: 01 02 ·s 24 quit timer function.
Notice: The time of AUTO-OFF will be displayed for 10 seconds, after that the display will change to display the set temperature but in fan mode the room temperature will be displayed.
2) When the unit is off, press this button once to start timer on function and "01" will be shown on the display, every press of this button increases the AUTO-ON time by 1 hour (24 hours at most), when the time accumulates to 24, press this button again the air conditioner will quit timer function. You can refer to the following: 01 02 ·s 24 quit timer function. When the timer on is activated the timer indicator lamp and the relative mode indicator lamps will flash and other buttons on the control panel are not functional, modes can be changed by pressing the buttons on the remote controller.
Notice: AUTO-ON time will be displayed all the time before the air conditioner is turned on.
3) The display of AUTO-ON/OFF time will be decreased by one hour.
5. TEMPERATURE ADJUSTMENT button
Button: When the unit is on, at cool mode the set temperature is displayed on the display all along. Press button once the set temperature will increase 1^(1^) , every press of this button increases the set temperature by 1^(1^) . The range of setting temperature is limited to 88^(31^) . At fan mode, button is not functional.
√ Button: When the unit is on, at cool mode the set temperature is displayed on the display all along. Press button √ once the set temperature will decrease 1^(1^) , every press of this button decreases the set temperature by 1^(1^) . The range of setting temperature is limited to 61^(16^) . At fan mode, button √ is not functional.
6. AIR FLOW DIRECTION ADJUSTMENT
Using the wheel on the front grille of the unit, the airflow can be directed to the left, right, straight ahead, or any combination of these directions.
FUNCTION SPECIFICATIONS
1. COOL RUNNING
1). Initial set temperature is 79^(26^) .
2). 3-minute time delay function of the compressor. When the setting temperature is lower than the room temperature, the compressor starts; when the setting temperature is higher than the room temperature the compressor stops.
3). The range of setting temperature is 61 °F-88 °F(16-31°C).
4). Both fan speed and air flow direction are adjustable.
2. FAN RUNNING
1). In fan mode, the display panel displays the room temperature, and both fan speed and air flow direction are adjustable.
2). The compressor does not operate during FAN mode.
3. ENERGY SAVER
1). This function is only available during cool running and the fan speed can be adjusted.
2). During ENERGY SAVER fan motor runs when the compressor runs, fan motor stops when the compressor stops.
4. PROMTING FOR CLEANING THE AIR FILTER
After the air conditioner has run for 200 hours and when it is turned off, the display panel will flashy display "CF" to remind you of cleaning the air filter.
5. SLEEP FUNCTION
Press the sleep button on the remote controller to start sleep function and press it again to stop sleep function. During sleep mode, only the relative function indicator lamp lights.
Notice: Press fan speed button during sleep mode, the air conditioner will stop sleep function.
During cooling mode, the set temperature will increase 2^ F(one)hour after setting SLEEP mode, and will increase 2^ F(one)F(are) in the next one hour (that means the set temperature increases 4 within two hours after setting sleep mode), then the air conditioner will work at this temperature all along.
During SLEEP mode, FAN SPEED will be "LOW".
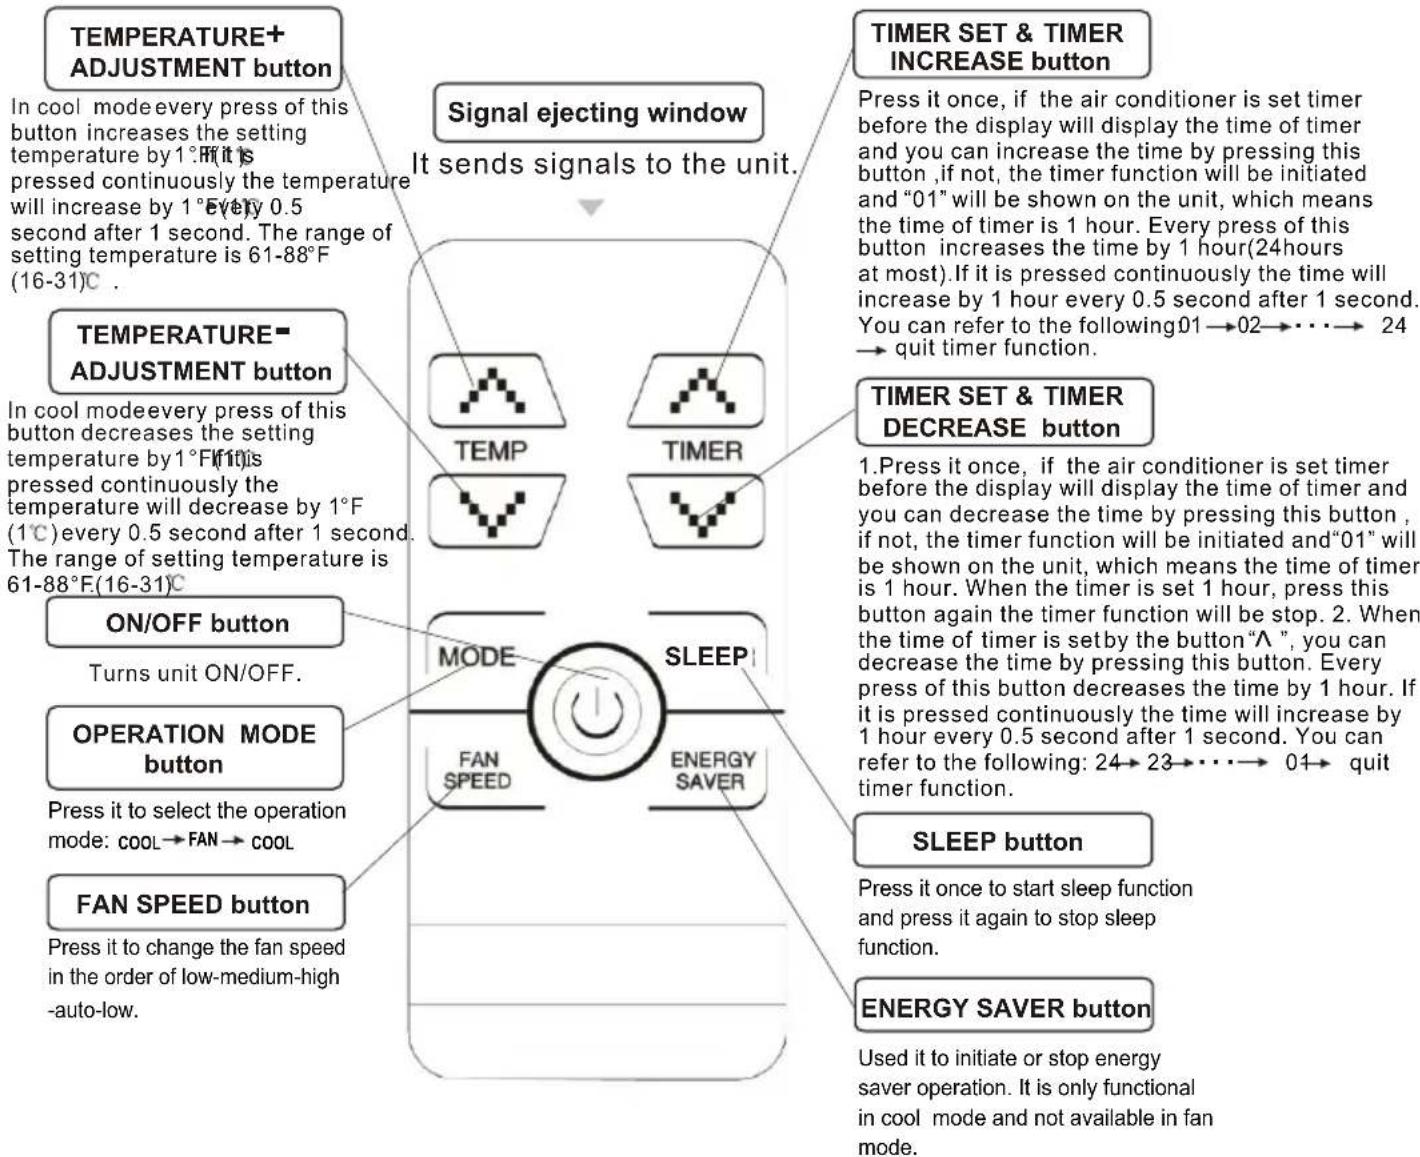
REMOTE CONTROLLER
flowchart
graph TD
    A["TEMPERATURE+ ADJUSTMENT button"] --> B["Signal ejecting window"]
    B --> C["TIMER SET & TIMER INCREASE button"]
    C --> D["TIMER SET & TIMER DECREASE button"]
    D --> E["SLEEP button"]
    E --> F["ENERGY SAVER button"]
    F --> G["FAN SPEED button"]
    G --> H["OPERATION MODE button"]
    H --> I["ON/OFF button"]
    I --> J["ON/OFF button"]
    J --> K["TURNS UNIT ON/OFF."]
    K --> L["Temperature=ADJUSTMENT button"]
    L --> M["In cool mode every press of this button increases the setting temperature by 1°F if it is pressed continuously the temperature will increase by 1° Every 0.5 second after 1 second. The range of setting temperature is 61-88°F (16-31)°C."]
    M --> N["It sends signals to the unit."]
    N --> O["TEMP"]
    N --> P["TIMER"]
    O --> Q["MODE"]
    P --> R["SLEEP"]
    Q --> S["FAN SPEED"]
    R --> T["ENERGY SAVER"]
    S --> U["FAN SPEED button"]
    T --> V["SLEEP button"]
    U --> W["FAN SPEED button"]
● HEAT mode is not applied to cool only type.
For specific usage and function of all buttons, please refer to "OPERATION PANEL" on Page 12-14.
- NOTICE:
- To operate, the remote should be within 6 meters of the unit with a clear line of sight.
- Remove the batteries if the remote controller is not to be used for long periods of time.
TURN THE AIR CONDITIONER OFF AND REMOVE THE PLUG FROM THE POWER OUTLET.
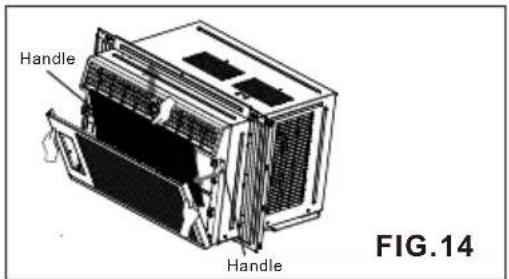
Air Filter Cleaning
The air filter will become dirty as it removes dust from the inside air. It should be cleaned every two weeks. If the air filter remains full of dust, the air flow may decrease and the cooling capacity will be reduced, possibly damage the unit.
Before cleaning, be sure to stop the operation and turn off the power switch.
- Put your hands on the left and right handles, pull the upper part of the inlet grille toward you (about 30°) and then take out the air filter from the air conditioner.(FIG.14).
- Wash the air filter under the faucet with warm water. Be sure to shake off all the water before replacing the filter.
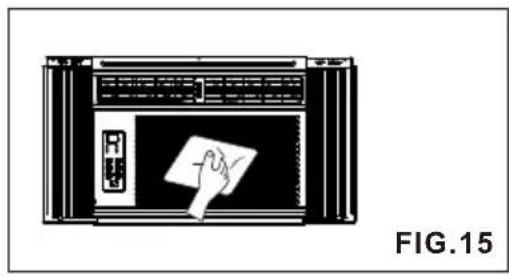
natural_image
Diagram of a device with a hand holding a paper, labeled FIG.15 (no text or symbols on the diagram itself)Air Conditioner Cleaning
Clean the front grille and inlet grille by wiping with a cloth dampened in mild detergent solution, as shown in FIG.15. The cabinet may be washed with mild soap or detergent and lukewarm water, then polish with liquid appliance wax.
To ensure continued peak efficiency, the condenser coils(outdoor side of the unit) should be checked periodically and cleaned if they become clogged with soot or dirt. Brush or vacuum exterior coils to remove debris from fins.
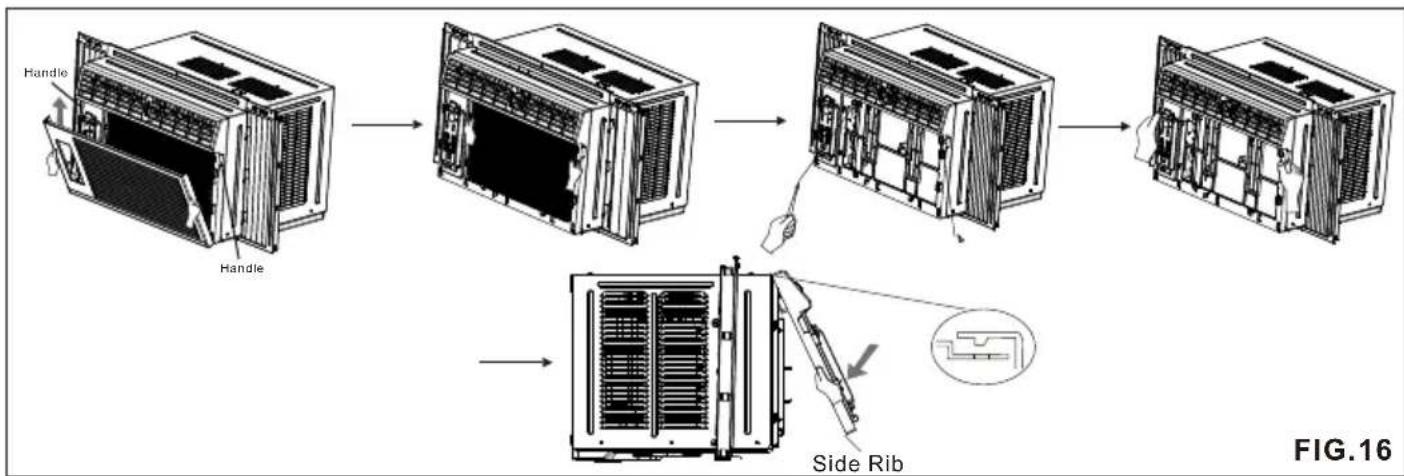
How to Remove the Front Grille
- Put your hands on the left and right handles, pull the upper part of the inlet grille toward you (about 30°) and then pull it upward from the air conditioner., as shown in FIG.16.
- Take out the air filter from the air conditioner.
- Remove the 2 screws fastened the front grille then pull the grille up from the bottom and pull the top of the grille away from the case to lift the top tabs out of their slots, as shown in FIG.16.
flowchart
graph TD
    A["Handle"] --> B["Device Rack"]
    B --> C["Close-Back Rack"]
    C --> D["Side Rib"]
    D --> E["Final Rack"]
    style A fill:#f9f,stroke:#333
    style B fill:#ccf,stroke:#333
    style C fill:#cfc,stroke:#333
    style D fill:#fcc,stroke:#333
    style E fill:#ffc,stroke:#333
BEFORE CALLING FOR SERVICE
Check the following list to be sure a service call really necessary. A quick reference to this manual may help you avoid an unneeded service call.
THE AIR CONDITIONER WILL NOT OPERATE
Check if...
Then...
| Wall plug disconnected. | Push plug firmly into wall outlet. |
| House fuse blown or electric breaker tripped. | Replace fuse with time delay type or reset circuit breaker. |
| Unit was turned off and then immediately on. | Turn unit off and wait 3 minutes before restarting. |
| Temperature set warmer than room temperature. | Set the temperature lower . |
AIR FROM UNIT DOES NOT FEEL COLD ENOUGH
Check if...
Then...
| Fan speed set in low . | Set fan speed to high . |
| The temperature set too warm. | Set the unit to lower temperature. |
| Room temperature below 61°F(16°C). | Cooling may not occur until room temperature rises above 61°F(16°C) |
| Temperature sensing tube touching evaporator coil, located behind front grille. | Remove front grille, and straighten tube away from evaporator coil. |
THE AIR CONDITIONER COOLING, BUT ROOM IS TOO WARM-ICE FORMING ON COOLING COIL BEHIND INLET GRILLE.
Check if...
Then...
| Outdoor temperature below 70°F(21) | To defrost the coil, set the air conditioner to fan mode. |
| Air filter may be dirty. | Clean filer. Refer to maintenance section of owner's manual. |
| The air conditioner set too cold for night-time cooling. | To defrost the coil, set the air conditioner to fan mode. |
THE AIR CONDITIONER COOLING, BUT ROOM IS TOO WARM
Check if...
Then...
| Dirty air filter-air restricted. | Clean air filter. Refer to maintenance section of owner's manual. |
| The temperature set too warm. | Set the unit to lower temperature. |
| Front of unit is blocked by drapes, furniture, etc.Air distribution is restricted. | Clear blockage in front of unit. |
| Doors, windows, registers, etc. open, cold air escapes. | Close doors, windows registers, etc. |
| Unit recently turned on in hot room. | Allow additional time to remove stored heat from walls, ceiling, floor and furniture. |
THE AIR CONDITIONER TURNS ON AND OFF RAPIDLY.
Check if...
Then...
| Outside temperature is extremely hot. | Set fan speed to high speed to bring air past cooling coils faster. |
NOISE WHEN UNIT IS COOLING
Check if...
Then...
| Sound of fan hitting water-from the moisture removal system. | This is normal when humidity is high. Close doors, windows and registers. |
| Window vibration-poor installation. | Refer to installation instructions or check with installer. |
TROUBLE DISPLAY
- Er : indicates malfunction of the room temperature resistance.
- En : indicates malfunction of the pipe temperature resistance.
- Ed : indicates malfunction of anti-icing protection. • E1: air filter clean.
CLIMATISEUR D'AIR — CONSIGNES DE SÉCURITÉ
natural_image
Line drawing of an air conditioning unit with ventilation grilles and fan (no text or symbols)natural_image
Line drawing of an air conditioner unit with ventilation grilles and fan (no text or symbols)FIG.4
natural_image
Line drawing of a door handle with a screw and metal bracket (no text or symbols)natural_image
Abstract black-and-white line drawing of vertical bars and horizontal lines on a flat base (no text or symbols)natural_image
Line drawing of a mechanical clamp or bracket assembly with a screwdriver inserted (no text or symbols)DANS LE CAS OÙ CLIMATISEUR EST BLOQUÉ PAR UN CONTRE-CHÂSSIS
natural_image
Pure mechanical cross-section diagram without any text, numbers, or symbolsnatural_image
Technical line drawing of an air conditioning unit with ventilation grilles and fan array (no text or symbols)
- CONTENTS
- WARNING
- Installation
- Operation
- CAUTION
- ■ Installation
- Preparation for Operation
- Usage
- Cleaning and Maintenance
- Service
- How and Why
- Normal Sounds
- Capacitance and Running Time
- Using the Air Conditioner
- To begin operating the air conditioner after installation, follow these steps:
- Note:
- REQUIRED TOOLS:
- WINDOW REQUIREMENTS
- PREPARATION OF CHASSIS
- GUIDE PANEL
- UPPER GUIDE
- GUIDE PANEL
- FOAM STRIP
- LOCATE THE UNIT IN WINDOW
- UNIT INSTALLATION
- INSTALL THE AIR CONDITIONER ON THE WINDOW
- SECURE THE GUIDE PANELS
- IF AIR CONDITIONER IS BLOCKED BY STORM WINDOW FRAME
- REMOVAL FROM WINDOW
- OPERATION PANEL
- 1.ON/OFF button Power
- FAN SPEED button Fan
- OPERATION MODE button MODE
- TIMER SET button Timer (Timer range: 1-24 hours)
- TEMPERATURE ADJUSTMENT button
- AIR FLOW DIRECTION ADJUSTMENT
- FUNCTION SPECIFICATIONS
- COOL RUNNING
- FAN RUNNING
- ENERGY SAVER
- PROMTING FOR CLEANING THE AIR FILTER
- SLEEP FUNCTION
- REMOTE CONTROLLER
- - NOTICE:
- Air Filter Cleaning
- Before cleaning, be sure to stop the operation and turn off the power switch.
- Air Conditioner Cleaning
- How to Remove the Front Grille
- BEFORE CALLING FOR SERVICE
- THE AIR CONDITIONER WILL NOT OPERATE
- AIR FROM UNIT DOES NOT FEEL COLD ENOUGH
- THE AIR CONDITIONER COOLING, BUT ROOM IS TOO WARM-ICE FORMING ON COOLING COIL BEHIND INLET GRILLE.
- THE AIR CONDITIONER COOLING, BUT ROOM IS TOO WARM
- THE AIR CONDITIONER TURNS ON AND OFF RAPIDLY.
- NOISE WHEN UNIT IS COOLING
- TROUBLE DISPLAY
- CLIMATISEUR D'AIR — CONSIGNES DE SÉCURITÉ
- DANS LE CAS OÙ CLIMATISEUR EST BLOQUÉ PAR UN CONTRE-CHÂSSIS
Brand : RCA
Model : RACE8002E
Category : Air Conditioning