
GM750 - Cellphone LG - Free user manual and instructions
Find the device manual for free GM750 LG in PDF.
User questions about GM750 LG
0 question about this device. Answer the ones you know or ask your own.
Ask a new question about this device
Download the instructions for your Cellphone in PDF format for free! Find your manual GM750 - LG and take your electronic device back in hand. On this page are published all the documents necessary for the use of your device. GM750 by LG.
USER MANUAL GM750 LG
Some of the contents in this manual may differ from your phone depending on the software of the phone or your service provider.
This handset is not recommended for blind and disabled people as it has a touch screen keypad.
GM750 User Guide
Congratulations on your purchase of the advanced and compact GM750 phone from LG which is designed to operate with the latest digital mobile communication technology.

Disposal of your old appliance
1 When this crossed-out wheeled bin symbol is attached to a product it means the product is covered by the European Directive 2002/96/EC.
2 All electrical and electronic products should be disposed of separately from the municipal waste stream via designated collection facilities appointed by the government or the local authorities.
3 The correct disposal of your old appliance will help prevent potential negative consequences for the environment and human health.
4 For more detailed information about disposal of your old appliance, please contact your city office, waste disposal service or the shop where you purchased the product.
Contents
Guidelines for safe and efficient use. 8
Getting to know your phone.....18
Open view. 20
Installing the USIM and battery....21
Memory card. 24
Resetting the device. 25
Using your Touch screen. 27
Using your Joystick. 29
Your Home Screen 30
Select Home Screen 30
Customising the LG Smart Home Screen 30
Customising the Windows Mobile default screen. 32
Quick keys. 33
Viewing the status bar. 34
Using the Multitasking function.....35
Using the Start Button. 36
Programs 36
Settings 39
Entering and Searching
Information. 44
Overview of Input Panel 44
Using the Keyboard. 45
Using Letter Recognizer. 46
Using Block Recognizer. 46
XT9 Keypad. 47
Using Transcriber. 48
Drawing and writing on the screen..52
Recording a Note. 54
Searching Information. 55
Calls 56
Making a call or a video call.56
Calling your contacts. 56
Answering and rejecting a call.56
In-call options. 57
In-video call Options. 58
Adjusting call volume. 59
Speed dialling 59
Viewing your call logs. 59
Contacts. 60
Searching for a contact 60
Adding a new contact 60
Creating a group. 61
Use your contact options. 61
Viewing information 61
Transferring your contacts. 62
Messaging. 63
Messaging. 63
Sending a message. 63
Message folders.. 63
Changing your text message settings. 64
Changing your multimedia message settings. 64
Setting up your email 66
Setting up your email through Microsoft® Exchange Server. 66
Setting up your email on a well-known email Service Provider .67
Setting up your email on Others.....67
Sending email / Write new email....67
Sending email / Replying to an email .68
Changing email setting. 68
Messenger. 69
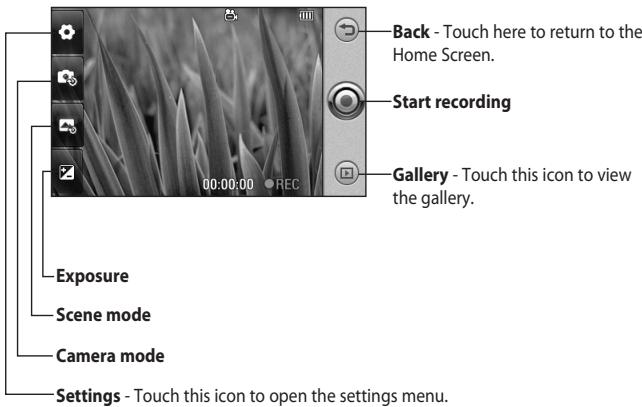
Camera. 70
Taking a quick photo .70
Once you've taken the photo .70
Getting to know the viewfinder.71
Adjusting the exposure. 72
Using the advanced settings.72
Changing the image resolution.73
Choosing a color effect. 74
Using the inner camera. 74
Viewing your saved photos.74
Video Camera. 75
Shooting a quick video 75
After taking a video. 75
Getting to know the viewfinder.77
Adjusting the exposure. 78
Using the advanced settings.78
Changing the video resolution. 79
Choosing a color effect 80
Using the inner video camera. 80
Watching your saved videos. 80
Multimedia 81
Pictures 81
My Pictures options menu. 81
Sending a photo. 81
Using a picture. 82
Moving or copying a picture. 82
Creating a slide show. 82
Checking your memory status .82
My Music. 83
Using a sound. 83
Videos 83
Watching a video 83
Sending a video clip. 83
Games and Applications 83
Playing a game. 84
Mobile Java. 84
Music. 84
Contents
Playing a track 84
Creating a playlist. 85
Playing a playlist. 85
Deleting a playlist. 85
Using the radio. 86
Searching for stations. 86
Listening to the radio. 86
Kinoma Play. 87
Using Kinoma Play. 87
Organiser. 88
Adding an event to your calendar ...88
Changing your default
calendar view. 88
Adding an item to your To Do list.....88
Setting your alarm .89
Using Office Mobile. 89
Using your calculator. 92
Using your File Explorer 92
Mobile Zip. 93
Adobe Reader LE. 96
ActiveSync. 97
Setting up Windows Vista 98
Set up synchronization in Windows
Mobile Device Center 98
Synchronizing Information. 100
Synchronizing via Bluetooth. 103
Synchronizing Music, Video, and
Pictures. 103
The Web 105
Browser 105
Accessing the web 105
Adding and accessing your
bookmarks. 105
Using browser option menus 106
Service. 107
Settings. 108
Personalising your profiles. 108
Changing your Display settings.....108
Changing your phone settings.....109
Using flight mode. 111
Change Date and Time. 112
Internet Sharing. 112
GPS Setting. 112
Bluetooth. 114
Turn on Bluetooth 114
Pairing with another
Bluetooth device 114
Sending and receiving your files
using Bluetooth 115
Changing your Bluetooth settings. 115
Wi-Fi. 117
Turn on Wi-Fi 117
Setup up Wi-Fi 117
Wireless network settings 117
Configuring Wi-Fi
Connection Settings. 118
DUN 120
Accessories 122
Network service 123
Technical data. 123
Troubleshooting 125
Guidelines for safe and efficient use
| Symbol | Description |
| ! | Read the Safety Information section of this user guide on page 9 |
| Do not use hand-held while driving | |
| For body-worn operation maintain a separation of 1.5 cm | |
| Small parts may cause a choking hazard | |
| This device may produce a loud sound | |
| Keep away from pacemakers and other personal medical devices | |
| Switch off when instructed in hospitals and medical facilities | |
| Switch off when instructed in aircrafts and airports |
| Symbol | Description |
| Switch off in explosive environments | |
| Do not use while re-fuelling | |
| This device may produce a bright or flashing light | |
| Do not dispose of in a fire | |
| Avoid contact with magnetic media | |
| Avoid Extreme Temperatures | |
| Avoid contact with liquid, keep dry | |
| Do not try and disassemble | |
| Do not rely on this device for emergency communications | |
| Only use approved accessories |
Please read these simple guidelines. Not following these guidelines may be dangerous or illegal.
Exposure to radio frequency energy
THIS DEVICE MEETS INTERNATIONAL GUIDELINES FOR EXPOSURE TO RADIO WAVES Your mobile device is a radio transmitter and receiver. It is designed and manufactured not to exceed the limits for exposure to radio frequency (RF) recommended by international guidelines (ICNIRP). These limits are part of comprehensive guidelines and
establish permitted levels of RF energy for the general population. The guidelines were developed by independent scientific organisations through periodic and thorough evaluation of scientific studies. The guidelines include a substantial safety margin designed to assure the safety of all persons, regardless of age and health.
The exposure standard for mobile devices employs a unit of measurement known as the Specific Absorption Rate, or SAR. The SAR limit stated in the international guidelines is 2.0 W/kg*. Tests for SAR are conducted using standard operating positions with the device transmitting at its highest certified power level in all tested frequency bands.
Although the SAR is determined at the highest certified power level, the actual SAR of the device while operating can be well below the
Guidelines for safe and efficient use
maximum value. This is because the device is designed to operate at multiple power levels so as to use only the power required to reach the network. In general, the closer you are to a base station, the lower the power output of the device. Before a phone model is available for sale to the public, compliance with the European R&TTE directive must be shown. This directive includes as one essential requirement the protection of the health and the safety for the user and any other person.
The highest SAR value for this device when tested for use when placed to the ear is ( )W/kg.
This device meets RF exposure guidelines when used either in the normal use position against the ear or when positioned at least 1.5 cm away from the body. When a carry case, belt clip or holder is
used for body-worn operation, it should not contain metal and should position the product at least 1.5cm away from your body. In order to transmit data files or messages, this device requires a quality connection to the network. In some cases, transmission of data files or messages may be delayed until such a connection is available. Ensure the above separation distance instructions are followed until the transmission is completed. The highest SAR value for this device when tested for use when worn on the body is ( ) W/kg.
- The SAR limit for mobile devices used by the public is 2.0 watts/kilogram (W/kg) averaged over ten grams of body tissue. The guidelines incorporate a substantial margin of safety to give additional protection for the public and to account for any variations in measurements. SAR values
may vary depending on national reporting requirements and the network band.
For SAR information in other regions please look under product information at www. lgmobile.com.
FCC SAR information
Your mobile device is also designed to meet the requirements for exposure to radio waves established by the Federal Communications Commission (USA) and Industry Canada. These requirements set a SAR limit of 1.6 W/kg averaged over 1 gram of tissue. The highest SAR value reported under this standard during product certification for use when placed to the ear is ( )W/kg and when properly worn on the body is ( ) W/kg.
Additionally, this device was tested for typical body-worn operations with the back of the phone kept
0.79 inches (2cm) between the user's body and the back of the phone.
To comply with FCC RF exposure requirements, a minimum separation distance of 0.79 inches (2cm) must be maintained between the user's body and the back of the phone.
* FCC Notice & Caution
Notice!
This device complies with part 15 of the FCC Rules. Operation is subject to the following two conditions:
(1) This device must not cause harmful interference.
(2) This device must accept any interference received, including interference that may cause undesired operation.
Guidelines for safe and efficient use
Caution!
Changes or Modifications that are not expressly approved by the manufacturer could invalidate the user's authority to operate the equipment.
Product care and maintenance

WARNING
Only use batteries, chargers and accessories approved for use with this particular phone model. The use of any other types may invalidate any approval or warranty applying to the phone, and may be dangerous.
- Do not disassemble this unit. Take it to a qualified service technician when repair work is required.
-
Keep away from electrical appliances such as TVs, radios, and personal computers.
-
The unit should be kept away from heat sources such as radiators or cookers.
- Do not drop.
- Do not subject this unit to mechanical vibration or shock.
- Switch off the phone in any area where you are required by special regulations. For example, do not use your phone in hospitals as it may affect sensitive medical equipment.
- Do not handle the phone with wet hands while it is being charged. It may cause an electric shock and can seriously damage your phone.
- Do not charge a handset near flammable material as the handset can become hot and create a fire hazard.
-
Use a dry cloth to clean the exterior of the unit (do not use solvents such as benzene, thinner or alcohol).
-
Do not charge the phone when it is on soft furnishings.
- The phone should be charged in a well ventilated area.
- Do not subject this unit to excessive smoke or dust.
- Do not keep the phone next to credit cards or transport tickets; it can affect the information on the magnetic strips.
- Do not tap the screen with a sharp object as it may damage the phone.
- Do not expose the phone to liquid, moisture or humidity.
- Use the accessories like earphones cautiously. Do not press the antenna unnecessarily.
- Do not use the phone or accessories in places with high humidity such as pools, greenhouses, solariums or tropical environments. It may cause damage to the phone and invalidation of warranty.
Efficient phone operation Electronic and medical devices
All mobile phones may get interference, which could affect performance.
- Do not use your mobile phone near medical equipment without requesting permission. Please consult your doctor to determine if operation of your phone may interfere with the operation of your medical device.
Some hearing aids might be disturbed by mobile phones. - Minor interference may affect TVs, radios, PCs, etc.
Pacemakers
Pacemaker manufacturers recommend that a minimum separation of 15cm is maintained between a mobile phone and a pacemaker to avoid potential interference with the pacemaker.
Guidelines for safe and efficient use
To ensure this, use the phone at the opposite ear to your pacemaker and do not carry it in a breast pocket.
Hospitals
Switch off your wireless device when requested to do so in hospitals, clinics or health care facilities. These requests are designed to prevent possible interference with sensitive medical equipment.
Road safety
Check the laws and regulations on the use of mobile phones in the area when you drive.
- Do not use a hand-held phone while driving.
- Give full attention to driving.
- Use a hands-free kit, if available.
-
Pull off the road and park before making or answering a call if driving conditions so require.
-
RF energy may affect some electronic systems in your vehicle such as car stereos and safety equipment.
- When your vehicle is equipped with an air bag, do not obstruct with installed or portable wireless equipment. It can cause the air bag to fail or cause serious injury due to improper performance.
- If you are listening to music whilst out and about, please ensure that the volume is at a reasonable level so that you are aware of your surroundings. This is particularly imperative when near roads.
Avoid damage to your hearing
Damage to your hearing can occur if you are exposed to loud sound for long periods of time. We therefore recommend that you do not turn on or off the handset close to your ear. We also recommend that music and call volumes are set to a reasonable level.
Glass Parts
Some parts of your mobile device are made of glass. This glass could break if your mobile device is dropped on a hard surface or receives a substantial impact. If the glass breaks, do not press or attempt to remove. Stop using your mobile device until the glass is replaced by an authorized service provider.
Blasting area
Do not use the phone where blasting is in progress. Observe restrictions and follow any regulations or rules.
Potentially explosive atmospheres
- Do not use the phone at a refueling point.
- Do not use near fuel or chemicals.
- Do not transport or store flammable gas, liquid, or explosives in the same compartment of your vehicle as your mobile phone and accessories.
In aircraft
Wireless devices can cause interference in aircraft.
- Turn your mobile phone off before boarding any aircraft.
Guidelines for safe and efficient use
- Do not use it on the ground without permission from the crew.
Children
Keep the phone in a safe place out of the reach of small children. It includes small parts which may cause a choking hazard if detached.
Antenna
Do not touch the antenna unnecessarily.
Emergency calls
Emergency calls may not be available under all mobile networks. Therefore, you should never depend solely on the phone for emergency calls. Check with your local service provider.
Battery information and care
- You do not need to completely discharge the battery before recharging. Unlike other battery systems, there is no memory effect that could compromise the battery's performance.
- Use only LG batteries and chargers. LG chargers are designed to maximize the battery life.
- Do not disassemble or short-circuit the battery pack.
-
Keep the metal contacts of the battery pack clean.
-
Replace the battery when it no longer provides acceptable performance. The battery pack may be recharged hundreds of times until it needs replacing.
- Recharge the battery if it has not been used for a long time to maximize usability.
- Do not expose the battery charger to direct sunlight or use it in high humidity, such as in a bathroom.
- Do not leave the battery in hot or cold places, this may deteriorate the battery performance.
- There is risk of explosion if the battery is replaced by an incorrect type.
-
Dispose of used batteries according to the manufacturer's instructions. Please recycle when possible. Do not dispose as household waste.
-
If you need to replace the battery, take it to the nearest authorized LG Electronics service point or dealer for assistance.
- Always unplug the charger from the wall socket after the phone is fully charged to save unnecessary power consumption of the charger.
- The actual battery life will depend on the network configuration, product settings, usage patterns, battery and environmental conditions.
Getting to know your phone
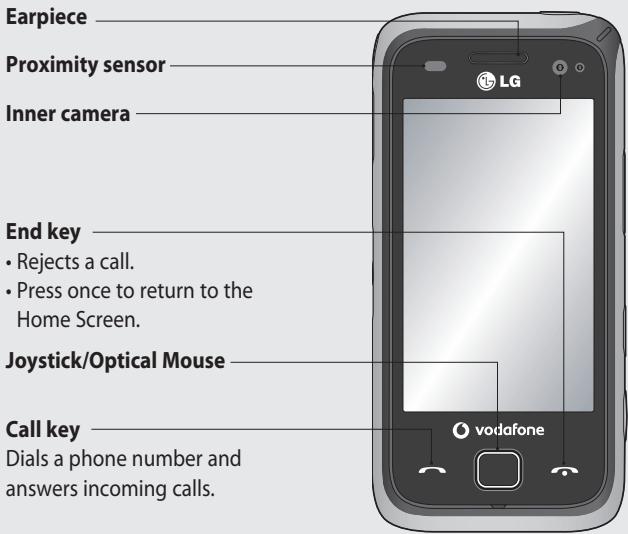
WARNING: Putting a heavy object on the phone or sitting on it can damage its LCD and touch screen functionality. Do not cover the protection film on the proximity sensor of the LCD as this can cause the sensor to malfunction.
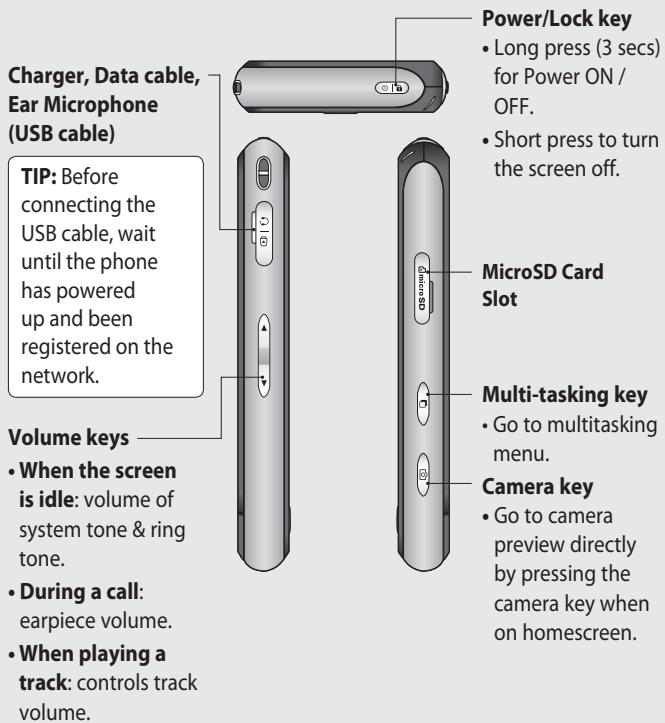
Open view
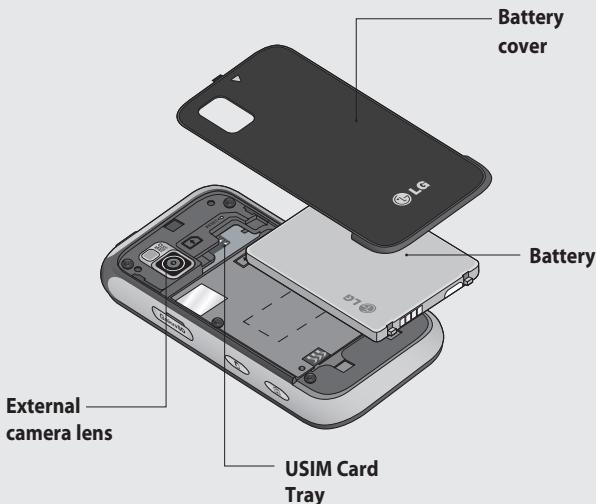
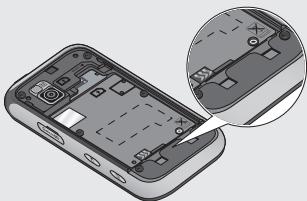
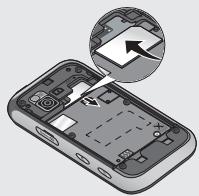
Installing the USIM and battery
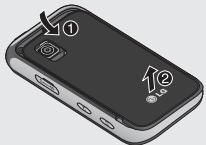
1 Remove the battery cover
Slide the battery cover towards the bottom of the phone and away from it.
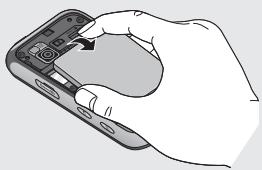
2 Remove the battery
Using the cut-out at the bottom, lift it from the battery compartment.
WARNING: Do not remove the battery when the phone is switched on, as this may damage the phone.
3 Install the USIM card
Put the USIM card into the USIM card holder. Make sure the gold-coloured contact area on the card is facing downwards. Push the USIM card holder back.
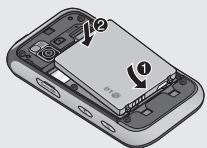
Installing the USIM and battery
4 Install the battery
First, insert the top of the battery into the top edge of the battery compartment. Ensure that the battery contacts align with the phone's terminals. Press the bottom of the battery down until it clips into place.
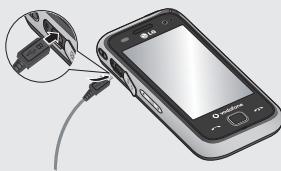
5 Charging your phone
Open the charger socket cover on the side of your GM750. Insert the charger and plug it into a mains electricity socket. When you recharge your phone after device switch off, the phone's LED lights up red.
When the phone is fully charged, the LED lights up green.
When the battery is fully discharged, you can not power on the phone. It takes approx. 5-10 minutes to reach a charge state sufficient for booting.
If you press and hold the power button for approx. 1 second in charging mode, the phone is turned on.
If user inserts external charger, Charging animation will be shown and LCD Backlight will be dark.
If user presses and hold OK key while LCD Backlight is turned off, LCD Backlight is turned on again
and show charging animation. If the battery is critically low, image for the critical low battery will be shown and notify user to charge more time.
NOTE: The battery must be fully charged initially to improve battery lifetime.
WARNING: Do not connect the charger to the phone without the battery. You must check the battery is inserted before charging.
WARNING: Do not remove your battery or USIM card while charging.
WARNING: There is a risk of explosion if the battery is replaced by an incorrect type. Dispose of used batteries in accordance with the maker's instructions.
WARNING: Unplug the charger from the mains and phone during lightning storms to avoid electric shock or fire.
WARNING: Make sure that no sharp items come into contact with the battery. This could pose a fire risk.
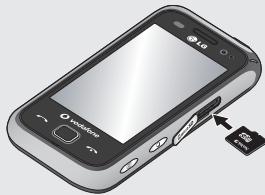
Memory card
Installing a memory card
You can expand the memory space on your phone by using a MicroSD memory card.
NOTE: A memory card is an optional accessory.
Slide the memory card into the slot at the top until it clicks into place. Make sure the gold-coloured contact area is facing downwards.
WARNING: Slide the memory card fully into the slot, otherwise damage can occur.
WARNING: Do not attach or remove a memory card when the phone is switched on, as this may damage the memory card.
Resetting the device
You may need to reset your device occasionally. A normal (or soft) reset of your device clears all active program memory and shuts down all active programs. This can be useful when the device is running more slowly than normal, or a program is not performing properly. A soft reset is also necessary after the installation of some programs.
If a soft reset is performed when programs are running, unsaved work will be lost.
You can also perform a hard reset (also known as a full reset). A hard reset should only be performed if a normal reset does not solve a system problem. After a hard reset, the device is restored to its default settings—the way it was when you first purchased it and turned it on. Any programs you installed, data you entered and settings you customised on the device will be lost.
To perform a soft reset
Find the Soft reset key.
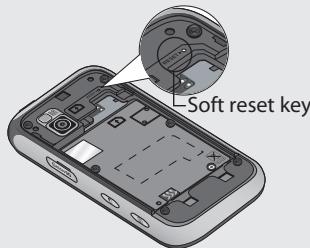
Use the stylus to press the reset key and hold it for a while. Your device may automatically restart and display the Home Screen.
Resetting the device
To perform a hard reset
A Hard Reset should only be performed after all other trouble shooting options have been exhausted. After a hard reset, the device is restored to its default settings - the way it was when you first purchased it and turned it on. Any programs you installed, data you entered and settings you customised on your device will be lost.
1 Power the device ON.
2 Tap Start > Settings > System tab > Clear Storage.
3 Enter 1234 for the password twice.
4 Press Enter.
5 Select whether to delete the Internal Memory or the External Memory (SD card) to reset.
6 You can also change the password by pressing Change Password.
Using your Touch screen
Touch screen tips
The Home Screen is also a great place to get used to using the touch screen.
To select an item, touch the centre of the icon.
- Do not press too hard; the touch screen is sensitive enough to pick up on a light, firm touch.
- Use the tip of your finger to touch the option you require. Be careful not to touch any other keys.
- When the screen light is off, press the power key once to restore the Home Screen.
- Whenever your GM750 is not in use it will return to the lock screen.
Calibrate the device
Calibrating the device screen involves tapping with the stylus the centre of a cross as it moves around the screen. This process ensures that when you tap the screen with your stylus, the tapped item is activated.
If your device does not accurately respond to screen taps, follow these steps to re-calibrate.
1 Tap Start > Settings > System tab > Screen.
2 On the Alignment tab, touch Align Screen and follow the instructions on the screen.
3 After calibration is completed, the Align screen reappears. Click OK on upper right corner.
Using your Touch screen
Control the touch screen
The controls on the GM750 touch screen change dynamically depending on the task you are carrying out.
Opening Applications
To open any Application, simply touch its icon.

Scrolling
Drag from side to side to scroll. On some screens, such as web pages, you can also scroll up or down.
Using your Joystick
Select the Joystick function
1 Tap Start > Settings > System tab > Optical Joystick.
2 Select Mouse Mode if you want to use the Joystick as a trackpad to control the mouse pointer on screen. Click OK on the upper right corner.
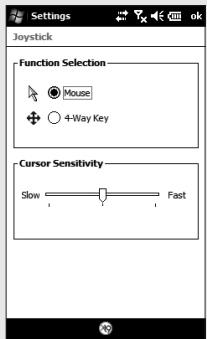
NOTE: 4-Way Key performance will depend on the speed of finger movement.
How to use your Joystick
1 Put your finger on the Joystick sensor and move smoothly. The Mouse cursor on the screen will move with your finger movement. You don't need to press the Joystick when you move the mouse cursor.
2 Place the mouse cursor on the icon that you want to execute and press (click) the Joystick. The application that you select will be launched.
Your Home Screen
From this screen you can access menu options, make a call, view the status of your phone and much more.
Select Home Screen
1 Touch Start > Settings > Personal tab > Home Screen.
2 Select a layout for your device Home Screen. If you select LG Smart Home, you will have a 5-Way Home Screen. If you select Windows Mobile Default, you can use Windows Mobile's Today screen.
Customising the LG Smart Home Screen
Get in touch with your GM750
- The User Interface is based on five types of Home Screen. To swap between the Home Screens just wipe quickly over the display from left to right or right to left.
Widget Home Screen

The Widget Home Screen can show your favourite widgets. If you press and hold an icon you will be taken to the edit menu where all the available widgets not yet on your screen will be shown in a bar at the bottom of the screen. To scroll through them flick across the widget bar.
Multimedia Home Screen
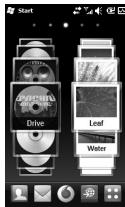
The Multimedia Home Screen can show your favourite pictures on the right side of the screen and your favourite music on the left.
Contact Home Screen

The contacts Home Screen can show your favourite contacts in a scroll through or list view.
Shortcut Home Screen
In the Shortcuts Home Screen, you can see the favourites shortcut icons.
Your Home Screen
Customising the Windows Mobile default screen
Touch Start > Settings > Today > Items tab.
1 Select the item you want to appear on the Today screen.
2 To change its position, tap Move up or Move Down. You can customise the further display options of Calendar and Tasks by tapping Options.
3 Check Today timeout then select the number of hours from LG GM750 | User Guide
the drop down list.
If you don't use your phone after the specified duration has elapsed, the screen switches to the Today screen.
4 Touch Start > Settings > Today > Appearance tab.
5 You can select the desired theme for the background.
6 If you use your own background image, tap Use this picture as the background. Tap Browse to locate the file you want.
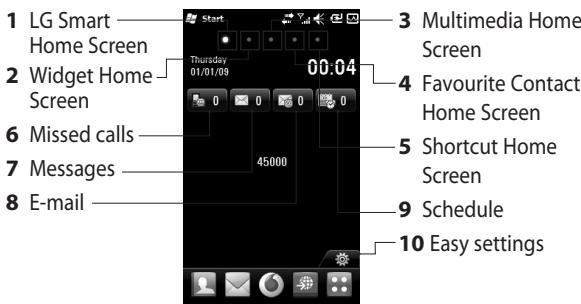
LG Smart Home Screen
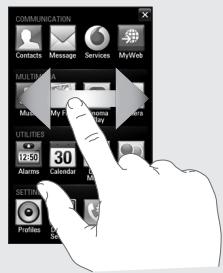
The LG Smart Home Screen displays the missed call list, unread messages, Email and upcoming appointments, tasks and alarms. You can tap a section on the screen to open the associated program.
Quick keys
The quick keys on your LG Smart Home Screen provide easy, one-touch access to the functions you use most.
| Icon | Description |
| Touch to open your contacts. To search for the number you want to call: Enter the name of the contact by touching next to the New Contact touchpad. You can also create new contacts and edit existing ones. | |
| Touch to access the Message menu. From here you can create a new SMS or MMS. | |
| Touch to access My web! | |
| Touch to access the Service menu directly | |
| Touch to open the main menu, which is divided into four sub-menus. | |
| Touch to bring up the touch dialling pad, which lets you make a call. | |
| Touch to access the E-mail menu. You can check your received Email and create new Email. | |
| Touch to access the Alarm menu directly. | |
| Touch to open your Calendar to check your schedule. | |
| Touch to enter the Music menu directly. |
Your Home Screen
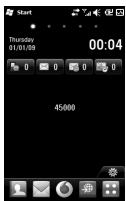
Viewing the status bar
The status bar uses different icons to show conditions such as signal strength, new messages and battery life as well as whether Bluetooth or GPRS is active.
Below is a table which explains the meaning of icons you're likely to see in the status bar.
| Icon | Description |
| ∅ | Bluetooth Hands-Free connection established |
| Bluetooth Hands-Free channel opened | |
| Bluetooth High Quality Audio channel opened | |
| Indicates the battery power remaining | |
| Indicates the battery is very low | |
| Battery charging | |
| Sound on |
| Icon | Description |
| × | Sound off |
| Ringer in vibration mode | |
| Connection is active | |
| ←× | Connection is not active |
| Synchronisation in progress | |
| Synchronisation error | |
| Y|| | Indicates maximum signal strength |
| Y | No signal |
| Y | Indicates Bluetooth service |
| Y! | No phone service |
| Y... | Searching for phone service |
| Gall | Voice call in progress |
| G+ | Calls are forwarded |
| G... | Call on hold |
| G! | Missed call or rejected call |
| G | GPRS (General Packet Radio Services) available |
| EDGE (Enhanced Data Rates For Global Evolution) available | |
| New email or text messages | |
| New voice mail | |
| There are more notifications. Tap the icon to view all | |
| USIM is not inserted. You can not use Network services without USIM | |
| Shows the list of running Applications by tapping this indicator | |
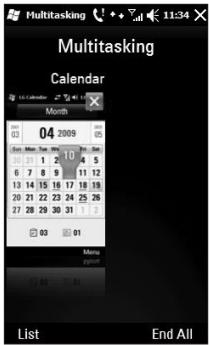
Using the Multi-tasking function
There are 3 ways to recall the Multitasking function.
1 By pressing the side key "Multitasking".
2 By tapping the Multi-tasking icon in the status bar.
3 By Touching Start > LG S-CLASS> Multitasking.
From here you can view the applications that are currently running and access or end them with one touch.
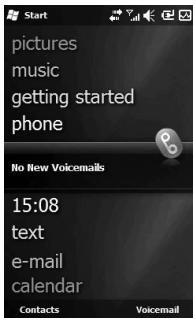
Using the Start Button
A tap on the Start button located at the top left corner of the Today screen displays a list of programs. It lets you easily switch from one program to another. You can start a program by selecting it from the menu.
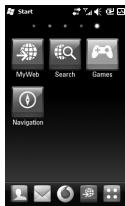
Programs
The following are some of the icons for the programs that are already installed on your device.
| Icon | Description |
| LG S-CLASS To use LG Applications. Camera, Music and other Applications. | |
| Tools To Access an array of tools and utilities on your mobile device. Adobe Reader LE allows you to open and read PDF files, FM Radio allows you to listen to FM Radio, Mobile Zip allows you to view and extract a wide range of archiving formats.Browser APN allows you to set the APN value and Stopwatch allows you to record the elapsed time of an event. | |
| ActiveSync To synchronise information between your device and a PC. | |
| Calculator To perform basic arithmetic calculations such as addition, subtraction, multiplication and division. | |
| 30 | Calendar To keep track of your appointments and creates meeting requests. |
| Contacts To keep track of your friends and colleagues. | |
| File Explorer Enables you to organise and manage files on your device. | |
| Getting Started Guides you through the general functions at device startup. | |
| Internet Sharing To use your device as an internet sharing device. | |
| Java Enables you to download and install Java applications, such as games and tools, on your device. | |
| E-mail To send and receive email and text messages. | |
| Messenger to send and receives instant messages with your Windows Live Messenger contacts. | |
| Notes To create handwritten or typed notes, drawings and recordings | |
| Pictures & Videos To collect, organise and sort picture and video files in the My Pictures folder of your device or on a storage card. | |
| Search Phone Allows you to find a file on your device. | |
| Task Manager To check active task information. | |
| Tasks To keep track of your tasks. |
Using the Start Menu
| Icon | Description |
| DUN Use your mobile device as a modem. | |
| Windows Live Enables Windows Live Access. | |
| Windows Media Enables the multimedia function on your device. |
Settings
You can adjust the device settings to suit the way you work. To see all available settings, tap Start > Settings, then tap the Personal, System, Connections and other device settings.
Personal menu
| Icon | Description |
| Buttons To assign a program or function to a hardware button. | |
| Home Screen To select a layout for your device. | |
| Input To set options for each of the input methods. | |
| Owner Information To enter your personal information on your device. | |
| Phone To customise phone settings such as ring tone, set a PIN number for your USIM card, and more. |
Using the Start Menu
System menu
| Icon | Description |
| About This is where you can see basic information such as the Windows Mobile® version and type of processor used on your device. You can also specify a name for your device. | |
| Backlight To set the backlight timeout and adjust Brightness, External power, Button settings. | |
| Certificates To see information about certificates that are installed on your device. | |
| Clear Storage Tap this icon only when you need to remove all your data and files from the internal or external memory and reset your device to factory default settings. | |
| Customer Feedback You can participate to the Customer Experience Improvement Program by sending your feedback to Microsoft. | |
| Encryption Allow files on your storage card to be encrypted. Encrypted files will be readable only on your device. | |
| Error Reporting To enable or disable error reporting when errors occur on your device. | |
| External GPS To set the appropriate GPS communication port, if required. You may need to do this when there are programs on your device that access GPS data or you have connected a GPS receiver to your device. See Help for details. | |
| Optical Joystick Select your Joystick settings. If you choose Mouse, a mouse cursor appears on the screen and you can use your joystick as a mouse. If you choose 4-Way Key, you can use your joystick as a navigation key. You don't need to press the joystick when you move the cursor. | |
| LG X Button Sets the "X" button to end programs immediately when you tap the button. | |
| Managed Programs This is where you can see the installation history of your device. | |
| Memory To check the device memory allocation status and memory card information. | |
| Power To check the remaining battery power. You can also set the timeout for turning off the display (switching device to Sleep mode) to conserve battery power. | |
| Regional Settings Sets the regional configuration, including the format for displaying numbers, currency, date and time on your device. | |
| Remove Programs To remove programs that you installed on your device. | |
| Screen To re-calibrate the screen and change the screen text size. | |
| System information Checks your system information and storage information. |
Using the Start Menu
| Icon | Description |
| Task Manager Checks active task information. You can also stop currently running programs. |
Connections menu
| Icon | Description |
| Browser APN To configure Internet Explorer to connect through one of the Access Point Names (APN): WAP APN: Default APN Web APN: Default preset Internet APN NOTE This service is not available in all countries. Please contact your service provider for further information | |
| Connections To set up one or more types of modem connection for your device, such as phone dial-up, GPRS, and more, so that your device can connect to the Internet or a private local network. | |
| Domain Enroll Connect your device to company resources. | |
| Config.GPRS Sets the GPRS authentication method, including None, PAP Authentication and CHAP Authentication. | |
| USB to PC Allows you to connect your phone to a PC via USB. | |
| Wi-Fi Allows you to customise Wi-Fi settings. | |
| Wireless Manager Allows you to manage all wireless settings such as Wi-Fi, Bluetooth and Phone. | |
| GPS Setting Set the GPS Type either Assisted GPS or Standalone. |
Other device settings
| Icon | Description |
| Bluetooth Allows you to customise Bluetooth settings. | |
| Clock & Alarms To set the device clock to the date and time of your local time zone or to a visiting time zone when you're travelling. Alarms can also be set at specified days and times of a week. | |
| Lock Allows you to manage all wireless settings such as Wi-Fi, Bluetooth and Phone. | |
| Sound & Notifications To enable sounds for events, notifications, and more, and set the type of notification for different events. | |
| Today To customise the appearance of and the information to be displayed on the Today screen. | |
| Microsoft My Phone To synchronizes your phone's contents with your My Phone account at http://myphone.microsoft.com |
Entering and Searching for Information
You can set various screen input methods, including Block Recognizer, Keyboard, Letter Recognizer, LG XT9 Keypad, LGJavaKey, Transcriber. The Input Panel icon appears on the menu bar to indicate which input method is currently selected. The Input Selector arrow (shown on the right side of the Input Panel icon) opens a list of available input methods. Notes menu is used in the examples below.
Overview of Input Panel
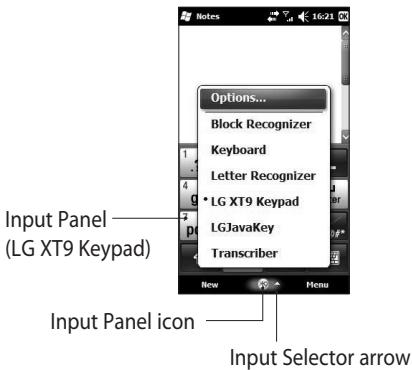
To change the input method, tap the Input Selector arrow.
| Icon | Indicates the selected input method is |
| The on-screen keyboard | |
| Transcriber. | |
| Letter Recognizer or Block Recognizer | |
| XT9 Keypad | |
| LGJavaKey |
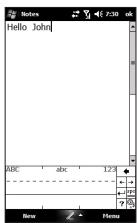
Using the Keyboard
To enter text, symbols and numbers, you can either type using the QWERTY Keyboard, ABC characters or the standard on-screen Keyboard.
Using the standard on-screen Keyboard
The on-screen Keyboard is available when text entry is possible. You can enter text by tapping keys on the keyboard that is displayed on the screen.
Enter text using the on-screen keyboard
The on-screen keyboard is available when text entry is possible.
To make the keys larger, tap the Input Selector arrow, and then Options. In the Input method list, select Keyboard and then tap Large Keys.
The general rule for entering text is the same as that for an MS-based PC.
Entering and Searching for Information
Using Letter Recognizer
With Letter Recognizer, you can write individual letters, numbers and punctuation, which are then converted to typed text.
Enter text using Letter Recognizer
Letter Recognizer is available when text entry is possible.
- Check [?] to see the demo for writing characters.
Using Block Recognizer
With Block Recognizer, you use a single stroke to write letters, numbers, symbols and punctuation, which are then converted to typed text.
Block Recognizer is available when text entry is possible.
With Block Recognizer, you use a single stroke to write letters, numbers, symbols and punctuation, which are then converted to typed text.
The preferred word list will disappear if there is no user response within 6 seconds.
Enter letters by writing in the abc (left) area of the box.
Enter numbers by writing in the 123 (right) area of the box.
Enter symbols and punctuation by tapping in either area of the box and then writing the desired character.
Check? to see the demo for writing characters.
XT9 Keypad
With XT9 keypad, you can enter text by tapping keys displayed on the screen. This is the most common way to enter text with word prediction function.


XT9 Keypad is available when text entry is possible.
Enter letters by tapping the keys labelled with the required letters.
XT3 Touch to turn on T9 predictive texting.
123 Tap to switch between numbers, symbols and text keystads.
Short press switches to uppercase for one key press, long press switches to caps lock mode.
Entering and Searching for Information
XT9 mode
In XT9 mode, you will see xt96. XT9 mode automatically compares your keystrokes with an internal dictionary to determine the correct word, thus requiring far fewer keystrokes than the traditional multitap mode.
This is sometimes known as predictive text. This feature is supported only in portrait screen.
NOTE: You cannot activate XT9 in the Search input box.
ABC mode
You can enter letters by tapping the key labelled with the required letter once or more until the correct letter is displayed. Tap once for the first letters and twice for the second letters. This mode is known as multitap mode.
LGJavaKey
LJavaKey is the navigation key used when you use a Java application. You cannot therefore enter letters using LJavaKey.
Using Transcriber
Transcriber is a handwriting recognition program that allows you to write in cursive, print, or a combination of both. Transcriber works transparently in the background of programs, recognising words with its integrated dictionary. When Transcriber is turned on, it
interprets stylus movement anywhere on the screen as handwriting input. For more information about using Transcriber, see Help on your device.
To start Transcriber
1 Start a program that accepts user input, such as Word Mobile.
2 Tap the Input Selector arrow and tap Transcriber. The Transcriber introductory screen appears.
To write using Transcriber
1 Within a program, position the cursor where you want text to appear.
2 Use the stylus to write anywhere on the screen. The handwriting will be converted to text shortly after you lift the stylus from the screen.
To enter punctuation and symbols
Transcriber comes with an onscreen keyboard that provides an easy way to add punctuation or a special symbol to existing text.
From a program, tap on the Transcriber toolbar. The keyboard remains visible until you tap the button again.
NOTE: To reposition the keyboard, tap and hold the title bar, then drag to the desired location.
To edit text
1 In a program, draw a line across the text you want to edit. This only appears to work if the line goes from left to right.
2 After you lift the stylus from the screen, the line will disappear and the selected text will be highlighted.
Entering and Searching for Information
3 Do either of the following:
Rewrite the text.
Use gestures to capitalise letters, insert a space and so on.
Transcriber Gestures
Use quick strokes of the stylus to edit your text or to insert returns, spaces or tabs.
| Do | To |
| ←」 | Insert a paragraph return at the cursor. The horizontal portion of the gesture must be at least two times longer than the vertical portion. |
| → | Insert a space at the cursor. The horizontal portion of the gesture must be at least two times longer than the vertical portion. |
| Do | To |
| ← | Move the cursor one space back and erase any text. Do the gesture by drawing a line from right to left. |
| U | Open the menu of alternate words if a word is selected, or the onscreen Transcriber keyboard if no text is selected. Do the gesture by drawing a line straight down and back up. |
| ↑ | Change the capitalisation of a selected letter, word or block of text. Do the gesture by drawing a line straight up. |
| ū | Undo the last action. Do the gesture by drawing a line straight up and back down. |
| ←→ | Copy the selected text. Do the gesture by drawing a line from left to right and back. |
| ←→ | Cut the selected text. Do the gesture by drawing a line from right to left and back. |
| A | Paste copied or cut text. Do the gesture by drawing a line from the lower left of the screen diagonally up toward the right and back down to the right. |
| → | Insert a tab. The horizontal portion of the gesture must be at least two times longer than the vertical portion. |
NOTE: You can also use the Enter, Space and Backspace buttons on the Transcriber toolbar.
The Transcriber toolbar
| Do | To |
| a | You can set the transcriber options such as Writing direction, Dictionaries and Shorthand. |
| b | You can set the shape of letters as your handwriting. |
| c | You can enter numbers, punctuation and symbols. |
| d | You can change text input methods. · a mode. This is the default for optimum handwriting recognition. · 123 mode. Numbers and some letters are allowed and the calculator is activated. · A mode. All letters are automatically capitalized. If you are in A or 123 mode, recognition returns automatically to the default mode once you lift the stylus. |
Entering and Searching for Information
| Do | To |
| spc | You can insert a space at the cursor. |
| ← | You can insert a paragraph return at the cursor. |
| ← | You can insert the cursor one space to the left. |
| → | You can move the cursor one space to the right. |
| ← | Back and erase any text. |
| ? | Help |
Drawing and writing on the screen
You can draw directly on the screen, or write on the screen and save notes in your own handwriting. To do this, you must set the input mode in Notes to Writing.
If you prefer to use handwriting or frequently add drawings to your notes, you may find it helpful to set Writing as the default input mode. If you prefer typed text, set Typing as the default input mode.
To set the input mode for Notes
1 Tap Start > Notes.
2 In the note list, tap Menu > Options.
3 In the Default mode box, tap one of the following:
Writing if you want to draw or enter handwritten text in a note.
Typing if you want to create a typed note.
4 Tap OK.
To write a note
Tap Start > Notes.
1 In the note list, tap New.
2 Write your text on the screen.
3 When finished, tap OK to return to the note list.
NOTE: To select handwritten text, tap and hold next to the writing. As soon as dots appear, and before they form a complete circle, quickly drag across the writing. If a letter crosses three ruled lines, it is treated as a drawing rather than text.
To draw in a note
1 Tap Start > Notes.
2 In the note list, tap New.
3 To draw on the screen, use the stylus like a pen.
4 A selection box appears around your drawing.
5 When finished, tap OK to return to the note list.
NOTE: To select a drawing (for example, to copy or delete it), tap and hold the drawing briefly. When you lift the stylus, the drawing is selected.
Entering and Searching for Information
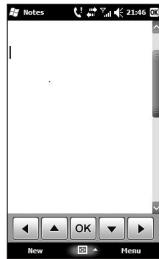
Recording a Note
You can create a standalone recording (voice note) or you can add a recording to a note.
To create a voice note
1 Tap Start > Notes.
2 Do one of the following:
To create a standalone recording, record from the note list.
To add a recording to a note, create or open a note.
3 If you do not see the Recording toolbar, tap Menu > View Recording Toolbar.
4 Hold your device's microphone near your mouth or other source of sound. Press the record button from the Recording Toolbar.
5 If you are adding a recording to a note, tap OK to return to the note list when finished.
6 If you are recording when a note is open, an icon will appear in the note.
7 If you are creating a standalone recording, the recording will appear in the note list.
To record a voice note during a call
1 Touch Note on the calling screen, and tab the recording icon to record a voice note during a call.
2 Once you have finished recording, a pop-up message will appear as shown below.
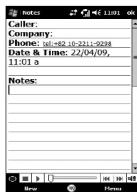
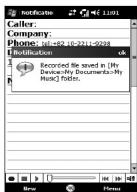
NOTE: When you start recording during a call, there isn't a notification beep sound to inform the other end user.
Searching for Information
You can search for files and other items stored on your device in the My Documents folder or on the storage card. You can search by file name or by word.
For example, you can search in email messages, notes, appointments, contacts and tasks, as well as in online Help.
To search for a file or an item
1 Tap Start > Search Phone.
2 In Search for, enter the file name, word or other information you want to search for.
3 If you have looked for this item before, tap the Search for arrow and select the item from the list.
4 In Type, select a data type to help narrow your search.
5 Tap Search.
6 In the Results list, tap the item you want to open.
Calls
Making a call or a video call
1 Touch to open the keypad.
2 Key in the number on the keypad. To delete a digit, press the clear key.
3 Touch the key or Voice Call to place the call. Touch to place the video call.
4 To end the call, touch the key.
TIP! To enter + for making international calls, press and hold down 0+ .
TIP! Press the power key to lock the touchscreen to prevent calls being made by mistake.
Calling your contacts
1 From the Home Screen touch to open your Contacts.
2 Scroll through the contact list or enter the first letter(s) of the contact you want to call by touching 念
3 From the list, touch the contact you want to call and select the number to use if there is more than one for that contact.
4 Touch Voice call or Video call.
Answering and rejecting a call
When your phone rings press the call key or Answer key on the screen to answer.
Press the end key to reject an incoming call.
In-call options
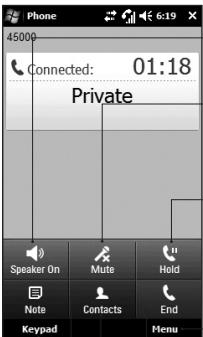
Speaker - Touch to turn the speaker phone on. Touch again to turn off.
Mute - Touch to turn the microphone off so the person you are talking to cannot hear you.
Hold - Touch to put a call on hold.
Menu - Choose from a list of further in-call options
-You can end the call.
Contacts - Search your contacts during a call.
Note - Add a memo during a call.
Keypad - Touch to open a numerical keypad for navigating menus with numbered options, when dialling call centres or other automated telephone services.
Calls
In-video call Options
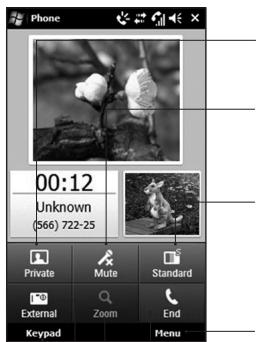
Private/Show - Touch to turn the video private(live)-mode on. Touch again to turn off
Mute/Unmute - Touch to turn the microphone off so the person you are talking to cannot hear you
Standard/Fine - Touch to request the talking party to control the video quality
Capture - Press the camera button to capture the video of the talking party.
Menu - Choose from a list of further in-call options

- You can end the call.
Zoom - Touch to zoom the current camera in.
External/Internal - Touch to switch the camera between the internal and the external Keypad - Touch to open a numerical keypad for navigating menus with numbered options, when dialling call centres or other automated telephone services.
Adjusting call volume
To adjust the volume during a call, use the up and down button on the right side of the phone.
Speed dialling
You can assign a frequently-called contact to a speed dial number.
1 From the Home Screen touch to open your Contacts.
2 Touch Menu and select Speed dials.
3 Your voicemail is already set to speed dial 1. You cannot change this. Touch any other number to assign it to a speed dial contact.
4 Your contacts list will open. Select the contact you want to assign to that number by touching the phone number once.
To call a speed dial number, touch on the Home Screen then press and hold the assigned number until the contact appears on the screen. The call will initiate automatically, without having to touch Voice call.
Viewing your call logs
From the Home Screen, touch , then touch Recent history in the COMMUNICATION tab.
Or, you can go to this menu by pressing Send Key > Menu > Call History.
View a complete list of all dialled, received and missed calls.
TIP! From any call log touch Menu and Delete all calls to delete all the recorded items.
TIP! Touch any single call log entry to view the date, time and duration of the call.
Contacts
Searching for a contact
From the Home Screen
1 From the Home Screen touch to open your Contacts. Touch and enter the contact name using the key pad.
2 Touch Video call or Voice call or the key to place the call.
From the main menu
1 Touch , touch Contacts on the COMMUNICATION tab.
2 Touch Menu and Search.
Adding a new contact
1 From the Home Screen touch and touch Menu and New contact.
2 Choose whether to save the contact to Handset or SIM.
3 If you want to add a picture to each contact, touch Add picture.
4 Enter the first and last name of your new contact. You do not have to enter both, but you must enter at least one.
5 Enter the numbers and assign a type to each of the numbers.
6 Eventually add an email addresses.
7 Assign the contact to one or more groups, choosing between No group, Business, Personal, Family, Seasonal or any groups you created.
8 You can also add a Ring Tone, Web page, Home address, Company name, Job title, Office loc, Memo and so on by clicking the More button.
9 Touch OK to save the contact.
Creating a group
1 From the Home Screen Touch and then touch Contacts in the COMMUNICATION tab.
2 Touch Menu and select New Group.
3 Enter a name for the new group.
4 Touch OK to save the group.
NOTE: If you delete a group, the contacts assigned to that group will not be lost. They will remain in your contacts.
TIP! You can edit an existing group by touching the selected group once. Choose View members, Edit the group, Send message, Send businesscard or Delete group.
Use your contact options
1 Touch Contacts from the COMMUNICATION tab, then touch Menu and Settings.
2 From here, you can adjust the following settings:
Display name - Choose whether to display the first or last name of a contact first.
Viewing information
1 Touch Contacts from the COMMUNICATION tab, touch Menu and touch Information.
2 From here you can view Service Dial Numbers, Own Numbers, your Memory Info. (memory space remaining) and My Business Card.
Contacts
TIP! To add your own business card, select My business card and enter your details as you would for any contact. Touch OK to finish.
Transferring your contacts
To transfer your contacts from your USIM to phone:
1 From the COMMUNICATION tab, touch Contacts and touch Menu then select Change location.
2 Touch Copy to handset.
3 Select names one by one and touch OK.
Messaging
Messaging
Your GM750 combines SMS and MMS into one intuitive easy-to-use menu.
There are two ways to enter messaging:
1 From the Home Screen, touch or , then scroll to Message from the COMMUNICATION tab.
Sending a message
1 Touch then Write New Message to begin composing a new message
2 Touch To enter the recipient's number, or touch to open your contacts. After entering the recipient's number, you can go back to the message composer screen by touching OK. You can add multiple contacts.
3 When you have finished, touch the message box below to start composing the text message.
4 Touch to insert Image, Video, Sound or Others.
5 Touch OK then press
Message folders
Your Messaging Folder structure is outlined below.
Inbox - All messages you receive are stored in your inbox. From here you can view and delete them, as well as other functions.
Outbox - This is a temporary storage folder while messages are being sent.
Sent Items - Messages that have been sent are stored in this folder.
Drafts - If you don't finish writing a message, you can save what you've done in this folder.
Messaging
Threaded Box - You can view messages as you send or receive them, as you would experience with an instant messaging client.
My Folders - Create folders to store your messages.
Deleted Items - Messages you delete are stored in this folder.
Changing your text message settings
Your GM750 message settings are pre-defined, so you can send messages immediately. These settings can be changed based on your preferences.
Scroll through Message Settings from the SETTINGS tab and touch
Text Message. You can change the following:
Text message center - Enter the details of your message centre.
Delivery Report - Slide the switch to the left to receive confirmation that your messages have been delivered. This feature works only if a set of conditions are met; the sender's network, the receiver's network and the receiver's Windows Mobile device all support it.
Save sent message - On/ Off
Changing your multimedia message settings
Your GM750 message settings are pre-defined, so you can send messages immediately. These settings can be changed based on your preferences.
In the Message menu, touch Settings, then select Multimedia message. You can make a change to the following:
MMS Center - Enter the details of your message centre.
Retrieval mode
Retrieve Immediately
On:Receive MMS messages immediately.Off:Receive notifications only. Download on Home Network only will be set to Off.
Download on Home Network only - On/ Off
Reject all message - Choose to not receive any MMS messages - On/ Off.
Delivery Report - Choose whether to allow and/or request a delivery report - Request report (On/ Off), Allow report (On/ Off).
Read Report - Choose whether to allow and/or send a read reply - Request report (On/ Off), Allow report (On/ Off).
Message class - Choose your message class - Personal, Advertisement, Informational and Auto.
Priority - Choose the priority level of your MMS - Low, Normal or High priority.
Validity period - Choose how long your message is stored at the message centre - 1 Hour, 6 hours, 12 hours, 1 Day, 3 Days or Maximum.
Save sent message - Choose where to save the message after sending - On/Off.
Delivery time - Choose how long to wait before a message is delivered - Immediately, After 1 hour, After 1 day or After 1 week.
Slide duration - Choose how long slides appear on screen - 2 seconds, 3 seconds, 4 seconds, 5 seconds etc.
Memory in use - Handset memory / External memory
Messaging
Setting up your email
You can keep in touch on the move by using your GM750 for email. It's quick and simple to set up a POP3 or IMAP4 email account.
1 Touch from the Home Screen and scroll through E-mail on the COMMUNICATION tab.
2 To Create a new message, choose MSExchange and select Write E-mail.
NOTE: You need the information from your network provider as follows: Server address, Domain name, User name, Password. You may also need installation of the certification distributed by the network provider on your device.
Setting up your email through Microsoft®
Exchange Server
1 From the Home screen or in the Start menu, tap the email icon > Settings > Add account > MSExchange.
2 Enter your email address, password, domain name and server address.
3 Select "Automatic Search" to get the email settings automatically from the Internet.
4 If server settings are not detected, enter them manually, then tap "OK".
Setting up your email on a well-known email Service Provider
1 From the Home screen or in the Start menu, tap the email icon > Settings > Add account.
2 Select email service provider.
3 Enter user ID, Password and My Name.
4 Select Push enable if you want to receive email automatically.
5 Tap OK to set up email account. Warning!
You may incur an additional cost when you connect to the internet.
The battery will be discharged faster when you receive a lot of emails.
The time to receive an email can be dependent on the account.
If you select Push Enable, GM750 can connect to the
network, regardless of the user setting to receive or send email.
Setting up your email on Others
1 From the Home screen or in the Start menu, tap the email icon > Settings > Add account.
2 Select Others.
3 Enter your Email Address, Email Password, Account Display Name and My Name.
NOTE: If you do not enter the name, the header of the email address will be saved automatically.
Sending email / Write new email
1 From the Home screen or in the Start menu, tap the email icon > Touch MSExchange > Touch "Write E-mail".
Messaging
2 Touch right next to , and touch To/Cc/Bcc.
3 To enter the title, tap Subject.
4 You can attach a video or image file when you touch in the right-hand corner of the screen.
5 Tap to send the email.
NOTE: An email might not be saved in the outbox, depending on your mail account or server policy.
Sending email / Replying to an email
You can reply, forward or reply to an email.
1 From the Home screen or in the Start menu, tap the email icon > Touch MSEXchange > Tap Inbox > Tap the reply icon > Touch Reply/ Reply all/ Forward.
2 Enter the contents you want to send.
3 Tap Send.
Changing email setting
Tap the email icon and touch Menu in the right-hand corner of the screen and touch Settings.
Preview Line - Allows you to set the preview line.
Alert Sounds - Set the alert sound when you receive an email.
Signature - Define whether to merge a signature to the message automatically.
Font - Set the Font Size and Font Type.
Spam Message - Set to sort spam message.
When Deleting Messages - Define whether or not email remains on the server.
E-mail Download Restriction -
Set condition to retrieve email from server.
Sync Items - Set the contact, schedule, to-do list and email when you use the account.
Messenger
NOTE: This service is not available in all countries. Please contact your service provider for further information.
You can chat with other people using this menu. Messenger can only be used with a supporting USIM and country.
Camera
Taking a quick photo
1 Press the Camera hard key on the right-hand side of the phone for more than 0.5 secs to launch.
2 Holding the phone horizontally, point the lens towards the subject you want to take a picture of.
3 Press gently the capture button and hold it down.
4 When the focus box turns green, the camera has focused on your subject.
5 Press firmly the capture button, the picture will be taken.
Once you've taken the photo
Your captured image will appear on the screen. The image name is shown with four icons on the right-hand side.
Touch to send the photo as a Message, E-mail or via Bluetooth.
Touch to delete the image.
Touch to take an other photo immediately. Your current photo will be saved.
Touch to use the image as Wallpaper or Contact Image.
Getting to know the viewfinder
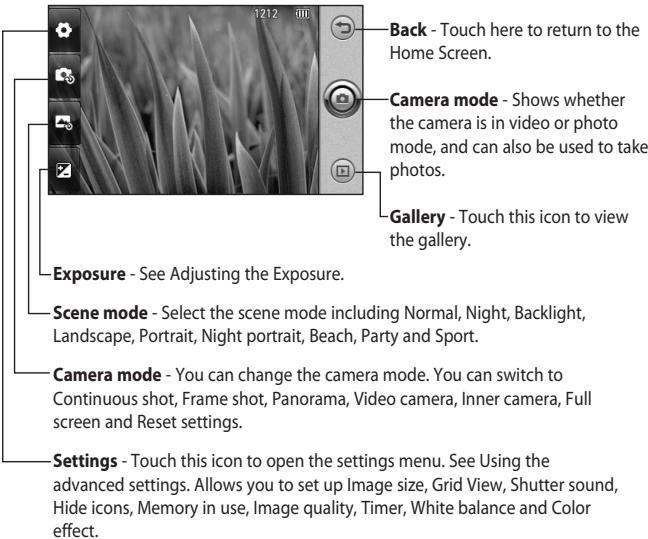
Tip! You can close all the shortcut options to give a clearer viewfinder screen. Just touch the centre of the viewfinder once. To recall the options, touch the screen again.
Camera
Adjusting the exposure
The exposure defines and controls the amount of light entering the image.
A low contrast image will appear darker, whereas a high contrast image will appear much brighter.
1 Touch Z.
2 Slide the contrast indicator along the bar towards l for a lower exposure, darker image or towards l for a higher exposure, brighter image.
Using the advanced settings
From the viewfinder, touch to open all advanced settings options. You can change the camera settings by scrolling the wheel. After selecting the appropriate option, touch the OK button.
Image size - Change the photo size to save memory space or to take
an appropriate size picture for a contact.
Color effect - Choose a colour tone to use on your new photo. See a colour effect by choosing between Off, Negative, Sepia, Mono, Aqua, Emboss, Sketch, Red, Green and Solarize.
White balance - Choose between Auto, Incandescent, Sunny, Fluorescent and Cloudy.
Timer - The self-timer allows you to set a delay after the capture button is pressed. Select Off, 3 secs, 5 secs or 10 secs. This is ideal if you want to be included in a photo.
Image quality - Choose between Super fine, Fine and Normal. The finer the quality, the sharper the photo. However, the file size will increase as a result, which means you'll be able to store fewer photos in the phone's memory.
Memory in use - Choose whether to save your photos to the Handset memory or the External memory.
Hide icons - Select whether to hide the icons on the camera menu automatically or manually.
Shutter sound - Select one of the four shutter sounds or off to take picture in silent mode.
Grid view - Choose between Off, Simple cross, Trisection
TIP! When you exit the camera, all your settings will return to default, except image size, Grid view, Shutter sound, Hide Icons and Image quality. Any non-default settings you require will need to be reset, for example colour effect. Check these settings before you take your next photo.
TIP! The settings menu is superimposed over the viewfinder, so when you change elements of the image colour or quality you will be able to see the image change in preview behind the settings menu.
Changing the image resolution
The more pixels, the larger the file, which means the files take up more memory space. If you want to store more pictures on your phone, you can alter the number of megapixels to make the files smaller.
1 Using the viewfinder, touch in the top left corner.
2 Select Image size from the Preview menu.
3 Select one of the six available resolutions (5M: 2560x1920, 3M: 2048x1536, 2M: 1600x1200, 1M: 1280x960, 640x480, 320x240).
Camera
Choosing a colour effect
1 Using the viewfinder, touch in the top left corner.
2 Select Color effect from the Preview menu.
3 There are ten colour tone options: Off, Negative, Sepia, Mono, Aqua, Emboss, Sketch, Red, Green or Solarize.
4 Once you've made your selection, the colour tone menu can be closed by selecting OK. You are then ready to take a picture.
TIP! You can change a picture taken in colour to black and white or sepia after it is taken, but you cannot change a picture taken in mono or sepia back to colour.
Using the inner camera
Your LG GM750 has an inner 640x480 camera for both video calls and taking photos.
1 To switch to the inner camera, touch then select Inner Camera from the Preview menu.
2 After a few seconds you'll see yourself in the viewfinder. To capture the image, press the capture button as normal.
3 After you've taken the photo you'll be offered all the same options as for an image taken with the main camera.
4 To return to the main camera, touch and then select Outer Camera from the Preview menu.
Viewing your saved photos
You can access your saved photos from within the camera mode. Just touch and your gallery will appear on the screen.
Video Camera
Making a quick video
1 Press the Camera hard key on the right-hand side of the phone.
2 Then touch and select Video camera to switch to video mode.
3 The video camera's viewfinder will appear on the screen.
4 Holding the phone horizontally, point the lens towards the subject of the video.
5 Press the capture button once to start recording.
6 Rec will appear at the bottom of the viewfinder with a timer at the bottom showing the length of the video.
7 Touch on the screen to stop recording.
After shooting a video
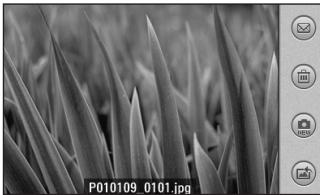
A still image representing your video will appear on the screen. The name of the video will be shown on the bottom of the screen, along with three icons on the right-hand side.
Video Camera

Touch to send the photo as a ssage, E-mail or Bluetooth.

Touch to delete the video you're just made, and confirm by Ching Yes. The viewfinder will appear.

Touch to shoot another videodeniately. Your current video be saved.
Getting to know the viewfinder
TIPI! You can close all shortcut options to give a clearer viewfinder screen. Just touch the centre of the viewfinder once. To recall the options, touch the screen again.
Video Camera
Adjusting the exposure
The exposure defines the difference between light and dark areas in an image. A low contrast image will appear darker, whereas a high contrast image will appear much brighter.
1 Touch Z.
2 Slide the contrast indicator along the bar towards 一 for a lower exposure, darker image or towards + for a higher exposure, brighter image.
Using the advanced settings
Using the viewfinder, touch to open all the advanced settings options.
You can adjust the video camera setting by scrolling the wheel. After Selecting an option, touch the OK Button.
Video size - Change the resolution of the video to save memory space. Select a video resolution between 400 × 240 , 320 × 240 , 176 × 144 and 128 × 96 .
Grid view - Choose between Off, Simple cross or Trisection.
Voice - Choose Mute to record a video without sound.
Hide icons - Select whether to hide the icons on the camera menu automatically or manually.
Memory in use - Choose whether to save your videos to Handset memory or External memory.
Video quality - Choose between Super Fine, Fine and Normal.
The finer the quality, the sharper the video will be. The file size will increase as a result, meaning you'll be able to store fewer videos in the phone's memory.
Duration - Set a duration limit for your video. Choose between Normal and MMS to limit the maximum size of the video to send it as an MMS.
TIP! If you choose MMS duration, choosing a lower image quality will enable you to shoot a longer video.
White balance - The white balance ensures that any white parts of your video are realistic. To enable your camera to adjust the white balance correctly, you may need to determine the light conditions. Choose between Auto, Incandescent, Sunny, Fluorescent or Cloudy.
Color effect - Choose a Colour tone to use for your video. Select a Colour tone between Off, Negative, Sepia, Mono, Aqua, Emboss, Sketch, Red, Green and Solarize.
Changing the video resolution
The more pixels, the larger the file size, which means the files take up more memory space. If you want to store more videos on your phone, you can alter their resolution to make the files smaller.
1 Using the viewfinder, touch in the top left corner.
2 Select Video size from the Preview menu.
3 Select one of the four resolutions:
- 400 × 240
2.320×240
3.176 x 144
4.128x96
Video Camera
Choosing a colour effect
1 Using the viewfinder, touch in the top left corner.
2 Select Color effect from the Preview menu.
3 There are ten colour effect options: Off, Negative, Sepia, Mono, Aqua, Emboss, Sketch, Red, Green, or Solarise.
4 Touch the colour tone you want to use.
Using the inner video camera
1 To switch to the inner camera, touch then select Inner camera from the Preview menu.
2 After a few seconds you'll see yourself in the viewfinder. To start recording the video, press the capture button as normal and press it again to stop recording.
3 After you have shot the video you will be offered all the options available for a video shot using the main camera.
4 To return to the main camera, touch and then Outer Camera.
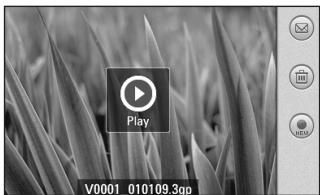
Watching your saved videos
1 In the viewfinder, touch
2 Your gallery will appear on the screen.
3 Touch the video you want to watch.
Multimedia
You can store multimedia files in your phone's memory so you have easy access to all your pictures, sounds, videos and games. You can also save your files to a memory card. Using a memory card allows you to free up space in your phone's memory.
To access the Multimedia menu, touch then select My Files from the MULTIMEDIA tab. You can open a list of the folders that store all your multimedia files.
Pictures
My Pictures contains a list of pictures including default images pre-loaded onto your phone, images you have downloaded and those taken with your phone's camera.
My Pictures options menu
The options which are available to you in My Pictures depend on what type of image you have selected. All of the options will be available for pictures you have taken with the phone's camera.
Sending a photo
1 To send a photo just select the picture you want.
2 Touch Menu and select Send. Choose from Message, E-mail, Bluetooth.
3 If you choose Message or E-mail, your photo will be attached to a message and you can write and send the message as normal. If you choose Bluetooth, your phone will search for a device to send the picture to.
Multimedia
Using a picture
You can choose images to use as a wallpaper, contact, start-up or shut-down image, or as your outgoing or incoming call image.
1 Touch menu key then select My Files from the MULTIMEDIA tab.
2 Touch My Pictures.
3 Select an image and touch Menu.
4 Touch Use as and choose Wallpaper or Contact Image.
Moving or copying a picture
An image can be moved or copied between the phone memory and the memory card. You may want to do this to clear some space in one of the memories, or to safeguard your images from being lost.
1 Touch menu key then select My Files from the MULTIMEDIA tab.
2 Touch My Pictures.
3 Select an image and Touch Menu.
4 Select Move or Copy.
Creating a slide show
If you want to view all the images on your phone, you can create a slide show to save you having to open and close each individual image.
1 Touch menu key then select My Files from the MULTIMEDIA tab.
2 Touch My Pictures.
3 Touch Menu then Slide show.
Checking your memory status
You can check to see how much memory space you have used and how much you have left available.
1 Touch menu key then select My Files from MULTIMEDIA tab.
2 Touch My Pictures.
3 Touch Menu then Memory Info.
My Music
The My Music folder contains the Downloaded sounds, Default sounds and Voice recordings. From here you can manage or send sounds or set them as ringtones.
Using a sound
1 Touch menu key then select My Files from MULTIMEDIA Tab.
2 Touch My Music.
3 Select a sound.
4 You can use the sound by selecting Use as menu.
5 Choose from Ring Tone or Message tone.
Videos
The My Video folder shows a list of downloaded videos and videos you have recorded on your phone.
Watching a video
1 Touch menu key then select My Files from MULTIMEDIA Tab.
2 Touch My Video.
3 Select a video to play.
Sending a video clip
1 Select a video and touch Menu.
2 Touch Send and choose from Message, E-mail, Bluetooth.
3 If you choose Message or E-mail, your video clip will be attached to the message. If you choose Bluetooth, your phone will search for a device to send the video to.
Games and Applications
You can download into your phone new games and applications to enjoy in your spare time.
Multimedia
Playing a game
1 Touch menu key then select Games & Apps from the MULTIMEDIA tab.
2 Windows games (Bubble Breaker, Solitaire) have been pre-installed. You can also download games from the internet. To play, tap the game that you want to play.
Mobile Java
GM750 supports Java and hence you can easily download java games and other java applications from the internet.
Mobile Java has two subFolders: Games and Applications.
Please note that additional costs may be incurred when using online services.
Music
Your GM750 has a built-in music player so you can play all your favourite tracks. To access the music player, touch then select Music from the MULTIMEDIA tab. From here, you can access a number of folders:
All Tracks - Contains all of the tracks you have on your phone.
Artists - Browse your music collection by artist.
Albums - Browse your music collection by album.
Genres - Browse your music collection by genre.
Favourites - Contains the songs you have saved as favourites.
Playing a track
1 Touch menu key then select Music from the MULTIMEDIA tab.
2 Touch All Tracks.
3 Select the track you want to play and touch
4 Touch to pause the track.
5 Touch to skip to the next track.
6 Touch to go back to the previous track.
TIP! To change the volume while listening to music, touch

Creating a playlist
You can create your own playlists by choosing a selection of tracks from the All Tracks folder.
1 Touch menu key then select Music from the MULTIMEDIA tab.
2 Touch Menu.
3 Touch New Playlist, enter the playlist name and touch OK.
4 The All tracks folder will be displayed. Touch all of the tracks
that you wish to include in your playlist; a tick will appear next to each selected track names.
5 Touch OK.
To play a playlist, select it and touch
NOTE: To add a second playlist, touch Menu then New Playlist.
Playing a playlist
1 Touch menu key then select Music from the MULTIMEDIA tab.
2 Select the playlist you wish to play.
3 Touch to play a playlist.
Deleting a playlist
1 Touch menu key then select Music from the MULTIMEDIA tab.
2 Select the playlist you wish to delete.
3 Touch Menu.
Multimedia
4 Touch Remove All to remove all of the tracks from the playlist; your empty playlist will be deleted when you go to All Tracks.
Using the radio
Your GM750 features an FM radio tuner allowing you to listen to your favourite stations on the move.
NOTE: You will need to attach your earphones to listen to the radio.
Searching for stations
You can tune your phone to radio stations by searching for them manually or automatically. You can save stations to specific channel numbers so you don't have to keep re-tuning.
Automatic tuning:
1 Touch then select FM Radio from the MULTIMEDIA tab.
2 Touch Menu.
3 Touch Scan.
4 Select Stop to stop the auto scan.
5 If you want to save the current channel, touch Menu and select Save preset. You can designate the Preset name and Shortcut key. It can be found in the preset list.
Listening to the radio
1 Touch
2 Touch FM Radio in the MULTIMEDIA tab.
3 Touch to bring up the preset list.
4 Touch the channel of the station you wish to listen to from the preset list.
5 Touch Menu and select Options; This allows you to enable RDS.
TIP! Enable RDS: Displays the received data message from the radio station on the screen.
TIP! To improve radio reception, extend the headset cord that acts as the radio antenna.
WARNING: If you connect a headset not specifically made for the phone, the radio reception can be affected.
Kinoma Play
Kinoma Play is described as the first "mobile media browser", since its feature set goes beyond capabilities traditionally associated with "players" traditionally available for mobile phones. For example, the built-in Kinoma Guide content discovery system allows users to
browse, search and stream over 500GB of mobile-ready content. Additionally, it can play video, audio and pictures directly from built-in services such as Flickr, YouTube, Audible and so on.
Using Kinoma Play
1 Touch the menu key, then select Kinoma Play from the MULTIMEDIA tab
2 Select the item you wish to use. If you want to return to the previous menu, touch on the bottom right, the menu will then be displayed.
Organiser
Adding an event to your calendar
1 From the Home Screen select then scroll through Calendar in the UTILITIES tab.
2 Select the date you wish to add an event to.
3 Touch Menu then New Appointment.
4 If you wish to add a subject to your event, touch Subject and type in your note.
5 Check the date and time you want your event to begin. Enter the finish date and time also.
6 Select Alarm to set an alert for the event. If you want to repeat the alarm, select Repeat.
7 Touch Categories then choose between Business, Holiday, Personal, Seasonal or create New category.
8 Touch OK to save the event in the calendar. A coloured square cursor will show days with saved events and an alarm will sound at the set time.
Changing your default calendar view
1 From the Home Screen select then scroll through Calendar in the UTILITIES tab. Select Settings in Menu.
2 Touch Set default view and choose Month, Week, Day, List or All Tasks.
Adding an item to your To Do list
1 From the Home Screen select then scroll through Calendar in the UTILITIES tab.
2 Select New Task in Menu.
3 Set the date for the task, add notes, then select its priority level: Low, Normal or High.
4 Save the task by tapping OK.
Setting your alarm
1 From the Home Screen select then scroll through Alarms in the UTILITIES tab.
2 If you want to add a new alarm, touch New Alarm.
3 Or if you want to set the alarm to sound again within one hour, touch Quick Alarm.
4 Set the time you wish the alarm to ring.
5 Choose the repeat type you want the alarm to repeat. The icons indicate the weekday you select.
6 Select Sound/Vibration to select the type of alarm you prefer.
7 After touching the More icon, you can select Alarm Bell, control Volume, Vibration and Type.
8 Select the snooze interval between 5, 10, 20, 30 minutes or Turn it off. Then select snooze repeat.
9 Finally add a memo to the alarm.
Using Office Mobile
Excel Mobile
Excel Mobile makes it easy for you to open and edit Excel worksheets and templates created on your PC. You can also create new worksheets and templates on your device.
NOTE: Work in full-screen mode to see as much of your workbook as possible.
1 From the Home Screen select
Organiser
2 Select Office Mobile in the UTILITIES tab, then choose Excel Mobile and open the worksheet.
3 Tap View > Zoom and select a percentage so that you can easily read the worksheet.
Unsupported features in Excel Mobile
Excel Mobile does not fully support some features such as formulas and cell comments. Some data and formatting may be lost when you save the worksheet on your device.
PowerPoint Mobile
With PowerPoint Mobile, you can open and view slide show presentations created on your PC in .ppt and .pps format.
Many presentation elements built into the slide shows - such as slide transitions and animations - will play back on the device. If the presentation is set up as a timed
slide show, one slide will move to the next automatically. Links to URLs are also supported.
To start a slide show presentation
1 From the Home Screen select then scroll through Office Mobile in the UTILITIES tab and select PowerPointMobile.
2 In the presentation list, tap the slide show you wish to view.
3 Tap the current slide to move to the next one.
If the presentation is set up as a timed slide show, slides will move on automatically.
To stop a slide show
- In a PowerPoint Mobile presentation, tap and End Show.
To navigate between slides
You can move to the next slide if a presentation is not set up as
a timed slide show, return to the previous slide, or go to any slide out of sequence.
1 From the Home Screen select then scroll through Office Mobile in the UTILITIES tab and select PowerPoint Mobile.
2 Open the presentation you wish to view.
3 Tap and Next or Previous, or tap Go to Slide and tap the slide you wish to view.
TIP!
Simply tap the current slide to go to the next one.
If you have zoomed in to see a slide in more detail, you cannot navigate to another slide until you zoom out. Tapping Next or Previous may play an animation on a slide rather than navigate to another slide.
Word Mobile
Word Mobile is a streamlined version of Microsoft Word. Word documents created on your PC can be opened and edited on your device. You can also create and edit documents or templates in Word Mobile and save them as .doc, .rtf, .txt, and .dot files.
You can only have one document open at a time. When you open a second document, the first one is saved and closed automatically. When you close a newly created document, it is automatically named after the first few words in the document and placed in the Word Mobile document list. You can easily rename the document with a more meaningful name and move it to another folder or a memory card.
Organiser
To create a file
From the Home Screen select then scroll through Office Mobile in the UTILITIES tab and select World Mobile.
1 In Word Mobile, tap New.
2 You will see either a blank document or template, depending on what you have selected as the default template.
3 Type a text.
4 When you have finished, tap OK to save the file.
Word Mobile does not fully support all features of Microsoft Word such as revision marks and password protection. Some data and formatting may be lost when you save the document on your device.
Using your calculator
1 From the Home Screen select then scroll through Calculator in the UTILITIES tab.
2 Touch the number keys to enter numbers.
3 For simple calculations, touch the function you require (+, -, x, ÷) , followed by =.
Using your File Explorer
Allows you to explore the files saved on your phone.
1 From the Home Screen select, then scroll through File Explorer in the UTILITIES tab.
2 Touch the folder you wish to see.
Mobile Zip
Mobile Zip is a comprehensive archiving tool for viewing and extracting a wide range of archiving formats.
Touch and select Tools in the UTILITIES tab, then tap Mobile Zip.
Main Features of Mobile Zip
Multi-tab user interface
- Open and browse a wide range of archive formats
- Extremely easy to use with user friendly interface
- Single-handed operation with extensive softkeys and navigation buttons support
- Two folder views that enable user to copy, move, extract and add to archive from one to the other in a breeze
- Extract-View-Edit cycle supported. Open an item in the archive, edit it and have it inserted back in the archive
- Open archive as regular folder in the folder views
- Encryption: Mobile Zip includes standard zip 2.0 file encryption which is compatible with other major zip file applications on the desktop, and AES 256 bits advanced encryption Which is available to some of the latest zip utilities on desktop computers.
- Encryption: Mobile Zip includes password manager (PassMan) that makes it easy for user to store and retrieve passwords using a single master password
- Encryption: Password-Manager view provides links to password list settings.
Views
Home view is used mainly as a startup page where you learn some basic features of the application and go through the setup.
Organiser
First-Folder and Second-Folder views are double-folder views that have been designed to make copying, moving, extracting and archiving data an extremely easy task
PassMan view is a password-manager view with some setting links that enable user to organise passwords in a single, master password-encrypted database
Options view provides you with links to settings dialogues and other informative links
Creating Zip Archive
In the selected folder, select an item or items, tap and hold on the selected item or items. When the shortcut menu appears scroll down to select:
-
Add to archive...: Allows you to add archive with options to set password, name and type.
-
Add to 'name.zip': Allows you to add directly the named archive without password.
Extracting Archive(s)
In the selected folder view, tap and hold on the selected archive(s). On the folder shortcut context menu, select:
- Extract...: Allows you to extract the selected archive(s). with option to set a destination folder, set a password, select extraction behaviour etc.
- Extract Here: Allows you to simply extract the content of the selected archive(s) in the current folder.
- Extract to 'name folder': Allows you to simply extract the content of the selected archive(s) to the named folder.
Password Manager
Password manager is a password-managing module that facilitates easy but secure password management. The password database file is saved in the application directory as an AES-256-encrypted file based on the master password. If you forget your master password, you lose the password list. In that case you need to use the Delete All command to delete the password list and create a new one. In the PassMan view you have the following options:
- Password Status Switch enables user to switch the password manager on and off. User will be prompted to enter the master password to activate password manager. Once activated, in the password dialogue the right-hand softkey will display the PassMan command. Use it to access the password list in
the password dialogue for any archive that prompts the user for a password. If a password list has not been defined, switching on the password manager will create a password database and the user will be prompted to input a master password for the database.
- Password List is the link to a dialogue that manages the user's password list. In the dialogue, use the right-hand softkey to add, edit, delete or save a password of the list. To add a new password, select New, fill in the ID and Password and then select Apply.
- Master Password enables the user to set a new master password for the existing password list.
- Delete All allows the user to delete the entire password list without prompting the user for the master password. Use it if you have forgotten your master password.
Organiser
Adobe Reader LE
Adobe Reader LE is an extension of the Adobe PDF software for mobile phones. It allows to reliably view rich, high-impact, more secure content on your GM750.
To view a file
From the Home Screen select the then scroll through Tools in the UTILITIES tab and select Adobe Reader LE. Find the file you want to see.
ActiveSync
ActiveSync synchronises information on your device and on your PC, such as Outlook content. ActiveSync can also synchronise over a cellular network with a Microsoft Exchange Server if your company or service provider is operating one with Exchange ActiveSync. When you synchronise, ActiveSync compares the information on your device with the one on your PC and/or Exchange Server, then updates all locations with the most recent information.
With ActiveSync, you can:
Synchronise information such as Outlook Emails, Contacts, Calendar appointments and Tasks between your device and your PC, as well as pictures, videos and music.
Synchronise Outlook Emails, Contacts, Calendar appointments and Tasks on your device directly with Exchange Server so that you can stay up to date even when your PC is turned off.
Exchange files between your device and your PC without synchronising.
Select which types of information are synchronised and specify the level of information to be synchronised. For example, you can define the time period of the Calendar appointments to be synchronised.
Before you can synchronise information with a PC, you need first to install ActiveSync on your PC. Then, you need to create a synchronisation relationship between your device and the PC. You can install ActiveSync from the internet, e.g. via http://www.
ActiveSync
microsoft.com/windowsmobile/enus/help/synchronize/device-synch.mspx
Once you have installed ActiveSync and set up a synchronisation relationship, ActiveSync on the PC recognises your device when you connect it and automatically transfers the synchronisation settings you specified on your device.
You may be able to synchronise your device with Exchange Server through your company or a wireless service provider. If you plan to do so, please obtain email address, Exchange Server address, user name, password and domain name from your administrator before starting the Sync Setup Wizard.
Setting up Windows Vista™
Microsoft Windows Mobile®
Device Centre is the replacement for Microsoft ActiveSync on Windows Vista™.
NOTE: Some versions of Windows Vista that come with Windows Mobile Device Centre are already installed. If Windows Mobile Device Centre is not available on your Windows Vista computer, you can install it from the Getting Started Disk that came with your device.
Set up synchronisation in Windows Mobile Device Centre
When you connect your device to your PC and start Windows Mobile Device Centre for the first time, you will be asked to create a Windows Mobile partnership with your device. Follow the steps below to create a partnership.
Connect your device to your PC. Windows Mobile Device Centre configures itself and then opens.
On the licence agreement screen, click Accept.
NOTE: Choose Connect without setting up your device if you only want to transfer media files, check for updates and explore your device, but not sync Outlook information.
Select the items you want to synchronise, then click Next.
Enter a device name and click Set Up. When you finish the setup wizard, Windows Mobile Device Centre synchronises your device automatically. Note that Outlook emails and other information will appear on your device after synchronisation.
Use Windows Mobile Device Center
To open Windows Mobile Device Center, click Start > All Programs > Windows Mobile Device Center on your Windows Vista computer. On Windows Mobile Device Center, you can do the following:
Click Mobile Device Settings to change synchronisation settings.
When you click Pictures, Music and Video > new pictures/video clips are available for import, a wizard guides you through tagging and transferring photos from your device to the Photo Gallery on your Windows Vista PC.
Click Pictures, Music and Video > Add media to your device from Windows Media Player to synchronise music and video files using Windows Media™ Player. For more information, see "Windows Media® Player Mobile" in Chapter 11.
ActiveSync
- Click File Management > Browse the contents of your device to view documents and files from your device.
Synchronising Information
When you connect your device to the PC using a USB or Bluetooth connection, ActiveSync will immediately synchronise. While the device is connected, ActiveSync synchronises every time you make a change on either the PC or the device.
Synchronising Outlook information
If you have set up a synchronisation relationship between your device and the PC, synchronisation keeps Outlook information up-to-date on the computer and Mobile handset. ActiveSync synchronises a limited amount of information by default to save storage space
on your device. You can change the amount of information synchronised for a given information type in changing the Settings for the information type. You can set up your device to synchronise with more than one PC or with a combination of one or more PCs and Exchange Server. When synchronising with multiple computers, the items that you synchronise will appear on all of the computers with which they are synchronised.
For example, if you have set up synchronisation with two PCs (PC1 and PC2) which have different items, and you synchronise Contacts and Calendar on the device with both computers, the result is as follows:
Location New state
| PC1 | All Outlook contacts and calendar appointments that were on PC2 are now also on PC1. |
| PC2 | All Outlook contacts and calendar appointments that were on PC1 are now also on PC2. |
| Device | All Outlook contacts and calendar appointments from both PC1 and PC2 are on the device. |
To start and stop synchronisation
To synchronise Outlook information and other local information on the PC, including media files, connect your device to the PC using Bluetooth or a cable.
If you are synchronising directly with an Exchange Server, you can use the PC connection to the network that is "Desktop Pass-through", or you can synchronise without connecting to the PC over a cellular network.
In ActiveSync, tap Sync. To end synchronisation before it completes, tap Stop. To change the type of information that is synchronised:
1 In ActiveSync on the device, tap Menu > Options.
2 Do one or both of the following:
Select the checkbox for any items you want to synchronise. If you cannot select a checkbox, you may have to clear the checkbox for the same information type elsewhere in the list.
Clear the checkbox for any items you want to stop synchronising.
ActiveSync
3 To stop synchronising with one PC completely, tap the PC and tap Delete.
NOTE: Outlook emails can be synchronised with only one computer. To change the available synchronisation settings, select the type of information and tap Settings.
To synchronise directly with an Exchange Server
You can set up a synchronisation with an Exchange Server on your device if it is available to you through your company or wireless service provider. However, you should first ask your administrator for the following information and then continue with the steps: email address, Exchange Server address, user name, password and domain name.
1 In ActiveSync on the device, tap Menu > Configure Server. If you have not yet set up synchronisation with an Exchange Server, it will say Add Server Source.
2 Enter the email address and tap Next.
3 In Server address, enter the address of the server running Exchange Server. Select the checkbox if this Server requires an encrypted (SSL) connection. Tap Next.
4 Enter user name, password and domain, then tap Next. To change the rules for resolving synchronisation conflicts, tap Advanced.
5 Select the checkboxes for the types of information items that you want to synchronise with Exchange Server.
6 To change the available synchronisation settings, select the type of information and tap Settings.
7 Tap Finish.
Synchronising via Bluetooth
You can connect your device to the PC to synchronise using Bluetooth.
To synchronise with a PC via Bluetooth
1 First, check "Allow connections to one of the following" from the ActiveSync connections Settings menu on your PC. Select the proper COM port. If there are no available connections you should first create a Bluetooth pairing.
2 Select the ActiveSync item in the Programs menu, then ActiveSync\\\Connect via Bluetooth.
Synchronising Music, Video and Pictures
If you wish to carry your music or other digital media with you while you travel, ActiveSync works with Windows Media Player to synchronise music, videos and pictures.
Other than selecting the Media information type in ActiveSync to be synchronised, all media synchronisation settings must be set in Windows Media Player. Before media can be synchronised you must do the following:
Install Windows Media Player Version 10 on the PC.
Connect your device to the PC with a USB cable. If the device is currently connected using Bluetooth, you must end that connection before media can be synchronised.
ActiveSync
Insert a storage card in your device (32MB or larger is recommended).
Set up a sync partnership between the storage card and Windows Media Player.
Change Media synchronisation settings
Once you select the Media information type in ActiveSync to be synchronised, any of your favourite music, video or picture files in Windows Media Player playlists can be synchronised. All you have to do is set up synchronisation in Windows Media Player for those media files.
To set up a sync relationship with a storage card
1 Open Windows Media Player.
2 Click the Sync tab.
3 Select the storage card.
4 Click Set up Sync.
The Web
Browser
Browser gives you a fast, fullcolour world of games, music, news, sport, entertainment and much more straight to your mobile phone - wherever you are and whatever you're into.
Accessing the web
1 From the Home Screen select then select MyWeb from the COMMUNICATION tab.
2 The browser homepage will be opened directly.
NOTE: You will incur an extra cost by connecting to this service and downloading content. Check the data charges with your service provider.
Adding and accessing your bookmarks
For easy and fast access to your favourite websites, you can add bookmarks and save web pages.
1 From the Home Screen select then select MyWeb from the COMMUNICATION tab.
2 Select . The list of your Bookmarks will appear on the screen.
3 To add a new bookmark, select ^+ .Enter a name for the bookmark followed by its URL.
4 Touch Add. Your bookmark will now appear in the bookmark list.
5 To access the bookmark simply touch it. You will be connected to the corresponding URL.
The Web
Using browser option menus
You can check the following menus by tapping Menu.
Home Page - You can access the home page directly.
History - You can display a list of the pages you've already viewed.
Forward - When viewing again previously viewed pages, selecting Forward displays the next page of the currently visited web site.
Refresh - Reload the currently displayed web site.
View
- Text Size: Largest/Larger/ Medium/Smaller/Smallest
- Enable Activex Controller: check to enable ActiveX controller
-
Mobile (Default view): This option identifies Internet Explorer Mobile 6 as a mobile browser.
-
Desktop: This option identifies Internet Explorer 6 as a desktop browser. This lets you open the same full Web page you would retrieve on their desktop.
NOTE
Those two options (Mobile and Desktop) help you control data consumption (mobile pages are less data intensive than desktop pages) by sending a different User Agent String to the server. Every time a mobile user string is sent, the content provider returns a mobile page if one is available. If no mobile page is available, the content provider returns a desktop page.
Tools
- Send Link: You can send the Link in a text message, via SMS, MMS or Email.
-
Properties: You can view the page's information.
-
Options: You can check more options.
Copy/Paste - You can copy or paste the text into a web page.
Service
Service consists of a set of applications offered by Vodafone. You can find this menu in the COMMUNICATION tap.
NOTE: Please refer to the Vodafone Service Guide provided with your phone or contact Vodafone or your service provider for further information.
Settings
In this menu you can personalise the settings of your GM750.
Personalising your profiles
The SETTINGS tab allows you to personalise each profile setting.
1 From the Home Screen select then scroll through Profiles in the SETTINGS tab.
2 Choose the profile you wish to edit: Normal, Vibrate, Silent, Outdoor or Automatic.
3 You can then change all of the sounds and alert options available in the list.
Changing your Display settings
1 From the Home Screen select then scroll through Display Settings in the SETTINGS tab.
2 You can choose the option menu from:
Backlight - Set your backlight settings.
NOTE: The longer the backlight stays on, the more battery power it uses and so you may need to recharge your phone more often.
Wallpaper - Choose your background.
TIP! ALC (Auto Luminous Control) Sensor LCD backlight brightness is automatically adjusted depending on the surrounding light.
Changing your phone settings
Enjoy the freedom of customising your GM750 to operate according to your own preferences.
1 From the Home Screen select then scroll through Phone in the SETTINGS tab.
2 You can choose one of the tab menu from the list below.
Phone
- Ring type: This option defines the incoming call notification mode. You can select from Ring, Increasing ring, Ring once, Vibrate, Vibrate and ring, Vibrate then ring, None.
- Ring tone: You can select the ringtone for incoming voice calls.
- Keypad: You can set the key tone to be played when pressing the keys (Long tones/Short tones/Off)
Security - When PIN Security is set to Enabled, you are requested to enter your PIN each time you switch the phone on.
Services - To access settings for a service, select it from the following list and tap Get Settings.
- Call Barring
Block incoming calls: All calls/ When roaming/Off.
Block outgoing calls: All calls/ International/International except to home country/Off
To edit mobile call barring settings, you need a password. You can obtain the barring password from your service provider upon subscription to this network service..
Call barring affects all voice and data calls, except emergency calls.
- Caller ID: Scroll to Everyone to let your caller ID be displayed to the people you call, No one to hide it or Only to contacts to let
Settings
it be displayed when you call from the contacts.
- Call Forwarding: Allows you to forward your incoming calls to another phone number or to your voicemail.
- Call Waiting: To be notified of incoming calls while you have a call in progress, select Notify me.
Voice Mail and Text Messages: When you insert the USIM card in your phone, it automatically detects and sets your voicemail and SMS servers by default. However, you can view the settings if you want. You can also view your voicemail numbers by tapping Voice Mail on the Speed Dial screen. - Fixed Dialing: Select Fixed dial numbers to turn on and compile a list of numbers that can be called from your phone. When activated, only numbers included in the fixed dial list can be called from
your phone.
Network - You can select the network type and the manner of selecting networks.
- Current network: The current Network is displayed in the Current network field.
- Network selection: Define how to choose between different available networks when travelling. For example, if you choose Manual, you can select the network yourself. Scroll to the desired network and tap OK on the upper right side of the screen. To have the network selected automatically choose Automatic.
TIP! Manual selection can be useful when you know that one network is less expensive than another or that it provides faster data transmission.
- Preferred networks: Tap Set Networks (retrieving settings may take a few minutes). Select a network and re-prioritise the order for network usage by tapping Move Up or Move Down.
Info. Service - Info service messages are text messages sent by the network to GSM phone users. They provide general information such as weather reports, traffic news, taxis, pharmacies and stock prices. Each type of information is associated with a number that can be obtained from the service provider. When you receive an info service message, a popup message will indicate a new message receipt or the info service message will be displayed directly.
-
Cellbroadcast: You can set the reception status.
-
Language: You can select a language you want by tapping on it. The info service messages in the selected language will be received.
- Select channel to edit or `delete':
You can manage the channels to receive information from.
Band - Select the band type that you want to use. You can choose Automatic, 3G Only or 2G Only. If you choose 2G Only, 3G services such as video call can not be used.
Keytone - Select between Melody and Beep.
Using flight mode
1 From the Home Screen select then select Wireless Settings in the SETTINGS tab.
2 Set the Flight Mode to ON by tapping the icon. Flight mode will not allow you to make calls, connect to the Internet or send messages.
Settings
Change Date and Time
1 From the Home Screen select then select Date & Time.
2 Adjust your date and time settings or choose to automatically update the time when you travel or for daylight saving.
Internet Sharing
Allows yo to use your device as an internet sharing device.
Note
- ActiveSync software version 4.5 or higher is required.
1 Connect the USB cable to the PC.
2 Tap Start > Internet Sharing.
3 Set PC Connection to USB or Bluetooth PAN
4 Set Network Connection to proper APN
5 Tap Connect in the bottom line
6 Data connection indicator (G/ E/ 3G) is displayed when PDP activation is performed successfully.
Note
Operating System on your PC is required Windows XP SP2 or later.
GPS Setting
To Set GPS Type
1 Tap Start > Setting > Connections tab.
2 Tap GPS Setting.
3 Assisted GPS provides enhanced standalone performance and speeds up the time required to determine initial GPS position by downloading latest constellation information.
But it requires a network connection and an extra charge to use Assisted GPS.
If you don't want it, please select Standalone GPS.

Bluetooth
Bluetooth enables compatible mobile devices, peripherals and computers that are in close proximity to communicate directly with each other without wires. This handset features Bluetooth connectivity, which allows it to connect compatible Bluetooth headsets, computer applications and so on.
Turn on Bluetooth
From the Home Screen select then select Wireless Settings.
Set the Bluetooth to ON by tapping the icon.
NOTE: If you use a PC sync via Bluetooth, you can exchange data only within the phonebook.
NOTE: When you receive data from another Bluetooth device, the phone requests a confirmation. After confirming the transfer, the file will be copied to your phone.
Pairing with another Bluetooth device
While pairing your GM750 with another device, you can set up a code that makes the connection more secure.
1 Make sure that Bluetooth is On. See Turn on Bluetooth for more information. You can change your visibility in the Settings menu.
2 Select Bluetooth in the SETTINGS tab and touch Add a device.
3 Select a device type to limit the search and touch Continue. Your GM750 will search for Bluetooth devices.
4 Choose the device you wish to pair with.
5 Verify the code match on both devices and select Yes. Your phone will then connect to the other device.
6 Your code protected Bluetooth connection is now ready.
Sending and receiving files using Bluetooth
Bluetooth is a great way to send and receive files as it uses no wires and connection is quick and easy. You can also connect to a Bluetooth headset to make and receive calls.
To send a file:
1 Open the file you want to send, which will typically be a photo, video or music file.
2 Touch Menu and choose Send. Choose Bluetooth.
3 If you have already paired the Bluetooth device, your GM750 will not automatically search for other Bluetooth devices. If not, your GM750 will search for other Bluetooth-enabled devices within range.
4 Choose the device you wish to send the file to.
5 Your file will be sent.
TIP! Check the progress bar to make sure that your file is being sent.
To receive a file:
1 To receive files, Bluetooth must be turned On.
2 A message will prompt you to accept the file from the sender. Touch Accept to receive the file.
3 You will see the sender of the file, the name of the file and where the file has been saved.
Bluetooth
Changing your Bluetooth settings
1 From the Home Screen select then scroll through Bluetooth in the SETTINGS tab.
2 Select Settings tab.
Add a device - Setup a new Bluetooth device.
Disable Bluetooth - Choose to deactivate Bluetooth.
Name - Check your device name that other devices see when your device is "discoverable". You can change the name or use the Windows Mobile name.
Discoverable - Make your device visible only when you wish other Bluetooth devices to find it. You can choose an option between Always Visible, Visible for 60 seconds or Not Visible.
Advanced - Set up additional options.
About - check your Bluetooth information.
Wi-Fi
Wireless Settings allows you to manage Wi-Fi Internet on your device. It allows the phone to connect to local wireless networks or access the Internet wirelessly. Wi-Fi is faster and has a greater range than Bluetooth wireless technology.
Turn on Wi-Fi
1 From the Home Screen select then select Wireless Settings from the SETTINGS tab.
2 Set the Wi-Fi to ON by tapping the icon.
Set up Wi-Fi
1 Make sure that Wi-Fi is On.
2 A bubble window pops up and shows detected Access Points.
3 Select the Access Point you are permitted to access and tap OK.
4 Select internet to have an internet service and tap Connect.
NOTE: If your Wi-Fi service provider or network administrator sets WEP encryption for network security, you should fill in the WEP key in the pop-up window. If WEP encryption is not set, this pop-up window is not shown. If you don't know the key, you need to ask your Wi-Fi service provider or network administrator for it.
Wireless network settings
A wireless network can be added either when the network is detected or manually by entering settings information. Before performing these steps, determine if you need authentication information.
1 Tap Start > Settings > Connections tab > Wi-Fi > Wireless tab.
Wi-Fi
2 Under Networks to access, select All available, Only access points or Only computer-to-computer for the list, depending on the type of networks to which you connect.
3 Do one of the following
- If you do not see a desired network, tap Menu > Add New.
- To change network settings for a network you have already configured, tap Network Adapters.
4 Proceed through the wizard to the Configure Network Authentication page.
-
Select the authentication method from the Authentication list - Open, Shared, WPA, WPA-PSK, WPA2 and WPA2-PSK.
-
To use data encryption, select an encryption method from the Data encryption list - Disabled, WEP
- To use a network key automatically, tap The key is automatically provided. Otherwise, enter the network key.
Configuring Wi-Fi Connection Settings
NOTE: Before you set the WLAN configuration, you need to ask your WLAN service provider or network administrator for the IP settings.
1 Tap Start > Settings > Connections tab > Wi-Fi
2 Select Network Adapters tab.
3 Tap Network Adaptor tab and select Broadcom 802.11 DHD Network.
4 If you tap Use server-assigned IP address, you can get IP settings assigned automatically. If you tap Use specific IP address, you need to set the IP address assigned by your WLAN service provider or network administrator.
5 Fill in IP address, Subnet mask and Default gateway.
6 Tap Name Servers.
7 Fill in DNS and Alt DNS, WINS and Alt WINS if necessary.
NOTE: To prevent a possible loss of data on your phone, WLAN automatically ends when the battery is almost empty or at a level less than five per cent.
DUN
NOTE:
Before activating DUN, make sure your device has a GPRS SIM card installed, and you have set up a GPRS modem connections on your device. Also make sure you have GPRS SIM support DUN, and connected your device to a computer via USB.
To use DUN, you have to install the LGUSBWMLModemDriver on your computer using the Getting Started Disc.
When you activate DUN, ActiveSync will be disabled automatically.
To Set up your device as an USB modem
1 On your device, tap Start > Programs > DUN
2 Plug in the USB cable adapter between your device and the computer.
3 Tag Activate.
To add your device as a USB modem to your Computer
1 On your computer, click Start > Control Panel.
2 Double-click Phone and Modem Options.
3 Click the Modems tab. Select the new modem from the Modem list, then double click the new Modem.
4 On the Advanced tab, add following AT command to the Extra initialization commands: AT+CGDCONT=1,"ip",
NOTE: For example, at+cgddcont=1,"ip""web. vodafone.de"
To dial up and connect to the Internet
1 On your computer, click Start > Control Panel
2 Double-click Network Connections.
3 Click File > Create a new Connection.
4 In the New Connection Wizard, click Next.
5 Click Connect to the Internet then click Next.
6 Select Set up my connection manually then click Next.
7 Select Connect using a dial-up modem then click Next.
8 Select the modem that you previously installed, then click Next.
9 Enter a descriptive name for this connection, then click Next.
10 Enter the telephone number as 99# or Vender support number(ex, 99***1#, then click Next.
11 Under Internet Account Information, you may not need to enter a user name and password when using GPRS. Just click Next to proceed.
12 Click Finish to exit the wizard.
13 The Connect dialog box then opens, Click Properties to check again whether the LGE WML USB Modem is selected. If it is correct, click OK, and then, return to the connect dialog box.
14 Click Dial to dial up and connect to the Internet.
Accessories
These accessories are available for purchase for use with your GM750.
Charger
Battery
Stereohedset
Data cable
Connect and synchronise your GM750 and PC.
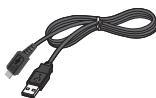
NOTE:
Always use genuine LG accessories.
- Failure to do this may invalidate your warranty.
- Accessories may vary in different regions.
Network service
The wireless phone described in this guide is approved for use on GSM/W-CDMA networks.
A number of features included in this guide are called Network Services. These are special services that can be offered through your wireless service provider. Before you can take advantage of any of these Network Services, you must subscribe to them through your service provider and obtain instructions for their use from your service provider.
Technical data
General
Product name: GM750
System: GSM/W-CDMA
Ambient Temperatures
Max: +55^ (discharging), +45^ (charging)
Min: -10°C
Declaration of Conformity

LG Electronics
Suppliers Details
Name
LG Electronics Inc.
Address
LG Electronics Inc. LG Twin Towers 20, Yeouido-dong, Yeongdeunggo-gu, Seoul, Korea 150-721
Product Details
Product Name
GSM/W-CDMA Terminal Equipment
Model Name
GM750
Trade Name
LG
C∈0168①
Applicable Standards Details
R&TTE Directive 1999/5/EC
EN301489-01V1.6.1,EN301489-07v1.3.1
EN 301 489-17 v1.2.1, EN 301 489-19 v1.2.1, EN 301 489-24 V1.3.1
EN301511V9.0.2
EN 301 908-1 V3.2.1 EN 301 908-2 V3.2.1,
EN 300 328 V1.7.1
EN50360:2001,EN62209-1:2006
EN60950-1:2001
Supplementary Information
The conformity to above standards is verified by the following Notified Body(BABT)
BABB, Balfour House, Churchill Road, Walton-on-Thames, Surrey, KT12 2TD, United Kingdom
Notified Body Identification Number: 0168
Declaration
I hereby declare under our sole responsibility that the product mentioned above to which this declaration relates complies with the above mentioned standards and Directives
European Standard Center
LG Electronics Logistics and Services B.V.
Veluwezoom 15, 1327 AE Almere, The Netherlands
Tel: +31-36-547-8940, Fax: +31-36-547-8794
email: jacob @ lge.com
Name
Issued Date
Seung Hyoun, Ji / Director
1.June.2009

Signature of representative
Troubleshooting
This chapter lists some problems you might encounter while using your phone. Some problems require you to call your service provider, but most are easy for you to correct yourself.
| Message | Possible causes | Possible Solutions |
| USIM error | There is no USIM card in the phone or it is inserted incorrectly. | Make sure the USIM card is correctly inserted. |
| No network connection | Signal weak Outside GSM network area | Move towards a window or into an open area. Check the service provider coverage map. |
| Codes do not match | To change a security code, you will need to confirm the new code by entering it again. | Contact your Service Provider. |
| Function cannot be set | Not supported by Service Provider, or registration required | Contact your Service Provider. |
| Calls not available | Dialling error New USIM card inserted. Charge limit reached | New network not authorised. Check for new restrictions. Contact Service Provider or reset limit with PIN 2. |
| Phone cannot be switched on | On/Off key not pressed long enough Battery empty | Press the On/Off key for at least two seconds. Keep the charger connected for a longer period of time. Clean the contacts. |
Troubleshooting
| Message | Possible causes | Possible Solutions |
| Charging error | Battery totally empty | Charge the battery. |
| Temperature out of range | Make sure that the ambient temperature is right, wait for a while, and then charge again. | |
| Contact problem | Check the power supply and connection to the phone. Check the battery contacts and clean them if necessary. | |
| No mains voltage | Plug in to a different socket or check the voltage. | |
| Charger defective | If the charger does not warm up, replace it. | |
| Wrong charger | Only use original LG accessories. | |
| Battery defective | Replace the battery. | |
| Phone loses network | Signal too weak | Reconnection to another service provider is automatic. |
| Number not permitted | The Fixed dial number function is on. | Check settings. |
LIMITED WARRANTY STATEMENT
1. WHAT THIS WARRANTY COVERS :
LG offers you a limited warranty that the enclosed phone and its enclosed accessories will be free from defects in material and workmanship according to the following terms and conditions:
(1) The limited warranty for the product extends the warranty period beginning on the date of purchase of the product.
(2) The limited warranty applies for 1 year from the original date of purchase and extends only to the original purchaser of the product and is not assignable or transferable to any subsequent purchaser/end user. It shall neither exclude nor limit any mandatory statutory rights of the customer or any of the customer rights against the seller/dealer of the product.
(3) This warranty is good only to the original purchaser during the warranty period, but limited to certain country if specified.
(4) The external housing and cosmetics parts shall be free of defects at the time of shipment and, therefore, shall not be covered under these limited warranty terms.
(5) Upon request from L.G. or their designated service agent the consumer must provide information to reasonably prove the date of purchase.
(6) Unless other service arrangements have been specified the customer shall bear the cost of shipping a defective product back to the Customer Service Department of LG. LG shall bear the cost of shipping the product back to the consumer after the completion of service under this limited warranty.
(7) During the warranty period LG or its authorised service agent will repair or replace at LG's sole discretion a defective product. A repaired or replaced product will not be given a prolonged or renewed warranty period.
2. WHAT THIS WARRANTY DOES NOT COVER :
(1) Defects OR Damages resulting from use of the product in other than its normal and customary manner.
(2) Defects or damages from abnormal use, abnormal conditions, improper storage. exposure to moisture or dampness, unauthorised modifications, unauthorised connections, unauthorised repair, neglect, abuse, accident, alteration, improper installation, or other acts which are not the fault of LG, including damage caused by shipping, blown fuses, spills of food or liquid.
(3) Breakage or damage to antennas unless caused directly by defects in material or workmanship.
(4) A warranty repair if the Customer Service Department at LG or other agreed service agent was not notified by the consumer of the alleged defect or malfunction of the product during the applicable limited warranty period.
(5) Products which have had the serial number or IMEI number removed or made illegible.
(6) This limited warranty is in lieu of all other warranties, express or implied either in fact or by operations of law, statutory or otherwise, including, but not limited to any implied warranty of marketability or fitness for a particular use.
(7) Damage resulting from use of non-LG approved accessories.
(8) All plastic surfaces and all other externally exposed parts that are scratched or damaged due to normal customer use.
(9) Products operated outside published maximum ratings.
(10) Products used or obtained n a rental program.
(11) Consumables (such as fuses).
(12) Suspected defects caused by a failure of the cellular network.
3. CONDITIONS :
No other express warranty is applicable to this product.
The DURATION OF ANY IMPLIED WARRANTY, INCLUDING THE IMPLIED WARRANTY OF MARKETABILITY, IL LIMITED TO THE DURATION OF THE EXPRESS WARRANTY HERIN. LG ELECTRONCS INC. SHALL NOT BE LIABLE FOR THE LOSS OF THE USE OF THE PRODUCT, INCOVINIENCE, LOO OR ANY OTHER DAMAGES, DIRECT OR CONSEQUENTIAL, ARISING OUT OF THE USE OF, OR INABILITY TO USE, THIS PRODUCT OR FOR ANY EXPRESS OR IMPLIED WARRANTY, INCLUDING THE IMPLIED MARKETABILITY APPLICABLE TO THIS PRODUCT.
Some do not allow the exclusive of limitation of incidental or consequential damages or limitations on how long an implied warranty lasts; so these limitations or exclusions may not apply to you. This warranty gives you specific legal rights and you may also have other rights which vary from country to country.