
LED 4 Stars - Lamp Hansa - Free user manual and instructions
Find the device manual for free LED 4 Stars Hansa in PDF.

| Product Type | LED desk lamp with clamp or base |
| Brand | Hansa |
| Model | LED 4 Stars |
| Intended Use | Indoor lighting for dry rooms (apartment, office) |
| Power Supply | 100-240 V AC, 50/60 Hz |
| Bulb Power | LED 6 W (non-replaceable) |
| Bulb Lifetime | 20,000 hours |
| Protection Class | II (double insulation) |
| Lighting | Touch switch |
| Mounting Options | Clamp or stable base |
| Orientation | Adjustable joint with wing nut |
| Approximate Dimensions (base) | Height 40 cm, base 15 x 15 cm |
| Approximate Weight | 0.8 kg |
| Cleaning | Slightly damp cloth or anti-dust cloth, unplugged |
| Maintenance | Tighten the joint screws if necessary |
| Safety | Do not use if damaged, do not immerse, do not cover |
| Repairability | Non-replaceable bulb, repair by certified professional |
| Included Accessories | Clamp and base (depending on version) |
| Color | White or black (depending on variant) |
| Material | Plastic, metal |
Frequently Asked Questions - LED 4 Stars Hansa
User questions about LED 4 Stars Hansa
0 question about this device. Answer the ones you know or ask your own.
Ask a new question about this device
Download the instructions for your Lamp in PDF format for free! Find your manual LED 4 Stars - Hansa and take your electronic device back in hand. On this page are published all the documents necessary for the use of your device. LED 4 Stars by Hansa.
USER MANUAL LED 4 Stars Hansa
natural_image
Modern desk lamp with adjustable arm and black handle, no visible text or symbolsD GEBRAUCHSANLEITUNG LED-Leuchte LED 4 Stars GB OPERATING INSTRUCTIONS LED lamp LED 4 Stars
F MODE D'EMPLOI Lampe à diodes LED 4 Stars I ISTRUZIONI D'USO Lampada a LED - LED 4 Stars
E INSTRUCCIONES DE USO Lámpara LED 4 Stars NL GEBRUIKSAANWIJZING LED-lamp LED 4 Stars
CZ NÁVOD K POUŽITÍ LED lampička LED 4 Stars SK NÁVOD NA POUŽITIE LED-lampa LED 4 Stars
natural_image
Mechanical assembly diagram showing two stages of a lifting or clamping mechanism (no text or symbols)natural_image
Mechanical assembly diagram showing a rotating component and a downward arrow indicating motion (no text or symbols)natural_image
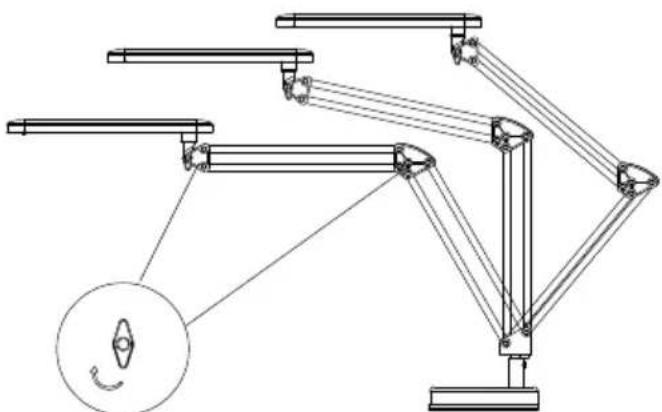
Technical line drawing of a mechanical linkage system with a magnified inset showing a curved component (no text or symbols)- Check that the delivery is complete and that the light does not exhibit any transport damages.
- If the delivery is incomplete or exhibits transport damages, do not use the light. Contact your vendor, where you purchased the light.
Proper use
This light is only suitable for lighting dry indoor areas (home/office).
Before you use the light

Before you use the device, please first carefully read through the safety notes and operating instructions.
Keep all safety notes and instructions for future use. Pass on all safety notes and instructions to any subsequent user of the light.
For your safety
Signal words

WARNING
Failure to observe the warning may result in injury to life and limb.

CAUTION
Indicates a hazard with a low risk that could result in a minor or moderate physical injury.
Symbols
Only suitable for indoor spaces!
Do not use any sprays when cleaning!

Double insulation

The light is suitable for installation on surfaces with normal flammability.
Safety notes

WARNING
Hazardous grid voltage! Risk of electric shock!
Deficient electrical installation
or excessive mains voltage may result in an electric shock.
- Do not use the light if it exhibits visible damages.
- Check the device and cable for damages on a regular basis.
- Have repairs performed by a qualified workshop.
- For repairs, only parts may be used that correspond to the original device specifications. There are electrical and mechanical parts in this unit which are essential in order to avoid exposure to sources of danger.
- Immerse neither the light nor the mains cord or plug in water.
– Never take hold of the mains cord with wet hands. - Keep the light, mains plug, and mains cord away from open flames, and hot surfaces.
- Never attempt to grasp an electric appliance once it has fallen in water. In such a case, immediately disconnect the mains plug.
-
If you are not using the light, cleaning it or in the event of a malfunction, turn the light off and always pull the plug out of the socket.
-
Never pull the mains cord out of the socket by the cord, instead always take hold of the mains plug.
- Never use the connector cord as a carrying strap.
- If the mains cord of this device is damaged, it must be replaced by the manufacturer or its customer service department or a person with similar qualifications in order to avoid risks.
- Render the device, which has outlived its purpose, unusable. Pull the mains cord out of the socket and cut the mains cord in half.

WARNING
Danger to children and other persons!
Children often do not recognise the risks of handling electric appliances or underestimate them. Children can become trapped in the packing film when playing and suffocate.
- Do not allow children to play with the packing film and never allow them to use electric appliances without supervision.

CAUTION
Fire hazard!
Do not use any sprays or the like to clean the light.
- Do not cover the light head with cloths or the like. The heat radiated from the light could cause them to catch fire.
Notes on the place of installation
- Set up the light on a solid, level surface (e.g. table or sideboard) close to a socket.
- Make sure that there is no risk of it tipping and that the cord does not pose a trip hazard.
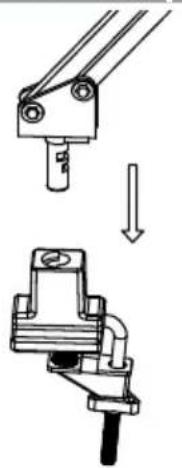
Assembly with clamp
natural_image
Mechanical assembly diagram showing a lever mechanism and a clamp mechanism (no text or labels)- Insert the pin of the lamp arm into the holder on the clamp.
- Mount the lamp on a solid, hard, even board with parallel surfaces.
- Ensure that the clamp is sufficiently secured.
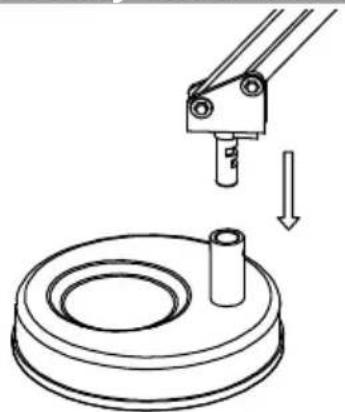
Assembly with stand
natural_image
Technical line drawing of a mechanical assembly with a lever and base component (no text or symbols)- Insert the pin of the light arm into the holder on the base.
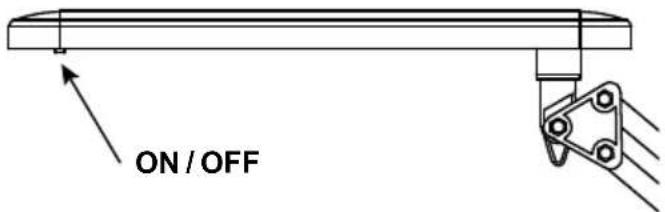
Turning the light on/off

- Insert the plug in a socket.
- Arrange the light in the desired position.
- Touch the button to switch the lamp on/off.
Replacing the bulb
• Bulb service life: 20 000 hours
• The bulb cannot be replaced.
Care and cleaning

WARNING
Hazardous grid voltage!
Risk of electric shock!
Improper use could result in
electric shock.
- When cleaning the light, always pull the mains plug out of the socket. When doing so, always take hold of the plug and not the cord.
- Make sure that no water penetrates the inside of the light or other parts carrying a current.
- Carefully wipe off the light with a damp cloth or a dry dust cloth.
natural_image
Technical line drawing of a mechanical linkage system with a magnified inset showing a curved component (no text or symbols)- If after a time the lamp will no longer stay in the desired position, you can tighten the joints with the toggle screws or the lamp joint with a cross-headed screwdriver.
Technical data
Voltage: 100 - 240 V AC
Bulb: LED 6W
Protection class: II
Model number:
Base: 41-5010.640-641 Clamp: 41-5010.642-643
Distribution
Styro GmbH
Industriestrasse 2
D-91583 Schillingsfürst
Tel.: +49 (0)9868 989490
www.styro.de
Spichtig AG
Frauholzstrasse 27
CH-6422 Steinen
natural_image
Mechanical assembly diagram showing two stages of a clamp or clamp mechanism (no text or symbols)natural_image
Mechanical assembly diagram showing a rotating component and a downward arrow indicating motion (no text or symbols)natural_image
Technical line drawing of a mechanical linkage system with a magnified inset showing a curved component (no text or symbols)Pied: 41-5010.640-641
Pince: 41-5010.642-643
Distribution
Styro GmbH
Industriestrasse 2
D-91583 Schillingsfürst
Tel.: +49 (0)9868 989490
www.styro.de
Spichtig AG
Frauholzstrasse 27
CH-6422 Steinen
natural_image
Mechanical assembly diagram showing a lever mechanism with an arrow indicating motion (no text or symbols present)natural_image
Mechanical assembly diagram showing a rotating component and a downward arrow indicating motion (no text or symbols)natural_image
Technical line drawing of a mechanical linkage system with a magnified inset showing a curved component (no text or symbols)natural_image
Mechanical assembly diagram showing two stages of a lifting or clamping mechanism (no text or symbols)natural_image
Technical line drawing of a mechanical assembly with a cylindrical component and a lever mechanism (no text or symbols)natural_image
Technical line drawing of a mechanical linkage system with a magnified inset showing a curved component (no text or symbols)natural_image
Mechanical assembly diagram showing two stages of a lifting mechanism (no text or symbols)natural_image
Mechanical assembly diagram showing a rotating component and a cylindrical part, with no visible text or symbols.natural_image
Technical line drawing of a mechanical linkage system with a magnified inset showing a curved component (no text or symbols)natural_image
Mechanical assembly diagram showing two stages of a lifting or mounting mechanism (no text or symbols)natural_image
Mechanical assembly diagram showing a rotating component and a downward arrow indicating motion (no text or symbols)natural_image
Technical line drawing of a mechanical linkage system with no visible text or symbolsnatural_image
Mechanical assembly diagram showing two stages of a clamp or clamp mechanism (no text or symbols)natural_image
Mechanical assembly diagram showing a rotating component and a downward arrow indicating motion (no text or symbols)- Zastrčte čap na vzpere lampy do držiaka v podstavci.
Zapnutie/vypnutie lampy
- Zastrčte zástrčku do el. zásuvky.
- Napravte svietidlo do želanej polohy.
- Dotknite sa gombíka pre zapnutie a vypnutie svietidla.
natural_image
Technical line drawing of a mechanical linkage system with no visible text or symbols- Proper use
- Before you use the light
- For your safety
- Signal words
- WARNING
- CAUTION
- Symbols
- Safety notes
- Hazardous grid voltage! Risk of electric shock!
- Danger to children and other persons!
- Fire hazard!
- Notes on the place of installation
- Turning the light on/off
- Replacing the bulb
- Care and cleaning
- Technical data
- Model number:
- Distribution
- Styro GmbH
- Spichtig AG
- Zapnutie/vypnutie lampy
Brand : Hansa
Model : LED 4 Stars
Category : Lamp